This is why you don’t try to do things halfway. And by "you" I mean me, I’m talking to myself again. It happens, look away if you must.
On my way to dinner at a lovely couple’s house, I decided to kill two birds (not literally, I swear) and bake a dessert for these two wonderful men, one that I could also photograph and give to you (work bird, dinner party bird: both dead). It was a great plan until I decided that I didn’t REALLY need to cut into it to photograph it. You were just going to have to trust me about all those gorgeous apple layers.
The thing is, these are two guys that aren’t just amazing humans they are also fantastic cooks and cocktail makers, people who have outstanding and beautiful taste. I didn’t want to do what I normally do, which is cut up the thing, take pictures of the thing, put-back-together the thing, and then apologize for the thing once I arrived. So I was just going to take photos of the OUTSIDE of the cake, and bring it intact.
Which worked long enough to get myself out the door and over to dinner to enjoy beautiful cocktails and Thai food as well as an intact dessert. Until I got home and realized that I can’t do that to you.
It also needs to be mentioned that this is 100% about my own neurosis, the lovely friends in question would have found a previously detached, photographed, and reattached dessert adorable and charming and encouraged me to do this, had I asked.
So I made it again, just so that I could cut it open and show you these layers. Then I ate it. Maybe that was my subconscious plan all along, I do things like that.
Peel and core the apples. Slice very thinly, set aside.
In a large bowl stir together the eggs, sugar, beer, butter, flour and salt.
Add the apples, toss to coat.
Line a large (10 x 5) loaf pan, or an 8x8 square pan with parchment, spray with cooking spray.
Add the apple mixture to a the prepared pan.
Bake for 60 minutes or until the cake as set. Allow to cool, remove from pan. Refrigerate until ready to serve.
Add the brown sugar, butter and beer to a saucepan over high heat. Boil for two minutes, remove from heat. Stir in the vanilla and heavy cream, return to heat and bring to a boil again. Boil for one minute, remove from heat, allow to cool.
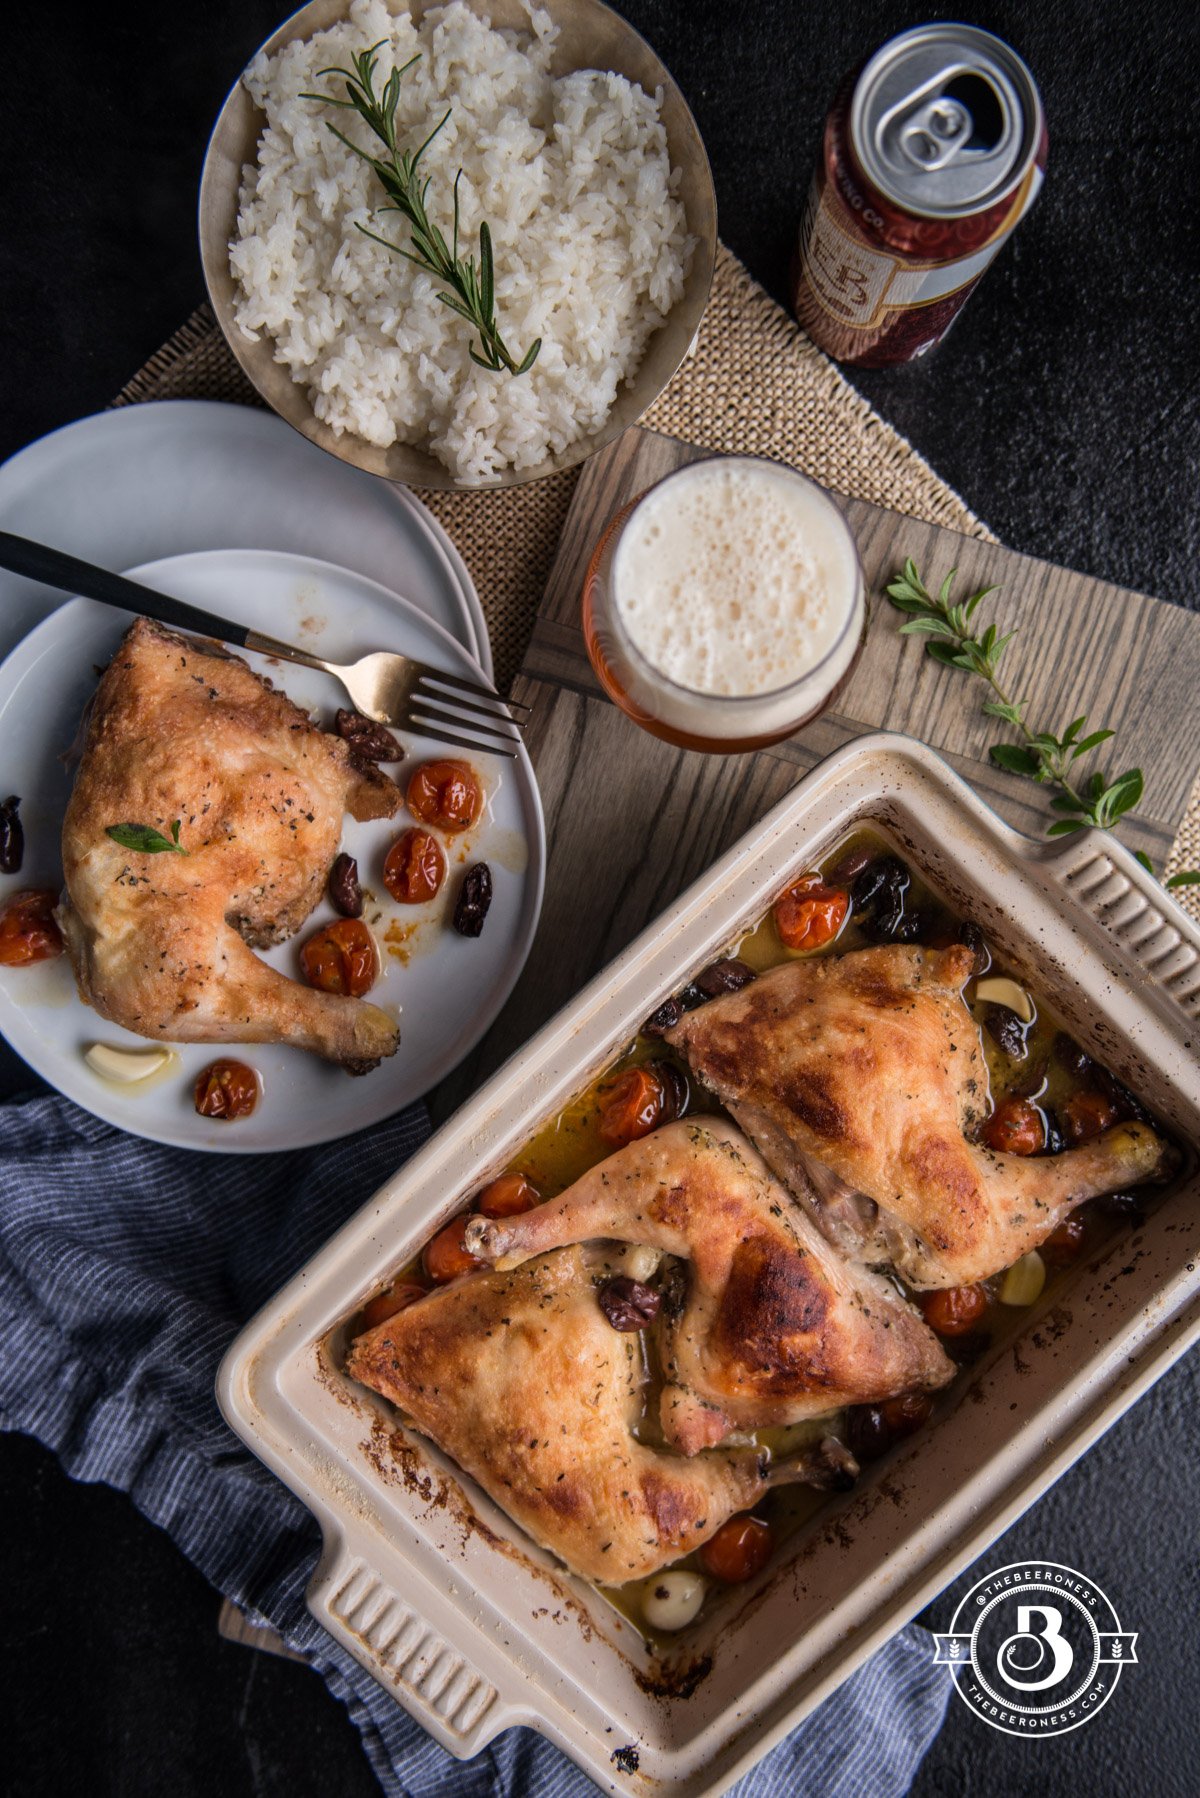
Provençal Beer Chicken, five minutes prep and perfect for weeknights or dinner parties!
This is what happens when I get excited without thinking. I’m just finishing up the back-and-forth-editing phase with my publisher for my next book. The vegetarian book I finished writing this summer (you guys, I love it. I can’t wait to show it to you), so as a celebration I made chicken.
Yes, let that sink in. I made CHICKEN to celebrate my "cooking with beer and in-season produce" vegetarian cookbook. I don’t make sense, you guys know that. Like how I decided to make homemade candy the day after Halloween, or when this happened.
But, the thing is, good food is good food. Sometimes that food has meat in it, sometimes it doesn’t. Roast chicken is one of my favorite ways to feed people, no matter the season. And this beer chicken was perfect: 5 minutes prep, and tastes fancy. I hope you like it. Unless you’re vegetarian, in that case, I apologize. But I do have an entire book headed your way, so I hope you forgive me.
1/3cupbeerpale ale or pale lager, I used Odell Colorado Lager
2cupsgrape tomatoes
¼cupkalamata olivespitted
2teaspoonskosher saltdivided
2sprigs of thyme
1sprig rosemary
1teaspoonfreshly ground black pepper
½cupall-purpose flour
2tablespoonsherbs de Provence
4chicken leg quartersbone-in, skin-on
Rice or pasta for serving.
Instructions
Heat the oven to 400°F.
In a baking dish add the olive oil, garlic, shallots, beer, tomatoes, olives and 1 teaspoon salt, stir to combine. Add the sprigs of thyme and rosemary.
Combine the pepper, flour, herbs de Provence in a shallow bowl.
Sprinkle the chicken on all sides with remaining salt. Dredge the chicken in the flour until well coated on all sides.
Add the chicken on top of the tomatoes in a tight, even layer.
Bake, uncovered, until the chicken is cooked through and skin is golden brown, about 45 minutes, basting with pan juices two or three times during cooking.
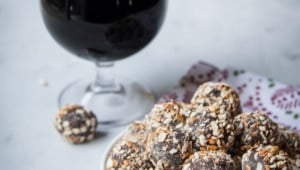
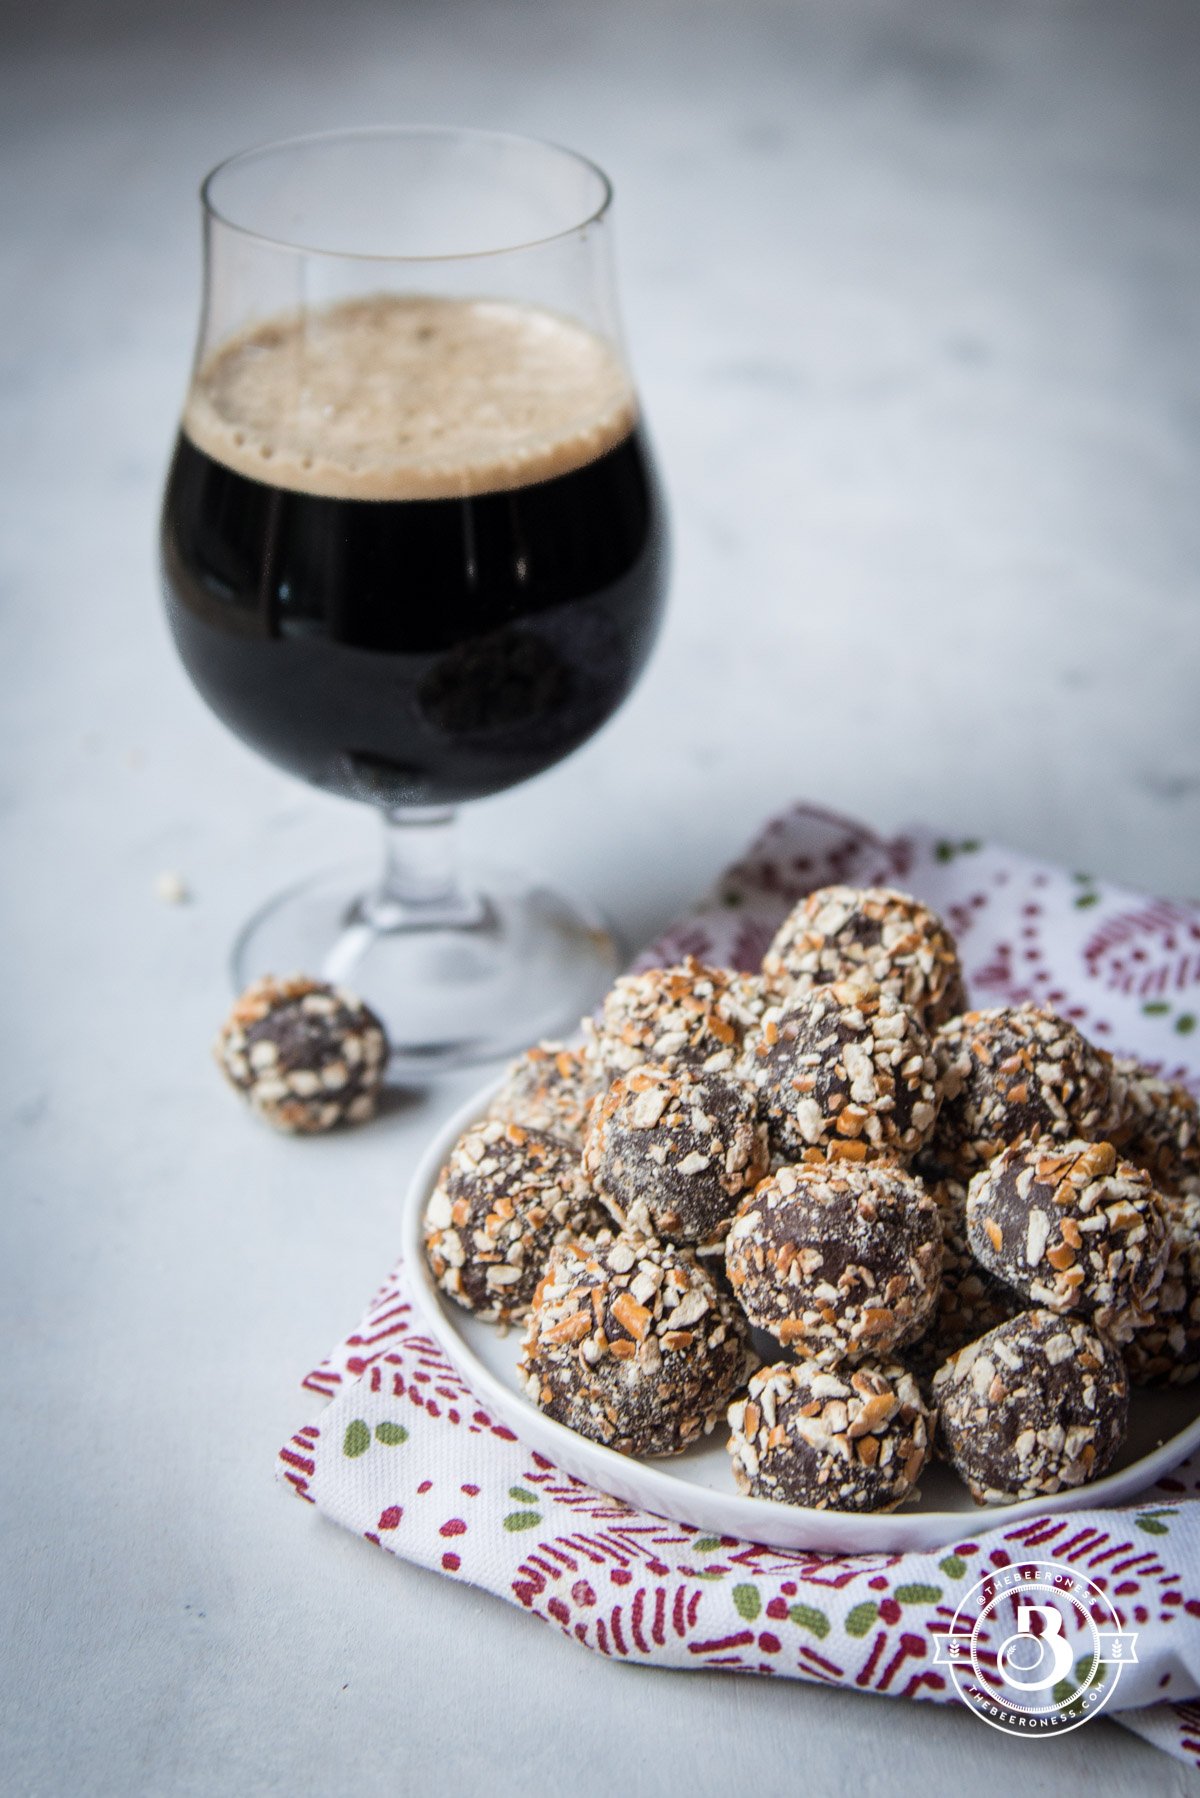
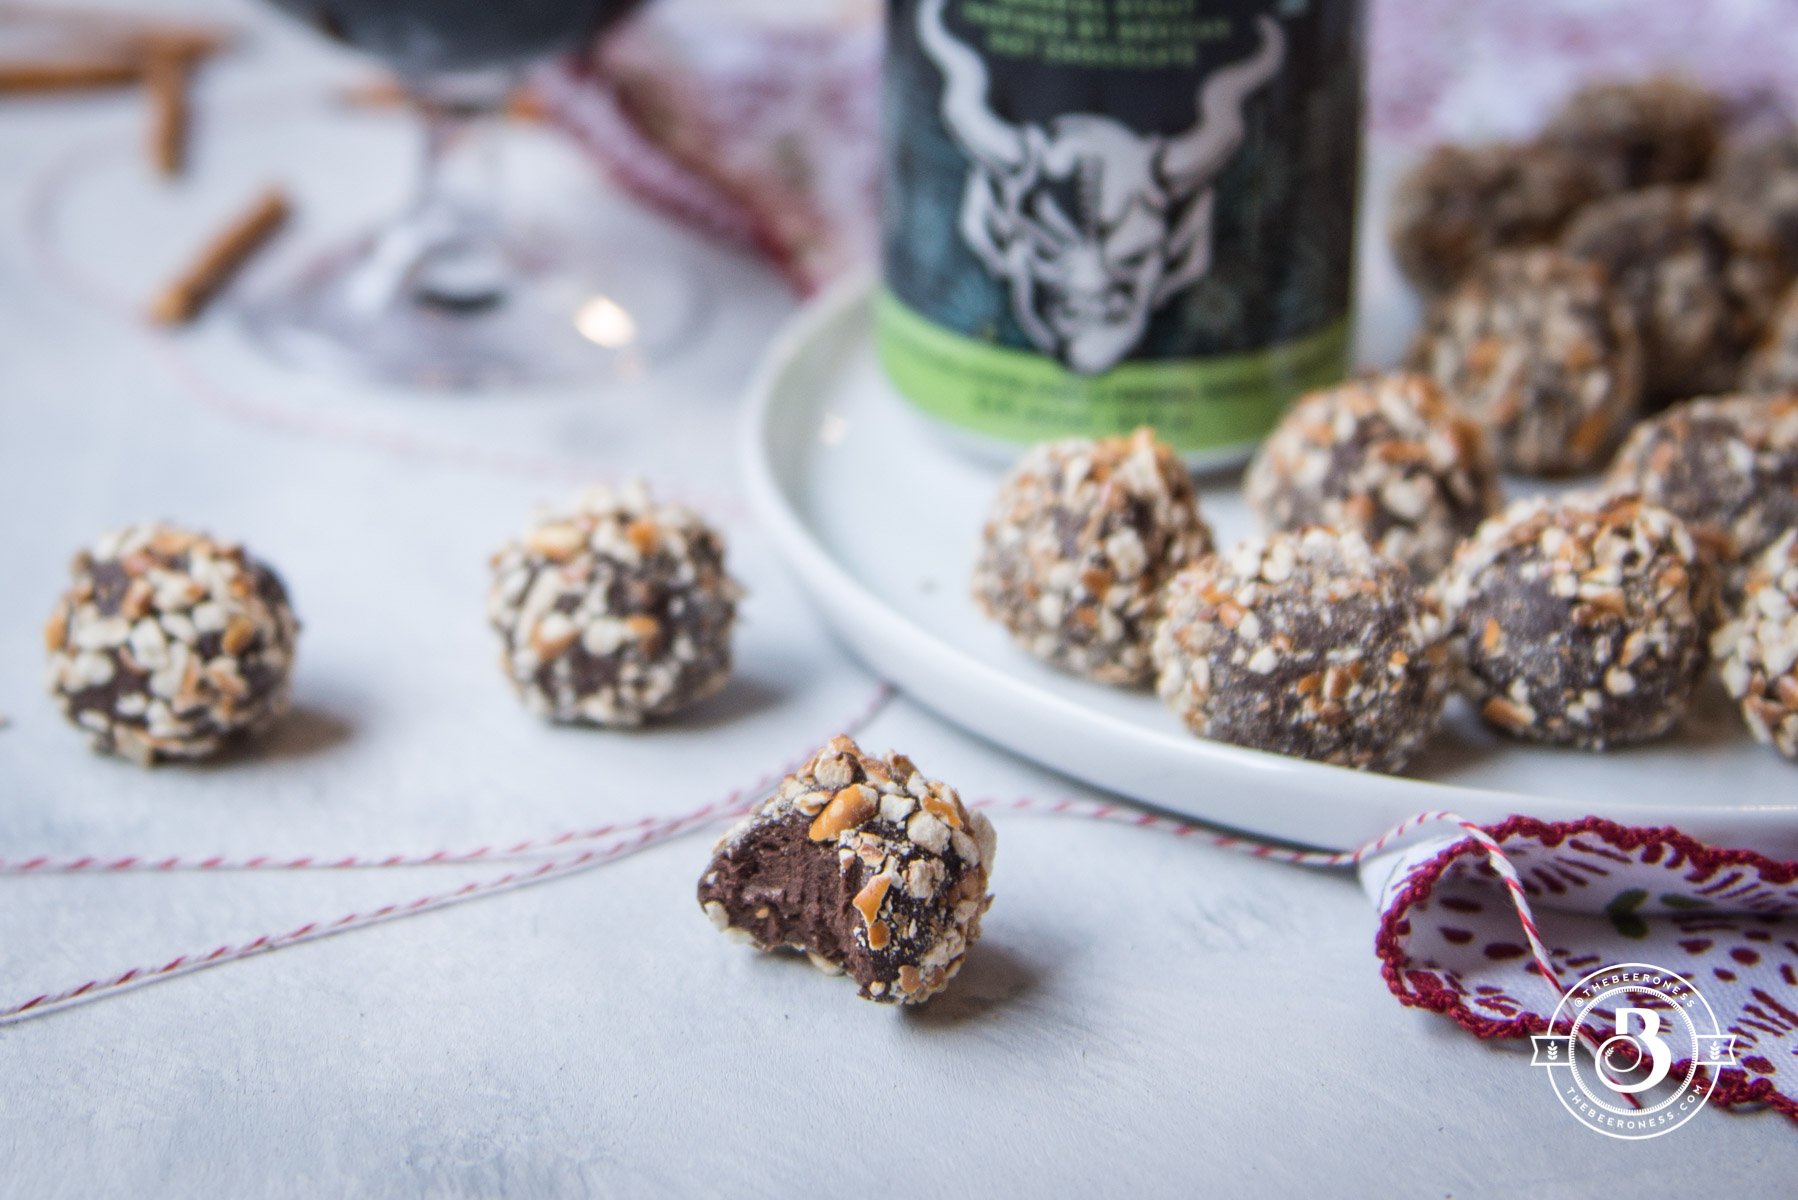
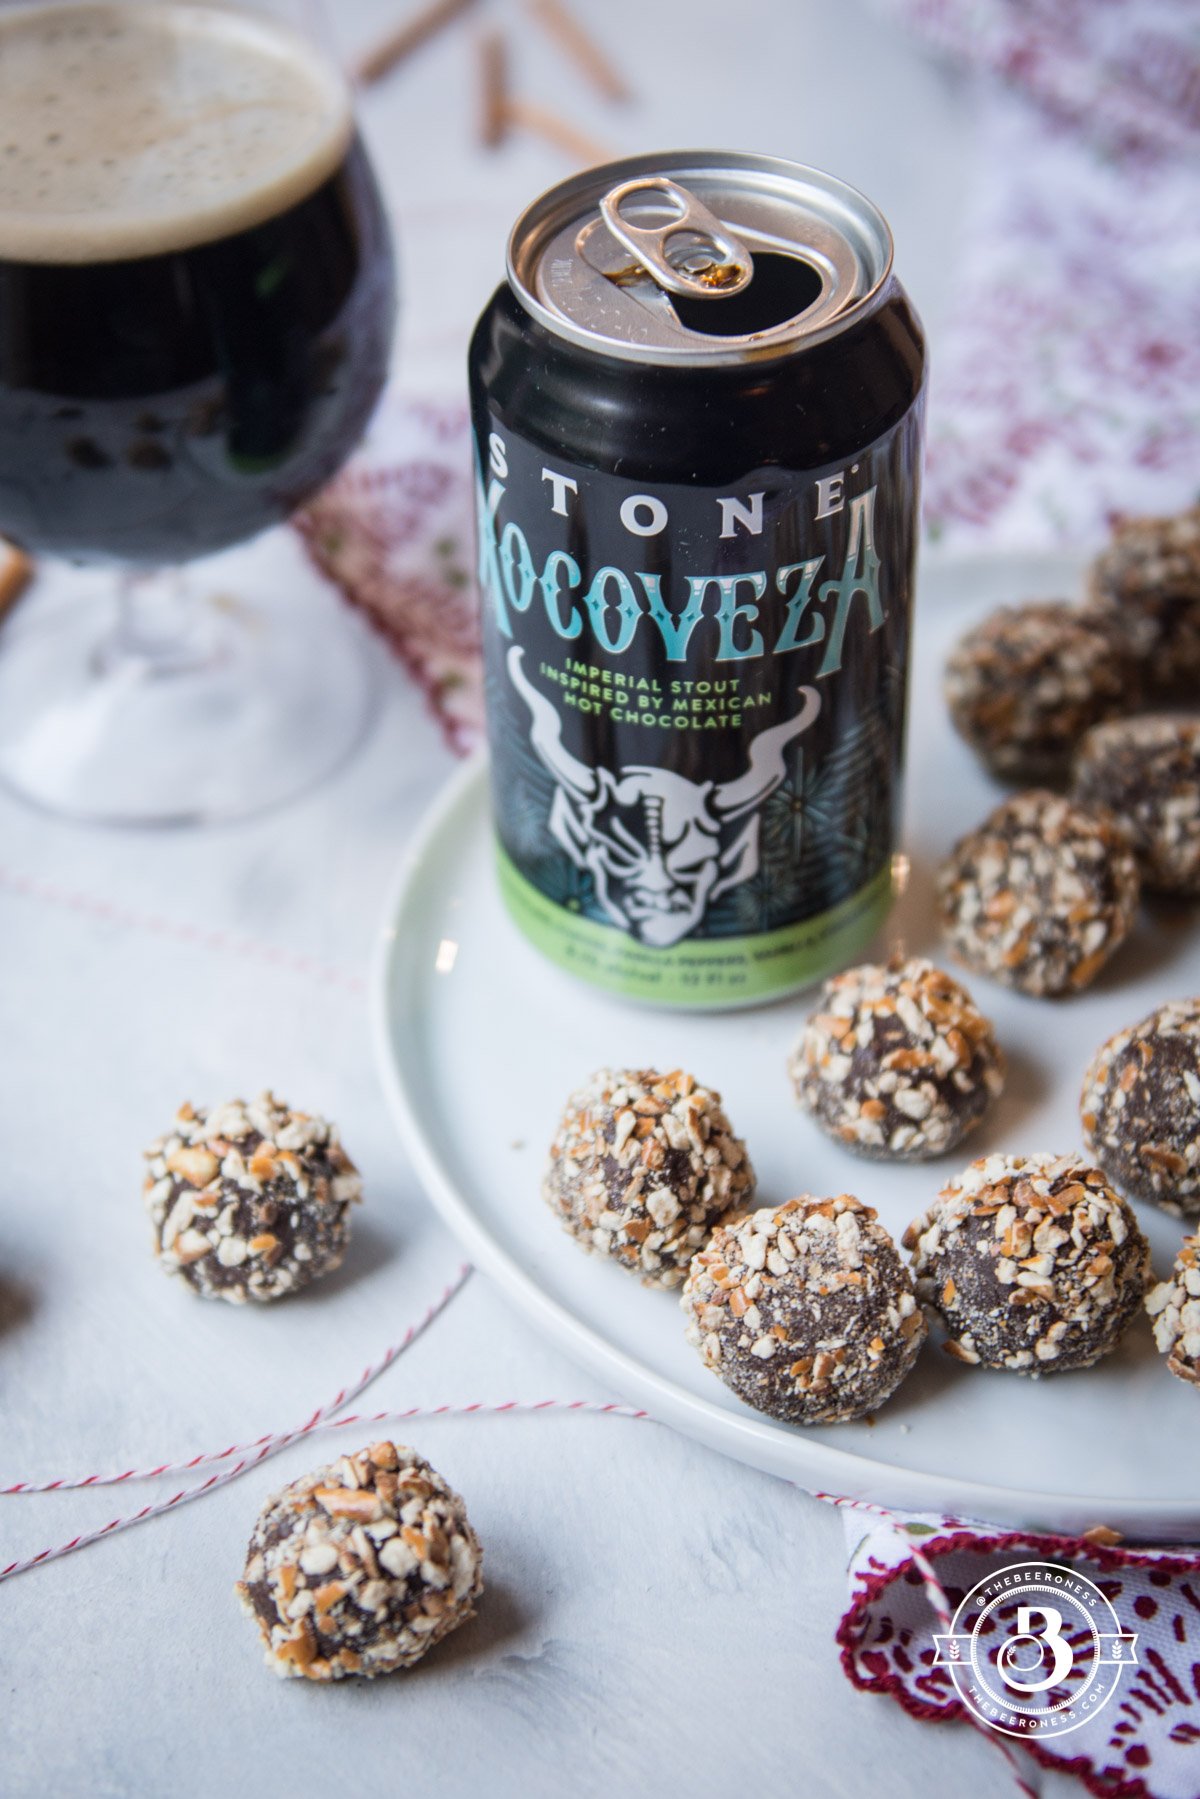
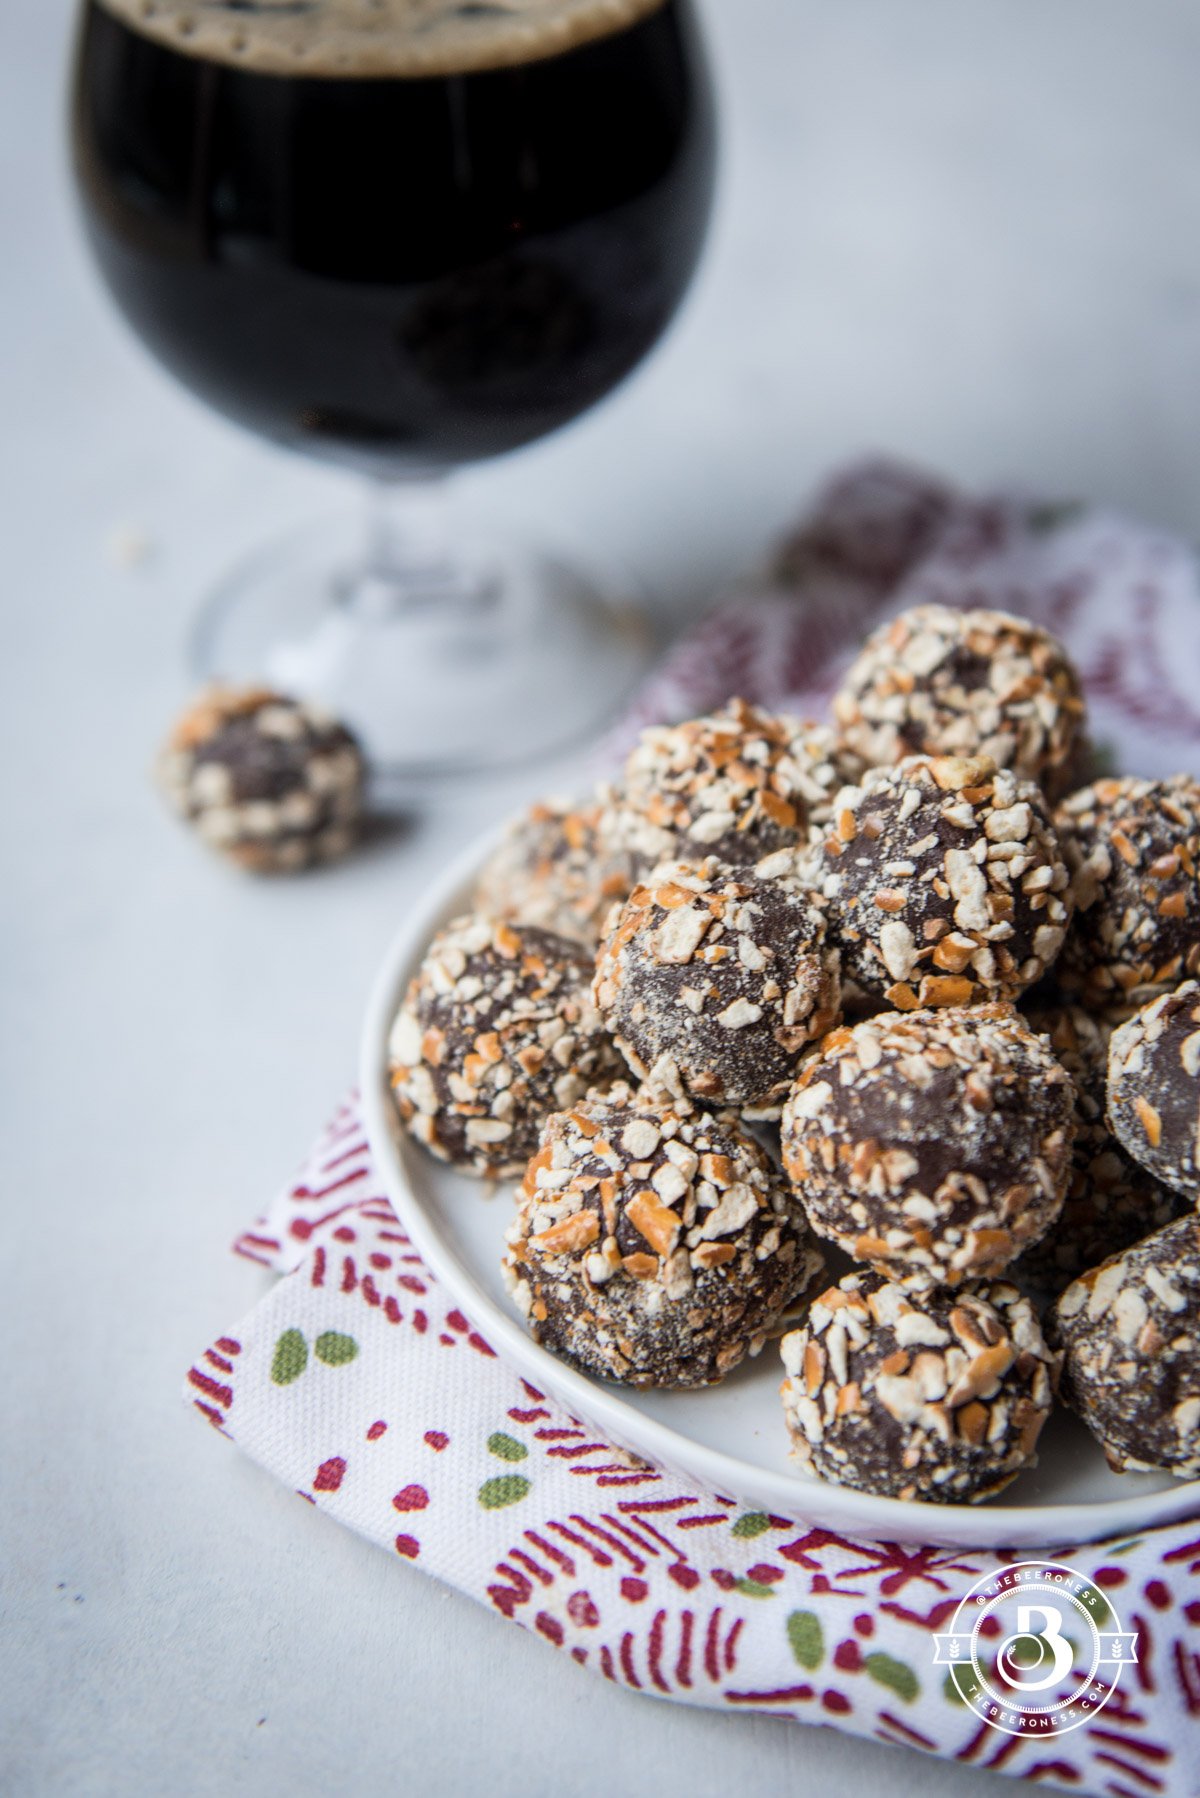
Easy Chocolate Beer Pretzel Truffles, 4 ingredients, and just a few steps!
I have a problem, the sort that will probably be solved with beer-infused chocolate, as most minor problems usually are. My problem (one of many, I’m sure you already know) is that I almost always assume that people—upon first meeting me—don’t like me. For one reason or another, this is what I default to: "I don’t think she likes me. Sure, she’s being nice, but that’s just because she’s a nice person." This does not, however, stop me from being chattier than said new person would probably like.
I know, it’s ridiculously insecure and eye-rolly. I know this. But it’s my default mode, thinking I have to earn it, like most things I have in my life. Then I do things like make chocolate truffles and bacon cupcakes and give them away hoping to earn peoples likes. Also: don’t do that. I don’t recommend it. But I’m far better at giving advice than I am at taking it. I’m an excellent advice giver, just ask. I’ll kick some wisdom at you.
I don’t take the advice, I just give it away. Unless that advice is about what beer to cook with or how to infuse chocolate with booze, those nuggets of wisdom I keep close. Also, if you want advice about what beer to pair with your dinner, or what city to visit on a whim, I’m your girl. How to navigate the intricacies of unknown humans? Maybe ask someone else. I’ll just be over here with these truffles trying to make friends with the new UPS guys.
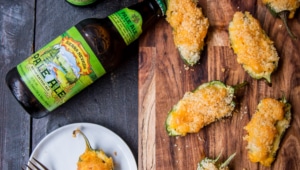
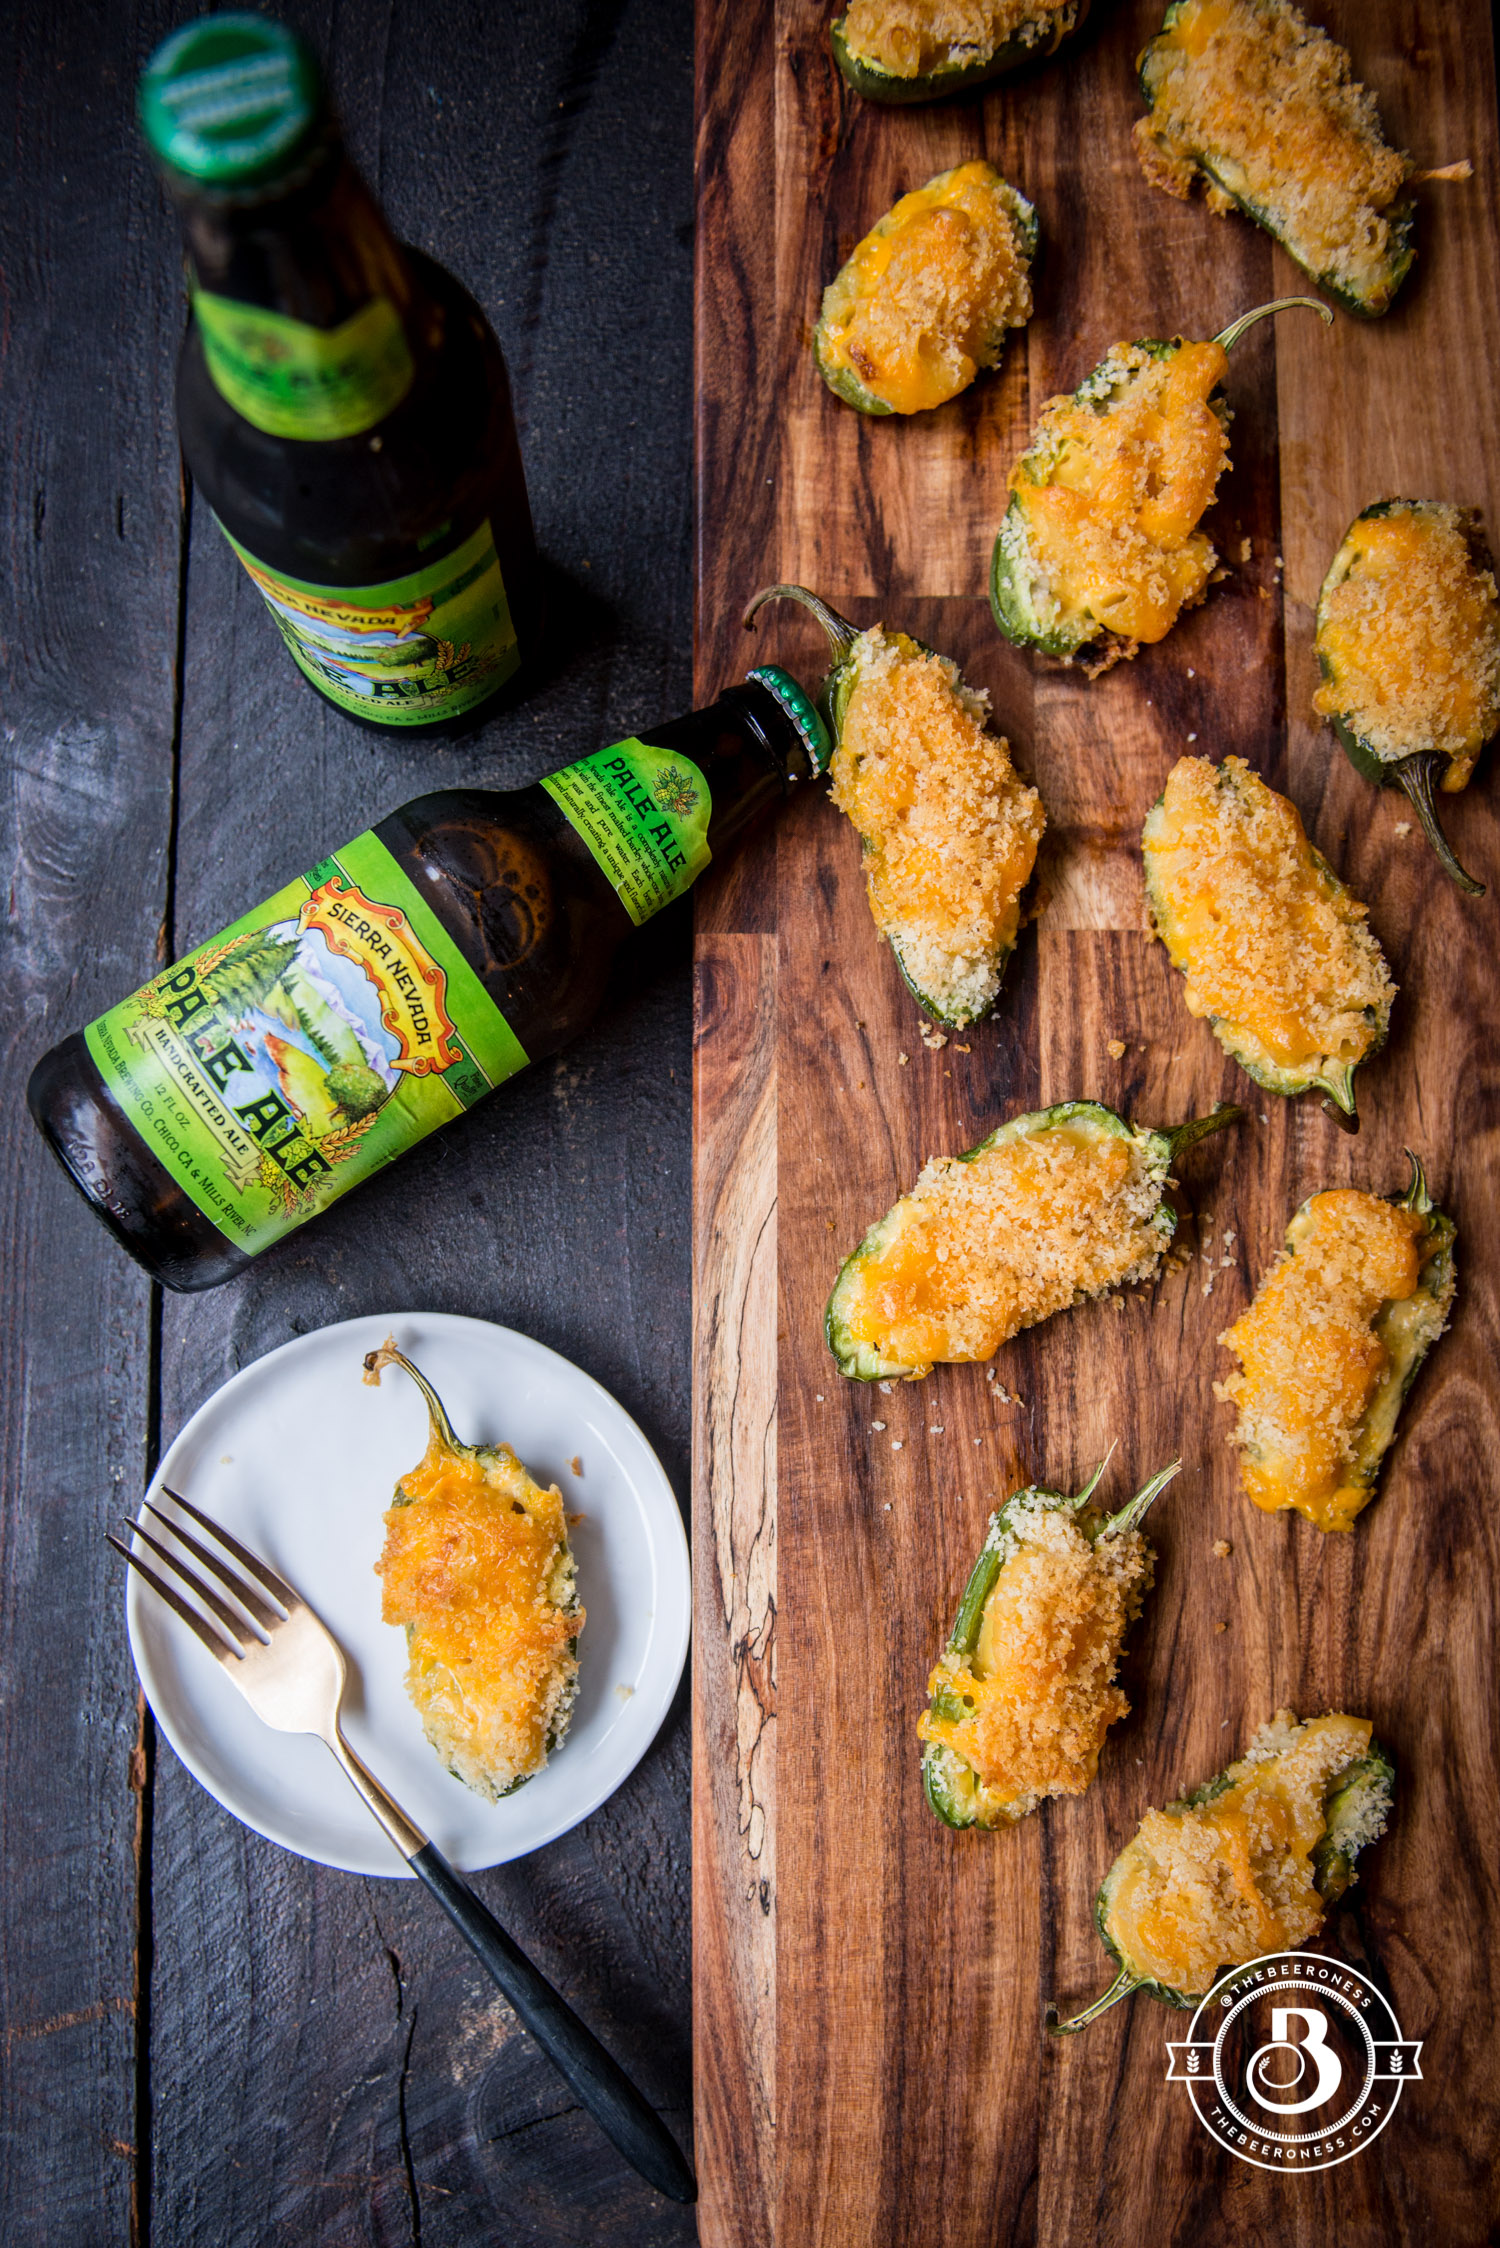
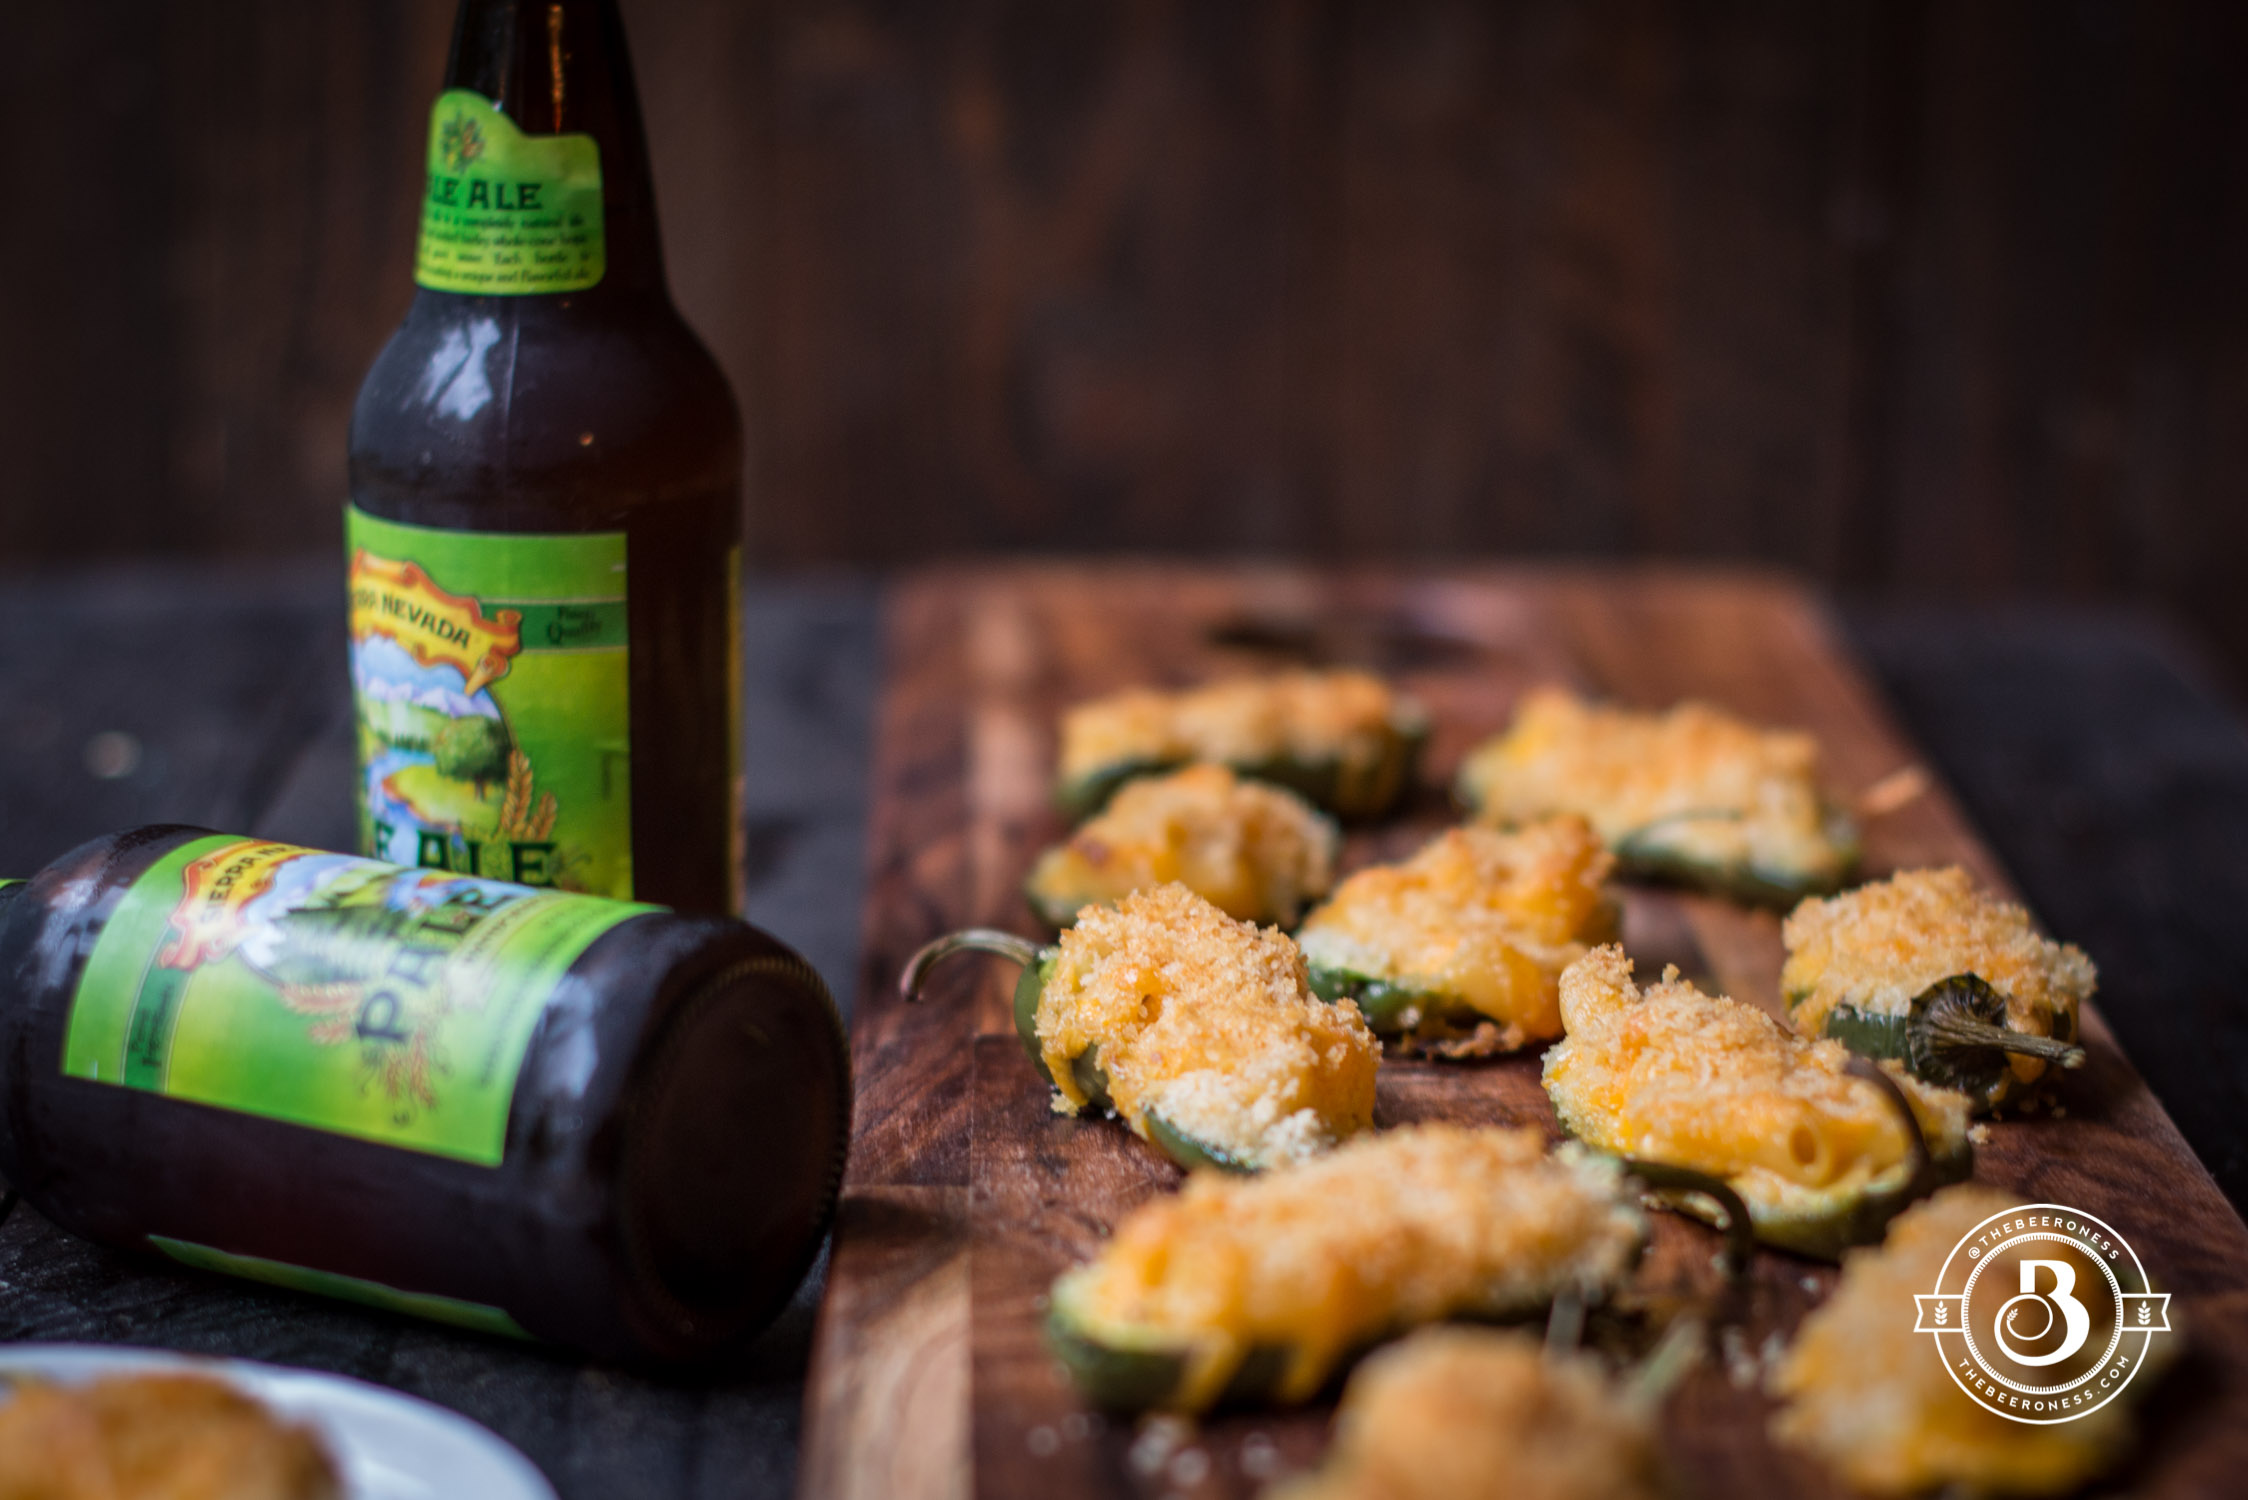
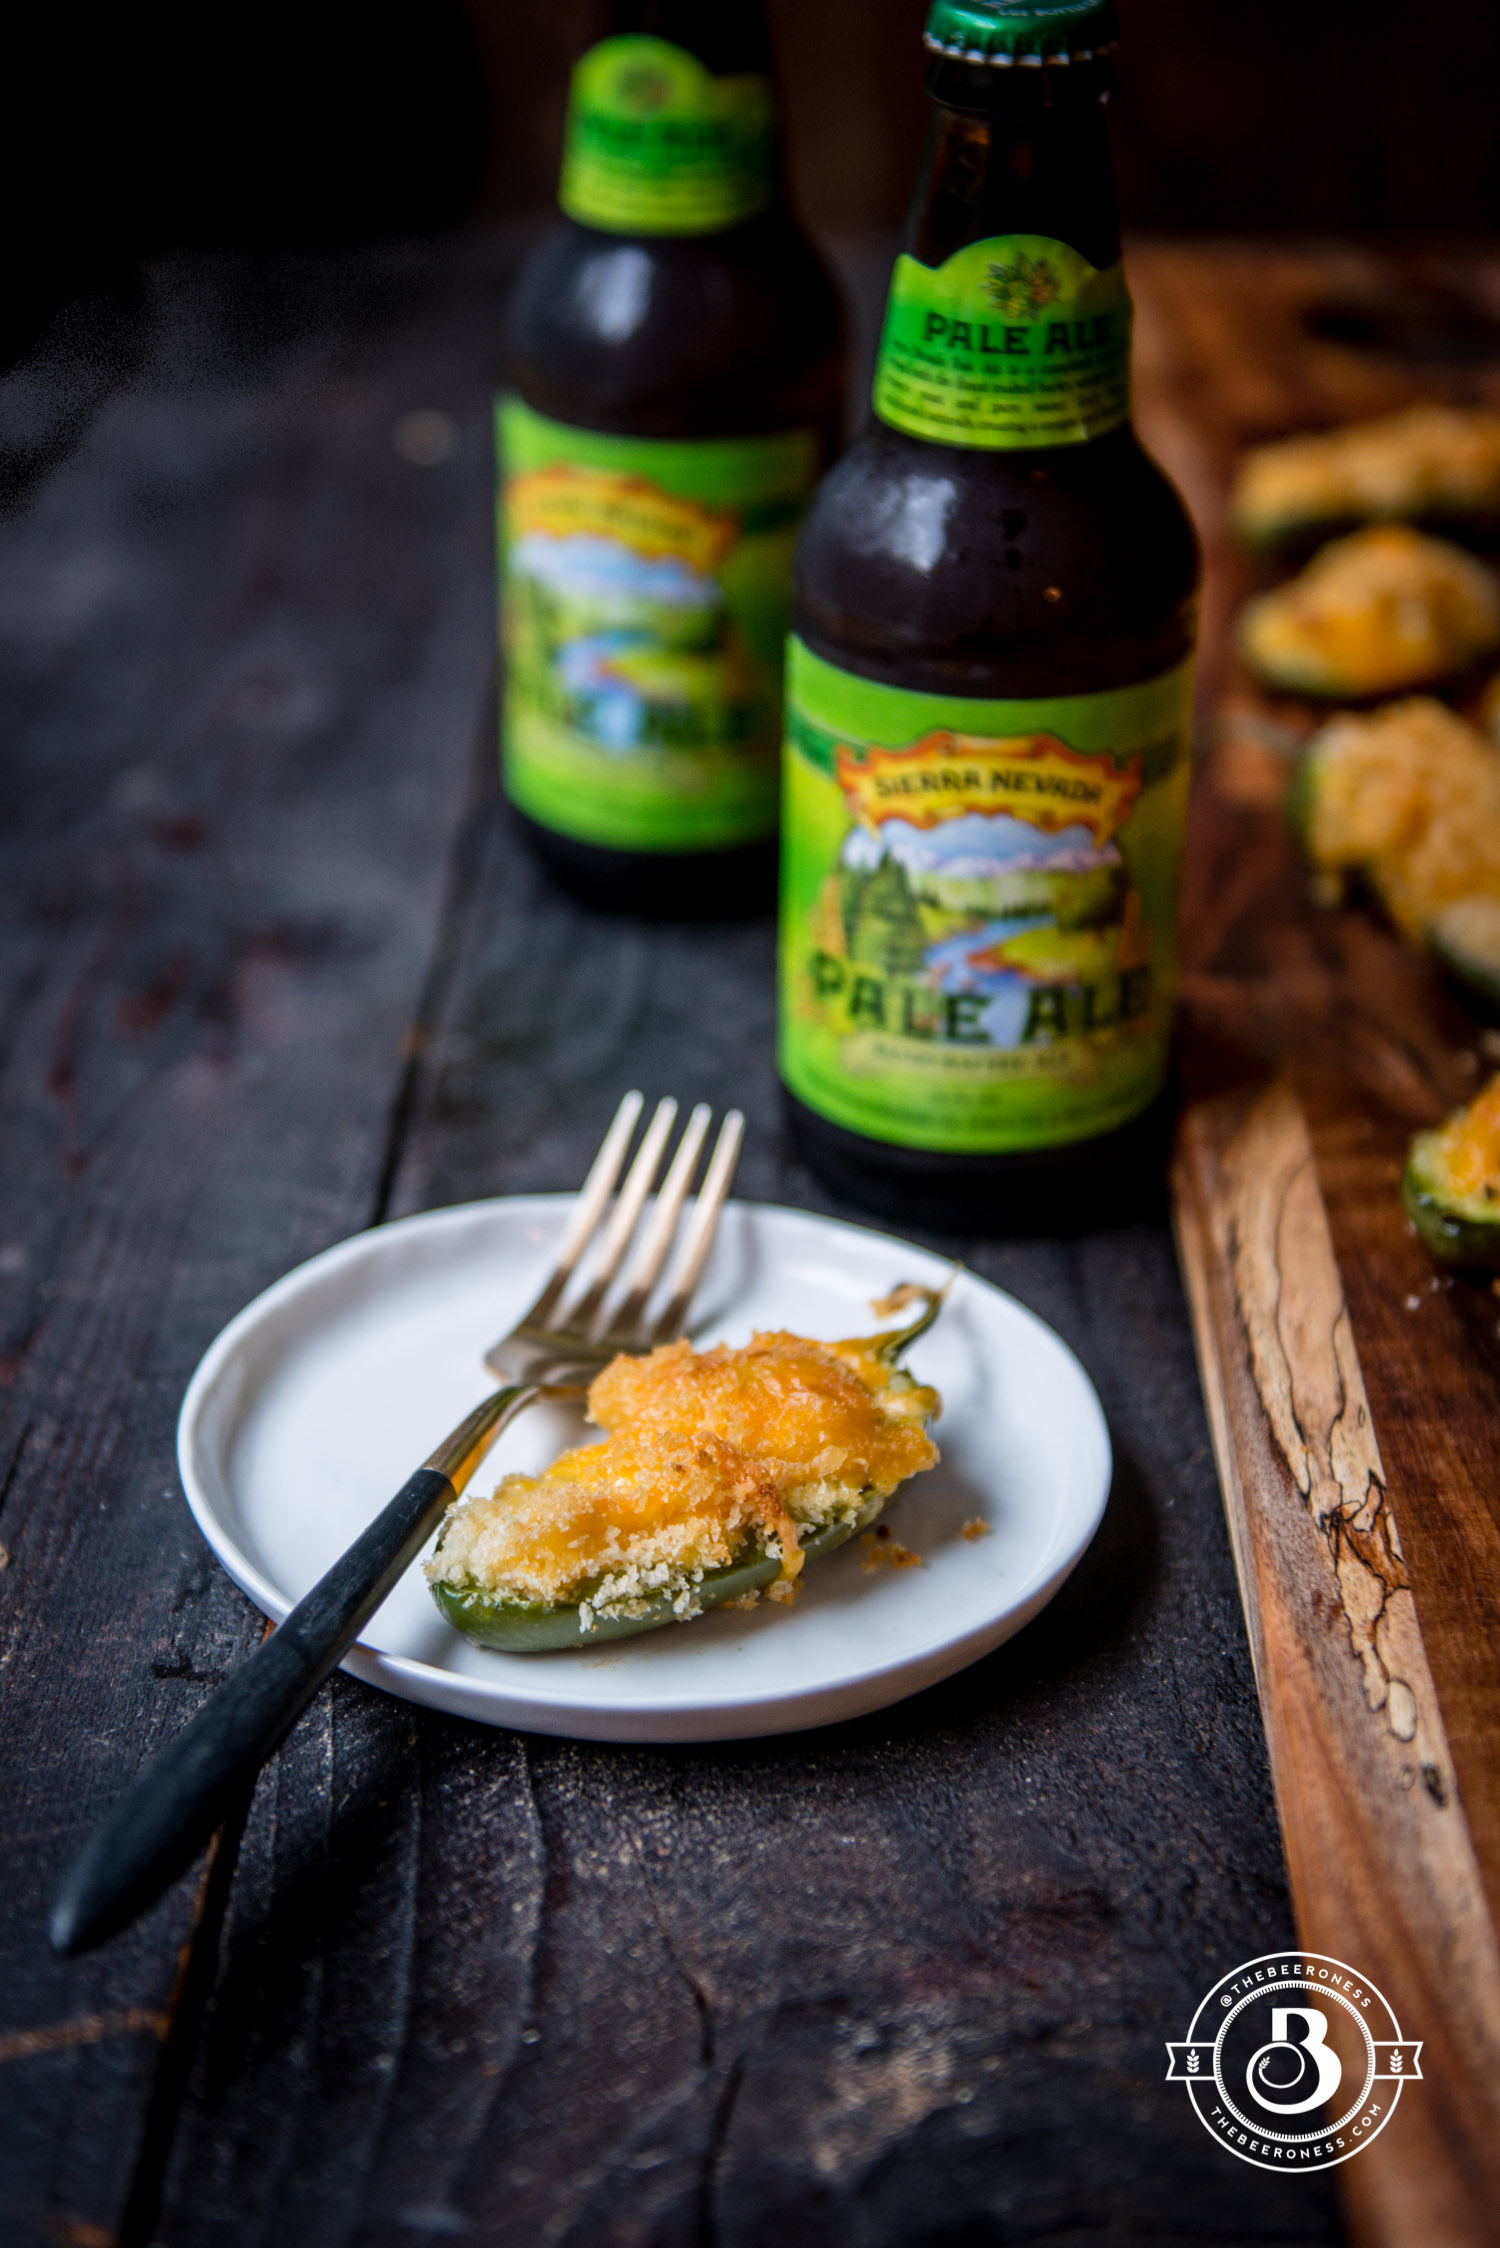
Beer Mac N Cheese Stuffed Jalapenos, the perfect game day snack!
I was born in California, cut my beer drinking teeth on Sierra Nevada, spent most of my life living up and down the Golden State. It’s a part of who I am and will always be my first home. You already know about the fires that have devastated one of the most gorgeous parts of our country. I watched, horrified, from my Pacific Northwest perch as my old neighborhoods were destroyed, my friends evacuated, places I used to roam burned beyond recognition.
Living in LA outsiders always asked if earthquakes scared me. No, never. Not once. It was the fires that ravaged us every year that put fear into my bones, not the occasional earthquake that hardly rattled the hanging lamps. This past year was the worse we’ve ever seen. I don’t need to go into statistics and details, you already know. When you just want to retreat into a beer and forget how bad it is, the good news is that there is a beer that can actually help.
Sierra Nevada has collaborated with over 1200 breweries nationwide to brew Resilience IPA, donating 100% of the sales (all of it, not just some of it) to the Campfire Relief Fund. Not only have they started out by donating 100K to the fund, brewed a beer to increase that amount on an hourly basis, partnered with over 1200 breweries, but they have also made it as easy as drinking a beer to help out. There will never be an easier way to do something to help a national tragedy.
Want to drink a beer for a charity? Find the brewery participating in the Resilience Butte County Proud IPA project. I’d bet there’s a brewery close by you, and a way that your weeknight happy hour can be more than just an excuse to meet up with friends. Contact your local brewery to find out when their Resilience IPA hits the tap room, mark your calendar, organize a get-together, feel good about your nightly pint.
3cups240g cheddar cheese, shredded (plus additional for top)
½teaspoonsalt
¼teaspoongarlic powder
12large jalapenos
2tablespoon14g melted butter
½cuppanko25g bread crumbs
Instructions
Preheat oven to 400°F
Cook the macaroni in lightly salted boiling water until just before al dente, about 5 minutes. Drain, set aside.
In a large pot over medium high heat, melt the butter. Whisk in the flour and cornstarch until well combined. Add the milk and beer, bring to a low simmer, do not boil.
A hand full at a time add the cheese, whisking until all the cheese has melted before adding more.
Stir in the salt and garlic powder (add additional to taste).
Add the noodles, stir until well combined, allow the noodles to finish cooking in the sauce, about 3 minutes.
Cut the jalapenos in half, scoop out the seeds and membranes.
Place the jalapenos, cut side up, on a baking sheet covered with parchment.
Fill the jalapenos with mac n cheese.
Sprinkle with shredded cheese.
Stir together the melted butter and panko. Sprinkle the panko on top of the jalapenos.
Bake for 15-20 minutes or until the panko has browned.
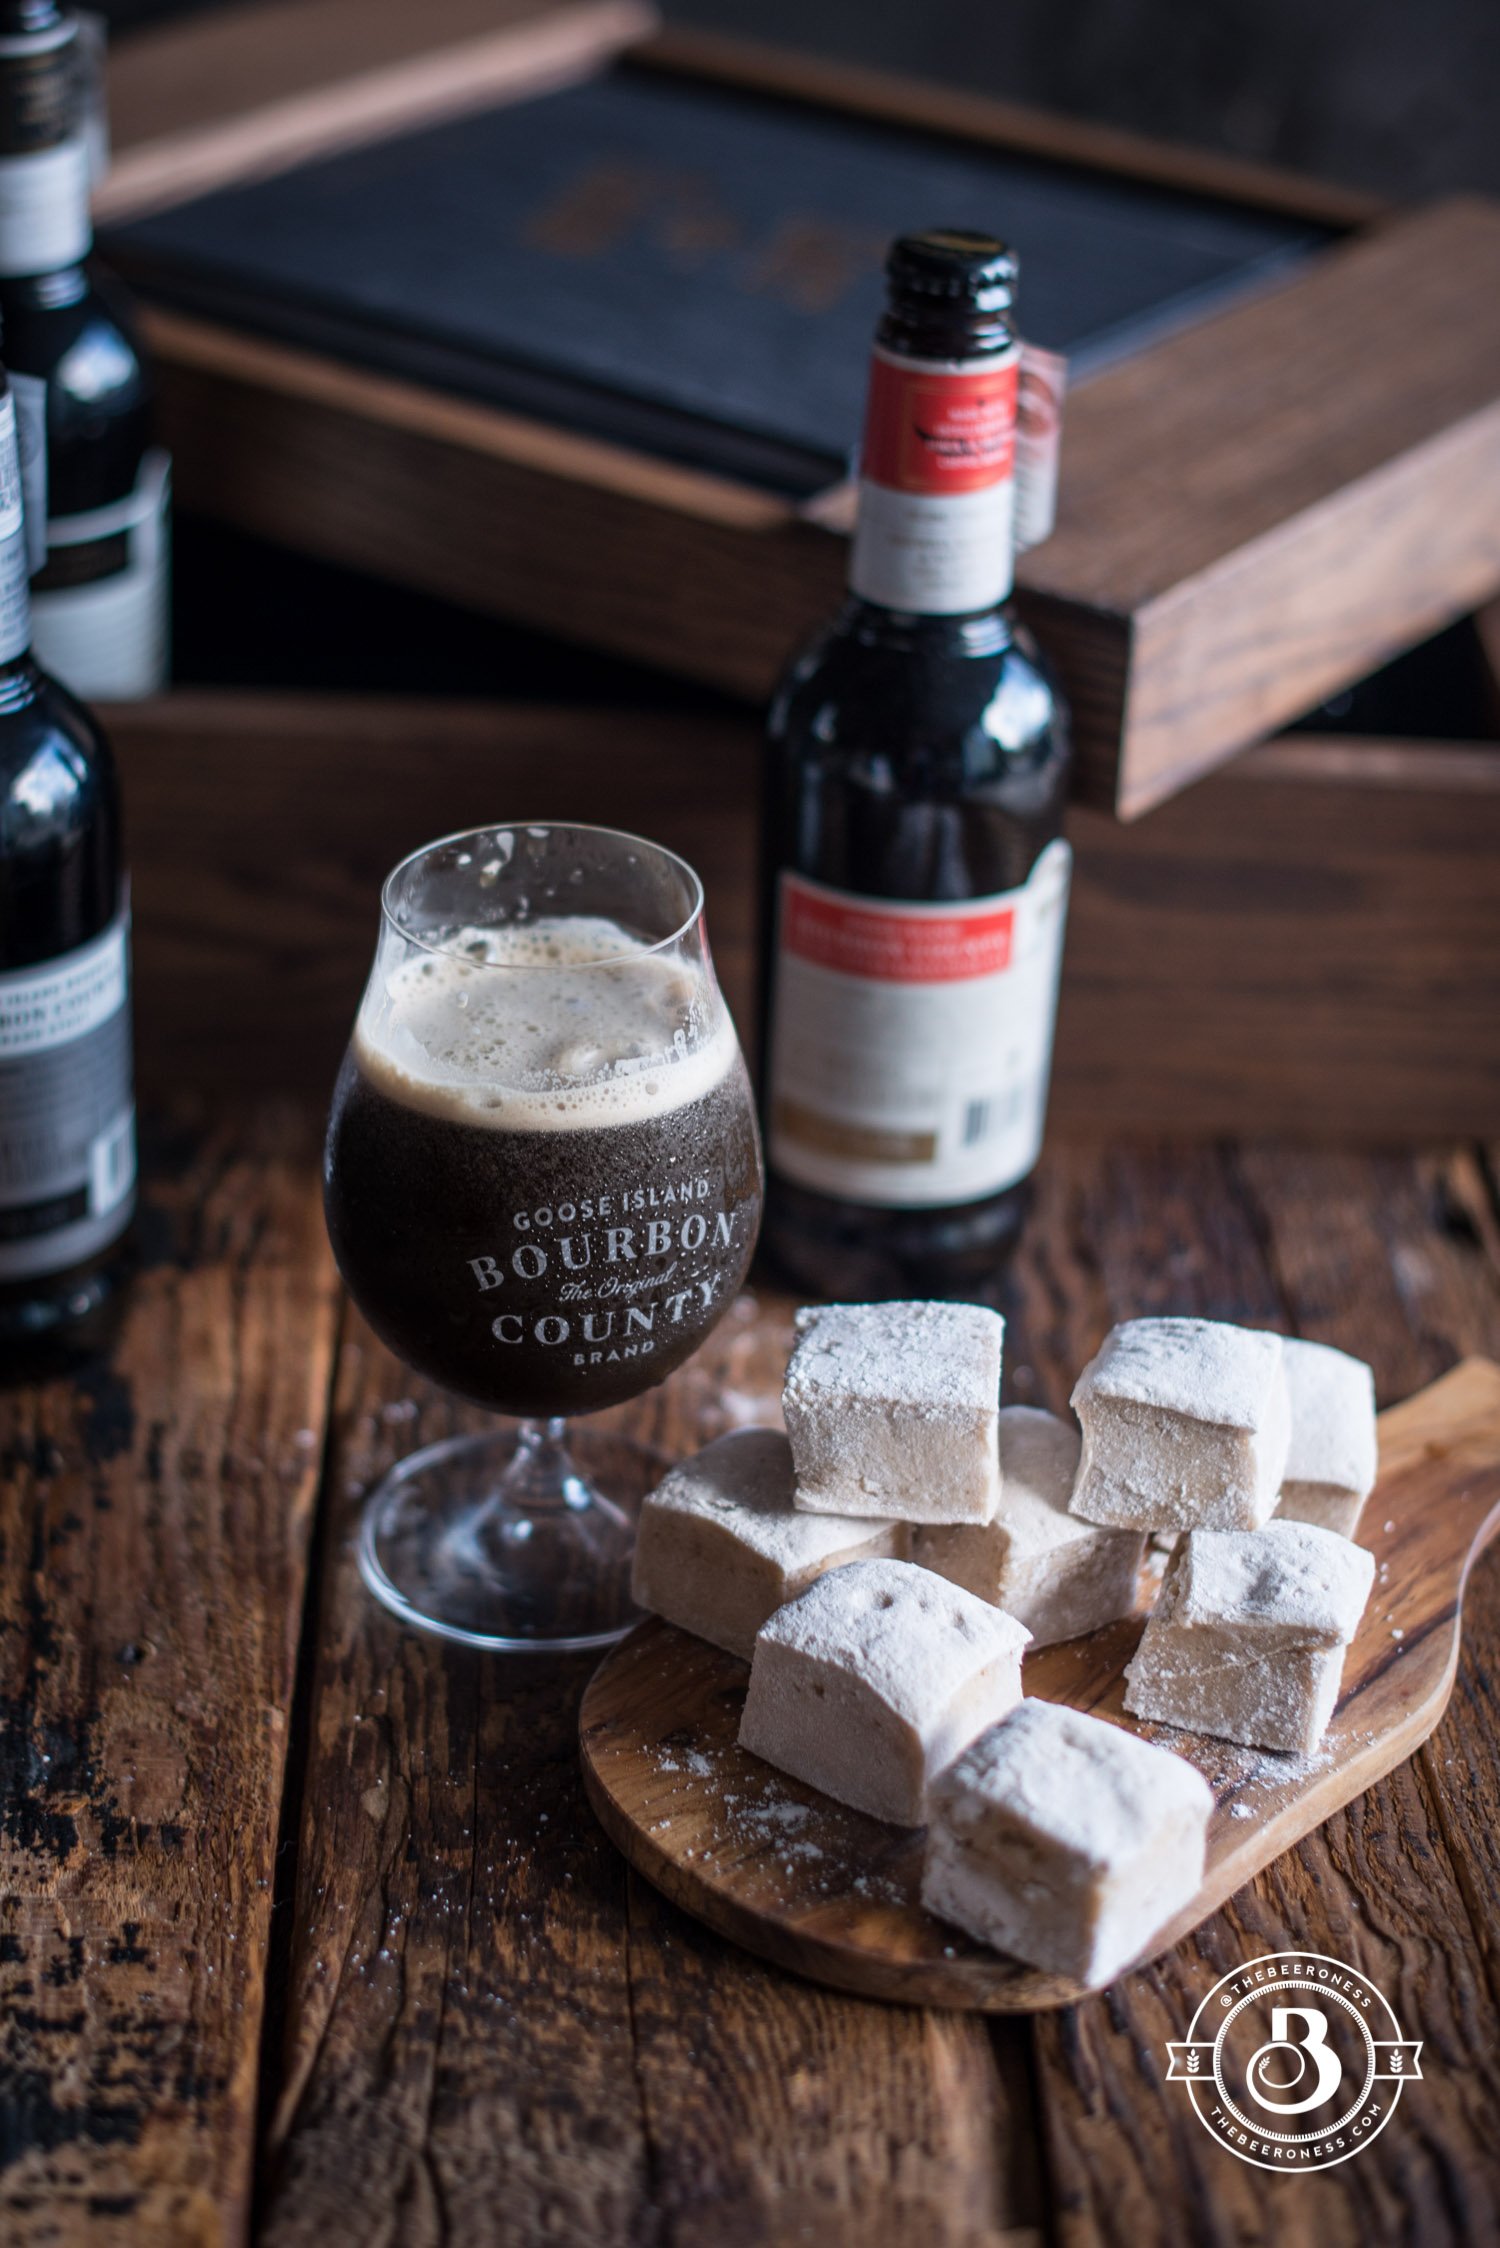
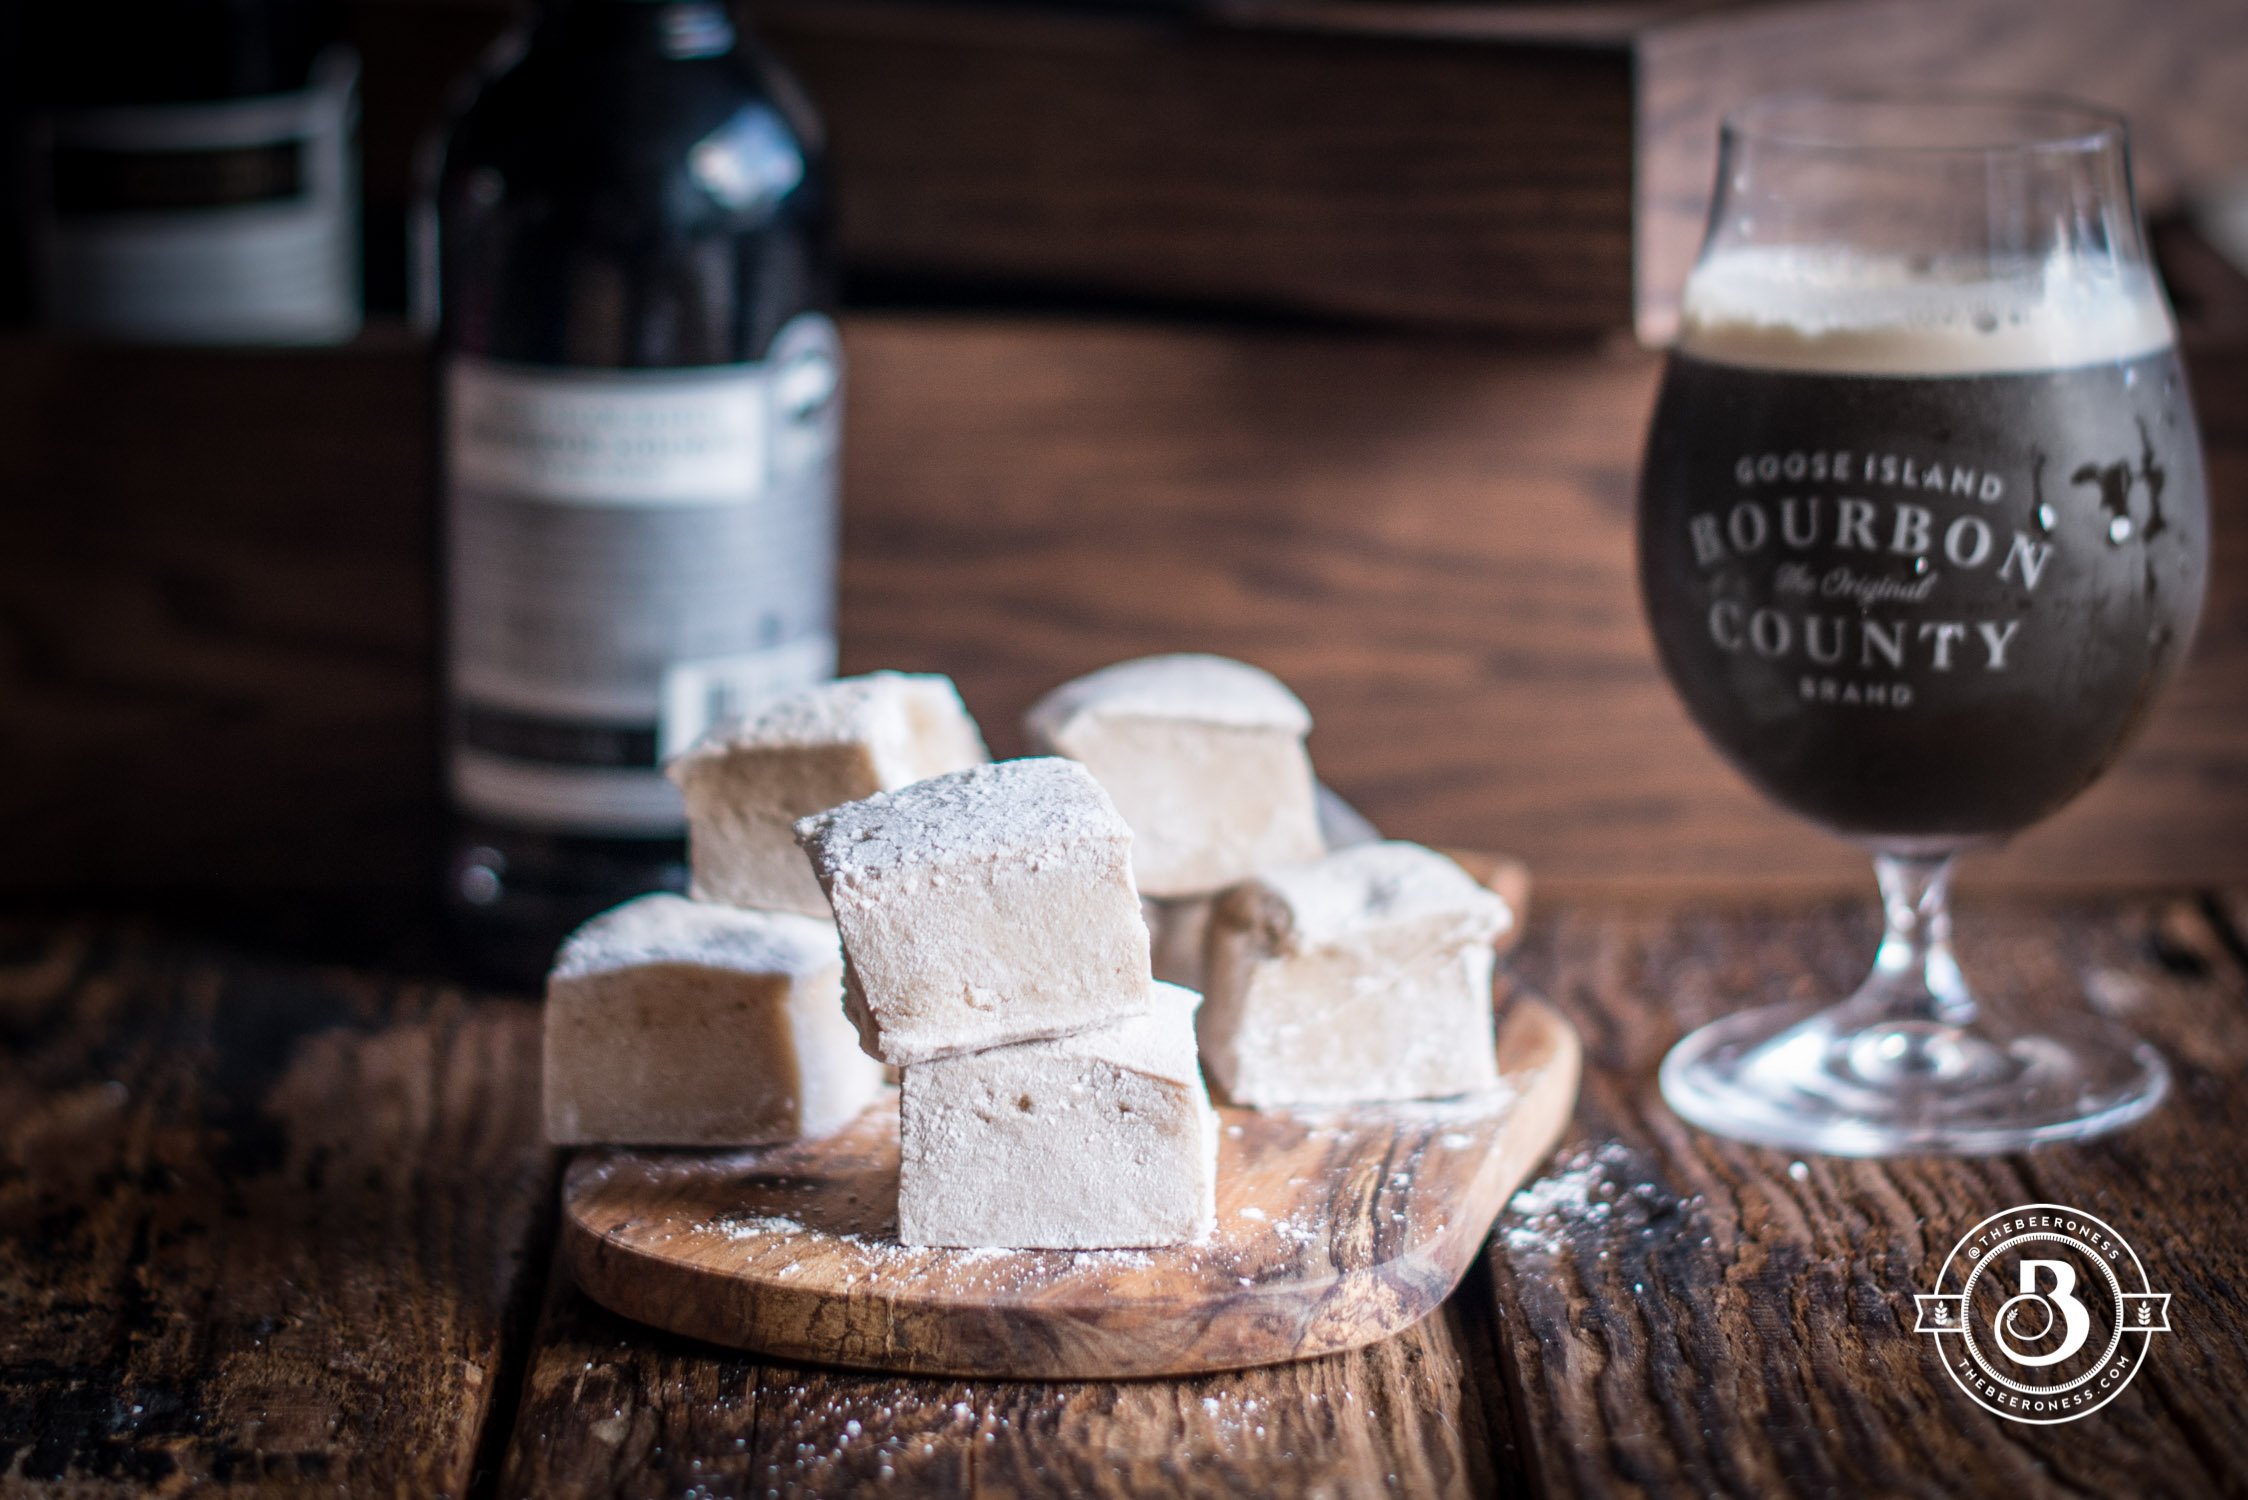
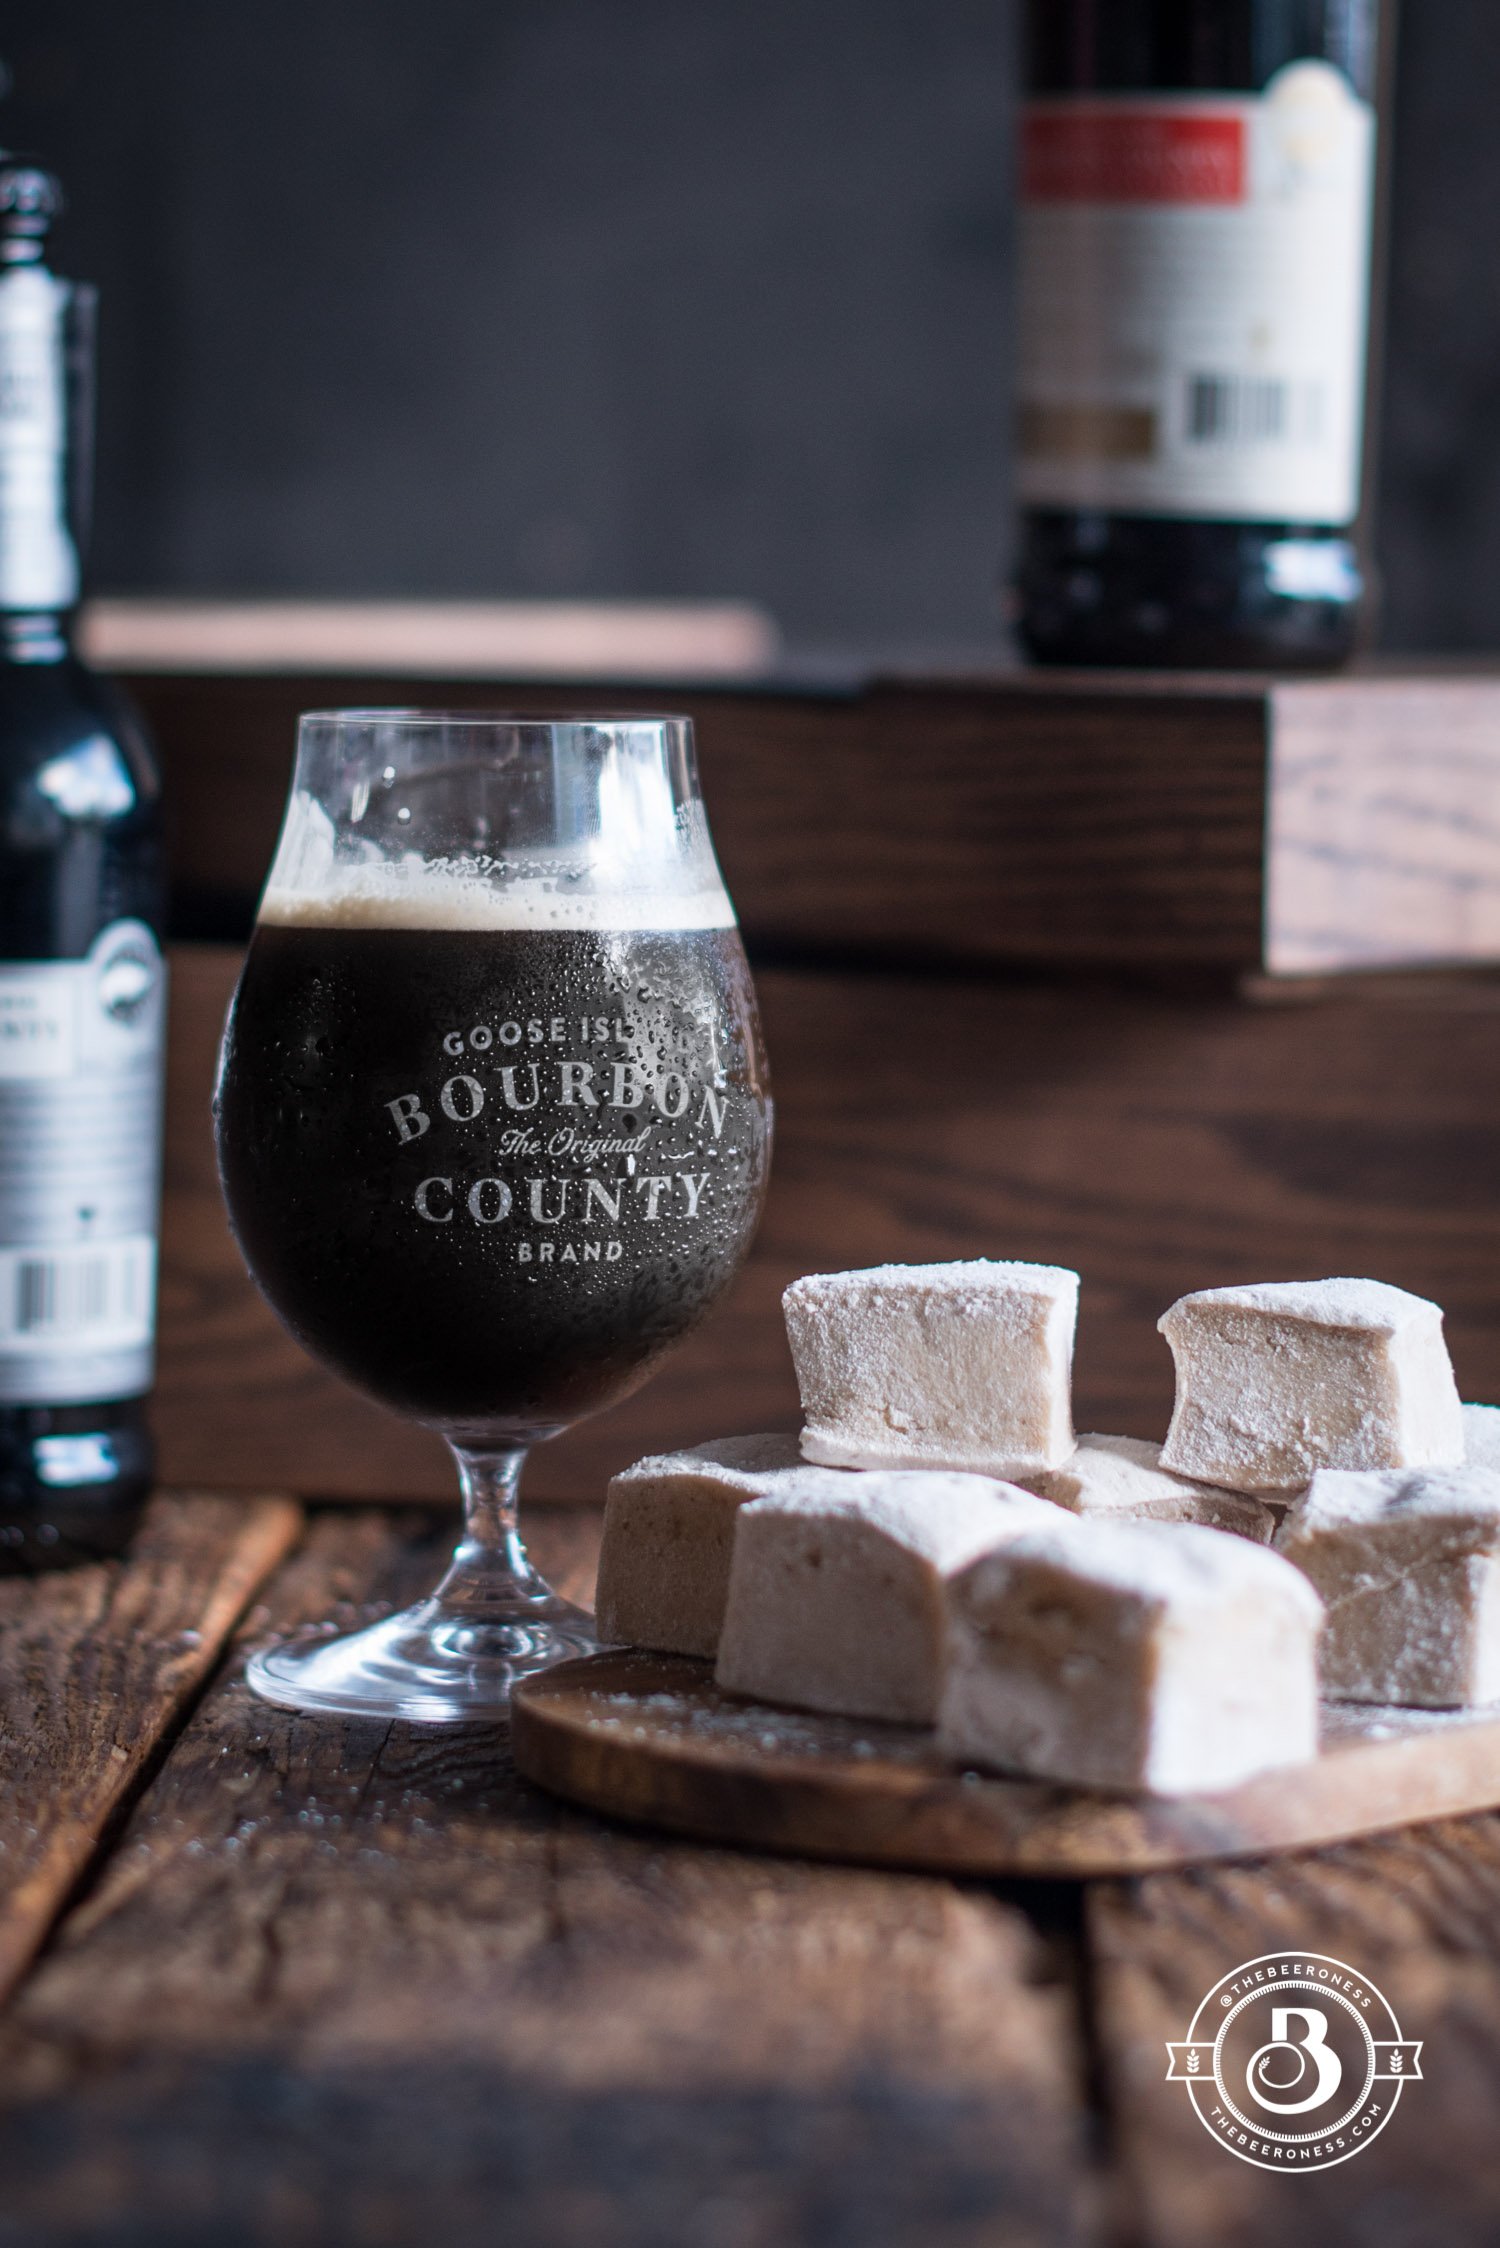
When you count the seasons by what’s available in the bottle shops, you see the months pass in a different way. Right now we’re just leaving Fresh Hop Season and moving into Barrel Aged Beer season, one of the best beer seasons of the year.
It’s also the time of year when beer releases hit a fevered pitch and people wait in line for hours hoping to score a bottle or two of a beer that’s been aging in a wooden barrel that formerly housed liquor. It’s worth it, even if just for the bragging rights and the perfect cellarable beer. Beers that you always want two of, one for now and one to save for later. Stored properly they can be even better years later.
Bourbon County is the Godfather of the bourbon barrel aged beer. Goose Island is widely credited as being the first people to take a discarded bourbon barrel, load it up with stout, store it for nearly a year and then drink it just to see what would happen. This, more than anything, is a commentary on the heart of true brewer. Curious, courageously experimental, and unafraid to think outside the bottle.
It was a move that would have cultural repercussions beyond their wildest dreams. Starting a movement so strong and widely adopted it caused spent liquor barrels to go from a nuisance that distilleries had to deal with to a sought-after commodity that caused a shortage.
The face of beer is undeniably altered for the better because of the curiosity that caused Greg Hall to fill 6 bourbon barrels with stout in the early 1990s. In the name of that experimentation and curiosity, I decided that I’d like to figure out what would happen if you put a beer — one that had spent time cohabitating in a wooden barrel with the remnants of bourbon — into a marshmallow. Turns out, it’s pretty fantastic.
Grease a 9x13 baking pan, sprinkle with powdered sugar until well coated, set aside.
In the bowl of a stand mixer add ½ cup cold, flat beer. Sprinkle with gelatin. Allow to stand while the sugar is being prepared.
In a large saucepan (mixture will bubble up) over medium heat, add the water, 2 cups sugar and corn syrup. Stir until the sugar has dissolved.
Raise heat to high and allow to boil until the mixture reads 240F on a candy thermometer (about 6-8 minutes).
Once the temperature has been reached, turn off heat.
Turn the mixer on low and slowly pour the hot sugar mixture into the gelatin. Once all the sugar has been added turn the mixer on high until light and fluffy and tripled in volume, this can take up to 10 minutes.
While the mixer is running, prepare the egg whites. Add the egg whites to a bowl with the salt. Beat on high with a hand mixer until stiff peaks form. Sprinkle with remaining 2 tablespoons sugar, beat until stiff peaks return.
Gently fold the egg whites and vanilla extract into the stand mixer ingredients until just combined.
Pour the marshmallows into the prepared pan. Sprinkle with powdered sugar. Allow to set at room temperature until set, about 2 hours. Remove from pan, cut into squares. Toss with additional powdered sugar to prevent from sticking together.
Notes
*Open the beer at least two hours before you plan to make the marshmallows, and up to several days in advance. Pour ½ cup into an open container. Loosely cover and refrigerate. Enjoy the reaming beer, since you HAD to open the beer it’s your job to finish the rest.
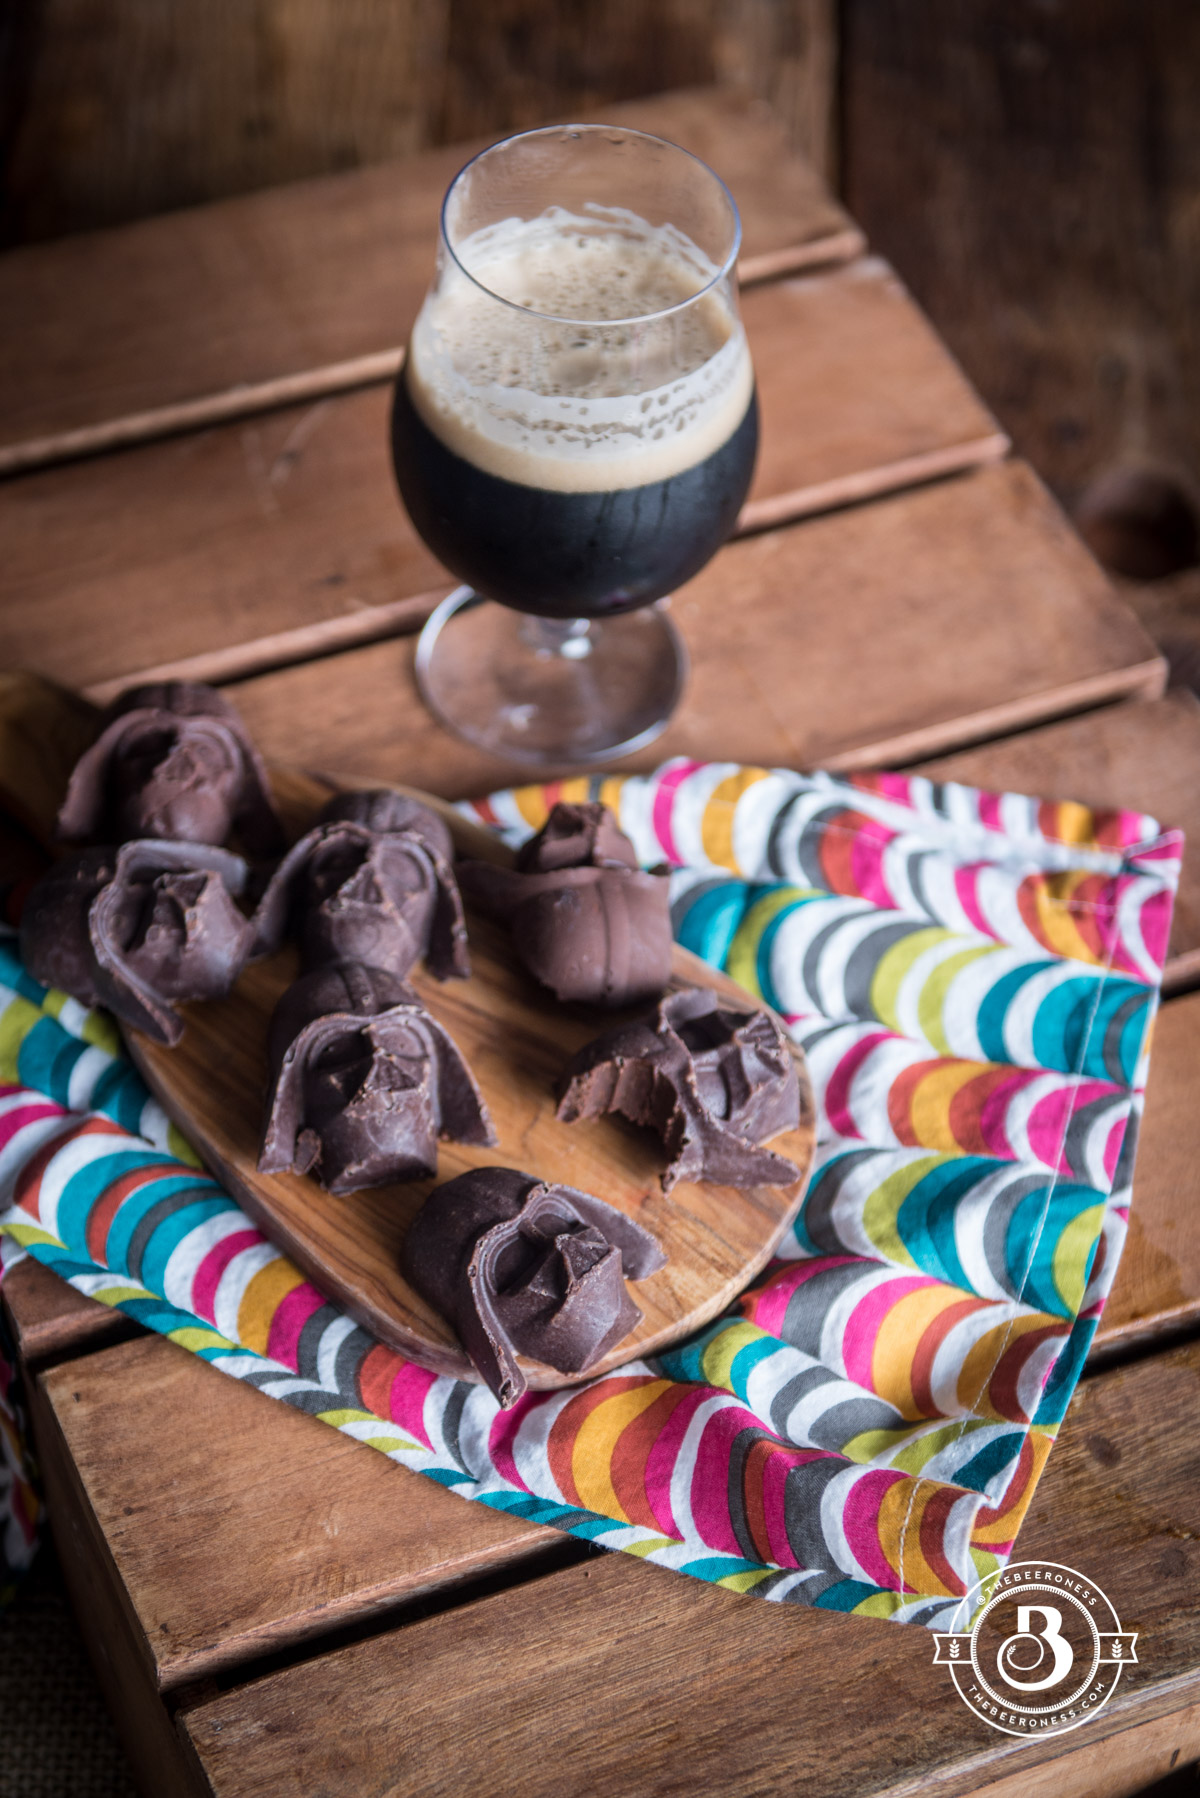
This is ridiculous. I know what you’re thinking: why can’t you just make fudge like a normal person? But I found this silicon Darth Vader mold from that time I made Star Wars cupcakes and you can’t honestly think that I could just put it away and forget about it? Of course not.
And since we’re just entering Barrel-Aged-Beer-Season, as well as Fudge-Making -Season, it just makes sense. If you don’t have a Darth Vader silicon mold (but really, why not? You totally should) you can use any silicone mold. Because fudge is great, but it’s not as fun as Dark Side Fudge, right?
Plus, there’s beer in there. And since Barrel Aged beers come in large bottles and I’m only asking you to pour out 1/4 cup for the homies, I mean for the fudge, then you get to drink the rest. Have I talked you into this yet? Do I need to hone my Jedi Mind Trick skills? How about you make some fudge and we can talk about it.
Add the chocolate, sweetened condensed milk, vanilla extract, beer and salt to the top of a double boiler (or a metal bowl set over a pot of gently simmering water).
Stir over medium-low heat (make sure the water does not boil) until most of the chocolate has melted. Remove from heat, continue to stir until all the chocolate has melted.
Are you ready? Take a deep breath because you don’t have a choice, the holidays and all that goes with them, are upon us. Let’s take a second to inventory this upcoming Q4 on a personal level, shall we? Of course we should, we like doing things like this.
Beer Ricotta Raviolo with Egg and Herb Butter Sauce, time to get fancy!
Plus a book giveaway!
It’s somewhere North of 3 am and we’re walking the winding back country roads of Big Bear, California. Thin dresses swishing in the cool August air as we try to walk back into town from the wedding Linda and I are in the mountains for.
Giggly and drunk on wine and still love-high from the touching vows we’d witnesses, we realize that we’re only "sort of" lost as we try to navigate the dusty walk back, void of any sidewalks or street lamps. Our ride had left hours before we did, and since this isn’t the sort of place that Uber inhabits, we decide that walking back down the mountain is our only option.
Grateful that one of the grooms insisted we wear flats—the more appropriate footwear choice for a mountain wedding over the heels we both reluctantly left in the hotel—we realize that running may be necessary when the only vehicle we’ve seen so far suddenly takes notice of us.
As the semi-truck pulls to a stop near us the driver climbs out of his cab to make his way towards us, and we bolt. In unison, we run towards town and around the bend in the road. Like a desert oasis, we see the hotel. Sprinting towards the doors, we finally stop to catch our breath once inside. We look at each other and burst out laughing. Not sure if we were in any real danger, or if the wine had turned a guy just checking on a flat tire into a sure-threat, we don’t care. We’re safe, slightly drunk, and happy.
Since that day Linda has steadily become one of the most important people in my life. Helping me in ways she can’t even understand through two of the most difficult points in my adult life. From frantic texts at midnight to long talks over bottles of wine, she’s the sort you always want to find solace in when the storm hits, or celebrate alongside when the moments are perfect. Although meeting her, years before the Big Bear wedding, I was immediately intimidated.
At a food conference in Los Angeles, she seemed to just appear in front of me. Tall, beautiful, wickedly smart, and incomprehensibly talented, she’s the sort you should be intimidated of. With a rapidly growing following and several TV shows and appearances under her belt, she’s the type that can pull of being pretentious and snobby. She could even get away with it, if she wanted. But the thing about her, possibly the most endearing part, is that there isn’t a trace of that in her, not one bit. She has a heart of gold, a passion for social justice, and she connects with damn near everyone. She won’t just remember you, she’ll remember the story you told her three years ago about your mom being in the hospital and she’ll ask you about it. She is just so likable. She’s also charmingly inappropriate, and wildly unpredictable. Which just makes you like her more.
She’s spent the better part of the past two years pouring herself and her immense knowledge of pasta into her new book, Pasta, Pretty Please, and it’s beautiful. If you don’t follow her on Instagram, you’re missing out, it’s the most impressive feed you’ll see.
I’m giving away a signed copy of the books that won’t just teach you how to make pasta, it will make you fall in love with it. You can enter on Instagram. Don’t have an Instagram? Share this post on Facebook (make sure it’s public so that I can see!) and post a link to your Facebook post in the comments below.
Linda has offered to sign the book for you, or Linda has also offered the option for her to sign your boobs, or both if you’re up for it.
Beer Ricotta Raviolo with Egg and Herb Butter Sauce
Adapted from Pasta, Pretty Please by Linda Miller Nicholson
3cupswhole milkdo not use Ultra-Pasterized, it won’t work
1cupheavy cream
½teaspoonsalt
1/3cupSaison beerPlus 2 tablespoons divided
3tablespoonsApple Cider Vinegaryou can also use lemon juice, or a combination of the two
For the Filling:
6large egg yolks
For the Sauce:
½cupunsalted butter
2clovesgarlicminced
2large leaves sageminced
Leavesfrom 1 sprig rosemarychopped
½cupchicken or vegetable broth
Salt to tastethe amount of salt you need will be dependent on the broth you use
¼cupfresh grated parmesan
Instructions
Make the ricotta:
In a pot over medium high heat (do not use an aluminum pan) add the milk, cream, salt and 1/3 cup beer.
Clip a cooking thermometer onto the side of the pan.
Bring the liquid to 190°F degrees, stirring occasionally to prevent the bottom from scorching. Keep a close eye on it, the liquid reaches and passes 190 very quickly and you don’t want it rising above 200.
Remove from heat, add the 2 tablespoons beer and then the vinegar (or lemon juice) and stir gently once or twice. It should curdle immediately. Allow to sit undisturbed for about 5 minutes.
Line a large strainer with 1 or 2 layers of cheesecloth; place the strainer in the sink over a large bowl.
Pour the ricotta into the strainer and allow to drain for 15 to 30 minutes and up to an hour (the longer it drains, the firmer the consistency)
Place in an air-tight container and store in the fridge, can be made up to 3 days in advance.
Make the green dough (skip if you aren't making the decorations):
In a large saucepan over high heat, bring the salt, baking soda and 8 cups water to a boil. Add the parsley and boil it for 15 seconds, remove it and place in a strainer, run under cold water to blanche. Drain and press out the water.
Add the parsley to a blender along with the eggs, blend first on low speed, then increase the speed and green liquid until smooth.
Strain the puree with a fine mesh strainer, reserving the green liquid and discarding the pulp.
In the bowl of a stand mixer fitted with a paddle attachment, combine the flour and puree. Mix on low speed until a ball of dough forms. Raise the speed to medium and continue to knead for 3 minutes (or by hand for 6-8 minutes) until the dough is smooth and elastic. Cover the ball of dough with plastic wrap and allow to rest at room temperature for 30 minutes (you can also refrigerate the well-wrapped dough for up to three days).
Make the red-orange dough:
In the bowl of a stand mixer fitted with a paddle attachment, combine the flour, eggs and tomato paste. Mix on low speed until a ball of dough forms. Raise the speed to medium and continue to knead for 3 minutes (or by hand for 6-8 minutes) until the dough is smooth and elastic. Cover the ball of dough with plastic wrap and allow to rest at room temperature for 30 minutes (you can also refrigerate the well-wrapped dough for up to three days).
*(skip to step 17 if you aren’t making a decoration) Cut the green dough into four equal sized pieces. Roll one piece out several times to make it thin enough to pass through your dough roller (wrap up the remaining pieces so they don’t dry out).
Pass through your dough roller on the widest setting, then again. Close the dough roller one more stop to make it thinner (one away from the widest setting), pass the dough through twice. Fold into thirds, like a letter going into an envelope. Pass through your dough roller again with the folded ends on the sides (this will make the sides of the dough sheet straight rather than jagged).
Continue to pass through the dough roller stopping down to a thinner setting every two passes until you reach halfway between the thinnest and thickest setting.
Using a cookie cutter, cut out 6 of your desired decoration shapes, set aside while you work on the rest of the Raviolo.
Cut the red-orange dough into four equal sized pieces. Roll one piece out several times to make it thin enough to pass through your dough roller (wrap up the remaining pieces so they don’t dry out).
Pass through your dough roller on the widest setting, then again. Close the dough roller one more stop to make it thinner (one away from the widest setting), pass the dough through twice. Fold into thirds, like a letter going into an envelope. Pass through your dough roller again with the folded ends on the sides (this will make the sides of the dough sheet straight rather than jagged).
Continue to pass through the dough roller stopping down to a thinner setting every two passes until you reach two stops away from the thinnest setting.
Repeat for one more piece of red-orange dough.
Make the Raviolo:
Lay the pasta sheets on a flat surface lightly dusted with flour.
If using a decoration, brush the top of one sheet of pasta with water. Brush the bottom side of the green pasta decoration with water. Place the decorations evenly spaced every 6-8 inches on the sheet of dough. Gently roll with a rolling pin to press together and adhere.
Add the ricotta to a piping bag or a Ziplock bag with the corner cut off.
Make circles of ricotta (a ricotta “nest”) on the blank pasta sheet evenly spaced every 6-8 inches. Nests should be about 3 inches across with a well big enough to just nestle an egg yolk into.
Place one unbroken yolk into each nest. Brush the pasta with water around each nest.
Carefully move the sheet of pasta with the green decorations on top of the sheet with the ricotta nests. Line the sheet up so that the green decorations are directly above the egg yolks.
Press firmly to adhere the top sheet of pasta to the bottom, taking care to remove all the air and seal the dough together.
Cut each Raviolo between each nest making 6 individual Raviolo. Allow to dry for about 15 minutes, flip over and allow the bottom to dry for about another 10 minutes.
Prepare a large pot of salted boiling water.
In a large saucepan melt the butter over medium heat. Stir in the garlic, sage and rosemary, cook for about 5 minutes.
Stir in the broth, cooking until warmed, salt to taste. Allow the sauce to simmer gently but not boil.
One at a time gently add the Raviolo to the boiling water, boil for 2 minutes. Using a large slotted spoon or a Spider, gently remove and allow all the water to drain off. Add to the sauce, cooking for an additional 3 minutes in the sauce while gently spooning the hot butter on top of the Raviolo.
Add to a plate with a spoonful of sauce, top with a sprinkle of parmesan cheese, serve immediately.
Notes
The green pasta decoration is optional. I used a hop flower cookie cutter, but any cookie cutter will do. Feel free to skip this step, it's mostly asthetic and skipping it will not diminish the overall flavor of the dish.
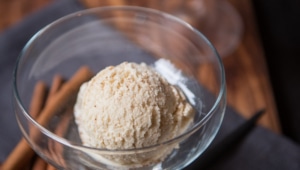
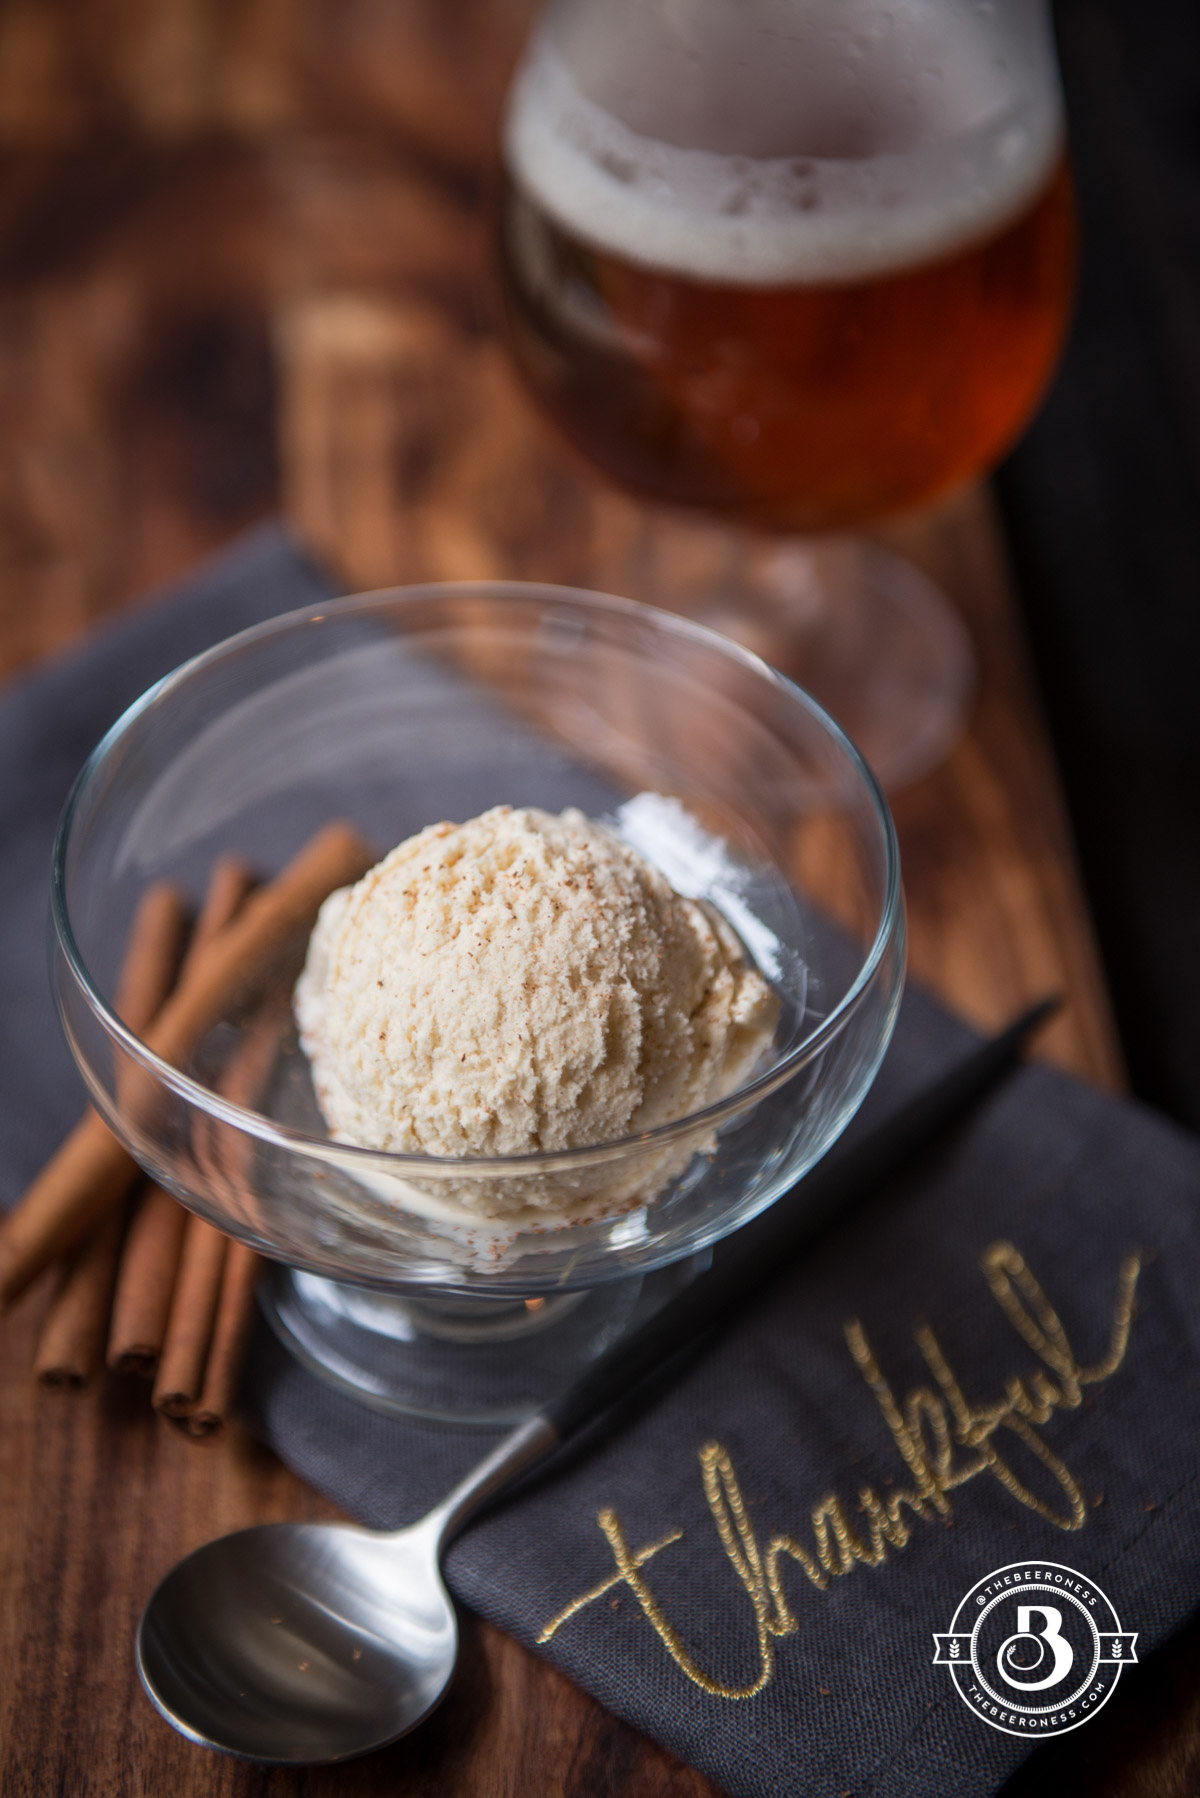
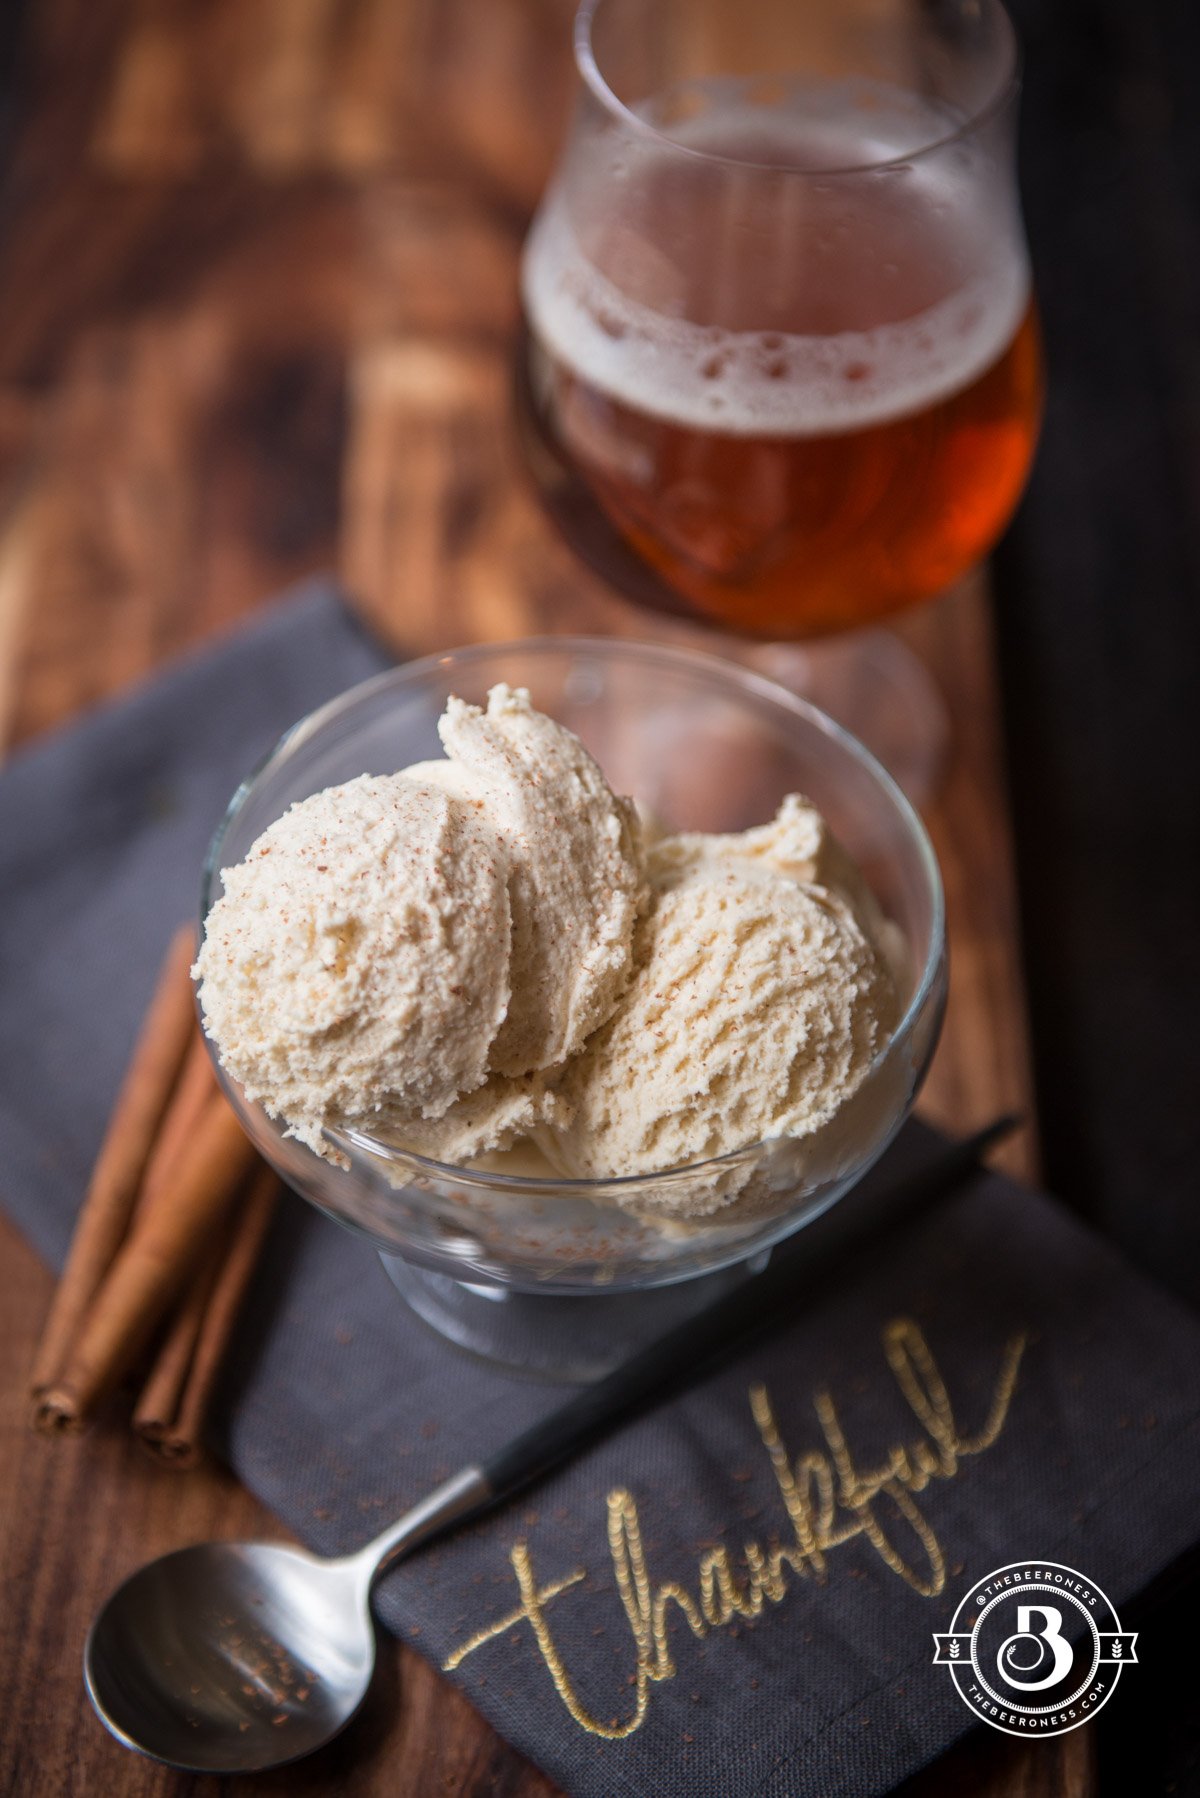
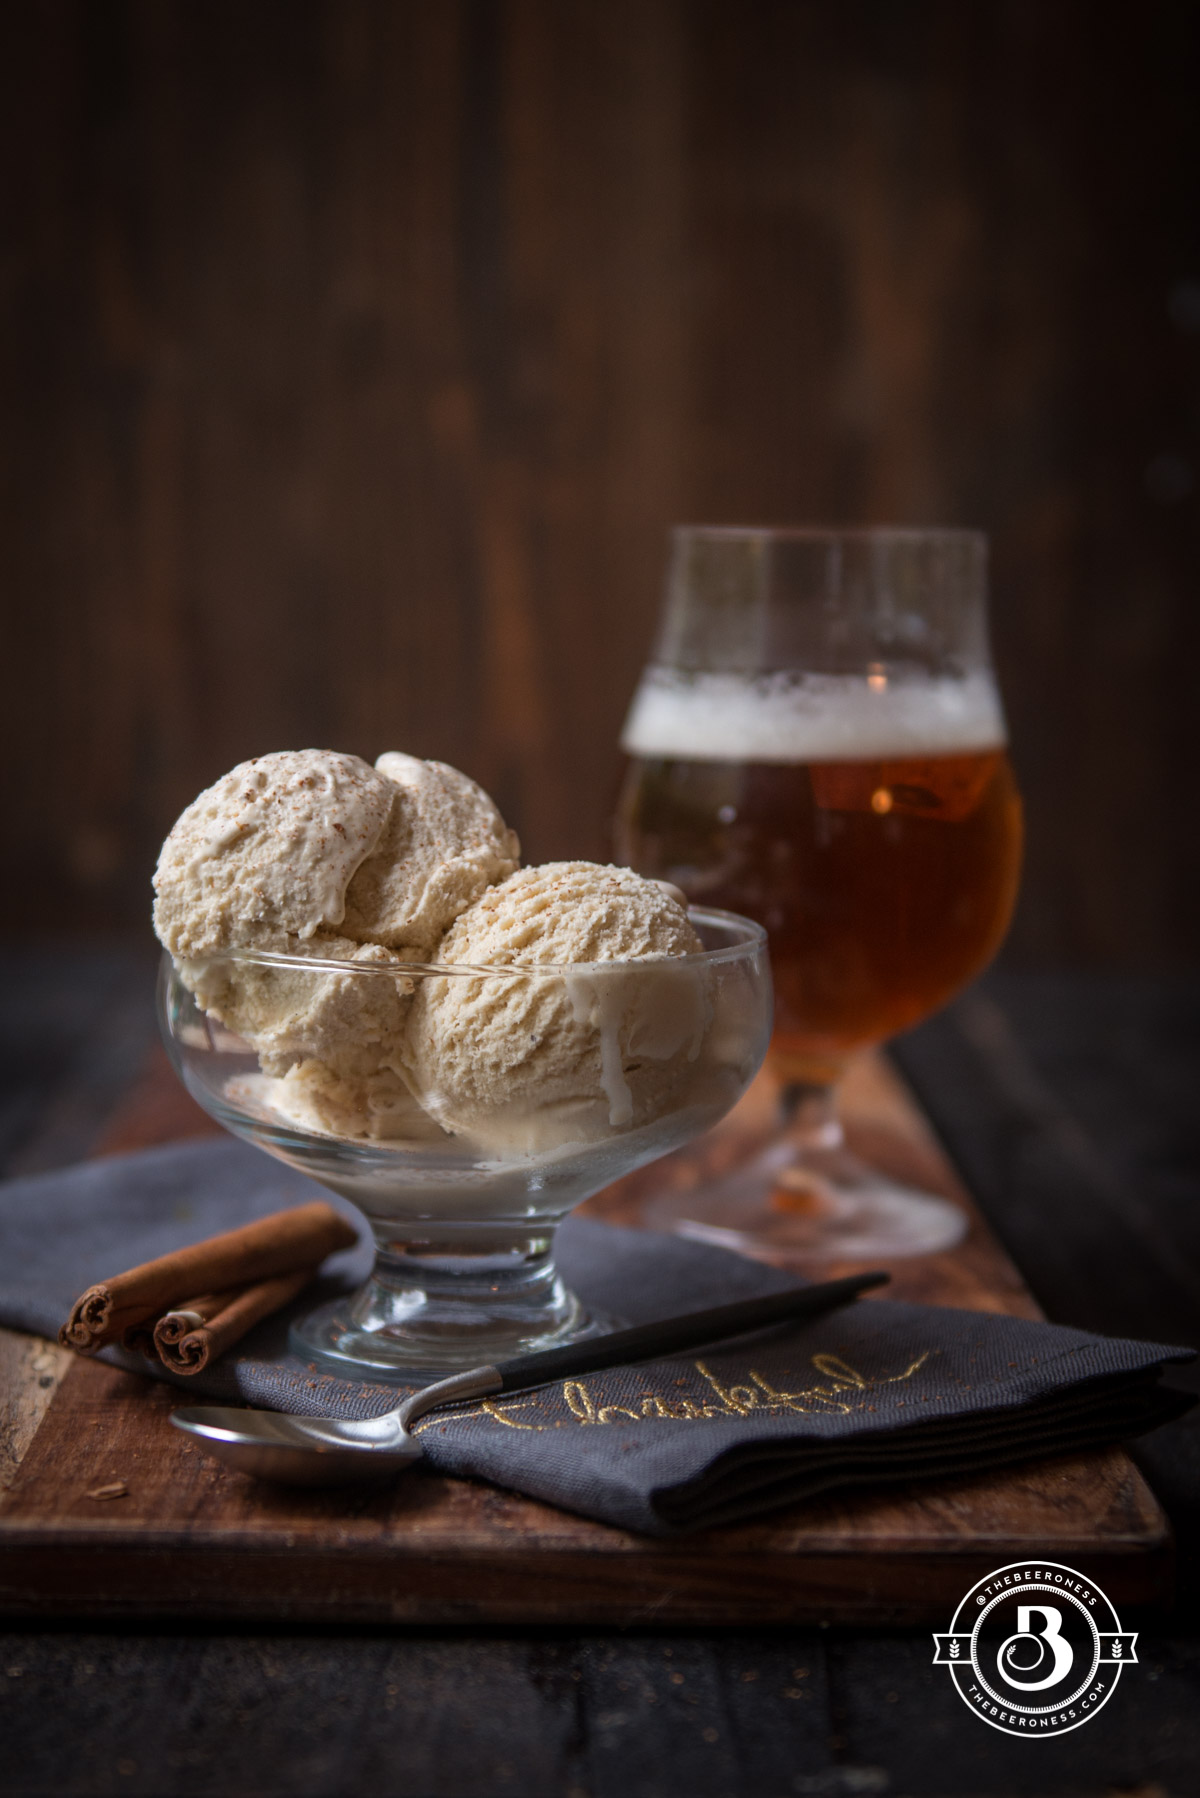
I’m here to change your mind, to flip your vote. I know, I know, eggnog is gross, right? Yeah, I thought so too. Then I realized that it’s not. It’s actually quite amazing, it’s basically boozy, drinkable ice cream. IF you make it right.
Most importantly: back off the nutmeg. Because the difference between a teaspoon of "fresh grated nutmeg," with its big, fluffy, air-filled piles, it’s about one quarter the amount you’d use if you just scoop it out of the McCormick bottle (jar? tin? container? What the heck do you call those things, anyway?)
Tl;DR: if a recipe calls for "fresh grated nutmeg" and you pssshhh all over that because you just want to scoop it out of the pre-ground tub (is that the word?), use 1/4 of what it calls for or you’ll wreck your dish.
Now that we’ve discovered why you didn’t like that one batch of nutmeg juice your aunt used to make, we can all agree that eggnog is amazing. Oh, and so is ice cream, and beer, obviously.
What beer should you use? Great question! I’m so glad you asked, let’s talk about that. Malty. Always a malty beer (back away from the IPA’s). I’ve done this a few times, this beer-ed up nog situation (I know, you’re shocked by this news, I’ll give you a second to recover).
Here are the undisputed reigning champs of beer-nog: Winter Ales (as long as it isn’t one of those winter IPAs), and Barleywines. Both are heavy on the malt, and full of those clove, cinnamon, spice notes that go so well in our boozy ice cream.
Sure, you can use a pre-made version. Or a leftover eggnog from your last nog endeavor. For an ice cream base, it’s completely fine. Want my scratch beer-nog recipe? Here it is: Pub Nog.
Just use a beer you love, a beer with high ABV and tons of malt. You’ll love it.
3cups730g prepared eggnog (homemade or store bought)
1cup240g heavy cream
½cup100g brown sugar
½teaspooncinnamon
1teaspoonvanilla extract
¾cup6oz winter ale beer or Barleywine
Instructions
Stir together all ingredients.
Churn in ice cream maker according to manufactures specifications until it reaches a soft serve consistency. This can take up to 20 minutes; the ice cream base should more than double in size (of all the ice cream recipes I make, this one takes the longest to reach this stage. Just keep allowing the ice cream to churn until it’s more than doubled in size).
Place in an airtight container, freeze until set, about 3 hours.
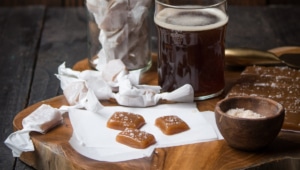
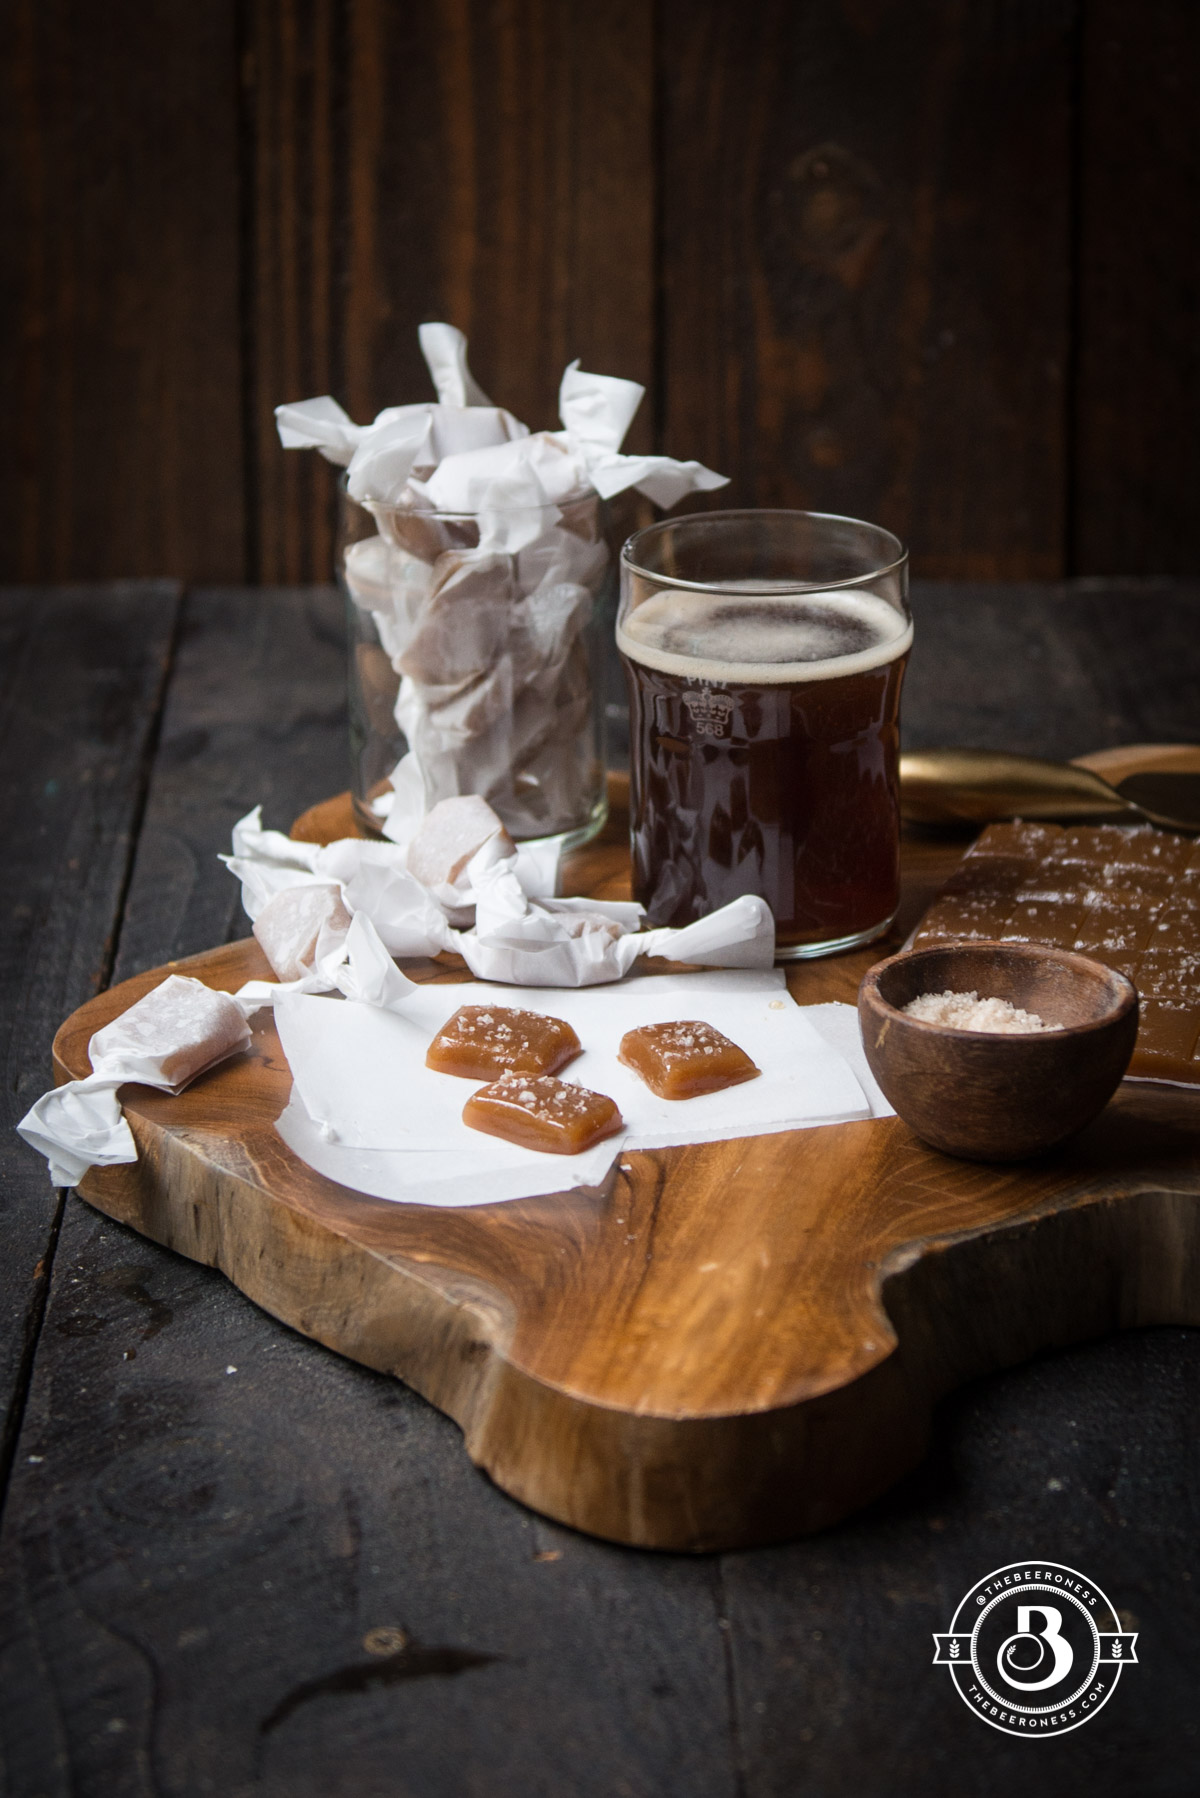
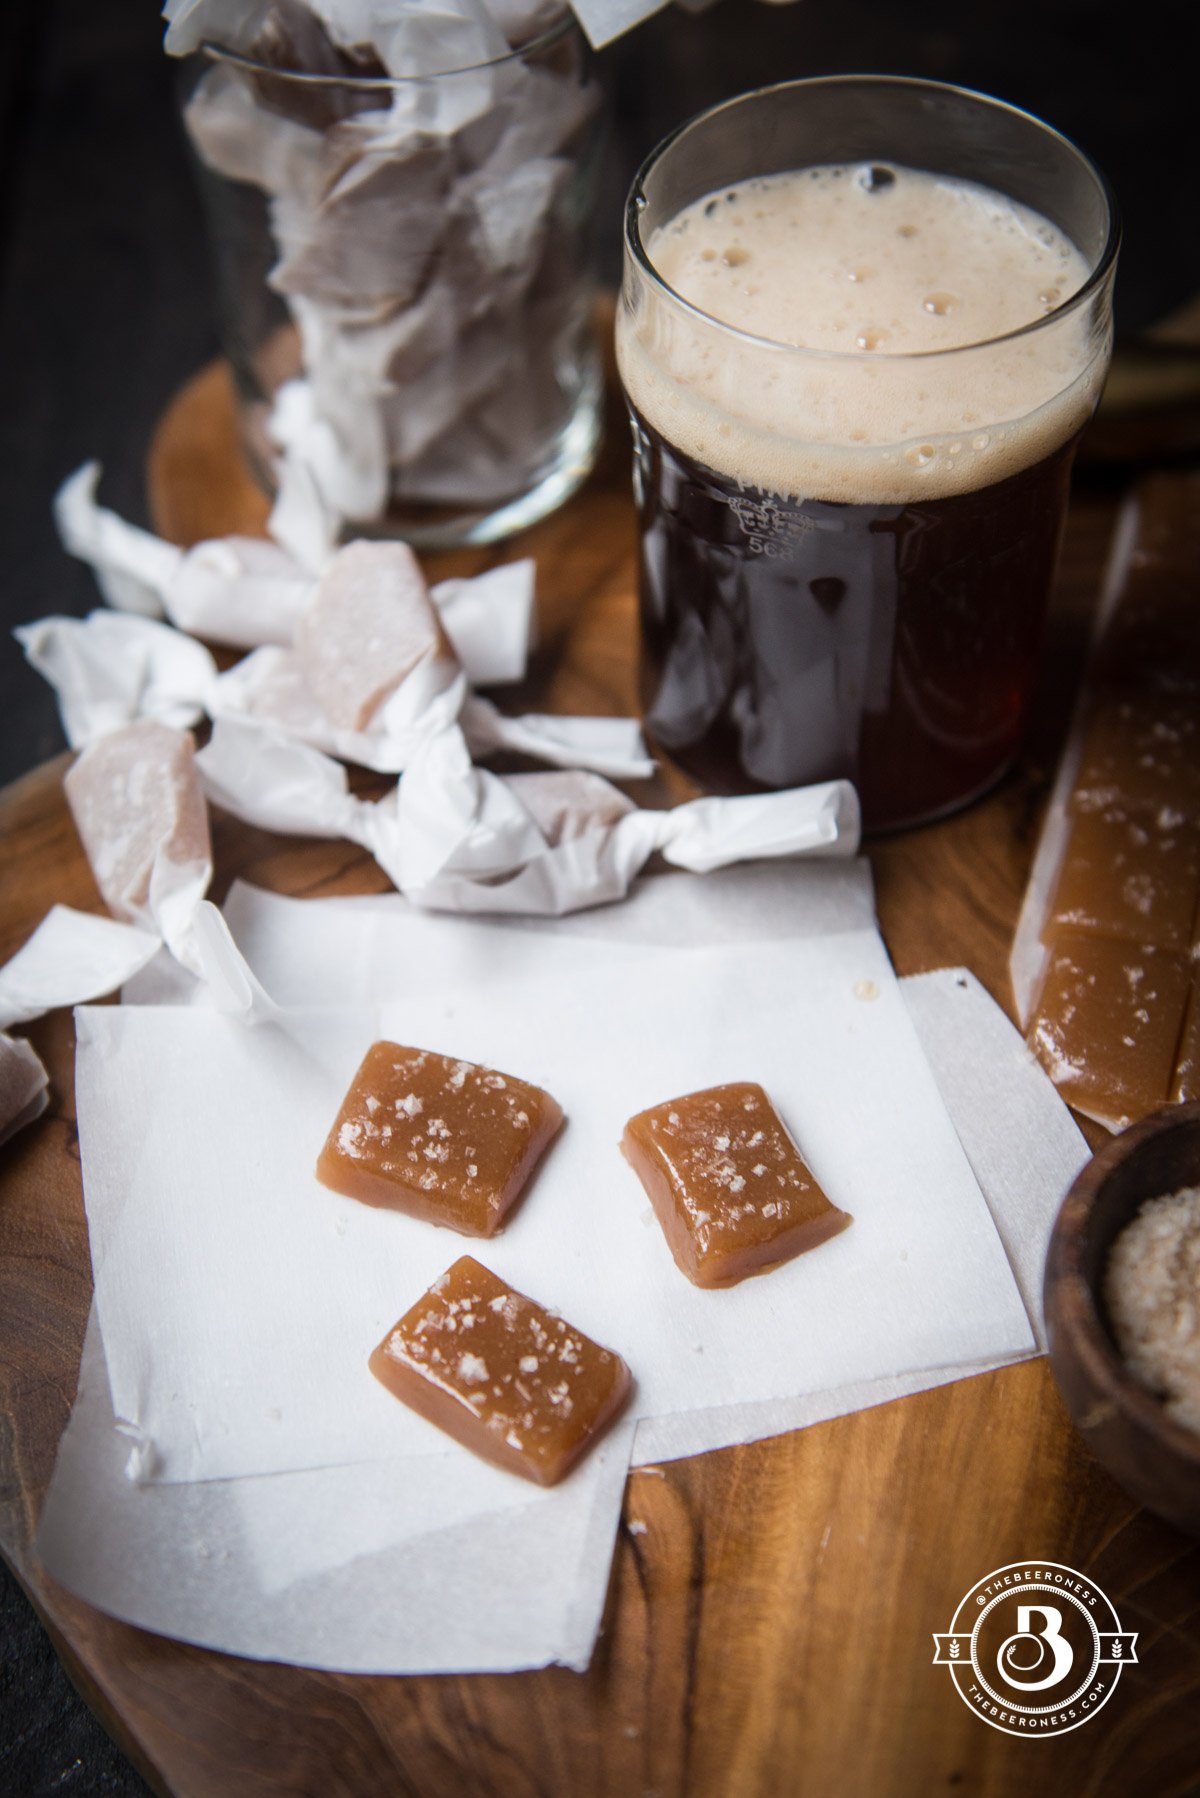
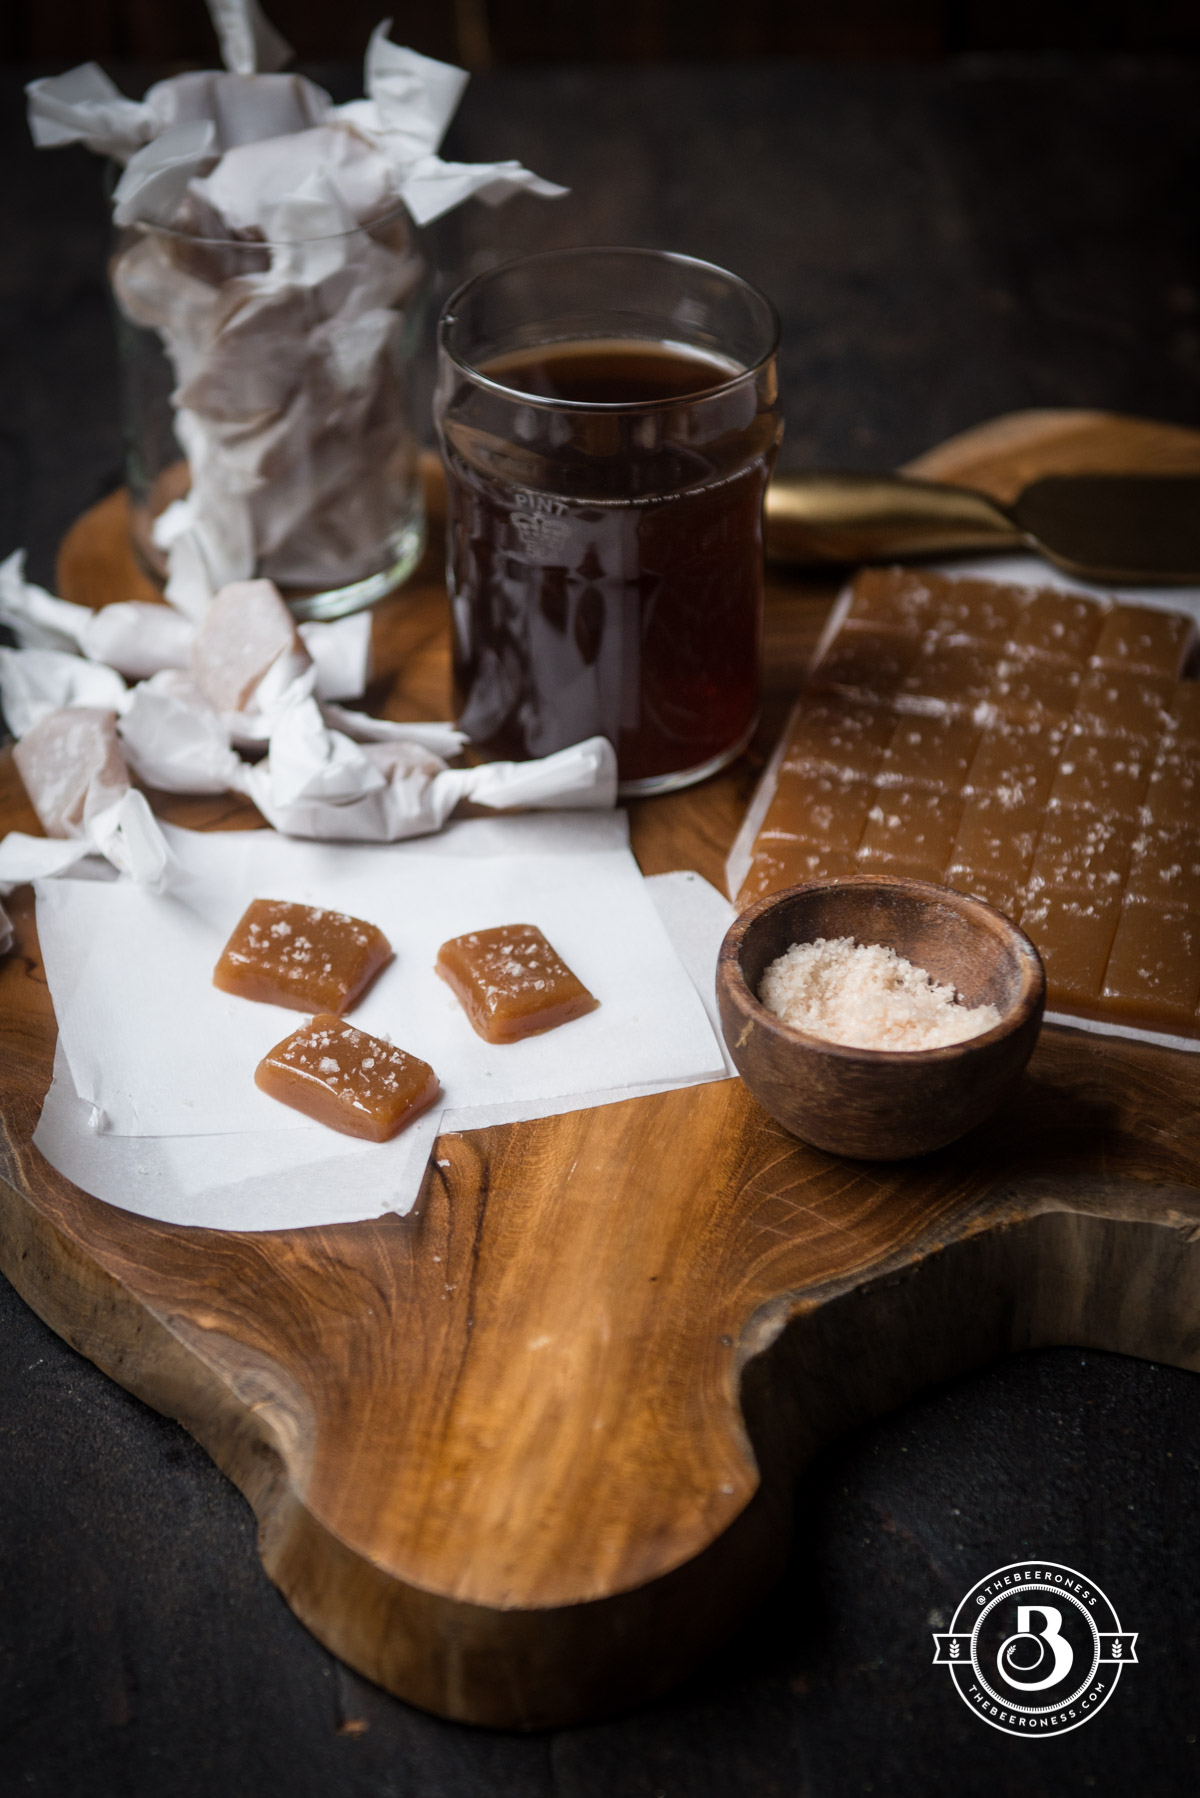
Wild Ale Salted Caramel Squares. 15-minutes and these are good to go!
This is what happens when I decide to give up sugar for a while.
I’m completely committed to the idea, and then I decide what I really need to do is make a whole batch of beer-infused caramels because that makes sense RIGHT after Halloween, obviously.
But then I decide to give them away (you know, because no one I know has WAY too much candy already), but before I do I need to eat some to figure out if they’re good or not. Then I eat more, you know, just to be sure. Which is a total lie because I like lying to myself about sugar consumption on a regular basis. I always get away with it, I’m an excellent self-liar. Although I’m terrible at lying to humans who aren’t me, I’m way too transparent.
Try it, ask me to lie to you about something I really want to lie to you about and you’ll be able to see right through me. No, I don’t like those shoes but I like you and I don’t want to hurt your feelings. No, I wasn’t ignoring your text, I just, ummm, there was… a bear in my yard?….and he was thirsty….
That’s how you know this is actually a really excellent use of 15 minutes, and completely delicious: I can’t lie to you. They’re also a great way to make holiday gifts and pretend like the batch only made 30 and not 60 because you would never just sit in your kitchen eating 30 caramels by yourself. It was that bear in your yard, he was also hungry…
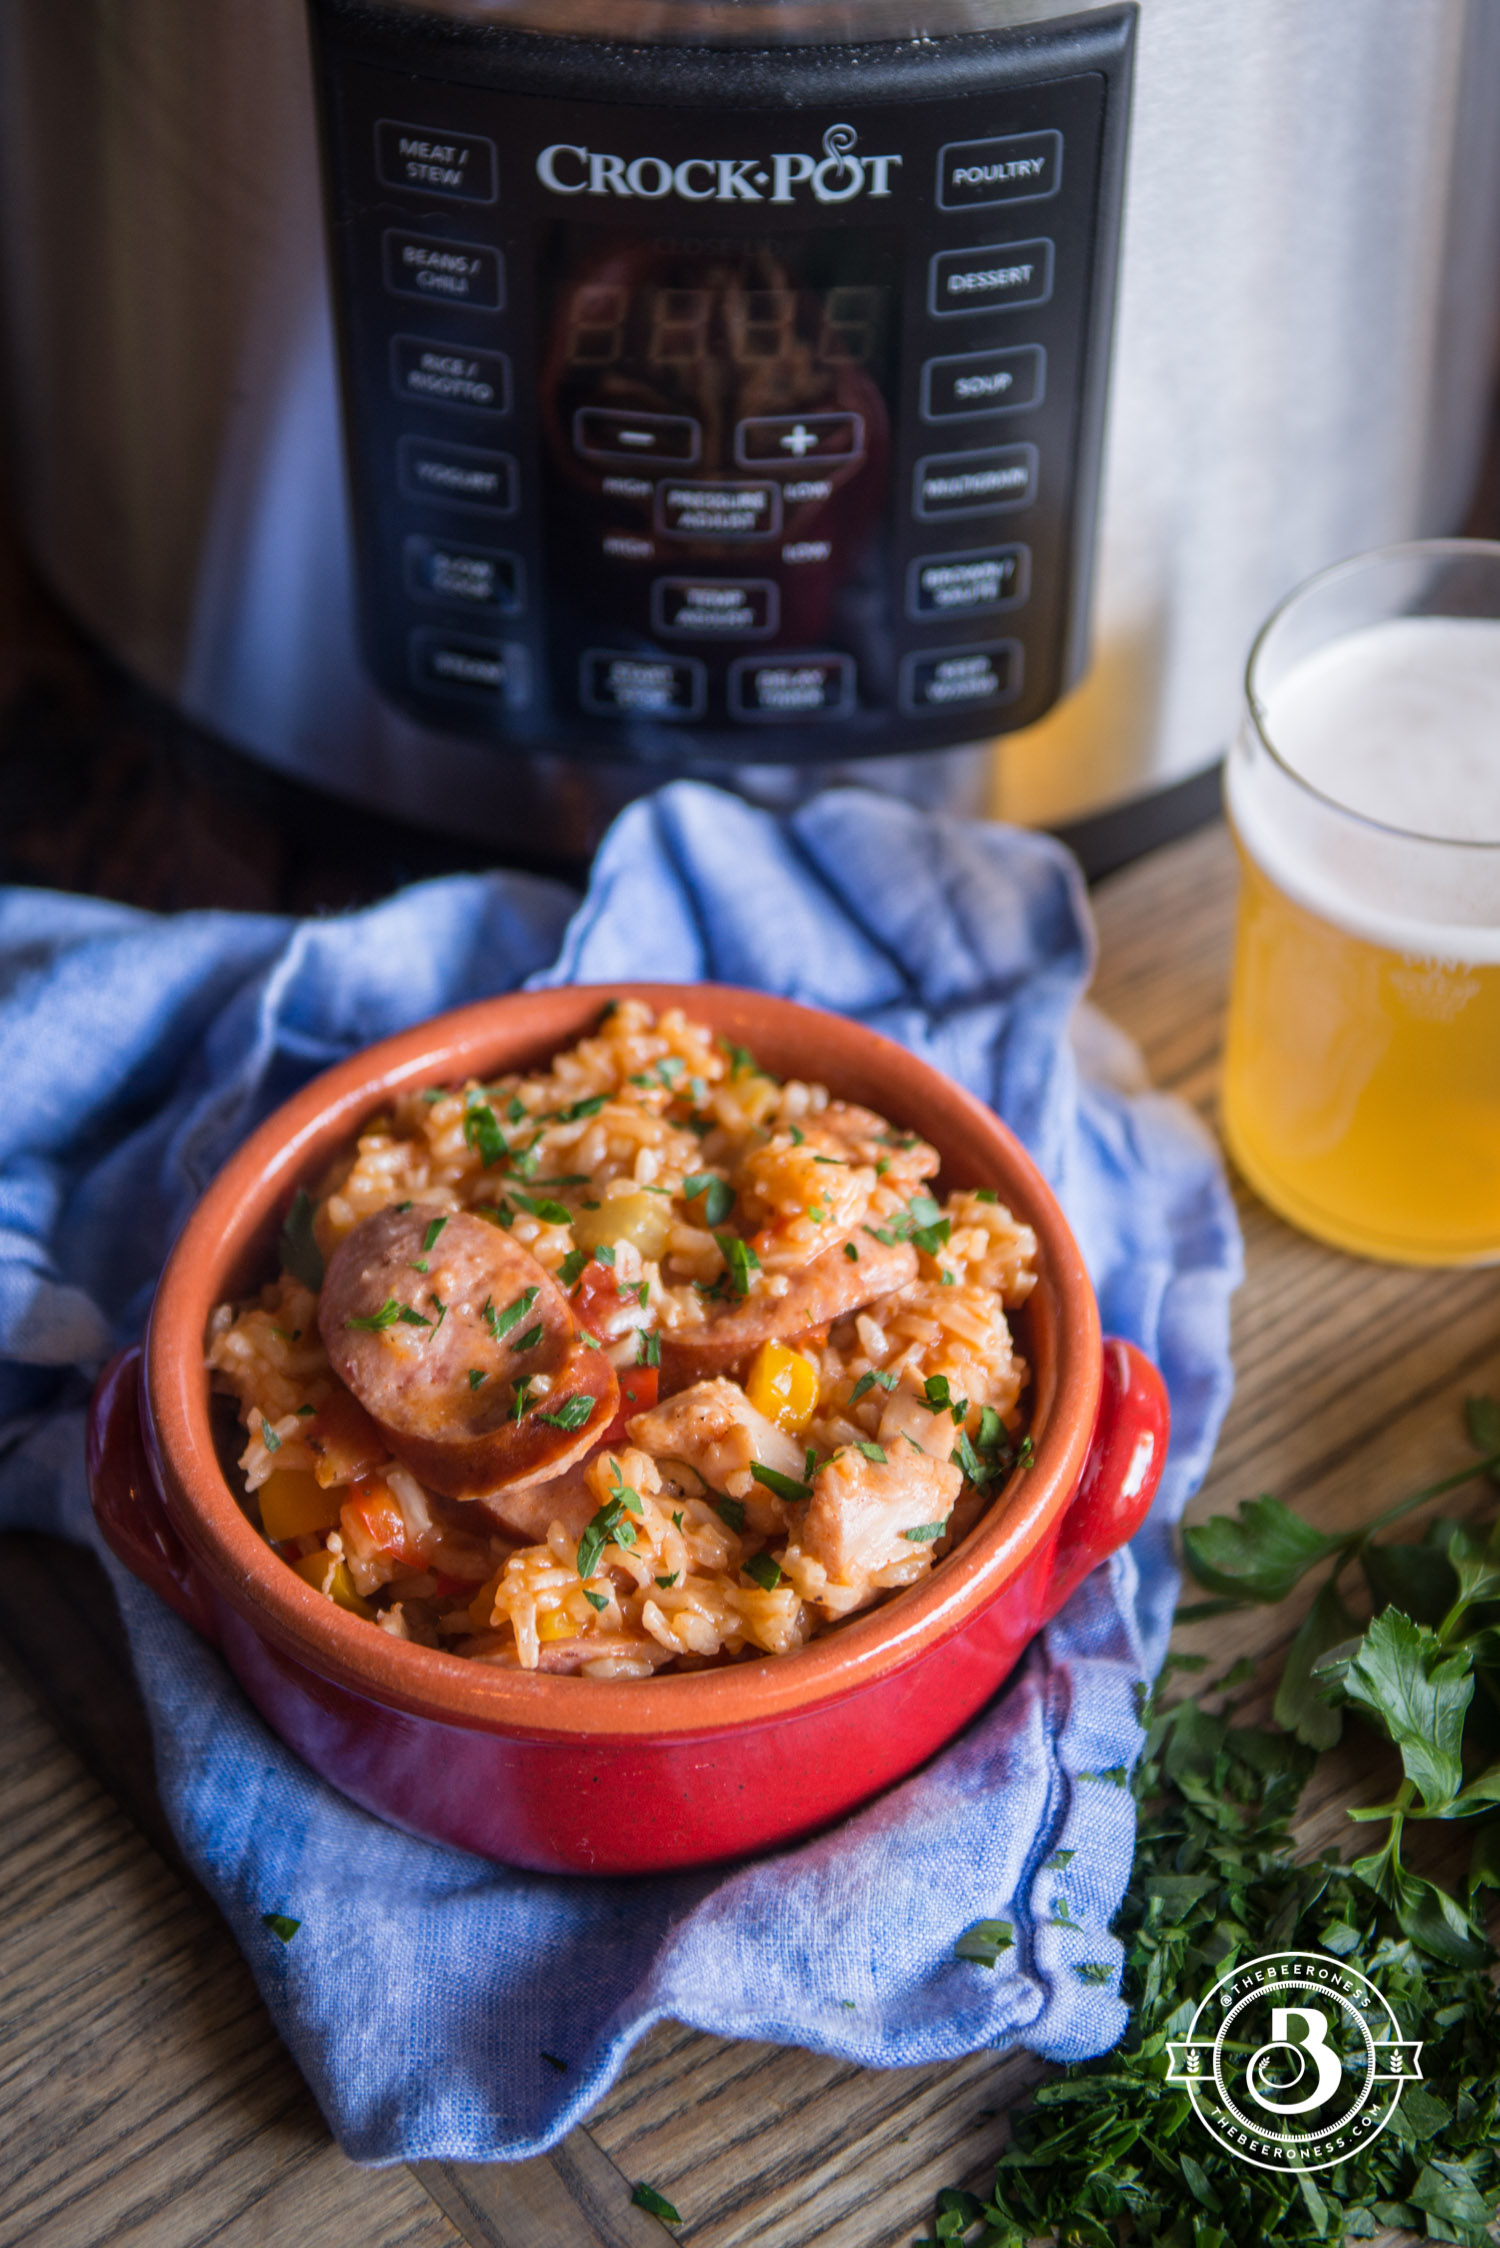
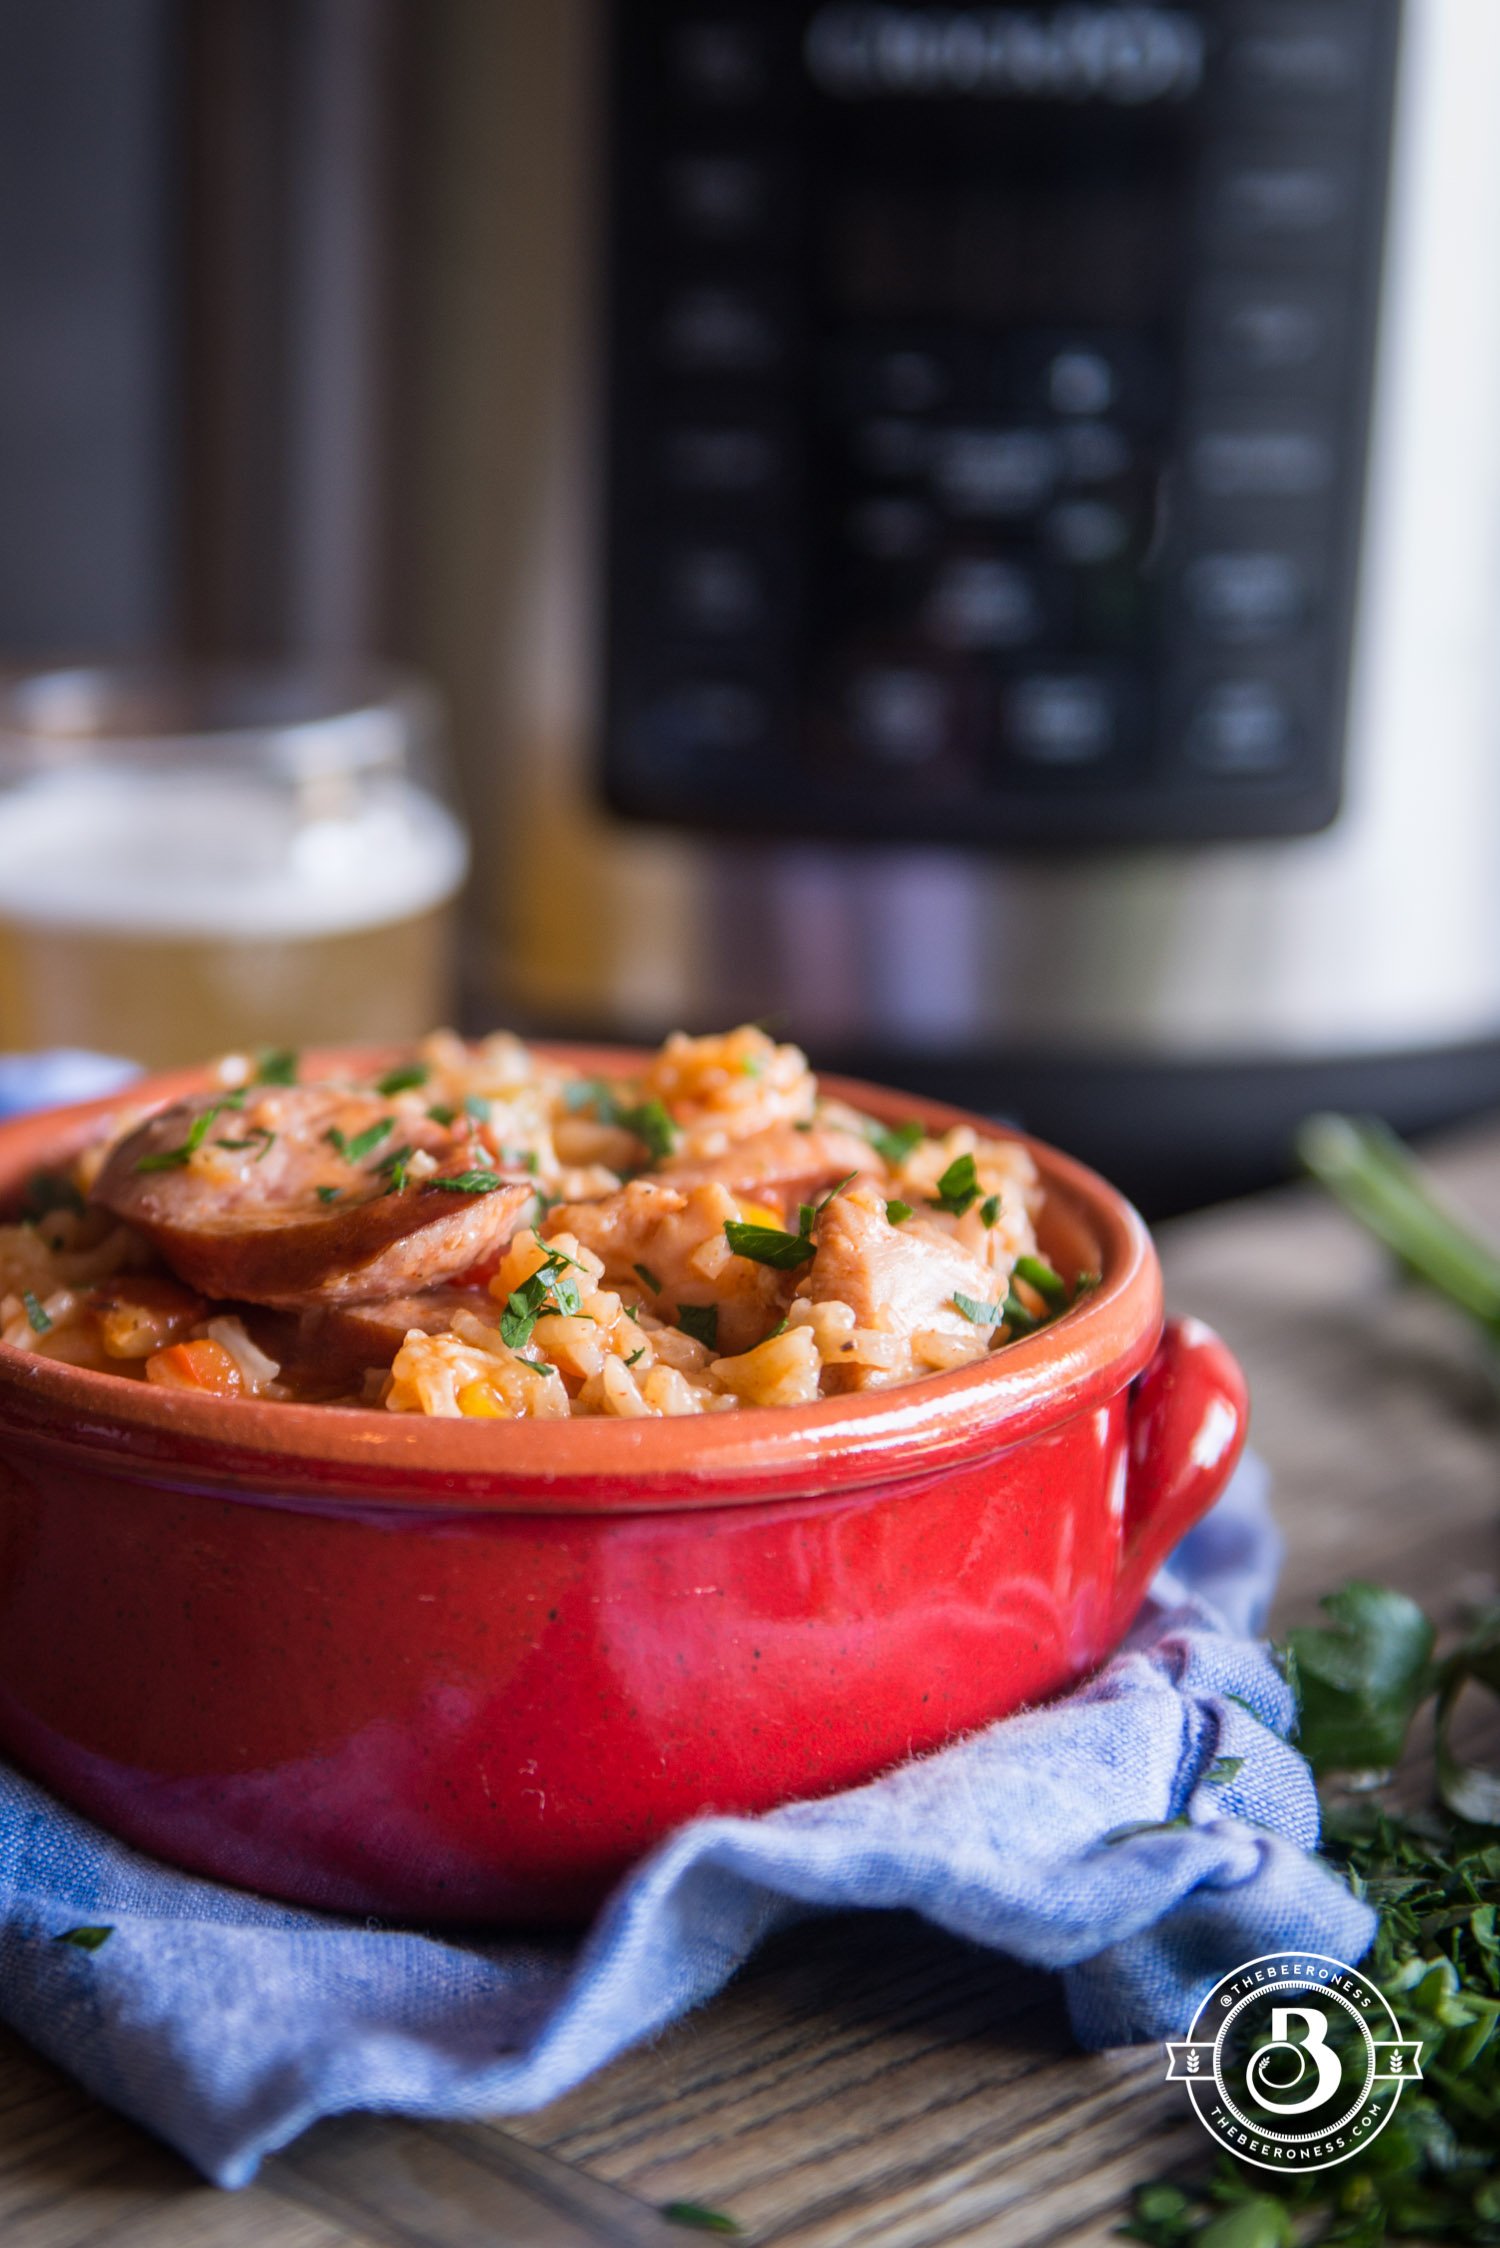
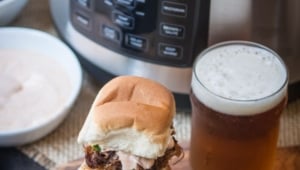
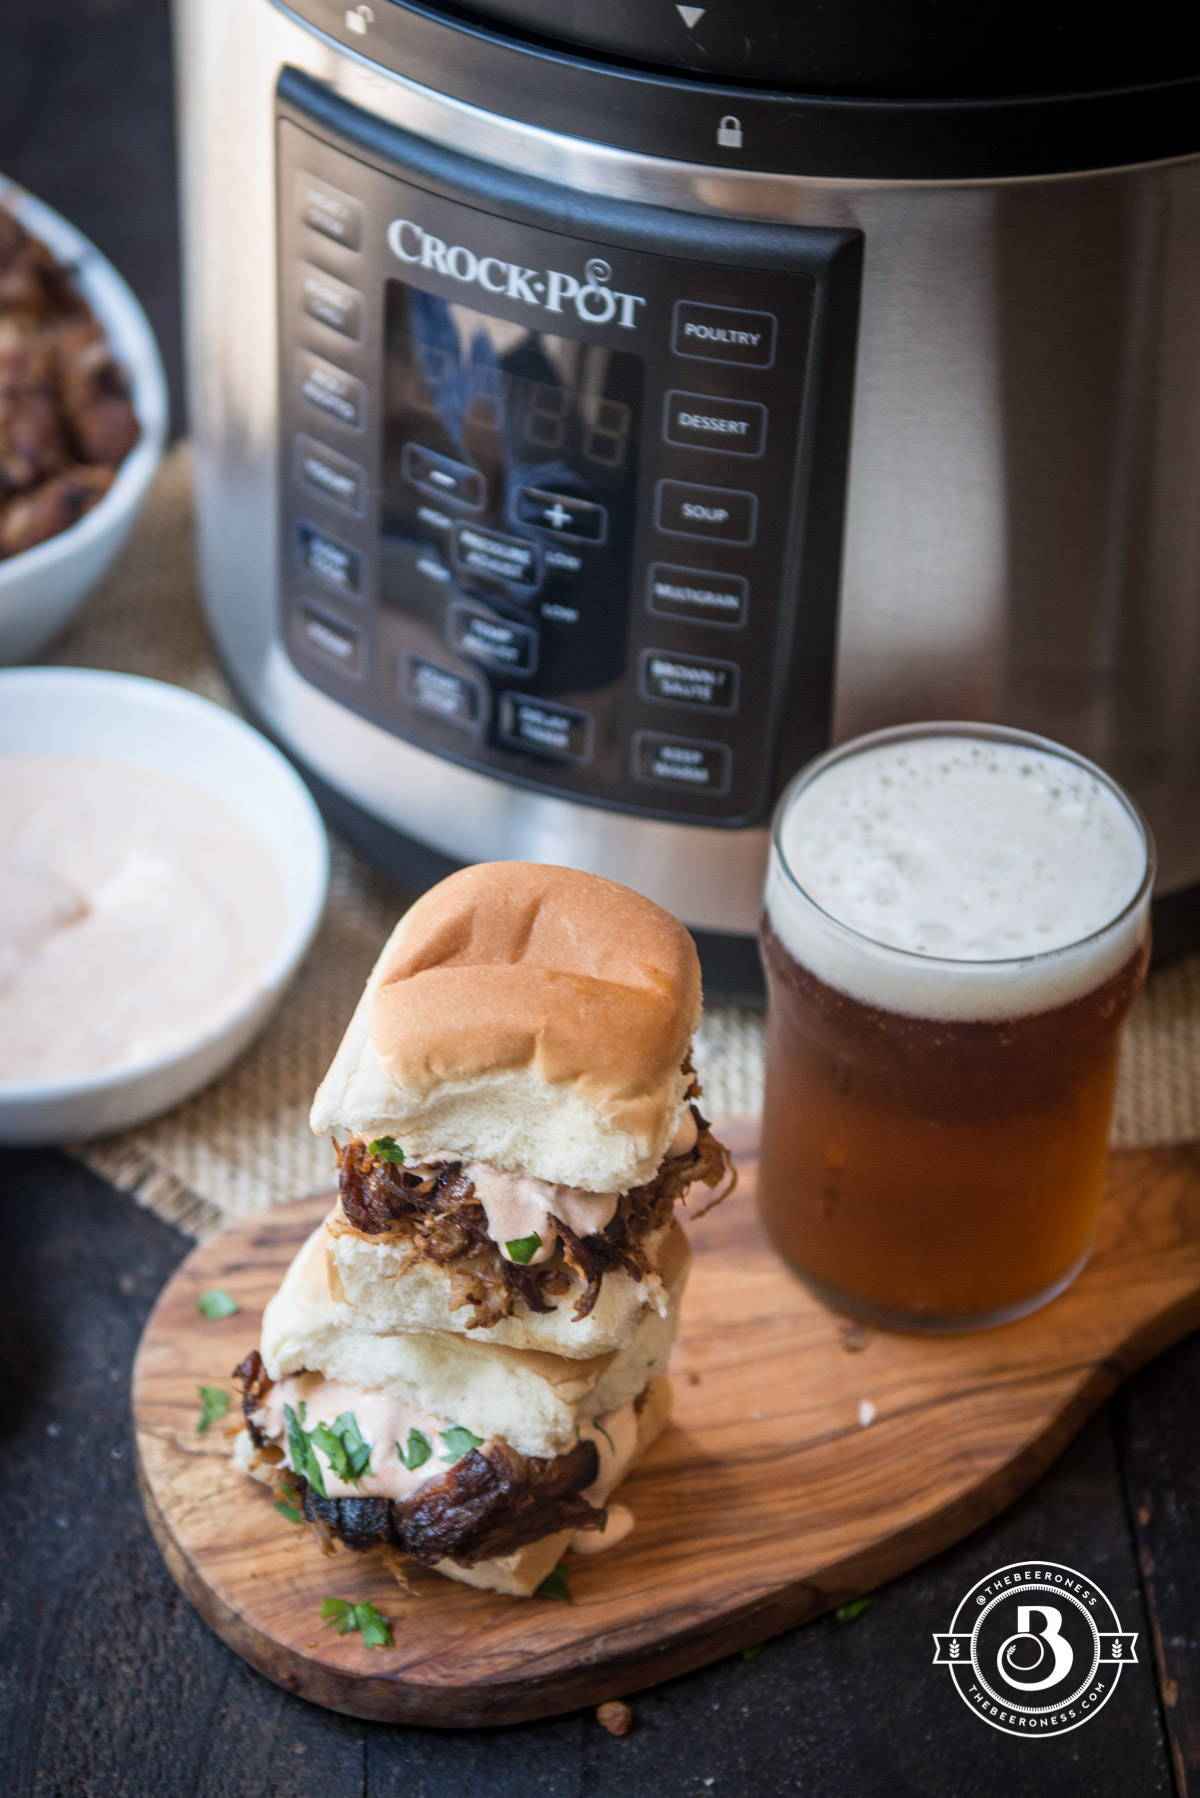
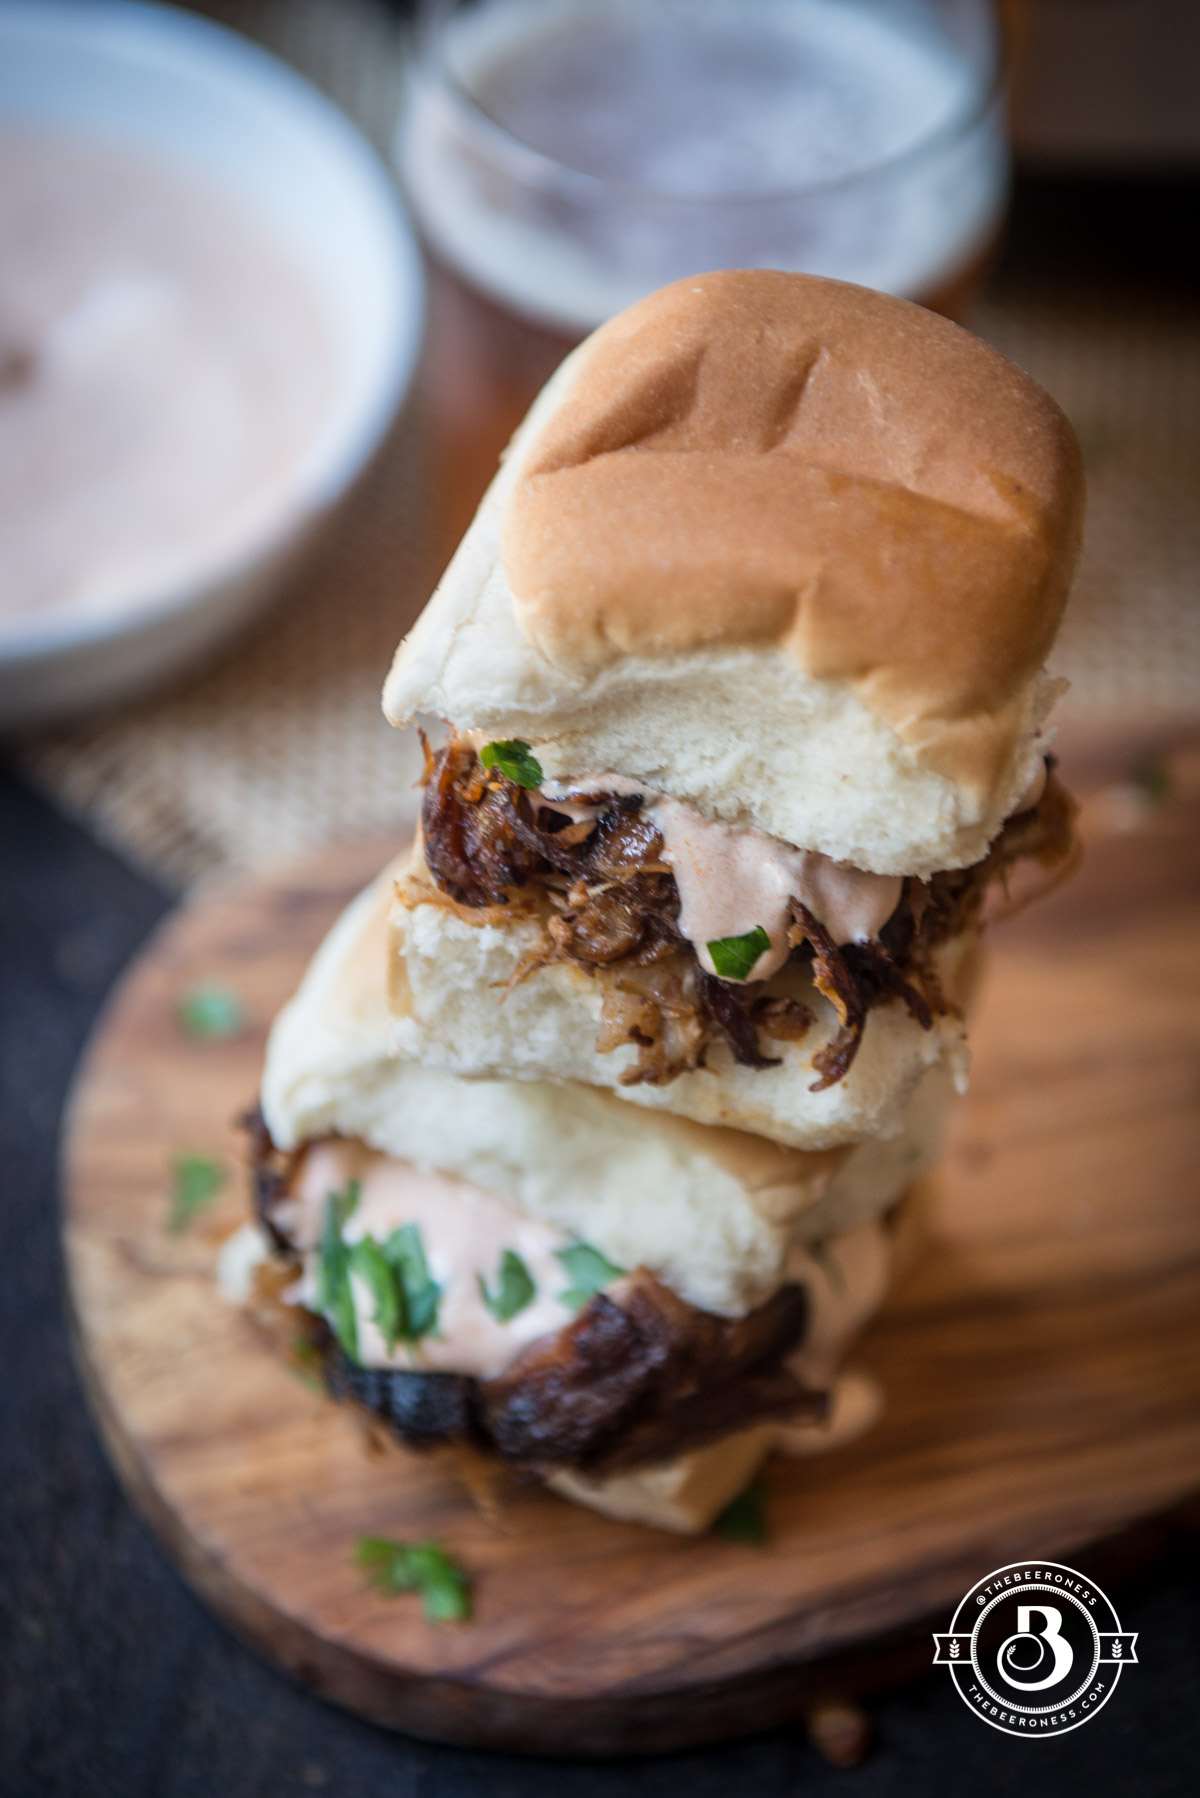
This post was sponsored by the Crock-Pot brand. Partnerships with The Beeroness and outside companies only occur when the company’s products are ones I use and enjoy myself. All ideas and opinions are my own.
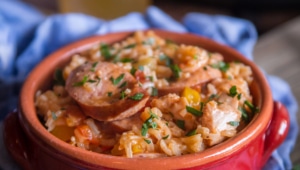
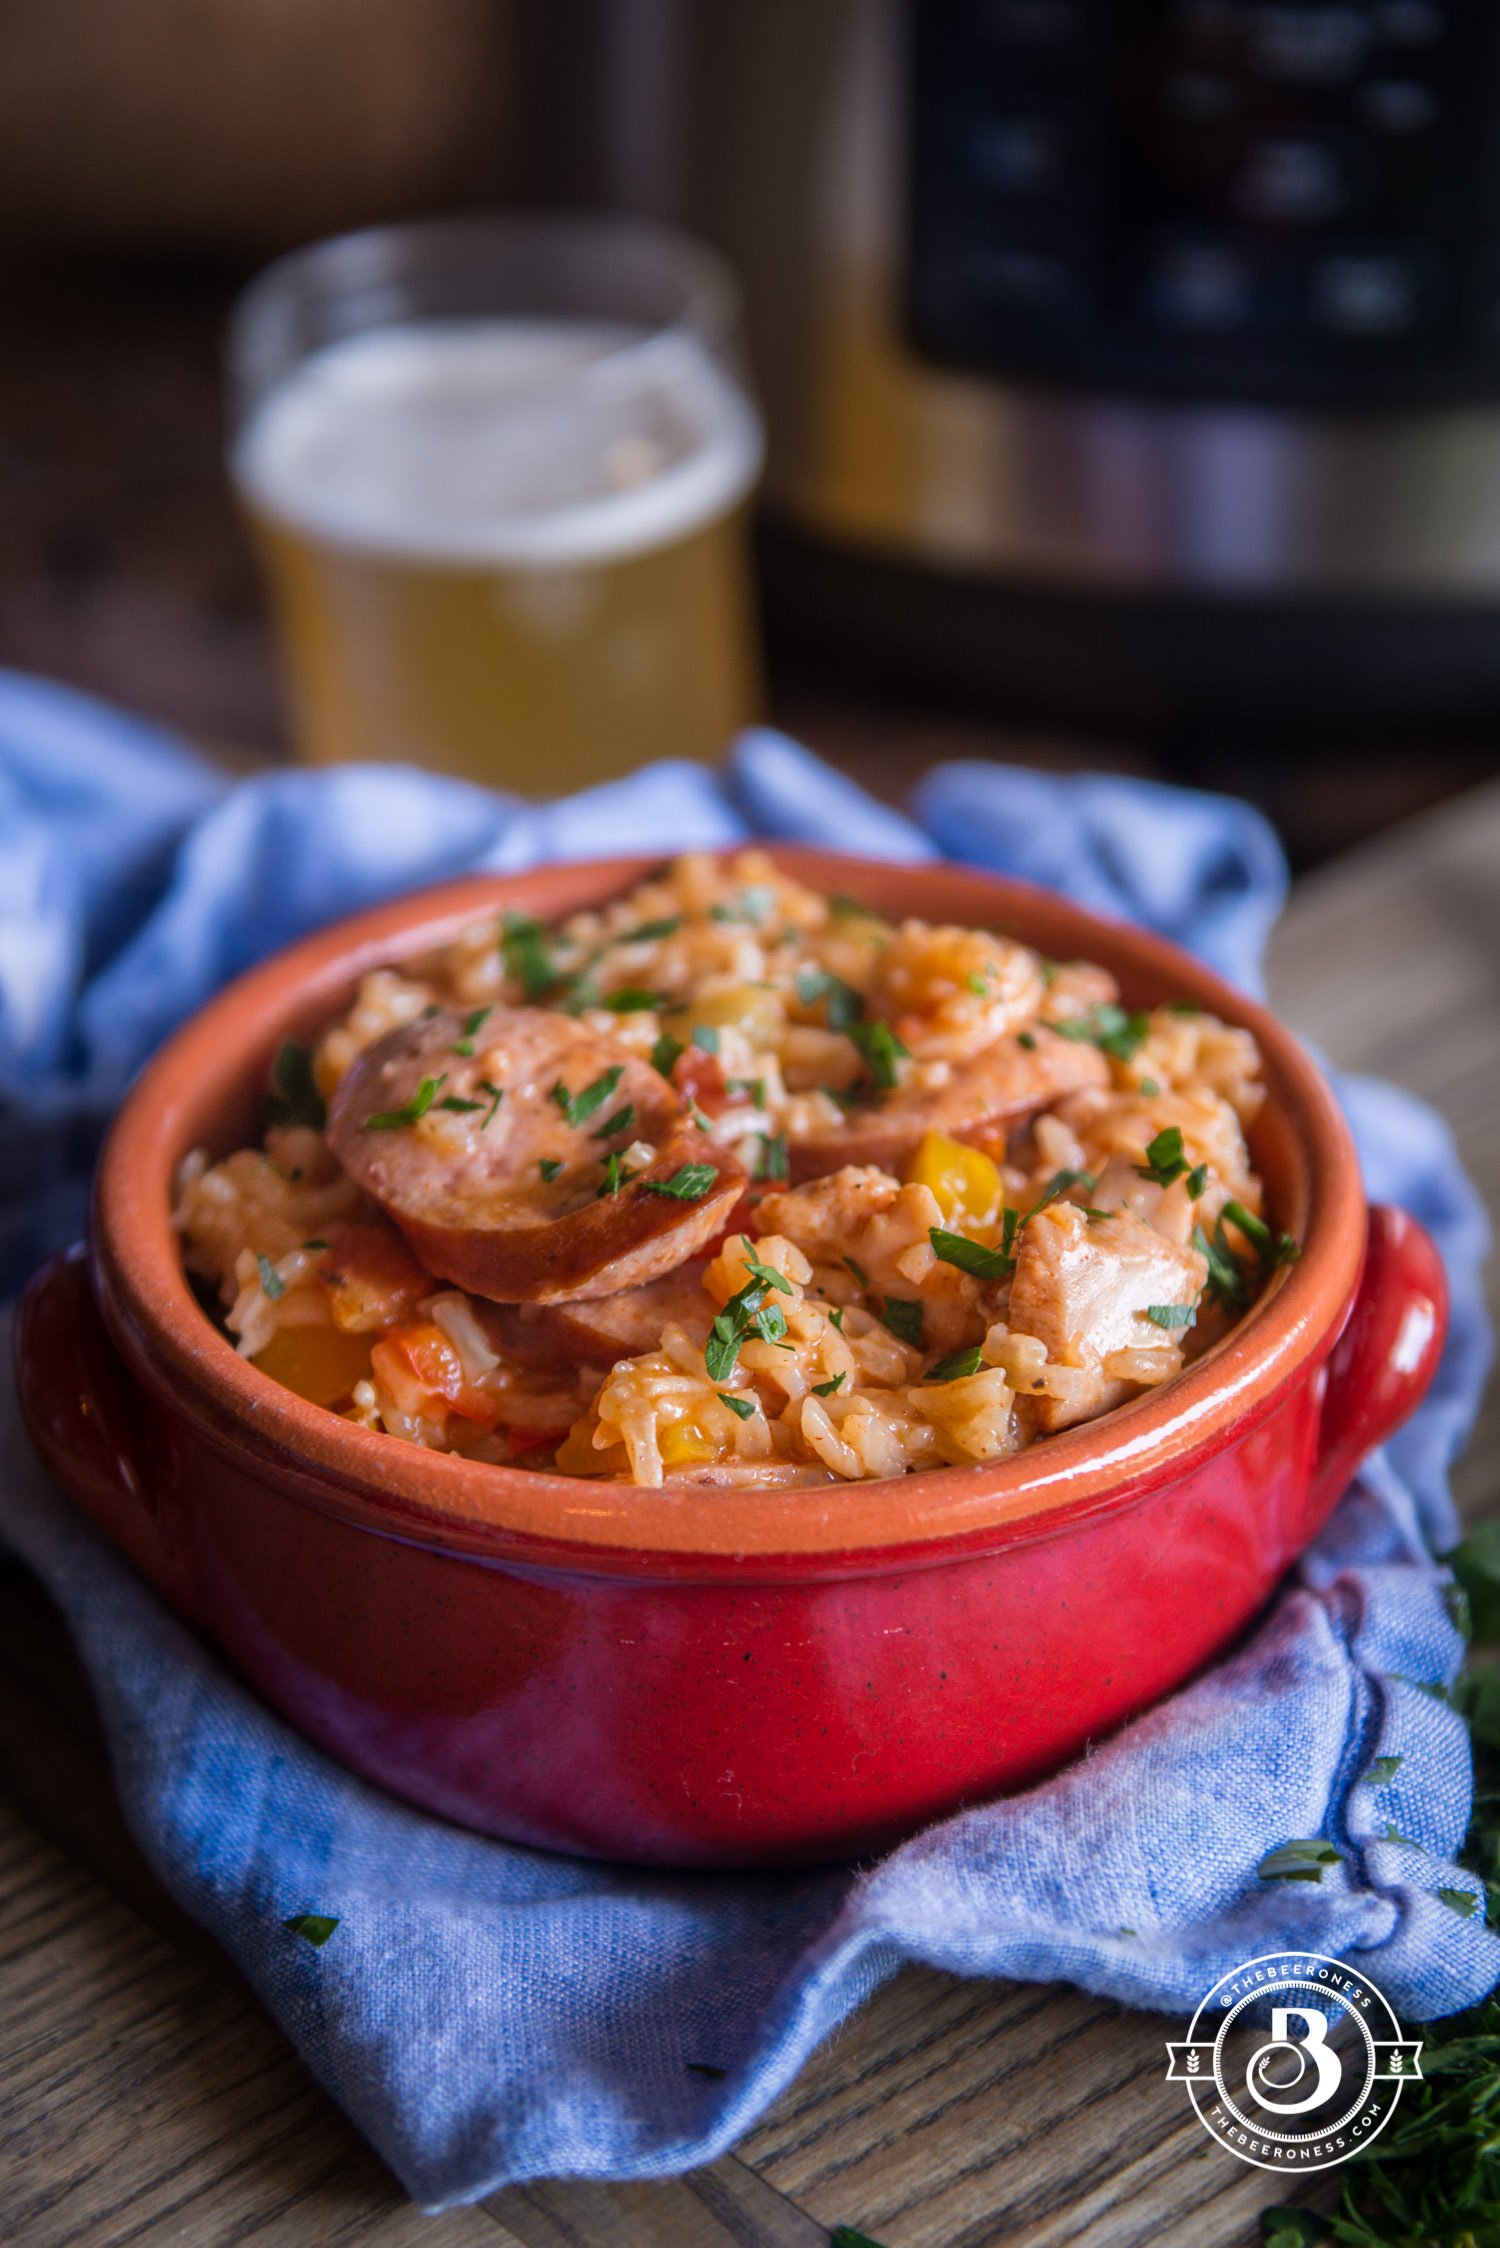
The reason I made this two days in a row is the same reason I love this little machine so much. I had every intention of this being a slow-cooker recipe, and that’s what I did. I slow cooked a jambalaya with all the meat, spices and rice that I wanted to cram into one bowl.
I liked it, I did. It was a super easy and satisfying way to eat a big ‘ol bowl of comfort food. But I couldn’t stop wondering how it would taste pressure cooked, and since the Crock-Pot Express Crock Multi-Cooker can do both, that’s just what I did. It was perfect, even better than the slow cooked version. Since the rice setting was built into the pressure cook mode (one of the hardest things to slow cook and get right is rice), it was simple.
The rice was perfectly cooked, the chicken was fall-apart-tender and the flavor tasted like it had slow cooked all day. THIS is how I’ll make jambalaya going forward, it was much better than I even hoped. I hope you like it as much as I do, this may be a staple in my house from now on.
The new Crock-Pot Express Crock Multi-Cookeris a game changer. It has eight different functions that encompass all the functions you would achieve from using multiple different kitchen appliances from slow cooking to pressure cooking and sautéing to searing. The Crock-Pot Express Crock Multi-Cooker is also available in NEW 4-Quart and 8-Quart Models.
12ouncesbeerpale ale, pilsner, pale lager, or wheat beer
114.5-ounce can diced tomatoes
1tablespoonsCajun seasoning blend
¼ to ½teaspooncayenne peppermore for spicier
2teaspoonspaprika
1teaspoongarlic powder
½teaspoonsalta full teaspoon if your Cajun spice mix is low or sodium free
1teaspoonblack pepper
1 ½cupsuncooked long grain white rice
¼cupchopped parsley for garnish
Instructions
Set the Express Crock to sauté on high. Add the oil, allowing to get hot before adding the bell peppers, onions, and celery. Cook until the vegetables have softened.
Stir in the sausage and chicken, cooking until the chicken has turned white on the outside. Stir in the remaining ingredients (reserving the parsley for garnish).
Add the lid, turning to the locked position. Make sure the steam release value is set to sealed.
Turn the rice/risotto setting to high for 8 minutes. The Express Crock will take about 10 minutes to heat up and build pressure, during this time the display will say “HEAt” (yes, with a lowercase “t”). Once the 8 minutes have finished, turn the steam release valve to open (careful, the steam is hot!). Allow the steam to release before opening the Express Crock.
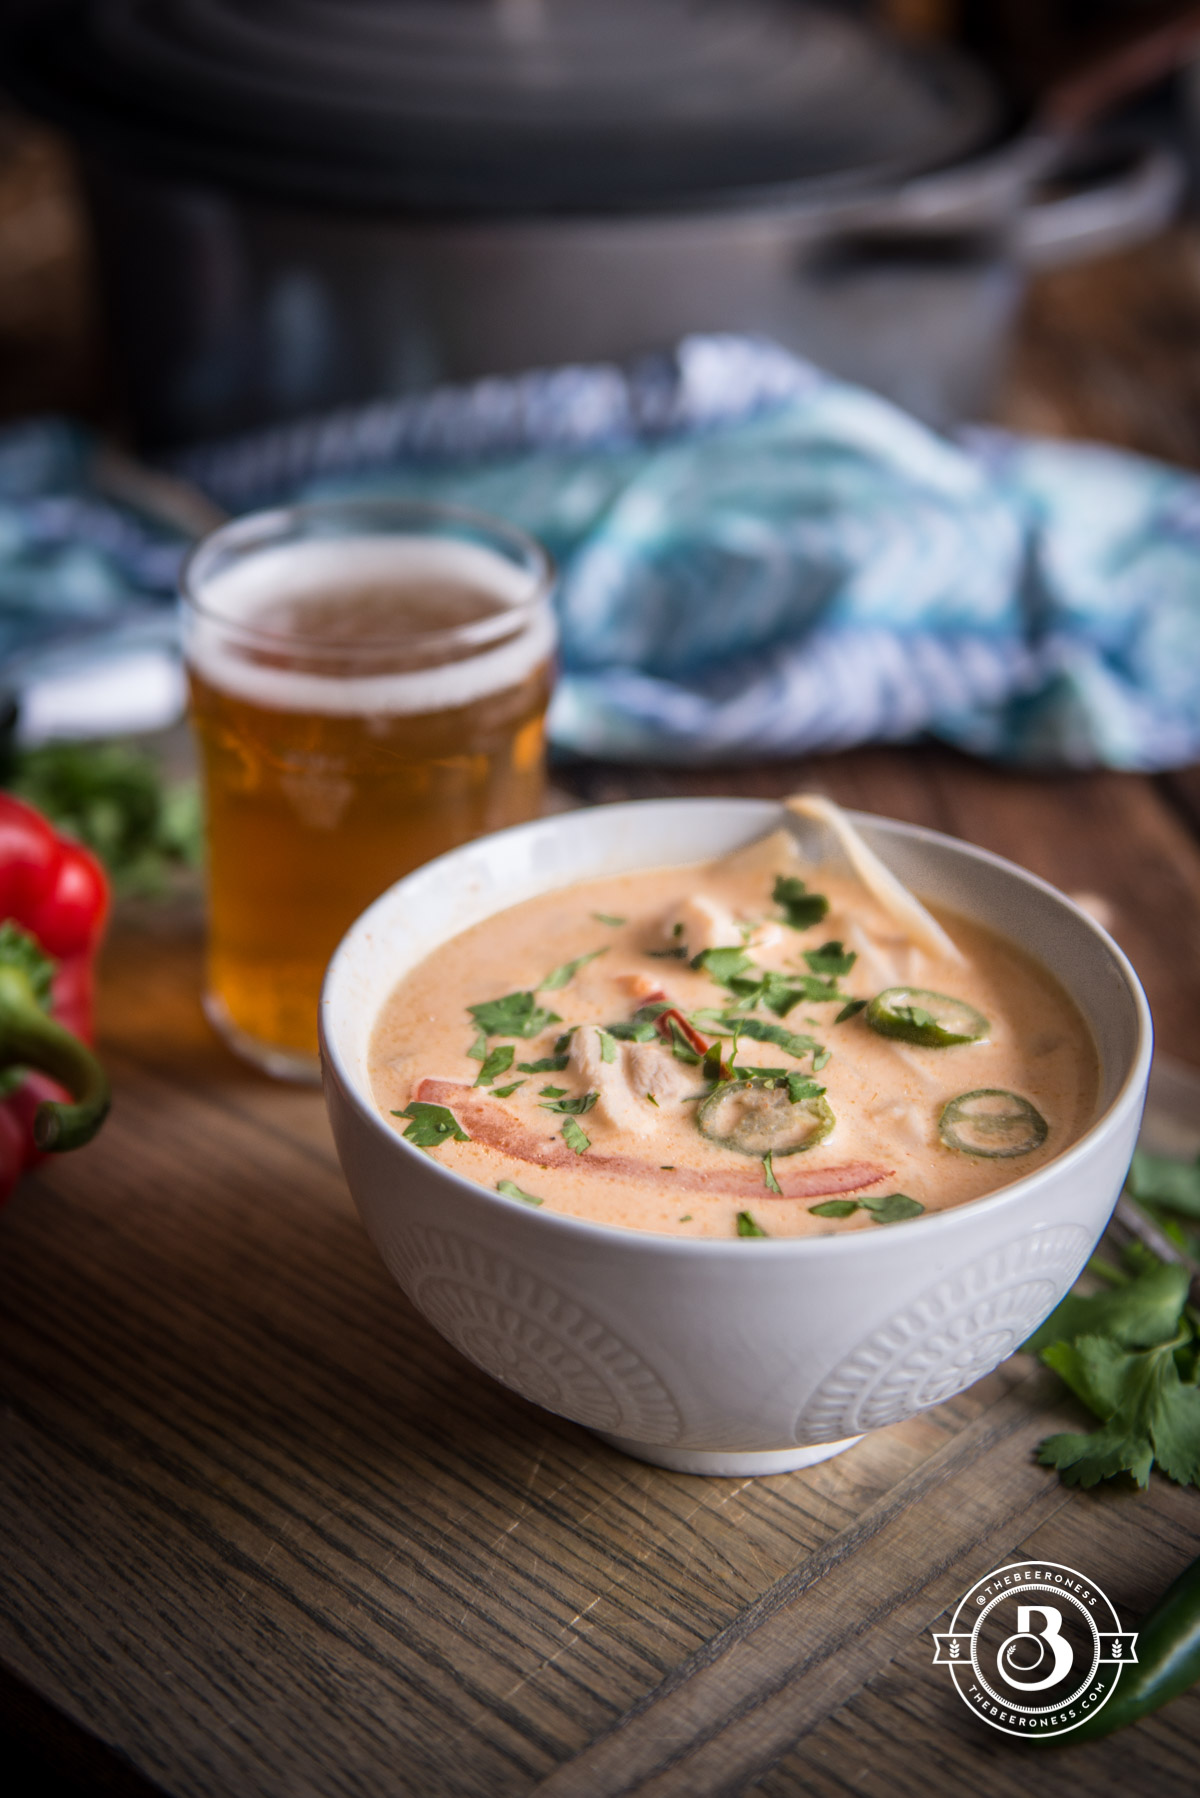
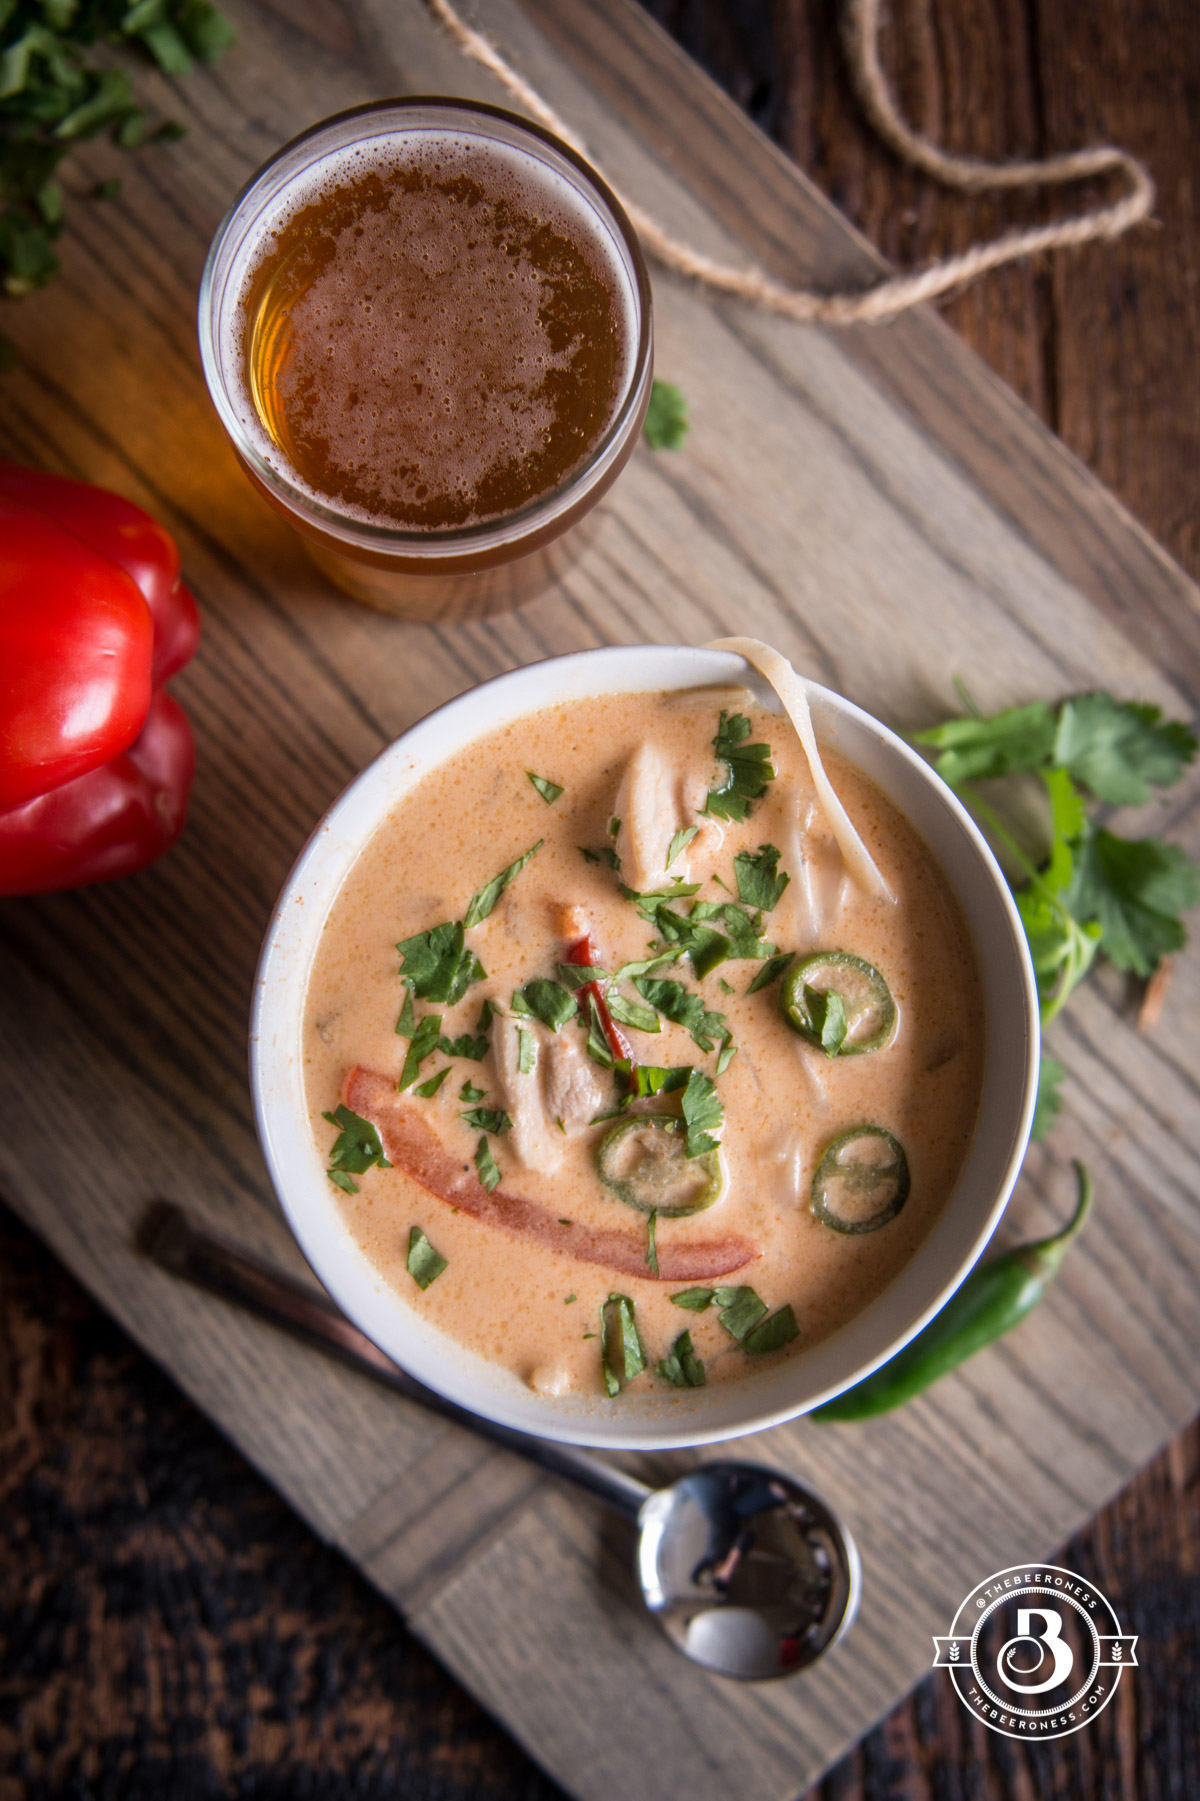
Pale Ale Thai Chicken Noodle Soup, 20-minutes to a deliciously satisfying soup!
We need to brace ourselves. The fall is spilling into winter and you can feel the frost and fire in everyone, online and in person. It makes me retreat, slowly back out the door and avoid other people in order to still like humans in general.
I imagine that we all, just for a moment, agreed on things. A literal moment, 90 seconds or so, all focus on what we can all get behind, even if it’s small. Small things that help us all feel like we get each other: how wrapping our hands around a warm drink on a cold day softens every stress, how squirrels are cute but also little assholes, and how we all dislike Gwyneth Paltrow (but we do, right?).
Maybe it won’t help, but these are the soup-making-days, the days I try to treat collective soul wounds with food. Sure, I know it doesn’t really help. I know I can’t make soup for all of you invisible internet people across the world. But I also know that you probably feel the same, in one way or another. At least this is what I try to believe in order to stay sane in the rapidly dissolving humanity of the world we live in.
Heat the olive oil in large pot or Dutch oven, add the onions, bell pepper and chili. Cook until the vegetables have started to soften, about 5 minutes. Stir in the beer.
Add the coconut milk, broth, chicken, fish sauce, salt, garlic powder and curry paste.
Simmer until chicken has cooked through, about 6 minutes.
Stir in the basil and rice noodles, simmer until noodles are cooked, about 5 minutes.
Adjust seasonings to taste (the amount of salt you need is directly dependent on the broth you use).
This was really born out of necessity, at least the first time I made it. I’m not very organized, open any of my cabinets and you’ll see it (you’ll be horrified). My house is more or less clean but my life is messy. Anything that I can put in a closet, out of site, gets the shove allowing me to continue to pretend like my house is clean.
This quality extends far past my pantry and into all parts of my grown-up life where it becomes startlingly apparent that I’m not very good at adulting. And even though I go to the grocery store nearly every day, I still found myself without eggs, bread, and any other breakfast-related items early one morning. I need breakfast, this isn’t negotiable.
Instead of just going to the store I decided to make biscuits. It was just easier to write a recipe than it was to get out of my pajamas and head to the store. I’m not a "pajamas at the store" kind of girl, I can’t look as messy as I feel. I like to put on a good show, and trick people into believing that I’ve got my shit together. Spoiler alert: I don’t.
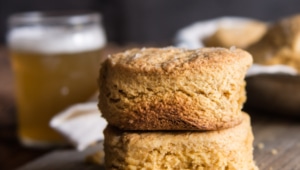
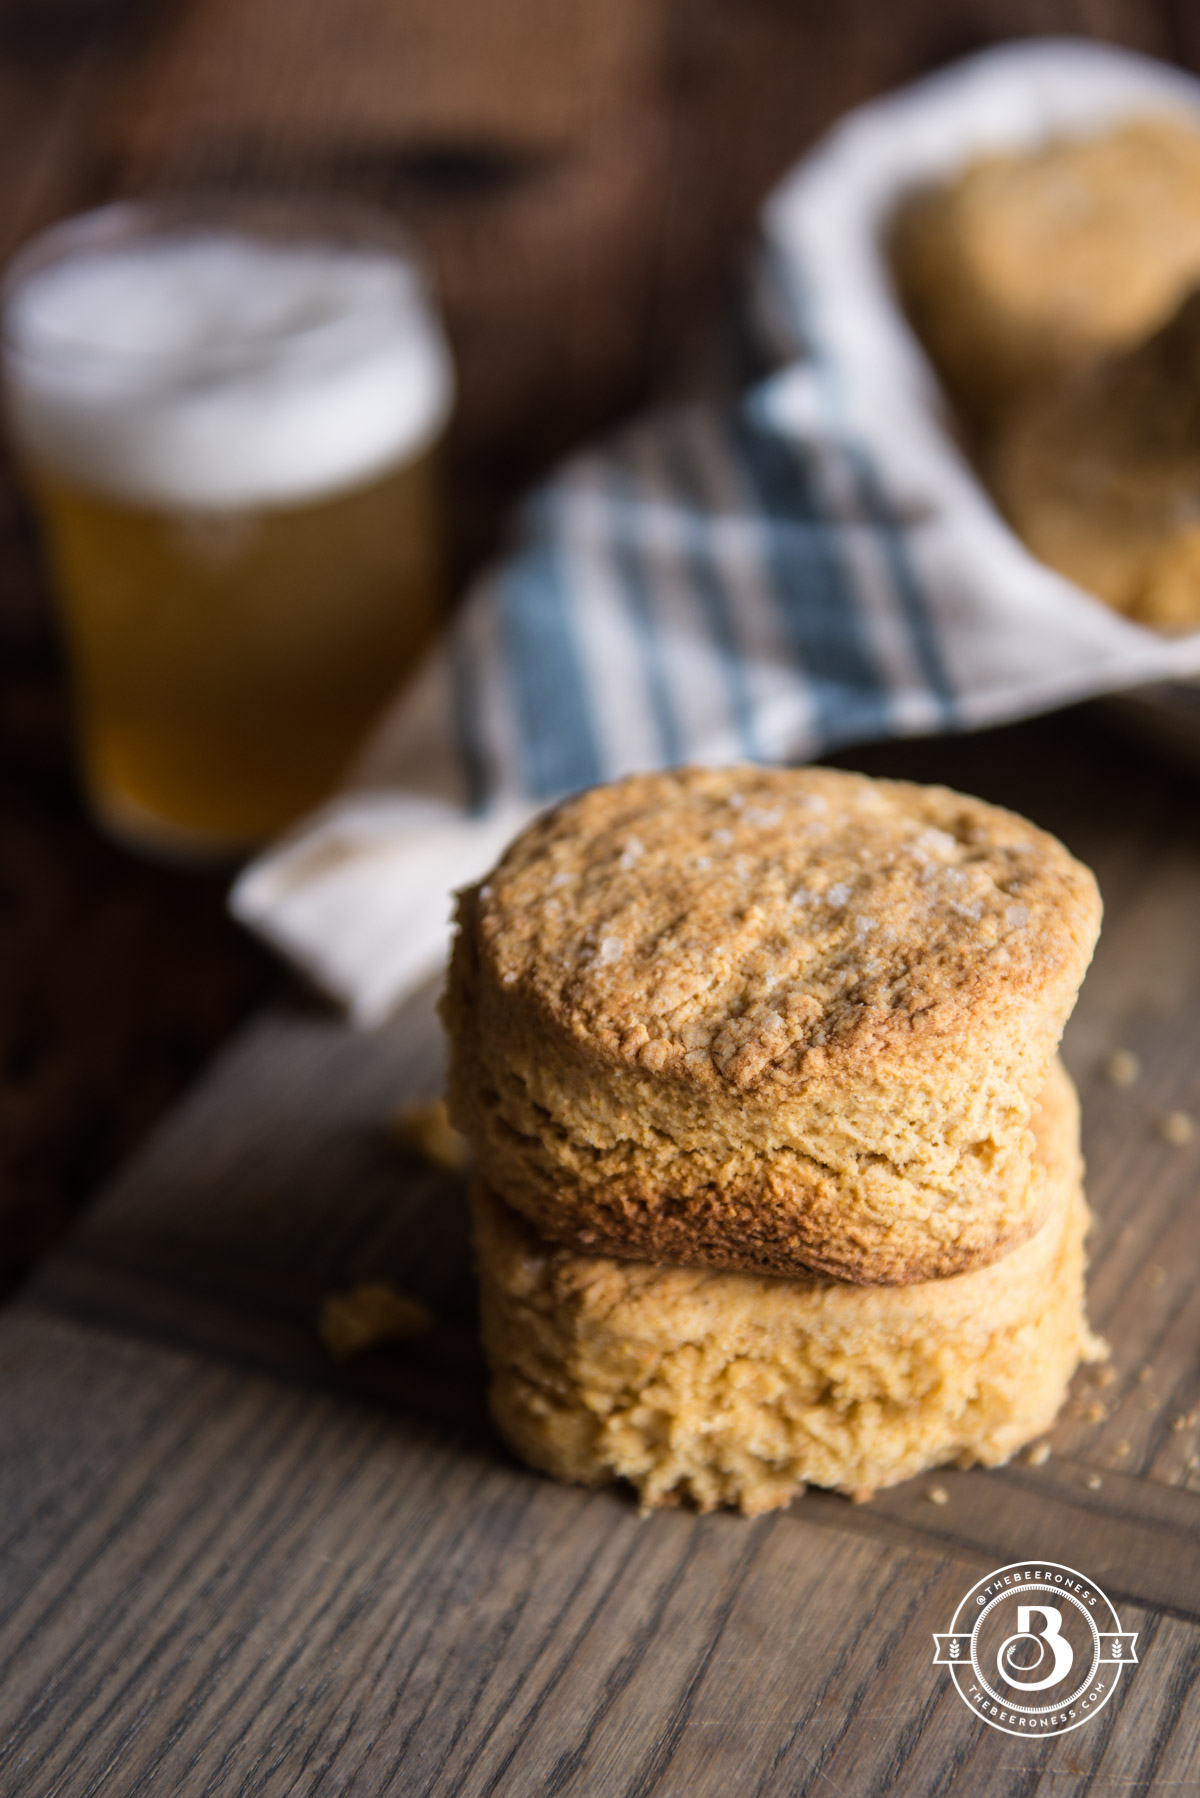
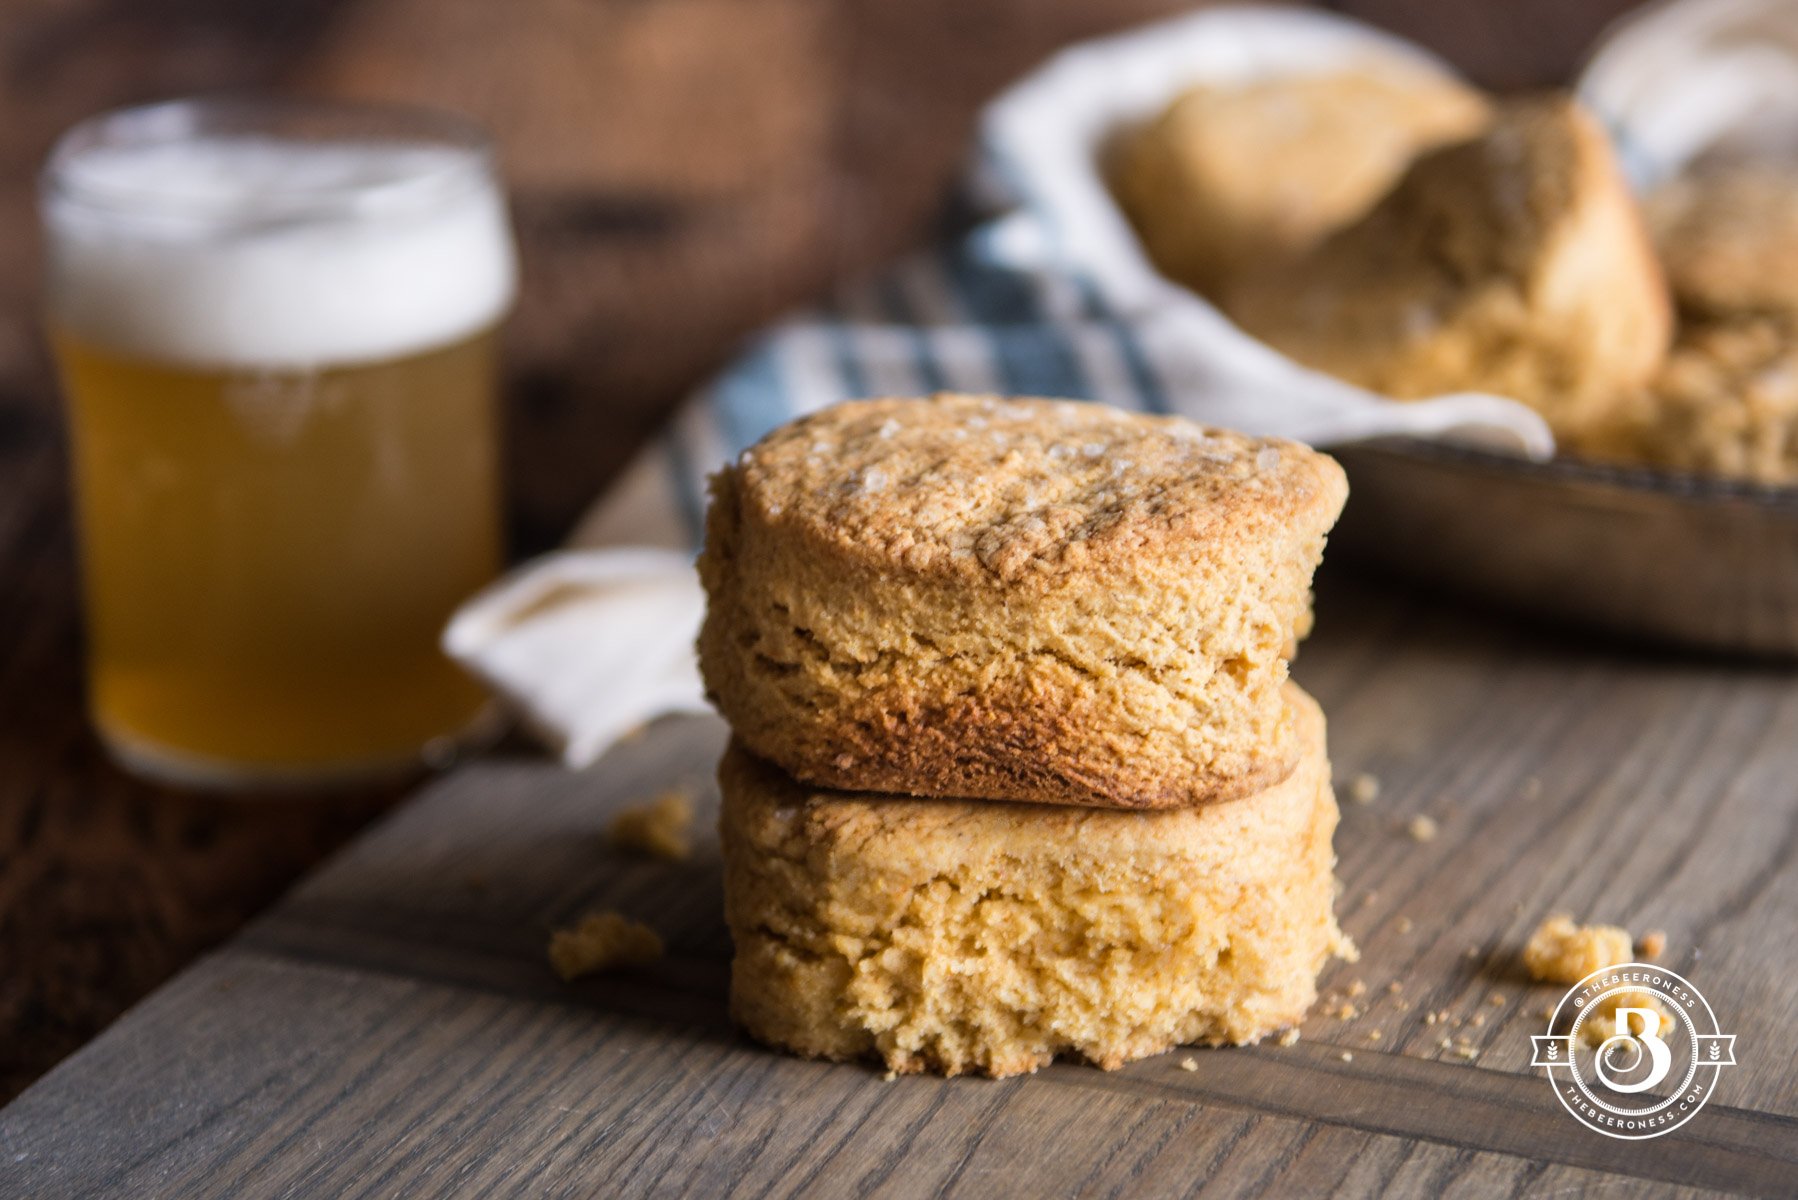
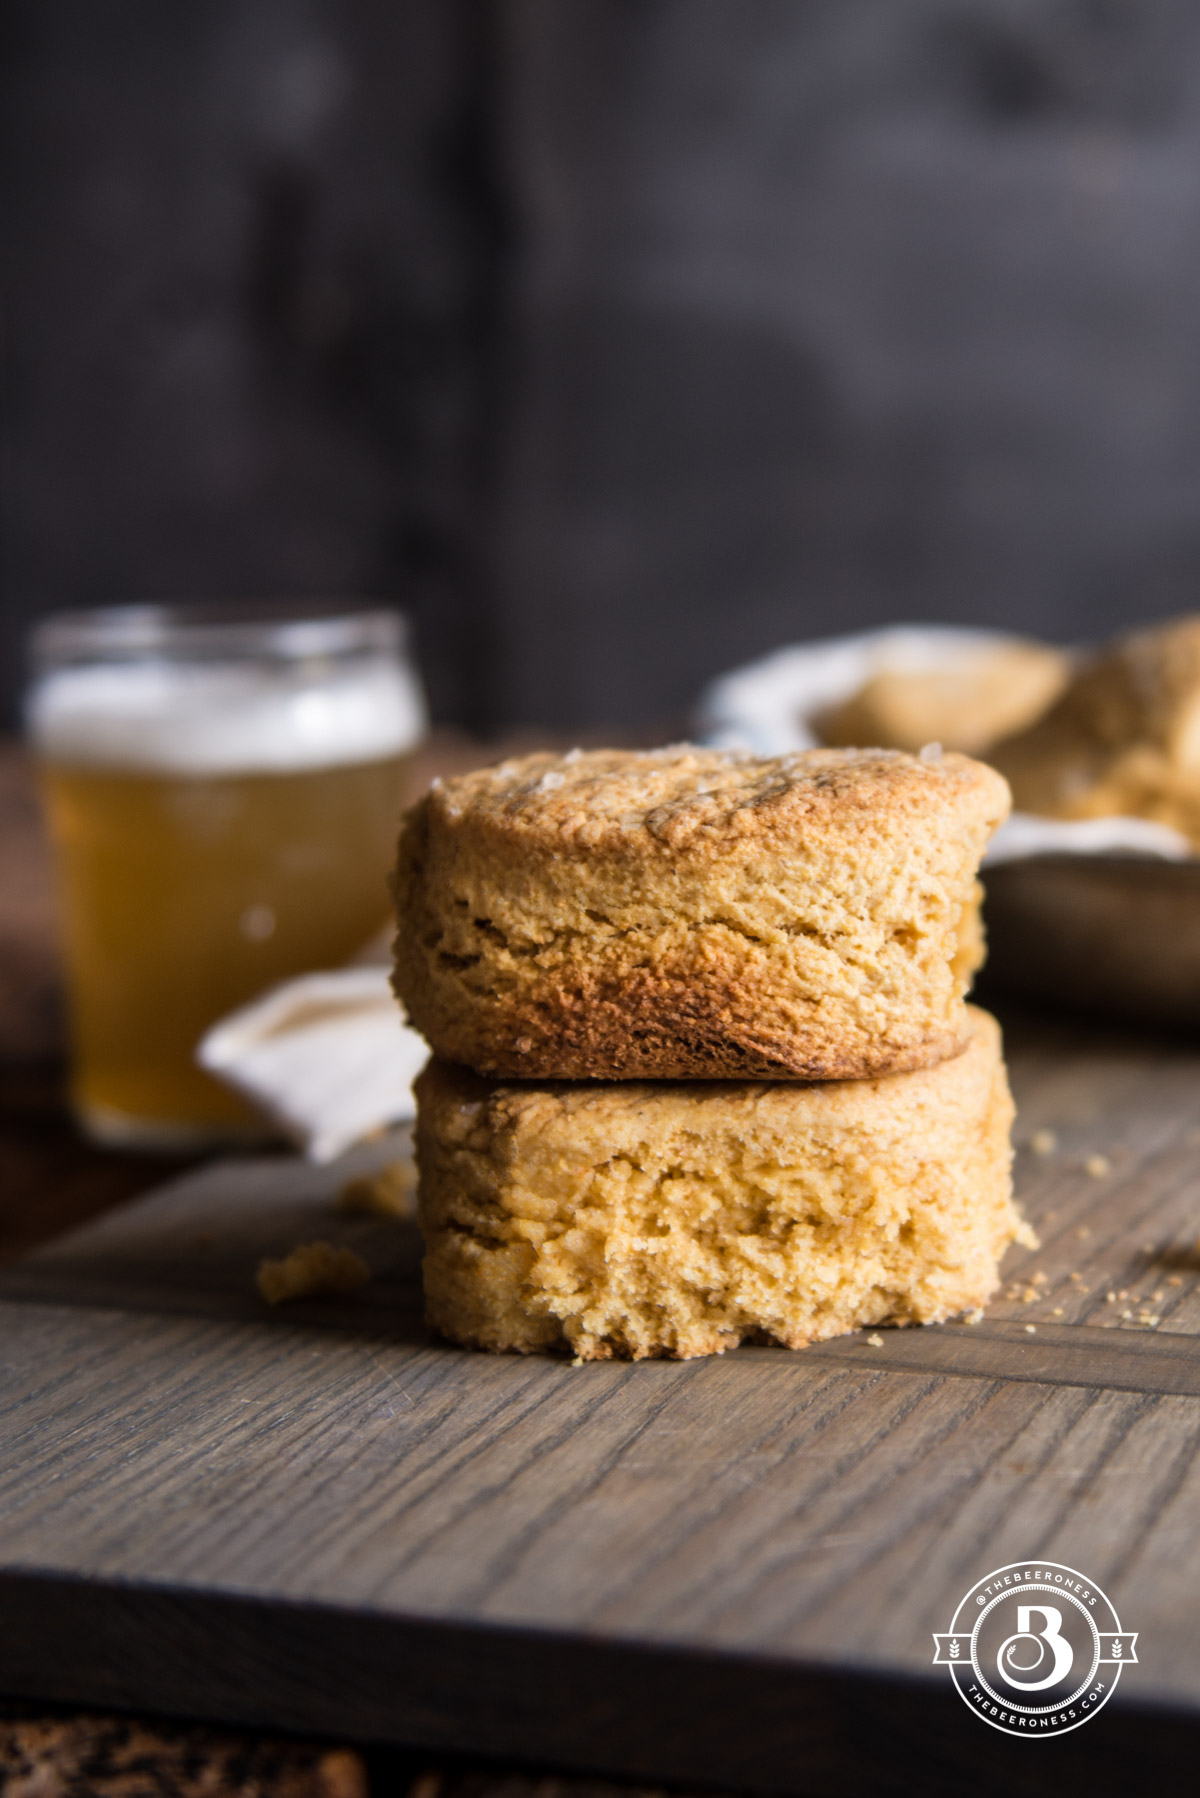
This hatched my Beer Cornbread Biscuits recipe, so tender and melt-in-your-mouth I obviously had to make them again, and then share it with you.
I also think I need to make them one more time, but add some cheddar cheese. And maybe some bacon.
10tablespoons142g cup butter cut into 1-inch pieces
2/3cup160 heavy cream
½cup116g beer (pale ale, pilsner, wheat beer)
1tablespoon14g melted butter
½teaspoonflaky sea salt
Instructions
Preheat oven to 425°F.
Add the flour, cornstarch, brown sugar, cornmeal, baking powder, baking soda and salt to a large bowl, stir to combine.
Add about half of the mixture to a food processor along with the butter, process until the butter is well combined with the dry mixture. Return the mixture to the mixing bowl, stir into the remaining dry ingredients.
Add the heavy cream and beer, mix with a fork until just combined.
Add to a lightly floured surface, press into a rectangle about 1 inch thick.
Cut into 6-8 circles with a biscuit cutter.
Add to a baking dish that has been sprayed with cooking spray.
Brush with melted butter, sprinkle with sea salt.
Bake until the tops are golden brown, 18-20 minutes.
Allow to cool before removing from the baking dish.
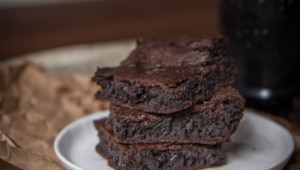
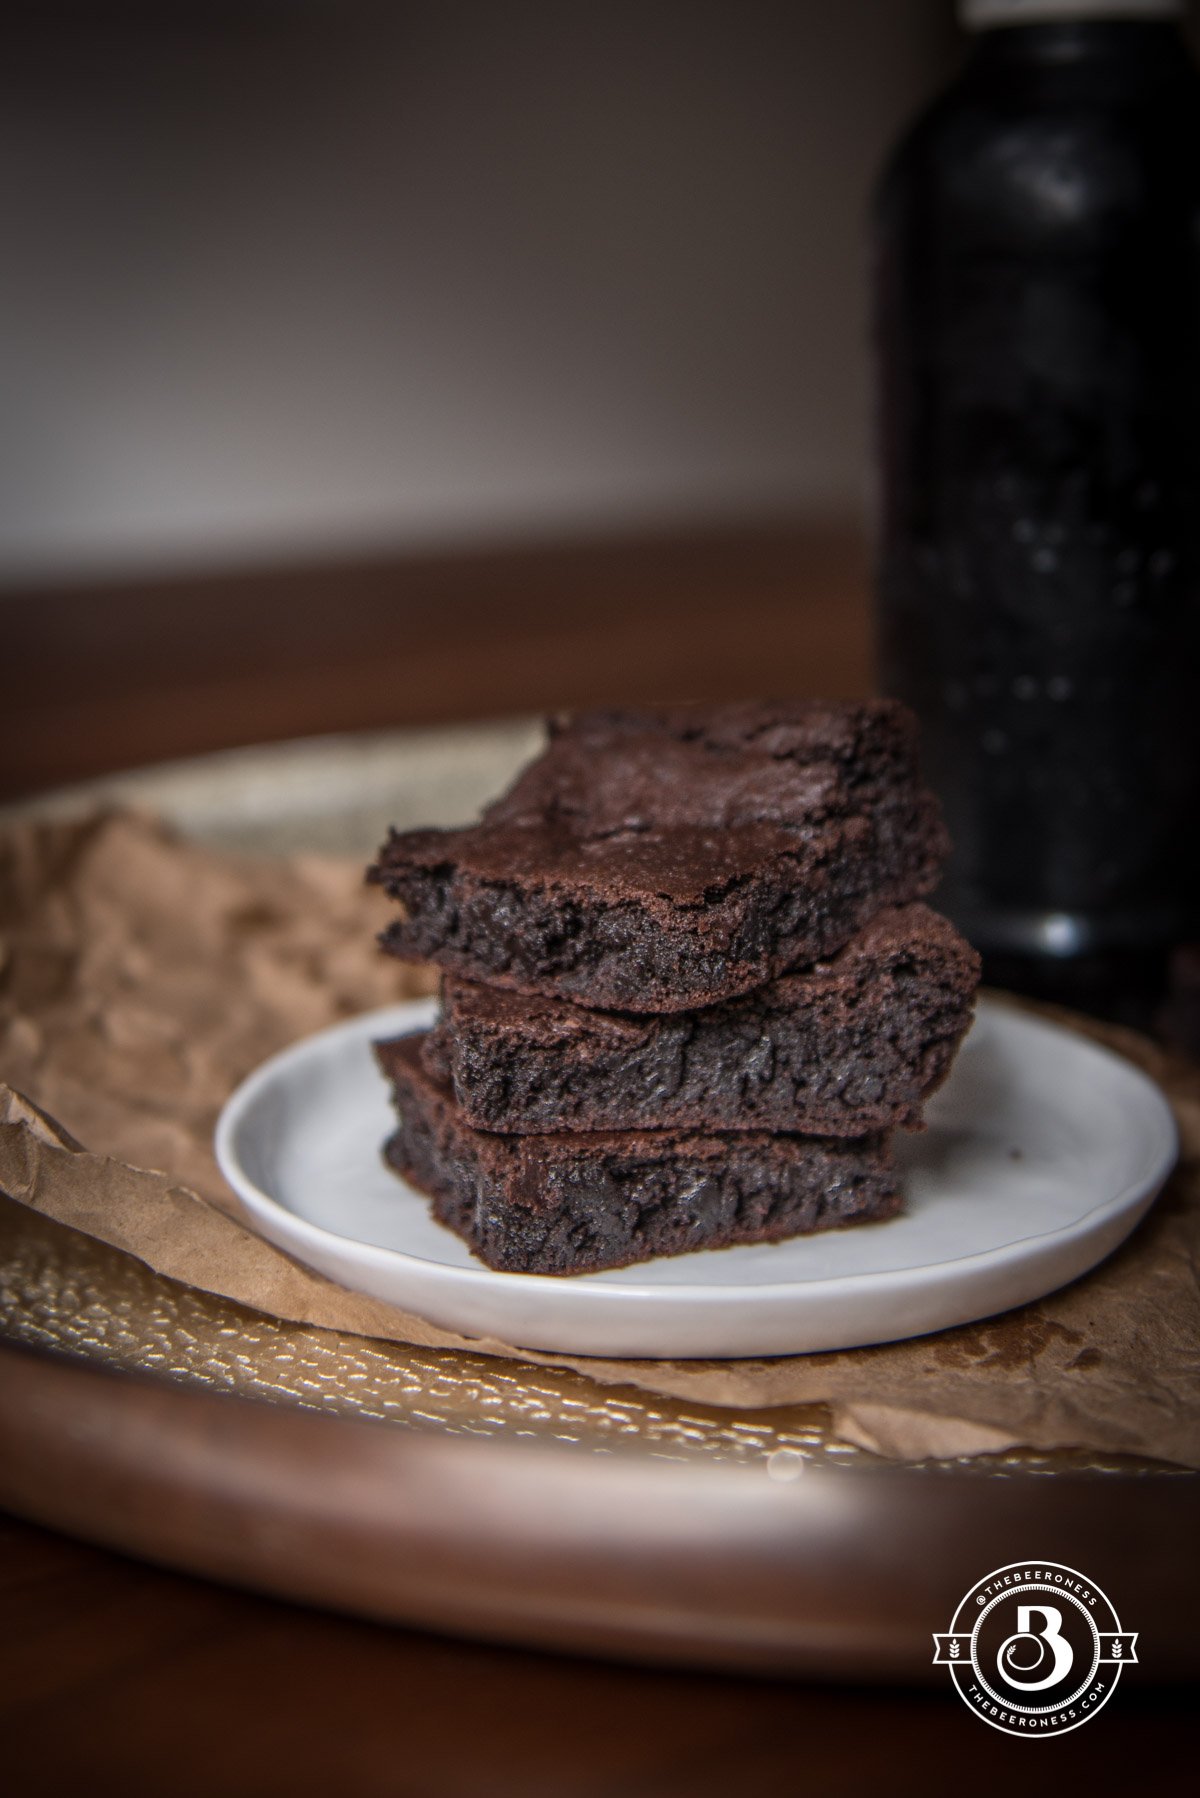
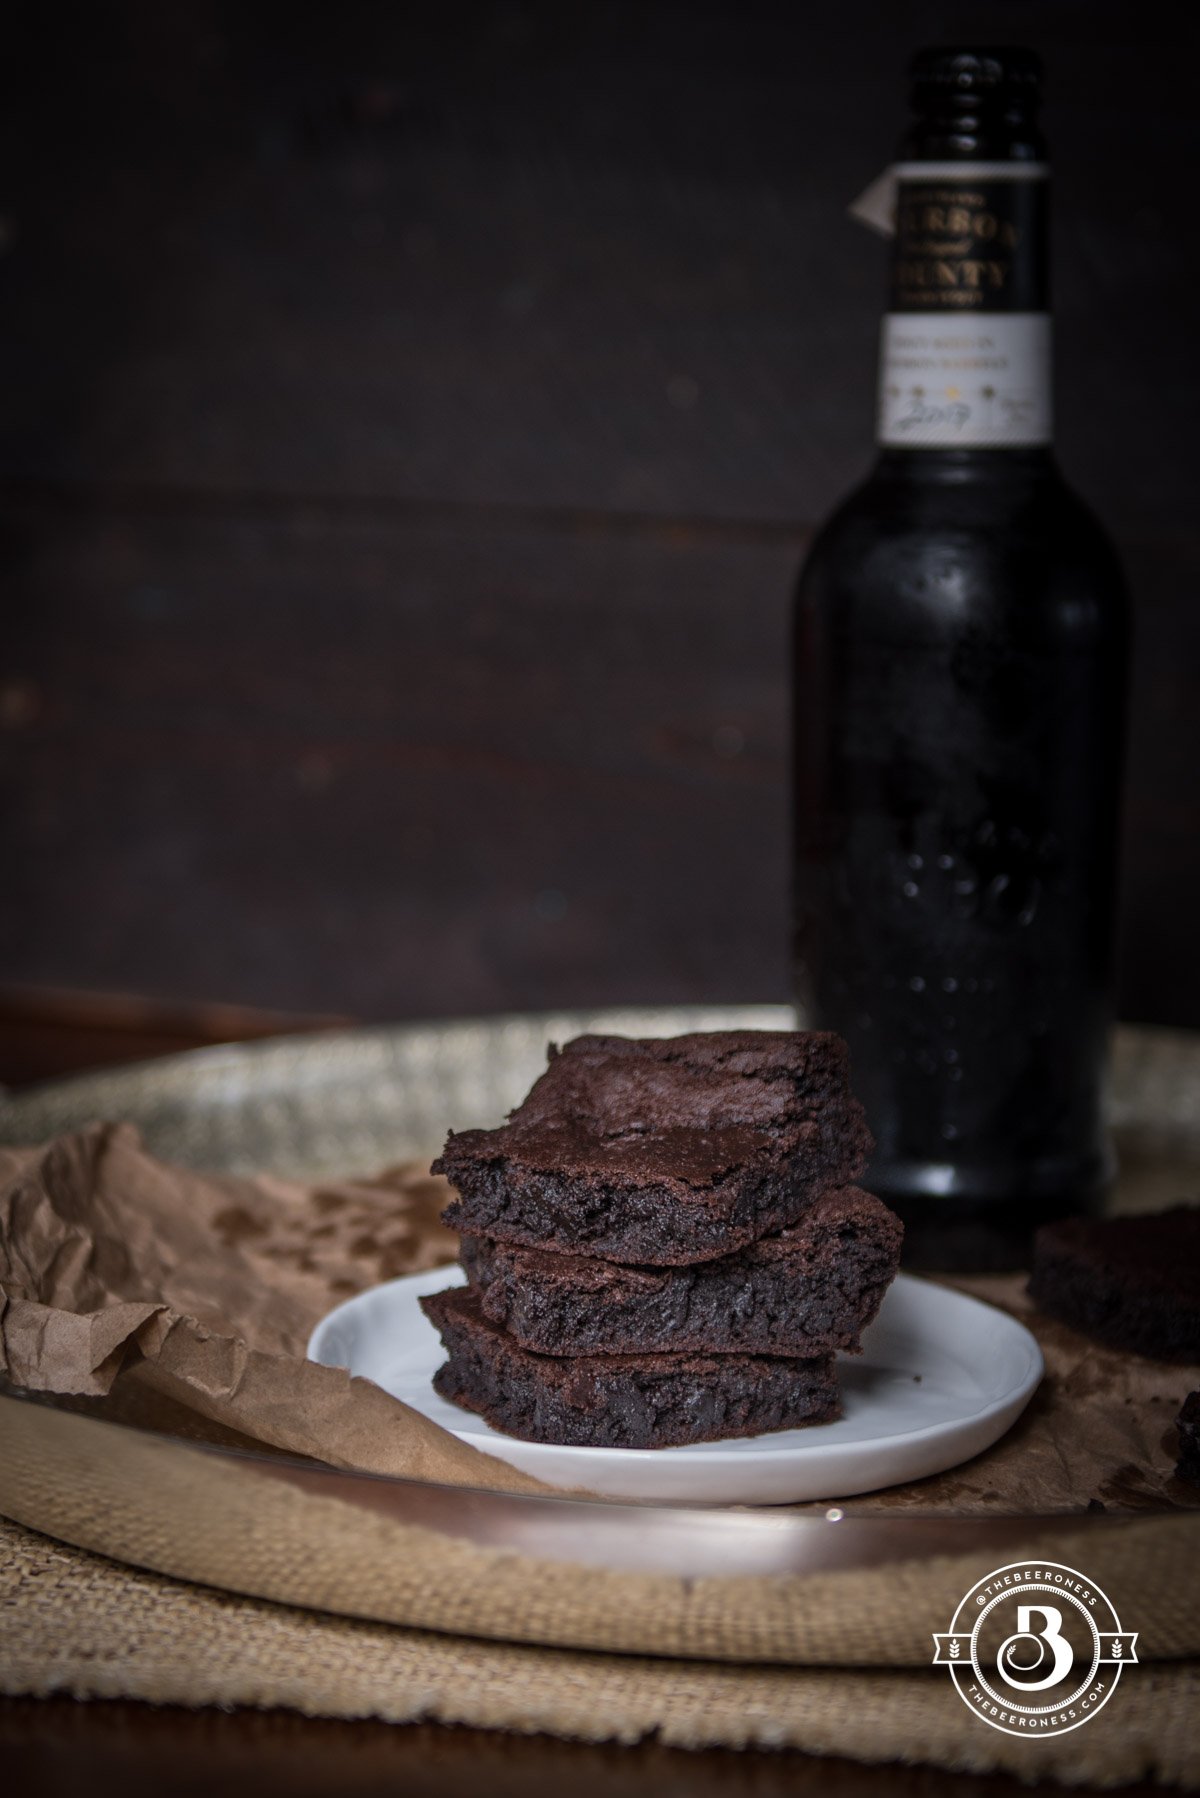
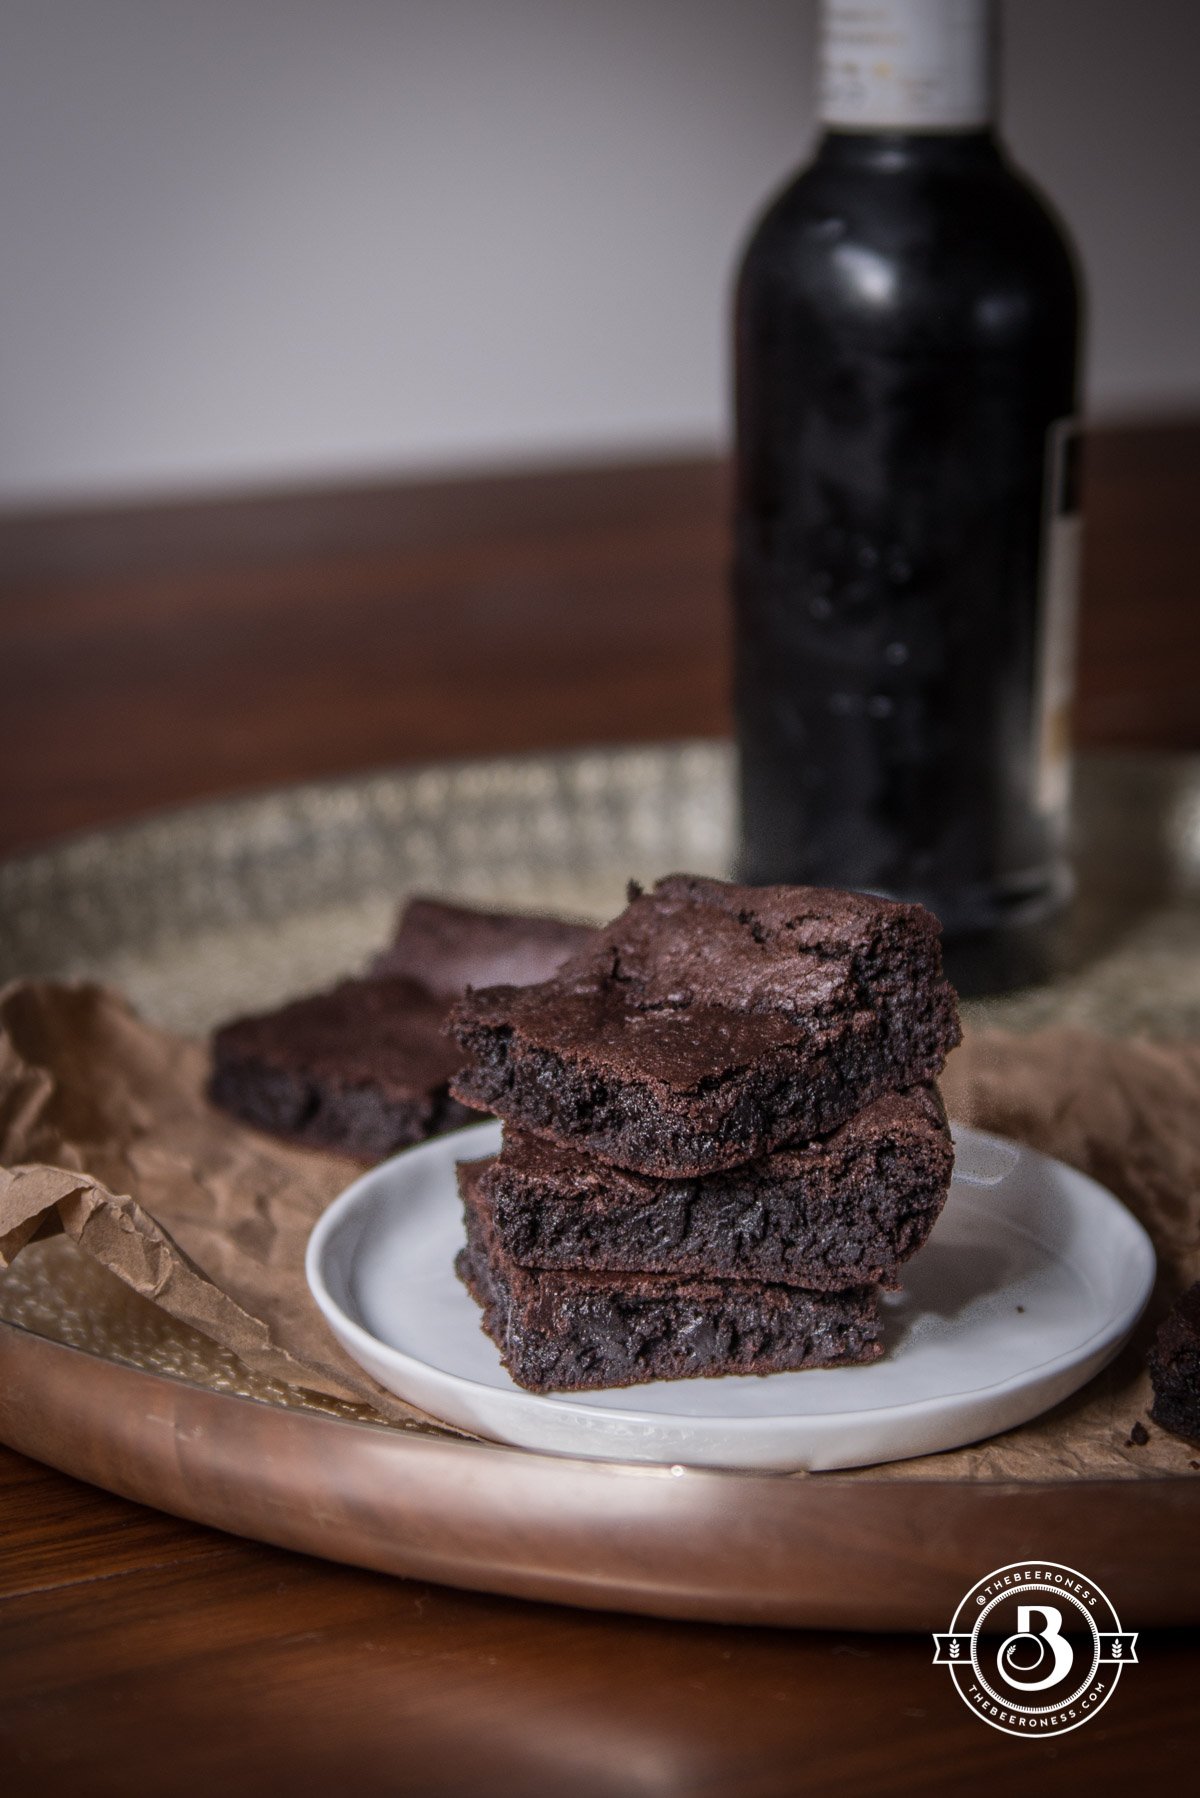
Ridiculously Good Stout Vegan Brownies (with no weird ingredients), just some things you probably already have in your pantry. And these brownies are legit!
It’s not so much that flax-eggs are weird. Or guar gum. Or agar agar. It’s not the "weirdness" of the ingredients I kept seeing in vegan brownie recipes, but rather the fact that I don’t own them. And outside of an online shopping trip, I have no idea where to procure such things in my neighborhood. I’m more of a vegan food enthusiast rather than an actual vegan.
What I really needed was a brownie recipe using just what I had in my pantry, because there is a good chance you’ll also have the same things in your pantry. They also needed to be actual brownies, not shiny-top cake squares (an issue with some recipes that don’t include eggs and butter).
I have a few rules and requirements when it comes to brownies: the absolute necessity of the crunchy top, they need to be chewy, and only psychopaths put nuts in a brownie. I like a fudgy, dense, chocolatey, chewy, crispy top brownie.
I tested the recipe over and over, making minor tweaks to fix the things I didn’t love, until it came out exactly the way I like my vegan food: shockingly vegan. As in, "serve it to meat-eaters and astound them". Or "Bring them to a dinner party and people ask for the recipe because they have no idea what it does not contain."
It’s also a great recipe for those of us who always want to bake right before we realize that we are out of everything and don’t want to go to the store.
Want to check and see if your beer is vegan? Branivore can help.
Ridiculously Good Stout Vegan Brownies (with no weird ingredients)
Add the sugar and coconut oil to a mixer fitted with a paddle attachment. Beat on medium until well combined. Slowly add the oil and vanilla, beating on high until the mixture resembles frosting.
Add the baking soda and vinegar, beat again until well combined.
Stir in the beer.
In a mixing bowl stir together the cocoa powder, flour, cornstarch, salt, and espresso powder.
Gently stir the dry ingredients into the wet ingredients until just combined, mixture will be thick.
Add in an even layer to a greased 8x8 pan, press flat.
Bake for 22 minutes. Allow to cool before cutting into squares.
This post was sponsored by Crock-Pot. Partnerships with The Beeroness and outside companies are rare and only occur when the company’s products are ones I use and enjoy myself. All ideas and opinions are my own.
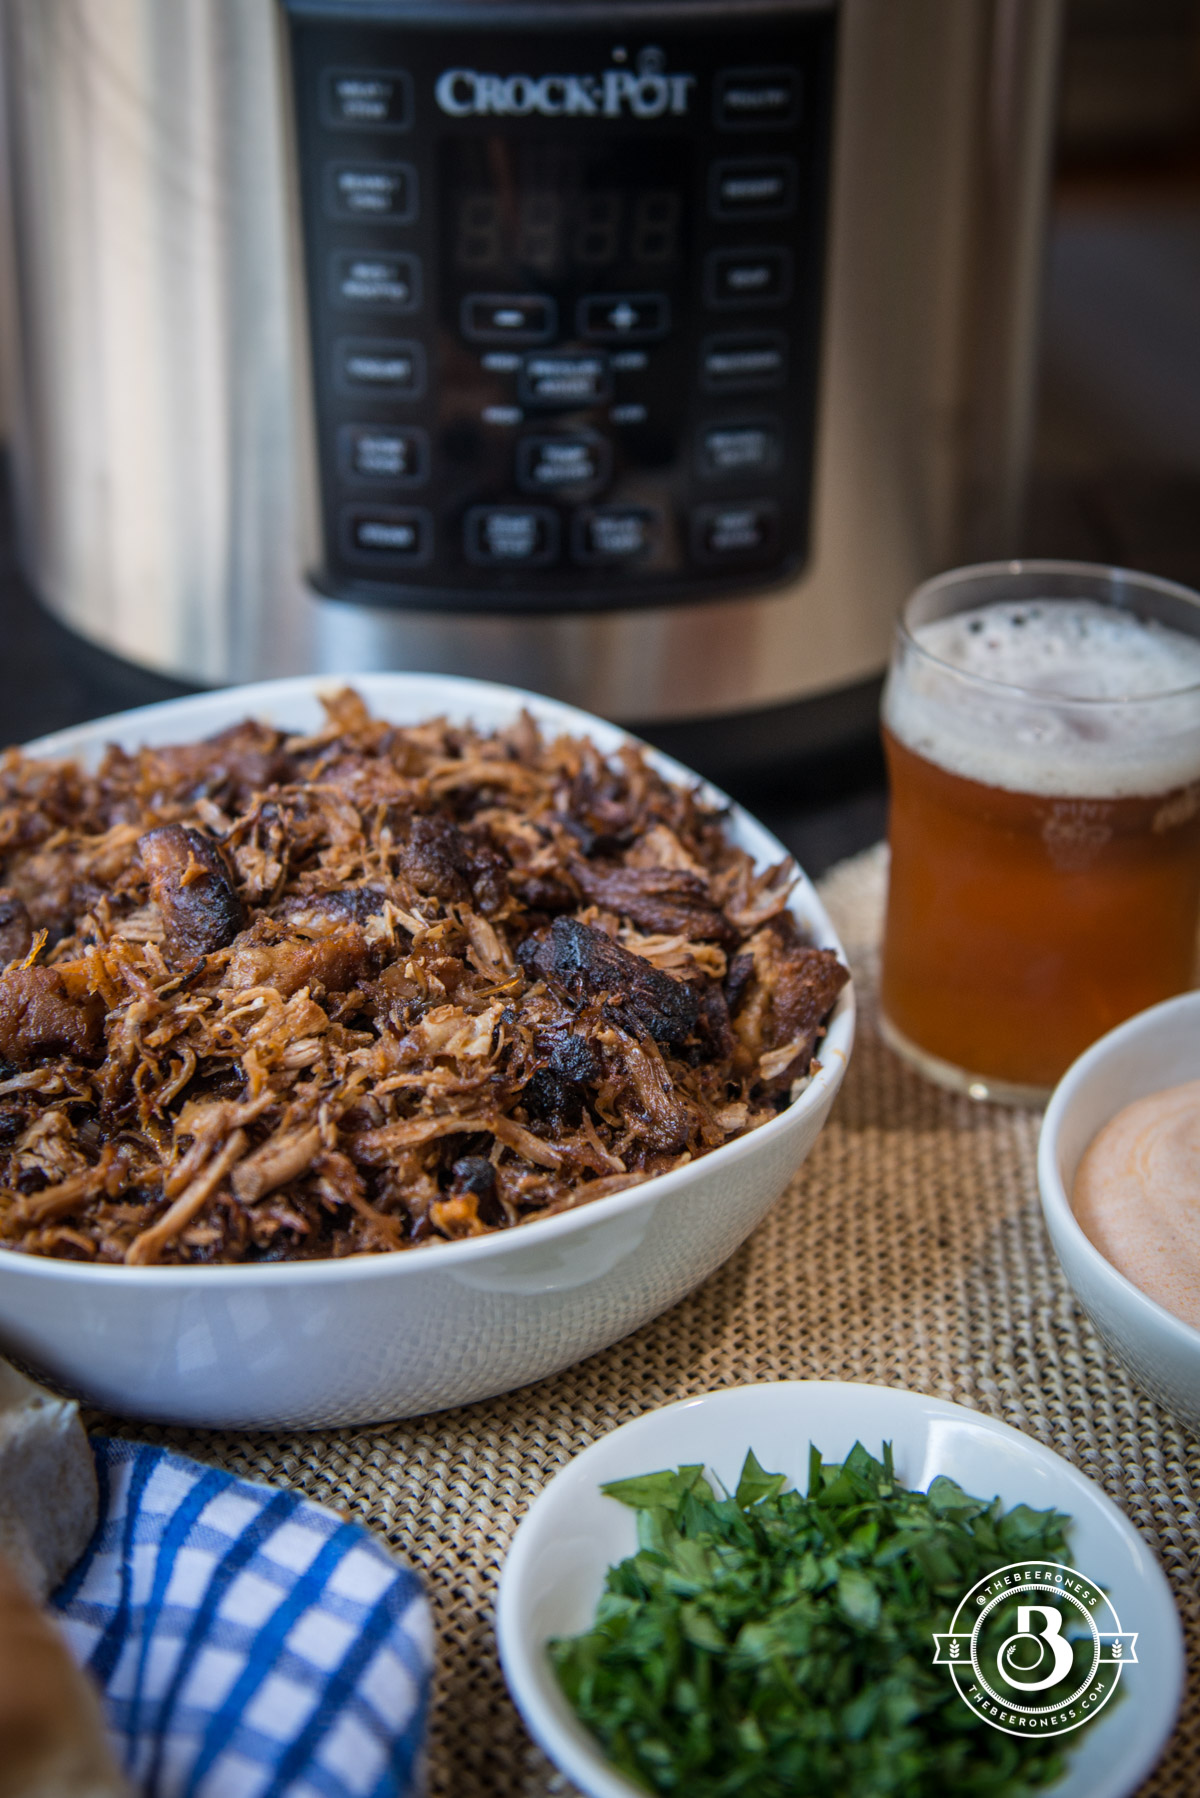
I’m still sort of in shock. If you’re a long time carnitas lover, you’ll know what I’m talking about. The best part of this delicious slow-cooked meat dish is the lovely caramelization you get on some of the end bits. It’s really not the same without that.
What shocks me is that I was able to get the perfect seared caramelization in a Crock-Pot! If you’d have told me that was possible, I might have fought you, bet you several pitchers of good beer that it wasn’t possible. And now here I am. I’d owe you quite a few beers, and I’d have gladly paid up, these carnitas were the best I’ve made and that sear is perfect! (Yes, it’s SUPER nerdy that I’m THIS excited about it. But I can’t even try to care, I’m so excited!)
The new Crock-Pot Express Crock Multi-Cooker is a game changer. It has eight different functions that encompass all the functions you would achieve from using multiple different kitchen appliances from slow cooking to pressure cooking and sautéing to searing. The Crock-Pot Express Crock Multi-Cooker is also available in NEW 4-Quart and 8-Quart Models.
I was a bit skeptical that the brown/sauté setting would work as well as a stovetop pot. It’s a good thing I didn’t have a bet going, it was perfect. Also, SO much easier. I didn’t have to use anything but the Multi-Cooker. I’m usually someone who digs the traditional Dutch ovens for such endeavors, but these carnitas came out so well, I’ll never go back.
So, if you want to win yourself a couple beers, just bet someone that you can’t make a Crock-Pot sear. Or pressure cook. You’ll never have to buy beer again.
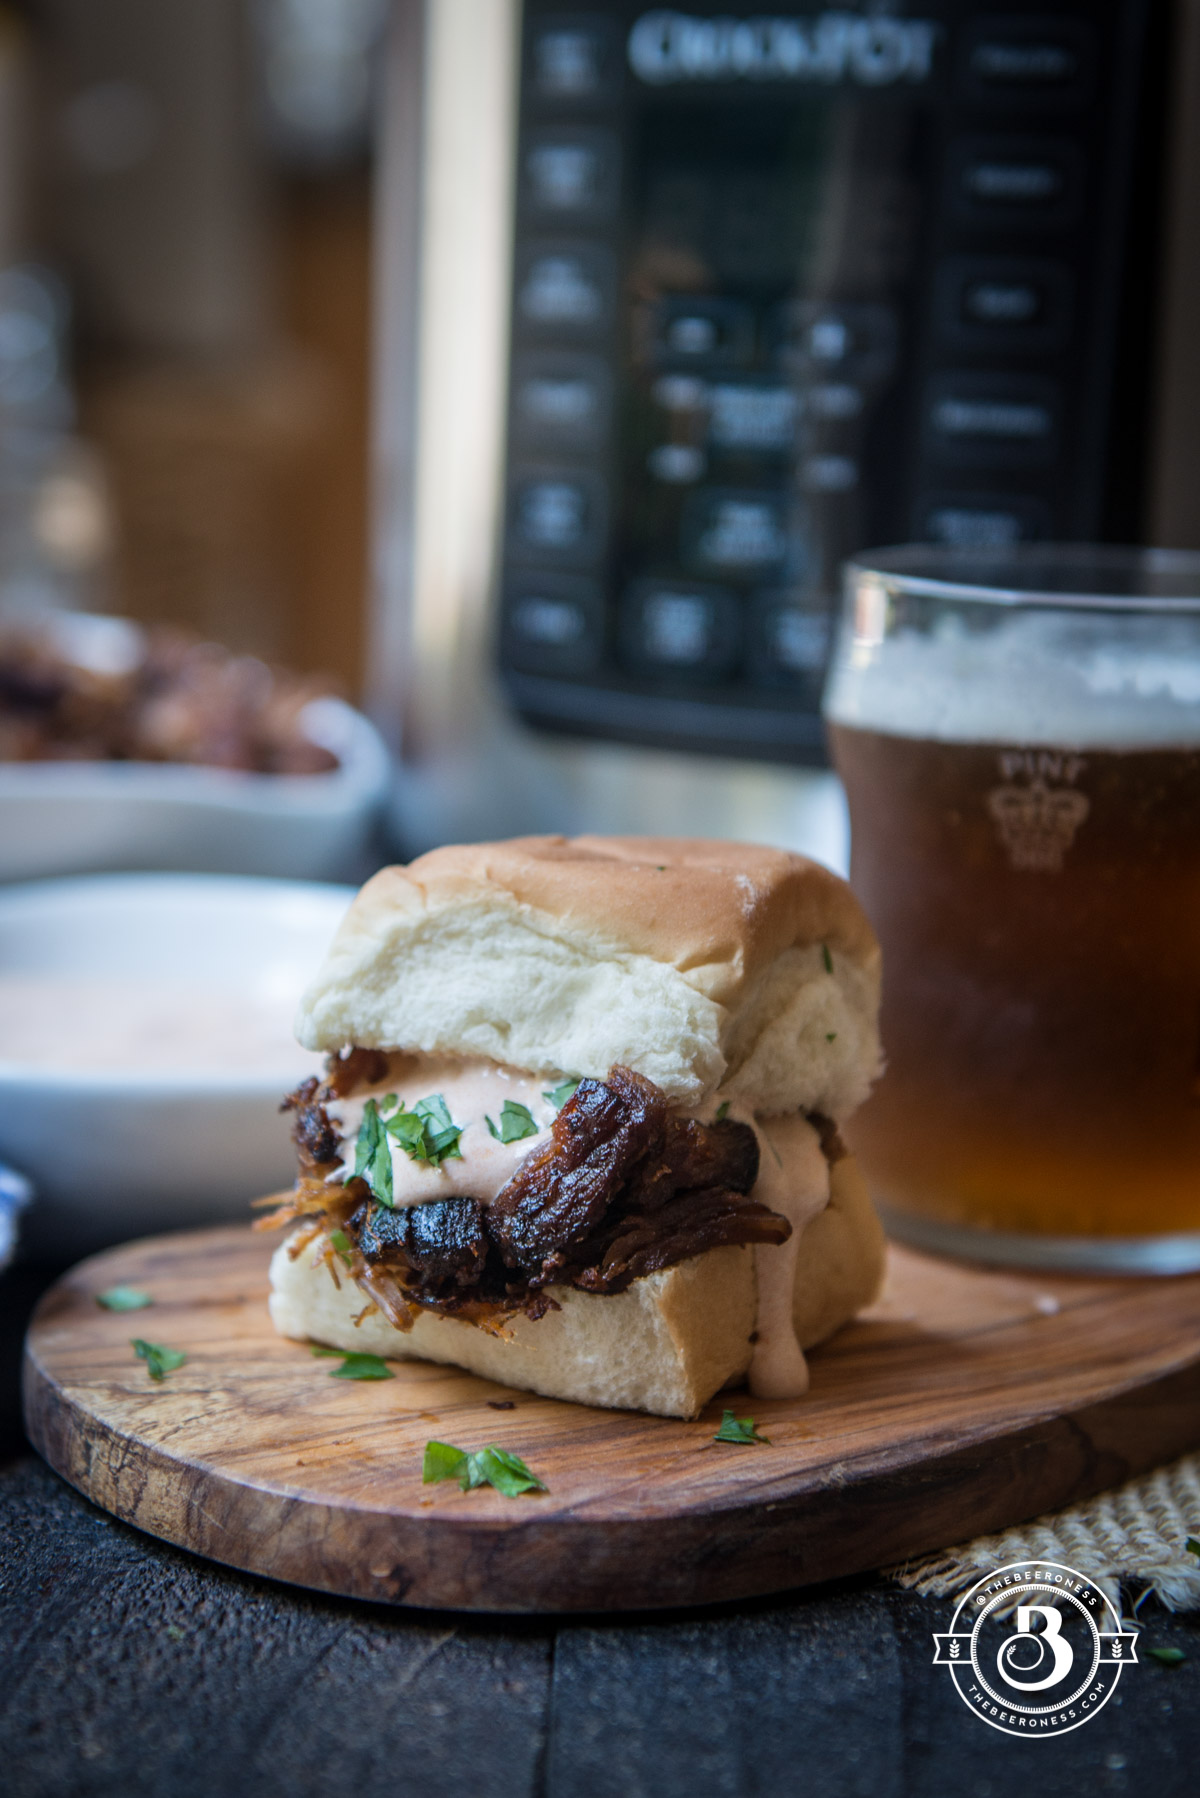
Crock-PotExpress Crock Carnitas Sliders with Chipotle Sour Cream
Sprinkle the pork on all sides with 1 tablespoon salt.
In a small bowl stir together the beer, tomato paste, lime juice, cumin, garlic powder, onion powder, chili powder, cayenne, and smoked paprika.
Add the pork and the sauce to a Crock-Pot Express Crock Multi-Cooker, add the lid (make sure the lid to the Multi-Cooker is locked but the steam value is open to “release” mode). Cook on high for 6 hours, or low for 8 hours.
Remove the inner bowl of the Crock-Pot, pouring off the liquid (leave a small amount, about 2 tablespoons, the amount doesn’t need to be exact), place the bowl back in the Crockpot.
Turn the multi-cooker to the “brown/sauté” setting on high. Shred the pork, in the cooker with two forks while the pot heats up in sauté mode. Press meat firmly down with a wooden spoon into a firm even layer.
Cook for 5-8 minutes, stir and press again into a firm even layer.
Once the remaining liquid is gone and there are pieces of meat that have been nicely caramelized, remove from the pot and add to a serving bowl, toss with the remaining ½ teaspoon salt.
Stir together the sour cream and chipotle peppers.
Add the carnitas to the slider buns, top with sour cream and sprinkle with cilantro.
Notes
*If you plan to make the meat in advance, save about ½ cup of the cooking liquid and add the storage container. It will help to keep the meat moist once you reheat.
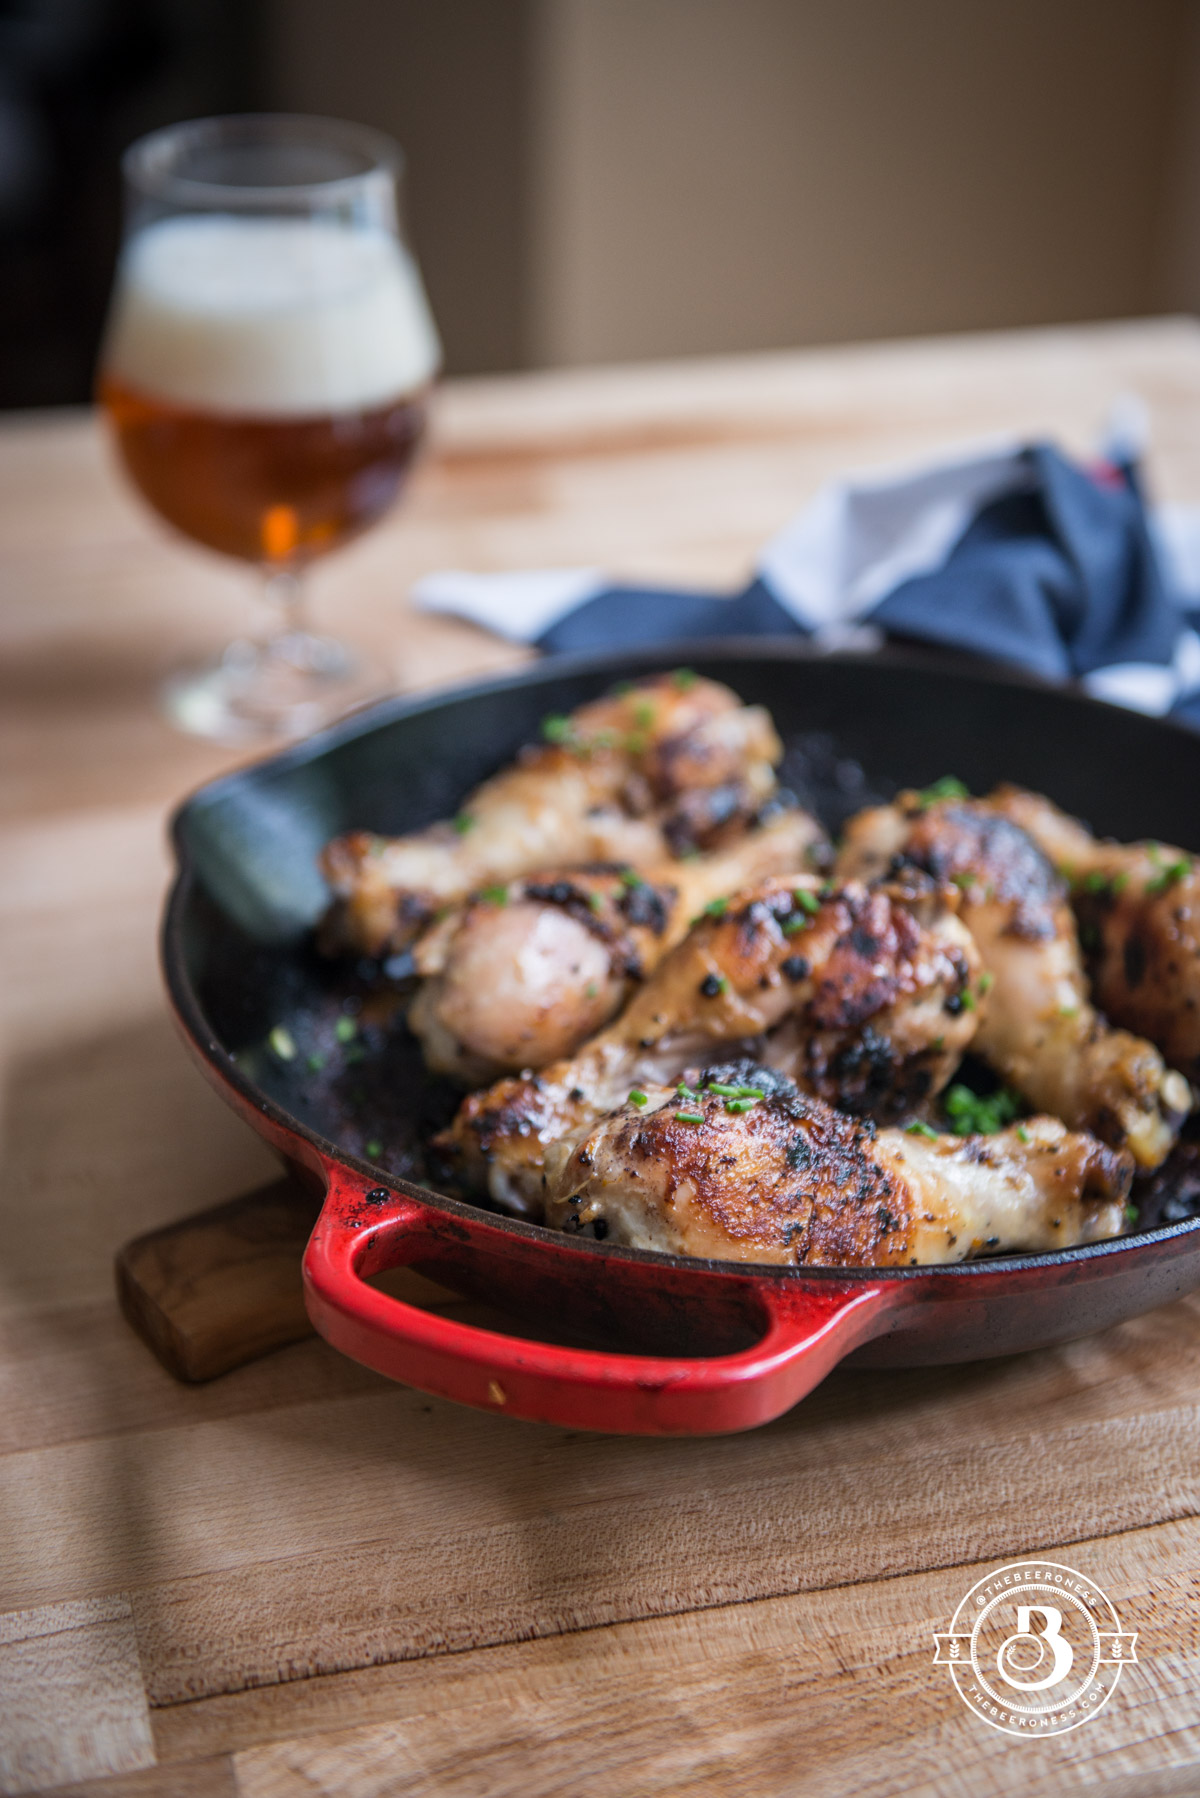
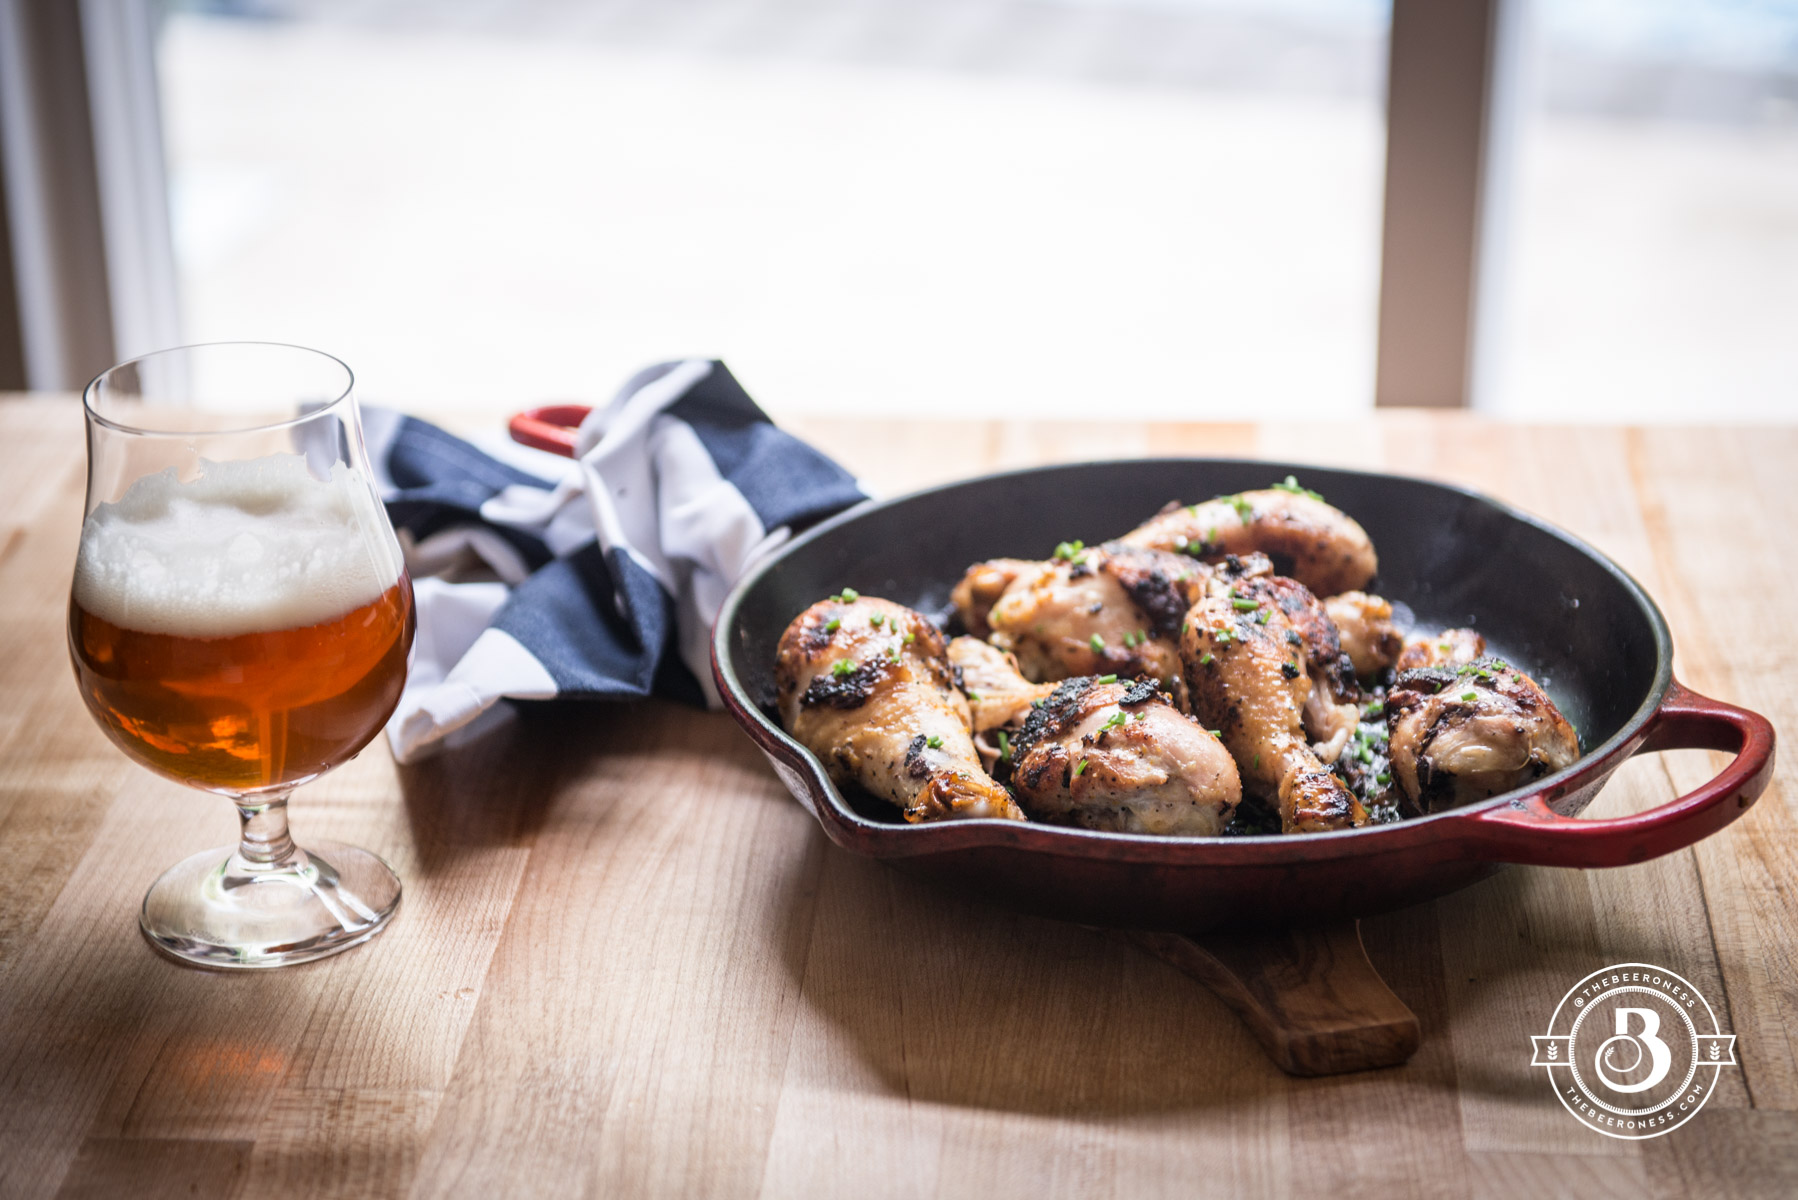
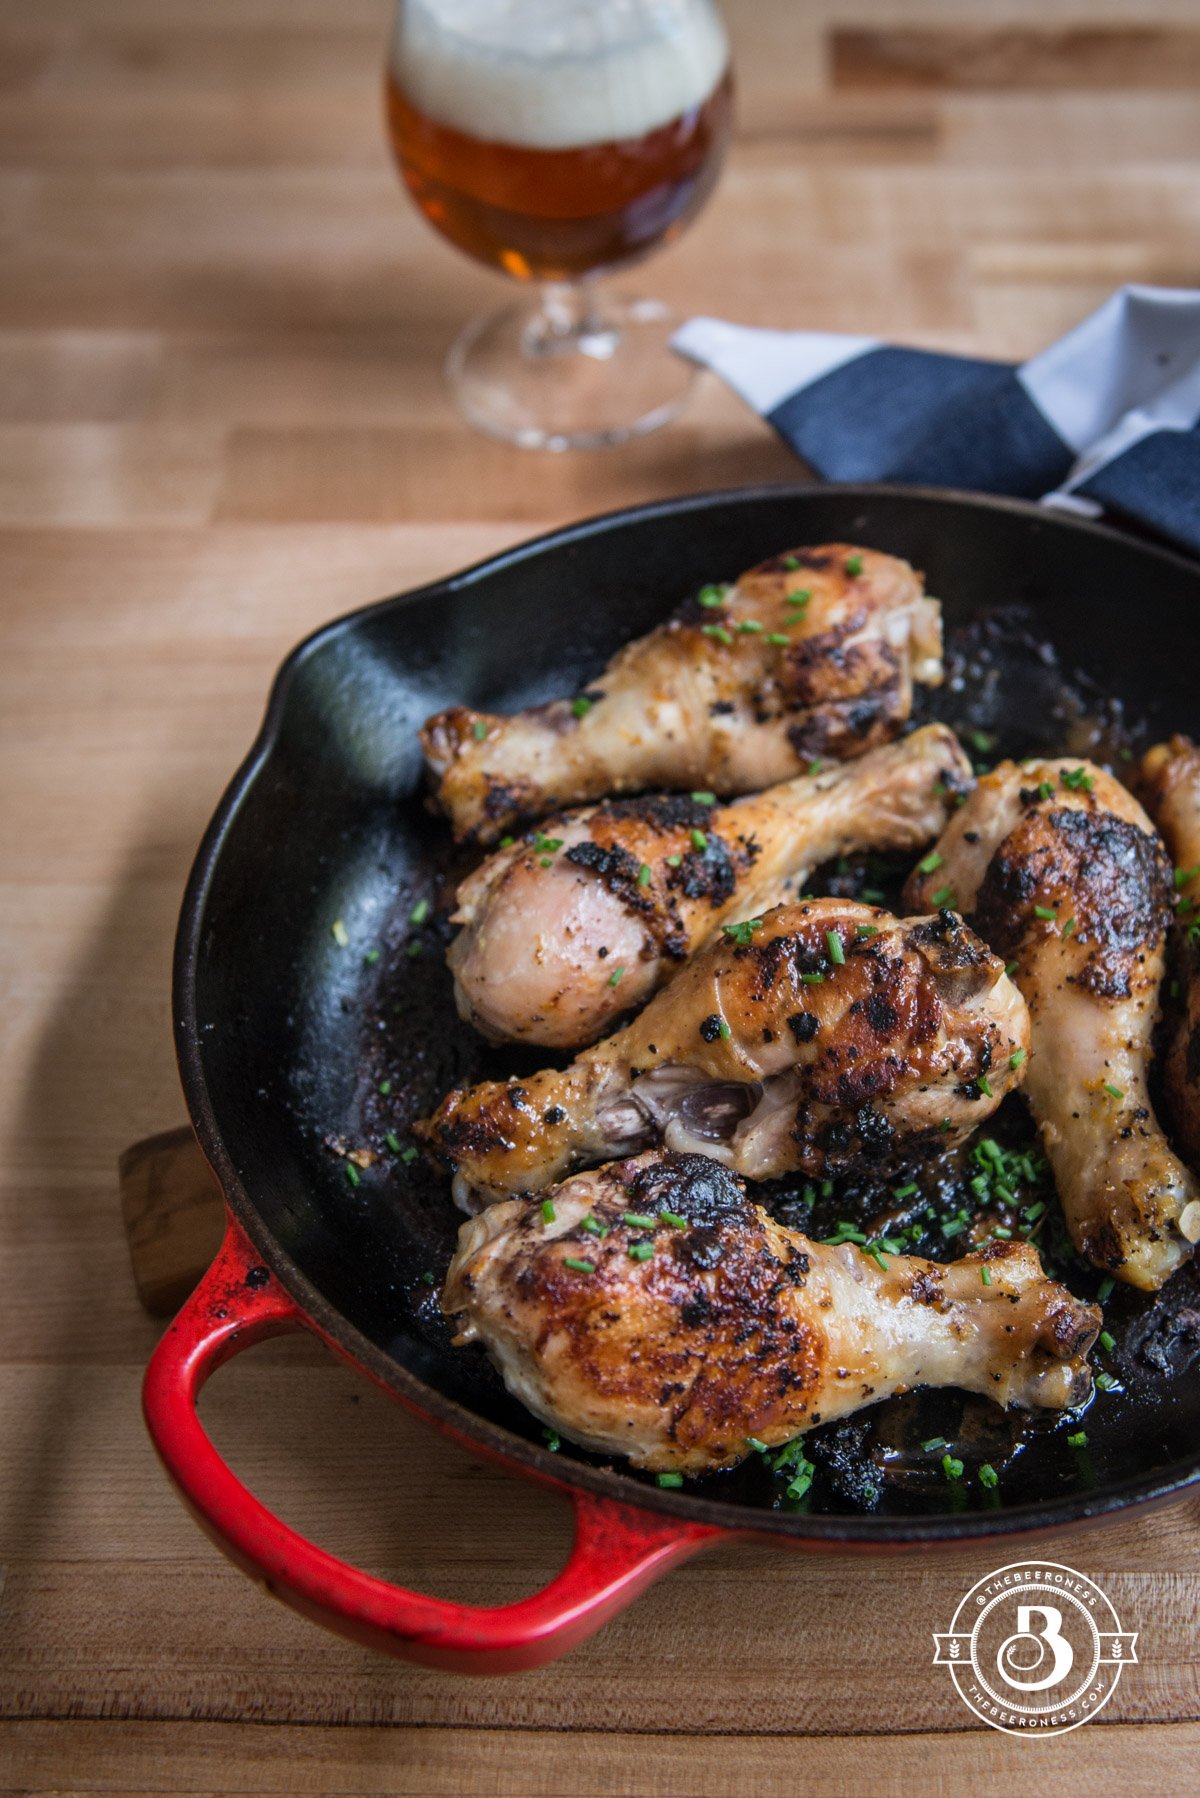
Oven Baked Orange Pepper Beer Chicken, delicious one-pot, super quick and easy meal!
There’s a thing about chicken that always seems to be true no matter how I make it: it’s just as much at home on a white tablecloth in a dimly lit sommelier infested fine dining space as it is on the rickety picnic table of a small backyard gathering.
I like this about chicken, it can go all places. This, in one way or another, is how I try to live my life. I want to be able to feel at home at the opera, or on the farm, or in the inner city. I say I TRY, not that I succeed. I try to be chicken, with its delicious versatility. I try to please everyone from nugget-loving-kids, to batter-dipped-and-fried-devotees to people who confit things.
I don’t, however, think it works all the time. I swear too much, making suburban moms nervous to have me at football parties. When I drink I get loud and start to draw too much attention. And I will probably knock down a toddler to pet a strangers dog. These are not very chicken-like things. Chicken makes people happy, chicken blends in but leaves a good impression. Chicken is a crowd pleaser.
I’m more like beer. You either love me or you don’t. But I do my best to make everyone happy. And maybe there is enough chicken in the world. But a girl can dream.
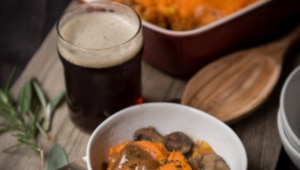
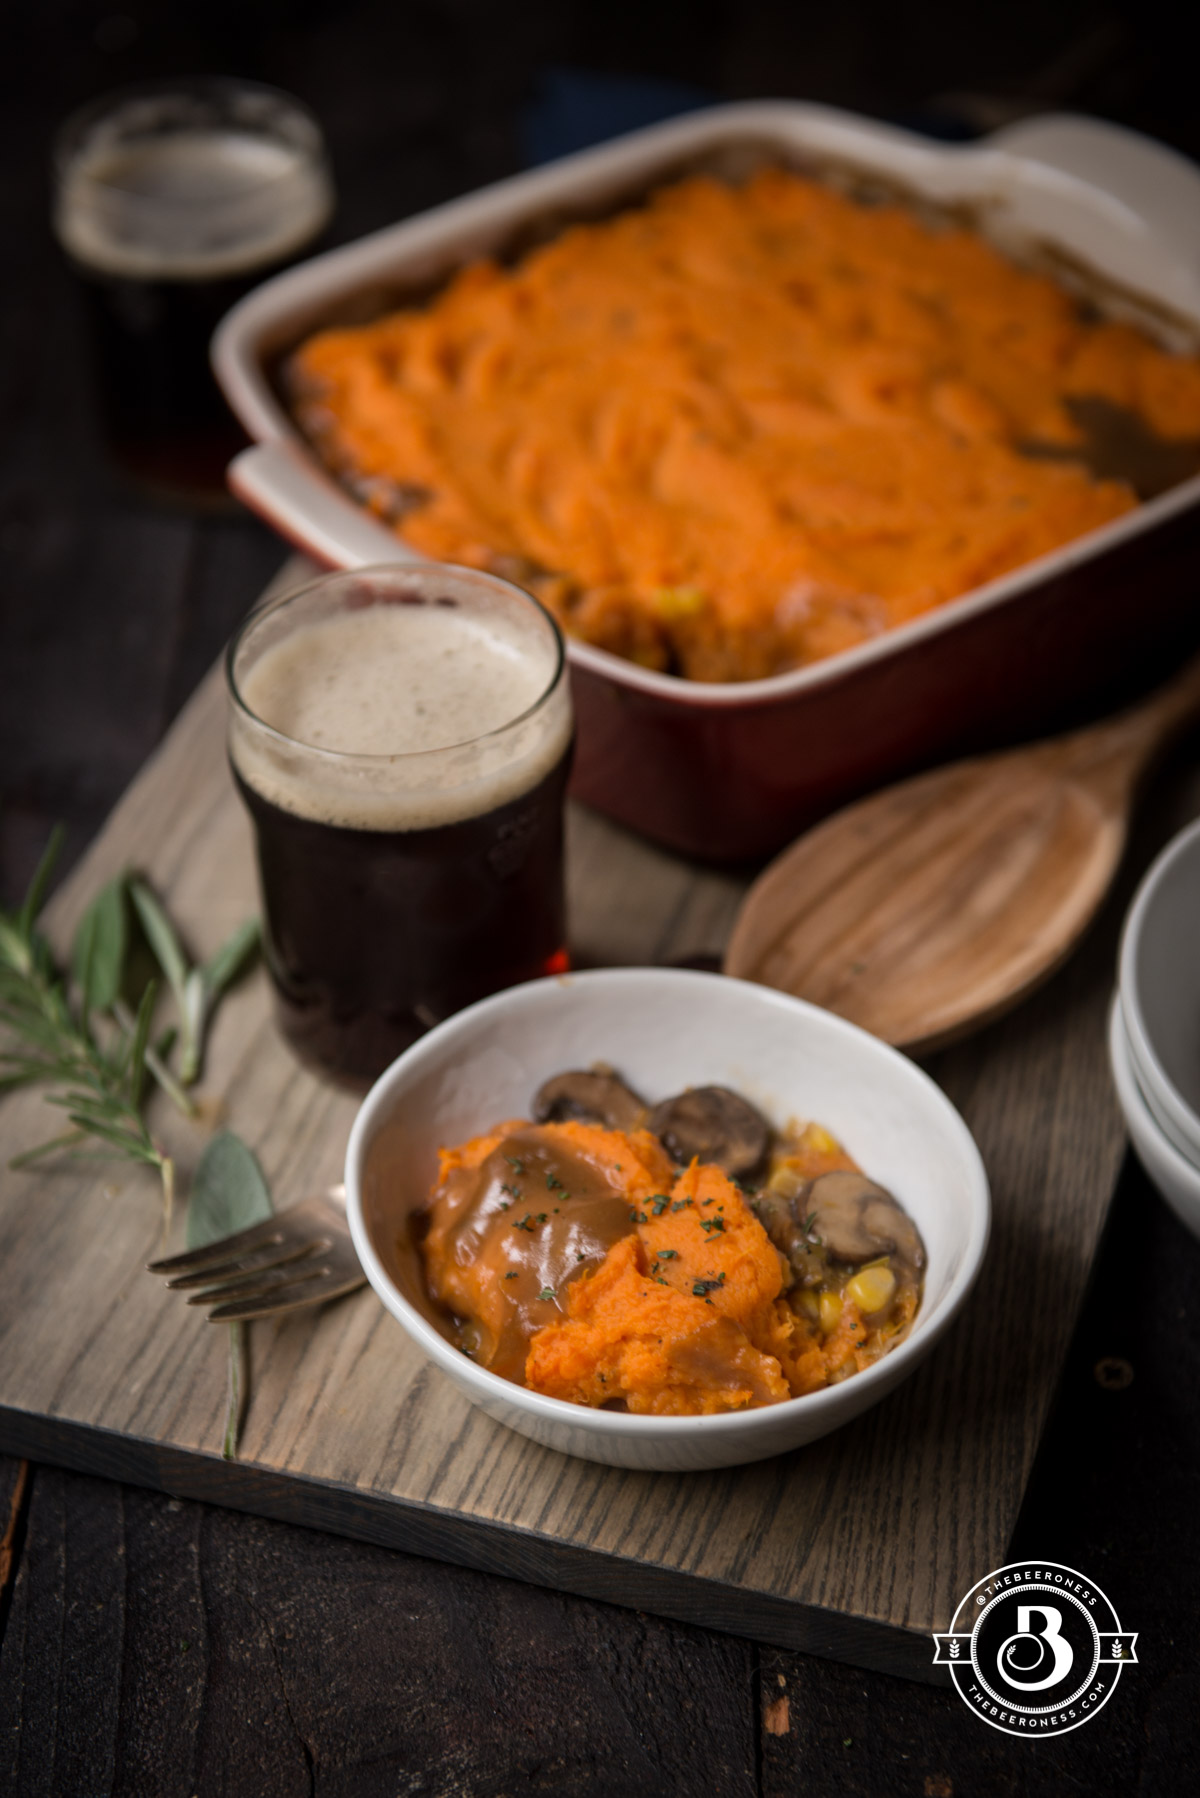
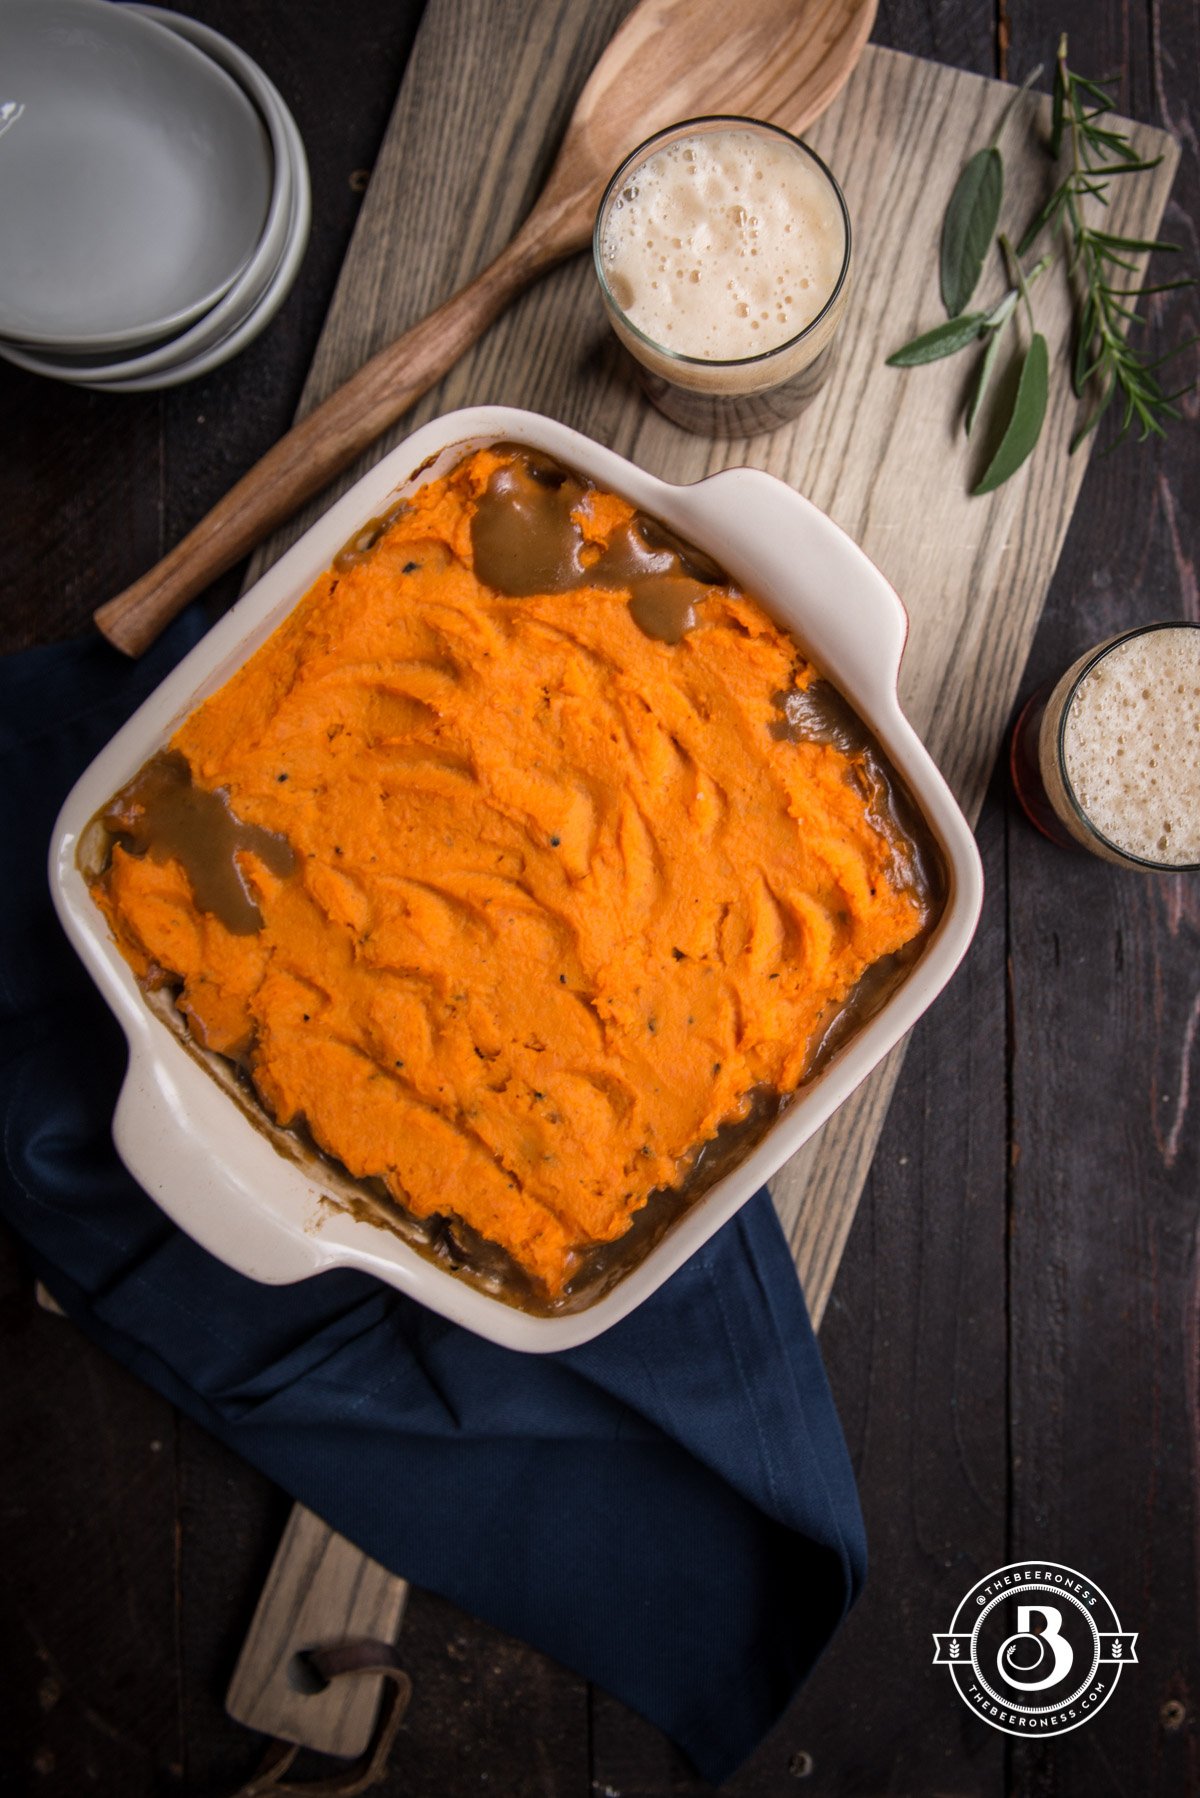
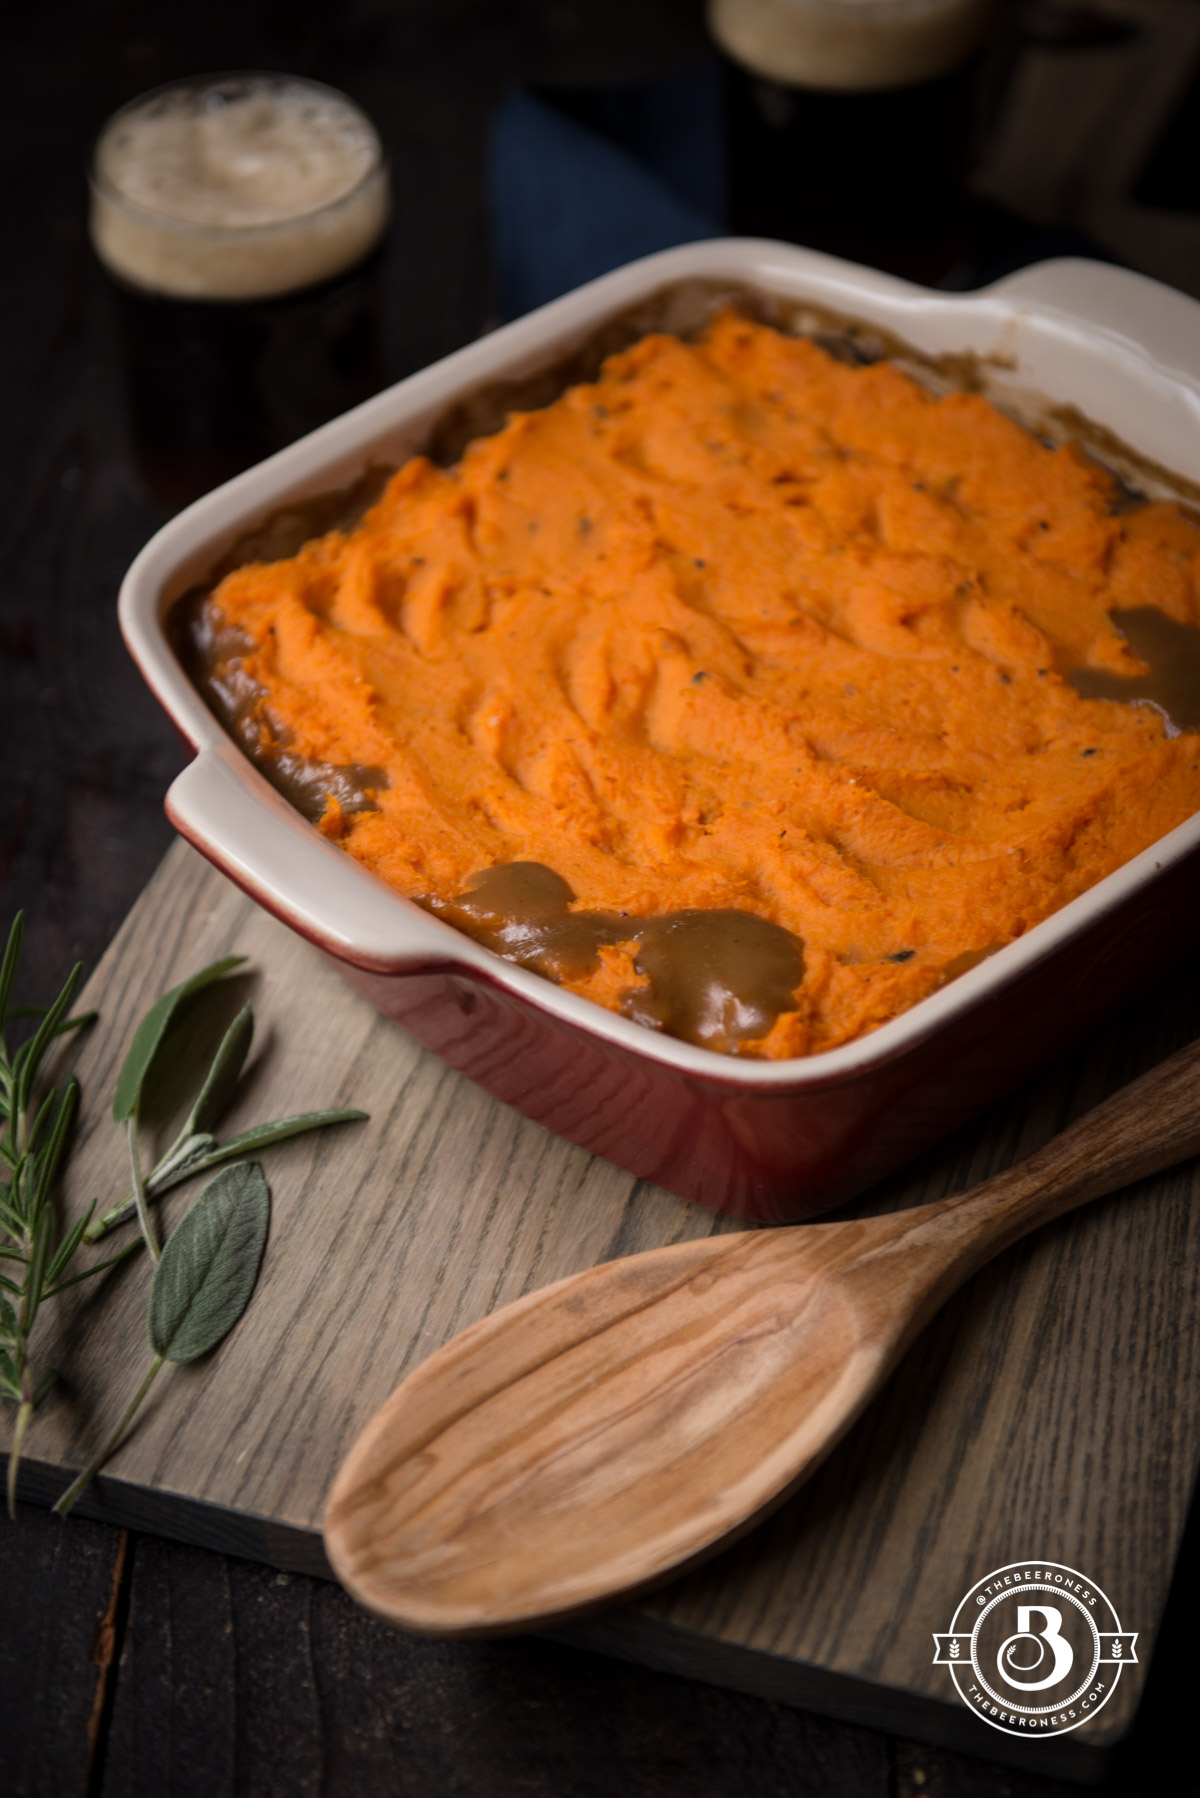
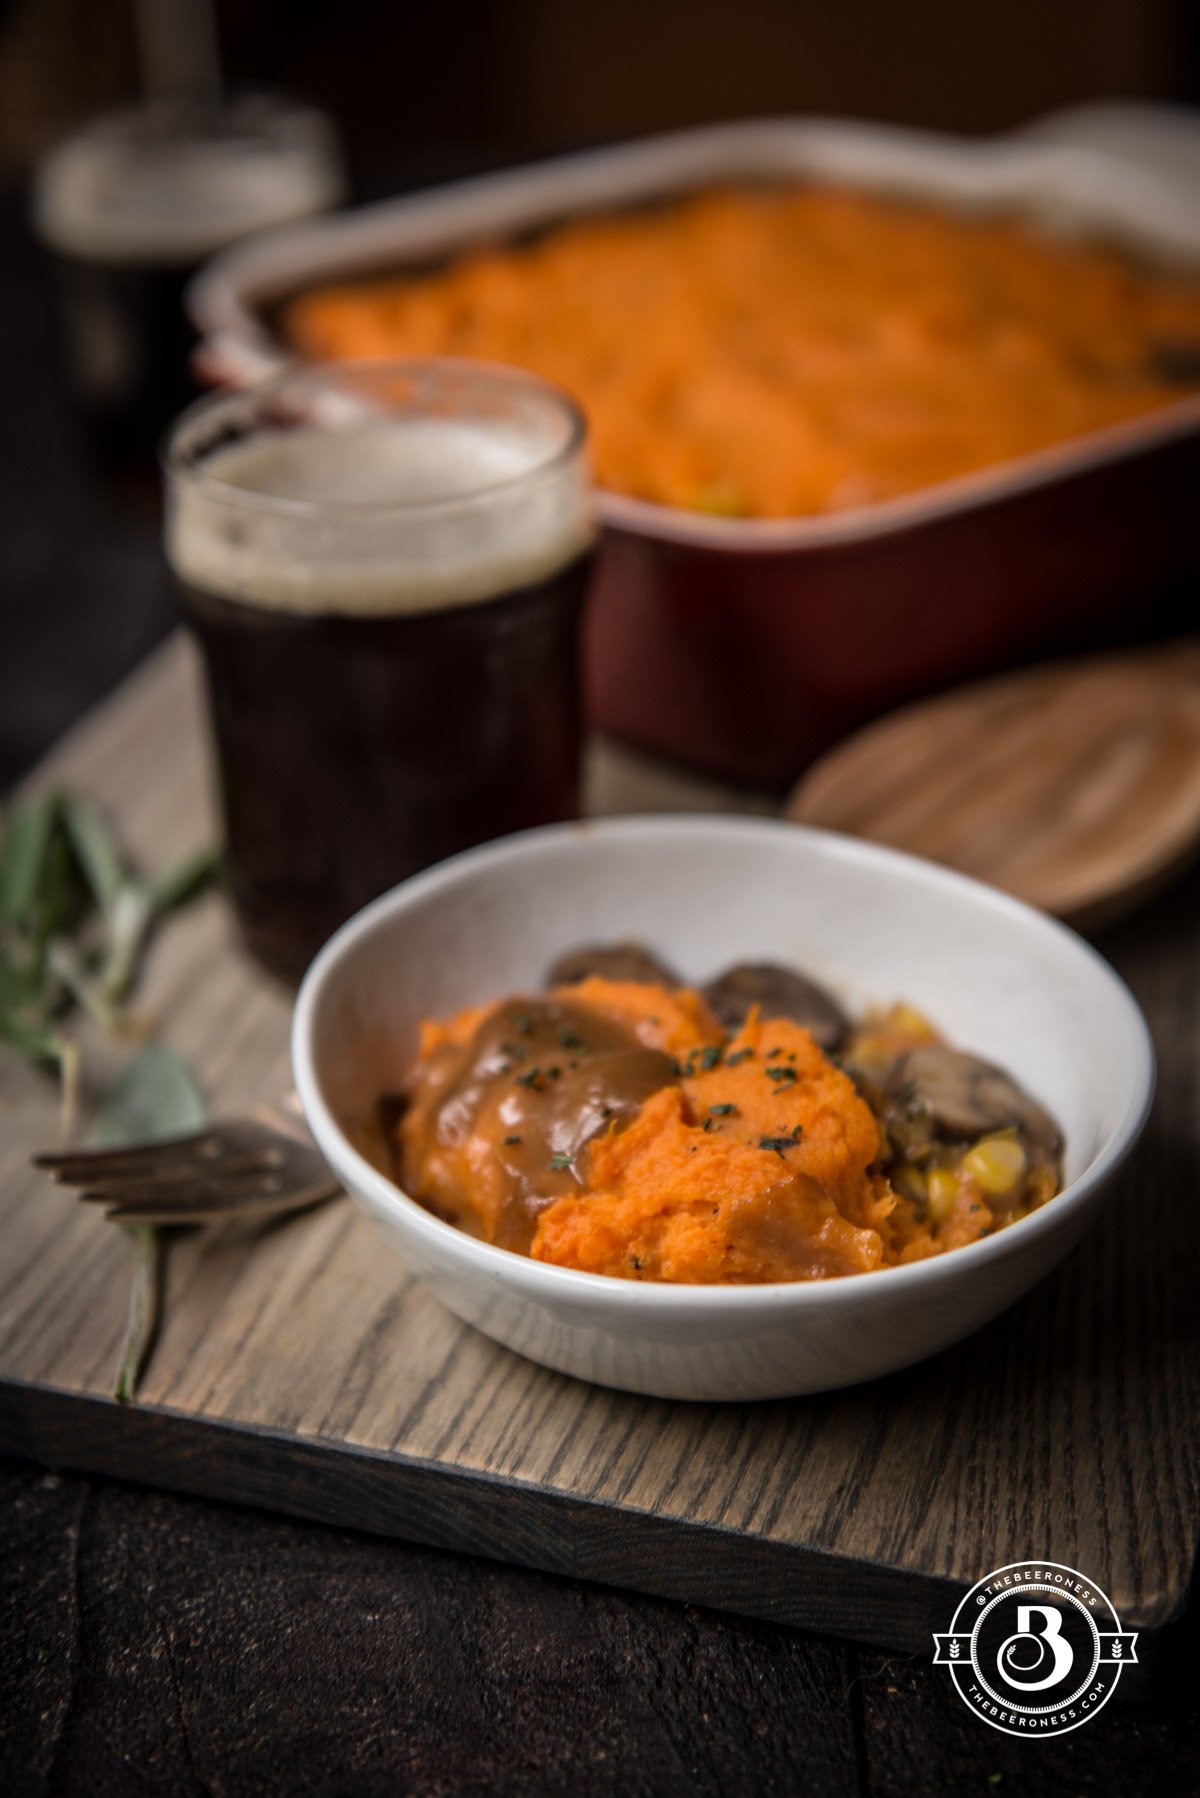
Sweet Potato Stout Shepard’s Pie (Meatless). Vegan, full of warm deliciousness, and freezer friendly.
Some days just making it to dinner feels like an accomplishment. After rage-cleaning your house because you spent too much time reading the news. After seriously considering faking an illness to stay in bed. After realizing that the hint of gray that’s peeking through the windows at noon is all the sun you’re gonna get today, and maybe for quite a while longer.
Baking helps, I promise. You get to feel like you did something, made something, provided something. You get to lose yourself in the task of it and force those other rage-inducing thoughts to the back of the shelf for a bit.
You also get to eat, and that’s always a win.
Today I decided to beer-ify a childhood favorite, that just seemed to be appropriate. I decided to make it vegan, because if I have beer, sweet potatoes, and caramelized leeks I don’t need much else. Also, it makes me feel healthy and that makes me less likely to want to stay in bed all day tomorrow.
This also freezes well, so that you can make a double batch and maybe bring it to someone who may need a little warm, beerified comfort. Because we’re all in this together.
2large leekssliced (white and light green parts only
1large carrotdiced
1rib celerydiced
1lbs16 oz sliced mushrooms
2teaspoonssage leafminced
1teaspoonrosemaryminced
1teaspoonsalt
1teaspoonpepper
1teaspoongarlic powder
1teaspoononion powder
2tablespoonsflour
½cupstout beer
1cupcorn kernels
1cupvegetable broth
Instructions
Preheat oven to 425°F.
Peel and cut the sweet potatoes into chunks, add to a large pot of salted boiling water. Cook until fork tender, drain and return to pot.
Add the almond milk, salt, and garlic powder. Mash until well combined.
Heat the olive oil over medium high heat in a large skillet. Add the leeks, carrots and celery, cooking until softened.
Add the mushrooms, cook until darkened and softened.
Stir in the sage, rosemary, salt, pepper, garlic and onion powder. Sprinkle with flour, stir until the flour has been moistened. Pour in the beer, scraping to deglaze the pan.
Stir in the corn and vegetable broth. Simmer until thickened.
Pour into am 8x8 pan. Spread the sweet potatoes over the top of the pan.
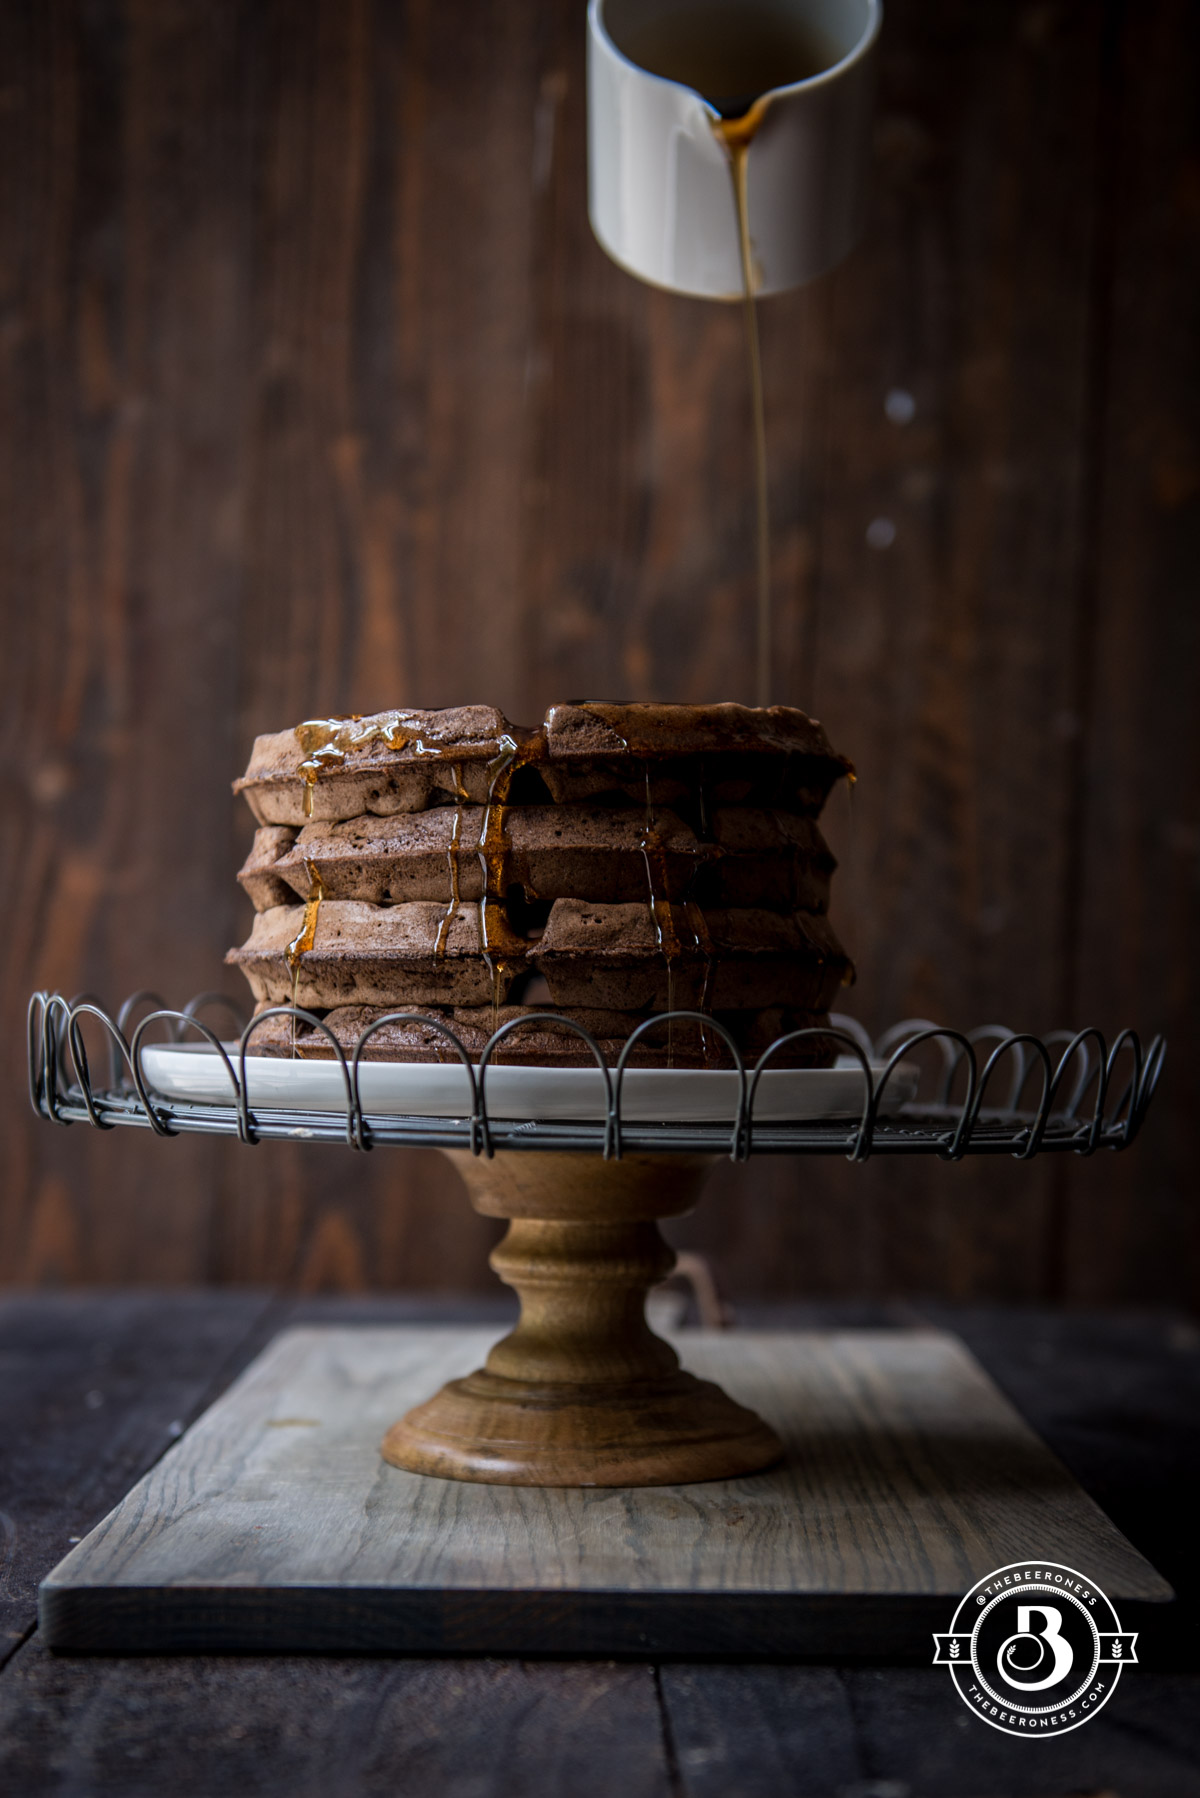
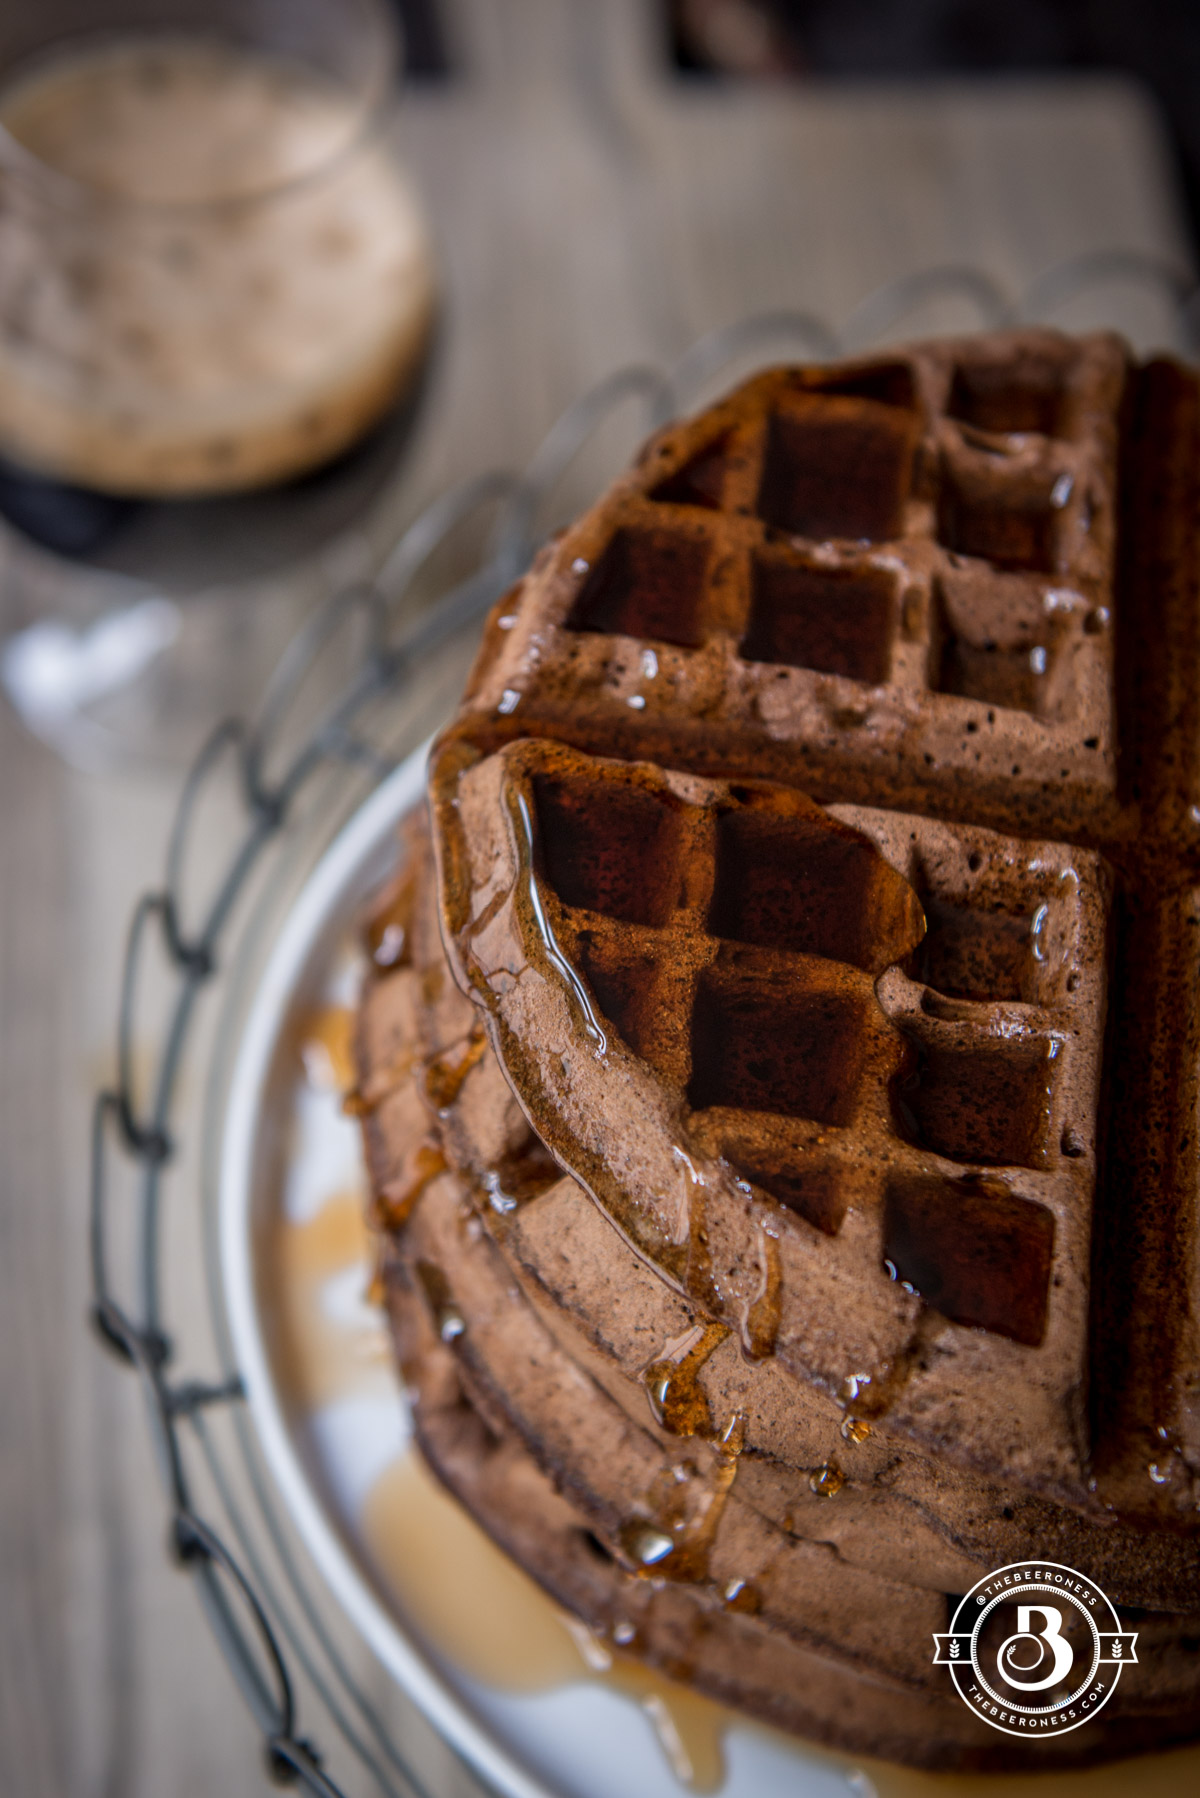
Chocolate Stout Brownie Waffles, beer for breakfast!
This is a PSA. In the light of everything else that will fly at you from your computer this week, all the sad-terrible-no-good-very-bad-news that will be inflicted on you, I’ve got some good news. Waffles aren’t just for breakfast. Breakfast has just been hoarding them.
Breakfast can be a selfish jerk sometimes, claiming coffee, doughnuts, pancakes and pajamas as it’s own. That’s not true, don’t listen. Of course, we love breakfast, it’s our adorable little brother of meals. But it’s about time we stand up for dinner and put on some pajamas at 6 pm and make some waffles.
You can also drink a coffee stout instead of just regular coffee with those Brownie Waffles and taunt breakfast with it. You and dinner will be very happy this weekend.
Add the beer, milk, melted butter, and vanilla to the yolks, beat until well combined, light and fluffy.
In the third bowl (make sure this is the largest bowl, all ingredients will end up in this bowl) stir together the flour, cocoa powder, cornstarch, baking powder, baking soda, salt and 1 cup sugar.
Beat the egg whites until stiff peaks form, beat in the remaining 2 tablespoons sugar.
Make a well in the dry ingredients, add the yolk mixture, stir until well combined.
Gently fold in the egg whites. Cook in your waffle iron according to manufactures specifications (make sure to use cooking spray or melted butter if indicated).