
Dessert

Beer Soaked Apple Pie With Cheddar Beer Crust

When it comes to baking, I’m always intrigued by a new spin on an old favorite. Not to say that I don’t fully appreciate the simplicity and beauty of a perfect and well done classic recipe.  I’ll never tire of a traditional, straight forward apple pie with a huge scoop of homemade vanilla bean ice cream.

But I was introduced to the pure magic of a cheddar pie crust as an encasement for a traditional apple pie, by Kelly of Evil Shenanigans. I couldn’t stop thinking about how much I want to beer-ify (it’s a word) that perfect pie. Kelly’s cookbook, Not So Humble Pies is all about how to take that sweet little pie you’ve always loved and turn it into something they’ll never forget.

She even agreed to let me post my modified and beer-ified version of the crust that’s in her book. Maybe because she watched me greedily inhale two pieces of her pie in record time and was afraid of my possible reaction to not having said pie in my life any longer.

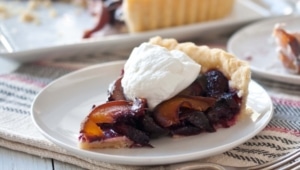
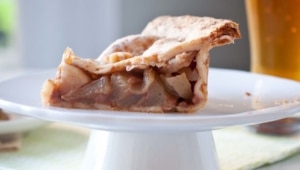
Here is my beer version of an apple pie with a cheddar crust. Which served as dessert, then breakfast the following day, then dinner.

It’s pretty versatile.


Beer Soaked Apple Pie With Cheddar Beer Crust

Ingredients
  

Crust:

  • 2 1/2 cups flour
  • 1 tsp salt
  • 1 tsp sugar
  • 2 sticks unsalted butter
  • 2 cups shredded cheddar cheese
  • 6-8 tbs beer pale ale, or wheat beer work best
  • 2 tbs melted butter to brush on prior to baking

Filling:

  • 7 cups Granny Smith apples peeled, cored and sliced (Granny Smith are the only apples that will not turn mushy during this process)
  • 16 oz pale ale or wheat beer
  • 2 lemons juiced
  • 1/4 cup unsweetened apple sauce
  • 2 tbs flour
  • 1/2 tsp nutmeg
  • 2 tsp cinnamon
  • 1/4 cup white sugar
  • 1/2 cup brown sugar
  • 1 tsp corn starch

Instructions
 

  • Combine 1 1/2 cups of flour, salt, and sugar in a food processor, pulse a few times until its combined. Add the butter and process until well combined, about 2 minutes.Add the remaining flour and process until incorporated, about 1 minute.
  • Move to a bowl and add the cheese and 6 tbs beer, mix until just incorporated. Don't over mix. If the dough is too dry, add more beer until the right consistency is reached.
  • Split into two equal sized portions and form into disks. Wrap the disks in plastic wrap and chill until very firm, about two hours. Because this dough is so soft, it is very important for the pie dough to be very cold and very firm.
  • Place the apples, lemon juice and 16 ounces of beer in a bowl and allow to soak at room temperature for 2 hours. If the apples are not fully submerged, toss every half hour to redistribute. Remove the apples from the beer and allow to drain and dry for about 30 minutes, or until fully dry.
  • Preheat oven to 350.
  • Add the apples and the remaining filling ingredients to a bowl and toss to coat.
  • On a well floured surface, place one of the disks, add flour to the top of the disk as well.
  • Roll out into an even thickness. Marble rolling pins are very cold and don’t disrupt the fat inside the dough, making them an excellent choice for rolling pie dough. When you place your dough in the fridge to chill, add your marble rolling pin as well, allowing it to chill.
  • Add you pie dough to a pie pan and press into shape, removing any excess. Add the filling.
  • Roll out the second disk of pie dough and add to the top of your pie. Press the top crust and the bottom crust together at the edges, cut holes to vent steam.
  • Brush with 2 tbs melted butter.
  • Bake at 350 for 35-40 minutes or until lightly golden brown. Cover the edges with foil of the edge starts to brown too quickly.

Crust adapted from Not So Humble Pies, Kelly Jaggers

Chocolate Chip, Stout & Beer Nut Cookies


If you live in the Los Angeles area, I’m going to need you to do me a favor. I’ve somehow been booked on CBS, Los Angeles mid-day news with a cooking segment this Friday, August 31st. They want me to do a quick Cooking With Beer segment on the news at noon. People will be hungry, naturally, it is lunch time, and my hope is that this will persuade them to ignore any brief moments of nervousness that I have.

But If you could tune in, and support me, that would be great. I’m not really nervous, I keep waiting for that to set in, but it hasn’t yet. When it does, I would love to know that people who have been visiting me here on this little blog for the past year are out there cheering me on.

That would be great.

In the meantime we’re going to make some cookies. These call for the classic Beer Nuts, which I found myself in possession of after a particularly round night of cards at my house. Several bags of Beer Nuts left by an anonymous donor.  And I can’t just leave them in my pantry, I need to find a use for them.

We are also going to revisit that crazy idea I have of making beer extract. Because vanilla is just too…well, vanilla.


Chocolate Chip, Stout & Beer Nut Cookies

Ingredients
  

  • 3/4 cup stout beer
  • 1 cup cake flour
  • 3/4 cup bread flour
  • 1/2 tsp cornstarch
  • 1 tsp baking powder
  • 1/2 tsp salt
  • 3/4 cup butter
  • 2/3 cup brown sugar
  • 1/2 cup white sugar
  • 1 egg
  • 1 cup dark chocolate chips 60%
  • 3 oz bag Beer Nuts

(Makes 10-12 cookies)

    Instructions
     

    • In a pot over medium high heat add the beer. Cook, stirring occasionally, until reduced to about 1 tbs.
    • In the bowl of a stand mixer, add the butter and both types of sugar, beat until well creamed. Add the egg and beat until well combined. Add the 1 tbs of beer extract and beat until well combined, scraping the bottom to make sure all the ingredients are well combined.
    • In a sperate bowl, add both types of flour (these two types of flour are very important to the end result of your cookies, regular all purpose flour will not give you the same results), cornstarch, baking powder and salt. Mix well. Add dry ingredients to the stand mixer and mix on medium/low speed until just barely combined, don't over mix. Add the chocolate chips and Beer Nuts, and stir until incorporated.
    • Resting the dough is an important step in this recipe. Cover a baking sheet with parchment paper, scoop golfball sized scoops of dough, roll them into round balls and place on the baking sheet, cover with plastic wrap and chill for at least 4 hours.
    • Preheat oven to 350.
    • Bake for 20-22 minutes or until light golden brown, don't over bake. (If you don't chill the dough, or if you make smaller sized cookies, the cooking time will be much shorter. Start to keep an eye on your cookies after about 14 minutes).


    Cherry Peach Tart With Coconut Cointreau Whipped Cream (Vegan)

    Julia Child would have turned 100 today. She’s an inspiration, not just for those of us who cook, but for anyone who is sitting in an unfulfilling life wondering how then ended up where they did. Anyone who thinks they are "too old" to start a new path.

    Julia didn’t start cooking until she was 32 and she didn’t enter culinary school until she was 37. And just look at how that turned out for her, I’d say pretty well. What if she had felt "too old" to start learning how to cook? Would we still be putting canned pineapple slices on ham and eating Sarah Lee on special occasions?

    Laura Ingalls Wilder didn’t start writing until she was in her 40’s and her Little House books weren’t written untill she was in her 60’s.

    Martha Stewart was a stock broker until she started working on renovating a farm house at the age of 32.

    Andrea Bocelli didn’t start singing opera until he was 34.

    Grandma Moses didn’t start painting until she was 70.

    Makes me feel like I have an early start on this career change I want to make. Instead of thinking "Who am I to do that?" Start thinking, "Why not me?" If they can do it, why not you?


    Reminder: If you are in San Diego and want tickets to the Foster Farms Cook Off on September 7th, check this out.

    Cherry Peach Tart With Coconut Cointreau Whipped Cream (Vegan)

    Ingredients

    Crust:

    • 2 cups flour
    • 1 tsp salt
    • 1 tsp sugar
    • 3/4 cup of vegetable shortening (can sub butter for non vegan)
    • 2 to 4 tbs ice cold water

    For the filling:

    • 3 cups cherries, halved and pitted
    • 1/3 cup powdered sugar
    • 1 tbs flour
    • 2 yellow peaches, sliced

    For the whipped cream:

    • 1 can full fat coconut milk, chilled in the fridge overnight (important) (can sub 1 cup whipping cream for non vegan)
    • Chilled bowl (like the bowl of a stand mixer, just place it in the fridge for a few hours)
    • 3 tbs powdered sugar
    • 1 tbs Cointreau

    Instructions

    1. In a food processor, combine 1 1/3 cup flour, salt, sugar and shortening, process until well combined. Add the remaining flour and process again until combined. Transfer to a bowl and add the water with a wooden spoon (don’t add the water while the dough is in the food processor or your dough will be brittle and cracker-like). If the dough isn’t moist enough, you can add more water, a tsp at a time until the consistency is right. Dump the dough into the bottom of a 9 inch tart pan with 1 1/2 inch high sides, sprayed with cooking spray. Starting with the sides first then the bottom, form the crust into the pan. Chill the crust for 2 hours in the fridge. (If you haven’t yet, put a bowl in the fridge to chill to make the whipped cream)
      (*Note: if you have a smaller tart pan, mine seems to be quite large, you will need less tart dough, pull out any excess and make a mini tart in a muffin tin. You can also double the recipe, form the excess into a disk, cover with plastic wrap, place in a Ziplock freezer bag and freeze. should keep up to two months)
    2. Preheat oven to 350.
    3. Add the cherries, sugar, and flour to a bowl and toss to coat. Add the cherries to the tart crust. Top with sliced peaches. Bake at 350 for 25-30 minutes or until tart crust is a light golden brown. Allow to cool before removing from tart pan.
    4. Make the whipped cream.
    5. Open the can without shaking. Scrap only the fat layer at the top and into the chilled bowl, do not include any of the water in the bottom of the can, just the fat layer. Using a hand mixer, on high, whip until light and fluffy. Add the powdered sugar and whip until combined. While the mixer is running, slowly add the Cointreau until combined.
    6. Serve the tart topped with whipped cream.

    Chocolate Coconut Ice Cream (Vegan)


    ( chocolate coconut ice cream vegan ) 

    I’m still in shock about this ice cream.

    First, I am still wrestling with this realization that I actually DO like coconut after years of testifying to my hatred for it. But it turns out that I love it, and my favorite of all the coconut products is coconut milk. And although I still loath "coconut" candy and all the oddly texture invasive disgust that it has assaulted my mouth with over the years, but I can’t hold that against the amazing substance that is coconut milk.

    I can’t stop putting it in things and my fervent adoration has only grown once I have discovered what it does once it hits my KitchenAid Ice Cream maker (affiliate link).

    A creamy texture that is much better than any cow’s milk product I have ever made. You’ve seen a can of full fat coconut milk, and that creamy layer on the top, it’s beautiful. And it’s incredible in ice cream, with a smooth and rich flavor that reminds me of the gelato I had in Italy.

    You will love this and everyone will be shocked that it’s vegan. I can’t even believe it.

    Chocolate Coconut Ice Cream

    Ingredients

    • 2 (13.5 oz) cans of full fat coconut milk
    • 1 1/4 cup sugar
    • 1/2 cup good quality unsweetened cocoa powder

    Yield: About 2 1/2 cups

    Instructions

    1. In a pot over medium heat, add all the ingredients and stir. Allow to simmer until thickened slightly, about 8 minutes.
    2. Place in a container and refrigerate until cold, about 4 hours.
    3. Add to an ice cream maker and churn until set, about 15 to 20 minutes. Freeze until desired consistency is reached

    *Note: I use a Kitchen Aid Ice Cream maker: churn time was 15 minutes for a "soft serve" consistency and another 2 hours of freeze time for a harder scoop style ice cream.


    Chocolate Stout S’Mores Bars

    I have some s’mores trivia for you. I have a fascination with useless mundane trivia, and tend to  collect and expel said facts without provocation. So, here is the s’mores trivia I promised that you are undoubtably eager to get to:

    • The recipe for s’mores was first published by the Girl Scouts in 1927. Further proof that those smug little culinary crack dealers have a long history with the creation of addicting sweet treats. (* this last sentence is not actual fact, just observation)
    • National S’Mores day is August 10th. More than enough time for you to whip up a batch of beer soaked s’more bars (*Actual fact).
    • The recipe’s original credit is given to Loretta Scott. But let’s be honest, stolen content predates blogs, no one really knows where the recipe came from. At least she didn’t steal their photo and submit it to Foodgawker. (*combination of fact, conjecture and emotional trauma resulting from web thievery)
    If you have any random, little known or otherwise useless s’mores facts, I’d love to hear them.


    Chocolate Stout S’Mores Bars

    Ingredients
      

    • 10 graham crackers
    • 3 tbs butter melted
    • 2 tbs brown sugar
    • 3 eggs
    • 1 cup white sugar
    • 1/2 cup brown sugar
    • 1/2 cup dark chocolate chips
    • 1 stick butter
    • 1 cup cocoa powder
    • 1/2 tsp salt
    • 1/2 cup flour
    • 2/3 cup chocolate stout
    • 3 cups standard size marshmallows

    Instructions
     

    • Preheat oven to 350.
    • In a food processor, add the graham crackers and the brown sugar. Process until nothing is left but crumbs. Remove the stopper from the food processor lid. While the food processor is on, slowly add the 3 tbs melted butter and process until it resembles wet sand.
    • Add to a 9 x 13 pan. Distribute evenly along the bottom, pressing firmly into place.
    • In a bowl, beat the eggs and both sugars on high until well combined, about 3 minutes.
    • In a microwave safe bowl, add the chocolate chips and the butter. Microwave on high for 30 seconds, stir and repeat until melted and well combined. Add the chocolate to the egg/sugar mixture and beat until well combined.
    • In a separate bowl, mix the cocoa powder, salt and the flour until well combined. Add to the wet ingredients and stir until just combined. Add the beer and stir until just combined.
    • Pour the batter over the crust.
    • Place marshmallows in even rows across the top, leaving a 1/2 inch boarder along the edge.
    • Bake at 350 for 22 minutes or until the marshmallows are golden brown.
    • You still want the bars to be soft, don't over bake, they will continue to set as they cool.

    Apricot Basil Ice Cream

    I’ve always defined the "Perfect Gift" as something you want but would never spend the money to buy for yourself. Things that may not be expensive, but because money is a limited resource no matter who you are , these things just don’t make that "Must Buy Today" list. Things you quietly (or possibly aggressively) lust after but there are always other things that take top billing in your budget.

    A few years ago I was given a KitchenAid Ice Cream maker (affiliate link). for Christmas. Perfect. I wanted it, but don’t make enough ice cream to really justify the purchase. I’d see it at Sur La Table, pause for a moment and then end up with something a bit more practical in that brown and purple bag.

    Now that I have it, it makes me feel like a brilliant hostess. "You MADE ice cream? From scratch?" it sounds so luxurious  and ambitious. Even though I only break it out a few times a year, I am always so glad I have it. If you agree not to tell anyone how easy it is to make ice cream from scratch, I won’t either. And we can continue to impress people with the long hours we slaved away to bring them such a momentous dessert.

    Apricot Basil Ice Cream

    Apricot add in:

     4 cups soft apricots, pitted

    1 tbs fresh lemon juice

    4 large basil leaves

    1/4 cup sugar

    Ice Cream Base:

    2 cups whole milk

    4 egg yolks

    1 tsp vanilla

    1 1/2 cups sugar

    1 cup heavy cream

    Place the bowl of your ice cream maker in the freezer for at least 8 hours (I store mine in the freezer so it’s always ready to go) or freeze according to manufacturer specifications.

    In a food processor, add the apricots, lemon juice, basil leaves and 1/4 cup sugar, puree until smooth, some chunks of apricot are fine.

    To make the ice cream base, add the milk, egg yolks, vanilla and remaining sugar  to a cold sauce pan and whisk until the mixture is well combined. Place the pan over medium high heat and stir until the mixture has thickened slightly (will coat a spoon), about 10 minutes, remove from heat. Stir in the cream.

    Add the apricot puree and mix until combined. Add to an air tight container and place in the fridge and allow to cool for at least 4 hours.

    Add to the frozen ice cream bowl and churn according to manufactures specifications, about 12 minutes in my Kitchen Aid Ice Cream Maker. Place in an air tight container and freeze until firm, about 2 additional hours.

    {Pin This Post!}

    Follow me on Twitter

    Follow me on Pinterest

    Domestic Fits on Facebook

    Chocolate Porter Strawberry Shortcakes With Beer Whipped Cream

    (Chocolate Porter Strawberry Shortcakes With Beer Whipped Cream)

    I’m taking a huge risk here.

    You may have taken one look at this post and decided that I’ve lost my magic. Chocolate beer cake is as common as Nascar sweatpants in Walmart. But unlike motor sports fashion blunders in public, I loved this dessert.

    I’m combining a past evoking childhood treat with my beer loving present tense self, and topping it with beer whipped cream. Strawberry shortcakes were one of my favorite desserts as a kid, but growing up I never had them from scratch. I was raised in a very prepackaged, frozen food section, shelf-stable house, with a mom who was trying to feed all of her 8 daughters (yes, that isn’t a typo, I have 7 sisters) with no time for any culinary adventure beyond reheating and assembling. Completely understandable.

    Making my childhood memory of strawberry shortcakes those pre-packaged round sponge cakes, with Cool Whip and chopped strawberries.

    So this is the "I cook from scratch and add beer" version of that. Although not a traditional "shortcake," I hope once I top it with drunken whipped cream and fresh berries you’ll forgive the misstep in terminology.

    Chocolate Porter Strawberry Shortcakes With Beer Whipped Cream

    For the cake:

    3 cups cake flour

    2 tsp baking soda

    1 tsp baking powder

    3/4 cup cocoa powder

    1 tsp salt

    2 sticks butter (softened)

    2 cups sugar

    5 eggs

    1 tbs vegetable oil

    12 oz Porter beer

    For the strawberries:

    4 cups strawberries, hulled and chopped

    1/2 cup sugar

    For the whipped cream:

    2 cups heavy cream

    1/2 cup powdered sugar

    2 tbs porter beer

    (makes 10)

     Preheat oven to 350.

    In a bowl, combine the flour, baking soda, baking powder, salt and cocoa powder.

    In the bowl of the stand mixer cream the butter and sugar. One at a time add the eggs, beating well and scraping the bowl between each addition, then add the oil. Alternating between the beer and the dry ingredients, add both a bit at a time, starting and ending with the dry ingredients, stir until just barely combined.

    Grease and flour two 8 inch cake pans.

    Pour batter into prepared pans. Bake at 350 for 20-25 minutes or until a toothpick inserted in the center comes out clean. Allow to cool.

    Invert the cake pan onto a flat surface. Using a 2 1/2 inch biscuit cutter, cut out 5 circles from each cake round (you can also use a large knife to cut them into squares).

    Place chopped strawberries in a bowl with sugar, stir to combine. Allow to sit at room temperature for ten minutes.

    In the bowl of a stand mixer, add the cream, powdered sugar and 2 tbs beer. Whip on high until soft peaks form, about 4 minutes.

    Place one cake round on a plate, top with strawberries and then with whipped cream.

    Join me: FacebookTwitter 

    Strawberry Beer Sorbet

    Everything I love about summer is in this dish.

    Or, more accurately, everything I love about summer that can fit into a small metal bowl are in that dish.

    Fresh produce.

    Homemade sorbet.

    Beer. Of course, beer.

    And when I was buying said beer, Alesmith Anvil, I had an interesting conversation with Beer Store Beer Guy.

    For the most part, I really like my chats with Beer Store Beer Guy so much that I forgive him when he makes the assumption that I have no idea how I ended up in the Beer aisle and he must point the poor lost girl back to the Chardonnay section where she has most likely wander off from.  I’m ok with this, the trapping of being tall and blonde and with the egregious mistake of having a brain in my head, I find it amusing. Like when I end up at the mechanics and they have no idea my step dad was ASE certified, or those adorable guys at Home Depot who try to point me back to the paint isle when I really want to buy a new blade for the tub saw so I can finish re-tiling the kitchen floor. The greatest advantage anyone has is to let others underestimate them. I’ve come to find it endearing when Beer Store Beer Guy, Hardware Store Guy and Mechanic Guy try to take care of the lost girl and help her find her way. Because what I really want to be is Marisa Tomei in the last court room scene in My Cousin Vinny saying things like,

    "'Cause Chevy didn’t make a 327 in ’55, the 327 didn’t come out till ’62. And it wasn’t offered in the Bel Air with a four-barrel carb till ’64. However, in 1964, the correct ignition timing would be four degrees before top-dead-center."

    And you can really only have that once someone decided to underestimate you.

    Something else you shouldn’t underestimate is the flavors in the Anvil. It may seem like a strange choice for this sorbet, giving the matlier, toastier flavors but I love the balance it gave.

    Choose a beer that has notes of citrus, fruit and spice. A citrusy IPA would be a great choice as well.

    And don’t be offended when others underestimate you, use it to your advantage.

    StrawBerry Beer Sorbet

    Strawberry Beer Sorbet

    Ingredients
      

    • 4 cups fresh strawberries hulled and chopped
    • 1 cup sugar
    • 2 cups beer pale ale with notes of citrus

    Instructions
     

    • In a sauce pan over medium high heat, add the strawberries and the sugar. With a potato masher, or mallet, smash and stir the strawberries until well macerated and combined with the sugar.
    • Allow the mixture to come to a boil, stirring and mashing until all the strawberries have broken down, about 10 minutes.
    • Remove from heat, stir in the beer and allow to cool. (If you want to strain the pulp and seeds, do so now. I didn't strain.)
    • Place the strawberry mixture in the refrigerator until completely cool, about 2 hours.
    • Churn in your ice cream make according to manufactures specifications. Place in a freezer safe container and chill until ready to serve.

    Join me: FacebookTwitter 


    Chocolate Coconut Brownies (Vegan!)

    To see my Coconut Oat French Toast, click on the picture:


    Why would a meat eating cheese monger such as myself want to make something vegan? Several reason, not the least of which are my friends and family who can’t or wont eat dairy. As meat eaters, it is even more important for us to experiment with vegan and vegetarian food and not hang on the crutch of animal products with the exclusion of other foods. We need to have all types of recipes in our arsenals, not just to accommodate those who might be guest at our tables, but in order to discover foods that we didn’t know we loved, because we didn’t think food with "vegan" labels applied to us. In exploring vegan cooking I have discovered what an amazing texture vegetable shorting lends to frosting, how rich and beautiful coconut milk tastes, and how fruit purees can be a flavorful stand in for butter. 

    Dairy free baking is something I want to lean towards more. Only using milk products when other substitutions would compromise the overall product, but in many cases vegan substitutions make the end result just as good or even better. Plant based foods just feel better in my body and if the taste of the food isn’t harmed then why would I make any other choice? 

    I started exploring dairy free cooking when three friends where coming over for dinner. One was kosher (meat and dairy can not be served together) one was allergic to cow’s milk and the other was breast-feeding a baby who couldn’t have dairy. All three needed a dairy free meal. I realized how much dairy I use. Why? I love plants, produce, vegetables, fruit…why all the milk? 

    These brownies where really good. Not just "good for vegan" but just really good. So fudgy and intensely chocolatey, even Tater couldn’t keep her little fingers off them. 

    She took a bite and then carefully put it right back where I had place it. So cute, I love that kid. 

    Chocolate Coconut Vegan Brownies

    1/3 cup coconut oil

    1 cup agave nectar 

    1/2 cup unsweetened soy milk (can sub coconut milk)

    1/3 cup strong coffee*

    1 cup cocoa powder

    3/4 cup whole wheat flour

    1/2 cup unsweetened shredded coconut (I used Bob’s Red Mill)

    1/2 tsp salt

    In a bowl, beat together the coconut oil and the agave nectar until well combined. Add the soy milk and coffee and beat again. in a separate bowl, add the cocoa powder, flour, shredded coconut and salt and stir to combine. Add the dry ingredients to the wet ingredients and stir until just combined, don’t over mix. 

    Spray a 8×8 inch baking dish with cooking spray (or line with parchment paper) and pour bater into prepared pan. 

    Bake at 350 for 16-18 minutes. You don’t want to overcook these or they will be too dry. Allow to cool before cutting into. 

    For an extra treat, serve warm topped with coconut milk ice cream. 

    *Note: Coffee intensifies the flavor of chocolate, with no trace of a coffee taste. If you don’t like coffee, or don’t have a coffee maker, stop by a Starbucks and order a black coffee, use 1/3 of a cup and freeze the rest in ice cube trays for use in future chocolate baking. 


    Follow me on twitter

    Follow me on Pinterest

    Like Domestic Fits on Facebook


    Beer Soaked Chocolate Covered Cherries

    Last week I was able to sit down with a guy, who in just two years went from a home brewer who was opening the doors to his first bar, to owning three bars and the fastest growing craft brewery in California.

    If you live in Los Angeles, and you’re a craft beer fan, I’m certain you have heard of Tony Yanow of Golden Road. If you haven’t you are going to want to acquaint yourself with him and what he’s building. Here is my article for your craft beer research indulgence.

    He is also the man who helped create one of my favorite IPA’s. Golden Roads, Point The Way IPA.

    As I’ve hammered into you several times before, IPA’s make terrible cooking subject, which is why I rarely use them. This is a recipe that doesn’t require cooking, and the tart hoppiness of the IPA is a great compliment to the cherries.

    And, as a salute to my fellow beer lovers who happen to be vegan (more vegan beer fans exist than one would expect) this is an easy recipe to veganize.

    IPA Soaked Chocolate Covered Cherries (vegan option)

    2 cups fresh Bing cherries, pitted

    1 cup IPA

    8 oz Dark Chocolate (60%) (For vegan, use vegan chocolate. Most higher end brands are vegan at 60%, but make sure to check if you want to make sure)

    Pit the cherries and add them to a loaf pan in one tight layer. Pour the IPA over the cherries and allow to soak at room temperature for 2 hours and up to 6. Drain and allow to dry for about 20 minutes (they need to be dry before chocolate gets involved).

    To temper the chocolate: (*Note. Tempering chocolate makes it shiny and gives it a nice snap. If you don’t care so much about that, you can just add the chocolate to a microwave safe bowl and microwave on high for 30 seconds, stir and repeat until melted)

    In a double boiler melt the chocolate over medium heat. If you don’t have a double boiler, add a metal bowl over a pot of water, making sure the bottom of the metal bowl does not come in contact with the water in the pot.

    Chop the chocolate into chunks and add about half to the top of the double boiler. Heat the chocolate to 115 degrees (use a clip-on candy thermometer to do this). Add the rest of the chocolate and stir until all of the chocolate has melted and is now down to about 90 degrees.

    A few at a time, add the cherries to the chocolate with a fork, roll around until coated, remove with the fork and allow to drain a bit, then place on a piece of parchment paper to harden. Repeat for all cherries. Chill until ready to serve.

    Join me: FacebookTwitter 

    Drunken Strawberry Tart with Beer Lemon Curd

    Being wrapped in a world filled with food people, the lovers, academics and fanatics, I’ve often lost my footing. Forgotten the simple pleasures of small, honest meals for the sake of a journey towards the creation of an epic recipe. While surrounding myself with people who strive to reinvent the world of food as we know,  I’ve been so entranced that I’ve stepped away from the core of who I am and the food I fell in love with.

    I am not a moderist cook.

    I am not a chef.

    I may never create an epic recipe.

    I am OK with that.

    It was through a process, not of self discovery but of self remembrance, that stumbled upon a memory that I had almost lost within my catalogue of food experiences. Under the thousand dollar dinners, PR events, celebrity chefs, and world renowned restaurants was a small Italian city, and a home cooked meal.

    Years ago, on what turned out to be a 16 hour layover, I was stuck in Pescara Italy. A girl about my age, just past 21, took pity on a broke and confused American in her tiny local airport and asked if she could show her town to me. It began with a home cooked meal, from her own mothers hands on a rickety folding table in her living room, the only place in the small apartment that would accommodate us all. Homemade bread, a small green salad, smashed peas and a roasted chicken.

    For dessert was a lemon tart. Simple, beautiful and tangy, made by the hands of a woman who didn’t speak a word of English, but who took time to cook for me even though we would never have the ability to have a conversation, and I could never properly thank her. This is the food that I fell in love with, and I am reminding myself to stay true to that.

    I’ve done my best to make the beer infused version of the tart that was made for me in Pescara, and chose a beer that is nearly as fascinating to me. Cooney Island Lager has flavors that remind me a great meal made in spring, orange, citrus, bread and apples.

    If you can’t find this beer, look for a low hop beer with notes of citrus, tropical fruits and bread.

    Drunken Strawberry Tart with Beer Lemon Curd

    Ingredients
      

    For the tart crust:

    • 1 1/4 cups of flour
    • 1/4 cup sugar
    • 1/2 tsp salt
    • 1 stick of unsalted butter cut into small cubes
    • 3-5 tbs ice cold water

    For the curd:

    • 1 tbs lemon zest
    • 2 whole eggs plus six yolks
    • 1 1/4 cup white sugar
    • 1 cup fresh squeezed lemon juice about 6 large lemons
    • ½ cup beer
    • 2 tbs corn starch
    • 1 stick unsalted butter cut into cubes

    For the Strawberries

    • 3 cups strawberries
    • ½ cup beer
    • 1/2 cup powdered sugar

    For the Whipped Cream

    • 1 cup heavy cream
    • 2 tbs beer
    • 1/2 cup powdered sugar

    Instructions
     

    • In a food processor, combine the flour, sugar, and salt. Pulse to combine. Add the cubes of butter and process until combined, about 1-2 minutes. Your dough should resemble course meal.
    • Start with 3 tbs of water, pulse until combined. If the crust doesn’t hold together add more water, a bit at a time, until it does.
    • Dump the dough into a 4 inch deep, 9 inch wide tart pan with a remove-able bottom (you can also use a pie pan). Starting with the sides, form the crust inside the pan, trying your best to make it all as even as possible. Cover with plastic wrap and chill for a least 3 hours.
    • Preheat oven to 375.
    • Place a sheet of parchment paper inside your tart and fill with pie weights. If you don’t have any, dried beans work great.
    • Bake for 20-25 minutes or until your tart is a light golden brown. Remove from oven, allow to cool slightly. remove pie weights.
    • Add the lemon zest, lemon juice, beer, sugar, corn starch, whole eggs and yolks to a bowl and whisk until well combined. Add the lemon mixture to a pan over medium/low heat along with the butter. Whisk until thickened, about 10 minutes. Allow to cool to room temperature.
    • Add the curd to the crust and chill until set, about 4 hours.
    • Just prior to serving add the berries to a shallow bowl of pie pan and cover with 1/2 cup beer. Allow to stand at room temperature for 15-20 minutes. Drain and return to bowl with the sugar, stir to combine.
    • Add all of the whipped cream ingredients to a stand mixer and mix on high until soft peaks form, about 4 minutes.
    • Top tart with berries and whipped cream just prior to serving.

    Coconut Chocolate Chip Oatmeal Cookies

    For years I’ve been insisting that I hate coconut. Ever since those crappy Almond Joys and Mounds bars started taking up valuable real estate in my orange plastic pumpkin during childhood Halloweens, I convinced myself that coconut was to blame.  Assaulting me with it’s odd texture that wasn’t quite crunch and wasn’t quite chewy and it definitely was not caramel.  

    And with the loathsome of all Trick or Treat offerings, the Neapolitan Sundaes as a side kicks in my Trow Away pile of post Halloween candy sorting, my distain was cemented. I hated coconut. 

    Even when I discover Malibu Rum in college, and I would only buy coconut scented sunscreen because the smell made me blissfuly happy, I still wouldn’t release my grudge. 

    And even, after years of growing up with the idea that International Cuisine was Costco Lasagna and Taco Bell, I figured out that I adored Chicken Panang so much I wanted to bathe in it, still my aversion persisted. 

    And when I waitressed in dozens of mid-level family style restaurants, with shrimp shooters and extreme fajitas avoiding conversation about my Flare, and I was introduced to the white trash joy of Coconut Shrimp, it changed nothing.

    I hate it, I’m serious. 

    It wasn’t until I read a post from my friend Julia that It all clicked. I don’t hate it. I hate crappy candy. Huge difference. 

    I went directly to my nearest store and bought some Bob’s Red Mill Coconut and set out to bake. 

    I made these for some friends who came over for a poker night, one of whom said, "No thanks, I don’t like coconut."

    After I begged and pleaded for him to just take one tiny taste, he ate five cookies. Afterwards, he said to me: "I totally thought I hated coconut until I ate these cookies."

    I have no idea what you mean. 

    Other than the fact that these cookies rule. And so does coconut. 

    My husband and I at Poker Night, not exactly winning,but having a great time. 

    Coconut Chocolate Chop Oatmeal Cookies

    1 stick of butter

    3/4 cup brown sugar

    1/2 cup white sugar

    1 egg

    1 tsp vanilla

    1/2 cup coconut milk fat (scraped off the top of a full fat can of coconut milk)

    1 cup oats

    3/4 cup bread flour

    3/4 cup all purpose flour

    1 tsp baking powder

    1 tsp corn starch

    1/2 cup unsweetened shredded coconut (Bob’s Red Mill strongly recommended) 

    1/4 cup sliced almonds

    3/4 cup dark chocolate chips

    In the bowl of a stand mixer, cream the butter and both sugars. Add the egg and vanilla and beat on high until well combined. Add the coconut milk and beat until well combined. 

    In a separate bowl, add the remaining ingredients (other than the almonds and chocolate chips) and stir until well combined. 

    Add the dry ingredients into the stand mixer and mix on low until just barely combined. Add the chocolate chips and the almonds and mix again until barely combined. 

    Cover a baking sheet with parchment paper. 

    Using a cookie scoop or an ice cream scoop, scoop out balls approximately the six of a golf ball and place evenly on the baking sheet. 

    Refrigerate for 2 hours, up to 24. 

    Preheat oven to 350. 

    Bake for 20-22 minutes or until lightly golden brown. You don’t want to over cook these, so start to check on them at about 12 minutes in case your oven cooks way faster than mine. Especially if you skip the refrigeration step, room temperature cookies will be done a lot sooner. Once you pull them out of the oven, slide the parchment paper onto the counter and allow to cool. 

    Pin this Post!

    Follow me on twitter

    Follow me on Pinterest

    Like Domestic Fits on Facebook


    Chocolate Stout Covered Beer Caramels

    You aren’t always aware of the nexus of a true obsession. It may only be in hind sight that the catalyst is revealed upon agonizing inspection of your past. For me, however, the spark was breathtaking, an obvious birth of a fixation that lead to this blog. That trigger was Bison Honey Basil Ale. A beer that begged to be turned into Beer Creme Brulee, my first post.

    If you enjoy this little blog that I have, and are as fascinated as I am with turning beer into chewable treats, you don’t have me to thank, you owe the lovely folks at Bison Brewery a debt of gratitude. As do I, or course.

    For this post, I used Bison Chocolate Stout, an excellent example of the genre.

    Chocolate Stout Covered Beer Caramels

    Ingredients
      

    For The Caramels:

    • 12 oz bottle low hop Pale or Amber ale divided
    • 2 cups white sugar
    • 1 cup light brown sugar
    • 1 cup butter
    • 1 cup heavy cream
    • 1 cup corn syrup

    For the Chocolate:

    • 1 1/2 cups 60% dark chocolate
    • 1/4 cup Chocolate Stout
    • 1 tsp flakey sea salt optional

    Instructions
     

    • In a large sauce pan over medium high heat, add 1 cup beer (reserve the remaining beer). Allow beer to boil and reduce until thick and syrupy and only about 1 tsp remains, about 20 minutes. Set aside. (Note: if you want a lower level of beer taste, skip this step and substitute the "extract" you have just made with 1 tsp of vanilla extract in the later step that calls for the beer extract)
    • Line a loaf pan with parchment paper, making sure the paper goes up and over the sides of the pan, set aside.
    • In a large sauce pan over high heat add both sugars, butter, cream, corn syrup and remaining 1/2 cup beer. Stir until butter has melted and then stop stirring while the candy boils (you can occasionally swirl the pan), clip a candy thermometer to the side of the pot, taking care that the tip doesn't touch the bottom. Allow to boil untouched until the liquid reaches 244 degrees. The caramel will reach 200 degrees rather quickly,but will take 15-20 minutes to reach 244. The last few degrees climb quickly so stay close to your pot.
    • Once the caramel has reached 244, remove from heat. Add the reduced beer "extract" that you have set aside and stir until the bubbling has subsided. Pour it into prepared loaf pan, allow to sit at room temperature for 10 minutes, then refrigerate until set, about 2 hours. Cut into squares.
    • In the top of a double boiler add the chocolate and the stout, stir over low heat until melted and creamy, about 5 minutes. Don't over heat or your chocolate will seize.
    • One at a time, place the squares into the chocolate with a fork. Roll around until covered, remove and add to a piece of wax paper, sprinkle with sea salt if desired. Once the squares been covered in chocolate transfer the to the refrigerator, repeat with remaining caramel. Chill until set, about 10 minutes.
    • Keep refrigerated.


    Join me: Facebook, Twitter

    Beer Popsicles: Lemon Pale Ale

    As summer heats up, so does my longing to add beer to everything I consume. I linger on the idea of changing classic recipes into beer recipes far longer than my busy day should allow. How would I add beer to a Tarte Tatin? What about an Blueberry pie? Or Eggs benedict? What beer would I use? Although I get lost in recipe development several times a day, it tends to make a long commute on a Los Angeles freeway that much more bareable.

    Due to recent move, I’ve been a bit handicapped by my lack of access to a familiar kitchen and all of my culinary tools. I’m slowly working my way back to feeling normal, that slight feeling of alien unfamiliarity when I get home  has begun to subside and my subconcious is starting to accept that the new place that I sleep, is now my home.

    Beer popsicles are a fun addition in any adult party. You can play with flavor combinations (strawberry basil, orange jalapeno, blueberry lime) or just use plain 'ole untouched beer. If you have little ones around, make sure to keep these labeled well and separated from the kiddie ones.  If you are worried about a tiny human being handed the wrong flavor, use colored popsicle sticks for the kids and plain boring wood ones for the grown ups. You can buy popsicle sticks, colored and plain at most craft stores or on Amazon. This is the popsicle mold I used, but just about any hollow vessel will work.

    I used Pike Brewing Naughty Nellie for these. With flavors of hops, grapefruit and citrus, it gave a sour punch that I really loved. This is a recipe that can take a hoppier beer because there is no cooking involved. Experiment with your favorite pale ale, you have a summer full of back yard barbecues to get it just right.

    Beer Popsicles: Lemon Pale Ale

    Servings 6 popsicles

    Ingredients
      

    • 1/3 cup fresh squeezed lemon juice about 4 large lemons
    • 1/4 cup sugar
    • 1 cup pale ale or IPA

    Instructions
     

    • Mix all ingredients together in a pitcher or measuring cup with a spout, stir until sugar has dissolved.
    • Pour into popsicle molds and freeze for at least 6 hours.
    • Run molds under hot water until the popsicles release.

    Join me: FacebookTwitter 

    Join me: FacebookTwitter 

    1 Minute Microwave Cupcake

    Microwave mug cakes first cake into my consciousness about 10 years ago through the pre-facebook existence of the email forward. I found them to be completely smarmy, the culinary equivalent of a Jerry Springer episode. My first though was, "Oh, yeah like I need QUICKER ways to get fatter." Email deleted.

    But then I found myself in my new place, without the gas turned on yet, but with a new microwave and the urge to celebrate.

    I caved.

    I made my little family microwave cupcakes to celebrate the move and the fact that I was finally back in a kitchen. Just remember that if you find yourself with unexpected guests and only about 5 minutes to whip up a dessert, this is a viable option.

    The secret to making these Smarmy Mug Cakes in cupcake form, is the baking cups. I love the crap out of these things. I always use them to make cupcakes because they are much cuter than the regular cupcake papers, and they don’t need muffin tins, just place them on a baking sheet and fill to half capacity. These were left over from Taters, Lets Have A Ball party and bought them from Sweet Lulu, but you can also buy plain white ones on Amazon. The trick is to only fill them half way.


    Smarmy Mug Cake, Cupcake Edition

    1/4 cup dark chocolate chips

    2 tbs butter

    1 egg

    1 tbs oil

    1 tbs milk

    1/4 cup sugar

    pinch of salt

    2 tbs cocoa powder (unsweetened)

    2 tbs flour

    1/8 tsp baking powder

    Frosting:

    1/2 cup (4oz) cream cheese

    1/4 milk

    1/3 cup powdered sugar (plus more if you want it sweeter)

    2 tbs cocoa powder

    (if you don’t like cream cheese frosting, heat 3 tbs milk or cream in the microwave until steamy, then pour over 1/3 cup chocolate chips, stir until melted. Pour the chocolate sauce over the cupcake. It will be messy, but delicious)

    (Makes 3)

    In a microwave safe bowl, add the chocolate chips and the butter. Microwave for 20 seconds, stir and repeat until melted.

    In a separate bowl, add the egg, oil, milk, sugar and salt and beat with a fork until well combined. Add the melted chocolate and stir again. Sprinkle the cocoa powder, flour and baking powder over the egg mixture and stir again with the fork until well combined.

    Distribute equally between three baking cups (standard cupcake papers will not work). I also added 4 chocolate chips to the very center of each cupcake to make a bit of a molten center. Microwave on high for 1 to 1.5 minutes. The "cooking" time will depend largely on the power of your microwave. Mine took 1 minute 15 seconds.

    You want to let the cupcake cool a bit because right out of the microwave they are screaming hot. While they cool, make the frosting. Add the milk and the cream cheese to a bowl and beat on high until smooth and creamy. Then add the powdered sugar and the cocoa powder and beat until combined. Add the frosting to a zip lock bag and cut about 1/2 inch off the bottom corner. Pipe the frosting into the cupcake. Serve with a fork.

    Eat immediately. Right away. I’m serious.

    Pin This Post!

    Follow me on twitter

    Follow me on Pinterest

    Like Domestic Fits on Facebook


    Chocolate Pretzel Beer Toffee

    The best part about visiting a brewery is the opportunity to sample those special release beers that never make it into bottles. Those brews that are only made in small batches, put into casks that sometimes make it to local pubs or events but will never make it into bottles in your local distributors shelves. Like those songs your favorite band will never record but will occasionally play live if you happen to catch a show on the right night, these are beers that make you feel special for having been granted the experience. In a world where it seems everything is accessible with the right google word search, these near mythical concoctions are only available to those who happen to be in the right place at the right time.

    One of my favorites is the Habanero Sculpin from Ballast point. Because of the process they use, the heat is fresh and bright. An uncooked scorch that isn’t shy. Habaneros are an extremely unpredictable ingredient, with heat levels that vary widely from pepper to pepper, making every cask of Habanero Sculpin different from the last. If you ever make it down to San Diego, stop in for a pint and count yourself among the special few.

    Since I wasn’t able to get my hands on any Habanero Sculpin, I found myself fixated on this Ballast Point Calico Amber Ale. And the result was a toffee that I couldn’t stop eating. So addictive, and it only takes about 20 minutes to make. I already have plans to make and hand this out as Christmas gifts, if I can wait that long to make it again.

    Chocolate Pretzel Amber Ale Toffee

    Chocolate Pretzel Beer Toffee

    Ingredients
      

    Toffee:

    • 1 Cup Sugar
    • 1 Cup Butter 2 sticks
    • 1/2 Cup Amber Ale

    Topping:

    • 2 Cups Pretzels Smashed
    • 2 Cups Dark Chocolate Chips 60% caco content
    • 1/4 Cup Amber Ale or Chocolate Stout

    Instructions
     

    • In a large pot over high heat add the sugar, butter and 1/2 cup amber ale, it will triple in volume during the cooking process so make sure to use a large pot. Stir until the mixture starts to boil. Allow to boil untouched until the mixture starts to darken and thicken at about 230 degrees. Stir continuously until it turns a very dark amber and hits 290 degrees. This process will take between 15 and 20 minutes from start to finish. pour onto a baking sheet covered with parchment paper or a Silpat. Allow to cool.
    • Add the chocolate to a large bowl. Heat the beer until hot but not boiling. You can heat it on a pot on the stove or microwave it in a microwave safe bowl. If you use the microwave, know that the beer will foam up once it reaches it's boiling point. Pour the hot beer over the chocolate chips and stir until well combined and melted.
    • Pour the chocolate over the toffee and smooth out in an even layer. Sprinkle the crushed pretzels over the chocolate and chill until the chocolate has set. Cut into pieces.

    Notes

    If you use a chocolate with less than 60% cocoa content, it will have higher levels of milk solids, because of this it will have a more difficult time hardening once the beer is added. Try to fine 60% and chill it to set.

    Join me: Facebook, Twitter

    Chocolate Beer Cream Puffs

     I want you to start thinking of beer as an extract. A complex amalgamation of flavors that functions in a recipe as an extract. If you were baking a fabulous caramel cake recipe, and the recipe calls for vanilla extract and all you had was mint would you just go ahead and use that? I wouldn’t, but then again a traumatic trip to Morocco has implanted a serious mint aversion in me. Think of beer the same way. If a recipe calls for a stout, an IPA isn’t going to work, you’re implanting an entirely different database of flavors. Stick with a stout or something similar, a porter maybe? If the recipe calls for a pilsner don’t use a porter, but you can always use a similarly flavored blonde ale.

    This recipe is the best "first timers" recipe when cooking with beer. It takes about 15 minutes, it can be thrown together at the last minute and its simple. This is what you can go to if you have a beer themed party, easy, elegant and beautiful beer flavors that are subtle enough to be loved even by those "non beer people" in your life. You might even convert a few.

    I use Flying Dog Road Dog Porter. With rock and roll good looks, a unbreakable tie to the incomprehensibly talented Hunter Thompson, and profanity right on the label, this is a beer that needs to be acknowledged. Its both full of flavor and easy to drink, this is a beer to seek out.

    Chocolate Beer Cream Puffs

    1 sheet puff pastry, thawed

    1 cup heavy cream

    3 tbs unsweetened cocoa powder

    1/4 to 1/2 cup powdered sugar

    2 tbs porter

    1 cup dark chocolate chunks

    1/2 cup porter beer

    2 tbs heavy cream

    preheat oven to 400.

    Place the puff pastry on a floured surface and roll in each direction, making it wider and longer. Using a 2.5 inch circle biscuit cutter, cut out 20-25 circles and place on a baking sheet covered with parchment paper.

    Bake at 400 until golden brown, about 15 minutes.

    In the bowl of a stand mixer, add 1 cup of heavy cream, 3 tbs cocoa powder, 1/4 cup powdered sugar, and 2 tbs porter. Beat on high until soft peaks form. Taste, add addition sugar if desired, beating to combine, put in a piping bag.

    Split the puff pastry circles in half to resemble buns and pipe the whipped cream into the center, replacing the top.

    In a microwave safe bowl, add 2 tbs heavy cream and 1/2 cup porter. In a separate bowl, add the chocolate chips. Microwave the cream/porter mixture until hot and steamy. Pour over the chocolate and stir until melted. You’ll reach a point where the ganache looks like chunky hot chocolate, it’s fine, just keep stirring until well combined.

    Spoon the ganache over the cream puffs.

    Drink the rest of the porter and enjoy your handy work.

    Join me: FacebookTwitter 


    Disclaimer: These are not traditional cream puffs, or profiterole as they are called in Greece and Italy, but the name "cream puff" seemed to describe them to the closest approximation of what they actually are. Feel free to re-name them Puff Pastry Whipped Cream Bites if this bastardized version of a traditional dessert bothers you. I don’t mind at all. 


    Chocolate Strawberry Cream Cheese Tart & Dealing with New Mom Fears

    When you get pregnant, people love to warn you about what will be missing from your new life once the baby comes. "You’ll never sleep again!!" They laugh upon hearing the great news. "Have sex now while you can!" His friends will tell him. "You are going to be so broke, those little suckers are expensive!" as if you just bought a tanking stock against their best financial advice.

    What they don’t tell you is that you will worry constantly. About everything. An irrational, gut wrenching fear that is so far beyond the non-mom worries you once had, any other type of fear just seems absurd. Even rational, legitimate non-mom fears seem silly in the face of your completely irrational New Mom fears. Forget that old fear of getting mugged late at night in a parking garage that has always given you the creeps, what about a Zombie attack?! What would I do with the baby if there are Zombies? She’s like a tiny appetizer! Fear of getting cancer? Forget it, what if a Mountain Lion wanders into the house and wants to eat the baby! Again, she’s like a tasty little morsel! What would I do?! I need a plan!

    You know how insane you’re being. You know it’s crazy. But you can’t help it. Forget sleep and sex and money, the hardest part of being a new mom is the crazy worry that wraps itself around you like a Boa Constrictor and squeezes the air right out of your lungs (Oh No! Boa constrictors?! What would I do if I’m at the park and one of those things got a hold of the baby?! Do they have those in California? Must. Google. It.)

    So, for the sake of my own sanity, and I have to admit that I’m sure I’m WAY crazier than most of you, I’ve devised a few rules to help me cope:

    1. Don’t watch the news. Especially local news. No good can come of bored reporters looking to sensationalize a story. Just watch reruns of Friends instead. This also applies to clinking on that story of a dead/missing/maimed toddler on the front page of Yahoo news. Just don’t do it.

    2. Use the phrase, "Does it end well?" when those friends and family members, who LOVE to relay to you the most tragic news, start to tell you about a story that they just heard. And if they even hesitate for a moment, yell in their face, "WHY ARE YOU TELLING A NEW MOM A STORY ABOUT A DEAD BABY??"  It’s therapeutic, I promise.

    3. Sometimes you have to make a plan. Even though it’s insane and you know that you will never be adrift at sea after your plane crashes in the atlantic with a toddler and a group of hungry cannibals, sometimes it makes you feel better to just make a plan so that your mind can rest.

    4. Dumber People than you have raised kids. Sounds harsh, right? It makes me feel better. When I hear stories about crack addicted mothers living on the streets, turning tricks in dirty hotel rooms while the 6 year old and a newborn baby are locked in the closet, most people think, "That’s awful! Those poor kids!" Not me, I think, "Well if she didn’t manage to get her kids killed or eaten by the ravenous undead, I think I have a pretty good shot!" When I feel like I barely have a 50/50 shot of getting my kid out of childhood alive and intact, it makes me feel better to think, "Dumber people than me have done it."

    And when all else fails, bake. But watch those Hansel & Gretel nightmares, those will keep you up at night.


    Chocolate Strawberry Cream Cheese Tart

    Ingredients

    Crust:

    • 2 cups of chocolate graham cracker cookies (like Trader Joes Cat Cookies, or Teddy Grahams)
    • 2 tbs brown sugar
    • 3 tbs melted butter

    Filling:

    • 16oz cream cheese
    • 2/3 cup sugar
    • 1 egg
    • 1 tsp vanilla extract

    Topping:

    • 2/3 cup water
    • 1 tbs corn starch
    • 3 cups fresh strawberries, sliced
    • 1/2 cup sugar

    Instructions

    1. Preheat oven to 350.
    2. In a food processor, add the chocolate graham crackers and brown sugar. Process until only crumbs remain. Add the melted butter and pulse until combined and it resembles wet sand. Dump into the bottom of a 9 inch tart pan with a removable bottom (that has been sprayed with cooking spray). Press very well into the bottom of the pan using the flat bottom of a heavy glass, measuring cup or mug.
    3. In the bowl of a stand mixer, beat the cream cheese and the sugar until well combined and creamy, about 3 minutes. scrape the bottom and add the egg, beating until well combined. Scrape the bottom of the bowl and then add the vanilla and beat on high for about 2 minutes. Pour over the crust and smooth out with a spatula.
    4. Bake at 350 for 20 minutes or until the center of the cream cheese doesn’t jiggle when the oven rack is shaken. This is not a "toothpick inserted in the center should come out clean" situation. Remove from oven.
    5. While the tart is cooking, add the remaining ingredients to a pot over medium high heat. Allow to boil until thick and very bubbly for about 10 minutes, stirring frequently. Remove from heat and allow to cool.
    6. Top the tart with the strawberries and chill until set, about 4 hours, before removing from the tart pan.

    Pin this post!

    Follow me on twitter

    Follow me on Pinterest

    Like Domestic Fits on Facebook