
Dessert

Panko Shortbread With Salted Ponzu Caramel: Recipe Inspired by Iron Chef

I watch The Next Iron Chef like it’s the Olympics. Once the battle is announced, I immediately start to formulate a recipe in my head. It’s my delusional way of participating.

At the end of an episode a few weeks ago, two chefs, Geoffrey Zakarain and Anne Burrell were asked to make a dessert out of Kikkoman Panko Bread Crumbs and Ponzu Sauce.

I immediately yelled out "Ponzu Caramel Sauce!!"

Mr. Fits gave me a strange sideways glance.

Anne Burrell, then, proceeded to MAKE a Ponzu caramel sauce. Which put a smug smile on my face. Until she lost.

In her defense, the judges loved her dish and Zakarain went on to win the tittle of Next Iron Chef. Although my personal favorite was Elizabeth Faulker, I do believe that Chef Zakarian was the perfect choice. His very first battle as an Iron Chef on Christmas Day earned him a PERFECT score.

Sigh.

Back to that Kikkoman battle:

The next day I couldn’t stop thinking about the idea of a dessert with Panko and Ponzu. Of course the recipes battled on Next Iron Chef aren’t written down, I have no idea how she made her gorgeous caramel, so I just had to leave it to my own devices to come up with one.

While this is rolling around in my head, I get an email from a lovely and adorable PR girl from Kikkoman whom I had met at IFBC in November. She wanted to know if she could send over a box of Kikkoman goodies for me to play with. Ummm…Yes. Yes you can.

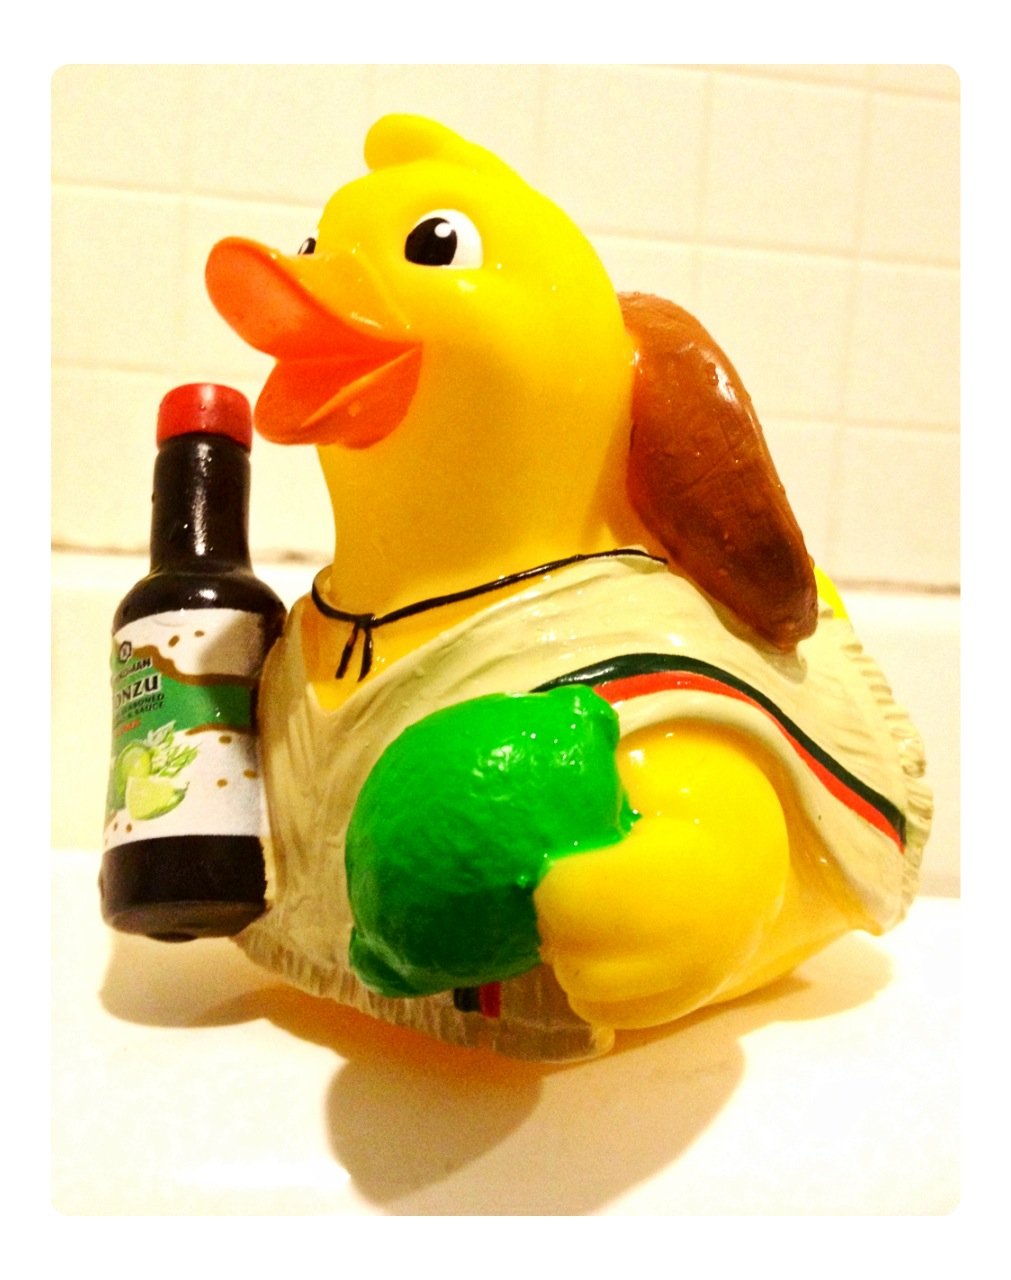
She even included a Kikkoman rubber ducky for Tater. Although I still can’t figure out why he is wearing a sombrero.

(I talked a little a few weeks ago about the whole Blogger/PR relationship and it is pretty awesome.)

So it was fate. I would be making a dessert out of Panko and Ponzu.

Here is what I came up with:

Battle Kikkoman!!!


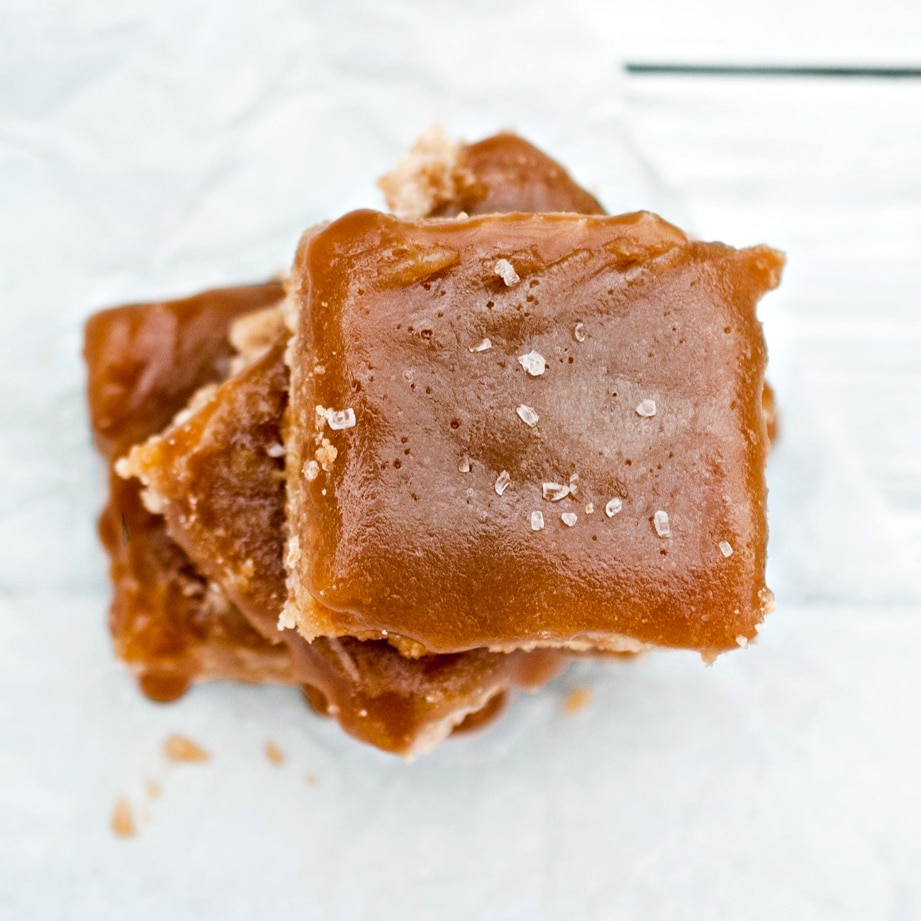
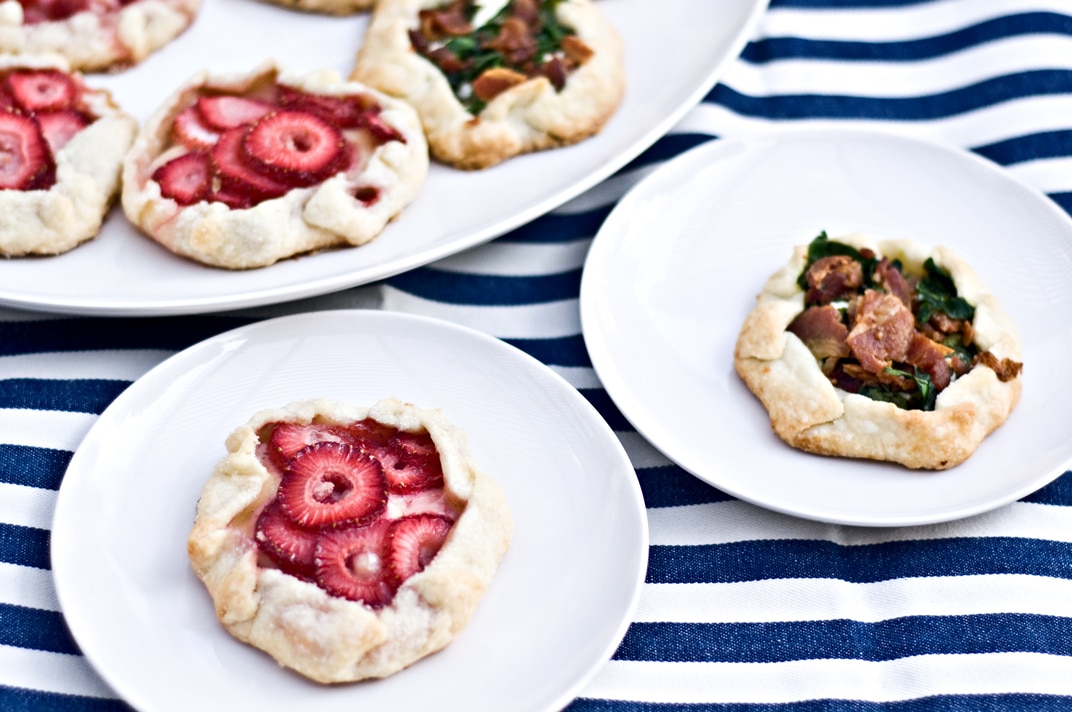
Panko Shortbread with Salted Ponzu Caramel Bars

Panko Shortbread:

1 cup flour

1/2 cup Kikkoman Panko

1/2 cup brown sugar

1/4 tsp salt

12 tbs butter


Ponzu Caramel Sauce:

1/2 cups sugar

1/3 cup light corn syrup

1 tbs Ponzu Sauce

1 cup heavy cream

1 stick of butter

1/4 tsp course sea salt


Line the bottom of an 11 x 7 inch baking dish with parchment paper, allowing the paper to go up and over the edges of the pan.

In a food processor, combine flour, brown sugar, Panko and salt, pulse to combine. Add the butter and process until combined, about 1 minute. Press the shortbread into the bottom of the baking dish in one even layer. Chill in the refirgerator for 30 minutes.

Preheat the oven to 350. Bake for 20 minutes or until a light golden brown color. Allow to cool.

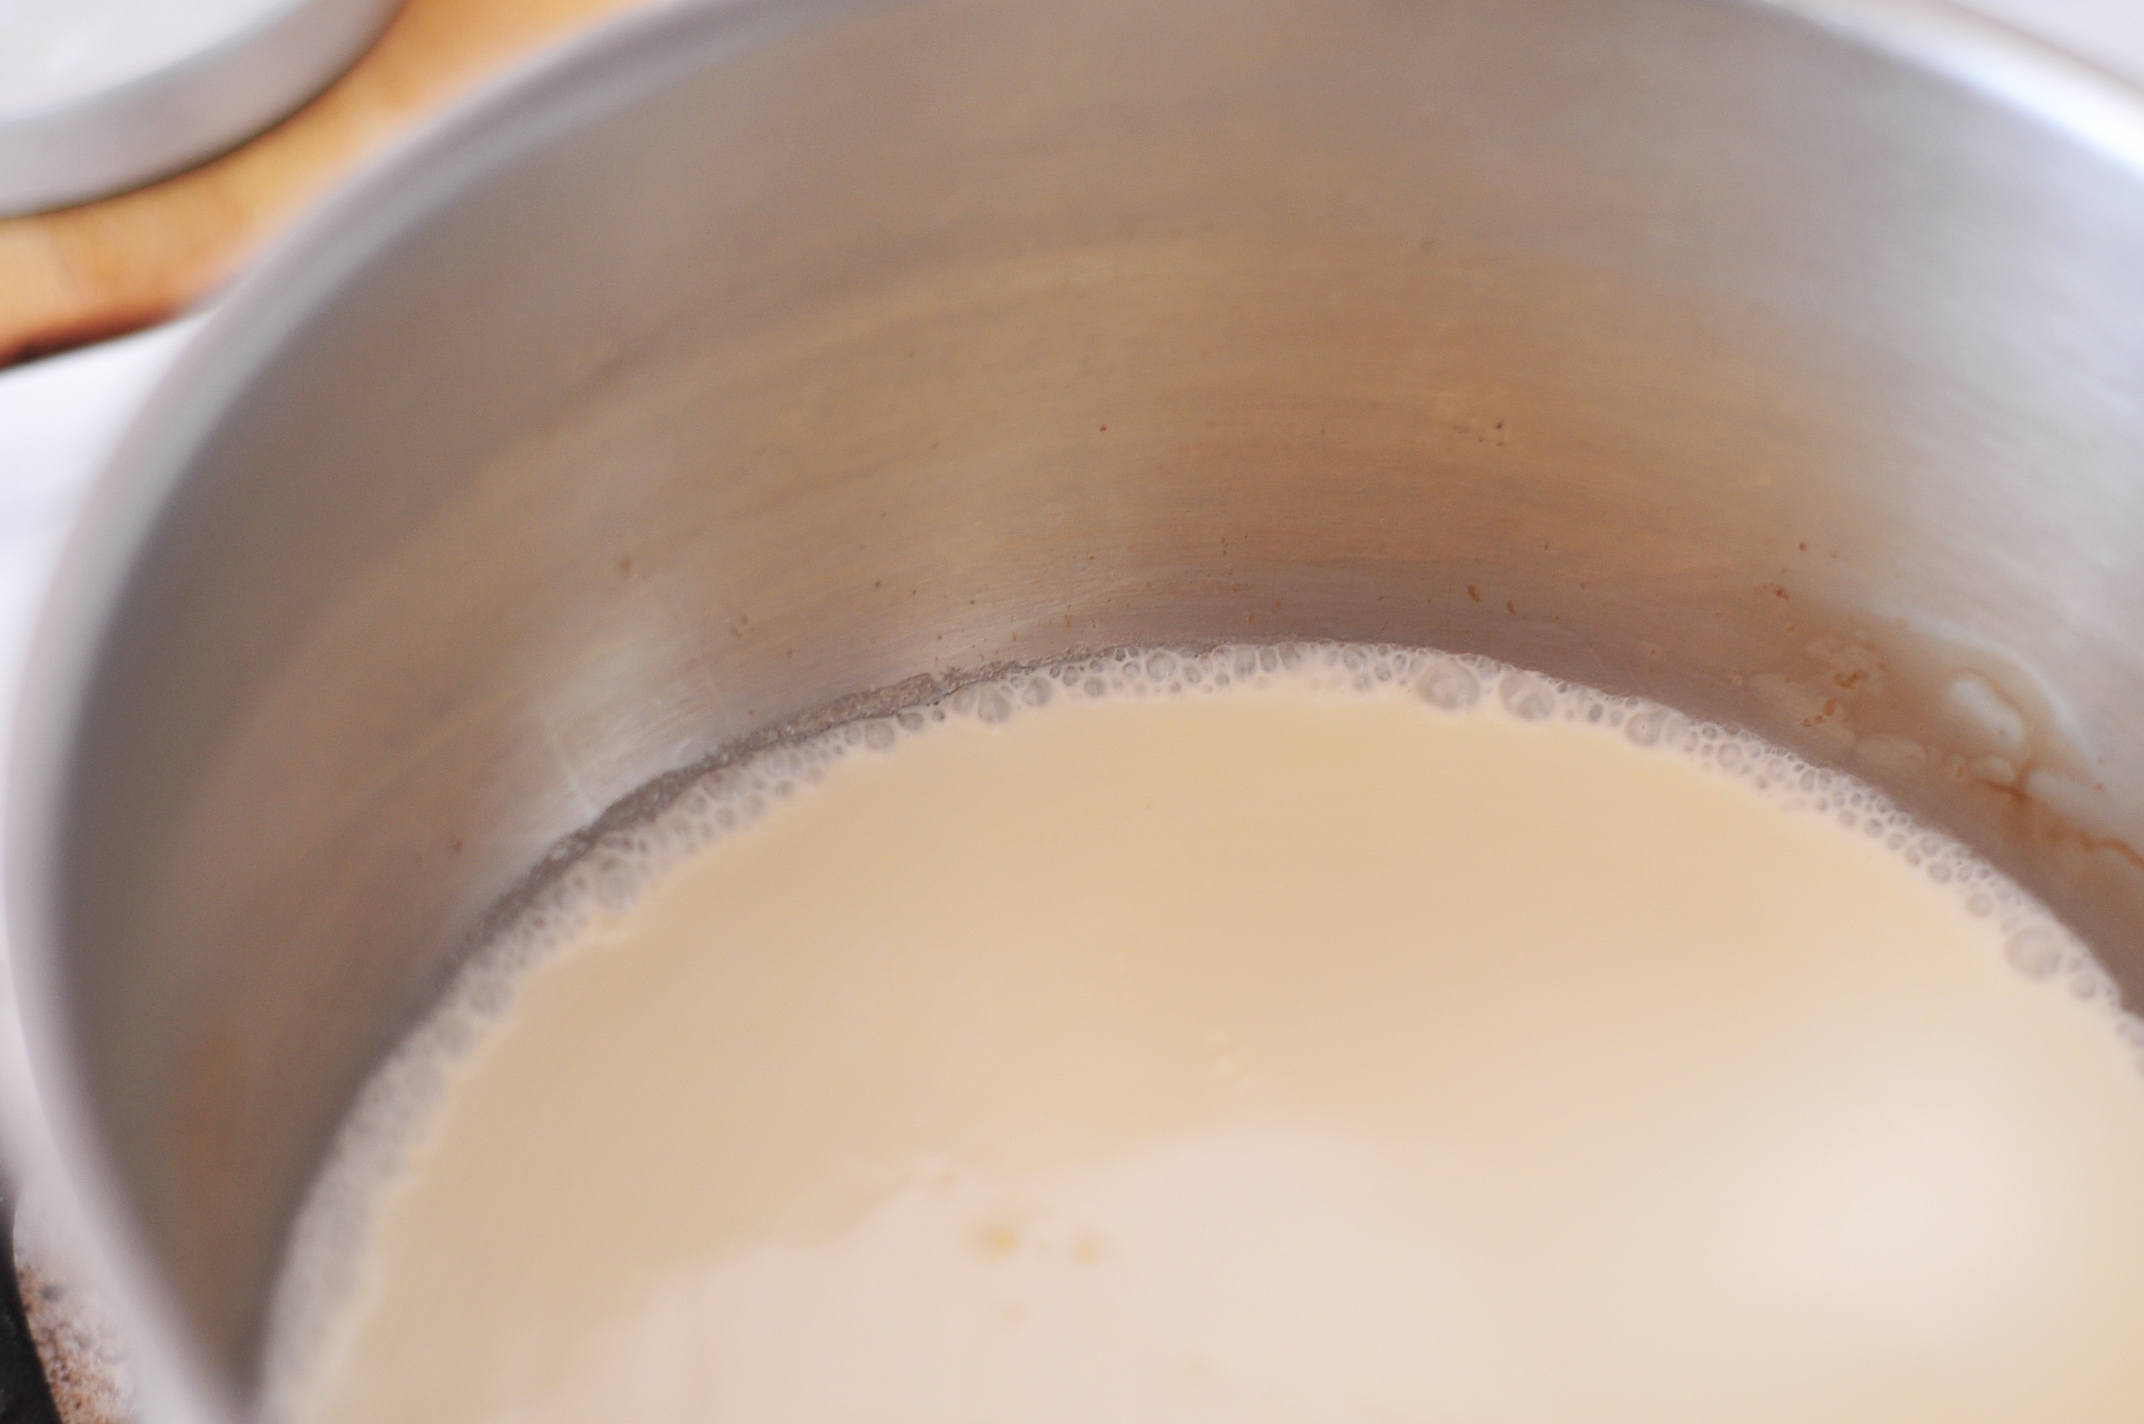
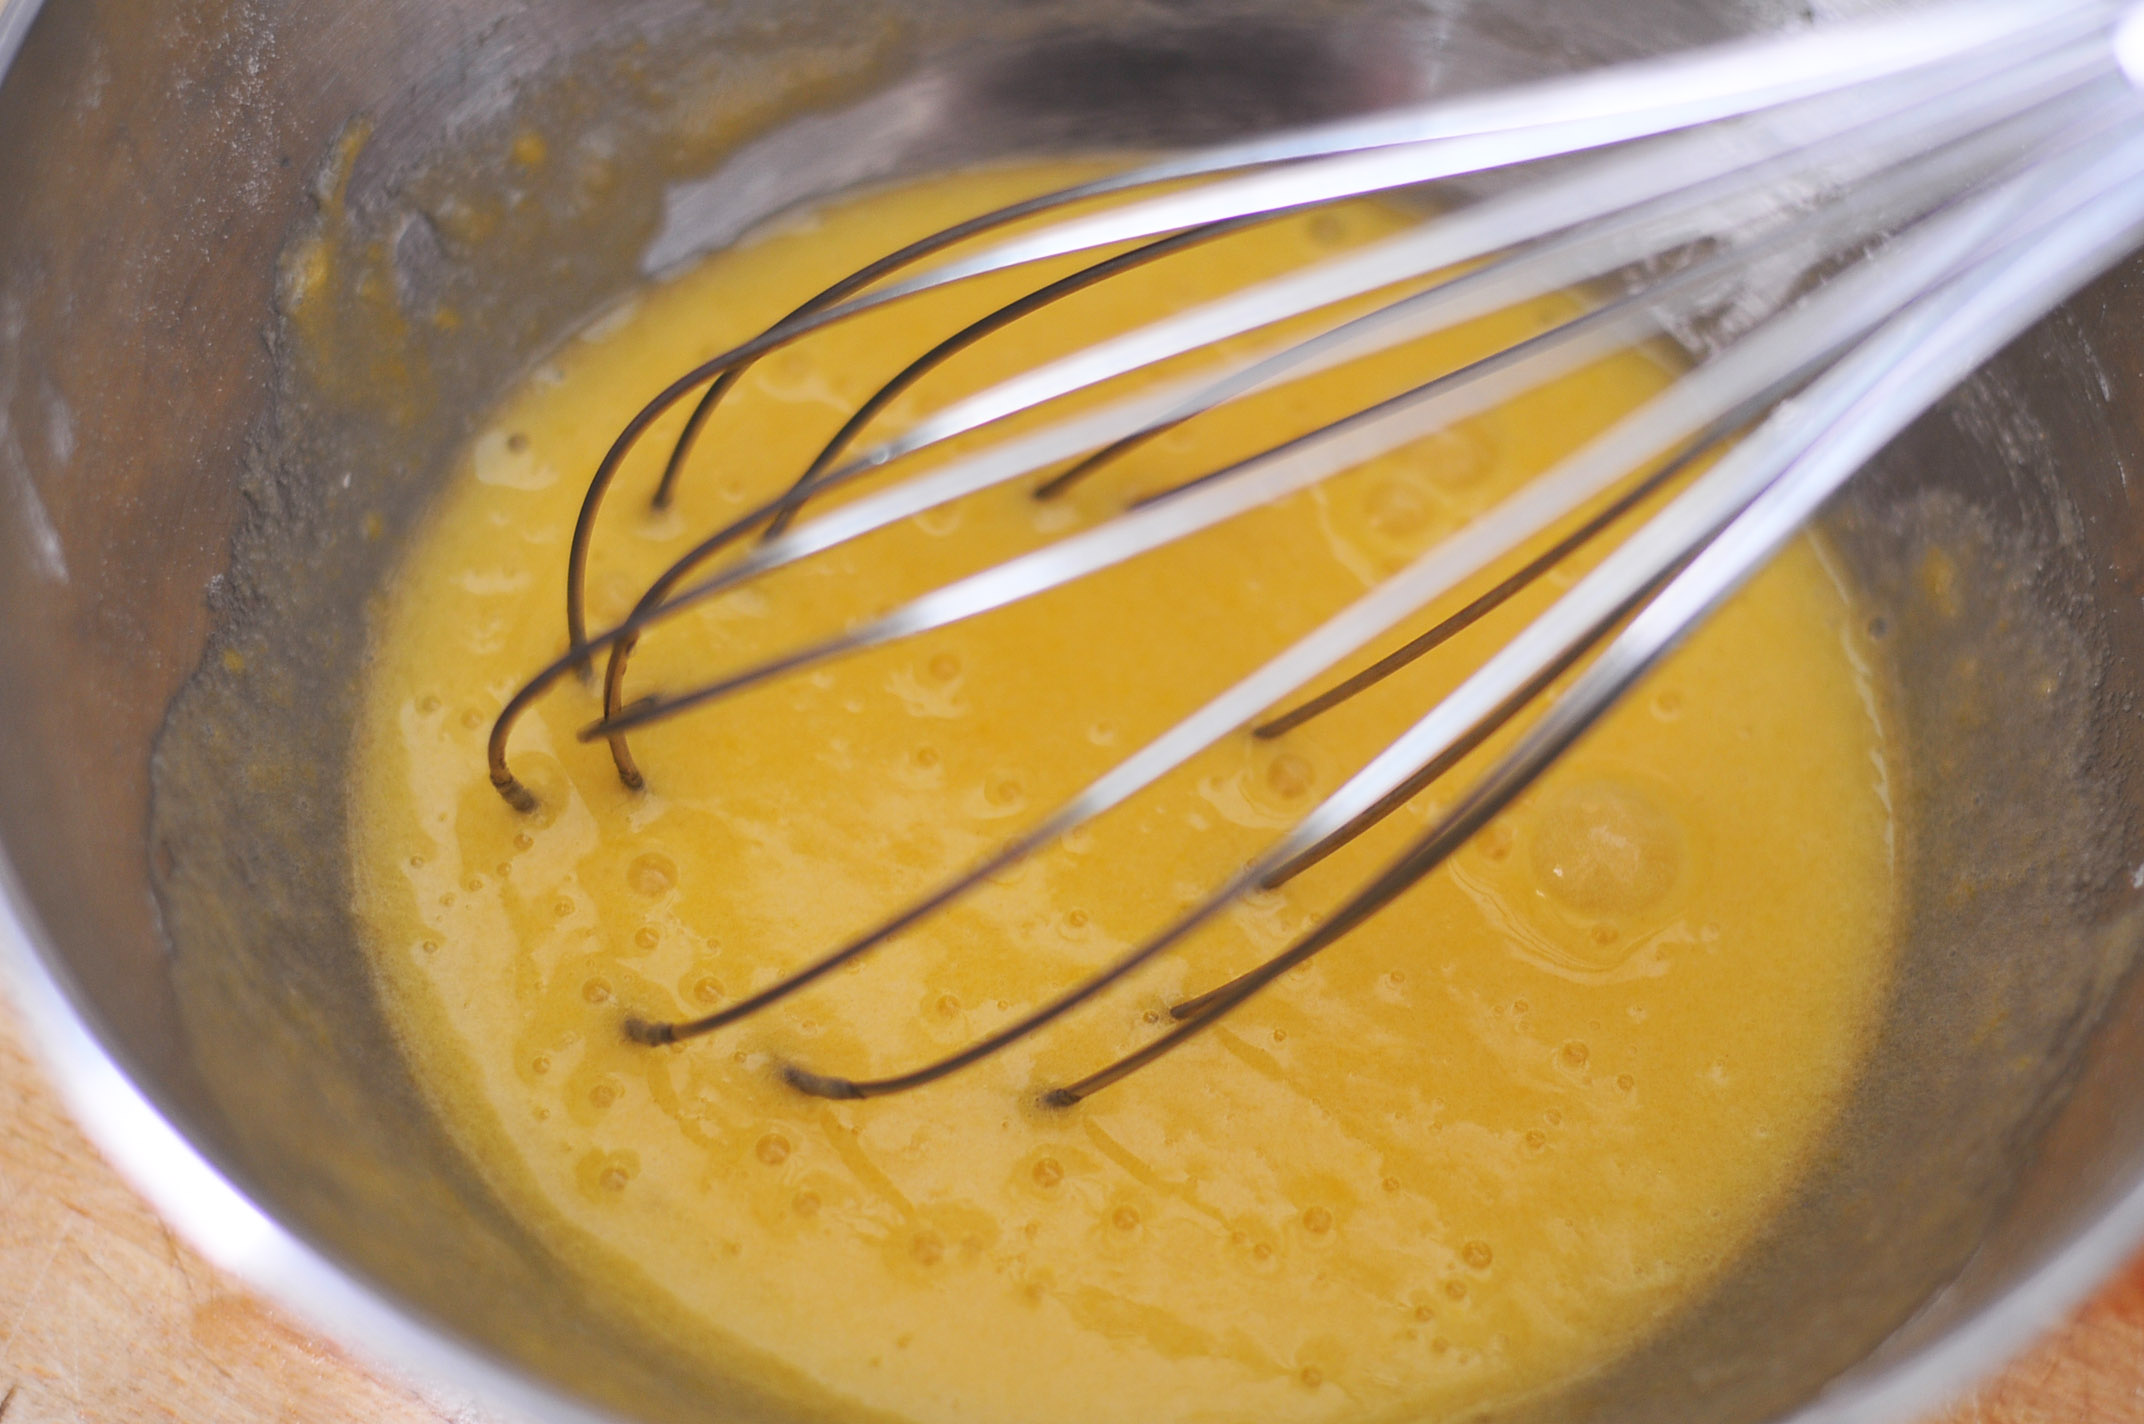
In a large pot over medium high heat, combine the sugar, corn syrup and ponzu sauce (mixture will bubble to a large volume during cooking). Stir until the sugar has dissolved. Allow to boil, without stirring, until the mixture reaches 230 degrees, about 5 minutes. While the caramel is cooking, do not stir, but swirl the pan every 30 seconds to redistribute the caramel sauce evenly. Once 230 degrees is reached, add the butter a few cubes at a time and stir, allowing the mixture to return to 230 degrees. Remove from heat and stir in the cream, adding slowly.

Pour the caramel over the shortbread and refrigerate for 4 hours, top with sea salt. Remove from pan using the parchment paper and cut into squares.

Chocolate Peppermint Souffle Cake With Candy Cane Whipped Cream

You didn’t think that I could make this delicious whipped goodness and not come up with a fabulous cake to go with it, did you?

But, I have to admit that I’m not a fan of mint, because of what I will always referr to as The Moroccan Mint Experience. While travel through Middle Atlas a few years ago with my sister…we…we’ll it’s hard to explain. But as a result, I no longer like mint. 

Although my favorite part of the devolution of mint in my life, is Mohammed 

He lives in a cave in a mountain town called B’Halil.

He made me mint tea in his cave. And when someone as wonderful and welcoming as Mohammad takes time to welcome you into his cave and heat up water over an open flame and make you tea out of brown water and mint leaves YOU DRINK IT!!

And I am so grateful to him for the tea. Although he has nothing to do my my distaste for mint tea, he is my favorite memory of my journey towards no longer liking it. 

For some reason, however, Candy Canes are exempt for my I Hate Mint rule. Can’t really say why. 

Even if you hate mint, or if you love it so much you want to take a long soak in big bathtub full of Junior Mints, I hope you like this cake. I did. 

Chocolate Peppermint Soufflé Cake With Candy Cane Whipped Cream

1/2 tsp natural peppermint extract

1 cup unsalted butter

7oz high quality 60% chocolate

5 eggs, room temperature, separated

1/3 cup plus 3 tbs sugar

1 tbs all purpose flour

1 tsp kosher or sea salt

2 tbs cocoa powder

Serve with:

Candy Cane Whipped Cream 

Preheat oven to 350.

In a small pot, add the butter and peppermint extract, stir over medium heat until the butter has melted, don’t allow to boil. Remove from heat.

In the top of a double broiler (or a metal bowl set over a pan of simmering water) add the chocolate and the peppermint butter. Stir over medium-low heat until the chocolate is melted and combined with the butter. Remove from heat and set aside to cool slightly.

 In the bowl of a stand mixer, add the egg yolks and 1/3 cup of sugar. Mix on high until well combined and light and frothy. Turn off the mixer, and add the flour, salt and the cocoa powder. Mix until just combined. Add the chocolate mixture and beat again until the chocolate is incorporated into the egg yolk mixture. 

In a separate bowl, add the egg whites and 1 tbs sugar. Beat with an electric mixer on high until soft peaks form. Add the remaining two tbs sugar and beat again until shiny and stiff peaks form. 

Remove bowl of the stand mixer that contains the chocolate batter. Put one third of the egg whites into the chocolate batter, and gently stir until barely combined. Add half the remaining egg whites and stir again. Add the remaining egg whites and stir until just combined. 

 Line the bottom of a 9 inch spring form pan with a round of parchment paper. Spray the sides with butter flavored cooking spray.

Pour the batter into the spring form pan in one even layer.

Bake at 350 for 35 minutes or until the top is dry and slightly cracked.

Allow to cool for at least 15 minutes, the top will deflate slightly.

 Remove from the spring form pan, allow to cool to room temperature.

Make the whipped cream.

Serve the cake topped with whipped cream.

Printable:Chocolate Peppermint Soufflé Cake

Printable: Candy Cane Whipped Cream

Don’t forget to Like Domestic Fits on Facebook to receive updates about new posts in your feed.

Homemade Bourbon Cherry Cordials & A Bourbon Cocktail Recipe

I’m SO excited about this post! Mr. Fit’s first recipe. It’s a bourbon cocktail recipe, he’s so good at cocktail makin'. I’ll share that with you all at the end.

First, these super fun chocolates that make a perfect last minute hostess gift. Or a fun addition to your holiday dessert tray.

Nothing like soaking fruit in liquor to help you get through the holidays!

While my cherries where soaking in bourbon, the three of us headed over to Travel Town to take a few shots of Tater.

I’m trying to challenge myself to get better at photography by taking pictures of non-edible things like humans. Even though she’s so cute I wanna bite her little cheeks!

Even though I am way too hard on myself, I think it is really important for me to take steps towards bettering myself in a lot of different ways. If I want to be a better photographer, it isn’t just going to all of the sudden happen one day. I have to work on it, read, study, shoot, and re-shoot. And I get to take pictures of Tater, and she is pretty stinkin' cute.

When we got back, and I had finished the cordials, I had a 1/2 cup of perfectly good bourbon and nothing to do with it. I hate to waste perfectly delicious booze, so I gave it to Mr. Fits and he wrote up a recipe for us all.

Use good bourbon for this recipe. You taste it, and you want it to taste good. My recommendation is Buffalo Trace. It’s a beautiful, artisan bourbon and it’s affordable. Shocking, I know. It is one of those magical products that is loved by bourbons snobs and inexpensive enough to go out and buy. Don’t tell those Buffalo Trace people that they could probably double the price and I would still buy it. It’s the only bourbon I actually like to drink.

Bourbon Soaked Cherry Cordials

30 fresh, sweet cherries (like Bing, don’t use sour or pie cherries)

1/2 cup Buffalo Trace Bourbon

2 cups dark chocolate (60%-70%)

Pit all thirty cherries and place then in one tight layer on the bottom of a loaf pan. Pour the bourbon on top of the cherries and toss to coat.

You want the cherries to be sitting in the bourbon, about half way covered.

Allow to soak for 1 1/2 hours at room temperature, tossing to redistribute the bourbon every 20-30 minutes.

Remove from the liquid with a slotted spoon and place cherries on a plate covered with 3-4 paper towels. Allow to drain and dry for about 10 minutes. Reserve the bourbon for the below cocktail recipe.

Place chocolate in the top or a double boiler. If you don’t have one (and to be honest, I don’t even have one) add water to the bottom of a pot, then place a metal bowl over the pot (this is what I do). Make sure the bottom of the bowl is not touching the water, very important. I have also heard that you can place the metal bowl on an electric heating pad, but I have never tried it.

Place the chocolate in the bowl, set heat to medium-low. Stir constantly. Use a food thermometer to measure the temperature. You want it to be between 90 and 93 degrees. This is so your chocolate gets that beautiful shine to it and has that crisp snap when you bite into it. If you heat it too much or too little, it won’t have that. 

Once the right temperature is reached, remove the bowl from the heat. Add the cherries in batches (about 8-10 at a time) roll them around in the bowl and remove with a spoon.

Place on wax paper to dry. Chill in the fridge until ready to serve. 

NOW that cocktail recipe I promised you. He even wrote it down for me, I love his handwriting:

Sunday Bourbon Fits

2 oz Cherry Infused Bourbon (from the above recipe)

1 tsp Grenadine

1 tsp Powdered Sugar

1 oz Lemon Juice 

1 Orange Slices (plus 1 additional for garnish)

1 Cherry (for garnish)

(makes one cocktail)

In a shaker half full of ice, add bourbon, grenadine, sugar and lemon juice, stir to combine. Add one orange slice, replace shaker cap, and shake well. Pour into an Old Fashion glass. Garnish with one orange slice and a cherry. 

Candy Cane Whipped Cream & The Importance of Fundamentals


Tater walked at 6 months. Bullshit, right? Actually, it’s true. Although you fully have the right to be skeptical because most babies are barley holding their heads up and don’t even have the concept of standing yet.

For those of you who haven’t been through the: "Watching your offspring launch themselves from one object to another, resulting in scary bruises and traumatic screams" phase of your life, here is what typical babies do:

5-6 months: Can probably roll over in both directions

6-7 months: Tries to get up on knees in crawling position

7-8 months: Makes first attempt at crawling

8-9 months: Starts to crawl, possible attempts at pulling self up on furniture

10-11 months: Pulls self up onto furniture, possibly takes steps while holding furniture

11-12 months: Takes first steps

12-14 months: Becomes a full times walker

Not so much in our house.

Tater literally tried to run before she ever crawled. Here is a video on You Tube of Tater taking steps at six months:

Tater Taking Steps At 6 Months

Just past her first Thanksgiving, not even 8 months old yet, she was walking around like she owned the joint. Watch this video of Tater Walking:

Tater Walking

(And please ignore my, "Talking to my infant" voice. Or better yet, turn the sound off. Yikes!)

THIS baby, whom I was still buying 3 month clothes for was walking all over the place in a way that made strangers gasp and pull out their video phones:

Was I proud? Of course. But I was also worried. Not to mention the fact that my 6 month old had denied me at least HALF of her baby-hood by deciding to become a toddler half a year early.

More than anything else, I have a little glimpse into the developing psyche of my tiny daughter. She is fiercely independent, motivated, headstrong, and completely refusing to learn things in a traditional fashion.

"Crawling? That won’t get me anywhere. I want to walk, so why don’t I just do that instead of wasting my time on the floor?"

Of course, I’m pretty sure I know where she gets that from, Mr. Fits and I were both "Non-Traditional" learners and in spite of the fact that we both score shockingly high on IQ tests, we struggled in school. A lot. Both of us spent our entire childhoods thinking we where stupid because our brains processed information differently and that tended to earn us lower marks on standardized tests.

I felt this way when I threw myself into photography. I wanted to be good at it from the beginning, so frustrated with myself for not being able to produce the images that I saw seasoned veterans shooting. Why didn’t I get it?! What was wrong with me?! I needed to understand the basics, let myself learn a little at a time, before I would be where I wanted to be. And, to be honest, I still get frustrated with myself for not being a better photographer, even though I have only had my DSLR for about 7 months.

Will Tater struggle to run before she can crawl in every area of her life?

Although the world is changing, and other learning styles are being foster, I still worry about her. Fundamentals are important. You have to learn the basics in order to have an anchor for the rest of the information.

Cooking is no exception. No one has ever just walked into a kitchen and made a perfect souffle without first learning how to cream butter and sugar, read a recipe, or sift flour.

Even if you have mastered some pretty complicated recipes, going back to the basics will only improve your cooking.

My favorite fundemental is whipped cream. Something our Grandmother made without a thought was replaced by a blue and white tub full of chemicals that we find in the freezer section. Whipped cream is easy to make and so impressive. Especially when you flavor it with candy canes.


Candy Cane Whipped Cream

4 standard size candy canes, unwrapped

1 cup heavy cream

1/2 cup powdered sugar

You will also need:

A piece of parchment paper, about 2 feet long

A mesh strainer

a large ziplock type bag

a candy cane pounder of some sort: rolling pin, frying pan, rubber mallet

Place your unwrapped candy canes in the zip lock bag. Place the zip lock bag on top of the parchment paper and smash the candy canes with your rolling pin until they have mostly turned to powder. 

Position your mesh strainer over your parchment paper. Pour the contents of your candy cane bag into the strainer.

Sift until the candy cane powder is on the paper and candy cane chunks are in the strainer. Save the chucks to add to your favorite cookie, chocolate cake or brownie recipe. 

form the paper into a funnel to pour the powder into a small cup. 

In the bowl of a stand mixer add your chilled heavy cream, powdered sugar and 2 tbs of the candy cane powder. You can add more powder for a more intense candy cane flavor or save the rest for another recipe. 

Whip on high until stiff peaks form. About 4 minutes. 


Printable: Candy Cane Whipped Cream

Don’t forget to Like Domestic Fits on Facebook to receive updates about new posts in your feed. 

Easy Homemade Chocolate Raspberry Mousse pie

 Sometimes you make a mistake and it ends up being a really great thing. I wish I had a wise true life story about a mistake gone right, but I don’t. Not at the moment. 

But this pie is a mistake gone right. I was trying to make chocolate whipped cream, but I wanted something more intense than cocoa powder. So I tried to melt some chocolate in heavey cream, and then chill it. 

When I came back the next day, and it was one solid mass. The I tried to whip it (Into shape!) and it turned into this creamy non-whipped cream type of dense mousse. So I made a crust for it and a chocolate raspberry topping and it’s now a pie. Or it was a pie until I ate it. 

It’s not a propper mousse, its a working-mom-still-wants-to-cook-from-scratch type of mousse.

I like it.

Super easy, fancy, still made from scratch, and impressive. Win, Win, Win.

Easy Chocolate Raspberry Mousse Pie

Filling:

2 cups heavy cream

2 3oz bars of semi-sweet chocolate

Crust:

2 cups chocolate wafer cookies (or chocolate teddy grahams or chocolate graham crackers)

1 stick unsalted butter, melted

1/4 cup white sugar

2 tbs brown sugar

Topping:

2 cups fresh or frozen raspberries

2oz 60% dark chocolate 

1/3 cup sugar


In a large pot, add the cream and the chocolate. Stir over medium-low heat until all of the chocolate has melted and it resembles chocolate milk. Add to the bowl of a stand mixer and place the bowl in the refrigerator. Cover and chill until set, at least 6 hours. Filling can be made up to 2 days ahead of time. 

Pre-heat oven to 350. 

Put the chocolate wafer cookies, or chocolate graham crackers (NOT chocolate covered) into a food processor and process until crumbled. Add the sugars and the butter and process until it looks like wet sand. Add a bit more butter if it’s too dry. Press into a 9 inch pie pan. Press hard, using a measuring cup, a flat bottom coffee cup or anything you can to make sure and pack it into the pan really well. This will keep it from crumbling when you cut it into slices. 

Bake for 10 minutes at 350 or until firm. Allow to cool. 

Place the bowl of chilled chocolate cream on to the stand mixer and beat on high for 3-5 minutes or until fluffy. At this point, you can taste to see if you want it sweeter. I tend to favor less sweet desserts, and if you like yours supper sweet, add 1/4 cup sugar and beat until its incorporated into the mousse.

Add the chocolate mousse to the pie crust and spread out evenly, place in the fridge to chill. 

In a pot over medium-high heat, add the topping ingredients. Stir until the raspberries and chocolate has melted, the raspberries have broken down, and the mixture has thickened. This will take longer if you are using frozen raspberries because the water content is higher. About 8-12 minutes. Pour the mixture over the mousse and chill until set, about 30 minutes. 

Chocolate Stout Cake With Porter Ganache & Beer Brown Sugar Buttercream

I’m going to start this post by telling you that I am biased. That being said and out of the way:

The West Coast of the United States has the best beer in the world. At least, it has the highest concentration of fantastic craft breweries.

I used two old favorites for this post. Black Butte Porter, from Descutes Brewery and Chocolate Stout from one of my favorites Breweries, Bison.

Of course there are other fantastic beers all over the world, and all over this fantastic beer loving country of ours, but the West Coast is like a Mecca. There are just so many all up and down the coast.

Now if someone will just organize a Beer Tour, we can all take 6 months out of our lives to travel up and down the Pacific Coast and drink ourselves silly with incredible craft beer. You get on that, I’m waiting.

Chocolate Stout Cake with Beer Brown Sugar Butter Cream Filling & Porter Ganache

Chocolate Stout Cake with Beer Brown Sugar Butter Cream Filling & Porter Ganache

Ingredients
  

For the Cake:

  • 3 cup flour
  • 1 tbs baking powder
  • 2 tsp baking soda
  • ¼ cup unsweetened cocoa powder
  • 1 tsp kosher salt
  • 2 sticks 16 tbs unsalted butter
  • 2 cup sugar
  • 4 eggs
  • 1 1/2 cup 2 3.5 oz bars 72% dark chocolate, chopped
  • 1 1/2 cup Chocolate Stout
  • 1 cup of brewed coffee cooled

For The Filling (Buttercream):

  • 1/2 cup beer
  • 1/2 cup of brown sugar
  • 12 tbs of butter softened
  • 1/2 tsp salt
  • 1 cup powdered sugar

For The Ganache:

  • 2 cups of dark chocolate chips
  • 1/2 cups of Blake Butte Porter
  • 1/2 cup heavy cream

Instructions
 

Cake:

  • Preheat the oven to 350.
  • Combine flour, salt, baking powder, baking soda and the cocoa powder in a bowl and whisk until well combined.
  • In the bowl of a stand mixer add the butter and sugar and beat until well combined. Add the eggs one at a time, beating well after each egg, scraping the bottom of the bowl between additions.
  • In a microwave safe bowl, add the 72% chocolate. Microwave for 30 seconds, remove and stir. Repeat until the chocolate is melted.
  • Add the melted chocolate to the sugar/egg mixture and blend well. While the mixer is on a medium-low setting, add the stout and then the coffee, continue to combine until well mixed, then add the flour mixture a little at a time until well combined.
  • Grease and flour two 9 inch cake pans. Bake for between 25 and 35 minutes (for cupcakes about 18 minutes) or until the cake springs back when lightly touched. Remove from oven and allow to cool.

Filling:

  • Place the beer in a microwave safe bowl, heat on high until very hot, add the brown sugar and stir until completely dissolved. Allow to cool to room temperature.
  • In the bowl of a stand mixer, add the butter (must be softened to room temperature or it will not work), salt and powdered sugar, beat until combined. Add the brown sugar mixture and mix slowly until mostly combined, then turn the mixer on high and then whip until the frosting is fluffy and well combined.

Ganache:

  • Place chocolate chips in a heat safe bowl. In a pot on the stove, add the heavy cream and the beer and cook over medium heat until hot and bubbly, stirring frequently, about 5-8 minutes. Pour the cream/beer over the chocolate chips and stir until well combined. Place in the fridge and allow to cool until slightly below room temperature.
  • Assembly:
  • Place the first layer of your cake on a a cake plate. Top with your brown sugar butter cream. Add the second cake layer. Pour the warm ganache over the top and allow it to run down the sides. Spread with a knife if necessary.

Join me: FacebookTwitter 

Salted Caramel Pecan Linzer Cookies

I’m reading What Alice Forgot. It’s about a woman who has no memory of the past ten years of her life. She thinks she is a blissfully in-love newly wed, pregnant with her first child when she is really a mother of three going through a nasty divorce. And she isn’t proud of the type of woman she has become: "a point-making hussy who went to the gym and upset her beloved sister and hosted cocktail parties…" 

It got me thinking. What would the 2001 version of myself think of the 2011 me? Would she be proud? I’m pretty sure I wouldn’t think of myself as a point-making hussy. So that’s a win.

What would surprise me? What would disappoint me?

I’m pretty sure I would be shocked that I make Linzer cookies and have a food blog. Ten years ago I was just trying to figure out how to cook, skipping steps and trying to cheat recipes.

Am I going to be proud of the 2021 version? That older model with the inevitably fancier techno-gadgets and an 11 year old daughter? What would she tell me? What would I remind her?

She: "Even though you want to kick people in the shins when they tell you to "enjoy the baby years, they go by fast!" They are right. ENJOY chasing your naked toddler around the house before bath time because that will end"

Me: "Don’t forget how much work it took you to get where you are an appreciate it."

Who knows what else.

Where do you want to be in 2021? Or even the end of 2012?

What is stopping you? Make yourself proud, that 2001 version, the 2008, 2010 version. 2021 is going to come whether you like it or not. Where do you want to be?

Think about those goals you have neglected, like books on a dusty shelf. Those ones you would be embarrassed to have to answer to 2006 for not having even attempted.

They seem overwhelming, but you don’t have to do it all right now, just take a step. One today, one tomorrow. Order a catalogue from a college that has the major you have been thinking about. Start a business plan for that small business you want to start. Or just buy the domain name (about $10 at godaddy.com) for inspiration.

Leave that boyfriend that treats you like crap.

Take that photography class because you know that photo is in your blood you just have to figure out what aperture means.

Take on a part-time job so you can save for that trip to Europe that you are always talking about.

Actually volunteer.

Be the person you wanted to be ten years ago.

It takes work, but it’s worth it. If was easy it wouldn’t make anyone proud.

Linzer cookies are a sign of progress in my life, I never would have tried this ten years ago. And the look so fancy!

Salted Caramel Pecan Linzer Cookies

Cookies:

1 cup (2 sticks) of Butter

3/4 cup sugar

1 egg

1 tsp vanilla extract

1 tsp baking powder

2 cups of flour

1 tsp salt

Filling:

4 tbs butter

1/2 cup brown sugar

4 tbs light corn syrup (like Karo)

2/3 cup chopped pecans

2 tbs heavy cream, brought to room temperature

1/4 tsp kosher or sea salt plus 1/8 tsp salt, divided

Plus 1/4 cup powdered sugar for topping, if desired

In the bowl of a stand mixer, cream the butter and sugar. Add the egg and the vanilla and beat until well combined. In another bowl, add the flour, baking powder and salt, mix with a fork until combined. Add the flour to the stand mixer and mix until the flour is just incorporated into the butter mixture.

Form into a disk and wrap with plastic wrap. Refrigerate until cold, about 1 hour. It is important that the sugar cookie dough is cold or the cookies will spread too much during making.

Preheat oven to 350.

Once the dough is chilled, roll out and cut into 2 1/2 inch circles. Use a small cookie cutter to cut out a small window in the middle of just half of the cookies.

Bake at 350 for 8-10 minutes or until the edges just barely start to brown. It will probably look as if they need another minute or too, but cookies continue to bake once they are out of the oven and you don’t want these to be too crispy.

Allow to cool. Top the window cookies with powdered sugar, if desired.

In a large sauce pan over medium high heat, combine butter, brown sugar, and corn syrup. Bring to a boil, stirring frequently until the sugar has dissolved.  Allow to boil, without stirring, for about 5-7 minutes or until the sauce has turned an amber color. Remove from heat, stir in the pecans, vanilla and the cream and stir until combined. Allow to cool until thickened, but not hardened.

You don’t want to make the caramel sauce too far in advance because it will harden in the pan once cooled, making it impossible to add to your cookies.

Add about 1 tsp of the caramel mixture to the middle of the solid cookies (the ones without the cookie cutter windows) be very careful not to touch hot caramel, it will burn the crap out of your fingers. Use two spoons to get it into place without needing to touch it. Top immediately with a cookie with a cookie cutter window. Sprinkle a few grains of salt in the window. I used a super fancy large grain salt my sister bought me for my birthday. Yes, I am now the sort of person who gets excited to receive a box of super fancy salts from all over the world as a present. Take that 2001.

Allow to chill in the fridge until the caramel has set, about 30 minutes.

Santa Hat Cookies & Why I Hate Santa

I guess HATE is too strong, but I don’t like Santa.

Except maybe this Santa. He’s awesome:

(Photo taken by my brother-in-law, and Hawks fan, Austin Metz)

It all started years ago when I was working at a group home with teenage foster and probation kids in South Central Los Angeles. I know, the white girl from the farm, in South Central.

I loved it.

I was able to see these kids as more than just Gang Members with horrible parents, but human children with potential, talent, hearts and brains. Being raised by grown-up damaged children.

It changed me.

I was teased, laughed at, listen to, and trusted.

I’ve posted so many serious posts lately, I’m no going to go into great detail about that first year, the first christmas. The kids who, at 16 years old, received their first Christmas presents of their lives, or how none of the parents came to our "Holiday Party."

But I will tell you this: Nearly every kid had a story about thinking he was bad because Santa didn’t bring him presents. After all, that’s the story, right? "Santa brings presents to good boys and girls. Bad kids don’t get any."

Or knowing that Santa wasn’t real because the Christmas after he turned 5 he sat in the living room, all alone on Christmas morning with no presents because Mom was on a bender and never came home.

This probably doesn’t apply to you. You will probably never have a Christmas when your kids don’t have presents. Hopefully.

But this year, more kids than ever won’t have presents. And the last thing I would want is for my daughter to carry that message with her to the kids at school who didn’t get presents, for her to think the reason those less fortunate kids didn’t get any gifts during the holidays was because they were bad. 

And I would never want ANY kid to think that the reason he didn’t get presents was because he’s bad.

We don’t need this.

Even though I don’t like the message that comes along with Santa (and I won’t even go into my fear of Mall Santas and their inherent creepiness) Santa is still an iconic symbol of Christmas. He is a great decoration. Which is why I made these Santa Hat Cookies.

I even have one Santa decoration at my house. Just one. I bought it in Paris a few years ago because I really wanted a Christmas Ornament from France and this was all I could find in September.

Links to donate to those in need, if you want:

Toys For Tots

Salvation Army

Angle Tree

Donation Town

These Cookies are pretty adorable, and really easy to make.

Santa Hat Cookies

Sugar Cookie Base:

1 cup (2 sticks) of Butter

3/4 cup sugar

1 egg

1 tsp vanilla extract

1 tsp baking powder

2 cups of flour

1 tsp salt

Cream Cheese Frosting:

1 package of cream cheese (8 oz) softened

1 stick of butter, 1/2 cup, room temperature (very important)

1 tsp vanilla

1/8 tsp salt

1 cup powdered sugar

Hat:

24 large strawberries, stem and leaves cut off


In the bowl of a stand mixer, cream the butter and sugar. Add the egg and the vanilla and beat until well combined. In another bowl, add the flour, baking powder and salt, mix with a fork until combined. Add the flour to the stand mixer and mix until the flour is just incorporated into the butter mixture.

Form into a disk and wrap with plastic wrap. Refrigerate until cold, about 1 hour. It is important that the sugar cookie dough is cold or the cookies will spread too much during making.

Preheat oven to 350.

Once the dough is chilled, roll out and cut into 2 inch circles (or just larger than the base of your strawberries).

Bake at 350 for 8-10 minutes or until the edges just barely start to brown. It will probably look as if they need another minute or too, but cookies continue to bake once they are out of the oven and you don’t want these to be too crispy.

Allow to cool.

In the bowl of a stand mixer, beat the cream cheese on high for about 2 minutes. Add your room temperature butter and mix until combined. Add the vanilla and beat again until combined. Turn the mixer off and add the powdered sugar, return mixer to a low speed and mix until the sugar is incorporated into the cream cheese.  Add the frosting to a piping bag. If you don’t have a piping bag, add to a large, heavy duty, zip lock bag and cut about 1cm off the bottom corner of the zip lock bag, this can be used as a make-shift piping bag.

Pipe a dime sized amount onto the cut end of the strawberry and place in the middle of your sugar cookie.

Pipe the frosting around the base of the strawberry, as well as a pea sized amount on the tip of the berry to resemble Santa’s Hat.


Baked Apple Rings: Healthy Indulgence

Another healthy post! We have to have ways to indulge and still enjoy. Of course, after I made these little 35 calorie rings of goodness, I smothered them in caramel sauce. Not quite as healthy. I had some leftover from Thanksgiving, so it was more like recycling. 

These are also a great treat for kids.

Or, a great dessert to bring to a party so that you will keep your grubby little hands off the chocolate tray, but still have somethings to snack on. 

Only 35 calories each. And even if you eat an entire apple, all by yourself, it’s only 160 calories. But you should probably stop there. Just sayin'

Baked Apple Rings

5 medium sized fuji apples, peeled cored and cut into 1/2 inch slices

1/3 cup flour 

1/4 cup Panko bread crumbs

2 tbs sugar

1 tbs cinnamon

1 tsp nutmeg

1/4 tsp salt

1/2 cup skim milk

1 large egg

1/2 tsp real vanilla extract

Preheat the oven to 400. 

In a bowl combine the flour, Panko, sugar, cinnamon, nutmeg, and salt, stir with a fork until well combined. In a separate bowl, combine the milk, egg and vanilla extract with a fork until well combined.  

Spray a baking sheet with butter flavored cooking spray. 

Place one of the apple rings in the milk mixture and into the flour mixture. Turn the ring over, coat well with the flour mixture. Place on the baking sheet. Repeat for all slices. 

Bake at 400 for 15 minutes. Turn the rings over and bake for an additional 10 minutes. Serve warm. 

Vanilla Bourbon Cranberry Sauce & 3 Ways to Use the Leftovers

Of all the Thanksgiving foods that I am asking you to make from scratch, and not out of a can, cranberry sauce is by far the fastest and easiest. It takes almost as much time to try and slop that phallic shaped, hideously ridges gelatinous mass onto a crystal serving dish as it does to throw a few ingredients in a pot and let it simmer. You have no excuse. Put down your reservations, and your can opener and give it a try. You can do it. I believe in you. 

As for those leftovers, that best part of that Black Friday, you have so many options. Cranberry sauce is the one thing that freezes super well, so you can put it in tupperware and save it for a week when you aren’t so double stuffed. Maybe there is a Christmas/Hanukkah party coming up and you signed up to bring the cupcakes? You are in luck. Freeze the leftover sauce, make the Cranberry Cream Cheese frosting below and you will have a cupcake hit on your hands. 

First, we’ll start with the recipe that gets us to these fine leftovers fit for transformations.

Vanilla Bourbon Cranberry Sauce

1/2 vanilla bean

4 cups of fresh cranberries

3/4 cup of water

2 tbs bourbon (good quality)

1 tsp real vanilla extract

1 cup of sugar


Slice the vanilla bean down the center the long way and scrape out the insides with the back of a knife. Place the vanilla scrapings, and the rest of the ingredients in a pot over medium/high heat. Allow to simmer, stirring occasionally, for about 10 minutes or until thickened. The longer you allow the sauce to cook, the thicker it will become.  

*all the alcohol burns off once heated, so this is safe to serve to minors. 

As I said before, cranberry sauce freezes well. You can save your leftovers for future use. 


Cranberry Cream Cheese Frosting

2 3/4 cups cream cheese (softened)

1 1/4 cups butter (softened)

1/2 cup cranberry sauce

3/4 cup powdered sugar

Cream cheese frosting is super, super easy to make and about a billion times better than that crap in a plastic can, as long as you follow the rules. Seriously, if you try to cheat this you will end up with a mixing bowl full of lumps that give your frosting the consistency of ground beef. The biggest rule: everything needs to be room temperature. Sounds wrong, but it’s true. Leave your butter and cream cheese on the counter for a few hours to let them soften. Here are a few acceptable shortcuts to get your ingredients to room temperature, since you may have patience issues, or lack of time issues, like I do.

1. If you are baking and the oven is on, place your sticks of butter and cream cheese (still wrapped) on top of the warm oven. That is, if you have an oven that gets warm. Turn them every 8-10 minutes to warm all sides. In about 30 minutes, they should be softened. 

2. Microwave. The problem with this is that you really don’t want anything melted, and since cream cheese is almost always wrapped in foil, this just works for butter. Put your wrapped butter on a microwave safe plate and microwave on high for 8 seconds. Turn one quarter turn and then repeat. do this until it is softened, but not melted. 

3. Cut everything into cubes and leave at room temp for about 30 minutes, should do the trick, unless your house is freezing cold. 

Put your softened cream cheese in the bowl of a stand mixer and beat on high for about 3 minutes. This will allow it to blend with the butter better and prevent any clumps. Add the softened butter and beat on high until well combined. Add the cranberry sauce and mix again until well combined. Turn off the mixer and add the powdered sugar. I don’t like my frosting super sweet, but if you do, add more powdered sugar. Mix on low speed until the powdered sugar is mixed into the cream cheese mixture. 

Cranberry Walnut Muffins

1 stick unsalted butter

1 cup sugar

2 eggs

1 tsp vanilla extract

3/4 cup sour cream

1 cup cranberry sauce

2 cups all-purpose flour

1 teaspoon baking powder

½ teaspoon baking soda

½ teaspoon ground nutmeg

1 tsp cinnamon

¼ teaspoon salt

½ cup walnuts, chopped

Makes 12

Preheat oven to 400.

In the bowl of a stand mixer, cream butter and sugar. Add eggs one at a time, then the vanilla; mix well between each addition. While the mixer is on low, add the sour cream and then the cranberry sauce, mixing until well combined. In a separate bowl, Combine flour, baking powder, baking soda, nutmeg, cinnamon and salt. With the mixer still on a low speed, slowly add the flour mixture to the cranberry mixture. Mix until just combined, don’t over beat. Stir in the walnuts. Add cupcake papers to a muffin tins.  Fill each paper until about 2/3 full.

Bake at 400 degrees F for 20-25 minutes or until muffins spring back when touched.

Allow to cool. 

Cranberry Pancake Syrup


1 cup cranberry sauce

1/4 cup maple syrup

Put both in a bowl, stir well, heat in the microwave for 20 seconds. Serve over pancakes.


Take a second to like my Facebook Page to receive info about new post in your feed.

Thanksgiving Craft: Chocolate Turkeys Made From Halloween Candy

Edible Thanksgiving crafts! Tater really isn’t old enough yet for this (but that kid will be tortured with many holiday crafts in her life, once she is old enough) but this is perfect for kids who are a little older. And an excellent way to use up that left over Halloween candy. They only take a few minutes each, and would make an adorable name card holder for your Thanksgiving feast.

For each Candy Turkey you will need:

2 miniature Reeses Cups

1 Hersheys Kiss

1 Yellow Starburst Candy (one can be used for up to 4 turnkeys)

1 Red Starburst Candy (1 can be used for 8-10 Turkeys)

1 Orange Starburst Candy (1 can be used for 2 Turkeys)

6 Almond Slices

Candy Melts to be used as "glue" (you may also be able to use Hersey’s kisses for this job)

1 Squeeze Bottle (can be found at most craft stores)

1 toothpick

Start by putting about about 1/2 cup of Candy Melts (Hershey’s kisses should work fine as well) in your squeeze bottle. I’ve only had one of these squeeze bottles for about a year and I use it all the time, so handy. After I’m done with it I just store it, with the candy melts still inside, in a large ziplock back and reheat it when I need it. Place in the microwave for 30 seconds, remove and shake to check consistency, heat for another 30 seconds and repeat until the chocolate is melted.

Then squeeze a small amount of melted chocolate on the top of a Reese’s cup (removed from all wrappers) and place the narrow end of the almond slices in the chocolate.

Use all six almond slices to make the Turkey tail, about halfway around the Reese’s cup.

Set aside and allow to dry.

Unwrap the red Starburst candy and cut off a small sliver (if this is a craft that kids are helping with, make sure to make all cuts yourself, or have the kids use a butter knife)

Cut the slice in half the long way to make a long skinny strip.

Take your long skinny "gobbler" and wrap it half way around the point of your unwrapped Hershey’s Kiss

Pressing the candy into place should be enough to hold it.

Cut the corner off your unwrapped yellow Starburst Candy.

Smash it and pinch it, to soften it and mold it into the shape of a beak then gently press into the point of the Hershey’s Kiss until secure.

(Man, I wish I’d gotten a manicure before I made this post)

Then cut off a small amount of the orange Starburst Candy and roll into a ball, flatten and press onto the kiss above the beak to make an eye.

Make another one, the same size to make the other eye.

Dip one end a toothpick into your melted chocolate and place a small dot in the middle of the orange eye.

Retrieve your Reese’s cup and turn it to the smaller side, opposite end from the one with the almond feathers. Place a dot of chocolate in the center.

Then place your Hershey’s Kiss head on top of that.

Slice off a small piece of your orange Starburst Candy.

Squeeze two thirds of it, making it narrow while leaving one end flat.

Make two cuts in the flat end to resemble Turkey toes (there is probably a more scientific name than "toes").

Make another Turkey leg, using the same method. Then place both over your second Reese’s cup, hanging down just slightly to the side of the middle. Place a dot of melted chocolate on the top (this is be used to fuse the Turkey to the base)

Retrieve your Turkey, and shave a small amount of the bottom Reese’s cup, below the Turkey face, between the almond feathers.

Place the Turkey, cut side down, on the base, over the legs.

Cute, right?

You can use this with your name card holders for your Thanksgiving place settings, or just put them on each plate. So cute.

Boston Cream Pie Cupcakes

If you read my How To Make Stuffed Cupcakes post, these pictures probably look familiar to you. I had so many people ask for that recipe (OK, one. One person asked, but still…) that I decided to post my recipe for Boston Cream Pie cupcakes.

Boston Cream Pie Cupcakes

For the Cupcake:

2 cups of flour

1 1/2 tsp baking powder

1 stick of butter

1/2 cups of sugar

1/4 tsp salt

1/2 tbs vanilla extract

4 egg whites

3/4 cup of whole milk

1/4 cup of oil

For the Filling:

 1 1/2 cups heavy cream

1/2 cup sugar

2 large eggs, plus one extra yolk

2 tbs flour

2 tsp vanilla extract

For the Ganache Frosting:

2 cups dark chocolate chunks

1 cup cream

1 tsp espresso powder

Preheat oven to 350.

In the bowl of a stand mixer, add the butter (softened!) and sugar and cream until light and fluffy. In a separate bowl combine the flour, baking powder and salt. Whisk until well combined. In another bowl, add the milk and oil.

A bit at a time, add the egg whites to the butter and beat on high until well combined and fluffy. With mixer on medium, add the flour mixture and the milk mixture, alternating between the two until everything is just combined (don’t over beat).

Add the batter to the cupcake papers until about 2/3 filled.

Bake for 25-30 minutes or until the cake springs back when touched.

Allow to cool.

While those are baking, make the pastry cream. You’re gonna love this stuff. I hope that this is what you will make from now on to fill your cakes with, instead of frosting. SO delicious, and pretty easy to make.

In a sauce pan over medium heat, bring the cream to a slight simmer, removing from heat when bubbles start to form around the edges. You don’t want to boil you cream, just heat it.

In a separate bowl, whisk the sugar, eggs and yolk, and flour until well combined and slightly frothy.

While continuing to whisk the egg mixture, add the cream about 1 tbs at a time. This is called tempering and basically, it’s a way to avoid turning your pastry cream into scrambled eggs. Once your have added about half the cream a tbs at a time, pour the rest in slowly and whisk until well combined.

Return the pastry cream to the stove and stir over medium/high heat until it comes to a rapid simmer. Continue to whisk until thickened, between 5 and 10 minutes. The cream should leave a track when you drag the whisk through it.

Remove from heat and stir in the vanilla. This needs to cool before putting into a piping bag. Pour into a bowl and cover with plastic wrap, pressing it to the surface of the cream. This will avoid that gross skin that used to grow on top of the homemade pudding your grandma used to make when it sat in the fridge too long.

You may, or may not remember my How To Make Stuffed Cupcakes post, but you use the same method of filling as I used for those.

Take a small paring knife and remove a chunk of the center of the cupcake. Make sure you leave an ample amount of the wall and sides of the cupcake intact or the filling will run all over the place.

Once the cream has cooled, spoon into a piping bag. Pipe the pastry cream into the middle of the cupcakes.

Next, make the ganache. Ganache is really easy to make, and a fantastic alternative to frosting. This can also be used as a fabulous cake filling.

Put the chocolate in a heat safe bowl, sprinkle with espresso powder. You can omit the espresso powder, but the coffee flavor doesn’t come through with such a small amount. Coffee brightens the flavor of chocolate, that’s why so many chocolate cake recipes call for it. Heat the cream (microwave or stove, either is fine) until hot and steamy but NOT boiling. Pour the cream over the chocolate and stir.

For a while, you are gonna stir and stir, and it will just look like chunky chocolate milk.

Don’t worry, it’ll all work out. Just keep stirring until it’s smooth and creamy.

Dip your cupcakes in the warm ganache, swirl a bit.

You can also spread it on with a spoon or pipe it on with a piping bag.


Beer Poached Apples With An Amber Ale Caramel Sauce

I came across Albion Amber Ale, from Marin Brewing Co this week. It isn’t a traditional Amber, but the flavors are bright and complex. One taste of this brown ale, and a caramel sauce immediately came to mind. The rich toffee and nut flavors paired beautifully with this recipe and the strong caramel and malt flavors came through in the sauce in such an amazing way.

Even if you skip the apple, this sauce is so incredible you can eat it right out of the jar with your fingers.

Beer Poached Apples with Amber Ale Caramel Sauce

4 fuji apples

2 1/2 cups (20 oz) Amber Ale

2-4 cups hot water

2 cups brown sugar, packed

3/4 cup heavy cream

2 tbs butter

Peel all four apples with a vegetable peeler. With an apple corer remove the core of the apples. Place in a large sauce pan or pot, cover with the beer. Add enough water so that the apples are no longer touching the bottom of the pot. Bring the liquid to a boil, then reduce heat to maintain a strong simmer. Roll the apples with a fork frequently to insure that all side of the apples are evenly cooked. Poach for 20 minutes or until the apples are fork tender. Use a slotted spoon to remove the apples.

Raise the heat to a strong boil and reduce the liquid to 1 cup. Depending on how much water you added, this should take about 20-30 minutes. Remove from heat and add the brown sugar, stir until dissolved. Add a thermometer with a clip to the side of you pan, submerging the tip in the liquid, but making sure it does not hit the bottom of the pan.

Boil, without stirring, until the temperature reaches between 225-230 degrees. Remove from heat and stir until the bubbling subsides. Add the cream and butter, stir to combine. Allow to cool.

Top the apples with the caramel and the chopped nuts.

Another fabulous way to serve this is to chop the apples, and serve the apples, nuts and caramel over vanilla ice cream. Amazing.

Join me: FacebookTwitter 

Party Food: Mini Galettes {Strawberry Brie & Bacon Goat Cheese}

The requirements for party food are pretty simple, but hard and fast.

  1. Yummy
  2. Must travel well
  3. Must have the ability to sit at room temperature for extended periods of time
  4. Bonus if it evokes this sentence from at least one other party goer: "Can I get that recipe from you?"
Mini galettes also have the added bonus of being adorable and fairly easy to make. If you want to make them with store bough crust, I may pound on you a little bit. The crust takes about 8 active minutes plus it’s really, really SO much better than store bought.
Feel free to make these your own and use what ever flavor combinations you love.
Miniature Galettes

CRUST

2 cups flour

1 tsp salt

1 tsp sugar

1 1/2 sticks of butter

1/3 cup ice cold water

FOR THE STRAWBERRY BRIE

4 oz brie, cut into slices

3/4 cups strawberries, chopped

1 tbs butter, melted

2 tbs sugar

FOR THE BACON GOAT CHEESE

6 strips of bacon, cooked and chopped

3 oz goat cheese, crummbled

1/2 cup fresh spinach, chopped (don’t use frozen, too much water)

Makes 12 (6 of each)

In a food processor, combine 1 1/3 cup flour, salt, sugar and butter, process until well combined. Add the remaining flour and process again until combined. Transfer to a bowl and add the water with a wooden spoon (don’t add the water while the dough is in the food processor or your dough will be brittle and cracker-like). If the dough isn’t moist enough, you can add more water, a tsp at a time until the consistency is right. Form dough into a disk, wrap with plastic wrap and chill in the refrigerator for at least 2 hours. You can make this up to 5 days ahead of time, just place the dough, wrapped in plastic wrap, in a large zip lock bag.

Place your chilled dough on a well floured surface. Top with more flour and roll until your dough is fairly thin and even. Cut out 12, 4 inch circles. I didn’t have a biscuit cutter that size so I used a margarita glass.

Place the dough circles on baking sheets that are either covered with parchment paper or sprayed with cooking spray.

Strawberry Brie:

A Trader Joe’s just opened on Friday down the street from my house. I am inappropriately excited about living within walking distance from such a fabulous food source. I bought these cute mini brie wheels. These are also fantastic to make mini baked brie out of, but that is for another post.

I cut each wheel into 3-4 slices. If you don’t live by a Trader Joe’s, you can also just use regular brie and cut it into slices small enough to fit inside the circle.

Place about 1 tbs of brie in the center of 6 of the circles. Top with about 2 tbs of strawberries.

Fold the edges up over the filling, leaving the center open. Pleat and press the edges when necessary.

Brush each of the 6 Mini Galettes with melted butter, sprinkle with about 1 tsp of sugar each.

Bacon Goat Cheese:

For the remaining 6 circles, add about 1-2 tbs of goat cheese to each circle. Top with 1-2 tbs of chopped spinach, sprinkle with bacon.

Fold the edges up over the filling, leaving the center open. Pleat and press the edges when necessary.

Brush the folded edge of each of the 6 Mini Galettes with melted butter.

Bake at 350 for 20 minutes, or until the crust is a light golden brown.

Pumpkin Cranberry Cookies

I’m beginning to wonder about people who HATE pumpkin. I can see hating a particular pumpkin dish, but ALL pumpkin? Maybe you just haven’t had enough different types of pumpkin. I love pumpkin, but probably because I love anything that can blur the lines of what we expect. Pumpkin can be sweet, salty, savory, pie, pasta, tart…It’s a vegetable that can masquerade as a dessert! That’s pretty fantastic.

Here is my recipe for pumpkin cookies, with the added tartness of cranberry.

Pumpkin Cranberry Cookies

Pumpkin Cranberry Cookies


Yield 24


1 1/2 cups of flour

½ teaspoon baking soda

1 teaspoon cinnamon

1/4 teaspoon fresh ground nutmeg

1/4 teaspoon ginger

1/2 teaspoon salt

3/4 cup dried cranberries

3 tablespoon unsalted butter, softened

3/4 cup white sugar

1 cup brown sugar

1 egg

1 teaspoon vanilla

1/2 cup pumpkin puree


Glaze:

1 cup powdered sugar

2 tablespoon orange juice (no pulp)

(makes about 12 cookies)


  1. Preheat oven to 350.


  1. In a large bowl, combine the flour, baking soda, cinnamon, nutmeg, ginger, salt and cranberries, whisk until combined.


  1. In the bowl of a stand mixer, cream the butter and both types of sugar on high speed until well combined. Add the egg, vanilla and pumpkin puree, mix until well combined. Turn the mixer on low and add the flour until just incorporated.


  1. On a baking sheet sprayed with cooking spray, drop about 2 tablespoon of the batter at a time, evenly spaced.


  1. Bake for 15-18 minutes or until the edges start to turn golden brown and the cookies are cooked through.


  1. Allow to cool.


  1. To make the glaze, add the powdered sugar and orange juice to a bowl and mix well with a fork until combined. Spoon onto the top of the cooled cookies.


Inside Out Caramel Apples

There has always been a problem with caramel apples. The ratio is off, backwards even. There just isn’t enough caramel and you’re left with, well, a half eaten apple on a stick.

read more

How To: Make Vanilla Pastry Cream, and What To Do With It

I’m going to push you one step further with your cake baking. You know that yummy cream that is inside doughnuts, the center of cream puffs and even the filling for that fantastic bakery fresh cakes? That’s pastry cream. And it’s easy to make. Even if you aren’t quite ready to give up the box cake mix, take the leap in dressing it up, super fancy, to make all those cake calories totally worth it. Pastry cream brings your cake way past the next level on to the "Did you really make this? Really? It’s amazing" level that you may have doubted you would ever reach. But you will. I believe in you.

Stop filling your cakes with frosting. Frosting is for the outside of the cake. Pastry cream is delicious and you should put this on your cake bakin' TO DO list. It’s easy, you’ll thank me with a big slice of yummy cake.

Vanilla Pastry Cream

 1 1/2 cups heavy cream

1/2 cup sugar

2 large eggs, plus one extra yolk

2 tbs flour

2 tsp vanilla extract

Step One:

In a sauce pan over medium heat, bring the cream to a slight simmer, removing from heat when bubbles start to form around the edges. You don’t want to boil you cream, just heat it.

Step Two:

In a separate bowl, whisk the sugar, eggs and yolk, and flour until well combined and slightly frothy.


Step Three:

While continuing to whisk the egg mixture, add the cream about 1 tbs at a time. This is called tempering and basically, it’s a way to avoid turning your pastry cream into scrambled eggs. Once your have added about half the cream a tbs at a time, pour the rest in slowly and whisk until well combined.

Step Four:

Return the pastry cream to the stove and stir over medium heat until it comes to a low simmer. Continue to whisk until thickened, between 5 and 10 minutes. The cream should leave a track when you drag the whisk through it.

Step Five:

Remove from heat and stir in the vanilla. This needs to cool before putting into a piping bag, a cake or your mouth. Pour into a bowl and cover with plastic wrap, pressing it to the surface of the cream. This will avoid that gross skin that used to grow on top of the homemade pudding your grandma used to make when it sat in the fridge too long.

For the raspberries, I put the pastry cream into a piping bag and piped them into the middle of raspberries. As if I needed another reason to eat raspberries. Or pastry cream.

This makes 2 cups, enough to fill between two layers. The cake I made last week was three layers of white cake so I doubled the recipe.