I’m over at a Passover Potluck today with Tori at The Shiksa In the Kitchen! Check it out, if you are Jewish or a Shiksa (non-jewish girl) I think you are gonna love it. Tori and I have acctualy known each other since the 4th grade and reconnect as adults through blogging.
She is one of the most genuine people I have ever known, sweet, smart and generous with her talents and knowledge.
Tori recently interviewed a man I know, Michael, who is an 81 year old Holocaust survivor who was sent to Auschwitz concentration camp when he was 13. His story is incredible and Tori even got is World Famous Tiramisu recipe! The interview is inspiring, you should read it (Click here).
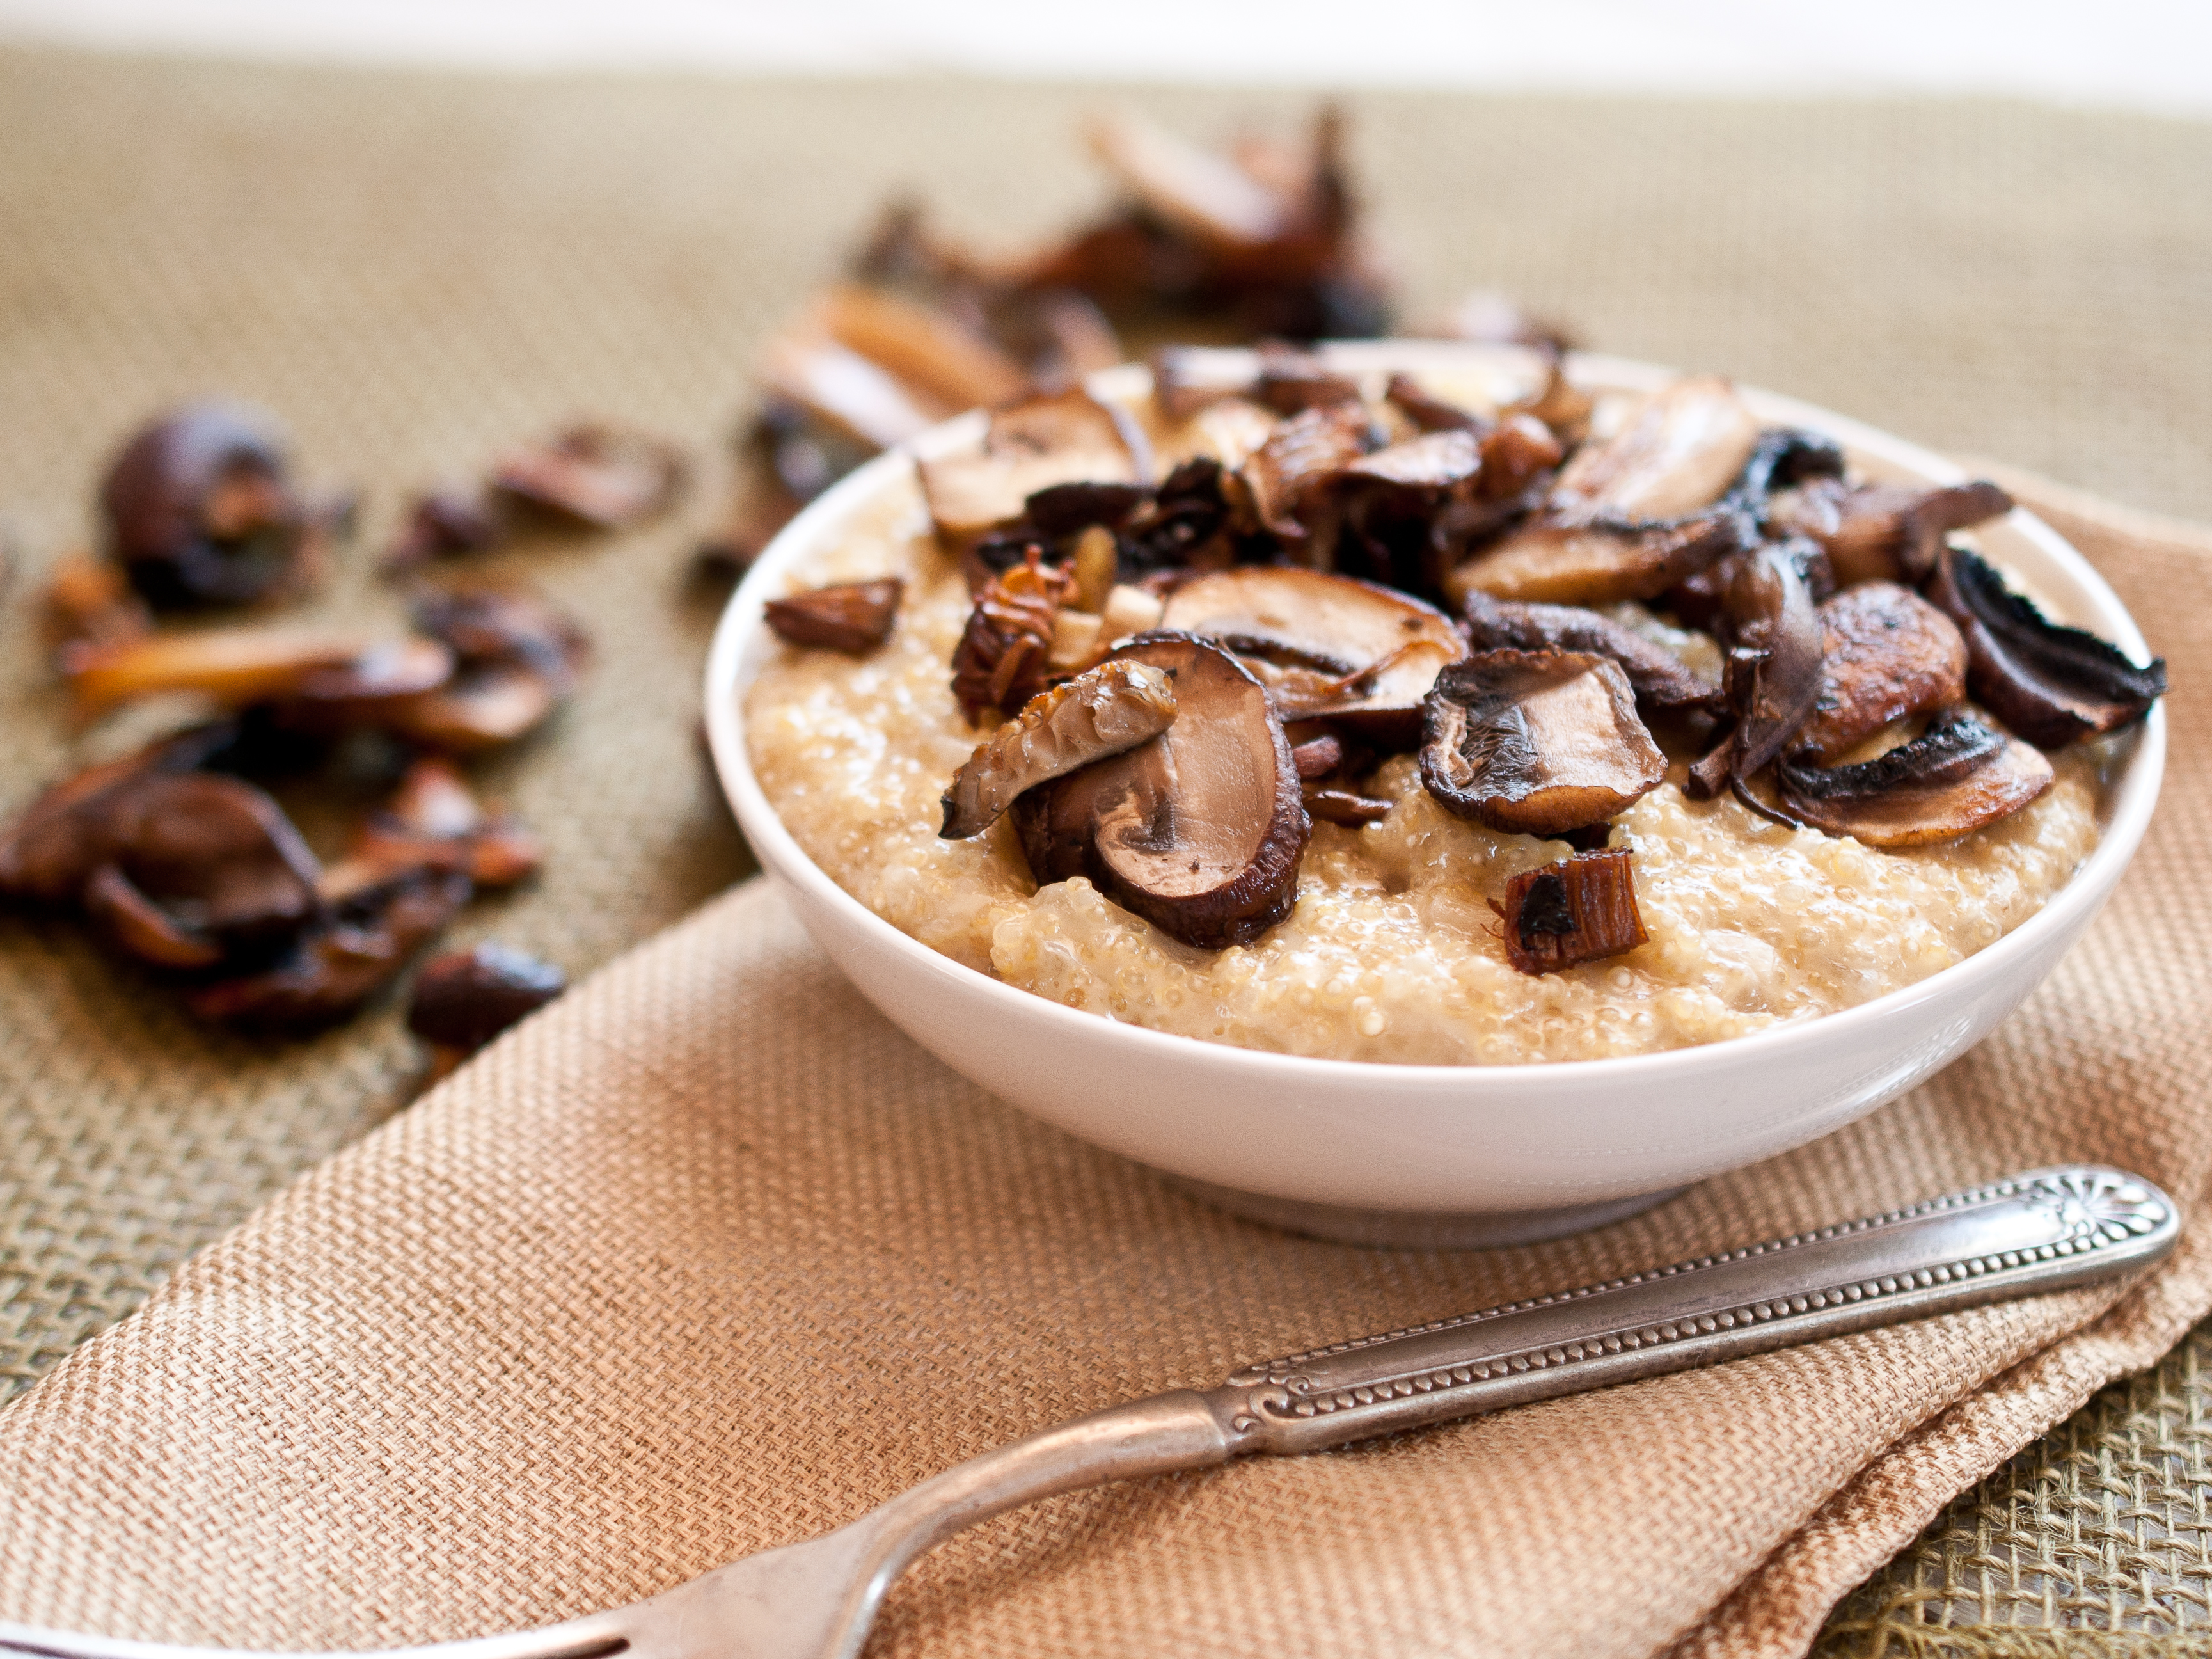
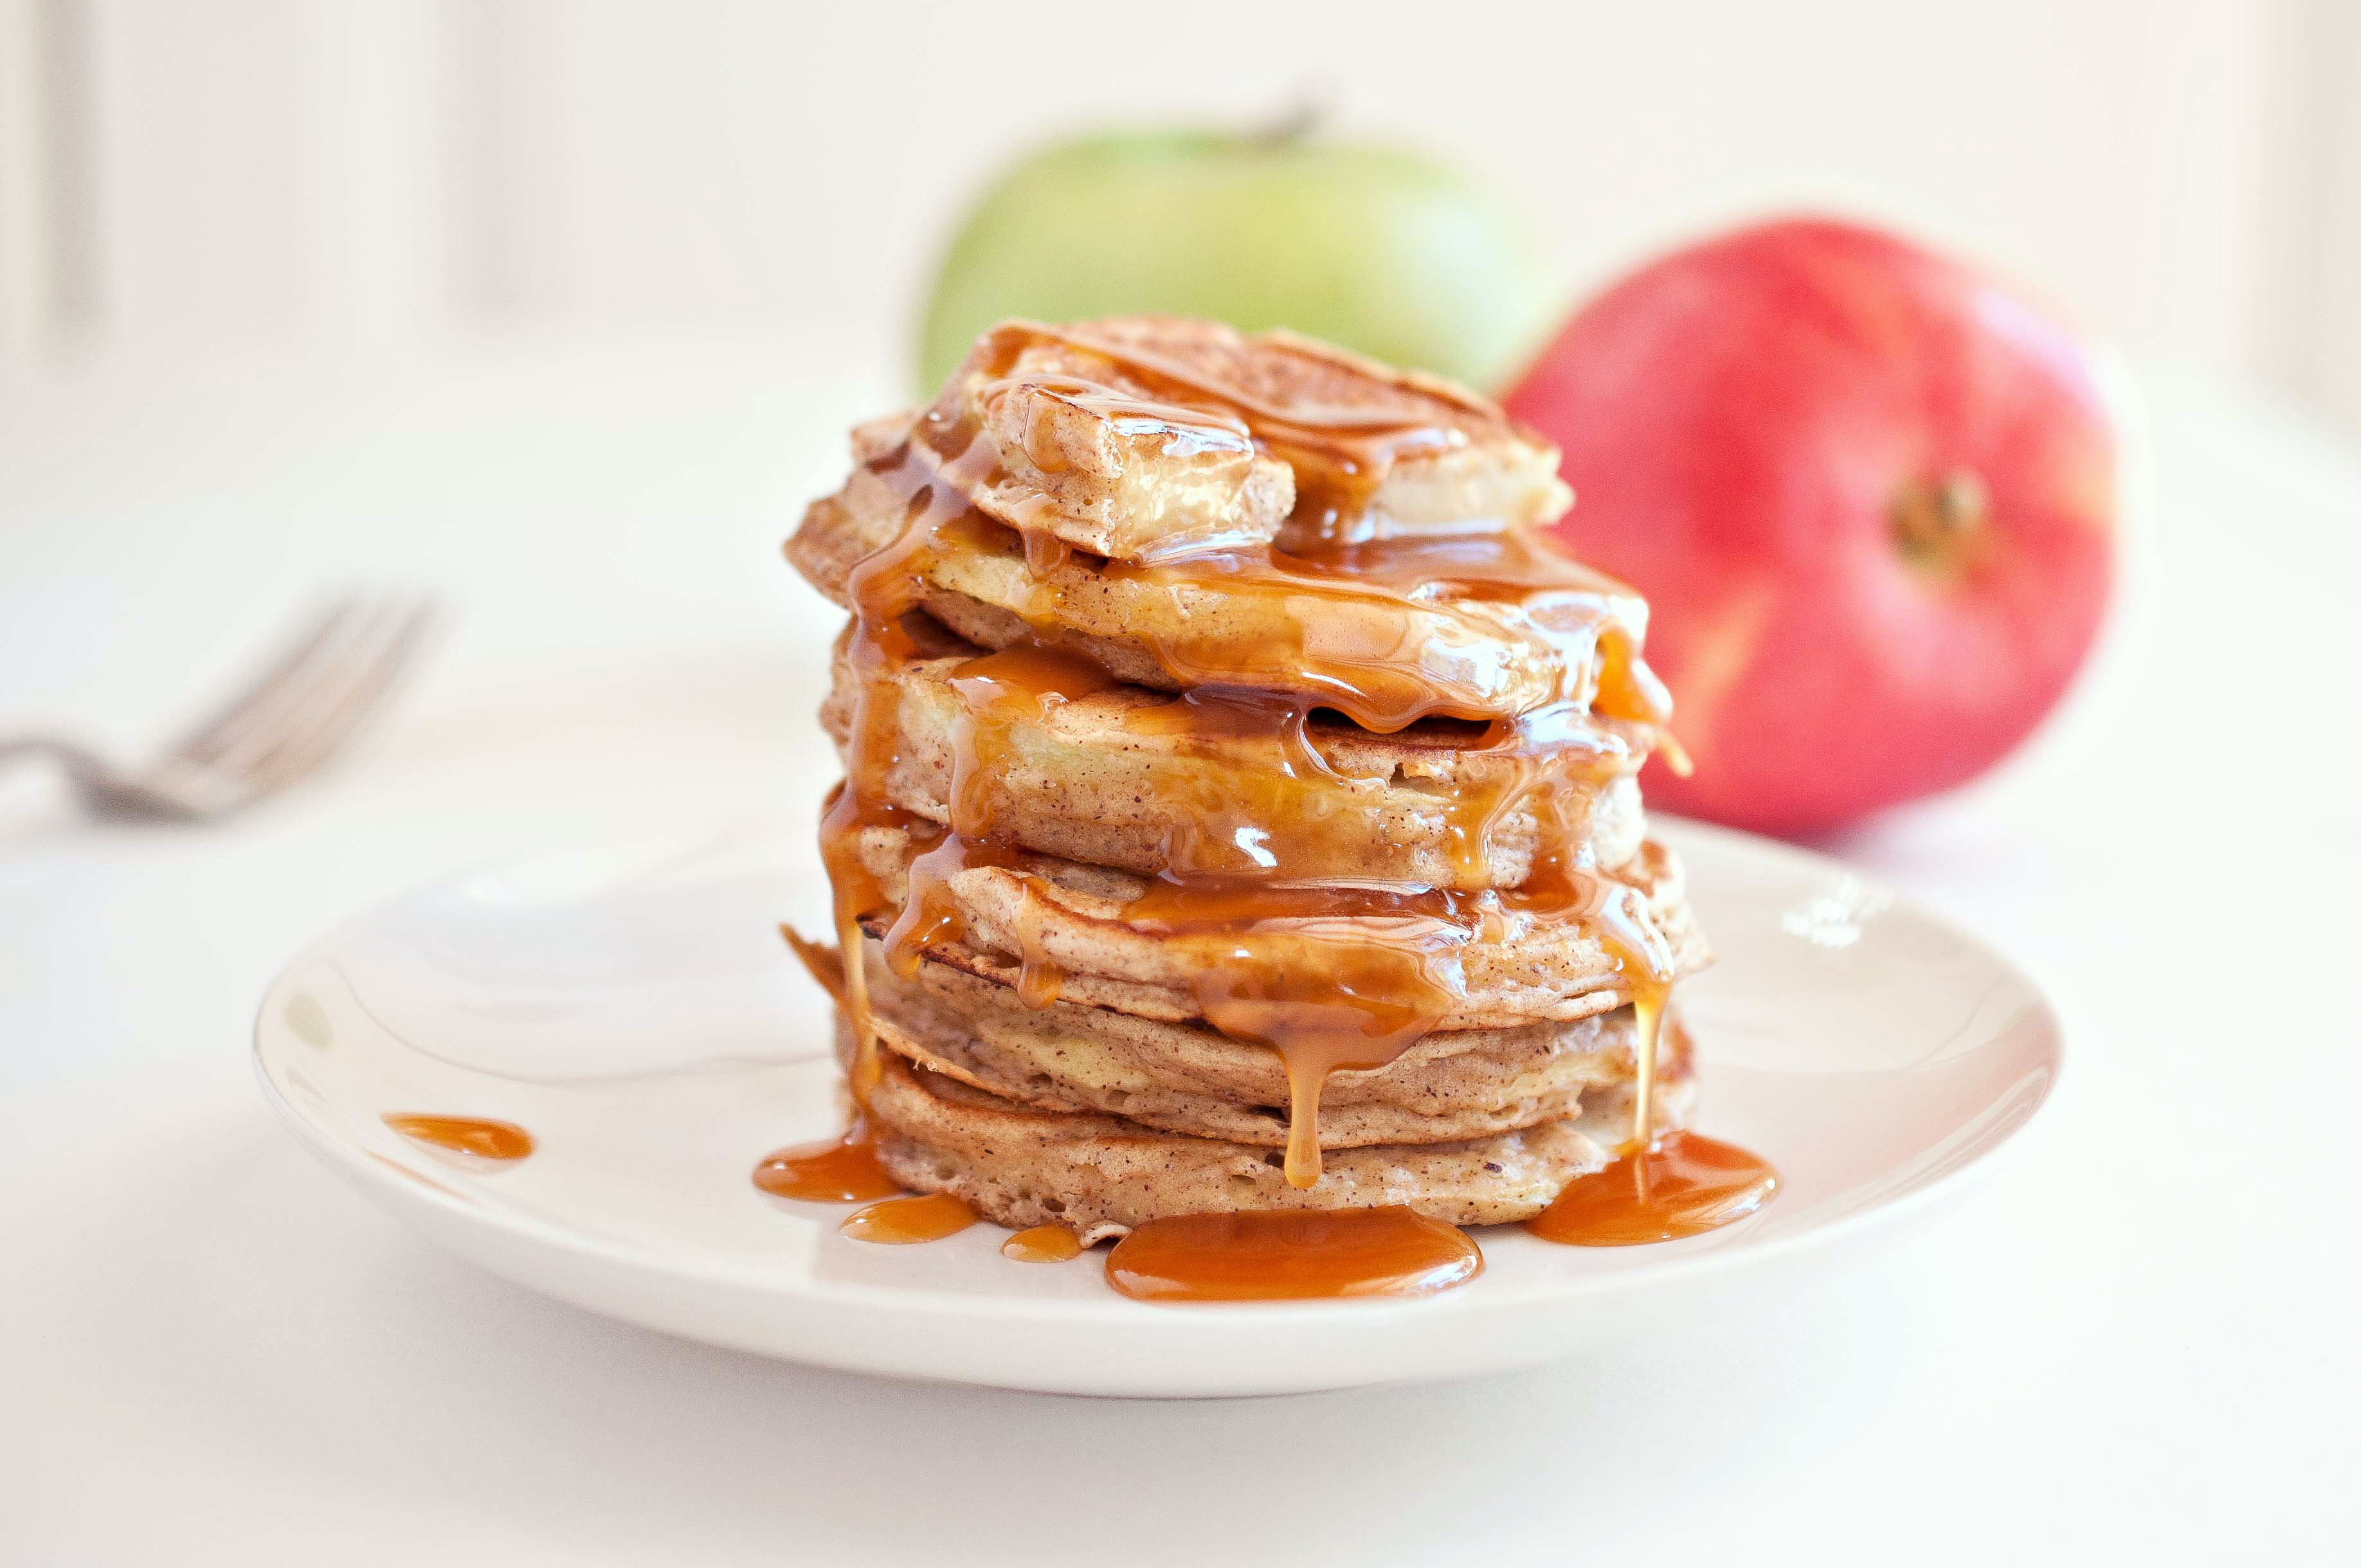
The recipe I created today for the Potluck is one of my favorite dishes, risotto, that I have re-made using the rules of Kosher cooking, which Tori was sweet enough to walk me through! I love Risotto, which is traditionally made with rice, but during passover, it isn’t considered Kosher. You all know my love for quinoa, so this was a fabulous stand in when rice is not an option! Roasting the mushrooms was so quick, and developed a rich flavor quickly.
For this giveaway, I’m working with the website Big Kitchen. With my crazy schedule and my propensity to take on way to much, most of my shopping is done online at the end of the day. Big Kitchen has just been added to my list of sites to browse in the free moments that I do have. Along with the wide array of items that you would expect from an online kitchen store, they also have a good selection of items made from recycled and sustainable materials.
And I’m sort of in love with these bowls and I want this because it reminds me of The Wizard Of Oz, and how have I lived my entire life without one of these?
You see how it goes.
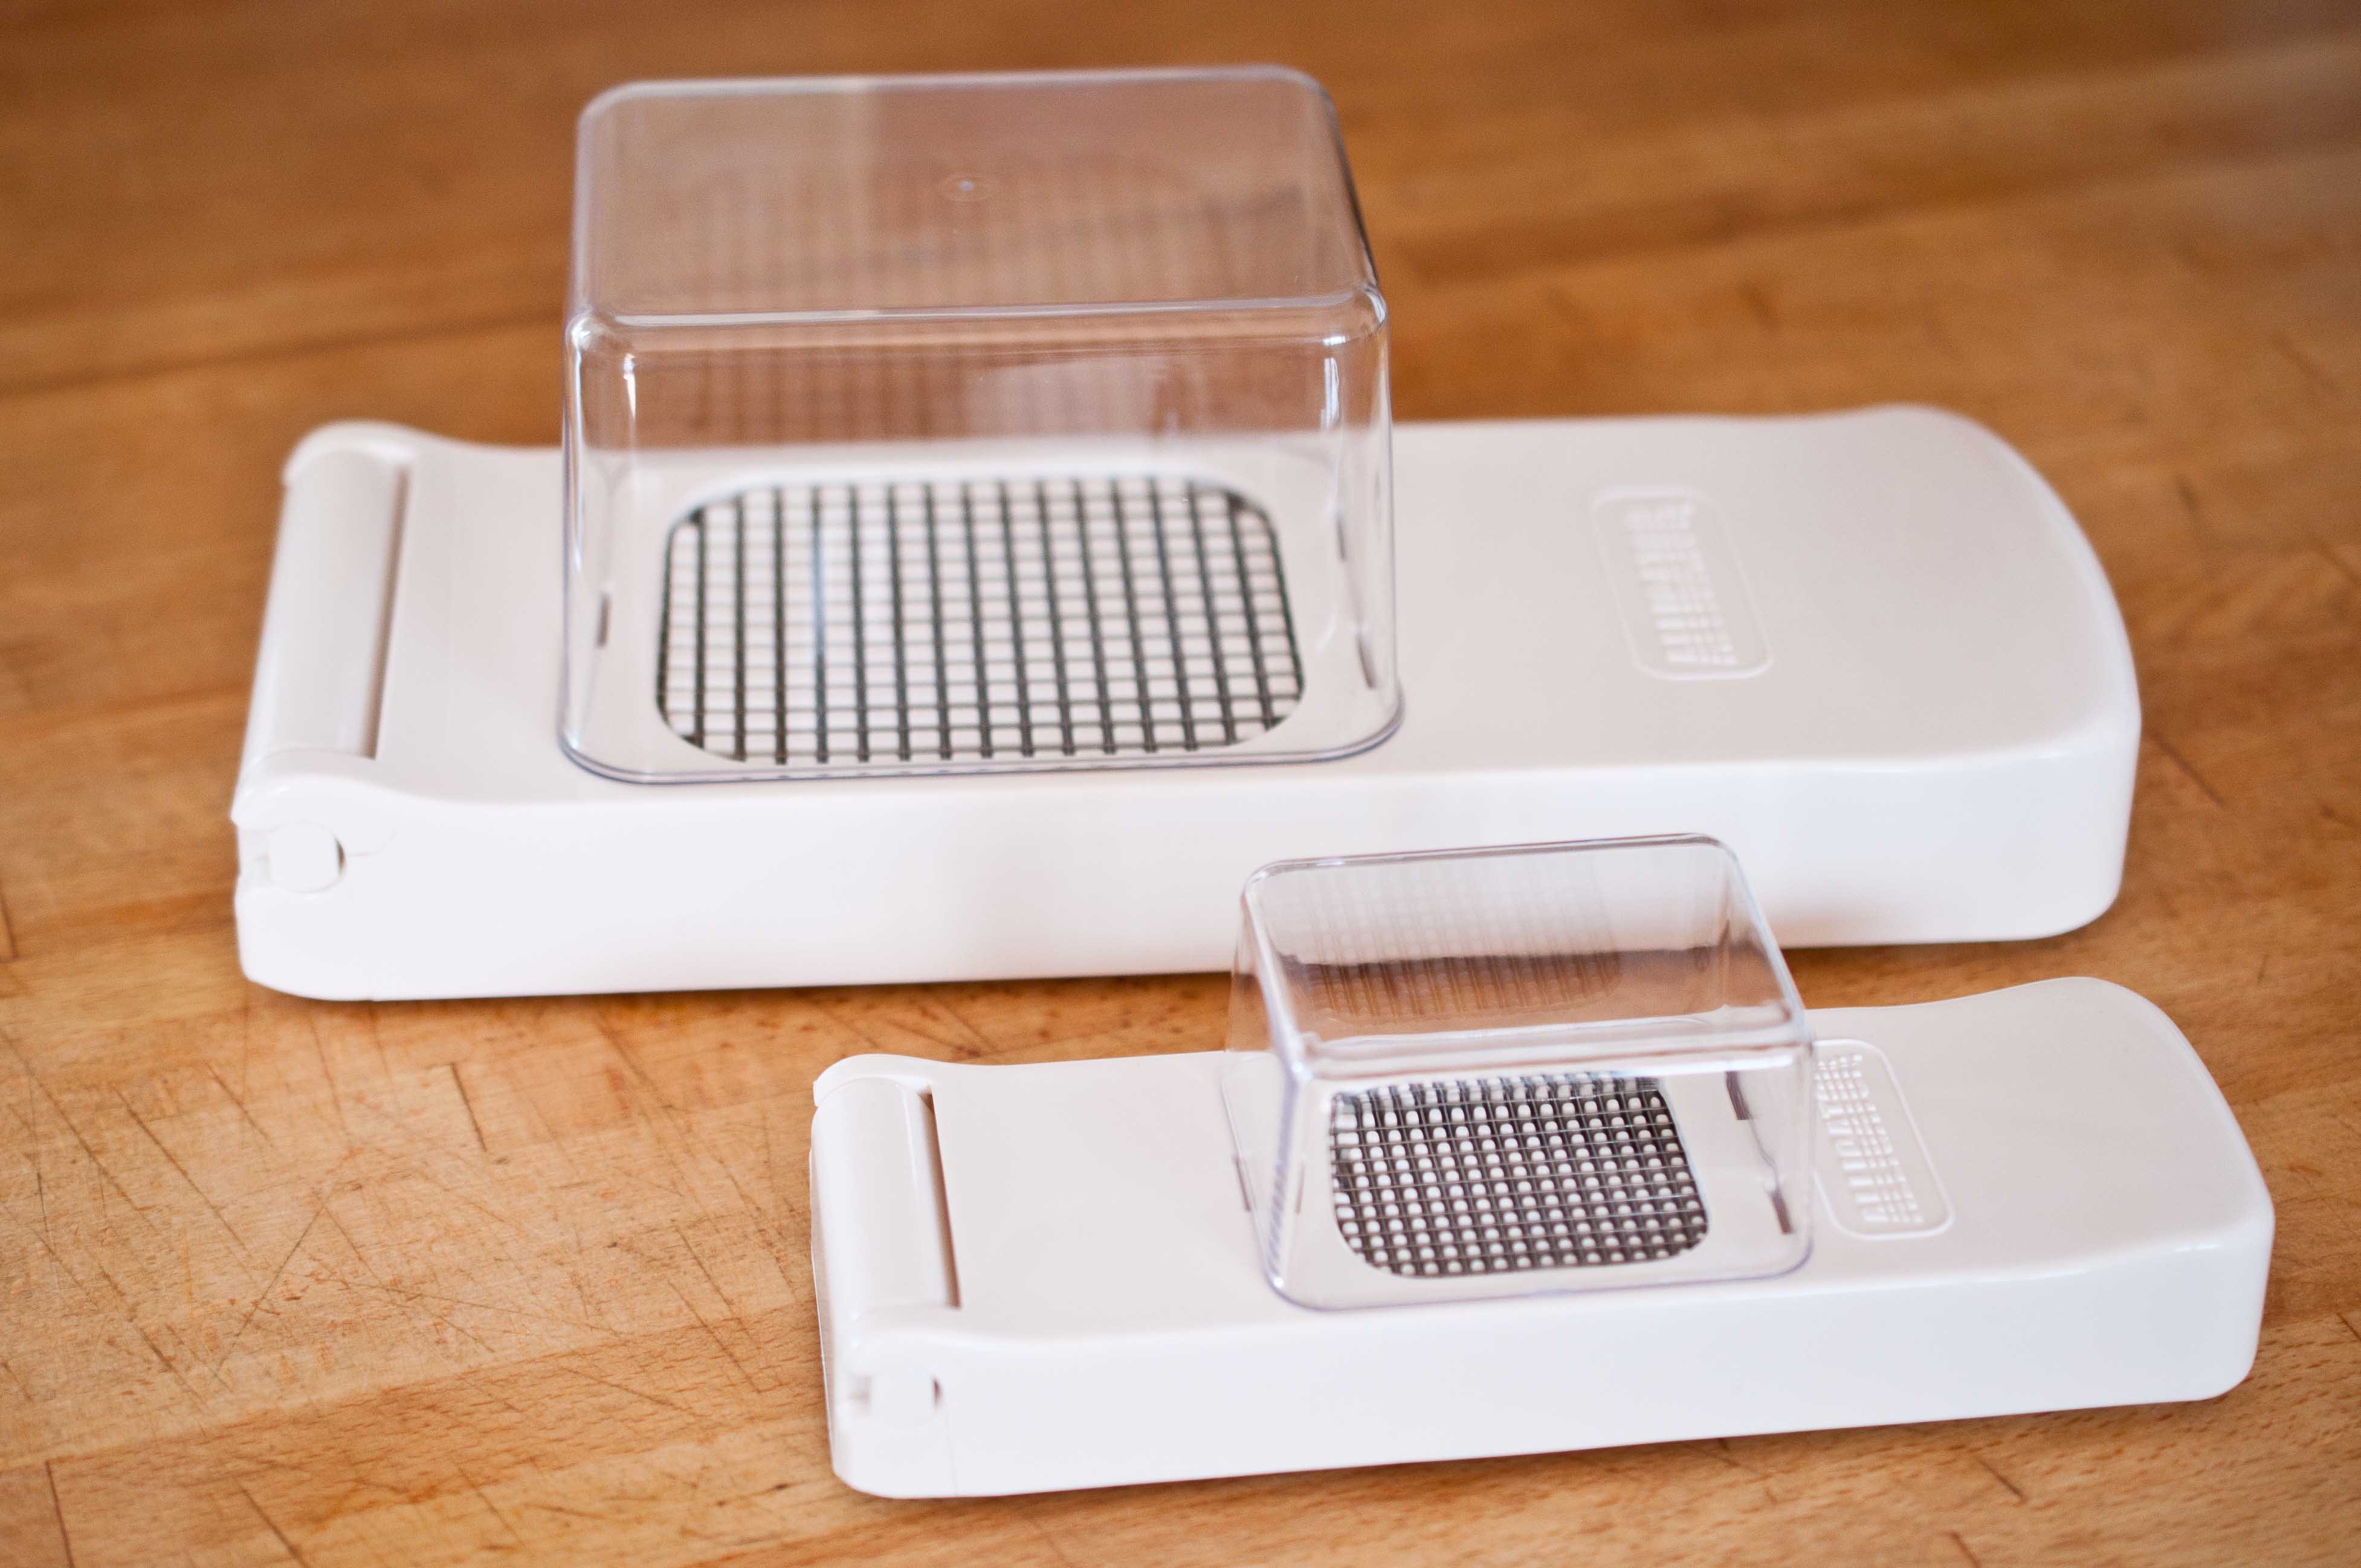
The lovely people over at Big Kitchen sent me a set of Alligator Dicers to play with, that I have since started to refer to as my "Food Chompers." AND they are also going to send a set, one small and one big, to one of you! SO nice.
If you are the lucky winner, here is what you will get:
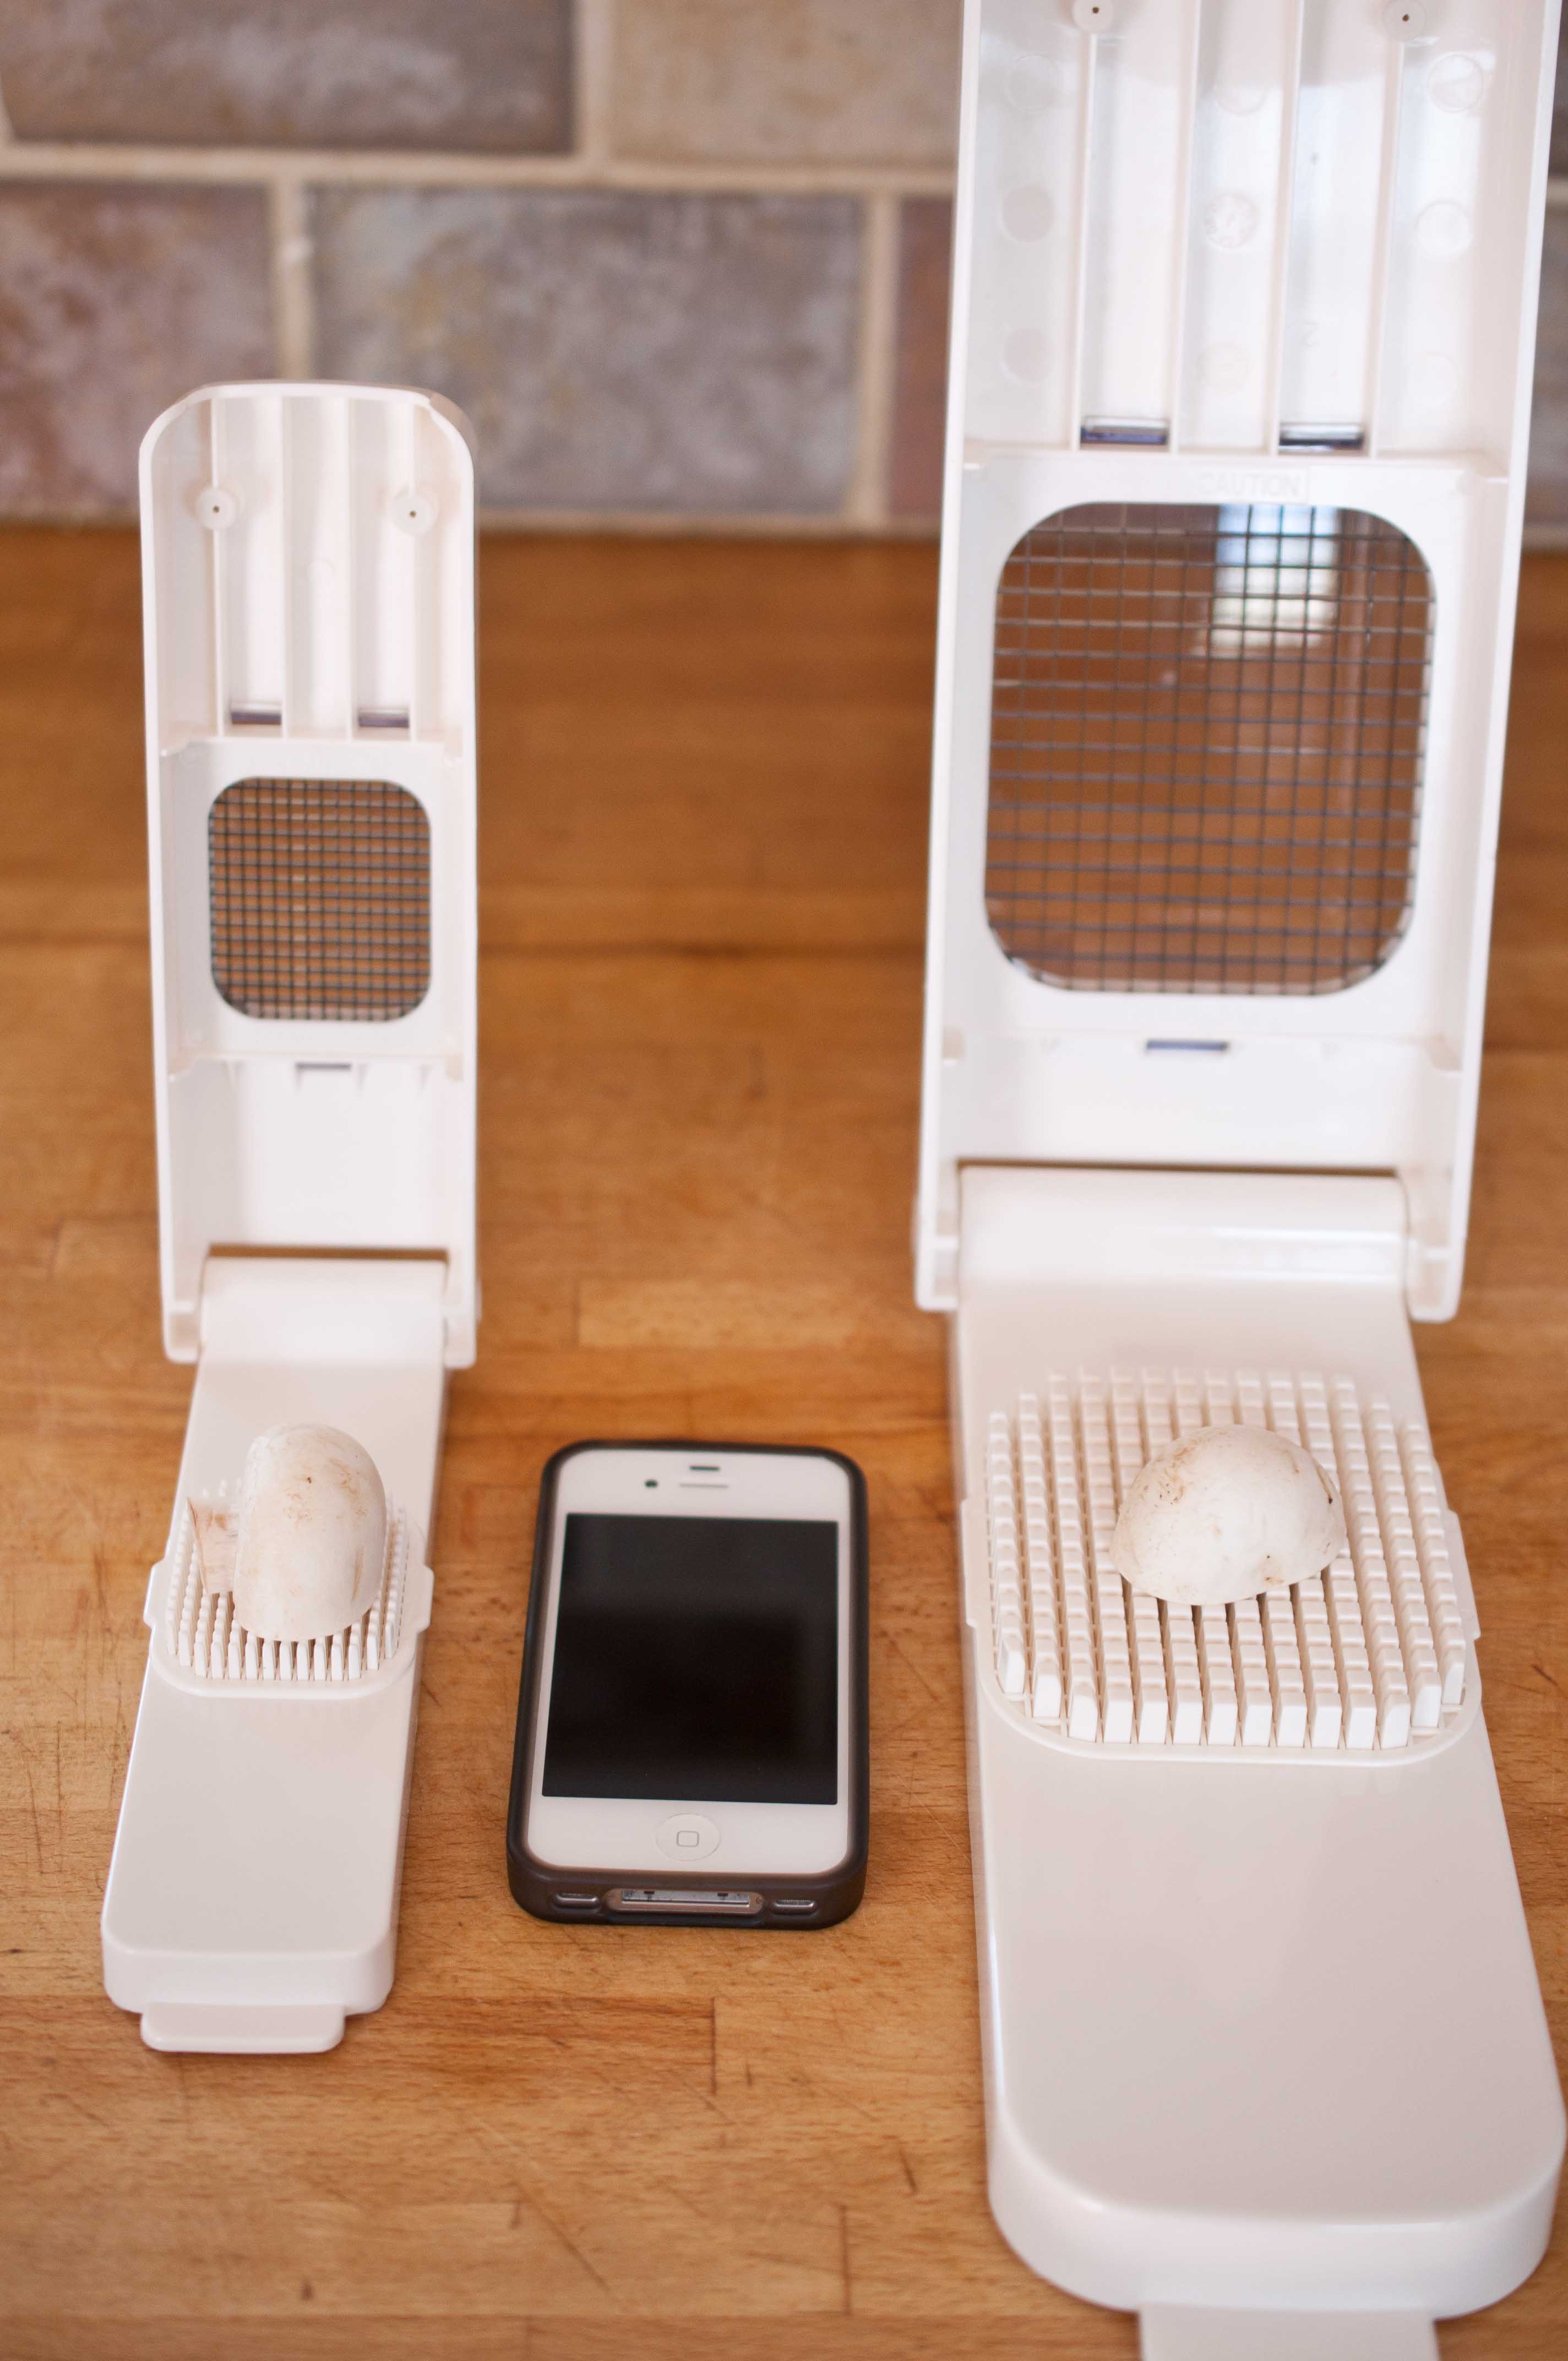
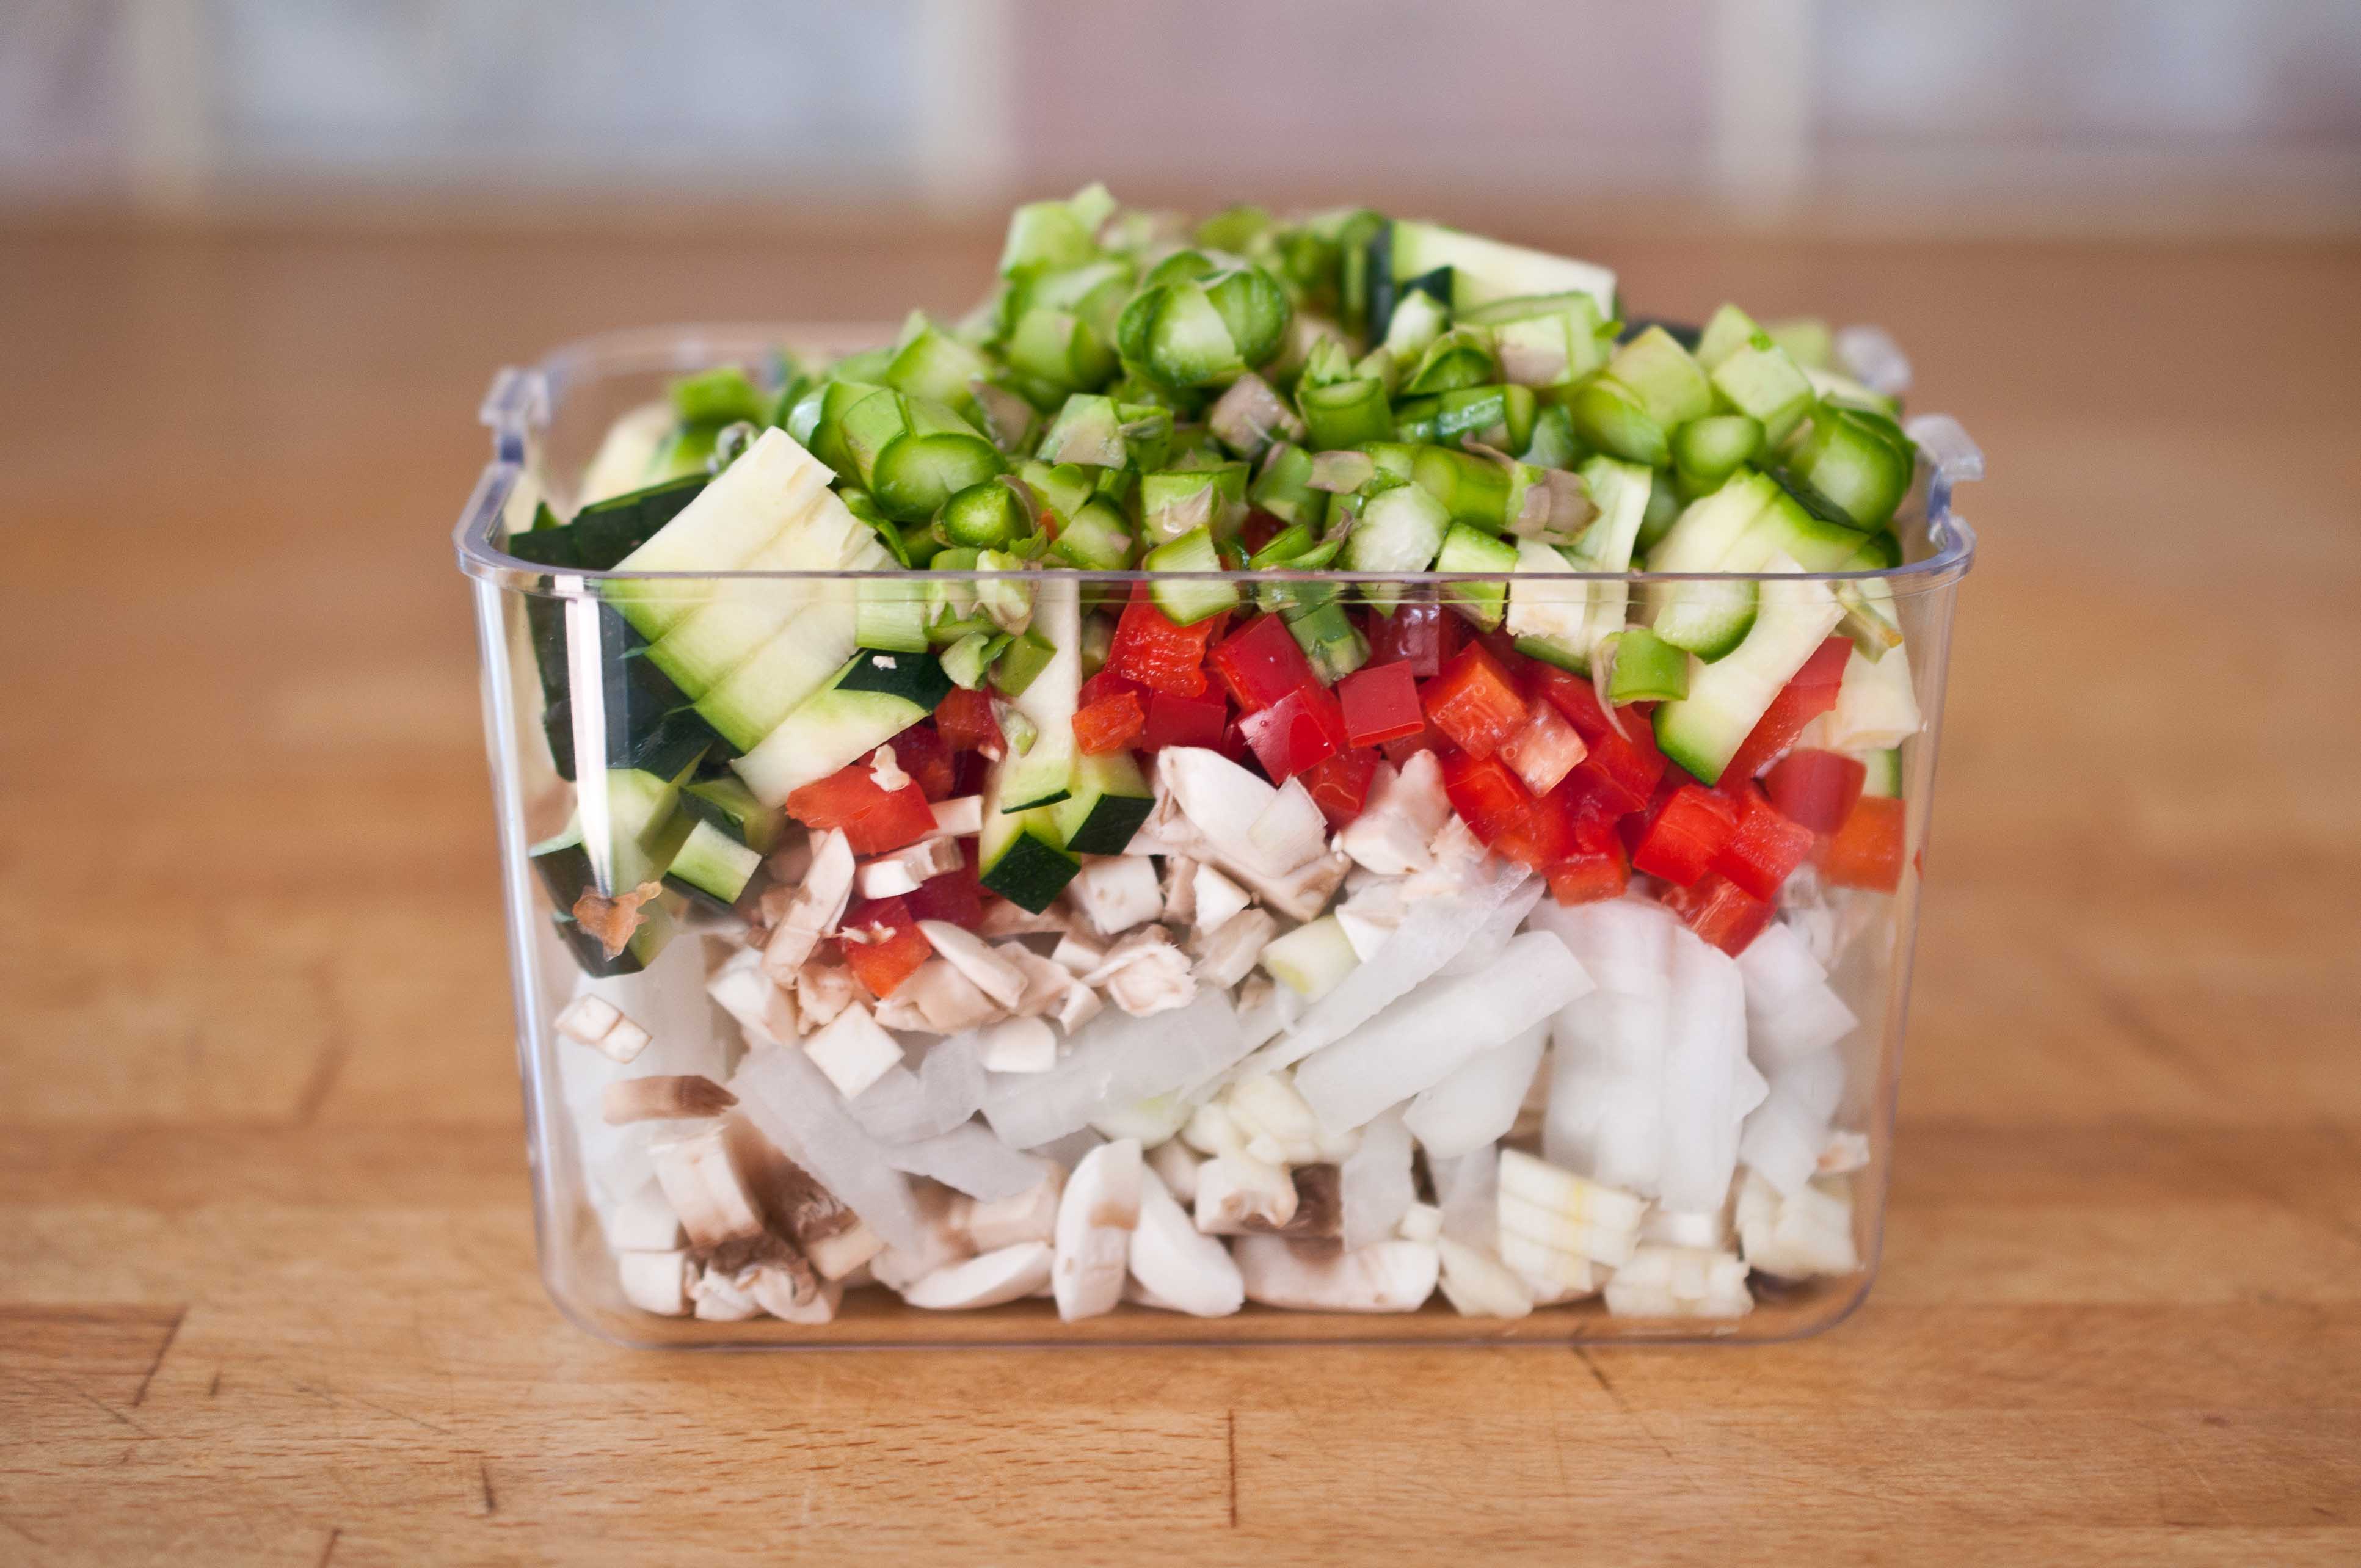
I used my iPhone for a scale reference to get a more accurate idea of size.
There is a mushroom, cut in half and place on the chomper plate to show you the size difference.
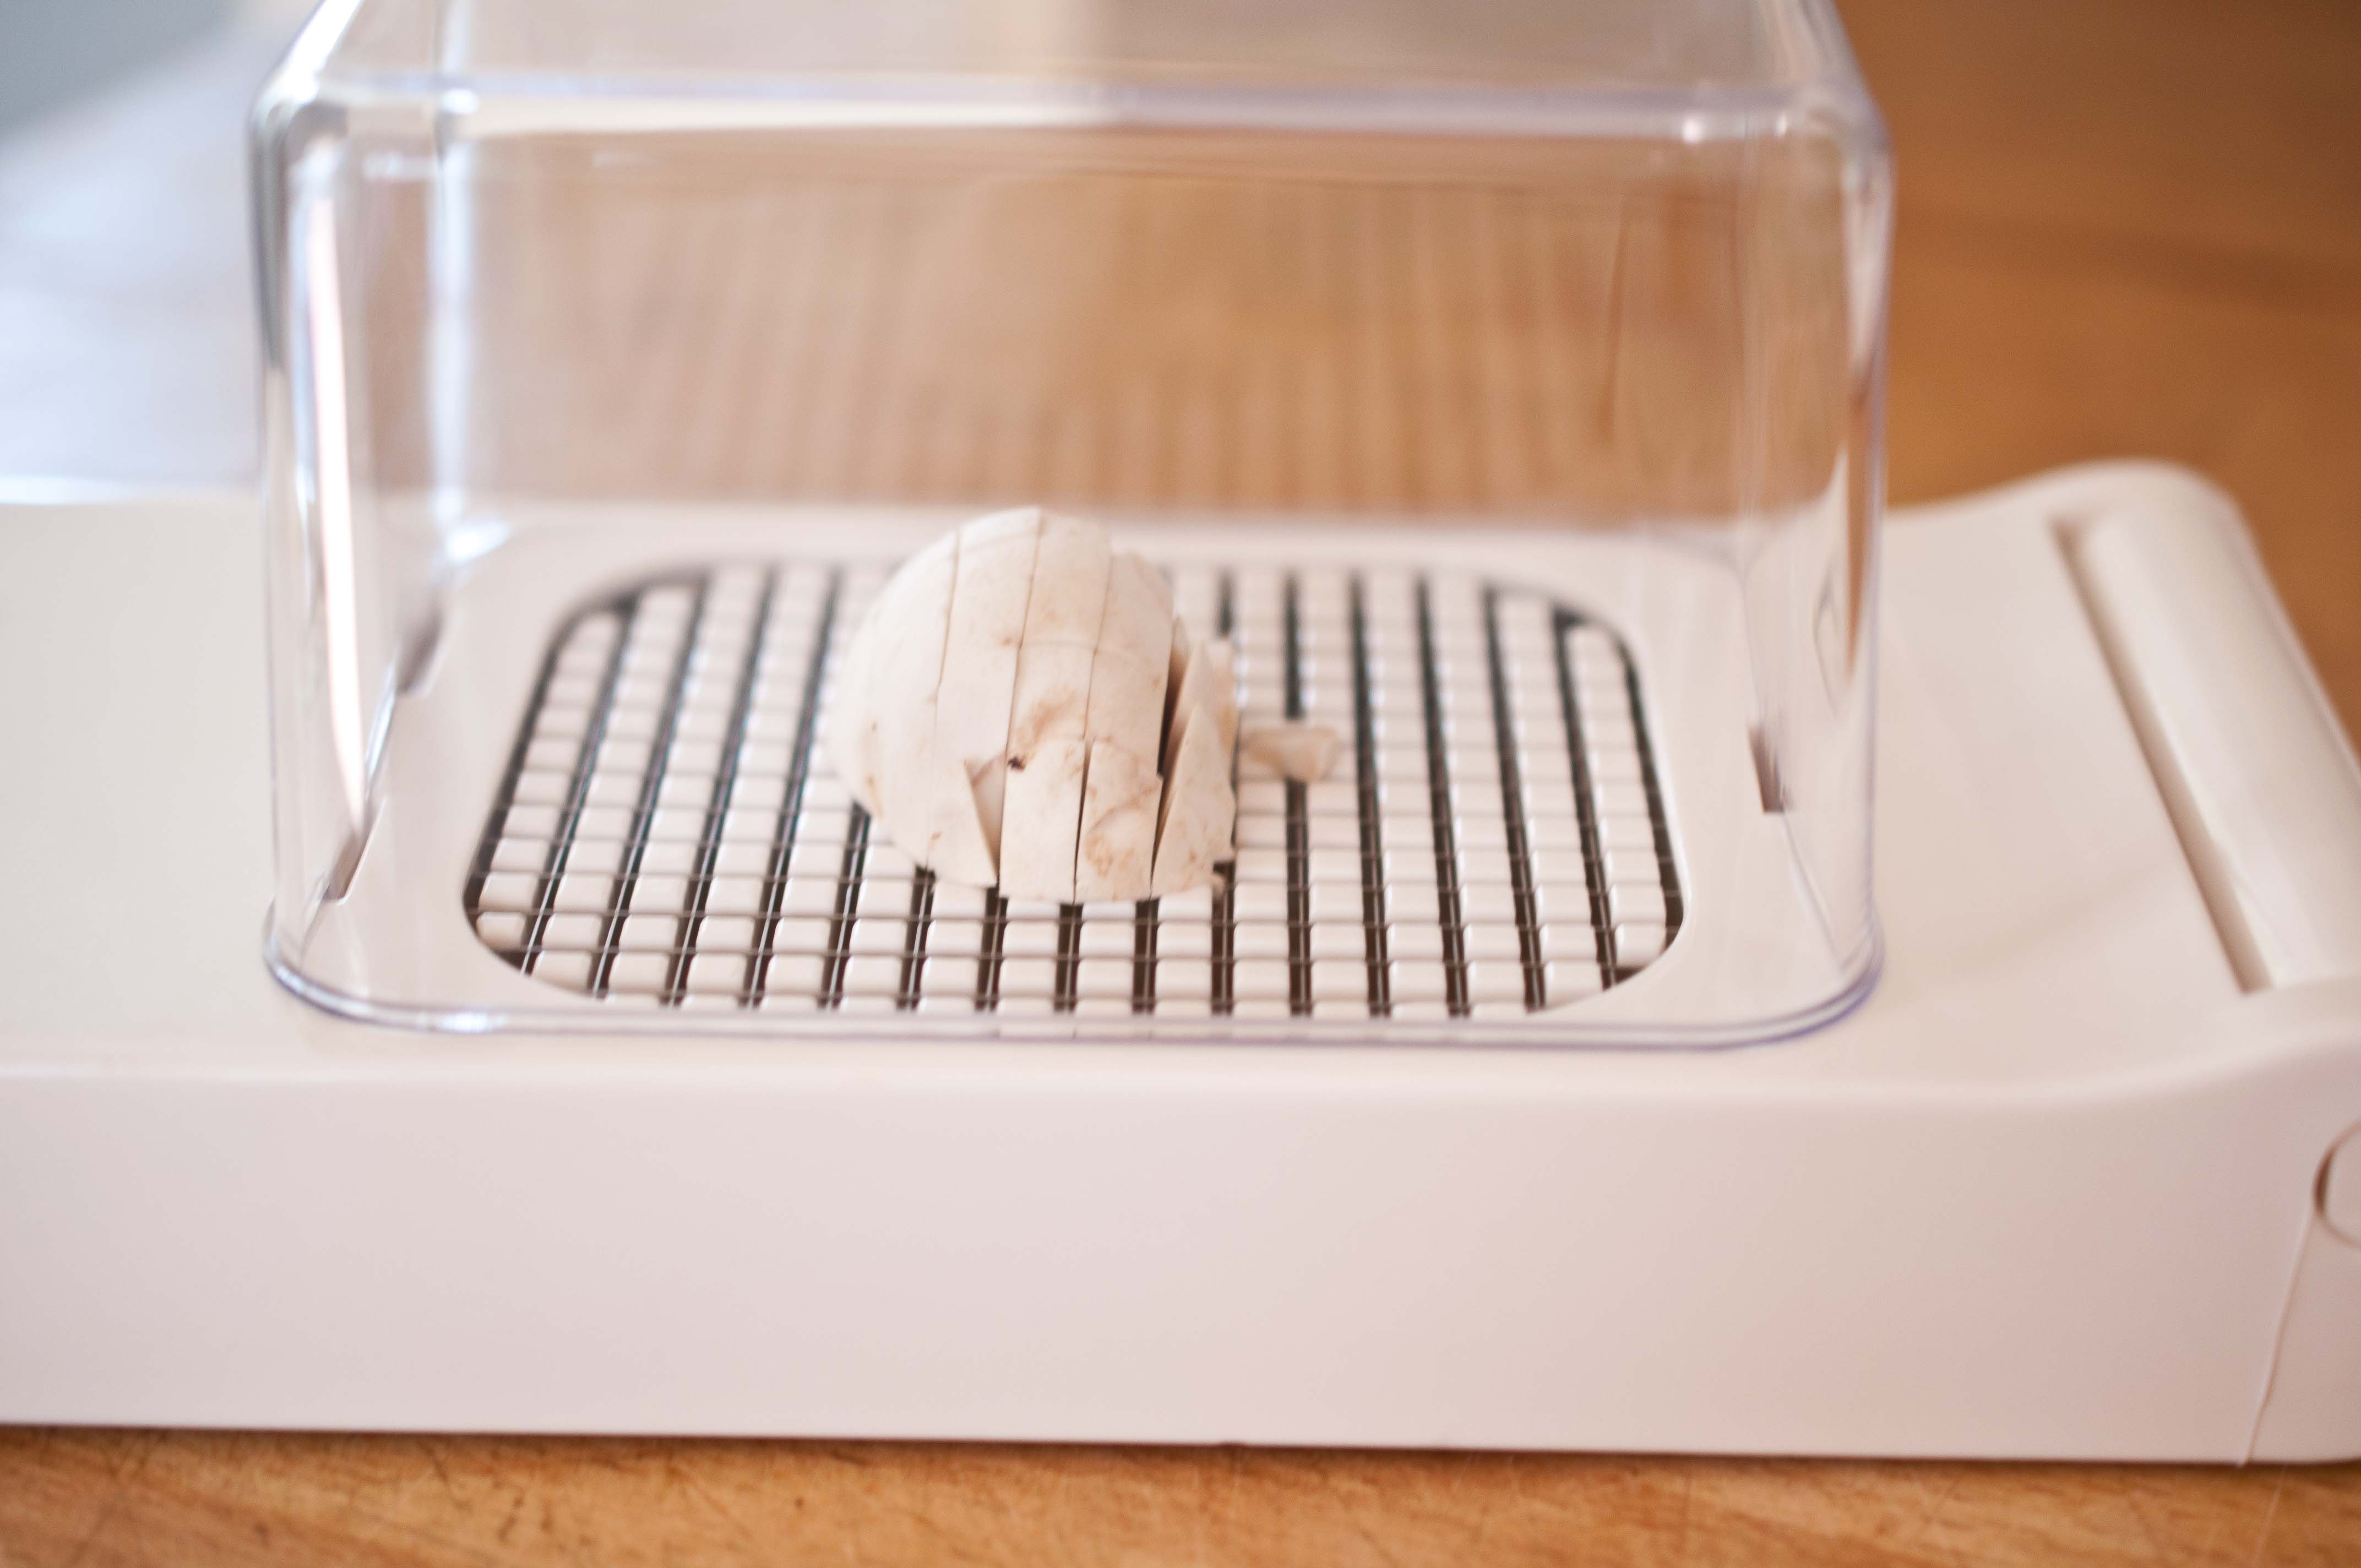
To use the chomper, just place the food on the plate, and press down, the food that is diced goes into a collection bin that is attached.
The Mini dicer is above, and the large dicer is below.
Here are the two collection bins side by side.
As you can see, with a half of a mushroom (or if you used a whole mushroom for that matter, you don’t really get a dice as much as "strips." I like this cut for the Quinoa salads I seem to make 5 times a week.
I also Chomped a bell pepper, and asparagus spears and those gave me a really great, consistent dice.
The best use for the Alligator Dicers is garlic and onions. I tend to need minced garlic and chopped onions on a near daily basis, and these dicers do a fast and efficient job.
I use the small one for the garlic
and the large one for the onions
This is especially helpful for those recipes that call for 6 cloves of garlic, minced and 2 onions, chopped. Not only a huge time saver but all of the pieces are the same size, which is important to insure that they cook evenly.
For the below recipe, I chopped: red bell pepper, asparagus, zucchini, garlic, onions, and mushrooms.
The dicers cleaned up easily with a hand washing and are small enough to store just about anywhere. While I do really love having these, I will probably still just use a knife if I have only a few vegetables to chop. When it comes to those recipes that call for a large amount of diced vegetables, these dicers are great to have around.
To enter the giveaway, just leave a comment on this post. Unfortunately, we are only able to ship to US addresses. Giveaway closes at 3-27-12, at 5:00 PM, PST.
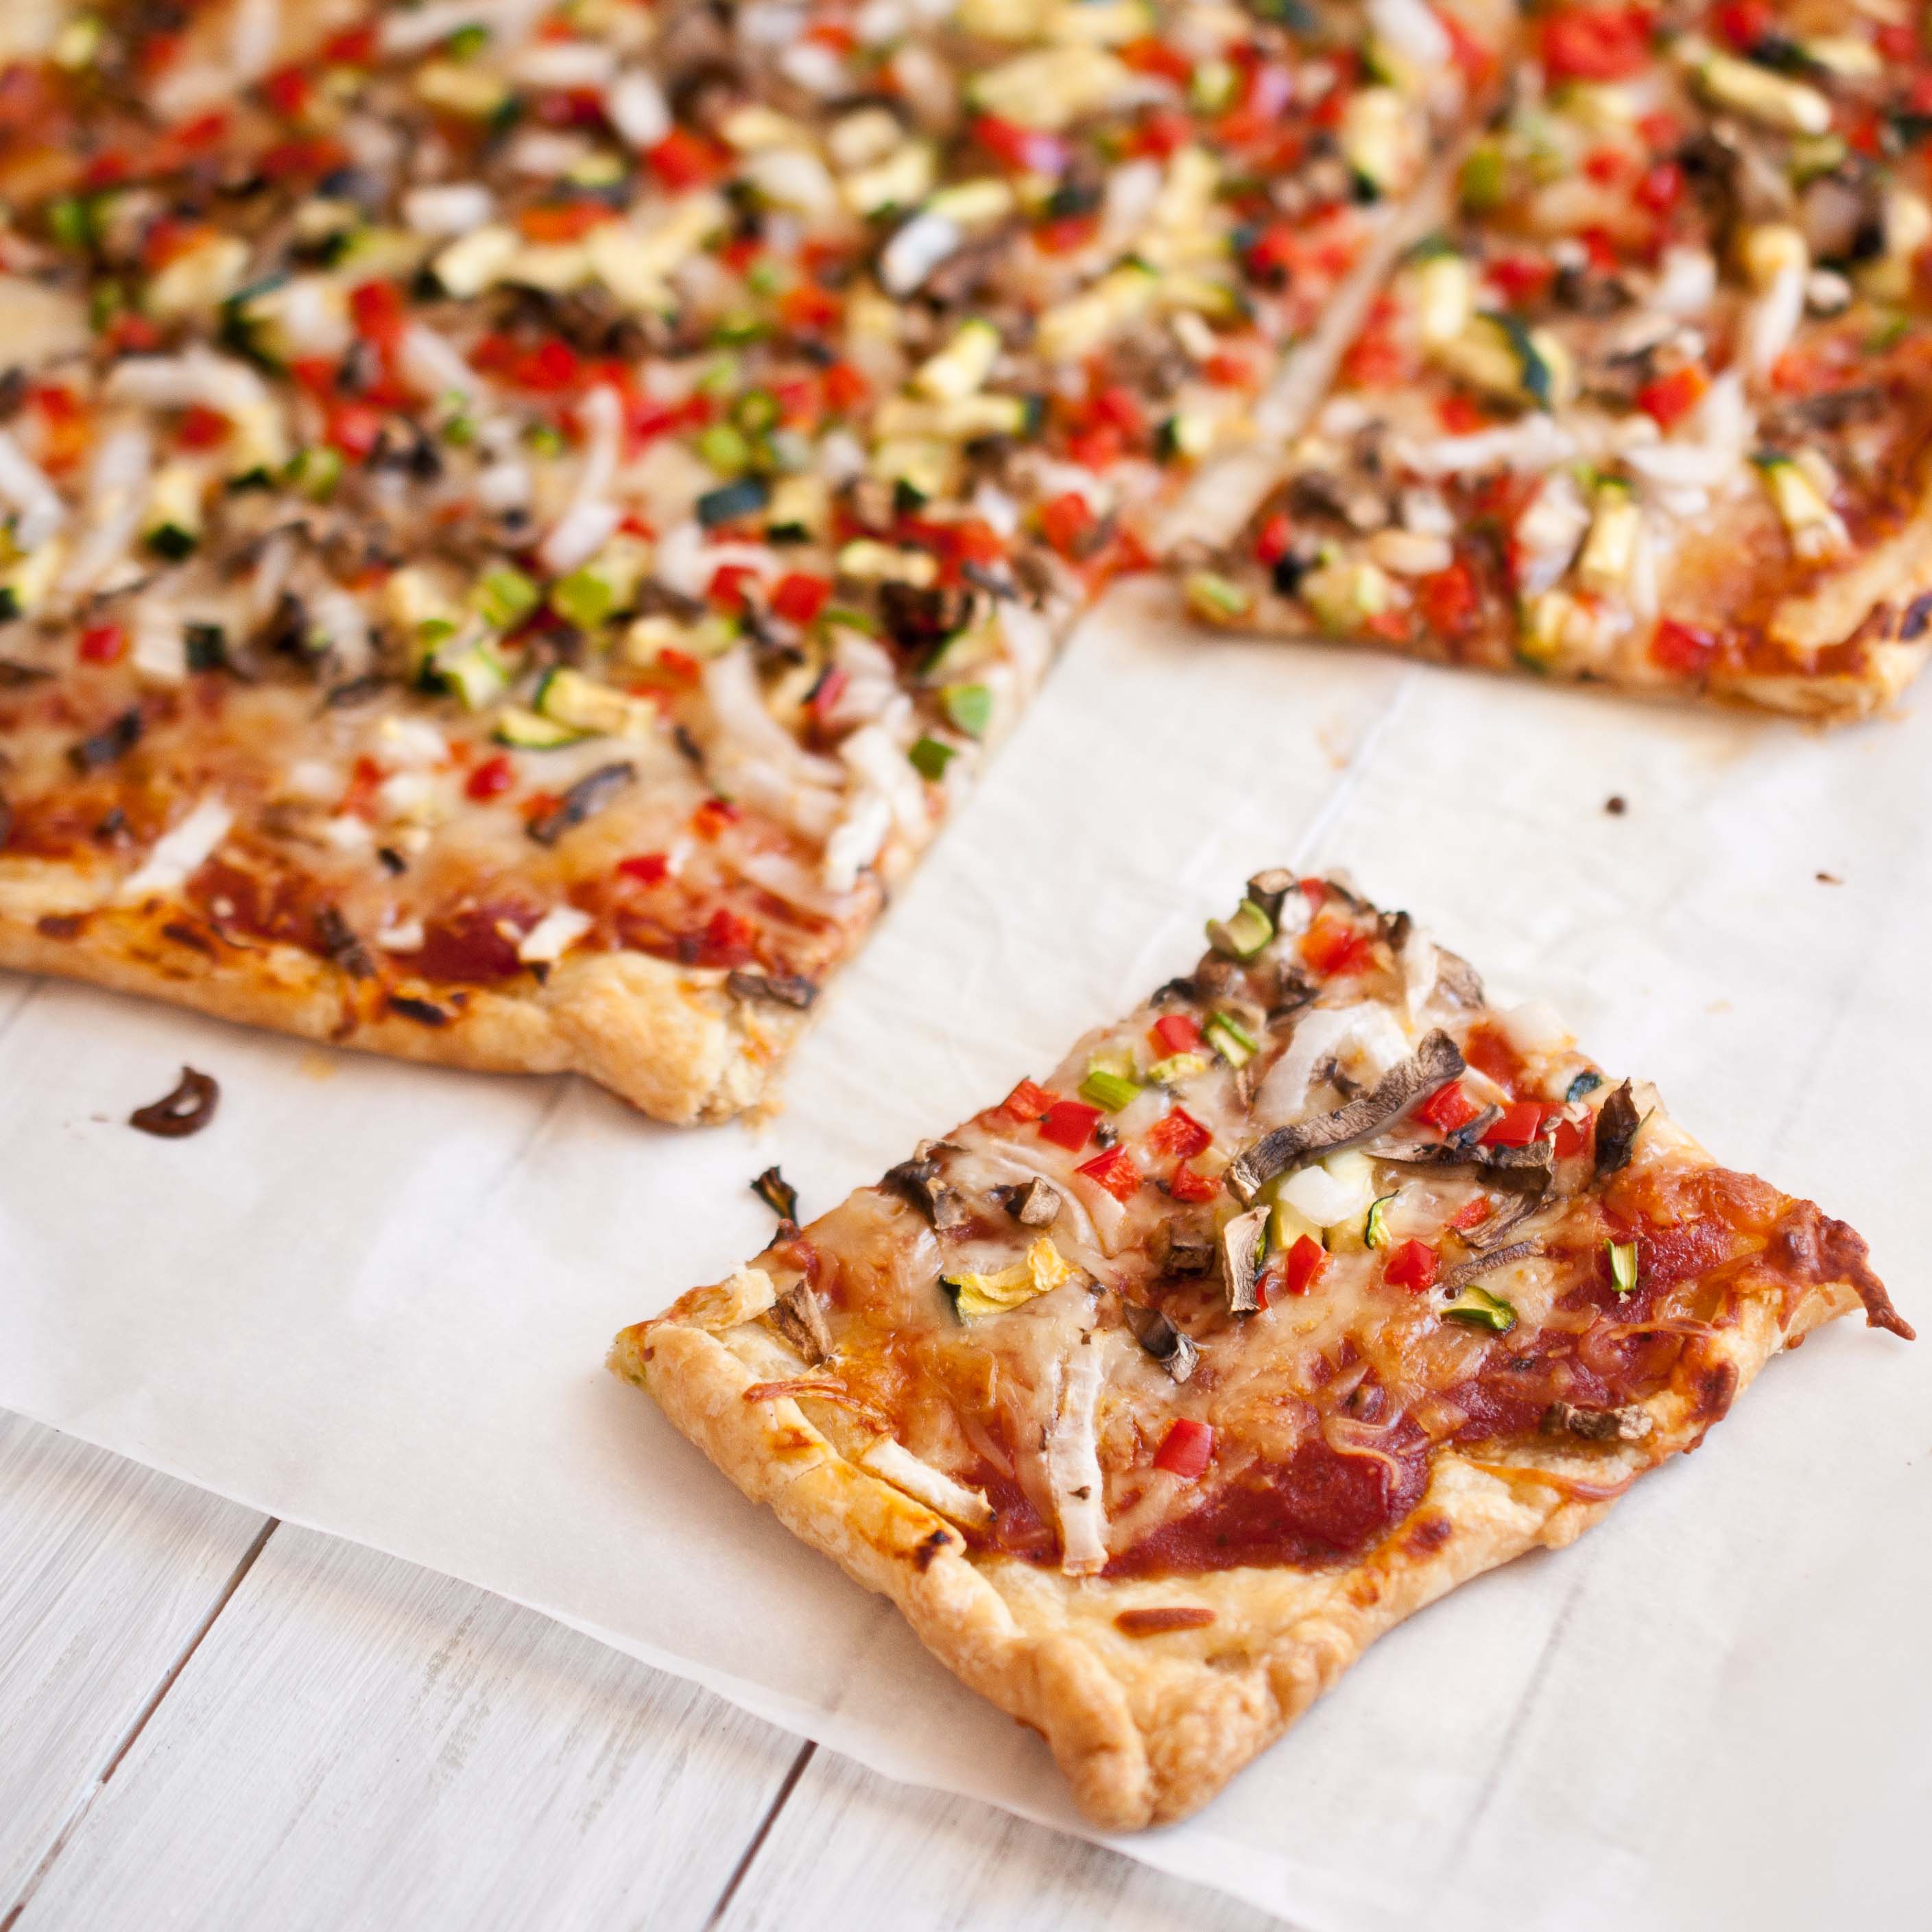
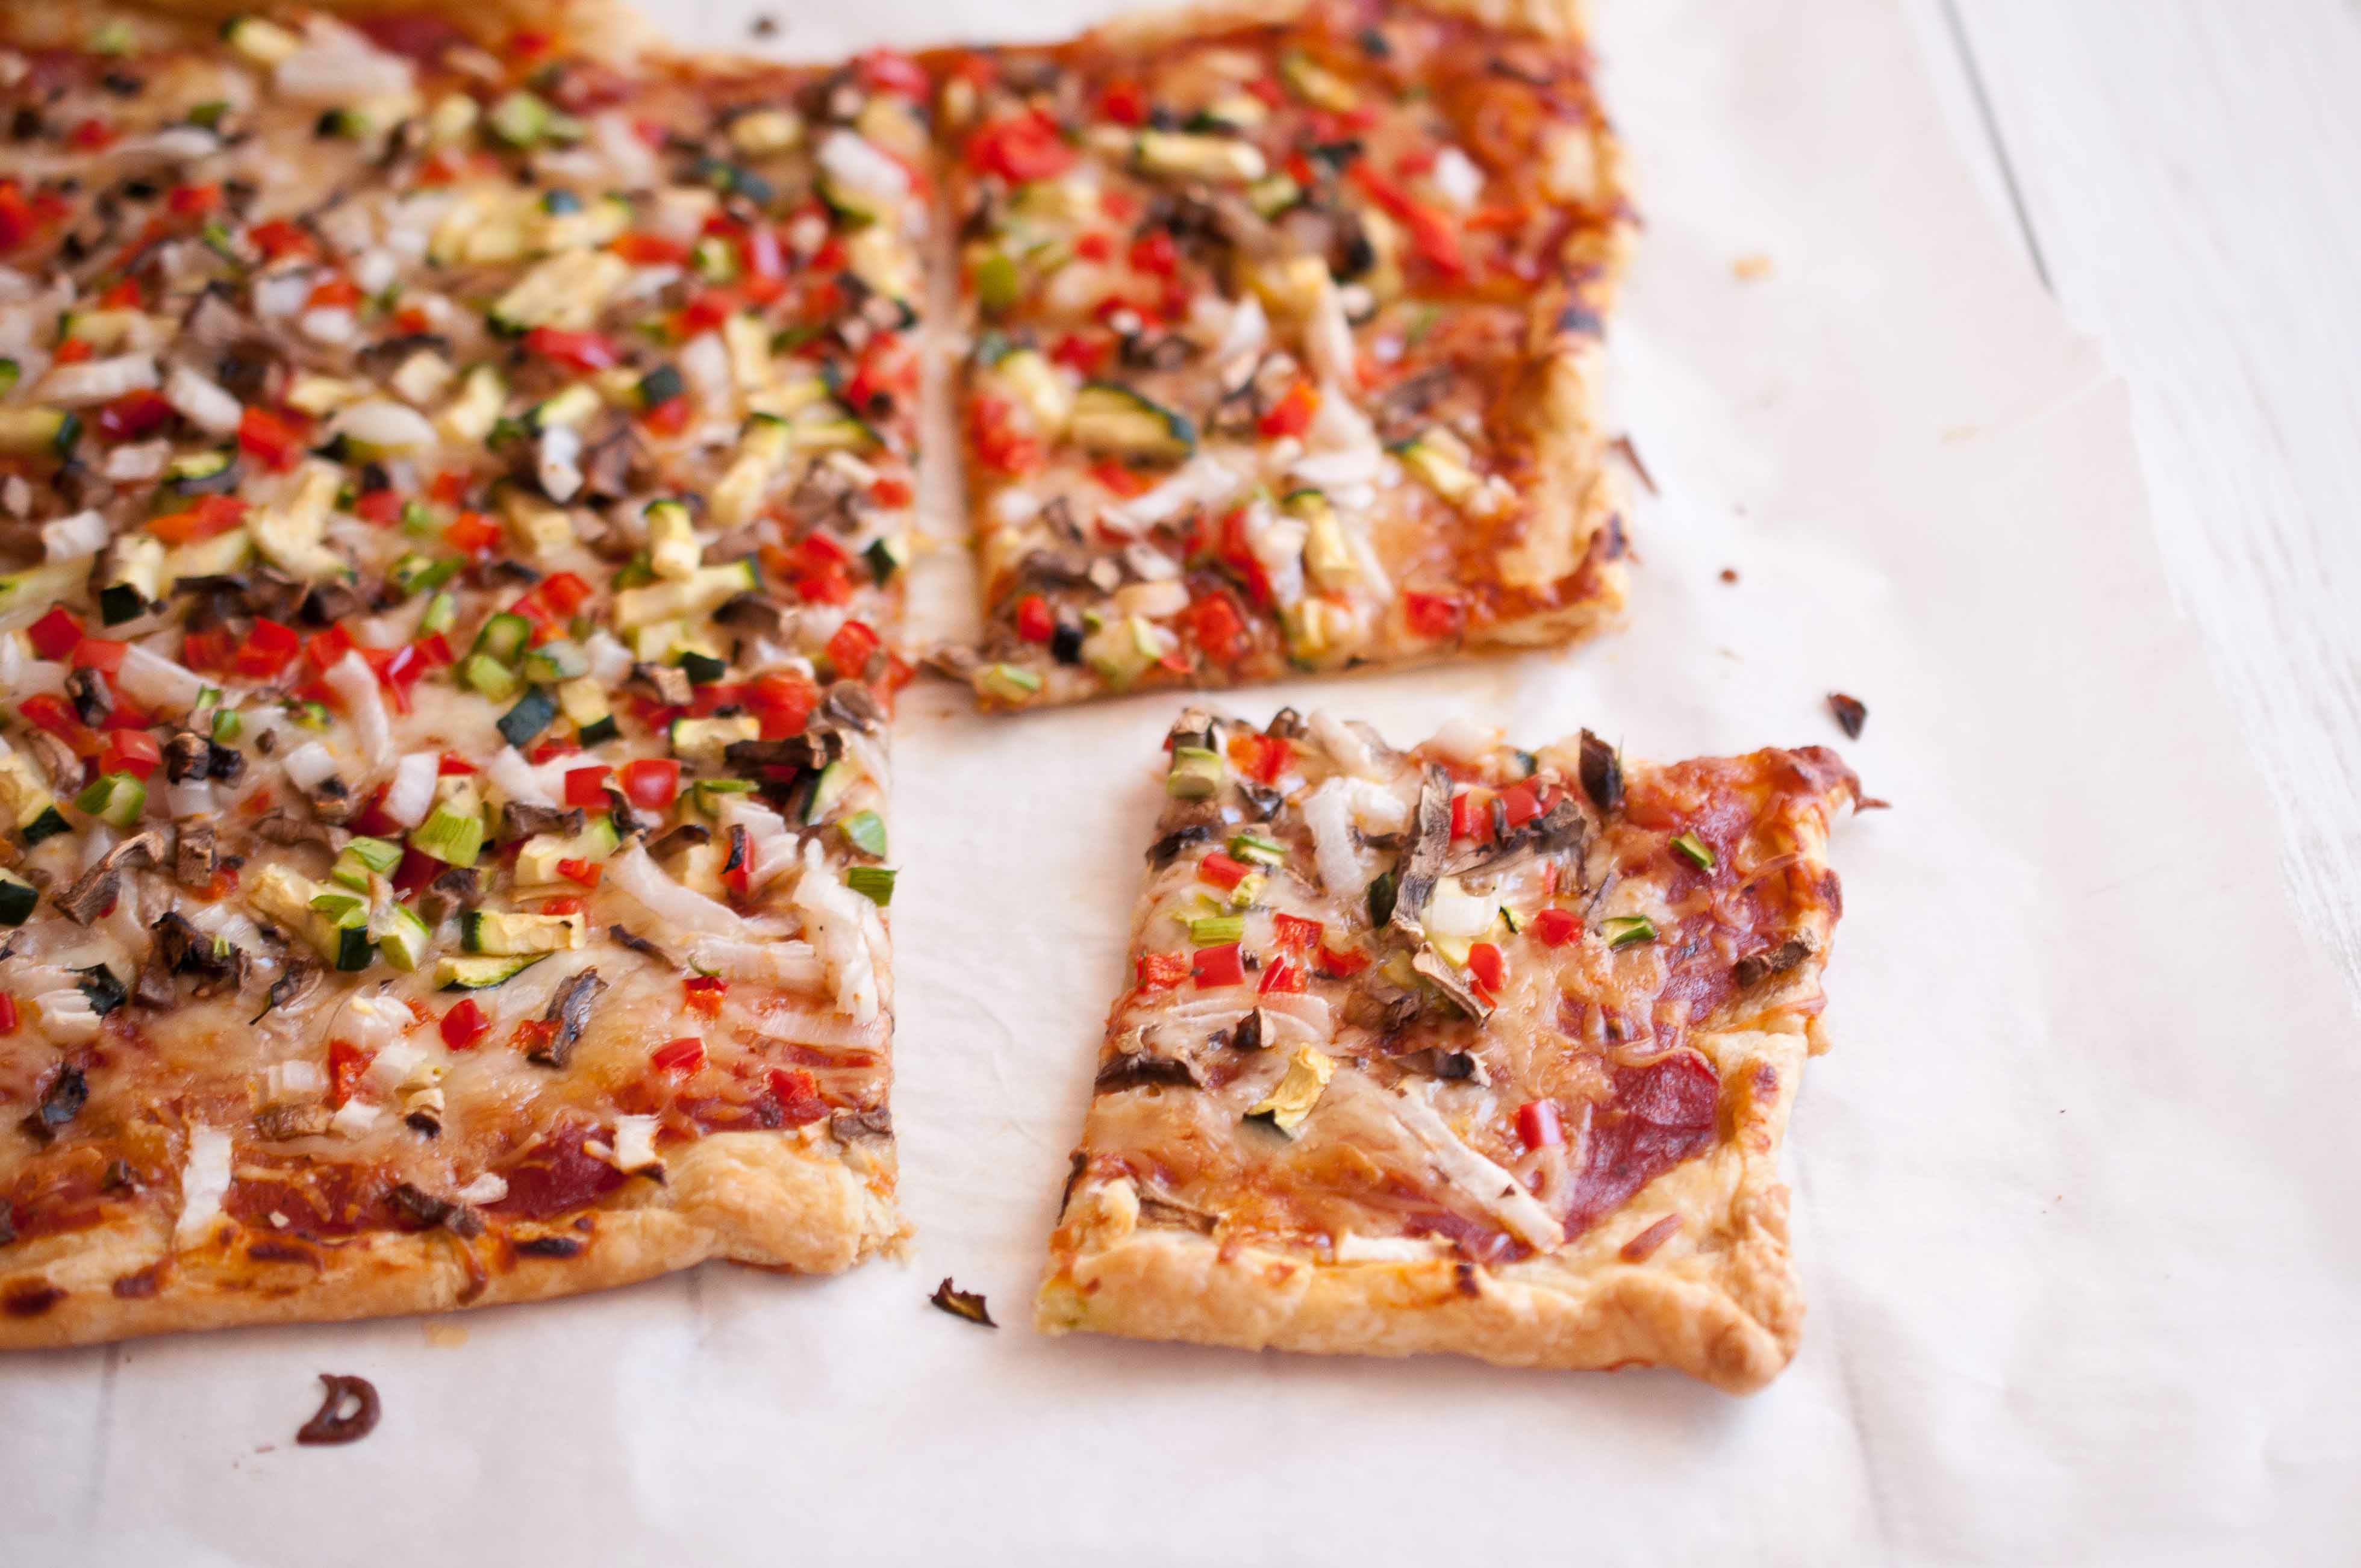
This is an easy, weeknight meal that you can throw together in just a few minutes. I used the vegetables I chopped with the Alligator Dicer as toppings.
Puff Pastry Pizza
1 sheet puff pastry, thawed
2/3 cup red pizza sauce
1 1/2 cup shredded mozzarella cheese
5 spears asparagus, trimmed and chopped
5 mushrooms, diced
1 clove of garlic
1/4 of a whole white onion chopped
1/2 one large zucchini, chopped
1/2 1 red bell pepper, chopped
2 oz goat cheese
Preheat oven to 400.
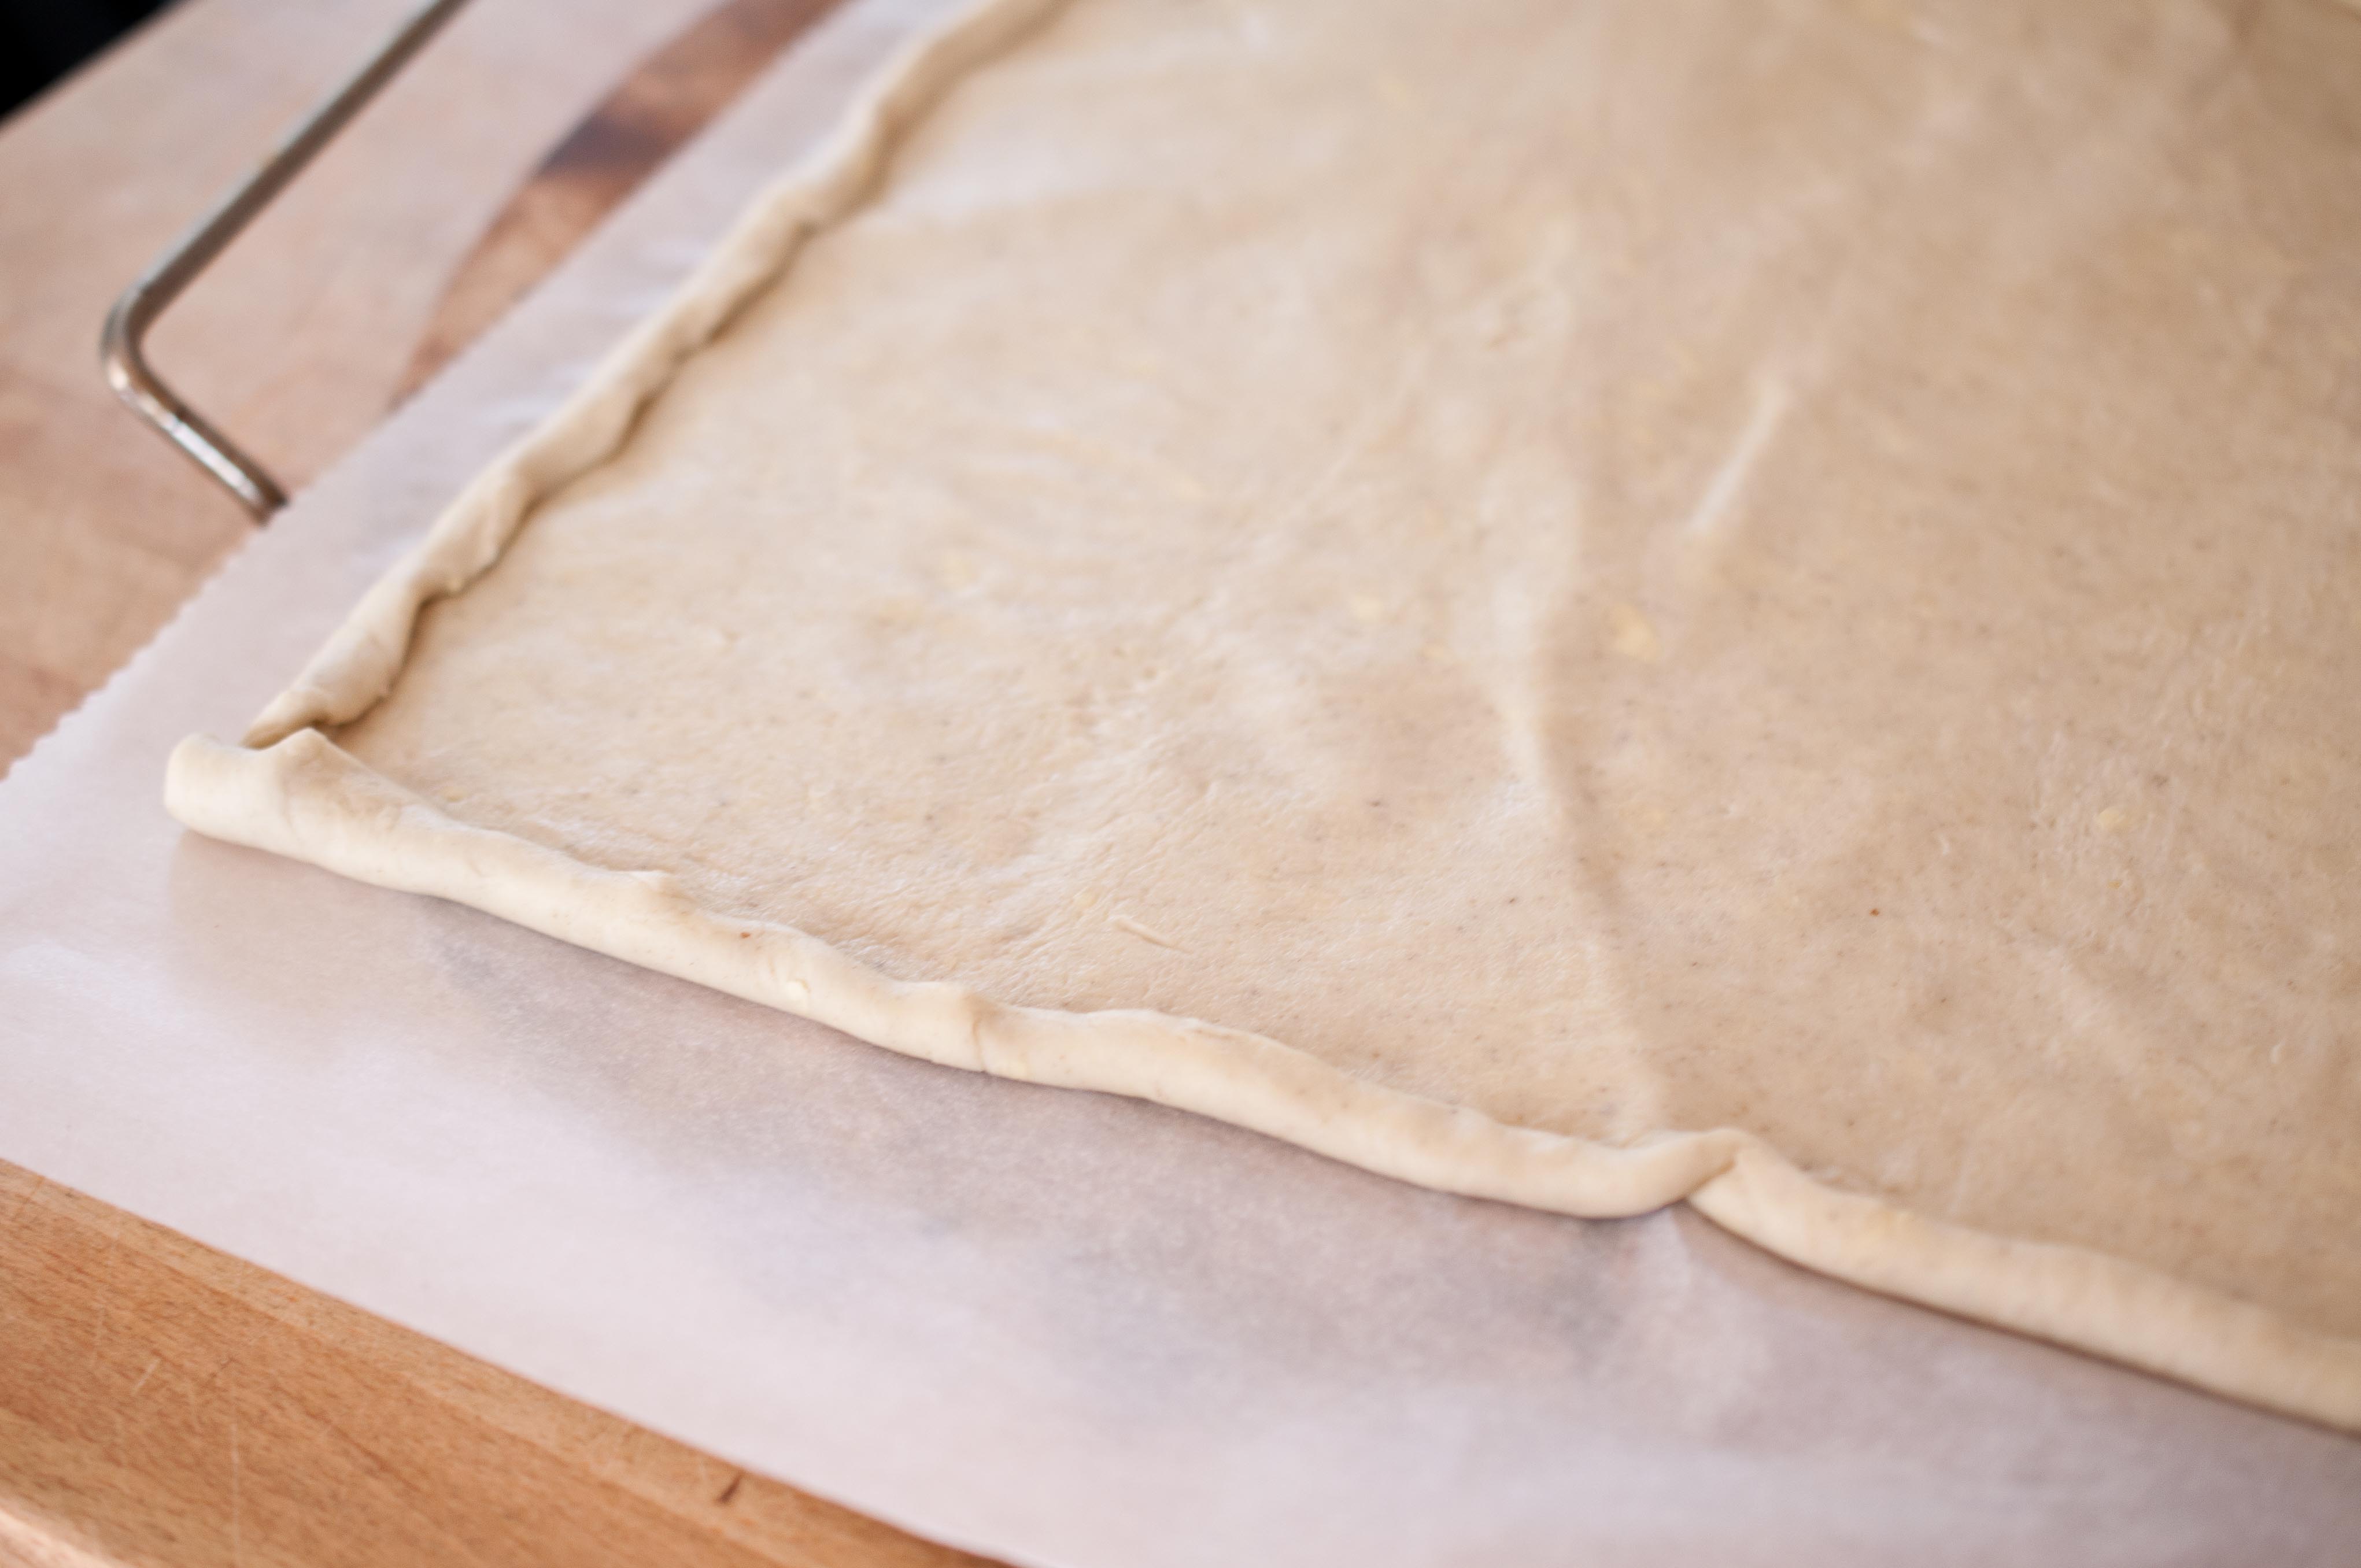
Place a sheet of parchment paper on the counter with one end hanging off the counter in front of you. Place the puff pastry on the parchment paper. Press your body against the parchment paper to keep it from sliding around and roll the puff pastry in both directions 4-5 times each way to make the puff pastry thiner, wider and longer. Transfer puff pastry on the parchment paper to a pizza stone of baking sheet. Roll the edges inward slightly
Bake for 10 minutes or until the puff pastry has turned a light golden brown.
Remove from the oven and top with sauce, then mozzarella cheese, then all of the chopped vegetables and then dot with goat cheese.
Bake for an additional 5 minutes or until cheese has melted.
The night after I joined the Bone Marrow Donor registry I had a dream that I was a Bone Marrow match for a little boy who was dying of Leukemia. But in my dream, I had joined the registry one month after he died of the disease. I had the lifesaving cure just walking around in my body and I had no idea until it was too late.
Horrible, I know. But It happens, I’m sure. This morning, when I woke up, I got an email for the registry, and whenever that happens I have a flicker of hope that I am one of those people who has the opportunity to donate. I want to. I want to use the marrow I grow so easily in my bones to save the life of someones else’s Tater, because I would want you to do that for me, if she is ever in need. Of course, if I ever am a match, I’m sure the news won’t come via email so as you have probably suspected the email was just an update about the progress being made by the Be The Match foundation.
Now that I have this platform, I want to use it to reach out. To help save the life of someones baby. What if it is you. What if you are the one who holds the key to a cure inside your bones.
Here was how simple it was for me to get on the list:
Go to a donation center, give blood, sign a form.
It can be even easier for you. You can click here, fill out a form online and order your cheek swap kit through the mail. It’s so easy.
It took about twenty minutes. Although it did cost me about $50 at the time, I can now put my mind at ease that I am doing what I can. $50 is a lot, more to some people than to others, but it was worth it for me know that I wasn’t the reason that someone was dying. That I wasn’t caring the lifesaving cure inside of me while someone was dying, over a mater of $50.
Click here to find out how you can get on the list of Bone Marrow Donors.
Here are some simple facts about Bone Marrow Donation and how and why to get on the list:
Q: If I join the Be The Match Registry, how likely is it that I will donate to someone? A: On average, one in every 540 members of Be The Match Registry in the United States will go on to donate bone marrow or peripheral blood stem cells to a patient. We cannot predict the likelihood that an individual member will donate because there is so much diversity in the population. However, if you are between the ages of 18 and 44, you are 10 times more likely to be called as a marrow donor than other members of the Be The Match Registry. That’s because research shows cells from younger donors lead to more successful transplants.
Every person who joins the registry gives patients hope, and new patient searches begin every day. You may never be identified as a match for someone, or you might be one of a number of potential matches. But you may also be the only one on the registry who can save a particular patient’s life.
Q: How do I become a bone marrow donor? A: The first step to become a bone marrow donor is to join the Be The Match Registry. Doctors around the world search our registry to find a match for their patients. If a doctor selects you as a match for a patient, you may be asked to donate bone marrow or cells from circulating blood (called PBSC donation).
Q. Does bone marrow donations involve surgery?
A: The majority of donations do not involve surgery. Today, the patient’s doctor most often requests a peripheral blood stem cell (PBSC) donation, which is non-surgical.
Q. Is Donating painful or involve a long recovery?
A: There can be uncomfortable but short-lived side effects of donating PBSC. Due to taking a drug called filgrastim for five days leading up to donation, PBSC donors may have headaches, joint or muscle aches, or fatigue. PBSC donors are typically back to their normal routine in one to two days.
Q. Is donating dangerous or weaken the donor?
A: There are rarely any long-term side effects. Be The Match® carefully prescreens all donors to ensure they are healthy and the procedure is safe for them. We also provide support and information every step of the way.
Q. Once you have been chosen as a match do donors have to pay to donate?
A: Donors never pay to donate. We reimburse travel costs and may reimburse other costs on a case-by-case basis.
Q: Does race or ethnicity affect matching? A: Racial and ethnic heritage are very important factors. Patients are most likely to match someone of their own race or ethnicity. Today, there simply aren’t enough registry members of diverse racial and ethnic heritage. Adding more diverse members increases the likelihood that all patients will find a life-saving match.
Members of these backgrounds are especially needed:
Black or African American
American Indian or Alaska Native
Asian, including South Asian
Native Hawaiian or other Pacific Islander
Hispanic or Latino
Multiple race
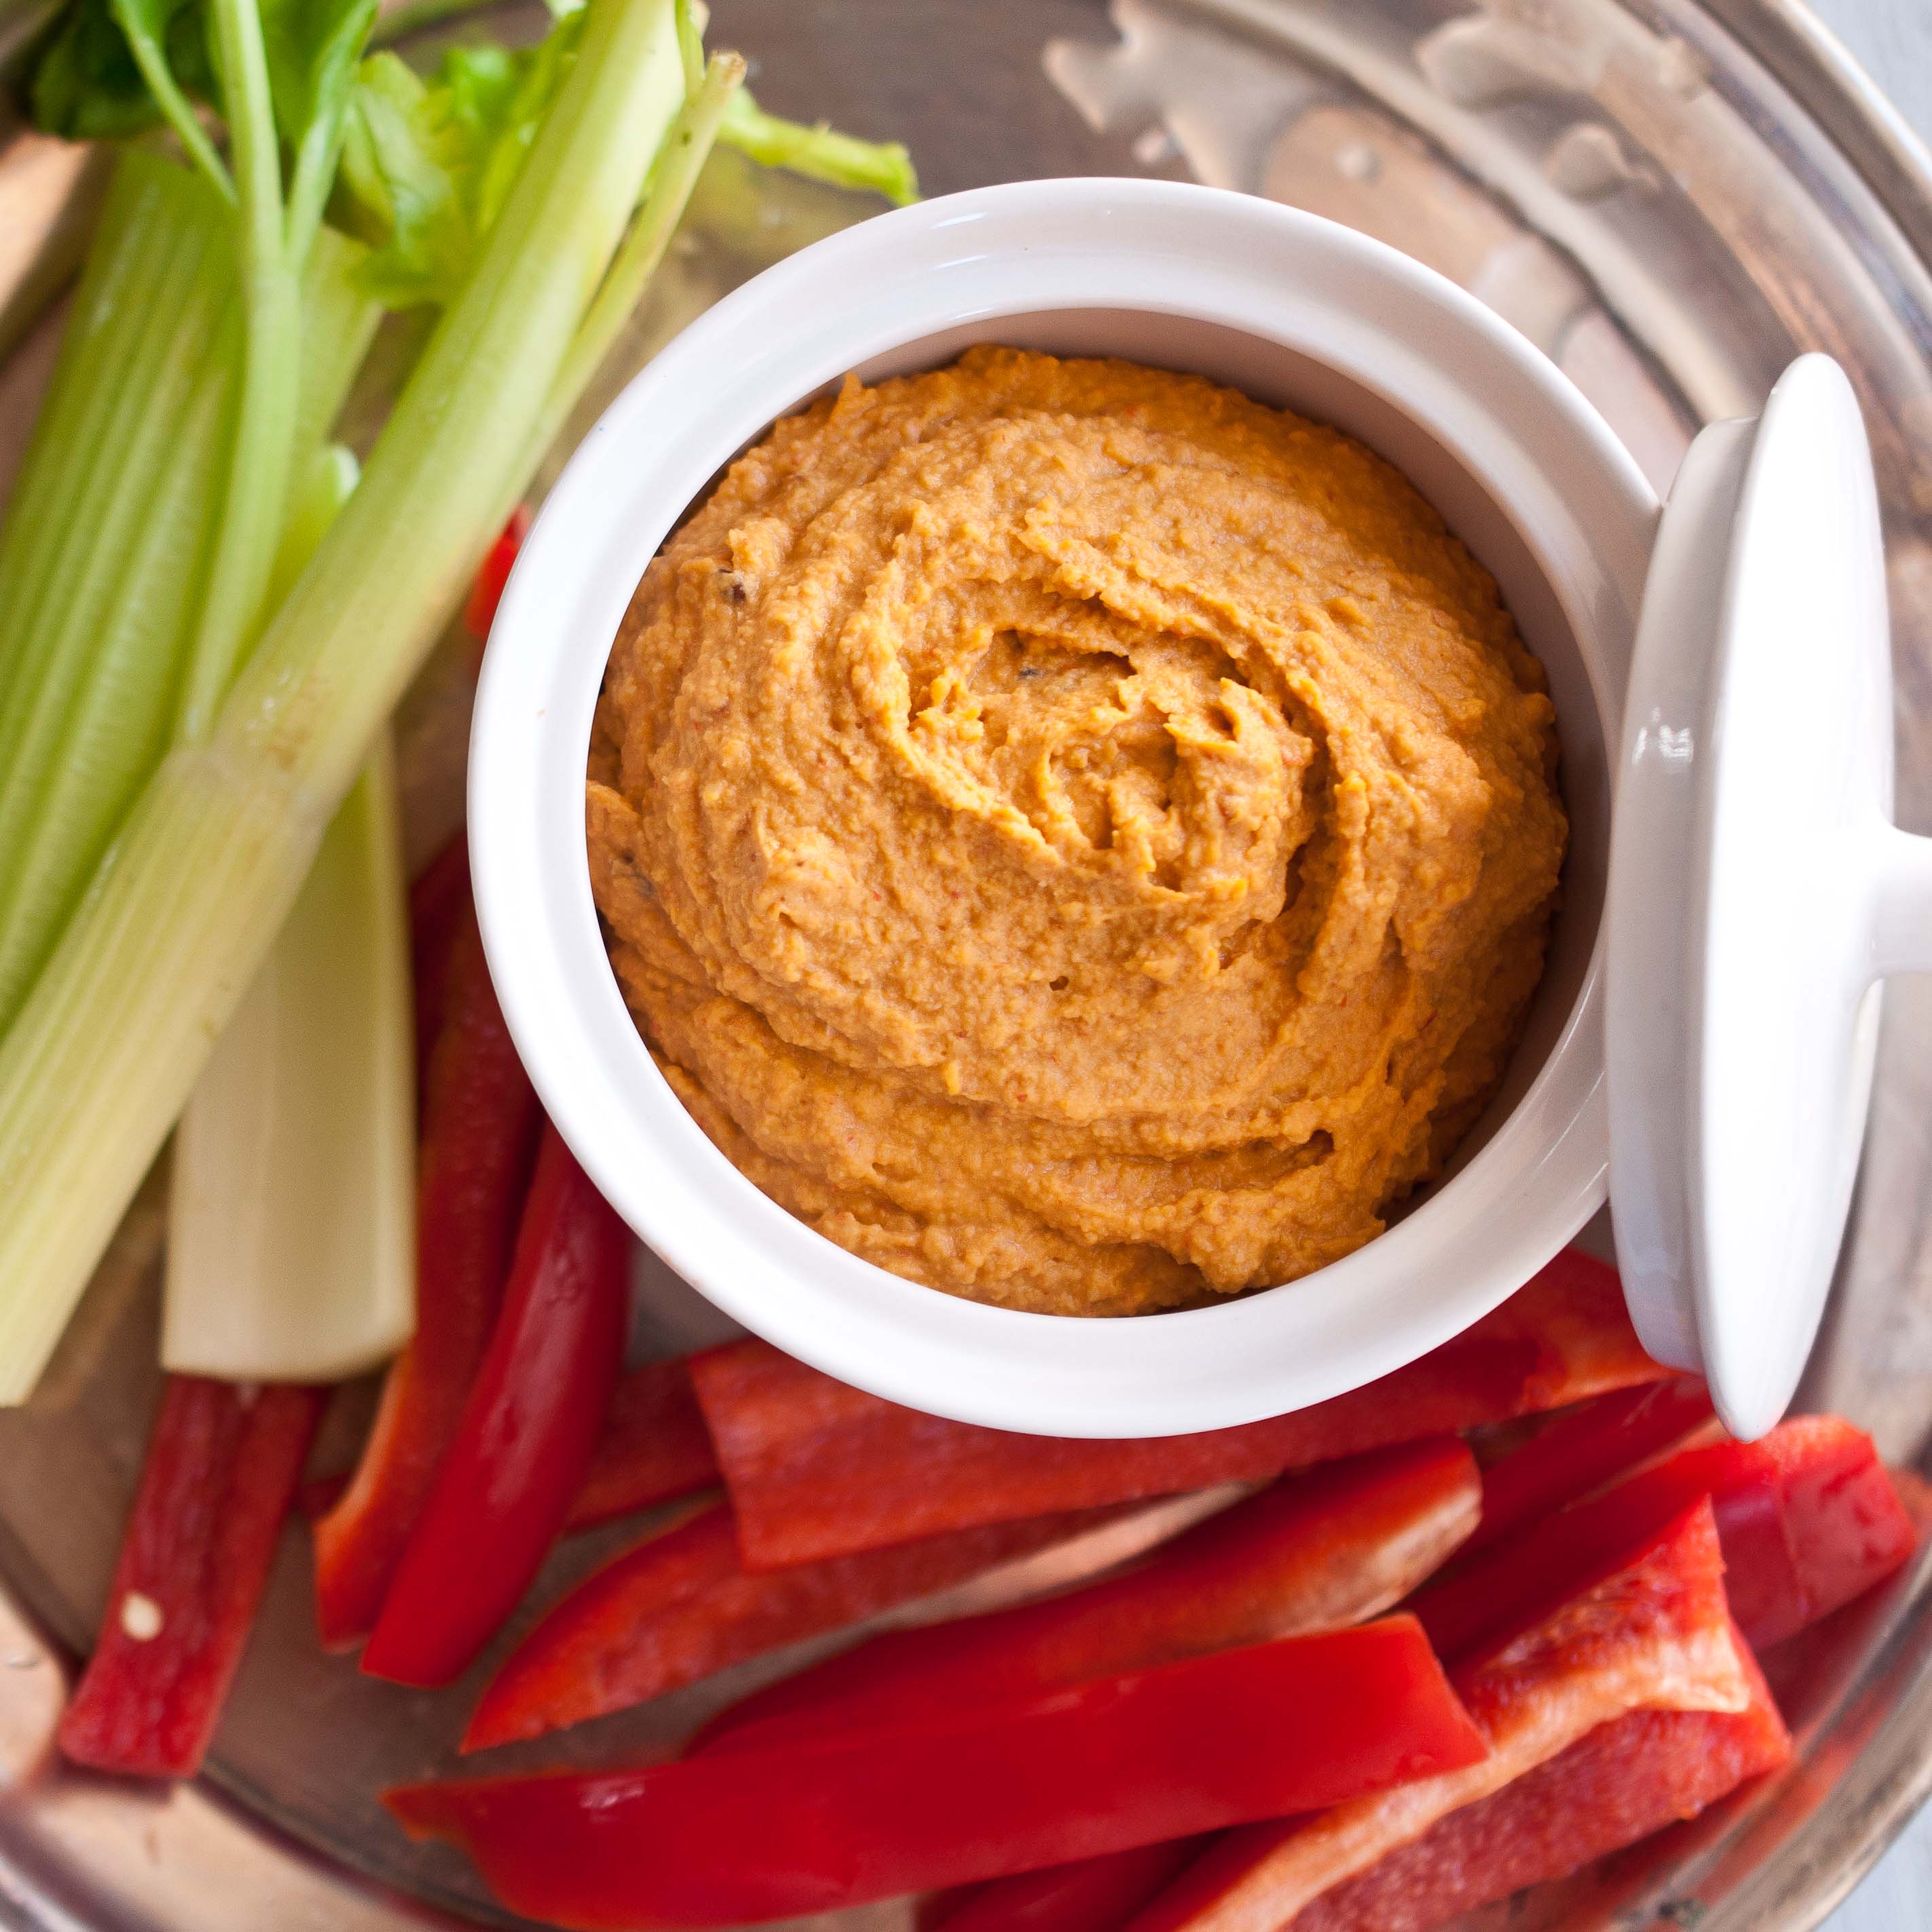
This in no way relates to Chipotle Hummus. Except that maybe those lazy summer days, hanging out with friends, enjoying a spicy dip, are gifts that you maybe able to give another person, if you are a match. And if you get on the registry, and get to donate marrow and save someones life: I will be really jealous.
Chipotle Hummus
15 ounces garbanzo beans
1/4 cup tahini
3 chipotle chilies in adobo sauce
1 tsp garlic powder
1/2 tsp cumin
2 tbs olive oil
1/4 cup lemon juice
1-3 tbs water
salt and pepper to taste
Crudites for serving
In a food processor, add the garbonzo beans, tahini, chilies, garlic, cumin, olive oil, lemon juice and process until smooth. Add the water until you reach the consistency that you prefer, more water will equal a creamier hummus. Salt and pepper to taste.
I find that this dip tastes best with the cool crunch of fresh vegetables such as cucumber slices, sliced peppers and carrot sticks.
I’m officially on Pinterest. It’s such a brilliant and simple idea. A big digital pin board that you can share with friends.
If you aren’t a blogger, you probably have no idea how many arguments and debates go on in blog land about this social networking site. The petitions, the disagreements, the loathing. If you are a non-blogger, you are probably a bit confused. What could anyone possibly have against pinterest?! It really comes down to respecting the originator of the idea you pin as well as the sanity of your pin followers. Here is a little list so that we can all pin in peace and harmony.
1. Pin to the original post. This is the biggest irritation of pin followers. You see a pin and think, "I LOVE those shoes. I will buy them right now." you click and then pin goes to the google homepage or someones email account or even the pinterst homepage. You’re a disappointed buyer and the seller of those shoes just lost a sale to a Ghost Pin. Check the URL of re-pins so that you don’t perpetuate this. I’ve had my own photos lead to everything from the Foodgawker homepage to the Facebook homepage to, for some inexplicable reason: Target.com. Even if you found the recipe on Foodgawker, or you found those shoes on a fashion tumblr, click through to the original website or blog and pin directly to that, for the sake of your pin followers.
2. Don’t cut and paste the recipe into the pin description. It doesn’t bother me so much, but it is the biggest frustration and the source of most animosity between pinterest and bloggers. Bloggers feel like they will lose traffic if people can get the recipe from pinterest, and traffic is all we have people! It validates what we do. It comes down to respecting the content of the person who has created it.
3. Follow your favorite bloggers. Pinterest generates an amazing amount of traffic for us and we are SO thrilled with that. If you have a favorite blogger, follow them on pinterst and re-pin their posts. It’s the easiest way to know that you are pinning or re-pinning correctly. If you have any questions, just ask.
4.Bloggers need to relax a bit. If pinners break these rules, it isn’t out of malice. People either didn’t realize their mistake or are just trying to make things easy for their friends. Just sigh and let it go, there is no need to get upset about possibly loosing a little traffic when most people will probably click through to your recipe (or seek it out) if they want to make it. My general philosophy is that it is better to lose traffic than lose readers.
5. Pin comments. We have covered that fact that bloggers don’t so much like it when they see their entire recipes posted in pin comments, which has been largely eliminated due to the enforcement of a character limit. And most pinners don’t like the long comments because it ruins the aesthetic of the overall board. But I personally love to see a quick review of the recipe written in the pin. For instance: "Made this for Thanksgiving! Loved it!" or "I didn’t make the frosting but the cake was great all on it’s own!" or even constructive comments: "I liked this but it needed more salt. I also added parmesan and it was a hit!" But don’t bash us. There is a pretty good possibility that we will see it and it hurts our feelings. We are real life humans with hearts and brains and feelings. Be nice, or at least helpful and tactful.
And please, if you have more to add to this conversation, do so in the comments section! And please, pin away!
Here is my pinterest, a little bare at the moment but I’m working on it!
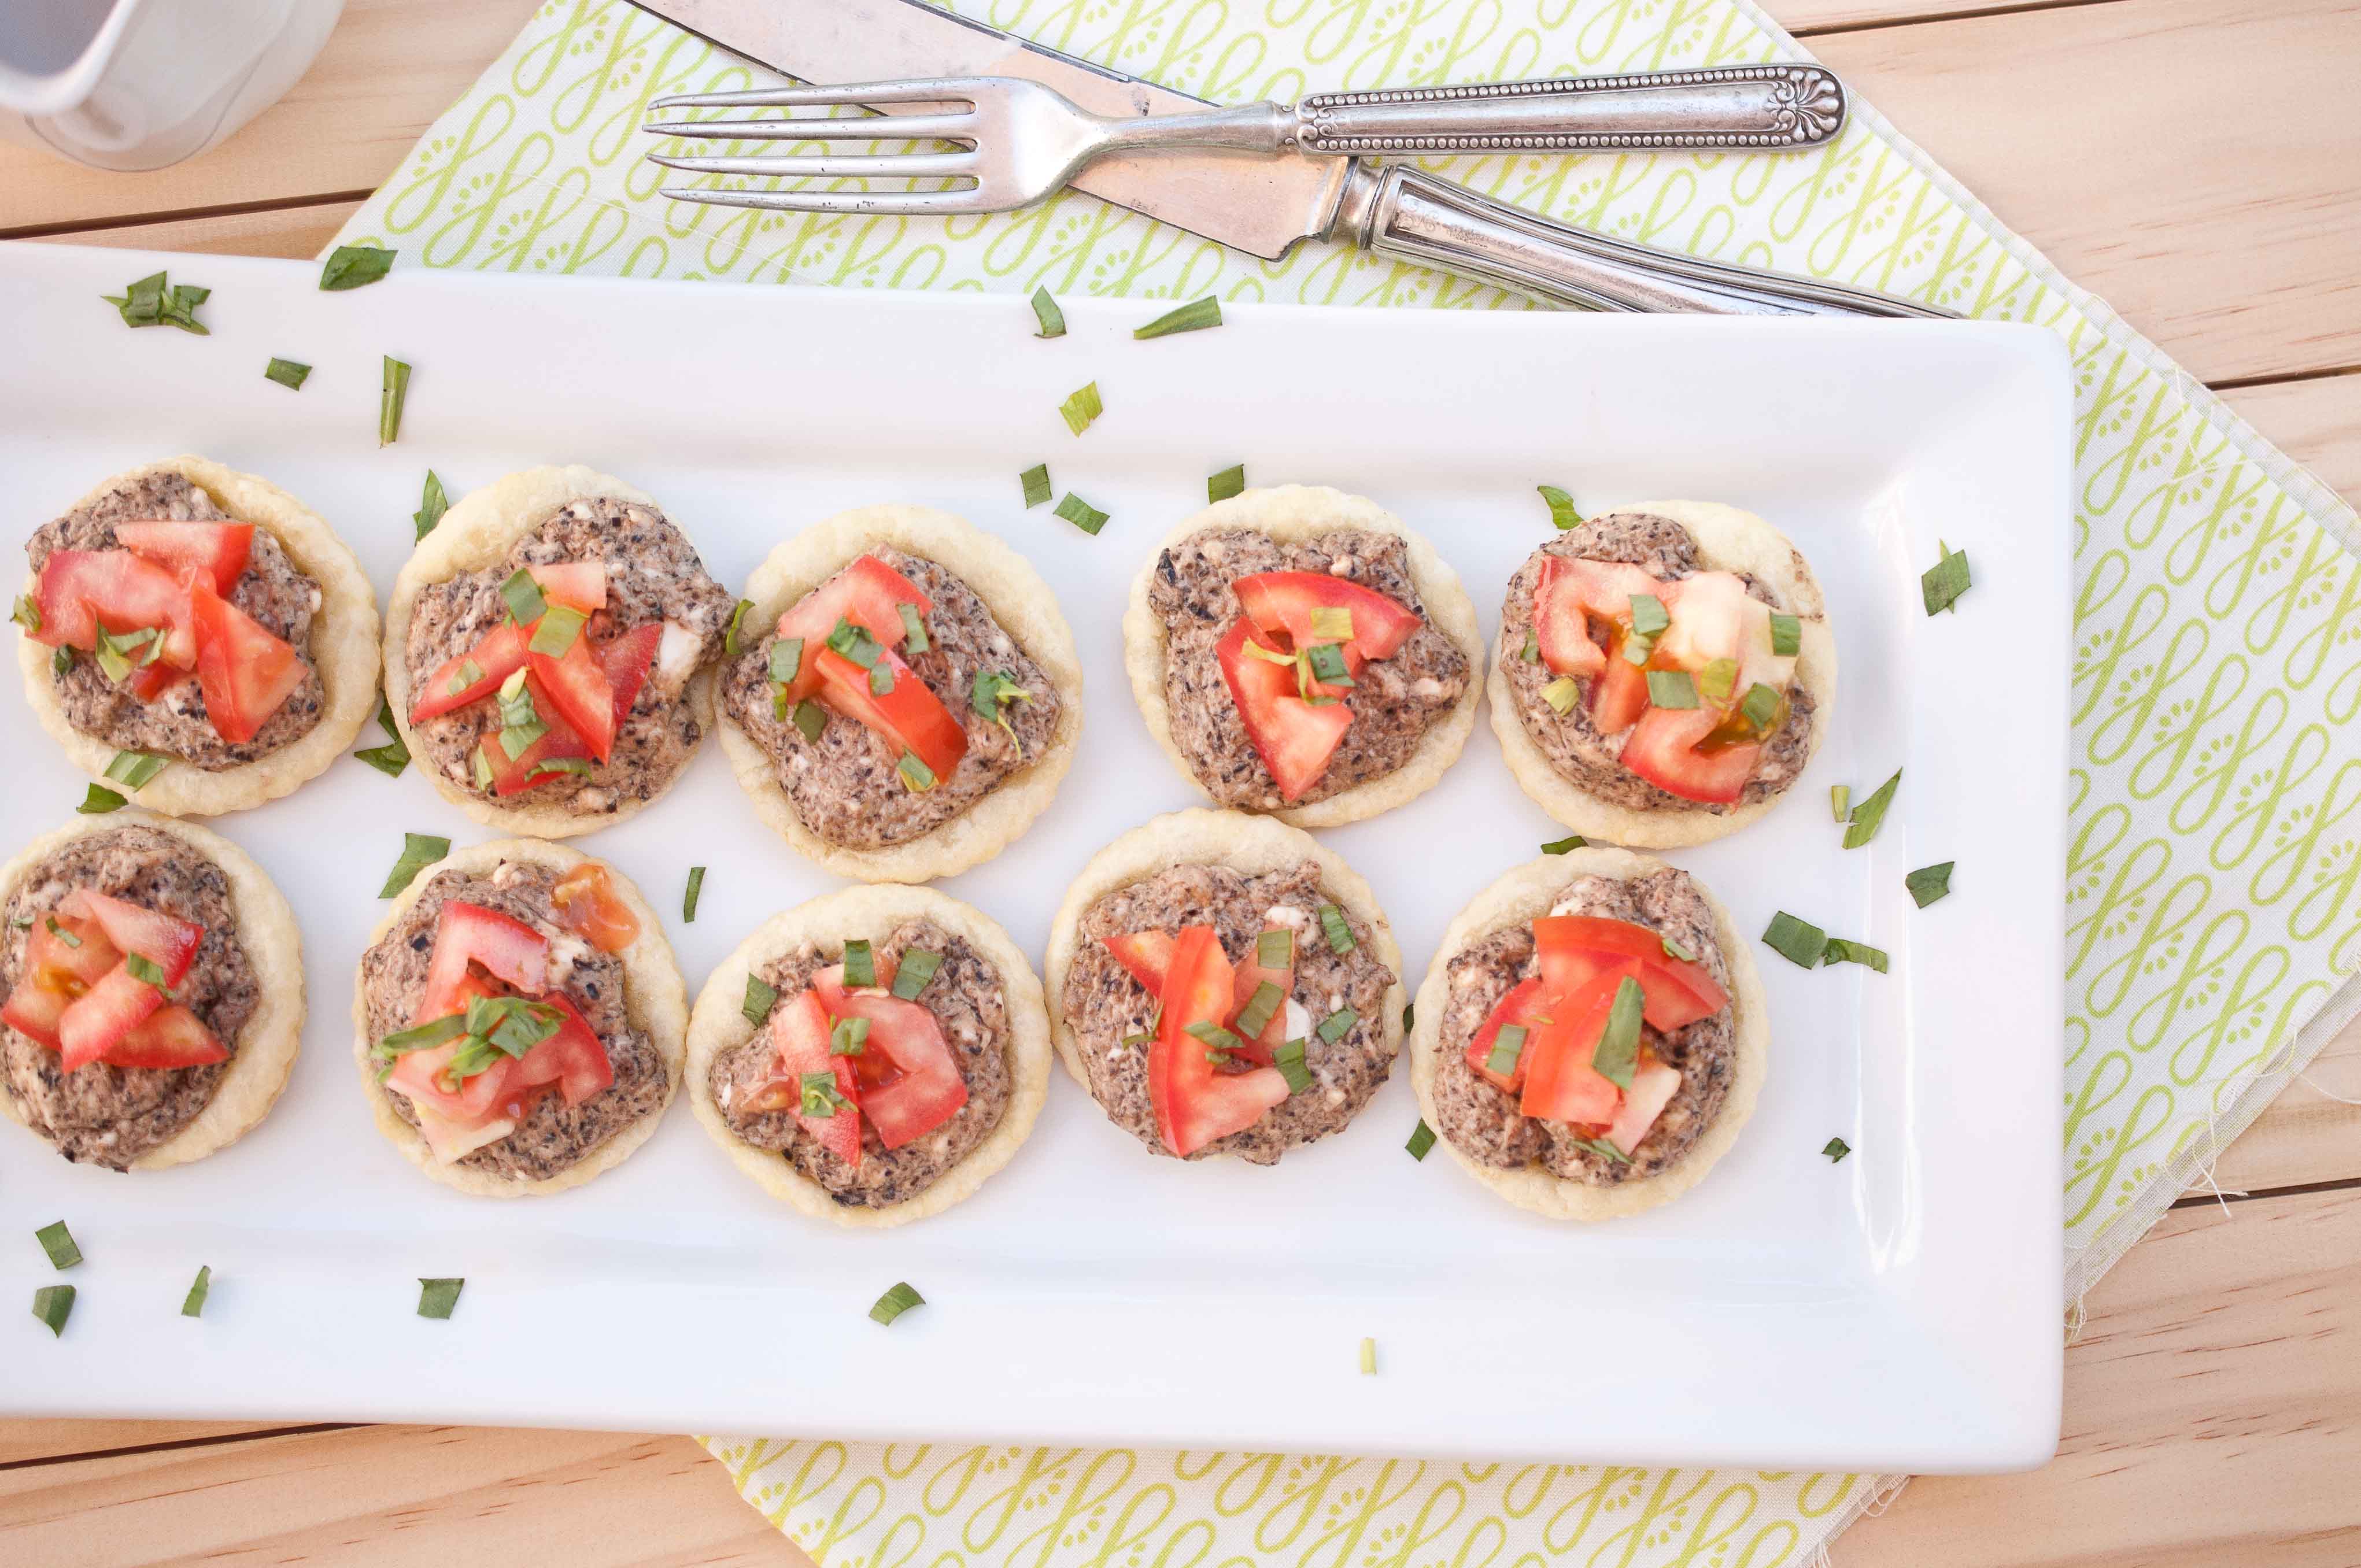
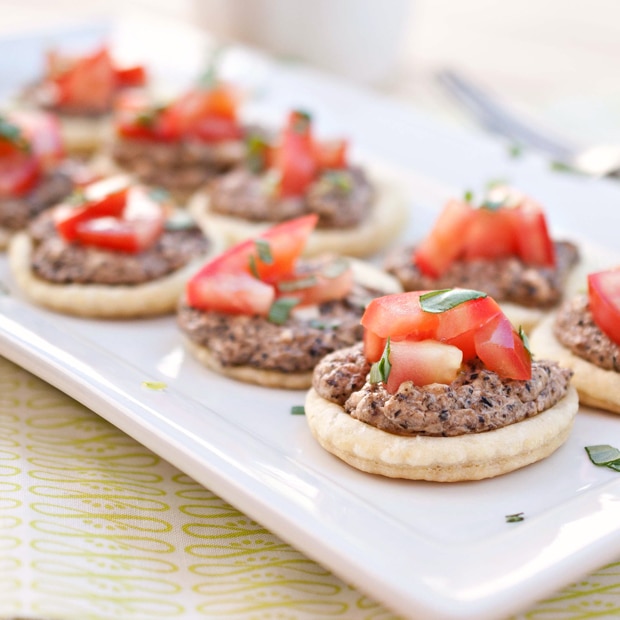
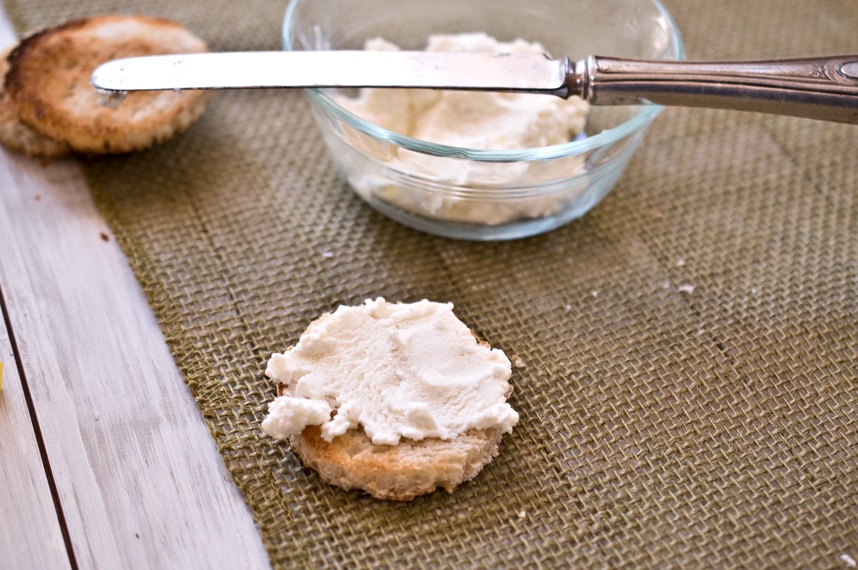
Olive and Goat Cheese Tartlets
Ingredients:
1 sheet puff pastry
1 6 oz can of Large Black Olives
4 oz goat cheese
8 oz cream cheese, softened
½ cup chopped tomato
1 tbs chopped fresh tarragon or basil
Directions:
Preheat oven to 350.
On a lightly floured surface, roll the puff pastry with the rolling pin three to four times in each direction, making the pastry thinner, longer and wider. Using a 3.5 inch biscuit cutter cut out 12-16 circles.
Place the pastry circles on a baking sheet covered with parchment paper.
In a food processer, add the olives, goat cheese and cream cheese. Pulse until well combined.
Top the pastry rounds with 1-2 tbs of the olive mixture.
Bake until the edges of the puff pastry turn a light golden brown, about 15-18 minutes. Transfer to a serving dish and top with tomato and fresh herb.
Food is one of the greatest choices we have as members of the 1st world. For the most part, we get to choose what we put in our bodies, and how much.
The path people take to the way they eat as adults is a direct result of the experiences they have as children. Although I am no longer a practicing vegetarian (as evidenced by the extensive number of bacon related posts on my blog) I did spend about 4 years in my early 20’s with a very meatless existence. That choice was a direct result of the farm style living of my youth.
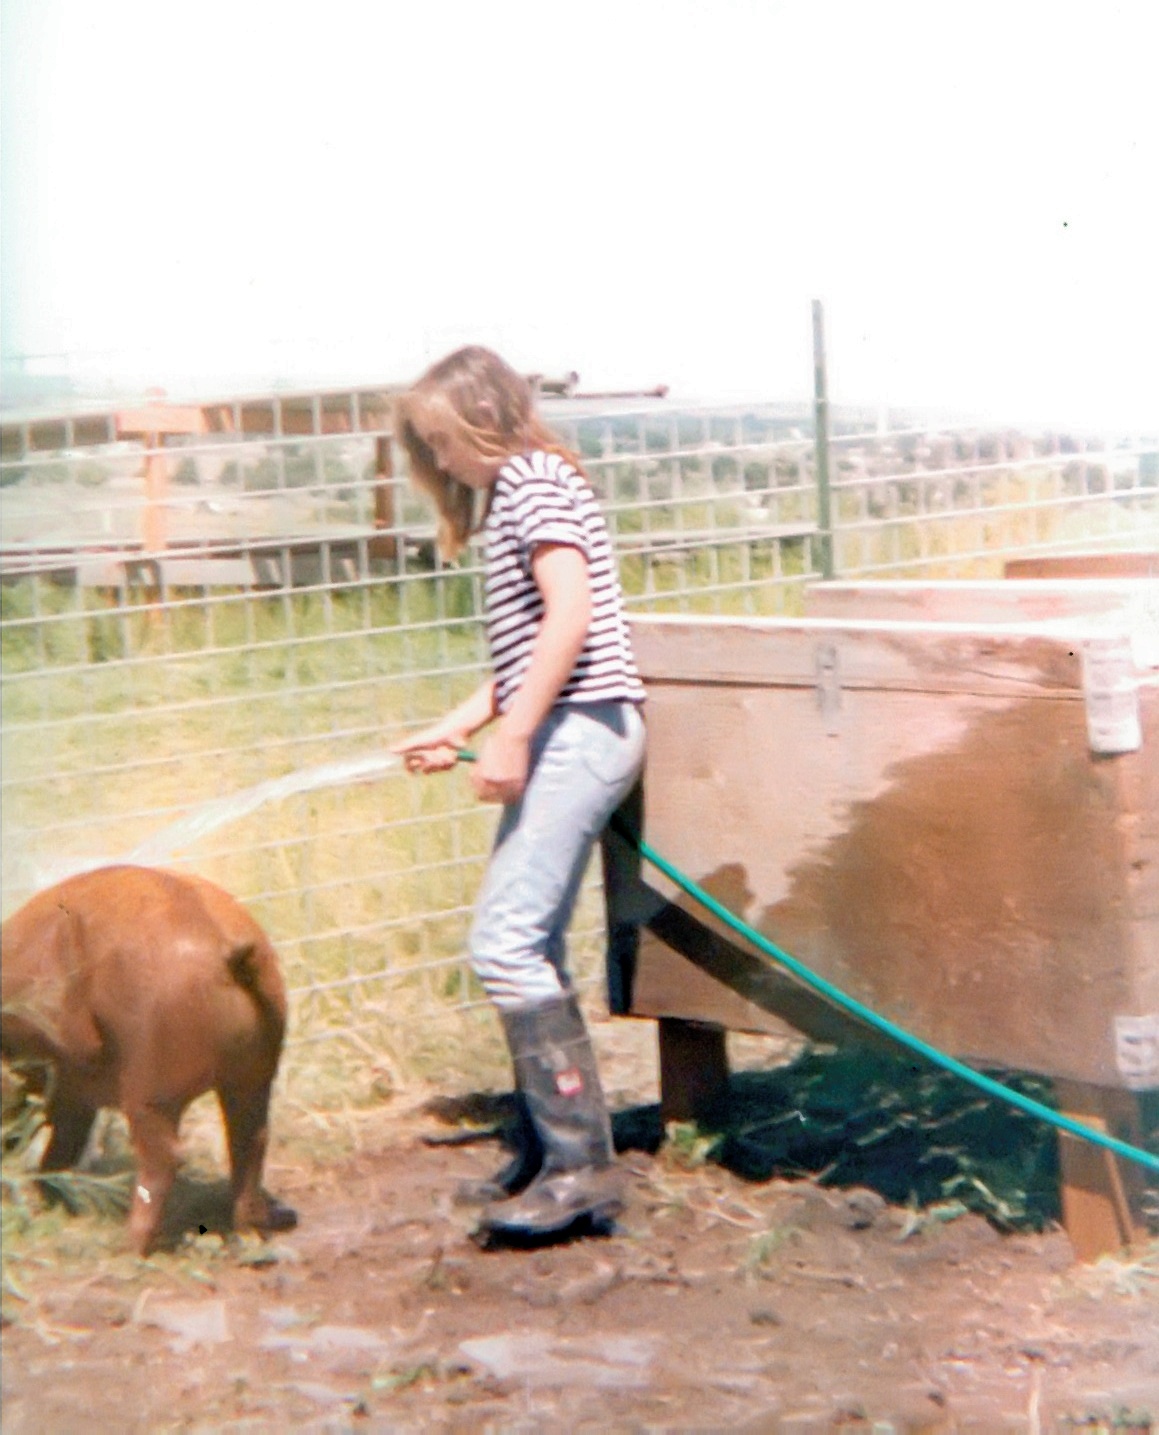
Just before I started Junior High, my parents moved me from the Central Coast of California to a small farm in Eastern Washington state. It sounded like such a romantic and adventurous journey, my love of animals having the full indulgence it had always wanted.
I was a 4-H kid, and the idea of acres and acres of animals was like a dream and within hours of a pig pen fully inhabited by squealing little pink and brown creatures I was in love. I named my favorite guy Garfunkel, as an nod to my love of 70’s music. I spent the summer feeding, walking, and training my new pet. In my head was the knowledge of the inevitable fate of this little guy, but some how it didn’t reach my heart.
Then, towards the end of summer, came an old Chevy pickup truck. White and faded with wooden boards rising up above the sides of the truck bed. I watched from the window as the town butcher consulted with my step father, compared guns, pointed at the pigs, and unceremoniously shoots Garfunkel in the head.
He struggles to get up. Another shot. He moves again. Another shot.
Three days later, I stared at the pork chops on my dinner plate, unable to get the image of his last moments out of my head. Unnerved by the feeling of knowing the first name of my dinner.
Although this is a brutal reality for the meat eating world, and one that we should come to terms with if we choose to eat meat, I am not advocating for everyone to go vegan. I know that the pigs my family raised had great lives. They were loved, cared about, and fed well. If it wasn’t for the dinner they became, they wouldn’t have existed in the first place.
Choice. Choosing to spend more for free range. Choosing to support local growers. Seeking out raw milk and cheese from reliable farms.
Because if the story of Garfunkel is horrifying to you, it is Disneyland compared to way some commercial farms are like.
Just some food for though.
Let me know what you think. If you disagree, agree, or even if you don’t care.
In the interim, here is a meatless breakfast that will give you a break from meat, if that is what you are looking for.
Portobello Mushroom Benedict with Sriracha Hollandaise
4 Portobello mushrooms
1/4 cup olive oil
pinch of salt
4 cups fresh spinach, chopped
1/4 cup chopped onions
3 cloves of garlic minced
4 eggs
1 large tomato, cut into slices
For the Hollandaise:
4 tbs melted butter
4 egg yolks
1 tbs lemon juice
2 tbs room temp water
1 tsp sriracha sauce
salt and pepper
In a pan over medium high heat, add the oil and allow it to get hot but not smoking. Place the mushrooms in the pan. If the pan is two small for all of the mushrooms to fit, cook in two batches. Turn the mushrooms once the bottom has turned dark and has softened, about 4 minutes. Sprinkle with salt and allow to cook on the other side until the entire mushroom is dark, soft and cook all the way through. Remove cooked mushrooms from pan and add the spinach, onions and garlic, cook until soft.
Poach the eggs in lightly salted simmering water. (Tutorial)
Melt the butter in the microwave. In a good quality sauce pan, add the yolks, lemon juice and water and whisk quickly and continually over low heat until it’s frothy and doubled in size (this is an arm work out, be prepared). You don’t want too much heat or you’ll have scrambled eggs. If you need to step away for even a second, or if it’s getting to hot, remove from the heat. While continuing to whisk, slowly add the butter in a steady stream. Continue to whisk until thickened, and almost doubled. If your sauce gets too dry and thick, you can add a few tbs of water. Add the sriracha, and salt and pepper to taste.
Place the mushroom on a plate, top with spinach, then tomato slice, then poached egg and drizzle with hollandaise.
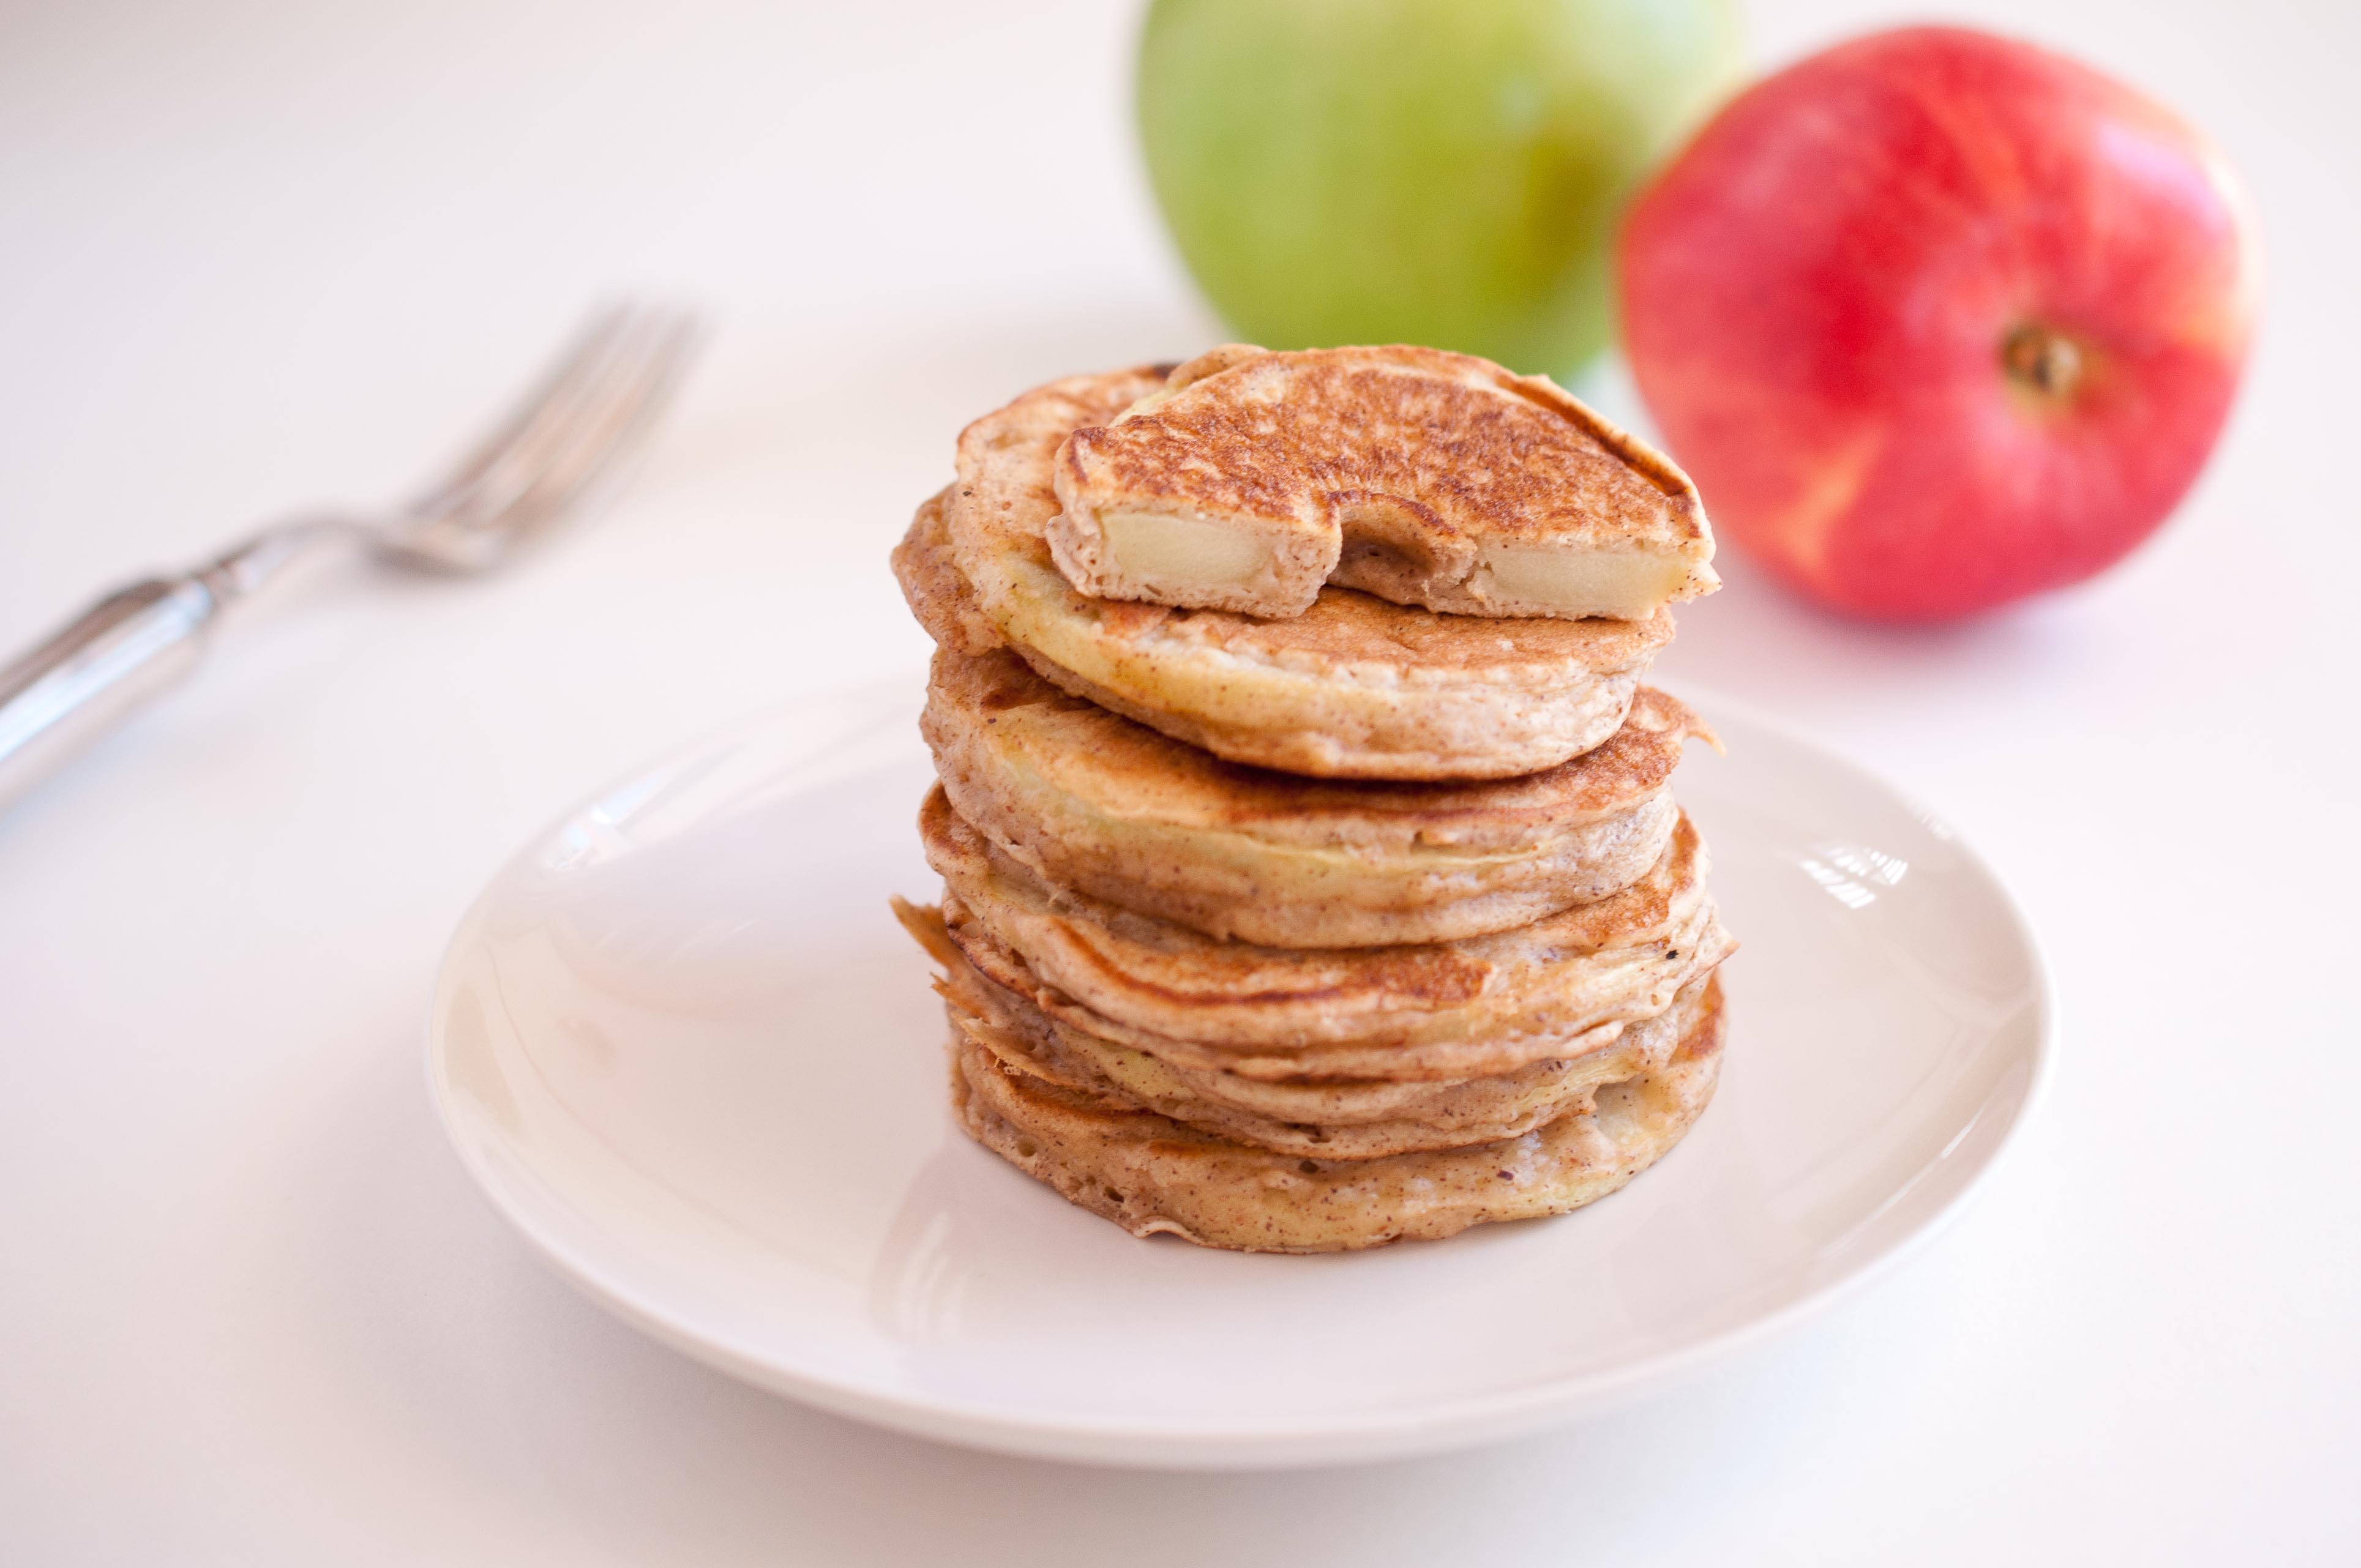
As a kid there were a few phrases that take an ordinary day and give it a bit of a sparkle. Like hearing the name of YOUR school being read over the radio as a closure for a Snow Day. Or hearing: "Let’s go get ice cream!" or, one of my favorites: "Breakfast For Dinner!!"
And now that I am a mom, I want to have breakfast for dinner too. It’s fun. But then I have the responsibility of an entire humans future health on my hands. That’s a lot of pressure. The way I reconcile these two things is by taking an ordinary pancake and filling it with a slice of fruit. Breakfast for dinner and a serving of wholesome fruit.
These babies only have 60 calories each. And you don’t even need massive amounts of syrup, the apple in the middle has the flavor and moisture to compensate.
Apple Ring Pancakes
2 large apples (I used Fuji Apples)
1 cup of flour
1/4 cup brown sugar
1 tsp baking powder
1/4 tsp nutmeg
1 tsp cinnamon
1/4 tsp salt
1/4 cup reduced fat (or fat free) sour cream
1 egg
1/2 tsp vanilla extract
3/4 cup sparklink water or club soda
(yields about 20 apple ring pancakes)
Preheat a griddle to 375, or use a large skillet. Coat with butter flavored cooking spray prior to cooking pancakes.
Peel and core the apples (I use this apple corer all the time). Cut the apples into 1/4 to 1/2 inch slices. Thicker slices will give you a crispier apple once cooked and a thinner slice will give you a softer apple once cooked.
In a large bowl, combine the flour, brown sugar, baking powder, nutmeg, cinnamon and salt until well mixed. In a separate bowl, add the sour cream, egg and vanilla, mix until well combined. Make a well in the dry ingredients, add the wet ingredients and stir until just barely combined. Add the sparkling water and stir. One at a time, dip the apple slices into the batter and place on the hot griddle. Allow the pancakes to cook until the edges start to look dry and then flip over, cooking on the other side until golden brown, about 3 minutes per side. Repeat for all apple slices.
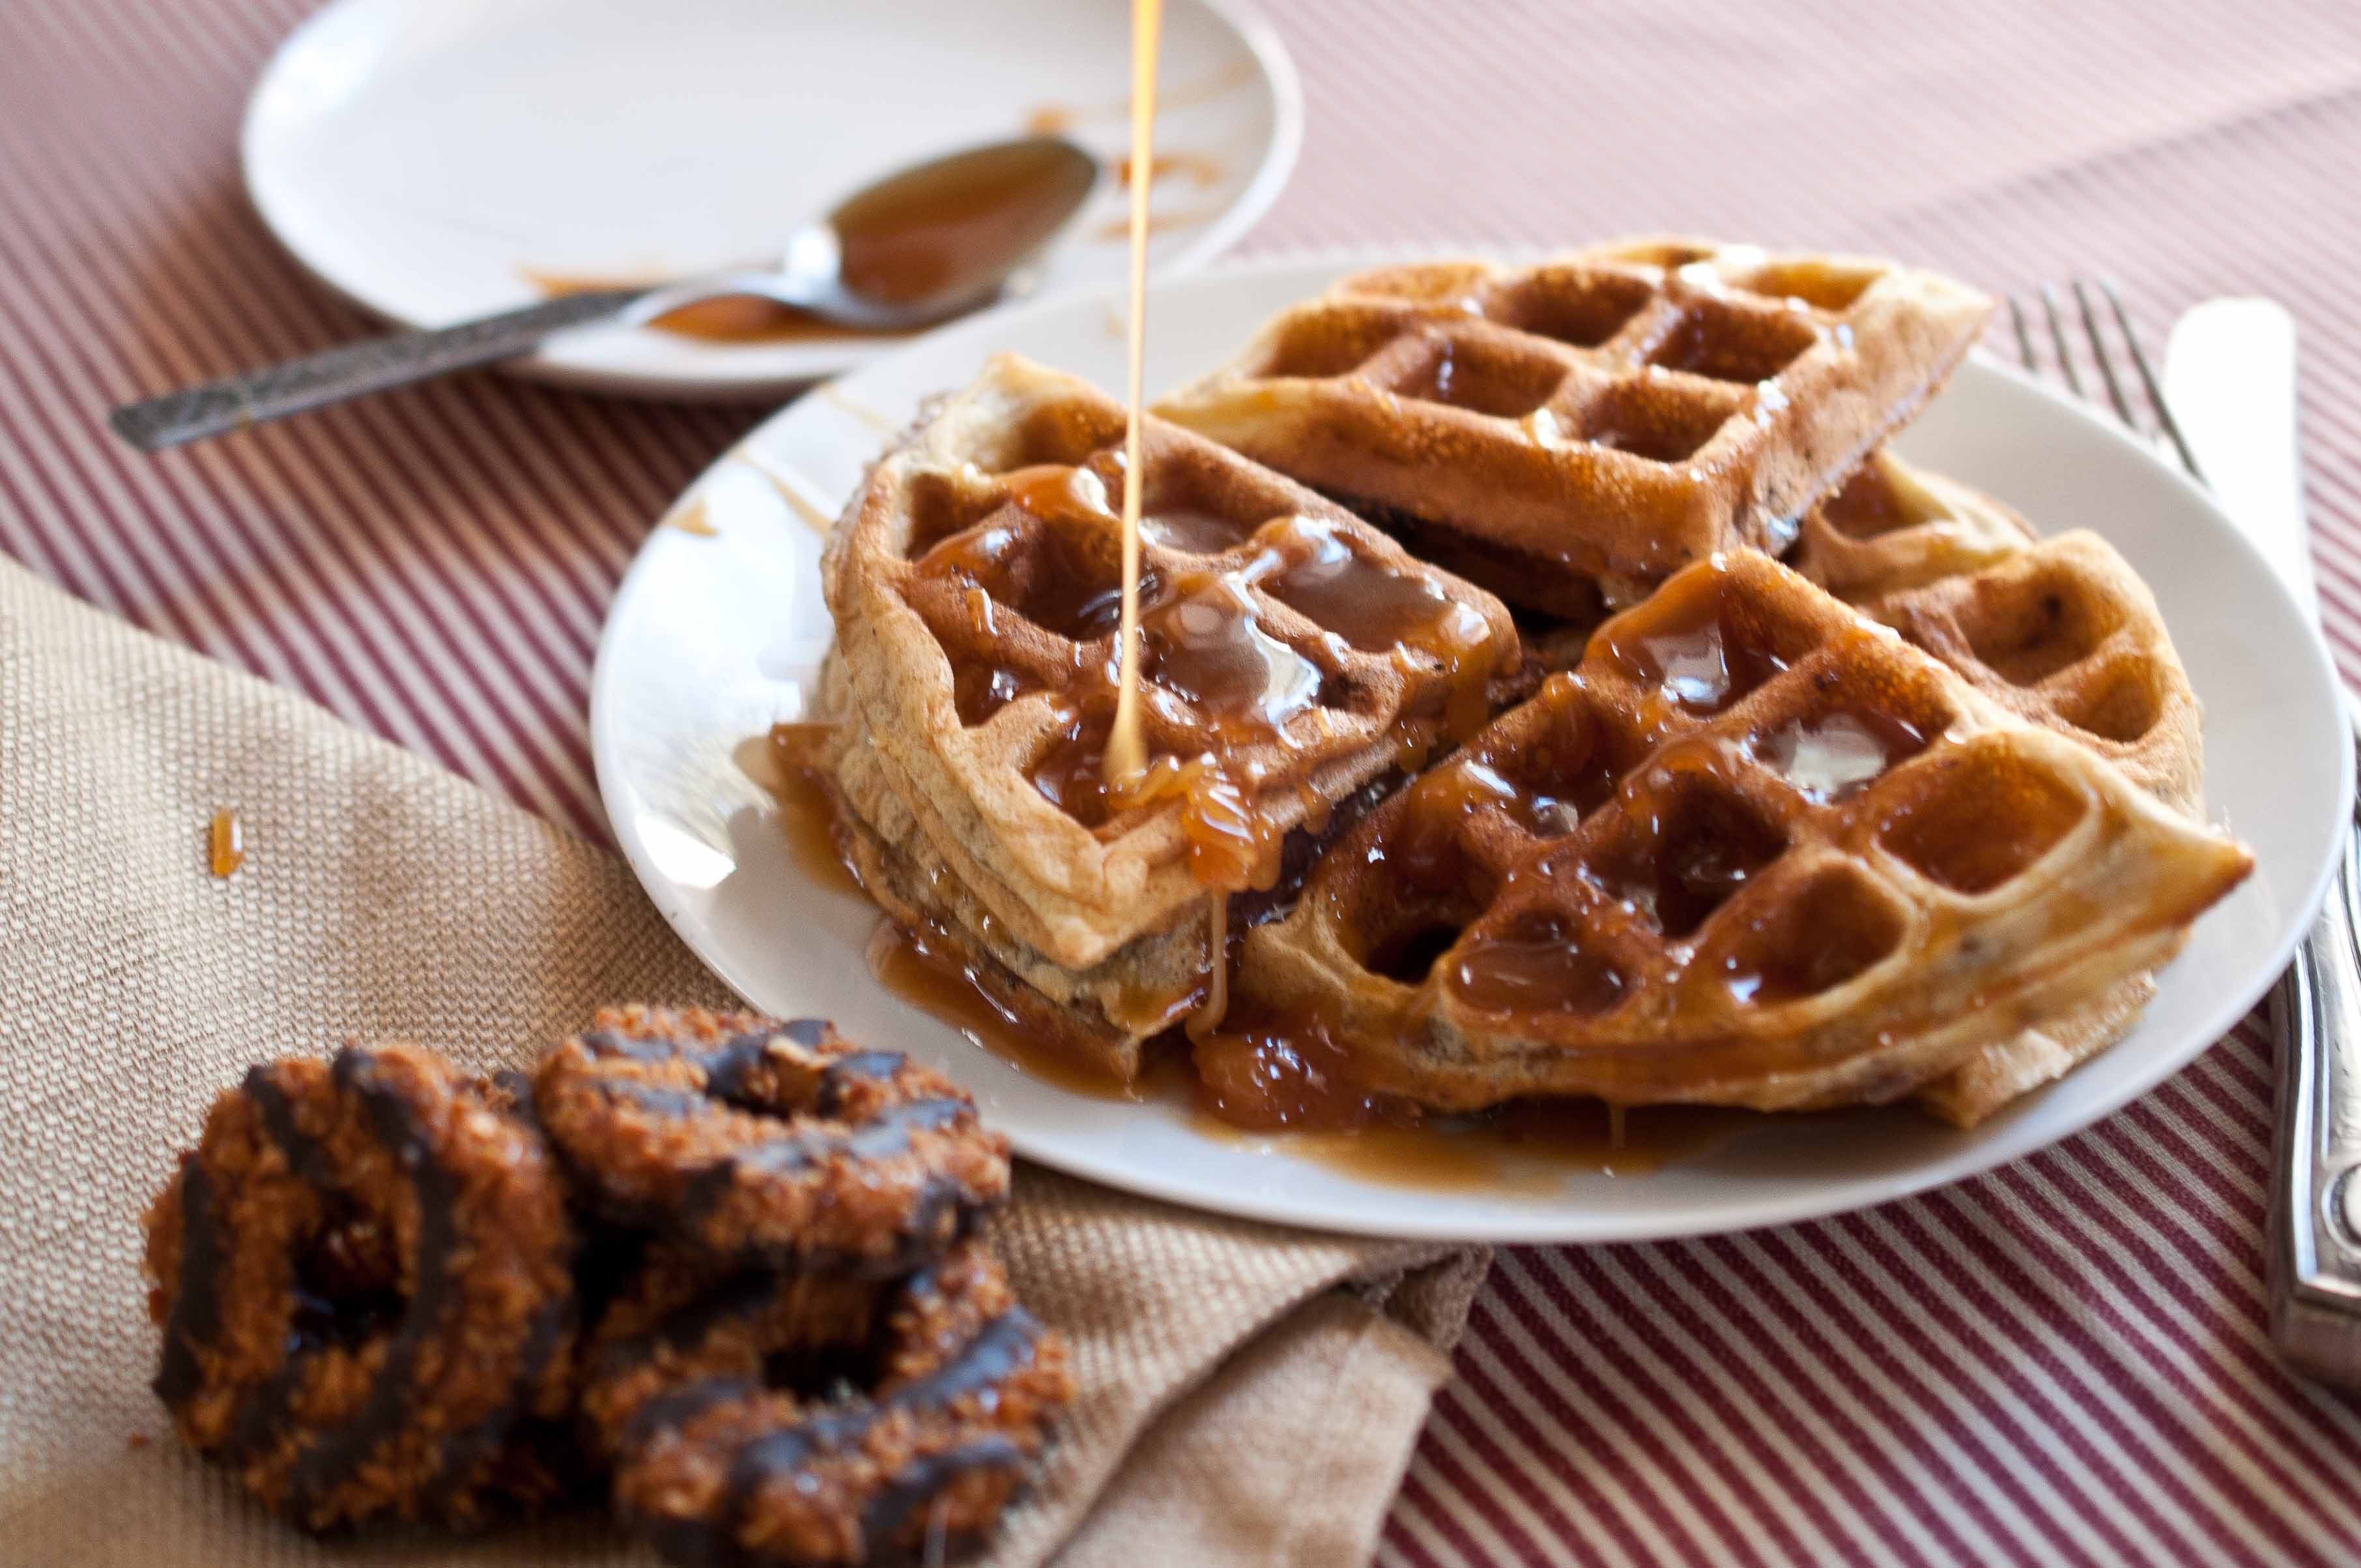
You don’t need syrup for these little guys but I couldn’t resist using the last of that Coconut Caramel Sauce that I made the other day. So good.
One big food blogger secret is that we rarely make recipes more than once. It’s true. And sad. It’s this constant race to provide new, fun, exciting, creative content for you that leaves us little time to revisit those recipes that we love. Of course, there are always those few recipes that we will make all the time, for the rest of our lives even if it means missing an opportunity to create a new post. This is one of those recipes for me. All I want to do now is make it all over again and add bacon and parmesean cheese.
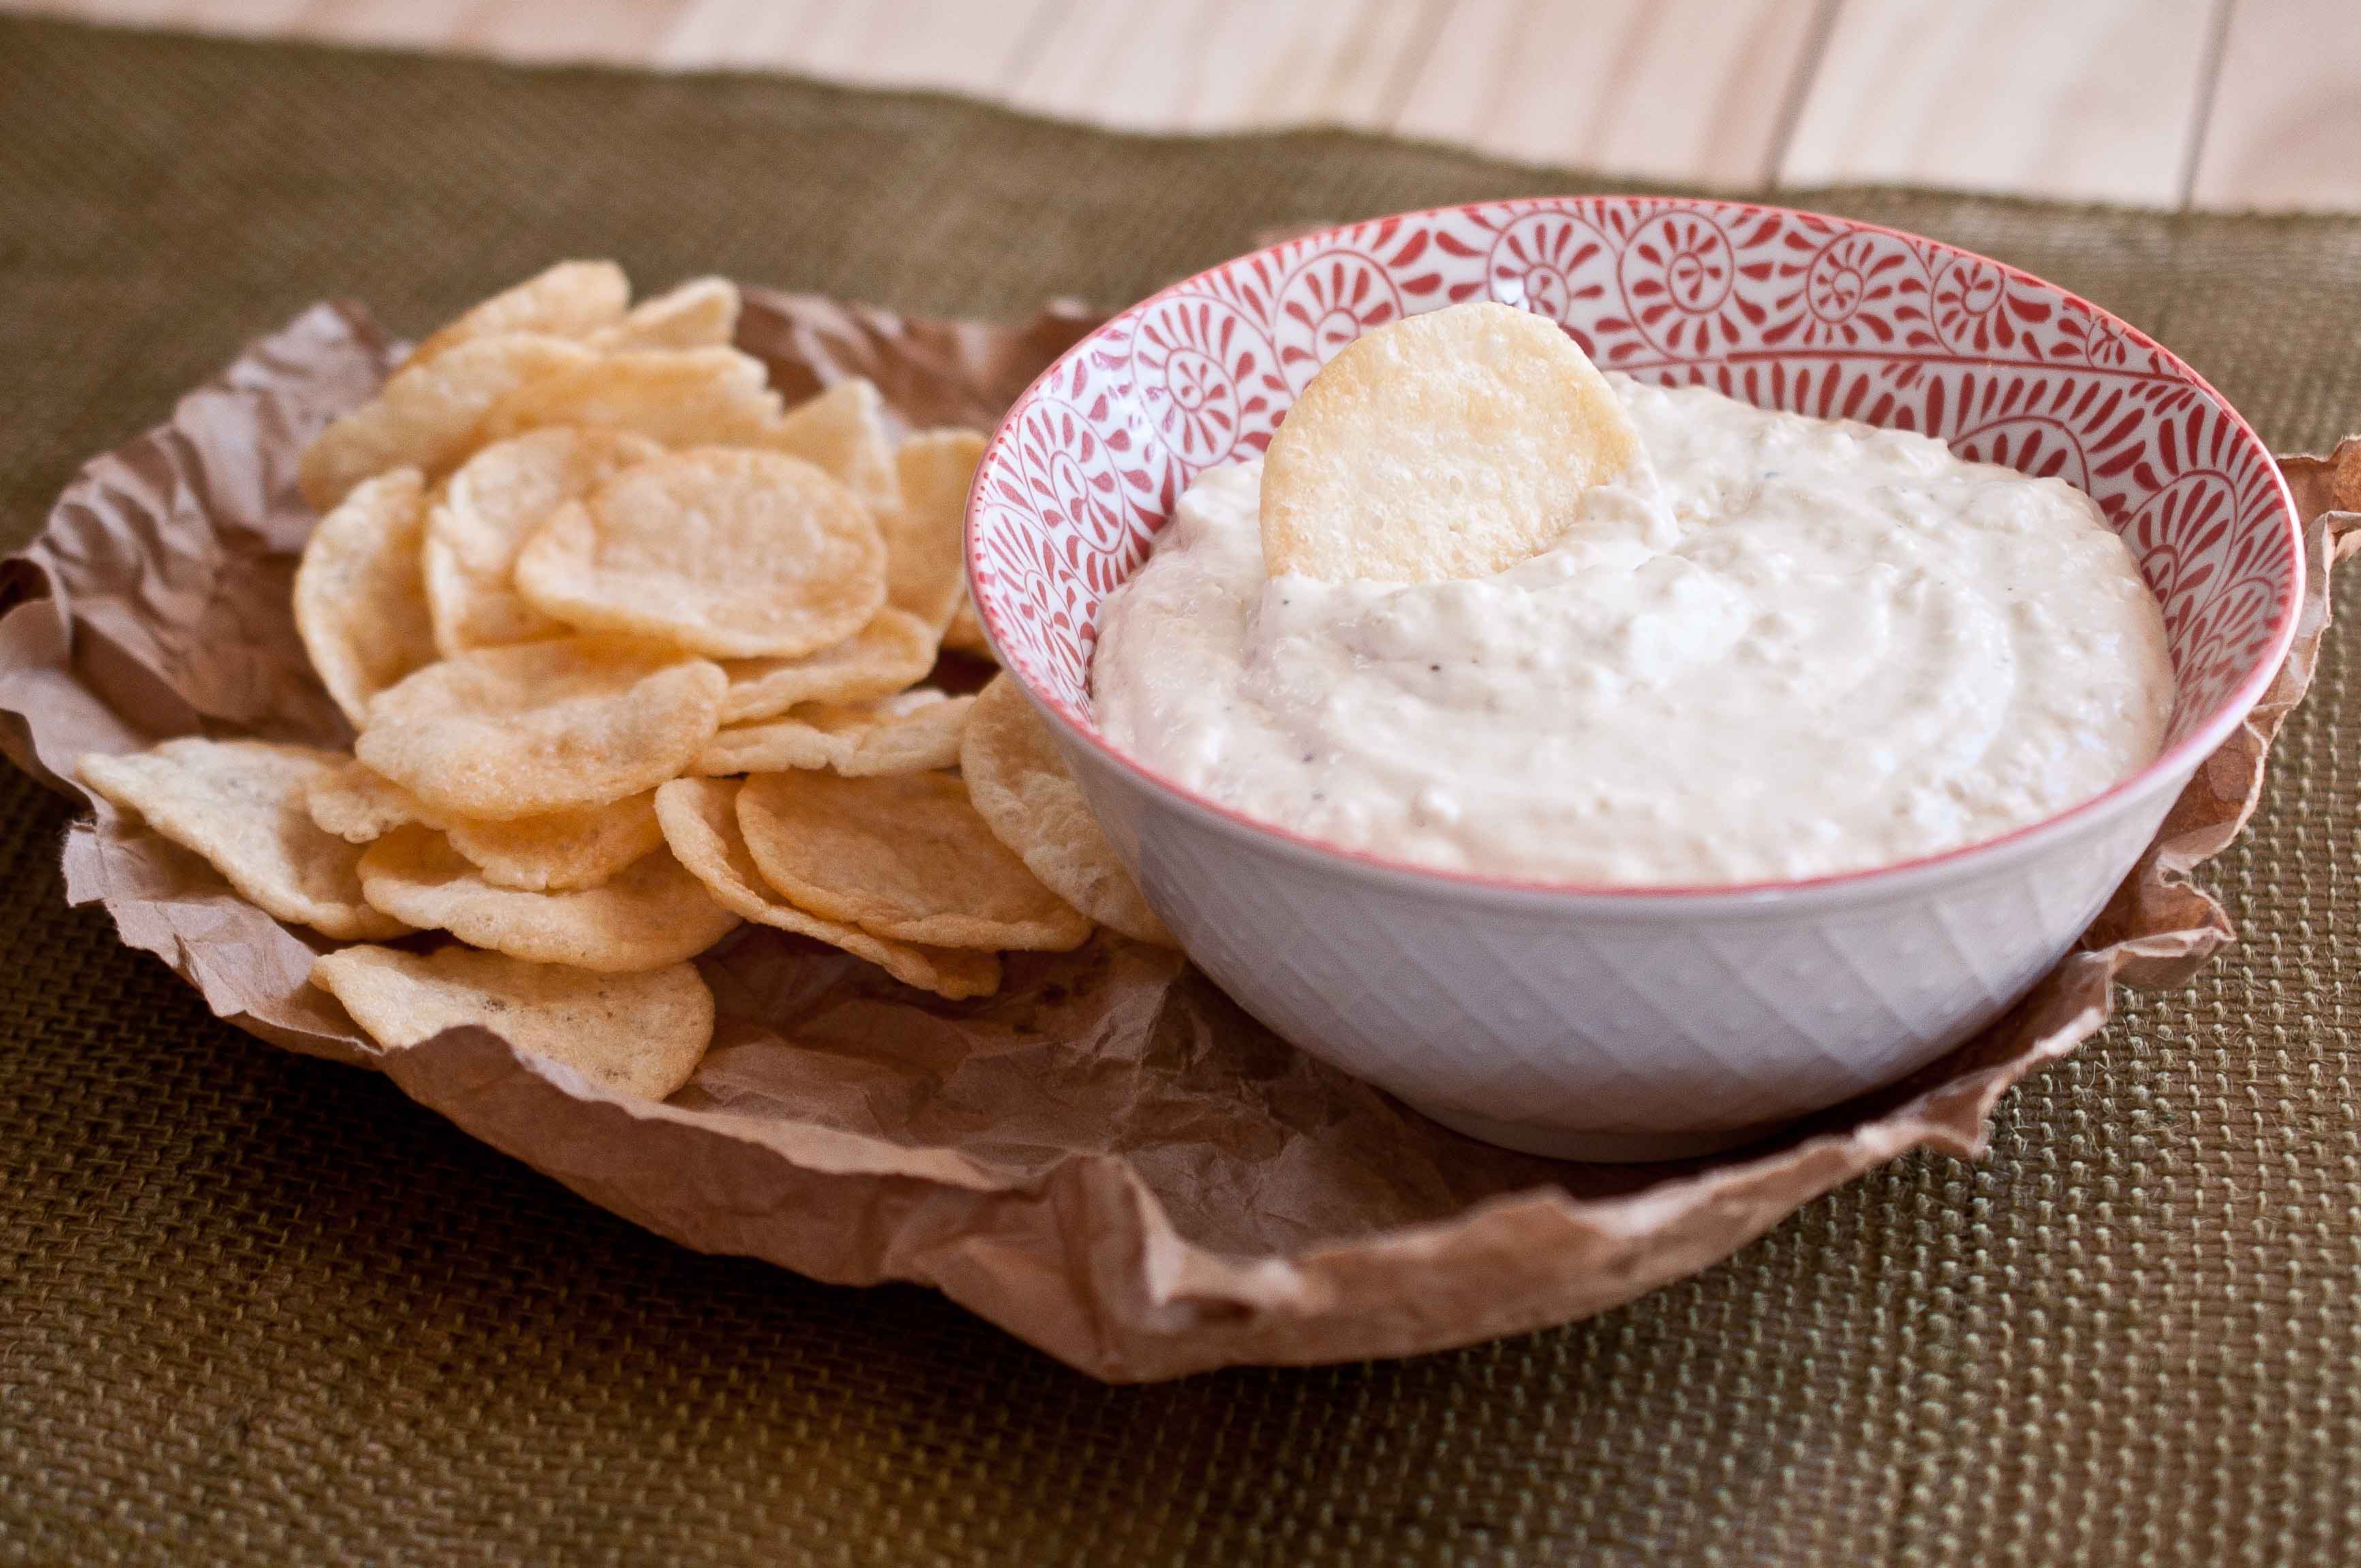
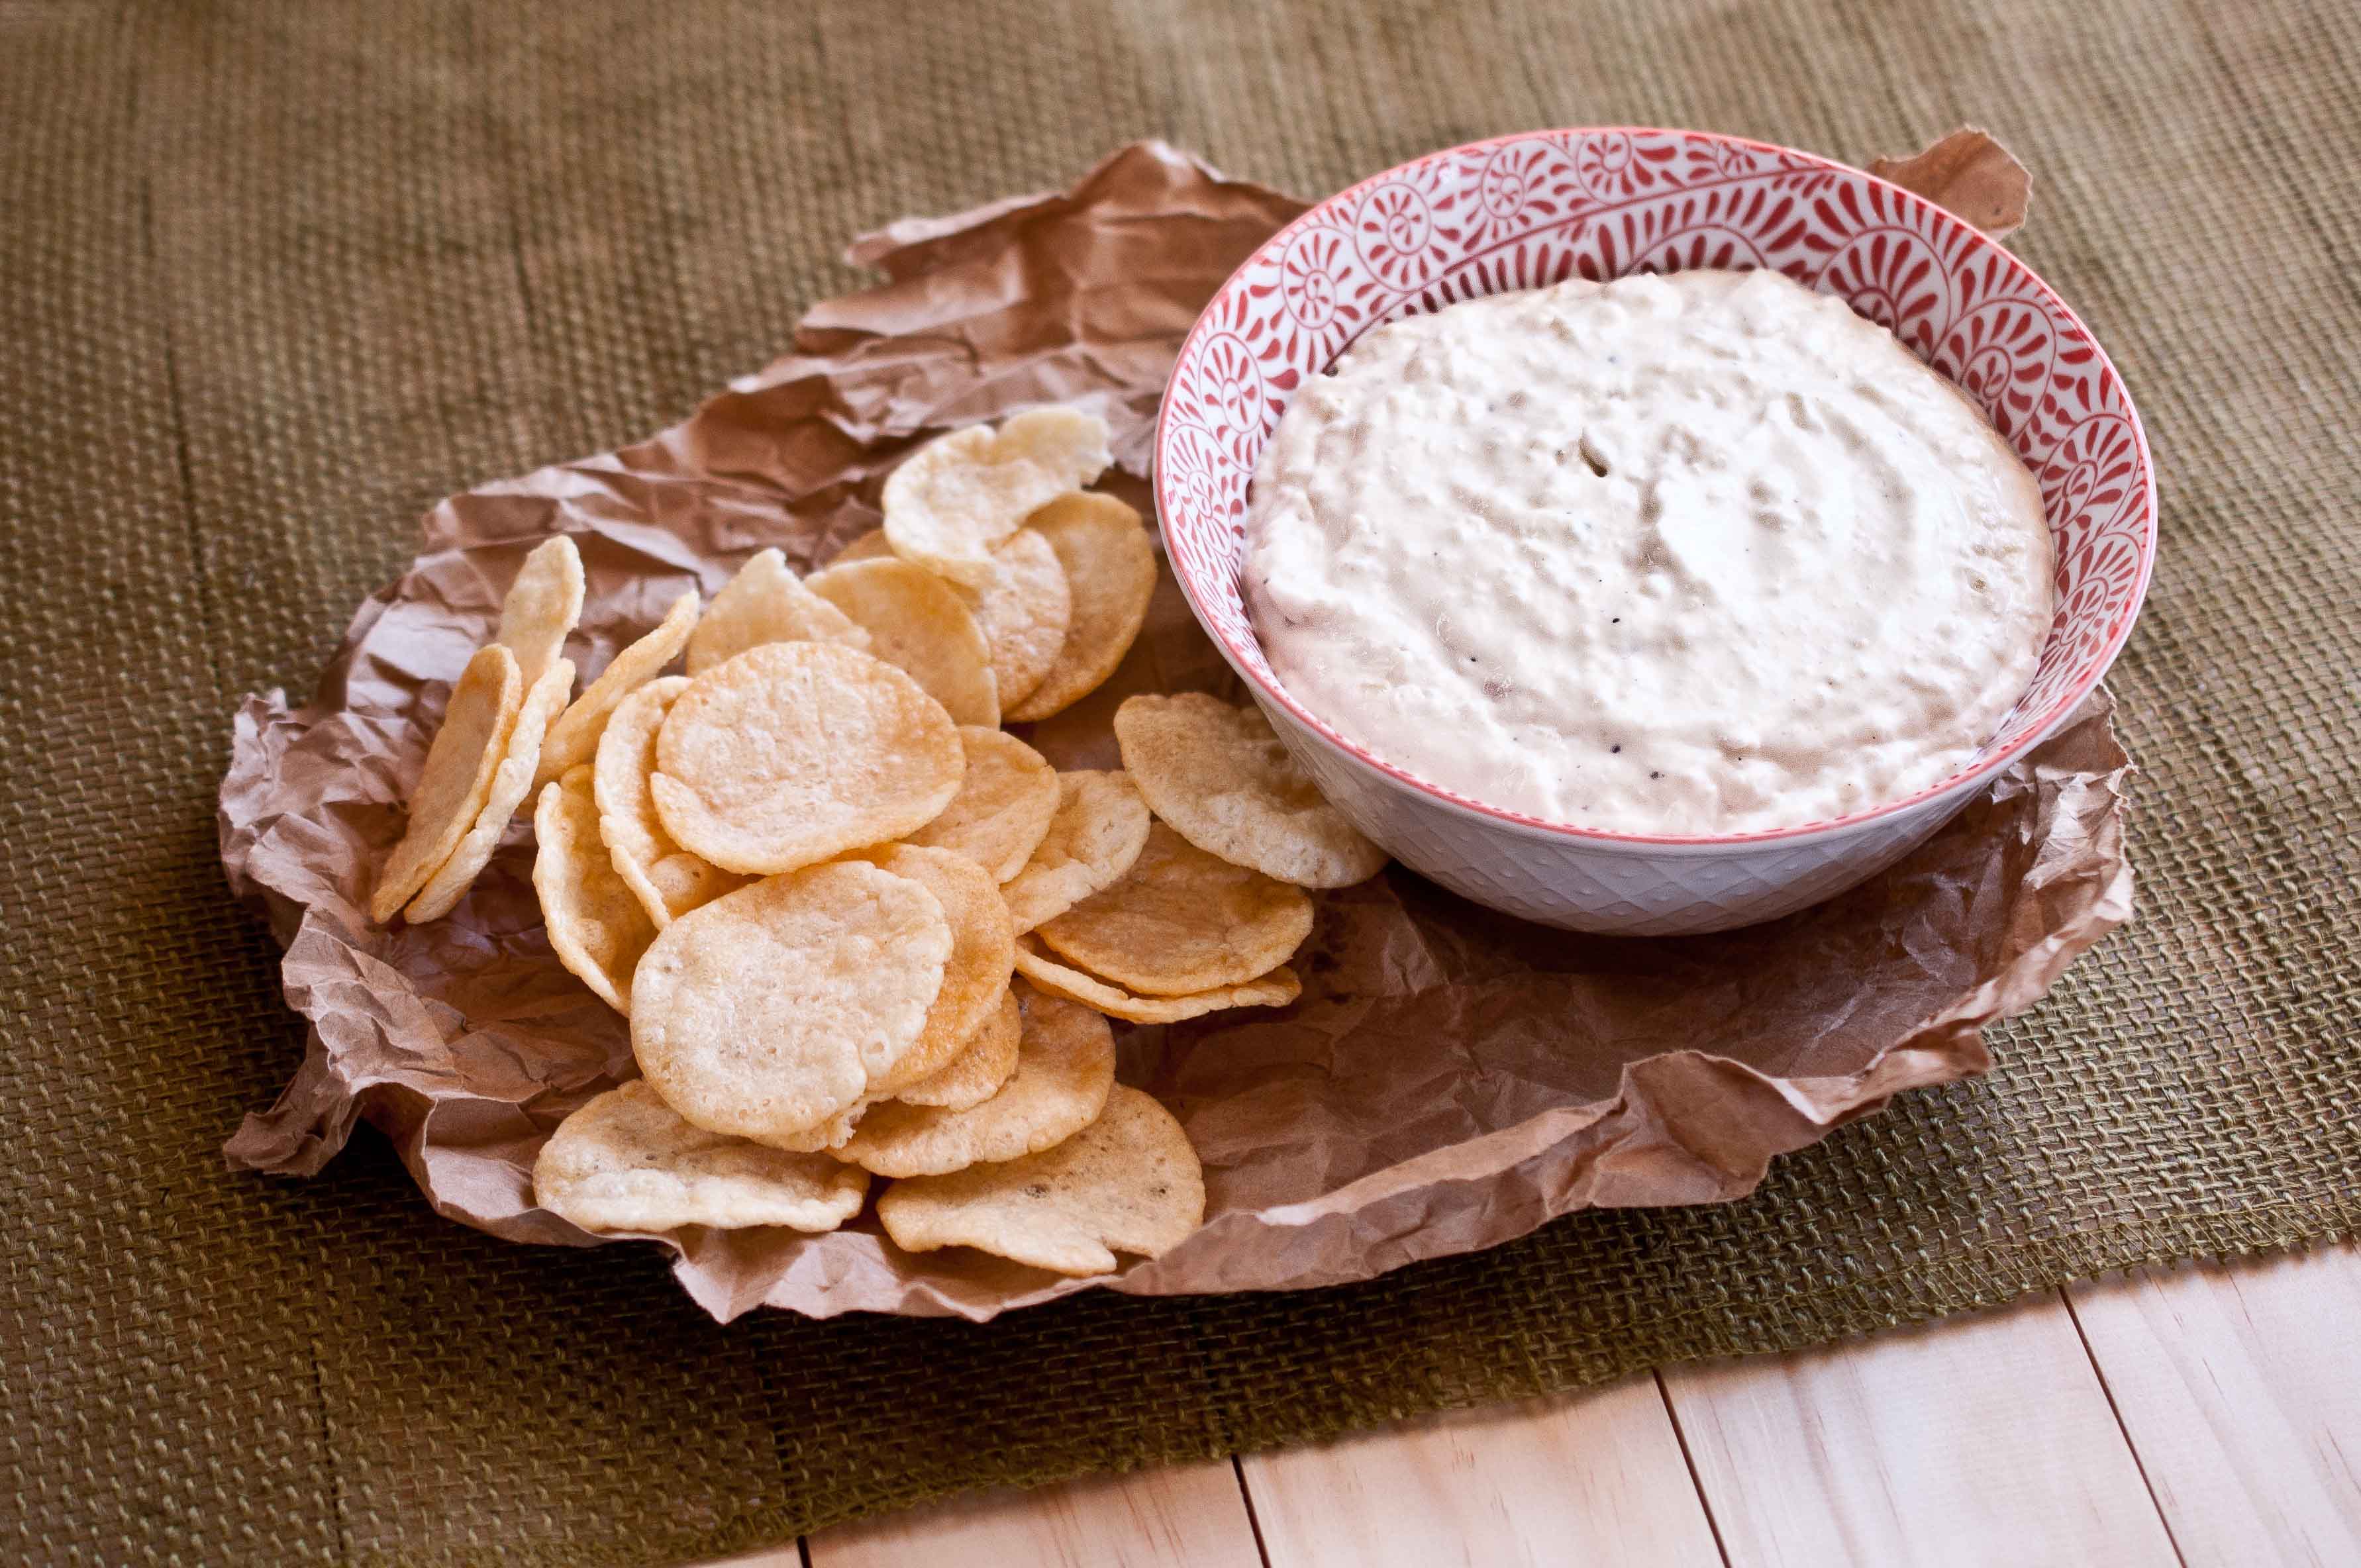
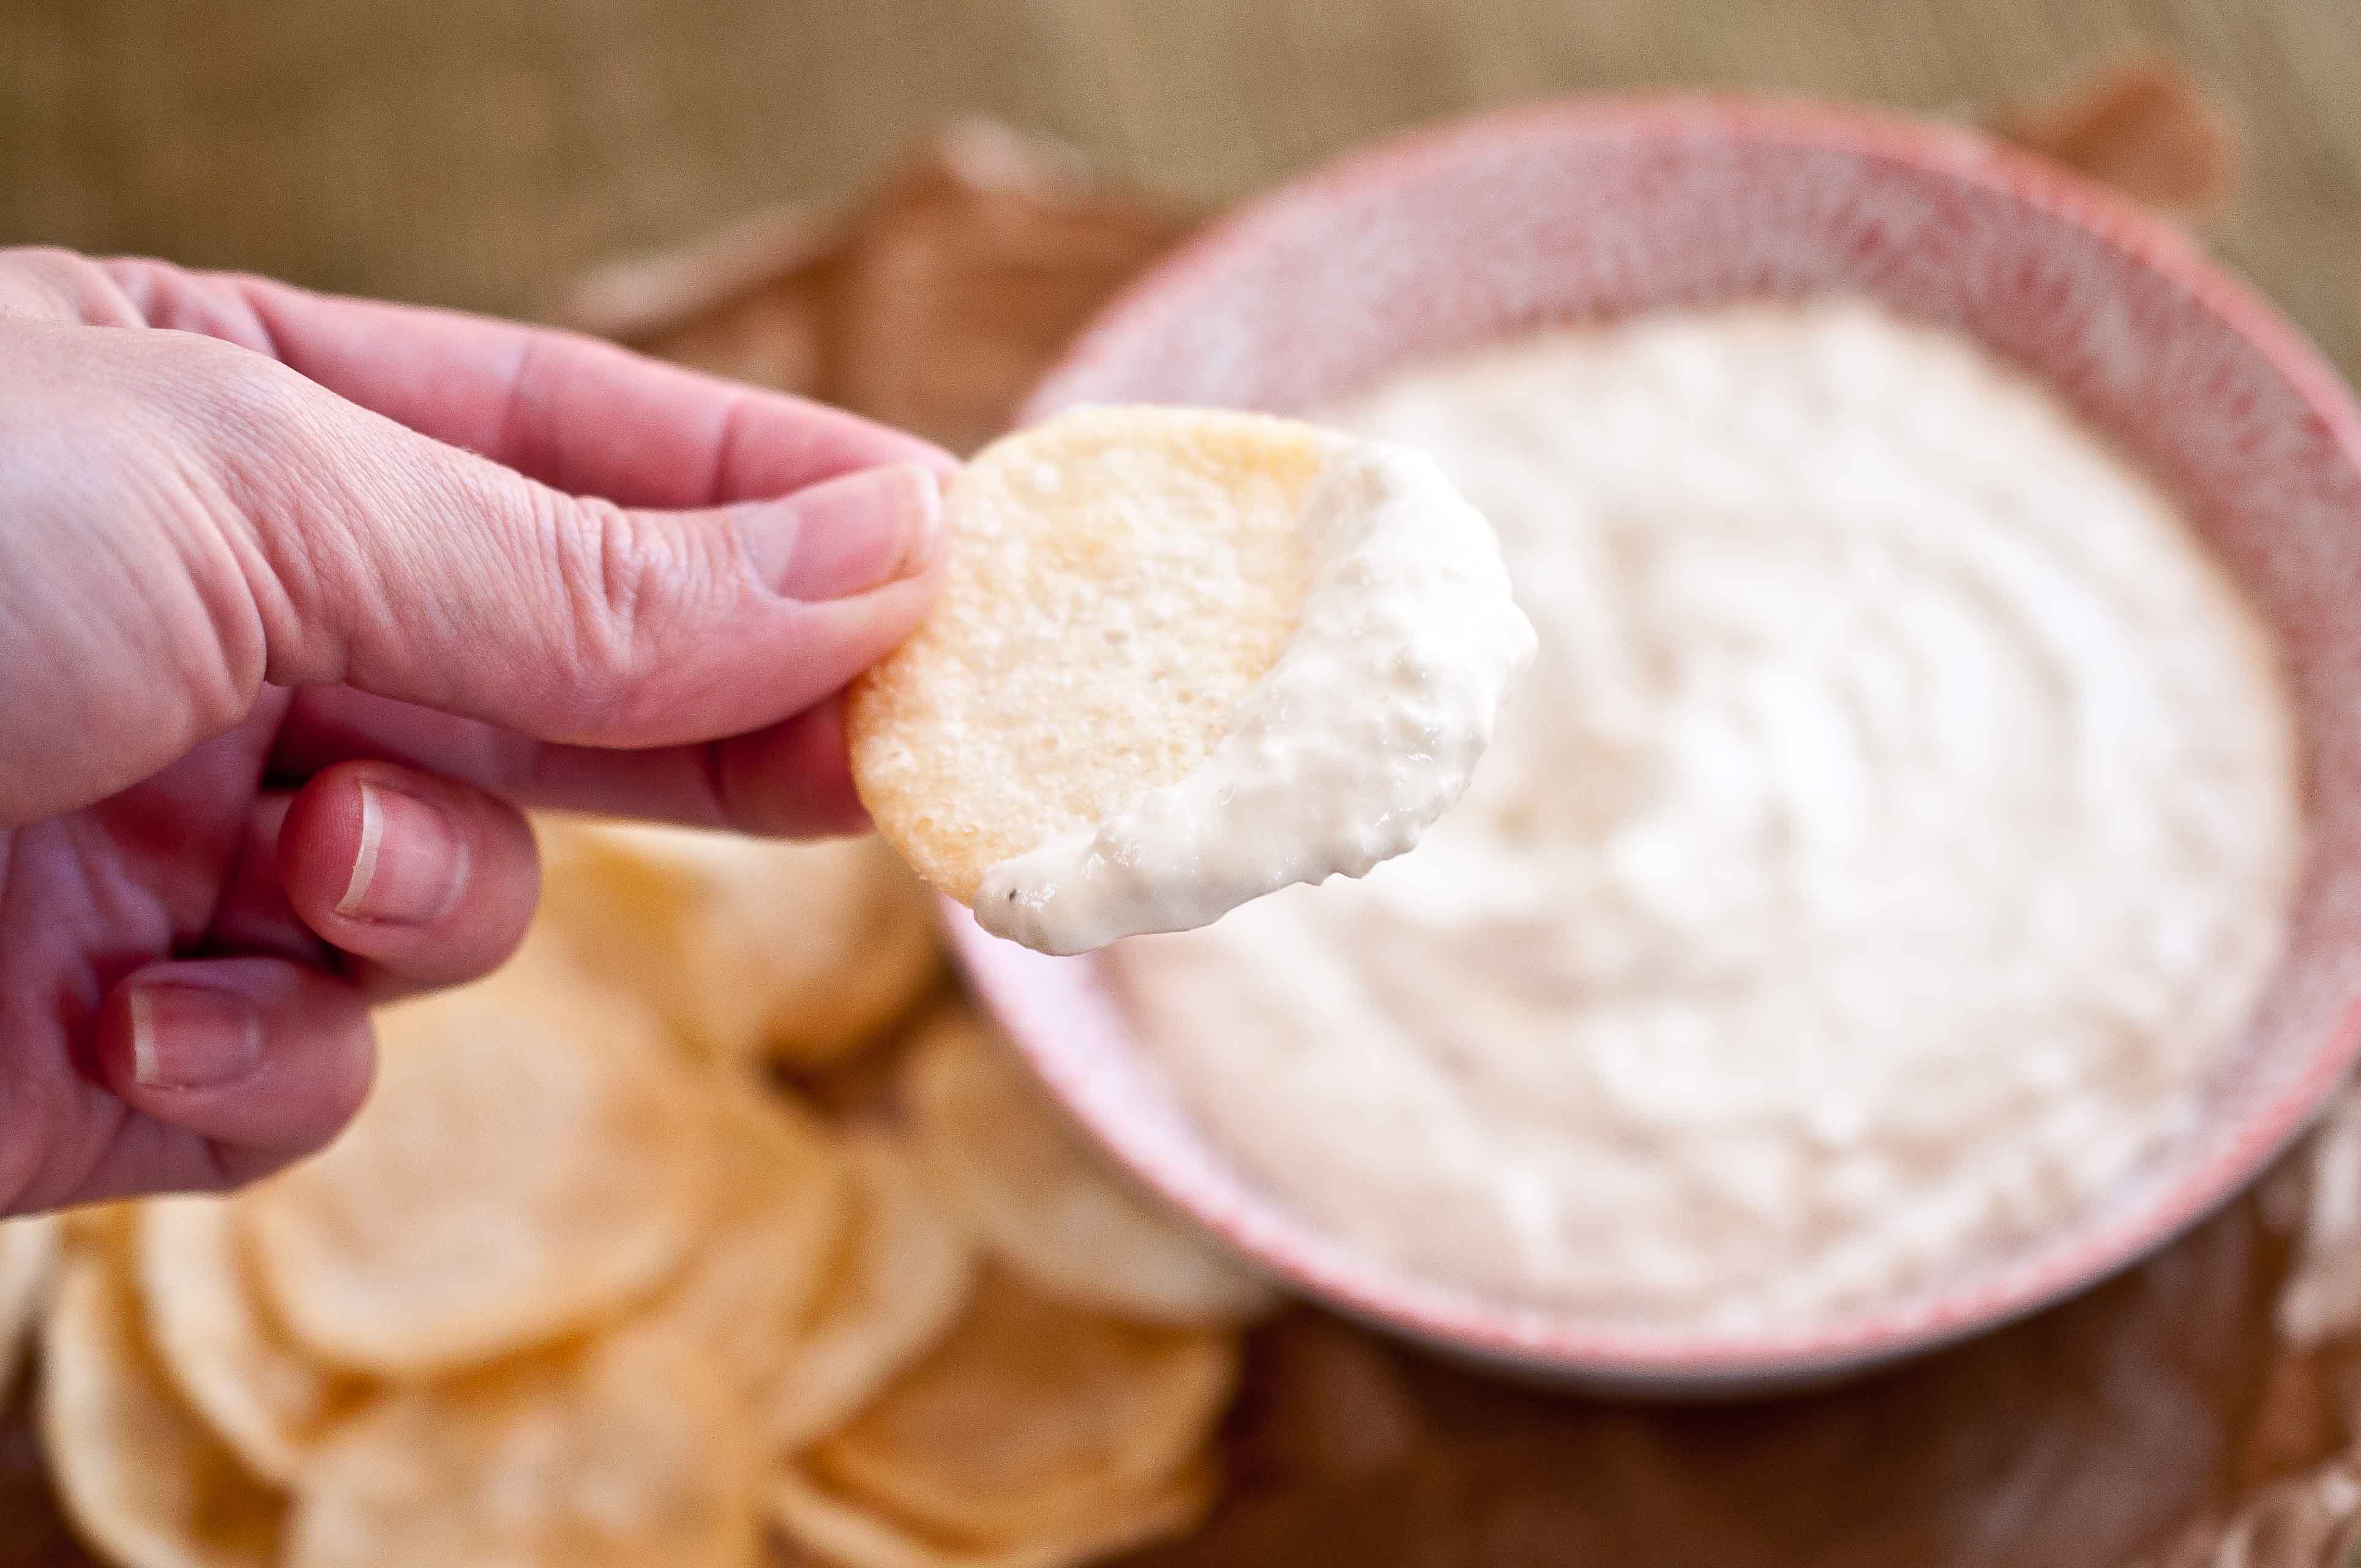
So addictive, creamy and delicious.
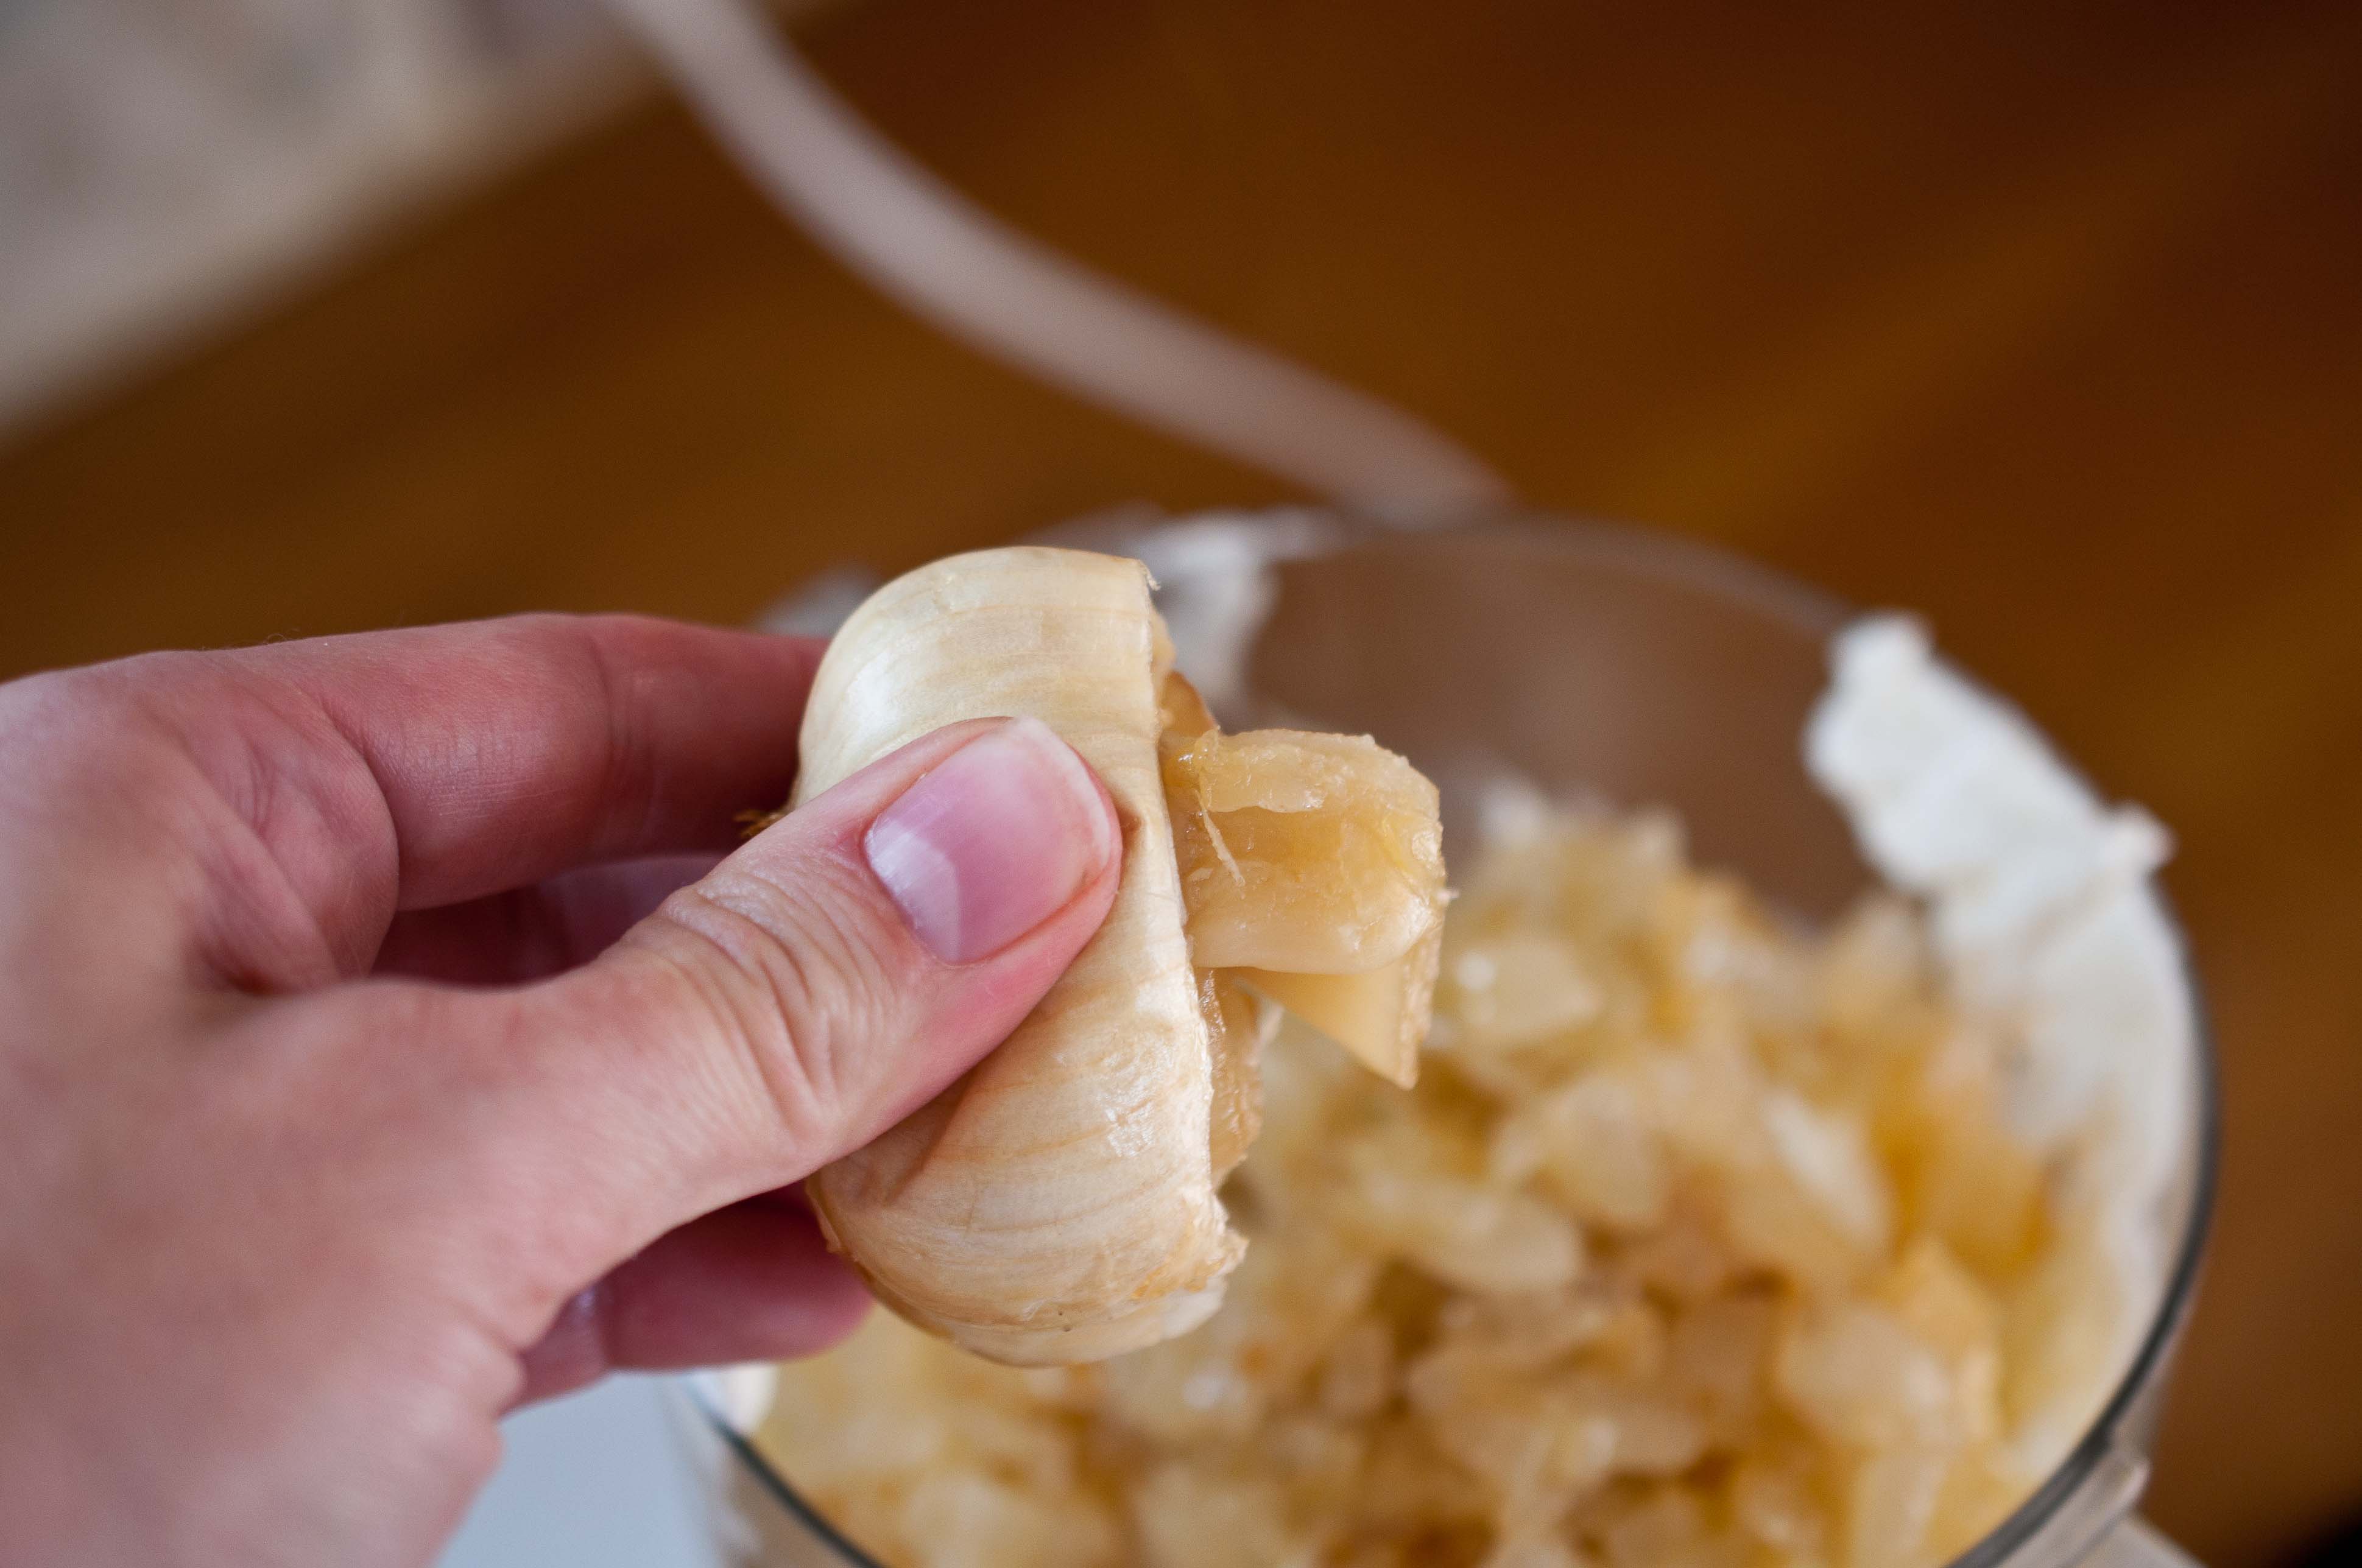
It’s a simple recipe with only a few ingredients. It isn’t hard to make but it does take time to develop the flavors, time that is well worth it. I’m moving myself and my family away from process’s foods as much as I can, a little at a time and this is my way of having that onion dip that everyone’s mom used to make with the instant soup mix packet, but with loads more flavor and no mysterious chemicals.
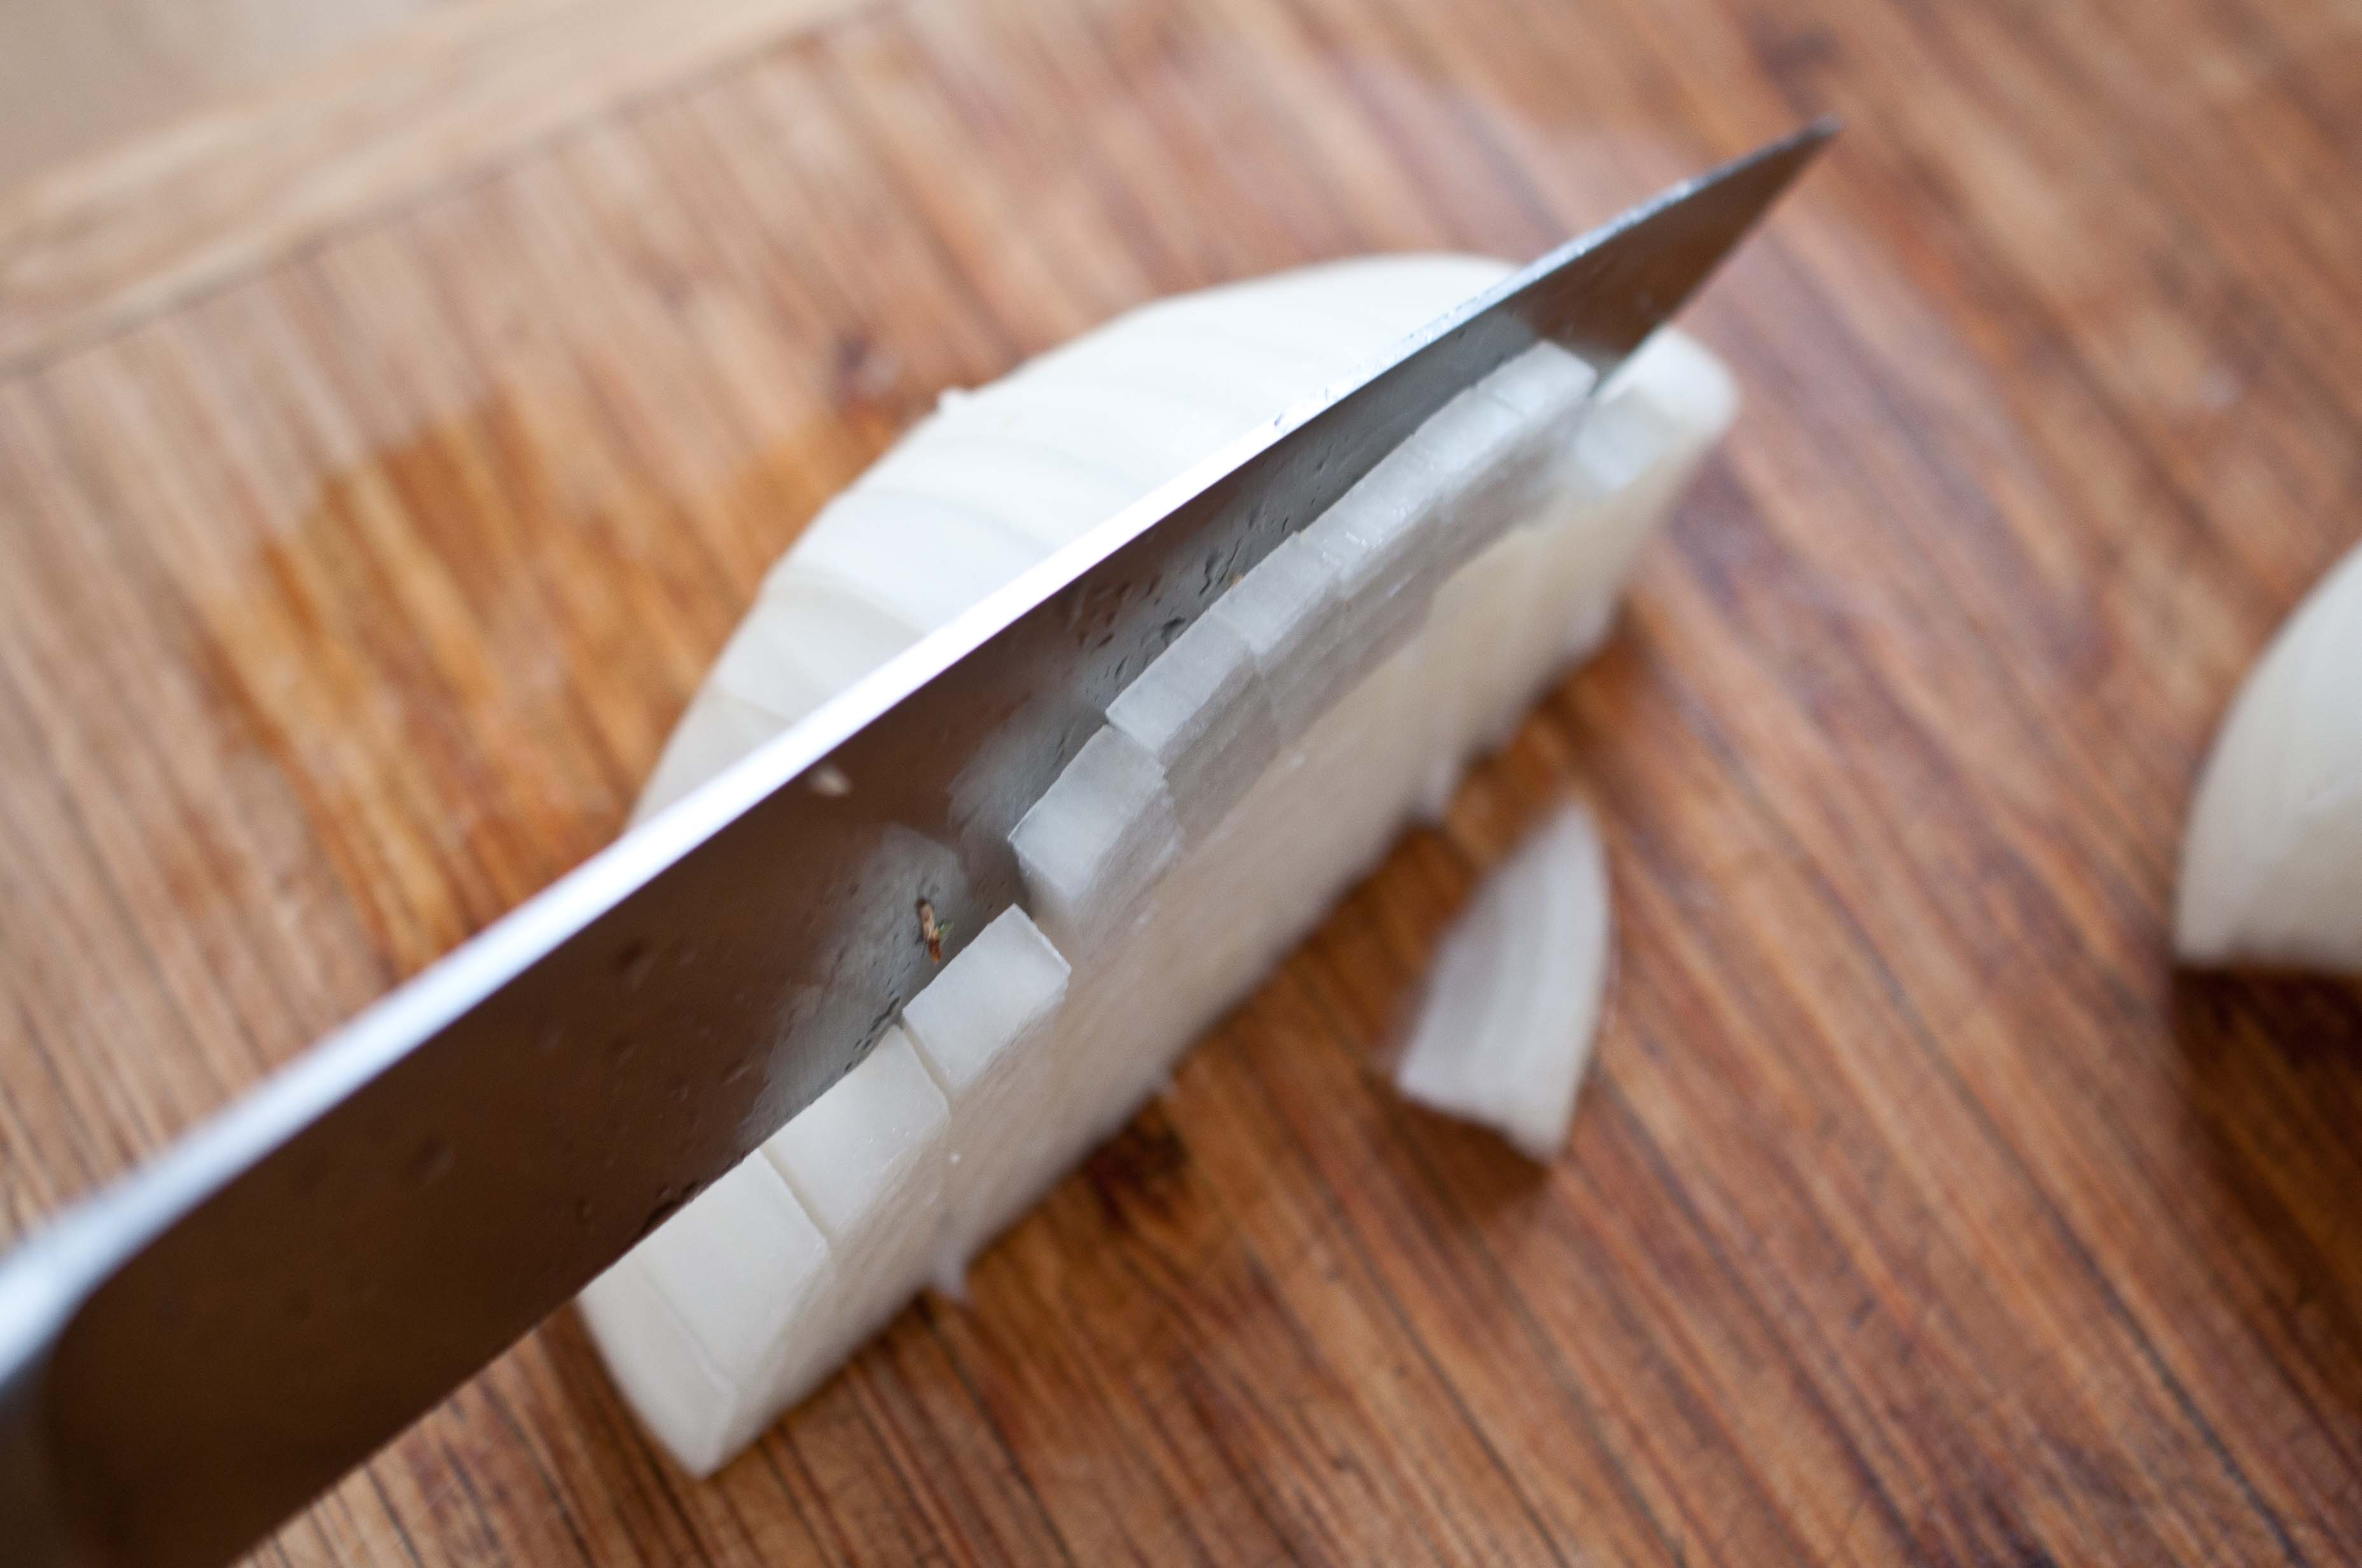
Also, I’m going to show you the right way to cut an onion.
And how to roast garlic.
Two skills that I hope stick with you for the rest of your life. My kitchen would be a much different place without onions and roasted garlic.
Roasted Garlic and Caramelized Onion Dip
1 whole white onion (I used a Walla Walla Sweet onion)
1/4 cup olive oil, plus 1 tbs, divided
1 large head of garlic
8 oz cream cheese (softened)
1/4 cup sour cream
salt and pepper to taste
How to cut an onion:
Cut the onion in quarters.
With the tip of the knife close to the center, make vertical cuts all the across the onion, about 1/4 inch apart.
Then cut the onion in the other direction, cutting across the cuts you just made.
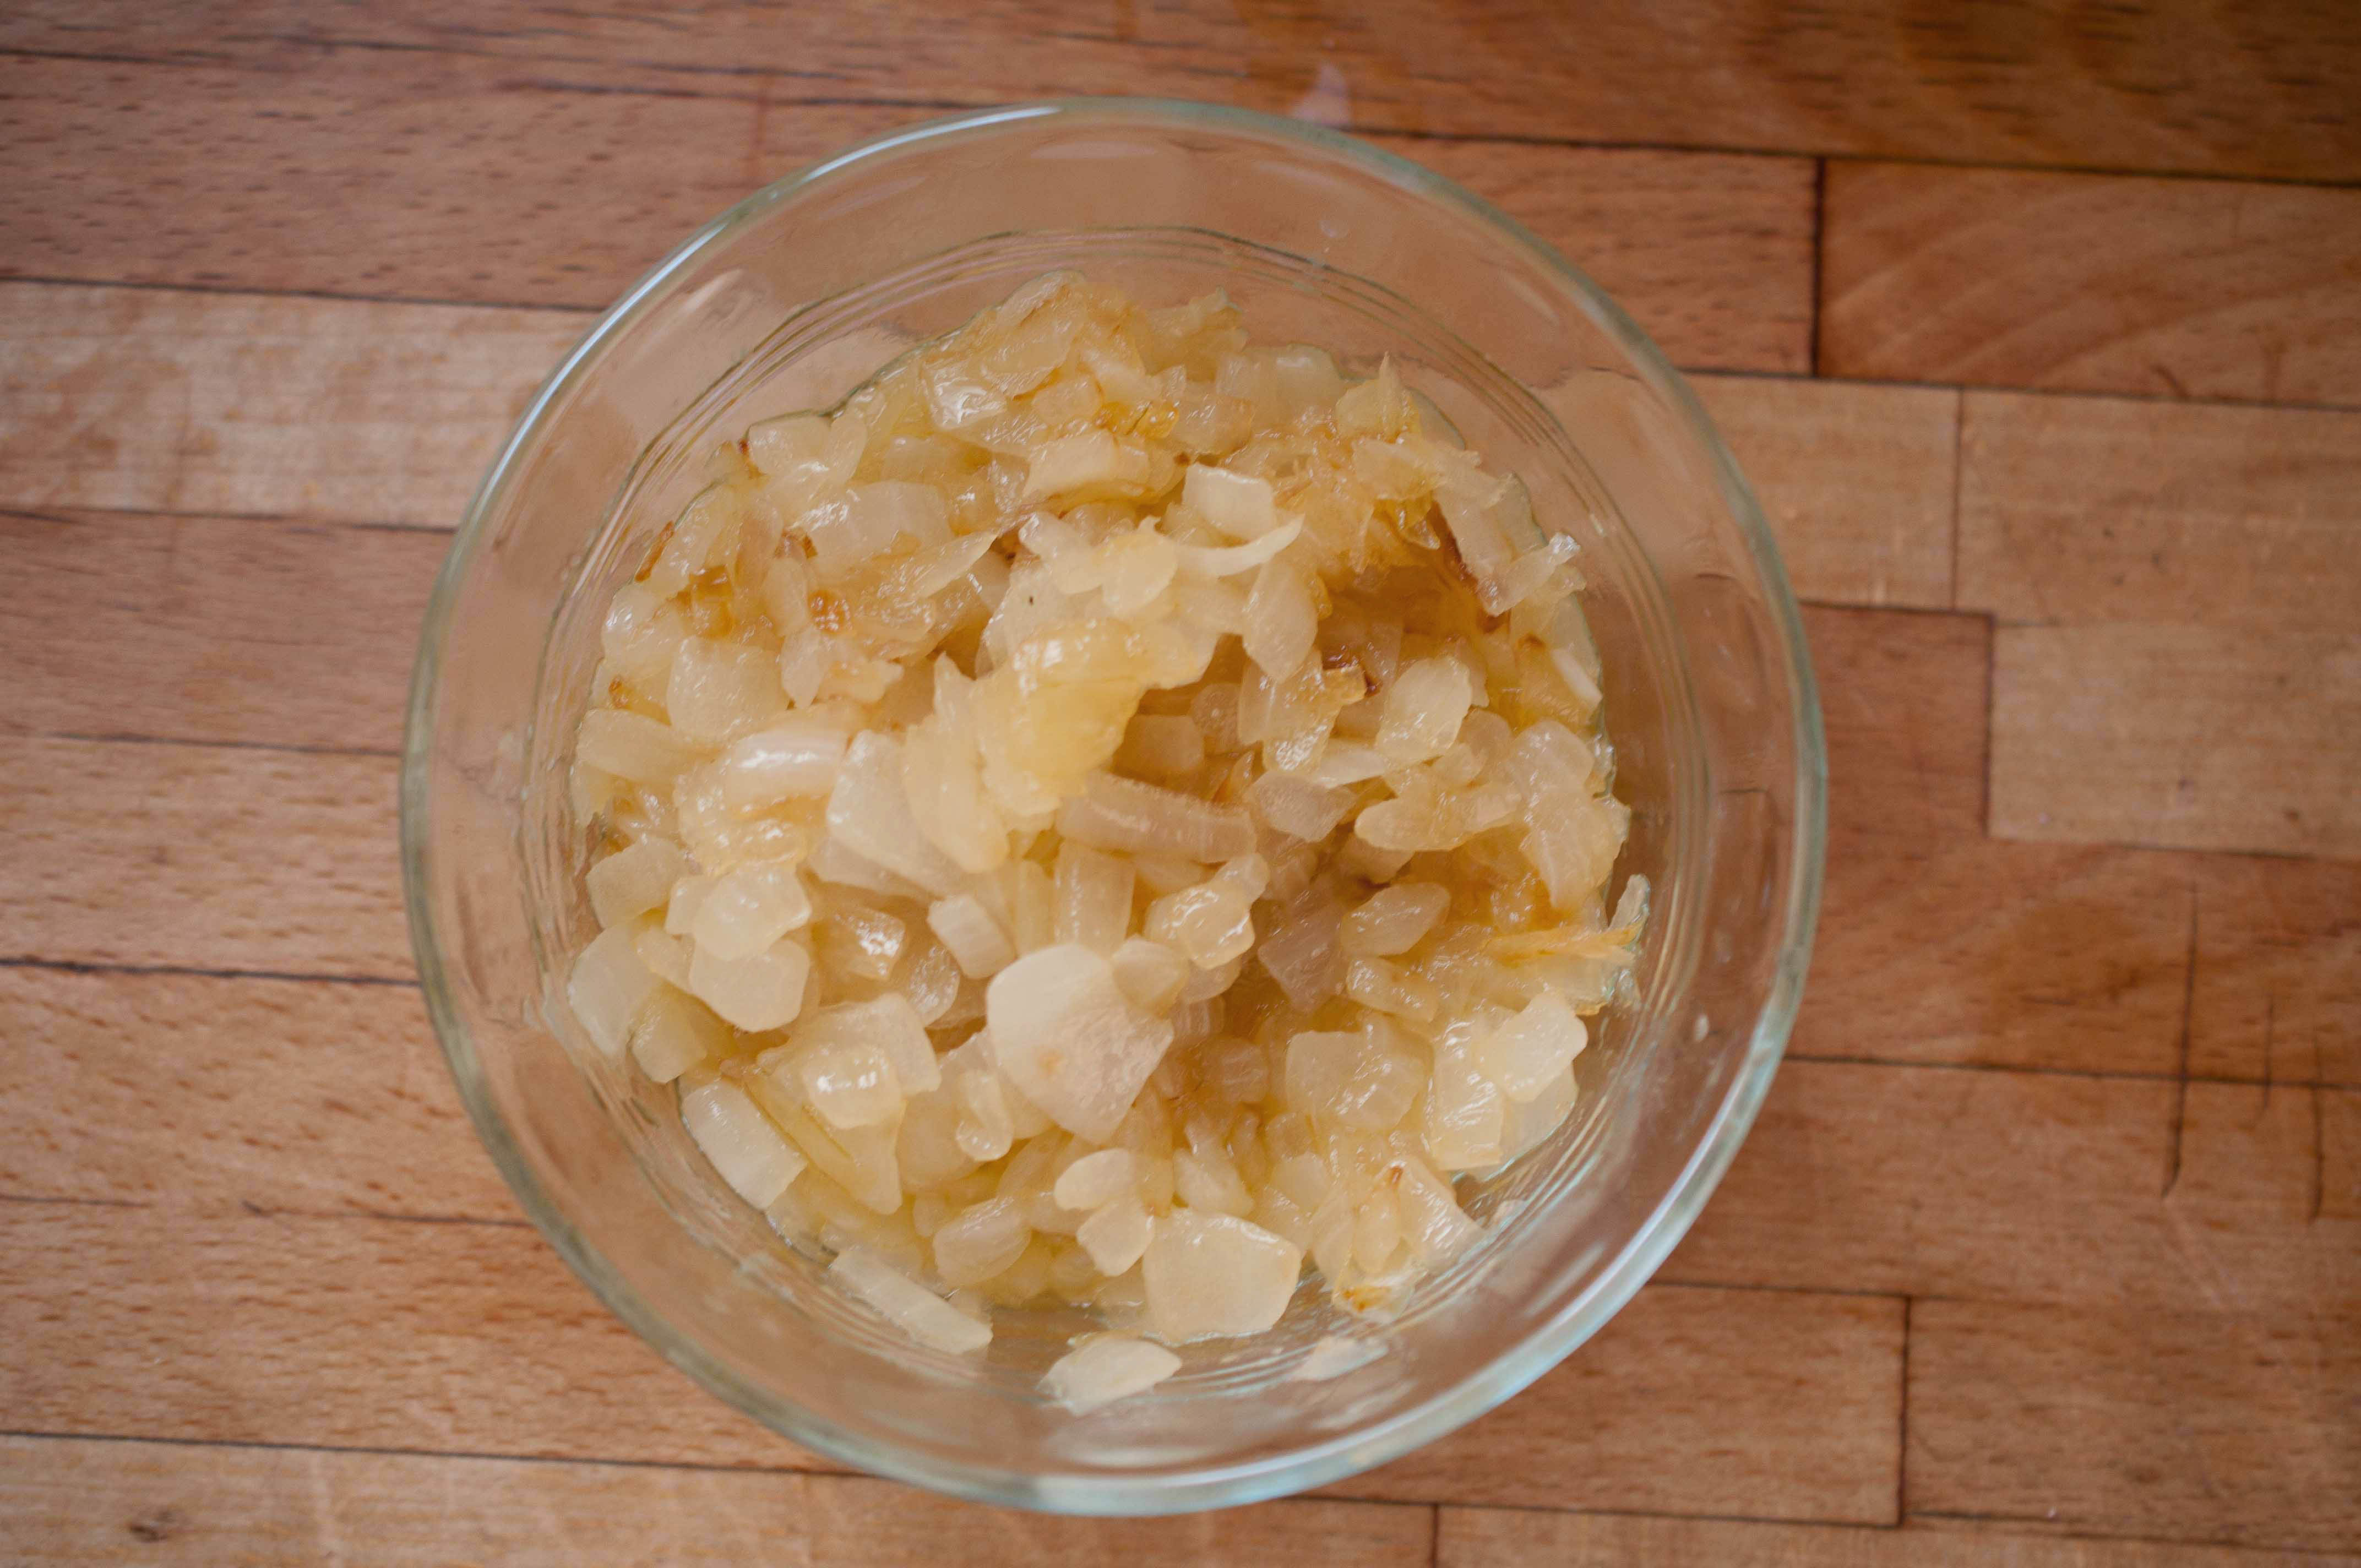
In a large pot or dutch oven, heat 1/4 cup olive oil. The key to caramelizing onions, and not BROWNING them, is: low and slow. Heat the olive oil over medium heat until shimmery, then reduce the heat to low and add the onions and a pinch of salt. Stir occasionally until the onions are soft and have turned an amber color. You want them to have that amber color or the sugars in the onion haven’t been caramelized yet and the flavors are not developed. This will take between 30 and 40 minutes, but you only have to stir occasionally so it isn’t a lot of work.
How to roast garlic:
This is very easy and gives you the most incredible tasting stuff. If you haven’t roasted a head of garlic yet, you should.
Preheat the oven to 400.
Cut the top off of the head of garlic.
Place on a sheet of aluminum foil and drizzle with 1 tbs olive oil.
Fold the foil up over the garlic into a tight packet. Place in a baking dish (I use a muffin tin) and place in the oven.
Bake at 400 for 30 minutes, or until garlic is soft and starting to turn an amber color.
Once you have brought out those incredible flavors in your garlic and your onions, break out the food processor.
Add the softened cream cheese, sour cream, onions and squeeze the garlic head until the soft cloves pop out and add them to the food processor as well.
Process until smooth and creamy. Add salt and pepper to taste.
So simple, so good.
Next time, I’m gonna try it with bacon and Parmesan cheese. I’ll let you know how it goes.
I had a couple of crack dealers show up at my door the other day. Looking all smug in their green little uniforms, pretending to be nothing more than just innocent little children. But they knew what they were doing, trying to force me to buy their crack. Or Girl Scout cookies. Whatever. I don’t need this guy with his cartoon gun to help me choose my favorite cookie, that’s easy: Samoas.
And you need to get creative when you have 17 boxes of cookies because you remember what it was like to try and sell stuff as a kid, and people shut their door in your face or calculated the cost per ounce and then told you it wasn’t a "good buy" as if that was the point, then once you grow up, you are a total sucker for kids selling crack. I mean cookies.
I’ll tell you my brilliant selling strategy I used when I was a kid.
Picture this:
Late 1980’s, tiny, blond, innocent looking elementary school kid with huge blue eyes outside the grocery store. My target was hip looking men in their early 20’s.
Me: "Sir, will you help us raise money for Rick Dees?"
Him: "What happened to Rick Dees?"
Me: "He’s in the hospital, he fell off the Top 40."
Worked every time. They laughed and then bought cookies. Humor and crack cookies are a dangerous combination.
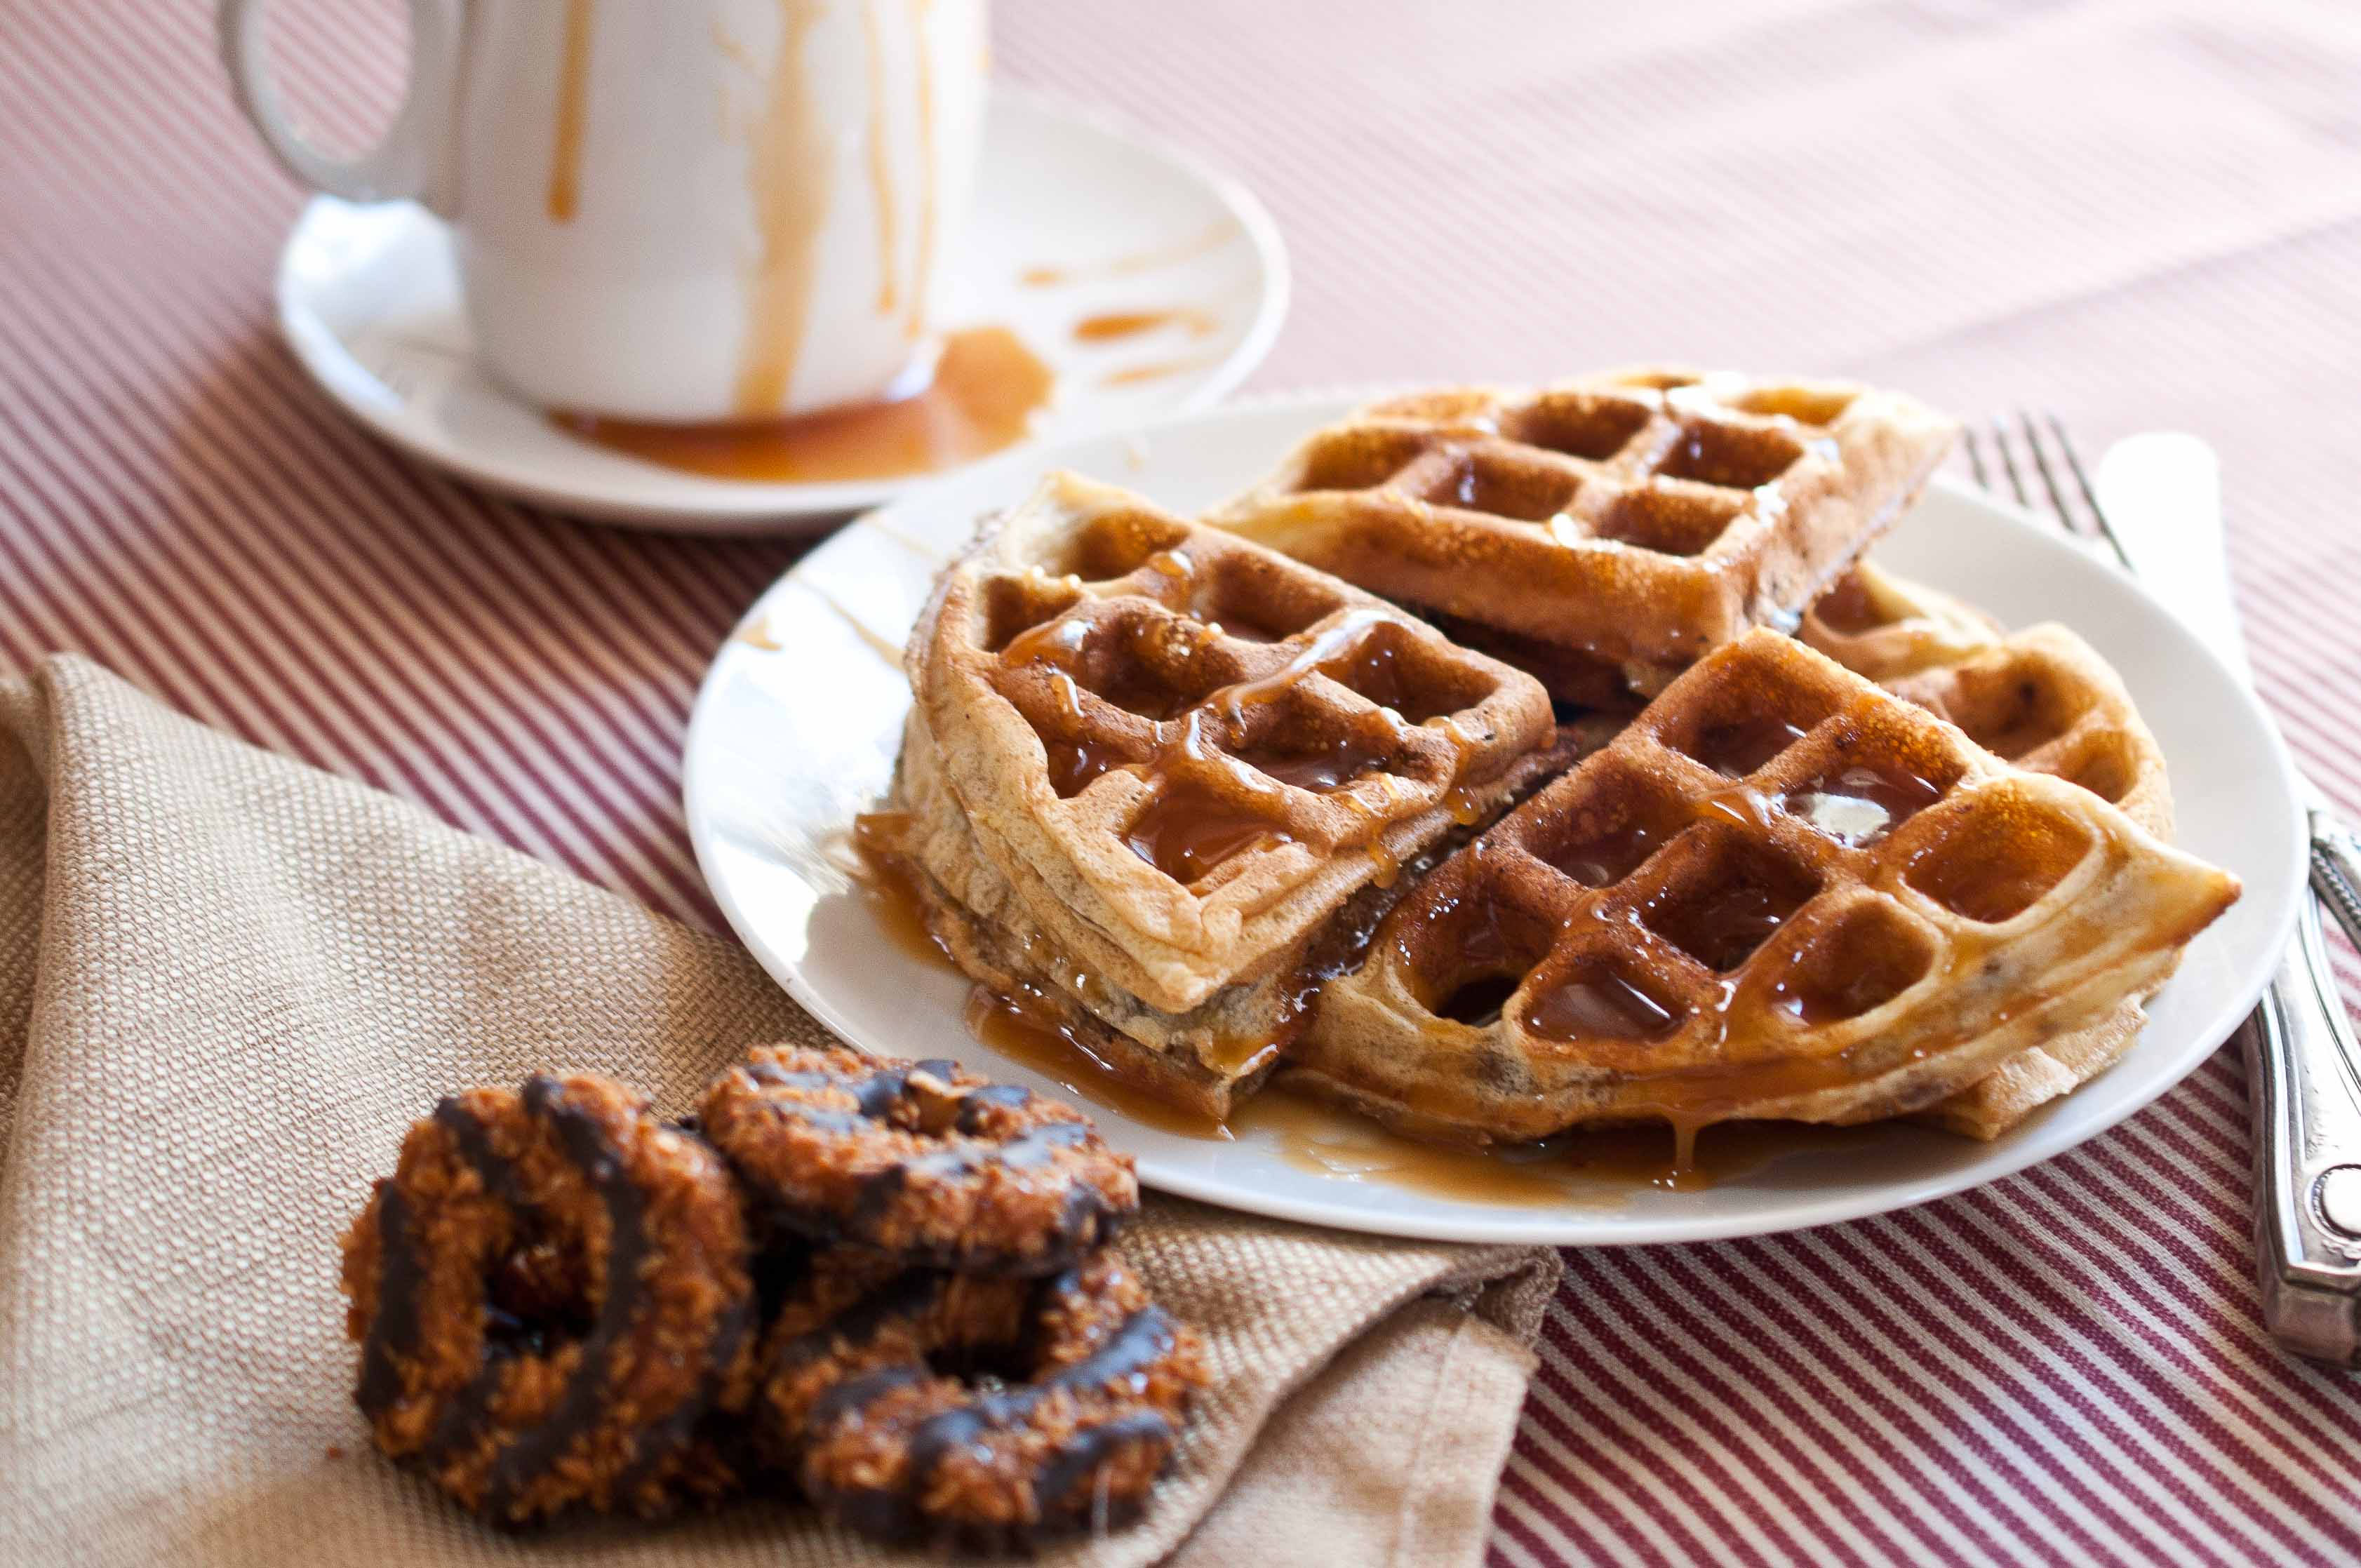
Another dangerous combo? Waffles and crack cookies.
Girl Scout Samoas Waffles With Coconut Caramel Sauce
The phrase, "If I had a gun to my head, and was forced to choose between [A. non-imporant thing] and [B. non-important thing]…" is hilarious.
Maybe it’s because I’m all hopped up on caffeine and DayQuil, but the thought of some masked man running around with a fire arm demanding that someone choose between Ryan Gosling and Ryan Reynolds fills me with the giggles.
The image I have is of a cartoon man, a hybrid of The Hamburgler and a bank robber from Ducktales running rampant through a mall, guns flying: "EDWARD OR JACOB!?!" It’s like a real life game of Would You Rather? with disastrous consequences.
+
So lets say that I someday meet this striped shirt, leather newsboy cap wearing, eye-masked character and he forces, yes, FORCES me to choose between chocolate and caramel…my choice would be caramel. * Sigh * I’m so sorry chocolate, but I had a GUN to my HEAD.
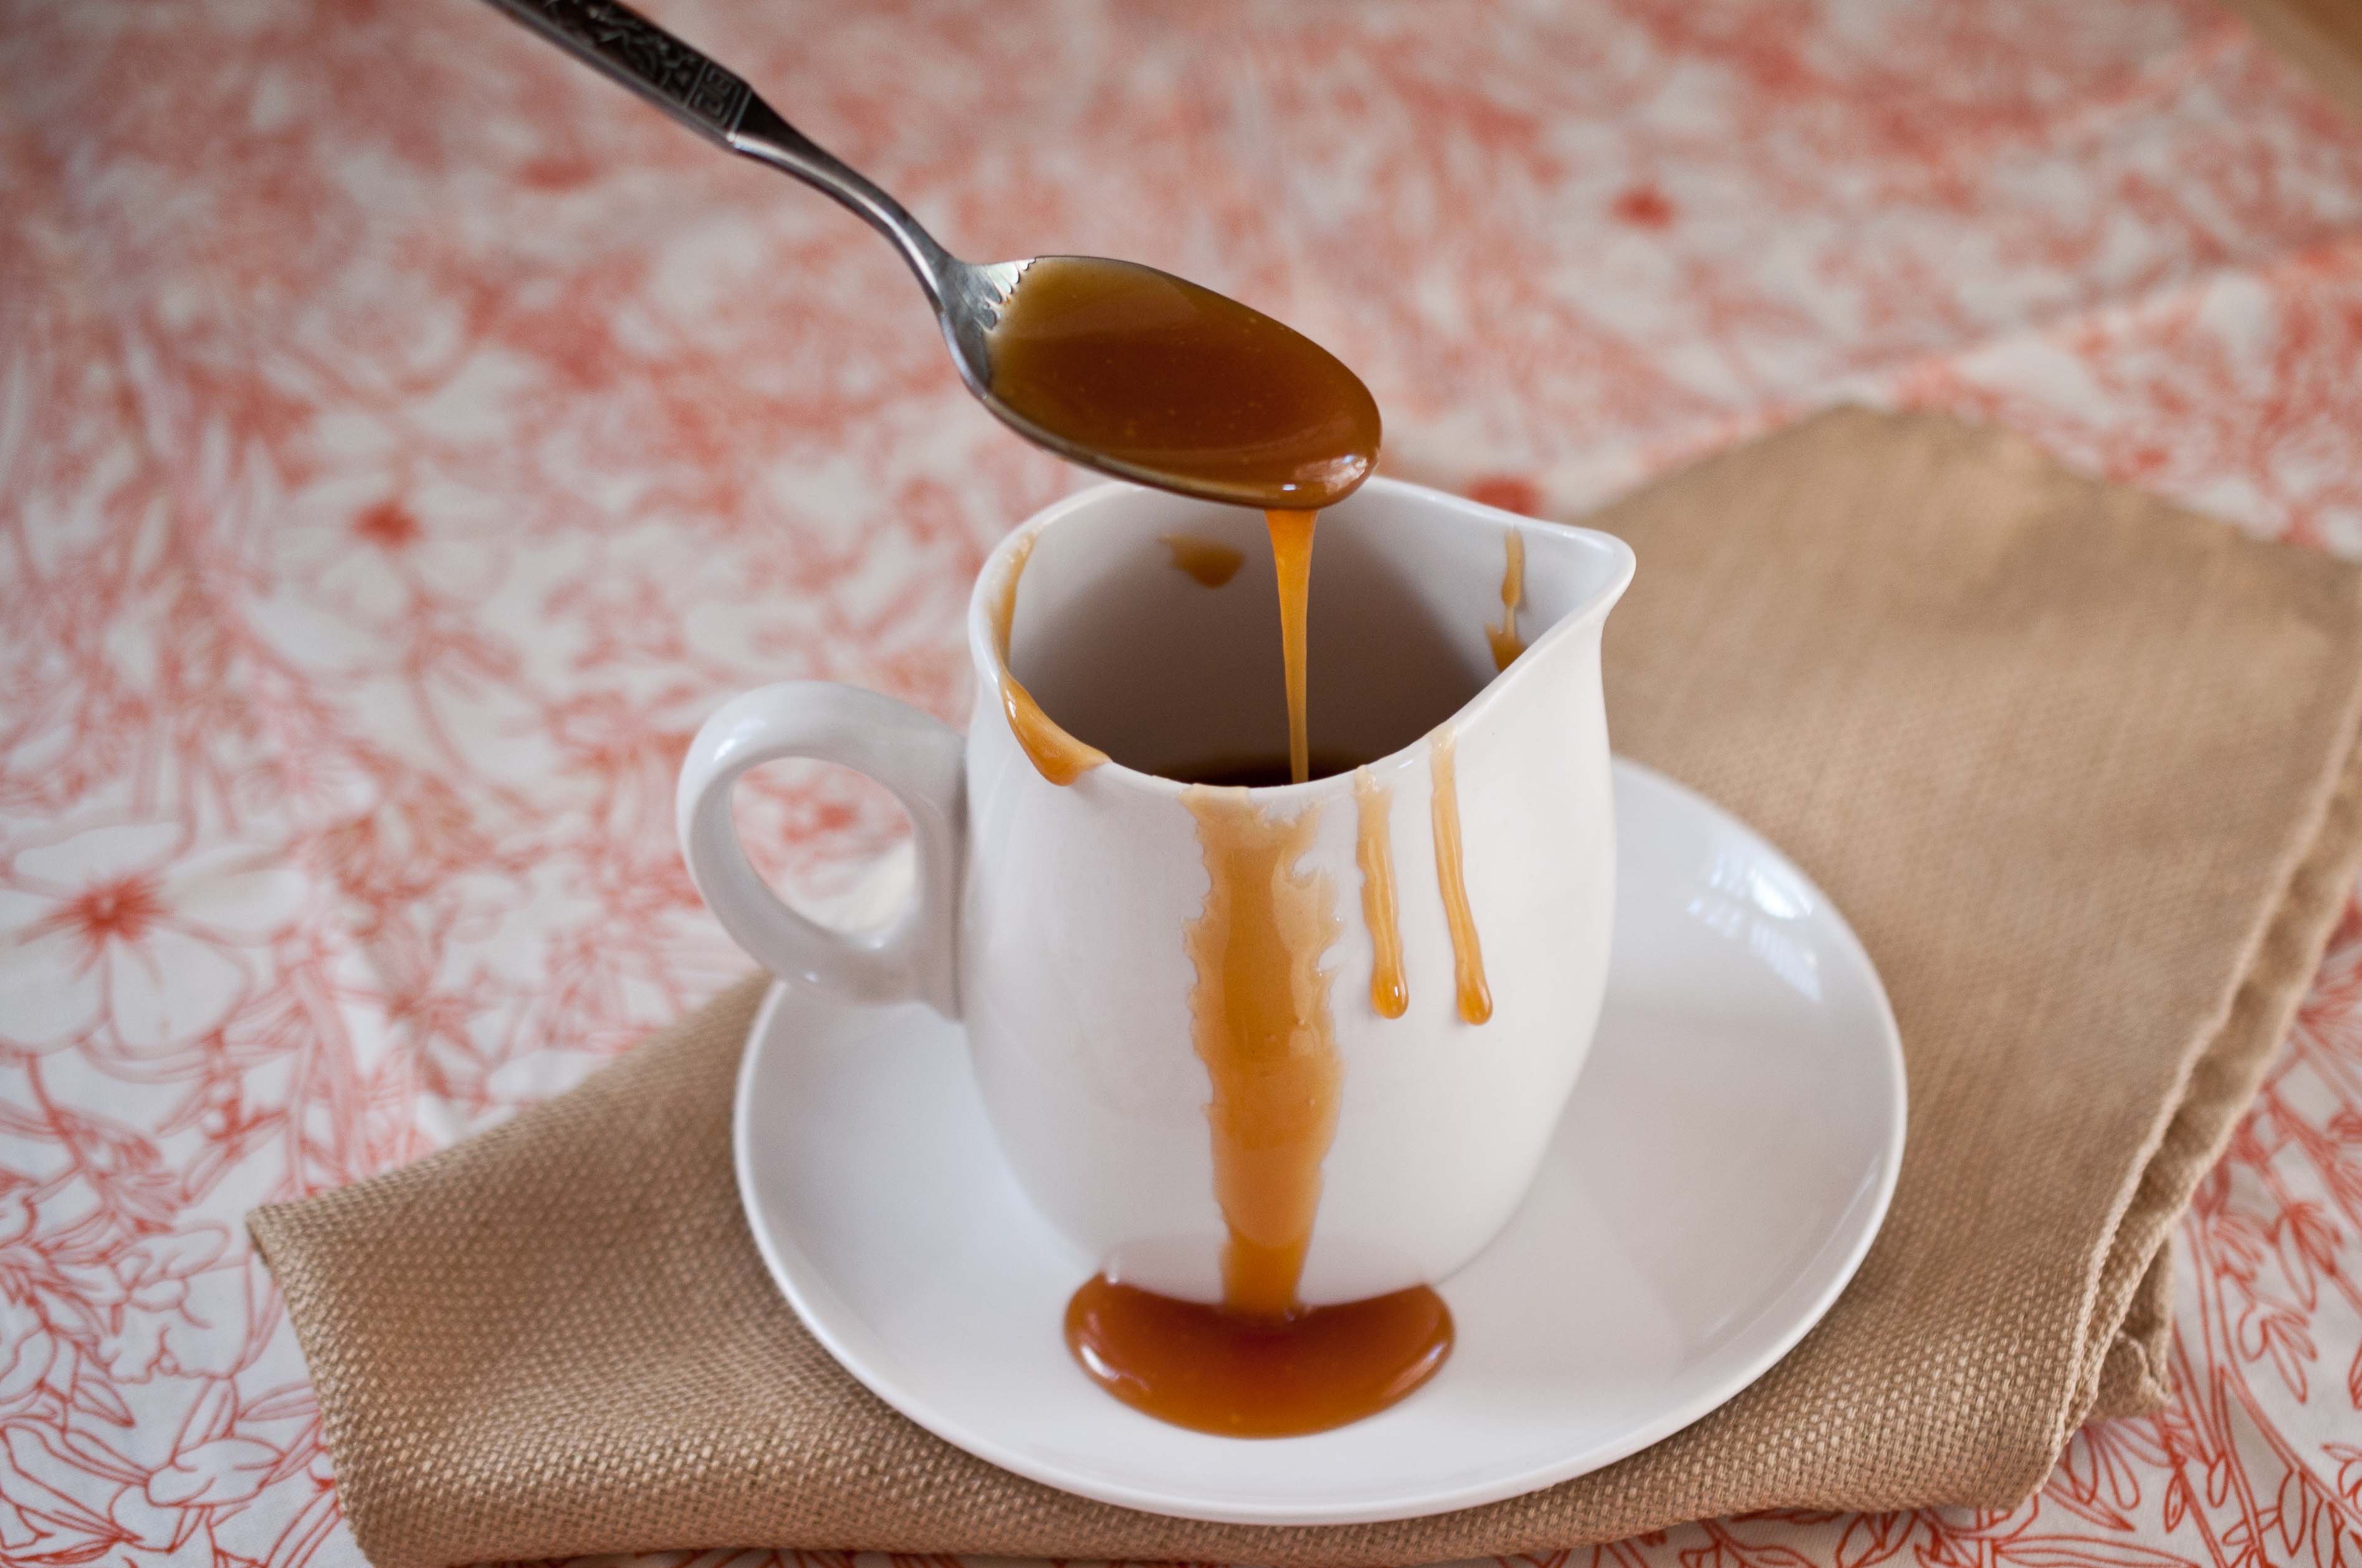
Coconut Caramel Sauce
1 cup sugar
1/4 cup light corn syrup
2 tbs butter
1/2 cup coconut milk
In a pot over high heat, melt the sugar and corn syrup. Stir until melted, then stop stirring, allowing to boil untouched. You will start to see the edges of the sauce turn a dark amber, while the center is still clear. Swirl the pan, without stirring, to redistribute the sugar so the edges don’t cook faster than the middle. Once the entire pot is an amber color and you can smell the caramel flavors, remove the pan from the heat (about 8-10 minutes). Stir in the butter, the sauce will bubble up furiously. Add the coconut milk and stir until well combined. Allow to cool to room temperature before serving. Store in the fridge in an air tight container.
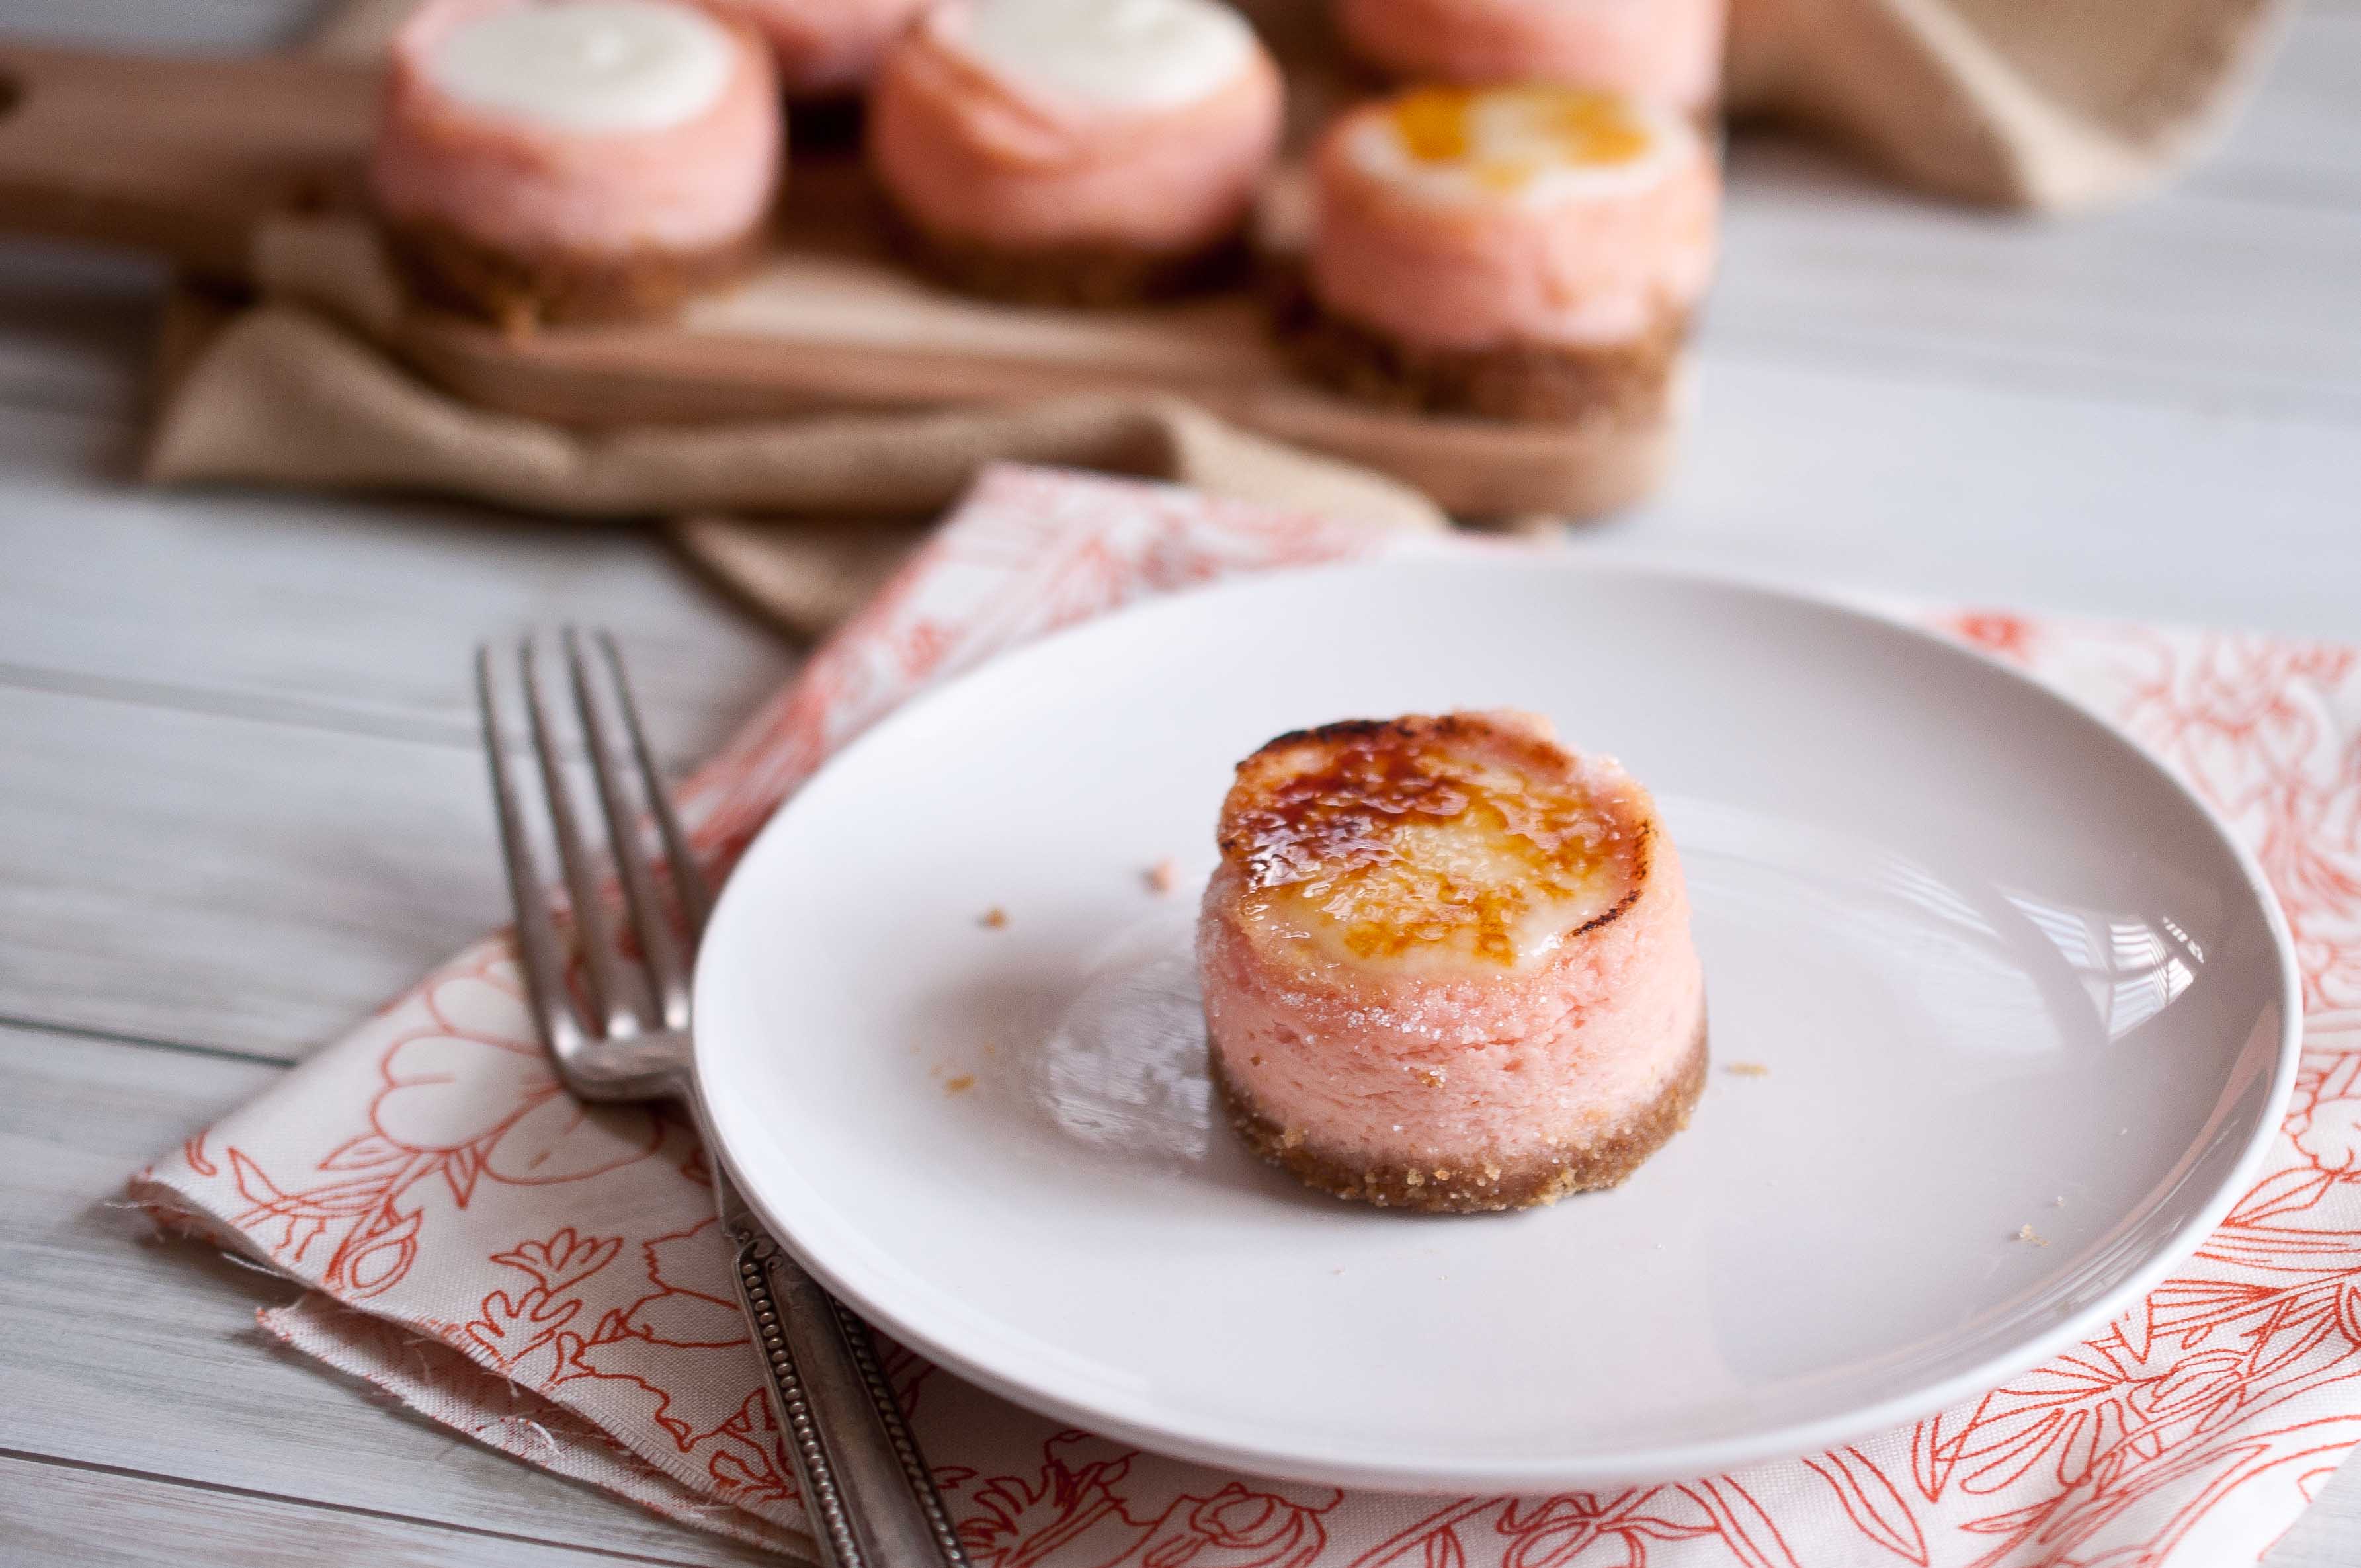
Reminding me that my previous reasons for not making cheesecake, namely my drive to avoid having an entire huge cheesecake in my fridge, is now void.
Small, adorable cheesecakes and the ability to "test" a recipe without having to deal with an entire HUGE cheesecake.
And I had an unsightly amount of homemade ricotta after deciding that I should not just make one batch, but I really needed to make two because it was so much better than anything I have ever bought in the grocery store.
All willpower was lost once I remembered the blood oranges I had.
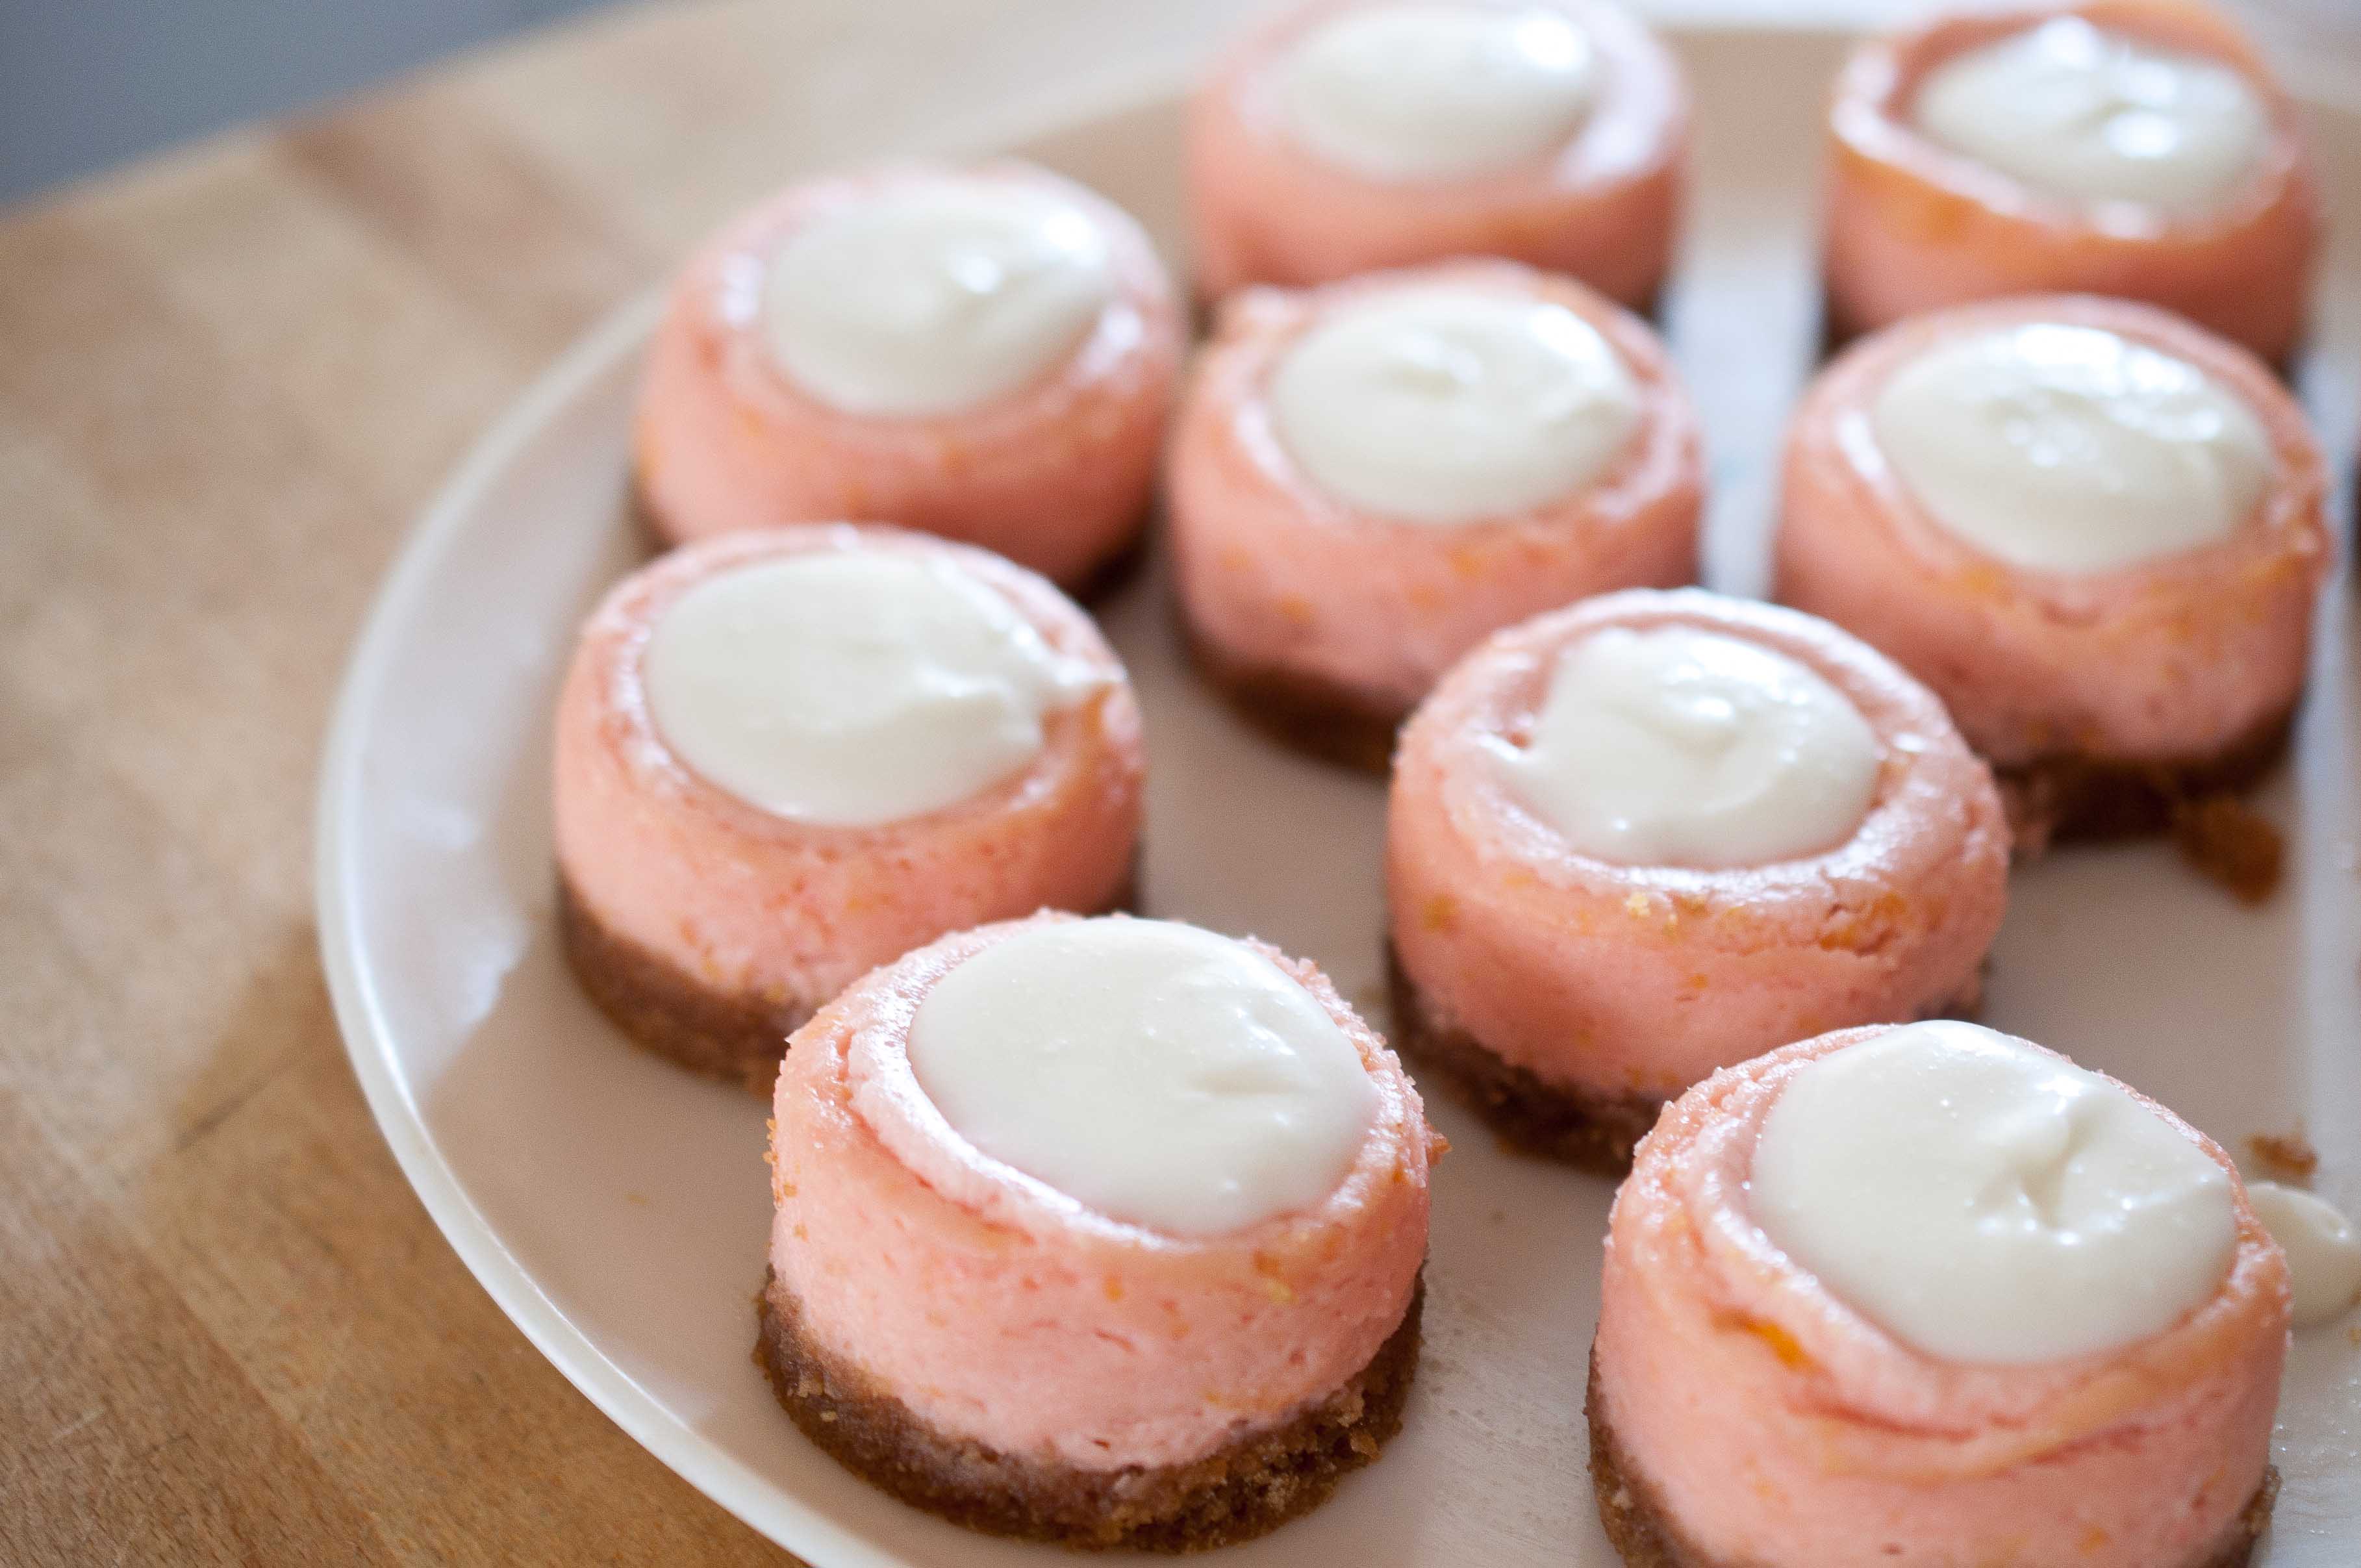
And then I began to wonder how that delicious sour cream topping, that you are sometimes lucky enough to find on top of a cheesecake, would taste if you made it with ricotta.
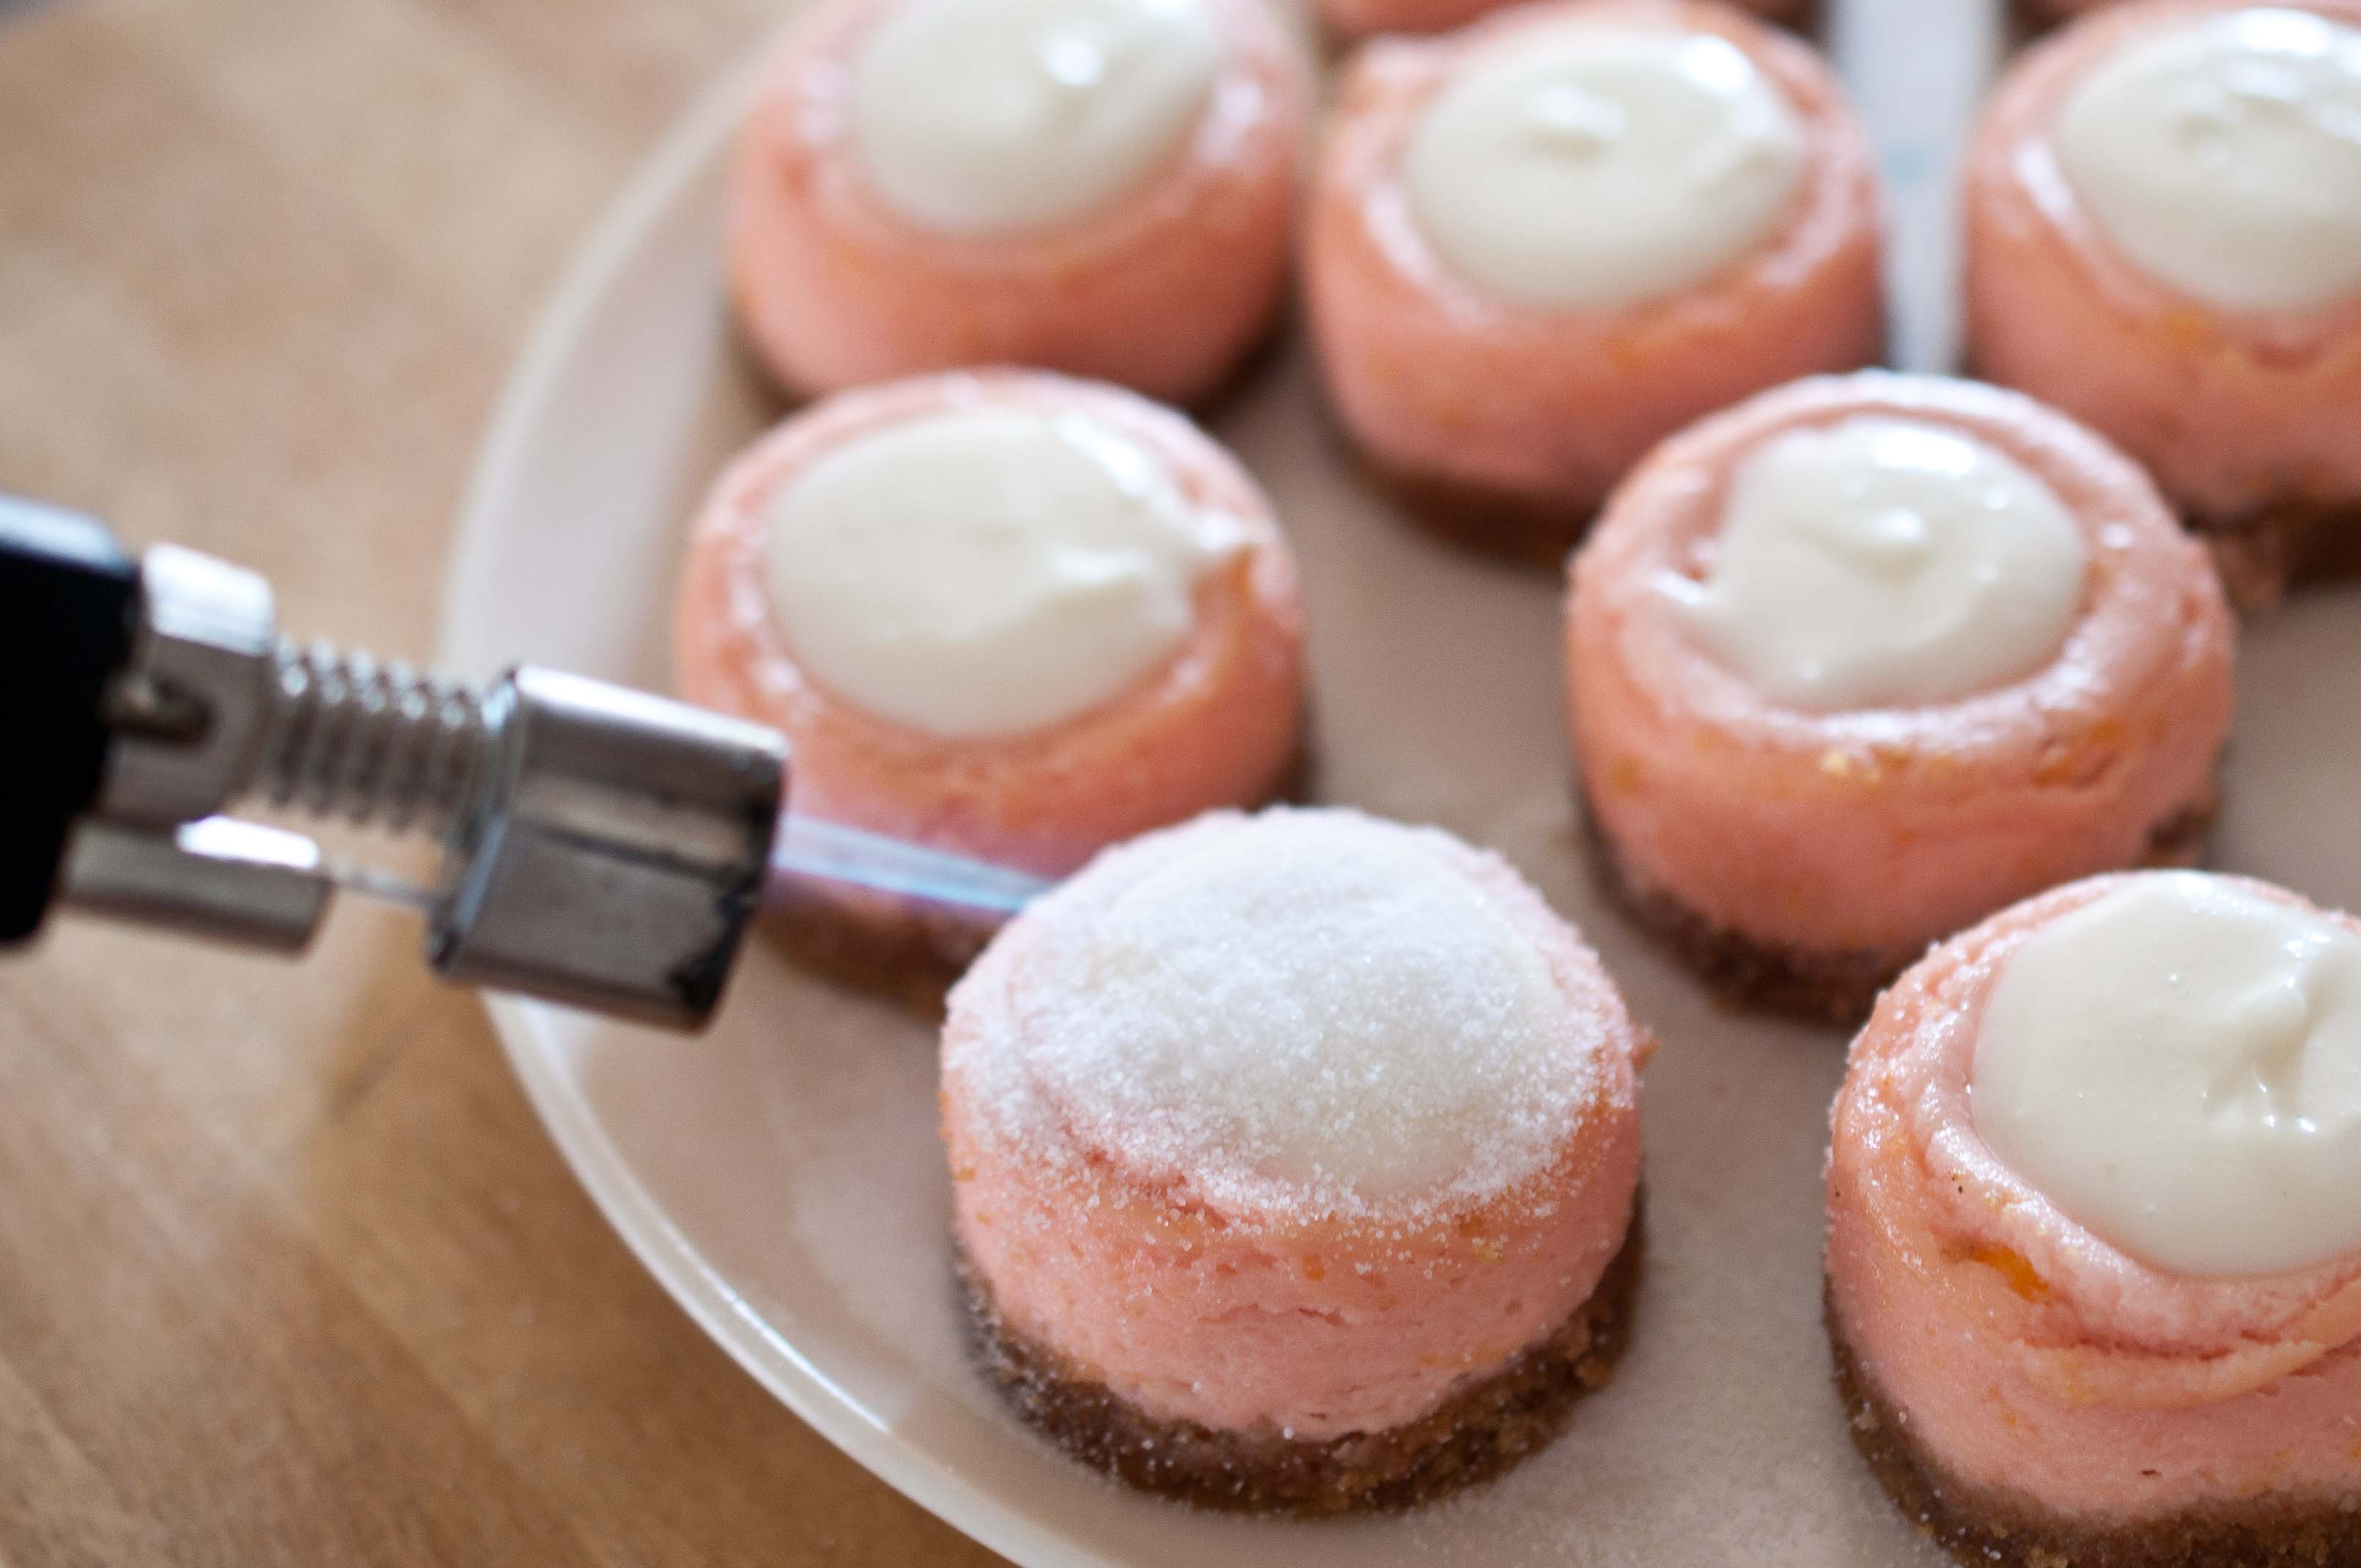
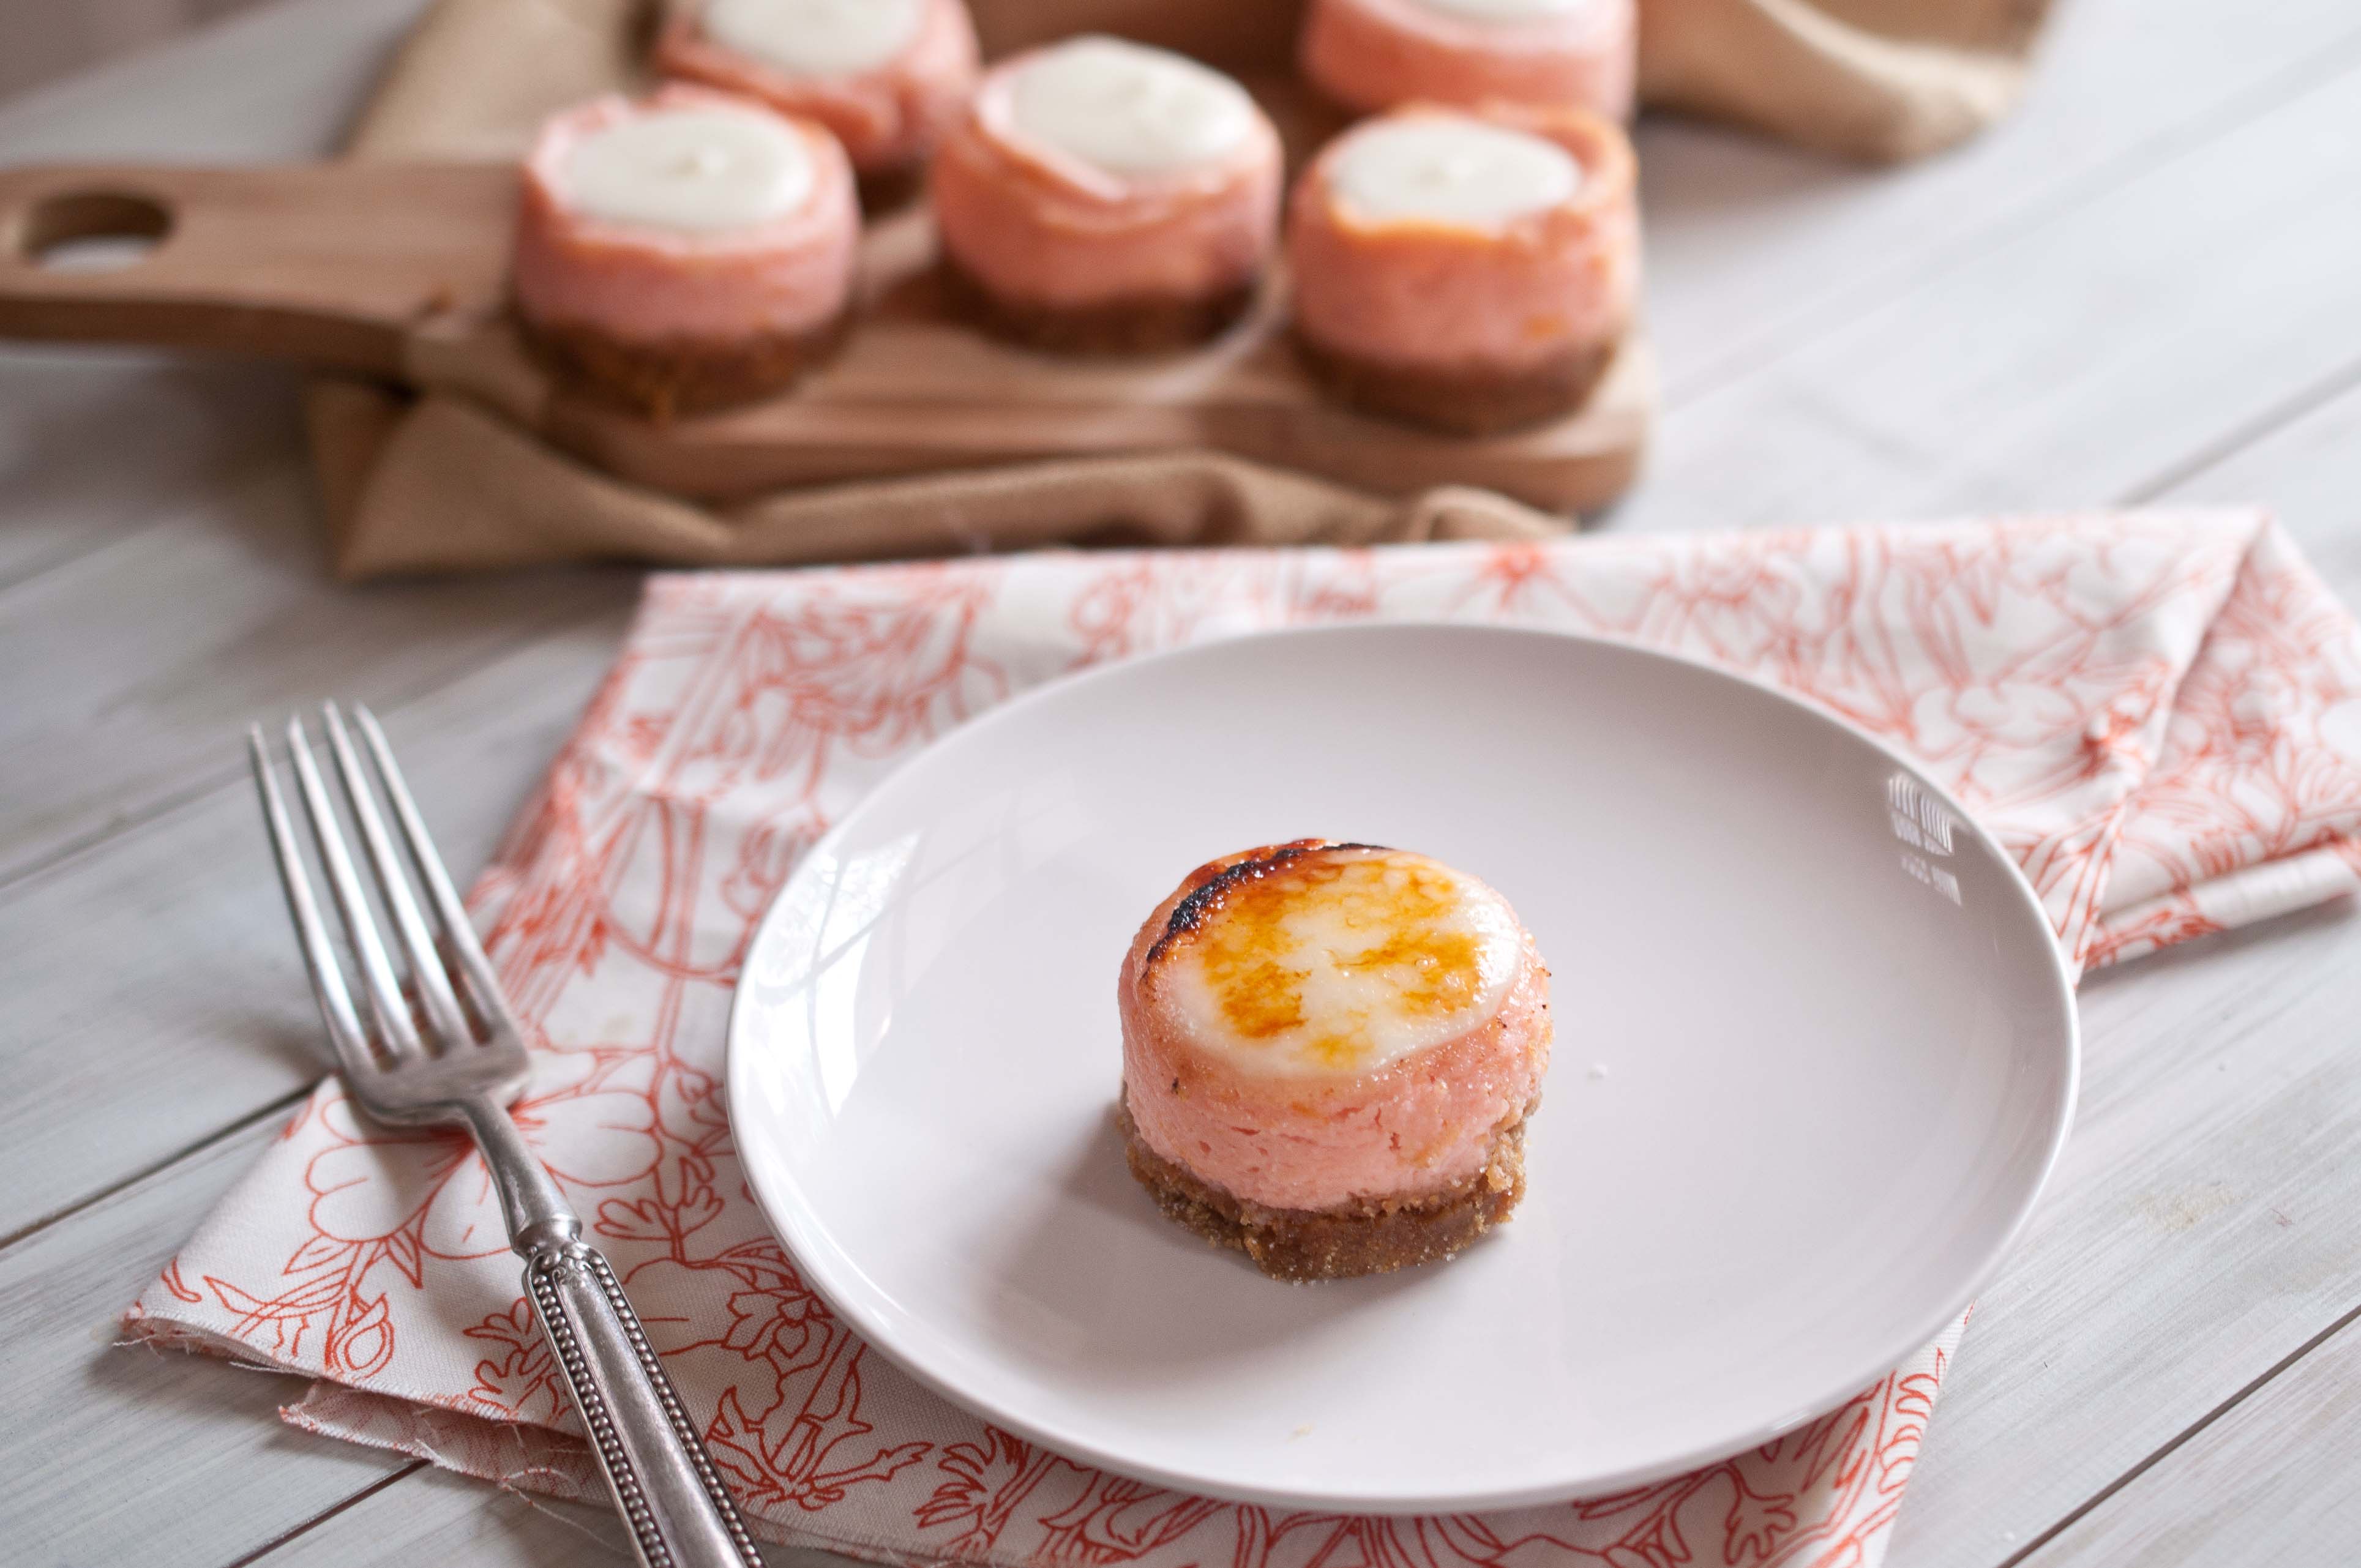
Then I decided that it needed the crunch of a bruleed sugar crust on top.
I really just don’t know when to stop.
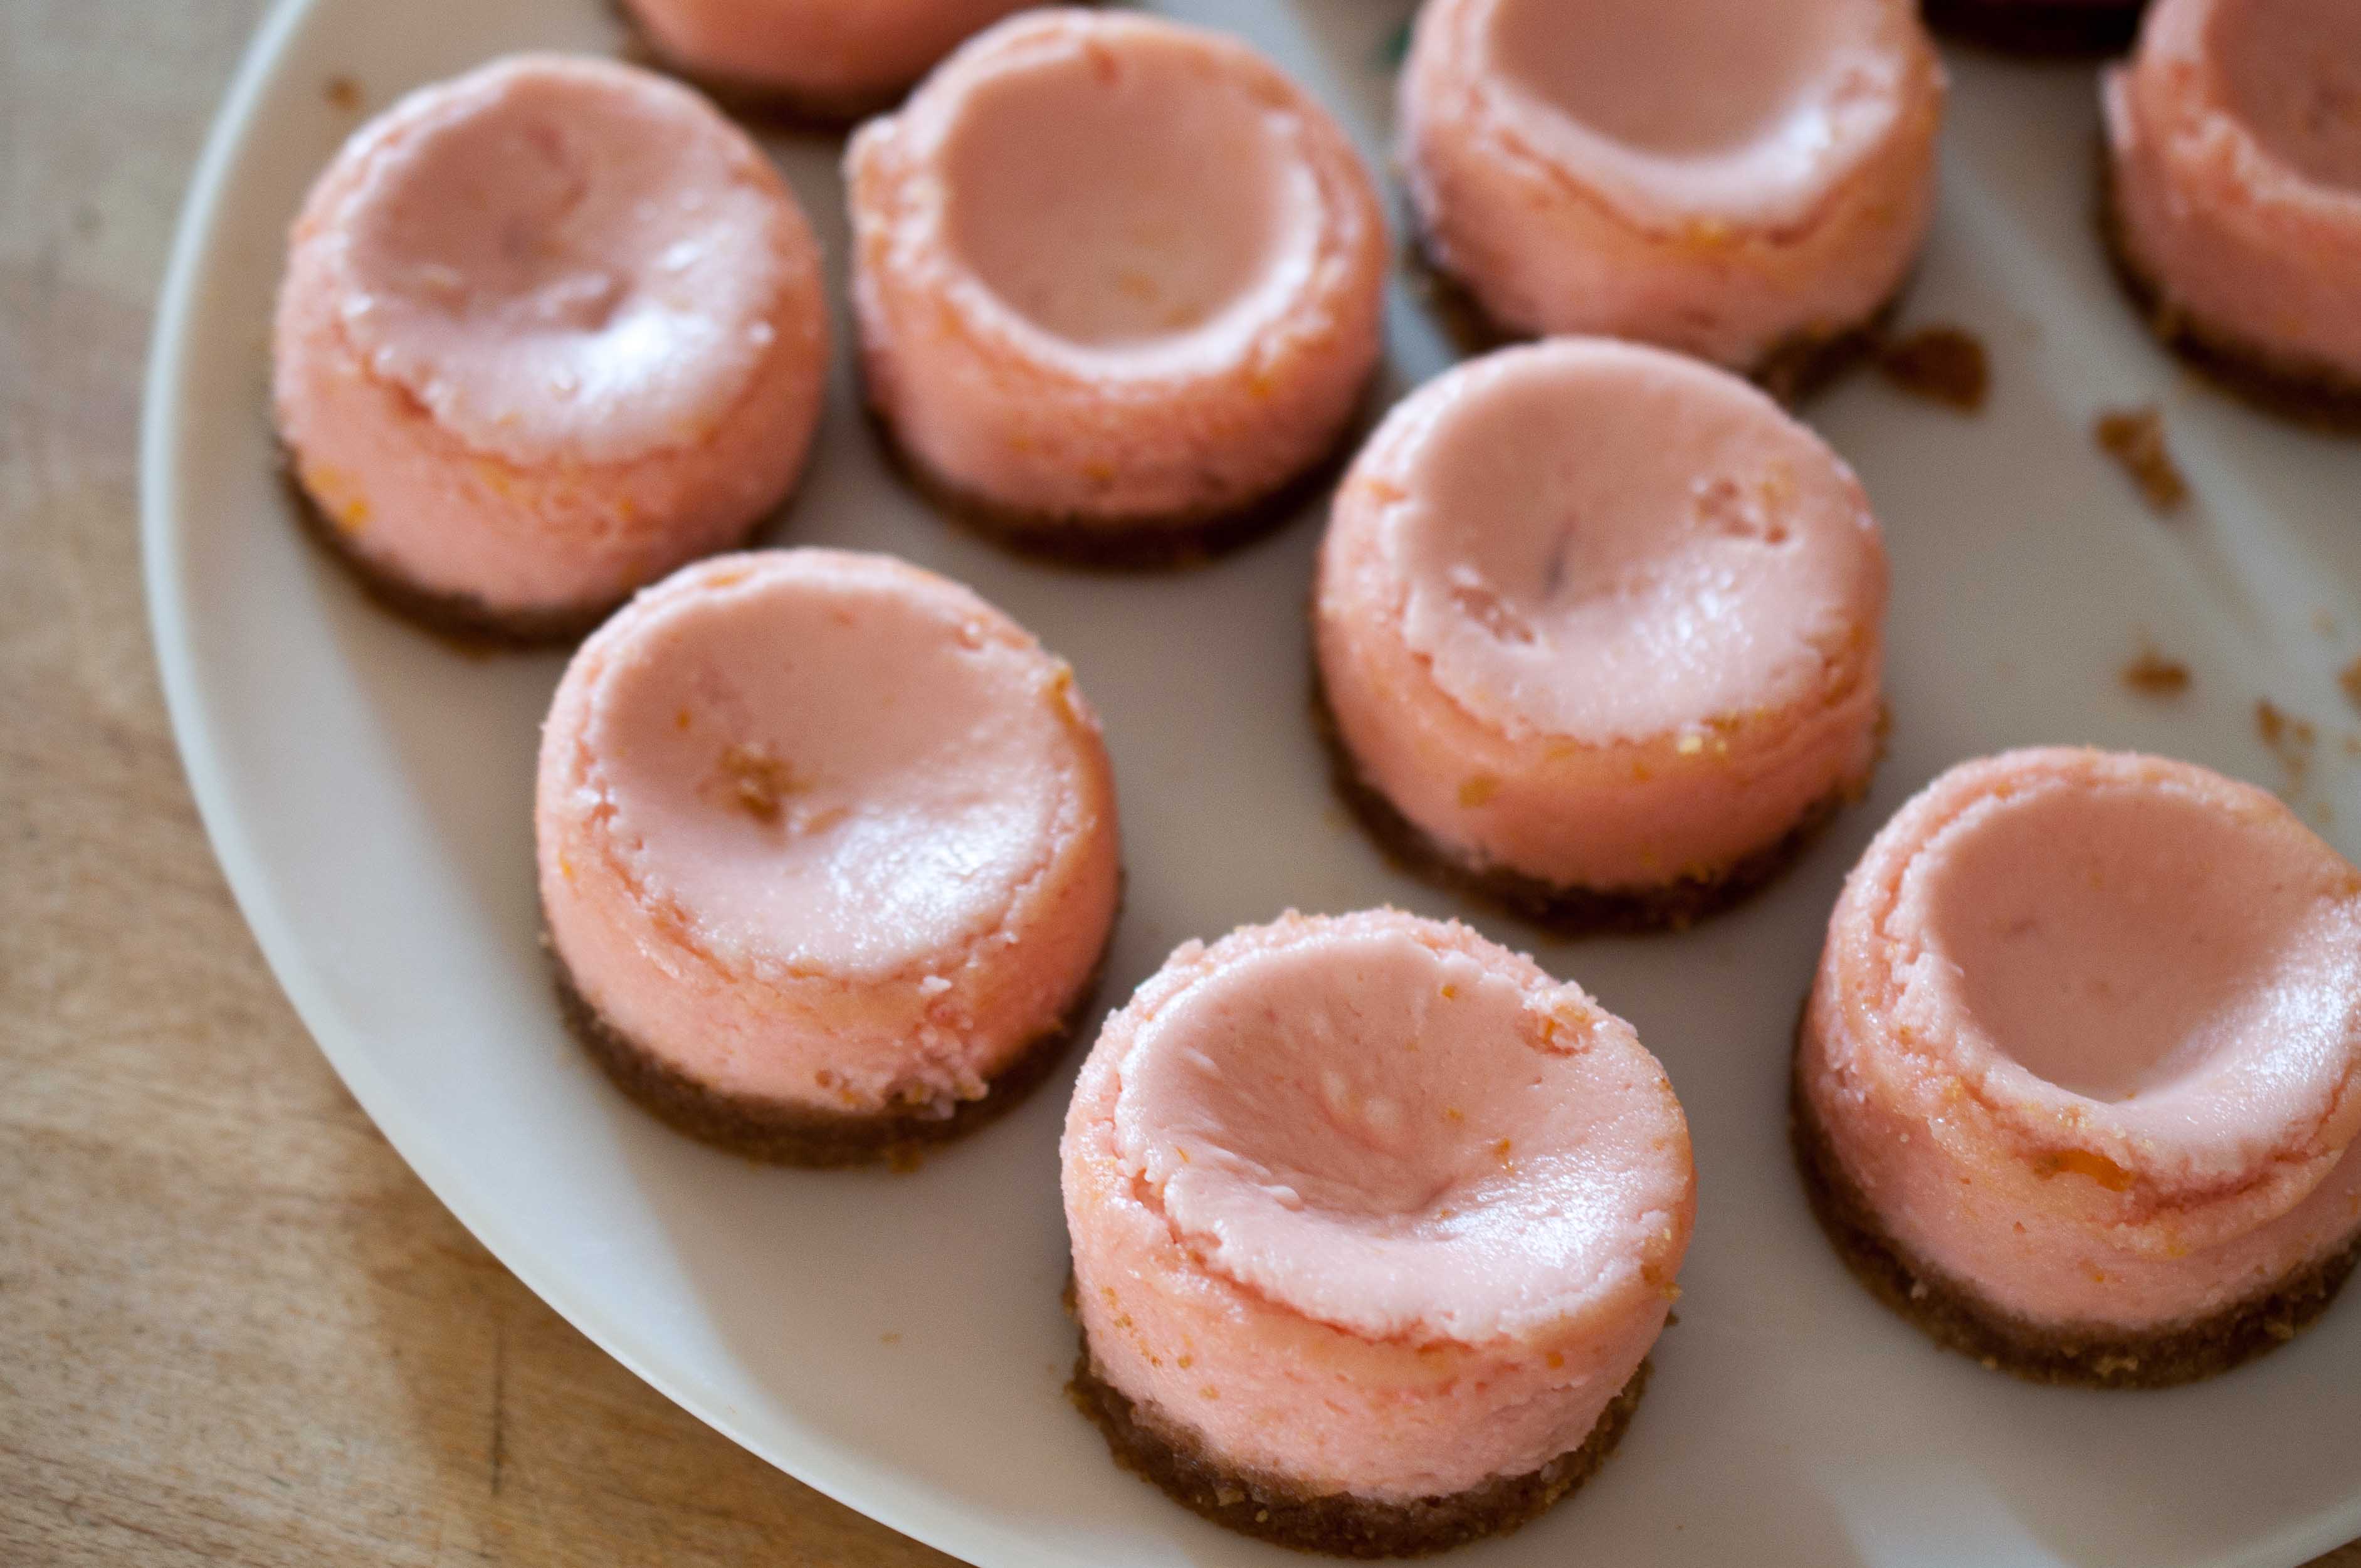
Bruleed Blood Orange and Ricotta Miniature Cheesecakes
I used the Chicago Metallics Miniature Cheesecake pan, and this recipe made 12. You can also use a standard muffin tin lined with cupcake papers, this recipe will make about 6. If you want to make a standard sized cheesecake in a spring-form pan, I would suggest that you triple the recipe.
Crust:
4 standard sized graham crackers (about 3/4 cup crushed)
2 tbs brown sugar
3 tbs melted butter
Cheesecake:
8 oz cream cheese, softened
1/4 cup ricotta
1/2 cup sugar
1 egg
1 tbs orange zest
1/4 cup freshly squeezed blood orange juice
Topping:
1/3 cup ricotta
1/3 cup powdered sugar
1/4 tsp vanilla
Plus 2 tbs granulated sugar for the brulee crust
Preheat oven to 375.
In a food processor, add the graham crackers and brown sugar, process until nothing is left but crumbs. Add the butter and process until it resembles wet sand, adding more butter or graham crackers if necessary to achieve the right consistency.
Place metal disks into place in the bottom of each slot. Spray with butter flavored cooking spray.
Place about 1 tbs of crust into the bottom each Cheesecake slot. Press very well into place until compacted.
Place the cream cheese and ricotta in the bowl of a stand mixer and beat on high until well combined. Add 1/2 cup granulated sugar beat on high until creamed. Add the egg, orange juice, and zest and beat until well combined, scraping the bottom of the bowl to make sure all ingredients are well combined.
Spoon the batter on top of the crust, filling the cheesecake slots until 3/4 of the way full.
Bake at 375 for 12-15 minutes or until the cheesecakes no longer giggle in the middle when the rack is shaken. This is not a situation where "a tooth pick inserted in the middle comes out clean."
Allow to cool for 20 minutes before attempting to remove from pan.
Once cool, press upward in the hole on the bottom of the pan. Disk should remove easily.
Once the cheesecakes cool, they will sink in the center, this is normal.
In a small bowl, mix the ricotta, powdered sugar and vanilla until well combined.
Top each cheesecake with enough ricotta mixture to fill to hole in the center until level.
Chill until ready to serve, at least on hour.
Just prior to serving, sprinkle an even layer of granulated sugar over each cheesecake.
Slowly pass a kitchen torch over the sugar until it melts into a liquid and becomes a golden brown.
Be careful, sugar burns are super nasty and hurt like a mother.
Seriously.
Don’t brulee the sugar until just prior to serving, the sugar will start to turn to liquid after about an hour.
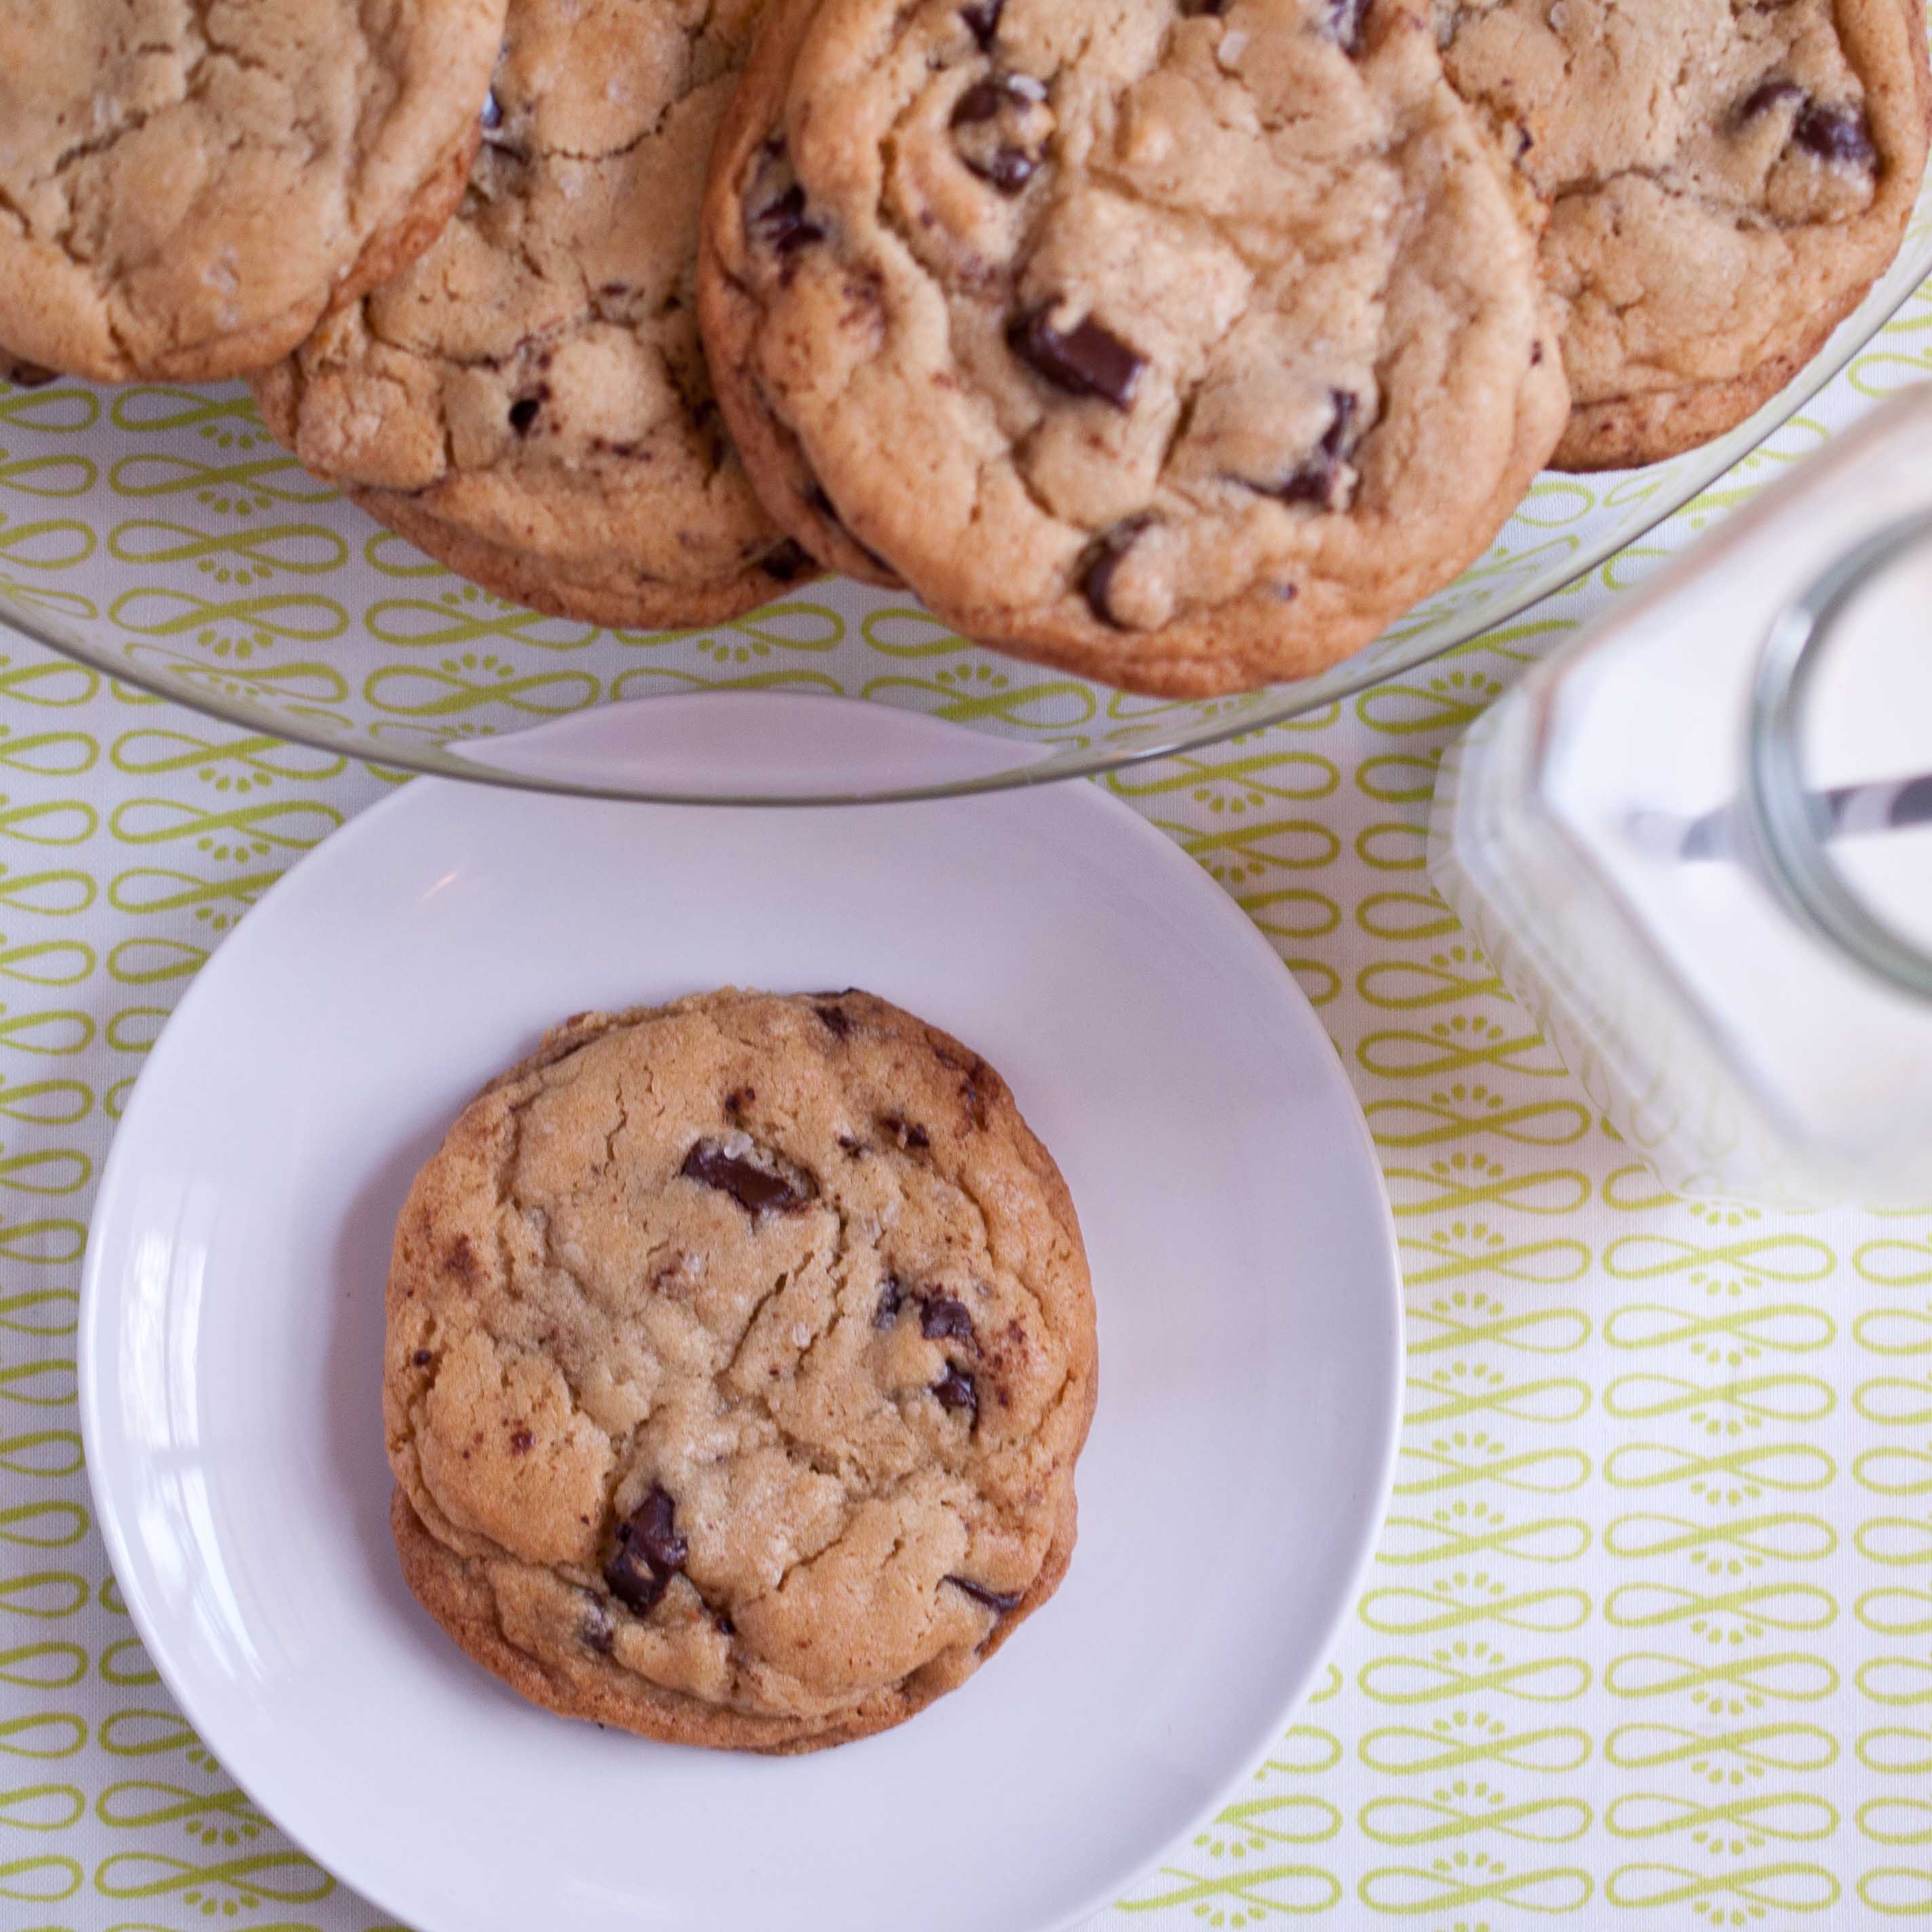
Here I am with a super bold statement of "Best Ever."
Finding the perfect cookie recipe for what you love in a cookie is a bit of a personal journey. Figuring out what you want, and how to make that happen. For me, I love a cookie to be soft, chewy, puffy without being cakey and the perfect amount of chocolate chips.
I did my research. Years of baking, problem solving, reading and asking people.
Consulting pastry chefs, New York times articles, Grandmas, kids, chocolate companies, and my big Sister.
It all finally paid off. This recipe is based on the famous and ground breaking New York Times 36 hour, Jaques Torres recipe with a bunch of additional advice and changes.
I like to call them Thursday Night Cookies, because if you want to have them over the weekend, you should probably start making them on Thursday night. The wait is worth it, I promise.
If you like the kind of cookies that I like, you will love these.
Thursday Night Cookies
Ingredients
2 cups cake flour
1 1/2 cups bread flour
1 tsp corn starch
1 1/2 tsp baking powder
1 1/4 tsp baking soda
1 tsp salt, plus 1/2 tsp divided
1 1/4 cups (2 1/2 sticks) unsalted butter
1 1/3 cup brown sugar
1 cup white sugar
2 egg
2 tsp vanilla extract
3 cups dark chocolate chips
(makes about 30 cookies)
Instructions
In a large bowl, combine both types of flour, baking soda, baking powder, corn starch and 1 tsp salt. All types of flour have different properties and will produce difference results, the combination of these two different types gives you cookies that are both soft and chewy. You won’t get these results if you just use one type or if you use all-purpose flour.
In the bowl of a stand mixer, fitted with a paddle attachment, cream the butter with both types of sugar, scraping the bottom of the bowl periodically to ensure the ingredients are well combined. Add the eggs, one at at time, and then the vanilla, beat very well and scraping the inside of the bowl between addition.
Reduce speed on the stand mixer to low and add the dry ingredients until just barely combined, making sure to scrape the bottom of the bowl to ensure that the butter and flour are all combined. Add the chocolate chips and stir until incorporated. You don’t want to over mix or your cookies will be tough.
This is where you will need some self control. The butter needs to reconstitute as a solid or the cookies won’t cook well. Place a sheet of plastic wrap over the bowl and press it against the top of the cookie dough, making a tight seal.
Place the cookies in the refrigerator to chill for at least 24 hours, preferably 36 hours. This is important, don’t skip this step or the cookies will spread and become dry and crispy.
Preheat oven to 350. Line a cookie sheet with parchment paper and using a cookie scoop, or an ice cream scoop, make balls of dough that are a bit larger than a golf ball. Place on a baking sheet, with ample space between each cookie. Sprinkle lightly with the remaining salt. (Only about 6 cookies will fit on a standard cookie sheet.)
Bake each cookie sheet one at a time for 21-23 minutes (*Note: Jaques Torres and I got this cooking time, but I hear from others that they are getting much shorter cooking times. Keep a close eye on your first batch) or until the cookies are just starting to get a light golden brown. Don’t over bake, the cookies will continue to bake about an additional 10 percent after being removed from the oven. Immediately transfer to a wire rack or a row of paper towels. (Here is a great tip from Michelle Tepper: Try cooking on parchment paper and just sliding the whole sheet off of the cookie tray and onto the counter to cool.)
*if you absolutly CAN NOT wait 36 hours, here is the only shortcut I will allow, although the cookies won’t be AS good:
Once the cookie dough is made, scoop the large golf ball sized cookies onto the cookie sheets, cover and then chill them for at LEAST 4 hours. Not one second shorter. This will only work if the dough is in a ball on the cookie sheet, not if it is still in the bowl.
Not in the way that Creme Brulee is dangerous, with the open flame and molten sugar that you just want to touch before it’s dry giving yourself the worst sugar burn of your life and using words that should never be said in public.
But in more of a, I-totally-don’t-care-if-this-will-make-me-gain-137-pounds-if-I-eat-the-whole-thing, kind of way.
But I love it. LOOOOOOVE it.
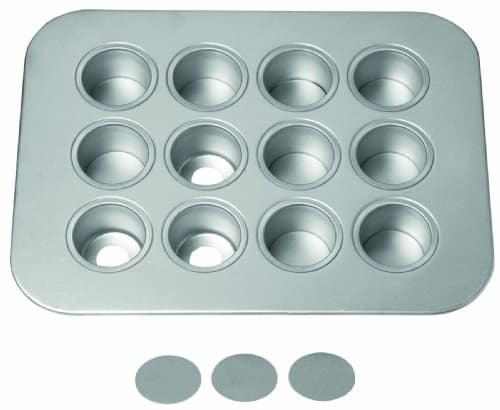
And then there is this mini cheesecake pan. It’s a fabulous little invention that offers tiny, portion controlled mini-cheesecakes. Let’s be honest, they aren’t good for you, but eating one won’t make you gain 137 pounds.
(Photo from:Chicago Metallic)
Here is the low down on this little pan, the one that made these adorable cheesecakes:
12-cavity mini cheesecake pan made of heavy-duty aluminized steel
Each cavity comes with pop-up bottom disc for simple dessert removal
Measures 13-8/9 by 10-3/5; each cavity measures 2 by 2 by 1-1/2 inches; 25-year limited warranty
Pros:
Creates adorable, small Cheesecakes that bake quickly and provide the right amount of dessert for a small group.
The metal disk inserts make it easy to remove the cheesecakes from their pan, without the use of a cupcake papers which tend to ruin the over all effect.
The shape is much more attractive than those mini-cheesecakes bake in muffin tins.
Perfect for parties.
Cons:
Although the product states that it is dishwasher safe, that does not seem to be the case. The small metal disks are almost impossible to get clean in the dishwasher, and the metal pan does not seem to respond well either. Making hand washing a must for this pan.
The Cheesecakes were a bit smaller than I would have liked.
The excessive use of the word "Cavity" on the product materials along with the word "Cheesecake" conjures up disturbing images of Dessert with Jeffery Dahmer.
Overall:
I really liked this pan and the options that it provides. Although the size was much smaller than I had expected (slightly larger than a mini muffin) the amount of batter needed was small as well, making it easy to throw together without a pound of cream cheese. This also leaves the option of making your basic, go-to, regular sized New York Cheesecake recipe, splitting it up into three different batches and adding different flavors to each, giving your guests three options instead of one. Variety is always a plus.
I love it and will probably use it until it falls apart. You can buy one here.
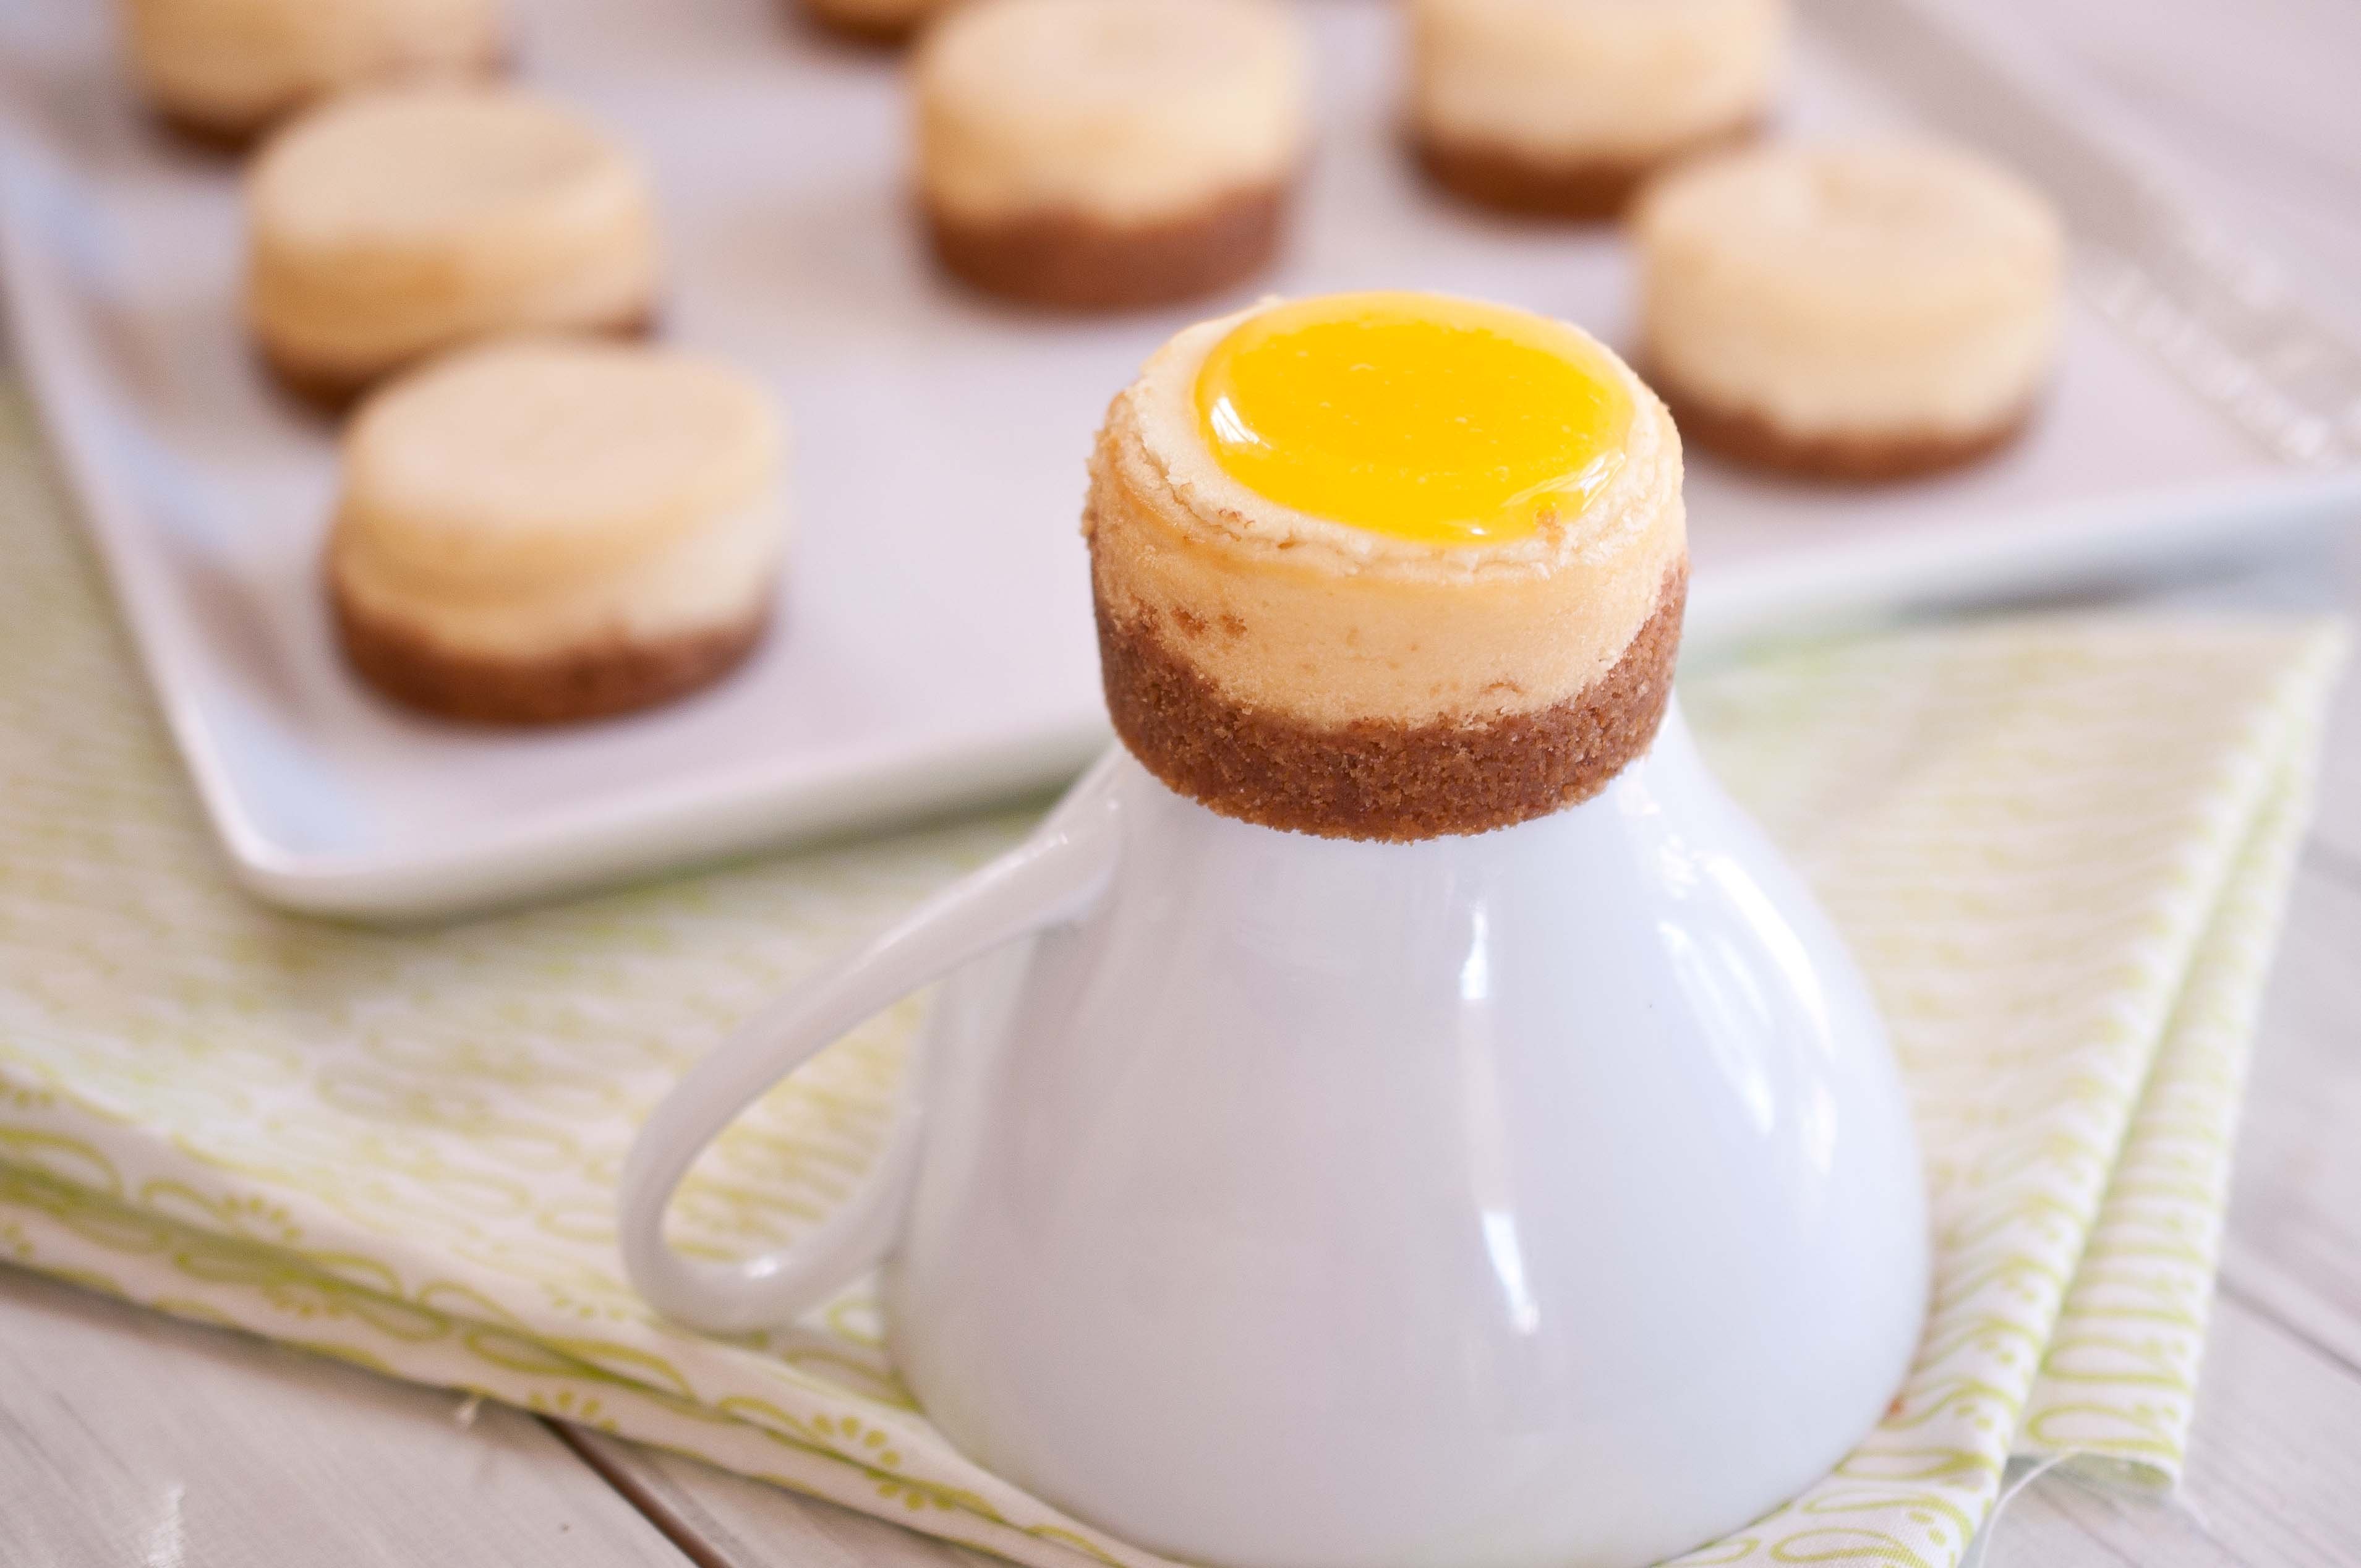
Lemon Goat Cheese Mini Cheesecakes
Crust:
3/4 cup crushed graham crackers
3 tbs melted butter
2 tbs brown sugar
Cheesecake:
1 8 oz Package of (full fat) Cream Cheese (room temperature, very important)
2 oz Goat Cheese (room temp as well)
1/2 cup sugar
1 egg
1 tsp vanilla
1 tbs lemon zest
Lemon curd:
1 egg yolks
1/4 cup sugar
2 tsp lemon zest
1/2 cup lemon juice
1/2 tsp corn starch
2 tbs butter
Preheat oven to 375
In a food processor, add the graham crackers and brown sugar, process until nothing is left but crumbs. Add the butter and process until it resembles wet sand, adding more butter or graham crackers if necessary to achieve the right consistency.
Place metal disks into place in the bottom of each slot. Spray with butter flavored cooking spray.
Place about 1 tbs of crust into the bottom each Cheesecake slot. Press verywell into place until compacted.
Place the cream cheese and goat cheese in the bowl of a stand mixer and beat on high until well combined. Add the sugar beat on high until creamed. Add the egg, vanilla, and zest and beat until well combined, scraping the bottom of the bowl to make sure all ingredients are well combined.
Spoon the batter on top of the crust, filling the cheesecake slots until almost full.
Bake at 375 for 12-15 minutes or until the cheesecakes no longer giggle in the middle when the rack is shaken. This is not a situation where "a tooth pick inserted in the middle comes out clean."
Allow to cool for 20 minutes before attempting to remove from pan.
Once cool, press upward in the hole on the bottom of the pan. Disk should remove easily.
While the cheesecake is cooking, make the curd.
In a bowl, whisk together the egg yolks, sugar, zest, corn starch and lemon juice until well combined.
Add to a pan over medium heat along with the butter and whisk constantly until thickened, about 8-10 minutes. Remove from heat. Allow pan to cool a bit, about ten minutes, and then place in the refrigerator to chill for about 20 minutes or until cool and thick.
Once the curd has cooled, top the mini cheesecakes with about 1-2 tsp of curd. Chill until ready to serve.
I once knew a man who lived to be 101. We had a bit of an unlikely friendship, since he had reached retirement age long before I was even born. He was smart, funny, and seems to have no concept of the age gap, reminding me that once his hip was better, he would take me dancing and then I would fall in love with him and leave my husband.
Life was a constant opportunity to make people laugh, and he took full advantage of it.
When he moved to Los Angeles in the 1940’s to get his pneumonia stricken daughters out of the frigid East Coast winters, he was without money, without a job, and without an education. He walked in to a Taxi company headquarters and asked for a job. He had a fantastic driving record and a winning smile, in his book, that’s the only resume he needed. As soon as the hiring manager found out that he had only live on the west coast of a week, knew nothing about Los Angeles freeways, and had never driven a cab, he shut down the interview.
"If you don’t know how to get from LAX to the Roosevelt Hotel, how are you going to get the client there??"
Jack responded with this famous smile, "Well if you don’t give me the cab, it’s gonna take a whole lot longer!"
He got the job.
Jack worked as a cab driver, running tourist from the Airport to Hollywood for over 30 years. He was also the very first Employee of the Month for the Cab company, and to date, the recipient of the most complimentary letters ever sent to the cab company about one of their employees.
As I sat with him only a few months before he died, I asked him if he had any regrets.
"Not really. The secret to living 100 years and not regretting anything is this: Do your best. Don’t hurt anyone. Make friends with anyone who will let you."
Not bad advice.
Here is another recipe to make for your friends. Sit together on long Saturday mornings, chatting, making memories and friends that will stay with you, even when you live to be 100.
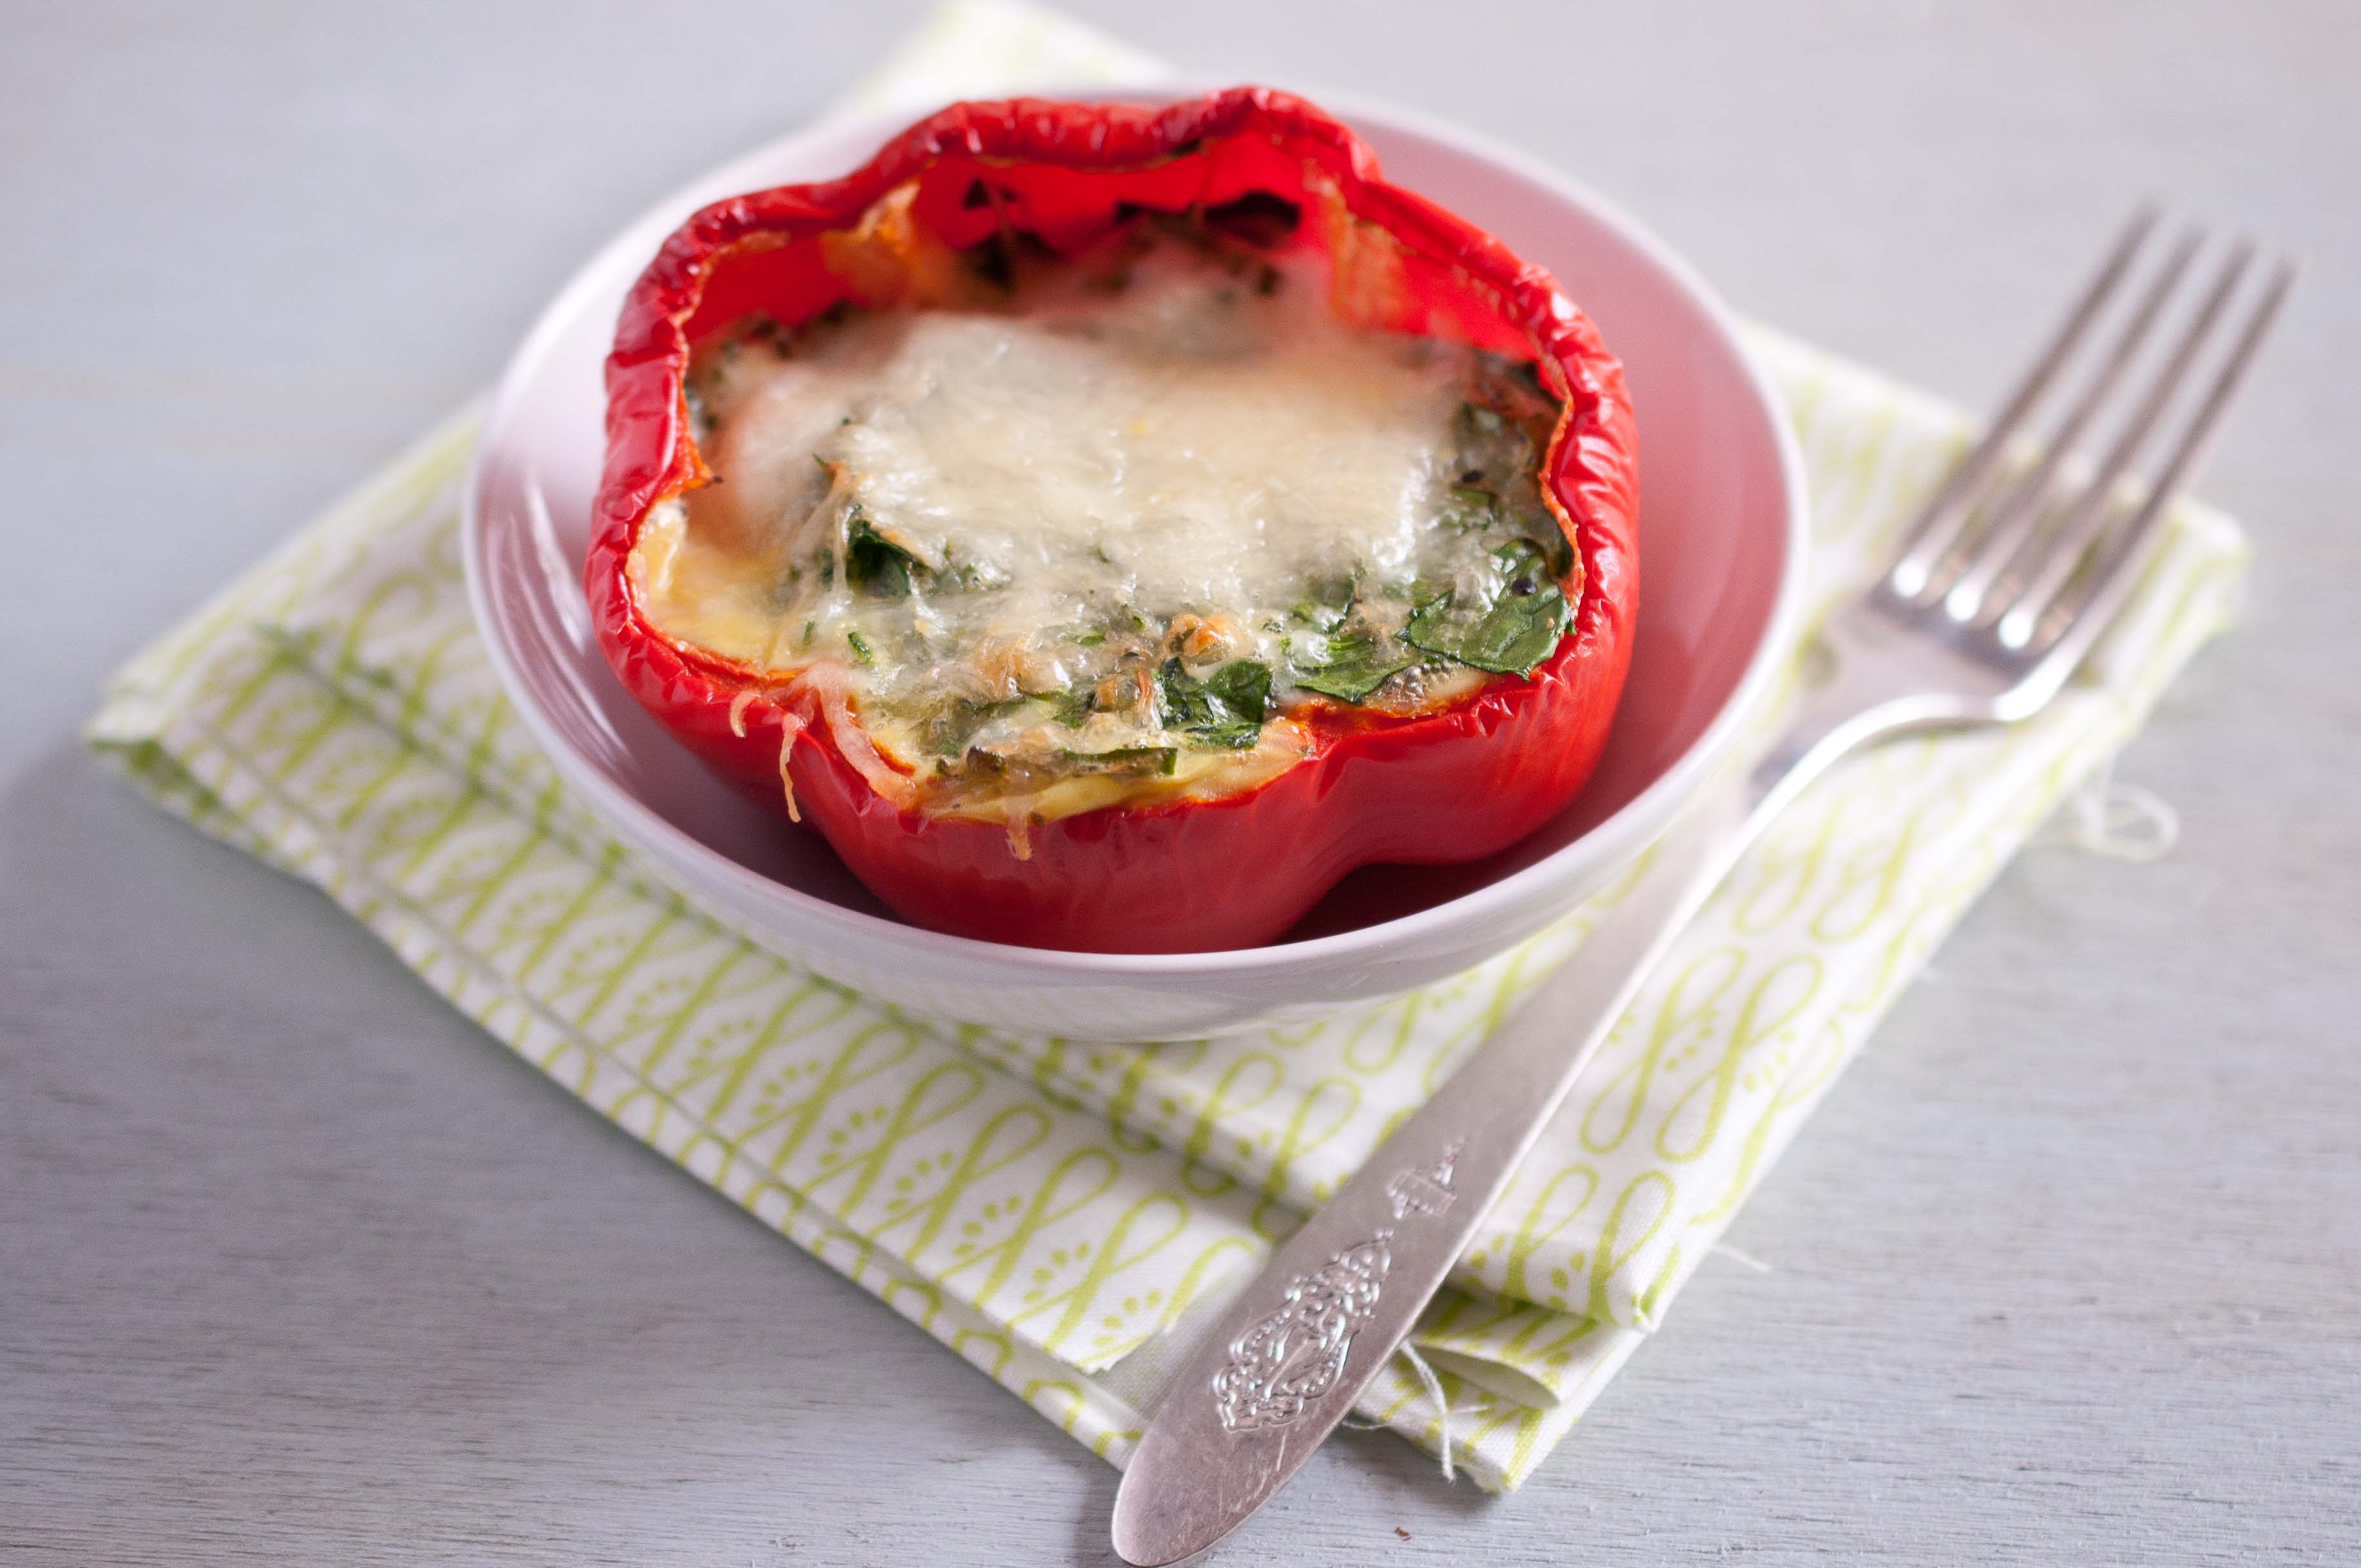
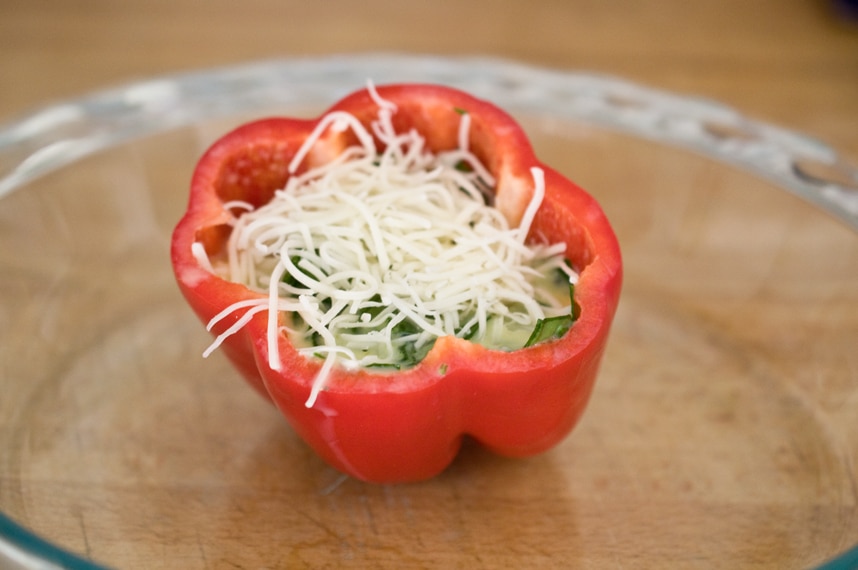
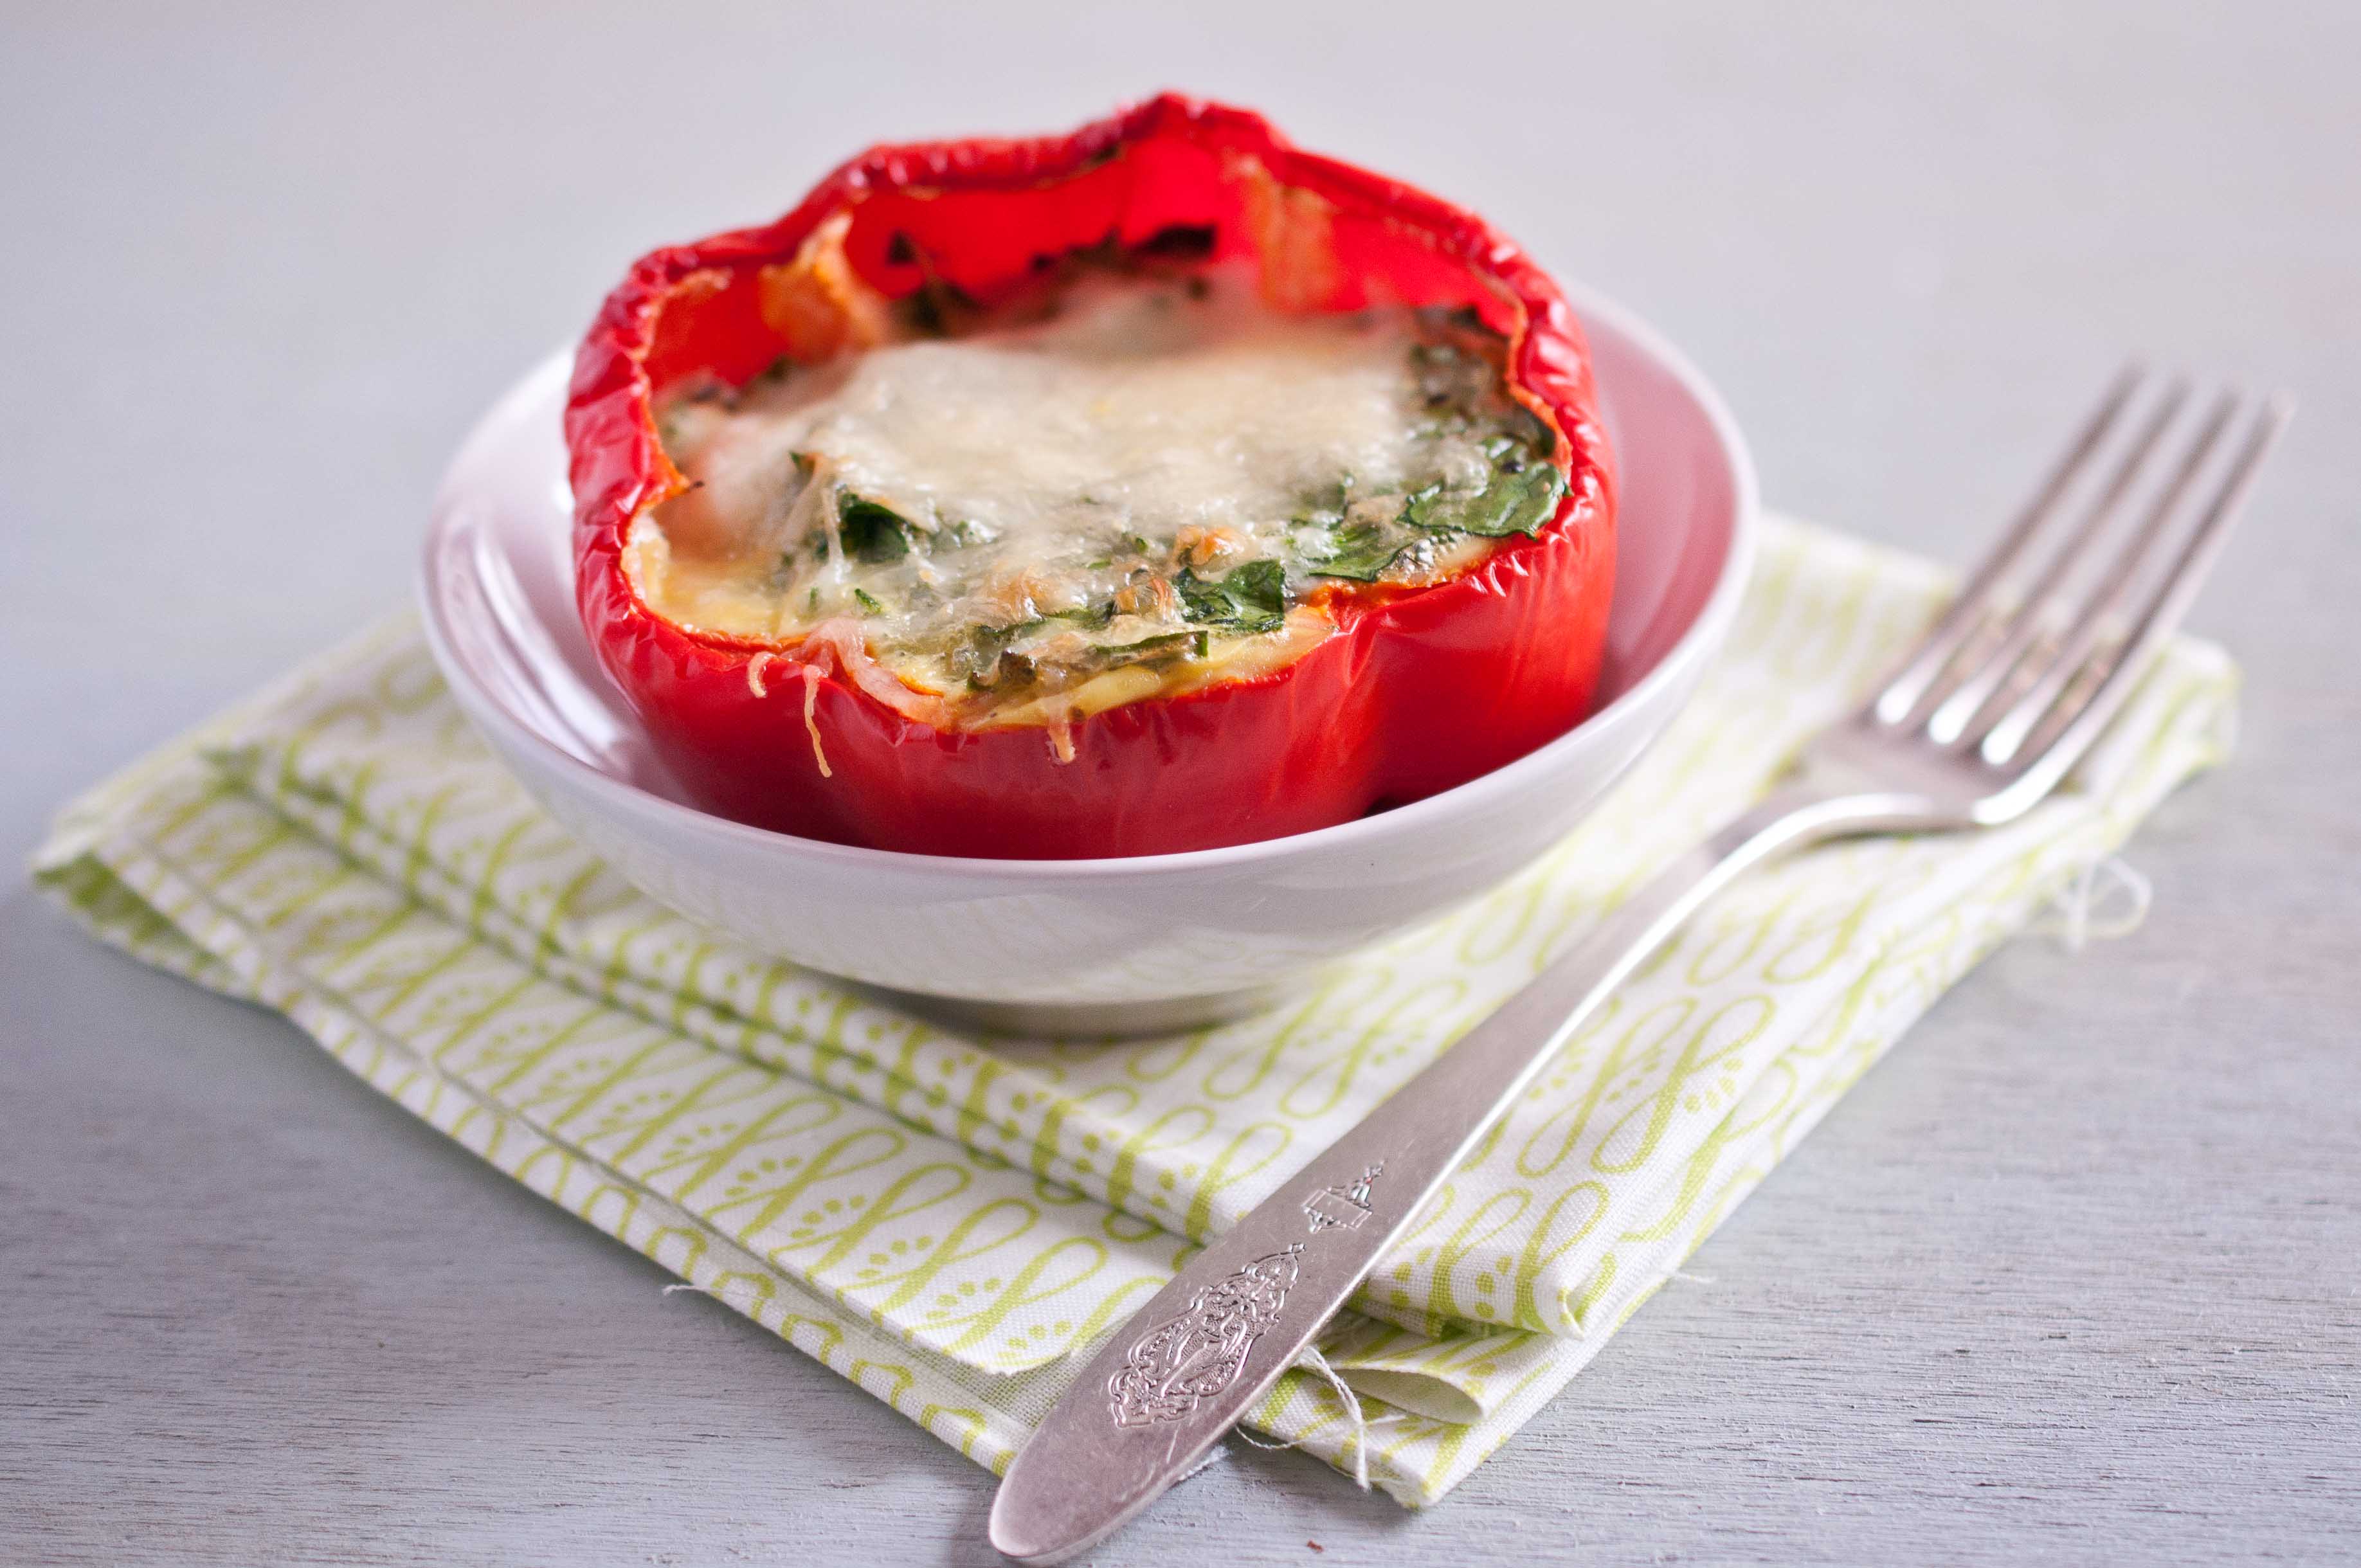
Spinach Quiche In Red Pepper Cup
4 large red bell peppers (try to find ones with flat bottoms, that will firmly stand up straight when set on a plate)
6 eggs
1/2 cup milk
1/2 cup heavy cream
3 raw breakfast sausages, casings removed, chopped
1/2 cup shredded Gruyere or Mozzarella, (plus 2 tbs for garnish if desires)
1/4 tsp salt
1/2 tsp pepper
1 cup fresh spinach, chopped
1 tbs scallions, chopped
Place oven rack on the lowest position and preheat oven to 350.
Cut the bell peppers in half, across the middle. You can chop the top half of the bell peppers, removing stems and seed, and place pieces in a freezer bag, saving it for a later meal.
Place the bottom half of the bell peppers in a glass baking dish, cut side up. Make sure to use bell peppers that can stand up on their own, or baking them will be a challenge.
In bowl, beat the eggs until well combined. Add the remaining ingredients and stir until well combined.
If you use, chopped frozen spinach, make sure to thaw, rinse and remove as much water as you can, too much moisture won’t allow this to set up.
Place baking dish with red peppers inside the oven. Pour the egg mixture into the red pepper cups until almost full (leave about 1/4 inch to 1/2 inch space at the tops) and sprinkle with cheese, if desired.
Bake for 45-55 minutes or until the center of the quiche no longer wobbles when you gently shake the rack.
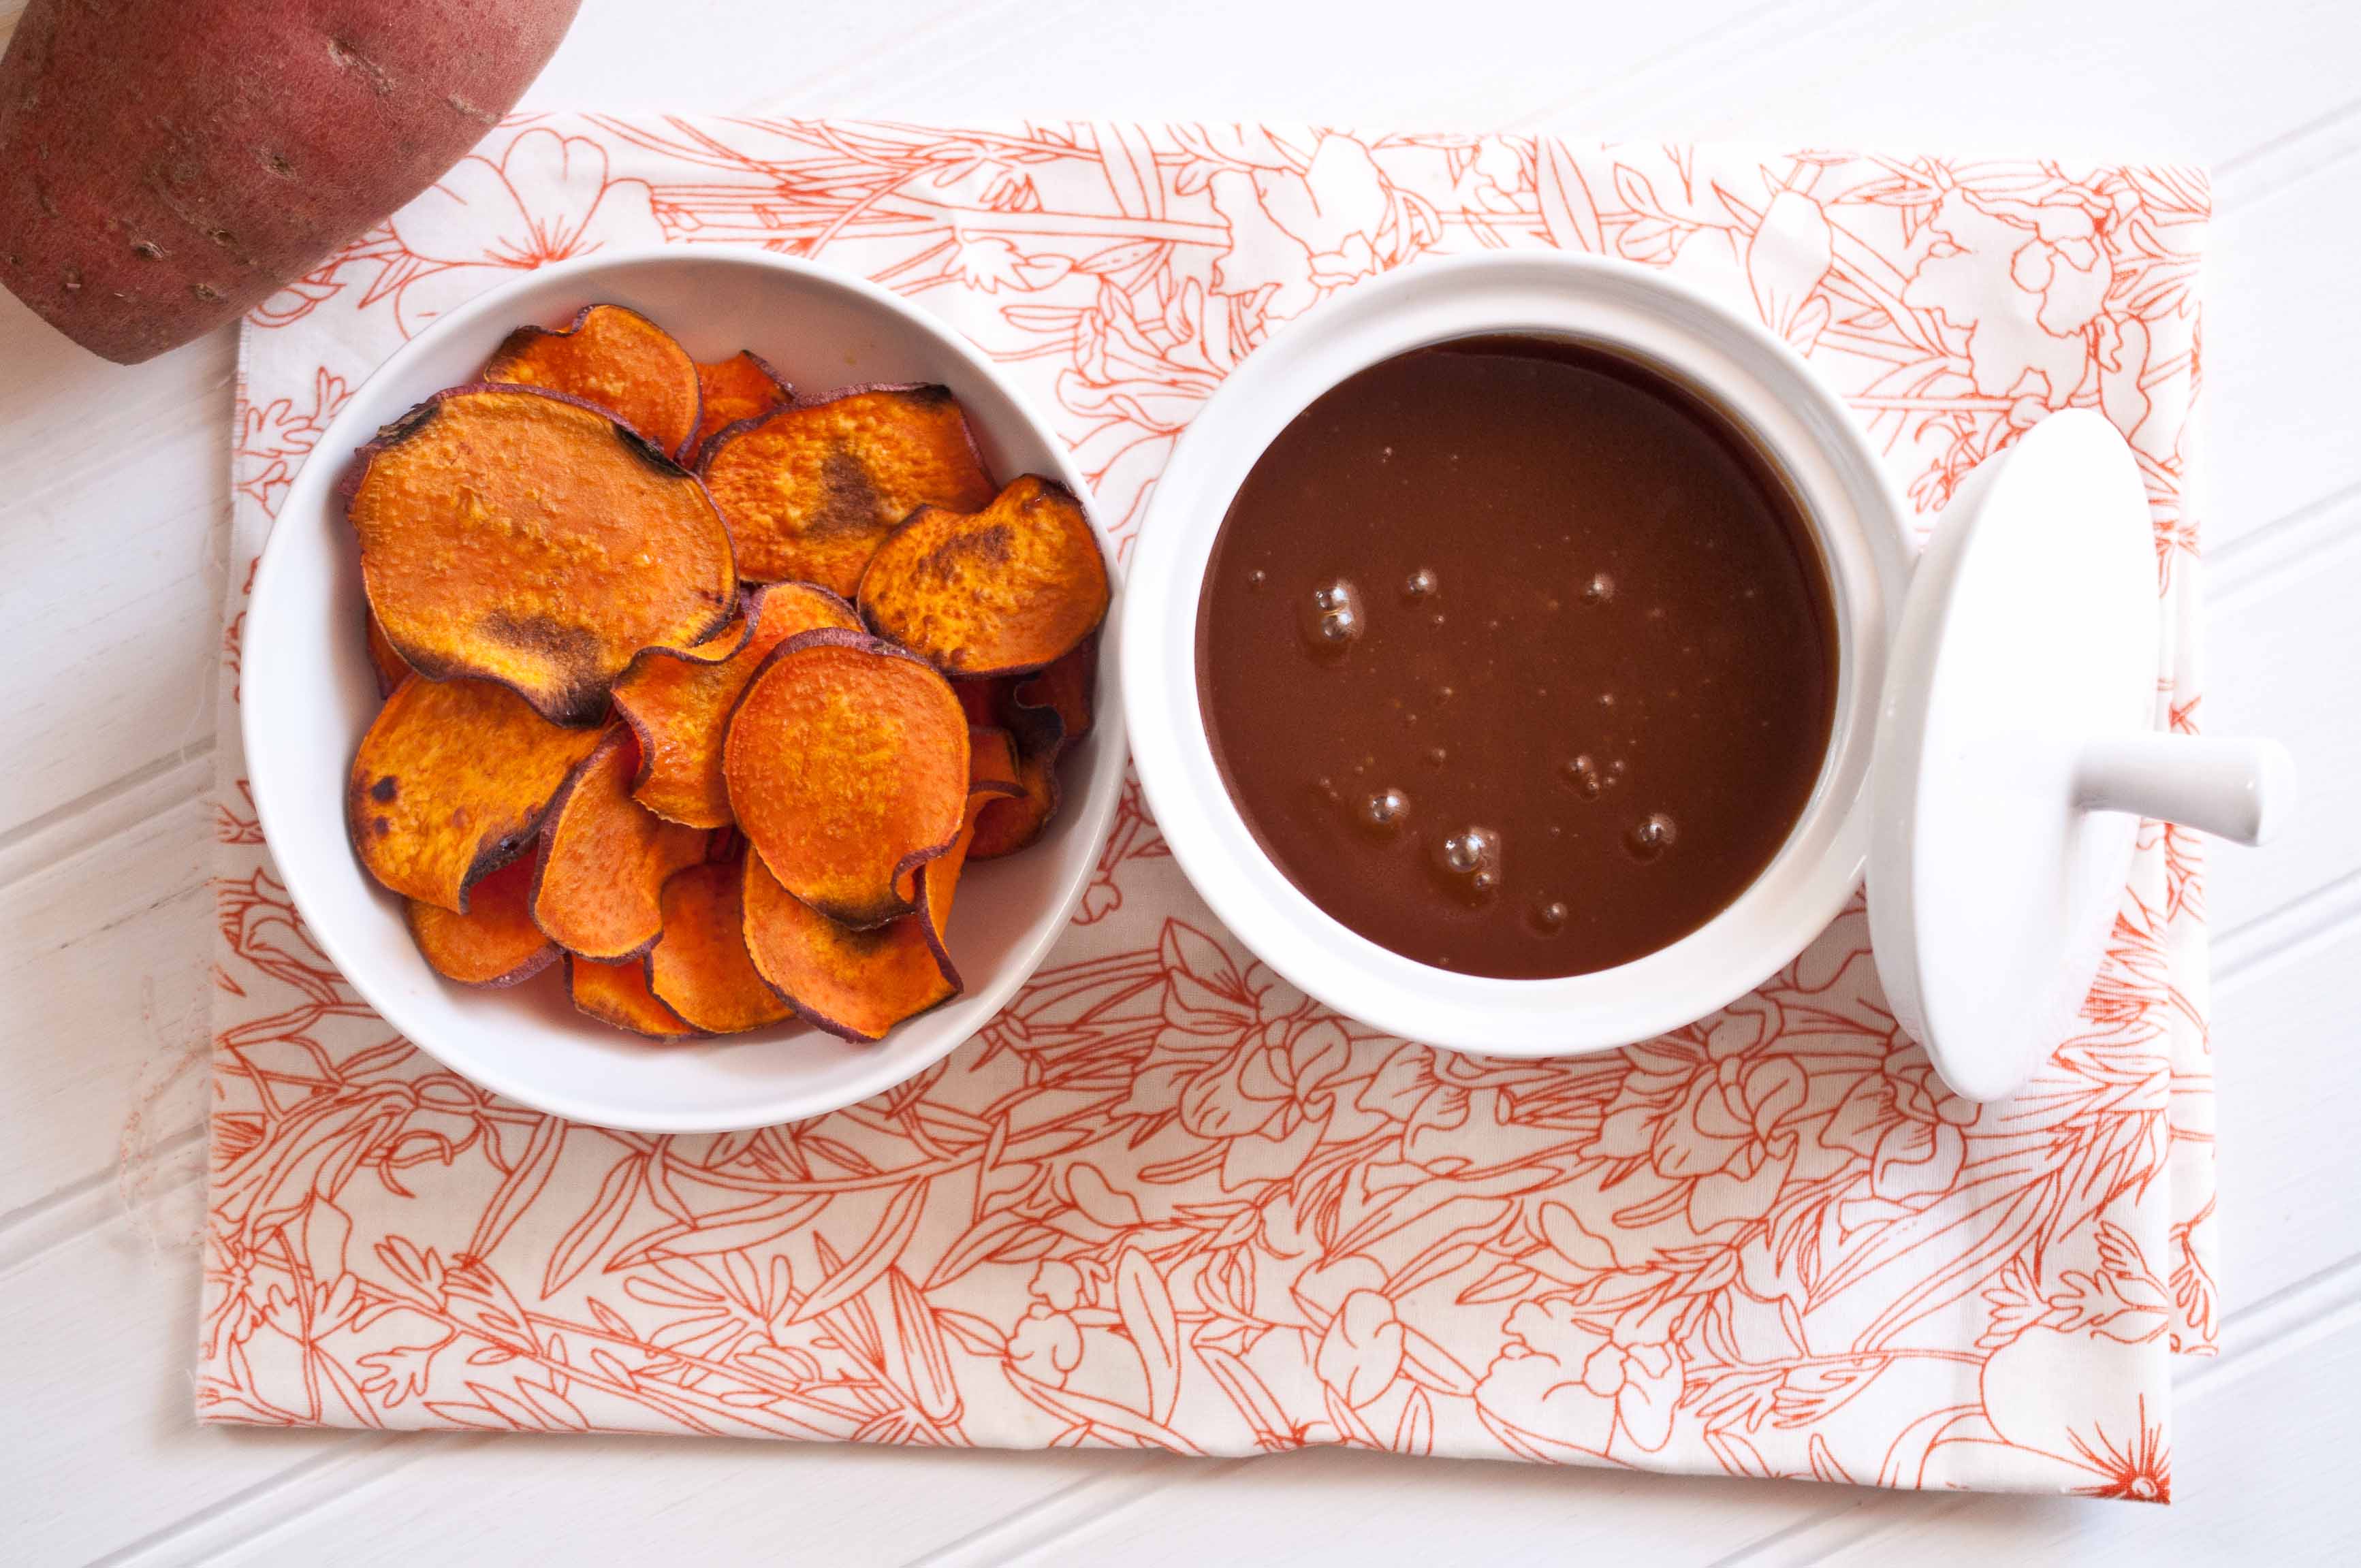
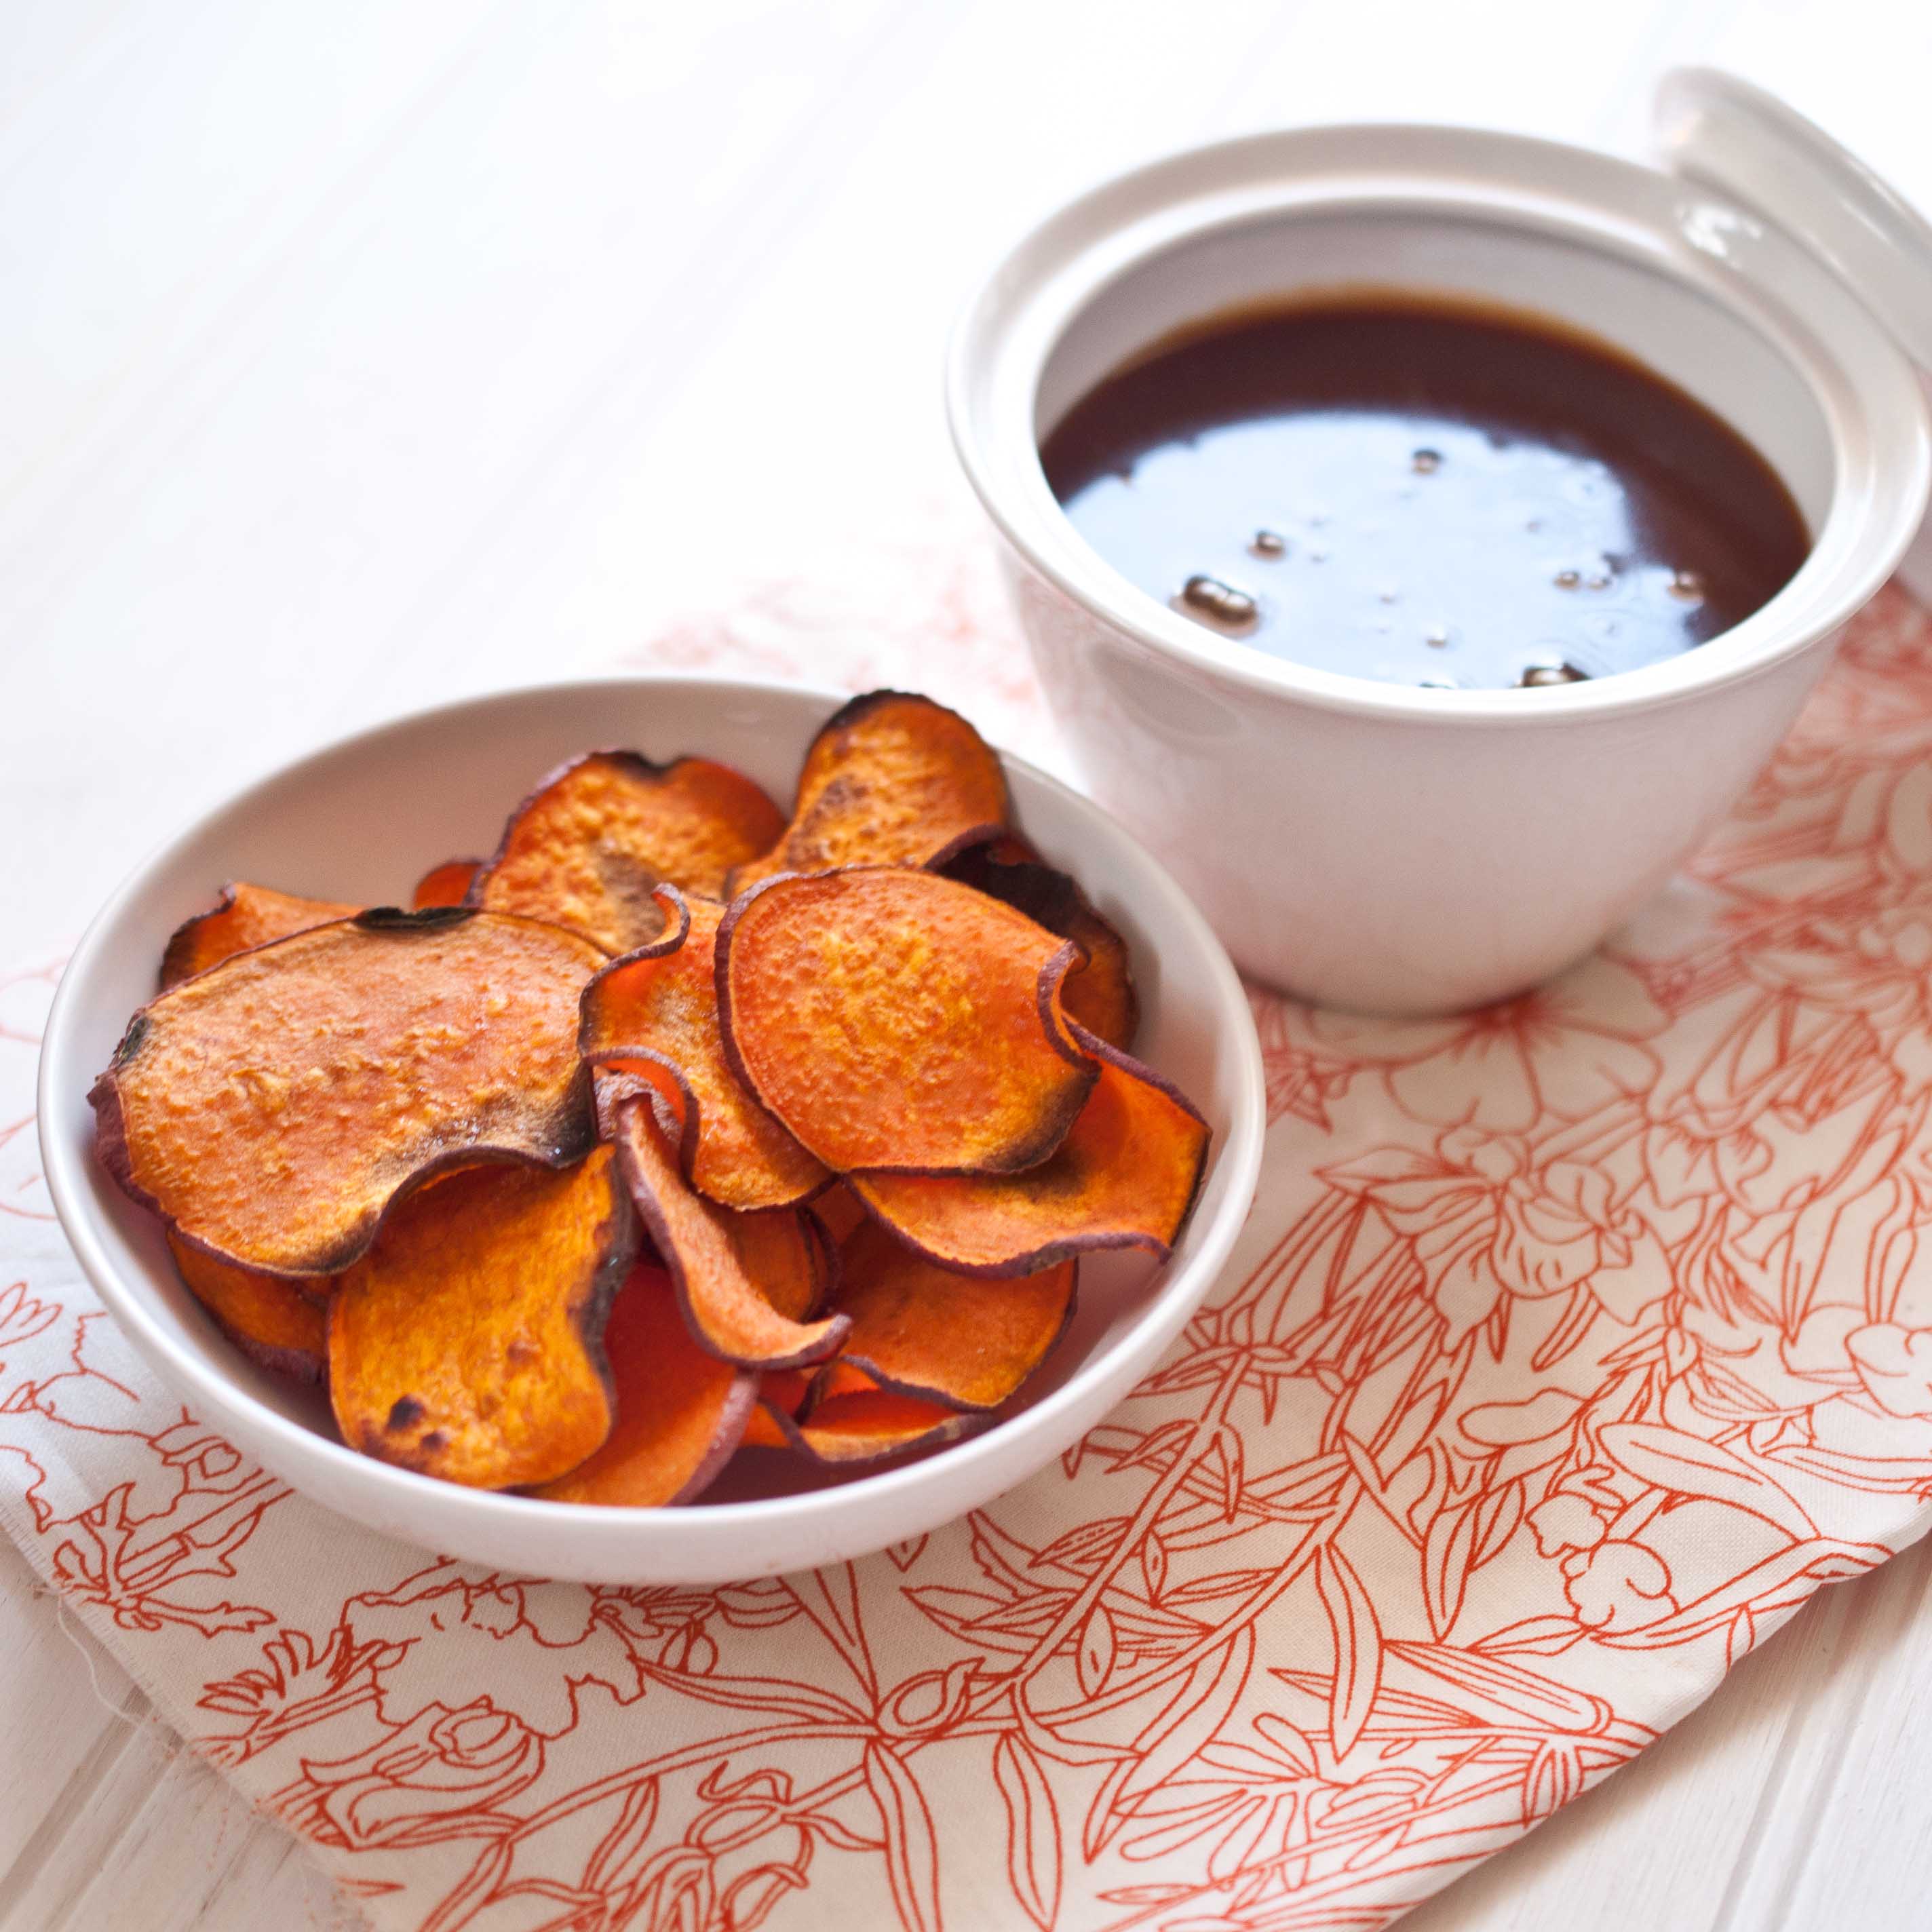
The where so cute, slightly chewy and a little crunchy.
And they are even healthy. Only about 7 calorie each. But, no one eats ONE, that’s insane. So, think of it like 70 calories if you have 10, or 140 if you have 20. And it makes you think that you are eating something that’s bad for you, which makes it taste better.
But of course, I got to thinkings. About how much I like to dip things.
And how in love I am with sauces. Even though this Cinnamon Caramel Dipping sauce makes it SO much less healthy, its super yummy. And it’s a good example of that balance thing I’m always running my mouth about.
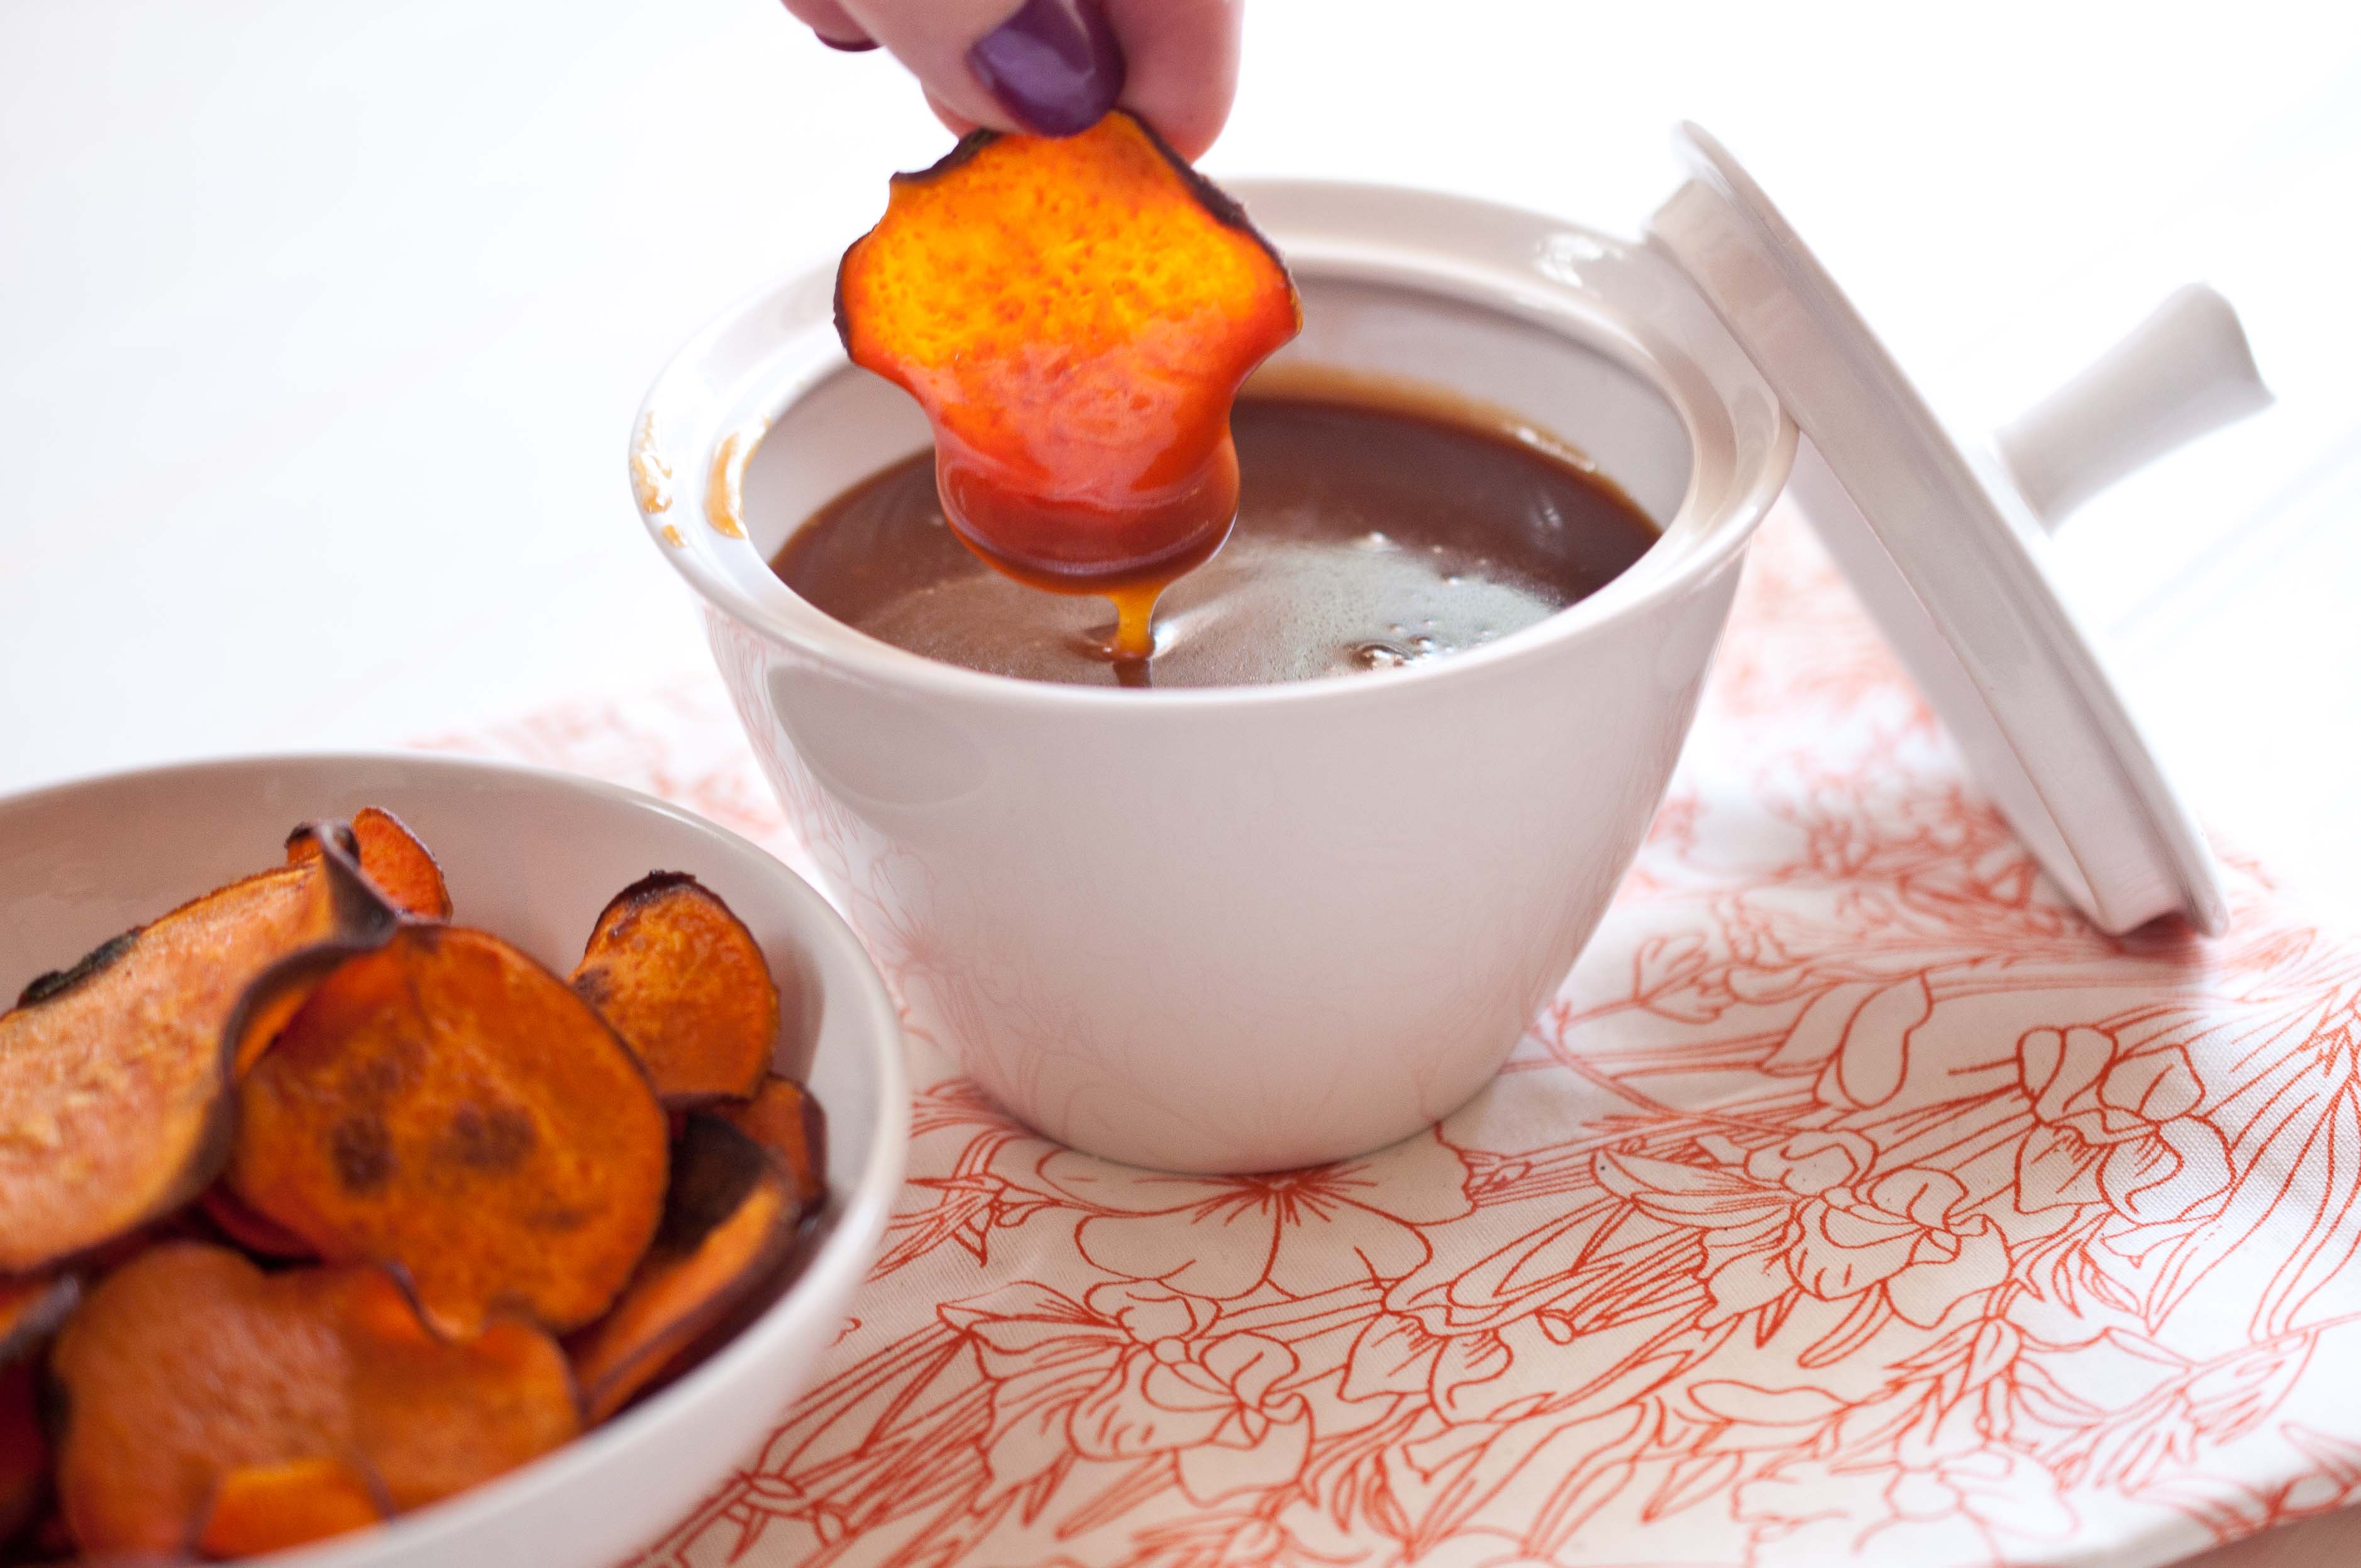
Baked Sweet Potato Chips With Cinnamon Caramel Dipping Sauce
2 large sweet potatos
Olive oil flavored cooking spray
1/4 tsp sugar
Caramel Sauce:
1/2 cup sugar
2 tbs honey
4 tbs unsalted butter, cut into cubes
1/2 cup heavy cream
1/4 tsp cinnamon
1/2 tsp vanilla
Preheat oven to 375
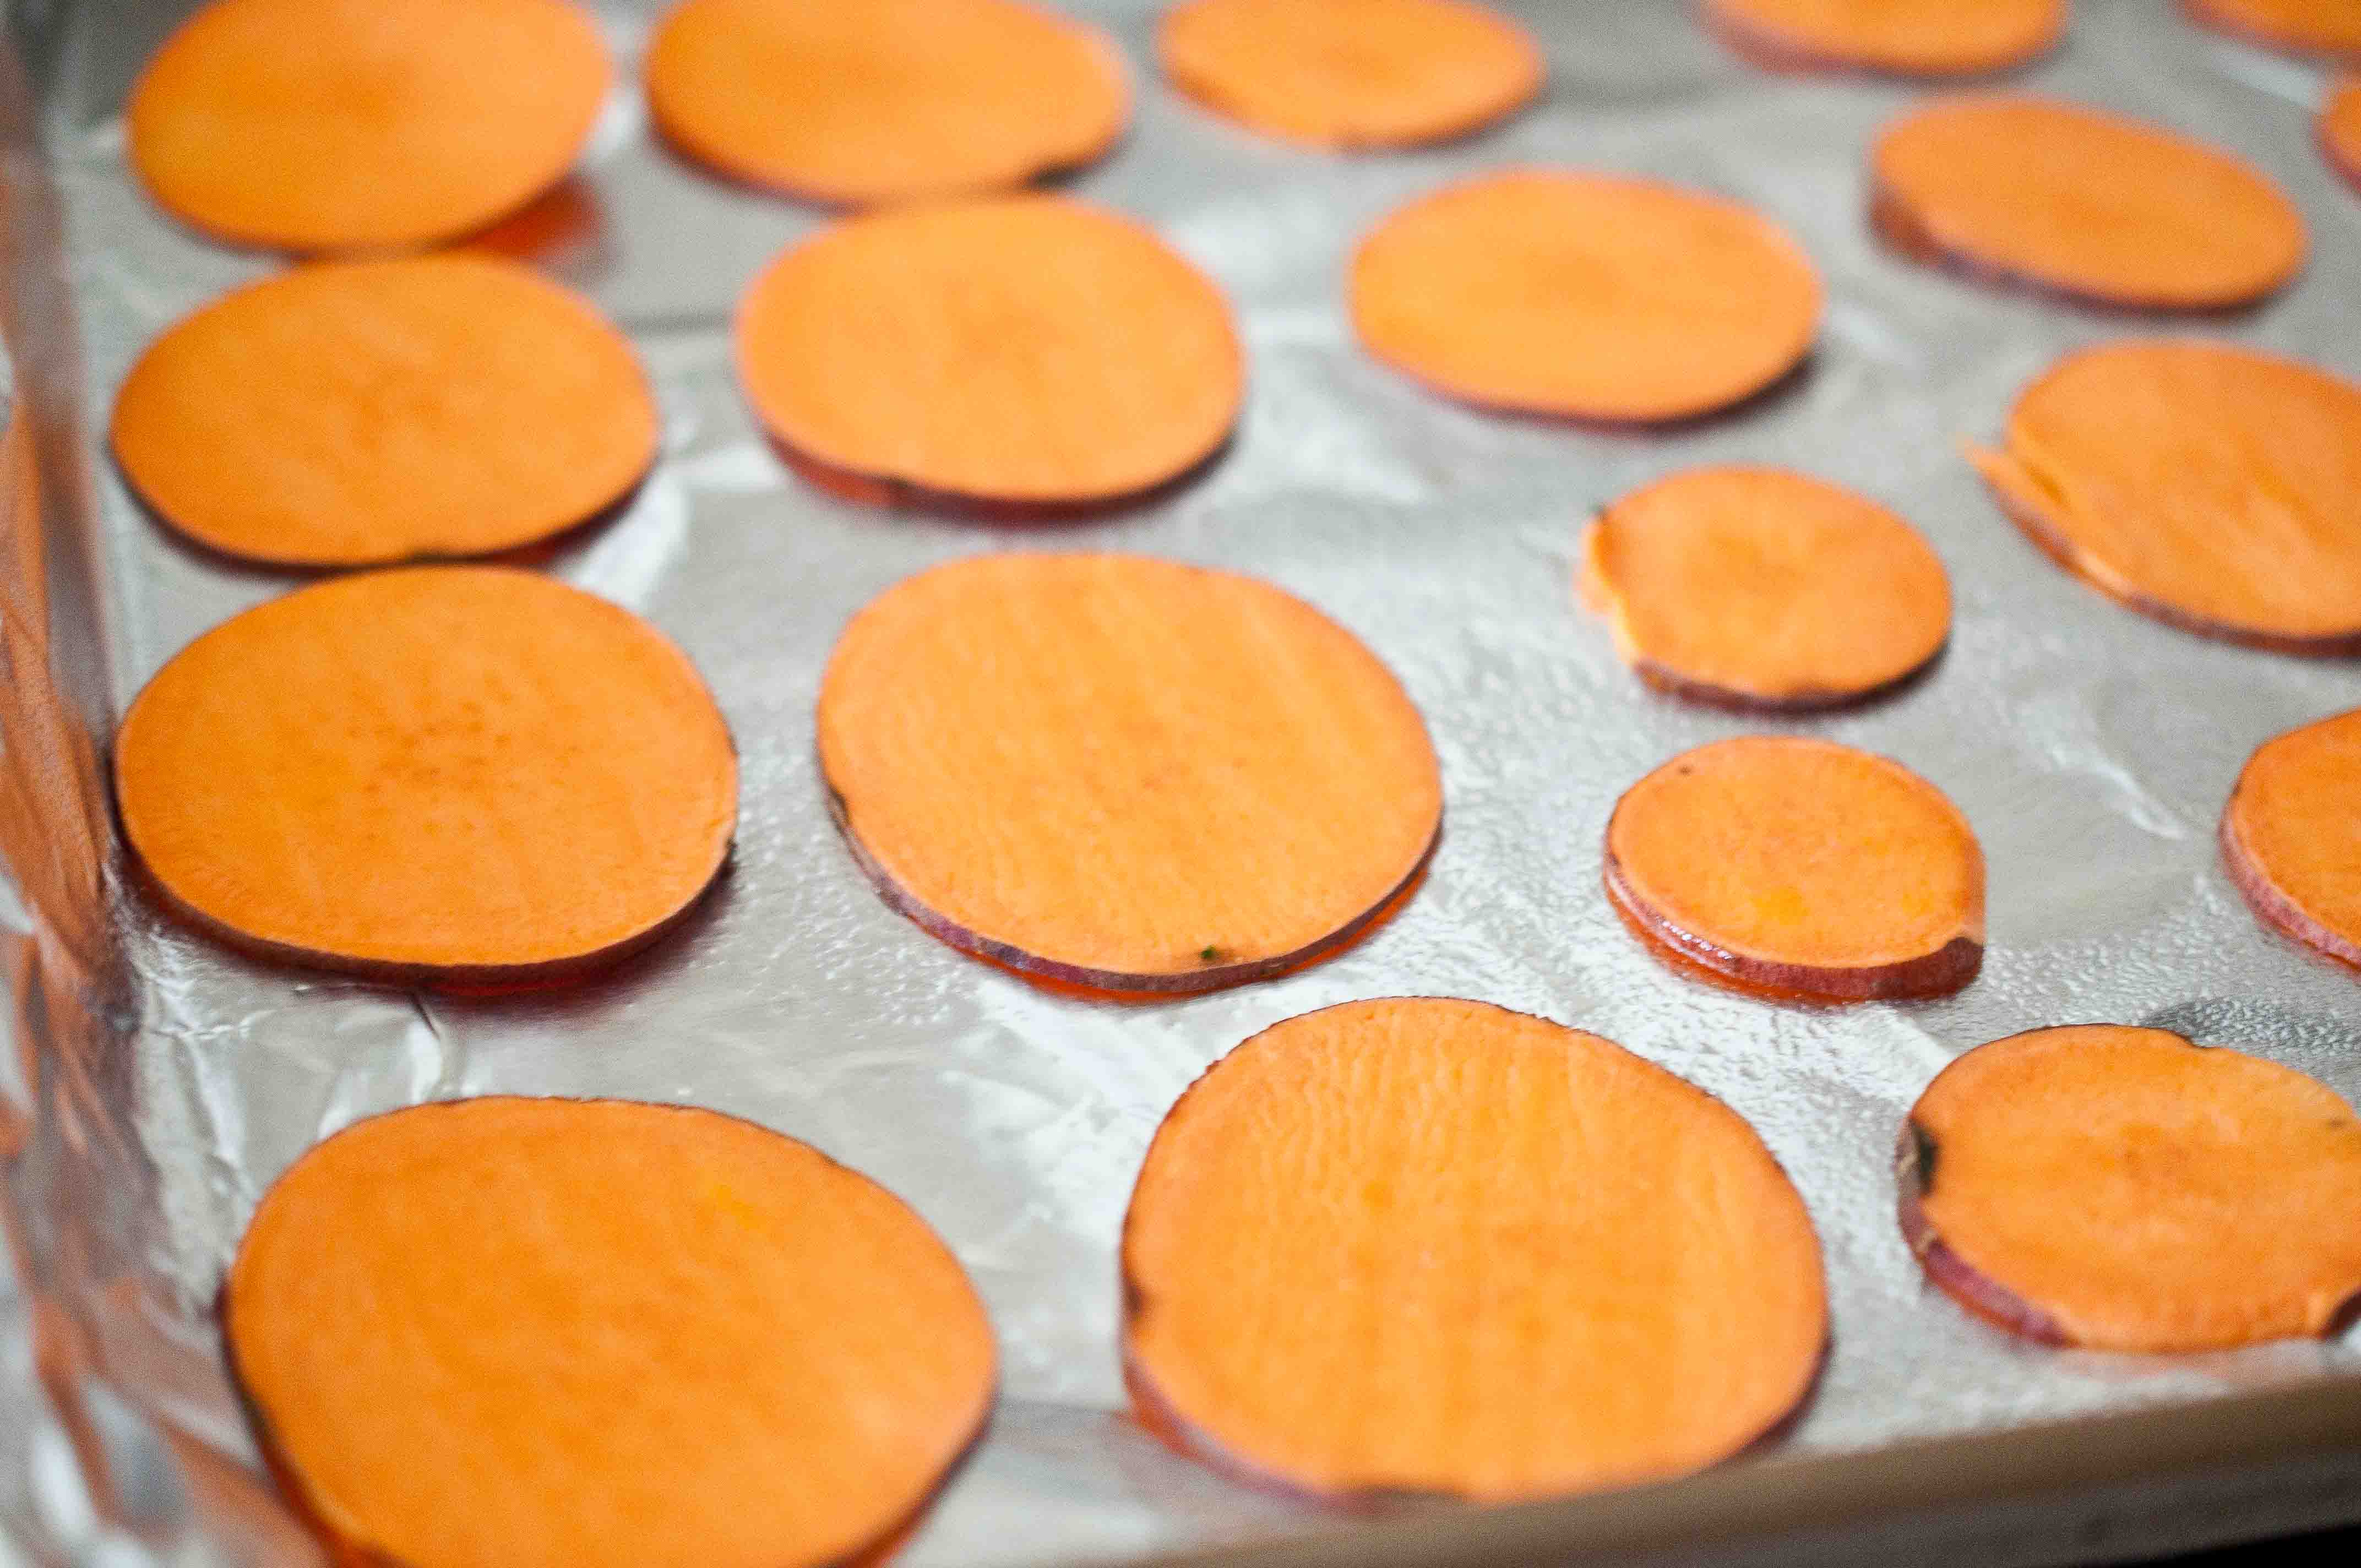
Slice the potatoes as thin as you can possibly make them. Using a mandolin slicer is the best way to do this, as it insures that your potato slices will cook evenly. If you don’t have a slicer, use this as an opportunity to practice those knife skills! Remember that thick slices will yield much different results.
Cover a baking sheet with aluminum foil, shiny side up. Spray with olive oil spray. Arrange the potatoes in a single layer on the baking sheet, making sure they don’t touch each other. Spray lightly with olive oil spray and sprinkle lightly with sugar. Flip the slices over and repeat. Bake at 375 for ten minutes. flip over and continue to bake until the potatoes are browned, about 8-10 minutes. Keep a close eye on your chips, they go from done to burned very quickly.
Make the sauce:
In a pot over high heat, add the sugar and the honey. Stir until the sugar is disolved, do not stir again while the caramel is cooking, but swirl the pan every 30 seconds to redistribute the caramel sauce. Allow to cook until the sugar is an amber color and about 220-225 degrees. Remove from heat and stir in the butter. Add the cream, vanilla and cinnamon and stir until combined and the sauce stops bubbling. Allow to cool a bit before serving.
I’m a breakfast girl. It isn’t possible for me to go the 16 hours between dinner and lunch the following day without eating. I become a crazy person when I’m hungry. Like the plant from Little Shop of Horrors yelling "FEED MEEE!!!" at random strangers. If I ever get stuck on a deserted island, or in a plane crash in the Andes, don’t pray for me, pray for which ever poor soul has to deal with the hungry version of me. Not pretty. Plus I just make bad decisions when I’m hungry, which results in me coming to the conclusion that an entire jumbo sized bag of Jalapeno Kettle Chips is just one snack, and it’s totally fine for me to eat the entire thing.
Because of this, I must eat breakfast. And besides my long standing love with Saturday Morning Breakfast indulgences, I want a super healthy breakfast 6 days a week.
And you are probably sick of all the quinoa, but I’m not. Not yet. It SO good for you, and if you cook it the right way, it has a great flavor and texture. Don’t cook it the same way you cook rice or it will be mushy.
Plus a healthy dose of Calcium, Vitamins A, B-6 & C
Only .5 grams of the bad Saturated Fat
Not too bad. And an easy thing to grab on your way out the door in the morning.
So that you can conquer the world without being a whiney and unreasonable. Or maybe that’s just me.
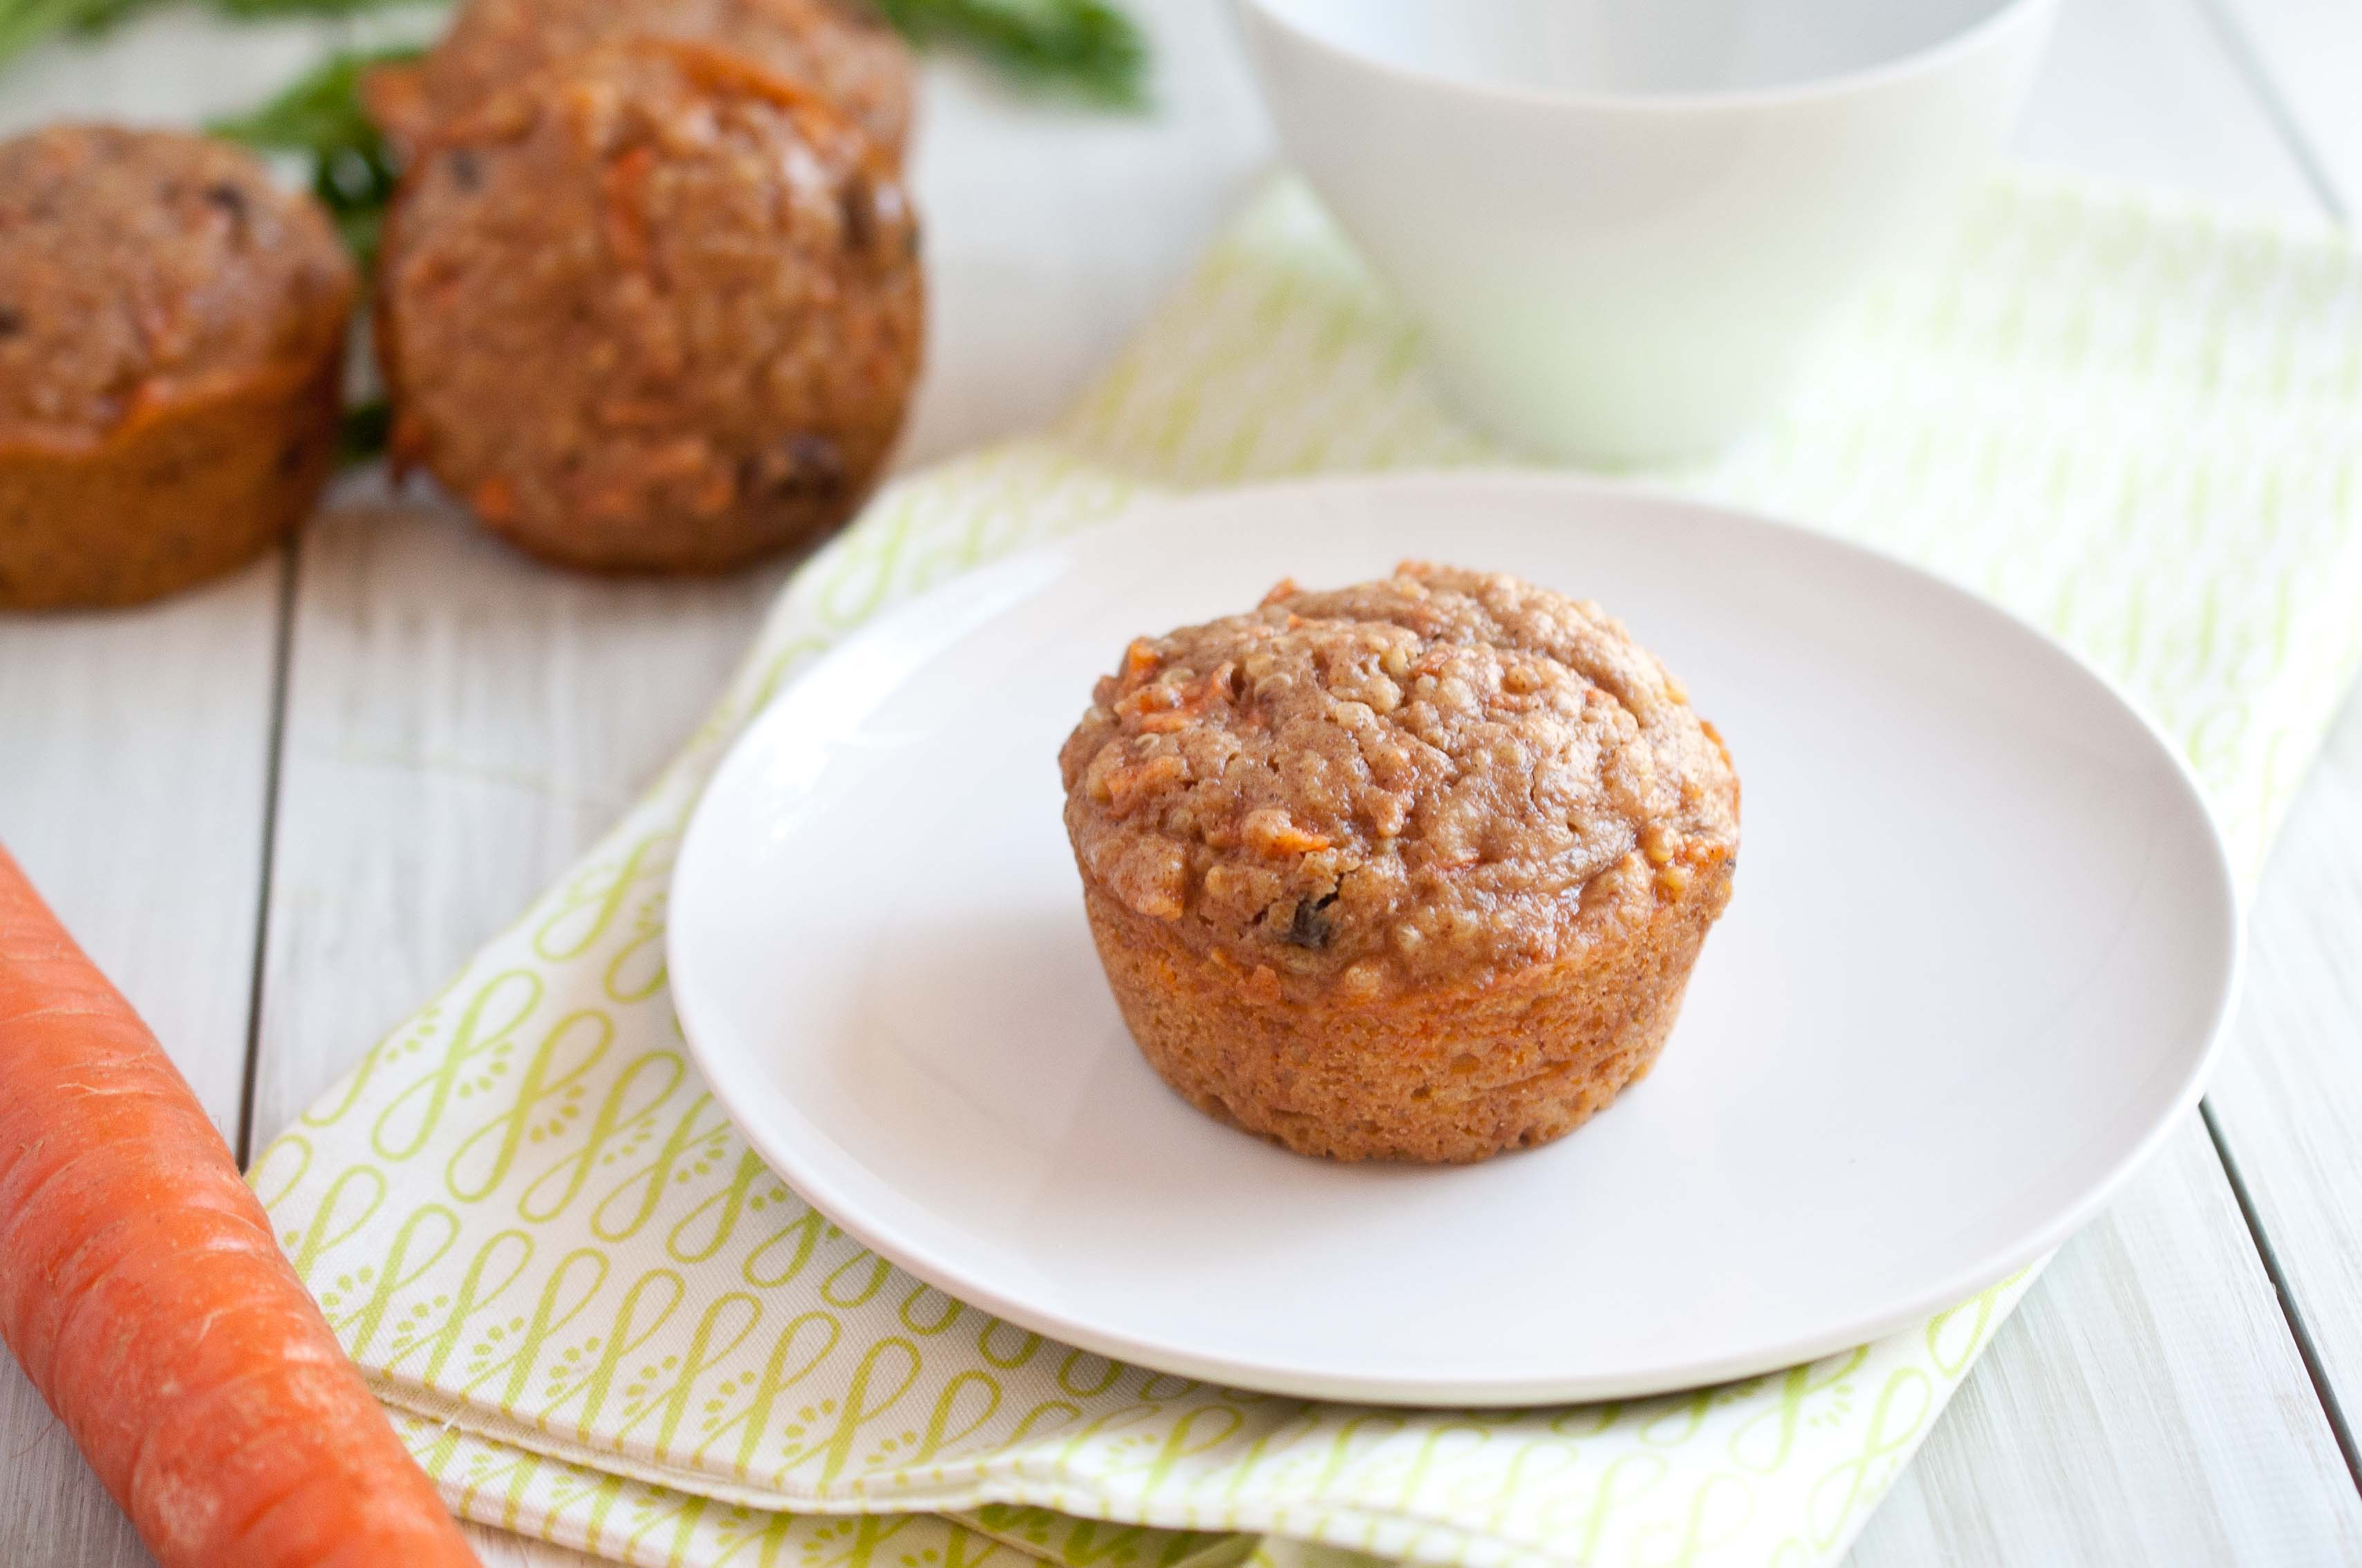
Quinoa Carrot Cake Breakfast Muffins
Ingredients
2/3 cup whole wheat flour
1/3 cup cooked quinoa (You need to cook your quinoa with 1 part quinoa to 1.5 parts water, too much water makes it mushy)
1/3 cup sugar
1 tsp cinnamon
1/4 tsp nutmeg
1 tsp baking powder
1/2 cup fat free sour cream
1/4 cup unsweetened apple sauce
2 tbs raw honey
1 tsp vanilla extract
1 egg
3/4 cup carrots, peeled and finely grated (place between sheets of paper towels to remove excess water)
1/4 cup of raisins
2 tbs chopped walnuts
(Makes 6 muffins)
Instructions
Preheat oven to 350.
In a large bowl, combine the flour, quinoa, sugar, cinnamon, nutmeg, and baking powder. Make a well in the ingredients. In another bowl, combine the sour cream, apple sauce, honey, egg and vanilla until smooth. Pour the wet ingredients into the well you made in the dry ingredients. Stir until just barely combined, a few lumps is fine. If you over mix, your muffins will be tough. Add the carrots, raisins and walnuts and stir until just combined.
Grease 6 wells of a muffin tin (or line with muffin papers). Pour evenly into the 6 wells, about 2/3 full.
Bake at 350 for 18-22 minutes or until the top springs back when touched.
By now, you have probably heard a thing or two about this scandal with Paula Deen. If you haven’t, here is a recap:
Paula Dean was diagnosed with Type 2 Diabetes.
Three years ago.
The number 1 treatment for Type 2 Diabetes is diet and exercise.
She continues to cook large volumes of high fat, high sugar food on TV, in her restaurants and cook books.
She now wants to endorse a Type 2 diabetes drug and "comes clean" about her diagnoses.
The public freaks out.
Although we all have opinions about, well, just about everything and everyone we have ever met, I’m not concerned about Paul Deen. I don’t know her, and it’s none of my business.
But I am concerned about you. And me. And what I feel like is my responsibility to you. I have quite a few "special occasion" food recipes on this blog, made with high fat, high calorie, high sugar ingredients. And I hope that doesn’t give you the wrong idea.
Learning from someone else’s mistakes is better than making one yourself, the same dramatic positive changes without the mess to clean up. Use her as inspiration, not as fodder for gossip. She is unhealthy and needs to make changes in her life, but that’s her business. How can we take this all in, look at ourself and see how to make our own changes rather than making her the villain? How can we help the people we love who are living unhealthy lives? How can we all be in this together and use it as a way to live better and eat better?
How can we have those uncomfortable conversations with people we love who are killing themselves with food? You know who just popped into your head when you read that. Why haven’t you talk to that person?
Use Paul’s story as an icebreaker in your own life. As inspiration to change.
Whether she decides to change or not, who cares?
I’m glad this came out, but can we stop pointing fingers and starting living better?
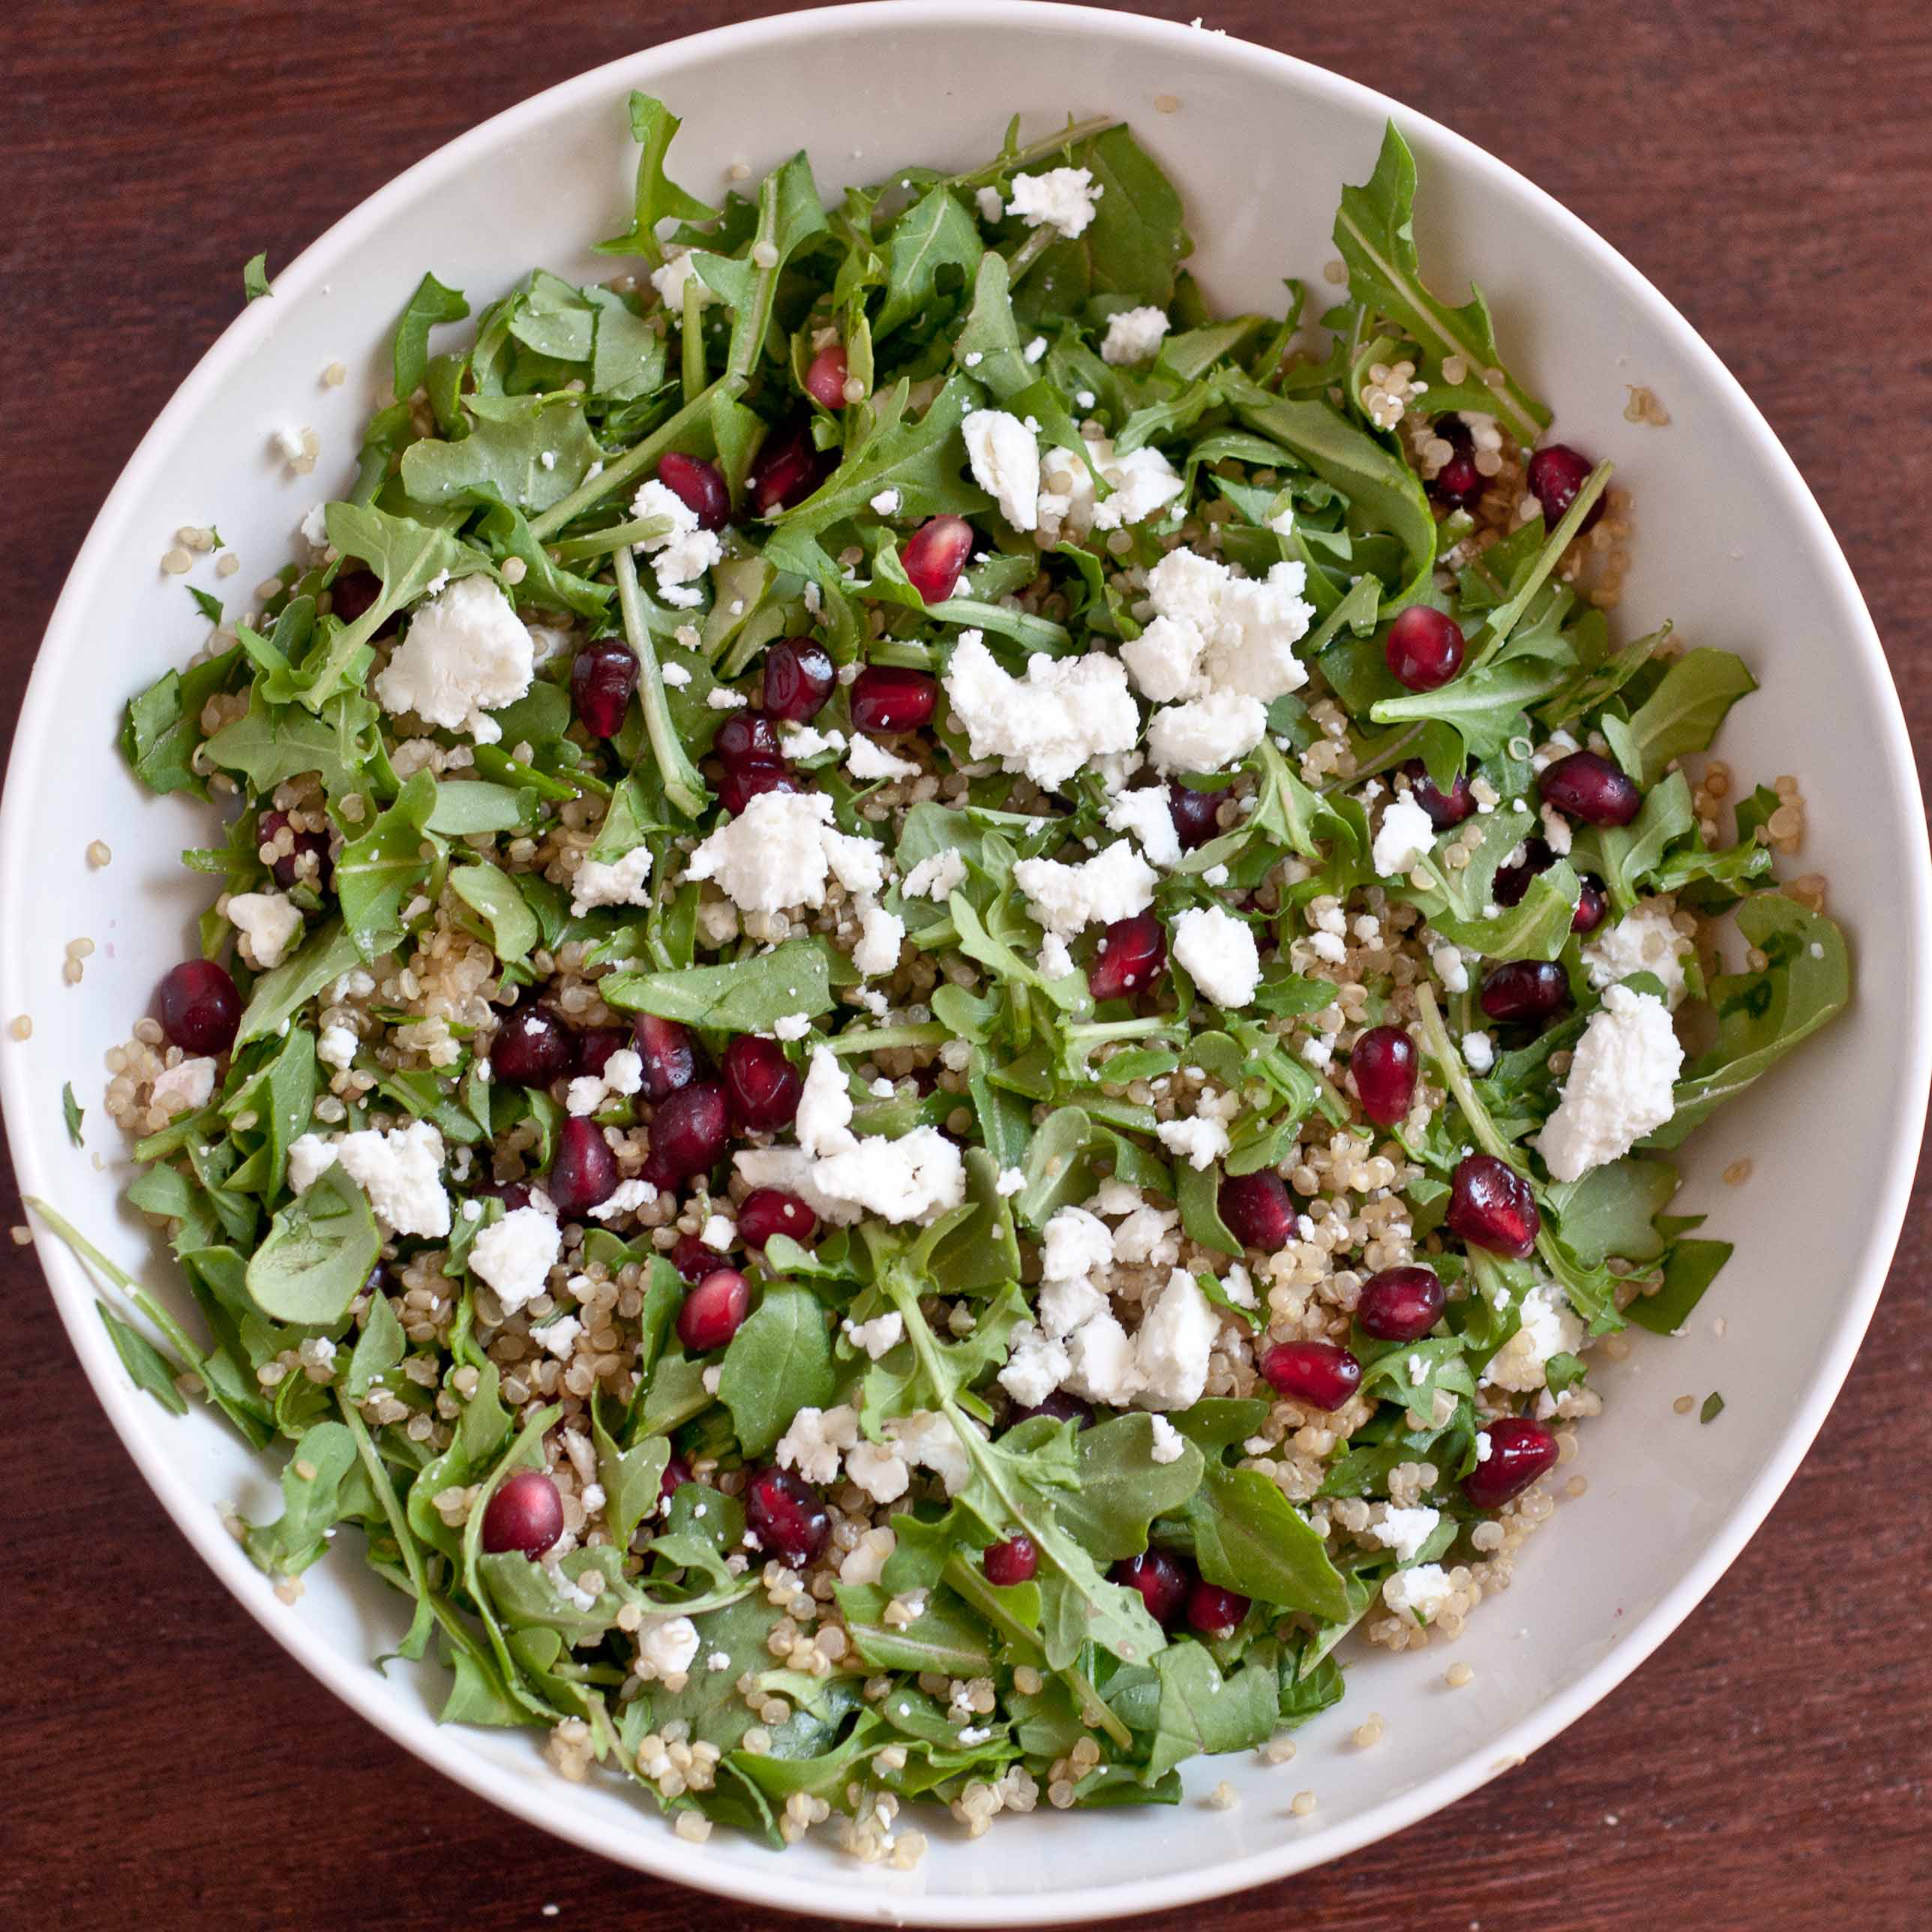
Here is my salad, my way of staying in shape. I eat it about 5 days a week in various forms and this one is my favorite.
Chocked full of protein, iron, amino acids, general good stuff. It also keeps me full until dinner.
So I made this resolution to not be so hard on myself.
This is a resolution I made, not for myself as much as for my daughter. And how I model womanhood to her.
I want to show her how to focus more on her successes than her failures.
Hold her strengths closer than she holds her weaknesses.
Our children only learn so much from our words, but our actions, especially those that we think they don’t see, are ingrained in who they are.
I’ve stopped using self deprecating statements, as my vow not to model for her what I so badly want to protect her from.
As I see her tiny body grow more and more into a mirror of my own, I now realize that all the things I say about myself, I am inadvertently saying about this tiny "Me" who is now running around trying to mimic what I do.
It’s cute when she says, "Bacon, Yum!"
Would it be as cute if she looks in the mirror and says, "I’m too fat to wear this"?
I don’t get to pick and choose what she picks up from me. I can just be more aware of my own attitudes and try to shape them into what I want her to pick up. And hope that I do my best to eliminate the mentalities that cause me to say hateful things about myself.
I want to teach her to look back on her mistakes with a postivive filter.
Not to say:
"What was I thinking?"
But instead to try and figure out:
"What was I learning?"
How the heck does this relate to Mac N Cheese soup? Well, most of you have resolutions about weight. Some of you probably even need to lose weight for health reasons. But if you have a daughter, or even a sensitive son, please don’t say:
"I don’t want to be so fat anymore."
Instead:
"I want to be healthier. Run faster, jump higher."
Because, the truth is, unlike a lot of regrets we have in life:
Your weight is fixable.
That is great news, because so many things we have done aren’t. Make a plan, stick to it. Focus on your success, not your failure and give yourself time to make it happen. Because,if you have kids, our resolutions aren’t that different. They are for our kids, modeling how to live. Eat how you want them to eat and they will follow suit.
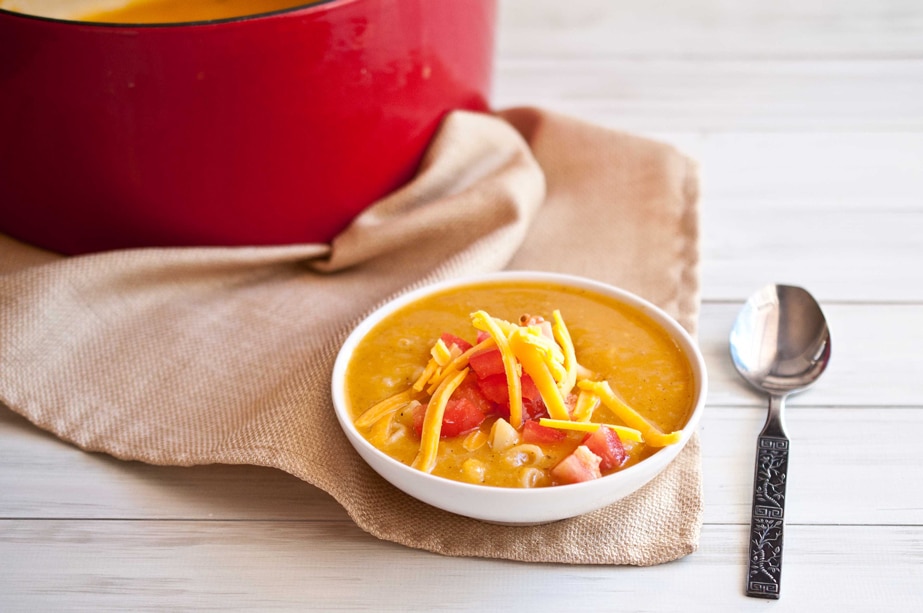
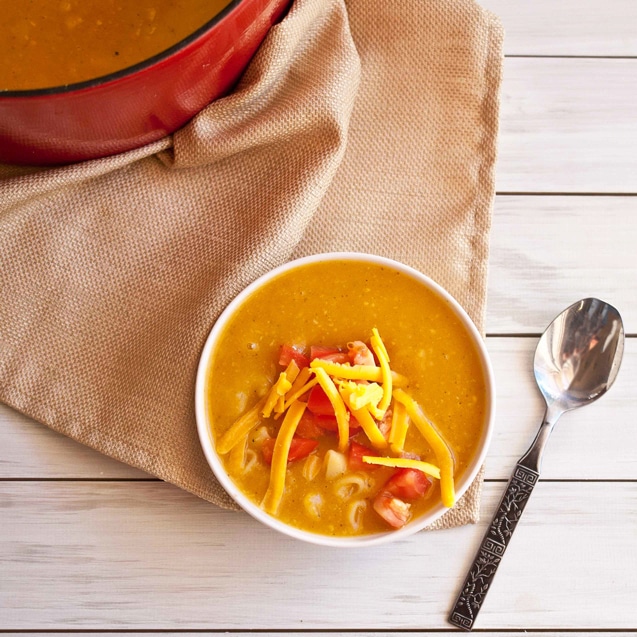
Mac N Cheese soup is great way to do this. It’s familiar, with just a bit of the high calories stuff. I’m focusing on the strengths of the food to bring it into a high flavor, low calorie food.
I used the Recipe Calorie Calculator on Spark people to find out how many calories are in this. It’s a great tool for homemade food. You can even adjust the ingredients to see how you can get the same amount of food for less calories.
Healthy Soup Recipe: 220 Calorie Mac N Cheese Soup
Ingredients
2 tbs Smart Balance Light (or other low cal margarine spread)
1/3 cup red onions, chopped
4 cloves of garlic, minced
1 tbs flour
6 cups of low sodium, fat free chicken broth
3 cups of butternut squash, fresh, peeled and chopped
2/3 cup Macaroni noodles
1/3 cup sharp cheddar, shredded
1/2 tsp chili powder
Salt and pepper to taste
1 cup chopped tomatoes
Makes 4 servings.
Instructions
In a large pot or dutch oven over medium high heat, melt the Smart Balance Light. Add the onions and cook until soft and translucent, but not browned. Add the garlic and stir until you can smell them cooking, about 20 seconds. Add the flour and whisk until combined with the butter spread and no flour lumps remain. Add the broth and bring to a boil. Add the cubes of butternut squash, place the lid on at an angle allowing the steam to vent, boiling until the squash is very soft. Remove from heat and allow to cool a bit. Using an immersion blender, puree the squash until smooth and creamy. Return to heat. Add the noodles and cook until al dente. Add the cheese and stir until melted. Remove from heat and add the spices, adjusting to your preference. Add to bowls and top with chopped tomatoes.


