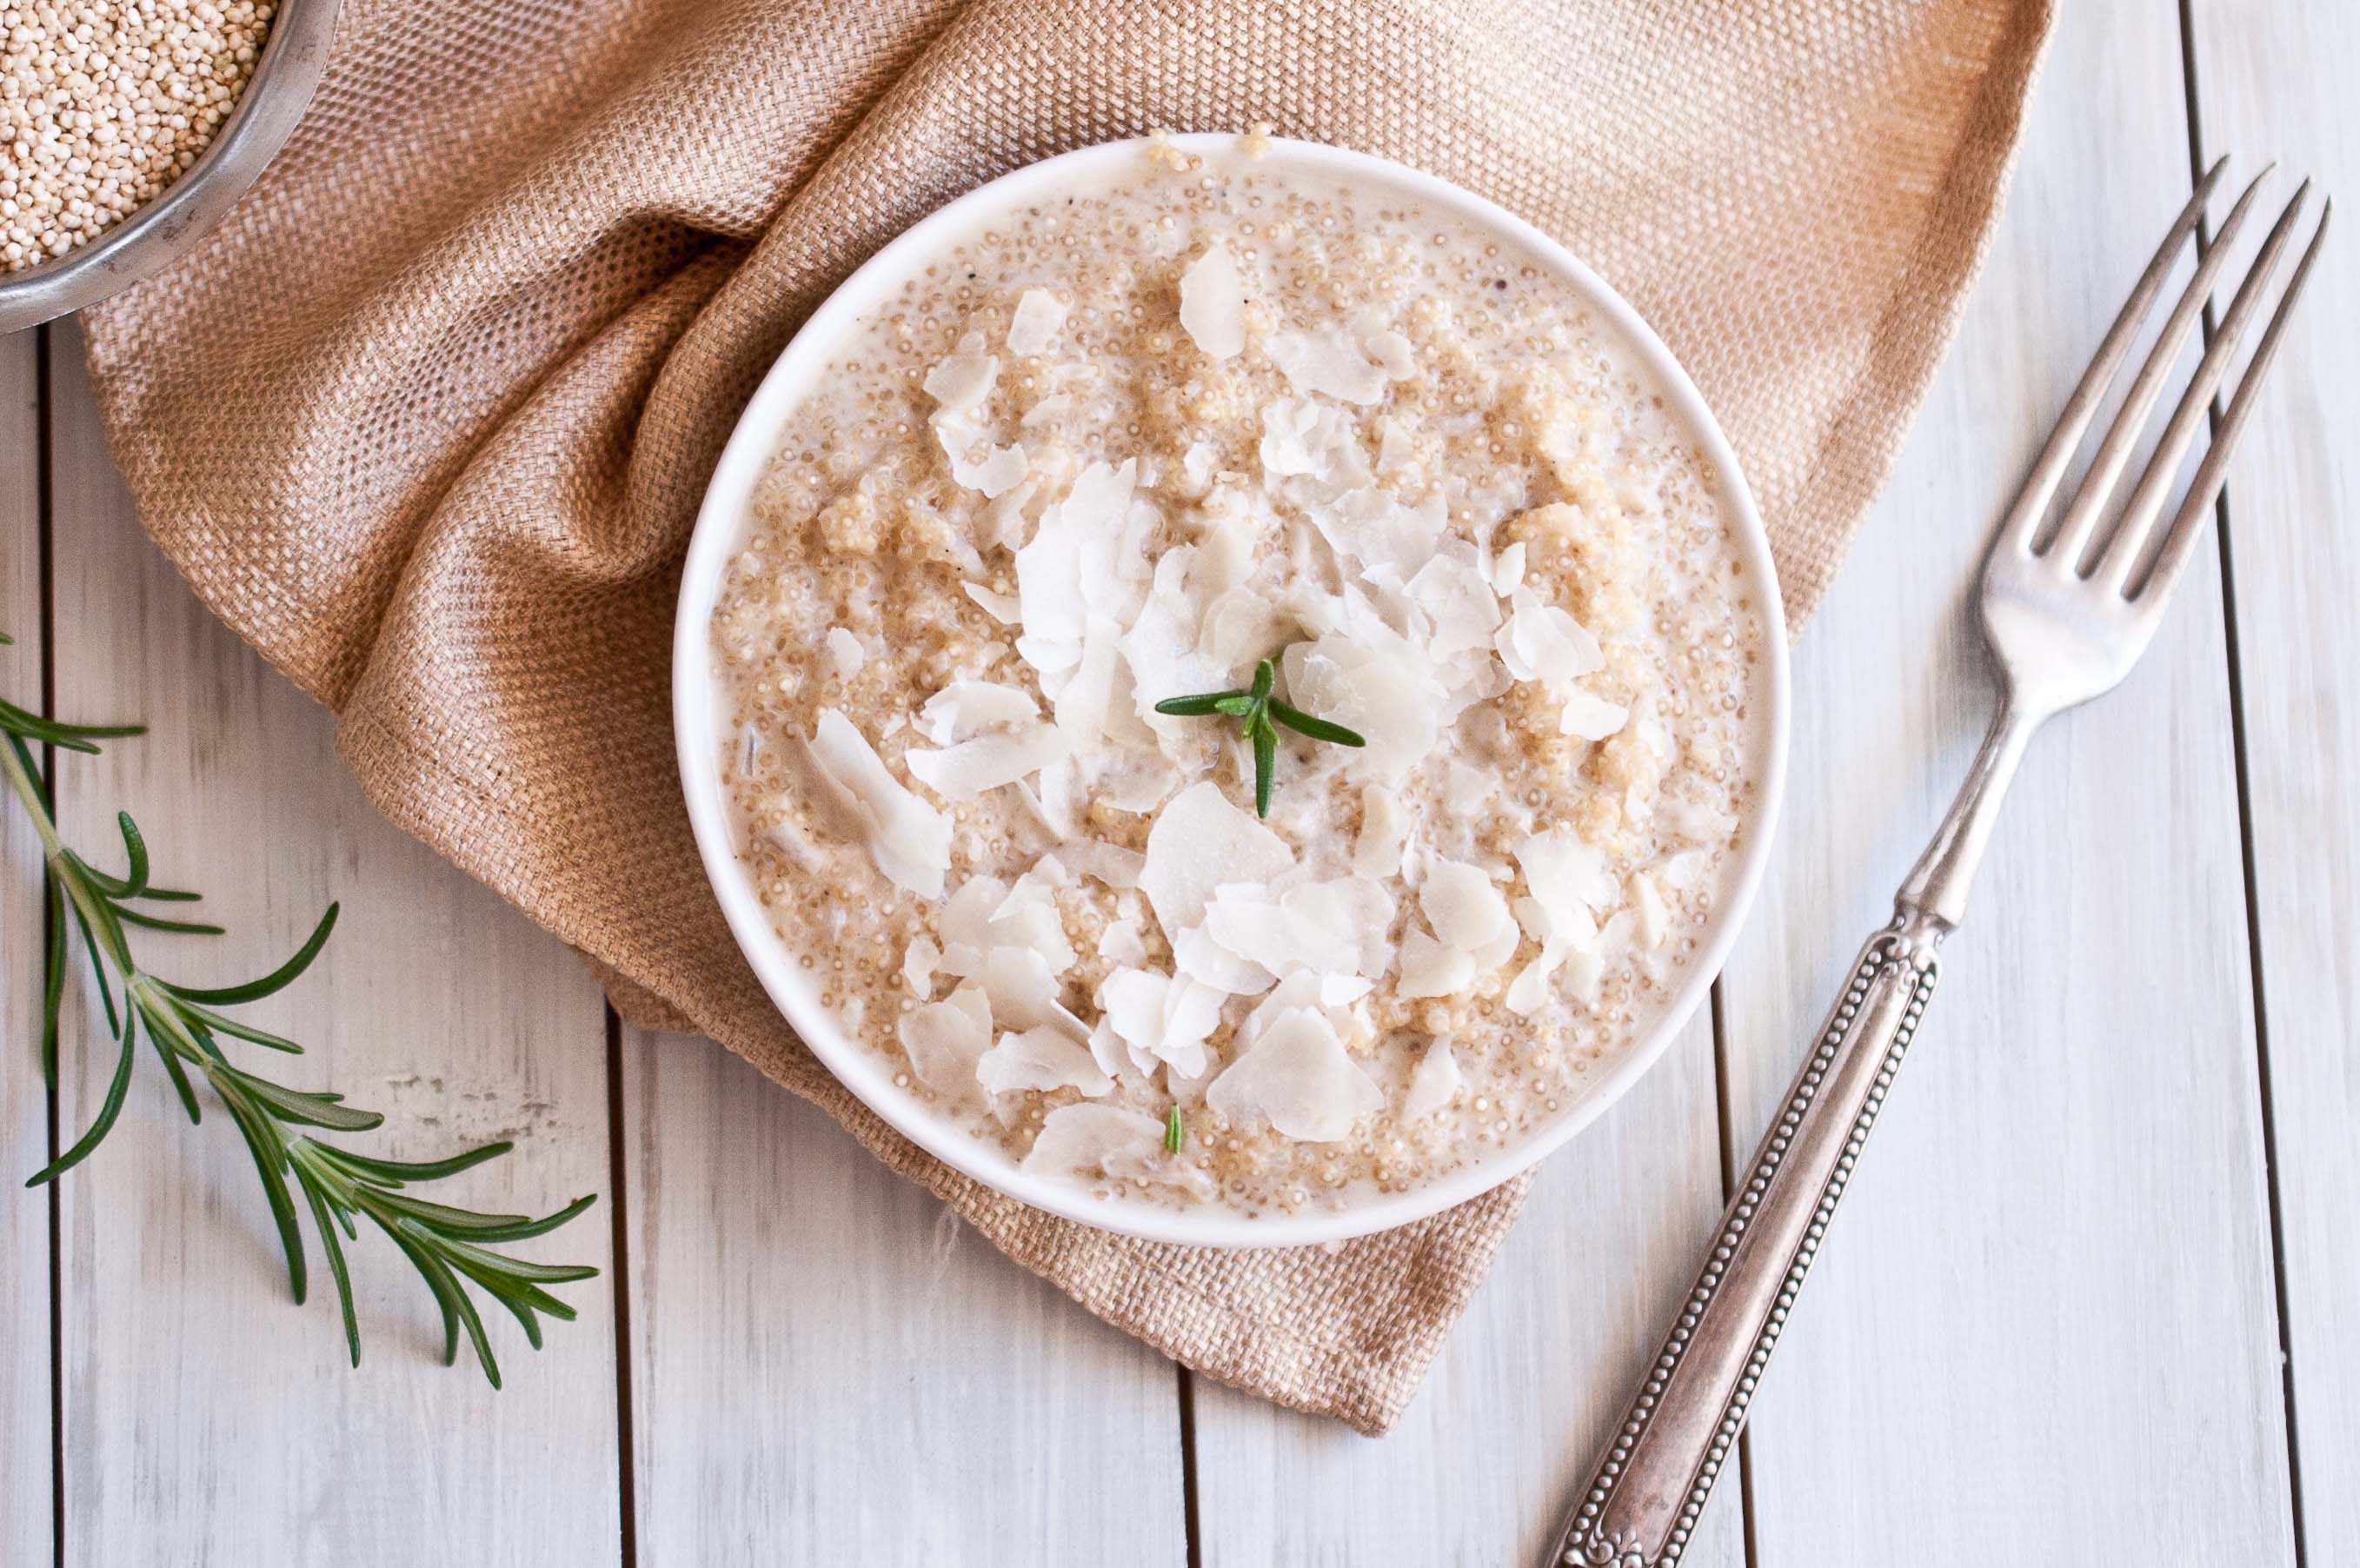
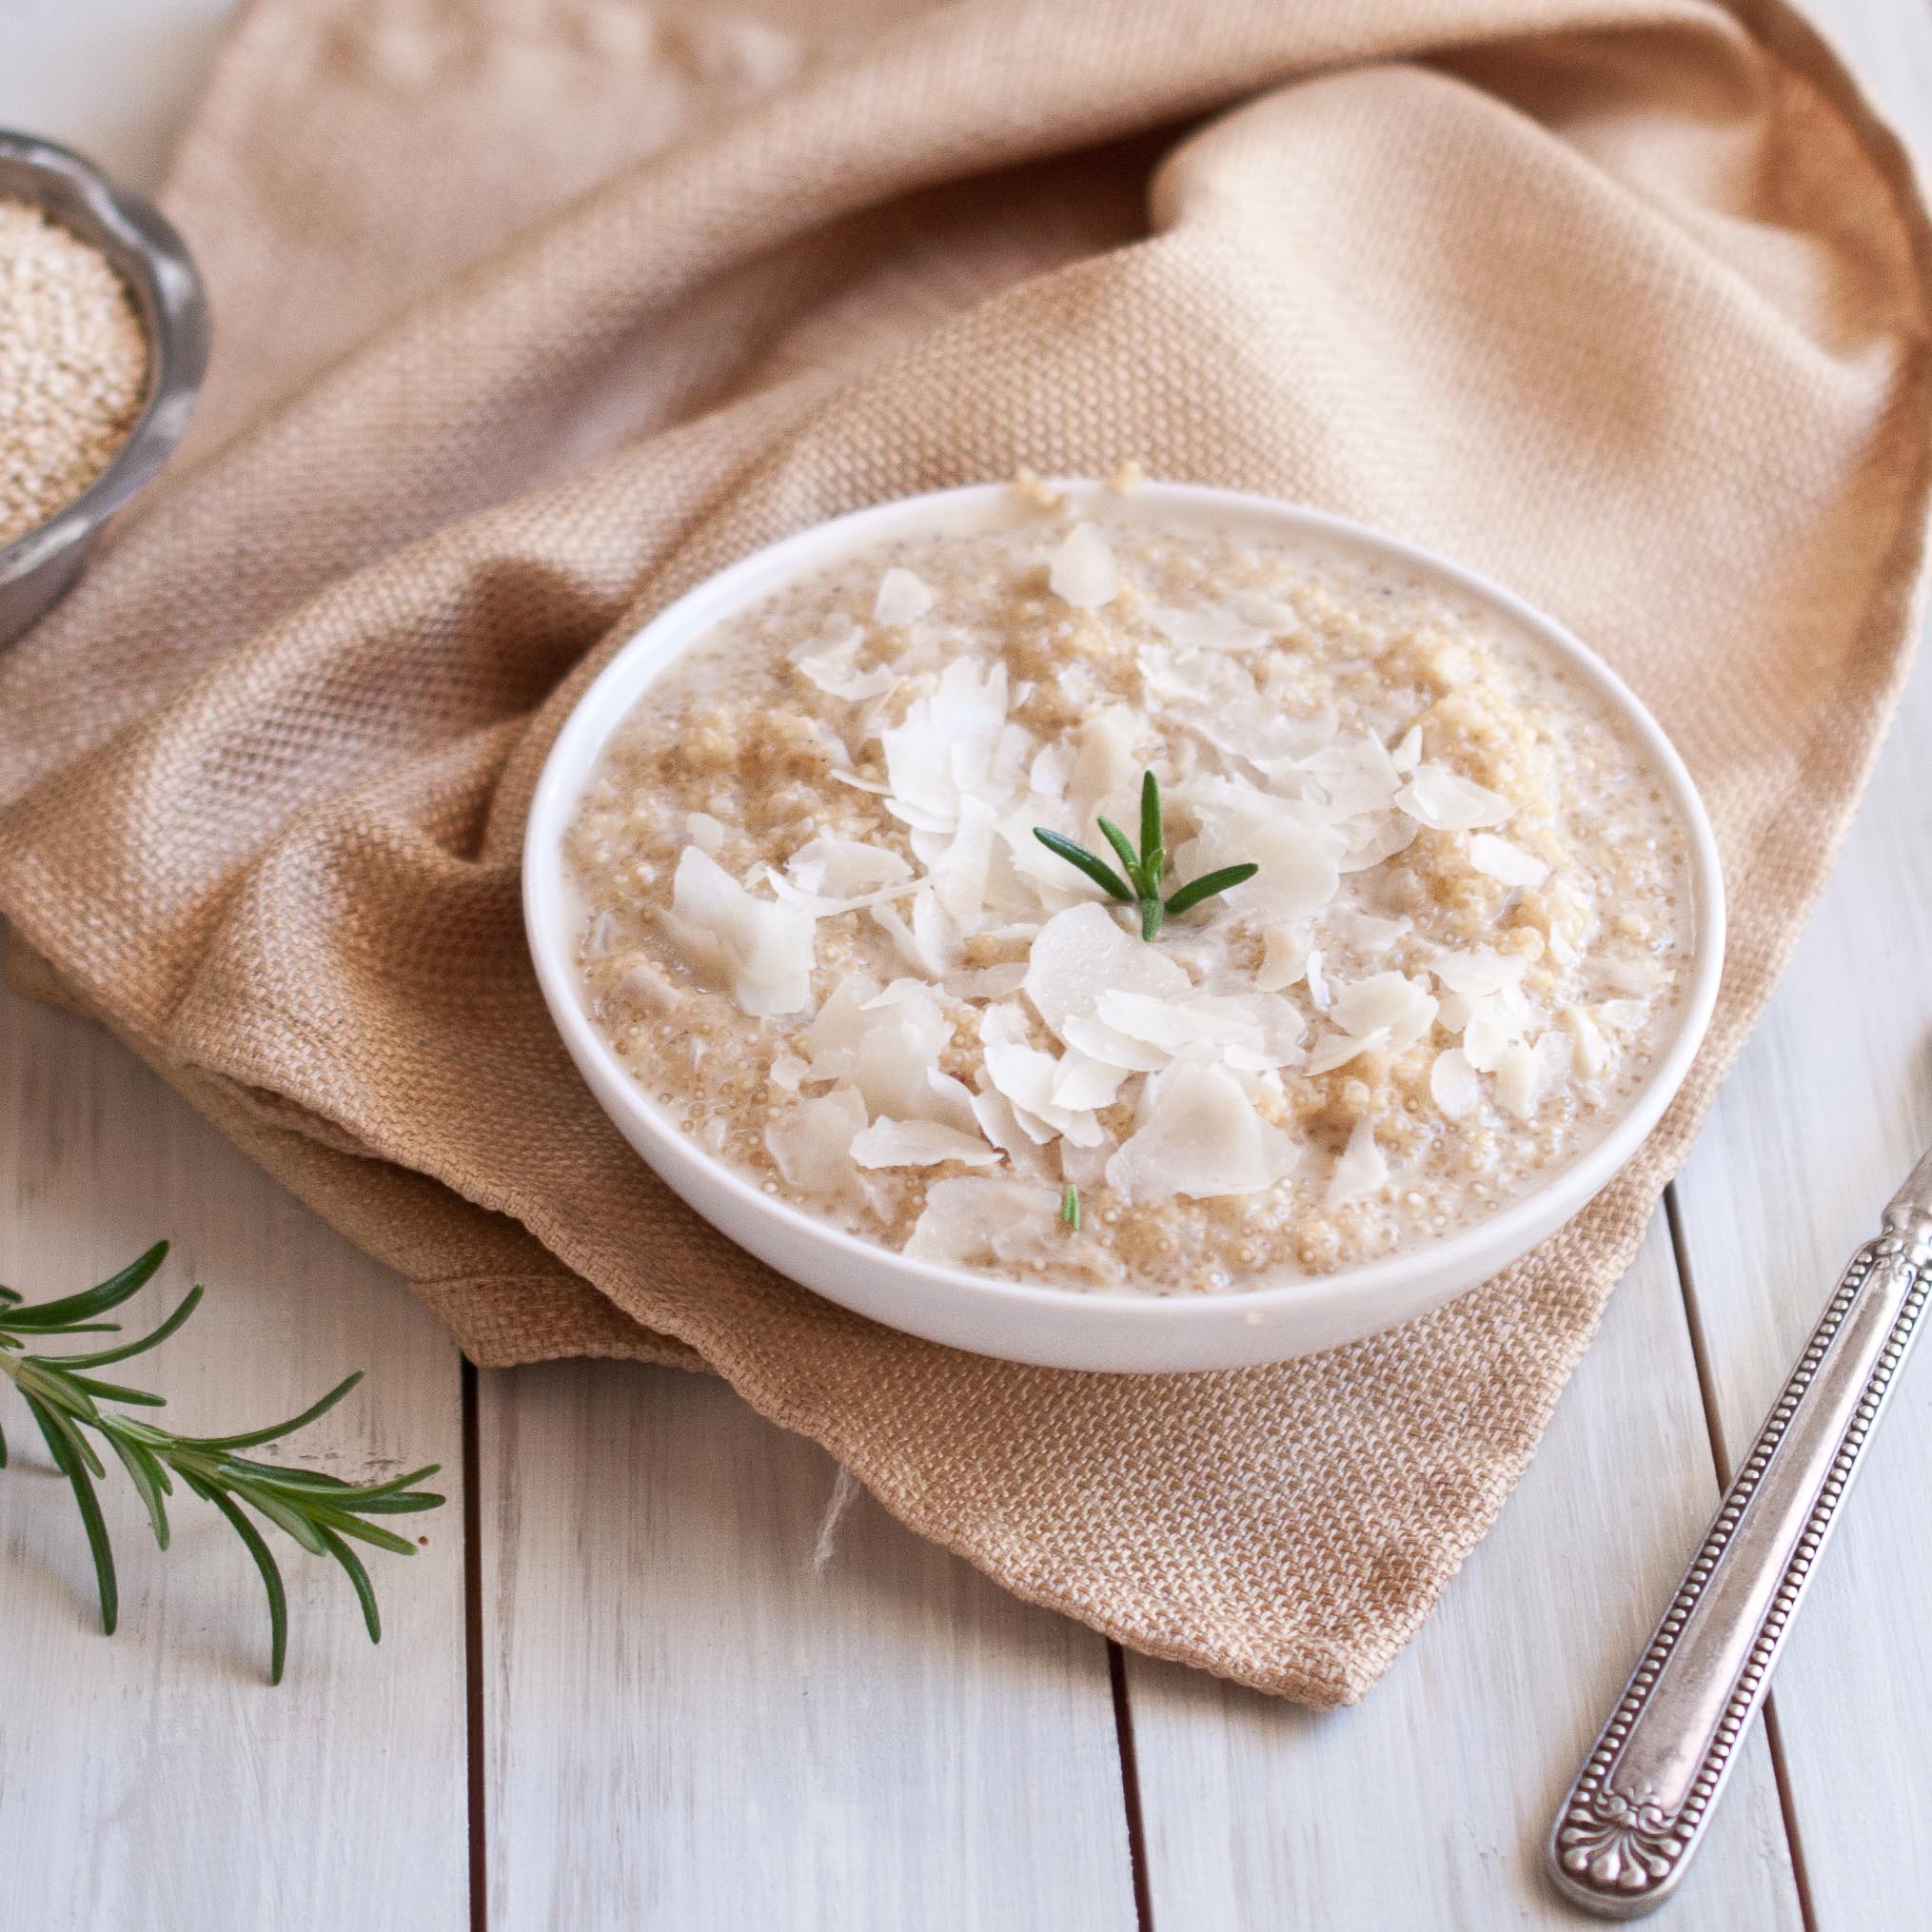
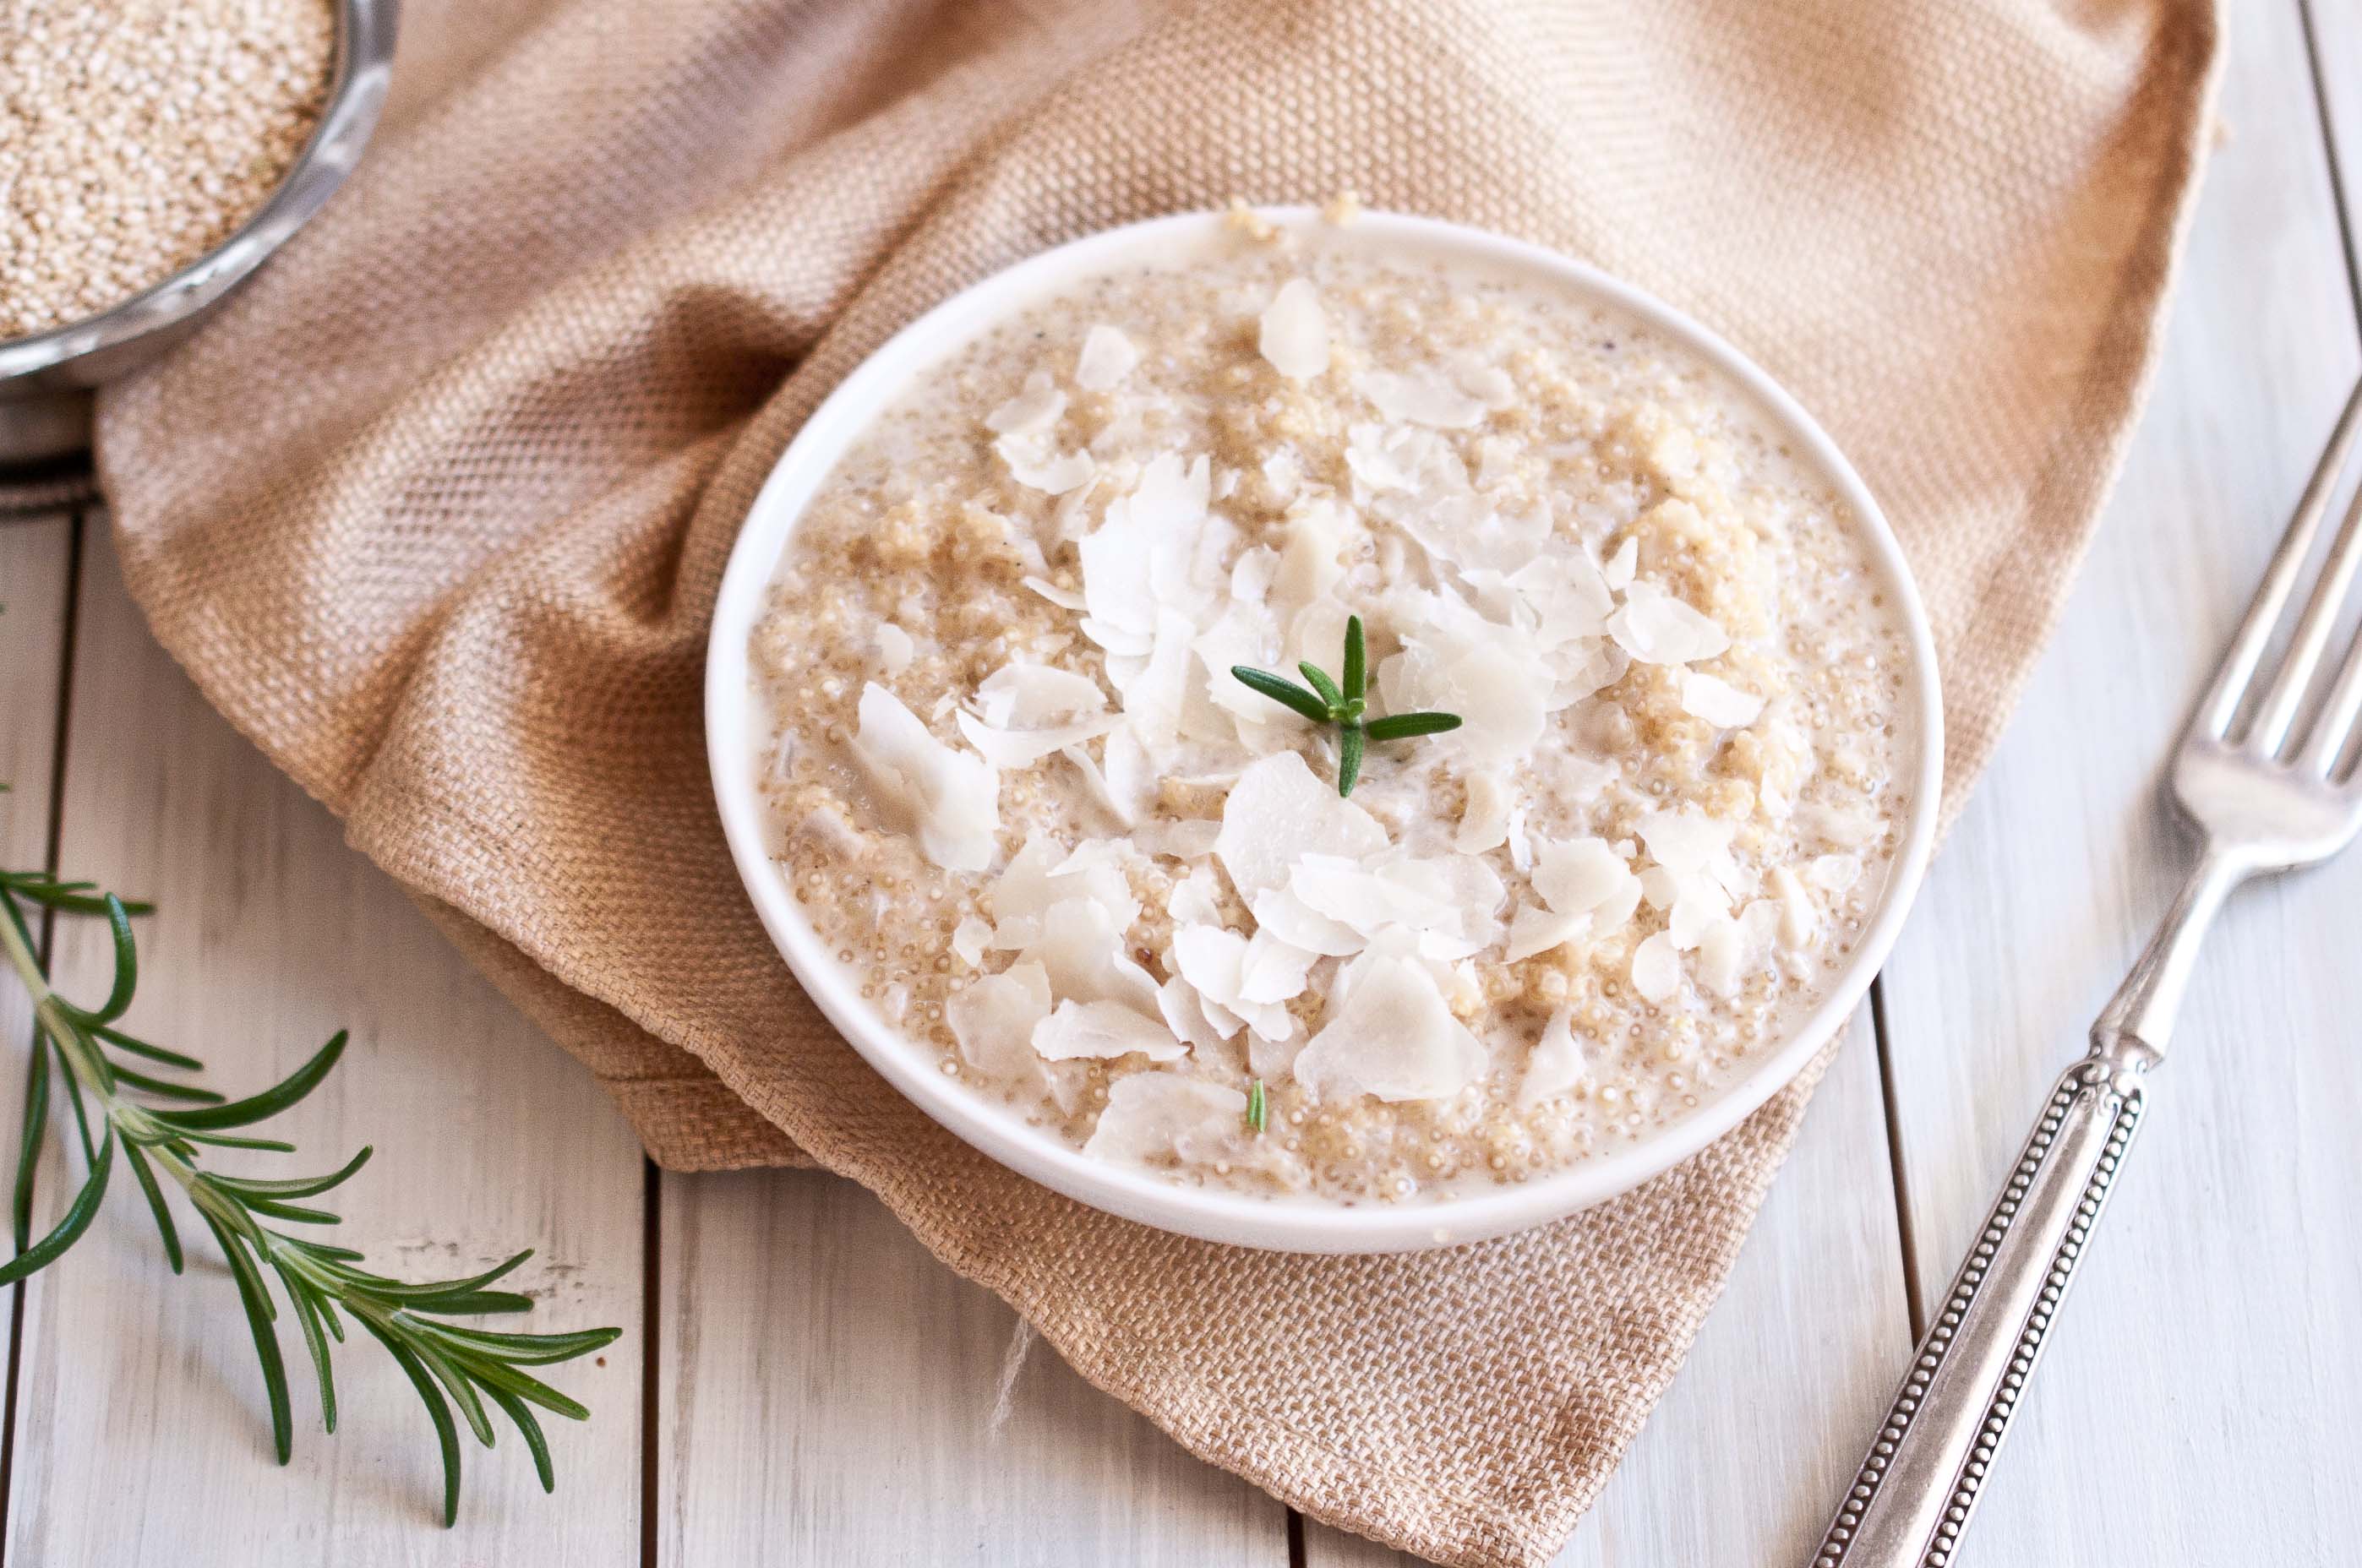
Risotto was the first recipe I ever mastered. I was so proud of myself, I could make a recipe without even looking at the directions once. And to this day, it’s my husbands favorite dish that I make, I’m pretty good at it.
And I’ve recently had this fascination with quinoa (you pronounce it Keen-Wa). It’s a pretty amazing little grain, it has protein, fiber, iron, and even has some magical powers. Well, sort of. It is credited with preventing migraines, assisting in rebuilding torn tissues, lowering blood pressure and even promoting fat burning. Pretty much something I want to put in my body on a daily basis.
I make quinoa salads for lunch at least once a week. Chop up whatever vegetables I can find, mix with a 1/2 cup quinoa and some balsamic and I’m set. Even keeps me full for hours.
This dish is a mix of those two loves, risotto and quinoa. To be quite honest, I prefer the rice version, but as far as a quinoa dish goes, this was pretty great. With all of those fabulous attributes that are in quinoa, I might as well call this Magical Risotto.
Quinoa Risotto
3 cups chicken broth
3 Tbsp unsalted butter
1 tbs chopped shallots 3 cloves of garlic, minced
1½ cups Quinoa, rinsed and dried
1/4 cup dry white wine (like Savignon Blanc) ¼ cup grated Parmesan cheese
1/4 cup heavy cream
Salt and Pepper
Place the chicken broth in a sauce pan and bring to a mild simmer, keeping to warm, but not boiling.
In a pan, toast the dry quinoa, stirring constantly, until you can smell a nutty aroma, about 3 minutes.
In a separate pot, add the butter and allow to melt over medium heat. Add the shallots and cook until opaque, but don’t allow to brown. Add the garlic and cook until you can smell them, about 20 seconds
Stir in the quinoa, cooking until it is completely coated with butter, don’t allow to brown. About 2 minutes.
Add the wine and cook until the pan begins to dry, stirring frequently. About 6 minutes.
Add a ladle full (about 2/3 cups) of broth into the quinoa. Stir frequently until the broth is almost dry, and then add another ladle full and repeat. This process should take about 15-20 minutes. Don’t leave the risotto while it’s cooking, the rice on the bottom of the pan burns easily. If you run out of broth, just use hot water the same way you would broth. If you have made risotto before, just know that the quinoa version will require less broth.
Once your risotto is cooked through (taste it to verify that the quinoa is cooked), turn heat to low and add the cheese, cream and salt and pepper to taste. Risotto should be soft and wet, not dry like typical quinoa. It should be firm enough to be served as a side on a plate, but soft enough to giggle when the plate is shaken.
So I made this resolution to not be so hard on myself.
This is a resolution I made, not for myself as much as for my daughter. And how I model womanhood to her.
I want to show her how to focus more on her successes than her failures.
Hold her strengths closer than she holds her weaknesses.
Our children only learn so much from our words, but our actions, especially those that we think they don’t see, are ingrained in who they are.
I’ve stopped using self deprecating statements, as my vow not to model for her what I so badly want to protect her from.
As I see her tiny body grow more and more into a mirror of my own, I now realize that all the things I say about myself, I am inadvertently saying about this tiny "Me" who is now running around trying to mimic what I do.
It’s cute when she says, "Bacon, Yum!"
Would it be as cute if she looks in the mirror and says, "I’m too fat to wear this"?
I don’t get to pick and choose what she picks up from me. I can just be more aware of my own attitudes and try to shape them into what I want her to pick up. And hope that I do my best to eliminate the mentalities that cause me to say hateful things about myself.
I want to teach her to look back on her mistakes with a postivive filter.
Not to say:
"What was I thinking?"
But instead to try and figure out:
"What was I learning?"
How the heck does this relate to Mac N Cheese soup? Well, most of you have resolutions about weight. Some of you probably even need to lose weight for health reasons. But if you have a daughter, or even a sensitive son, please don’t say:
"I don’t want to be so fat anymore."
Instead:
"I want to be healthier. Run faster, jump higher."
Because, the truth is, unlike a lot of regrets we have in life:
Your weight is fixable.
That is great news, because so many things we have done aren’t. Make a plan, stick to it. Focus on your success, not your failure and give yourself time to make it happen. Because,if you have kids, our resolutions aren’t that different. They are for our kids, modeling how to live. Eat how you want them to eat and they will follow suit.
Mac N Cheese soup is great way to do this. It’s familiar, with just a bit of the high calories stuff. I’m focusing on the strengths of the food to bring it into a high flavor, low calorie food.
I used the Recipe Calorie Calculator on Spark people to find out how many calories are in this. It’s a great tool for homemade food. You can even adjust the ingredients to see how you can get the same amount of food for less calories.
Healthy Soup Recipe: 220 Calorie Mac N Cheese Soup
Ingredients
2 tbs Smart Balance Light (or other low cal margarine spread)
1/3 cup red onions, chopped
4 cloves of garlic, minced
1 tbs flour
6 cups of low sodium, fat free chicken broth
3 cups of butternut squash, fresh, peeled and chopped
2/3 cup Macaroni noodles
1/3 cup sharp cheddar, shredded
1/2 tsp chili powder
Salt and pepper to taste
1 cup chopped tomatoes
Makes 4 servings.
Instructions
In a large pot or dutch oven over medium high heat, melt the Smart Balance Light. Add the onions and cook until soft and translucent, but not browned. Add the garlic and stir until you can smell them cooking, about 20 seconds. Add the flour and whisk until combined with the butter spread and no flour lumps remain. Add the broth and bring to a boil. Add the cubes of butternut squash, place the lid on at an angle allowing the steam to vent, boiling until the squash is very soft. Remove from heat and allow to cool a bit. Using an immersion blender, puree the squash until smooth and creamy. Return to heat. Add the noodles and cook until al dente. Add the cheese and stir until melted. Remove from heat and add the spices, adjusting to your preference. Add to bowls and top with chopped tomatoes.
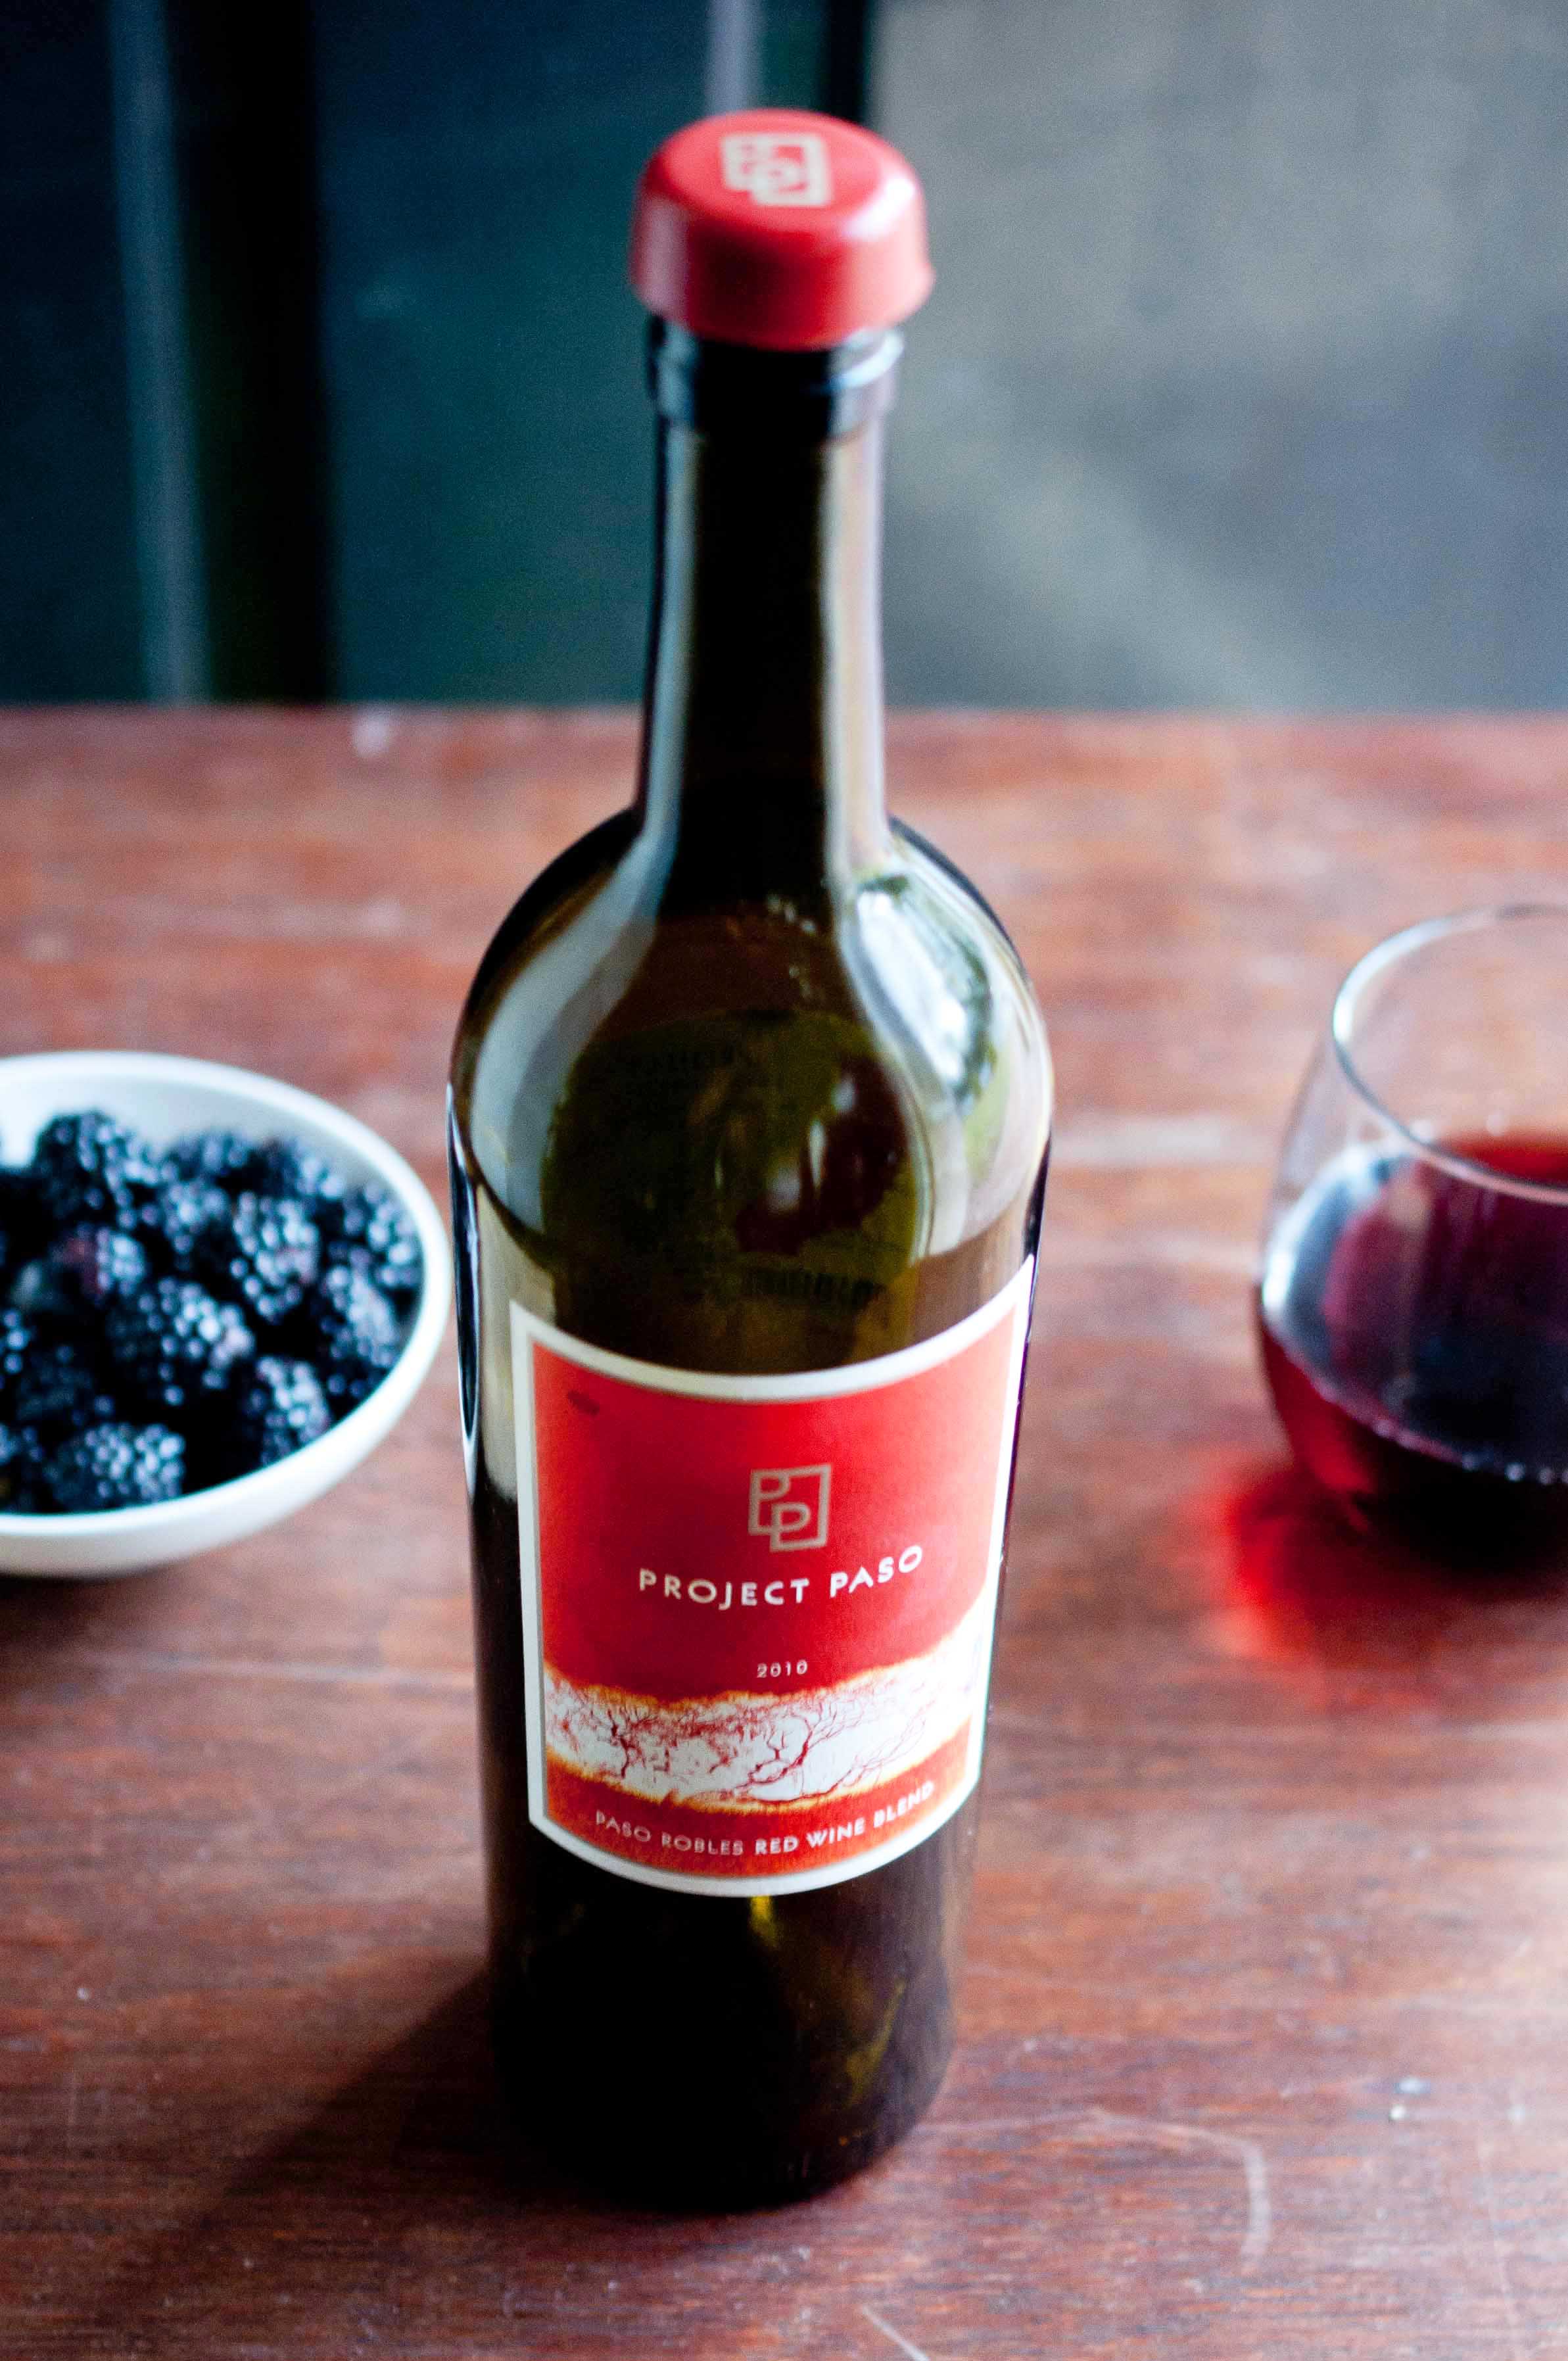
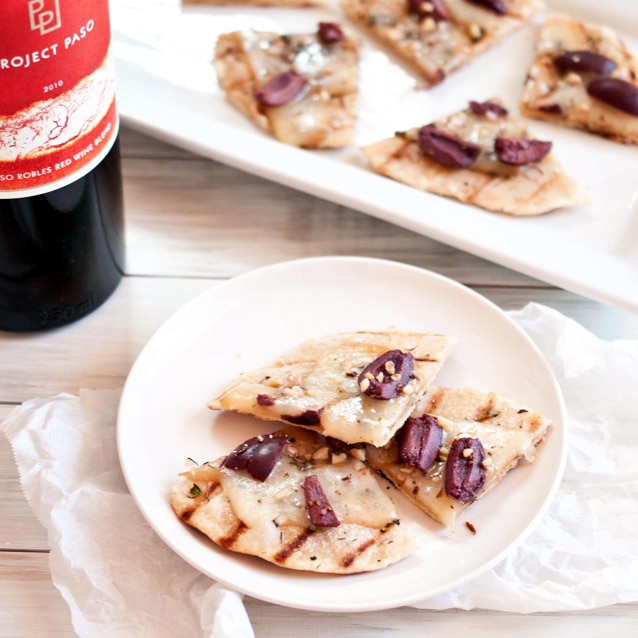
I’ve had a few people ask me about Wine Week. Specifically, if Don Sebastiani & Son's paid me for these post. Nope. I really do love these wines. Some are even under $10.
They didn’t even ask me to post about the wine. Just sent me an email and asked if they could send me a shipment of wine, with recipes that are perfectly paired to each bottle.
Here is some advice: If someone asks if they can send you wine, asking nothing in return, Say Yes.
I felt so flattered that I was asked, and so excited to have this project to work on. They even included information and advice about pairing wine and food. So I got to learn a few things. OK, a bunch of things.
But, more than anything, it feels like a small step towards my goals that I’ve been working so hard on. Being taken seriously in the world of food, and someday being able to make enough of an income from it that I get to spend more time at home with my little lady.
And, I got to make food like this:
The only thing I changed about the recipe they sent over was the crust. The recipe called for a store bought tortilla, which, I’m sure is fine. But I made these tortillas using all the fat I save every time I cook bacon, and they were so delicious, and really, super easy, I wanted to make them again. Plus, they cost about 16 cents to make.
If you have never made your own tortillas, I promise you, it is so easy. Sounds hard, right? It’s not. At all. Plus, it is SO SO SO much better than the ones you buy at the store, it’s like a completely different food. And it takes about 10 minutes, and then you let them rest for about 20 minutes while you are getting everything else together. You can do that. I swear.
This recipe was paired with Project Paso Red Wine Blend. I really like blends, it’s like they take all the good stuff from each type of wine and mix them all together. This, like the Pepperwood Grove, is a high acid, low tannin wine that is pretty easy to pair with most entrees. It can even go with pork or chicken dishes. This would be a great wine to serve if you are having Fancy Pizza Night. Which you should.
Pizzetta With Bacon Fat Tortilla Crust
Tortillas:
2 cups of flour
1/2 tsp salt
4 tbs bacon fat (can use butter or lard as a substitute)
1/2 cup warm water
Topping:
1/4 cup olive oil
1/2 tsp caraway seeds
1 tsp oregano
1 tsp thyme
1/2 tsp fresh cracked black pepper
1/4 tsp salt
12 Kalamata olives, pitted and cut into quarters
8-12 oz Smoked Mozzarella
2 tsp chopped walnuts
Makes 8 small pizzas
After cooking bacon in a skillet, save your bacon grease by pouring it through a fine mesh strainer into a container with a tight lid (just pour the next round on the top of the previous) and keeping it in the fridge. This stuff is liquid gold, don’t pour it down the drain.
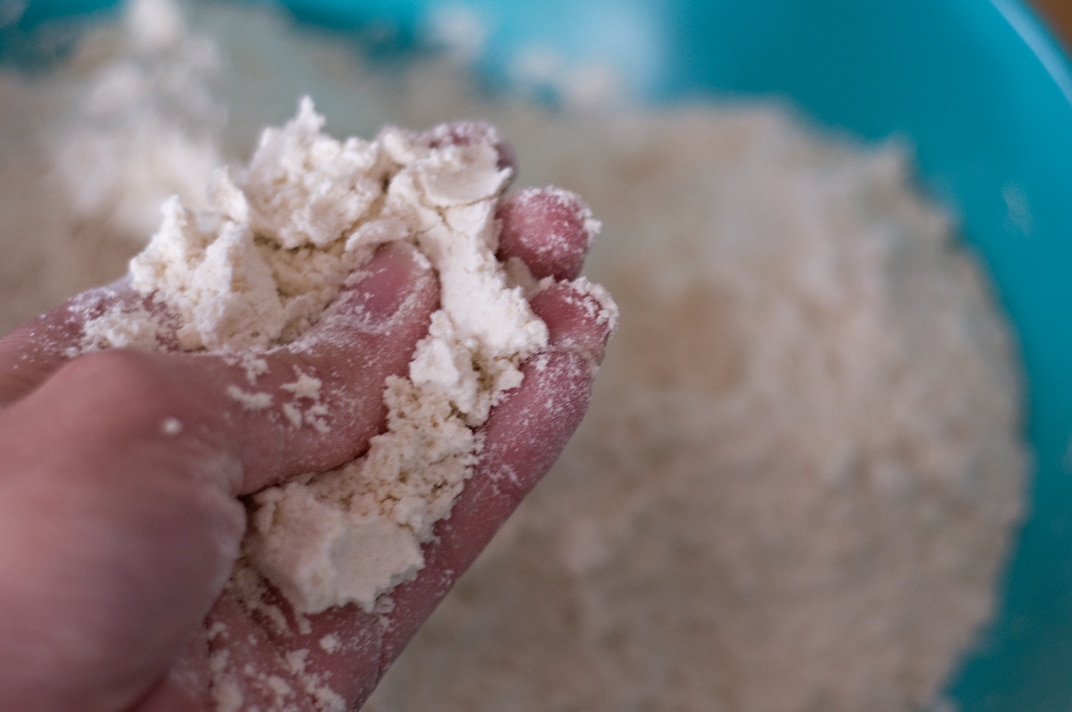
Combine the flour and bacon fat in a large mixing bowl, working in the fat with your fingers, until completely incorporated.
Dissolve the salt in the water, pour about 1/3 cup of it over the dry ingredients and immediately work it in with a fork.
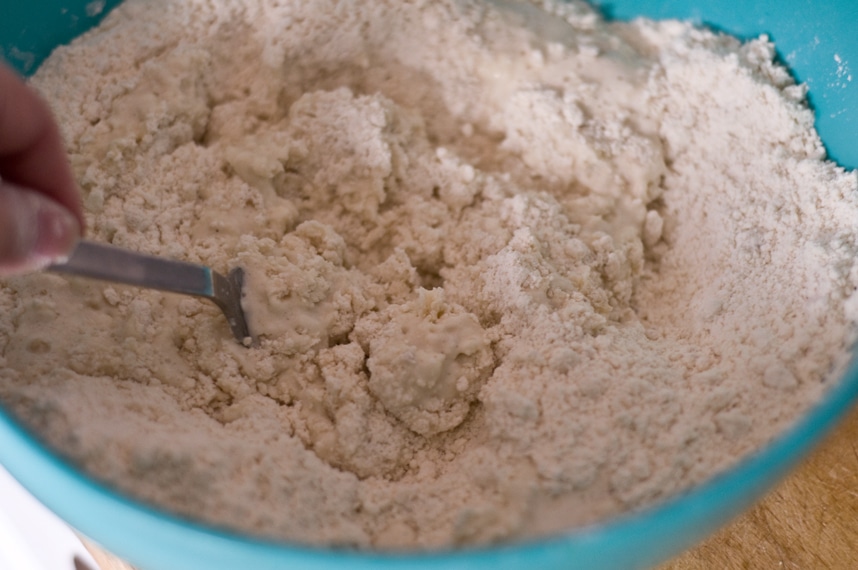
The dough will be in large clumps rather than a homogeneous mass.
If all the dry ingredients haven’t been dampened, add the rest of the liquid (plus a little more, if necessary).
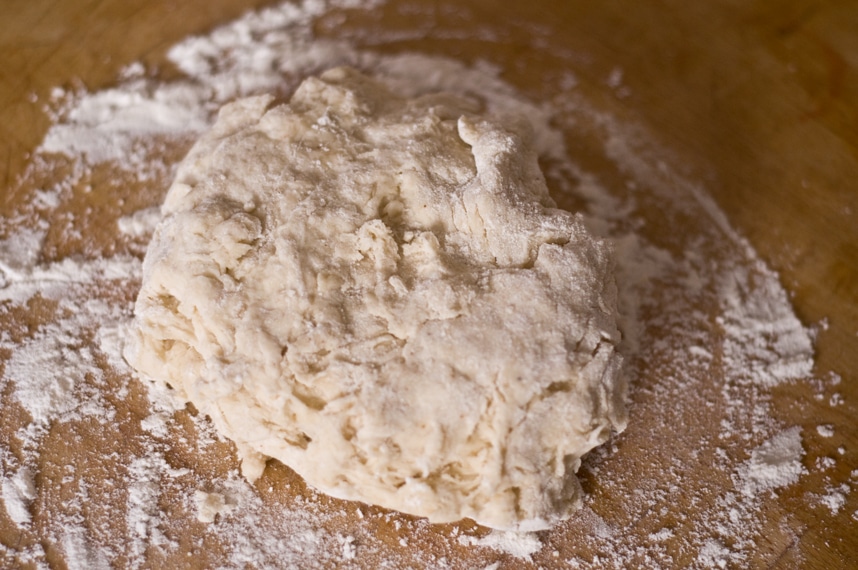
Scoop the dough onto your floured work surface
and knead until smooth.
It should be medium-stiff consistency — definitely not firm, but not quite as soft as most bread dough either.
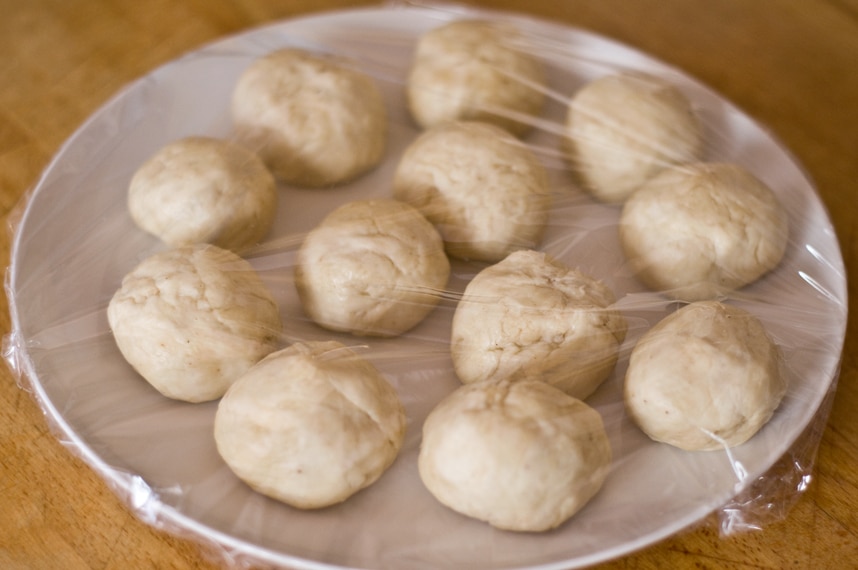
Divide the dough into 8 portions and roll each into a ball.
The best way to do this is to cut the dough into two equal portions. Then cut each of those in half, so you now have four. Then cut each of those four in half and you now have eight. Set them on a plate, cover with plastic wrap and let rest at for 20-30 minutes (to make the dough less springy, easier to roll).
While those are resting, prepare the toppings. Roughly chop the caraway seeds and add to a small bowl. Add the oregano, thyme, black pepper and salt, stir to combine.
Slice your cheese into thin slices (you can also grate it).
You can either press your tortillas using a tortilla press lined with parchment paper to prevent sticking, which I used. I rotated the tortilla and pressed it several times
*Make sure your tortillas are VERY thin & flat before cooking. Much thinner than pie dough in order for it cook all the way through.
or you can roll them with a rolling pin using this method:
On a lightly floured surface, roll out a portion of the dough into an even 7-inch circle: Flatten a ball of dough, flour it, then roll forward and back across it; rotate a sixth of a turn and roll forward and back again; continue rotating and rolling until you reach a 7-inch circle, lightly flouring the tortilla and work surface from time to time.
If you have a grill pan, I would highly recommend using it, if not you can use a heavy skillet heated over medium to medium-high heat. Brush the tortilla with olive oil and Lay the tortilla on the hot grill pan.
After 30 to 45 seconds, when there are browned splotches underneath, flip it over. You will know it is time to flip when the edges look dry and lighter in color. Brush again with olive oil and sprinkle with the seasoning mix. Top with the cheese, then the olives and walnuts. Cook until the cheese has melted. Repeat for all tortillas.
I loved (LOVED!!) this recipe and pairing. I am much more of a red wine person and learning about versatile red, with a higher acidity and lower tannin level than most reds, I am able to serve a red wine as a stand in where most people would typically put a white. Because, remember, pairing is more about acid and tannin levels than white versus red.
I CAN have a red wine with white meat!! As long as I can pick the right one.
I really liked this wine, and I loved that I am now able to pair a red wine with white meat if I so desire. Still maybe a bit to tannin heavy for a light, white fish, but works perfect with pork or possibly a chicken dish. AND It’s UNDER $10!! I love that. I love that I can serve a beautiful wine, paired perfectly with my beautiful salad, and no one will ever know that I so incredibly affordable.
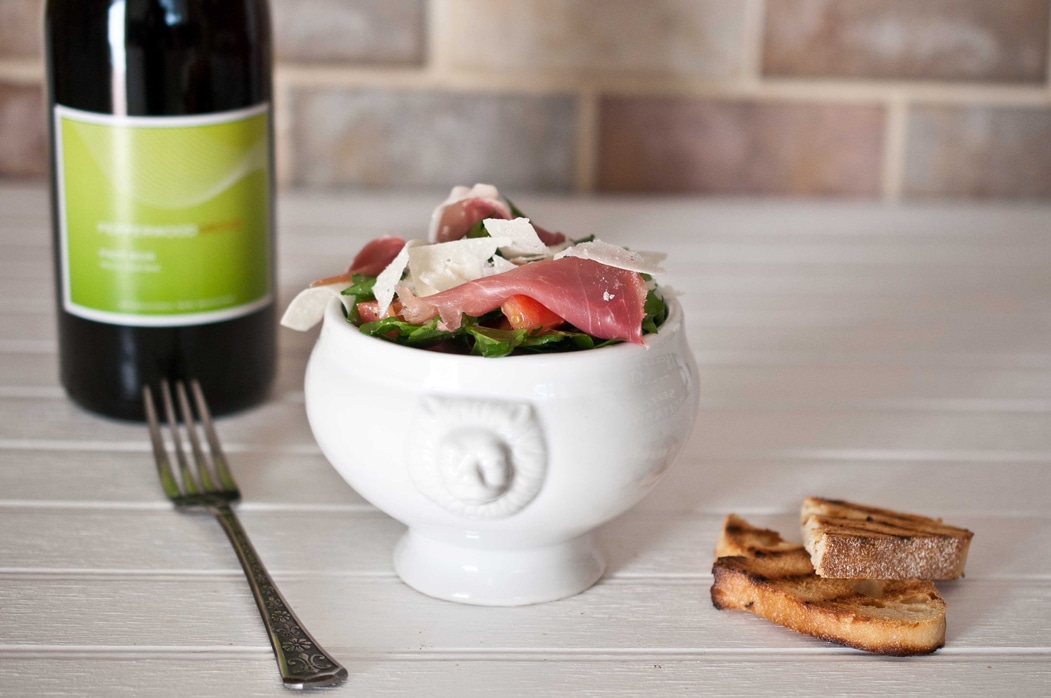
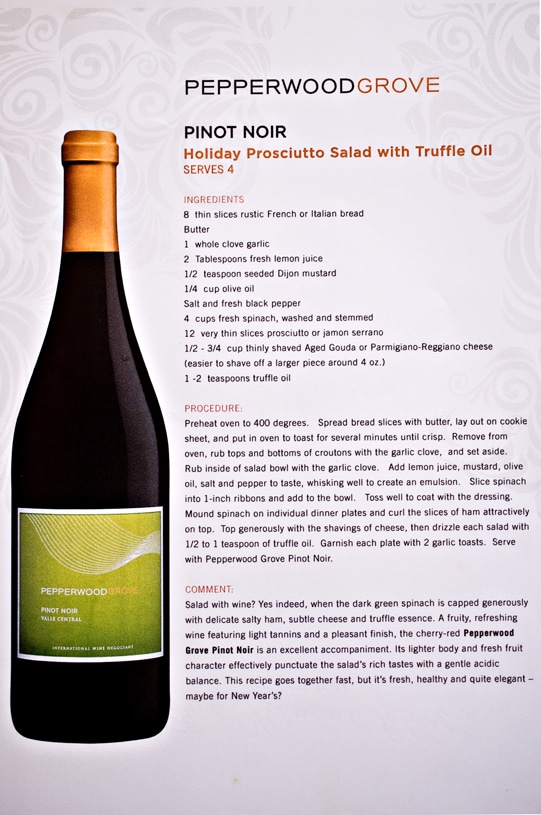
This was a recipe that I followed the closest. And I loved it so much I made it twice in the same week. It is easy, full of flavor and has a fancy boldness that is perfect for a dinner party.
It has a super easy homemade dressing that you mix right in the salad bowl.
Since I had truffle oil on hand from when I made this, I used it in place of the olive oil.
Instead of rubbing the bowl and the bread with garlic, I used a microplane to grate it to a paste and spread it on the bread, and just added the garlic paste to the dressing
I grilled the bread slices on my grill pan and served them on the side
I added chopped tomatoes
I really hope you love this salad as much as I did, its simple, fresh and delicious.
Seek out the wine if you can, and remember that it is a red that you can pair with high acid dishes if you are one of those people who doesn’t particularly fall in love with whites.
More food and wine parings coming this week. Stay tuned!
I get asked a lot of questions as a food blogger. Some are about food. Some are about blogging. Some are more personal. But one of the most common questions I get asked is, "How do you stay so skinny when you cook so much food?!"
First, it’s hard. Really.
Work, being a mom, a wife, a blogger. AND trying to stay in shape is a lot of work.
A lot.
Here are some of the rules that I use to a balance food blog and skinny jeans:
1. I don’t eat fast food. It is a really rare occasion when I do, and never, ever, ever for dinner. More of a road trip occasion, or an I’m running late so I’m going to grab the one sandwich under 400 calories at Quiznos occasion. And no chips, and an unsweetened iced tea.
2. I always eat breakfast. Once in a while I have fatty things, like that french toast I still can’t stop thinking about. But 5 out of 7 days, its 2 slices of reduced calorie whole wheat toast (or whole wheat english muffin) with 1/2 tbs peanut butter each. For breakfast, you want the trifecta: low cal, high protein, good carbs.
3. I read ALL the labels of everything I put in my mouth. And just assume that you will have more than the serving size. For instance: most cereal puts a "serving size" of 3/4 a cup. Really? That’s less than my cup of coffee. You will probably have more like 2 cups. So that cereal that you think is only 175 calories. It’s probably more like 430. Thats like eating a burger. But at least the burger is worth it. Bottom line, if you are counting calories, measuring your food is a BIG part of that.
4. Snack well. I like to get the most food possible for the least amount of calories. It’s like a game. But I don’t eat a lot of processed foods, and even when I did, those 100 calorie packs aren’t really a calorie bargin. I want 2, and if I’m going to eat 200 calories, I’d rather have a snickers. This is one of my go to snacks: 1 cucumber, peeled and sliced, drizzled with lemon juice, sprinkled with salt and chili powder. It’s like 15 calories. I also do that to radish slices. Crispy and salty. Like chips, but good for you.
5. Know your weaknesses. I know I like to cook big breakfast on the weekend, and eat more for dinner when I get to cook for other people. So on the weekdays, I eat a low dairy, high plant, low fat diet. Such as: Salads with low-cal dressing (or just balsamic vinegar) or even my favorite salsa instead of dressing, non-dairy soups, roasted veggies with skinless chicken.
6. Know your calories. I have the Lose It app on my phone (it’s free) and I try to stay under 1,600 calories a day during the week. Give up calories where you can, but don’t feel like you have "earned" an extra slice of pie. That just ruins all the work you did. The truth is, unless you are an Olympic swimmer who burns 14,000 calories a day, you will never reach your goal weight with exercise alone. Never. You have to get your eating in check. Can you indulge? Sure, once in a while, but make sure you make up for it but eating lots of plants. Don’t starve yourself, it makes your body store everything as fat. So you are hungry and still gaining. That sucks. Think of calories like you think of money. You only have so many (probably around 1,700 a day if you’re a girl) to spend before you go "into debt" (meaning: gain weight). Is that mediocre lunch really worth half of your calorie budget? Do you like that White Chocolate Mocha from Starbucks 600X more than a regular cup of coffee? Because that’s how many more calories are in it (a venti White Chocolate Mocha, with whip has 620 calories, a plain cup of coffee has about 5 calories). Spend where it counts, cut when it doesn’t.
7. Find the WHY. I have a Masters Degree in Psychology. Did you know that? It’s true. The mental part is hard. Probably harder than being hungry, is being unmotivated. Write a list of WHY you want to stay (or get) in shape and post it everywhere, and keep updating it. And talk yourself down when you do want to grab for that bad stuff. Oh, and don’t keep in the house, it just makes it that much more difficult for yourself.
(pretty much my WHY for everything good in my life)
8. Replacement behaviors. This is an important part of therapizing yourself. Find your bad habits and replace them with good ones. For me: 3pm candy jar. My coworkers all have them, and I do as well. Instead of wandering around chatting with the intention of snacking, I walked my office building for 15 minutes, stairs and all. Now, my candy jar is filled with candy I don’t like and I’m not even tempted to eat, just for those people who come to visit with the intention of snacking.
9. Just have one. If you really want to try a new recipe for cupcakes, pie, cookies, thats OK. Try and plan to make them when you can give the rest away. For me, most of the fun of cooking is having a recipe in my head and trying to figure out how to make it work in the kitchen. But most of my food, the sugary, high fat stuff, is given away. Take it to the office, or to a friends house, or let your husband take it to his office. Find a charity, like a women’s shelter, that might want it. Or throw it out. It sucks to waste food, but is it really doing any good taunting you from the fridge? Or, you can make a half or a quarter of the original recipe using an online site like Half Recipe.
10. Move a lot. Even though exercise doesn’t burn as many calories as we would like, it’s still important to move. For me, it’s spin class. Because it’s the most amount of calories I can burn in the least amount of time. If I really push myself, do everything that spin guy is yelling at me to do, I can burn nearly 700 calories in an hour. Thats a lot. Do that 3 times a week and thats 30 lbs a year. Find something that you will actually do, and do it. A lot. Spoil yourself with dance class, then treat yourself to shrimp cocktail (fairly low cal treat).
11. Water is essential. Get a water bottle and carry it around like a security blanket. First, it flushes out your body. Second, the human thirst reflex is so weak, it is often mistaken for hunger. Drink a lot of water and you will eat less and glow more.
Now onto the recipe. This makes 2 large entree sized portions, at about 330 calories each, or 4 side salad portions at about 165. If you want a little more, you can add 3oz grilled skinless chicken.
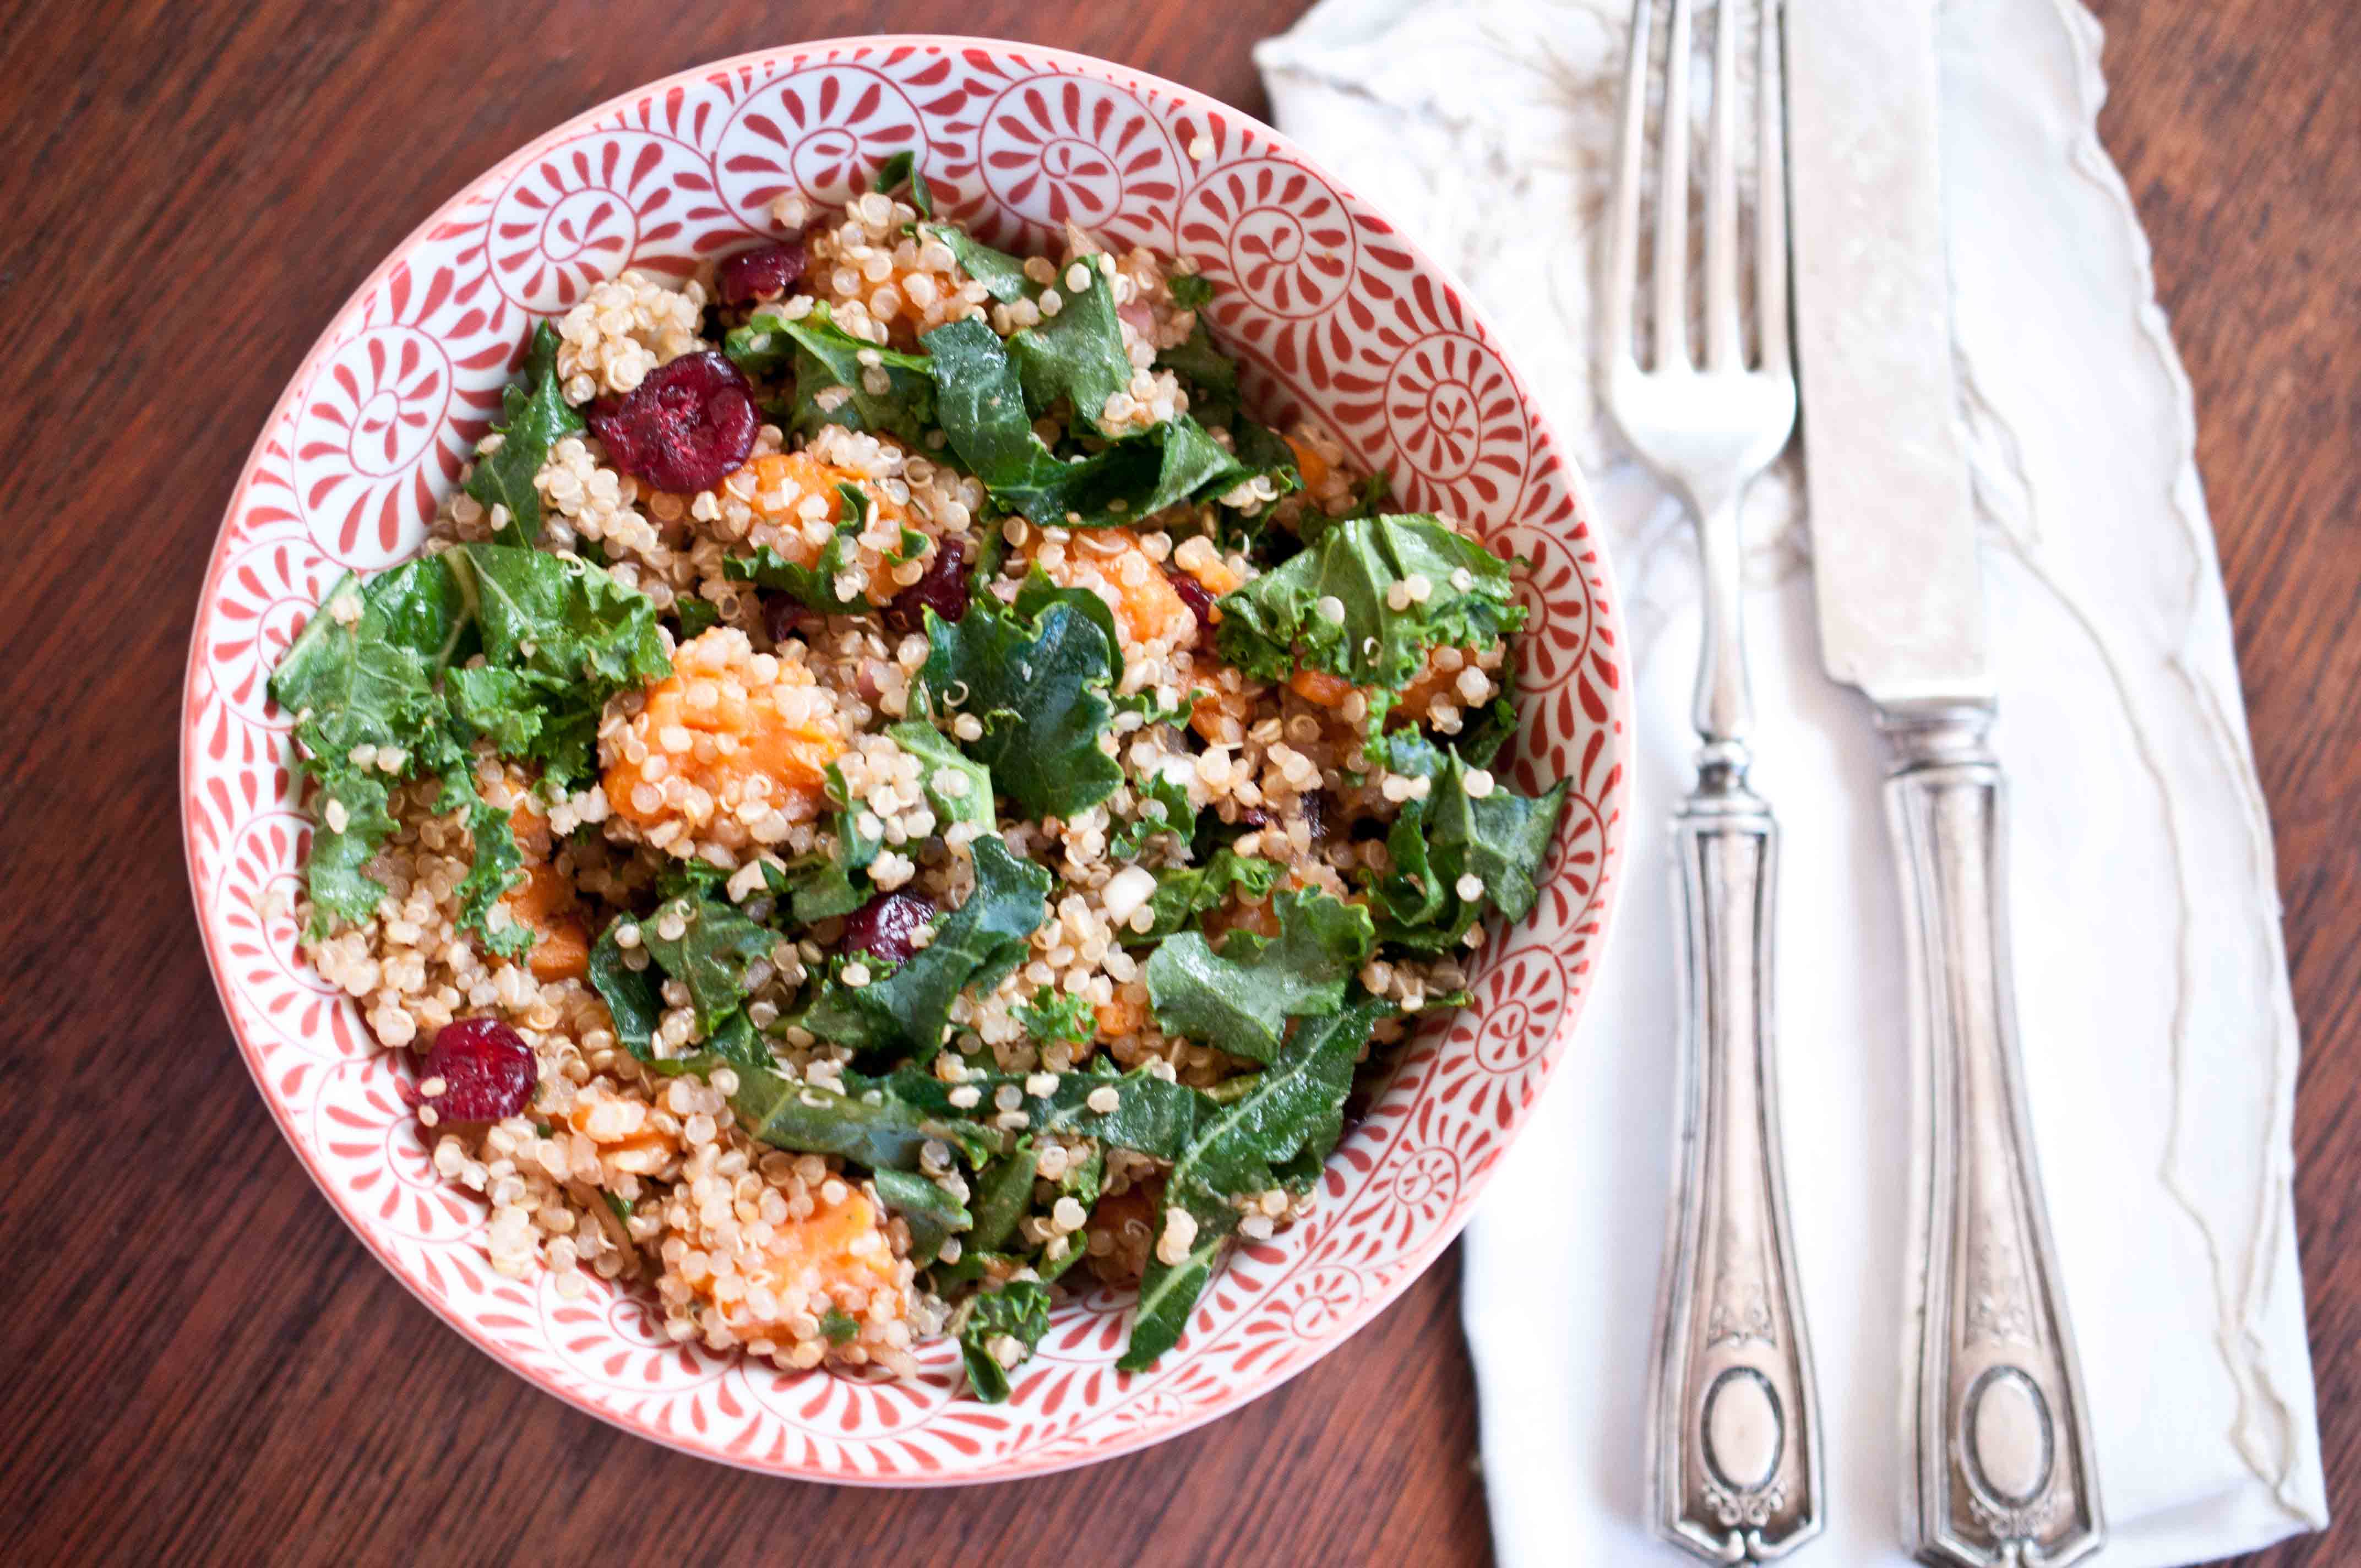
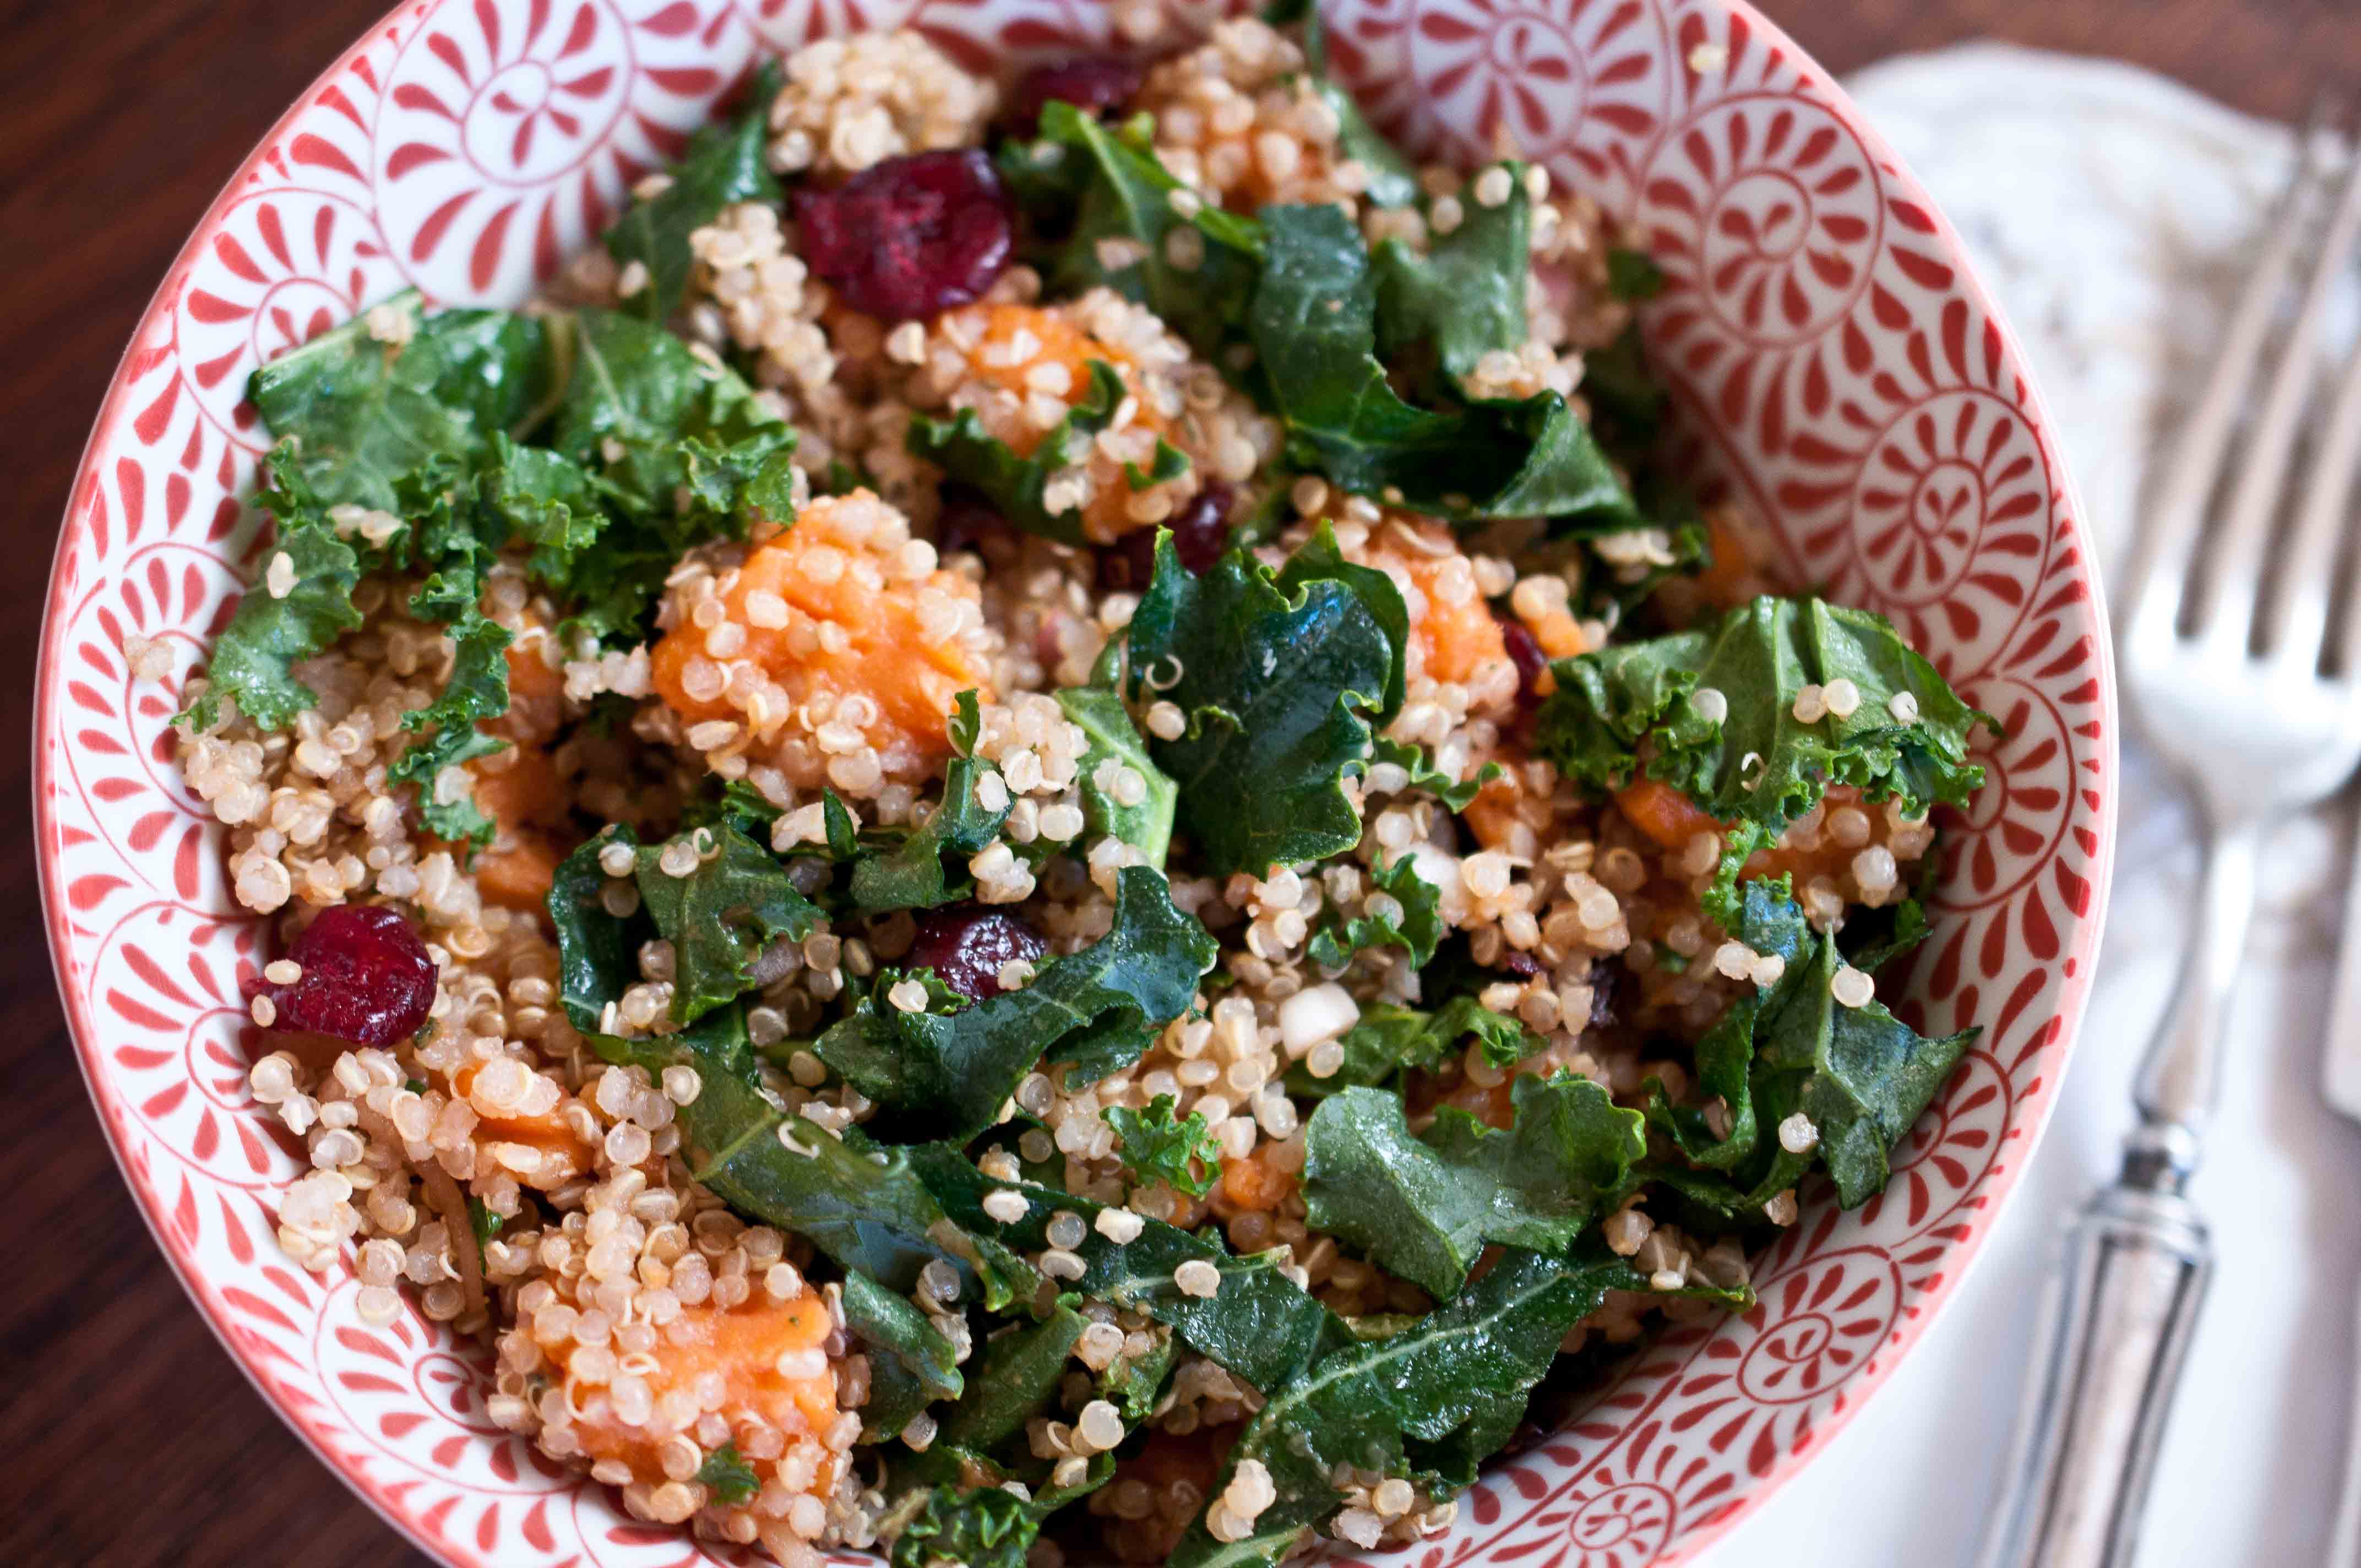
Sweet Potato Quinoa Salad
1 large sweet potatoes, peeled and diced
1 cup cooked quinoa
1 tsp fresh sage, minced
1 1/2 cups fresh kale, chopped
1/3 cup dried cranberries
1 large roasted red bell pepper, chopped
2 tbs shallots, minced
2 tbs balsamic vinegar
2 tsp raw honey (sub agave for vegan)
1/4 tsp salt
1/2 tsp black pepper
Boil the sweet potatoes in a large pot of lightly salted, boiling water until fork tender, about 5-8 minutes. Remove from water with a slotted spoon, allow to drain. I did a guest post of Eating Rules about the proper way to cook quinoa, if you are interested.
In a large bowl, combine the quinoa, sweet potatoes, sage, kale, cranberries, and red pepper. In a small bowl, add the shallots, balsamic, honey, salt and pepper, stirring to combine. Drizzle over the quinoa salad, tossing to coat.
Legal Disclaimer: I am not a nutritionsinst. The ideas presented here are just what works for me.
I have a pretty serious garlic addiction. Which turns out, is a good thing. A great thing even, garlic has a ton of health benefits. (Here is the part where I spew a bunch or nearly useless facts like the true food geek that I am).
First of all, it protects you from cold and flu viruses. When I as pregnant with Tater and I was feelin that sick feelin come on, I was too scared to take any medicine. I was completely nuts about everything I ate, CONVINCED if I made one wrong move, it would destroy my adorable, growing fetus-child (for more on that story, you can read this). I roasted 3 heads of garlic and ate them spread all over a loaf of crusty bread. I stunk for 3 days, but I didn’t get sick.
Not only that, but it also helps lower cholesterol, manage blood pressure and it even has antibiotic qualities. Wheeew! So glad that’s over!
The second I heard about Black Garlic, I wasn’t able to focus on the rest of my life until I bought some.
SO I did. And I offically have a new addiction.
Black garlic has a sweeter flavor, and the texture of black licorice. It can’t always be used in the same way, but it has a beautiful flavor that works well baked.
I strongly recommend ordering some (click here), and trying to see what you can make out of it. Let me know how it goes.
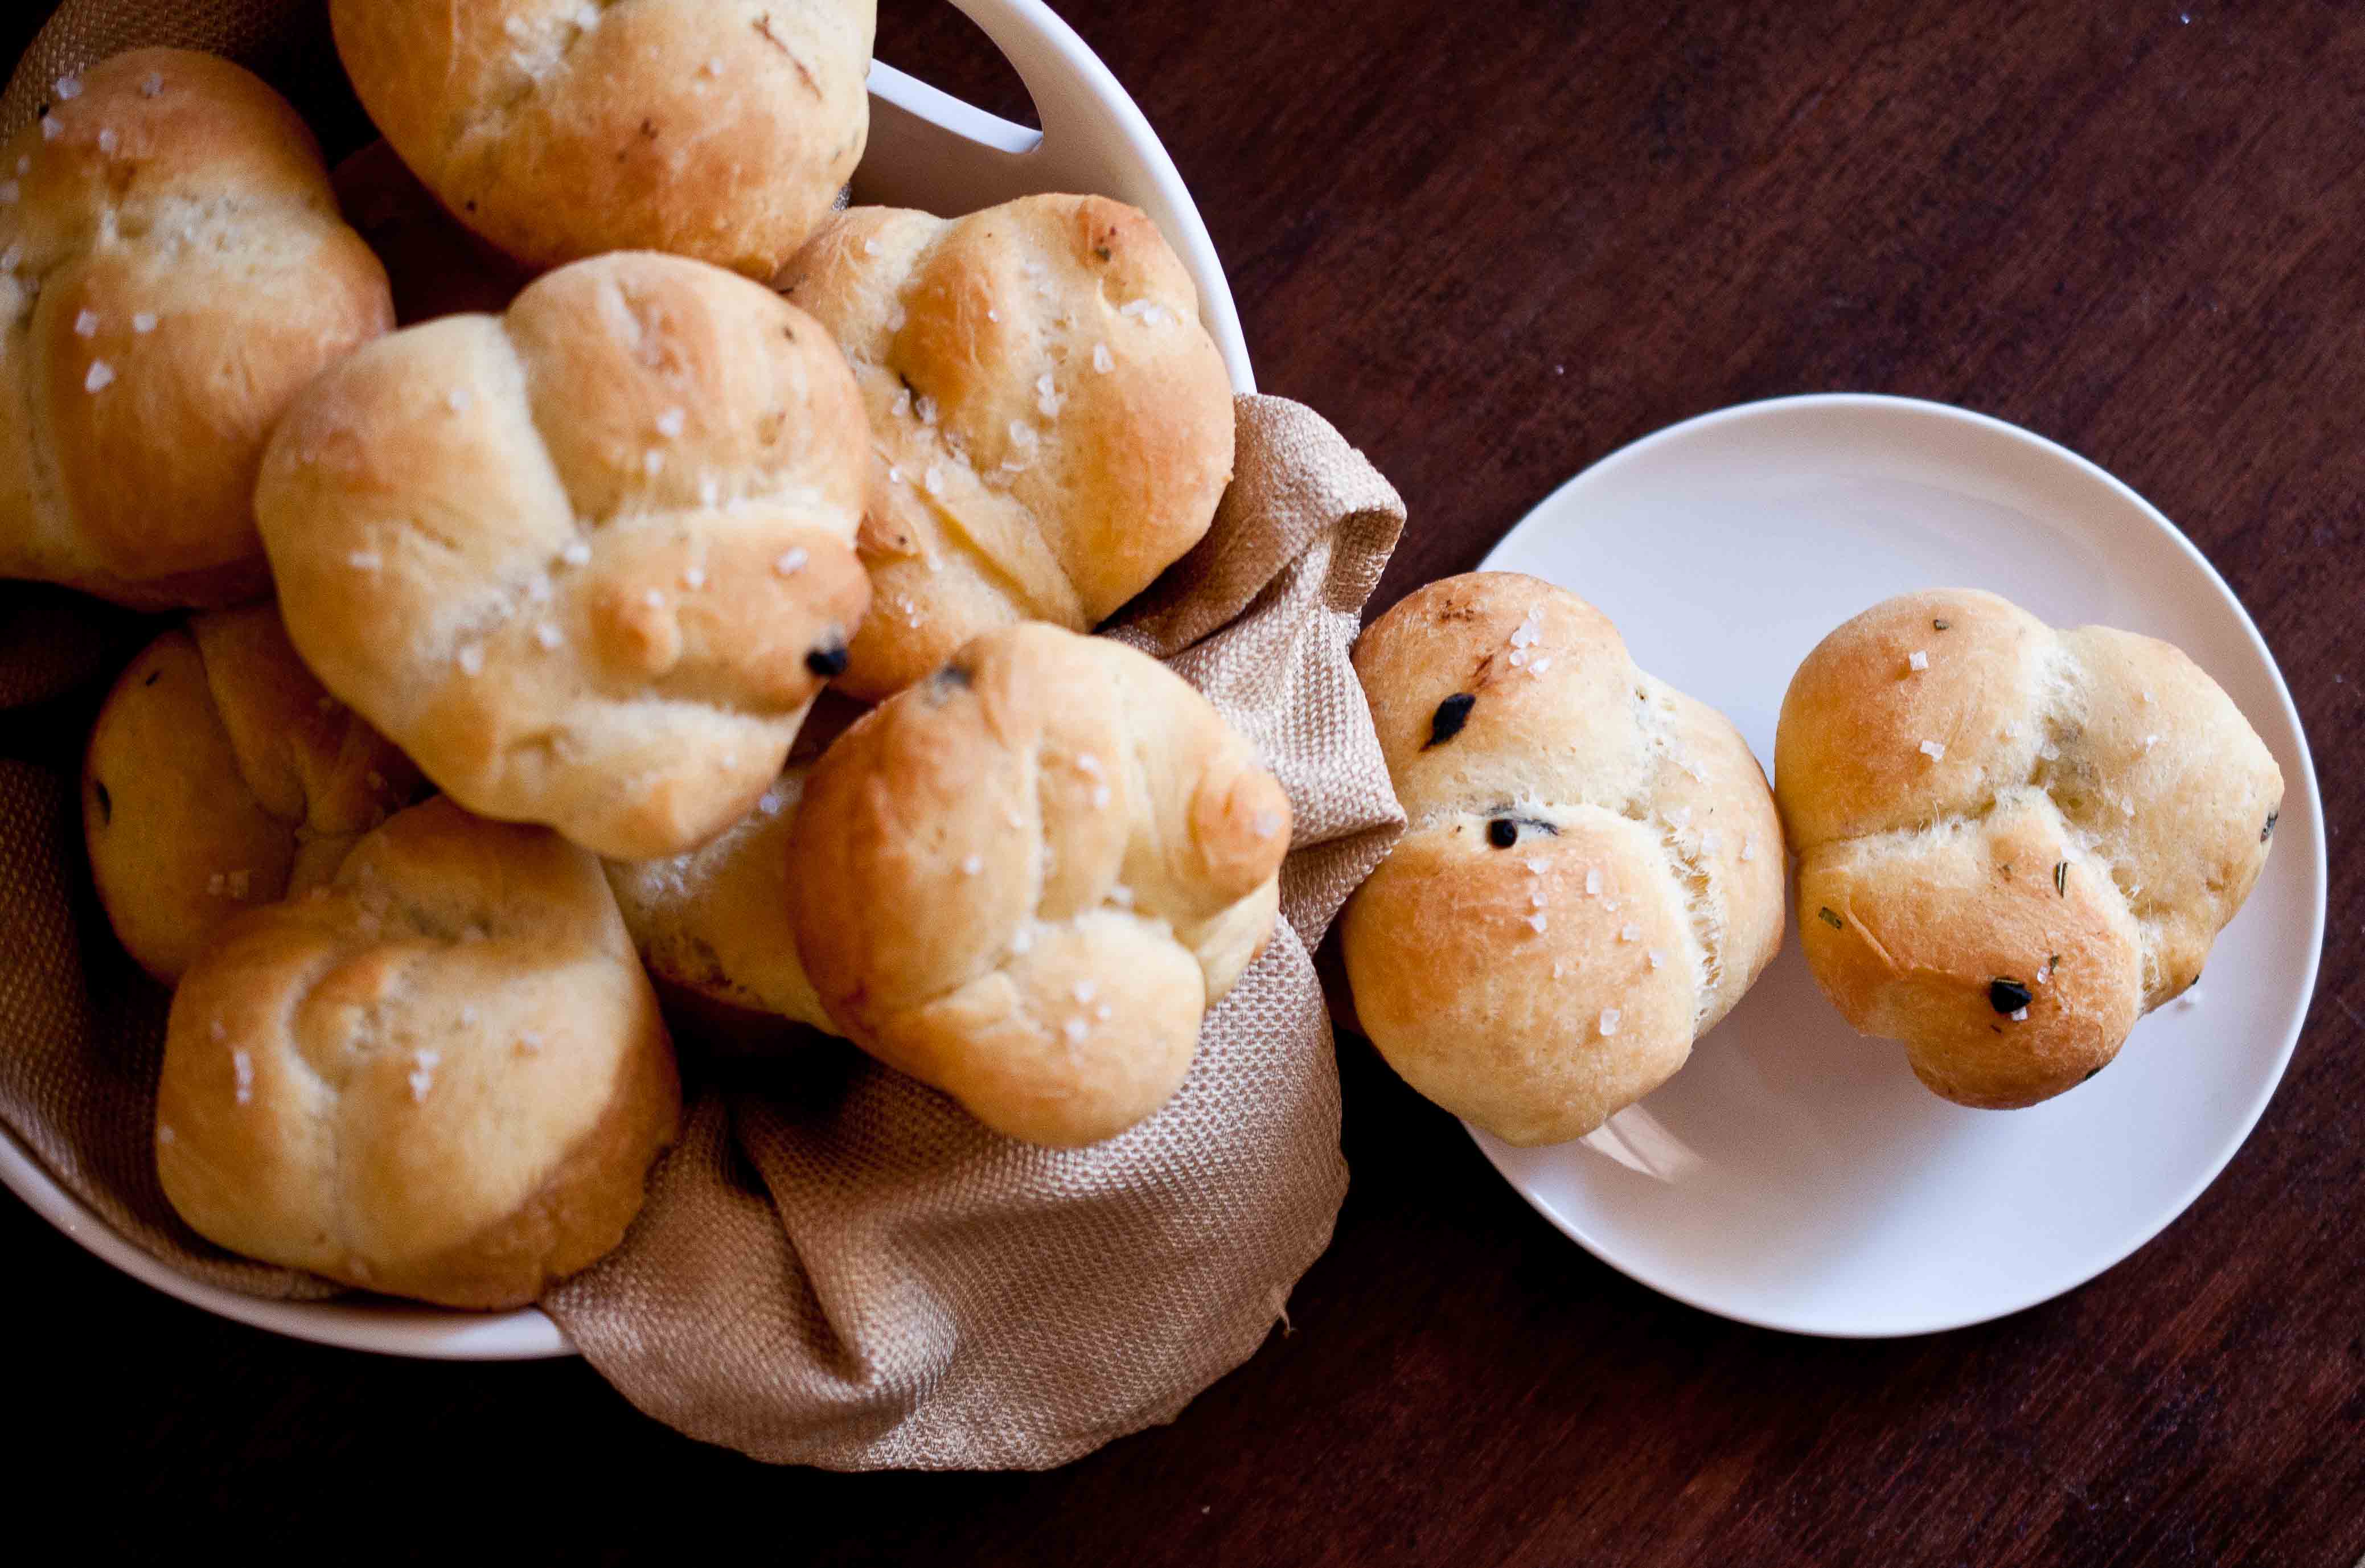
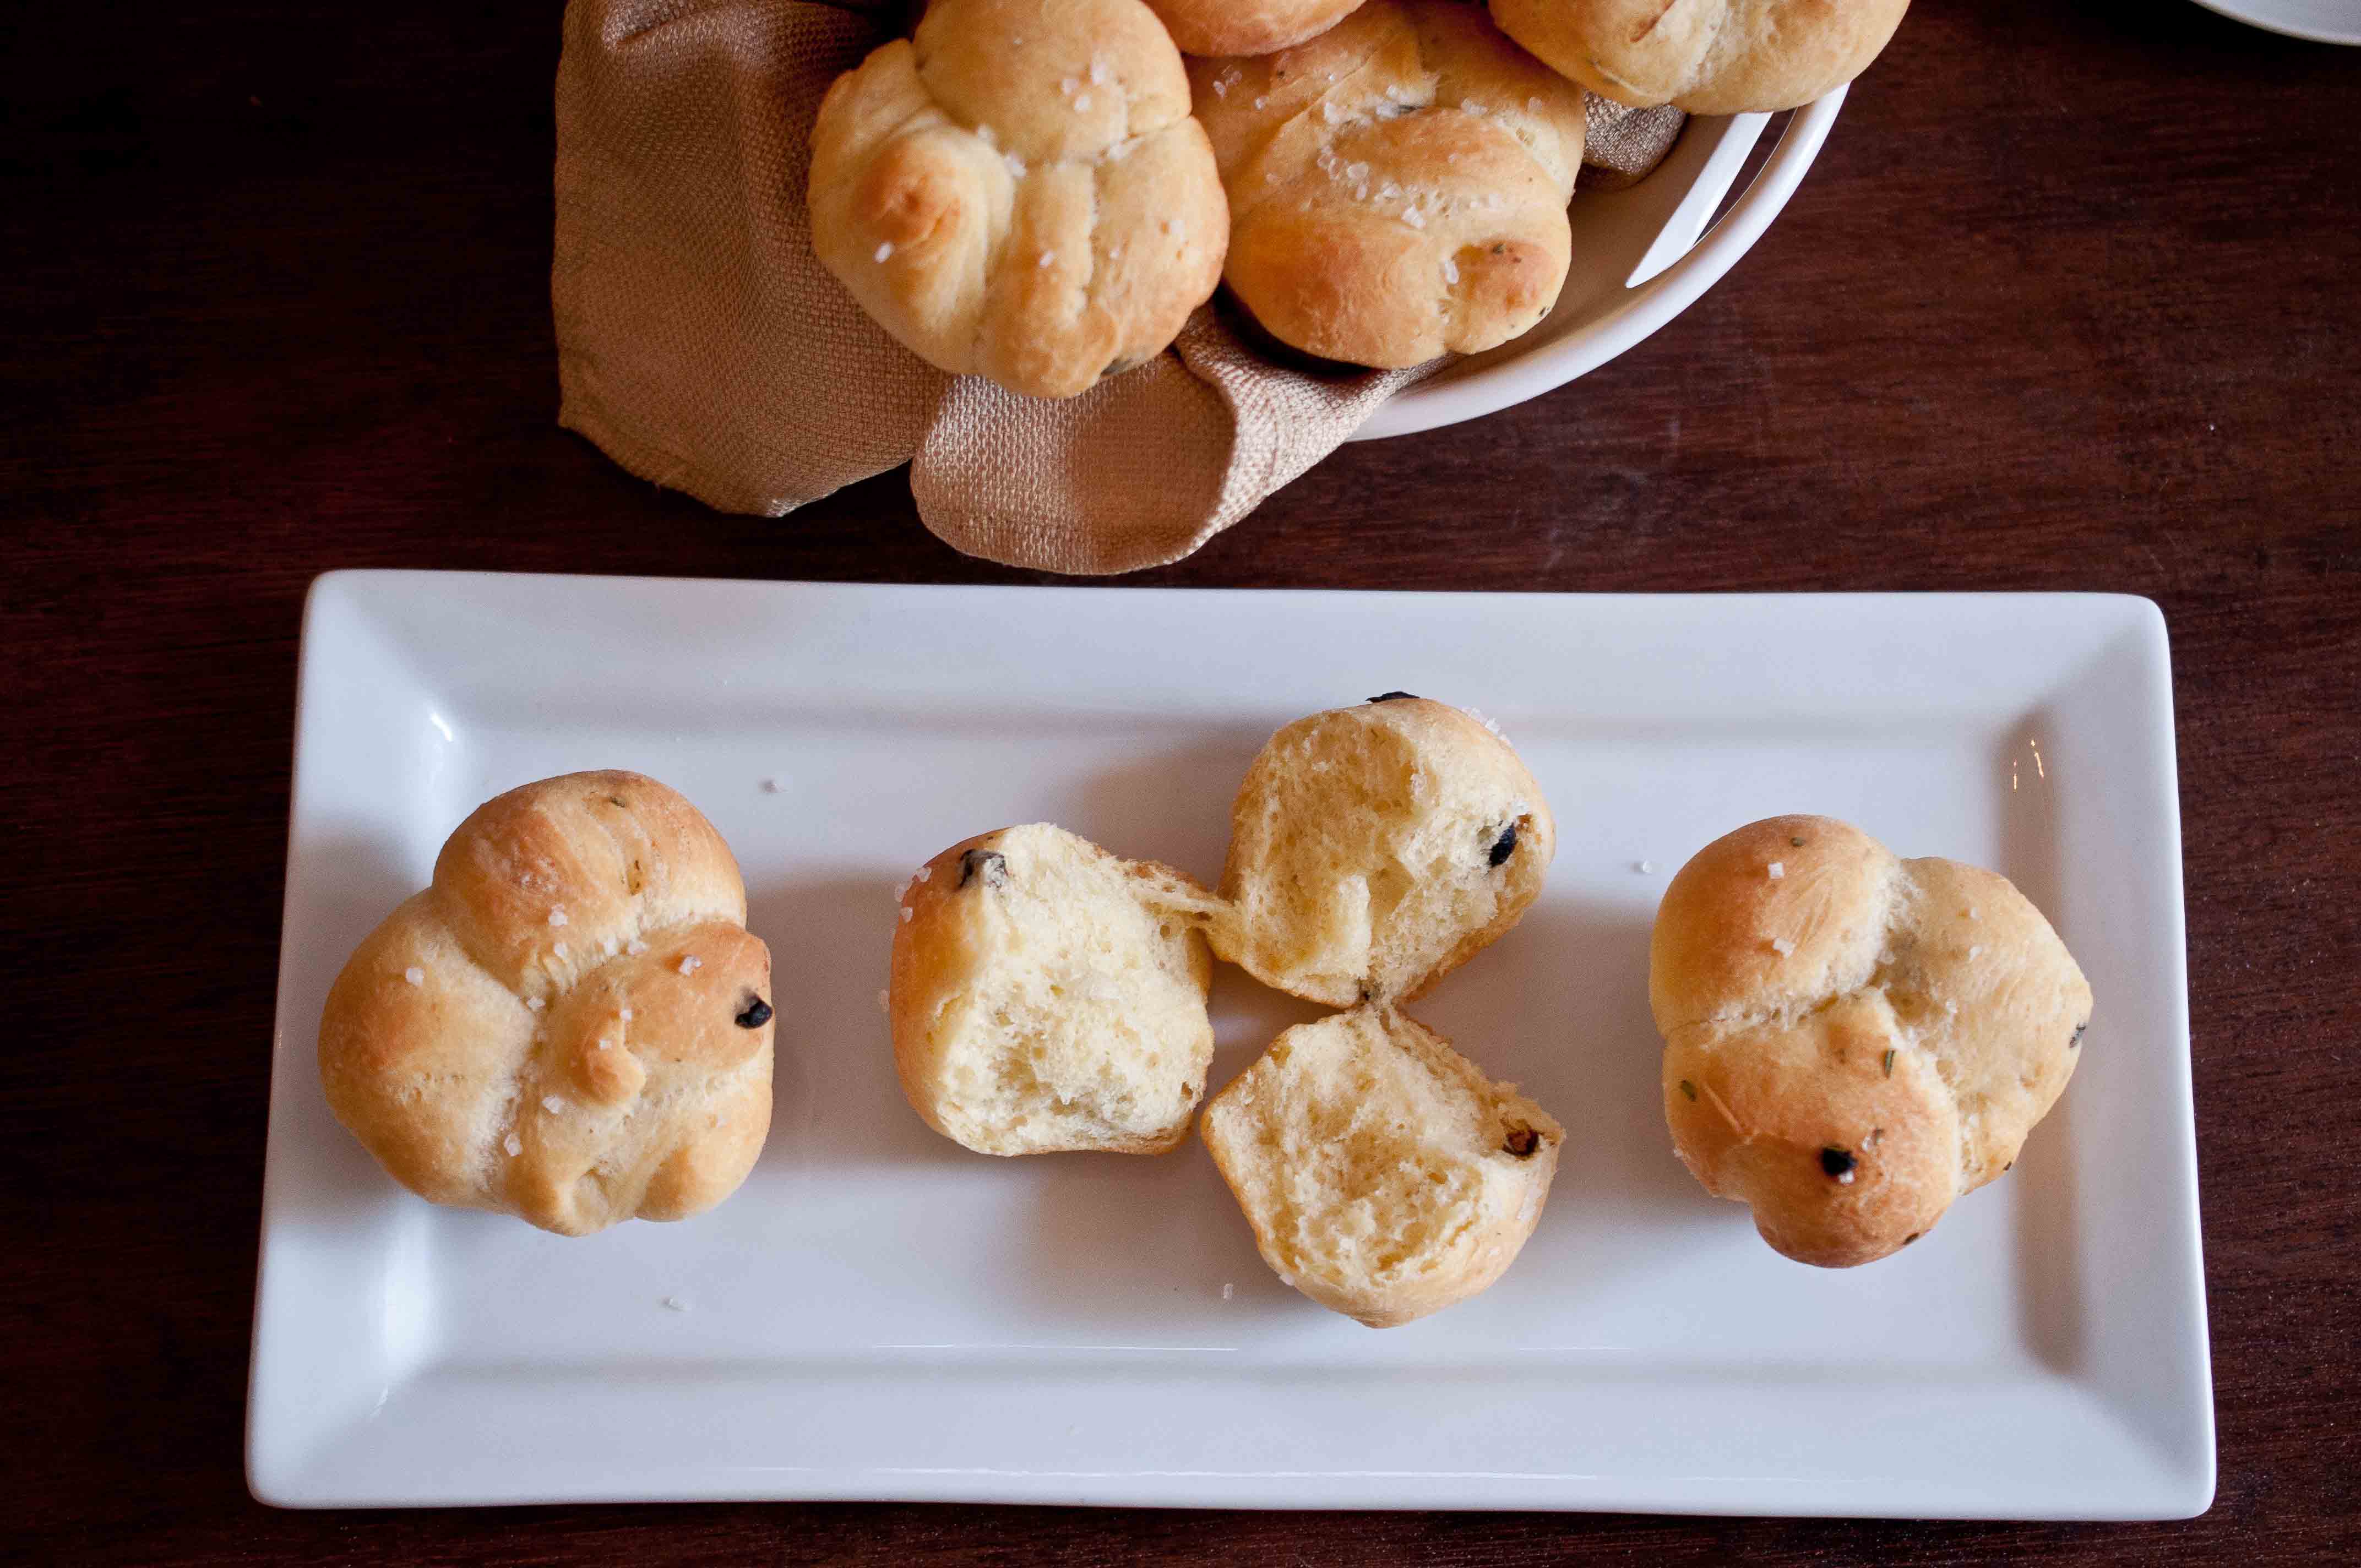
Salted Black Garlic Brioche Rolls
1/2 cup room temp milk
1 envelope of dry active yeast (1/4 oz)
2 2/3 cups all-purpose flour
2 tablespoons sugar
1 teaspoons salt,
3 large eggs
1 1/2 sticks unsalted butter, softened
5 cloves garlic, chopped
1 tbs Fresh Rosemary, minced
Topping: 1 tbs melted butter 1-2 tbs course salt
Add the milk to a microwave safe container, heat in the microwave for 10 seconds, test the temperature (you want it between 105 and 110) and repeat until the desired temperature is reached. Put the milk in the bowl of a stand mixer. Sprinkle the yeast on top and allow it to get foamy, about 5 minutes. Add the flour, salt and sugar and mix on low with the dough hook attachment until shaggy, flaky lumps form (about 1 1/2 minutes). Add the eggs, one at a time, mixing until combined. Add the softened butter (softened is important), beat until the dough gathers around the hook and is smooth and shiny. Add the garlic and the rosemary and beat until just combined. Coat the inside of a bowl with olive oil and place the dough ball in inside. Wrap with plastic wrap leave in a warm place until it’s double in size, about 1 1/2 hours. Grab the dough at the sides until it has deflated. Allow to rise a second time at room temperature, until it has doubled in size, deflating every 15 minutes by grabbing the sides, about 45 minutes.
(If you need to make this the night before, this is a good place to stop. Place in a very cold fridge, below 40 degrees, take out of the fridge the next day and continue. Note that if the dough is cold, the next rise will take longer.)
Remove from the bowl and place on a floured surface, shape into a long log, about 4 inches wide and 1 foot long. Using a sharp knife, cut in 3 equal sized pieces. Then cut each of those pieces in half (you will now have 6 pieces.) Now cut each of those pieces in half and you will have 12 equal sized pieces. Each of these pieces will be a roll, but you have to make some more cuts first. Cut each slice into 3 equal sized pieces, rolling each into a ball and placing all three into the same well of a greased muffin tin. Repeat for each slice. Cover with plastic wrap, and allow to double in size at room temperature, about 30 minutes. Brush the top with melted butter and sprinkle generously with course salt. This is when you break out the fanciest salt you have. Or buy some just for the occasion. Preheat the oven to 400. Bake for 16-18 minutes or until golden brown.
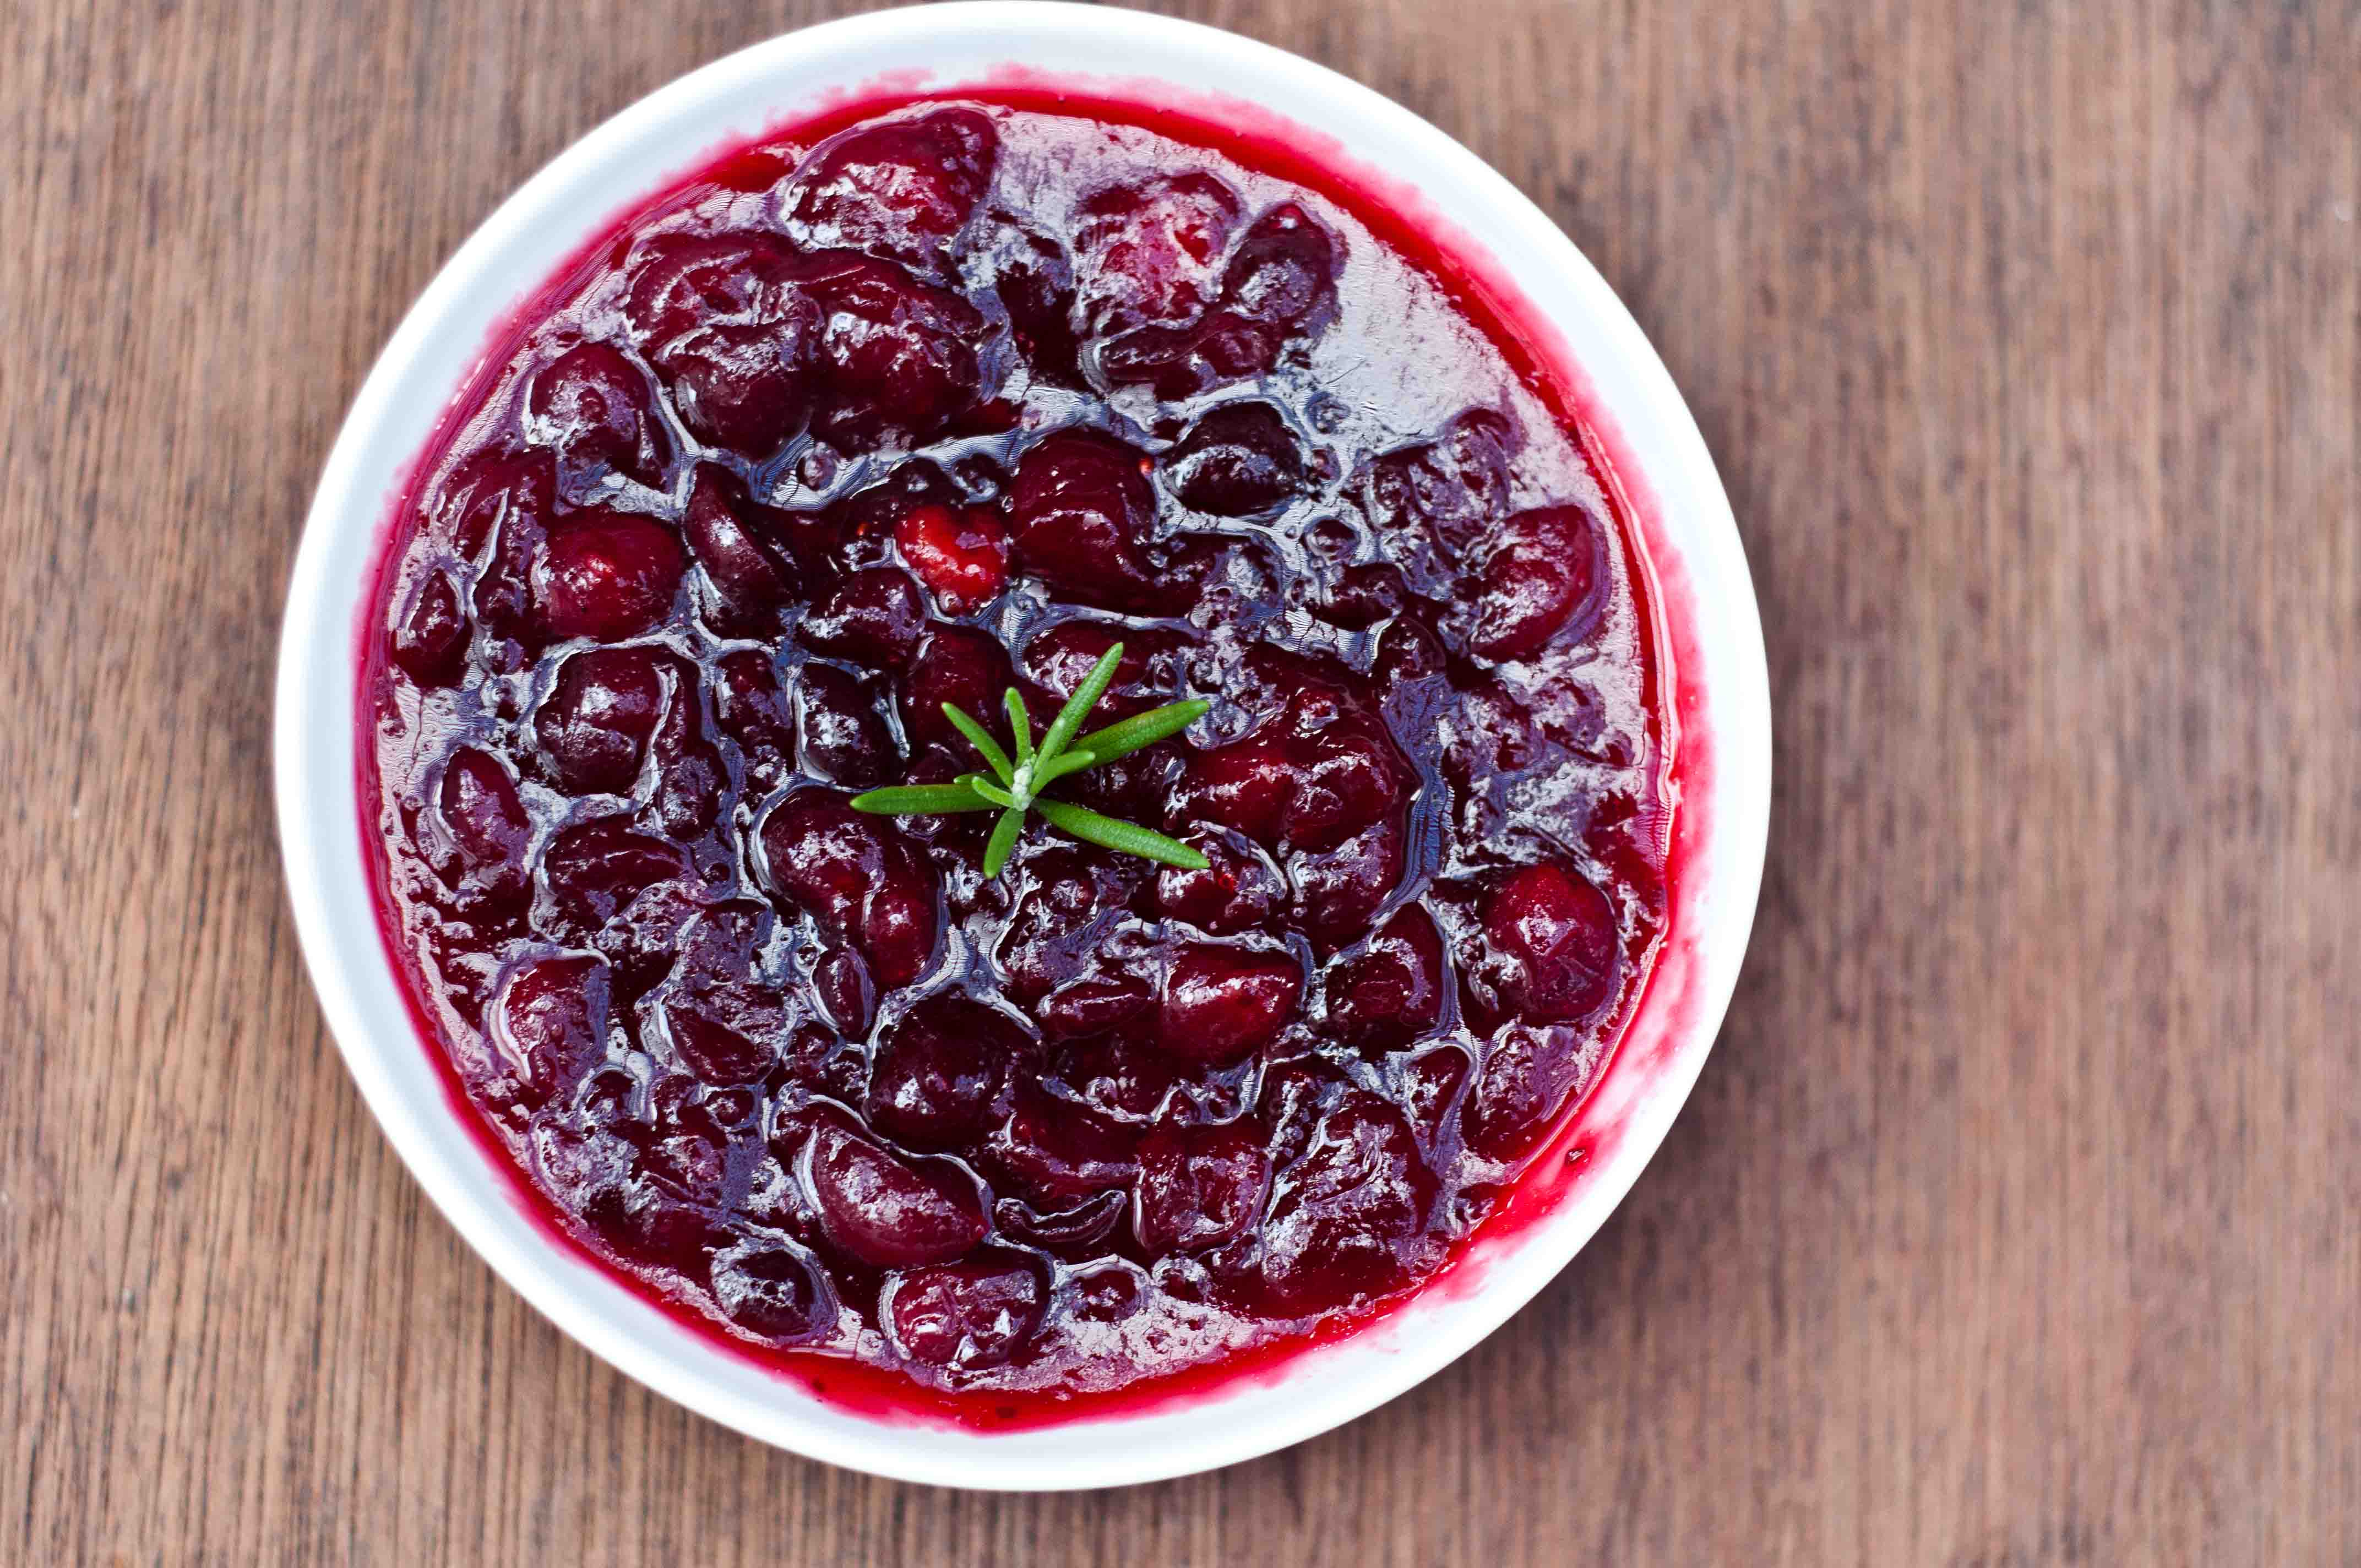
Of all the Thanksgiving foods that I am asking you to make from scratch, and not out of a can, cranberry sauce is by far the fastest and easiest. It takes almost as much time to try and slop that phallic shaped, hideously ridges gelatinous mass onto a crystal serving dish as it does to throw a few ingredients in a pot and let it simmer. You have no excuse. Put down your reservations, and your can opener and give it a try. You can do it. I believe in you.
As for those leftovers, that best part of that Black Friday, you have so many options. Cranberry sauce is the one thing that freezes super well, so you can put it in tupperware and save it for a week when you aren’t so double stuffed. Maybe there is a Christmas/Hanukkah party coming up and you signed up to bring the cupcakes? You are in luck. Freeze the leftover sauce, make the Cranberry Cream Cheese frosting below and you will have a cupcake hit on your hands.
First, we’ll start with the recipe that gets us to these fine leftovers fit for transformations.
Vanilla Bourbon Cranberry Sauce
1/2 vanilla bean
4 cups of fresh cranberries
3/4 cup of water
2 tbs bourbon (good quality)
1 tsp real vanilla extract
1 cup of sugar
Slice the vanilla bean down the center the long way and scrape out the insides with the back of a knife. Place the vanilla scrapings, and the rest of the ingredients in a pot over medium/high heat. Allow to simmer, stirring occasionally, for about 10 minutes or until thickened. The longer you allow the sauce to cook, the thicker it will become.
*all the alcohol burns off once heated, so this is safe to serve to minors.
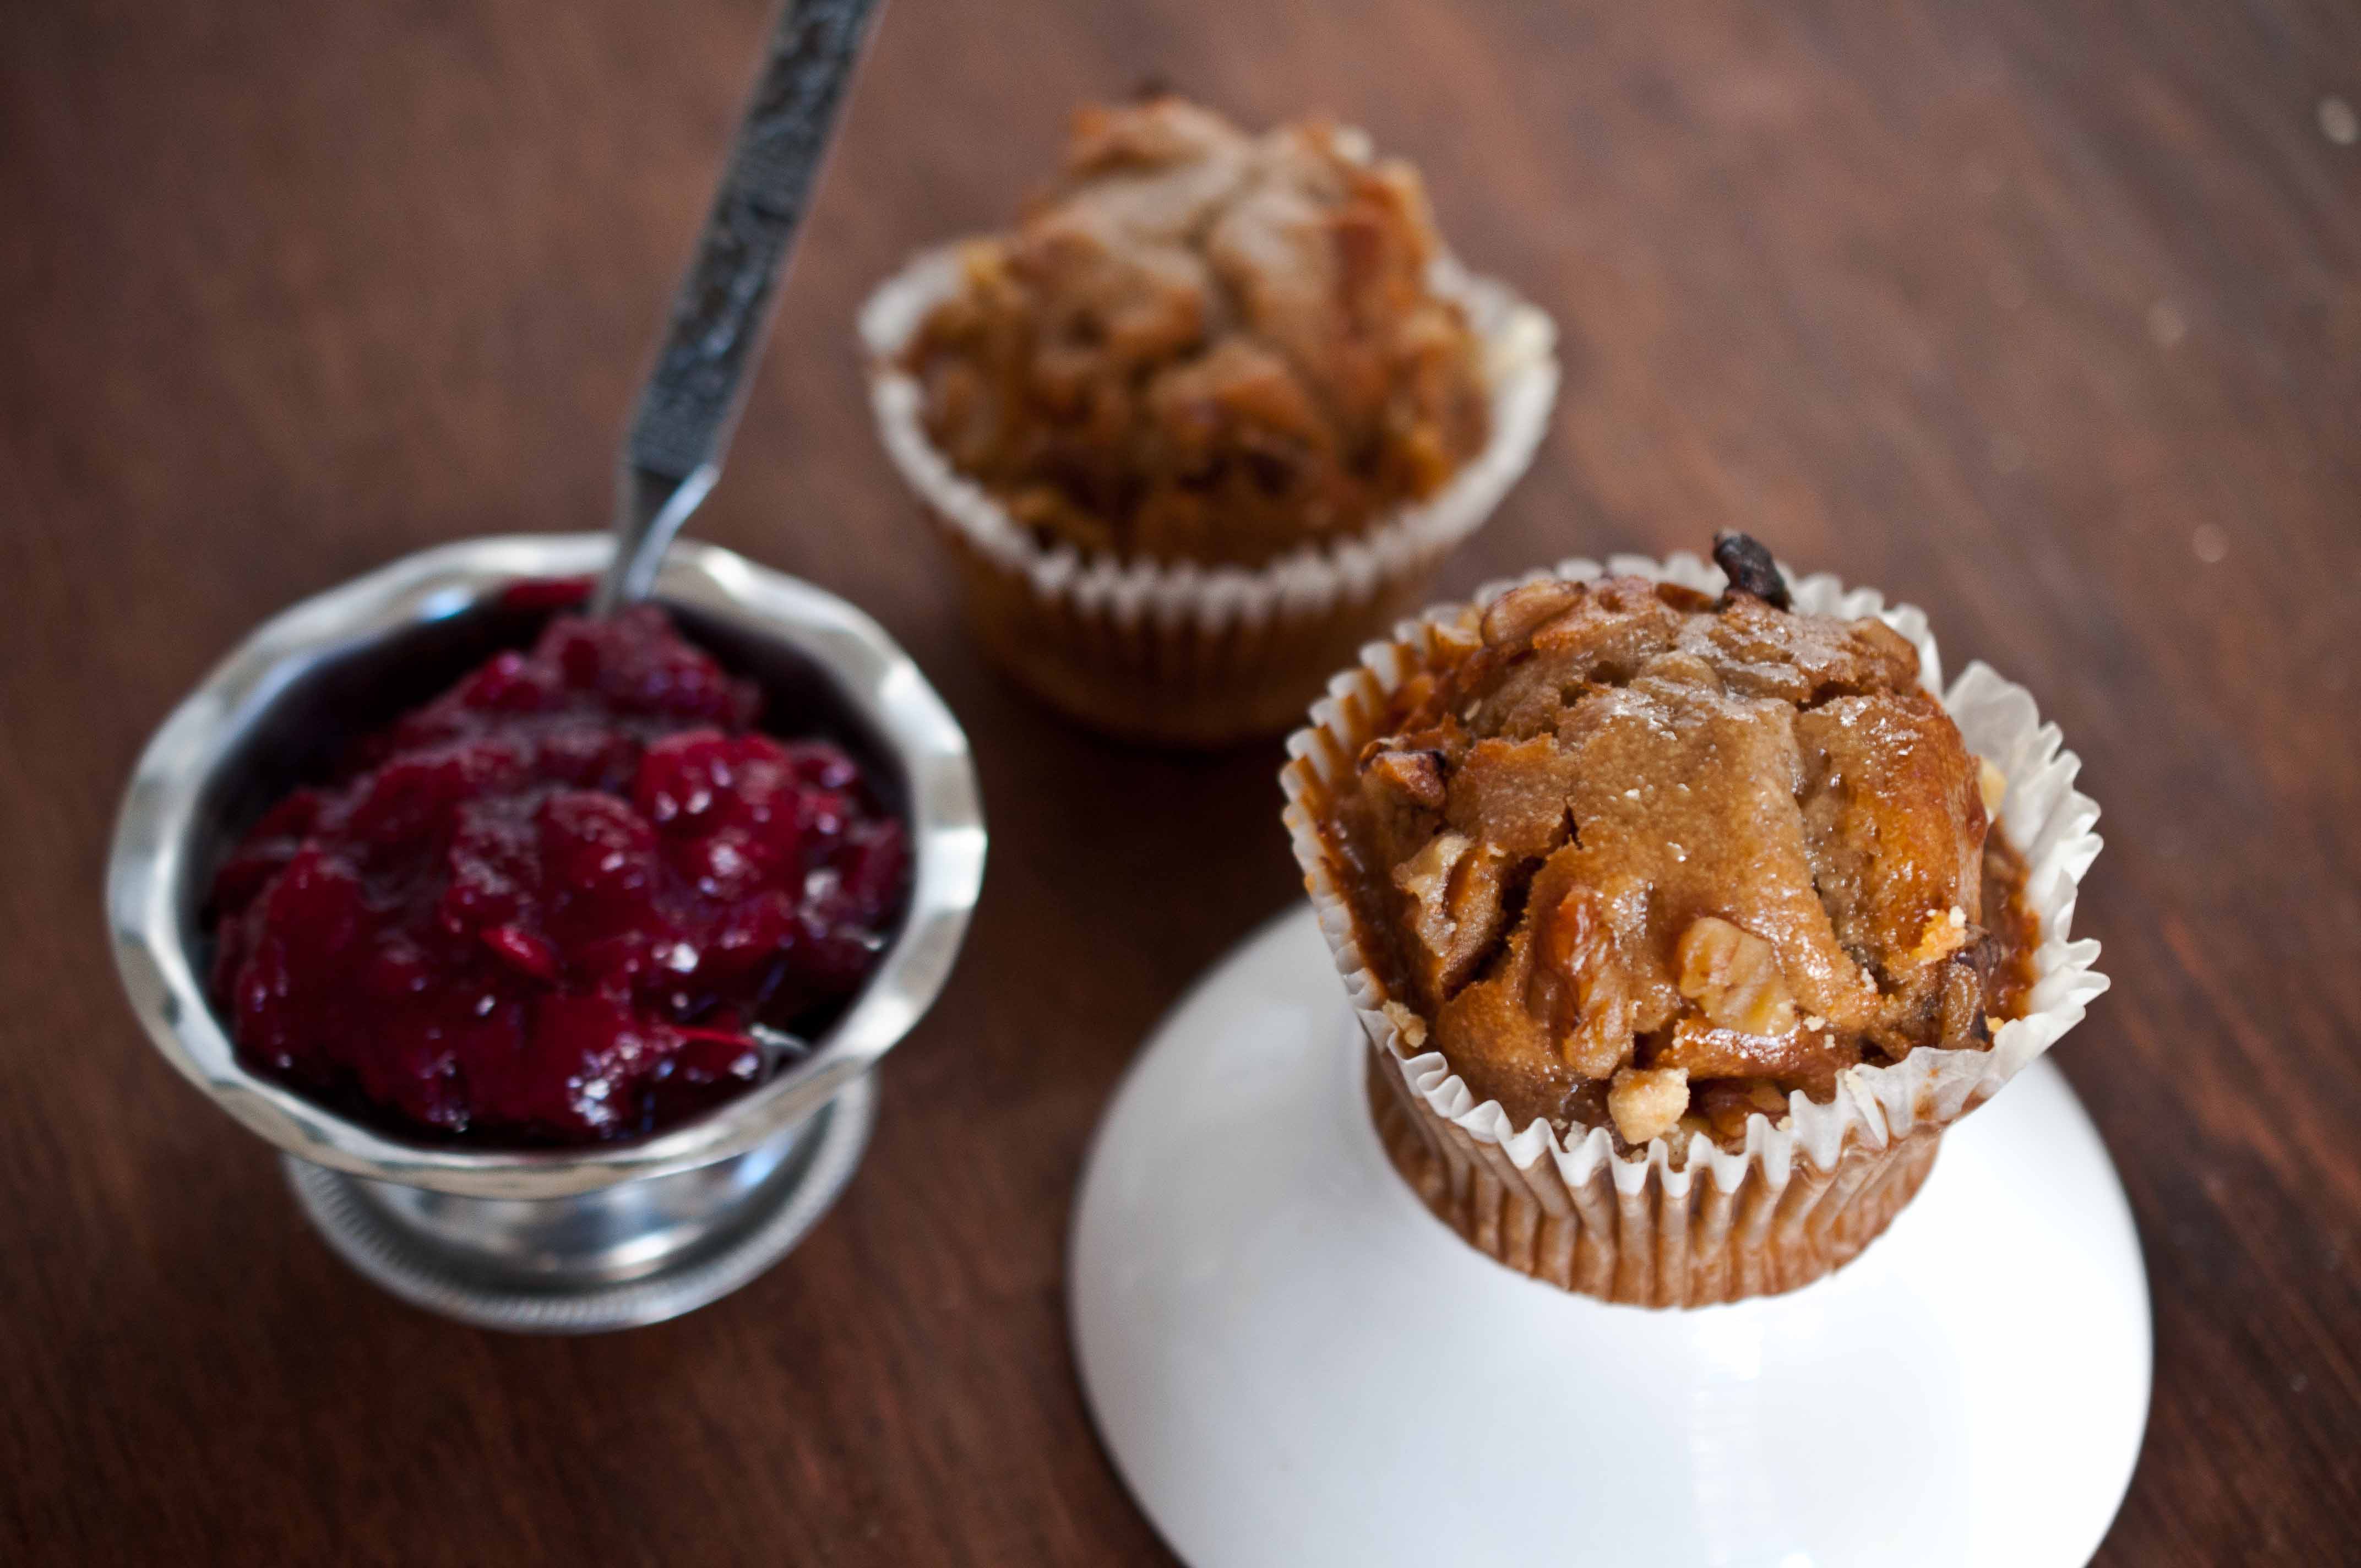
As I said before, cranberry sauce freezes well. You can save your leftovers for future use.
Cranberry Cream Cheese Frosting
2 3/4 cups cream cheese (softened)
1 1/4 cups butter (softened)
1/2 cup cranberry sauce
3/4 cup powdered sugar
Cream cheese frosting is super, super easy to make and about a billion times better than that crap in a plastic can, as long as you follow the rules. Seriously, if you try to cheat this you will end up with a mixing bowl full of lumps that give your frosting the consistency of ground beef. The biggest rule: everything needs to be room temperature. Sounds wrong, but it’s true. Leave your butter and cream cheese on the counter for a few hours to let them soften. Here are a few acceptable shortcuts to get your ingredients to room temperature, since you may have patience issues, or lack of time issues, like I do.
1. If you are baking and the oven is on, place your sticks of butter and cream cheese (still wrapped) on top of the warm oven. That is, if you have an oven that gets warm. Turn them every 8-10 minutes to warm all sides. In about 30 minutes, they should be softened.
2. Microwave. The problem with this is that you really don’t want anything melted, and since cream cheese is almost always wrapped in foil, this just works for butter. Put your wrapped butter on a microwave safe plate and microwave on high for 8 seconds. Turn one quarter turn and then repeat. do this until it is softened, but not melted.
3. Cut everything into cubes and leave at room temp for about 30 minutes, should do the trick, unless your house is freezing cold.
Put your softened cream cheese in the bowl of a stand mixer and beat on high for about 3 minutes. This will allow it to blend with the butter better and prevent any clumps. Add the softened butter and beat on high until well combined. Add the cranberry sauce and mix again until well combined. Turn off the mixer and add the powdered sugar. I don’t like my frosting super sweet, but if you do, add more powdered sugar. Mix on low speed until the powdered sugar is mixed into the cream cheese mixture.
Cranberry Walnut Muffins
1 stick unsalted butter
1 cup sugar
2 eggs
1 tsp vanilla extract
3/4 cup sour cream
1 cup cranberry sauce
2 cups all-purpose flour
1 teaspoon baking powder
½ teaspoon baking soda
½ teaspoon ground nutmeg
1 tsp cinnamon
¼ teaspoon salt
½ cup walnuts, chopped
Makes 12
Preheat oven to 400.
In the bowl of a stand mixer, cream butter and sugar. Add eggs one at a time, then the vanilla; mix well between each addition. While the mixer is on low, add the sour cream and then the cranberry sauce, mixing until well combined. In a separate bowl, Combine flour, baking powder, baking soda, nutmeg, cinnamon and salt. With the mixer still on a low speed, slowly add the flour mixture to the cranberry mixture. Mix until just combined, don’t over beat. Stir in the walnuts. Add cupcake papers to a muffin tins. Fill each paper until about 2/3 full.
Bake at 400 degrees F for 20-25 minutes or until muffins spring back when touched.
Allow to cool.
Cranberry Pancake Syrup
1 cup cranberry sauce
1/4 cup maple syrup
Put both in a bowl, stir well, heat in the microwave for 20 seconds. Serve over pancakes.
Take a second to like my Facebook Page to receive info about new post in your feed.
Thanksgiving is the perfect holiday because gratefulness is such an underrated personality trait. I wish people admired that quality in others like they admire shoes and jewelry and waist size.
"She is SO grateful! I wish I had that."
We should start the day that like. Before we ever get out of bed, list the things you are thankful for.
If you aren’t feelin' in a Thankful kinda mood right now, this’ll do it:
I’ve know quite a few survivors of the Nazi Holocaust. Most of whom are in their 90’s now. I know a man who was in Auschwitz concentration camp and went to the gas chamber. Twice. Both times, something was broken, and the entire chamber full of terrified, naked, sobbing Jewish men, women and children where told to go back to their cells. To this day, when something goes wrong, a toilet breaks, his phone service is down, his car needs work, he will always say, "Thank God for things that break! Broken pipes saved my life!" Nothing like a concentration camp story to put your life in perspective, right?!
No matter what you are facing, what is wrong, or what is hard to deal with. Take some time to think about what is right in your world. Hold the good closer than you hold the bad. I have so much to be thankful for, and I hope a day never comes that I stop thinking that.
Every Thursday, not just the 4th Thursday in November, we should take some time and to list the things we are thankful for, no matter how long or short that list is.
Oh, yeah, food. That’s why you’re here. These little guys are pretty fantastic. Plus, you don’t just have to limit them to your leftover candied yams, fill these with what ever you have. Other great empanada combos:
Turkey (chopped), mashed potatoes & gravy
Stuffing & cranberry sauce
Mac & Cheese
But, even if you didn’t make yams, or you don’t celebrate Thanksgiving and want to make these, I’ll give you an easy candied yam mash recipe that will be perfect for the filling.
Thanksgiving Leftover Empanadas: Candied Yams
For The Dough:
2 1/4 cup flour
1 tsp salt
10 tbs butter, cold, cut into cubes
1 egg
1/3 cup ice water
For the Filling:
2 cups leftover candied yams, Mashed
OR
2 large yams, peeled and chopped (about 4 cups)
1/2 stick butter (4 tbs), chopped into cubes
1/4 cup maple syrup
1/2 cup brown sugar
1/2 tsp salt
1 tsp cinnamon
1/2 tsp nutmeg
1/4 cup pecans
Topping:
1/4 cup maple syrup
1/2 tsp salt
Put 1 1/2 cups of flour and the salt in a food processor, pulse for a second to combine. Add the butter and process until combined. Add the remaining flour and process again. Move to a bowl. In a small bowl, beat the egg and water together until well combined then add the egg/water to the dough with a wooden spoon. If you add the water and egg with the food processor, your dough will turn out crispy and cracker like.
Form into a disk, cover with plastic wrap and chill for at least 1 hour.
Preheat oven to 400.
If you are using leftovers you can skip this next paragraph.
Place your chopped yams in a large loaf pan, sprinkle the top with cubes of butter. Drizzle with the maple syrup and then top with the brown sugar.
Bake, uncovered at 400 for about 40 minutes or until the yams are fork tender. Remove from the oven and allow to cool a bit. Drain off most of the liquid (leaving about 2 tbs in the bottom of the pan). Mash with a potato masher until mixture until creamy, add the pecans, cinnamon, nutmeg and stir.
Once your dough is chilled, roll it out to an even thickness on a flowered surface. Cut out 4 inch circles. I don’t have a 4 inch circle cutter, so I used a margarita glass.
Brush the edges of each circle with water. Put about 2 tbs of filling in the middle, leaving the sides clear. Fold the circle over and press the edges together well to make a secure seal. Put three small slits on the top of the empanadas to allow steam to escape. Place on a baking sheet sprayed with cooking spray (or covered with parchment paper). Brush the top with maple syrup, sprinkle with a small amount of salt.
Bake at 400 for 20-22 minutes or until golden brown. Eat, smile, be thankful.
Take a second to like Domestic Fits Facebook Page to receive info about new post in your feed.
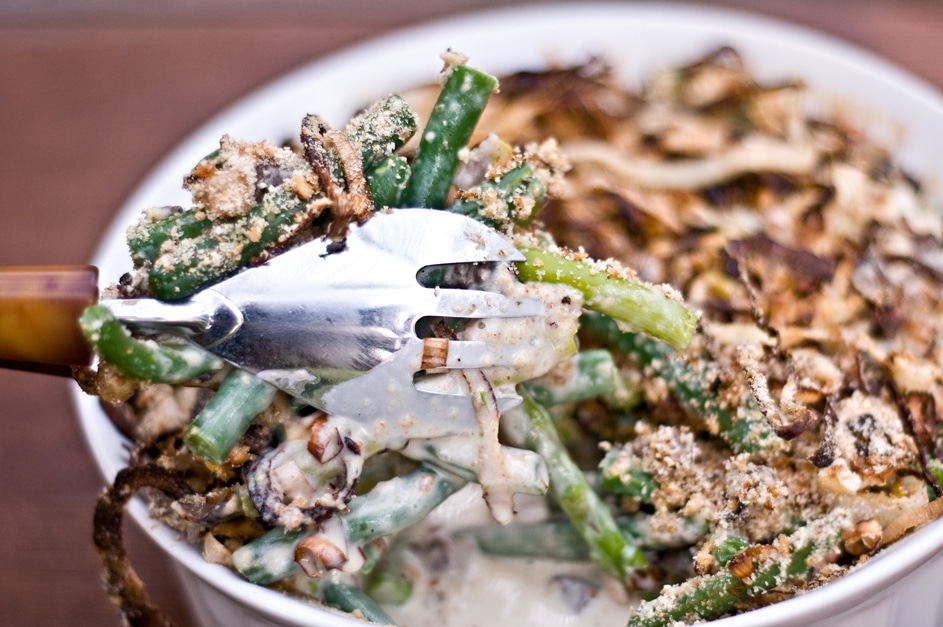
I have a lot of Non-American readers, making it necessary for my to explain why I’m doing a post about a green bean casserole.
In America, we have this very strange tradition of making our Thanksgiving feast from cans of food. Nearly every dish that most Americans grew up eating on that November Holiday involved a can of soup, or a package of Jell-o. I see you all, nodding your American heads in agreement. A smile for Grandmas Jell-o salad that still graces your Holiday table because your own kids would FLIP if it wasn’t there in that big Pyrex bowl. I know, don’t think I was exempt from this in my upbringing. But we are grown-ups now. We live in a country that has over 13 million acres of farm land dedicated to fruits and veggetables. We even grow 100 million TONS of produce every year.
We should eat it.
A lot of it. Eat food, not chemicals.
Try it, my American friends, we are lucky enough to live in a country with more produce that we could ever eat. Let’s give it a shot.
Could you do it? Cook an entire Thanksgiving without ONE can? I’m gonna.
Grown-up Homemade Green Bean Casserole
Ingredients
Topping:
2 leeks
1 large white onion
1 tbs olive oil
1/2 cup Panko bread crumbs
1 tbs salt
Casserole:
5 cups fresh green beans, trimmed and cut in half
2 tbs butter
4 cups Crimini mushrooms (baby bella), washed and chopped
3 large cloves of garlic, chopped
1 cup of chicken broth
2 tbs flour
1 cup cream
Instructions
Preheat oven to 400.
Cut the leeks (white and very light green portion only) into thin rings. Cut the onion into thin slices. place in a small bowl and toss with the olive oil to coat. Add to a baking sheet and add the Panko bread crumbs and salt, toss to combine.
Bake at 375 for about 25 minutes, tossing about every 8-10 minutes. Remove from the oven when a golden brown color is reached.
Place the green beans in a pot of rapidly boiling water. Boil for 5 minutes and immediately drain by pouring into a colander, rinse with cold water for 2 minutes to stop the cooking.
In a sauce pan over medium heat, melt the butter. Add the mushrooms and cook for about 5 minutes, or until they turn a dark brown. Add the garlic and cook for about 30 seconds.
In a separate bowl, add the chicken broth and the flour, stir to combine. Pour into the pan through a mesh strainer to remove any flour lumps. Stir until thickened, about 3-5 minutes. Remove from heat, add the cream and stir until combined. Return to heat and allow to cook until thickened, about 5 minutes. Remove from heat, add the green beans and 1/2 cup of the onion/leek mixture, stir. Pour into a 2 quart baking dish.
Time management tip: If you want to make this the day before Thanksgiving, this is where you stop. Cover the baking dish and put it into the fridge. Put the cooled onion/leek mixture in a separate container of Ziplock bag to prevent them from getting soggy from sitting on the top of the casserole all night.
Bake at 375 for 10 minutes, covered with aluminum foil. Remove foil, add onions, and bake for 10 more minutes or until warmed through.
(note: if you are cooking this after removing from the fridge, as in the above Tip, cook covered for 20 minutes then add the onions and bake for ten more.)
I’ve been eating a lot of quinoa salads ever since I did a guest post for Eating Rules. The post was about the amazingness of quinoa and how to make it the right way, as in not mushy. Andrew, of Eating Rules, posed a challenge to the world at large to give up processed food for one month, and somewhere around 3,000 people have accepted. Could you do it? Could you give up all processed foods for an entire month? You can start small, maybe one week, or maybe one meal per week for a month. How about "Unprocessed Wednesday Night Dinners" for the rest of the year. What is unprocessed? That been quite the discussion, for more information read this. But the short answer is, don’t eat food that has ingredients you don’t (or couldn’t) have in your kitchen. Skip the boxed, frozen, prepackaged, canned and chemical laden foods. Keep the journey from the farm to your table as short as possible. Cook with real, whole vegetables, fresh meats, grains that aren’t labeled "Instant" or "Success" or "Minute" but just: rice or quinoa. Make biscuits from scratch, roast a whole chicken, steam some vegetables, or grill some meat. You can do it. And the less processed foods your family eats, the healthier you’ll all be. For some inspiration to ditch the 37 ingredient bags of food, check out this family who did it and chronicled the highs and the lows.
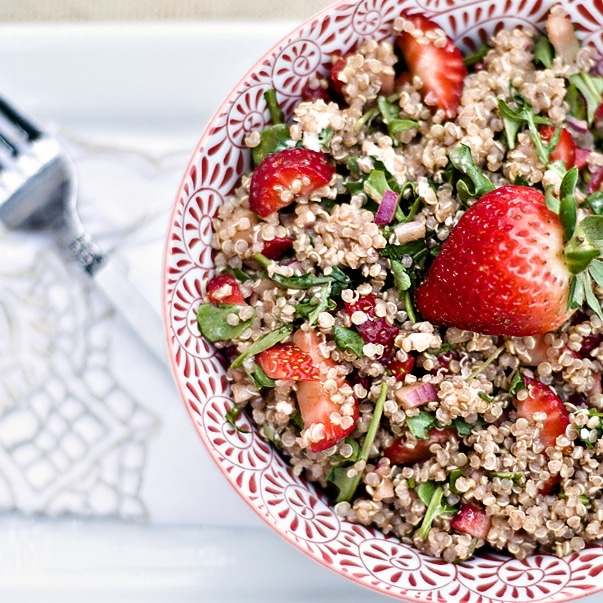
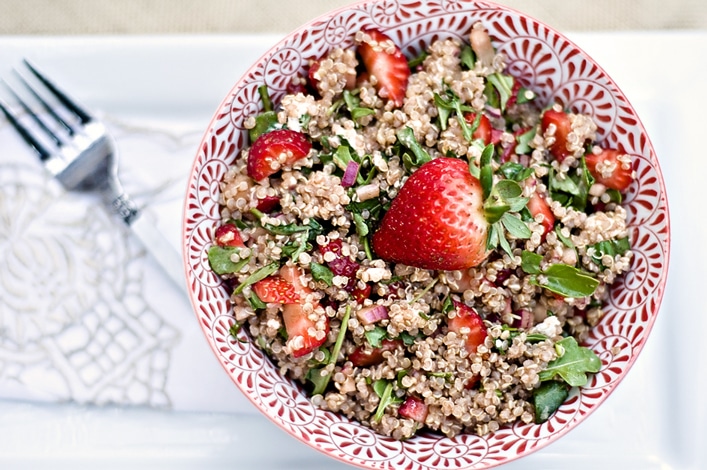
Strawberry, Goat Cheese and Quinoa Salad
1 cup of quinoa, cooked
1 cup Strawberries, hulled and chopped
3 oz goat cheese, crumbled
½ cup chopped arugula
1 tbs basil, chopped
¼ cup balsamic vinegar
1/8 tsp salt
2 tbs red onions, minced
2 tbs honey
In a bowl add the quinoa, strawberries, goat cheese, basil, arugula and toss combine. In a separate bowl, whisk together the balsamic vinegar, salt, onions and honey. Drizzle the balsamic mixture over the quinoa/strawberry mixture and toss to coat. Serve immediately.
(Makes 2 large salads, or 4 small side dish salads.)
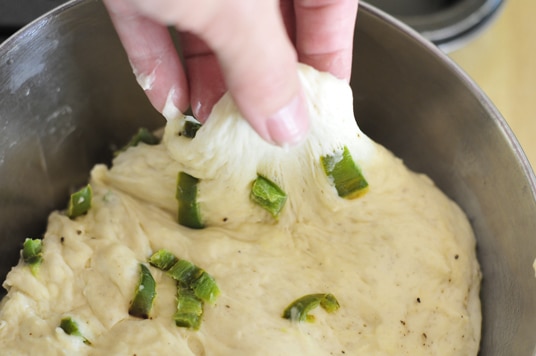
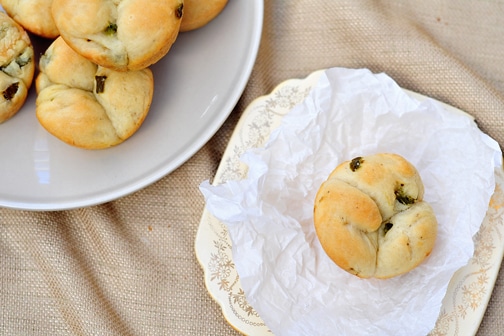
Happy National Spicy Food Day! Seriously, its a day. August 19th is dedicated to the celebration of spicy food. I love spicy food, and have a tendency to look at a dish and think, "And how would this taste with jalapenos?" Which is where these rolls came from. I took perfectly innocent, delightful brioche rolls and corrupted them with jalapenos. Just like I did with that Mac N Cheese, and those cornbread muffins. It might be a sickness.
Jalapeno Brioche Rolls
1/4 cup chopped jalapenos
2 tbs butter
1/2 tsp salt
1/4 cup water
1/4 cup milk
2 tablespoons sugar
1 envelope of dry active yeast (2 1/4 tsp)
3 cups all purpose flour
1 teaspoons salt
3 large eggs
2 sticks unsalted butter, softened
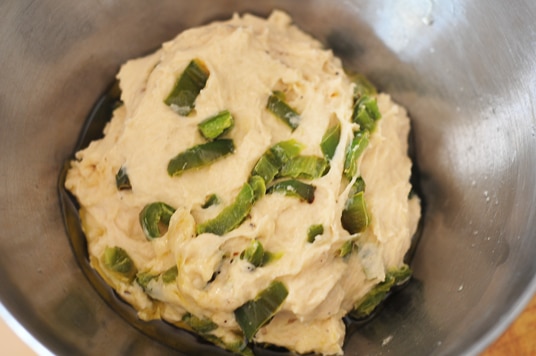
Chop the jalapenos, removing the seeds.
Heat 2 tbs of butter in a pan over medium heat until melted. Add the jalapenos and sauté until softened, about 5 minutes. Allow to cool. Combine the milk and the water and heat in the microwave for 10 seconds, test the temperature (you want it between 105 and 110) and repeat until the desired temperature is reached. Put your warm milk/water and sugar in the bowl of a stand mixer.
Sprinkle the yeast on top and allow it to get foamy, about 5 minutes.
Add the flour and with the dough hook attachment, mix on low speed until its combined into a flaky ball (about 1 1/2 minutes).
Add the eggs, one at a time, mixing until combined.
Add the softened butter (softened is important) and the jalapenos, beat until the dough gathers around the hook and is smooth and shiny.
Coat the inside of a bowl with olive oil and place the dough ball in it
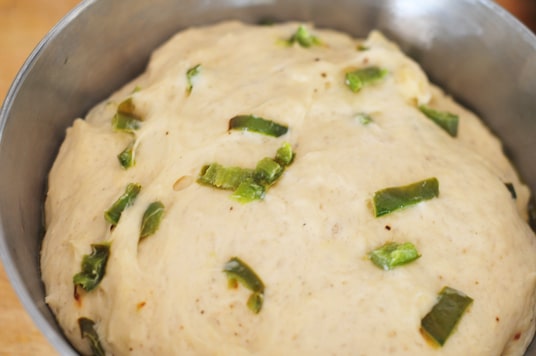
Wrap with plastic wrap leave in a warm place until it’s double in size, about 1 1/2 hours.
Grab the dough at the sides until it has deflated.
Allow to rise a second time at room temperature, until it has doubled in size, about 45 minutes.
Remove from the bowl and shape into a long log, about 4 inches wide and 1 foot long.
Using a sharp knife, cut in 3 equal sized pieces.
Then cut each of those pieces in half (you will now have 6 pieces.)
Now cut each of those pieces in half and you will have 12 equal sized pieces.
Each of these pieces will be a roll, but you have to make some more cuts first.
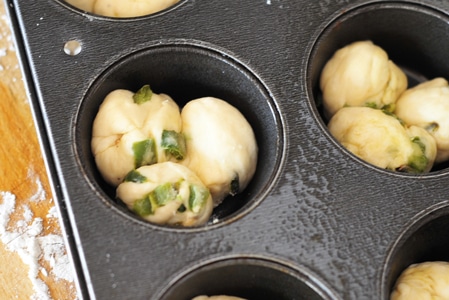
Cut each slice into 3 equal sized pieces, rolling each into a ball and placing all three into the same well of a muffin tin. Repeat for each slice.
Cove with plastic wrap, place in the fridge and allow to double in size, about 1 1/2 hours.
Preheat the oven to 400. Bake for 20 minutes or until golden brown.
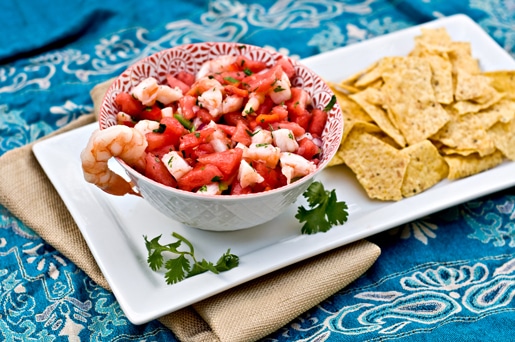
The last time I had ceviche I was one week into my pregnancy with Tater. We were in New York. A trip that had been planned for months, even before all the fertility goalies were removed and we were officially “trying.” The first few weeks of pregnancy, when it is all just more of an idea, a theory, than an actual BABY, there is a thick fog of impending miscarriage. As if that is the inevitable outcome. You don’t tell anyone outside your very inner circle so that you don’t have to UNtell, “in case…well, you know.” We had gone to have dinner at the apartment of a newly married couple we know. He’s a musician we’ve known since we were kids and she is a doctor we feel grateful to know as adults. We arrive to a beautiful spread of homemade ceviche. I panic. I haven’t been able to do all research. Fish? Some is ok, right? What if this is the horrible, mercury laden trigger that will decimate the theoretical baby growing in my uterus? I gave a frantic look towards Mr. Fits. Casually, he searched Google on his phone without missing a conversation beat, as if just answering a text rather than shieling his unborn theory from poisonous, metal saturated fish. “It’s fine,” he leans over and whispers to me, showing me the phone, “Very low in mercury. They even encourage you to eat this kind because the omega 3’s are good for brain development.” Brain development? BRAIN? I’m growing a brain. It all hits me. I am growing a human. No one can even tell and my guts are making a brain. That was the moment that this theory, this idea, this pregnancy actually started to become a baby, a human Tater. Ceviche will always remind me of that night, and the realization that my pregnancy would end with my beautiful baby being born.
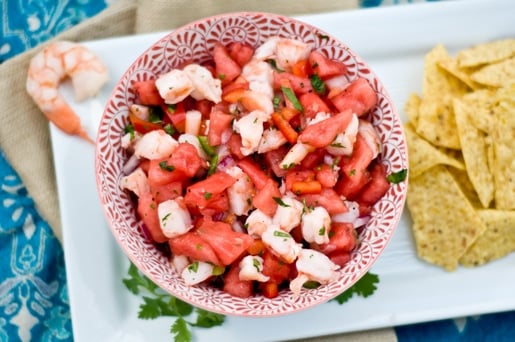
Watermelon Ceviche
3 cups of watermelon, chopped
½ cup diced red bell pepper
¼ cup diced red onion
¼ cup chopped cilantro
2 tbs diced fresh jalapenos, seeds removed
1 ½ cup cooked, chopped shrimp, tails removed
½ cup fresh squeezed lemon or lime juice (or a mixture of both)
1 ½ tsp kosher salt
1 tsp black pepper
1 tsp sriracha
Corn chips and Boston lettuce leaves for serving
Put all the ingredients (except the chips and lettuce) in a large bowl and mix until combined. Allow to chill for at least an hour before serving.
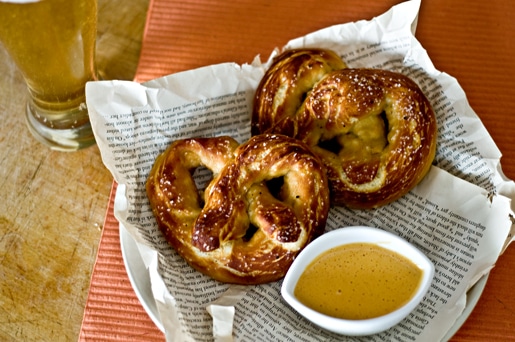
A few weeks ago I professed my love for Hepp’s Salt Barrel. They have this amazing Black Truffle salt that I have a huge culinary crush on. I’ve spent that last week inventing a recipe that would showcase this gorgeous spice. What better vehicle for salt consumption than a pretzel? Salt makes everything taste better, but in this case, it’s the star.
Truffled Soft Pretzels with a Smokey Garlic Aioli
1 cup water, warmed between 105-110 degrees fahrenheit
1 tbs sugar
1 tsp kosher salt
1 tsp active yeast
2 2/3 cups flour
1/4 cup truffle oil (can use olive oil instead) plus 2 tbs, divided
2 tbs veggtable oil
5 cups of water
1/2 cup baking soda
1 tbs black truffle salt
Aioli:
4 cloves of garlic
1 tbs olive oil, plus 1 tbs, divided
3 egg yolks
1 whole egg
1/2 tsp smoked paprika
1/8 tsp salt
In the bowl of a stand mixer, combine the water, sugar and then sprinkle the yeast on top. Give it five minutes to get foamy before proceeding. With a dough hook attachment, put the mixer on low and slowly add the flour and kosher salt. slowly add the 1/4 cup truffle oil, then increase the speed to medium and allow the mixer to knead the dough unit it’s smooth and gathers around the hook about 6-8 minutes. Coat the inside of a glass or metal bowl with the vegetable oil. Gather the dough into a ball and place inside your oily bowl, cover tightly with plastic wrap. Allow to sit in a warm place for about an hour or until it’s doubled in size (this may be a good time to start working on the aioli, instructions at the bottom).
Preheat your oven to 450 and line a baking sheet with parchment paper.
Bring the water and baking soda to boil in a pot on the stove.
Remove the dough and place on a sheet of parchment paper (if you don’t have parchment paper, use a clean oiled surface that will resist the dough sticking to it). Using a sharp knife, cut the dough into three equal sized pieces, then cut each of those pieces in half, giving you six equal sized pieces of dough.
grab one end of the dough and hold so that the other end hangs towards the ground. Using your other hand, gently squeeze the dough from top to bottom to form a long rope, using gravity to assist. You can also try rolling the dough on an oiled surface, to form a 12-18 inch rope of dough. Place on the parchment paper, forming a U shape, then brining each end in towards the bottom, crossing the ends in the middle to form a pretzel shape, pressing the ends in to secure them in place. Once the water has come to a boil, add one pretzel at a time. Allow the pretzel to boil on one side for 20 seconds and then flip it over and allow to boil on the other side for 20 seconds and remove and place on the baking sheet covered with parchment paper. once all of the pretzels have been shaped and boiled, brush with the remaining truffle oil and sprinkle with the truffle salt. Bake in the oven for 12-14 minutes or until a dark golden brown.
To make the aioli, you first need to roast the garlic. I prefer to roast whole cloves at a time, because it smells amazing, and you can always use roasted garlic in just about everything. But you only need 4 cloves for this recipe so that’s what we’ll do. Preheat your oven to 450. Take your four cloves from the bulb and leave the paper skin on. Place on a sheet of aluminum foil and drizzle with 1 tbs olive oil. Fold the aluminum into a tight package and place in a baking dish. Roast in the oven at 450 for 20 minutes, allow to cool. In a food processor, add the yolks, whole egg, smoked paprika and salt. Cut the root of you roasted garlic bulbs (where it was attached to the clove) and squeeze the garlic out and add to the food processor. Turn the food processor on and allow to process for about 3 minutes, or until thick and frothy. While your food processor is still on, slowly, slowly add the remaining 1 tbs oil, a tiny bit at a time. Allow to process for a few more minutes, until thick.
Serve your pretzeles right away. These just don’t keep very well, so if you have leftovers the next day, put them in your food processor because they make amazing bread crumbs. Keep the pretzel bread crumbs in an air-tight container in your refrigerator.
This was my breakfast this morning. Even if you aren’t a make-it-from-scratch kinda guy, biscuits should be the exception to that rule. A homemade biscuit tastes so wonderful, and it takes only about 10 minutes to throw these babies together. Plus, the leftovers are great for sandwiches.
Lemon Pepper Biscuits
2 cups of flour
1/2 tsp sea salt
1 1/2 tsp black pepper
1 1/2 tsp lemon zest
1/2 tsp baking powder
1/2 tsp baking soda
1 tsp sugar
1 stick (8 tbs) butter, cut into small cubes
1/4 cup whole milk
1/4 cup of carbonated water
1 tbs lemon juice
Preheat oven to 450.
I’ve mentioned this before, a time or 12, but overworking dough makes it tough. The less you work with dough the better the texture. BUT, when making biscuits it’s important to make sure that all the butter is distributed evenly or you’ll get pockets of butter that will cook differently. Your goal is to distribute the butter as quikly and evenly as possible. To do this, cut the butter into small cubes and have a food processor do the quick work for you.
Put the flour, salt pepper, zest, baking powder, baking soda and sugar in your food processor and pulse until combined. add your butter cubes and process until the butter is evenly distributed, about 1-2 minutes. Then add the milk, lemon juice and carbonated water and process until the liquid is well combined with the dry ingredients, about a minute.
Dump the dough onto a floured surface. Squish together with your hands to form a ball and then flatten into a rectangle about 6 -8 inches long and 2 inches high. Use a sharp knife to cut the biscuits into squares. You can make them as big or small as you want, but this recipe will make 4-6 average sized biscuits.
Place the biscuits on a baking sheet covered with parchment paper. Sprinkle the top with a bit of sea salt and pepper.
Bake for 12-15 minutes or until light golden brown.
This week I started writing a regular feature for the Glendale Examiner on farmers markets and creating original recipes from what I find there. I love all of what is involved in the previous statement. Farmers markets are one of favorite places to be. Cooking and writing recipes has become a part of who I am. Writing is a skill that I have dedicated myself to learning. And I get to photograph the entire adventure. Now if only this hobby would pay the bills and I could finally quit my day job! Maybe someday, with a lot of work, I’ll be able to tittle my post: I Quit My Job + A Recipe.
The La Canada farmers market is only about a mile from my house. It sits right below the Angeles National Forest, still charred from a fire that ravaged it a few years ago. Although on the smaller side, this particular market has a diverse selection of goods including homemade cheese, imported salts and fresh caught seafood. You can read more about my adventures at the La Canada Market on my Examiner page.
I have a special place in my heart for great salt and Hepp’s does it better than most. Don’t ever underestimate the power a great salt has on your cooking. Used properly it can make your food taste 20% better. You can make the same dish as the guy next to you and your salt will make people remember yours and forget his. It has a sneaky way of hiding in your dish, it’s own flavor largely concealed, springing up and grabbing onto the flavors of the other ingredients, brightening and popping them. If a dish tastes “flat” it’s most likely due to salt not being able to do his job. Salt on the caliber that Hepp’s offers is also a fantastic gift for a foodie, just sayin’.
Somehow, after only a few minutes in his booth, I began to develops a slight crush on Country Fresh Herbs. I was so incredibly impressed by how beautiful and, well, fresh everything looked. It was like produce heaven. My favorite was the Shisido peppers, this is what I want my Trick Or Treat basket to look like next year:
After an hour of wandering among the booths, being sidetracked again and again, I selected 5 ingredients and slowly formulated a recipe.
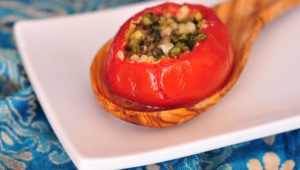
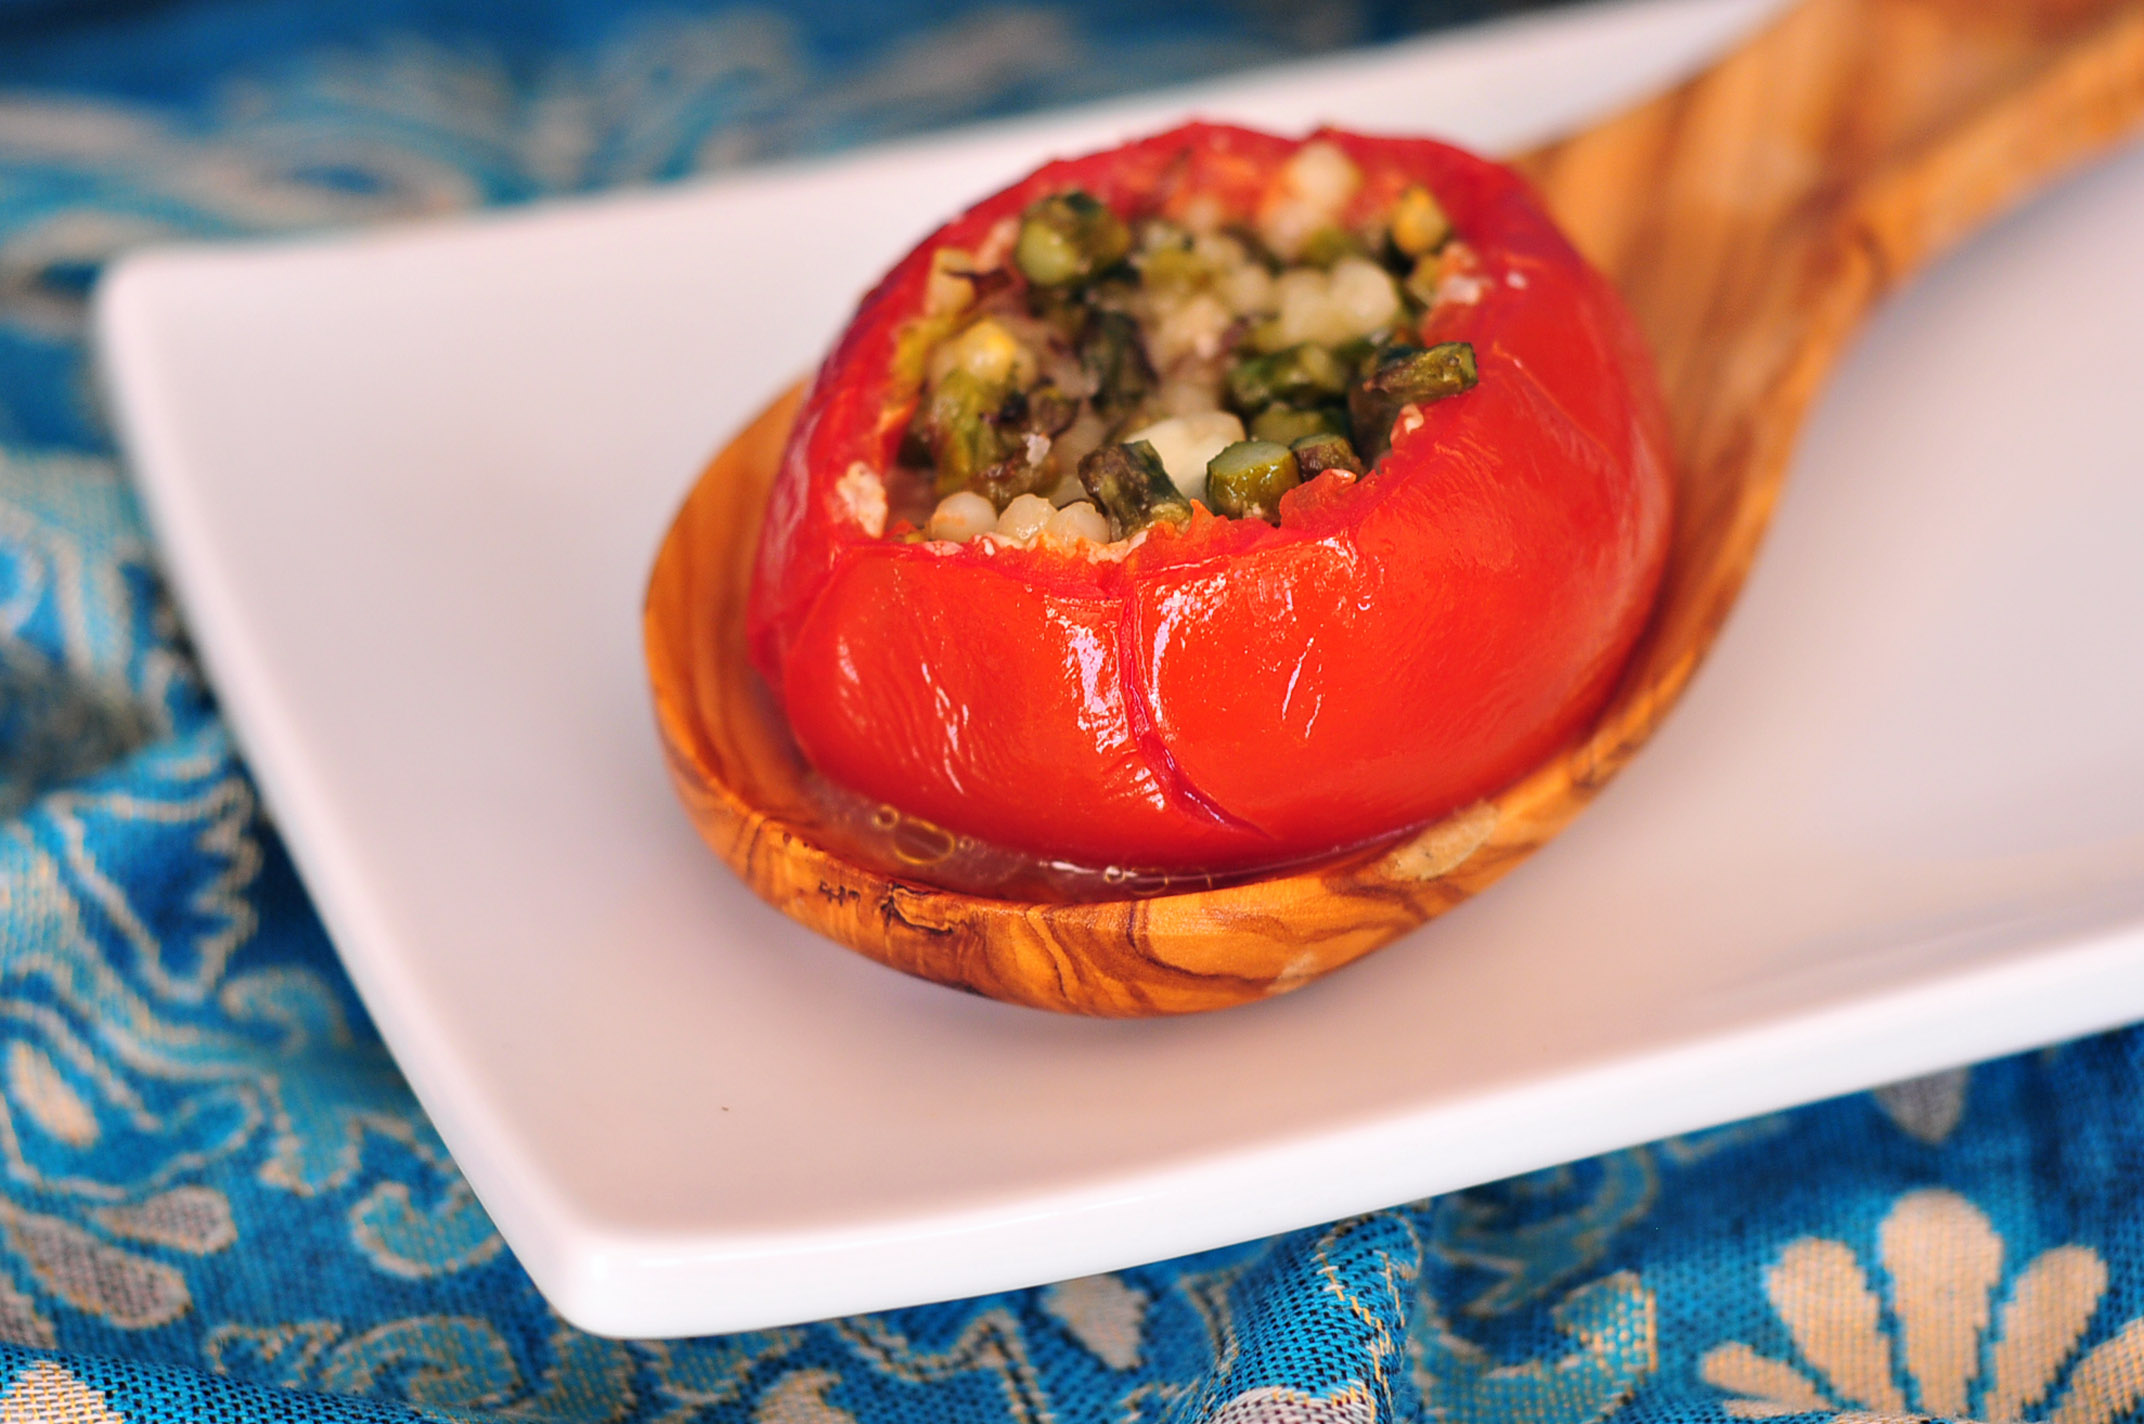
Roasted Tomatoes Stuffed with Goat Cheese and Asparagus
Ingredients:
5 Beefsteak Tomatoes
1 tbs Olive Oil, plus ¼ cup divided
¾ cup Fresh Asparagus, chopped (top half of the stalks only)
1 tbs Chopped Shisido Peppers, seeds removed
½ tsp Salt, plus 1 tsp divided
½ tsp black pepper
1/3 cup Goat Cheese
¼ Cup Israeli Cous Cous
Preheat oven to 425. In a skillet over medium-high heat, add 1 tbs olive oil. Once the oil is hot, add the asparagus, peppers, ½ tsp salt and pepper, cooking until the vegetables are slightly soft, about 5 minutes.
Remove from heat, allowing to cool a bit. Cut a thin slice off the top of every tomato, enough to expose the insides. Using a spoon, remove the flesh and seeds from the inside of each tomato, leaving the walls and bottomintact.
Add the goat cheese and Cous Cous to the asparagus pan, stir until combined. In a large bowl, add the remaining olive oil and salt, toss the tomatoes until well coated. Place the tomatoes in a baking dish, cut side up. Fill each tomato with the goat cheese and asparagus mixture.
Cover with aluminum foil and bake for 30 minutes.
Although not officially part of this recipe, I sprinkled each tomato with a bit of my Hepps salt before eating. I might have an addiction in the making.
I love to stuff food with other food. It’s so fun to try and figure out exactly how that can be done. These turned out beautifully, but if you would rather not eat stuffed muffins, you can always serve the goat cheese mixture as a spread.
Ingredients:
1 head of garlic
1-2 tbs olive oil
6 tbs of butter
1 cup of chopped fresh spinach
1/4 cup of onion, chopped
2 1/2 cups of flour
3 tbs baking powder
1/2 tsp salt
2 tbs rosemary, minced
1 1/3 cup whole milk
1/4 cup oil
2 eggs
5 oz goat cheese
1/4 cup chopped tomatoes
salt and pepper to taste
Makes 12 muffins
Preheat oven to 400. If you have never roasted garlic before, it’s time you start. I love roasted garlic so much, its great to add to so many recipes or just use as a spread on toast. Plus, it smells amazing. Start by chopping off the top of the garlic to expose the cloves inside. Put him on a sheet of aluminum foil and pour about 1-2 tbs of olive oil over him, salt and pepper.
Close the foil into a tight package, put in a baking dish and cook for about 30-40 minutes or until garlic is soft.
While the garlic is roasting, heat the butter in sauce pan over medium heat until melted and bubbly. Add the onions and the spinach and saute until onions are translucent and spinach is soft. Allow to cool
in a large bowl, add the flour, salt, rosemary and baking powder and whisk until well combined. make a well in the center. In another bowl, add the eggs, milk and oil. Once your garlic is done cooking and you have allowed him to cool a bit. Squeeze the garlic into the liquids bowl and break up the pieces as much as you can. Make sure that the papery skin doesn’t make it into the bowl. Stir the wet ingredients until well combined. Add the wet ingredients and the butter/spinach mixture to the well you made in the dry ingredients and still until combined, but don’t over mix. Add the batter to a greased muffin tin until each well is about 2/3 full.
In a small bowl, add the goat cheese, tomatoes, salt and pepper.
Mix until combined and then form balls with your hands using about 2 tsp of the cheese mixture.
Add the cheese balls to the middle of the batter filled muffin tin, press down slightly.
Put the muffin tin in the refrigerator and allow to chill for 15 minutes.
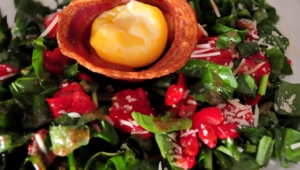
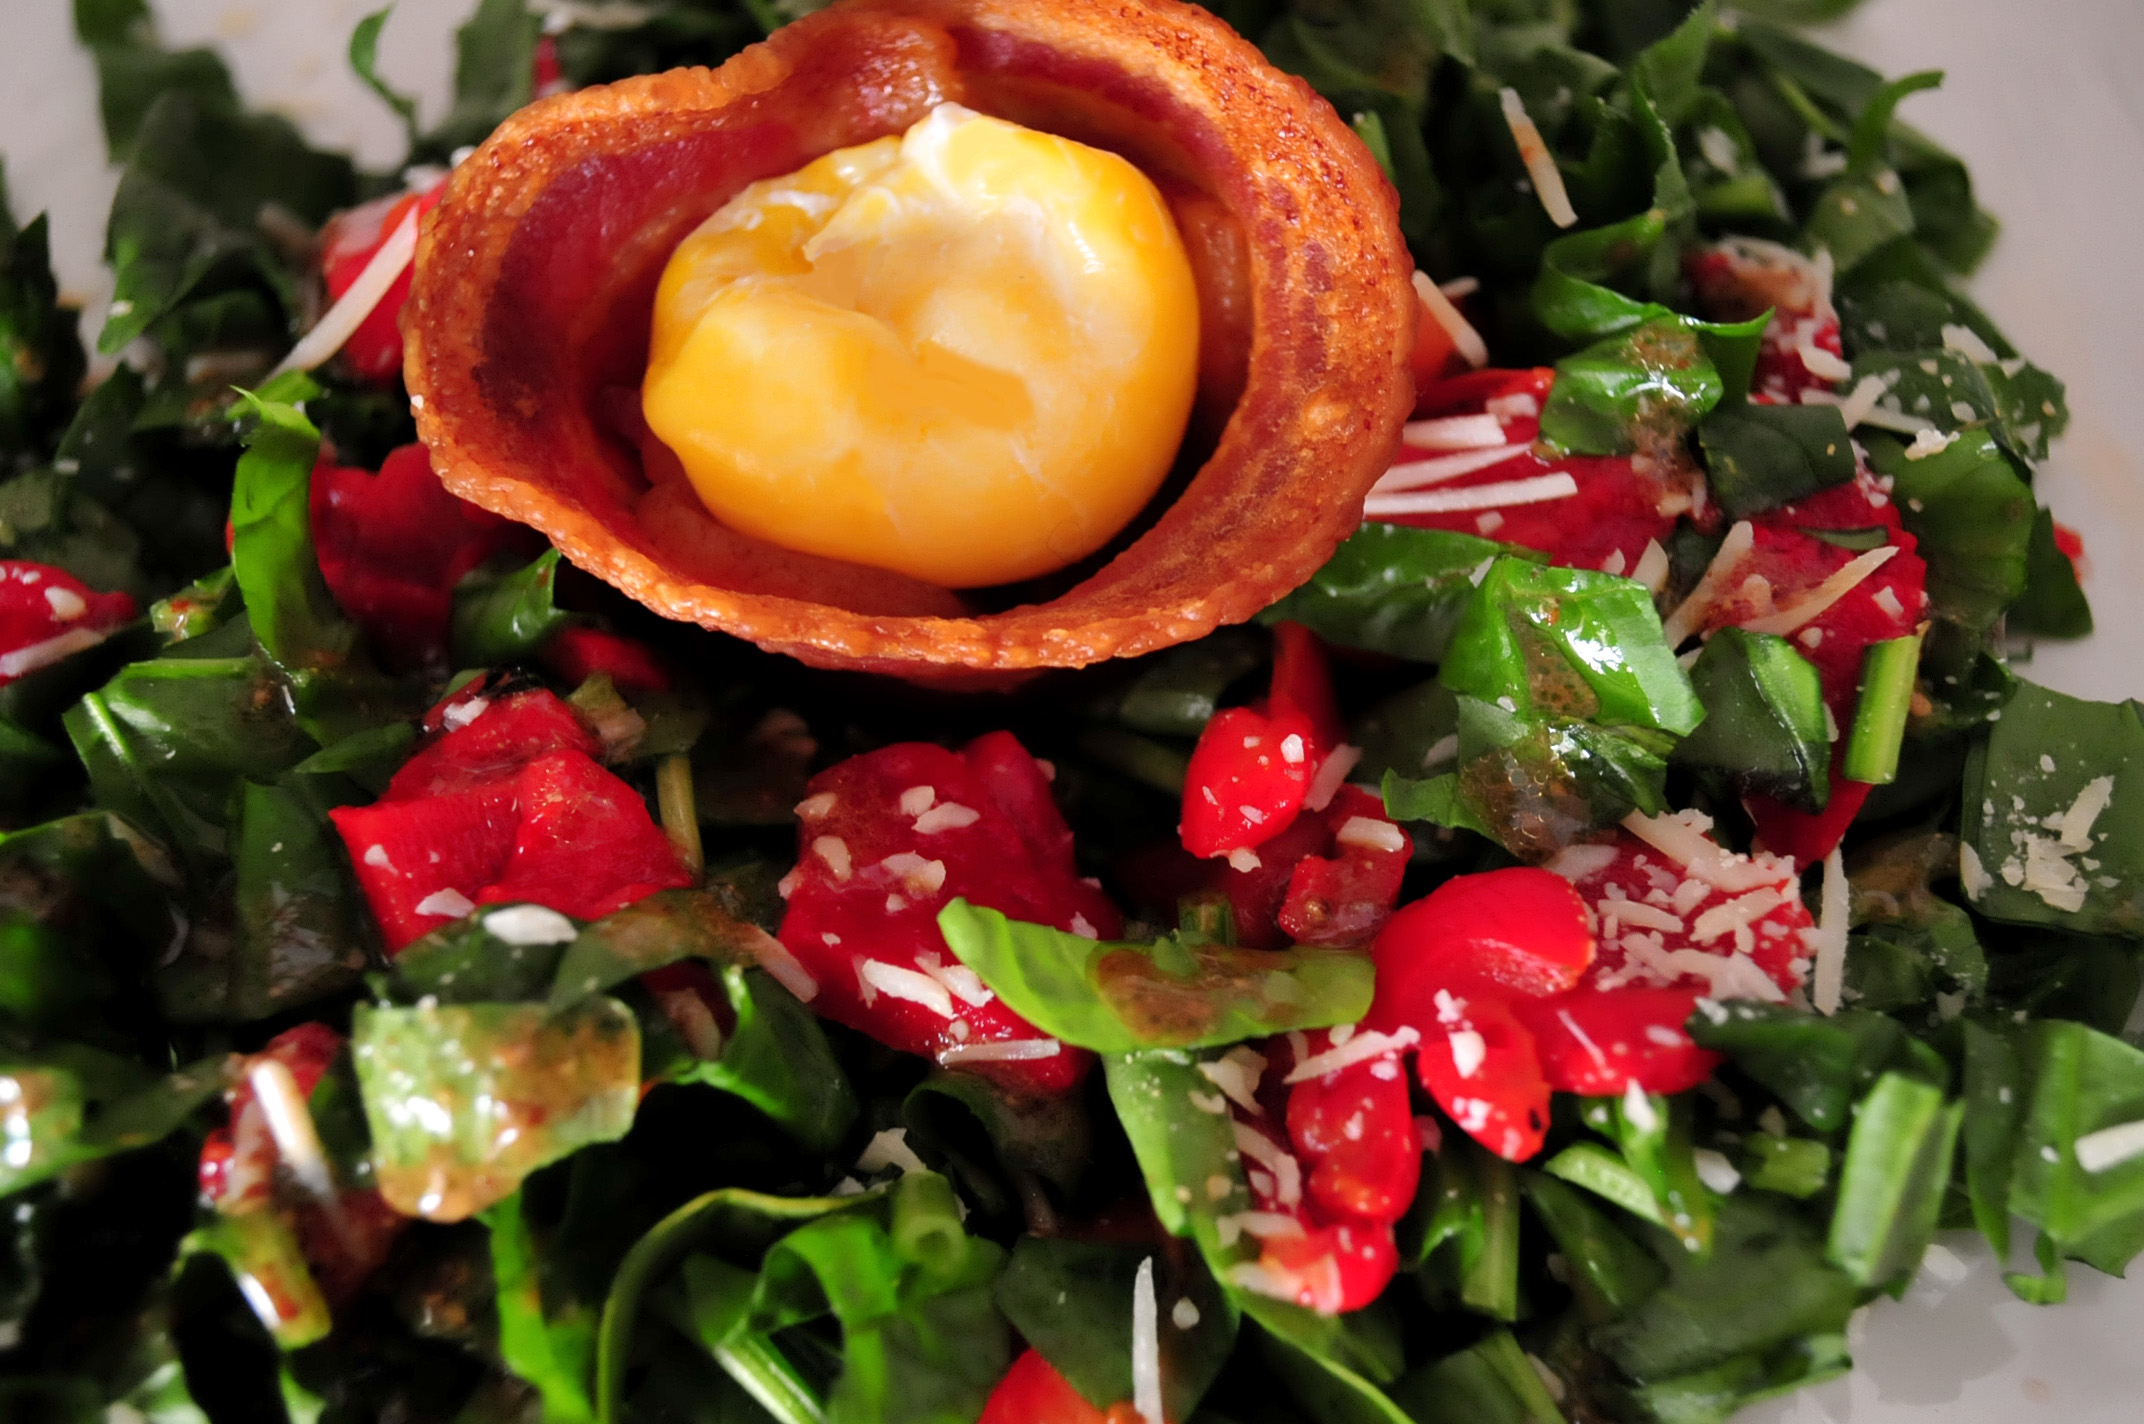
There is a beautiful restaurant in Chicago called the Blackbird. They have this amazing little salad that they serve in a crispy basket made out of potatoes. So brilliant. This got me thinking about other foods that would make great crispy edible baskets…bacon.Of course.
It really doesn’t matter what kind of salad you serve this on top of, because the bacon and egg yolk are clearly the star. I just used what I had on hand.
Ingredients:
2 cups of chopped fresh spinach
1/4 cup chopped roasted red peppers
2 tbs shredded fresh parmesan
2 tbs olive oil
1 tbs balasmic vinegar
1 tsp crouse ground mustard
1 tbs fresh lemon juice
salt and pepper to taste
2-4 strips of bacon (depending on thickness)
1 egg yolk (or two, if you’re like me and pop the first on when trying to separate it from the whites)
Start with the bacon. Preheat oven to 350. Take one or two strips and line the inside walls of a muffin pan. I had really thick bacon so that’s what I used, but I think the next time I make this, super thin bacon would work really well. Cut a second strip in half and use it to line the bottom of the pan, overlapping with the sides.
Bake until its stable enough to hold together on its own, about 15 minutes, but again, this will depend on your bacon thickness. Transfer to a baking dish and continue to cook until its crispy.
(At this point, you may want to add a pot of water to the stove to boil.)
While your bacon basket is crisping, assemble your salad veggies on a plate. Add the oil, vinegar, and mustard to a bowl and stir it up
Then add the lemon and stir some more.
Top the salad with the dressing, salt and pepper and toss a bit. Add the beautiful bacon basket to the top.
Separate your egg yolk from your white and flash poach. I’m not completely sure if “Flash Poach” is an actual term, but in Fits Land it means to poach for one minute in rapidly boiling water until the yolk is slightly encapsulated so that it doesn’t break apart upon entering afore mentioned crispy basket.
Add the egg yolk to the basket and stand back and revel in the beauty of a salad that you can’t wait to eat.
Gratin simply means “with a browned crust of bread crumbs and cheese” or, “Yummy, creamy and Melty.” OK, that last one is just mine, but in my opinion, pretty darn accurate. Sadly, too many people have never formed a relationship with Gratin outside of a dehydrated Betty Crocker box that my Grandmother called “Potatoes All Rotten”. Y’all are missing out. Homemade Gratins are fantastic and easy and will most likely always grace my holiday tables. This one is my favorite. I hope that if you are one of those who still bares the scars of adolescent forced prepackaged food trauma, that you will give this recipe a try. Really, its like therapy.
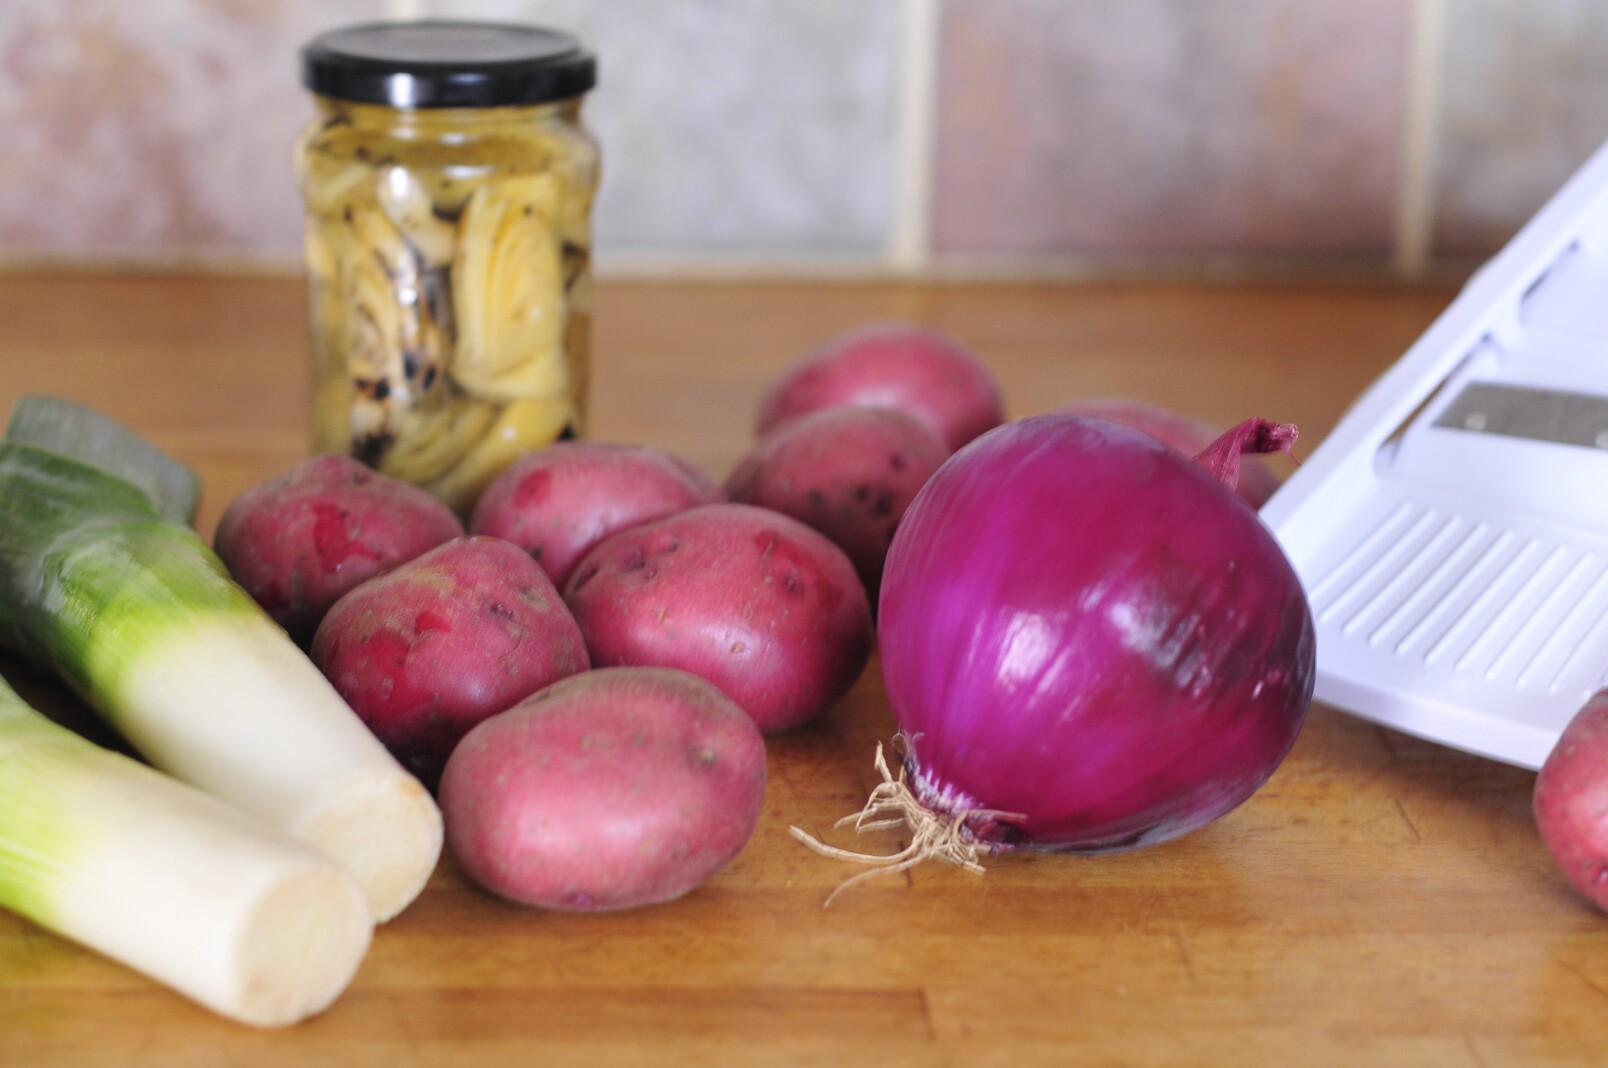
Ingredients:
3 large leeks
1/2 a large red onion
8 medium sized red potatoes, peeled
1/4 stick of butter
3 cloves of garlic, minced
12 oz of artichoke hearts (2 small jars, drained)
1 cup heavy cream
1 cup grated Swiss or Gruyere plus 1/2 cup, divided
If I were writing this for one of those cooking contests I love to enter, I would tell you to boil the potatoes for 5 minutes in lightly salted water. BUT for you, I’ll give the shortcut. In a microwave safe bowl, add the potatoes and cover completely with water. Microwave for about 8 minutes or until you are able to get a fork through the potatoes, but they are still a little firm, check after 5 minutes in case your microwave is WAY more powerful than mine, it’s old. This will allow all the veggies to cook at the same rate while in the oven rather than over cooking some and under cooking others.
Then remove them and place on paper towels to soak up excess liquid, if not, you’ll have a soupy gratin
In a large sauce pan over medium high heat, heat the butter until melted. Add the garlic, onions, & leeks and cook until soft and slightly caramelized. Then add the cream, salt and pepper and reduce heat and bring to a gentle simmer. Add one cup of the cheese and the artichokes and cook until cheese is melted.
In a baking dish (I used 8 inch round) arrange the potatoes in tight concentric circles
Using a slotted spoon, top the potatoes with a layer of the veggie/cheese mixture.
Add another layer of potatoes and another layer of veggies. Spoon about 1/2 a cup of the remaining cheesy cream mixture that the veggies where just in, onto the gratin. Top with remaining 1/2 cup Swiss cheese and then Panko, salt and pepper.
Cover in foil and bake for 20 minutes. Uncover and bake for an additional 15-20 minutes or until the top lives up to its Gratin title and the center is no longer cold. You can also make this a day ahead of time, just increase the cooking time to 30 minutes covered and then 20 uncovered if it’s out-of-the-fridge-cold.