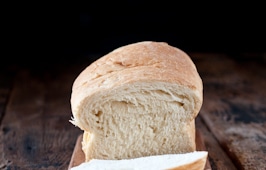
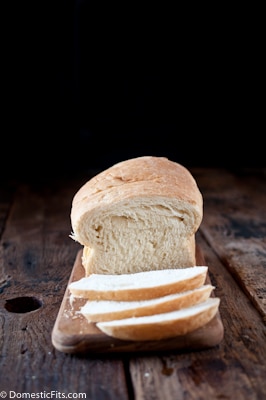
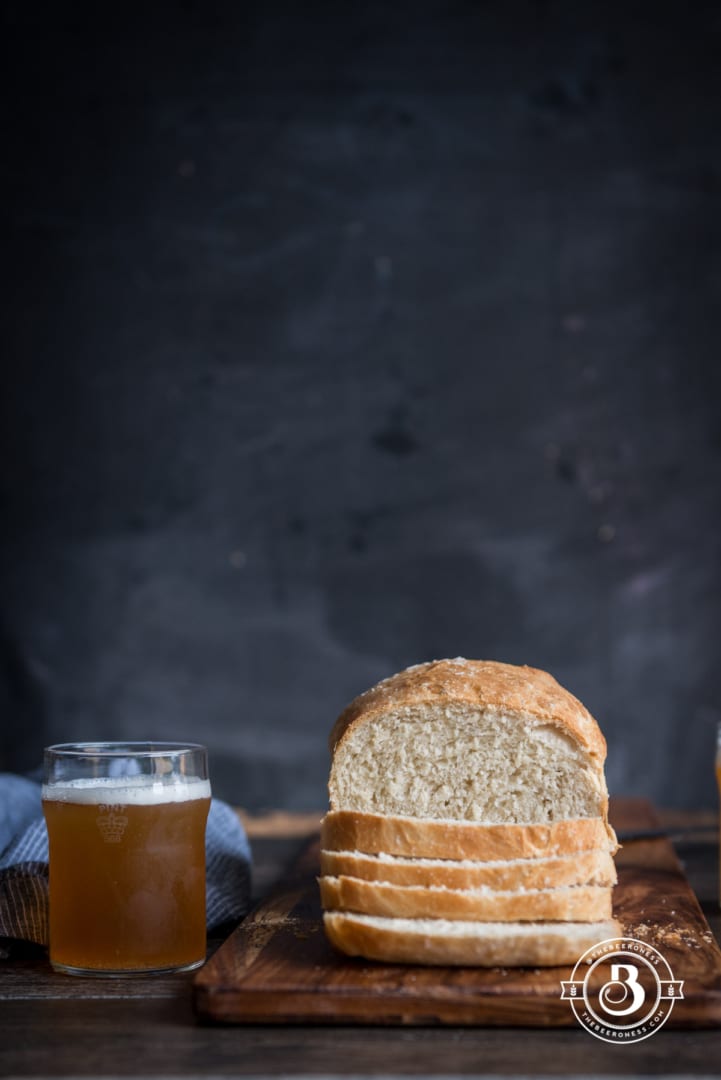
Easy Homemade Sandwich Bread
![]() Jackie Dodd-Mallory
(Senior Editor)
Jackie Dodd-Mallory
(Senior Editor)
We do this resolution thing every year, and although I love a good goal setting exercise, we can tend to favor resolutions that are a bit self-deprecating. Maybe you don’t need to hate yourself of that credit card debt or those extra pounds. Maybe our resolutions should be about learning something new, tapping into those great talents we already have and exploring them. Or expanding on interests we already have.
I want to make more food from scratch. I’m already a person who eats very little processed food, but sandwich bread is something I’ve always bought from the store. I buy good bread, but there is always a long list of ingredients most of which I’m not completely sure what it is and one of which may or may not be made from human hair (so gross).
A few weeks ago I started to make my own from scratch. As part of my Sunday routine (a day I’m almost always in the kitchen anyway) it’s become easy, simple, even second nature. It’s also infinitely better tasting and a fraction the price.
And I know all the ingredients, it’s a win all the way around.

Step one:
Add the flour, yeast and sugar to a stand mixer (sugar feeds yeast so add it to make sure your yeast is nice and active).

Step Two:
Add the milk and water to a microwave safe bowl and heat to 120 to 130 degrees on a cooking thermoeter. This is for Rapid Rise yeast. If you use regular Dry Active yeast, just heat it to 110 (the package will say what temperature is best for the yeast you’re using). Add the warm liquid to the stand mixer and mix on high. once most of the flour has been moistened, add the oil and the salt.

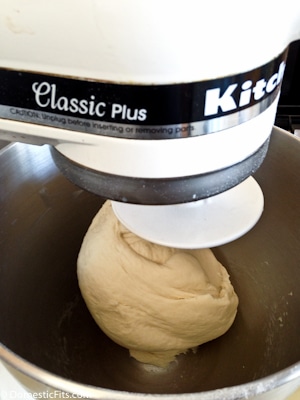
Step three:
Beat on high until the dough has started to gather around the hook and is no longer sticky, this will take about 8 minutes.
It will look like this for a while:

Keep mixing until it looks like this:
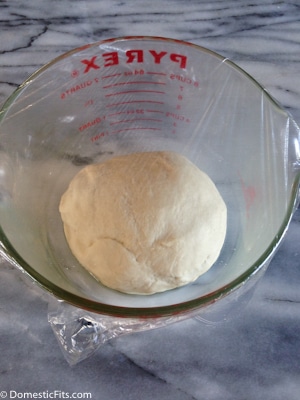
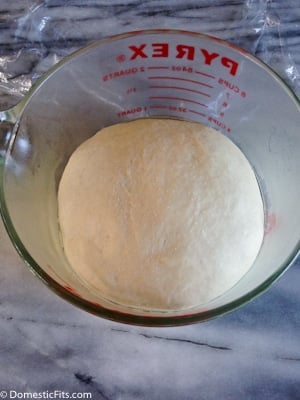
Step Five:
Add to a lightly oiled bowl, cover and allow to sit in a warm room until doubled in size, about an hour.
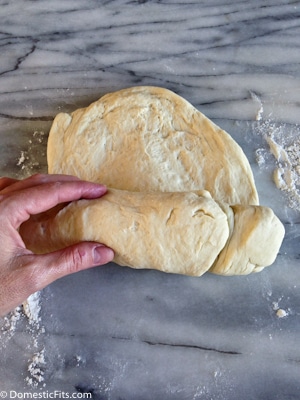
Step Six:
Knead a few times on a lightly floured surface. Form into a long rectangle (you want the width of the rectangle to be about the length of your loaf pan.)


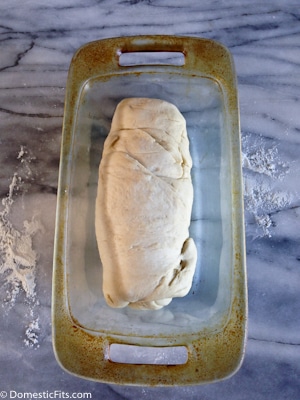
Step Seven:
Preheat your oven to 350.
Roll the rectangle into a log and add to your loaf pan. Cover and allow to rise until about doubles in size.
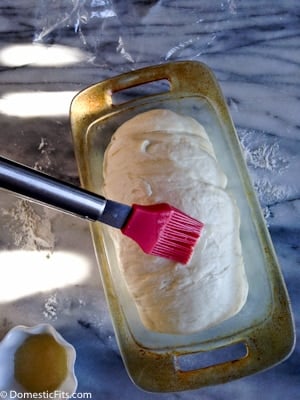
Step Eight:
Brush with melted butter and bake at 350 for 30-35 minutes or until golden brown.

Easy Homemade Sandwich Bread
Ingredients
- 3 cups all purpose flour
- 2 tbs sugar
- 1 packet rapid rise yeast (2 1/4 tsp)
- 1/2 cup milk (any kind will work, including almond milk)
- 1/2 cup water
- 1/4 cup vegetable oil
- 1/2 tsp salt
- 2 tbs melted butter (optional)
Instructions
- Add the flour, yeast and sugar to a stand mixer
- Add the milk and water to a microwave safe bowl and heat to 120 to 130 degrees on a cooking thermoeter. This is for Rapid Rise yeast. If you use regular Dry Active yeast, just heat it to 110 (the package will say what temperature is best for the yeast you’re using). Add the warm liquid to the stand mixer and mix on high. once most of the flour has been moistened, add the oil and salt.
- Beat on high until the bough has started to gather around the hook and is no longer sticky, this will take about 8 minutes.
- Add dough to a lightly oiled bowl, cover and allow to sit in a warm room until doubled in size, about an hour.
- Knead a few times on a lightly floured surface. Form into a long rectangle (you want the width of the rectangle to be about the length of your loaf pan.)
- Preheat your oven to 350.
- Roll the rectangle into a log and add to your loaf pan. Cover and allow to rise until about doubles in size.
- Brush with melted butter if desired and bake at 350 for 30-35 minutes or until golden brown.
Adapted from King Arthur Flour Classic Sandwich Bread Recipe


Comments
Chung-Ah | Damn Delicious December 30, 2013 um 2:01 pm
I love that you’ve started making things from scratch on Sundays. That’s inspiring me to do the same! I’d love to do it but just don’t have the time right now but once things cool down in the new year and I do yoga (new years resolution), this bread will be a must!
Averie @ Averie Cooks December 30, 2013 um 6:40 pm
Having a go to sandwich bread recipe is like gold! Yours is gorgeous! Pinned!
Tieghan December 30, 2013 um 8:00 pm
I am all about homemade whenever possible. Especially with bread! I mean, nothing compares to fresh homemade bread!!
Your bread looks perfect! Soft, light and perfect for any sandwich!
Maureen | Orgasmic Chef December 31, 2013 um 12:34 am
I love making bread and I can get it done by lunch. I would love to get up at 5am and make bread for breakast. Yeah, I know, it’s not going to happen in 2014.
Your break looks lovely and perfect for lunch!
Happy New Year!
breadbakerkathy March 21, 2014 um 10:31 pm
So start your dough the nite before and place it in the refrigerator tightly covered in a container that is at least 3x the size of your dough ball. Be sure to oil the sides of the container. The dough will rise slowly. Then punch it down in the morning. Shape into desired form, let rise and bake. You can have fresh oven baked bread by noon. I have been known to punch it down again and continue to leave it in the refrigerator, but note… It will rise faster the second time. I have also seen it crawl out of my container…no worries, just punch it down and continue. Appy baking!
addie | culicurious December 31, 2013 um 7:40 am
Bread is so worth any effort it takes to make! Thanks for the recipe 🙂 Happy New Year!
RavieNomNoms January 2, 2014 um 11:03 am
Thank you so much for this recipe! It looks amazing!
Hana Lehmann January 7, 2014 um 5:28 am
Have you tried substituting whole wheat flour? Would that be a problem?
Jackie January 7, 2014 um 10:28 am
try a 50/50 blend of AP flour and Whole wheat flour. or if you want to do 100% WW, try this one: http://www.kingarthurflour.com/recipes/100-whole-wheat-sandwich-bread-recipe
Kitchen Belleicious January 7, 2014 um 7:38 pm
wow this does look easy! I cant wait to give it a go!
Valerie | From Valerie’s Kitchen January 11, 2014 um 6:08 pm
There’s nothing like a loaf of fresh, homemade bread. Great step-by-step!
Mik Lear January 20, 2014 um 11:37 am
Hmmmmm. I used whole wheat flour..what nice dough!!!! On the second rise now…, I am sure this recipe is gonna be used alot!!! More later after it cooks!
Christie Ewen January 27, 2014 um 12:23 pm
This bread sucked
Jackie January 27, 2014 um 12:34 pm
Can you be more specific? It’s a King Arthur Flour recipe that has been made by thousands of people and got a 5 star rating on their site. If you can be more specific I can help you trouble shoot the issue you had with it.
Jen Frank February 15, 2014 um 1:54 pm
…sucked up and added tasty deliciousness to every sammich creation you made? I knew it. 😉
Jessica H February 1, 2014 um 8:42 am
I love this bread and so does my family. Mine tends not to come out as smooth( no clue why) but it all comes together in the end and bakes up so nice. I make two a week one I freeze and one we use right away.
andrea February 3, 2014 um 4:15 pm
We love this. Easy and good.
Caroline February 3, 2014 um 6:33 pm
The dough seems very dense, and i just put it aside to rise. I’m worried that it will be too oily…it is VERY oily dough. Is it supposed to feel like that?
tiffany February 5, 2014 um 8:37 am
this is wonderful! I must try it!
When I make bread, I like to add a teeny bit of brown sugar to the dissolving yeast 🙂
Lindsay February 8, 2014 um 2:25 pm
Made this last night and it is DELICIOUS! Mine did come out a bit crumbly, though, and isn’t holding together as much as I would like when sliced. Any idea if I may have done something wrong or how to correct this?
Jackie February 9, 2014 um 9:02 pm
If you don’t sift your flour it can get dense and you can end up using more than you think. Try sifting the flour, or add a bit more milk. Also, wait for the bread to cool completely before cutting.
Lindsay February 10, 2014 um 3:04 pm
Thank you! Planning to try again this weekend 🙂
Amber February 12, 2014 um 4:05 pm
This recipe states several times about having the bread in a rectangle to fit your loaf pan but it never mentions the loaf pan size that is required? What size loaf pan do I need?
Jackie February 12, 2014 um 4:12 pm
Any basic, standard loaf pan will work. I used a 1.5 qt loaf pan.
Kylie H February 16, 2014 um 12:46 pm
I’m getting ready to put this in the oven right now!. However, I didn’t sift my flour as the recipe did not state to do so and I’m a first-time bread maker! Do you think that will cause any issues?? It looks good so far so I’m excited to try it!!
Jackie February 16, 2014 um 4:07 pm
It should be fine. Flour just gets really dense if it’s not sifted. You can actually add up to 50% more than stated if flour is compacted rather than scooped.
Kristen February 28, 2014 um 10:14 am
Can you tell me approximately how long it will take to double in size?
Jackie March 1, 2014 um 9:46 am
Depends on how warm the room is. About an hour.
Charity March 7, 2014 um 8:15 pm
I’m on the 2nd rise right now. I used bread flour instead of all purpose as I have just learned that there is a difference in the final density. I also mixed this all by hand (well, my daughter helped since she loves to knead) since I don’t have a stand mixer. The dough seems good so far and I am hopeful that it will be our new bread source (especially since I read about the hair thing….ew). I am using a longer than normal loaf pan so I am hoping it will fill it ok.
Laurie March 10, 2014 um 2:16 pm
This is the best and easiest bread recipe I have ever used. My kids ask me to bake a fresh loaf of bread everyday using this recipe. It has become our families favorite! Thank you so much for sharing it with all of us.
breadbakerkathy March 21, 2014 um 10:43 pm
This is similar to the recipe I make. But making one loaf at a time is not reasonable for me. I make 3 loaf recipe and 3x, so I make 9 loaves in a day. It does not take much longer to do. Then I bag them and put them into the freezer. Each loaf when thawed tastes like I just made it. You can reheat the loaf in the microwave if you want it warm. Happy baking!
breadbakerkathy March 21, 2014 um 10:51 pm
You do not need a loaf pan…You can make a round loaf by shaping dough into a ball and pinching it together on the bottom. You can use a knife to make cuts in the top of the dough if you want a little decoration. Just make quick slashes…3 lines or an X mark. You can bake it on a greased cookie sheet or an ungreased bakers stone. Happy baking!
Terry L. March 30, 2014 um 7:06 pm
good receipe
For consistant results always use a (bread) flour. As a wheat grower I can tell you it makes all the difference between dense flat breads or nice fluffy loafs. It is the reaction of the yeasts to the specific proteins / starches. I always reactivate my yeast even if it says you don’t have to.
Julie July 19, 2014 um 4:34 am
I’ve made this twice and it is delicious, BUT I find that my loaf isn’t rising as high as yours in the picture. The top only reaches the top of my loaf pan, so I don’t get that nice bread shape in my slices (or, I feel, as much bread). I am using bread machine yeast and bread flour, if that changes anything. I also don’t have a stand mixer, so I just mix it up by hand.
I tried following your recipe exactly and then I followed the instructions on my yeast, which were to let the dough rest for only 10 mins for the first rise, then shape it and let it sit for an hour. It turned out the same way both times.
Pamela October 26, 2014 um 5:13 pm
Just finished eating a loaf of this bread with Dinner, turned out beautifully, Thank you!
The dough seemed very dense but rose very well, not a lot of air holes when slicing. This would make very nice sandwich bread.
Khan November 13, 2014 um 6:28 pm
I tried making bread loaf twice and both times it came out very dense not nice and fluffy bread like sold in the market. It more look cakey.
What could I be doing wrong? Something with the yeast ? Do I need a special bread yeast? If yes then what would be the name?
Also my dough did not rise as much …
I am on a dairy free and soy free diet and I’m trying my best to find something closer to market bread so that I can enjoy my breakfast and sandwiches again
Terry L January 5, 2015 um 8:26 pm
If you are having trouble with bread raising make sure you are using bread flour not general purpose. If you still have trouble use a proof box. Direction can be found on the internet. I use my microwave. Put two cups of water in the microwave and boil it usally 5-8 . min. Cover your bread and put it in the microwave with the heated water.( do not turn on the microwave oven with the bread in it).Let it set for 45-60 min. if it gets cold remove the bread turn on the microwave for 3-5 min.. Put the bread back in the microwave with the hot water until raised.
Nina R February 20, 2015 um 8:35 am
This is the bread recipe I’ve been looking for!!!! This ended up so fluffy and a beautiful crust. I had to thank you for sharing. One question…. Can you double the recipe?