
fondant

Fondant Basics

I am not usually a baker for hire. Especially cakes. They take so long and frustrate me. I can never get them as perfect as I want and I end up feeling (in a very overly dramatic fashion) that they are a complete disaster. A friend of Mr. Fits asked me to make a Monkey Cake for the baby shower she was throwing for her sister and her sisters wife to welcome their baby boy. Maybe it was the mushy soft spot that I now have for babies since Tater was born (this did not really exist prior to birth of my adorable little lady) or maybe it’s how easy it is to guilt me into baking by merely asking, but I said yes. *sigh*

Fondant 101

If you’re not sure what the stuff is that covers those cakes, it’s fondant. It’s a sugar dough that is rolled out like cookie dough to cover a cake and can even be sculpted, like clay, for decorations. If you have an interest in giving it a try, you should. It takes a little practice but general gives a very impressive look to your cakes.

I have been working with fondant for about 5 years and I have learned a thing or two about this sugar dough that I’ll share with you all.

First, it’s not very tasty. Really, even the good kinds don’t really add to the taste of a great cake. I have never, ever heard anyone say, "This cake tastes really good, but you know what it needs? A nice layer of fondant." It’ll never happen. It’s use is purely aesthetic. If you can perfect the technique of buttercream your cake can look just as good and taste somewhere around a million times better, but that’s for a different post.

Fondat can be difficult to work with, but if you really want to make a cake that  has a professional look to it, this is a great option.

There are three brands of fondant that I have worked with, and as far as my experience goes, these are the three main brands:

Wilton

Satin Ice

 Fondx

The basic rule, when it comes to yummy vs easy, is that the better it tastes the more difficult it is to work with.

Wilton is at the bottom of the yumminess food chain. It tasted like sugary play-dough. I would however, suggest you start here if you have never given fondant a try. Wilton fondant is a tank compared to the other two. It’s forgiving and tough. Use it your first time to get a feel for how to use fondant then move on when you think you’re ready.  Just let your guests know that, although it is edible, you would recommend peeling it off before eating the cake.

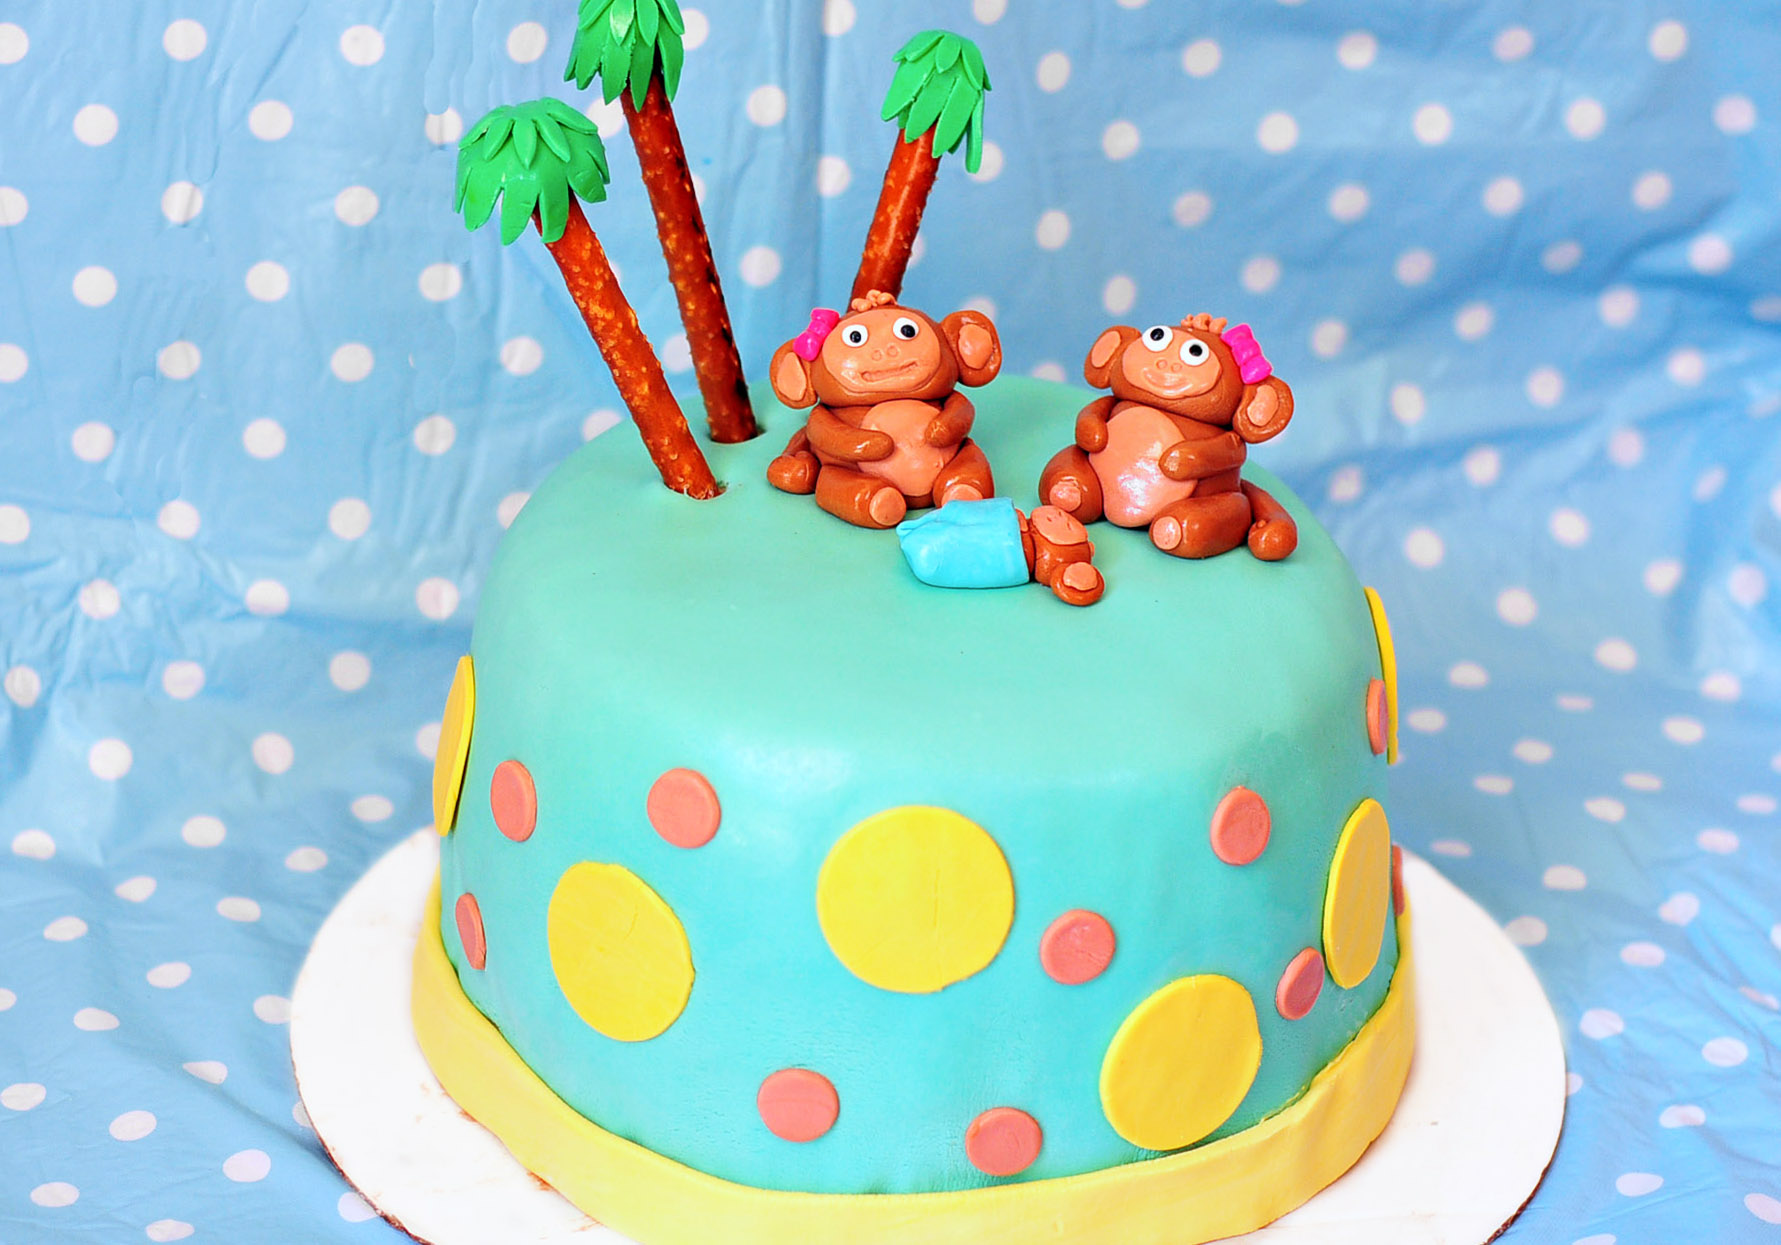
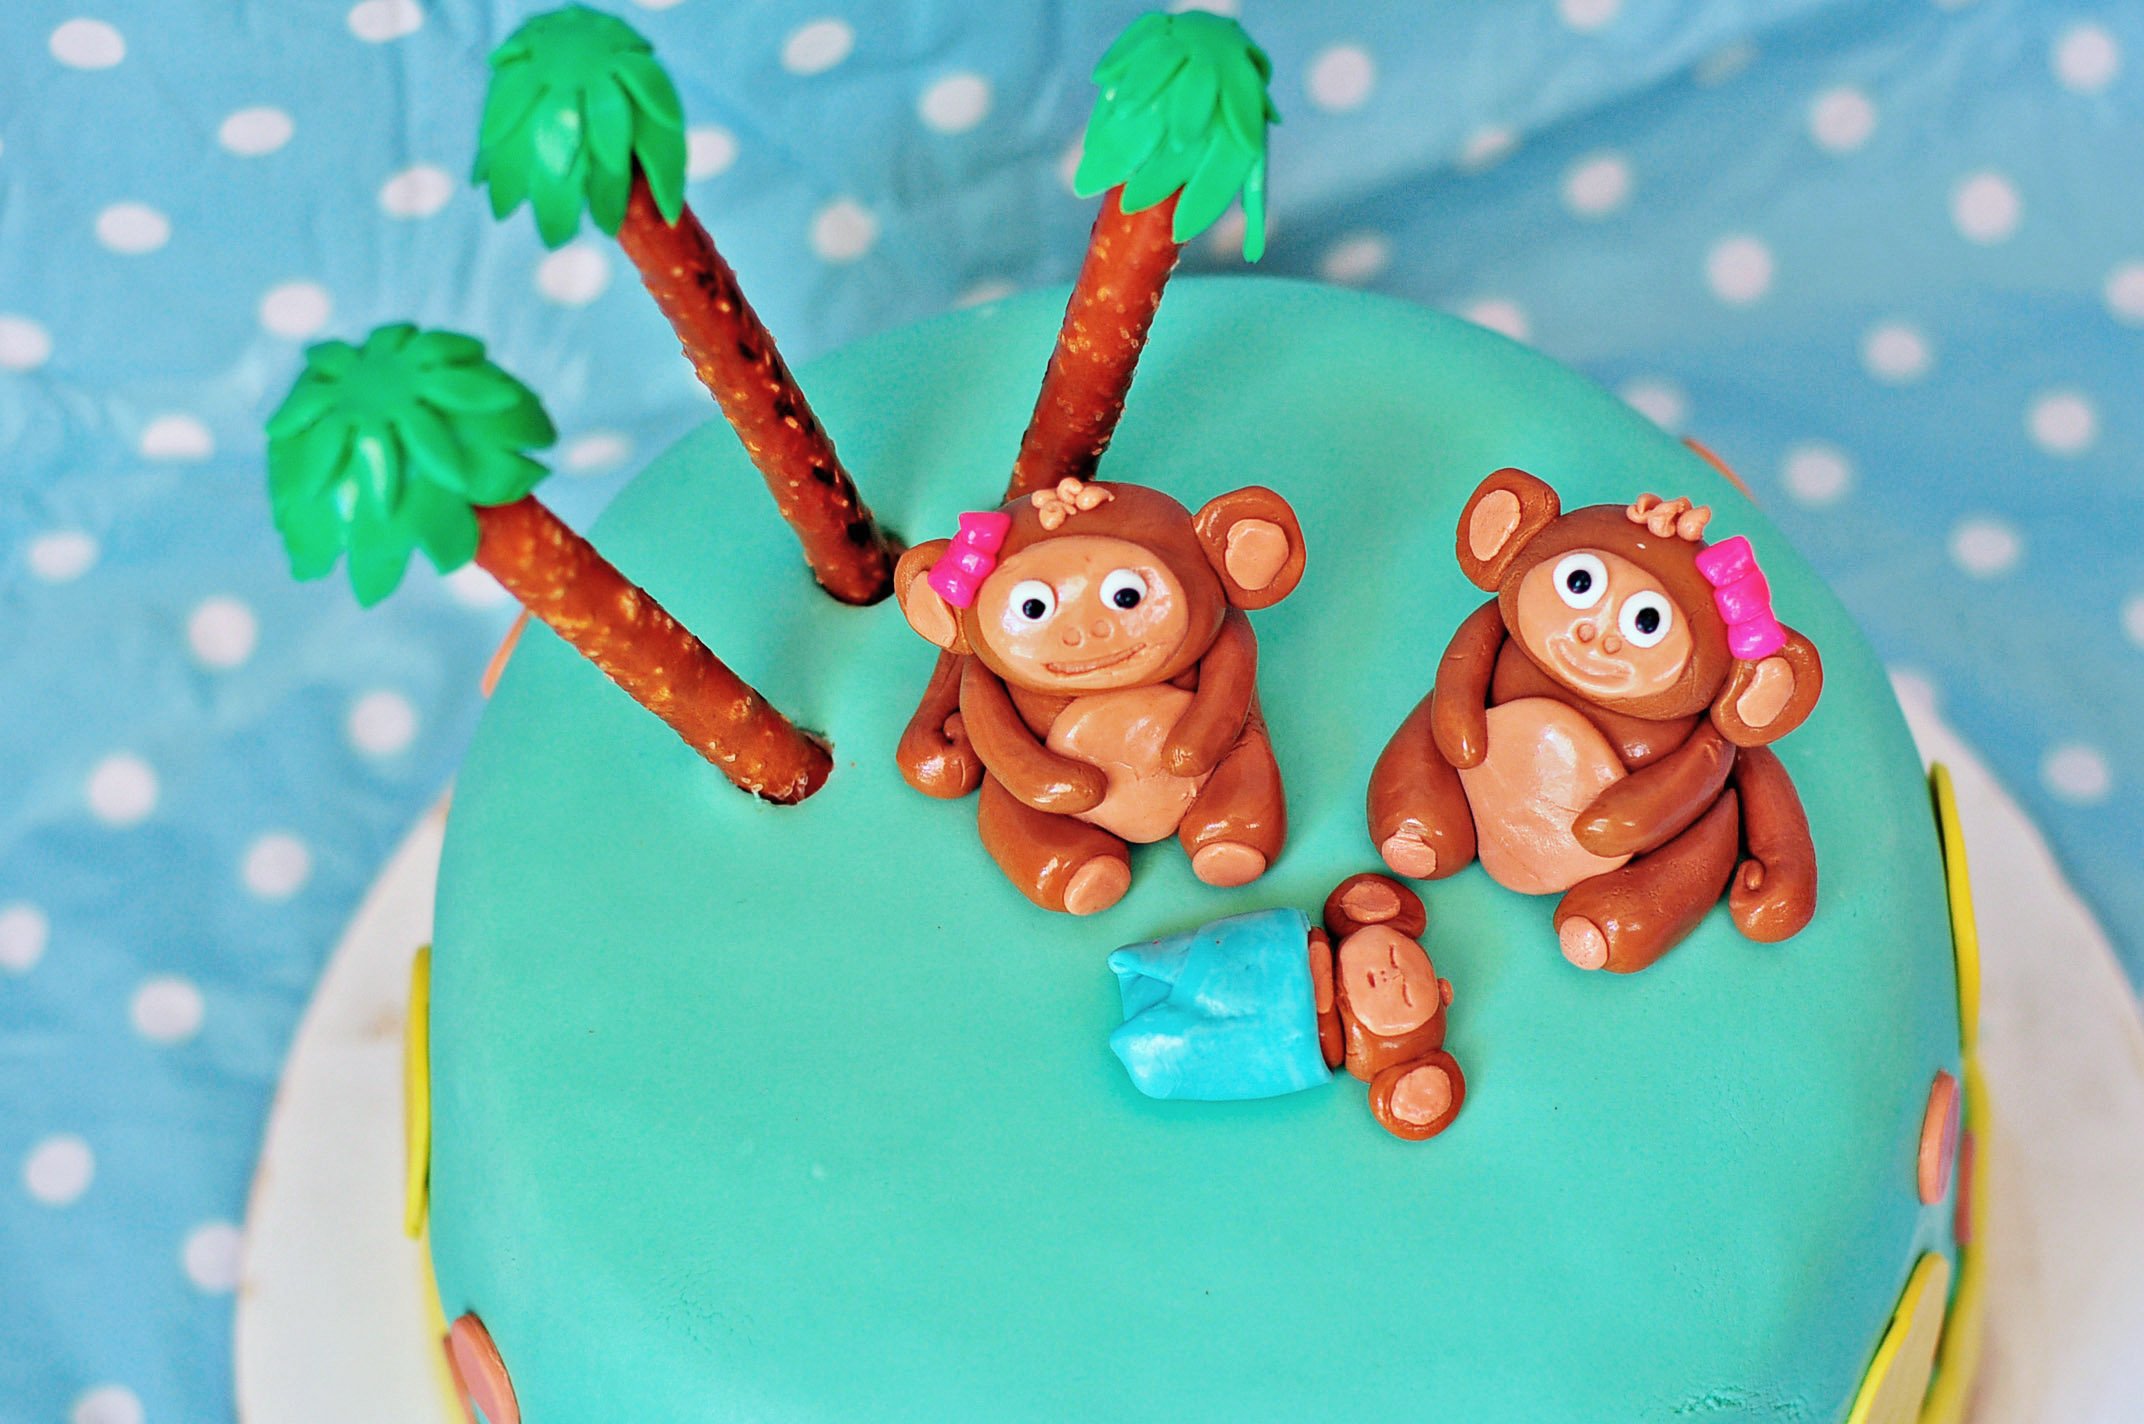
Satin Ice is far superior to Wilton in the taste department, but, it’s a bitch to work with. I’ve renamed it Satan Ice and probably won’t use it for cake covering ever again. It has a great flavor and tends to blend well with the frosting but it is extremely fragile, cracking and tearing easily. It is a great option for molding decorations or adorable little monkey mommas and babies.

Fondx, and Elite by Fondx are my favorite. Not as yummy as Satin Ice (although some would disagree), but much easier to work with. It isn’t as hearty as Wiltons, but it is much tastier.

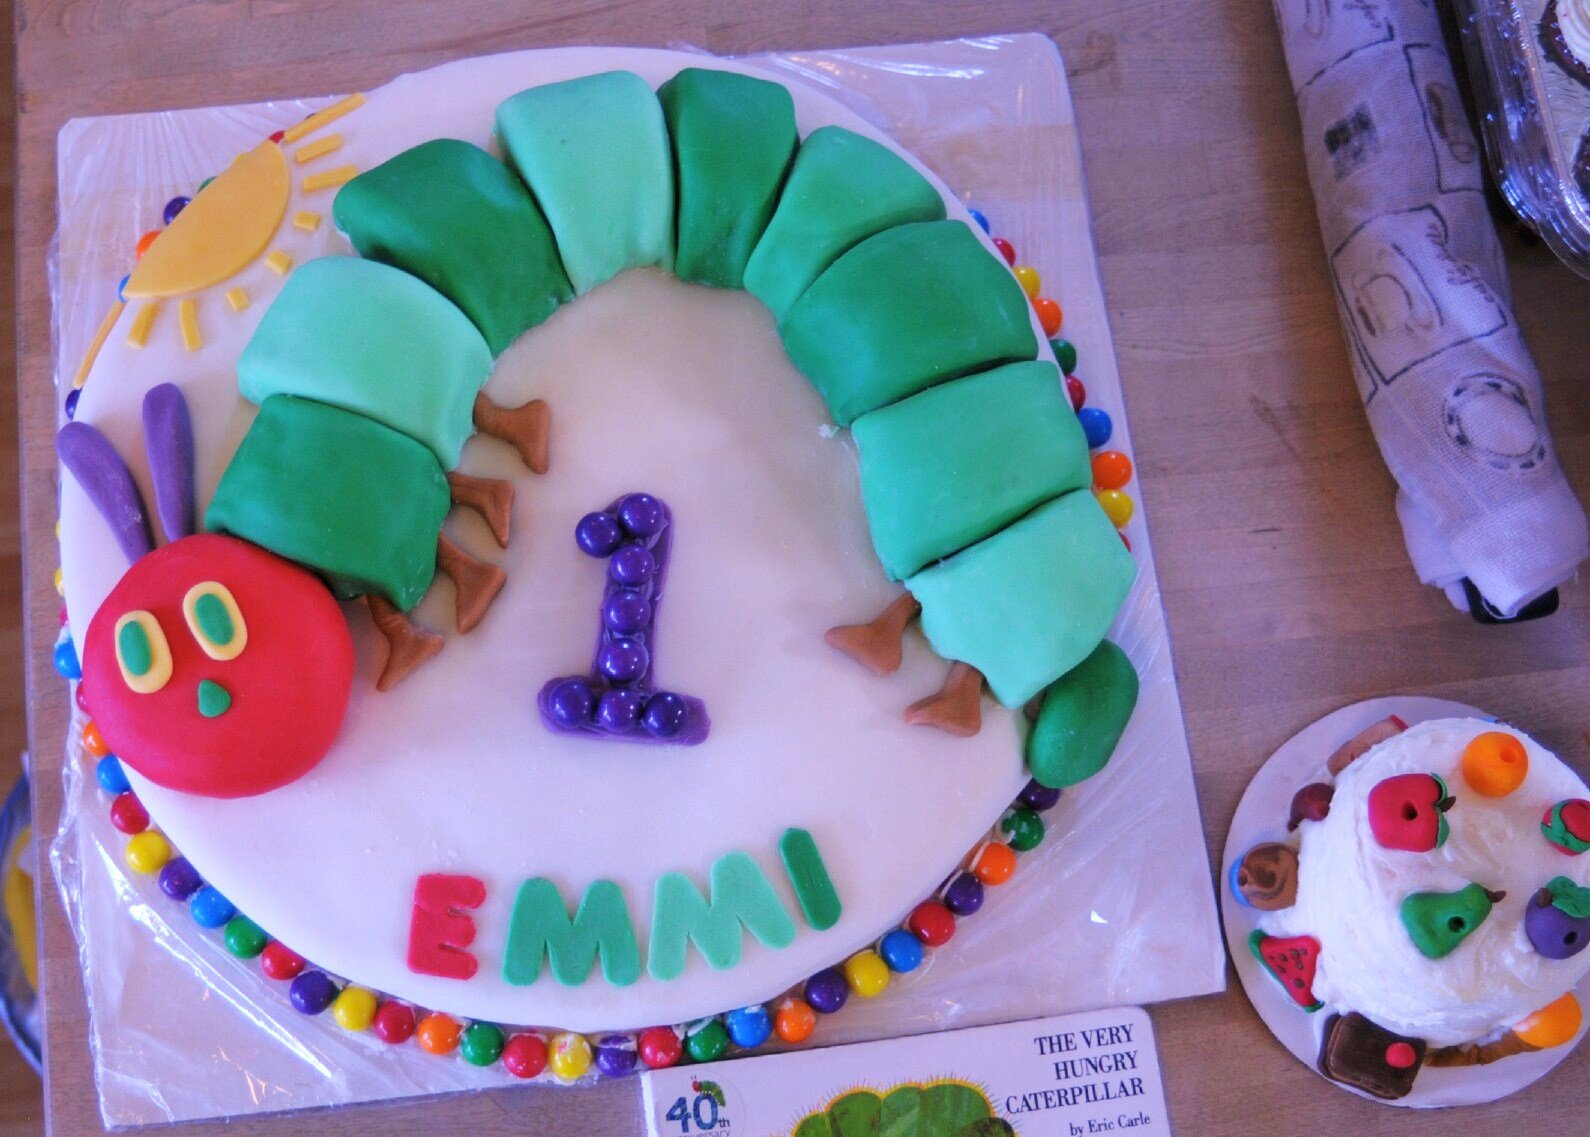
Fondant comes in nearly every color you can imagine and is much easier if you buy it pre-colored. The draw back to this is cost. If you look at the monkey cake picture, you can see there are 9 different colors. If I was to buy 9 different colors of fondant it would cost me about $150. Since I’m pretty sure no one wants to pay that much for a cake that only serves a few dozen, coloring fondant is the way to go. I buy white and then use gel food coloring to achieve the color I want. The use of gel is important in order to keep a solid consistency to your fondant, instead of turning your fondant to a sticky mess with too much liquid. Just add a bit of the gel to your white fondant and knead until the color is consistent. If it starts to turn mushy, add some powdered sugar.

You need to ice your cake at least two separate times. Some call the first icing a crumb coat, because the cake crumbs will invade this first layer, and others (including myself) call it dirty ice, because it sounds more fun. Allow first layer of icing to set completely, about an hour.

The next coat is your final coat and it helps to smooth everything out and cover any bumps or holes in your cake. Think of fondant as that super shiny, thin bridesmaid dress that makes you look awful and shows every flaw, and you would never be caught dead it in it, let alone PHOTOGRAPHED in it over and over, if you didn’t really love your friend–and the final ice is the Spanx that allowed you to keep your sanity and hit on the cute bartender. The final ice is the compression garment of the cake world, makes everything look smooth and pretty.

Fondant will show every imperfection so make sure your final ice is as smooth as you can make it. If you need to go for round 3 on icing, then do that.

Roll out your dough, on a flat surface covered with powdered sugar, the way you would roll out pie dough. Make sure that you roll out a circle large enough to cover your cake with at least a two inch overhang on all sides.  To transfer your dough to your cake, you can either use an extra set of hands, or you can try and slide a large cardboard sheet (like a cake board) underneath.

Once its over your cake use your hands to smooth it down the cake. Start at the top and work your way down.

Using a sharp paring knife or a pizza cutter, remove the excess fondant.

The bottom will probably look a bit rough. Making a perfectly even cut around the bottom is very difficult so don’t beat yourself up about it, just cover it up. To do this, I have used the following:

Long strip of fondant

Small balls made of fondant

Candy gumballs

Marshmallows

Mini cupcakes

If you look at novelty cakes, most of them have some type of bottom boarder.

To get that powdered sugar off the cake, I use a clean make-up blush brush that I bought specifically for the job.

To make the cake shine, spray the fondant with vodka. The alcohol will evaporate so you don’t have to worry about getting the pregnant lady drunk at her own baby shower. I use a small travel sized spray bottle that was probably intended for transporting hairspray across TSA lines.

If you have ever used clay, fondant reacts in similar ways when sculpted. There is an adorable British girl who has several You Tube posts about making fondant animals.

Good luck in your caking adventures. Remember that every cake is a learning process and your first cake won’t be perfect, it’ll be a starting point.

Girly Pink Skull Cake

Somehow, over the past half a decade, the iconic symbol of rebellion, mayhem and destruction has morph itself into an adorable emblem of girly fun. I’m not sure who does PR for the Skull, but BRAVO! This cultural make-over surpasses even Mark Wahlbergs move from the Funky Bunch to Oscar Nominee. My current cake creation was in celebration of my wonderful friend, (who is a symbol of Girly Fun times in my life) and her most recent birthday.

To start, I made a four layer lemon cake. I decided to make Mango Cream Cheese frosting because that is a favorite of the birthday girl. It was good, but the mango bits made the frosting a bit chunky and it wasn’t mango-y enough. If you like  mild mango flavor, here is the recipe. To mango it up a notch, you can add Mango Extract: http://www.amazon.com/Natural-Mango-Extract-29-Fl/dp/B002BX351A

In a sauce pan over low heat, add 2 cups of sugar, 1/4 cup of butter and one large mango, diced, skin removed. Stir infrequently until the mango chunks are super soft and falling apart, about 30 minutes. I left this on the stove, semi-forgotten, while I gave Tater a bath, so you really don’t need to babysit it as long as the heat is on low and you stir it occasionally. Let it cool to room temperature, then puree in a food processor until as smooth as you can make it. The biggest rule for making cream cheese frosting is that your ingredients NEED to be at room temperature. You can’t cheat and try and trick your frosting, you’ll end up with a big mess the consistency of ground beef.  In a stand mixer, put 32 ounces of room temp cream cheese 2 sticks of room temp butter and mix well. Then add the room temp mango mixture and blend well. Everyone likes a different sweetness level on their frosting, I like mine closer to savory than overly sweet. I added about 1 cup of powdered sugar to this, taste and add more depending on your preference. I also added quite a bit of pink food coloring

pink-frostingStarting with a white 14 inch cake board circle (you can buy at cake supply stores or Michaels Arts and Crafts) I stacked up the layers with a hefty amount of frosting in between each layer. After that,  I iced the cake completely, this will be the first coat. Some call it crumb coat, because the cake crumbs will invade this first layer, and others (including myself) call it dirty ice, because it sounds more fun. Allow that to set completely, about an hour.

dirty-iceThe next coat is your final coat and it helps to sooth everything out and cover any bumps or holes in your cake. Think of fondant as that super shiny, thin bridesmaid dress that makes you look awful and shows every flaw, and you would never be caught dead it in it, let alone PHOTOGRAPHED in it over and over, if you didn’t really love your friend–and the final ice is the Spanx that allowed you to keep your sanity and hit on the cute bartender. The final ice is the compression garment of the cake world, makes everything look smooth and pretty.

cake-final-iceFondant is tricky and unforgiving. There are several different kinds of fondant, including homemade. The easiest to work with, although the yuckiest to eat, is Wilton’s. It would probably be the most accessible for you because it is the most widely carried. I do recommend using it for beginners because it is the most forgiving and will allow you to get a feel for fondant work before moving on the bitchier fondants. Just tell your guest that it is edible, but that you recommend they peel it off and don’t eat it. I used Fondx, actually pretty tasty but very soft and unforgiving. You can buy it in all different colors but I would recommend white and then color it yourself. Just use gel food coloring instead of liquid and if it gets too goopy, add powdered sugar. Then grab an unspecified amount (just gonna have to guess based on your cake size) and put on a clean surface dusted with powdered sugar. I used a softball size, colored hot pink

fondant-ballThen roll it as close to a circle as you can. I would highly recommend the use of a marble rolling pin.

pink-rolled-fondantSlowly  and carefully pick it up (you can use your rolling pin for assistance) and move to the cake. Here is a good picture tutorial from Satin ice: http://www.satinfinefoods.com/how.htm

Starting at the top, gently smooth the fondant. This will cause the bottom of your fondant to have bit of a ruffle effect

cake-fondant-precutTo cut the ruffle off, I use a sharp paring knife that I push the fondant a bit under the cake. A lot of people use a pizza cutter. Just use what works for you.

bottom-fondant-cutYou will notice quite a bit of powdered sugar left on your pretty cake. You can buy a brush at cake supply stores, I used a clean make-up blush brush. Just brush the cake until all the sugar is gone. You will still have a light layer. The next step is vodka! Not a shot for the weary baker, but a spray for the cake. Vodka is used in nearly every bakery to clean up cakes and give them a pretty shine. I use a small travel size spray bottle, probably intended to transport hairspray across FAA lines, but works really well in my kitchen. Just spray a light layer over your cake for a pretty, powder sugar free shine

cake-fondant-coveredI rolled a small hunk of white fondant on my cuttin’ surface and used a skull cookie cutter to cut out some decorations for the cake.

fondant-skulls-cut-outI used food coloring and a small artist brush to make a boy skull and a girl skull as well as left over fondant to make little bows

fondant-skulls-just-madeI decided that the boy and girl skulls made for a Hot Topic Wedding Cake look that I wasn’t diggin’ so I just used the girl skulls

fondant-skulls-no-mini-cupcakesAt some point in this decorating furry, I managed to make about 18 mini cupcakes and 3 regular sized cupcakes in black cupcake papers. I also ran out of pink frosting, as well as cream cheese, so I made Vermouth Whipped Cream. Sounds super hard and fancy, right? Not really. In a stand mixer, combine 2 cups heavy cream (or whipping cream, both will work just fine), 1 cup of sugar, 1 shot of vermouth and I added the pink food coloring. beat on high for about 4 minutes or until stiff peaks form. Opposite of the cream cheese, the cream has to be chilled or you’ll be churning butter. Then spoon it into a large Ziplock bag for the cheater piping bag. Cut the corner off, about the size of your pinky nail. Then pipe the whipped cream on in a swirl pattern. Looks SO fancy and it’s easier and faster than any other frosting method.

cheater-piping-bagThen I sprinkled the cupcakes with small pink sugar pearls. I placed them on the cake board at the base of the cake, securing them the the Wilton’s Candy melts that I use so often for my pastry glue. Just put a small amount of candy melts in a glass bowl, microwave for 30 seconds, stir and repeat until melted. Smear a bit on the bottom of each cupcake and place on the cake board.

fondant-skulls-on-cakeThe top cupcakes I used a wooden skewer to secure in place, I didn’t want those babies going anywhere

cupcake-skewerI used those same Wilton’s candy melts in a Pirate Skull Pick Mold

http://www.wilton.com/store/site/product.cfm?id=1E26F64B-1E0B-C910-EA95C108A7B263D0&killnav=1

and stuck two of them in each of the cupcakes to make a two sided skull topper

cupcake-topIt didn’t look quite done so I made some black fondant and cut out three hearts to add balance. DONE!! Happy Birthday Kelly!!

cake-done-6cake-donecake-done2cake-done3
cake-done4

The Very Hungry Caterpillar Cake


The adorable Miss Emmi turned 1 just a few days after Tater. Emmi loves the Very Hungry Caterpillar more that I have ever seen a kid love a book, it’s quite adorable. She’s that bugs #1 fan. So of course, her party had to follow suit. Tater and I spent Saturday afternoon hagnin’ out with Emmi and her fabulous mother and we made a cake.

First, I made a 20 inch 2 layer strawberry cake

hc-cake-base-cake

The we covered it in cream cheese frosting and then a layer of white fondant and put brightly colored gumballs at the bottom

hc-cake-gumballs

We then cut out three inch circles from another sheet cake, cutting off the rounded top and cut those circles in half

hc-cake-circles

We frosted those half circles and then covered them in different shades of green fondant

hc-cake

We covered one of the cake circles in red fondant to use as the head

hc-cake-just-head

On went the body

hc-cake-body-part-way-on

Although Miss Emmi’s house is filled with every baby toy imaginable, the ladies spent most of the day playing on the stairs

claire-emmi-stairs

Emmi’s mom was a quick study with the fondant and was able to make her name, Caterpillar legs, antennae and eyes as well as an adorable sun

emmis-party-9

And check out that mini smash cake, made by Emmi’s aunt. Very adorable!

Happy first year Emmi!