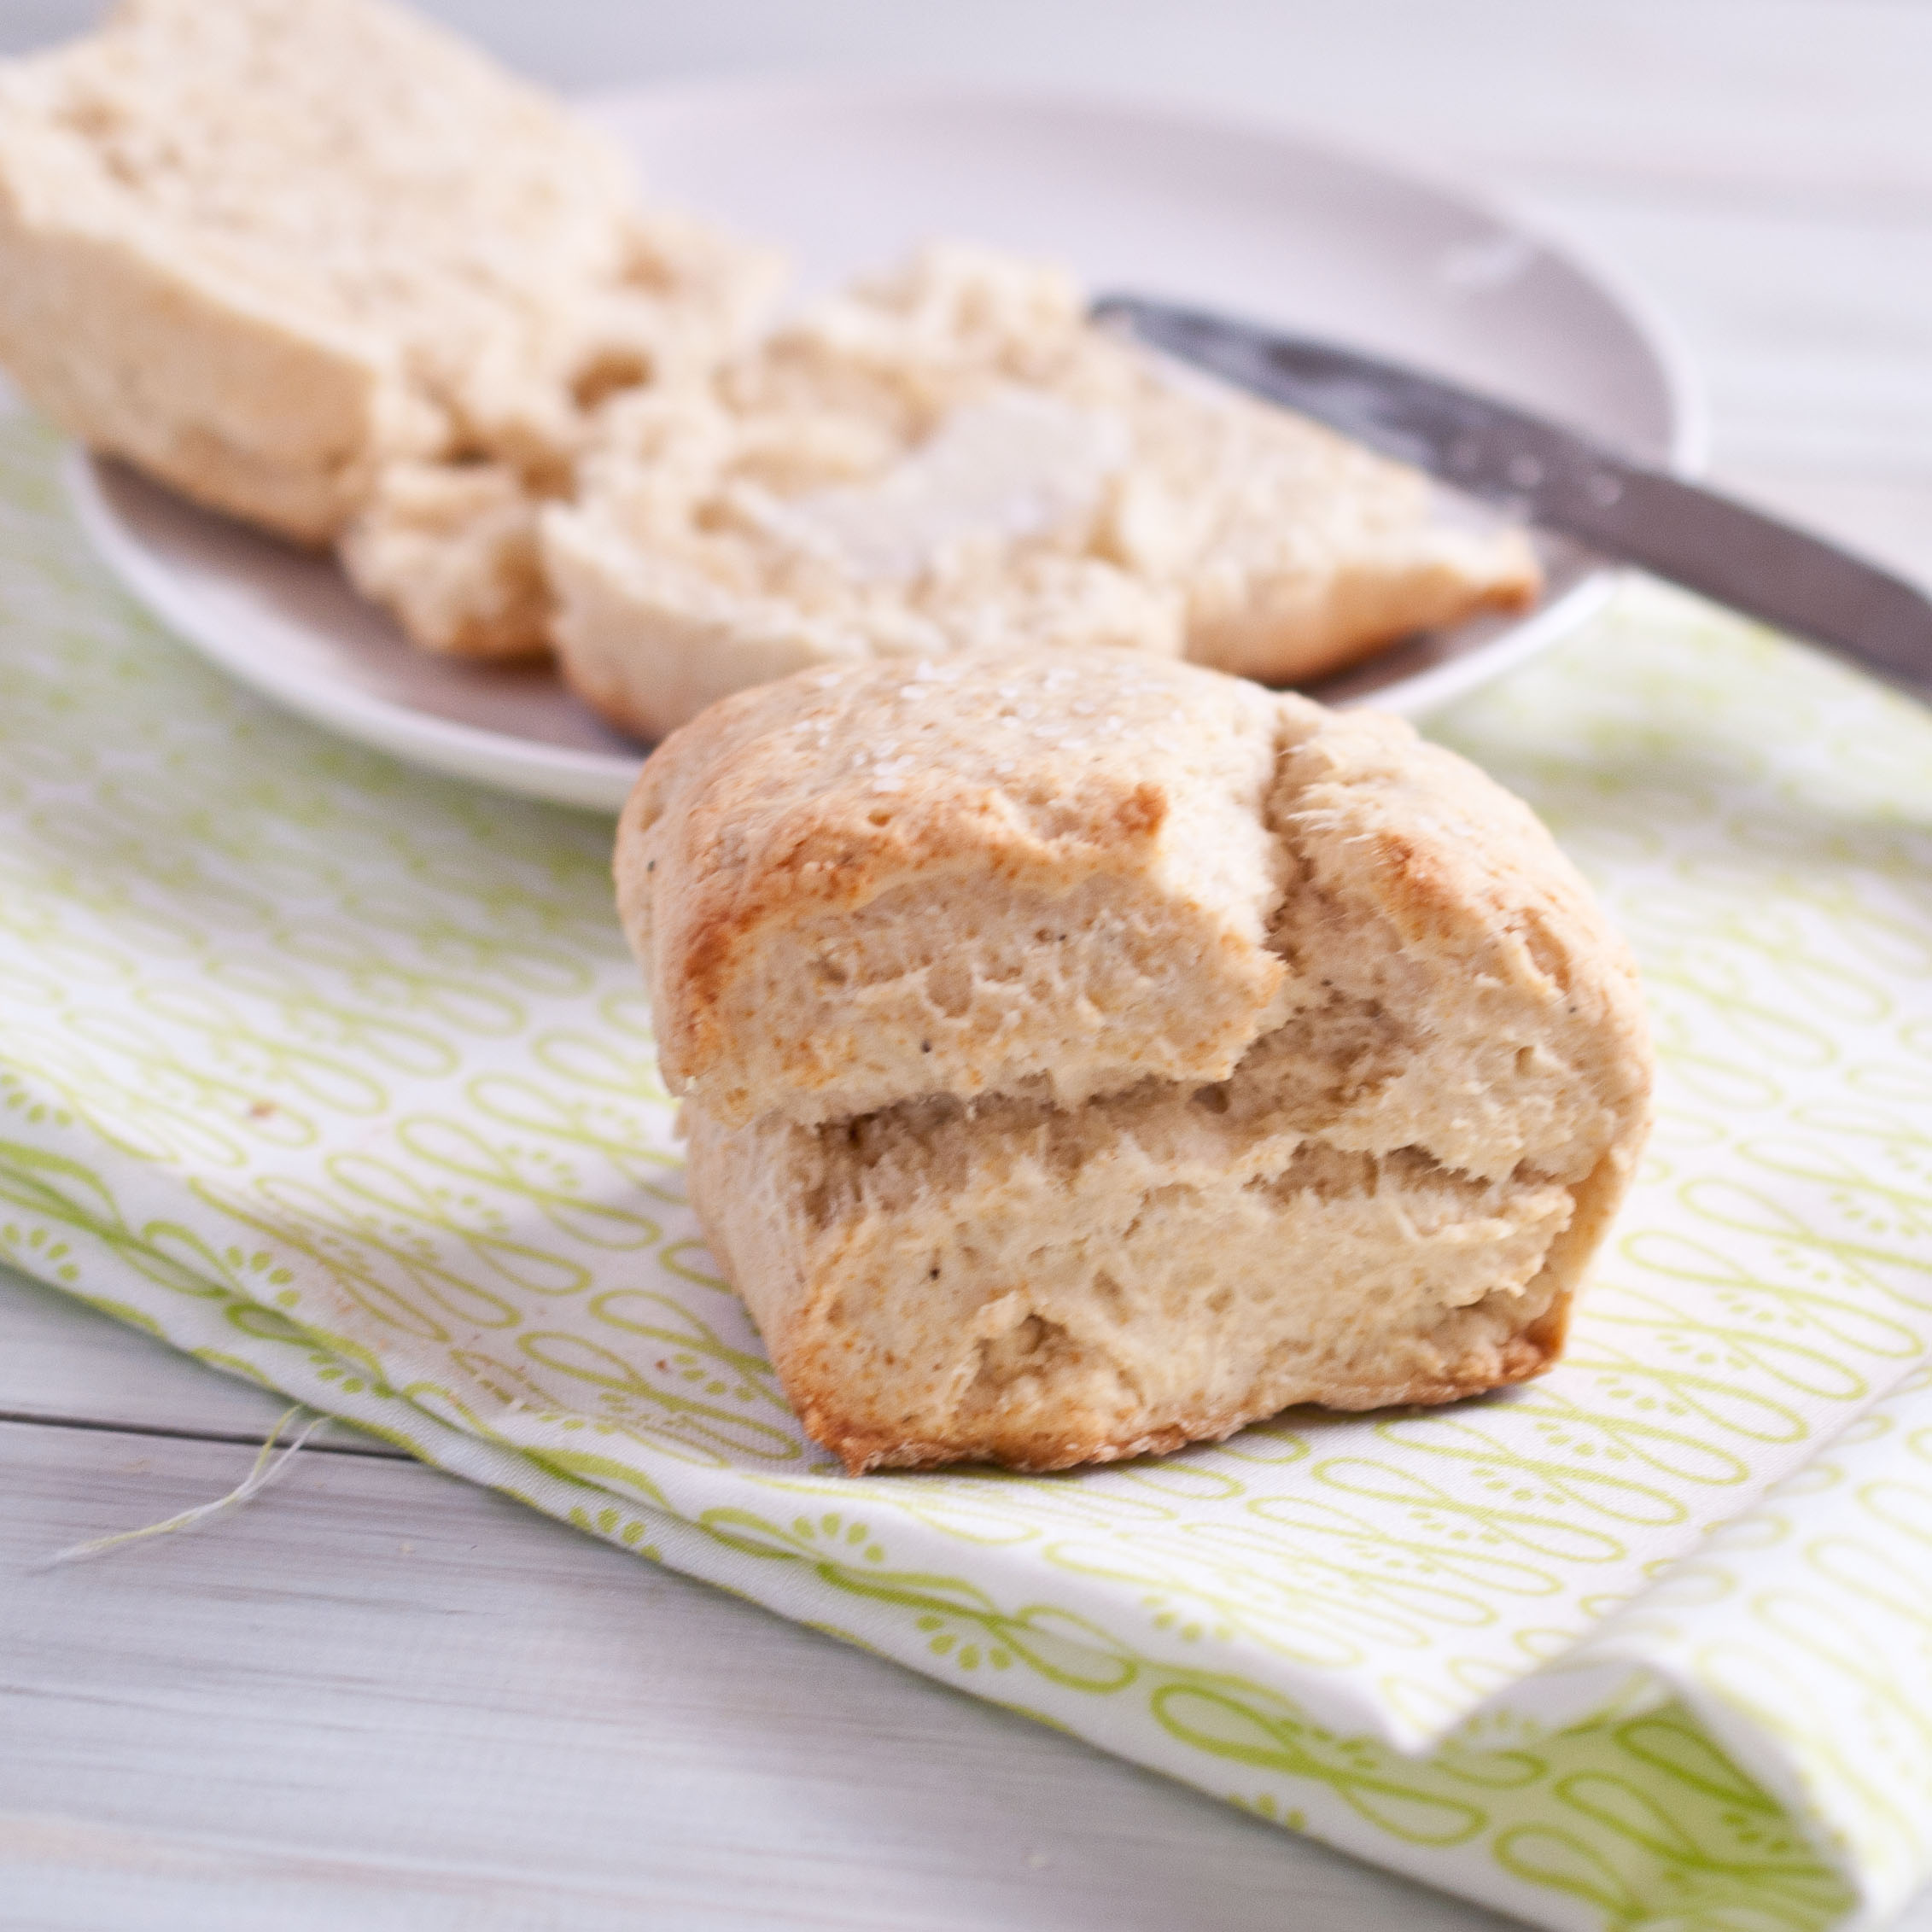
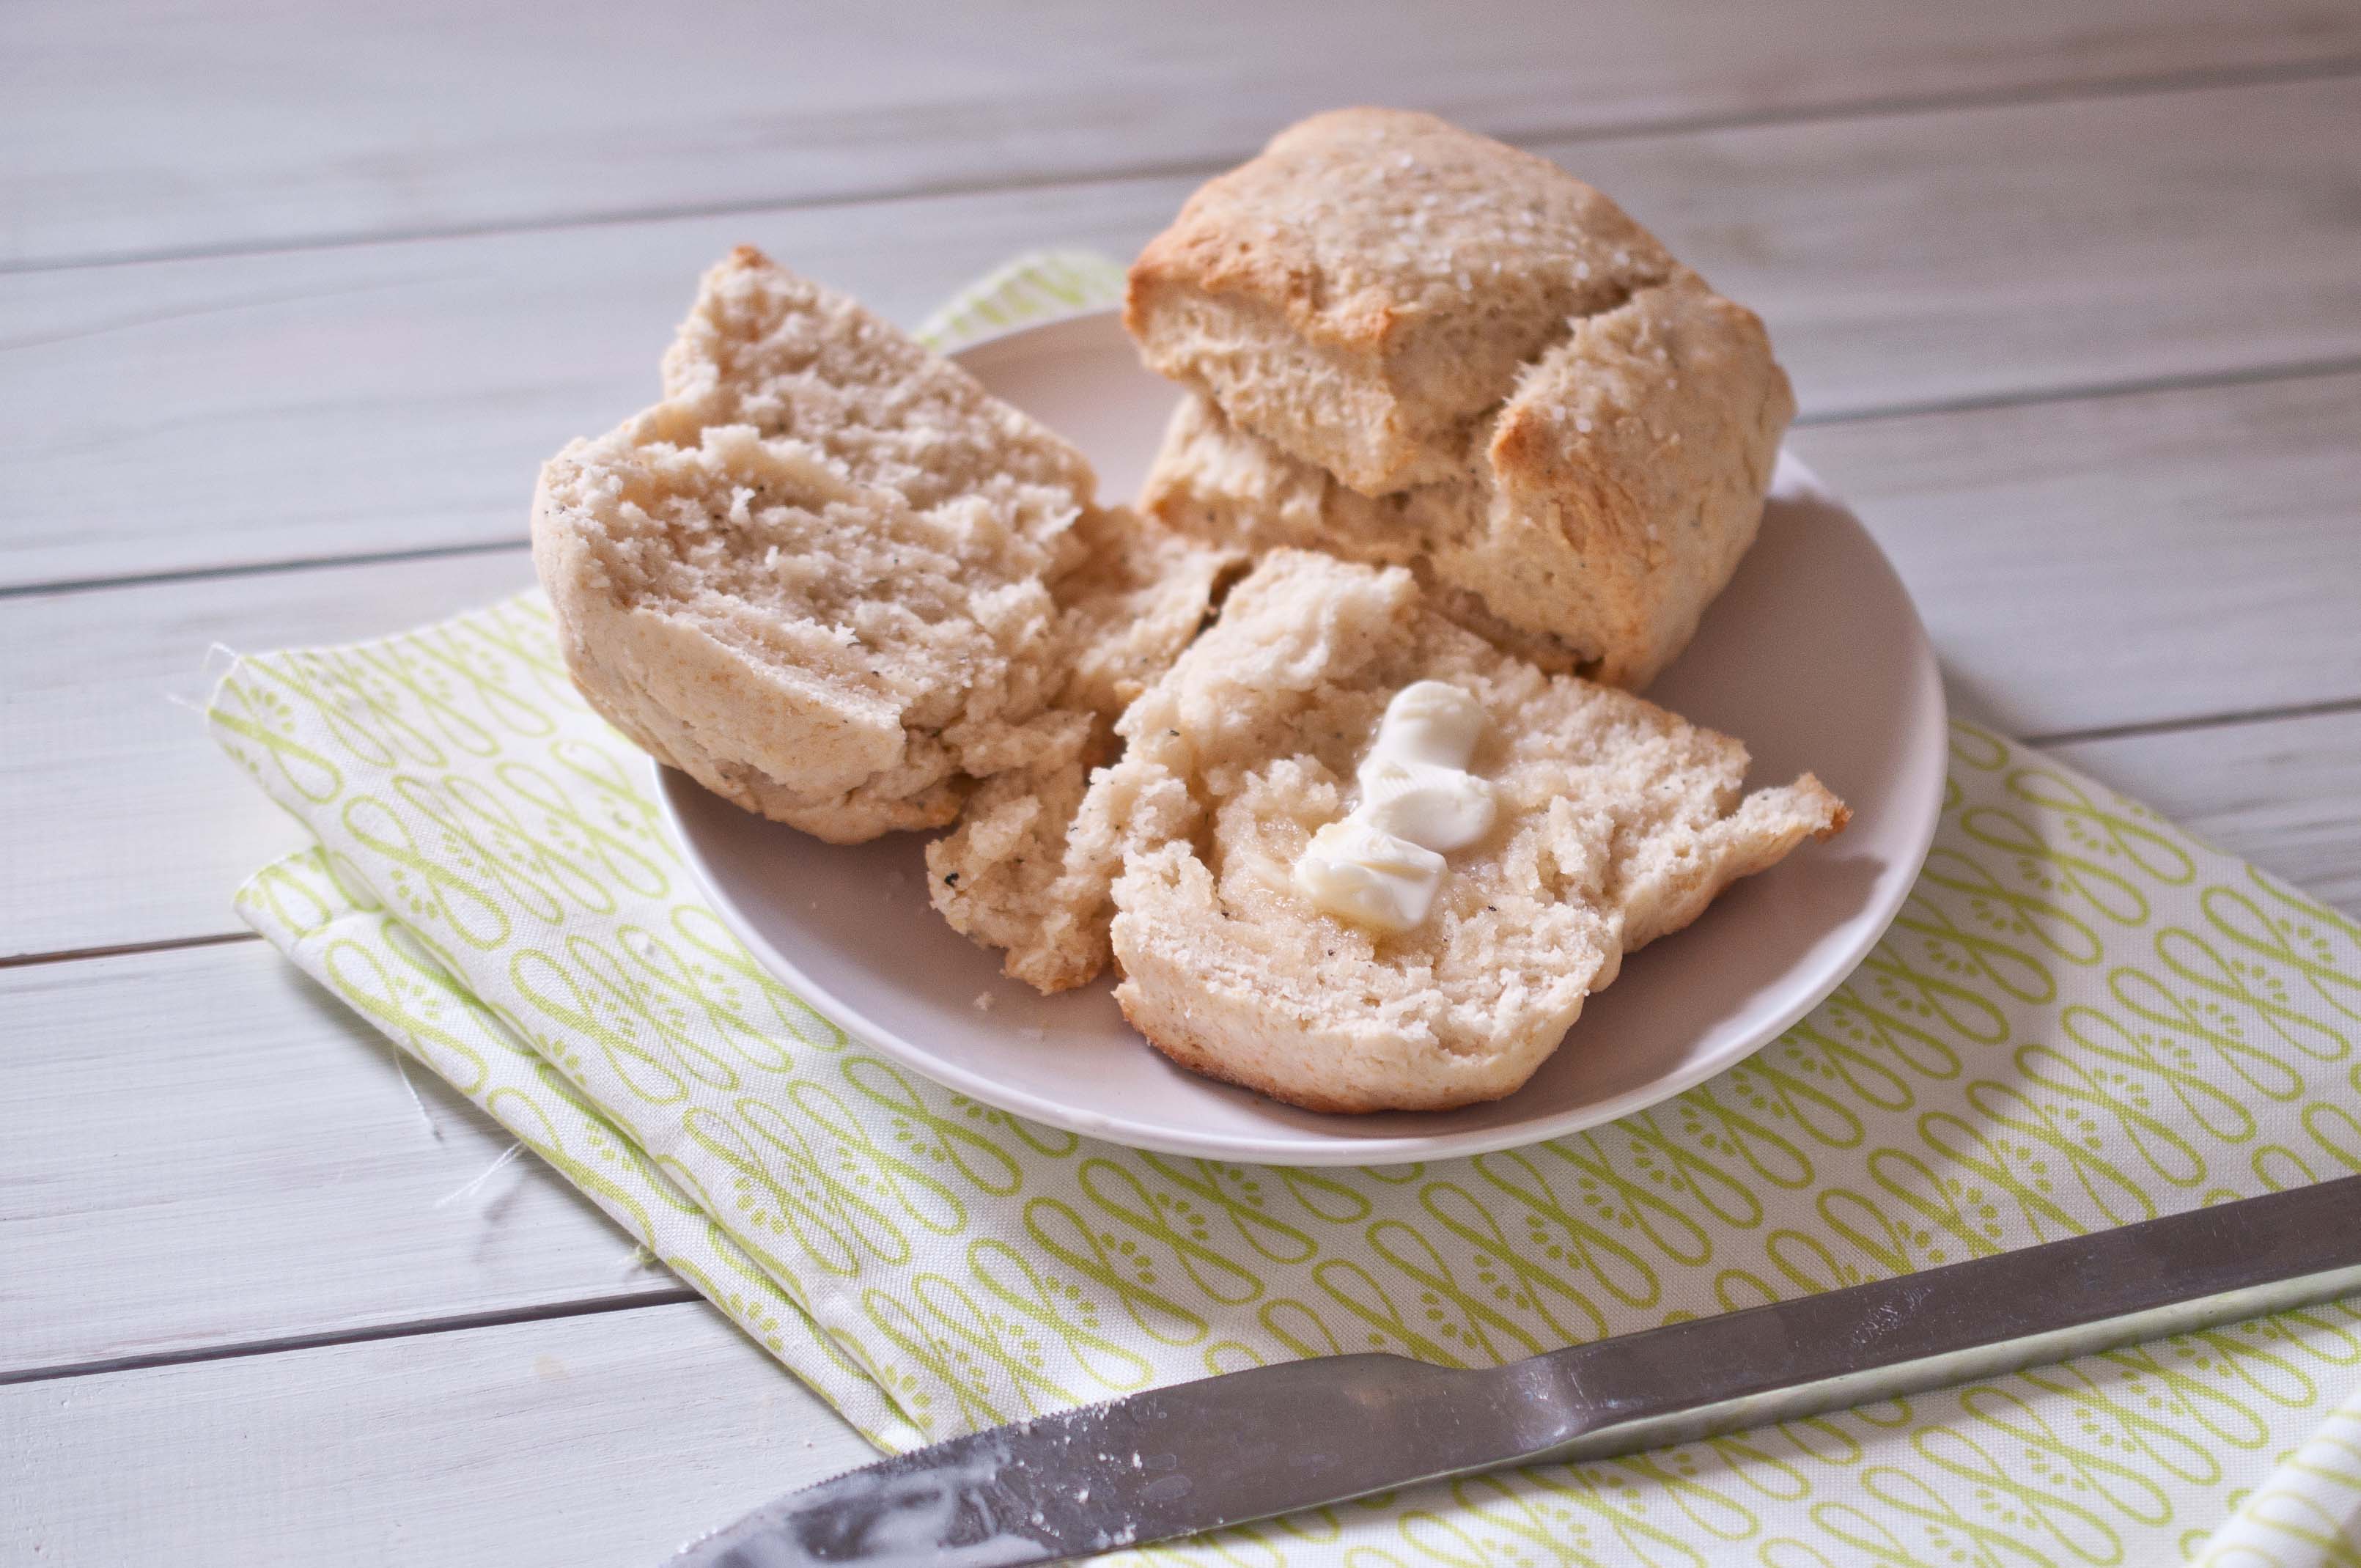
I’m a bit of a bacon fat hoarder. I make excessive amounts of bacon on weekends, straining and storing the bacon fat that gets left behind into small containers that are now littering my fridge.
I have to find ways to use it. I make tortillas with bacon fat, which are delightful and this past weekend biscuits were also made in an attempt to decrease my ever-growing stash.
Bacon and biscuits. Saturday Breakfast Indulgence at its best.
Bacon Fat Biscuits
1 cups cake flour
1 cup all-purpose
1 tsp baking powder
1/2 tsp baking soda
1/2 tsp salt
1 tsp sugar
5 tbs bacon fat
2/3 buttermilk, plus an additional 1/4 cup, divided
1 tbs melted butter
Preheat oven to 450
In a food processor, combine both types of flour, salt, baking powder, baking soda and sugar. Give a quick pulse until combined. Add the bacon fat and process until the flour and bacon fat are well combined and look like course crumbs. Add 2/3 cup milk and pulse until just barely combined. Add additional milk, a bit at a time until all of the dough has been dampened and pulls away from the sides of the food processor. Don’t over process or your biscuits will be tough.
Remove from food processor and place on a floured surface. Form into a long rectangle and cut into squares with a sharp knife. This will give you square biscuits without any waste. Since over worked dough becomes tough, "scraps" left over from cutting out round biscuits can’t really be re-rolled and used, they should be discarded. Forming the dough into a long rectangle and cutting with a sharp knife will allow you to use all the dough as biscuits without any waste.
Cover a baking sheet with parchment paper, then place the biscuits on the sheet. Brush with melted butter.
Bake at 450 for 10-12 minutes or until golden brown.
Not in the way that Creme Brulee is dangerous, with the open flame and molten sugar that you just want to touch before it’s dry giving yourself the worst sugar burn of your life and using words that should never be said in public.
But in more of a, I-totally-don’t-care-if-this-will-make-me-gain-137-pounds-if-I-eat-the-whole-thing, kind of way.
But I love it. LOOOOOOVE it.
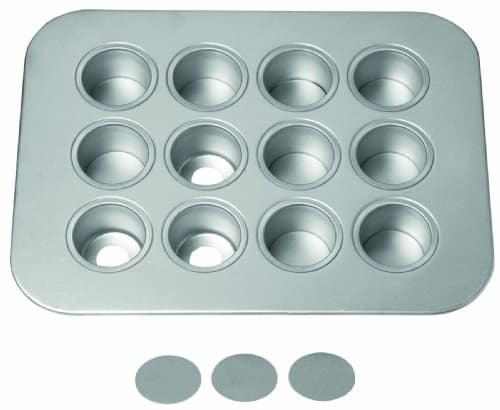
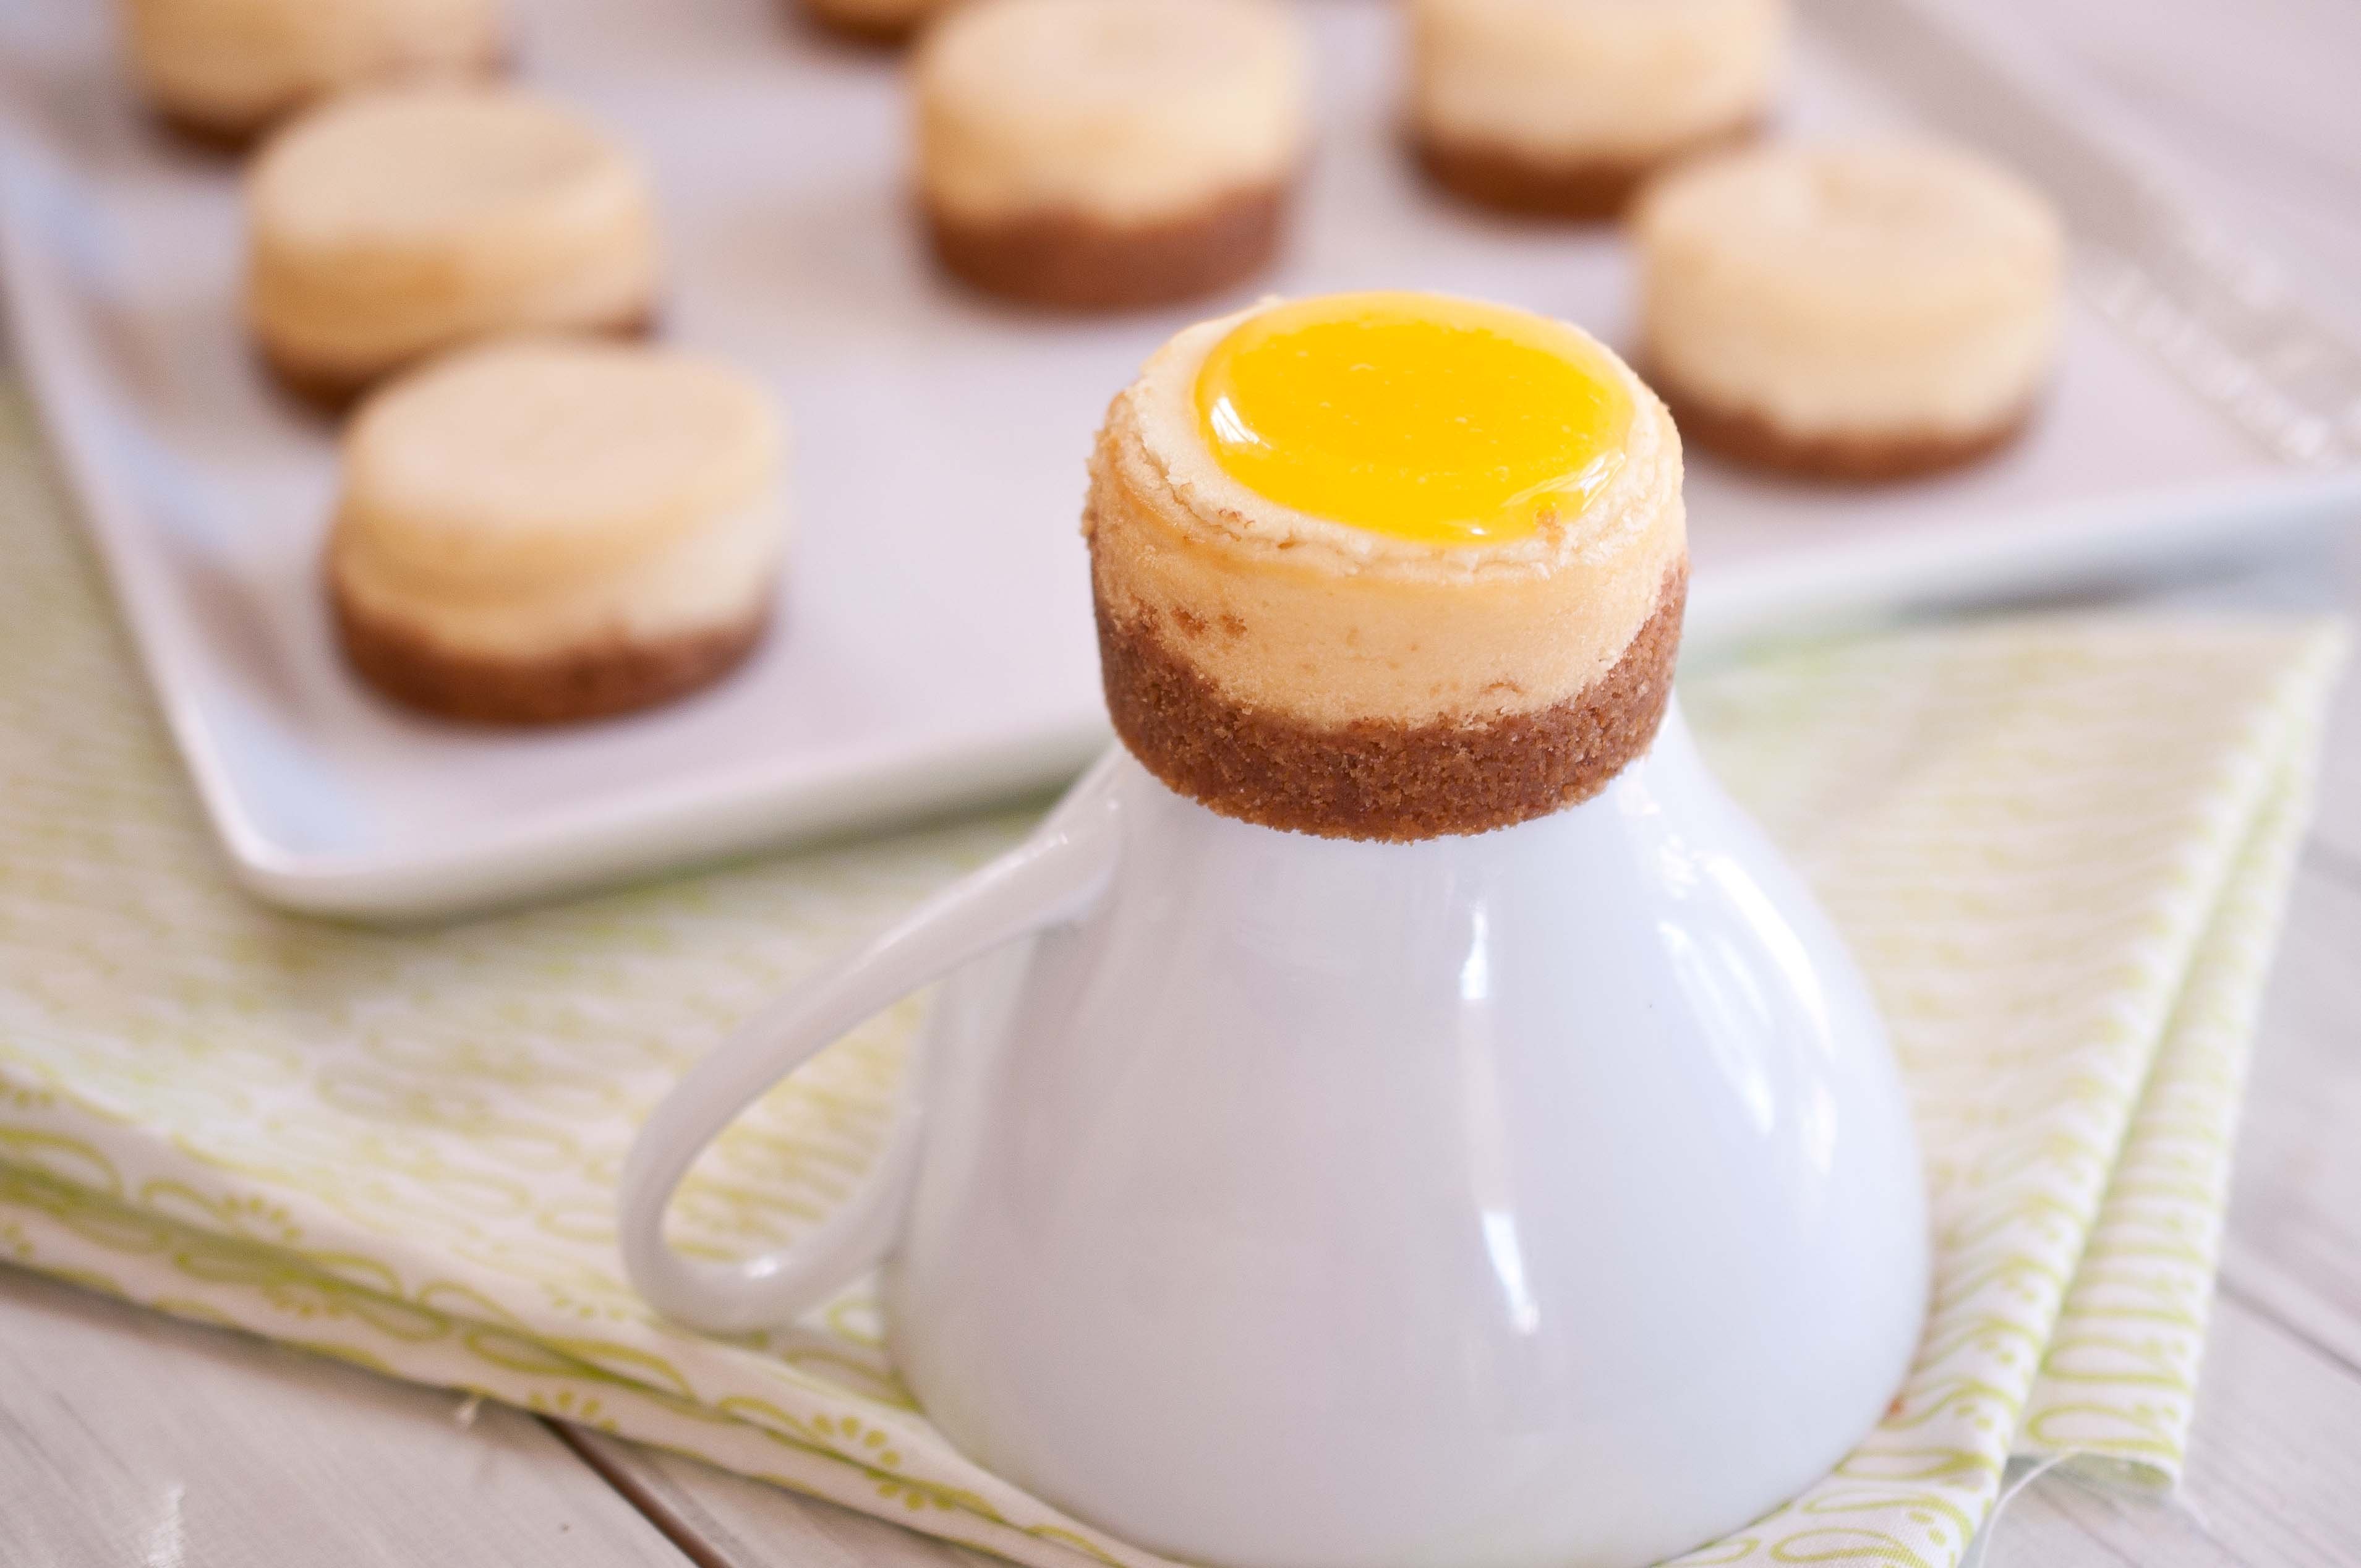
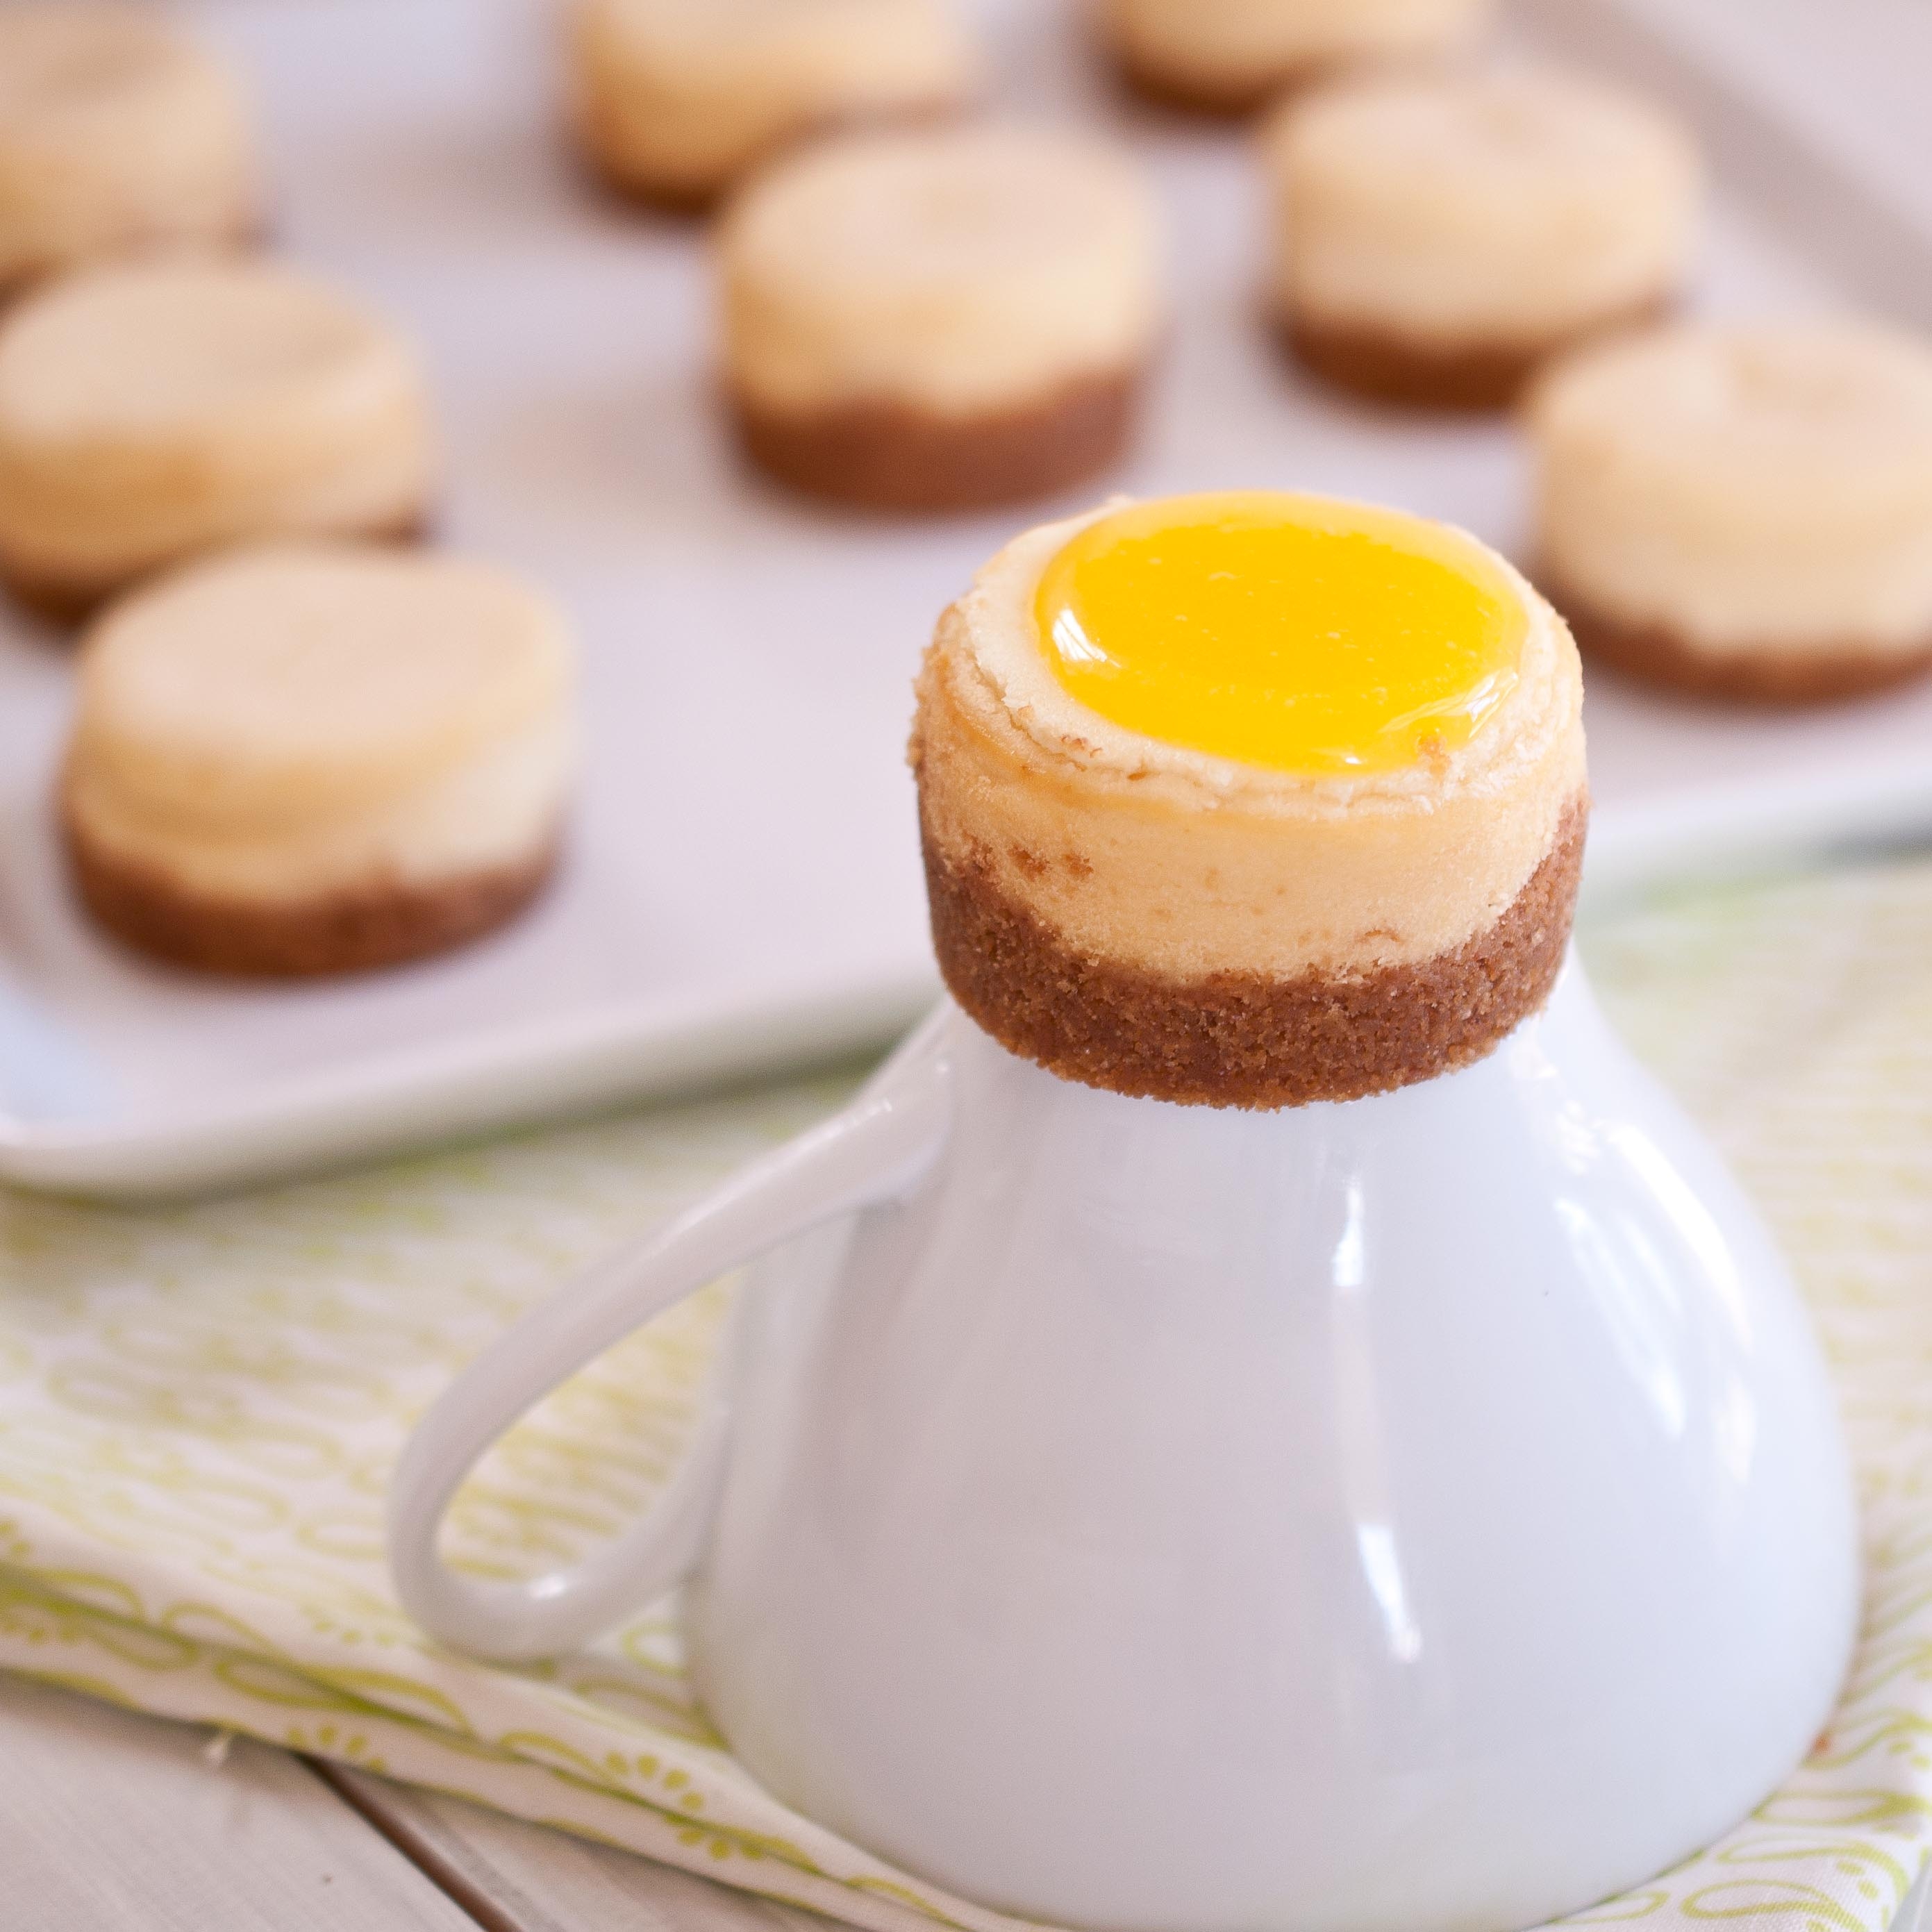
And then there is this mini cheesecake pan. It’s a fabulous little invention that offers tiny, portion controlled mini-cheesecakes. Let’s be honest, they aren’t good for you, but eating one won’t make you gain 137 pounds.
(Photo from:Chicago Metallic)
Here is the low down on this little pan, the one that made these adorable cheesecakes:
12-cavity mini cheesecake pan made of heavy-duty aluminized steel
Each cavity comes with pop-up bottom disc for simple dessert removal
Measures 13-8/9 by 10-3/5; each cavity measures 2 by 2 by 1-1/2 inches; 25-year limited warranty
Pros:
Creates adorable, small Cheesecakes that bake quickly and provide the right amount of dessert for a small group.
The metal disk inserts make it easy to remove the cheesecakes from their pan, without the use of a cupcake papers which tend to ruin the over all effect.
The shape is much more attractive than those mini-cheesecakes bake in muffin tins.
Perfect for parties.
Cons:
Although the product states that it is dishwasher safe, that does not seem to be the case. The small metal disks are almost impossible to get clean in the dishwasher, and the metal pan does not seem to respond well either. Making hand washing a must for this pan.
The Cheesecakes were a bit smaller than I would have liked.
The excessive use of the word "Cavity" on the product materials along with the word "Cheesecake" conjures up disturbing images of Dessert with Jeffery Dahmer.
Overall:
I really liked this pan and the options that it provides. Although the size was much smaller than I had expected (slightly larger than a mini muffin) the amount of batter needed was small as well, making it easy to throw together without a pound of cream cheese. This also leaves the option of making your basic, go-to, regular sized New York Cheesecake recipe, splitting it up into three different batches and adding different flavors to each, giving your guests three options instead of one. Variety is always a plus.
I love it and will probably use it until it falls apart. You can buy one here.
Lemon Goat Cheese Mini Cheesecakes
Crust:
3/4 cup crushed graham crackers
3 tbs melted butter
2 tbs brown sugar
Cheesecake:
1 8 oz Package of (full fat) Cream Cheese (room temperature, very important)
2 oz Goat Cheese (room temp as well)
1/2 cup sugar
1 egg
1 tsp vanilla
1 tbs lemon zest
Lemon curd:
1 egg yolks
1/4 cup sugar
2 tsp lemon zest
1/2 cup lemon juice
1/2 tsp corn starch
2 tbs butter
Preheat oven to 375
In a food processor, add the graham crackers and brown sugar, process until nothing is left but crumbs. Add the butter and process until it resembles wet sand, adding more butter or graham crackers if necessary to achieve the right consistency.
Place metal disks into place in the bottom of each slot. Spray with butter flavored cooking spray.
Place about 1 tbs of crust into the bottom each Cheesecake slot. Press verywell into place until compacted.
Place the cream cheese and goat cheese in the bowl of a stand mixer and beat on high until well combined. Add the sugar beat on high until creamed. Add the egg, vanilla, and zest and beat until well combined, scraping the bottom of the bowl to make sure all ingredients are well combined.
Spoon the batter on top of the crust, filling the cheesecake slots until almost full.
Bake at 375 for 12-15 minutes or until the cheesecakes no longer giggle in the middle when the rack is shaken. This is not a situation where "a tooth pick inserted in the middle comes out clean."
Allow to cool for 20 minutes before attempting to remove from pan.
Once cool, press upward in the hole on the bottom of the pan. Disk should remove easily.
While the cheesecake is cooking, make the curd.
In a bowl, whisk together the egg yolks, sugar, zest, corn starch and lemon juice until well combined.
Add to a pan over medium heat along with the butter and whisk constantly until thickened, about 8-10 minutes. Remove from heat. Allow pan to cool a bit, about ten minutes, and then place in the refrigerator to chill for about 20 minutes or until cool and thick.
Once the curd has cooled, top the mini cheesecakes with about 1-2 tsp of curd. Chill until ready to serve.
I once knew a man who lived to be 101. We had a bit of an unlikely friendship, since he had reached retirement age long before I was even born. He was smart, funny, and seems to have no concept of the age gap, reminding me that once his hip was better, he would take me dancing and then I would fall in love with him and leave my husband.
Life was a constant opportunity to make people laugh, and he took full advantage of it.
When he moved to Los Angeles in the 1940’s to get his pneumonia stricken daughters out of the frigid East Coast winters, he was without money, without a job, and without an education. He walked in to a Taxi company headquarters and asked for a job. He had a fantastic driving record and a winning smile, in his book, that’s the only resume he needed. As soon as the hiring manager found out that he had only live on the west coast of a week, knew nothing about Los Angeles freeways, and had never driven a cab, he shut down the interview.
"If you don’t know how to get from LAX to the Roosevelt Hotel, how are you going to get the client there??"
Jack responded with this famous smile, "Well if you don’t give me the cab, it’s gonna take a whole lot longer!"
He got the job.
Jack worked as a cab driver, running tourist from the Airport to Hollywood for over 30 years. He was also the very first Employee of the Month for the Cab company, and to date, the recipient of the most complimentary letters ever sent to the cab company about one of their employees.
As I sat with him only a few months before he died, I asked him if he had any regrets.
"Not really. The secret to living 100 years and not regretting anything is this: Do your best. Don’t hurt anyone. Make friends with anyone who will let you."
Not bad advice.
Here is another recipe to make for your friends. Sit together on long Saturday mornings, chatting, making memories and friends that will stay with you, even when you live to be 100.
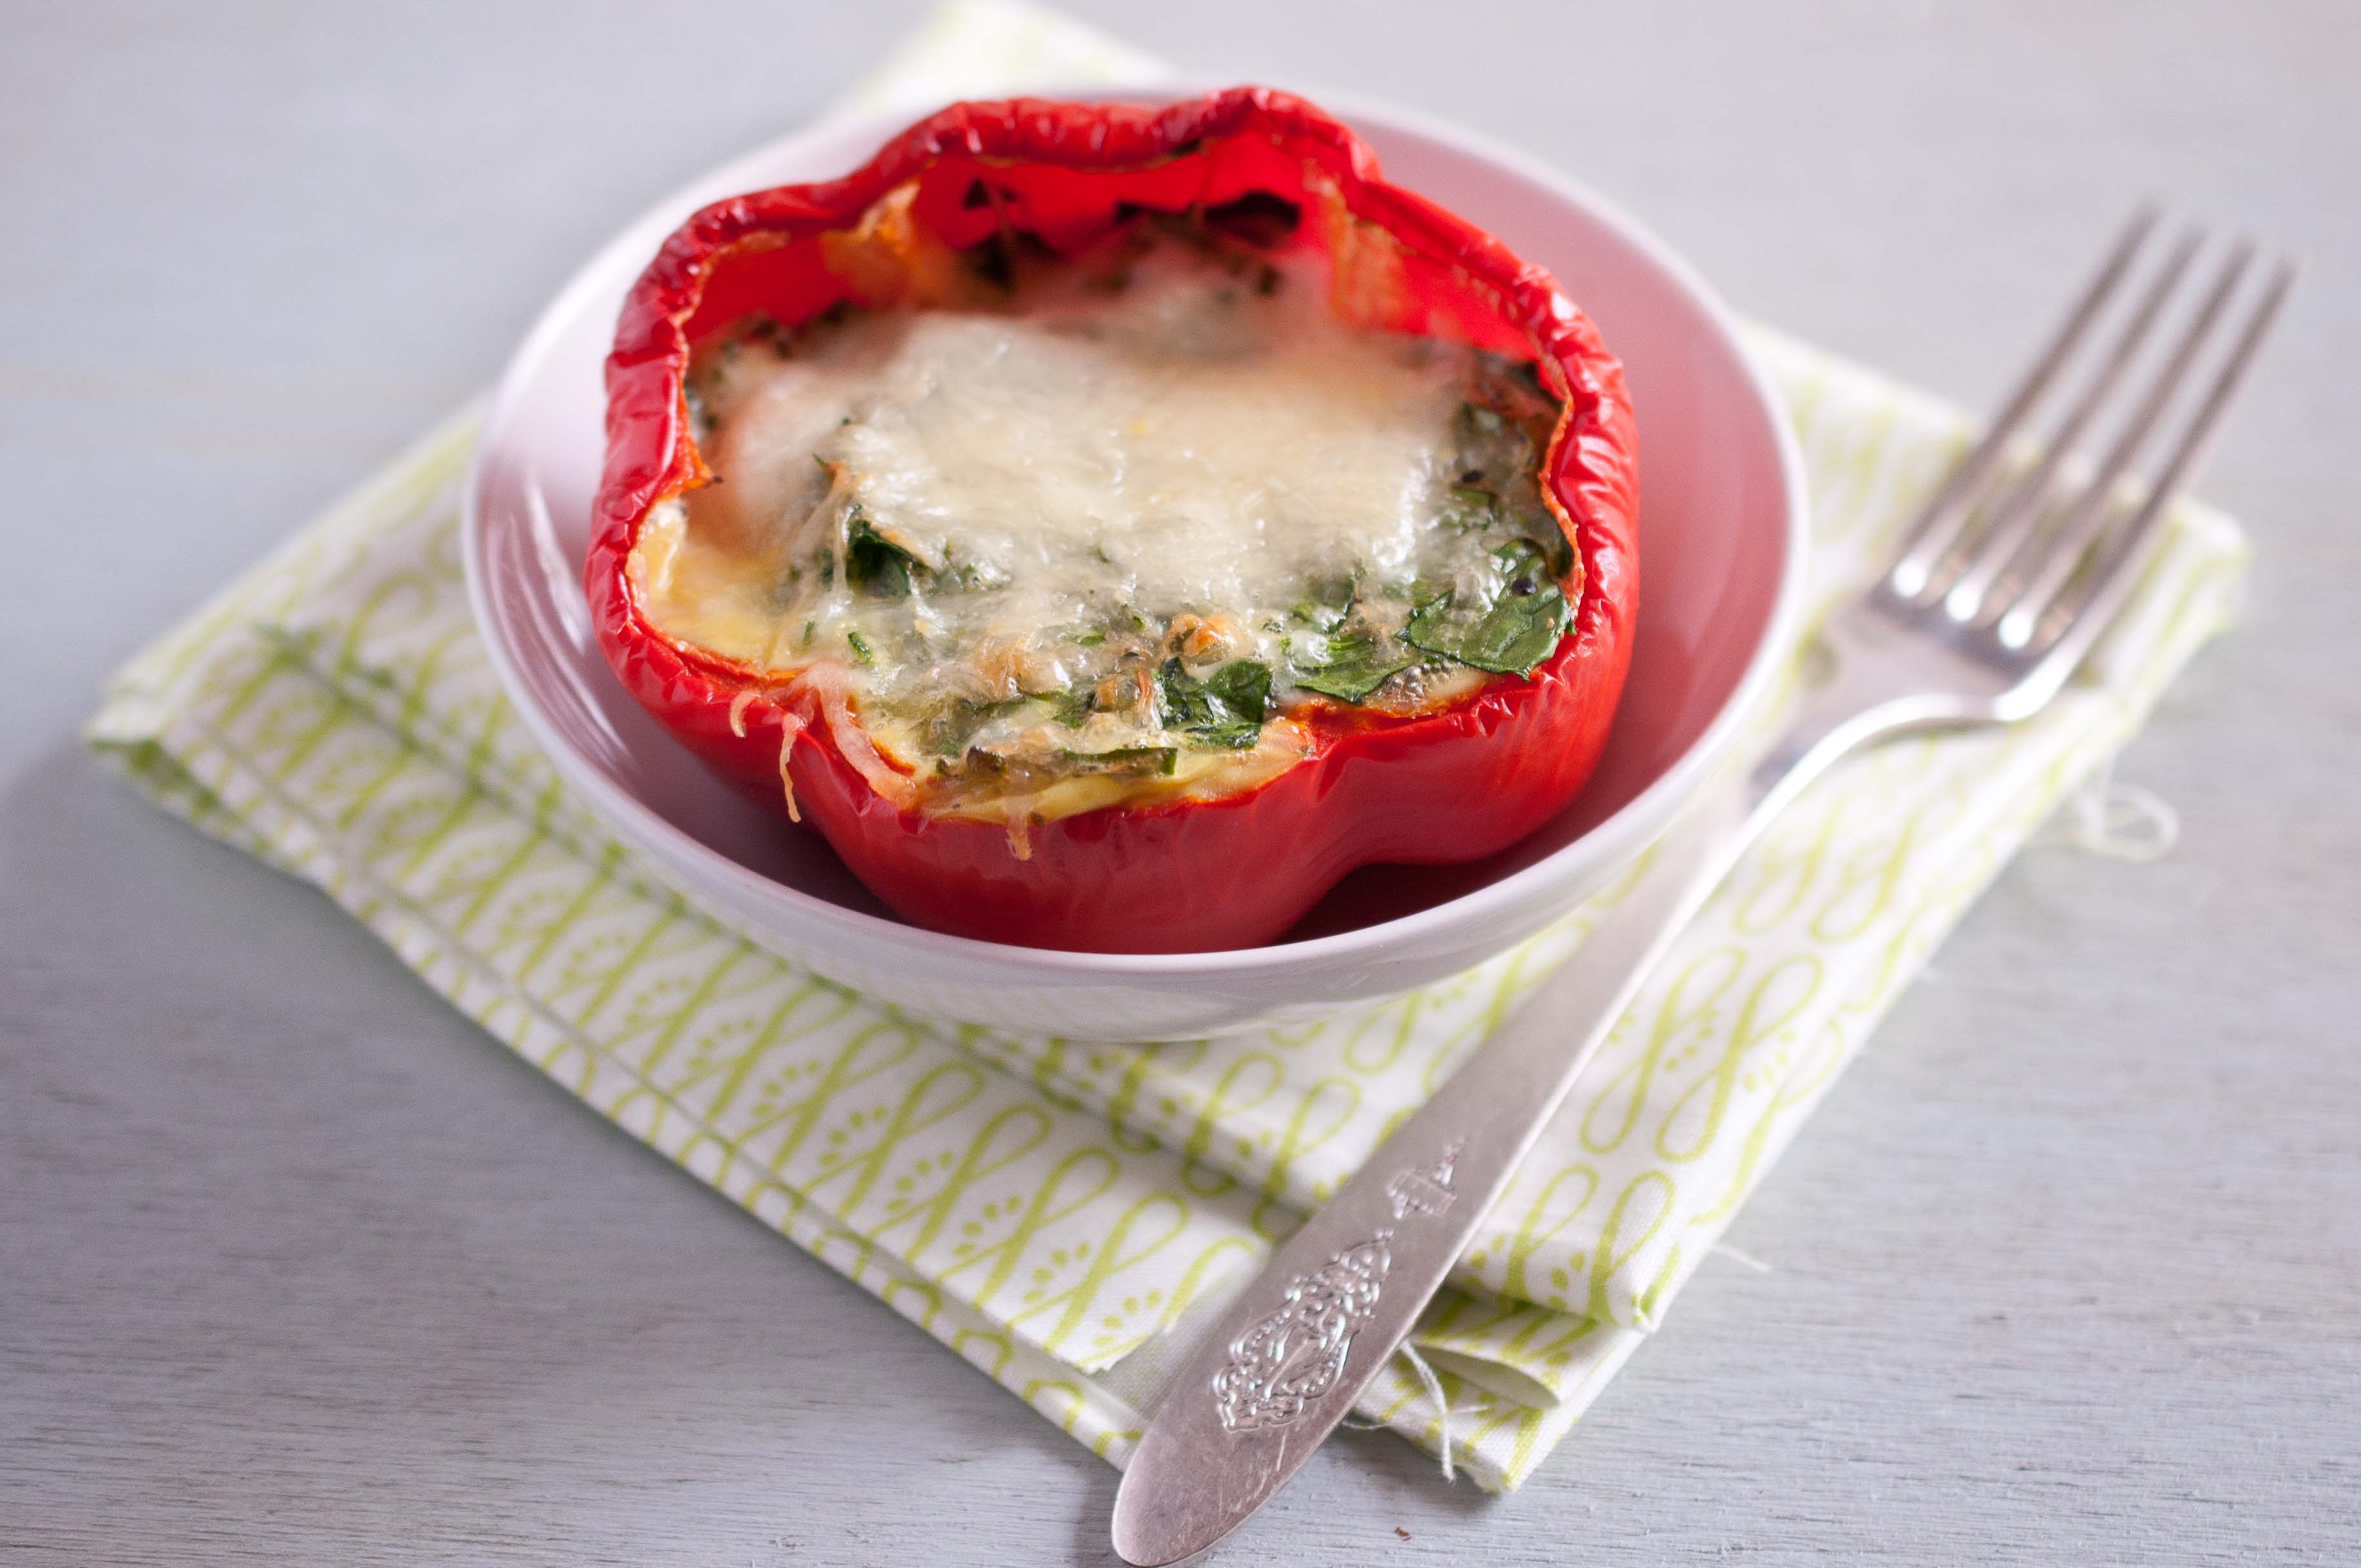
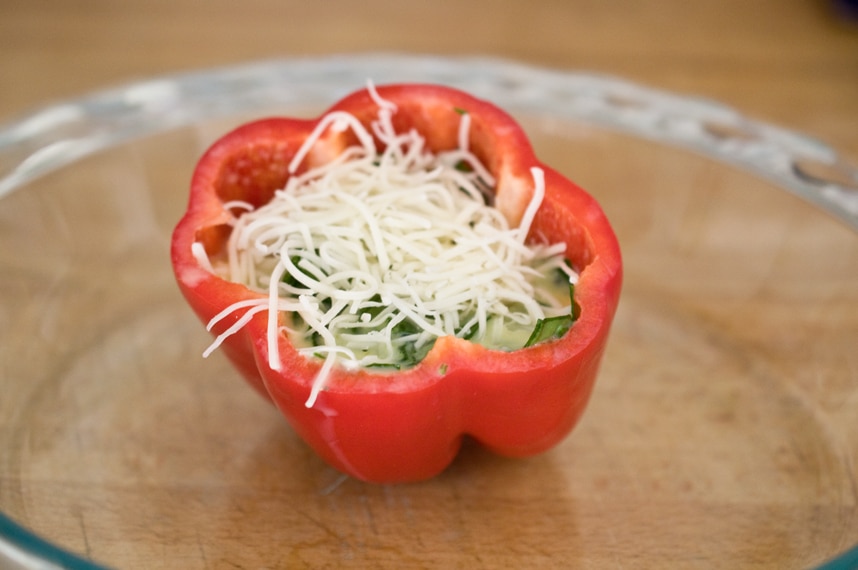
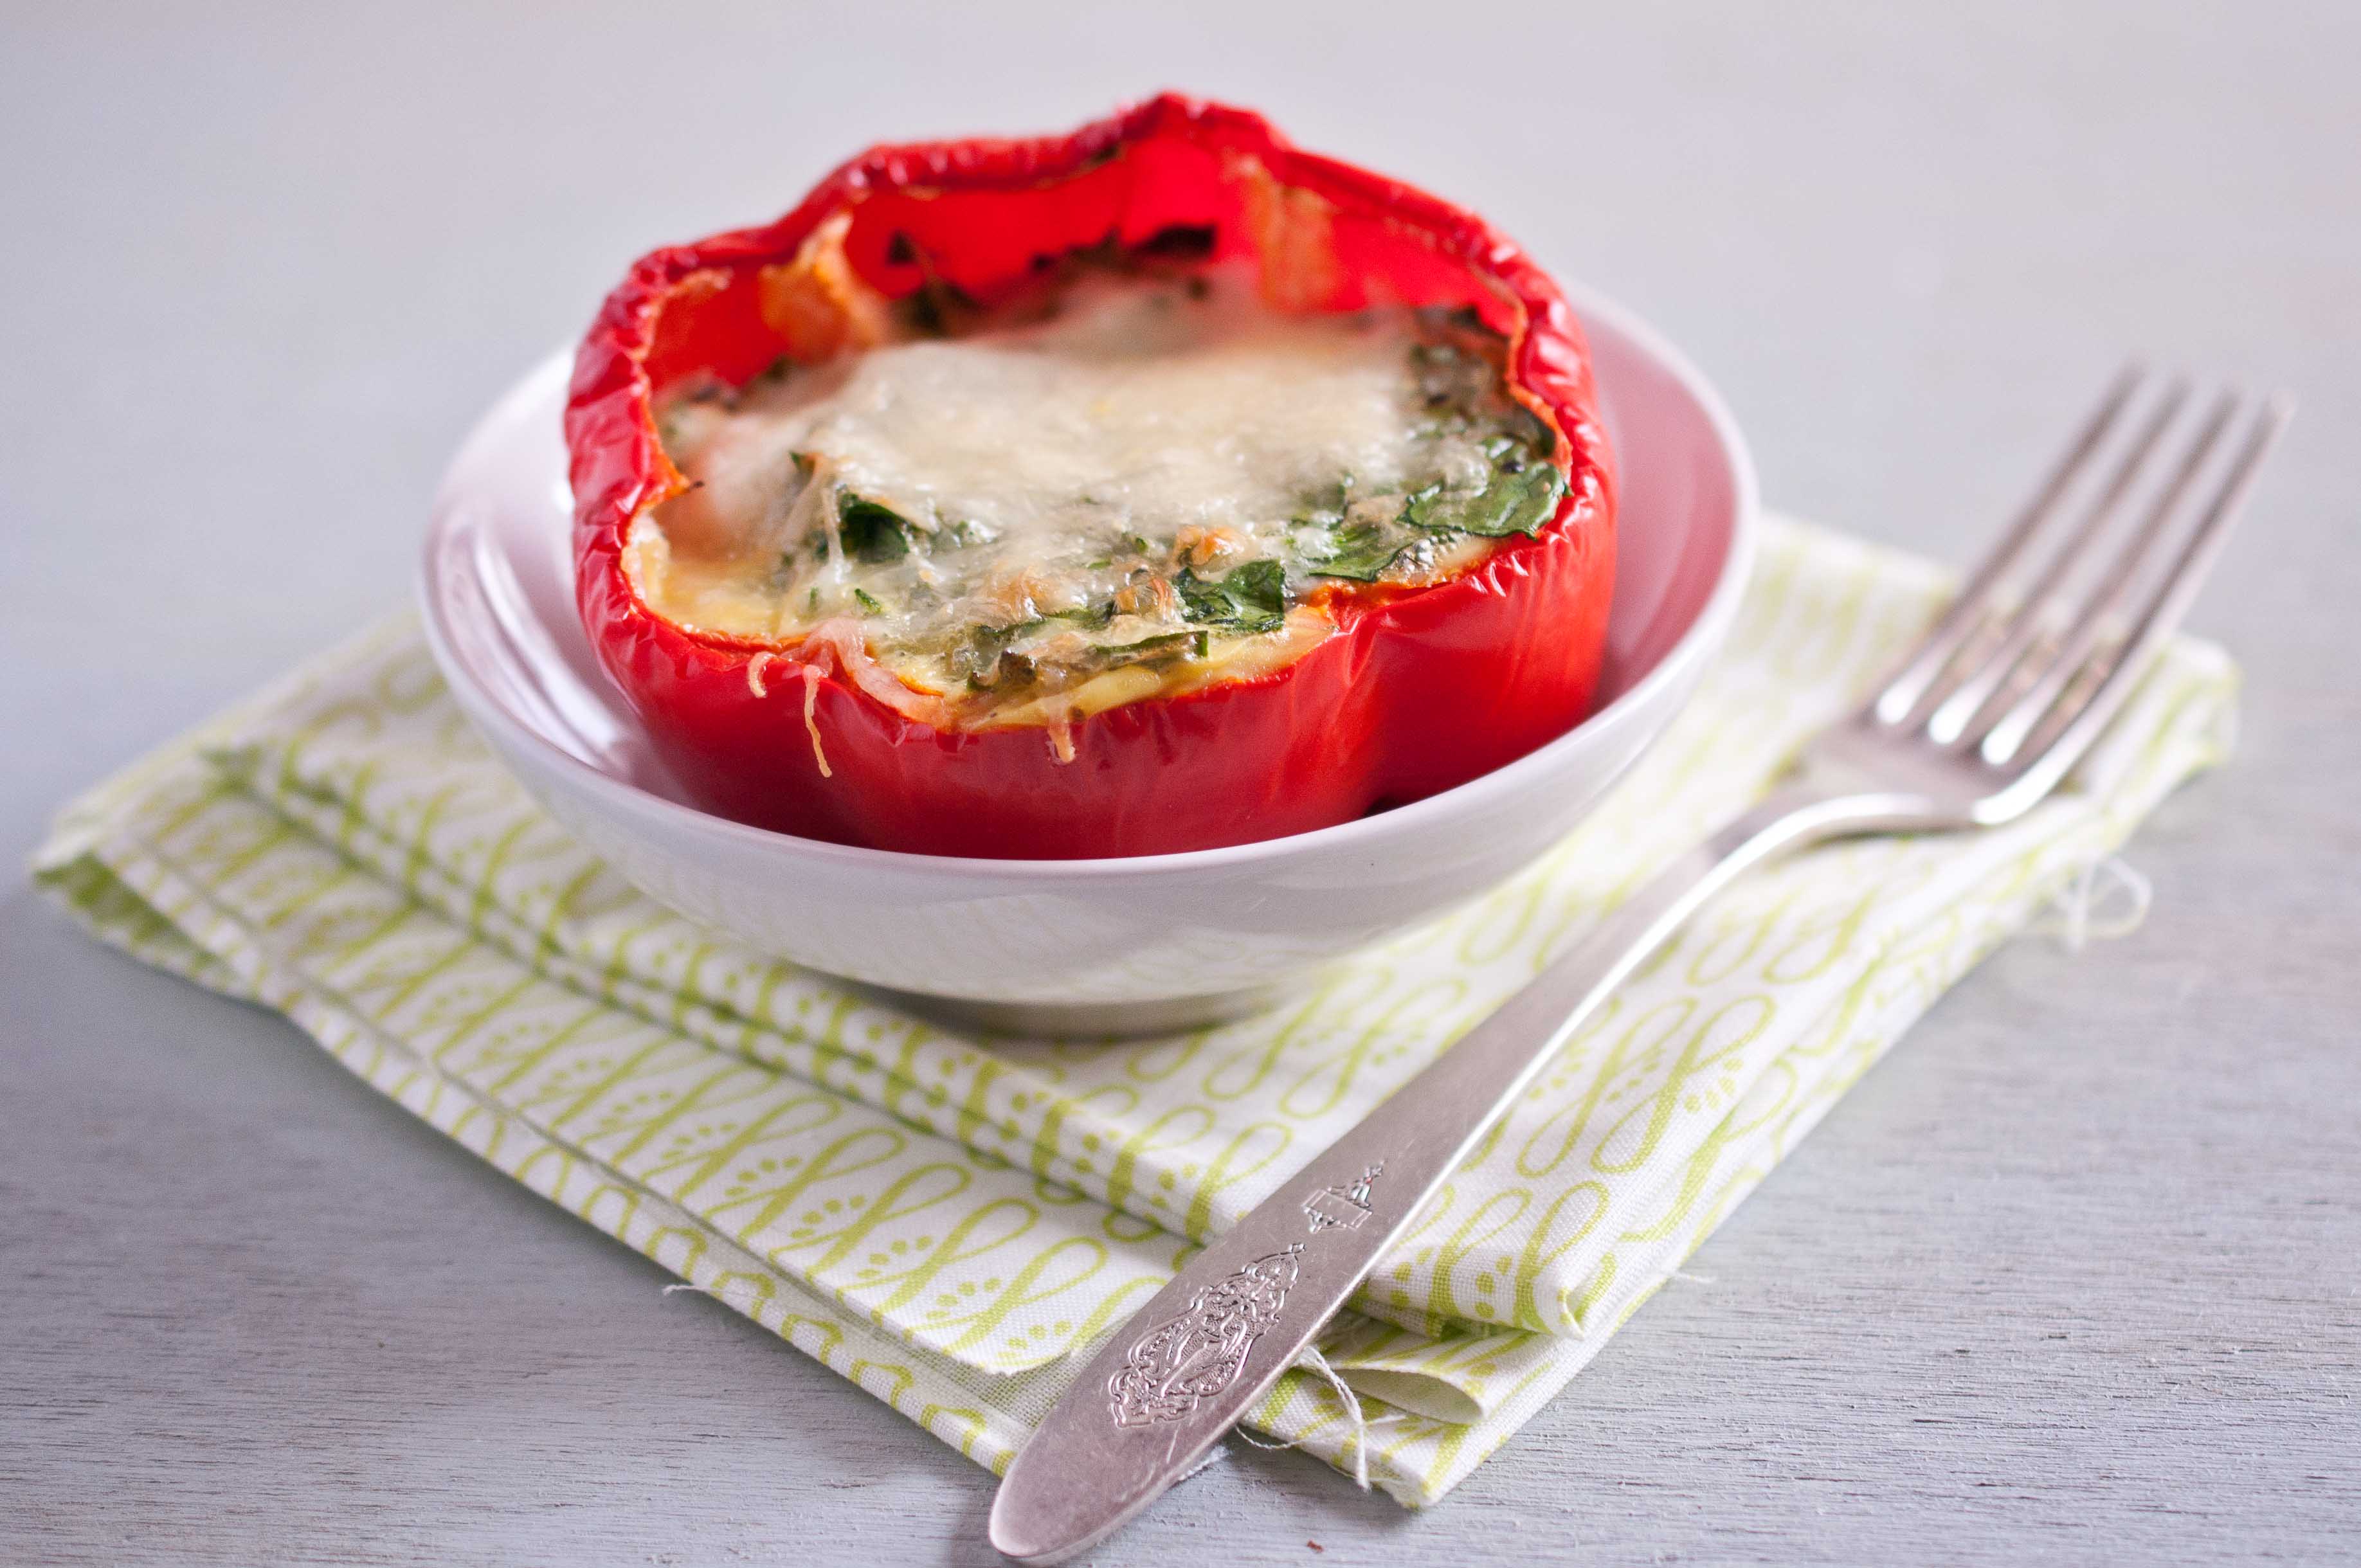
Spinach Quiche In Red Pepper Cup
4 large red bell peppers (try to find ones with flat bottoms, that will firmly stand up straight when set on a plate)
6 eggs
1/2 cup milk
1/2 cup heavy cream
3 raw breakfast sausages, casings removed, chopped
1/2 cup shredded Gruyere or Mozzarella, (plus 2 tbs for garnish if desires)
1/4 tsp salt
1/2 tsp pepper
1 cup fresh spinach, chopped
1 tbs scallions, chopped
Place oven rack on the lowest position and preheat oven to 350.
Cut the bell peppers in half, across the middle. You can chop the top half of the bell peppers, removing stems and seed, and place pieces in a freezer bag, saving it for a later meal.
Place the bottom half of the bell peppers in a glass baking dish, cut side up. Make sure to use bell peppers that can stand up on their own, or baking them will be a challenge.
In bowl, beat the eggs until well combined. Add the remaining ingredients and stir until well combined.
If you use, chopped frozen spinach, make sure to thaw, rinse and remove as much water as you can, too much moisture won’t allow this to set up.
Place baking dish with red peppers inside the oven. Pour the egg mixture into the red pepper cups until almost full (leave about 1/4 inch to 1/2 inch space at the tops) and sprinkle with cheese, if desired.
Bake for 45-55 minutes or until the center of the quiche no longer wobbles when you gently shake the rack.
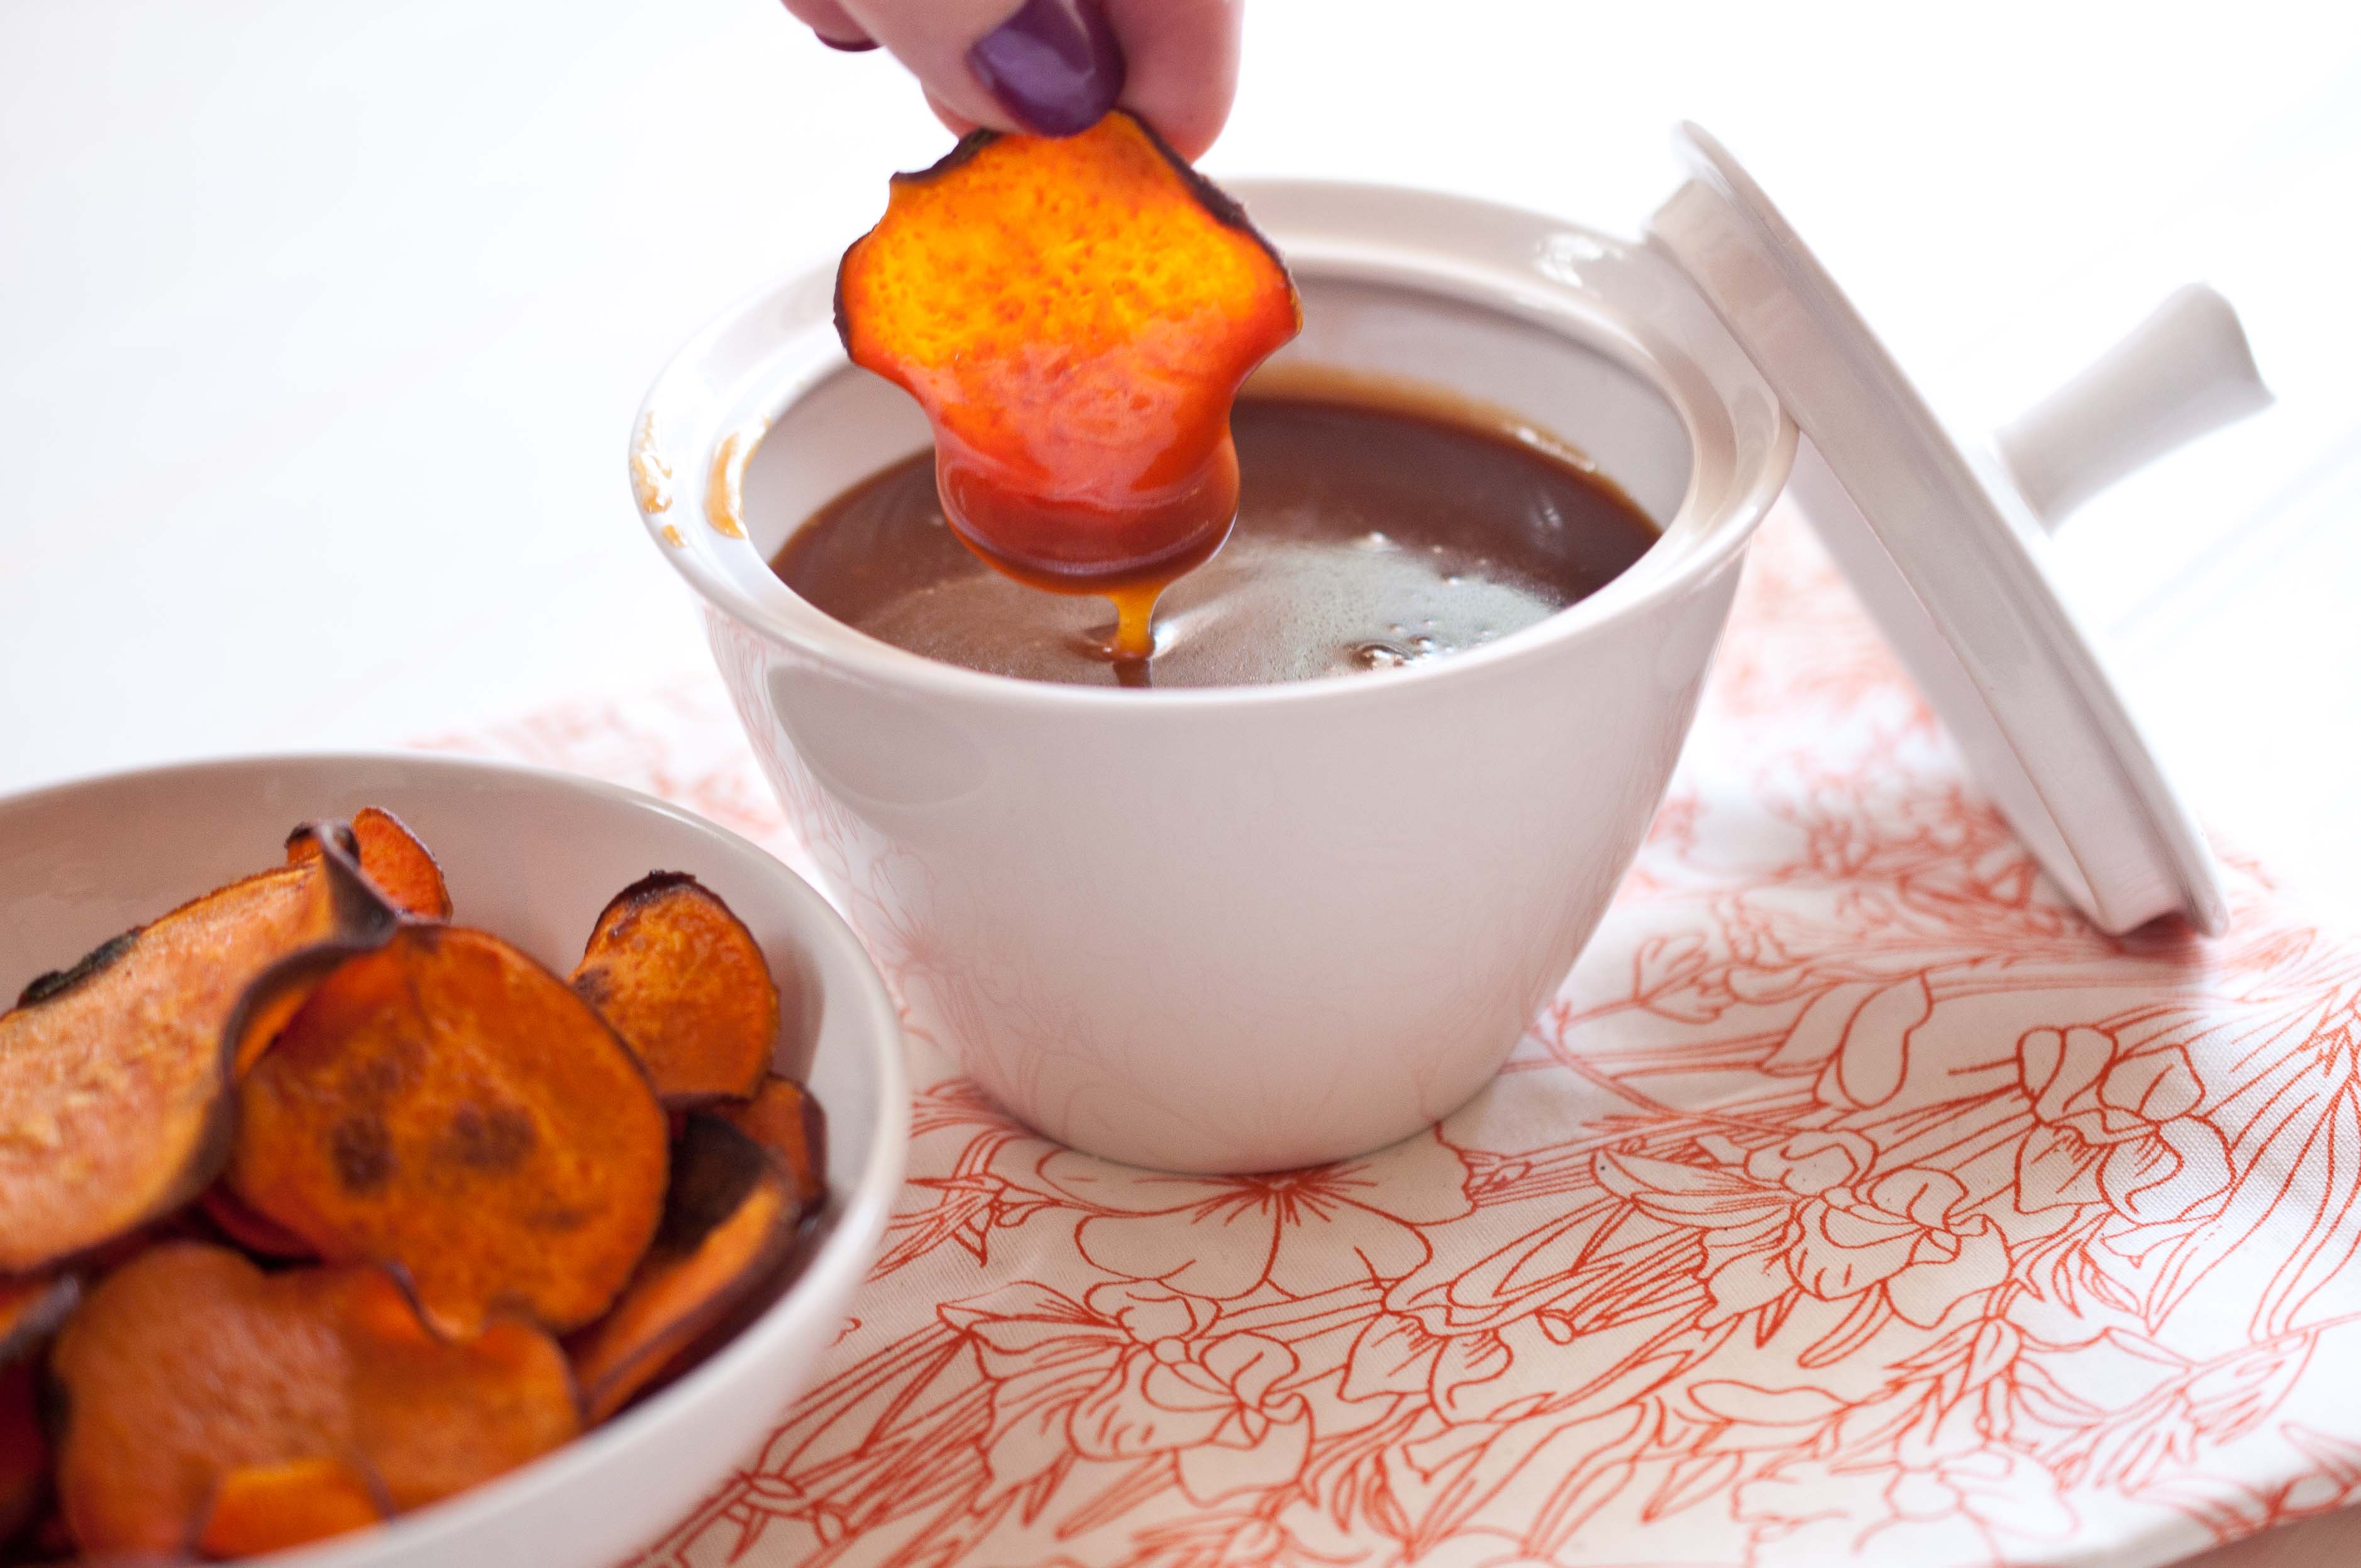
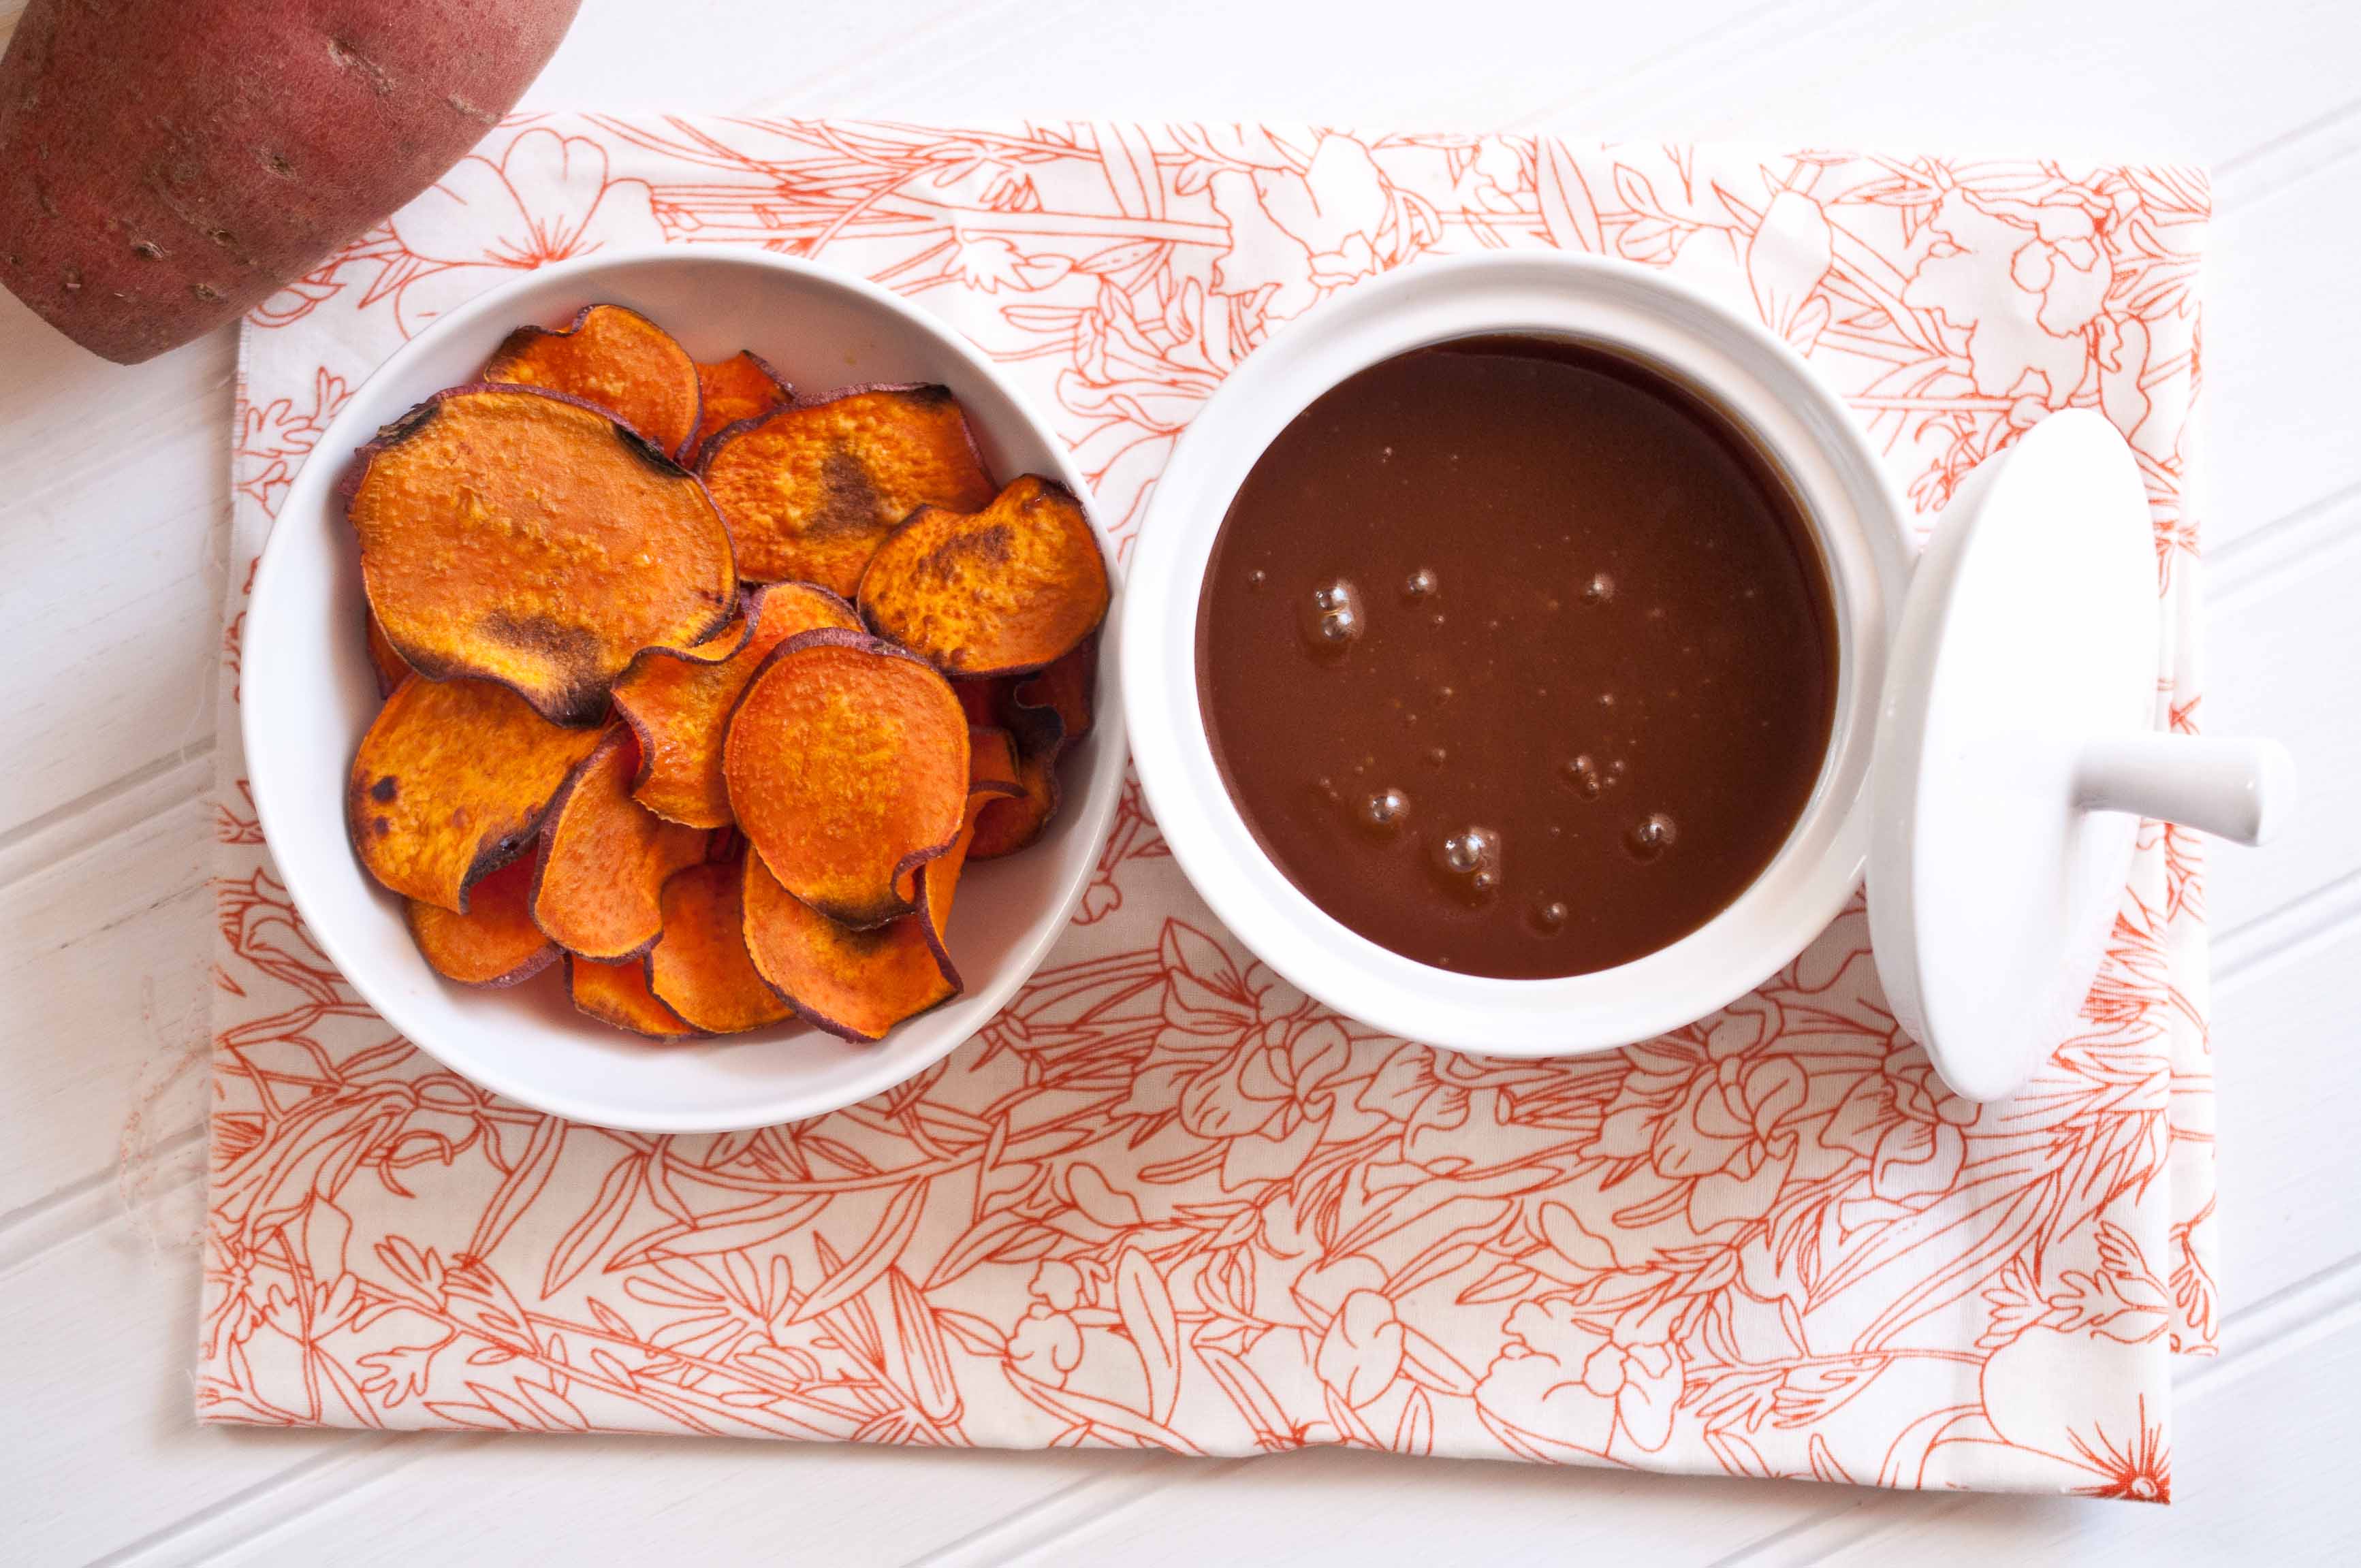
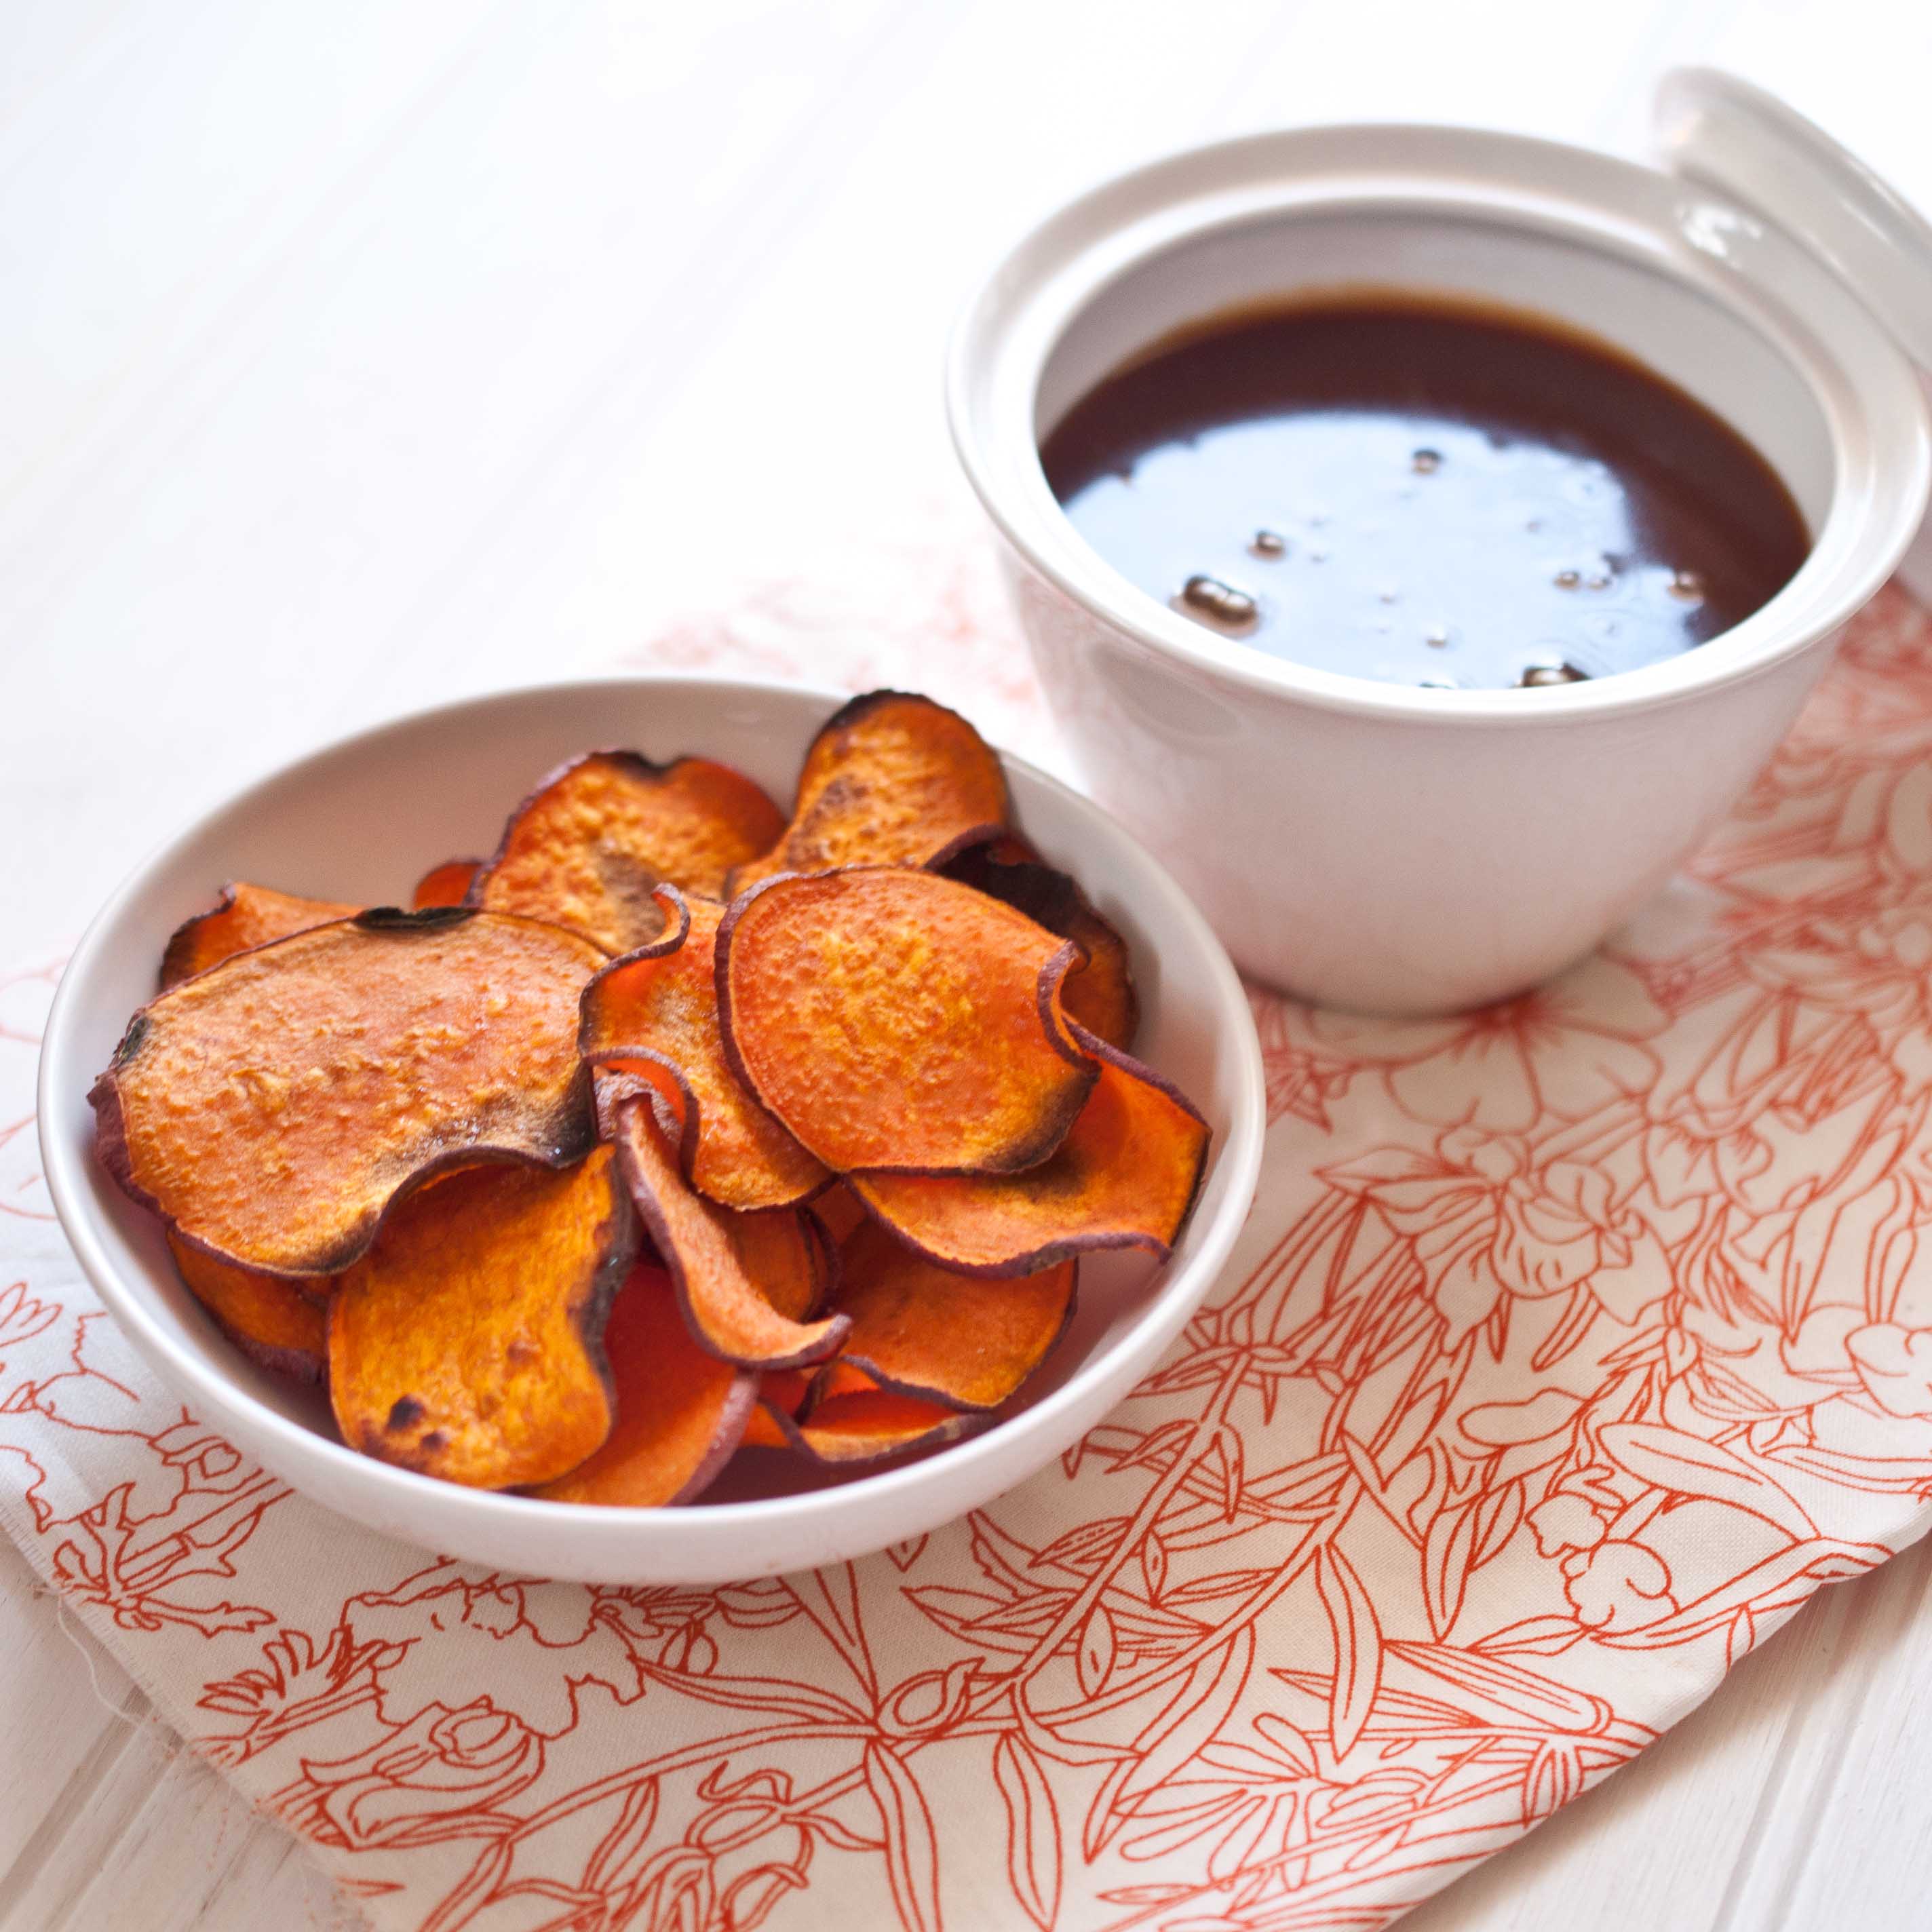
The where so cute, slightly chewy and a little crunchy.
And they are even healthy. Only about 7 calorie each. But, no one eats ONE, that’s insane. So, think of it like 70 calories if you have 10, or 140 if you have 20. And it makes you think that you are eating something that’s bad for you, which makes it taste better.
But of course, I got to thinkings. About how much I like to dip things.
And how in love I am with sauces. Even though this Cinnamon Caramel Dipping sauce makes it SO much less healthy, its super yummy. And it’s a good example of that balance thing I’m always running my mouth about.
Baked Sweet Potato Chips With Cinnamon Caramel Dipping Sauce
2 large sweet potatos
Olive oil flavored cooking spray
1/4 tsp sugar
Caramel Sauce:
1/2 cup sugar
2 tbs honey
4 tbs unsalted butter, cut into cubes
1/2 cup heavy cream
1/4 tsp cinnamon
1/2 tsp vanilla
Preheat oven to 375
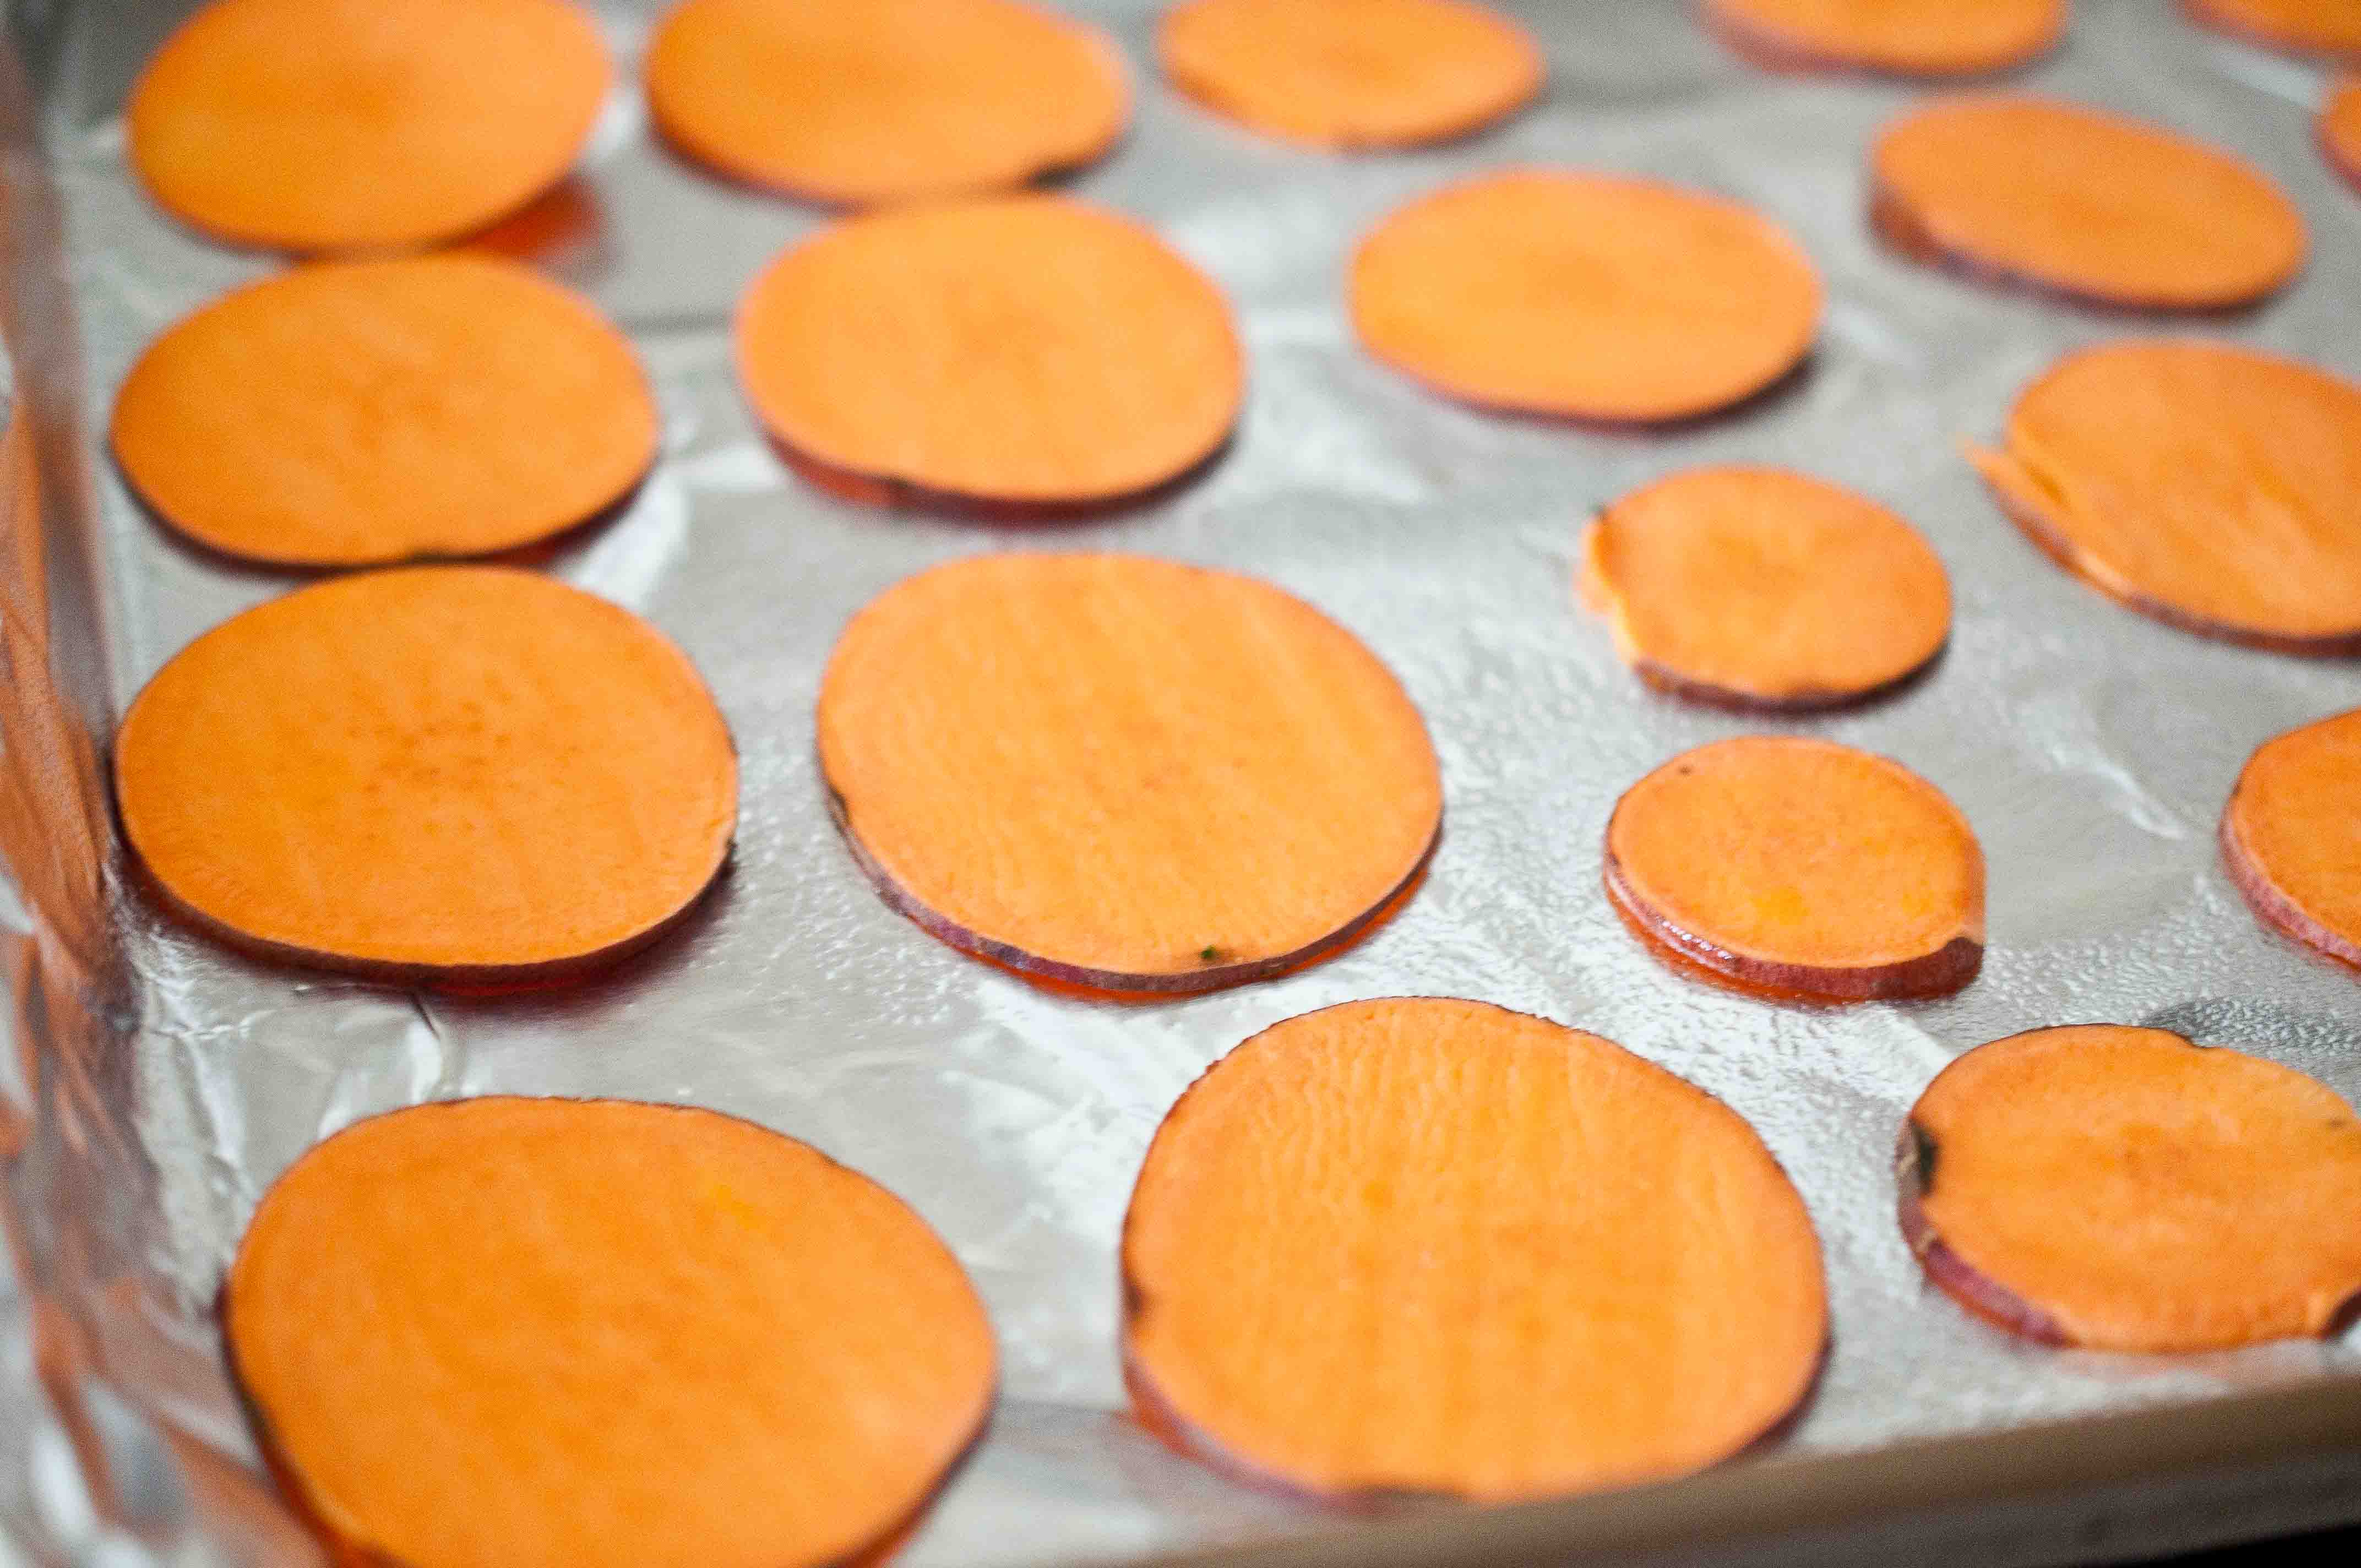
Slice the potatoes as thin as you can possibly make them. Using a mandolin slicer is the best way to do this, as it insures that your potato slices will cook evenly. If you don’t have a slicer, use this as an opportunity to practice those knife skills! Remember that thick slices will yield much different results.
Cover a baking sheet with aluminum foil, shiny side up. Spray with olive oil spray. Arrange the potatoes in a single layer on the baking sheet, making sure they don’t touch each other. Spray lightly with olive oil spray and sprinkle lightly with sugar. Flip the slices over and repeat. Bake at 375 for ten minutes. flip over and continue to bake until the potatoes are browned, about 8-10 minutes. Keep a close eye on your chips, they go from done to burned very quickly.
Make the sauce:
In a pot over high heat, add the sugar and the honey. Stir until the sugar is disolved, do not stir again while the caramel is cooking, but swirl the pan every 30 seconds to redistribute the caramel sauce. Allow to cook until the sugar is an amber color and about 220-225 degrees. Remove from heat and stir in the butter. Add the cream, vanilla and cinnamon and stir until combined and the sauce stops bubbling. Allow to cool a bit before serving.
I’m a breakfast girl. It isn’t possible for me to go the 16 hours between dinner and lunch the following day without eating. I become a crazy person when I’m hungry. Like the plant from Little Shop of Horrors yelling "FEED MEEE!!!" at random strangers. If I ever get stuck on a deserted island, or in a plane crash in the Andes, don’t pray for me, pray for which ever poor soul has to deal with the hungry version of me. Not pretty. Plus I just make bad decisions when I’m hungry, which results in me coming to the conclusion that an entire jumbo sized bag of Jalapeno Kettle Chips is just one snack, and it’s totally fine for me to eat the entire thing.
Because of this, I must eat breakfast. And besides my long standing love with Saturday Morning Breakfast indulgences, I want a super healthy breakfast 6 days a week.
And you are probably sick of all the quinoa, but I’m not. Not yet. It SO good for you, and if you cook it the right way, it has a great flavor and texture. Don’t cook it the same way you cook rice or it will be mushy.
Plus a healthy dose of Calcium, Vitamins A, B-6 & C
Only .5 grams of the bad Saturated Fat
Not too bad. And an easy thing to grab on your way out the door in the morning.
So that you can conquer the world without being a whiney and unreasonable. Or maybe that’s just me.
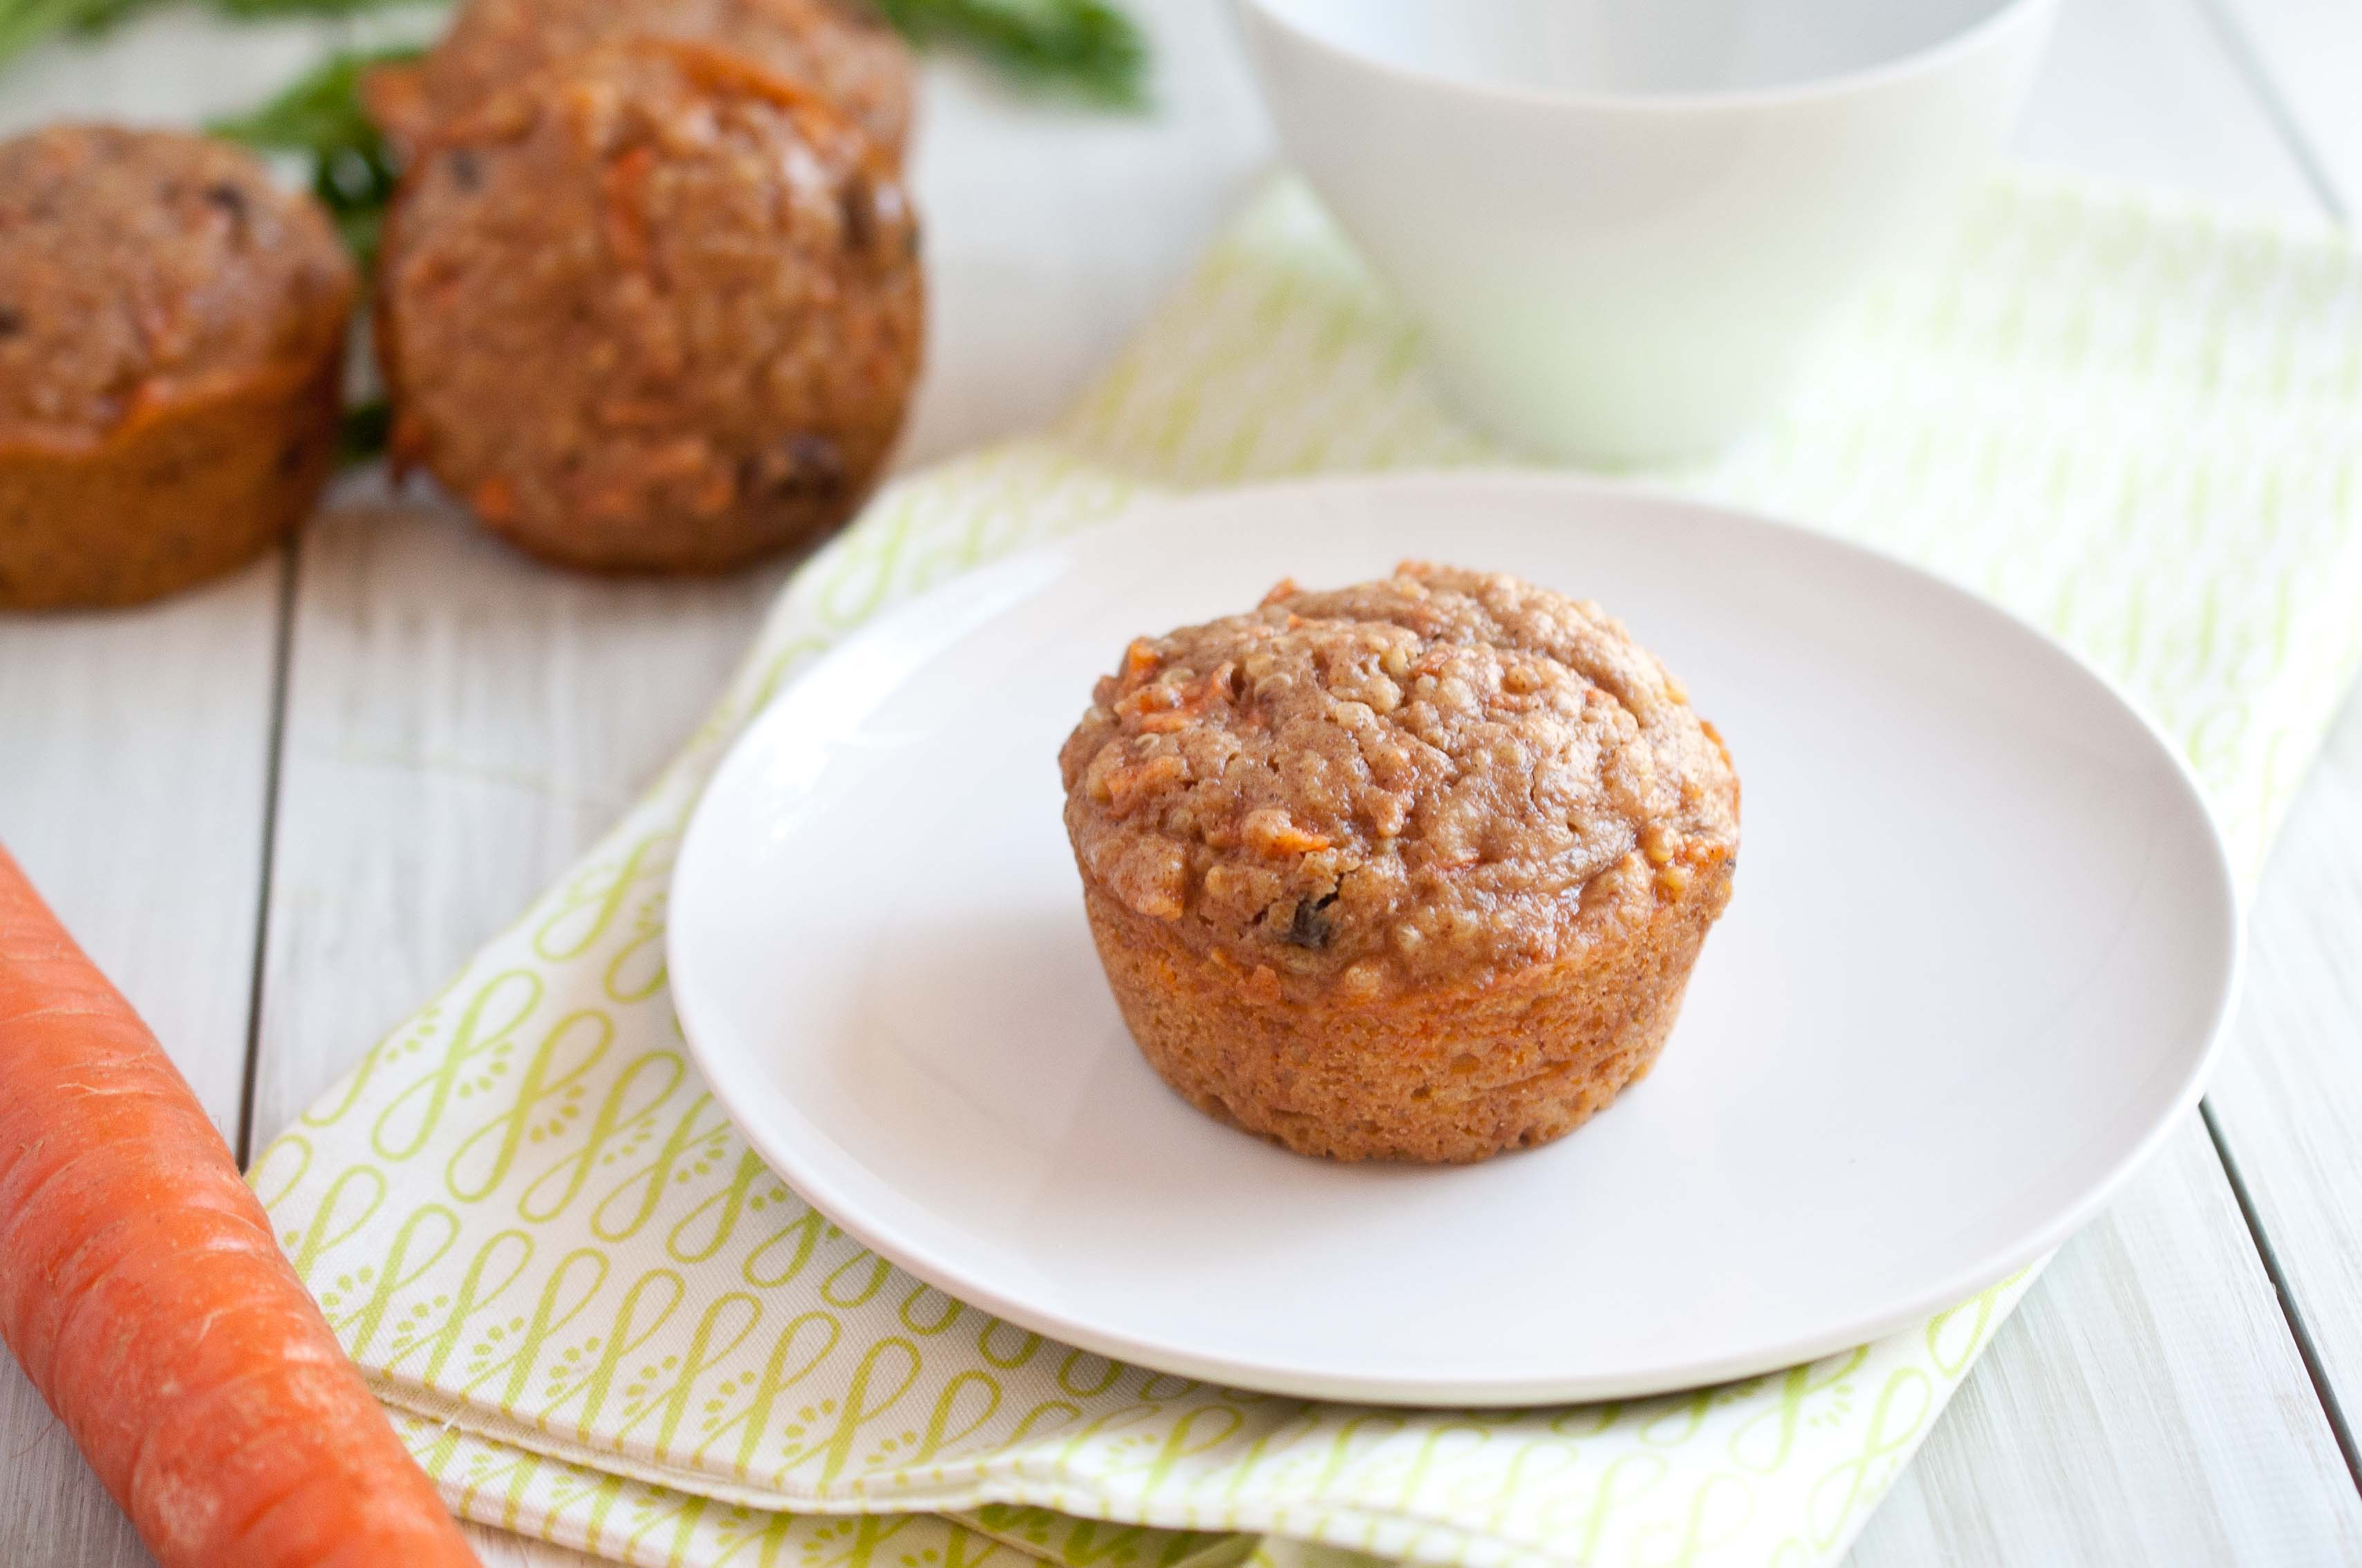
Quinoa Carrot Cake Breakfast Muffins
Ingredients
2/3 cup whole wheat flour
1/3 cup cooked quinoa (You need to cook your quinoa with 1 part quinoa to 1.5 parts water, too much water makes it mushy)
1/3 cup sugar
1 tsp cinnamon
1/4 tsp nutmeg
1 tsp baking powder
1/2 cup fat free sour cream
1/4 cup unsweetened apple sauce
2 tbs raw honey
1 tsp vanilla extract
1 egg
3/4 cup carrots, peeled and finely grated (place between sheets of paper towels to remove excess water)
1/4 cup of raisins
2 tbs chopped walnuts
(Makes 6 muffins)
Instructions
Preheat oven to 350.
In a large bowl, combine the flour, quinoa, sugar, cinnamon, nutmeg, and baking powder. Make a well in the ingredients. In another bowl, combine the sour cream, apple sauce, honey, egg and vanilla until smooth. Pour the wet ingredients into the well you made in the dry ingredients. Stir until just barely combined, a few lumps is fine. If you over mix, your muffins will be tough. Add the carrots, raisins and walnuts and stir until just combined.
Grease 6 wells of a muffin tin (or line with muffin papers). Pour evenly into the 6 wells, about 2/3 full.
Bake at 350 for 18-22 minutes or until the top springs back when touched.
There are food and activity parings that strongly associate in our minds, food that will always be linked to a specific occasion. Crab cakes remind me of weddings, Ritz Crackers and Cheddar Cheese squares are paired with trips to the river, Chicken Salad Sandwiches are for bridal/baby showers and Buffalo sauce is for sports watchin'. Can you even hear that word and not want to put on a team jersey?
By now, you have probably heard a thing or two about this scandal with Paula Deen. If you haven’t, here is a recap:
Paula Dean was diagnosed with Type 2 Diabetes.
Three years ago.
The number 1 treatment for Type 2 Diabetes is diet and exercise.
She continues to cook large volumes of high fat, high sugar food on TV, in her restaurants and cook books.
She now wants to endorse a Type 2 diabetes drug and "comes clean" about her diagnoses.
The public freaks out.
Although we all have opinions about, well, just about everything and everyone we have ever met, I’m not concerned about Paul Deen. I don’t know her, and it’s none of my business.
But I am concerned about you. And me. And what I feel like is my responsibility to you. I have quite a few "special occasion" food recipes on this blog, made with high fat, high calorie, high sugar ingredients. And I hope that doesn’t give you the wrong idea.
Learning from someone else’s mistakes is better than making one yourself, the same dramatic positive changes without the mess to clean up. Use her as inspiration, not as fodder for gossip. She is unhealthy and needs to make changes in her life, but that’s her business. How can we take this all in, look at ourself and see how to make our own changes rather than making her the villain? How can we help the people we love who are living unhealthy lives? How can we all be in this together and use it as a way to live better and eat better?
How can we have those uncomfortable conversations with people we love who are killing themselves with food? You know who just popped into your head when you read that. Why haven’t you talk to that person?
Use Paul’s story as an icebreaker in your own life. As inspiration to change.
Whether she decides to change or not, who cares?
I’m glad this came out, but can we stop pointing fingers and starting living better?
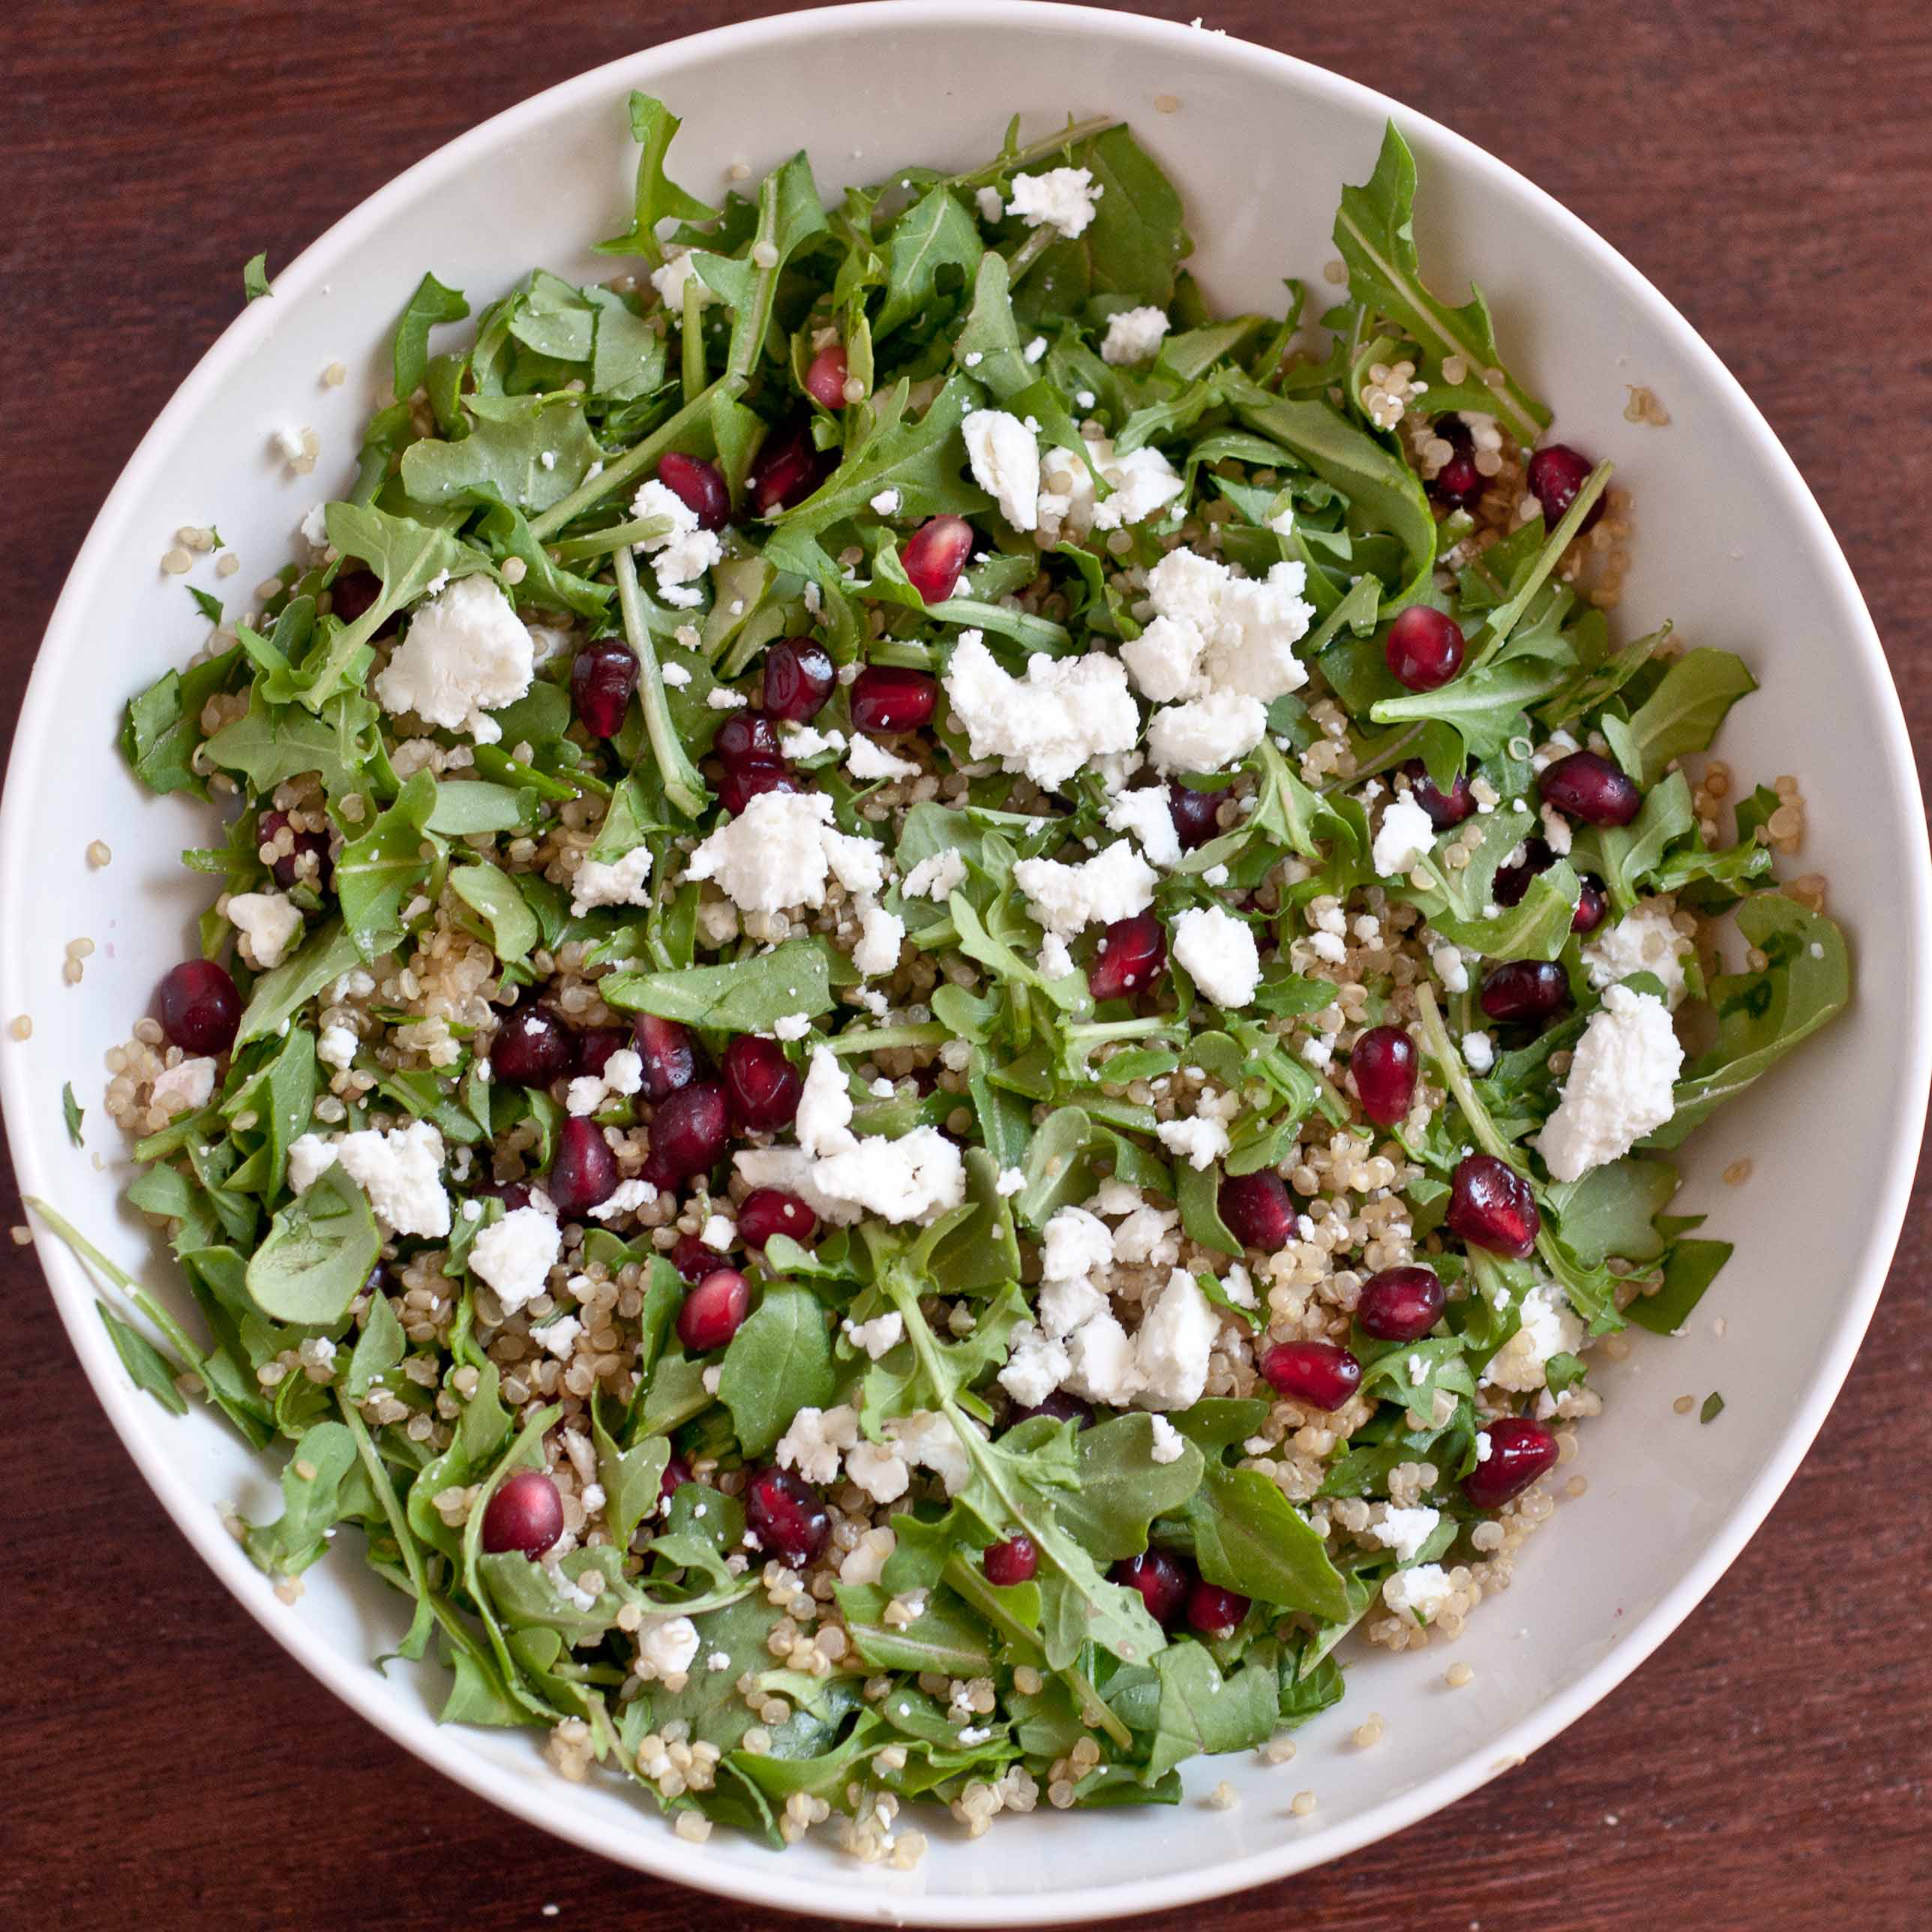
Here is my salad, my way of staying in shape. I eat it about 5 days a week in various forms and this one is my favorite.
Chocked full of protein, iron, amino acids, general good stuff. It also keeps me full until dinner.
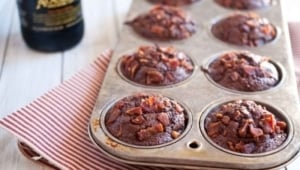
There is something mysterious and alluring about Alaska. Beautiful landscapes pushing past a transcendental, white washed façade. I’ll even forgive her the birth of ignorant, poorly spoken, female politicians to glimpse the majesty of the Aurora Borealis. It just may be because of this enchanted terrain that the beer seems to have a prestigious eminence. The water is clearer and more ethereal, giving rise to a superior scaffolding for the detailed flavors put forth in Alaskan craft beer.
The Alaskan Brewing Smoked Porter has a bold, creamy, smoked profile that bridges the flavors of bacon and chocolate in these muffins. The savory sweet interplay works well for breakfast or dessert, or anytime in between.
In a large bowl, combine the cocoa powder, flour, sugar, salt, baking powder, and smoked paprika, whisk until well combined.
In a separate bowl, beat the egg and the oil. Make a well in the dry ingredients and add the egg/oil, chocolate chips and the beer. Stir until combined.
Spray muffin tins with butter flavored cooking spray (or line with muffin papers). Add the batter to the muffin tins until about 2/3 full. Top with the chopped bacon, evenly distributed between the muffin tins.
Bake for 18-22 minutes or until the top springs back when touched.
I know that you can all tell how much I love party food, I’ve been making a lot of it these days. Food to serve to other people. Every country in the world will tell you how important food is to their culture, how community happens around a table, how love grows between mouthfuls of hand made food. It’s too bad that hasn’t become ingrained in Americans. We have "fast" food, as if we just need to get through the meal as quickly as possible to move on to better things like…reality TV? Whats the rush? Why don’t more people savor meal times, enjoy it as a journey and view food as too sacred to be "Fast"? Or take time to make food for as well as WITH their loved ones?
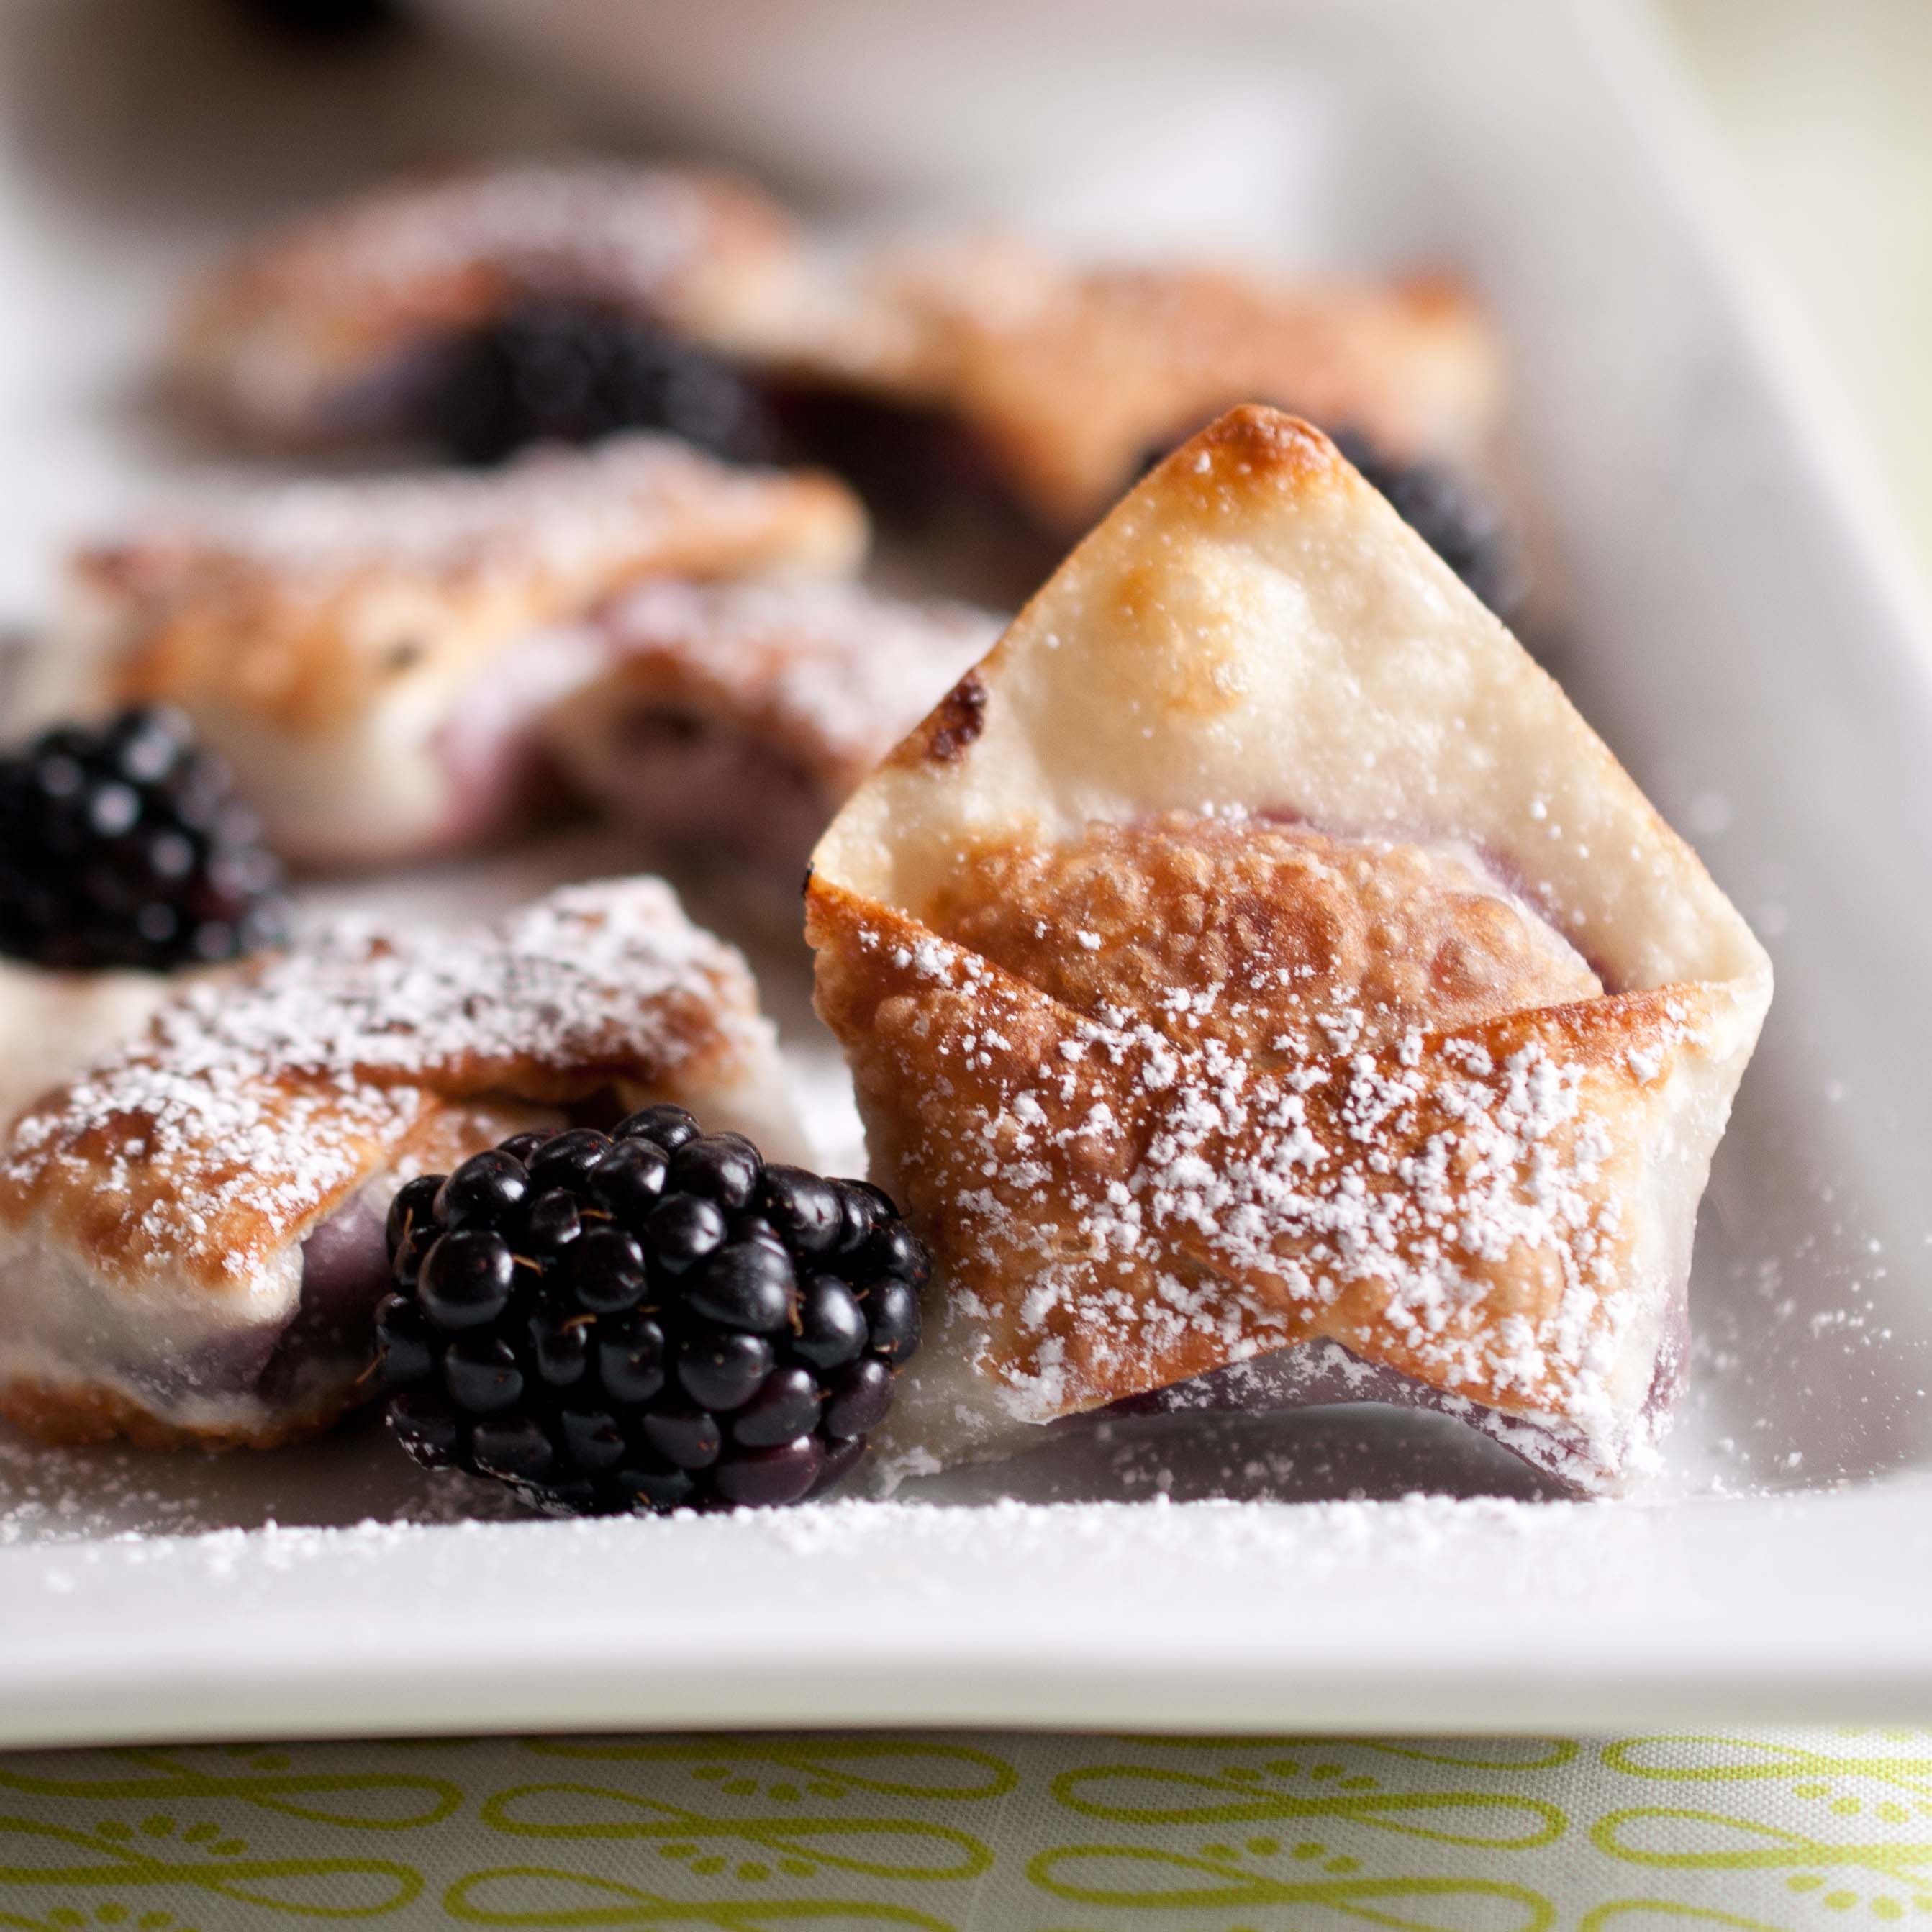
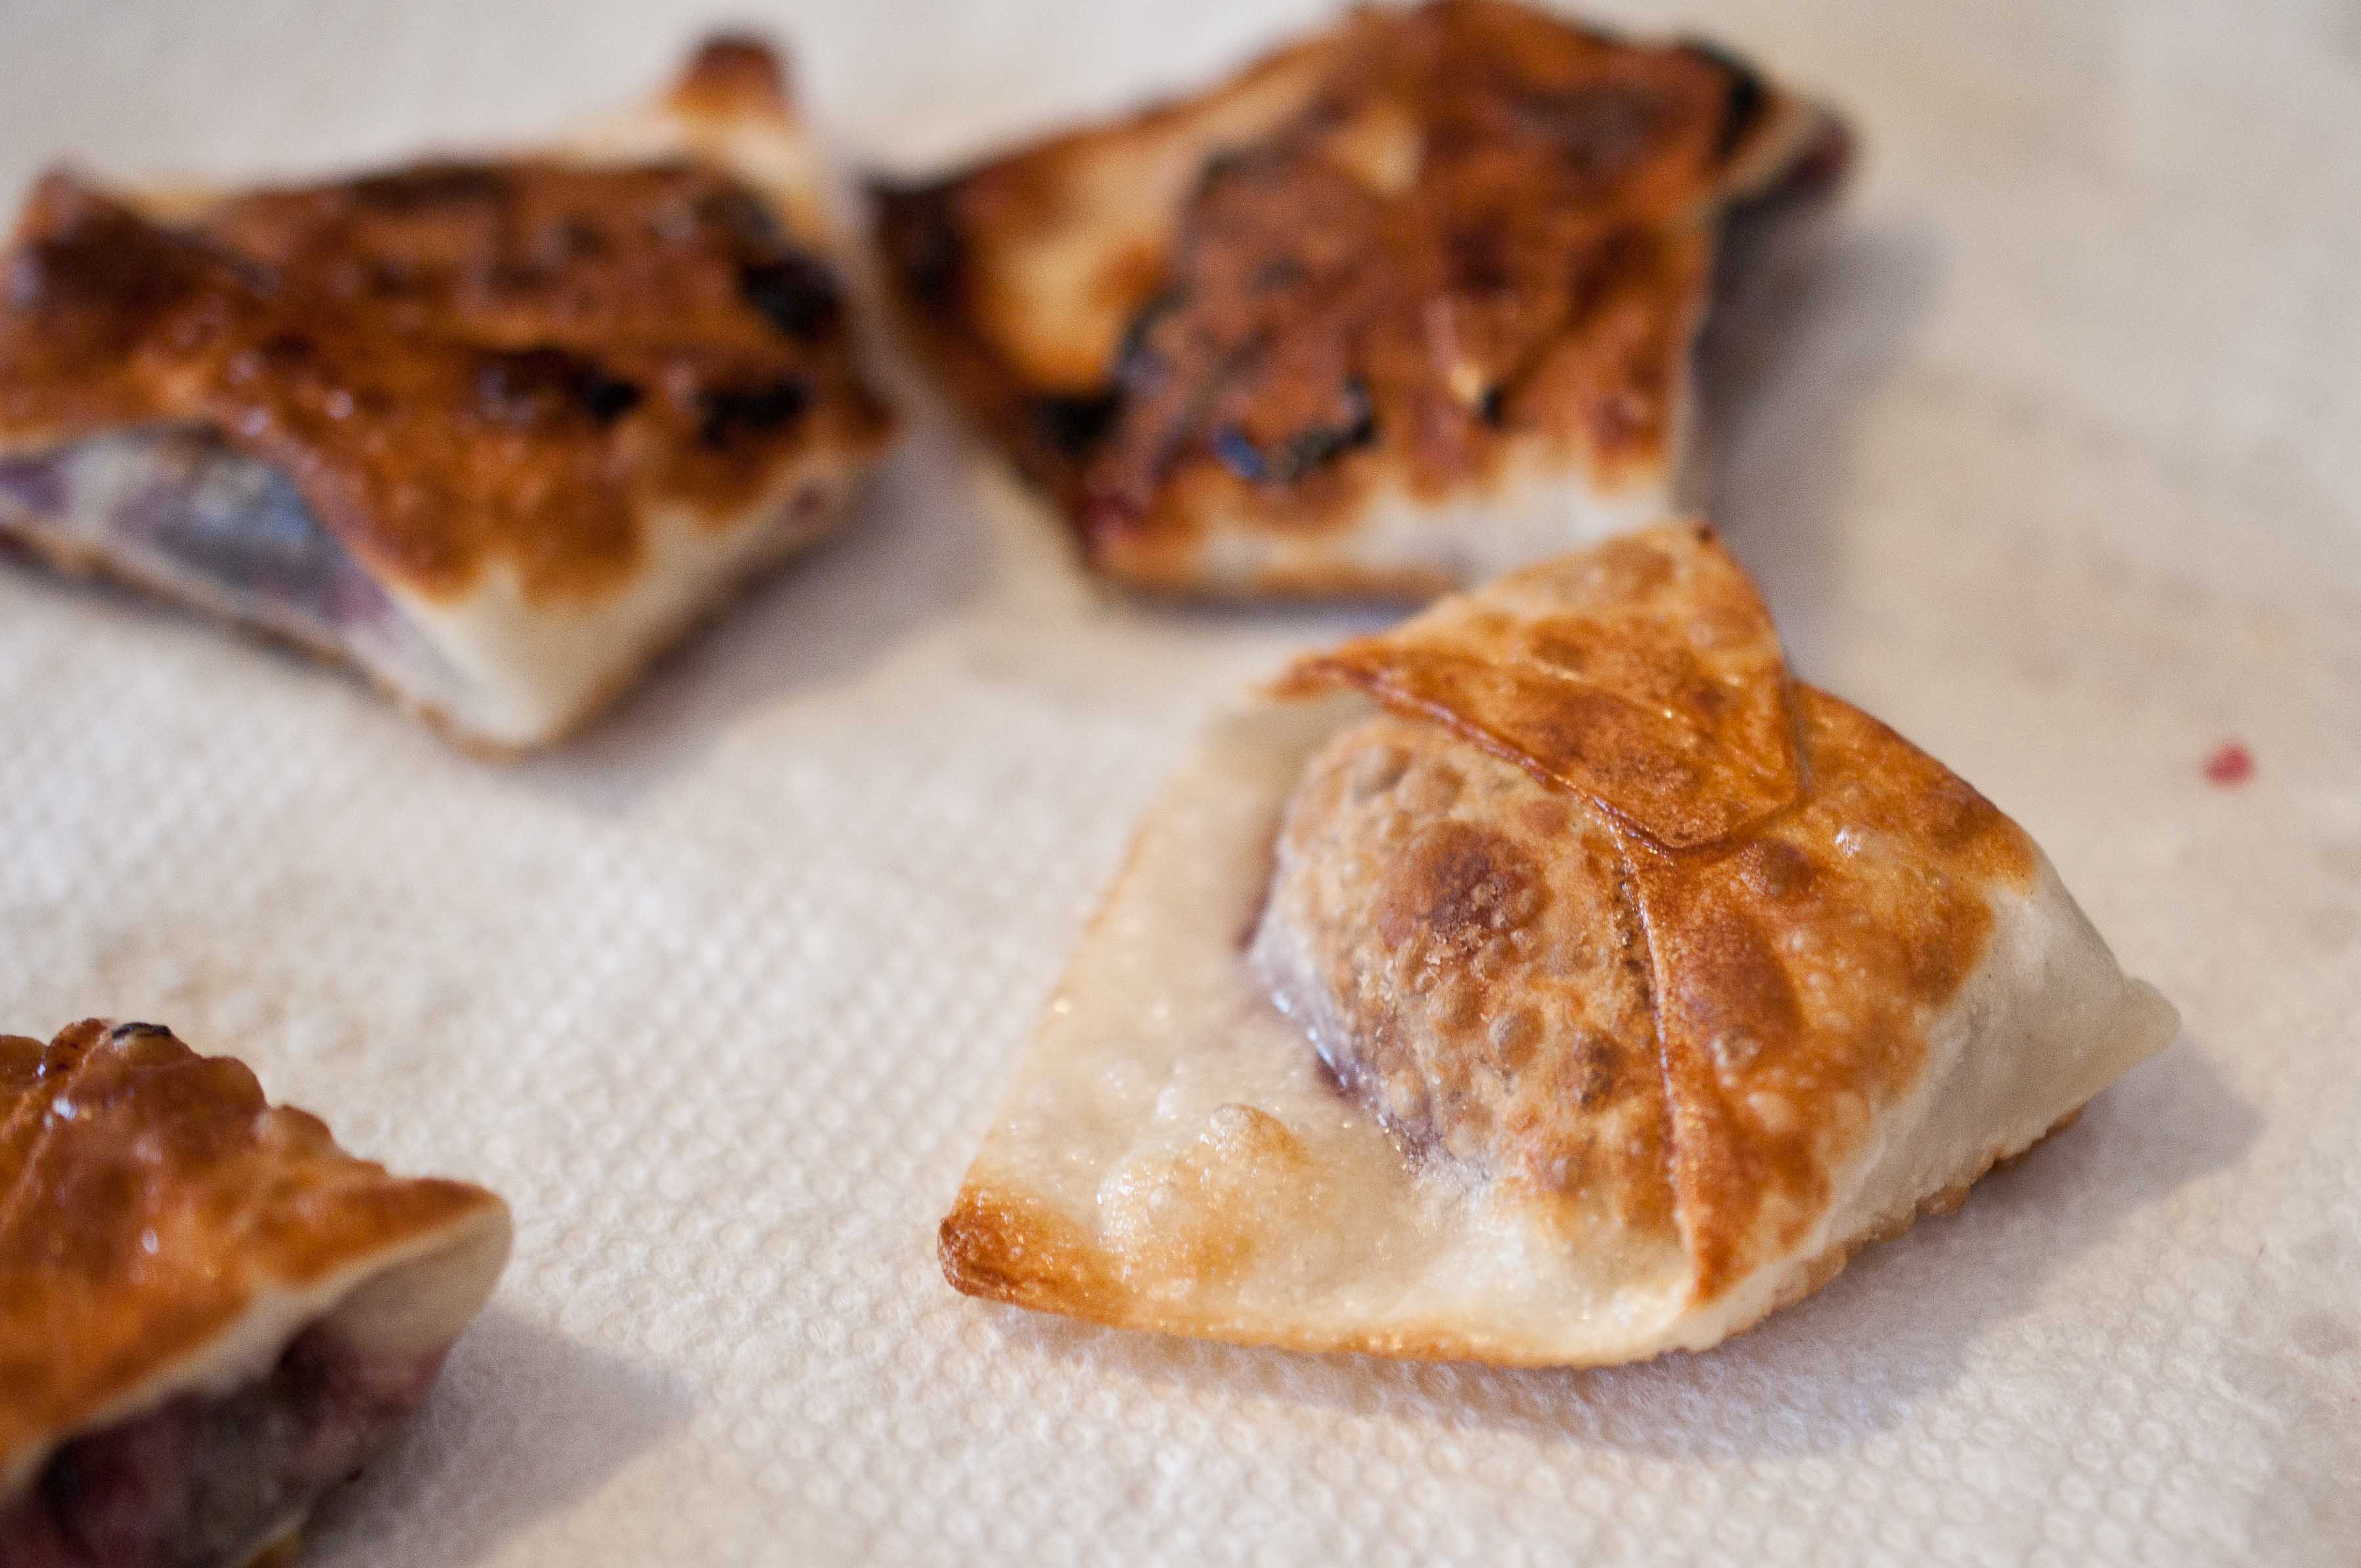
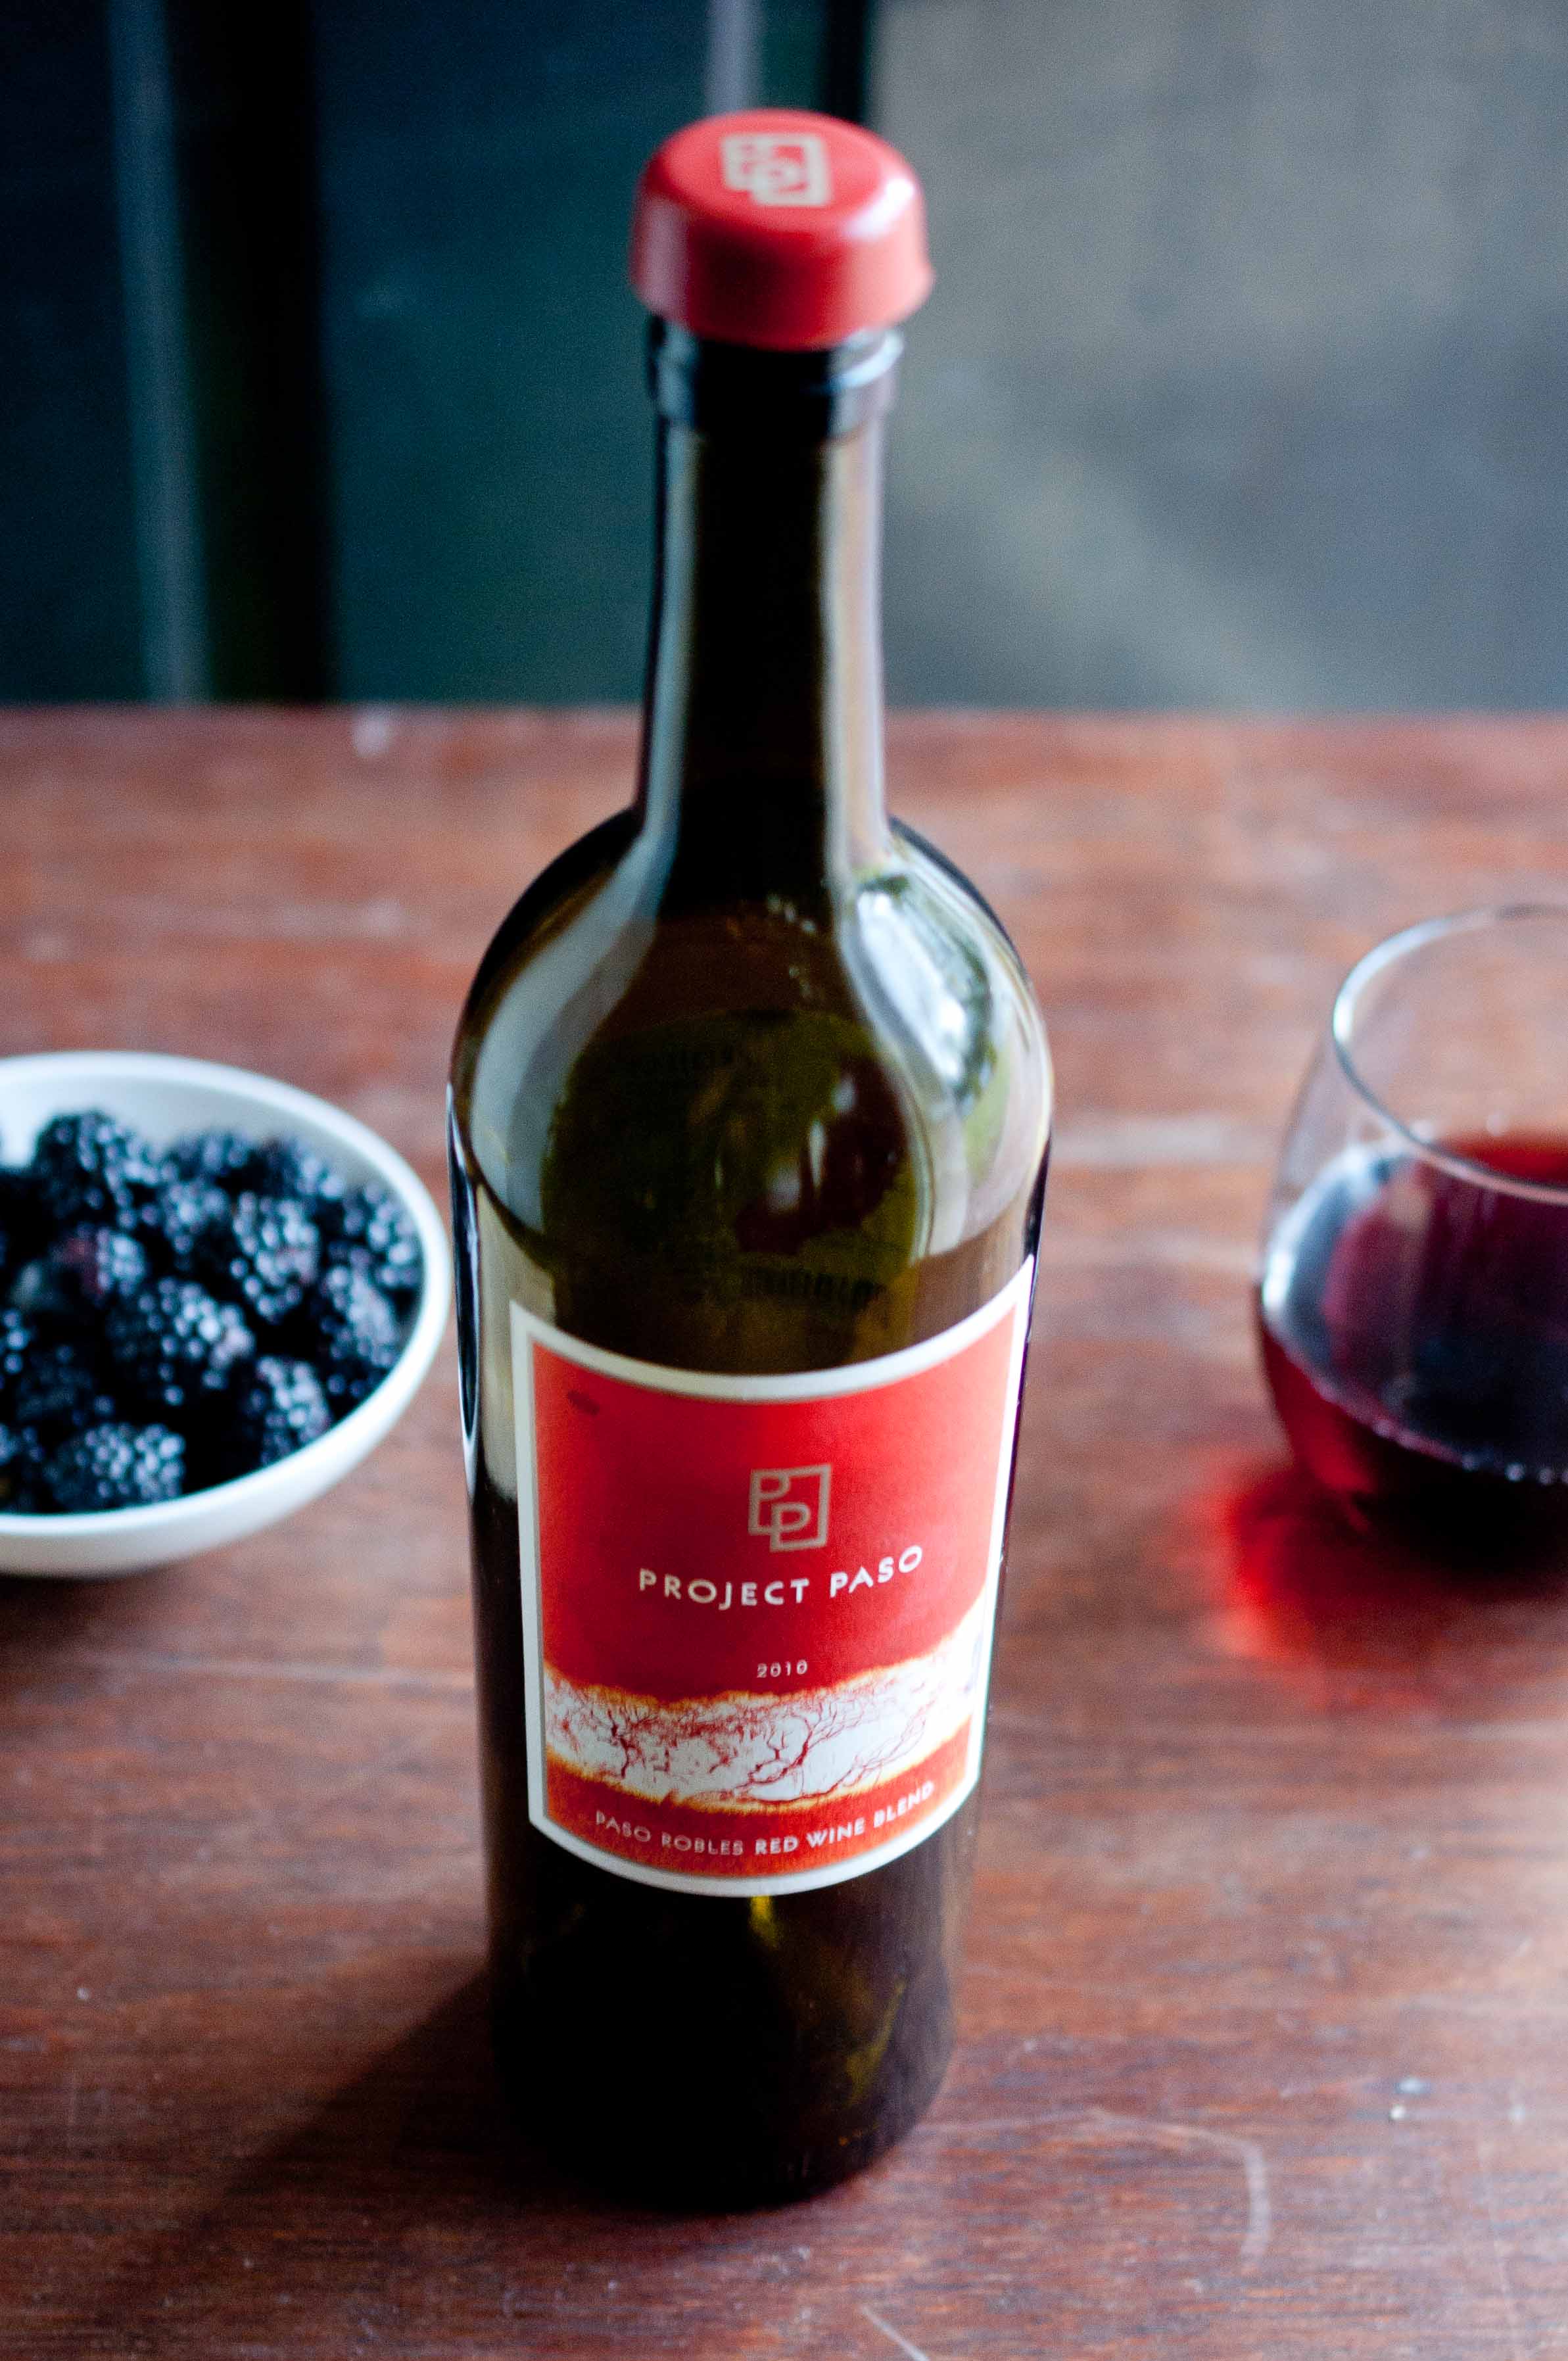
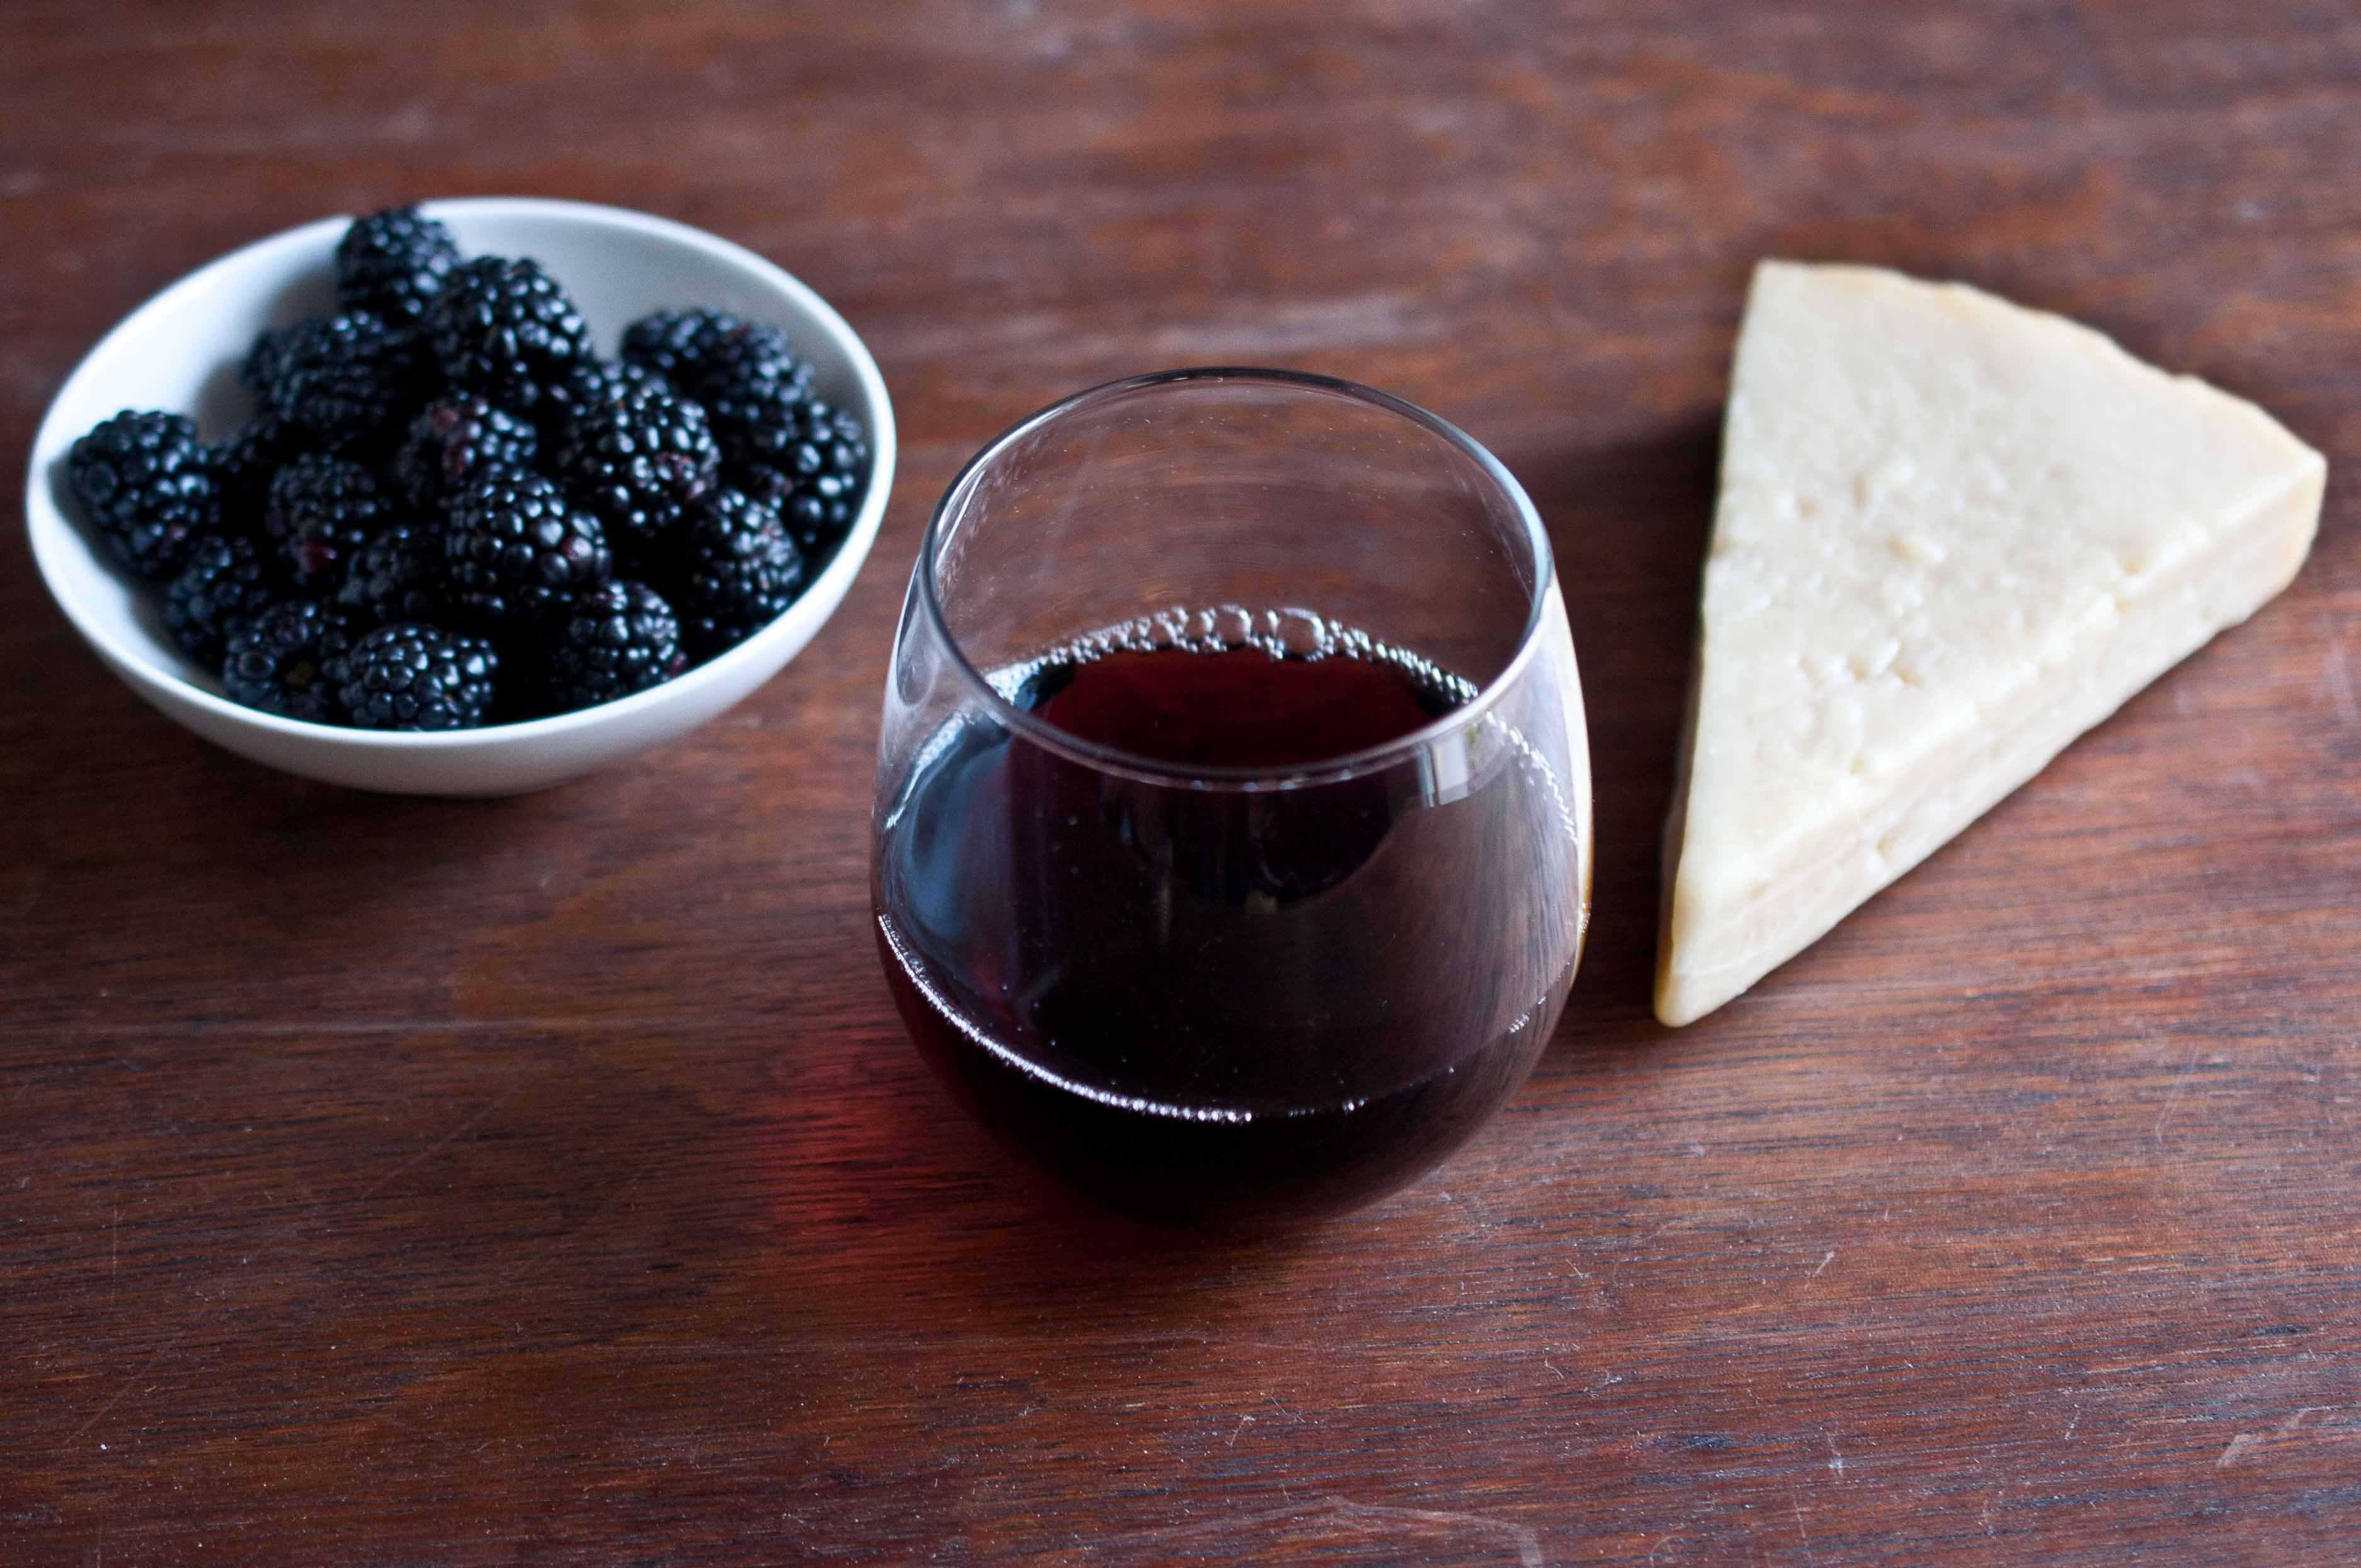
Blackberry Cabernet Wontons
3 cups of blackberries (fresh or frozen)
1 1/2 cups powdered sugar, (plus 1/4 cup for dusting, divided)
1/2 cup Cabernet Sauvignon
1/2 tsp salt
14-16 wonton wrappers
In a pot over medium heat, add the blackberries, 1 1/2 cups powdered sugar, wine and salt. allow to cook and reduce until the liquid becomes very thick, with tracks left behind when you drag a spoon through the pan, about 10-15 minutes. Frozen berries have a higher water content, so those will take longer than fresh.
Allow to cool.
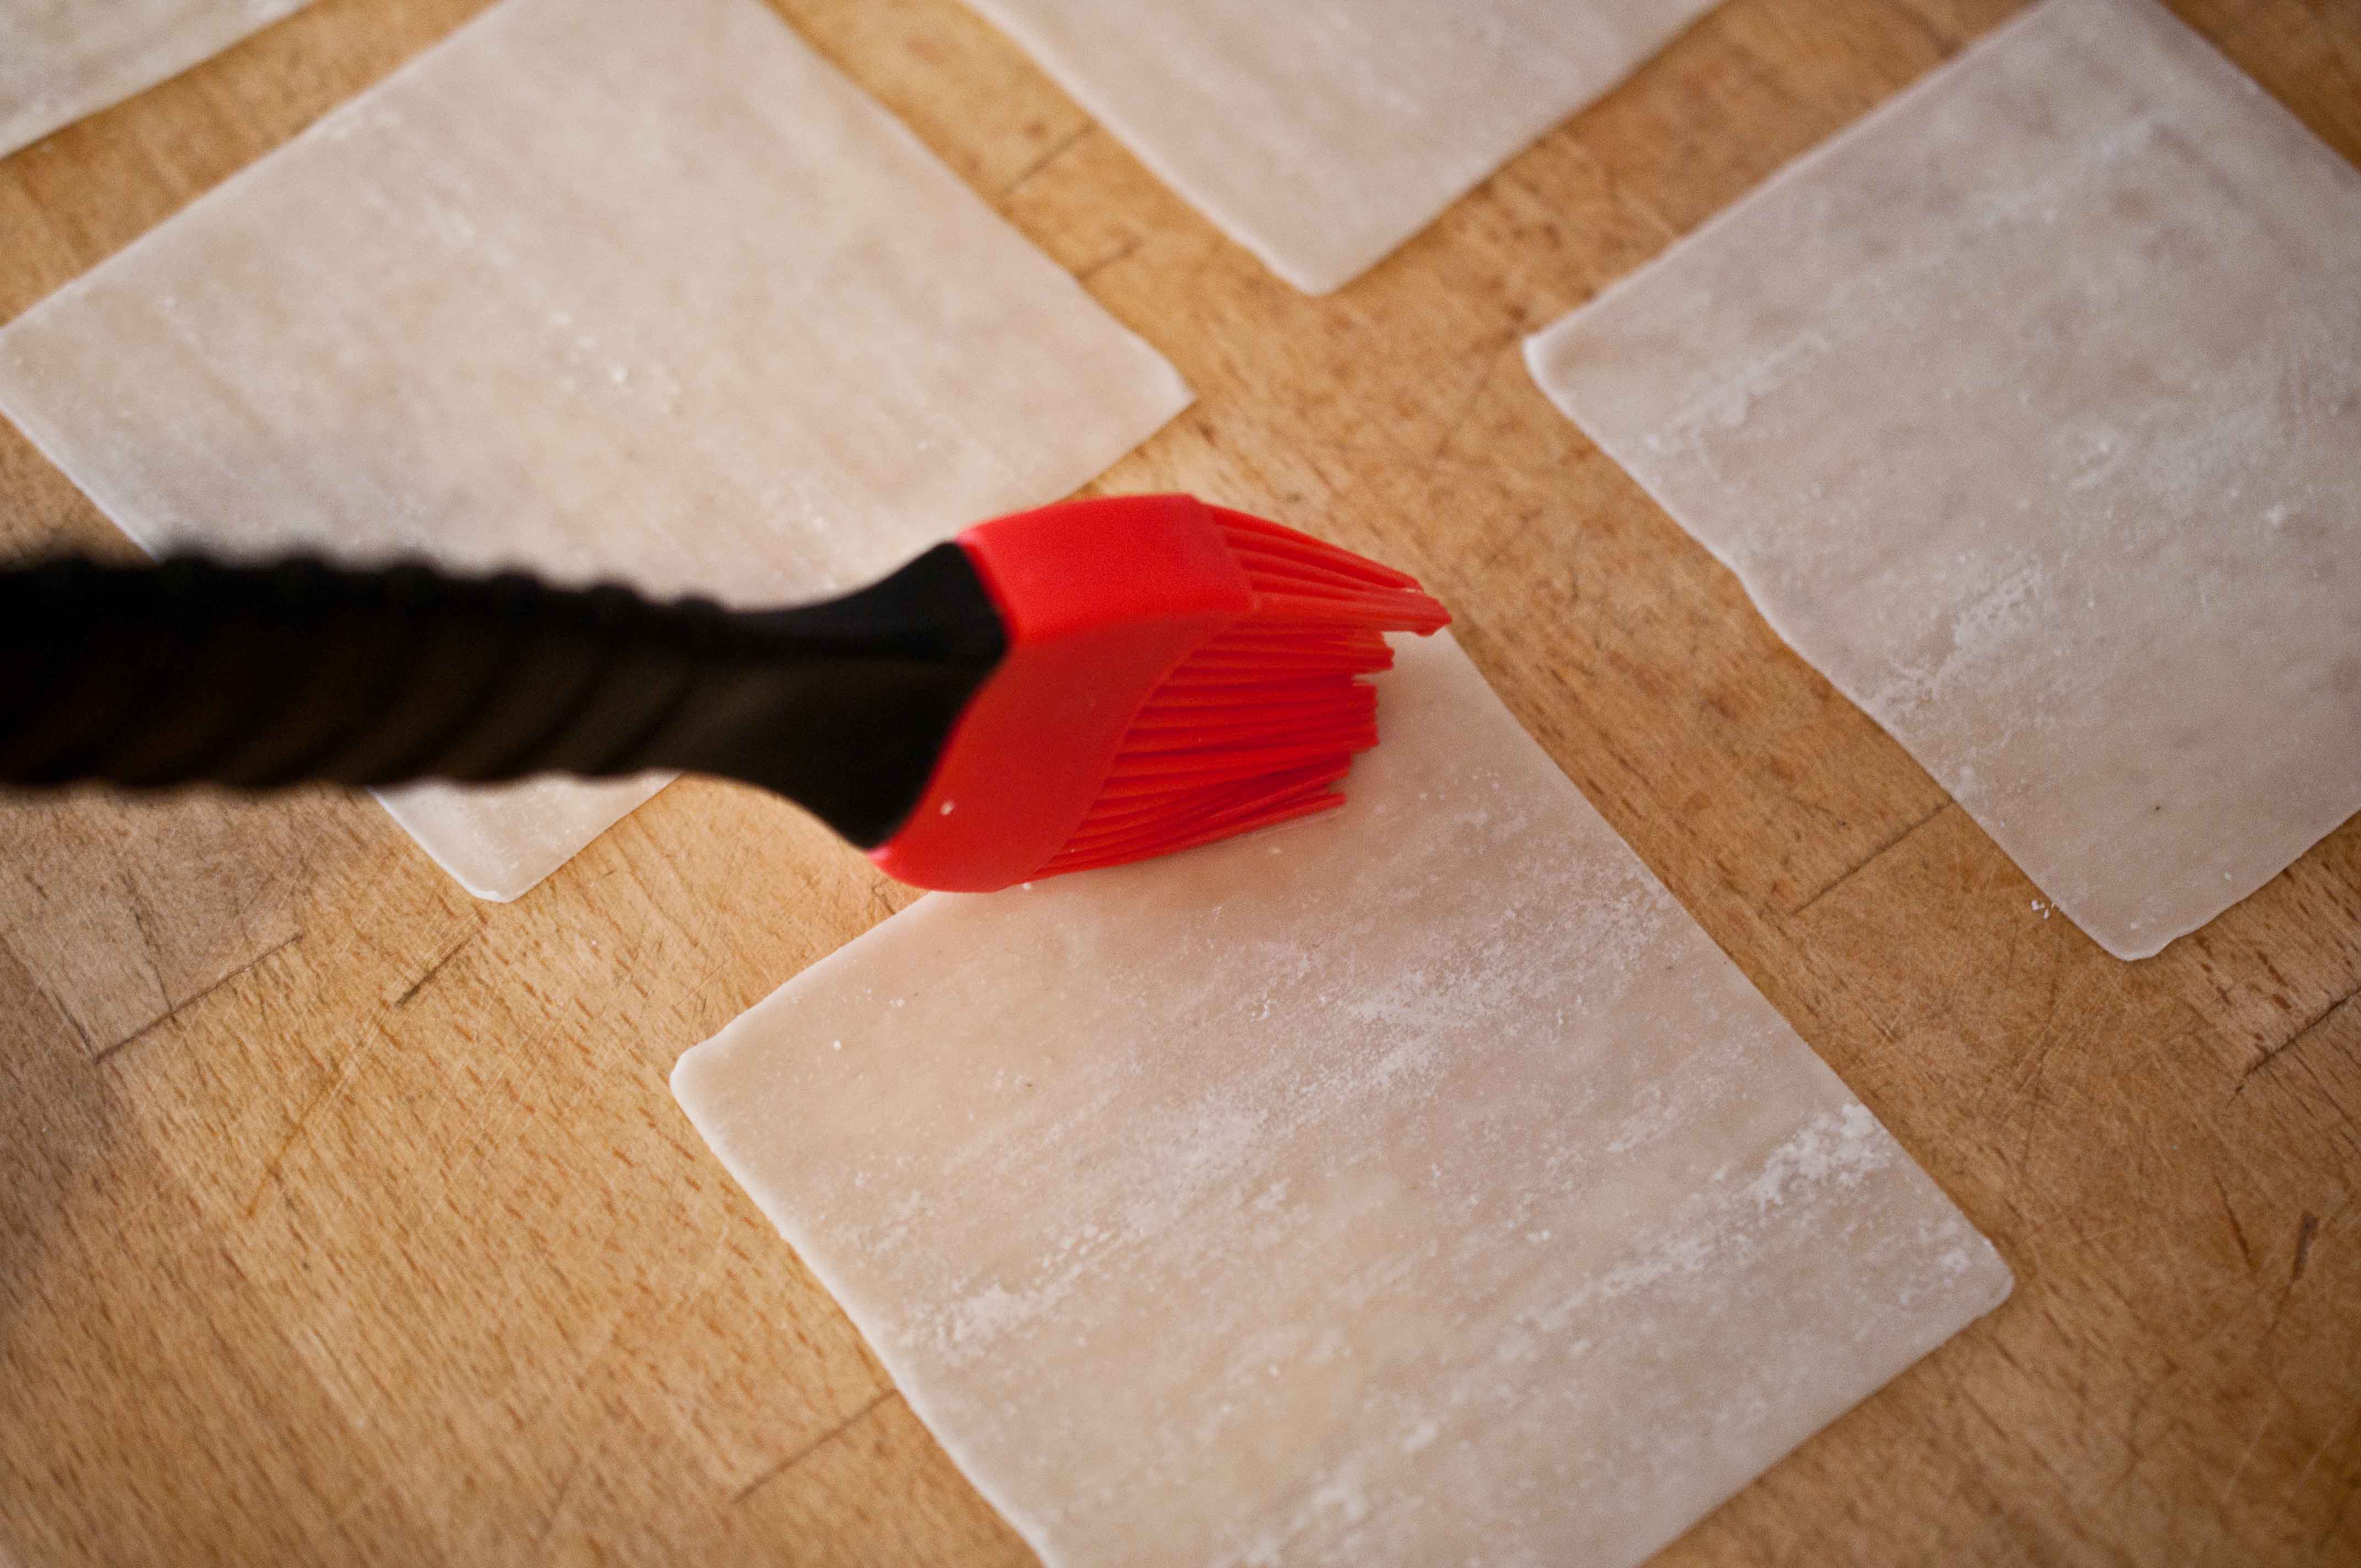
Place the wonton wrappers on a flat surface. Brush all of the edges with water.
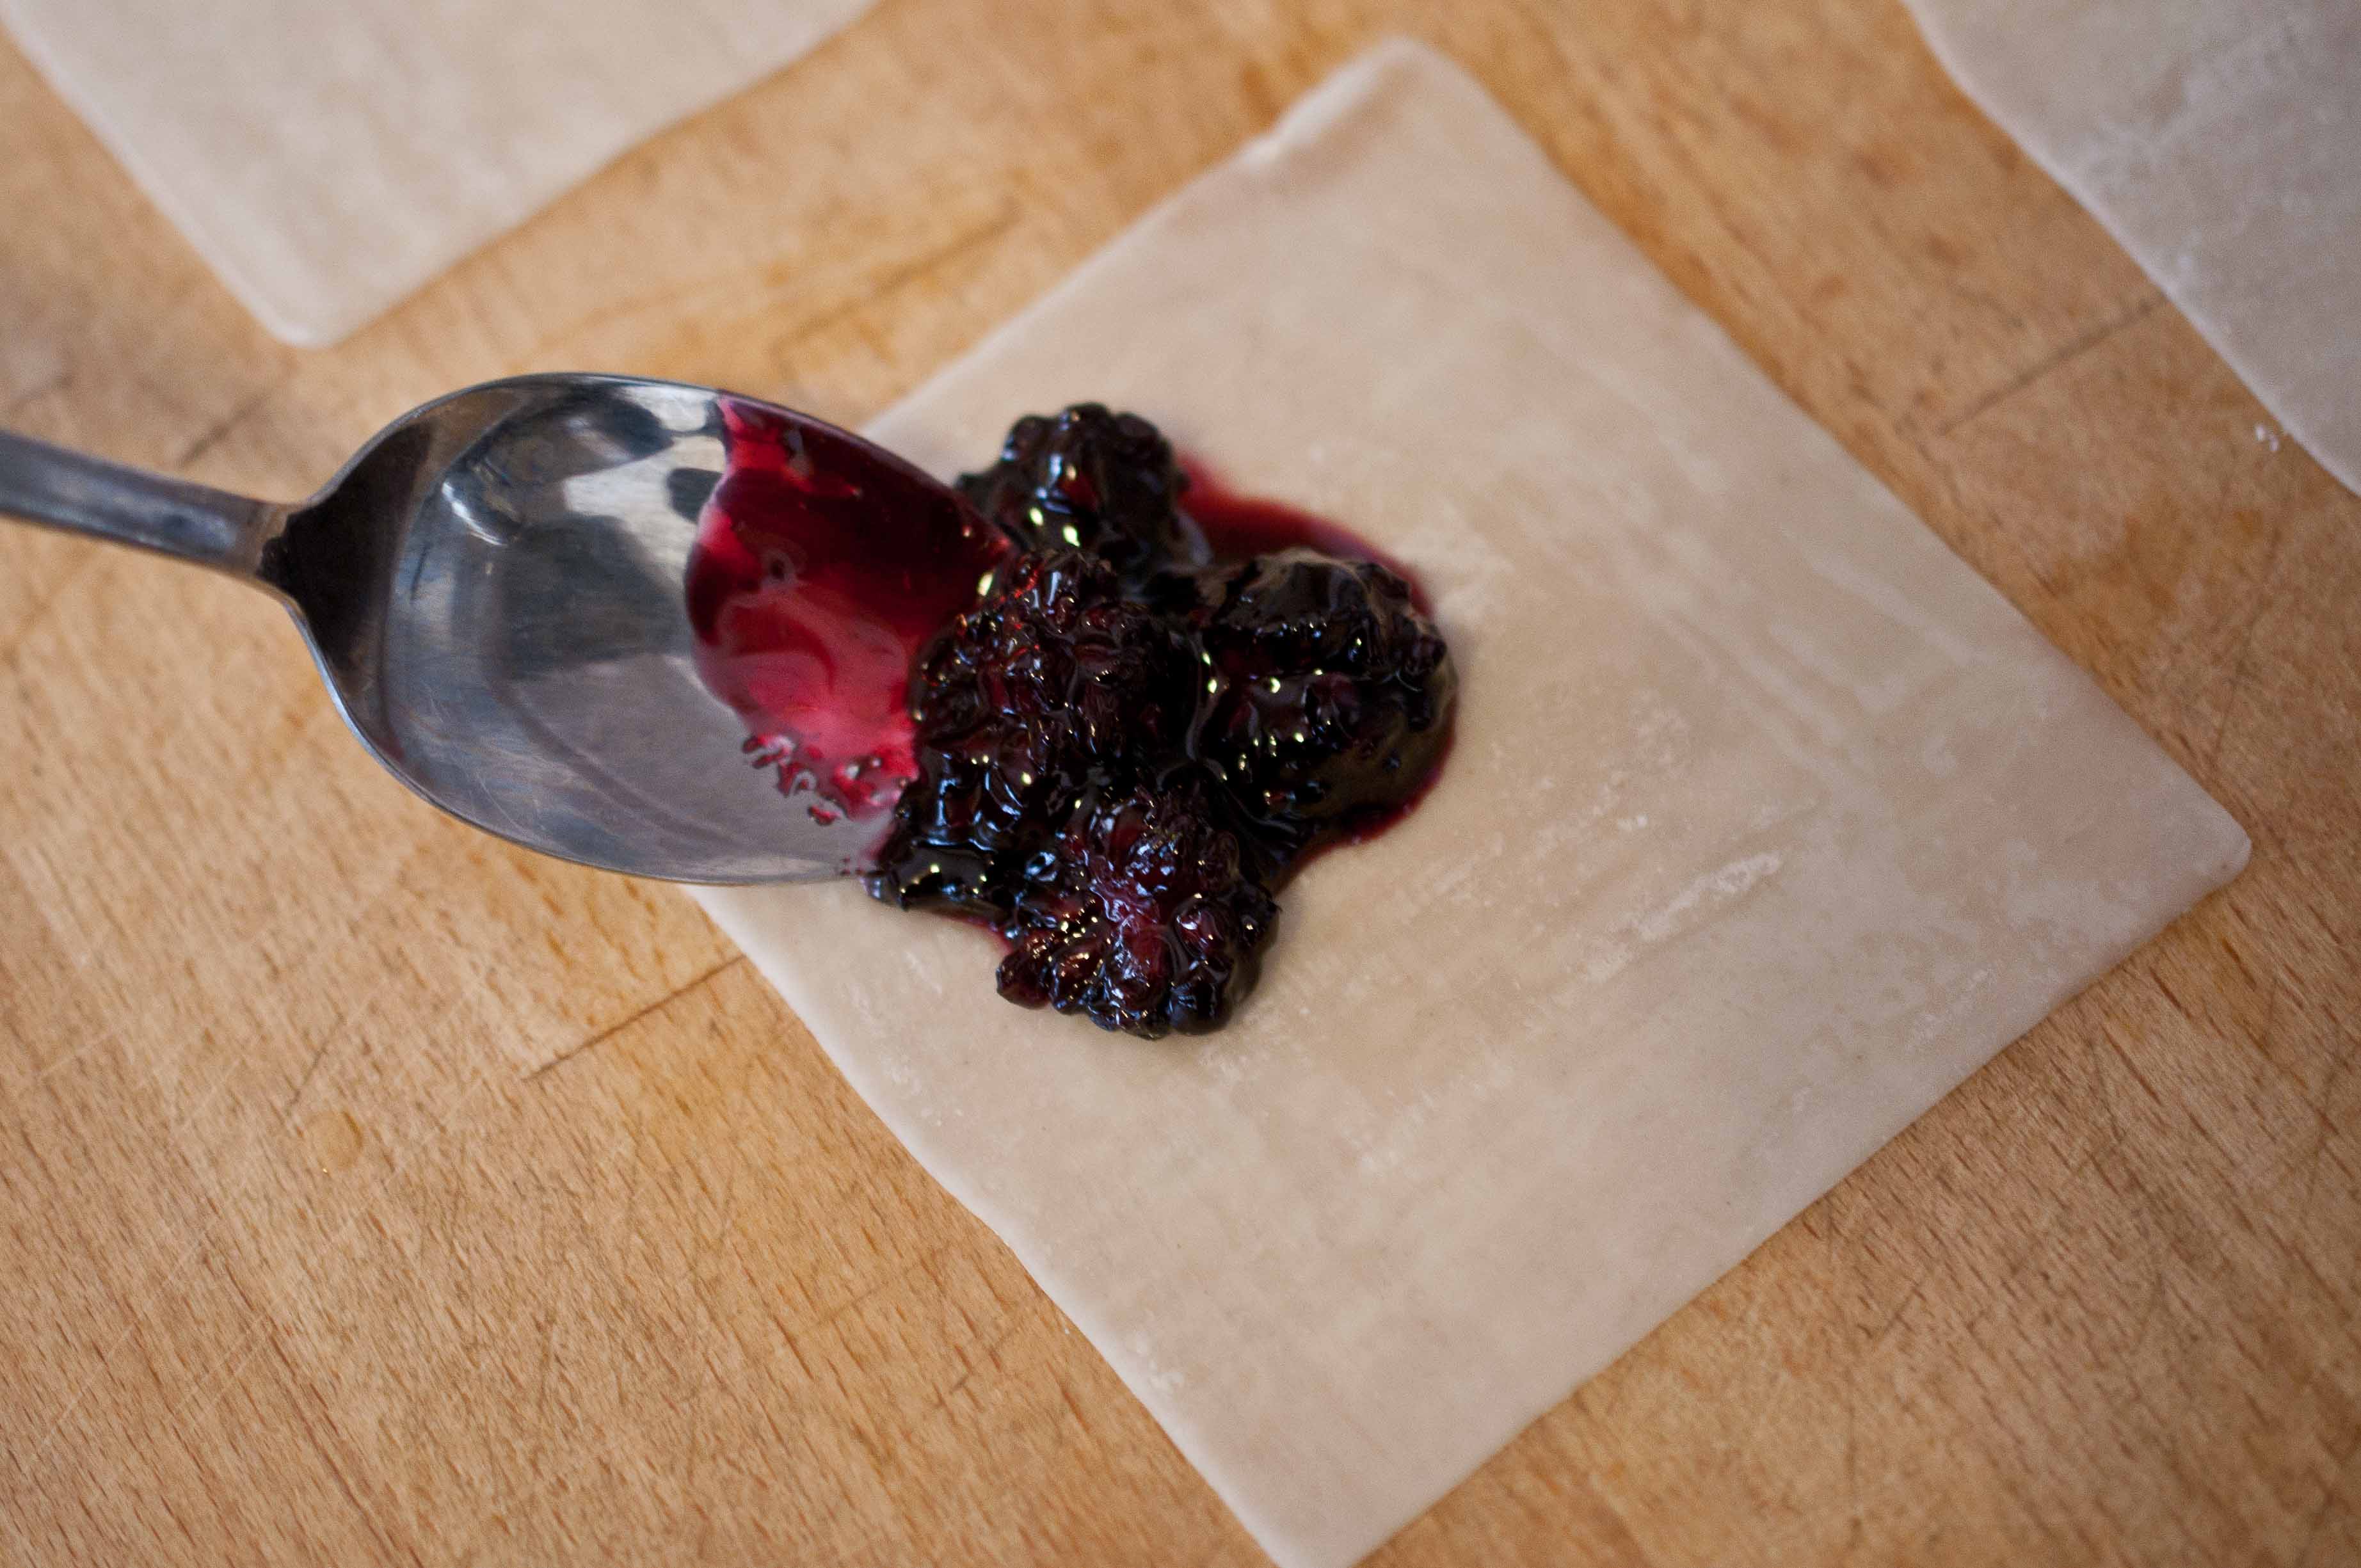
Place about 1 to 2 tsp of blackberries in the center of the wonton paper.
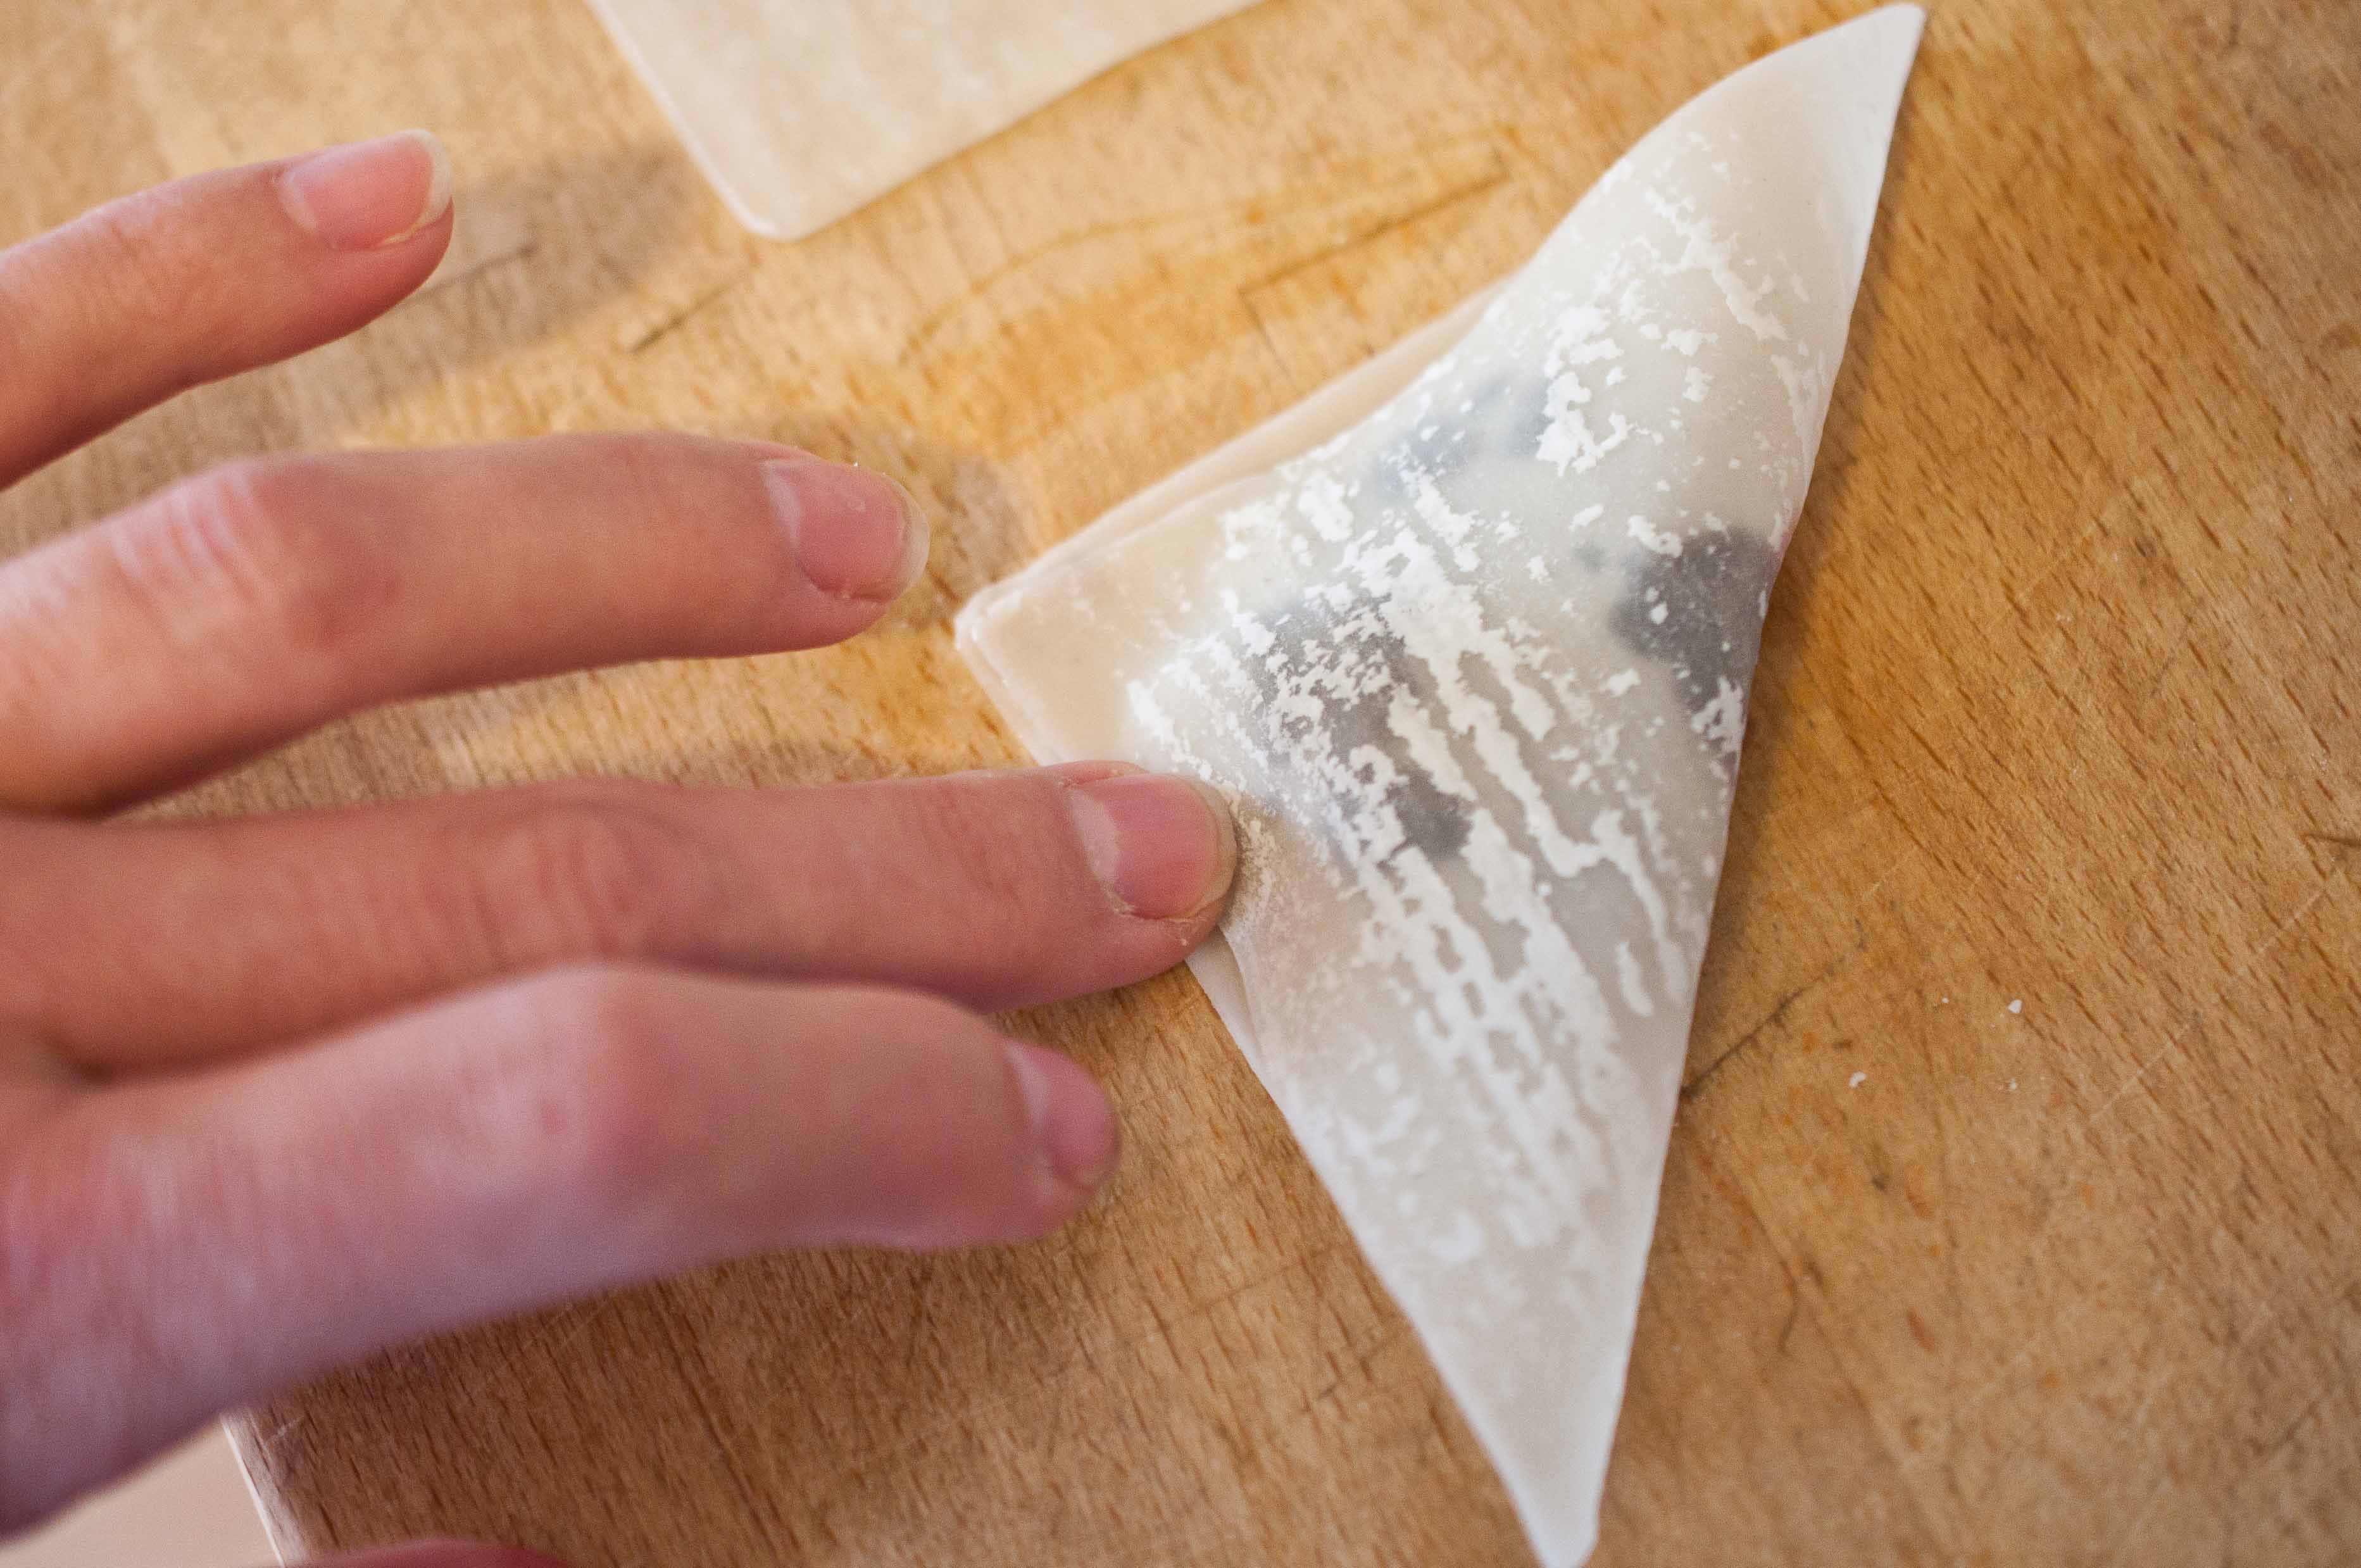
Fold the wonton paper in half to form a triangle, press the edges together until very well sealed.
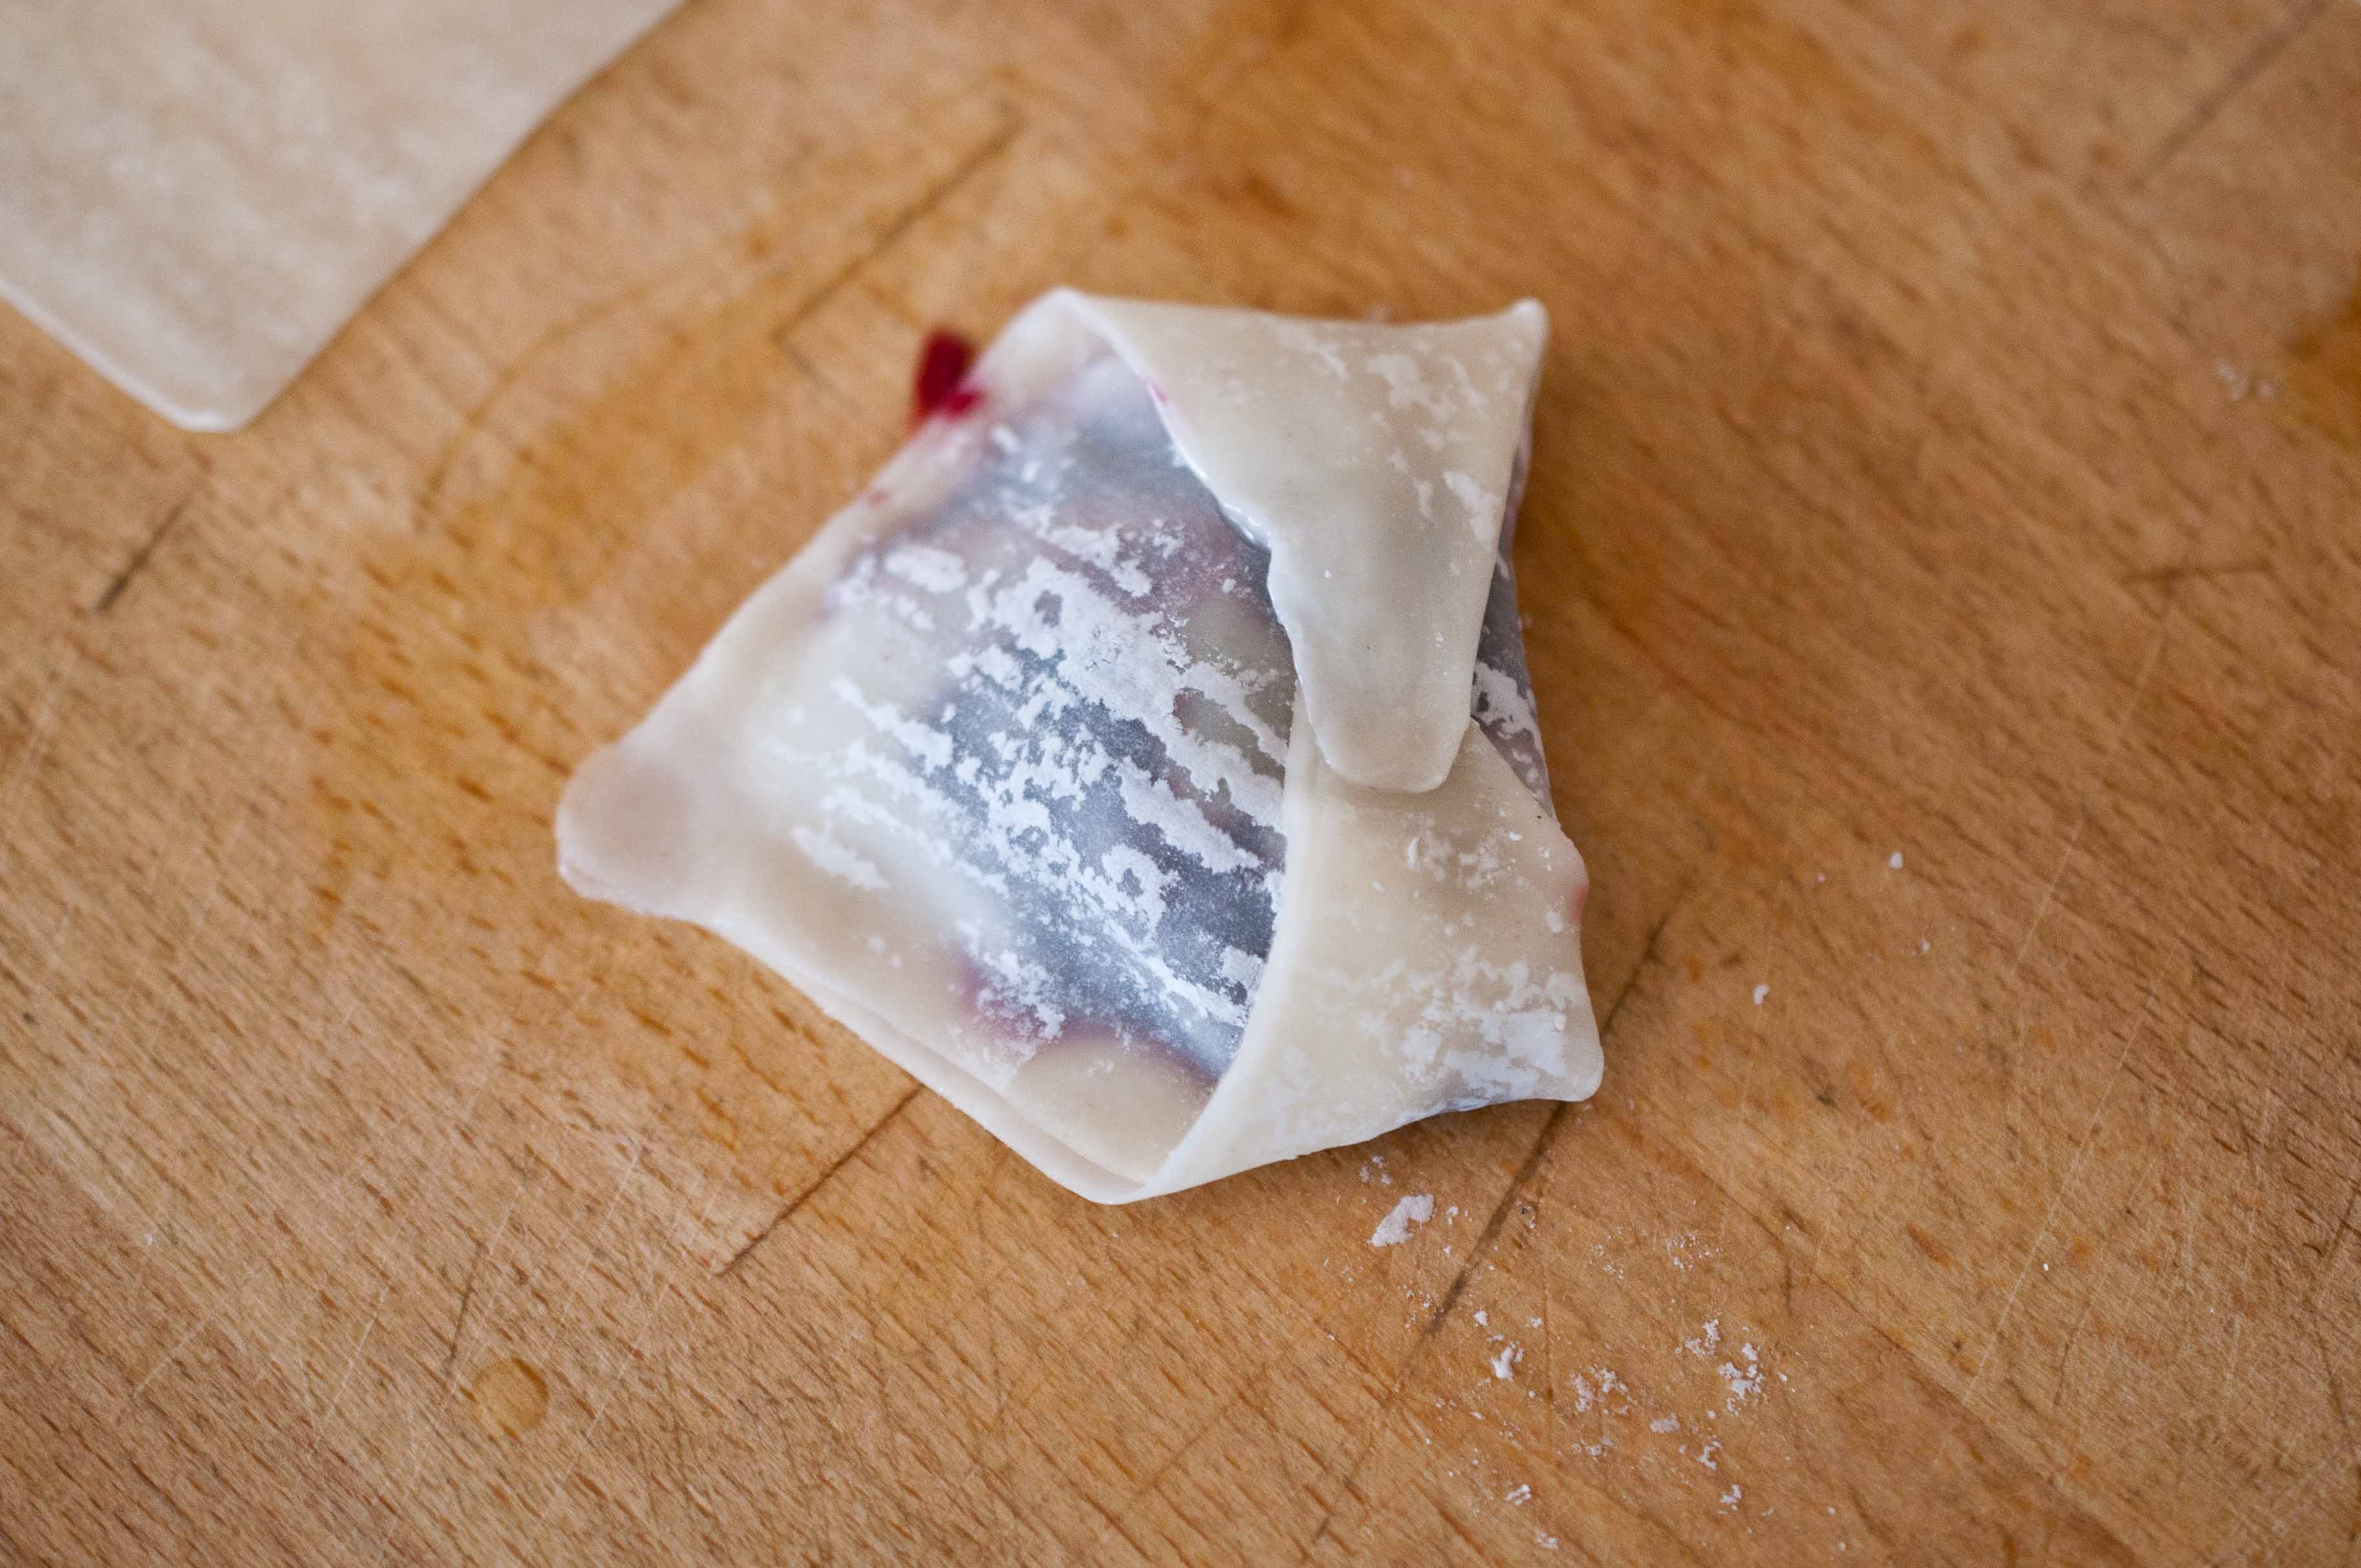
Brush the bottom of the triangle with water and fold the corners into the center and press into shape.
Heat 1/4 to 1/2 cup of oil (enough to form about 1/2 inch of oil in the bottom of your pan) in a pan over medium-high heat.
Cook the wontons, about 6 at a time, on each side until golden brown. About 3 minutes per side.
Remove from pan and allow to dry on a stack of paper towels.
Everyone has guilty pleasure foods. No matter how "foodie" you think you are, there is a food that you love, but would never want to be eating if Thomas Keller decided to peek in your kitchen window.
For me, that’s good ole American bar food. Nachos, potato skins, jalapeno poppers, onion rings. Love it. Plus, it just brings up good memories. Do you have any BAD memories of eating chicken wings and drinking a beer?
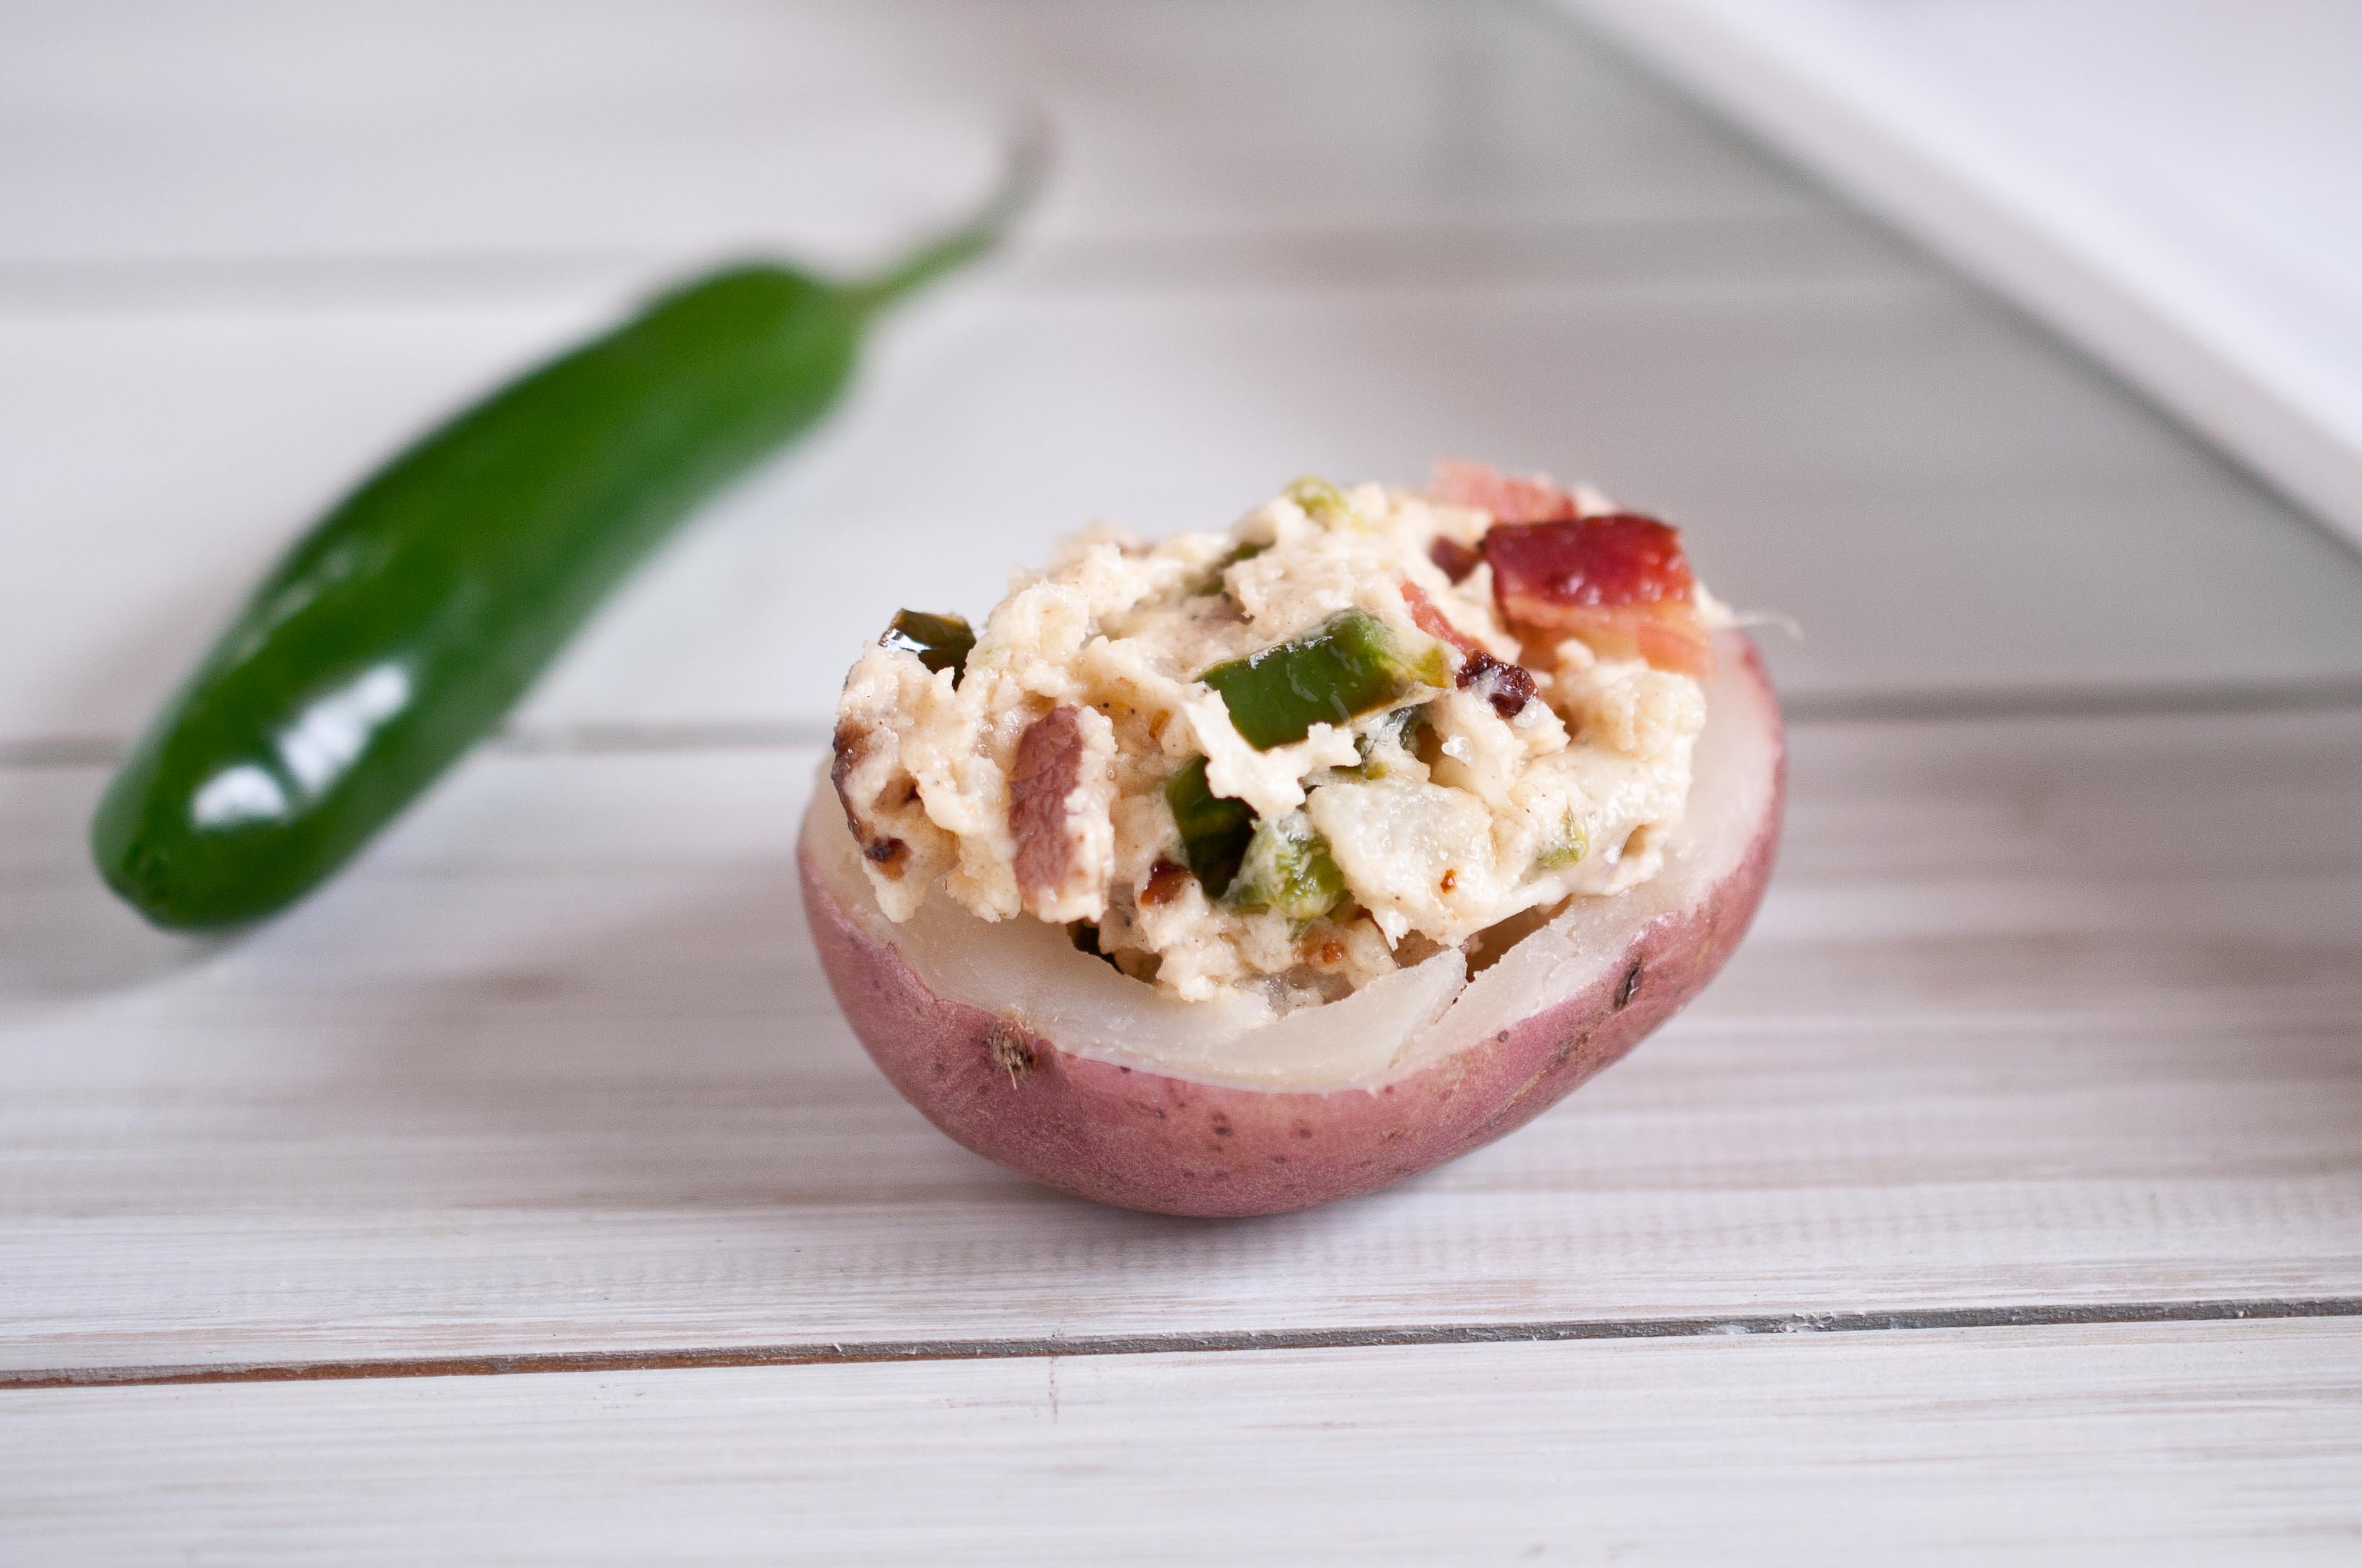
Here are two of my great guilt pleasure loves, in one bite. The love child of Jalapeno Poppers and Potato Skins.
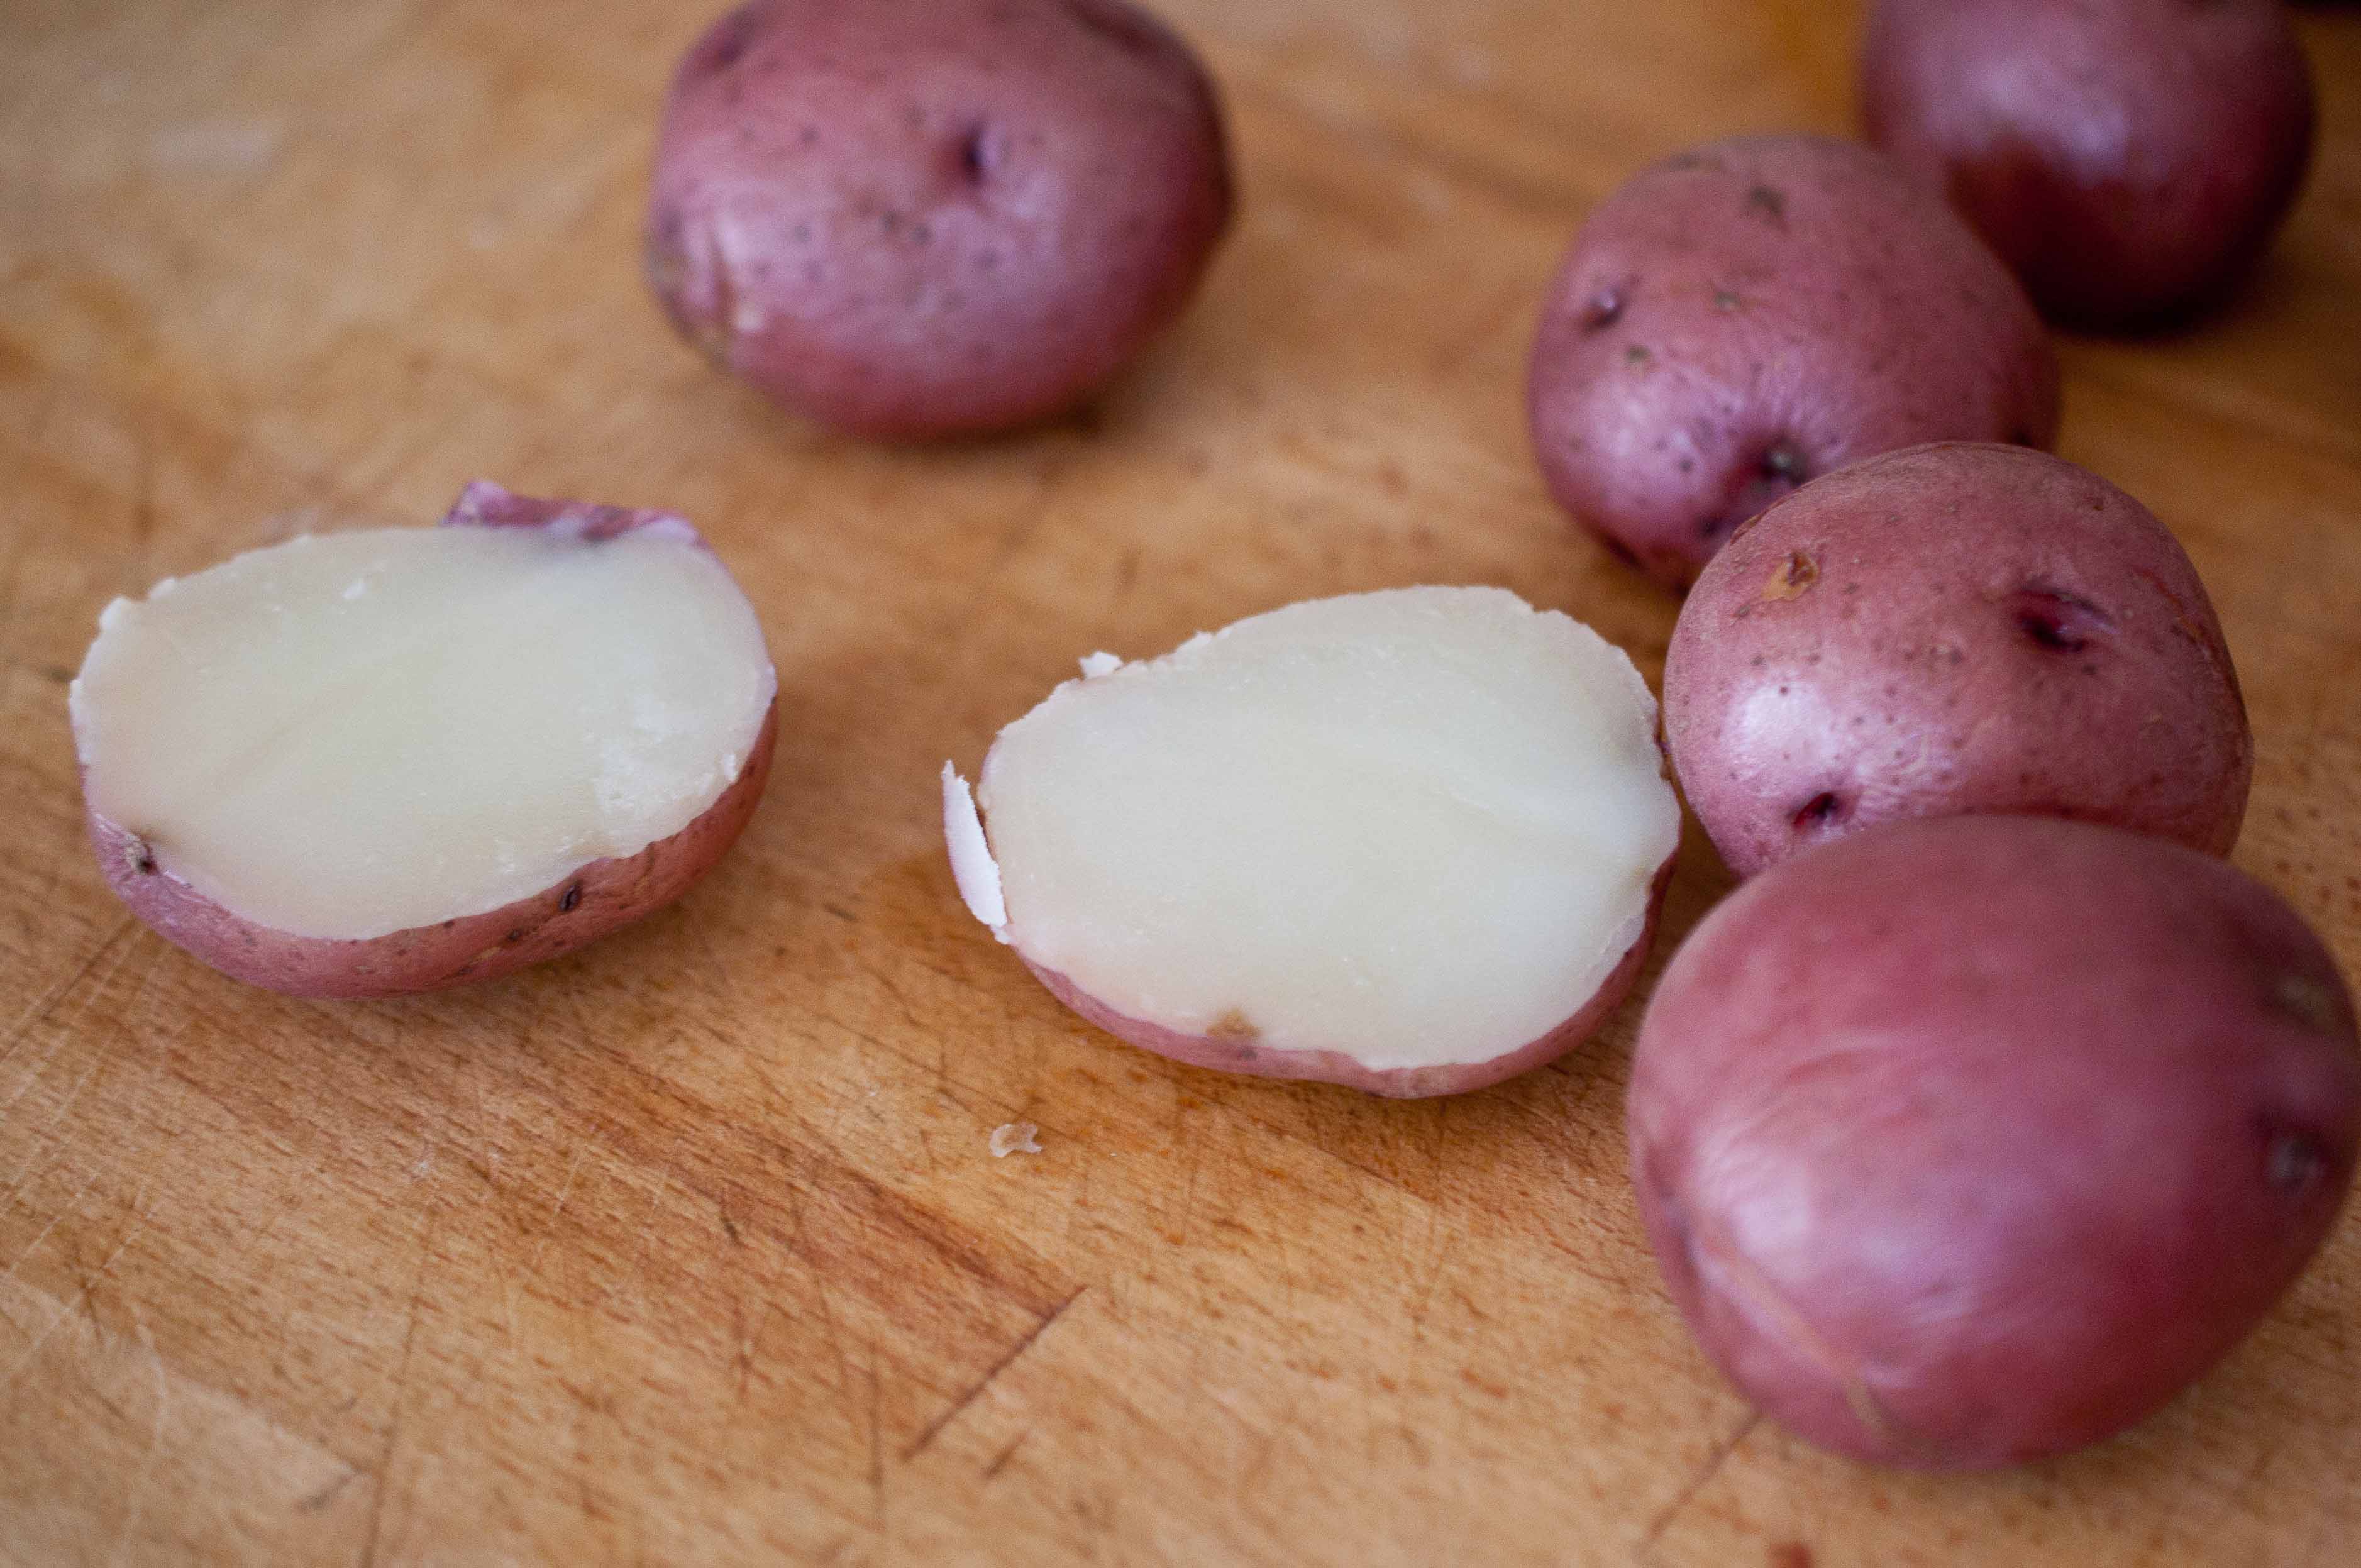
Jalapeno Popper Filled Potato Bites
12 baby red potatoes
3 tbs butter
1/2 cup chopped red onion
4 cloves of garlic, minced
4 medium sized fresh jalapenos, seeded and chopped
8 oz cream cheese
1/2 cup parmesan cheese
4 strips of bacon, cooked and chopped (you can leave this out if you are vegetarian)
1/2 tsp Kosher or sea salt
1/2 tsp pepper
In a large pot of lightly salted water, boil the potatoes until fork tender, about 18-22 minutes. You want the potatoes to be soft enough to bite into, but firm enough to hold their shape as mini cups.
Remove from water and allow to cool for about 10 minutes. Cut each potato in half, down the middle. You want to cut the potatoes in a way that will allow them to lay as flat as possible. The best may to do this is to just place them on a flat surface and see how they naturally want to lay and cut parallel to the surface they are sitting on. If you cut them according to what looks nice, they may roll all over once they are filled.
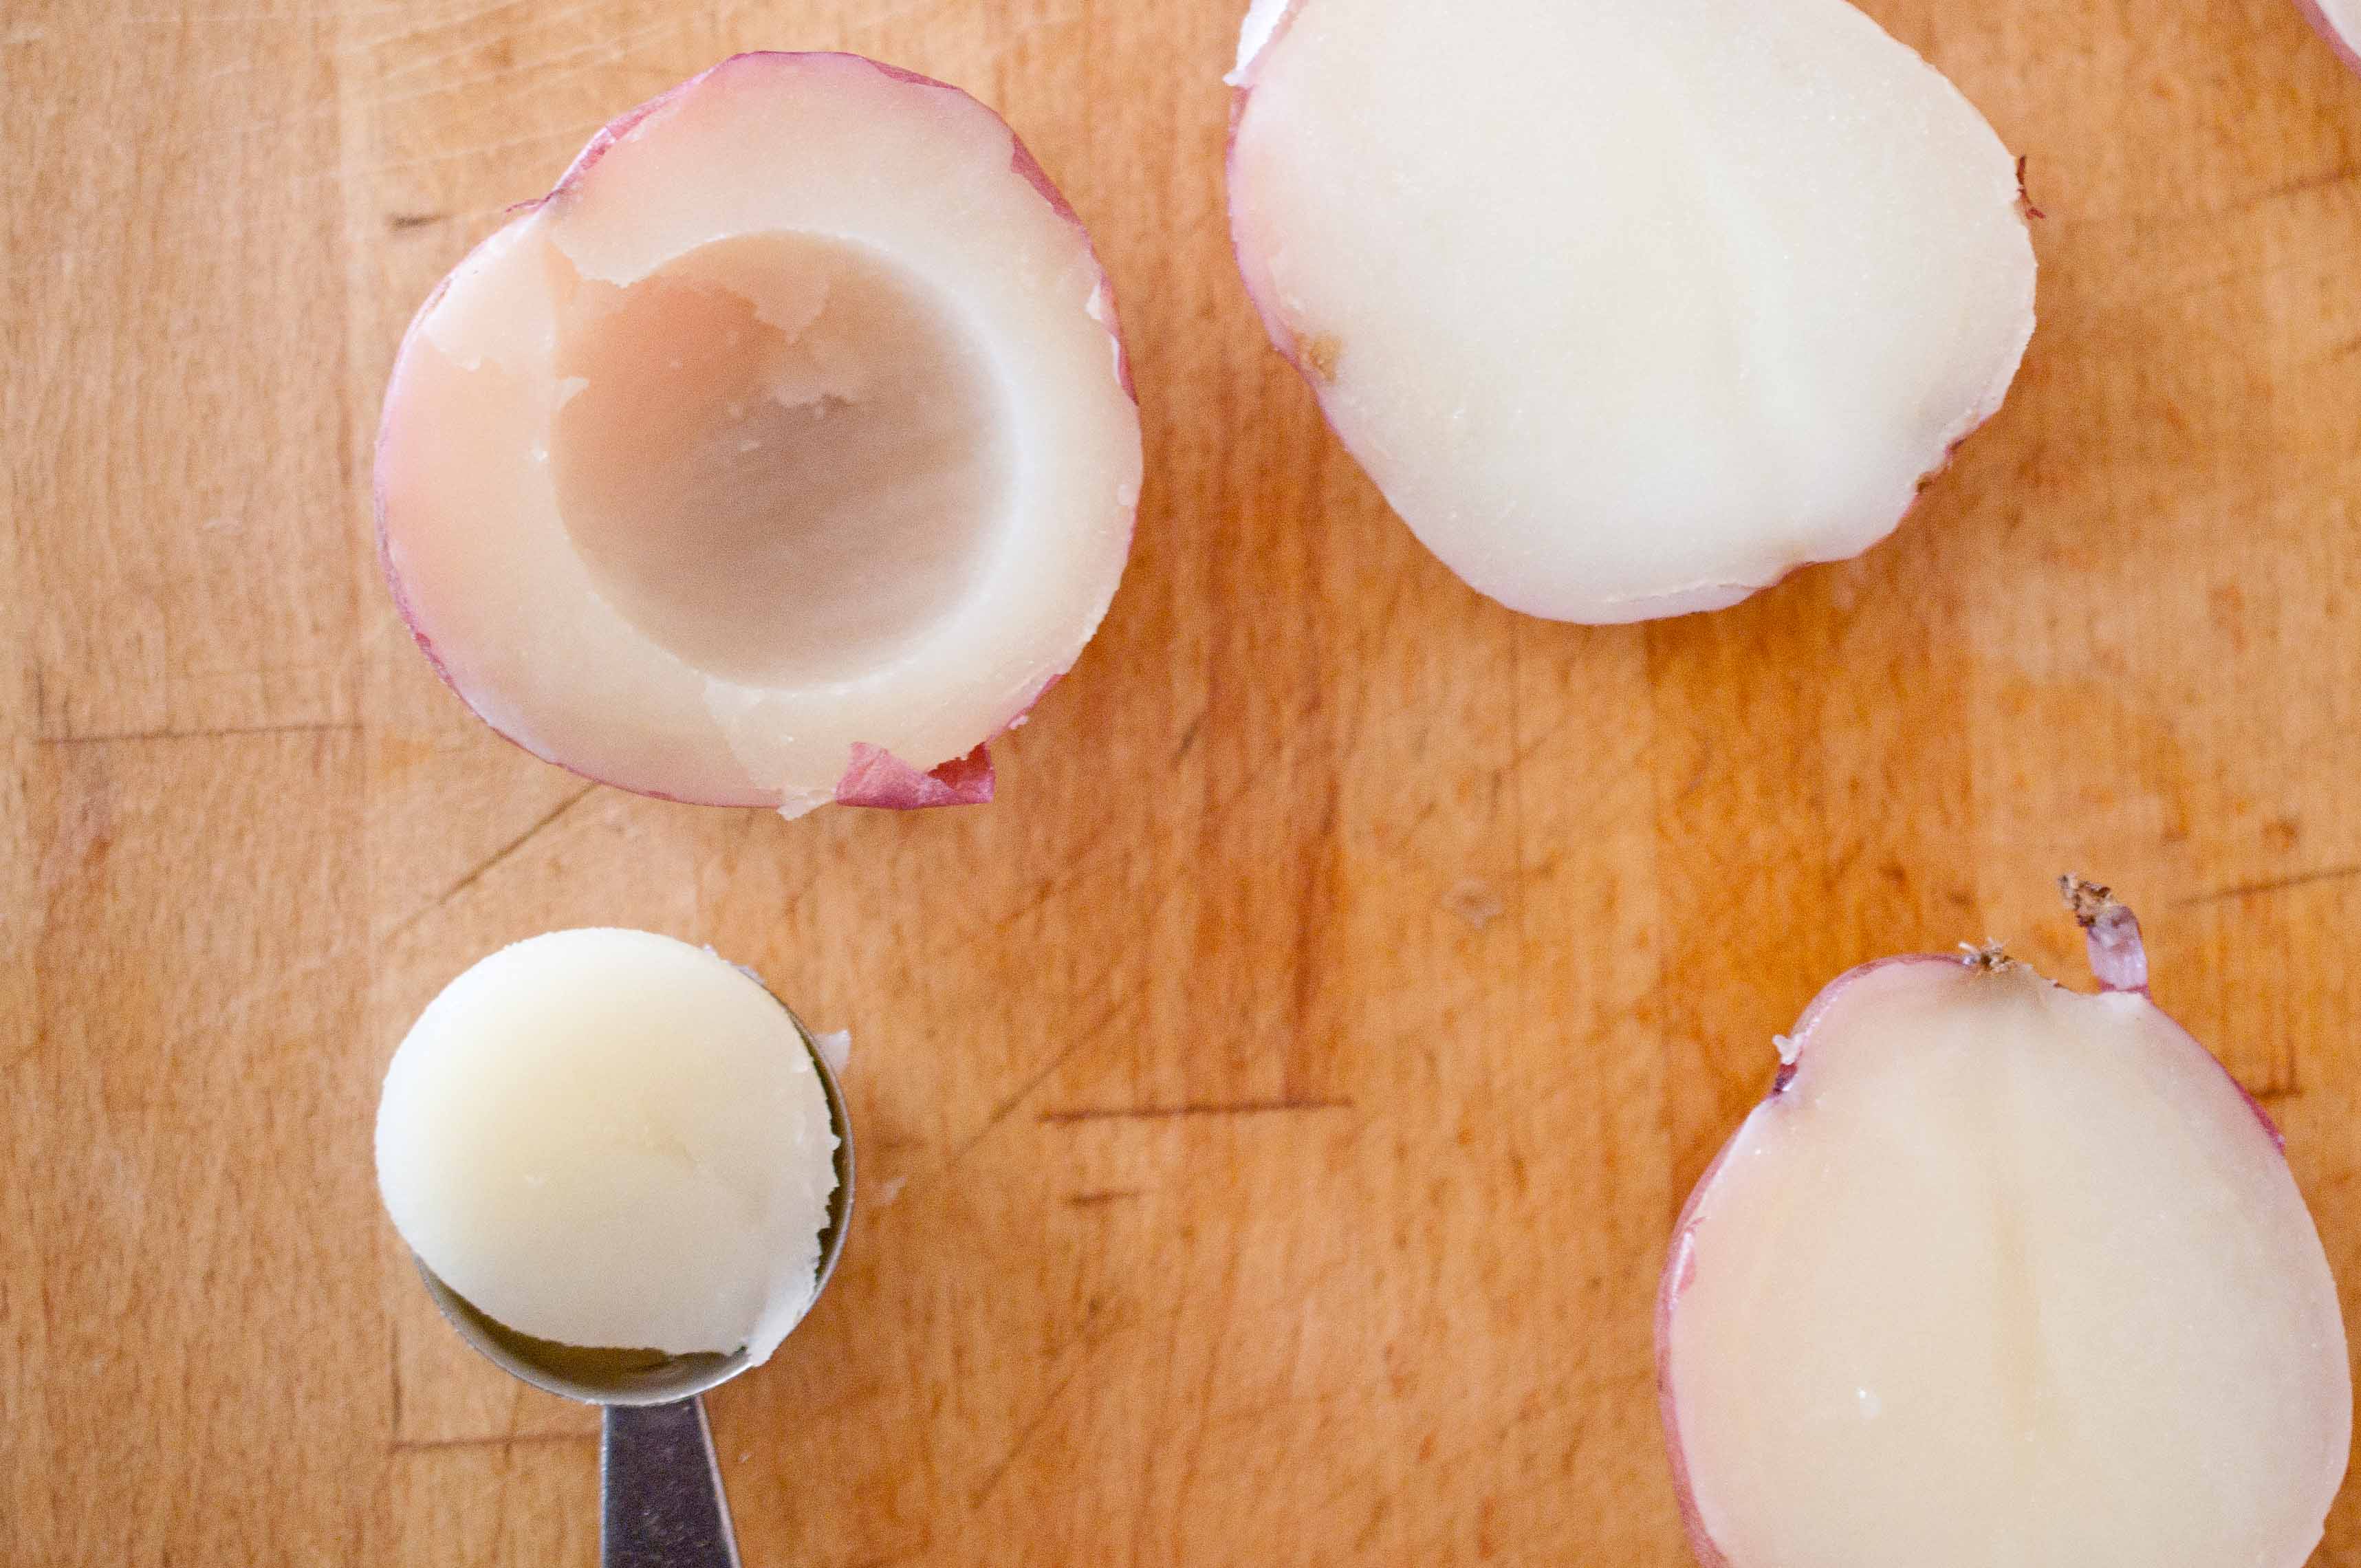
Once they are cut, remove most of the inside with a mellon baller, leaving enough of the walls and bottom intact to hold the filling.
Make sure and save that potato middles you just scooped out, you will add them to the filling.
In a pan over medium-high heat, melt the butter. Add the onions and cook until opaque. Add the jalapenos and stir, cooking until Jalapenos are soft, about 5 minutes. Add the garlic and stir. Add the cream cheese and stir until melted. Remove from heat and add the potato middles and mash with a potato masher until combined. Return to heat and add the bacon, parmesan cheese, salt and pepper and stir until cheese is melted. Allow to cool, then fill the potatoes. Serve warm.
There are so many great things about living in Los Angeles. In my 20’s I got to partake in a lot of them. My husband is a musician and we ran around with a very Music Industry crowd. Late nights, parties, back stage passes, Rock Stars, watching our friends become famous, blah, blah.
The best thing about California? The produce.
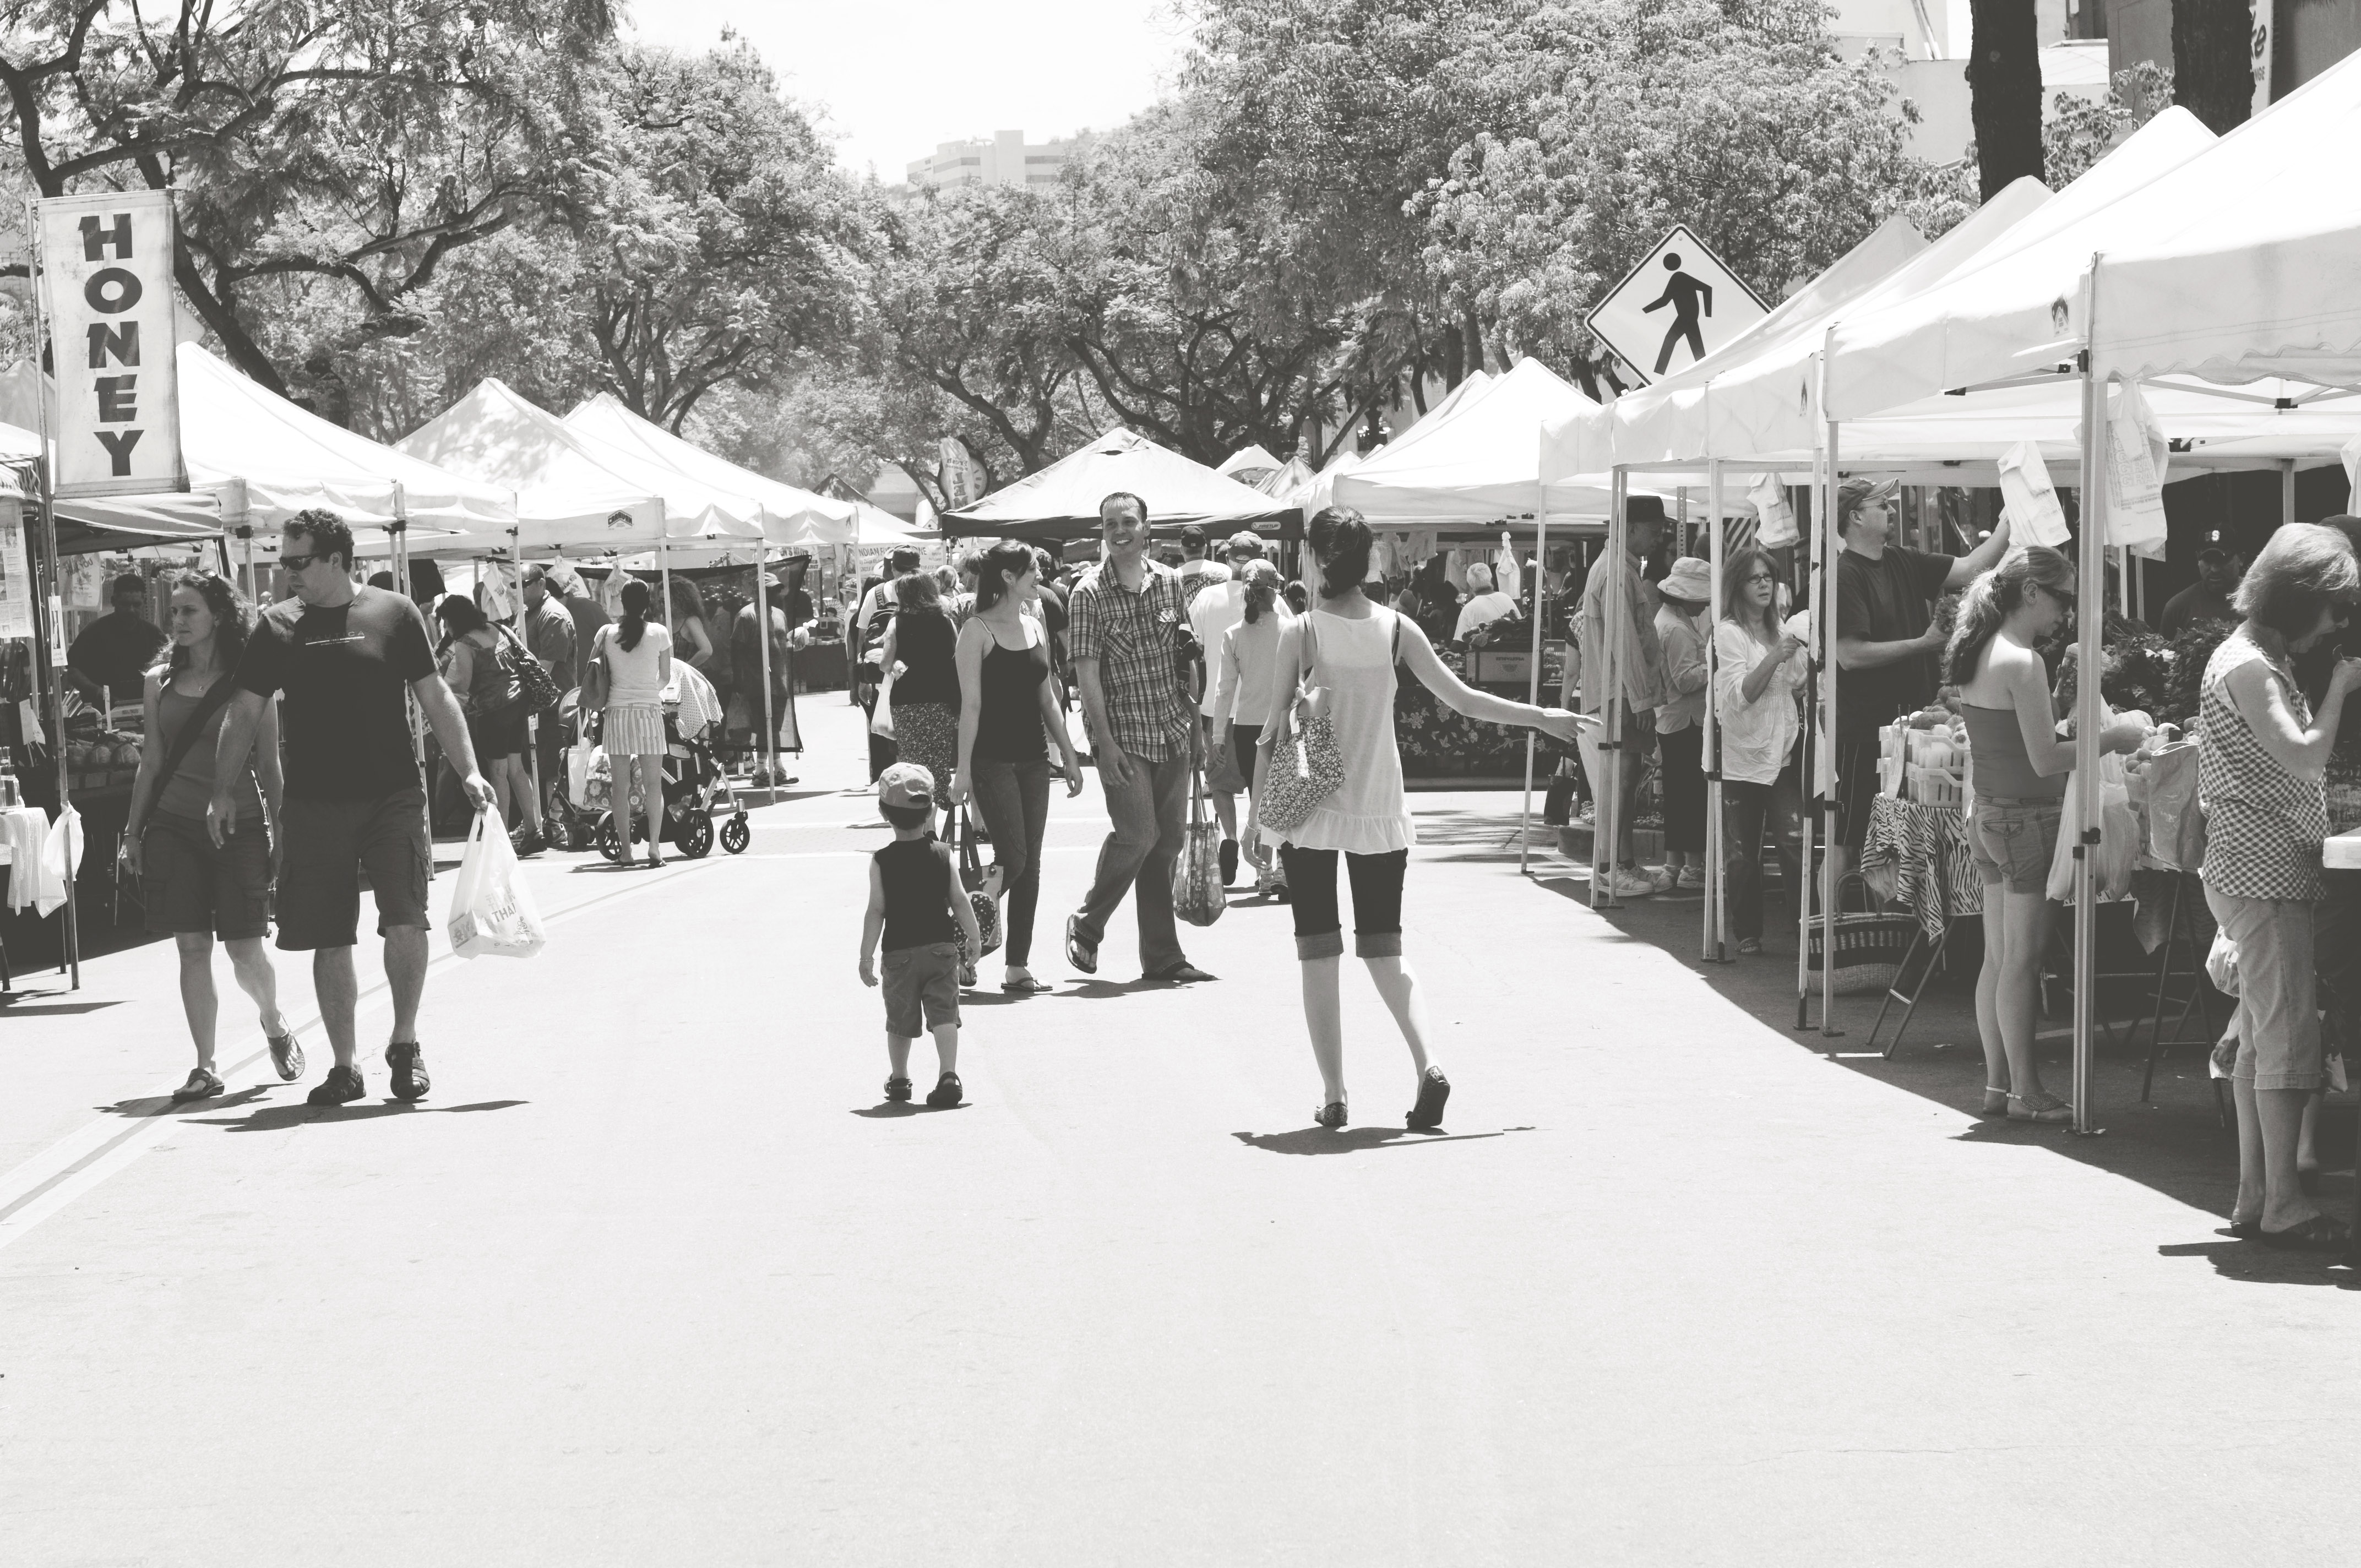
Seriously. If you ever visit LA, skip Hollywood Blvd (don’t worry, it sucks) and head for a farmers market. We have them nearly every single day of the year, with the exception of a few major holidays.
Tuesday in October? Head to Culver City or Silverlake. Thursday in February? There is a great one in Hollywood called Yamashiro.
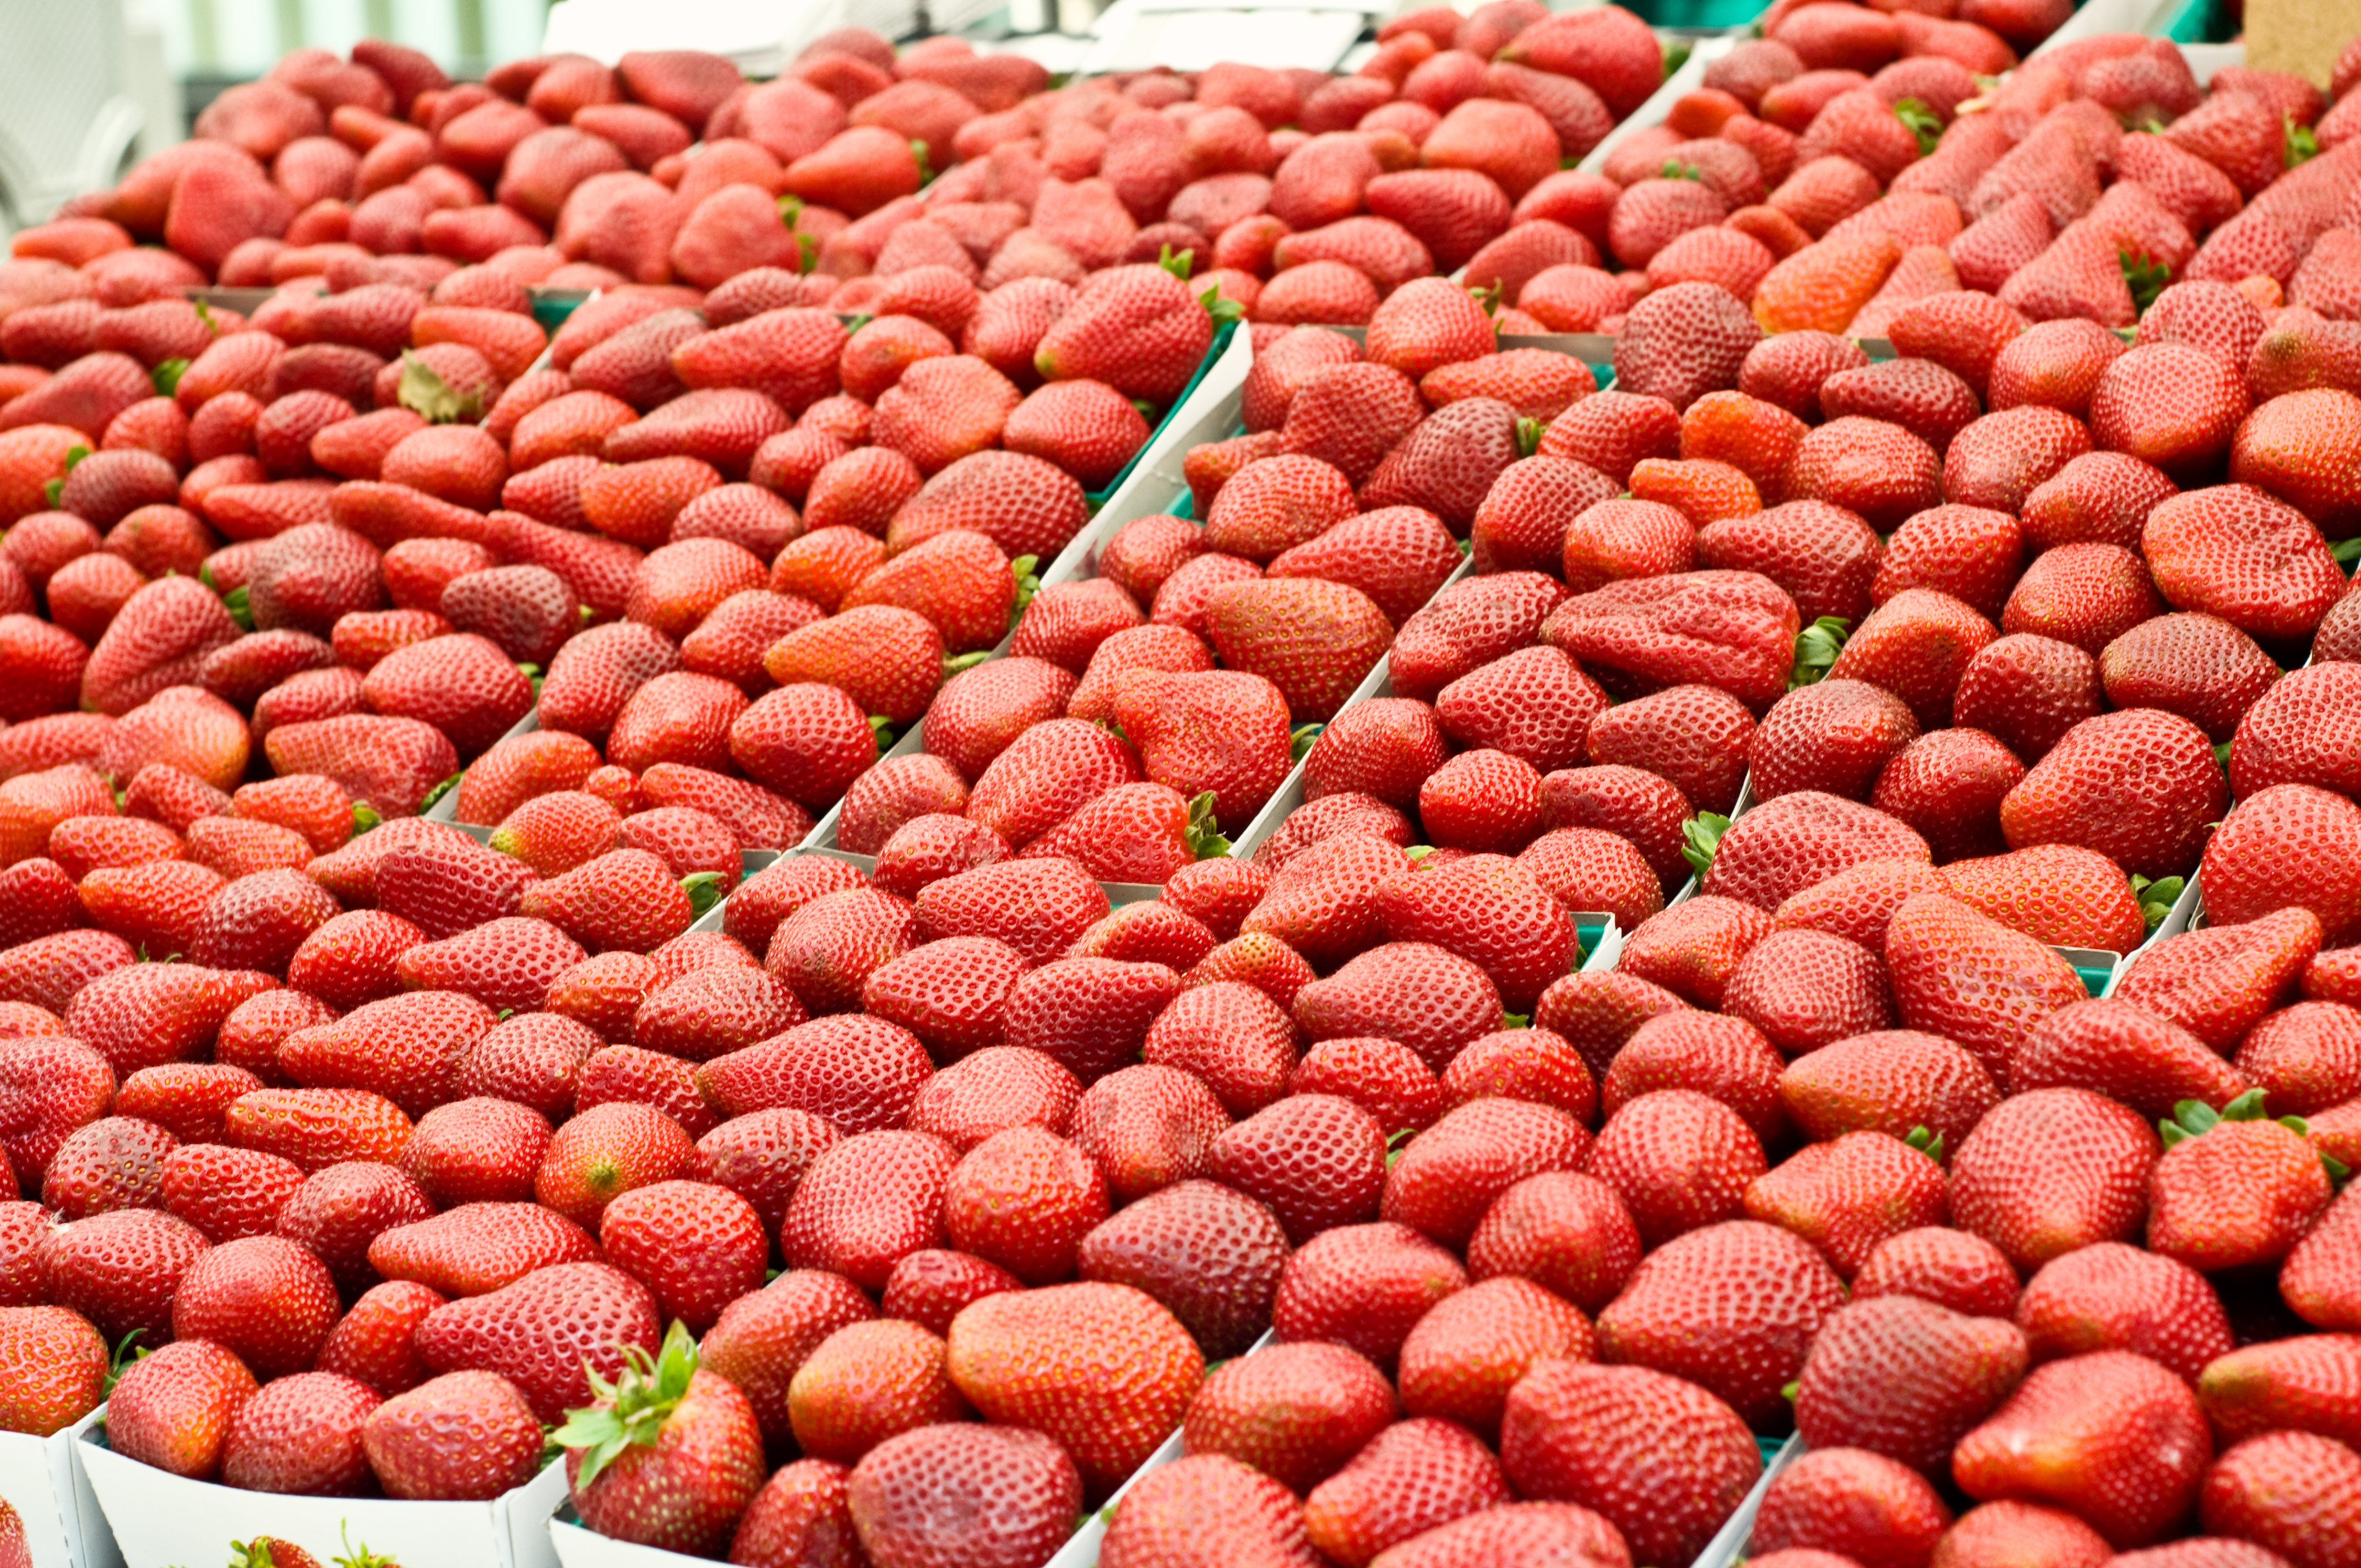
And Strawberries are in season nearly all year. Did you know that California grows 50% of the produce for the entire United States? It also grows 75% of the produce for the Western side of Canada.
And, California has the best strawberries in the world. If you ever make it to California, put: "Eat a real California Strawberry" on your to do list. California grows 85% of the strawberries in the US.
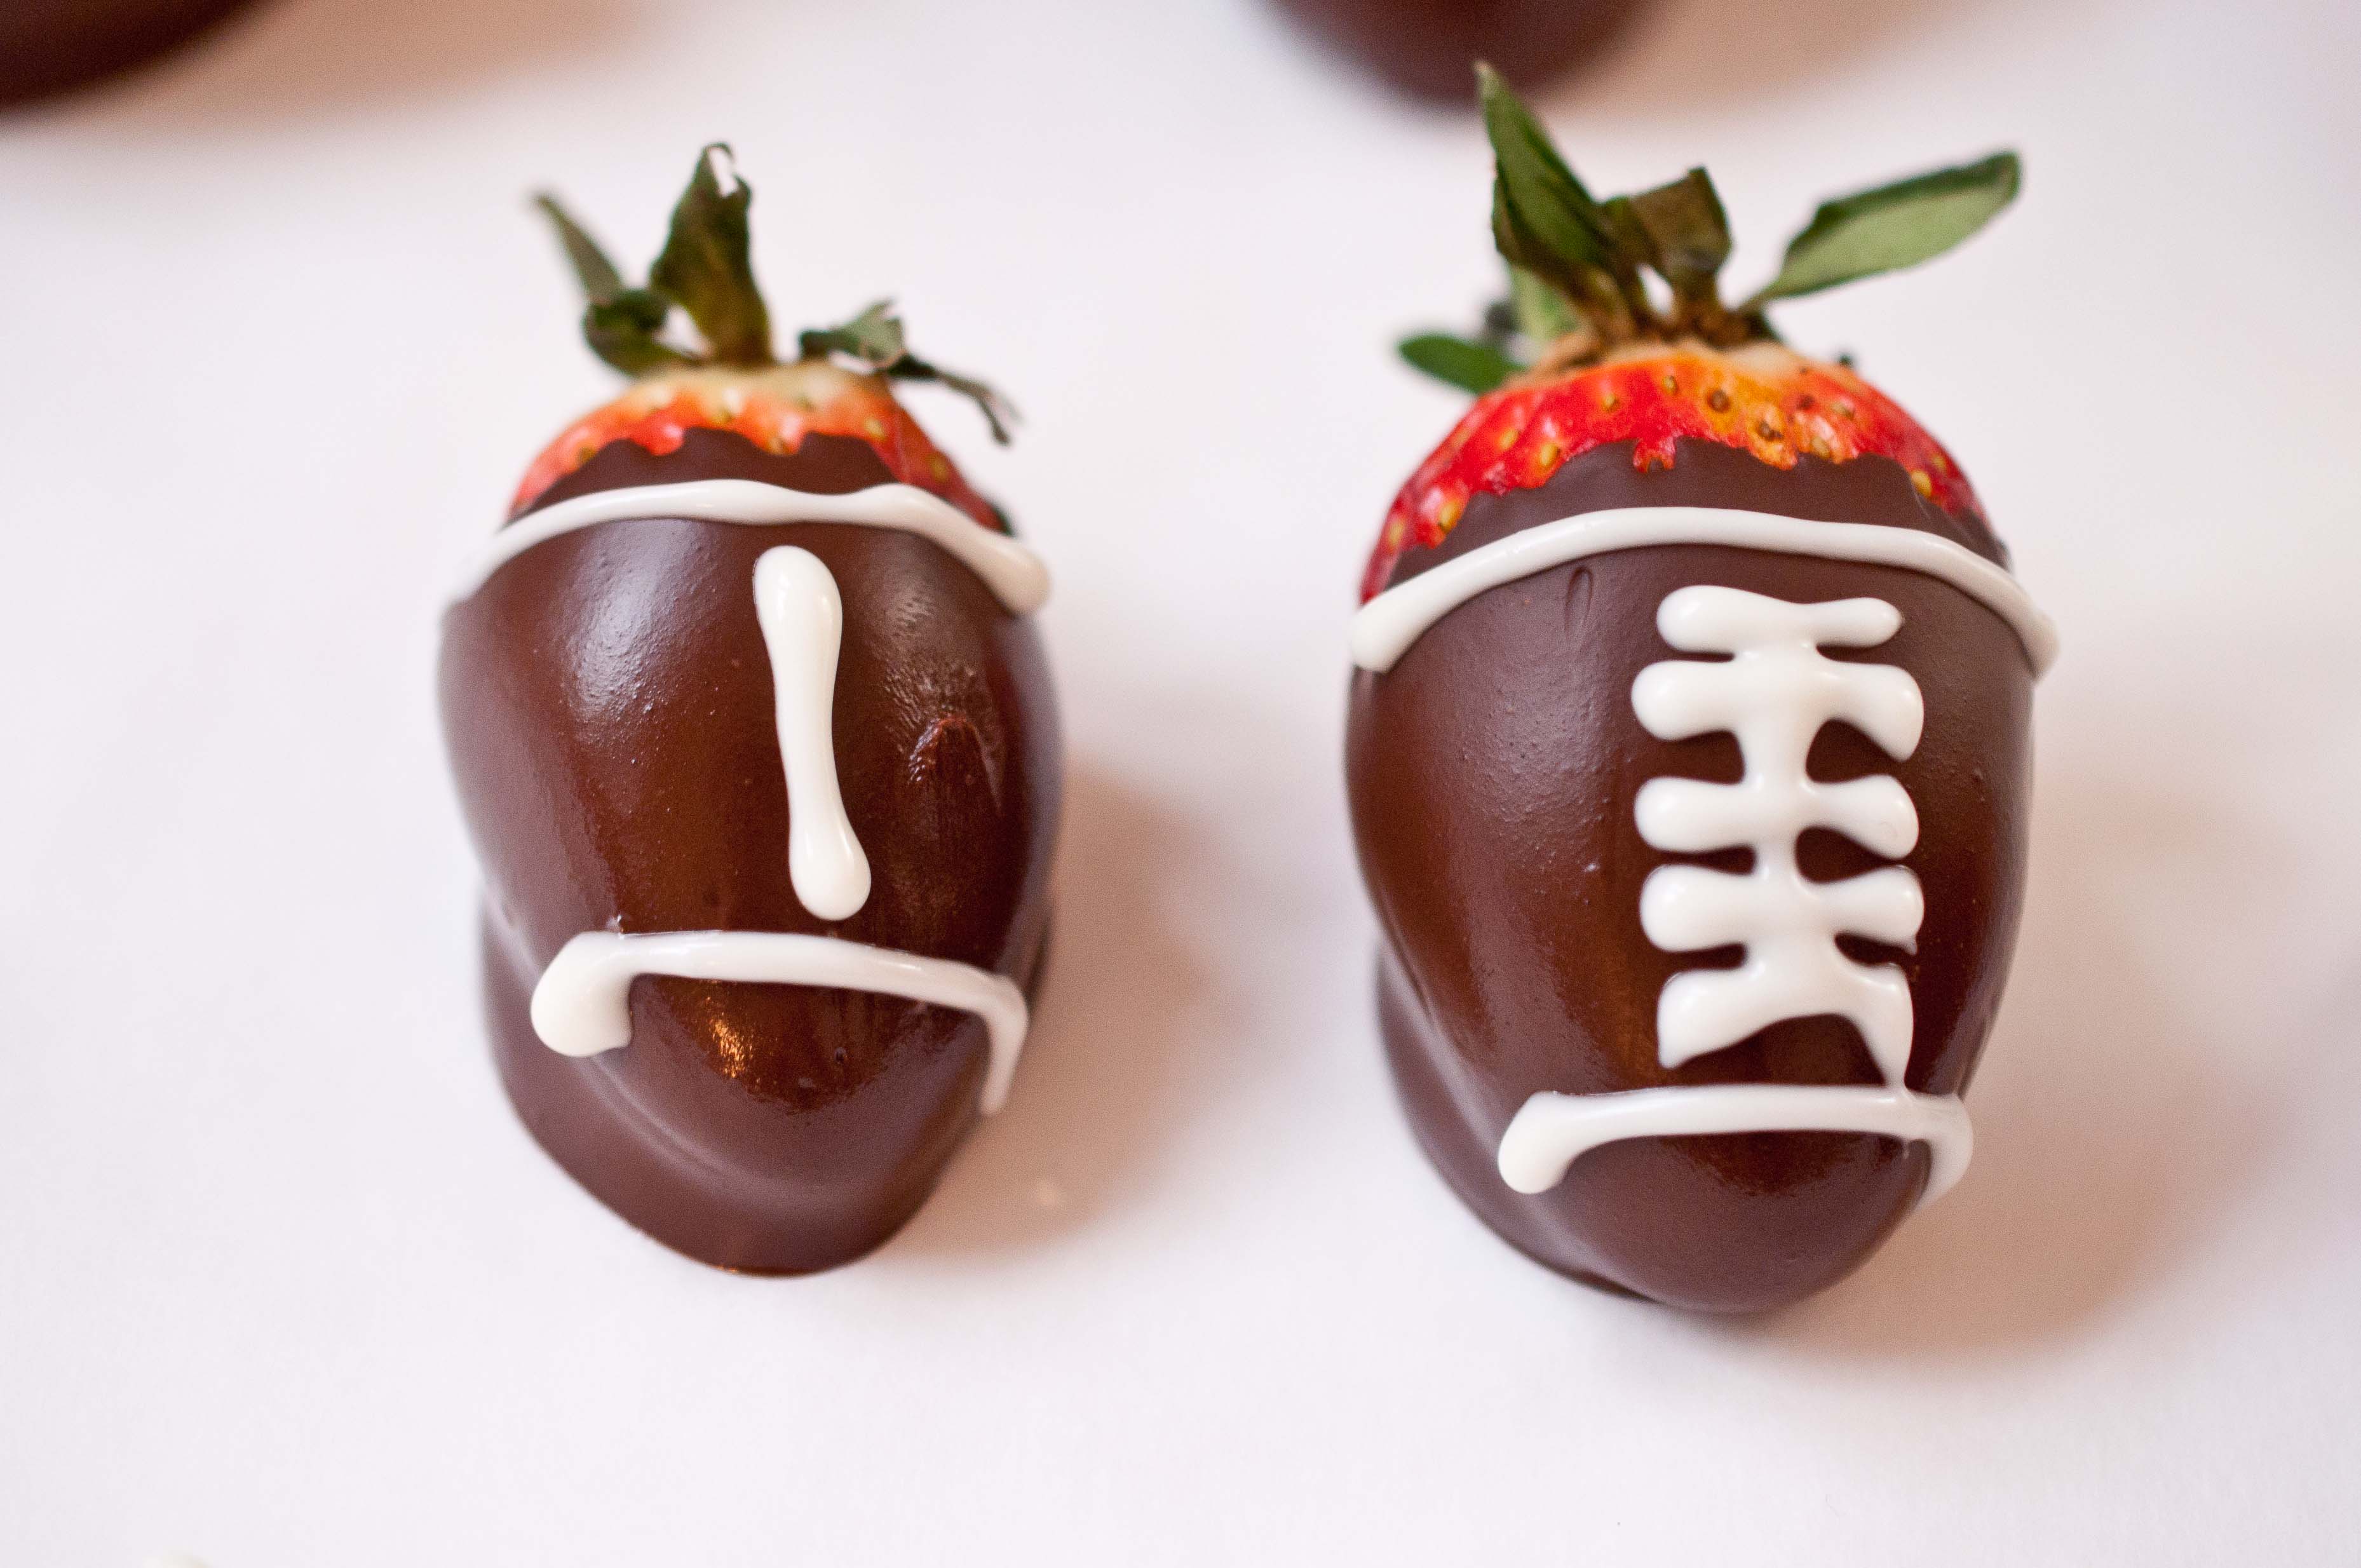
I do realize that there is a chance that when that little ball game rolls around in a few weeks, (what’s it called again? The Super Bowl?) you might not live in a place as lucky as Strawberry-afornia or have access to these beauties year round. That’s OK, just tuck this idea away in your head and make them for a sports themed birthday party sometime over the summer.
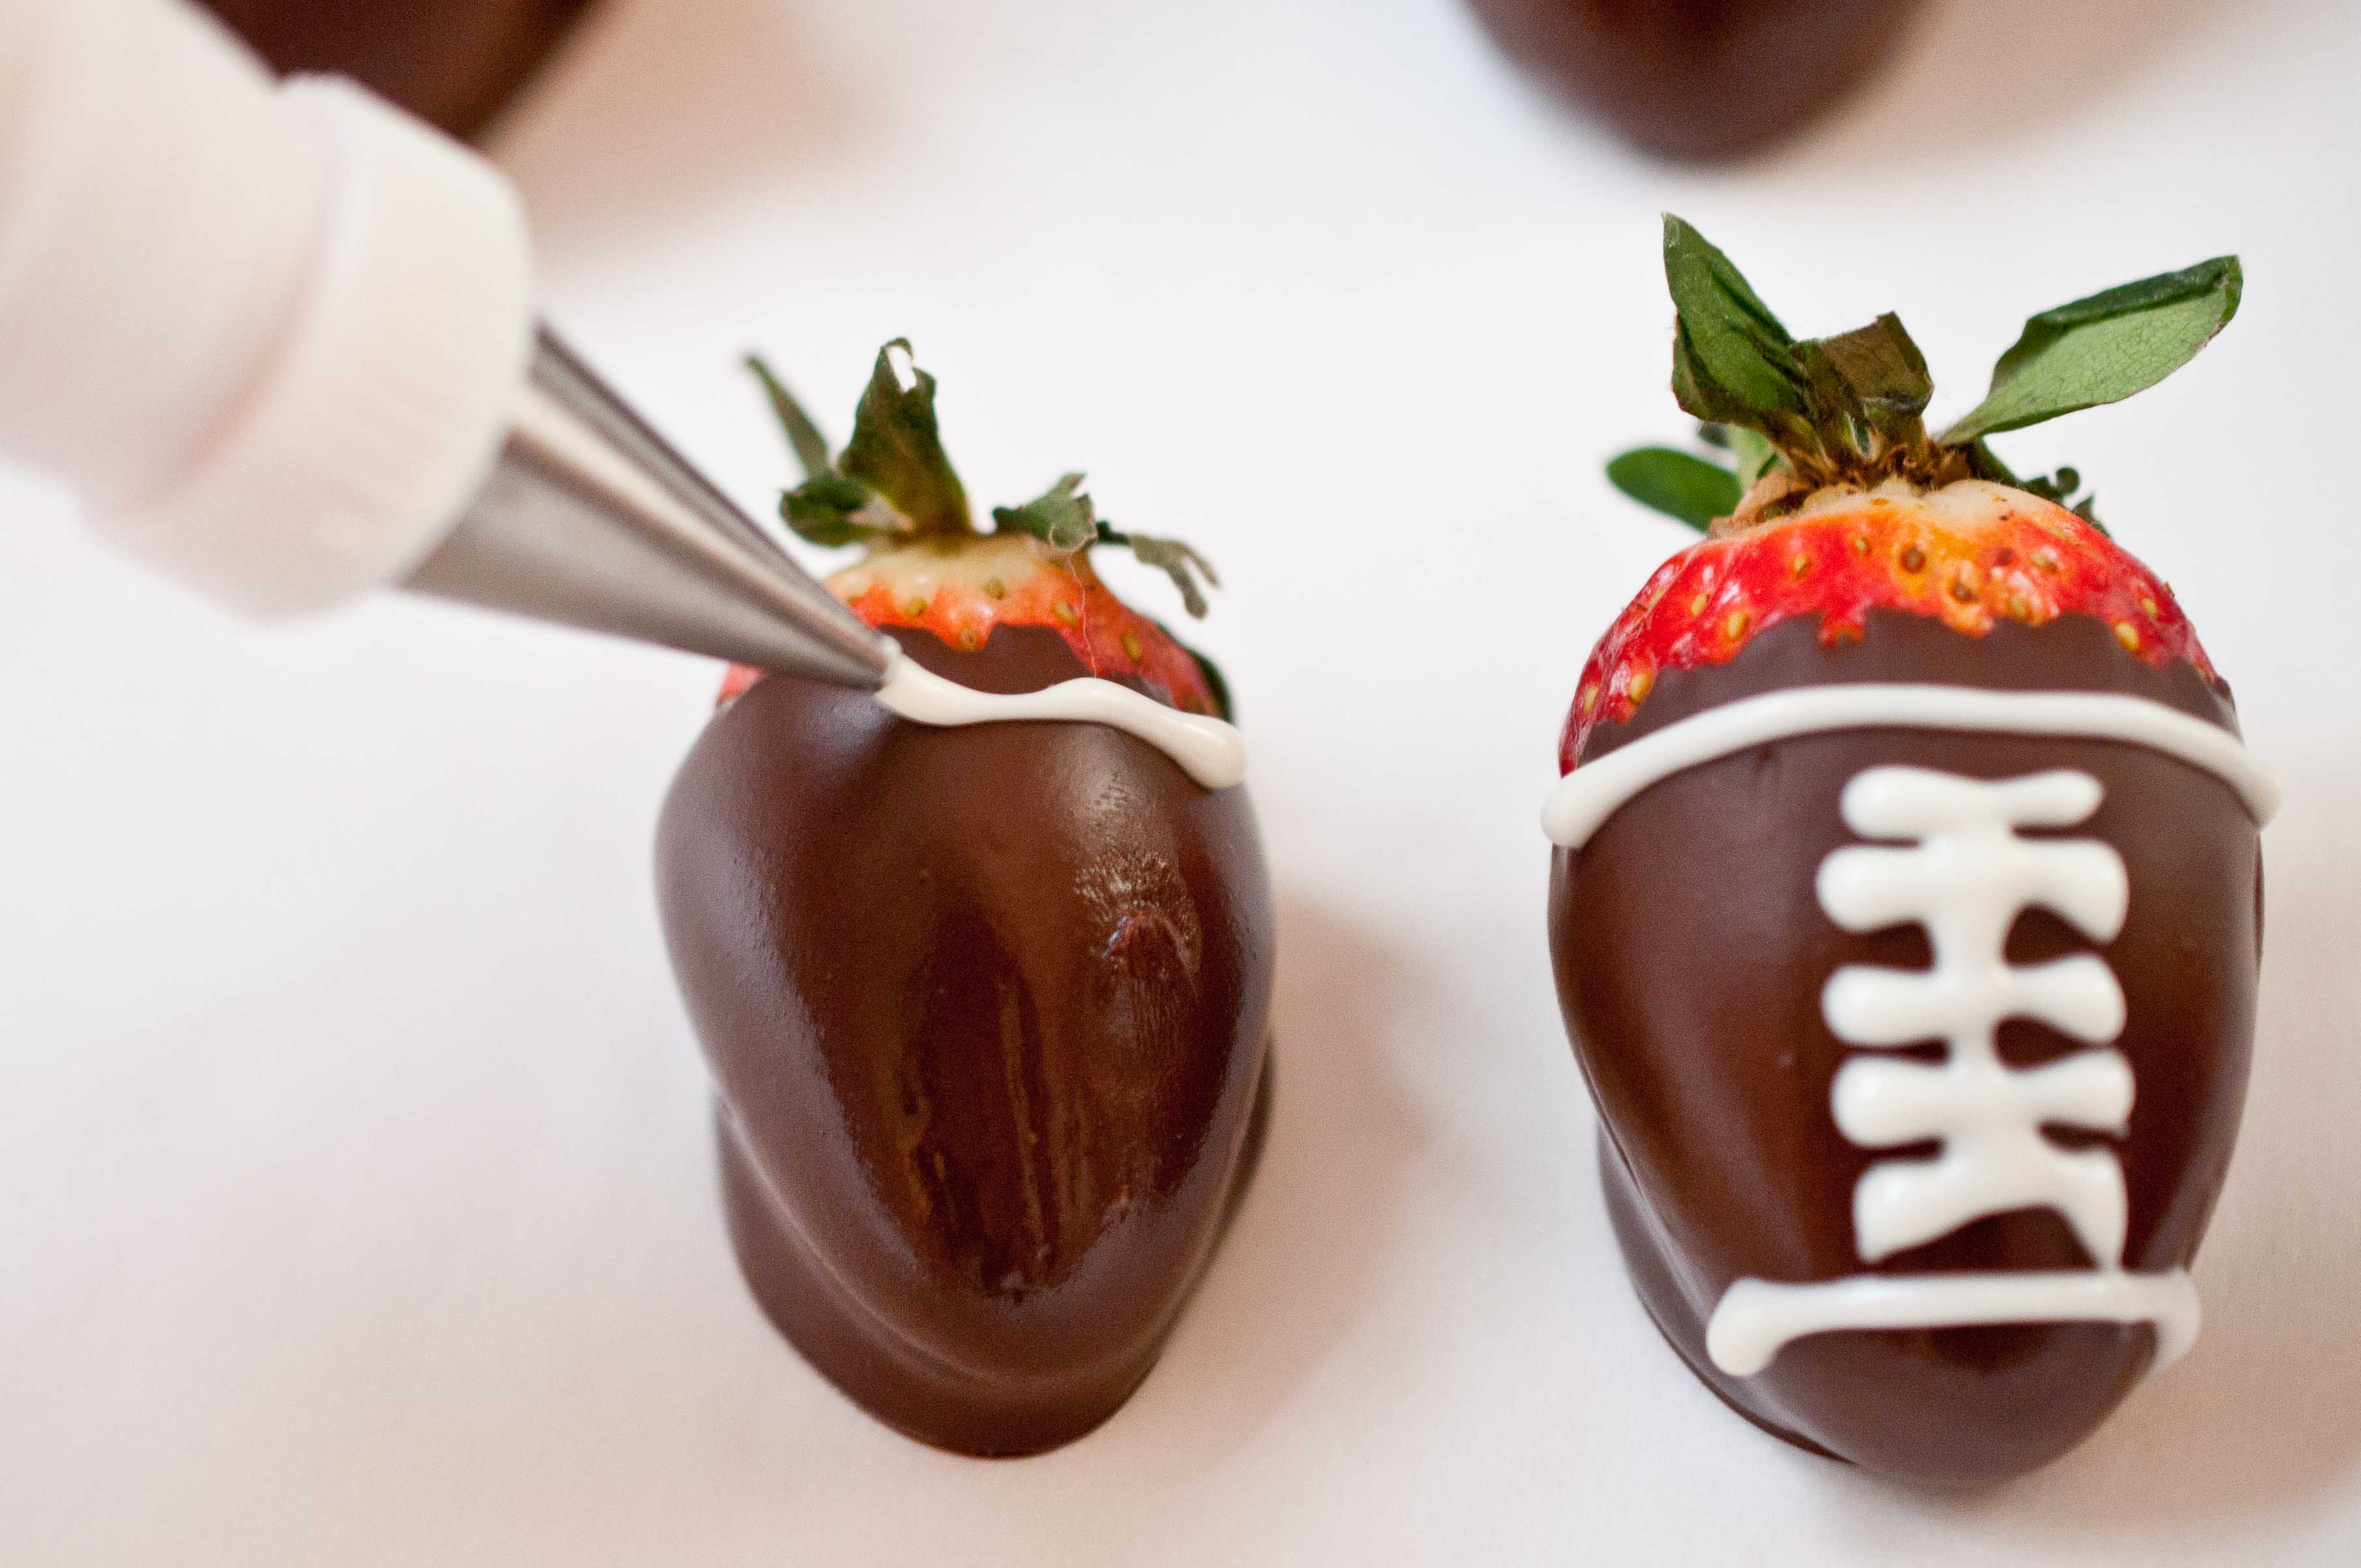
Chocolate Strawberry Footballs
1 1/2 cups dark chocolate chips
12-14 large strawberries
1/4 cup white chocolate chips
you will also need:
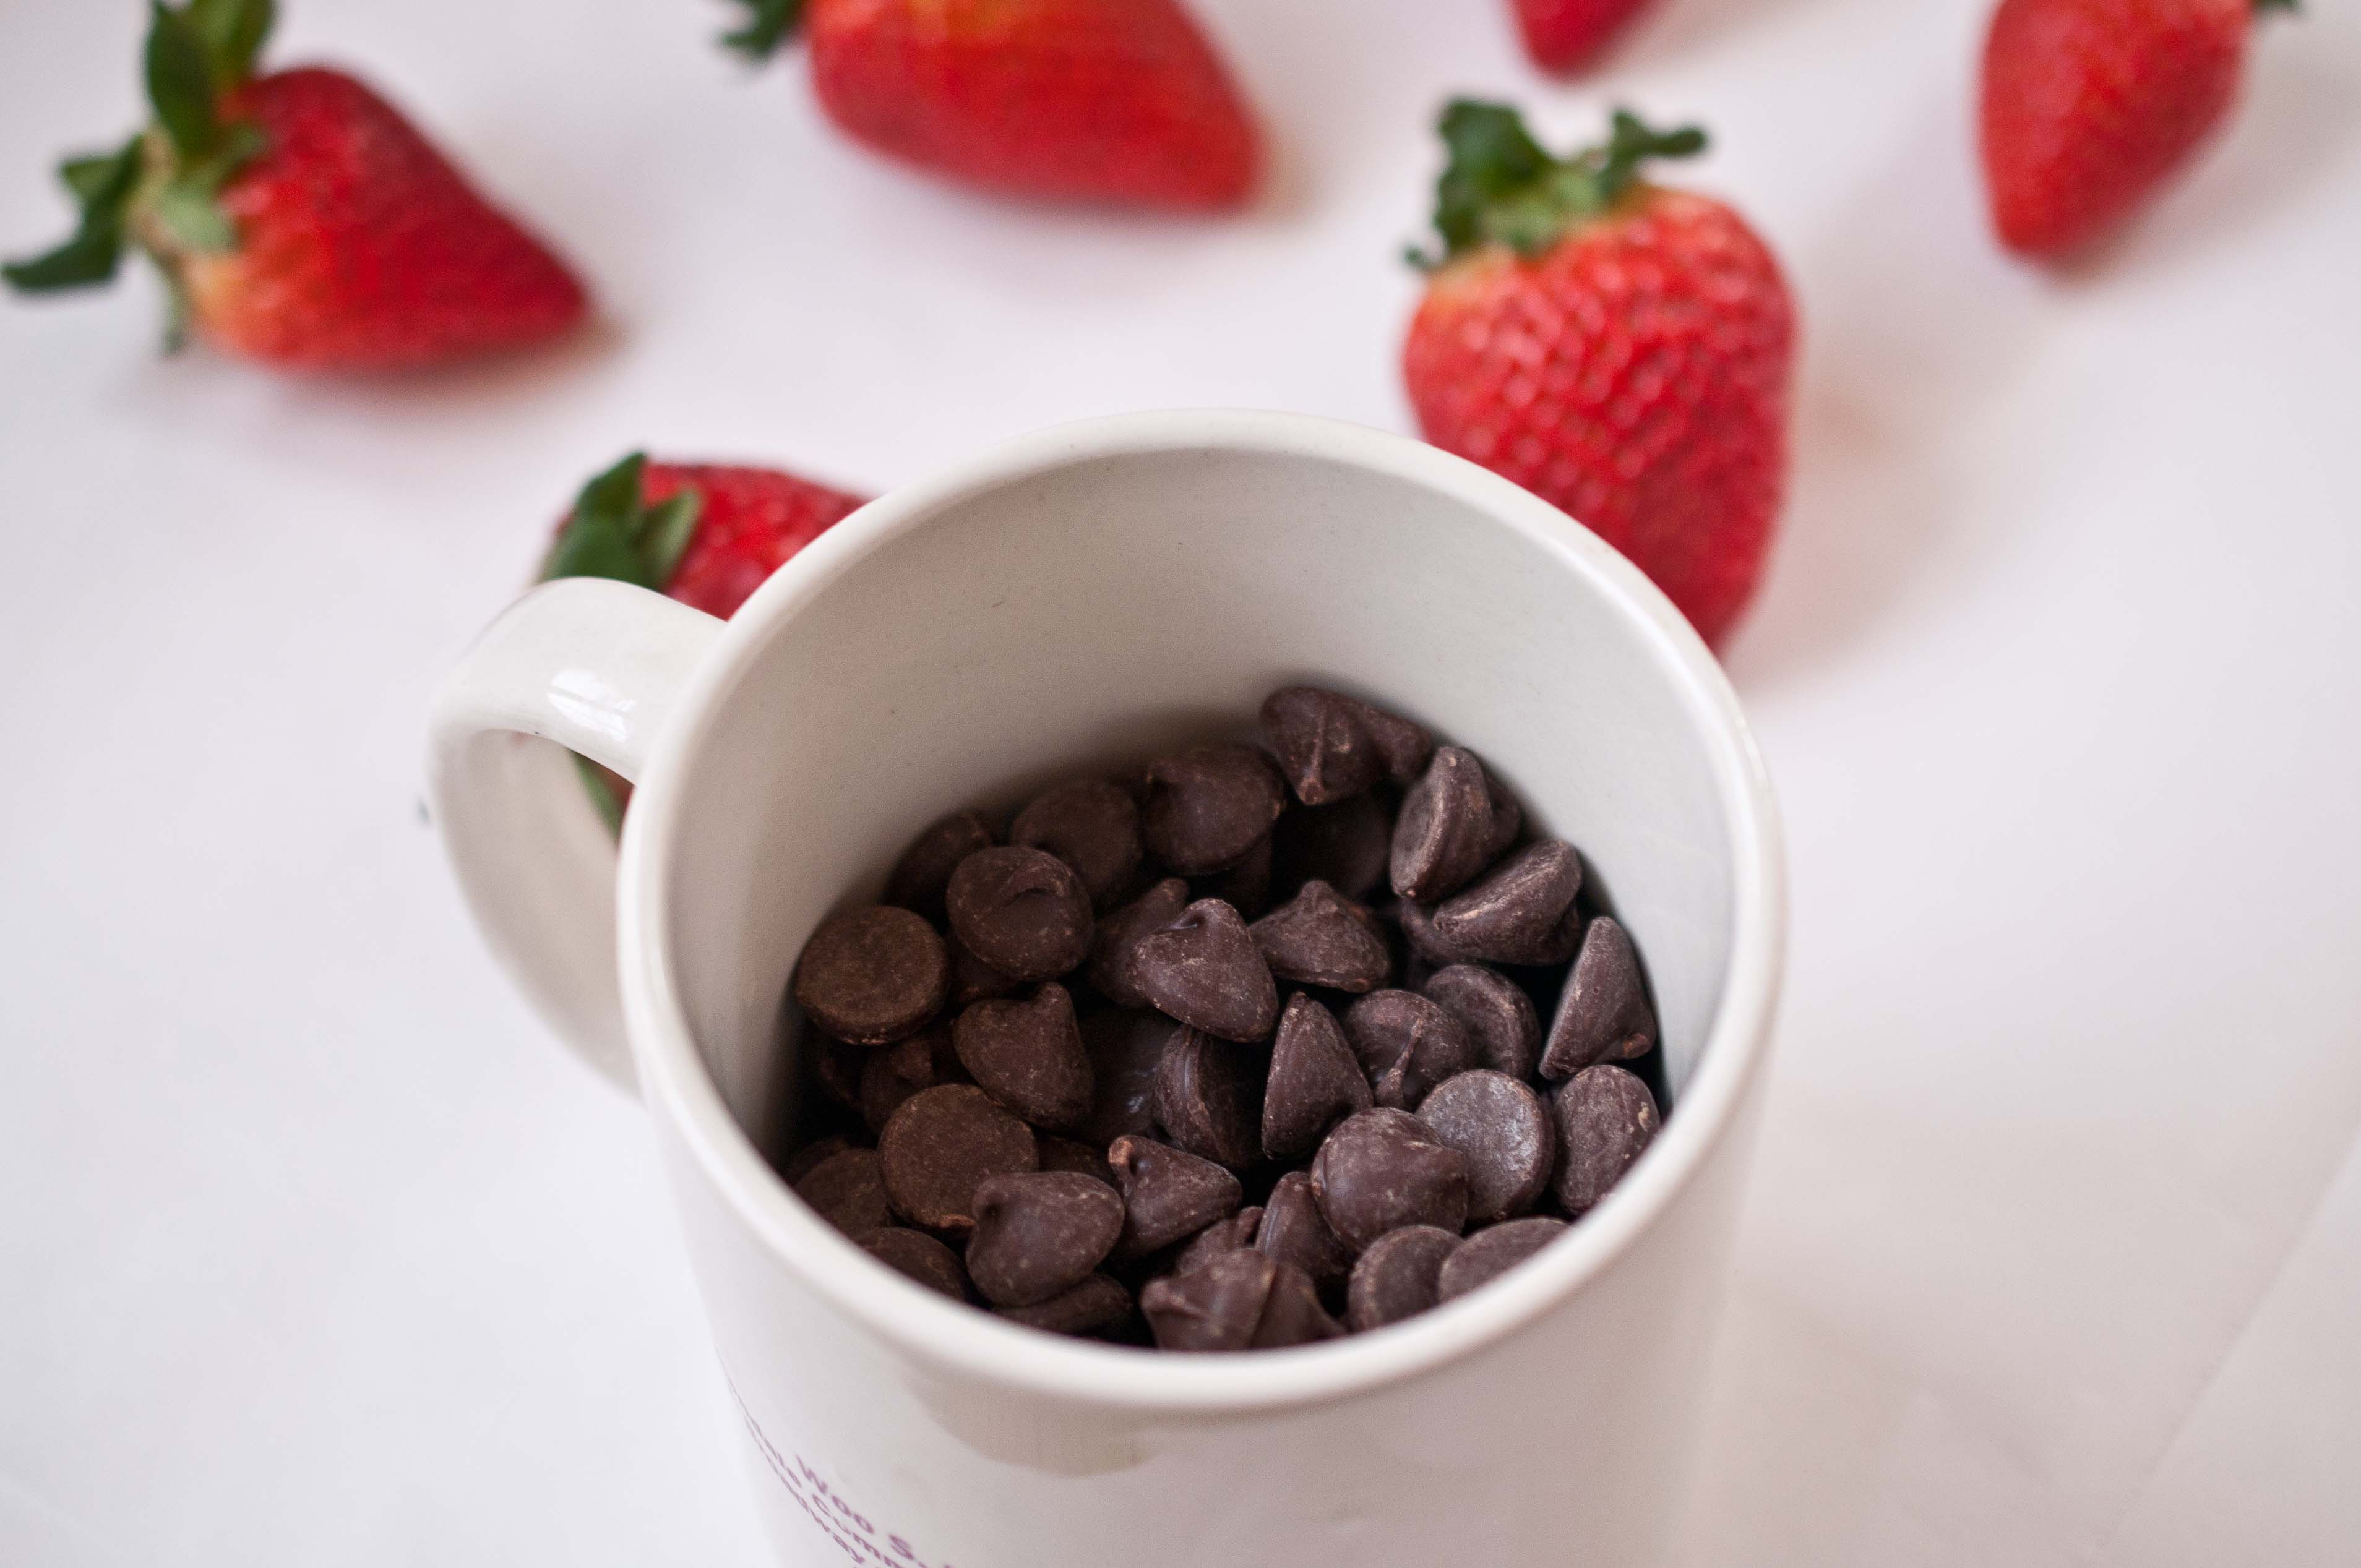
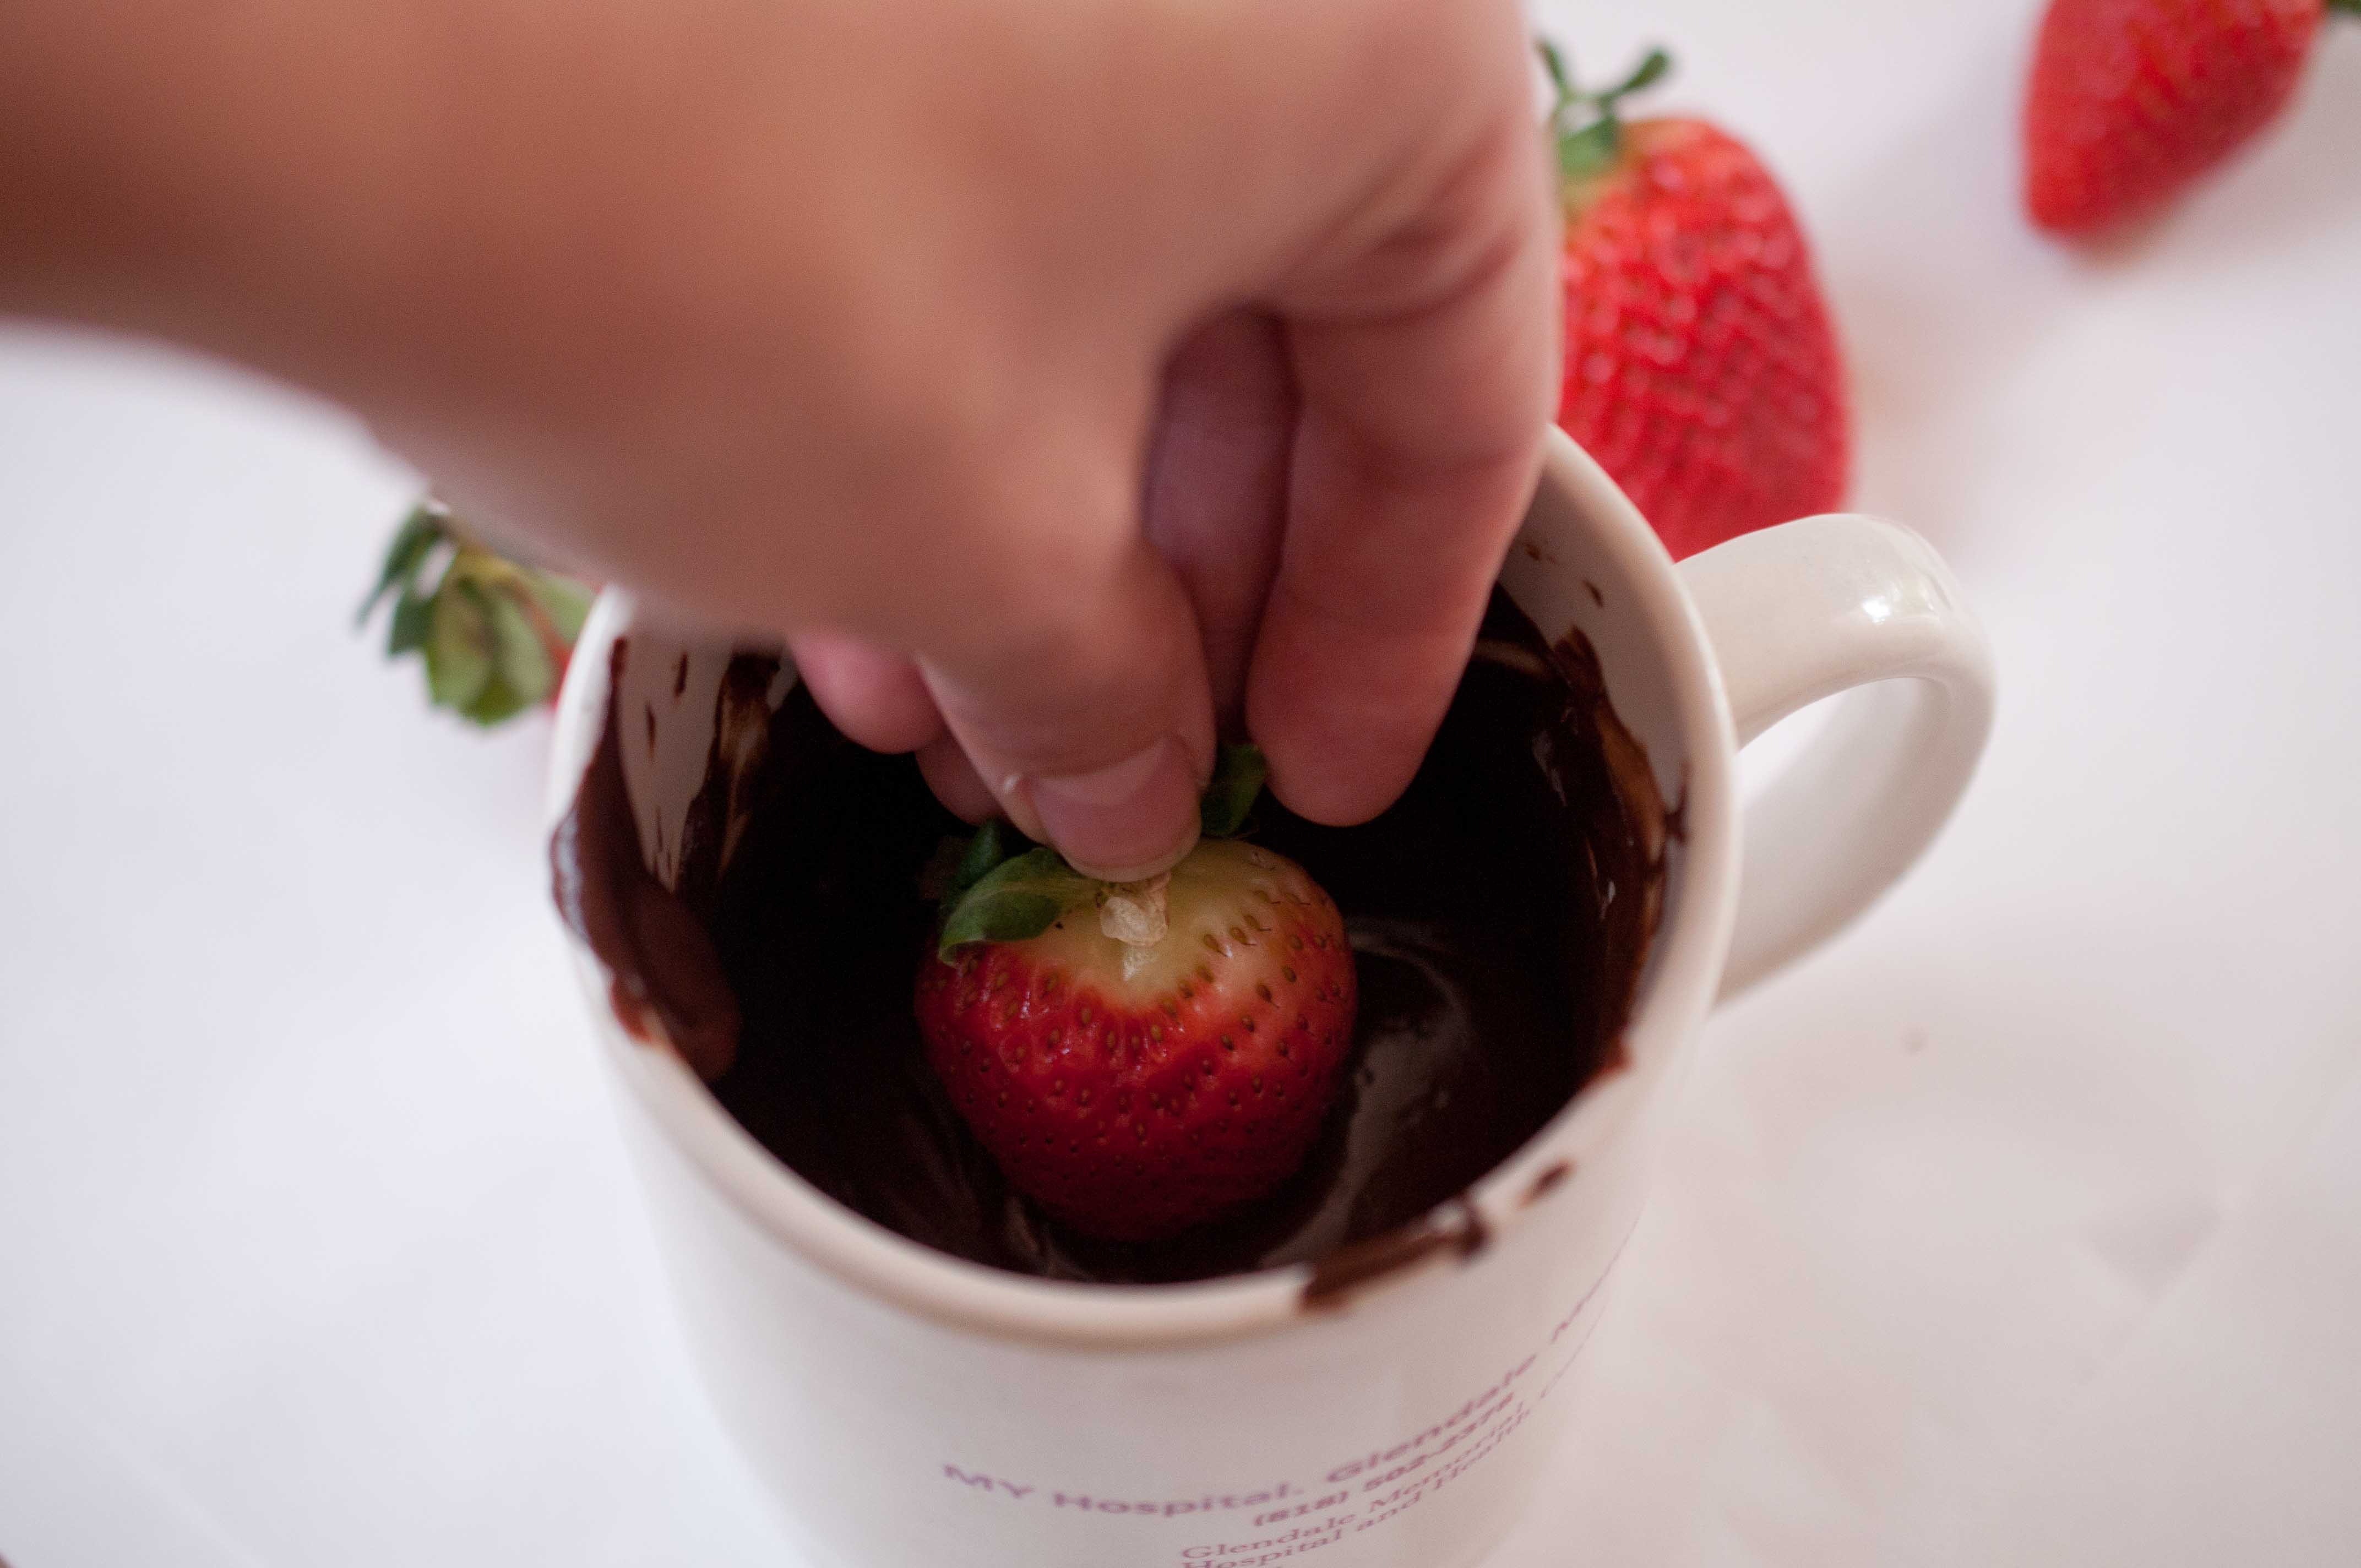
2 Coffee mugs
piping bag
#2 tip
Parchment paper
In a microwave safe coffee mug add the dark chocolate chips. I’ve found this to be the best vessel for strawberry dipping. If the bowl you use is too wide then the melted chocolate is too shallow, and it’s hard to get the strawberries dipped.
Microwave on high for 30 seconds. Stir and repeat until melted. Don’t over heat or your chocolate will seize and there is really no coming back from that.
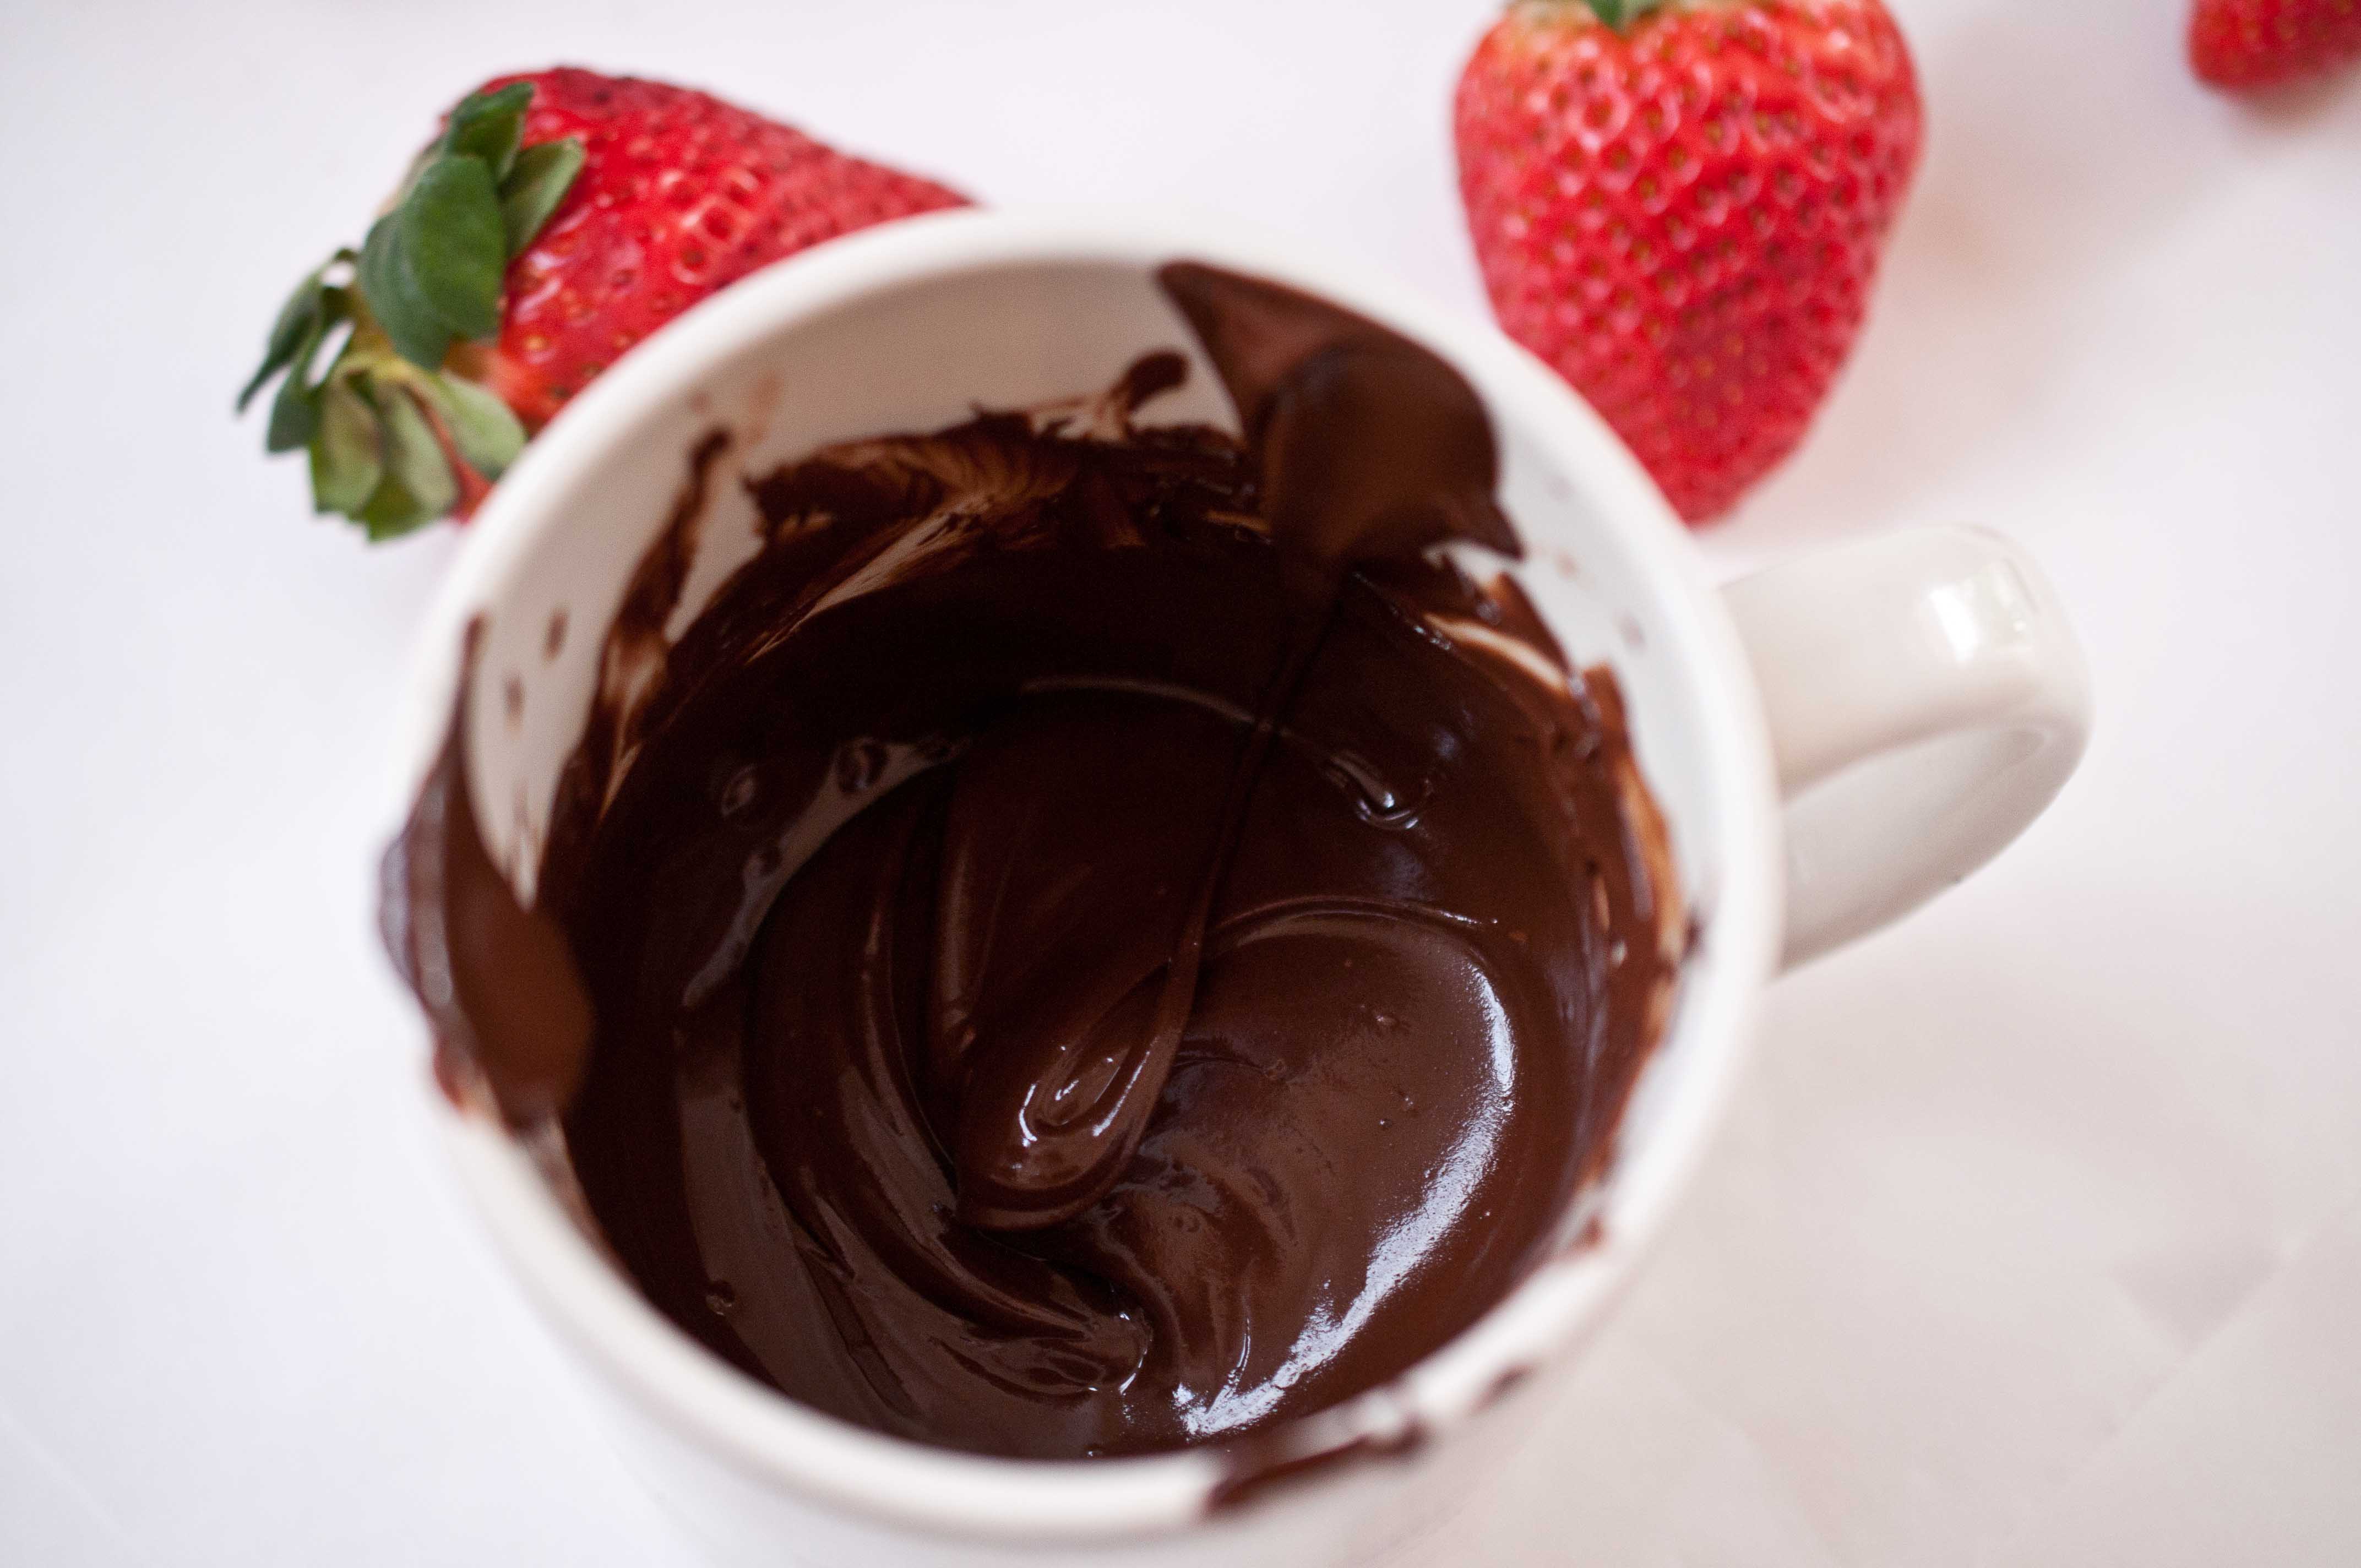
Grab the strawberry by the leaves (make sure strawberries are completely dry or the chocolate won’t stick).
Dip in the chocolate and swirl around carefully until coated.
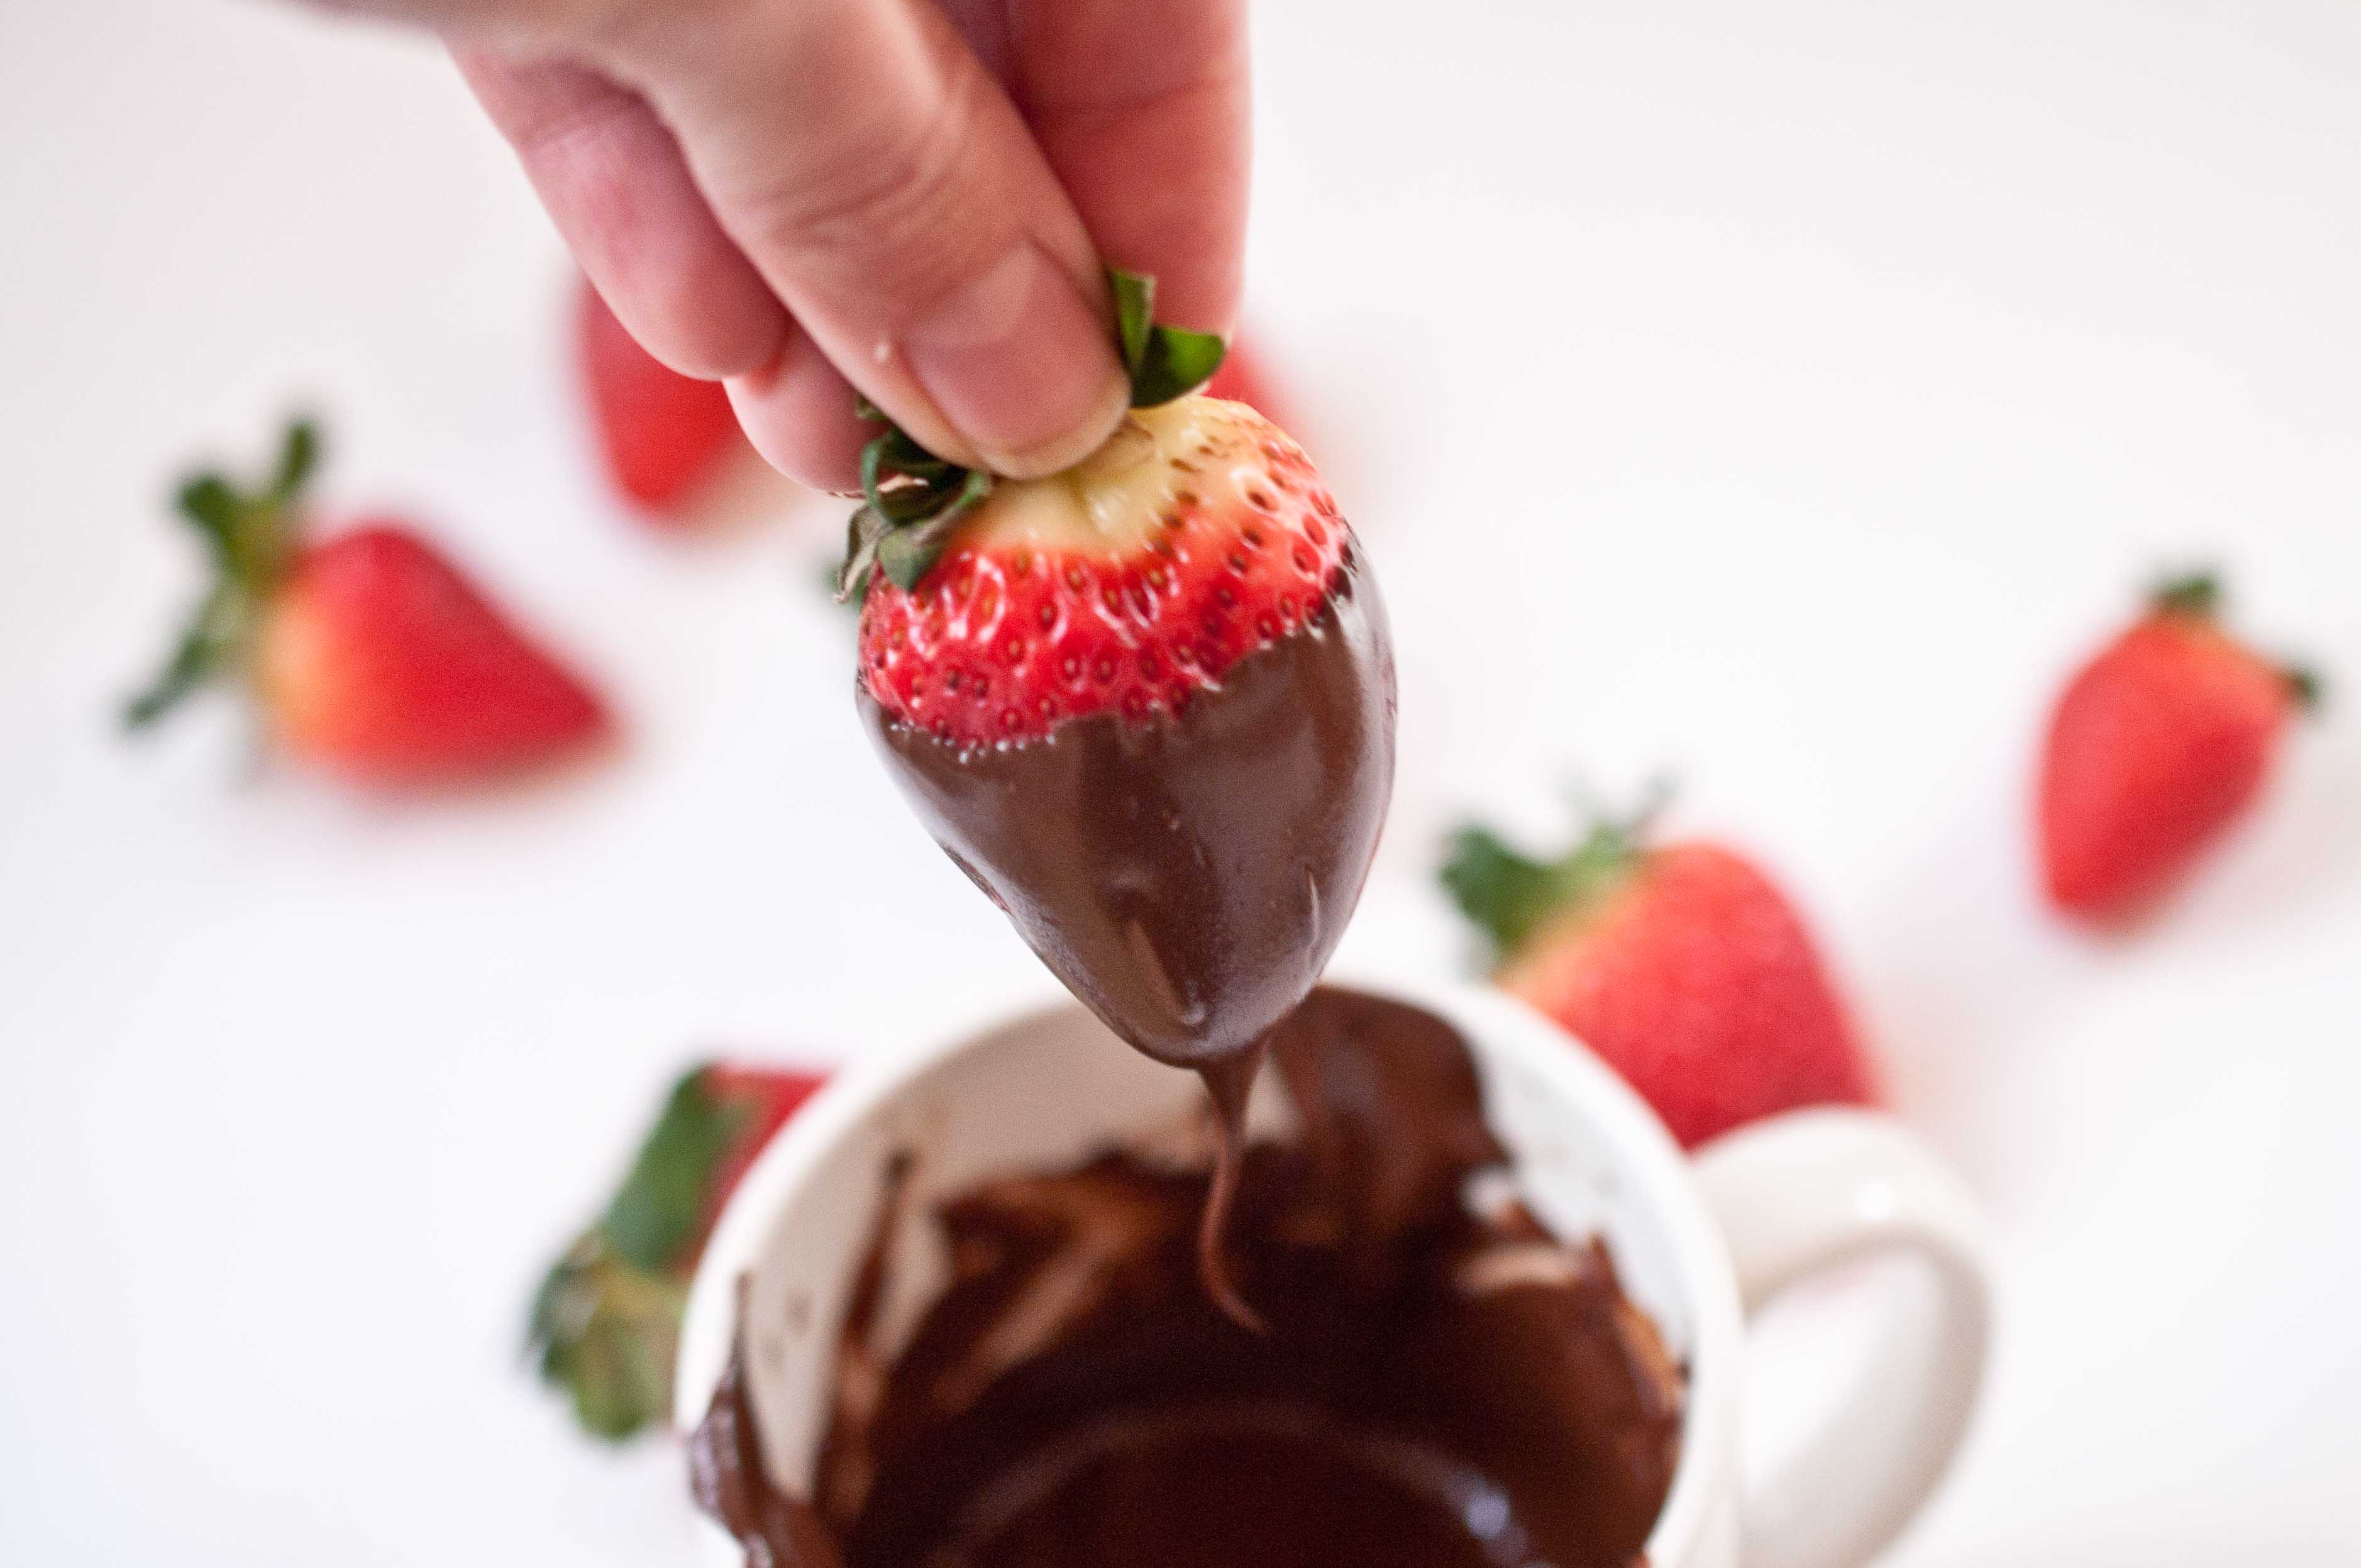
Hold above the coffee mug for a few seconds to allow the excess to drip off.
Place on a sheet of parchment paper to dry.
Push forward slightly to avoid a pool of dried chocolate forming in the front of your berry.
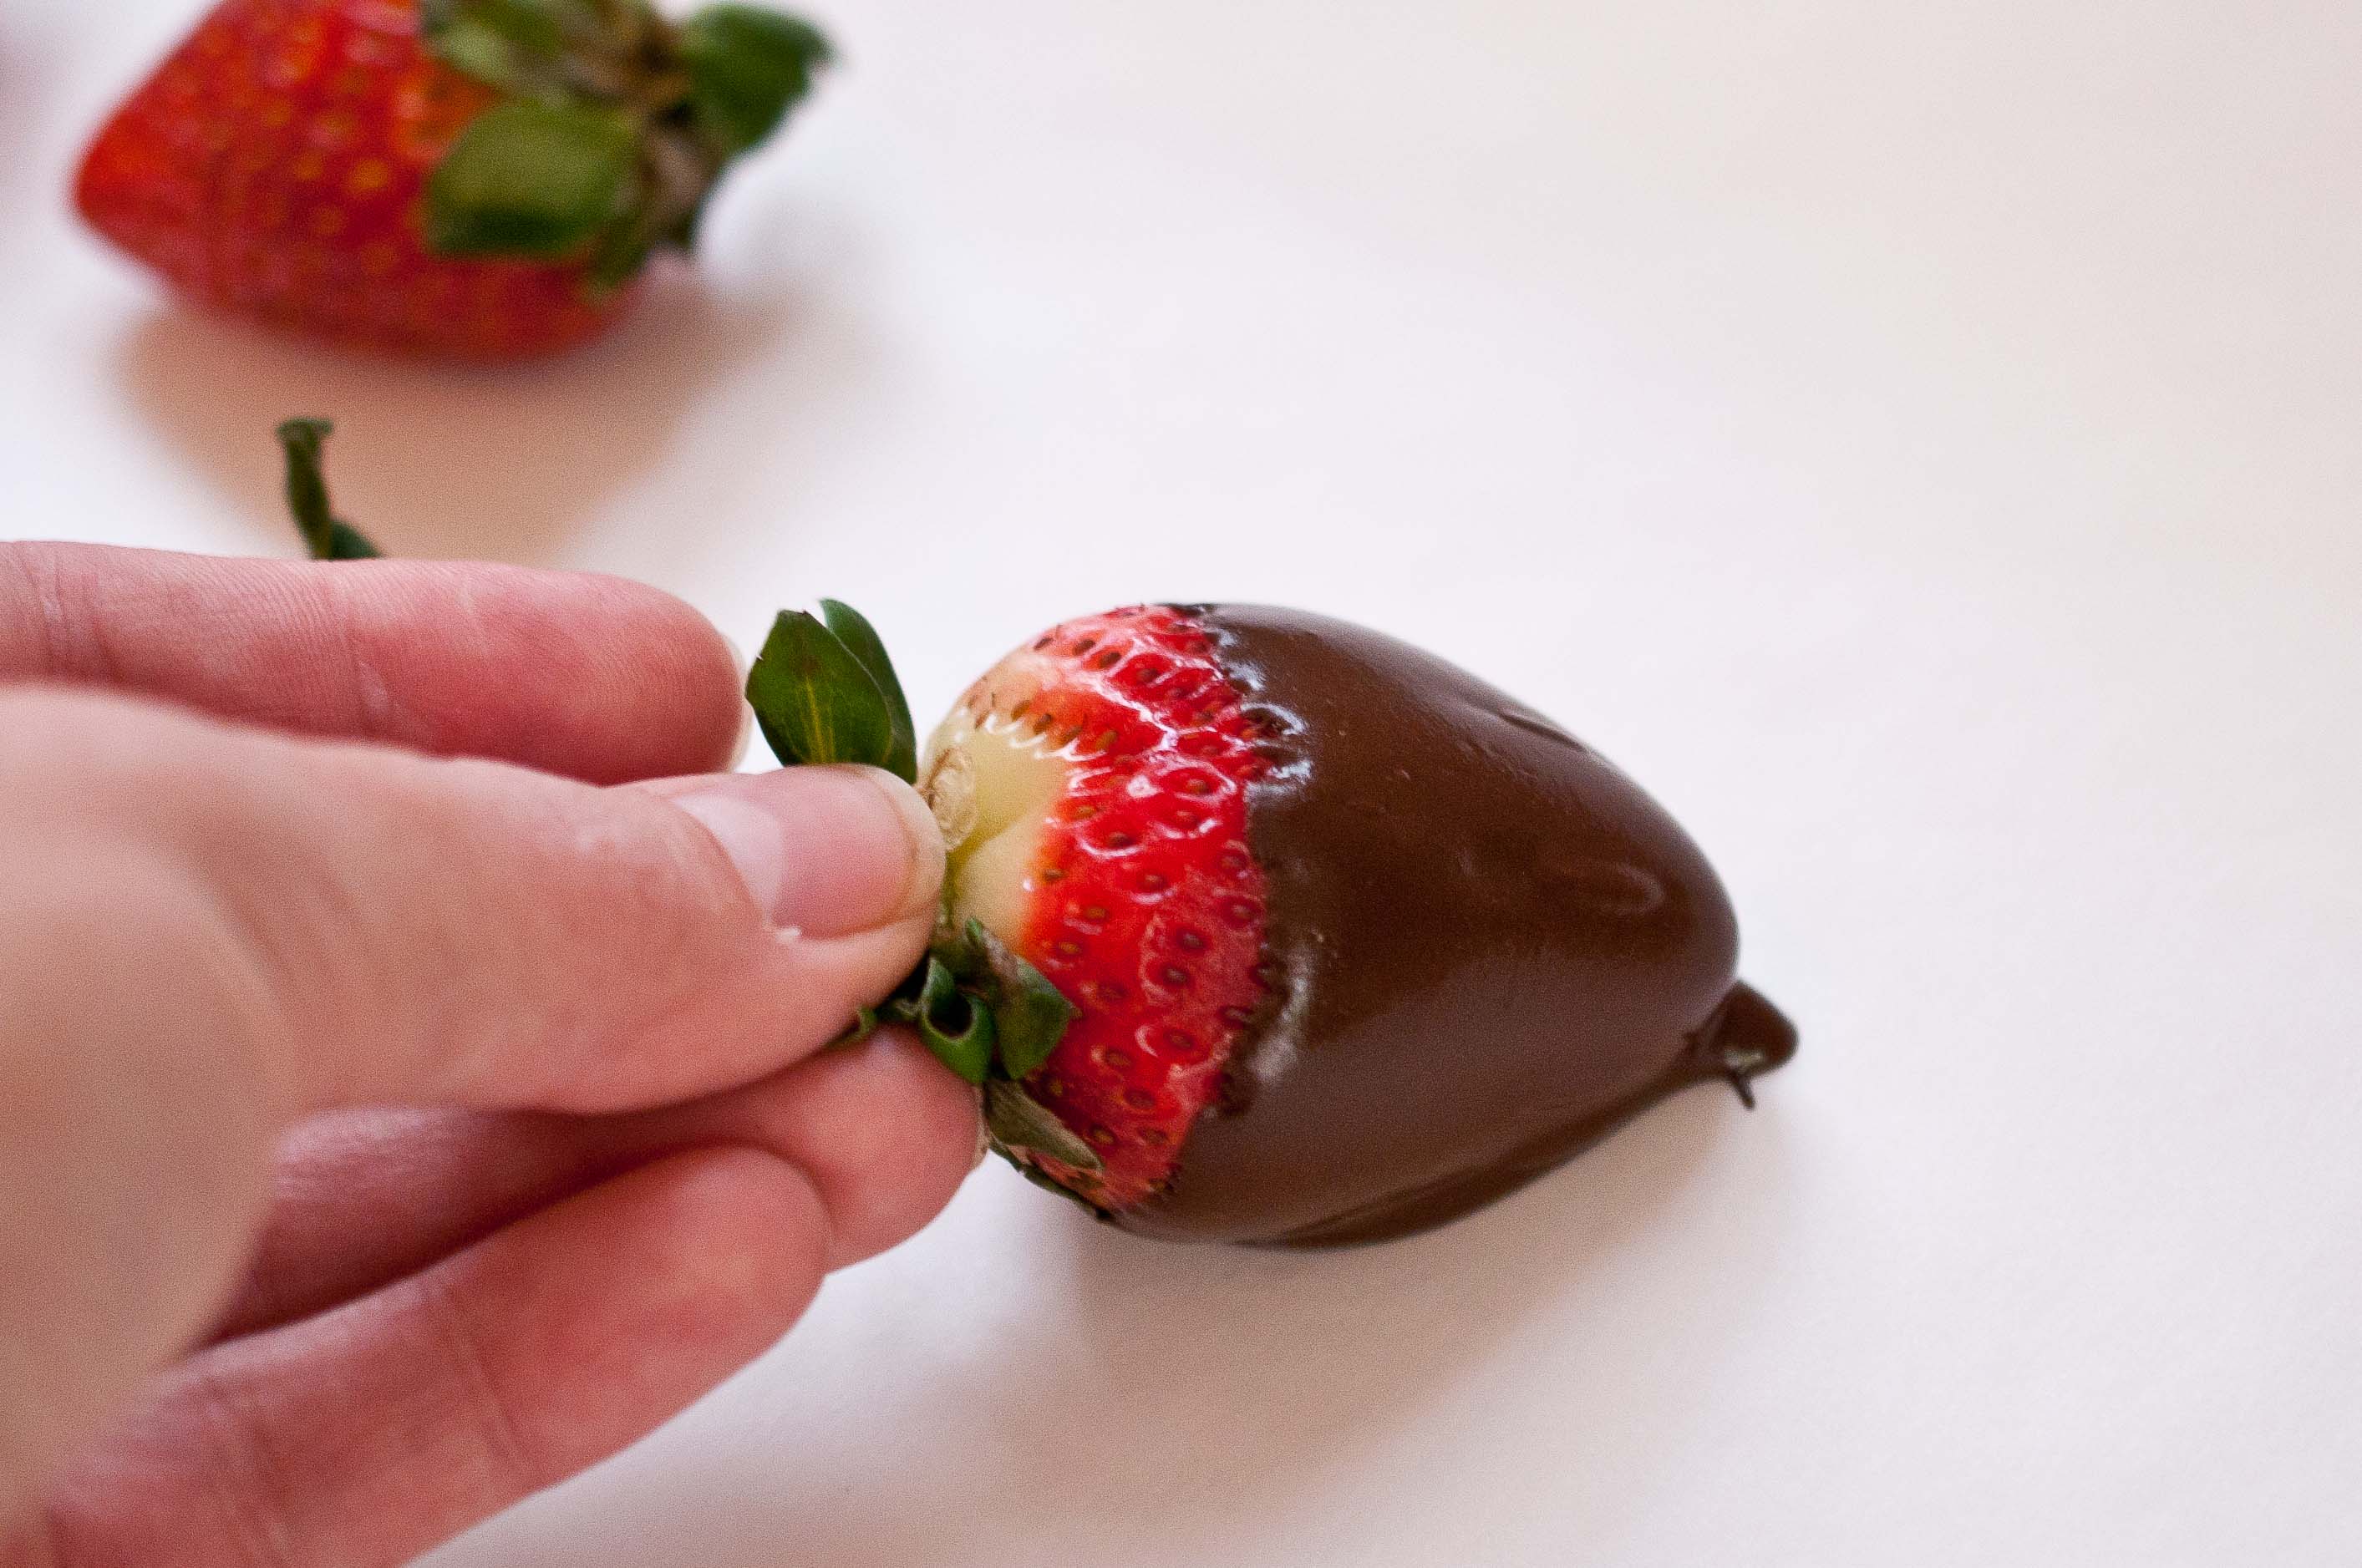
Allow to dry for about 15 minutes.
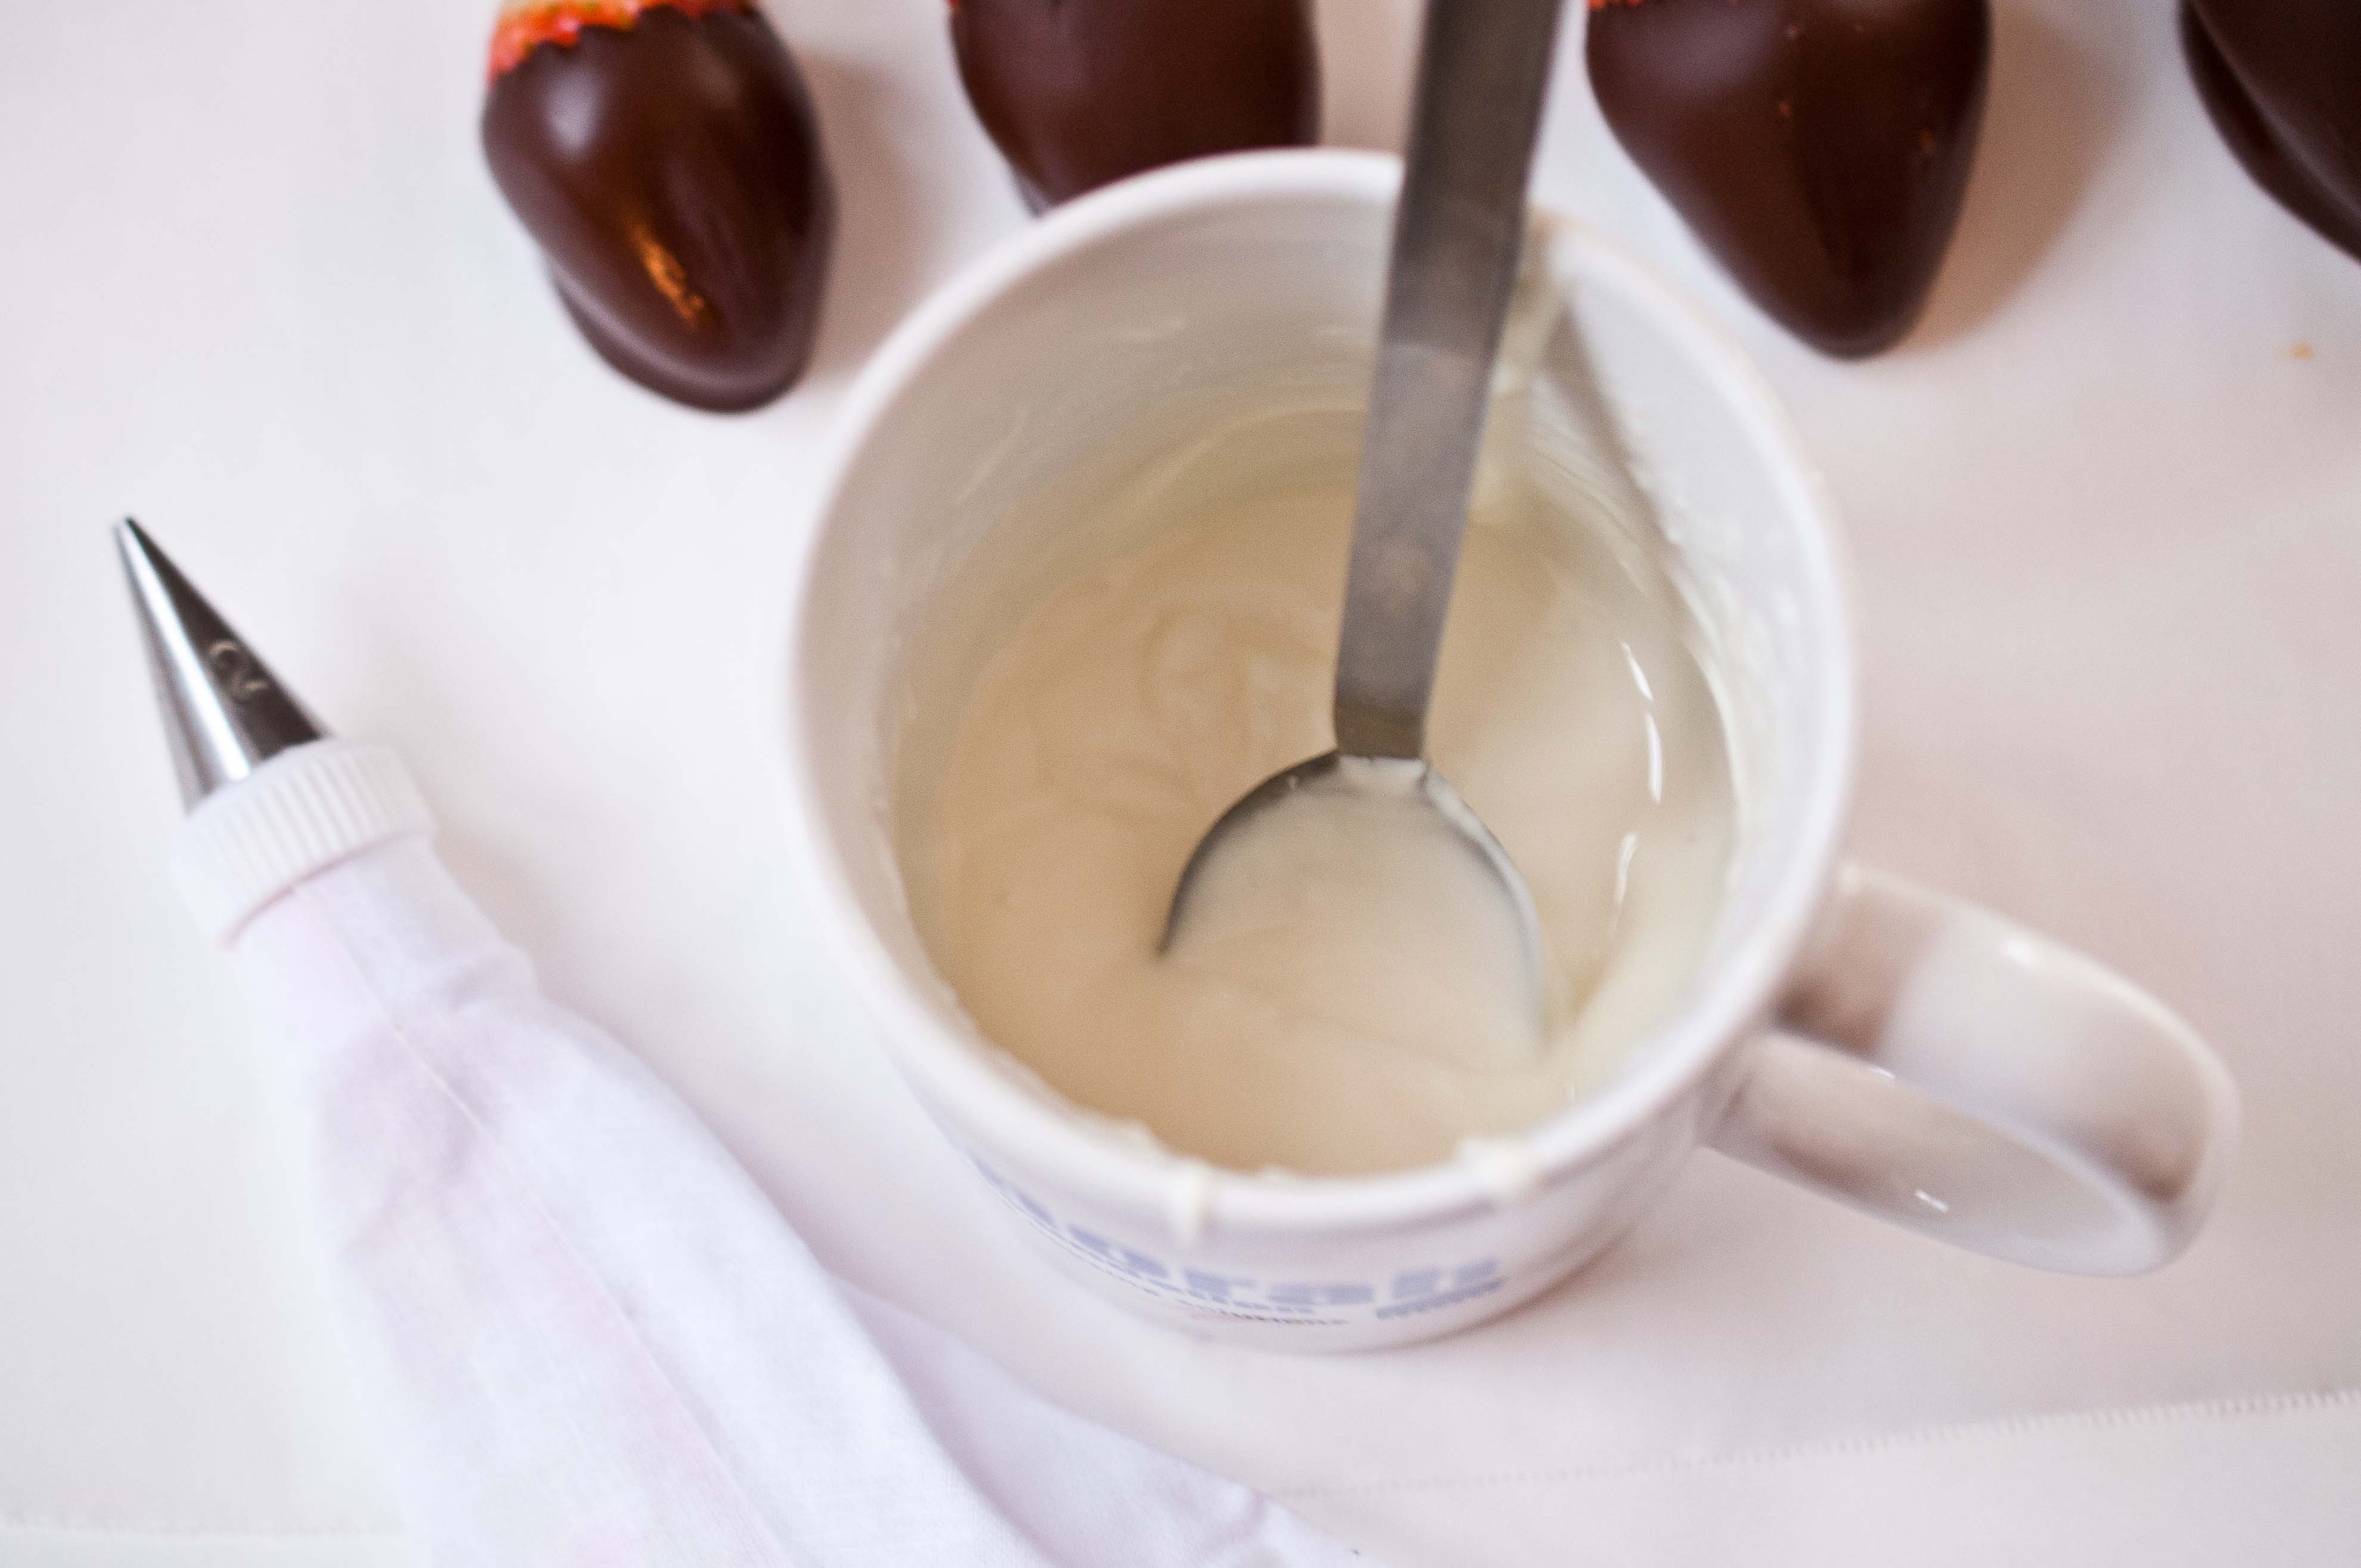
In a separate coffee mug (or really, any microwave safe bowl will work for this), add the white chocolate. Microwave on high for 20 seconds and stir, repeat until melted. You have to be even more careful with white chocolate, it tends to seize quicker. It isn’t actually chocolate, its cocoa butter solids so it behaves differently. If it does seize, you can try and add a few drops of canola oil, but you might just need to toss it out and start over.
Pour the white chocolate into your piping bag. Pipe on a stripe at the top and one at the bottom of your strawberries.
Then pipe a line down the middle of the berry.
Then pipe 5 or 6 lines across the middle line.
Tips:
-Let the white chocolate cool a bit, but not harden, before piping. If it’s too hot, it’ll be really runny.
-When piping the lines, double back a bit to avoid the "strings" of white chocolate from dripping down the sides.
-Serve chilled
-Don’t make more that 24 hours in advance, strawberries tend to shrink a bit as they age.
Firefighters are a rare beast. The perfect combination of rugged bravery and compassion driven sensitivity. A sports watching, beer drinking guys-guy, who is also the first in line to pull a shivering puppy from a frozen river and then make a batch of tender homemade scones.
So what do you do if you find yourself on the daylight side of a fantastic evening, eye to eye with one these hungry beasts?
Make waffles.
Not just any waffles, beer waffles. With beer caramel sauce.
Somehow, it seems to be a rule that every fire house has at least two resident fire fighting chefs, ready for a culinary battle at all times. Making it a near certainty that the beast you woke up with is used to eating, or cooking, great food on a regular basis. Your average breakfast just won’t do.
And keep a healthy stock of Fireman’s Brew handy. Not only is it made by real life Firefighters, they even donate a portion of their profits to causes that support families of fallen Firefighters. Craft beer with a cause.
Great beer and a warm fuzzy feeling. Fireman sold separately.
12ozBlonde Ale or Pilsnersuch as Firemans Blonde Lager
Caramel Sauce:
12ozAmber Alesuch as Firemans Amber Ale
2cupsbrown sugarpacked
3/4cupheavy cream
1tspvanilla
2tbsbutter
Instructions
Make the caramel sauce: Add the beer to a pot over high heat and bring to a strong boil, reducing the beer to about 1 cup, about 6-10 minutes.
Remove from heat and add the brown sugar, stir until dissolved. Add a thermometer with a clip to the side of you pan, submerging the tip in the liquid, but making sure it does not hit the bottom of the pan.
Boil, without stirring (swirl the pan occasionally to redistribute the caramel sauce), until the temperature reaches between 230 degrees. Remove from heat and stir until the bubbling subsides. Add the cream, vanilla and butter, stir to combine. Allow to cool.
Make the waffles:
Heat your waffle iron according to manufacture directions.
In a large bowl, combine the flour, 1/4 cup sugar, salt and baking powder. In another bowl, stir together the butter, milk and egg yolks, in a third bowl add the egg whites and a pinch of salt.
Make a well in the dry ingredients and add the milk mixture. Stir to combine. Add the Pilsner (there will be significant bubbling) stir until just combined, a few lumps are to be expected.
Whip the egg whites until light and fluffy and tripled in volume. Add the remaining 2 tablespoons sugar, whip until well combined. Stir the egg whites into the waffle batter.
Using the waffle iron, cook waffles according to manufacture directions (make sure to use butter flavored cooking spray, if called for).
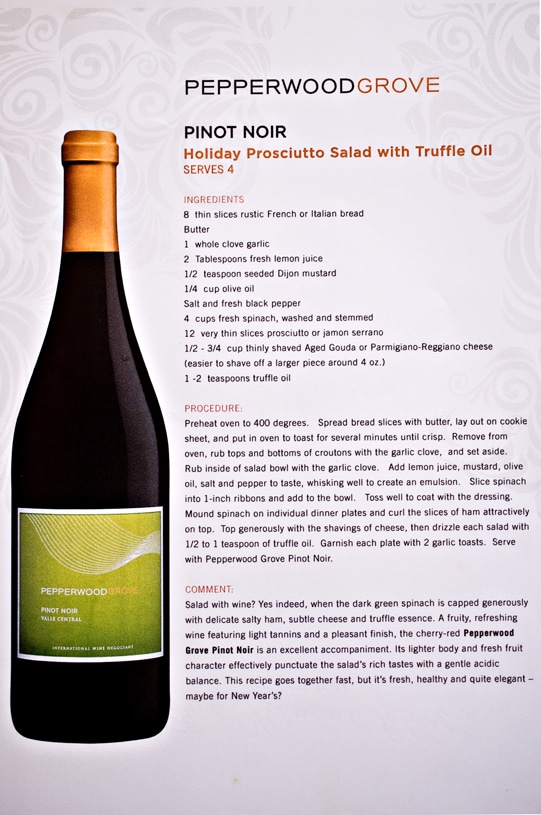
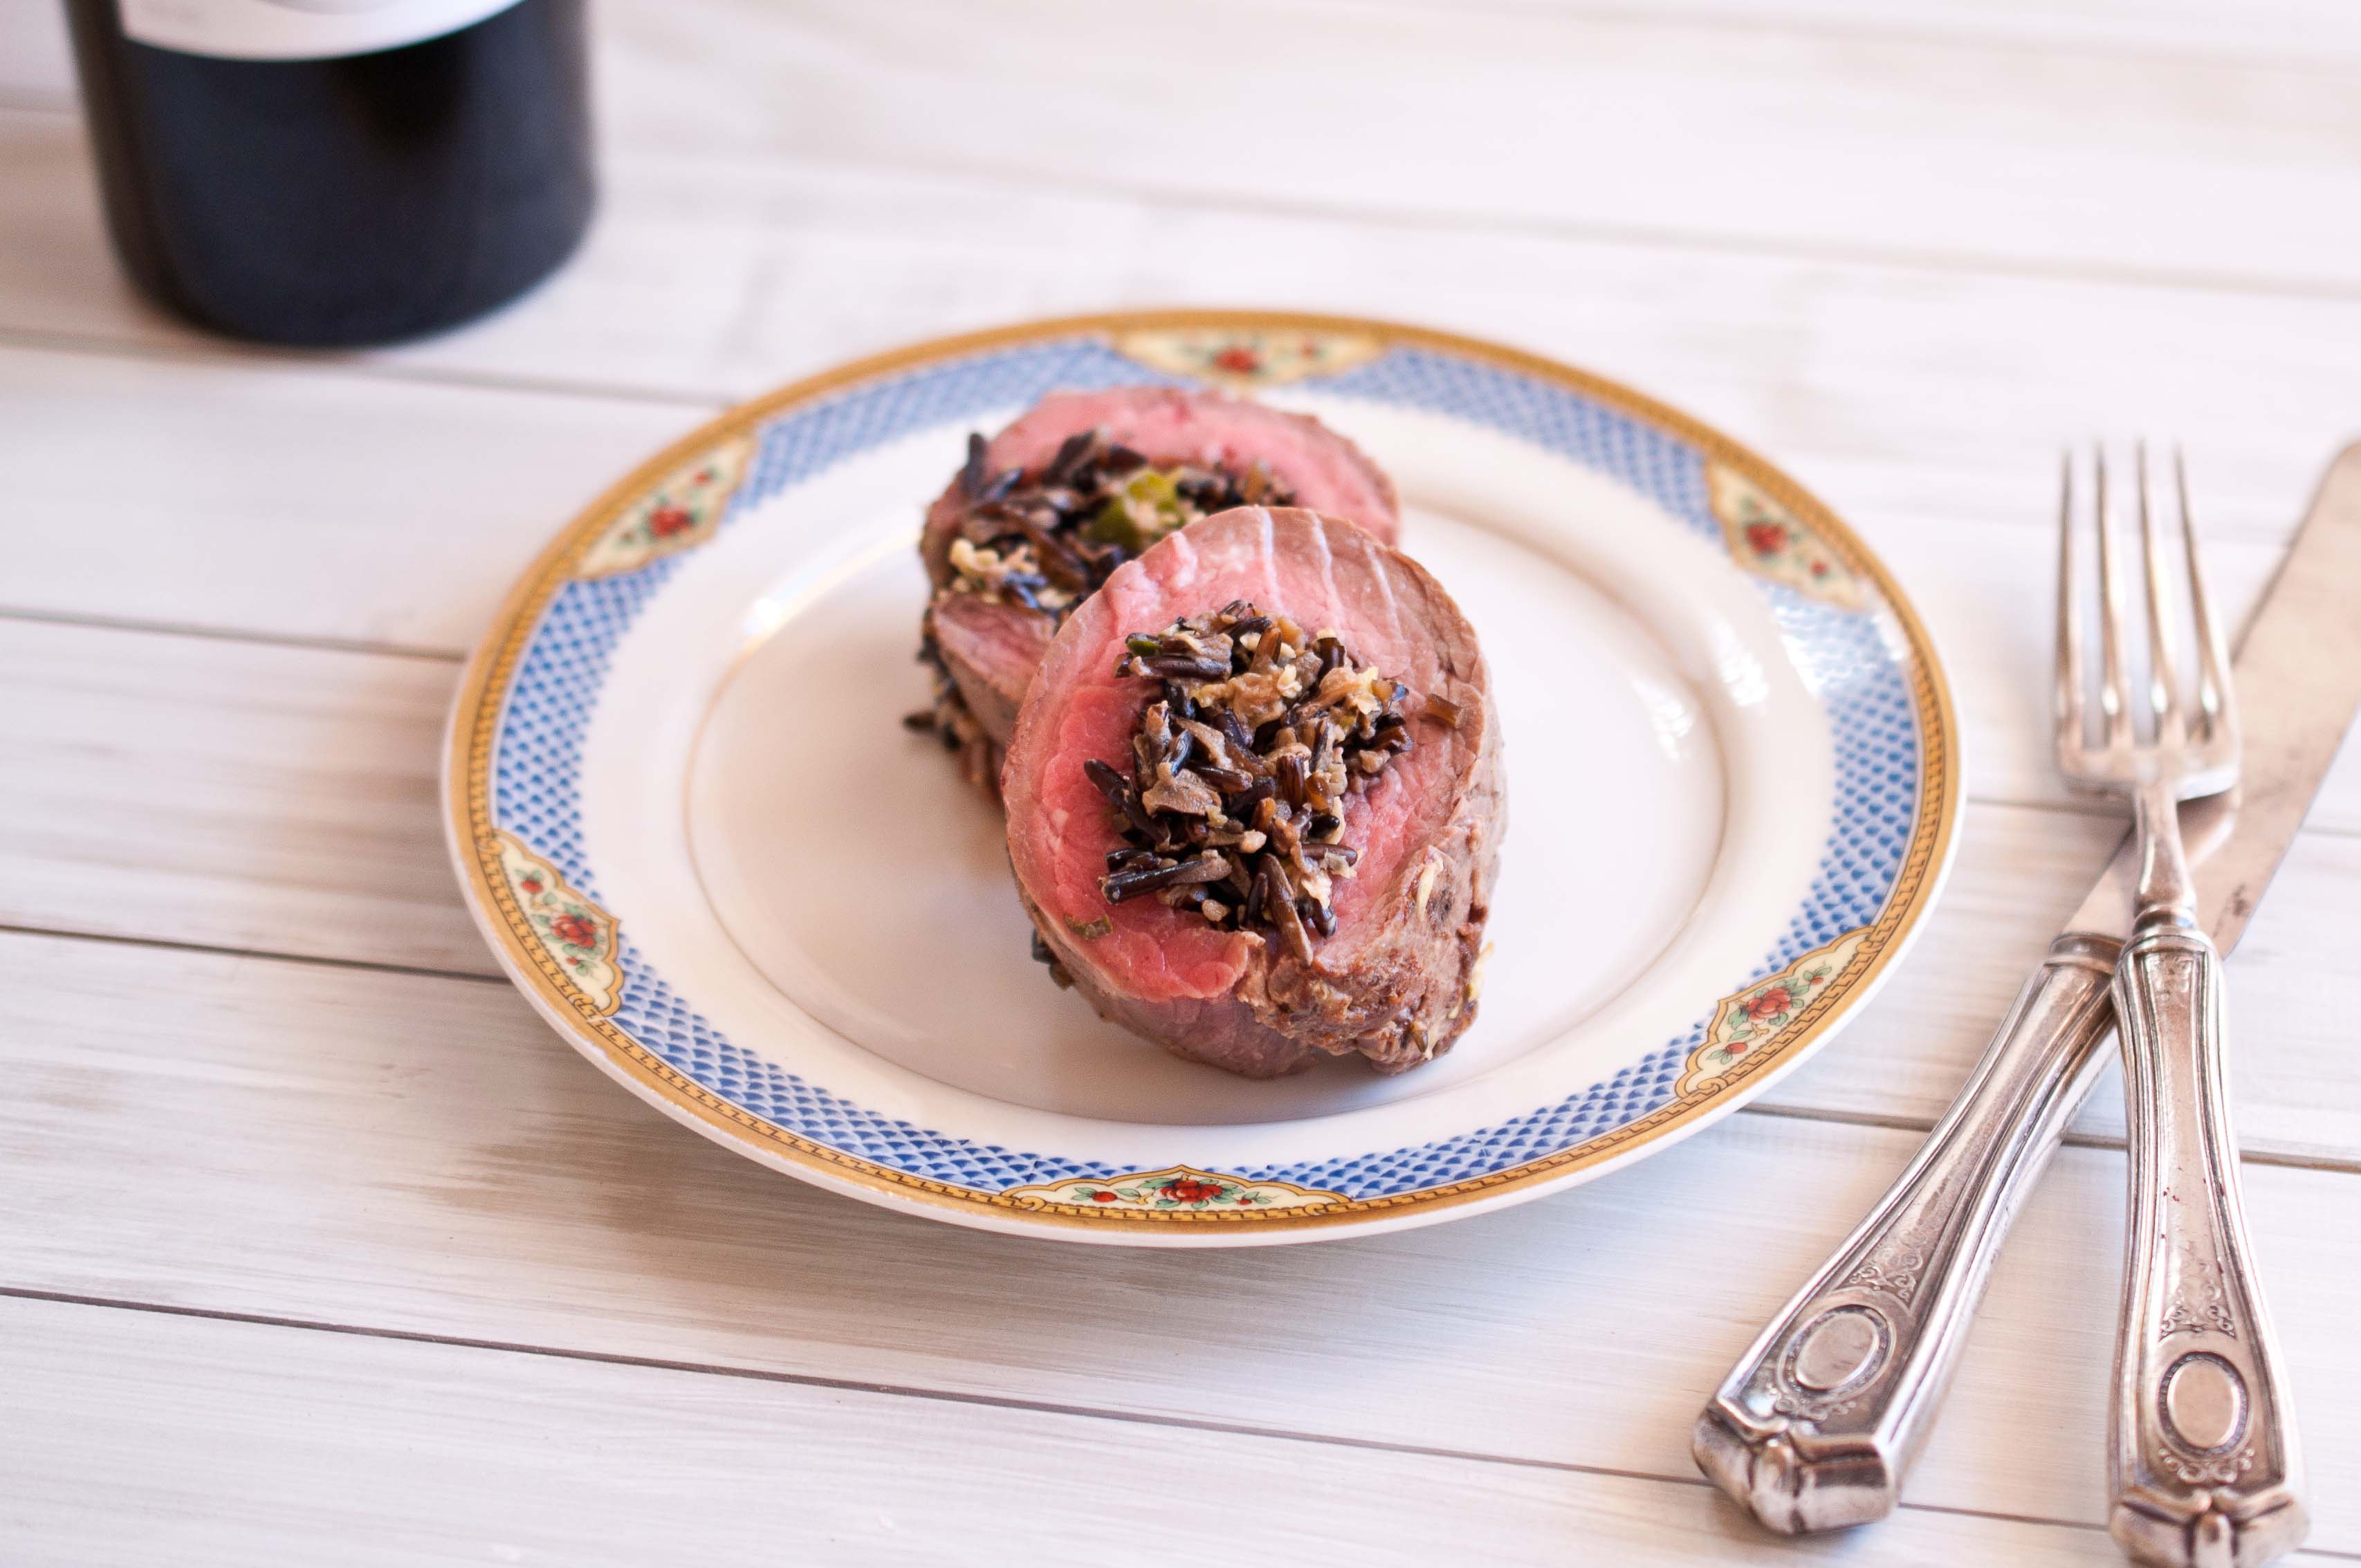
I loved (LOVED!!) this recipe and pairing. I am much more of a red wine person and learning about versatile red, with a higher acidity and lower tannin level than most reds, I am able to serve a red wine as a stand in where most people would typically put a white. Because, remember, pairing is more about acid and tannin levels than white versus red.
I CAN have a red wine with white meat!! As long as I can pick the right one.
I really liked this wine, and I loved that I am now able to pair a red wine with white meat if I so desire. Still maybe a bit to tannin heavy for a light, white fish, but works perfect with pork or possibly a chicken dish. AND It’s UNDER $10!! I love that. I love that I can serve a beautiful wine, paired perfectly with my beautiful salad, and no one will ever know that I so incredibly affordable.
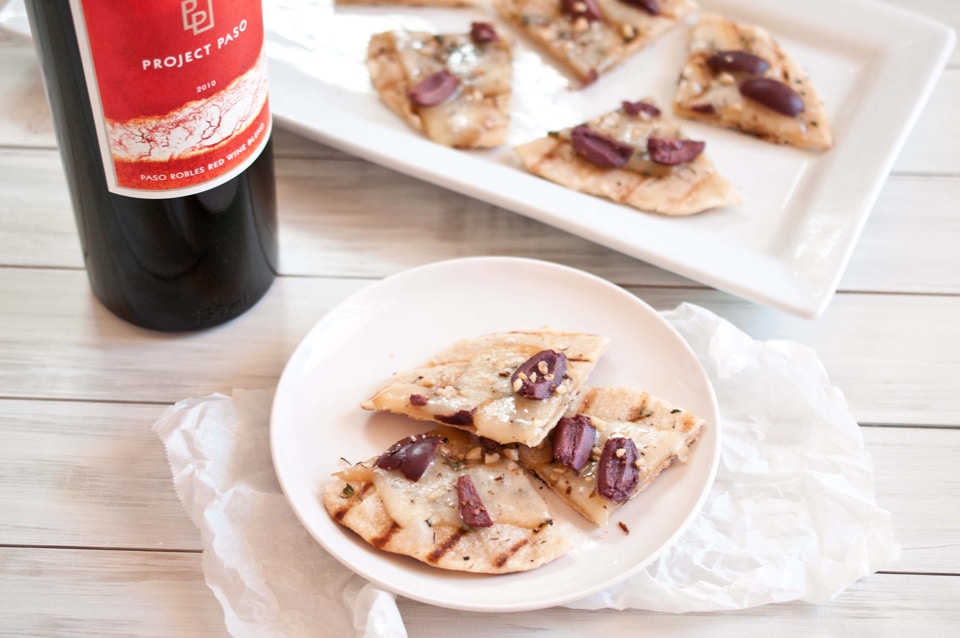
This was a recipe that I followed the closest. And I loved it so much I made it twice in the same week. It is easy, full of flavor and has a fancy boldness that is perfect for a dinner party.
It has a super easy homemade dressing that you mix right in the salad bowl.
Since I had truffle oil on hand from when I made this, I used it in place of the olive oil.
Instead of rubbing the bowl and the bread with garlic, I used a microplane to grate it to a paste and spread it on the bread, and just added the garlic paste to the dressing
I grilled the bread slices on my grill pan and served them on the side
I added chopped tomatoes
I really hope you love this salad as much as I did, its simple, fresh and delicious.
Seek out the wine if you can, and remember that it is a red that you can pair with high acid dishes if you are one of those people who doesn’t particularly fall in love with whites.
More food and wine parings coming this week. Stay tuned!
A few weeks ago I got an email from a wonder man I had met at IFBC in November. He works withDon Sebastiani & Son's Wine Company, and asked if he could send over a shipment of wine along with perfectly paired recipes.
First, who says no to that?
Secondly, I realized how little I actually know about food and wine parring. This was more than an opportunity for free wine, this was an opportunity for a free education.
Learning not just how to pair wine, but why. What the flavors do to each other and how the wrong pairing can change the dish you took so much time making.
I spent a week with these wines, cooking and pairing. Some of the recipes I followed nearly exactly (a very rare occurrence in my life) and some I changed completely while still keeping the integrity of the pairing. By the end of the week I was able to see that wine is not just something to drink with your meal, but wine functions as an additional ingredient to your dish.
Wine changes the way your food tastes. This can be a great thing, making the flavors more intense, brighter and more delicious. This can also be a terrible thing, making the spicy flavors hotter than you want, bringing out flavors you never intended to highlight. What you drink with your meal alters the experience you have, knowing how to do it correctly gives you the control.
After I knew the basics of food and wine pairing, I began to see not only the importance of it but how easy it can be. I was already pairing food and drinks without realizing it, wanting a cup of coffee with my chocolate cake and a lemony iced tea with my Caesar salad. The principals are the same.
This week I’ll be posting the food and wine pairings, as well as why these foods are paired. Each of the dishes featured in the photos in this post will be discussed. Stick around and we will all get a crash course in food and wine pairings, but first, here are the Rules:
Rule one: Acid needs acid
Any food with a high acid level, or something you just want to squeeze a lemon onto, is perfect match for high acid wine. If you are serving Chicken Picatta, or pasta with tomato sauce, opt for a Barolo, Sauvignon Blanc or Chianti. Serving a high acid wine with a meal like this, and you will bring out the citrus notes of your food.
Rule Two: Tannins Need Fat
First of all, what IS a tannin? Tannins are the astringent component in red wine that give it structure. This is what can cause that bitter, pucker feeling in the back of your throat. This needs fat for balance, fat will soften the tannins and bring a smoother feel. Serve a bold Cabernet with a nice fatty piece of Prime Rib.
Rule Three: Fish Goes with Acid, Not With Tannins
We have all heard the old rule of: White Wine for White Meat, Red Wine for Red Meat. The reason for that is acid and tannins, not color. If you are serving fish, think of the wine like a you would a squeeze of lemon on top (high acid wine) rather than a sprinkle of cheese (tannin heavy red wine).
Rule Four: Pair Wine With Dominant Flavor, Not Necessarily The Meat
This is another reason to ignore the old rule White for White, Red for Red. Just because you have pork on your plate, doesn’t mean that is the flavor that will stick around. Is that pork being served in a robust red sauce? Or is that beef being served with a creamy lemon sauce? If the sauce on your plate is the dominant flavor, pair to that, not the meat.
Rule Five: Spice Needs Sugar
This is the best example of wine paring going awry. Serving a super spicy dish with a high alcohol, tannin heavy wine with will set your guests on fire. Two great elements producing a catastrophe combination when mixed. Alcohol intensifies the heat. If however, you cooked a dish that is much more mellow that you have intended, pair with one of those high tannin, high alcohol wines to crank up the heat. But, for the most part, you want to stick with a sweeter, low alcohol wine. Even if you don’t like sweeter wines, you will be surprised at how those sugars are altered with introduction of the heat. Try a Gewürztraminer or a Riesling.
Rule Six: Sweet Needs Sweeter
You want the wine to be sweeter than the dessert. Even if you are not drawn to the sweeter wines, taking a sip of a rich, sweet port before, and after, a bit of a dense fudgy cake completely transforms the flavors of both elements.
I think a lot of resolutions come down to that, finding a balance by remembering the things that you have allowed to unbalance in your life.
Most problems in life come down to too much, or not enough, of one thing or another. This is where I am, right at this moment.
I care too much about what others think about me, my blog and my recipes. I worry too much about how many Twitter followers or Facebook likes I get. I’m much too hard on myself about not being further along in my quest to work full time in the world of food. I am much too self-deprecating too often.
I don’t allow myself enough space and time to grow and learn. I don’t give myself enough credit for my accomplishments.
In the name of balance:
I am grateful. I am a hard worker. I am a fast learner. I push myself. (That is the start of my resolution, balance the bad thoughts with good ones.)
More than anything I want to teach these things to my Daughter. This thing called "balance" that we all find so hard.
My promise to my little girl, just a year and a half into her life, is this:
I will try as hard as I can to show you how to love yourself, by loving myself. The world will teach you enough self-loathing, I will not model it for you. I will be the example of how to push yourself towards your goals, while still enjoying your life. And while every little girl in the world, at some point, will say, "I wanna be like my Momma!" I promise to try and be worthy of that statement. I will do my best to teach you how to put your self-worth into your SELF not into others. How to be in a relationship, not defined by it. How to set a goal and reach it, while still giving space to fail and get back up.
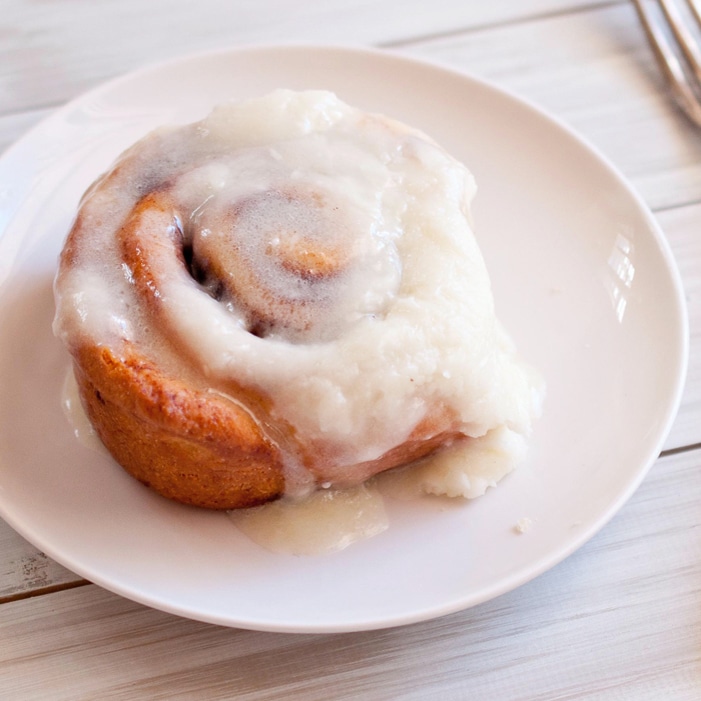
Cinnamon Rolls where my resolution two year ago, when I was pregnant. I called my sister in a pregnancy induced semi-panic over Christmas Traditions. We didn’t have any Holiday traditions growing up and I wanted, no, NEEDED to have some for my own family. Where do I start? What do I do?? My sister, who has always been a strong force in my life, as well as a great example of balance, reminded me that my fetal child had no current need for holiday pageantry and I had time for decision making. I told her that I wanted to make cinnamon rolls from scratch on Christmas Morning. She said that was a great place to start.
A few weeks later, on my birthday, a Cinnamon Roll pan from King Arthur Flour showed up at my house. I cried. I decided right then that my Holiday Traditions would revolve around being together as a family, like a Traditional Christmas Morning breakfast with Cinnamon Rolls. I resolved to spend more time with people I love.
For the rest of my life, I’ll be making these on Christmas Morning. Sometimes resolutions do stick with you.
This is food Networks attempt to re-create the carefully guarded secret recipe of Cinnabon’s Cinnamon Rolls. It’s amazing, which is why this is the recipe that I have decided to use as my Christmas Tradition and not attempting to create my own, although slight alterations have been made.
12 tablespoons unsalted butter, softened, plus more for the pan
1/2 cup granulated sugar
3 tablespoons ground cinnamon
1 tsp fresh ground nutmeg
For the Glaze:
2 cups confectioners' sugar
1/3 cup heavy cream
4 tablespoons unsalted butter, melted
Directions
Make the dough: Warm the milk in a medium saucepan over low heat until it reaches about 100 (you can also use the microwave, and test every 20 seconds. I keep a digital people thermometer from the drug store in the kitchen to use when I heat up liquid to proof yeast. It’s cheap and accurate). Remove from the heat and sprinkle in the yeast and 1/4 teaspoon sugar (don’t stir). Set aside until foamy, 5 minutes. Whisk in the melted butter, egg yolk and vanilla.
Whisk the flour, the remaining 1/4 cup sugar, dry milk, the salt and nutmeg in the bowl of a stand mixer. Make a well in the center and pour in the yeast mixture. Mix on low speed with the dough hook until thick and slightly sticky. Knead on medium speed until the dough gathers around the hook, 6 minutes. (Add up to 2 more tablespoons flour if necessary.)
Remove the dough and shape into a ball. Butter the mixer bowl and return the dough to the bowl, turning to coat with butter (those are the Food Network instructions, I use a large glass bowl that I spray with butter flavored cooking spray). Cover with plastic wrap and let rise until doubled, 1 hour 15 minutes.
Roll out the dough, fill and cut into buns (see instructions below). Butter a 9-by-13-inch baking pan; place the buns cut-side down in the pan, leaving space between each. Cover with plastic wrap and let rise until doubled, 40 minutes. If you are making this the night before, this is a good place to stop. Instead of allow to rise until double in size on your counter top, place the buns in a cold fridge. It should take about 6-8 hours for the second rise to happen in a cold fridge, instead of 40 minutes at room temp.
Preheat the oven to 325.
Bake the buns until golden brown, about 35 minutes. Cool in the pan 15 minutes. Meanwhile, make the glaze: Sift the confectioners' sugar into a bowl, then whisk in the cream and melted butter. Transfer the buns to a rack and spoon the glaze on top while still warm.
How to Form Cinnamon Buns
1. On a lightly floured surface, roll the dough into a 12-by-14-inch rectangle with the longer side facing you.
2. Spread with the softened butter, leaving a 1/2-inch border on the far long edge. Mix the sugar and cinnamon; sprinkle over the butter.
3. Brush the unbuttered far edge with water. Roll the dough away from you into a tight cylinder and press on the long edge to seal.
4. Cut the cylinder with a sharp knife to make 6-9 equal-size buns.
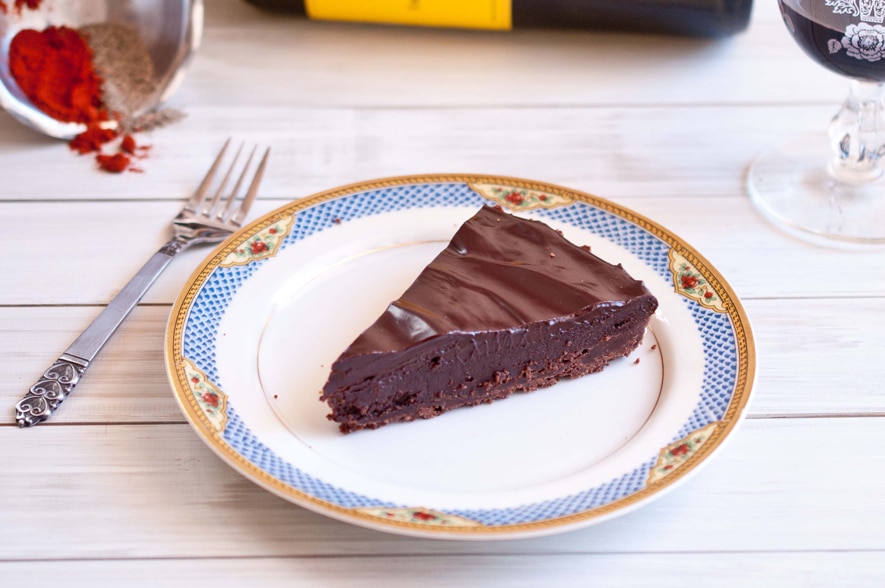
I watch The Next Iron Chef like it’s the Olympics. Once the battle is announced, I immediately start to formulate a recipe in my head. It’s my delusional way of participating.
At the end of an episode a few weeks ago, two chefs, Geoffrey Zakarain and Anne Burrell were asked to make a dessert out of Kikkoman Panko Bread Crumbs and Ponzu Sauce.
I immediately yelled out "Ponzu Caramel Sauce!!"
Mr. Fits gave me a strange sideways glance.
Anne Burrell, then, proceeded to MAKE a Ponzu caramel sauce. Which put a smug smile on my face. Until she lost.
In her defense, the judges loved her dish and Zakarain went on to win the tittle of Next Iron Chef. Although my personal favorite was Elizabeth Faulker, I do believe that Chef Zakarian was the perfect choice. His very first battle as an Iron Chef on Christmas Day earned him a PERFECT score.
The next day I couldn’t stop thinking about the idea of a dessert with Panko and Ponzu. Of course the recipes battled on Next Iron Chef aren’t written down, I have no idea how she made her gorgeous caramel, so I just had to leave it to my own devices to come up with one.
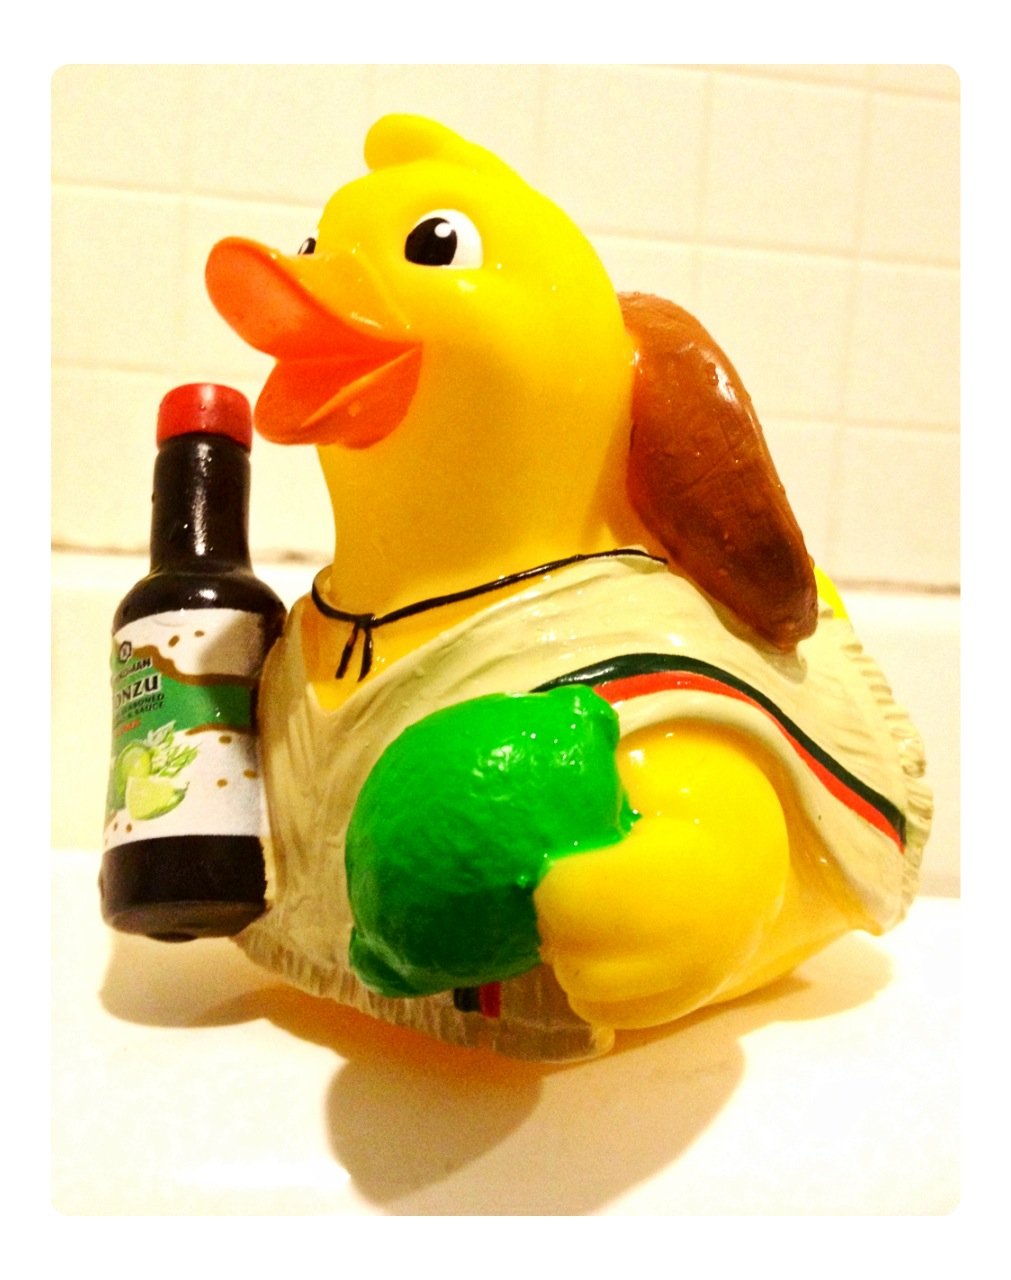
While this is rolling around in my head, I get an email from a lovely and adorable PR girl from Kikkoman whom I had met at IFBC in November. She wanted to know if she could send over a box of Kikkoman goodies for me to play with. Ummm…Yes. Yes you can.
She even included a Kikkoman rubber ducky for Tater. Although I still can’t figure out why he is wearing a sombrero.
(I talked a little a few weeks ago about the whole Blogger/PR relationship and it is pretty awesome.)
So it was fate. I would be making a dessert out of Panko and Ponzu.
Here is what I came up with:
Battle Kikkoman!!!
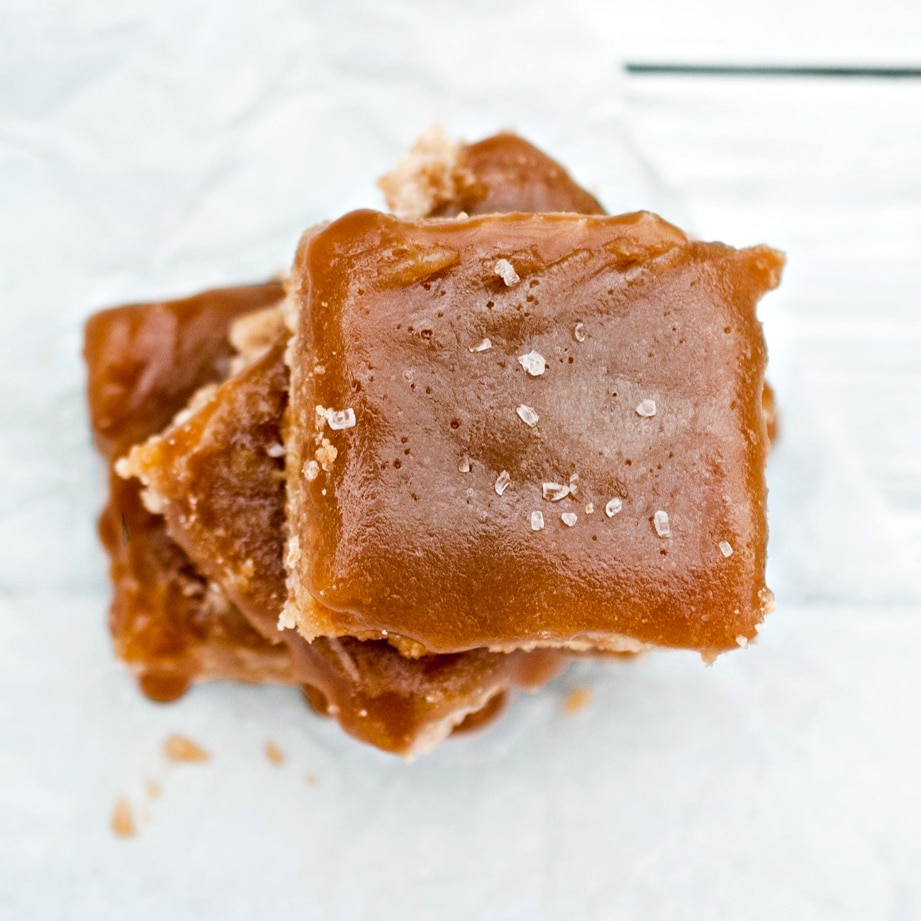
Panko Shortbread with Salted Ponzu Caramel Bars
Panko Shortbread:
1 cup flour
1/2 cup Kikkoman Panko
1/2 cup brown sugar
1/4 tsp salt
12 tbs butter
Ponzu Caramel Sauce:
1/2 cups sugar
1/3 cup light corn syrup
1 tbs Ponzu Sauce
1 cup heavy cream
1 stick of butter
1/4 tsp course sea salt
Line the bottom of an 11 x 7 inch baking dish with parchment paper, allowing the paper to go up and over the edges of the pan.
In a food processor, combine flour, brown sugar, Panko and salt, pulse to combine. Add the butter and process until combined, about 1 minute. Press the shortbread into the bottom of the baking dish in one even layer. Chill in the refirgerator for 30 minutes.
Preheat the oven to 350. Bake for 20 minutes or until a light golden brown color. Allow to cool.
In a large pot over medium high heat, combine the sugar, corn syrup and ponzu sauce (mixture will bubble to a large volume during cooking). Stir until the sugar has dissolved. Allow to boil, without stirring, until the mixture reaches 230 degrees, about 5 minutes. While the caramel is cooking, do not stir, but swirl the pan every 30 seconds to redistribute the caramel sauce evenly. Once 230 degrees is reached, add the butter a few cubes at a time and stir, allowing the mixture to return to 230 degrees. Remove from heat and stir in the cream, adding slowly.
Pour the caramel over the shortbread and refrigerate for 4 hours, top with sea salt. Remove from pan using the parchment paper and cut into squares.
You didn’t think that I could make this delicious whipped goodness and not come up with a fabulous cake to go with it, did you?
But, I have to admit that I’m not a fan of mint, because of what I will always referr to as The Moroccan Mint Experience. While travel through Middle Atlas a few years ago with my sister…we…we’ll it’s hard to explain. But as a result, I no longer like mint.
Although my favorite part of the devolution of mint in my life, is Mohammed
He lives in a cave in a mountain town called B’Halil.
He made me mint tea in his cave. And when someone as wonderful and welcoming as Mohammad takes time to welcome you into his cave and heat up water over an open flame and make you tea out of brown water and mint leaves YOU DRINK IT!!
And I am so grateful to him for the tea. Although he has nothing to do my my distaste for mint tea, he is my favorite memory of my journey towards no longer liking it.
For some reason, however, Candy Canes are exempt for my I Hate Mint rule. Can’t really say why.
Even if you hate mint, or if you love it so much you want to take a long soak in big bathtub full of Junior Mints, I hope you like this cake. I did.
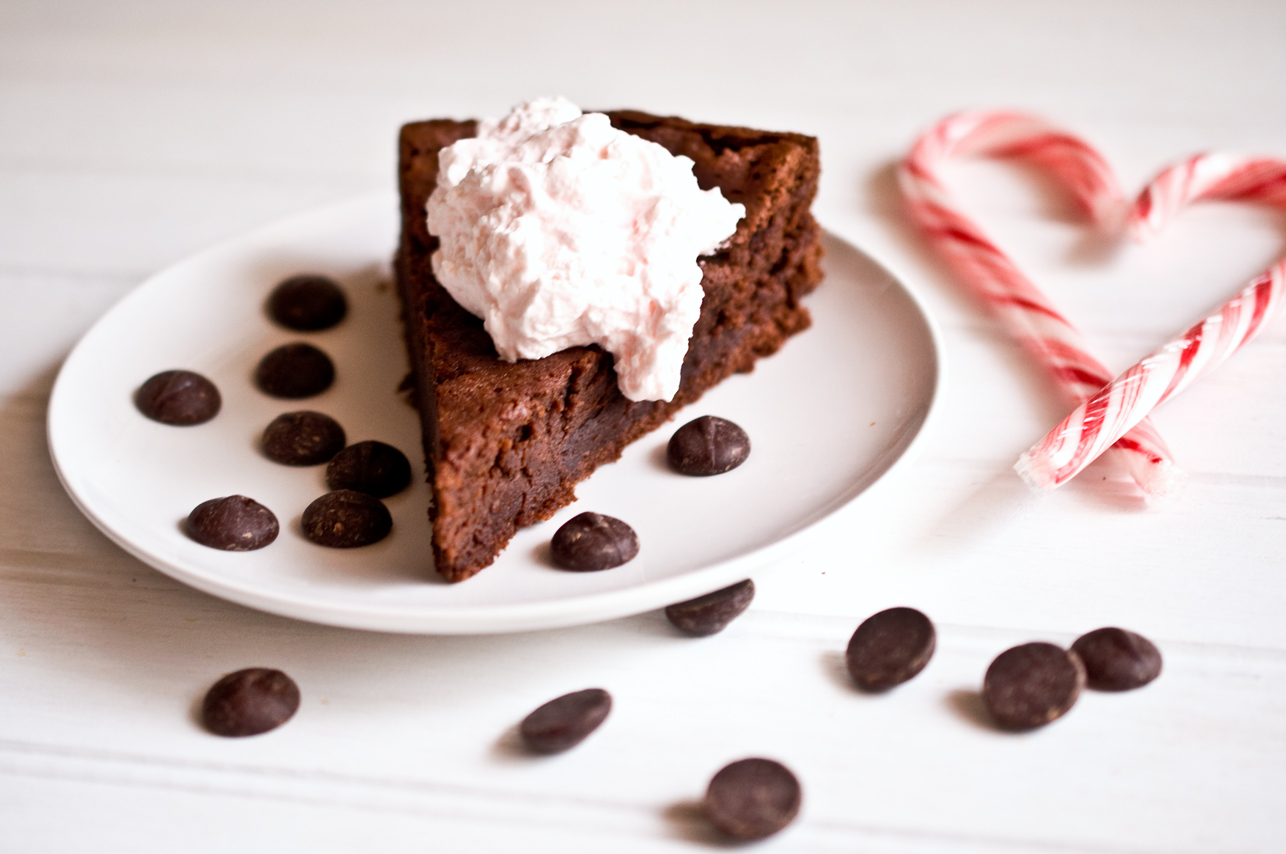
Chocolate Peppermint Soufflé Cake With Candy Cane Whipped Cream
In a small pot, add the butter and peppermint extract, stir over medium heat until the butter has melted, don’t allow to boil. Remove from heat.
In the top of a double broiler (or a metal bowl set over a pan of simmering water) add the chocolate and the peppermint butter. Stir over medium-low heat until the chocolate is melted and combined with the butter. Remove from heat and set aside to cool slightly.
In the bowl of a stand mixer, add the egg yolks and 1/3 cup of sugar. Mix on high until well combined and light and frothy. Turn off the mixer, and add the flour, salt and the cocoa powder. Mix until just combined. Add the chocolate mixture and beat again until the chocolate is incorporated into the egg yolk mixture.
In a separate bowl, add the egg whites and 1 tbs sugar. Beat with an electric mixer on high until soft peaks form. Add the remaining two tbs sugar and beat again until shiny and stiff peaks form.
Remove bowl of the stand mixer that contains the chocolate batter. Put one third of the egg whites into the chocolate batter, and gently stir until barely combined. Add half the remaining egg whites and stir again. Add the remaining egg whites and stir until just combined.
Line the bottom of a 9 inch spring form pan with a round of parchment paper. Spray the sides with butter flavored cooking spray.
Pour the batter into the spring form pan in one even layer.
Bake at 350 for 35 minutes or until the top is dry and slightly cracked.
Allow to cool for at least 15 minutes, the top will deflate slightly.
Remove from the spring form pan, allow to cool to room temperature.