I’ve learned a thing or two about what you like since I joined Pinterest. You like heathy food, football food, chocolate food and pie food. Today, I’m focusing on those last two, they’re the most fun anyway.
If you fancy yourself a bit of a Pinterest junkie and need a new fix, you might want to wander over to Foodie and check that out as well. It’s just as easy to make collections and much easier to share those with the embed feature.
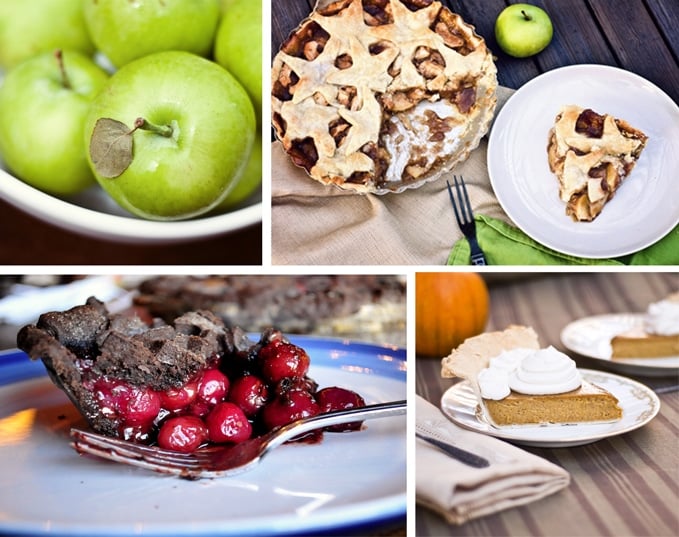
In honor of the upcoming Pi Day (March 14th), here is my collection of Chocolate Pies. Now if you’ll just grab me the strongest coffee you can find and fork, I’d like to get started.
This is a sponsored post. All opinions are my own.
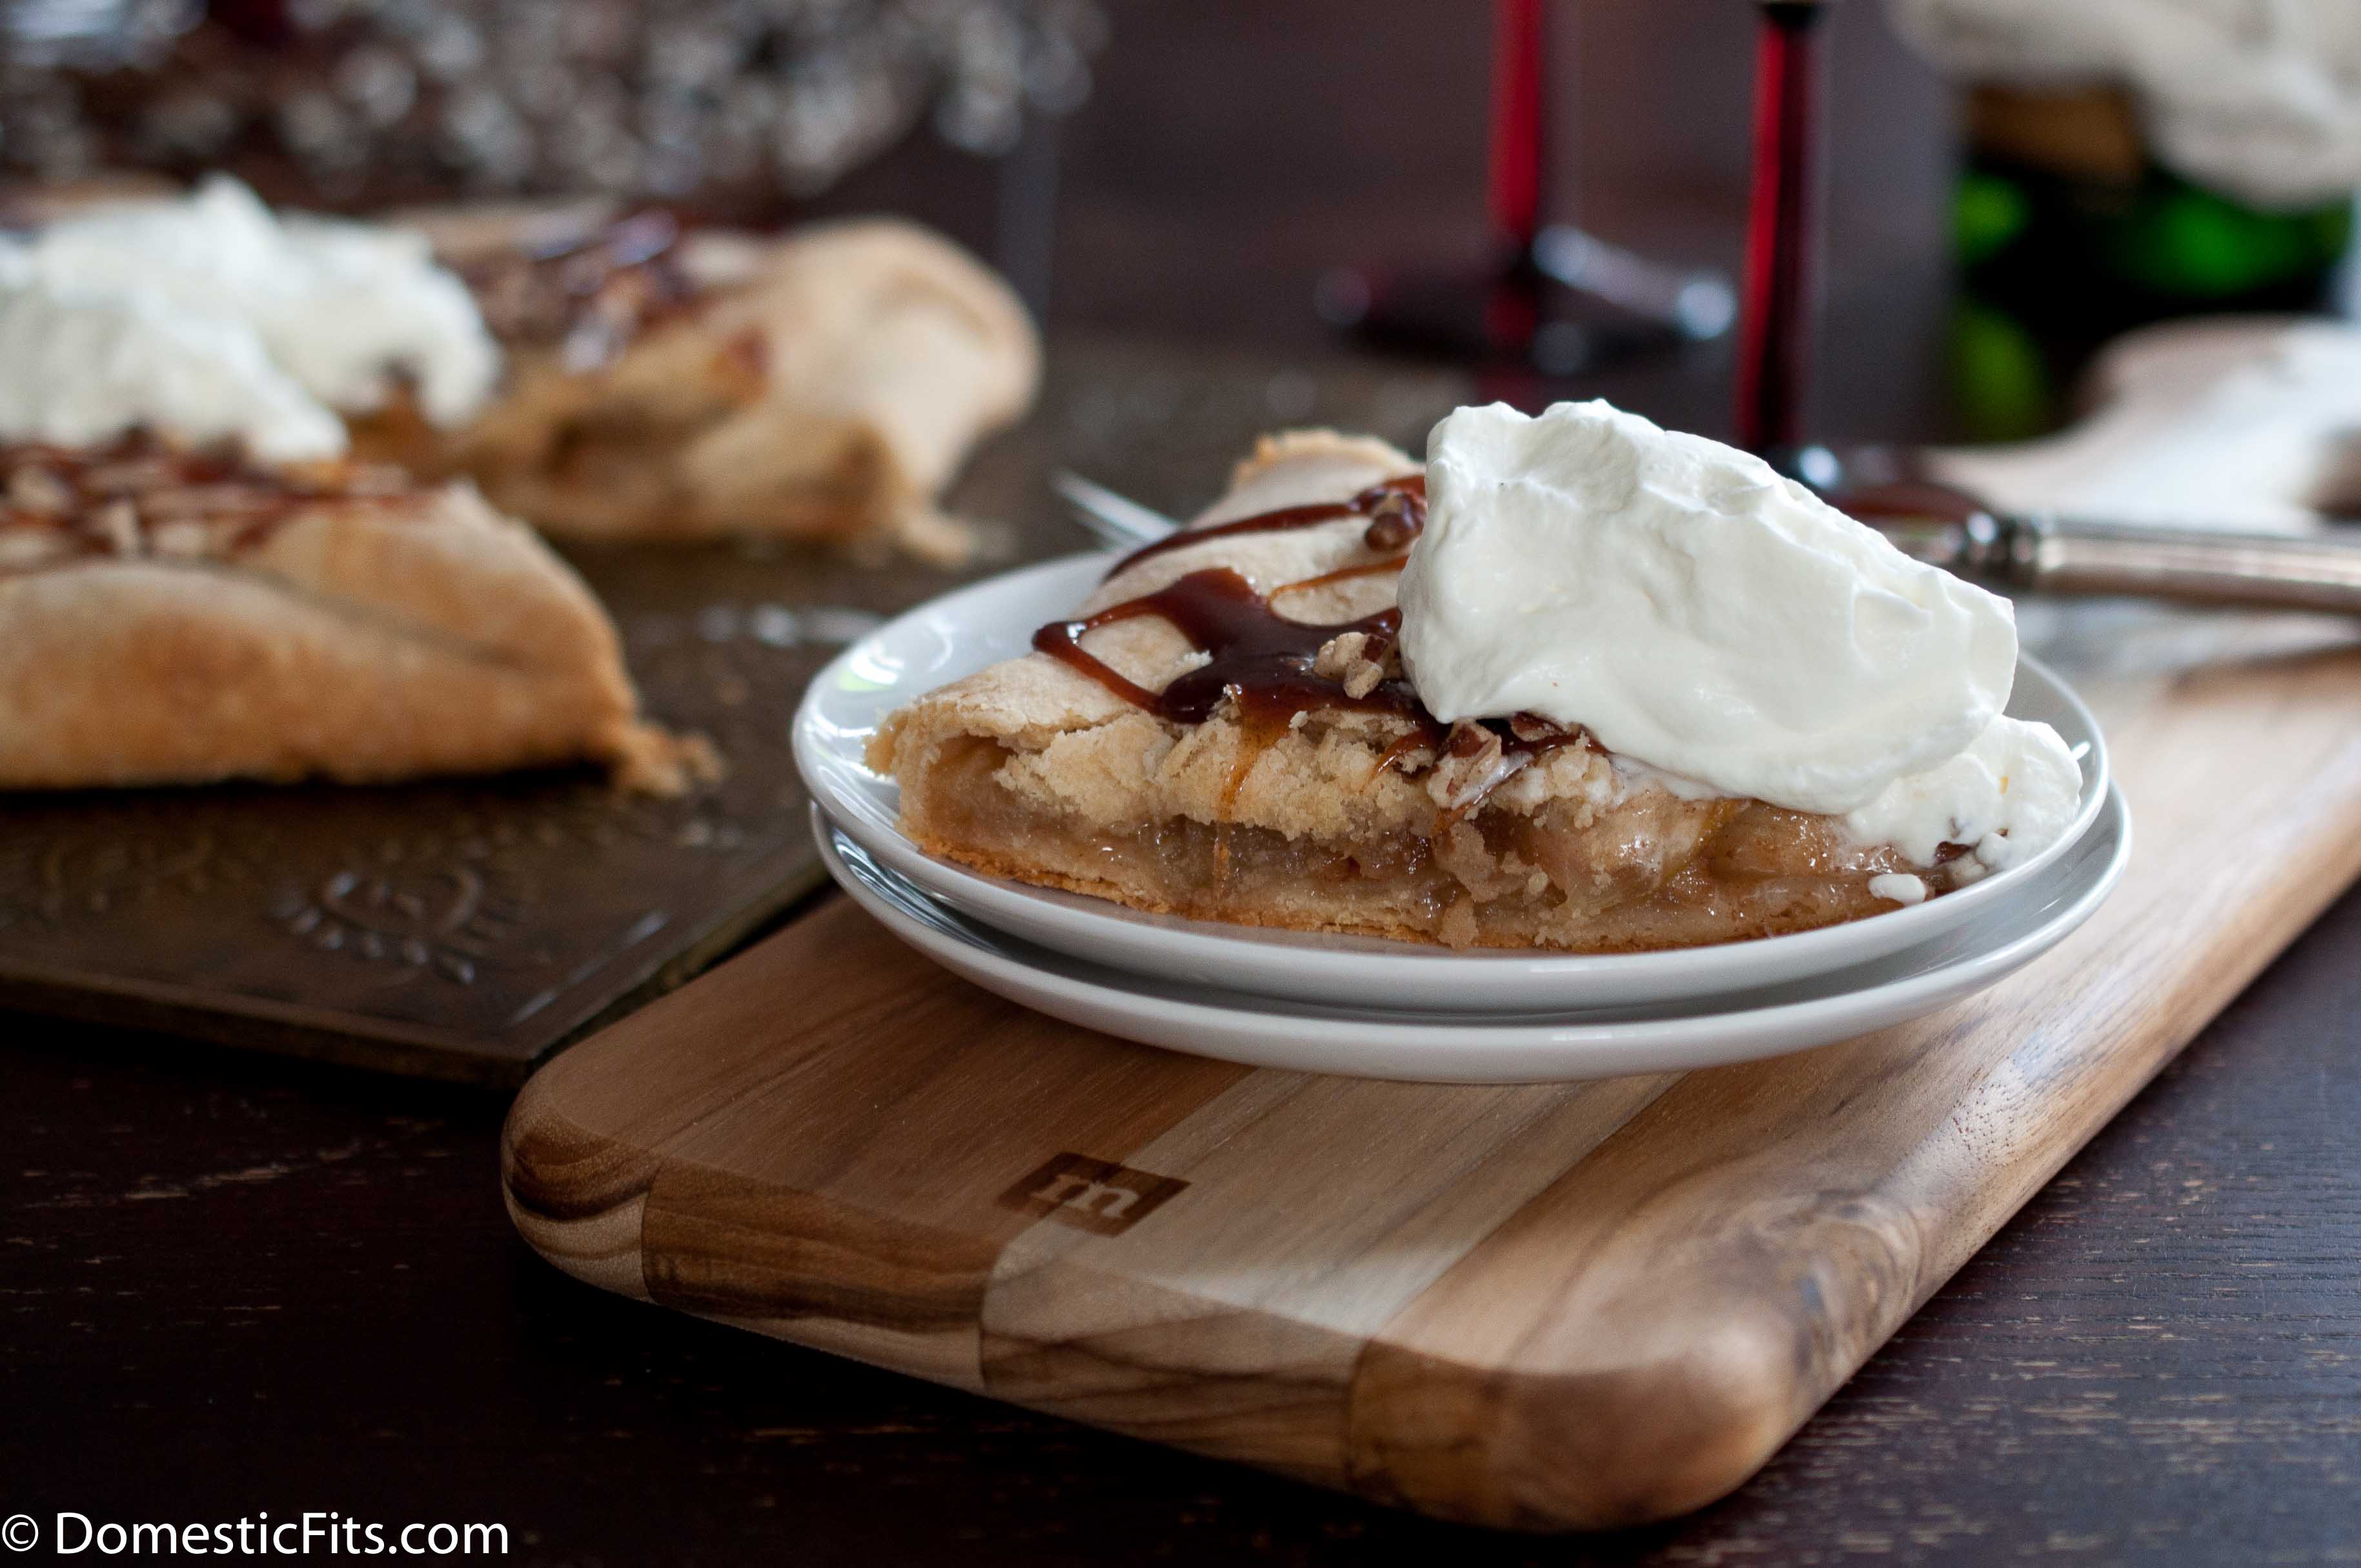
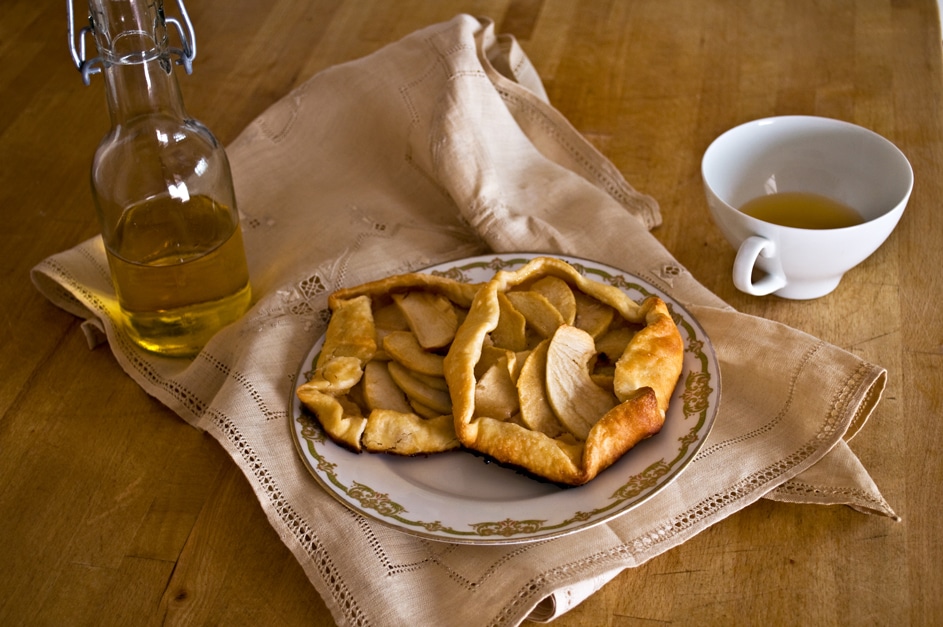
I made three Galettes in the past week. This one, one I’m working for the cookbook I’m writing and a small caramelized onion and cheddar one that got devoured.
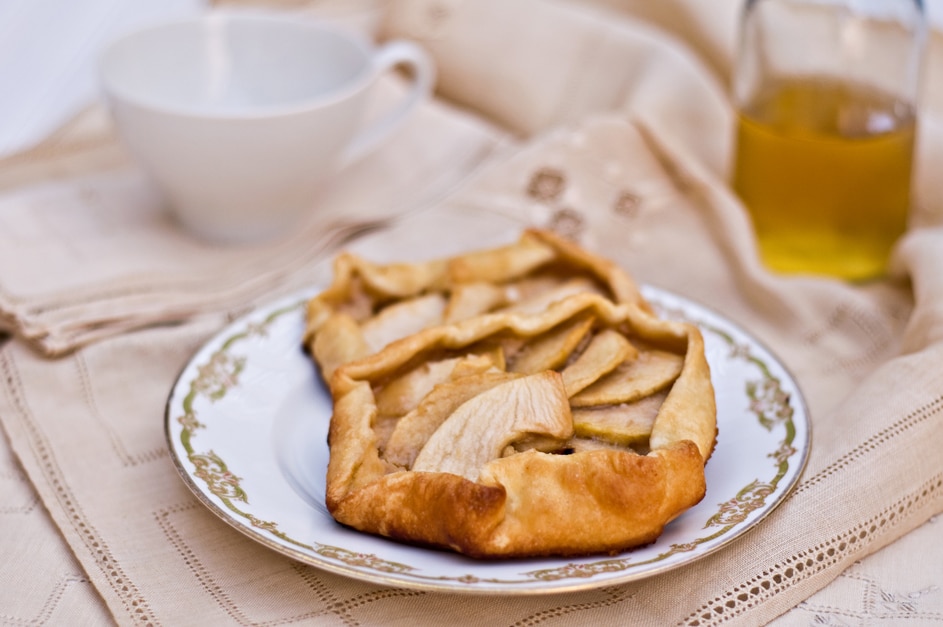
These are like a secret weapon, in a way. The crust (which you absolutely MUST be made from scratch) is one of my favorite recipes I’ve ever made. It’s soft and buttery and flakey and takes about 8 minutes to throw together.
Eight minutes and you have yourself the best homemade crust you have ever tasted. It does need at least an hour to chill, but the best part is that you can make it days ahead of time and it’s all ready to go when you need it. You can even double the recipe and freeze the extra in a ziplock freezer bag for up to a month.
It’s rustic and it’s imperfections just make it that much more charming.
It has that perfect balance of foodie without fussy and casually elegant. Perfect.
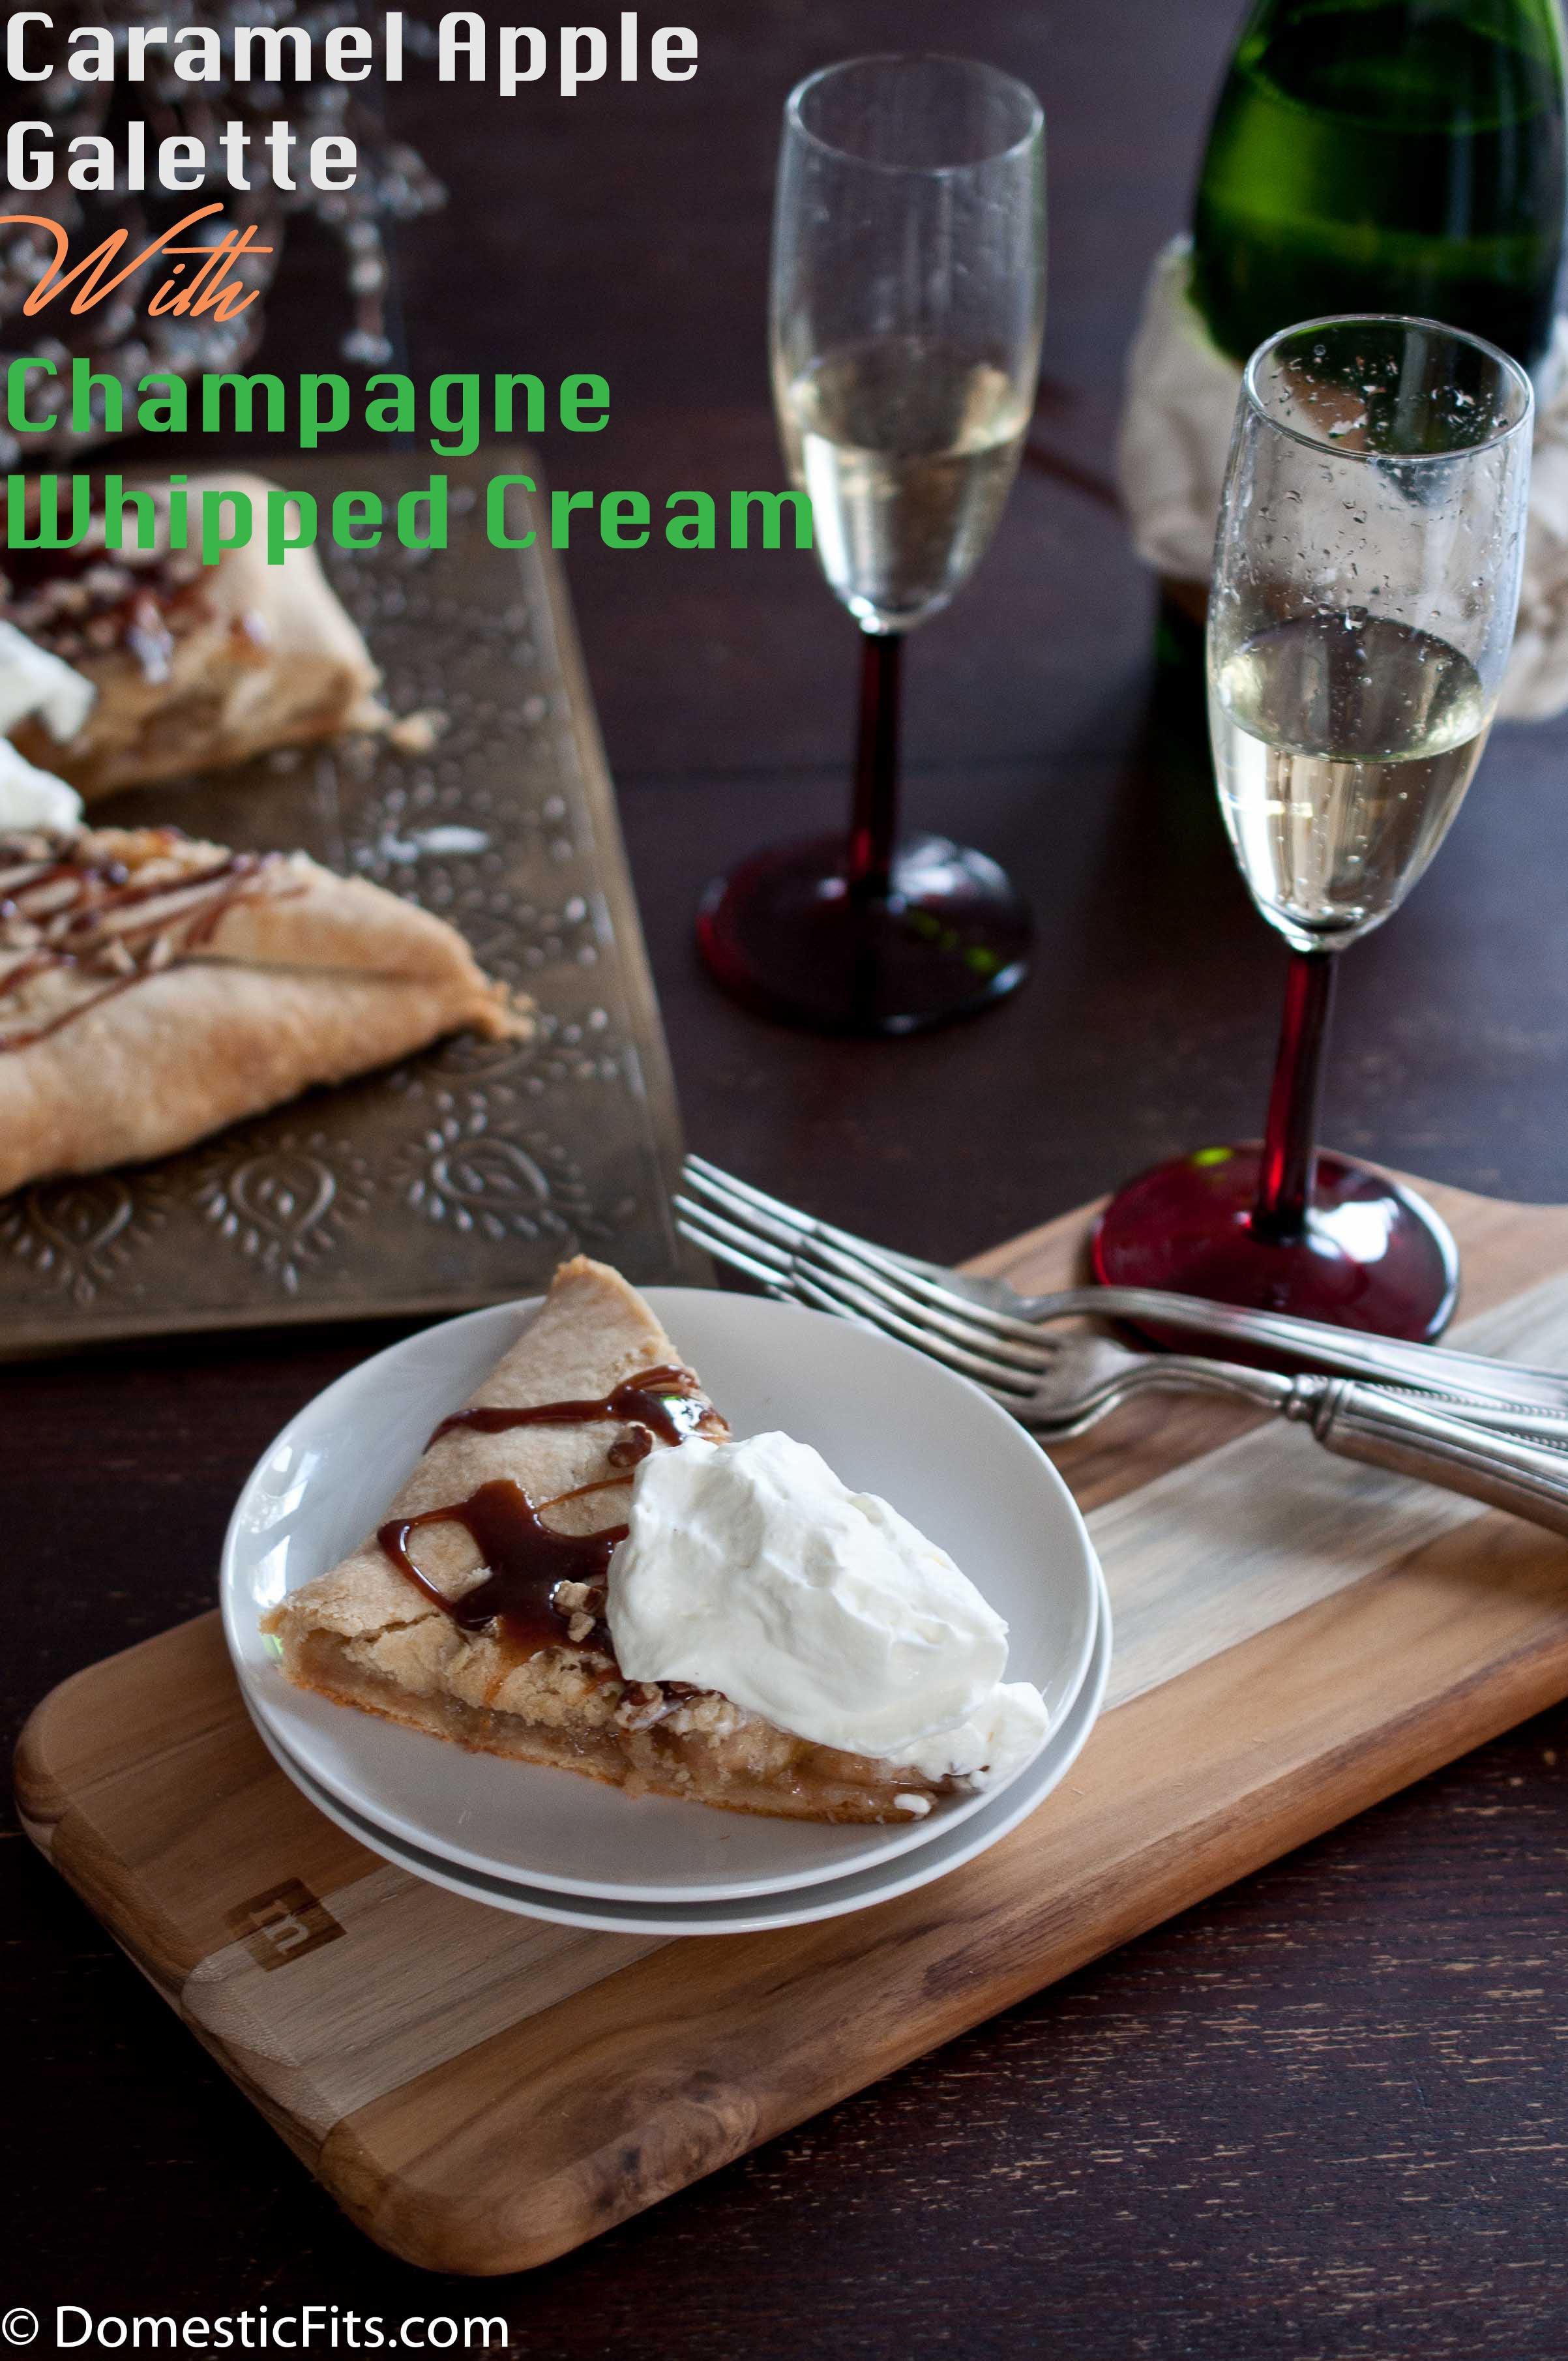
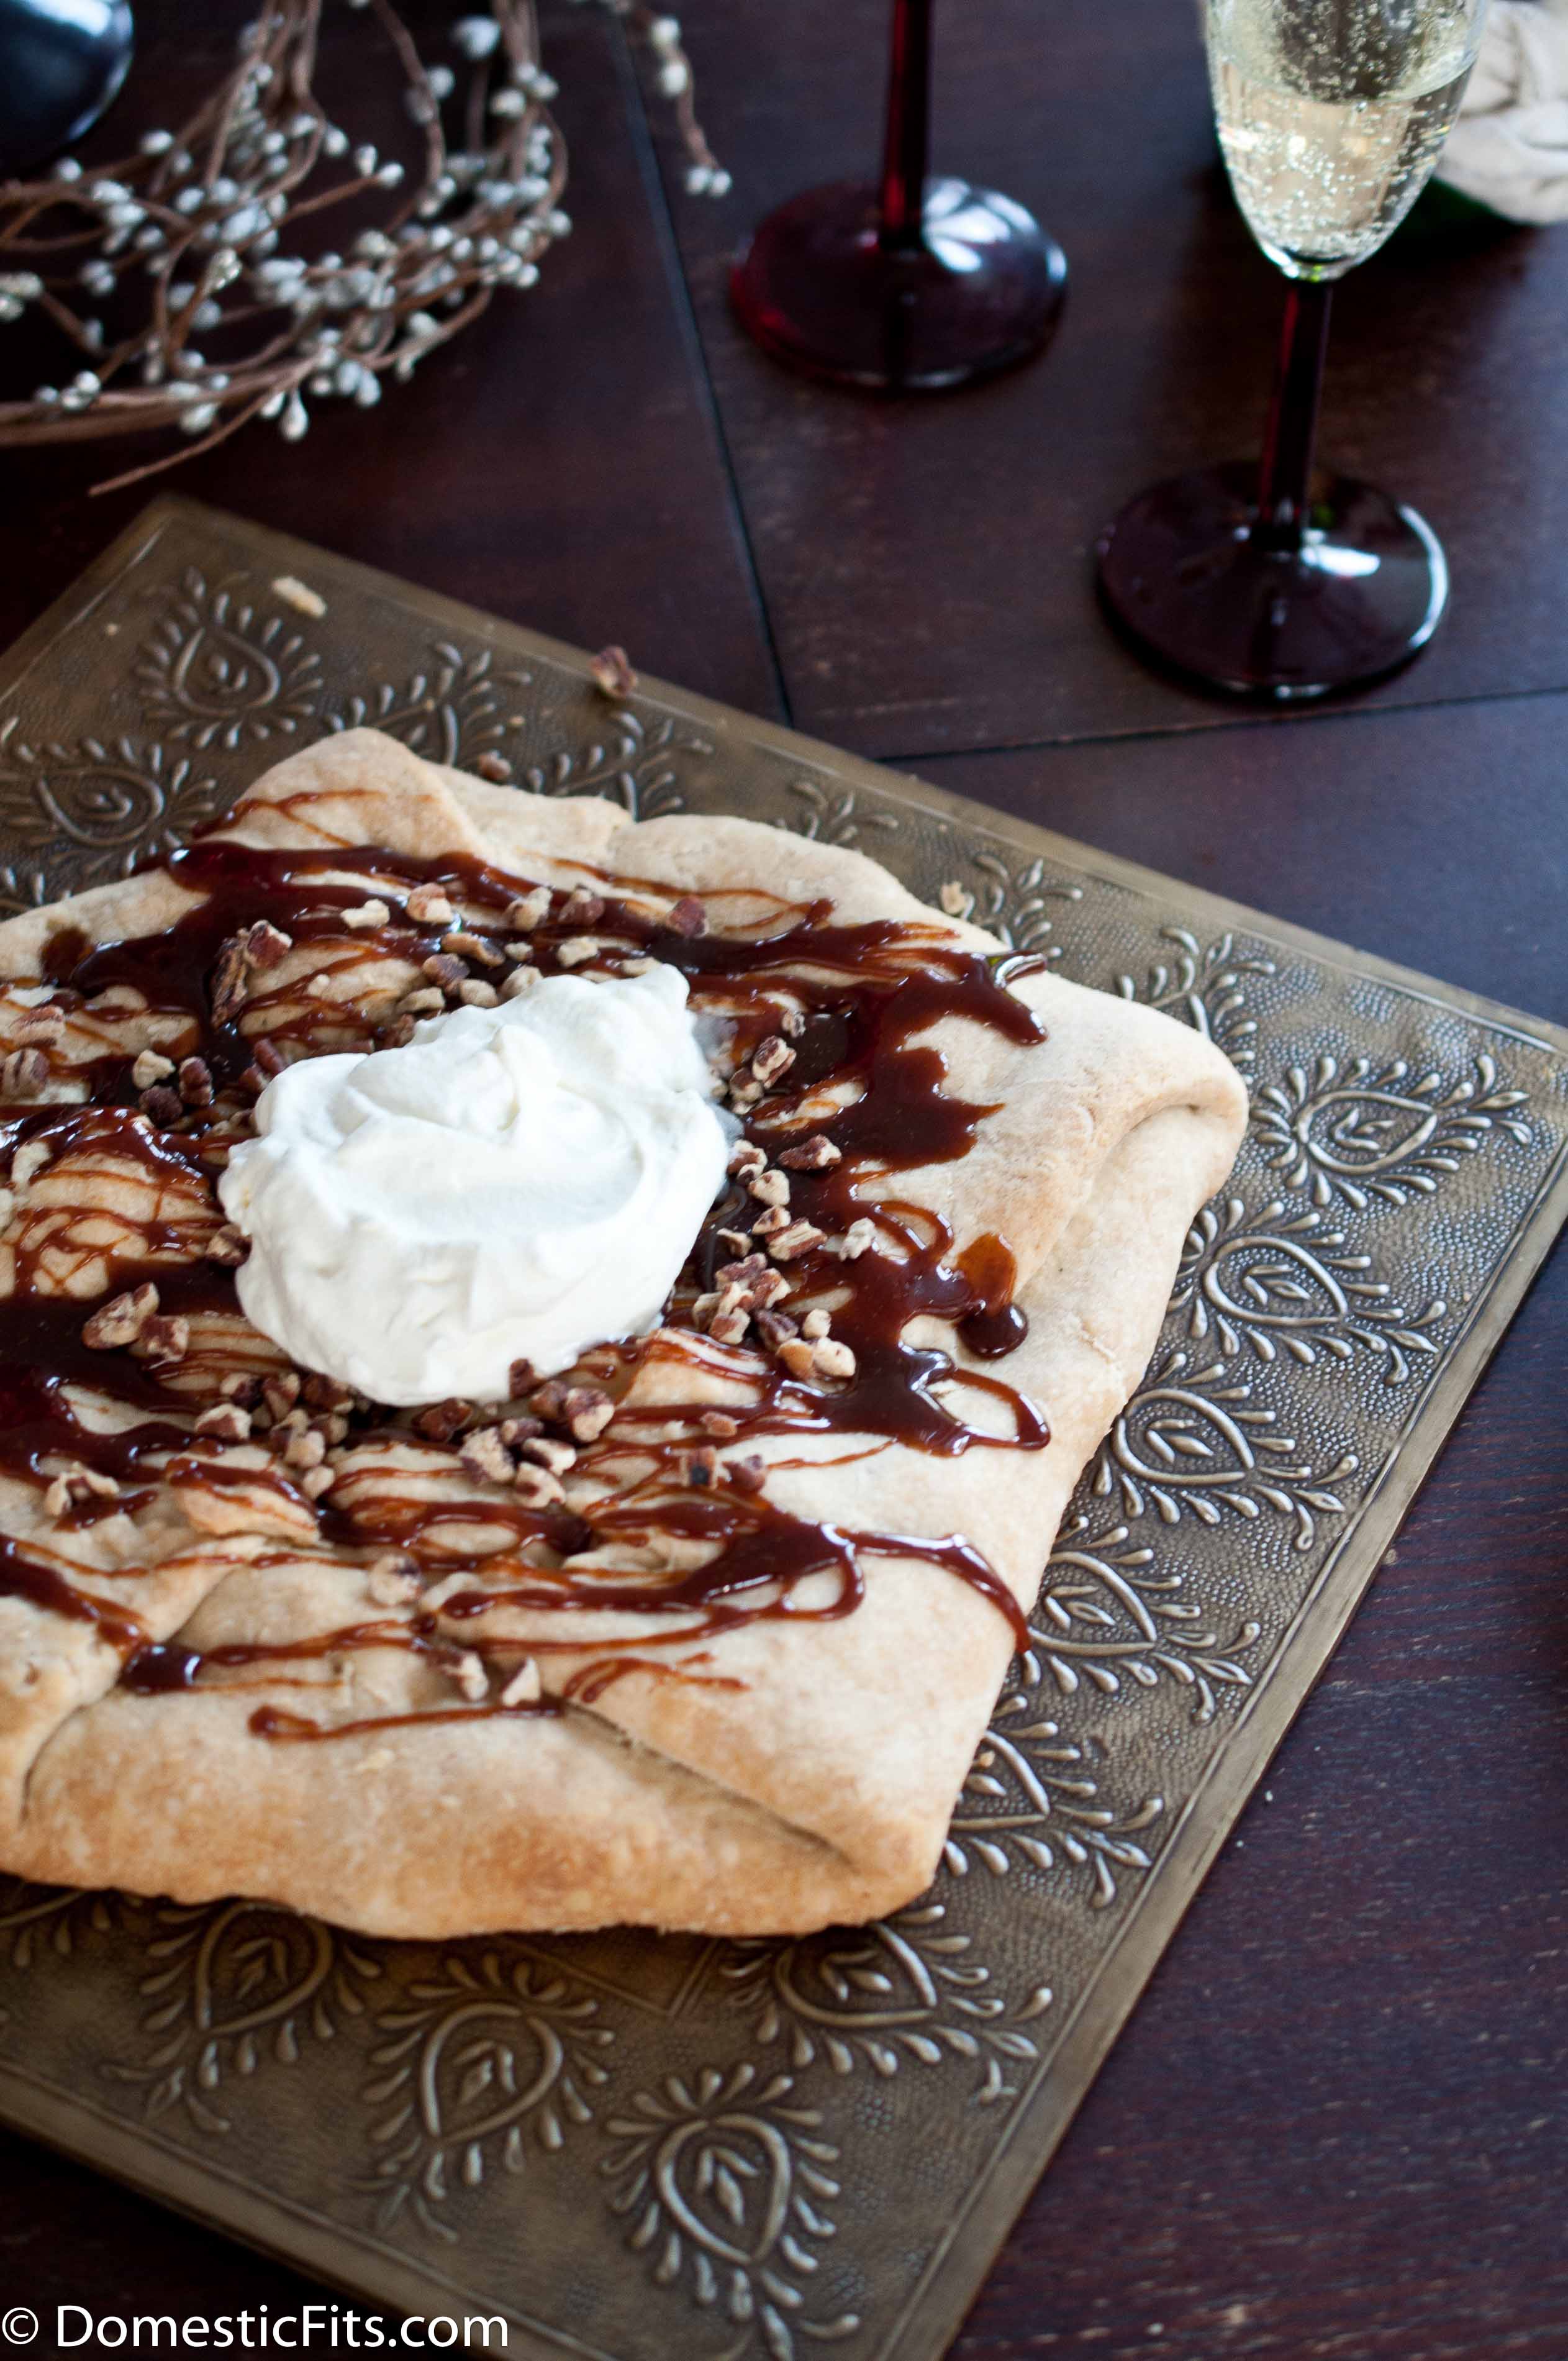
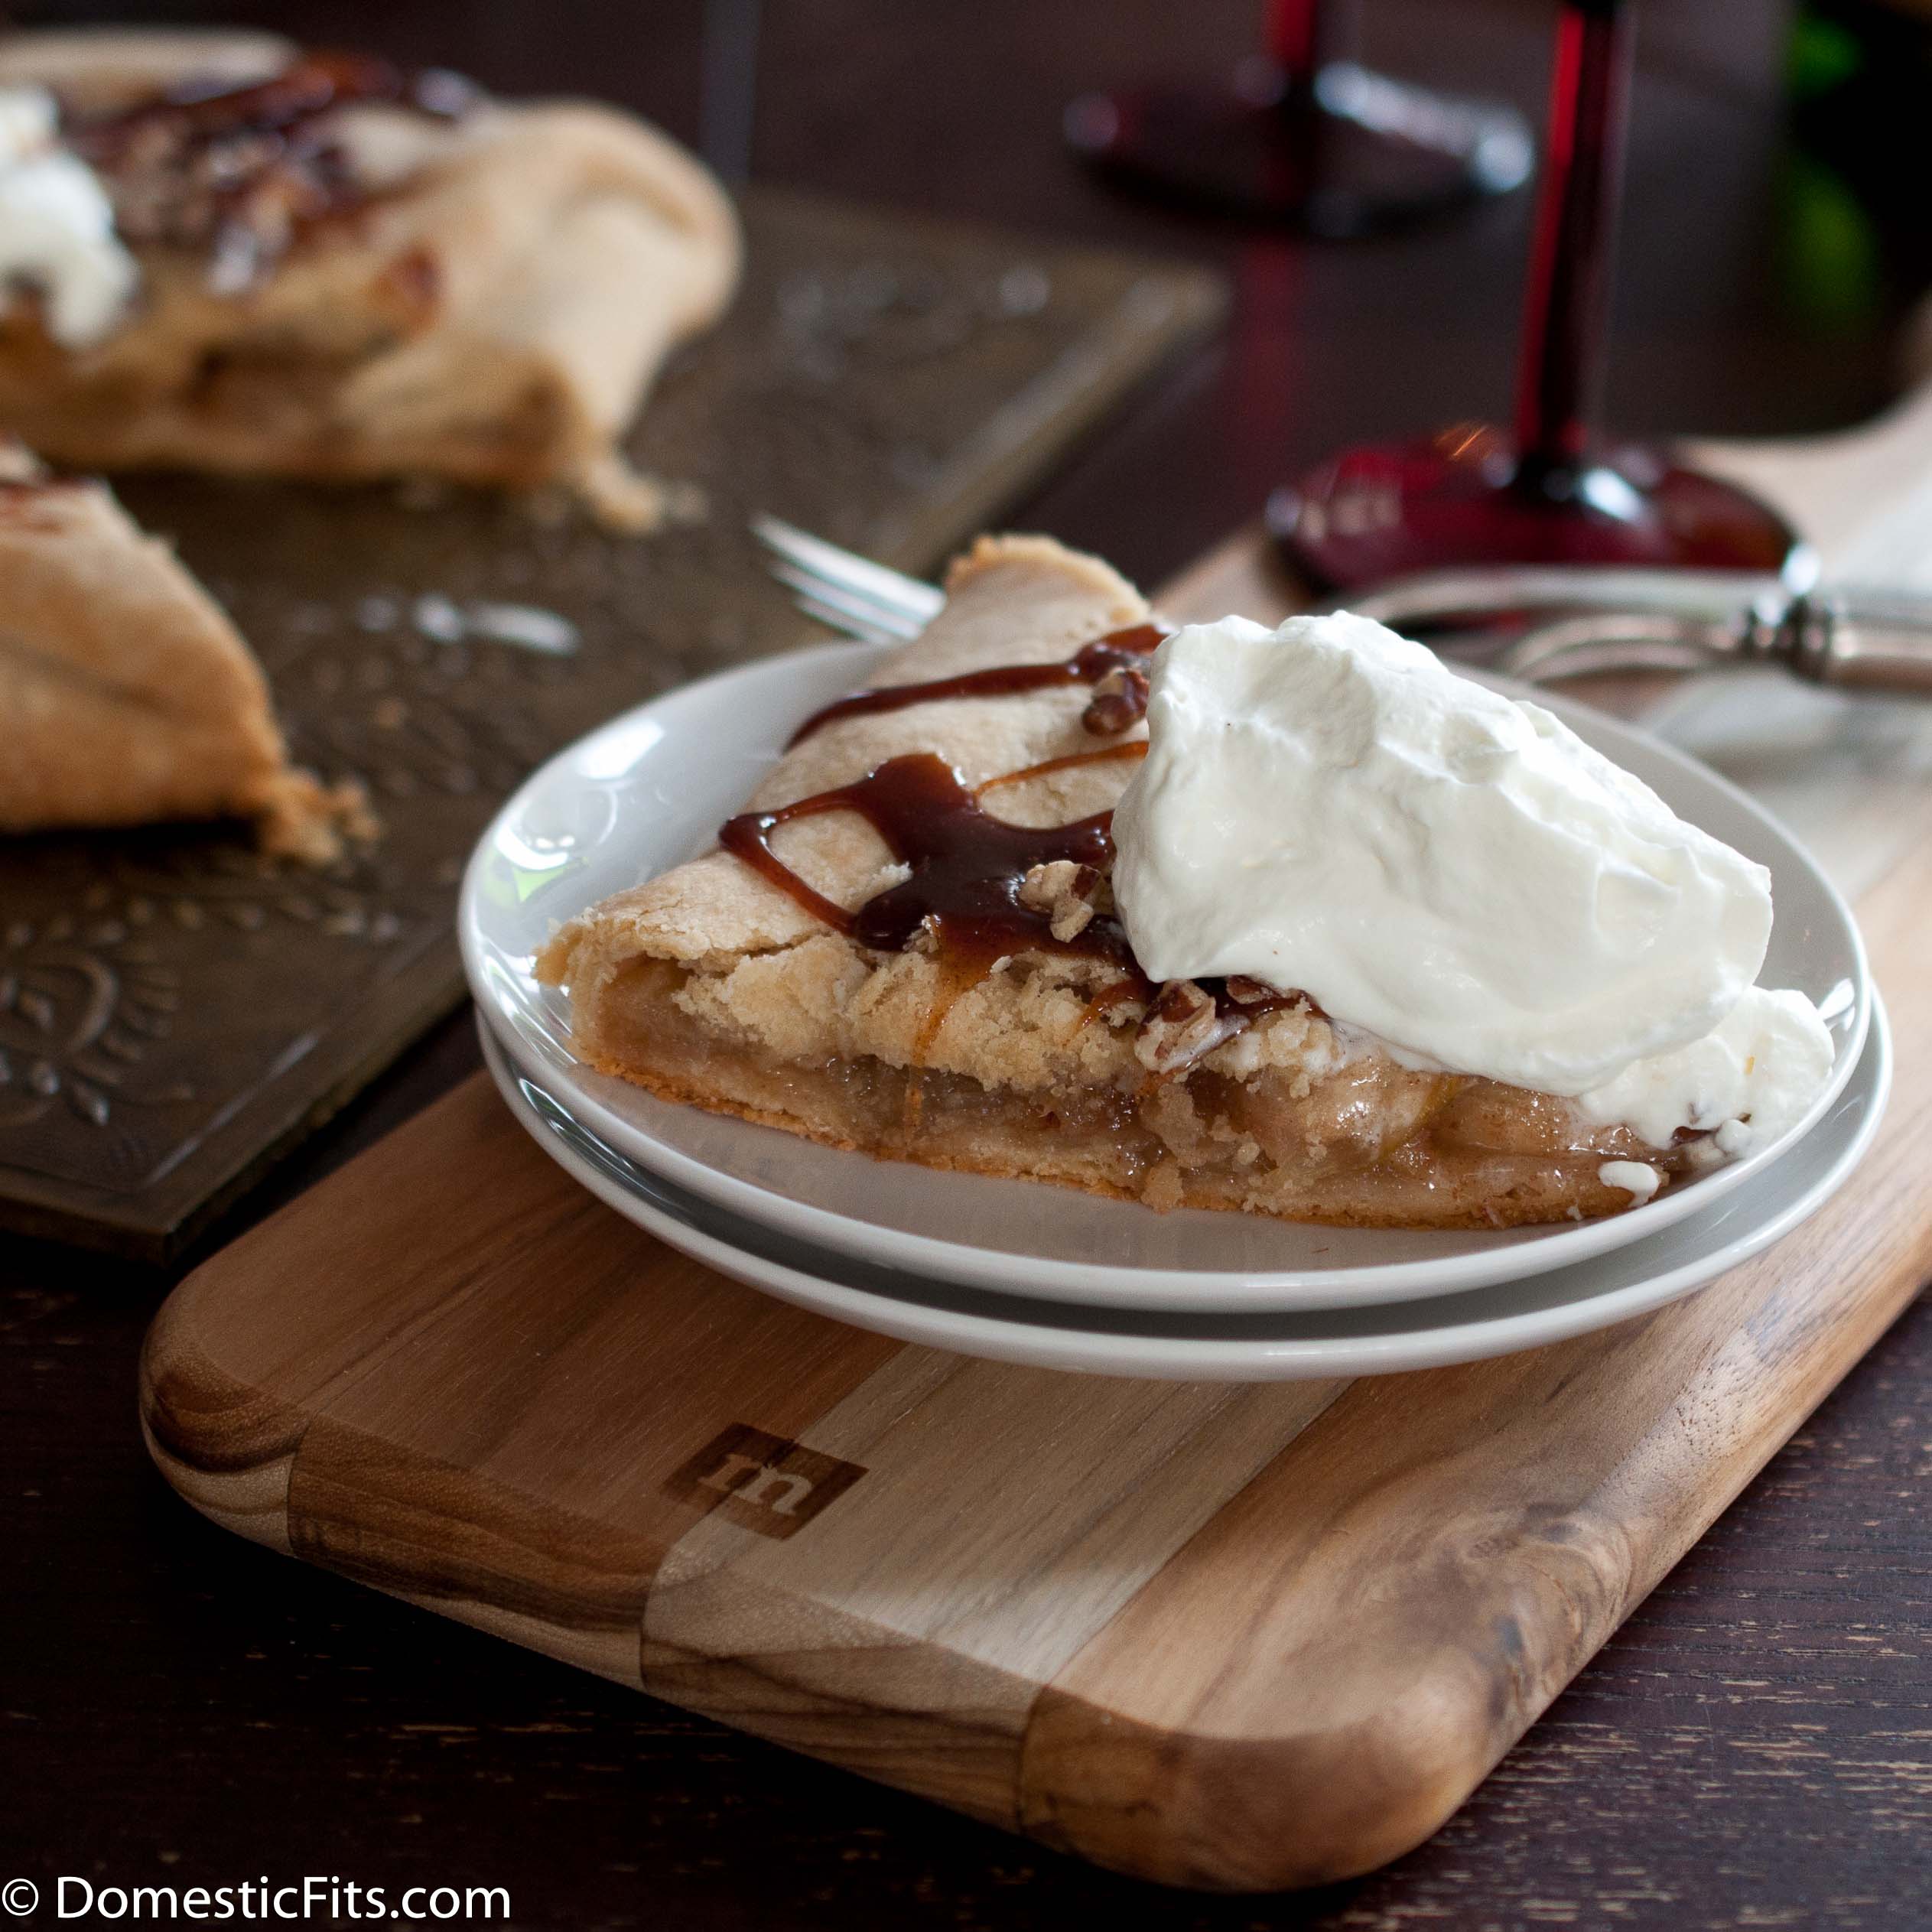
And with Champagne Whipped cream (for real!!) it’s perfect for New Years.
Oh, and I found out last year how to pronounce Galette. I really wanted to say Guh-Lay, because it sounded more elegant to me. I was wrong, I’ll put my linguist aspirations on hold. It’s pronounced Gal-Let. Either way, it’s delicious.
Caramel apple Galette with Champagne Whipped Cream
Ingredients
For The Crust:
2 cups flour
1 tsp salt
1 tsp sugar
1 1/2 sticks (3/4 cup) of butter
1/3 cup ice cold water
For The Filling:
4 large honeycrisp apples, peeled, cored and sliced (about 5 cups)
3 tbs lemon juice
1 tbs Vietnamese cinnamon
1 cup white sugar
½ cup brown sugar
¼ cup water
2 tbs butter
1 tsp bourbon vanilla
1 tbs melted butter
For The Whipped Cream
1 cup heavy cream
¼ cup powdered sugar
¼ cup champagne
Instructions
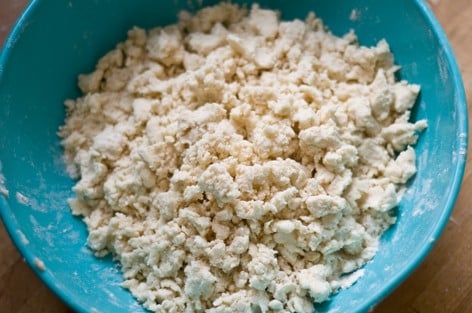
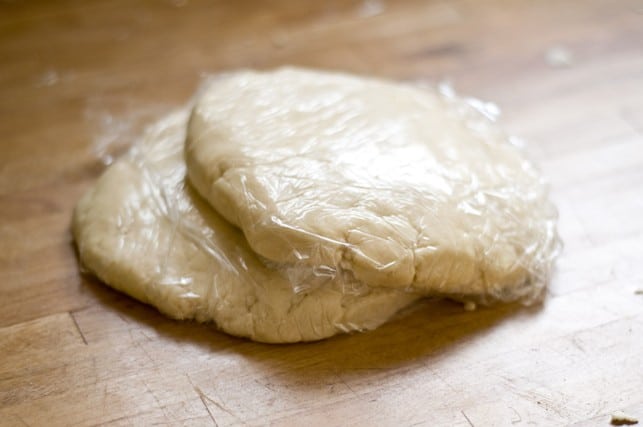
In a food processor add 1 1/3 cup flour, salt, sugar and butter, process until well combined. Add the remaining flour and process again until combined. Transfer to a bowl and mix in the water until just combined (don’t add the water while the dough is in the food processor or your dough will be brittle and cracker-like). The dough should be soft. Form dough into a disk, wrap with plastic wrap and chill in the refrigerator for 2 hours. Can be made three days ahead of time.
Preheat oven to 375.
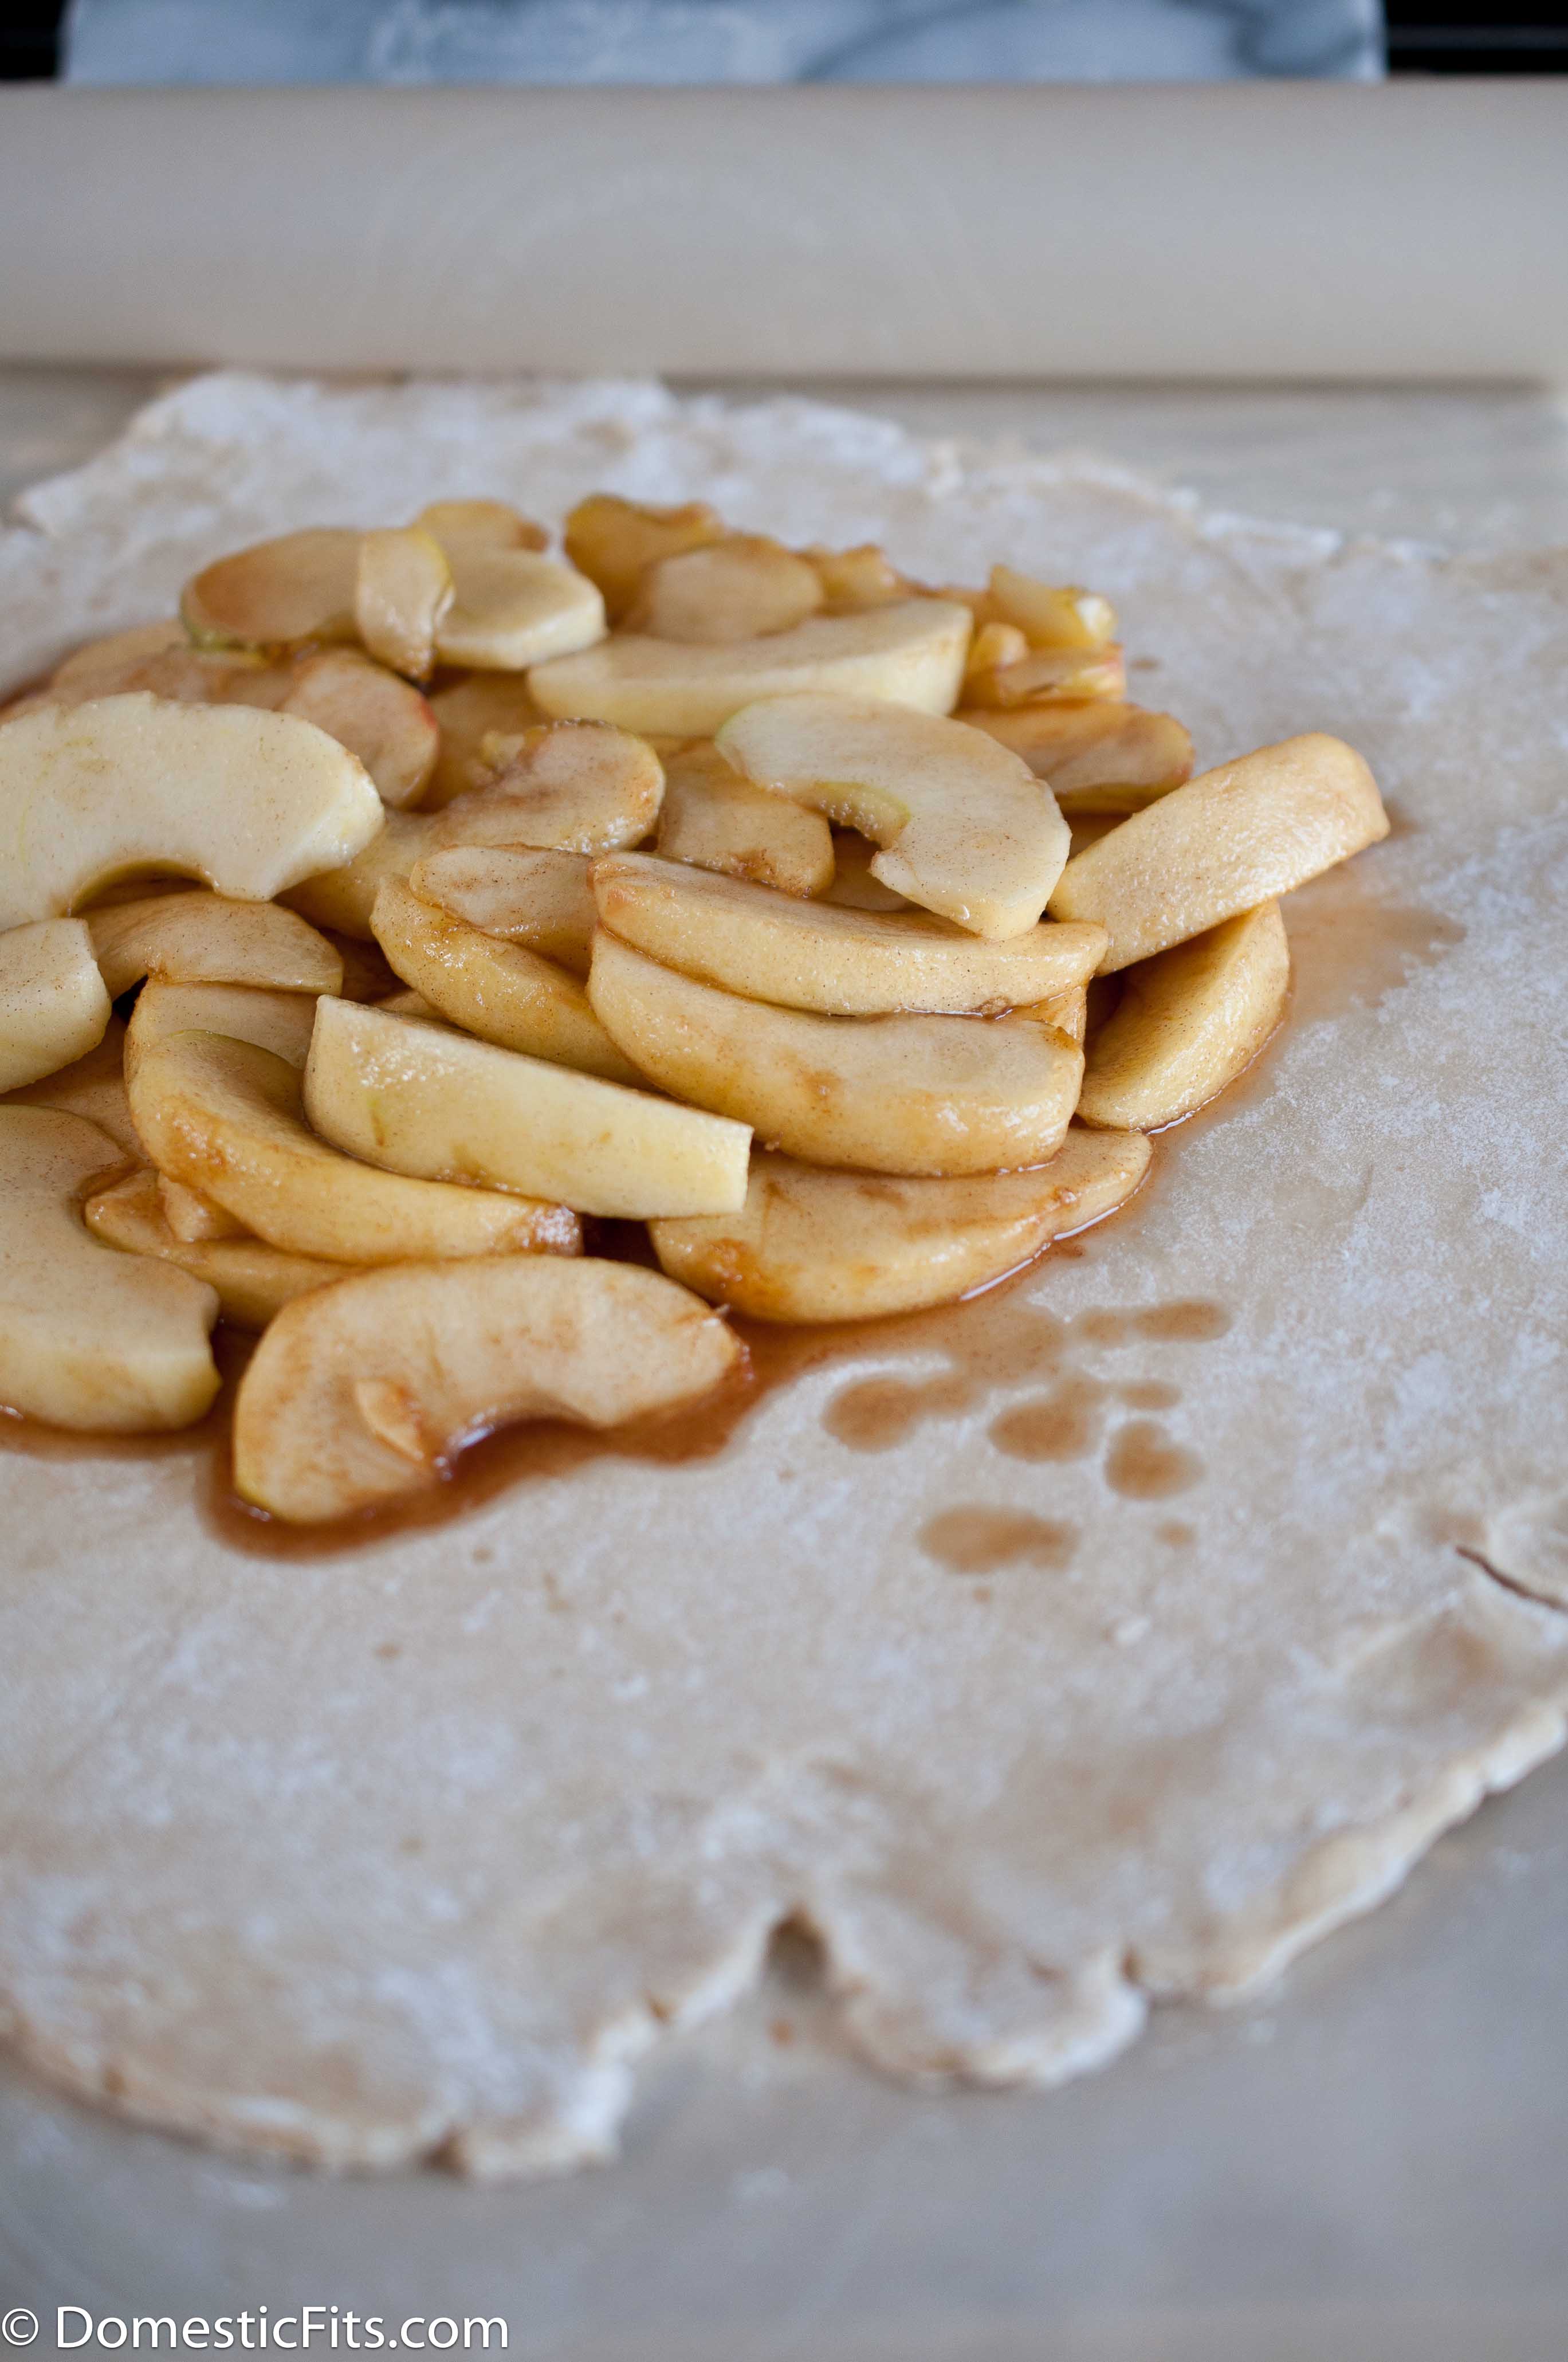
Place sliced apples in a large bowl. Sprinkle with lemon juice, pinch of salt and cinnamon, toss to coat. Allow to sit at room temperature for 10 minutes.
In a pot add both kinds of sugar and water, stir until combined and all sugar has been moistened. Turn burner to high, allow to boil until sauce has turned amber. Remove from heat. Allow to cool for about 5 minutes. Drain apples and add to caramel sauce, toss to coat. (if your sauce seizes when you add the apples, return to heat and allow to cook until the sauce has softened) Allow Apples to marinate in caramel while you prepare the crust, about 10 minutes.
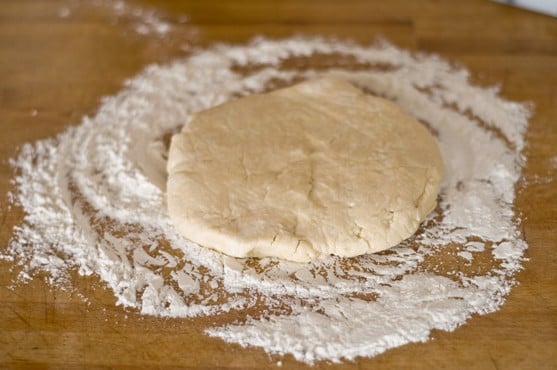
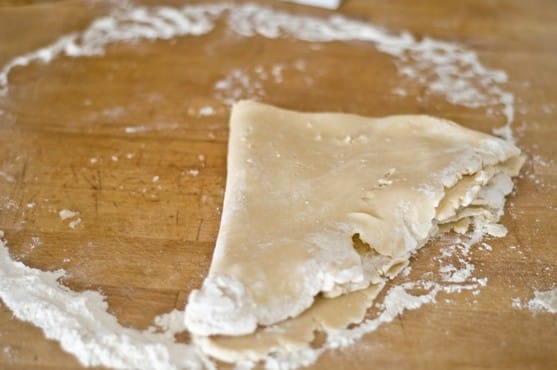
Once dough has chilled, place on a well floured flat surface. Dust the top with flour. Roll into a 16 inch rustic circle. Transfer dough to a sheet or parchment paper. Using tongs, remove apples from pot (reserve sauce) and add to the center of the dough, leaving a 3-4 inch boarder empty. Fold the empty dough up over the filling leaving a hole in the center of the Galette. Using the parchment paper, transfer the Galette and the parchment to a baking sheet. Brush crust with melted butter.
Bake at 375 for 30-35 minutes or until golden brown.
While the Galette is baking, finish the caramel sauce. Return reserved caramel sauce to the stove and allow to boil until it has reached 230. Turn off heat, and while stirring continuously, add the butter and the vanilla. Drizzle sauce over galette.
To make the whipped cream, add the cream and powdered sugar to a stand mixer and beat on high until peaks form, about 3 minutes. Reduce speed to medium and slowly add champagne. Briefly return speed to high to return peaks to whipped cream. Refrigerate whipped cream until ready to use, top Galette just prior to serving.
It was the first to be devoured, even before the impromptu poker game ended. And, I’m not gonna lie, having every guest who ate it say, "Oh my GOD. This is so good" is really awesome.
When you are trying (fairly desperately) to wedge your way into the food world, there are certain expectations that people have when you make a dish.
The bar is pretty high.
And to be honest, I’m always nervous. Just like the feeling I get when a friend of mine says, "I’m going to make one of the recipes off your blog!"
I was so relieved when Thanksgiving turned out great. These rolls were so good they were second to be polished off, and this Beer Brined Turkey was the best I’ve ever made. Even though it was the same recipe I used last year, it was even better this year.
And the secret to the best potatoes ever is using an ungodly amount of butter. Like, several sticks. And some sour cream.
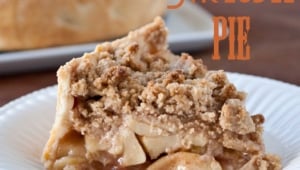
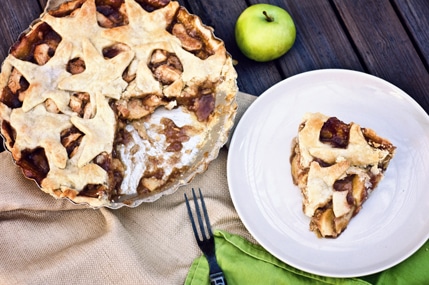
But this pie. THIS pie will now be the way I make apple pie. And making it in a spring form pan just makes it look incredibly impressive.
Deep Dish Apple Streusel Pie
Ingredients
For The Crust:
1 ½ cups flour
½ tsp salt
1 tbs sugar
1 stick of butter, cold, cut into cubes
2 tbs shortening
1/4 cup beer (or 2 tbs water and 2 tbs vodka)
For The Filling:
7 large Fuji apples, peeled, cored and thinly sliced (about 9 cups)
3 tbs lemon juice
2 tbs flour
½ cup brown sugar
½ tsp salt
1 tsp cinnamon
1/2 tsp nutmeg
1 tbs honey
For The Topping:
1 ½ cup flour
½ cup quick oats
½ cup white sugar
½ cup brown sugar
1 tsp cinnamon
½ tsp salt
1 ½ stick chilled butter
Instructions
In a food processor, add 1 cup of flour (reserving the other ½ cup) salt, sugar and pulse to combine. Add the butter cubes and the shortening, process until combined. Add the remaining ½ cup of flour, process until well incorporated.
Transfer to a bowl, add the beer and mix until combined. Dough will be very soft. Form into a wide flat disk, wrap in plastic wrap and chill for at least 2 hours.
Roll out dough on a lightly floured surface, transfer to a 9-inch spring form pan (This recipe makes way too much for a regular pie pan), press into shape. Remove the excess. Chill until ready to use.
Preheat oven to 350
In a large bowl combine all of the filling ingredients.
Pour into the crust.
In a food processor, add the topping ingredients, pulse until combined.
Grab handfulls and press together into a ball. Grab pea sized pieces and spread over the top.
Bake at 350 for 35-40 minutes or until golden brown.
Julia Child would have turned 100 today. She’s an inspiration, not just for those of us who cook, but for anyone who is sitting in an unfulfilling life wondering how then ended up where they did. Anyone who thinks they are "too old" to start a new path.
Julia didn’t start cooking until she was 32 and she didn’t enter culinary school until she was 37. And just look at how that turned out for her, I’d say pretty well. What if she had felt "too old" to start learning how to cook? Would we still be putting canned pineapple slices on ham and eating Sarah Lee on special occasions?
Laura Ingalls Wilder didn’t start writing until she was in her 40’s and her Little House books weren’t written untill she was in her 60’s.
Martha Stewart was a stock broker until she started working on renovating a farm house at the age of 32.
Andrea Bocelli didn’t start singing opera until he was 34.
Grandma Moses didn’t start painting until she was 70.
Makes me feel like I have an early start on this career change I want to make. Instead of thinking "Who am I to do that?" Start thinking, "Why not me?" If they can do it, why not you?
Reminder: If you are in San Diego and want tickets to the Foster Farms Cook Off on September 7th, check this out.
Cherry Peach Tart With Coconut Cointreau Whipped Cream (Vegan)
Ingredients
Crust:
2 cups flour
1 tsp salt
1 tsp sugar
3/4 cup of vegetable shortening (can sub butter for non vegan)
2 to 4 tbs ice cold water
For the filling:
3 cups cherries, halved and pitted
1/3 cup powdered sugar
1 tbs flour
2 yellow peaches, sliced
For the whipped cream:
1 can full fat coconut milk, chilled in the fridge overnight (important) (can sub 1 cup whipping cream for non vegan)
Chilled bowl (like the bowl of a stand mixer, just place it in the fridge for a few hours)
3 tbs powdered sugar
1 tbs Cointreau
Instructions
In a food processor, combine 1 1/3 cup flour, salt, sugar and shortening, process until well combined. Add the remaining flour and process again until combined. Transfer to a bowl and add the water with a wooden spoon (don’t add the water while the dough is in the food processor or your dough will be brittle and cracker-like). If the dough isn’t moist enough, you can add more water, a tsp at a time until the consistency is right. Dump the dough into the bottom of a 9 inch tart pan with 1 1/2 inch high sides, sprayed with cooking spray. Starting with the sides first then the bottom, form the crust into the pan. Chill the crust for 2 hours in the fridge. (If you haven’t yet, put a bowl in the fridge to chill to make the whipped cream)
(*Note: if you have a smaller tart pan, mine seems to be quite large, you will need less tart dough, pull out any excess and make a mini tart in a muffin tin. You can also double the recipe, form the excess into a disk, cover with plastic wrap, place in a Ziplock freezer bag and freeze. should keep up to two months)
Preheat oven to 350.
Add the cherries, sugar, and flour to a bowl and toss to coat. Add the cherries to the tart crust. Top with sliced peaches. Bake at 350 for 25-30 minutes or until tart crust is a light golden brown. Allow to cool before removing from tart pan.
Make the whipped cream.
Open the can without shaking. Scrap only the fat layer at the top and into the chilled bowl, do not include any of the water in the bottom of the can, just the fat layer. Using a hand mixer, on high, whip until light and fluffy. Add the powdered sugar and whip until combined. While the mixer is running, slowly add the Cointreau until combined.
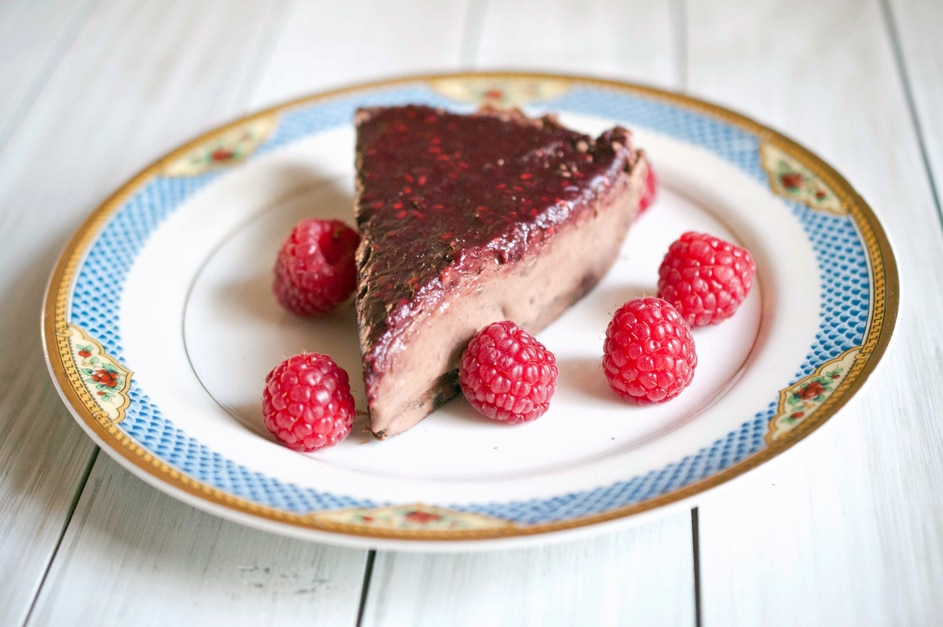
Sometimes you make a mistake and it ends up being a really great thing. I wish I had a wise true life story about a mistake gone right, but I don’t. Not at the moment.
But this pie is a mistake gone right. I was trying to make chocolate whipped cream, but I wanted something more intense than cocoa powder. So I tried to melt some chocolate in heavey cream, and then chill it.
When I came back the next day, and it was one solid mass. The I tried to whip it (Into shape!) and it turned into this creamy non-whipped cream type of dense mousse. So I made a crust for it and a chocolate raspberry topping and it’s now a pie. Or it was a pie until I ate it.
It’s not a propper mousse, its a working-mom-still-wants-to-cook-from-scratch type of mousse.
I like it.
Super easy, fancy, still made from scratch, and impressive. Win, Win, Win.
Easy Chocolate Raspberry Mousse Pie
Filling:
2 cups heavy cream
2 3oz bars of semi-sweet chocolate
Crust:
2 cups chocolate wafer cookies (or chocolate teddy grahams or chocolate graham crackers)
1 stick unsalted butter, melted
1/4 cup white sugar
2 tbs brown sugar
Topping:
2 cups fresh or frozen raspberries
2oz 60% dark chocolate
1/3 cup sugar
In a large pot, add the cream and the chocolate. Stir over medium-low heat until all of the chocolate has melted and it resembles chocolate milk. Add to the bowl of a stand mixer and place the bowl in the refrigerator. Cover and chill until set, at least 6 hours. Filling can be made up to 2 days ahead of time.
Pre-heat oven to 350.
Put the chocolate wafer cookies, or chocolate graham crackers (NOT chocolate covered) into a food processor and process until crumbled. Add the sugars and the butter and process until it looks like wet sand. Add a bit more butter if it’s too dry. Press into a 9 inch pie pan. Press hard, using a measuring cup, a flat bottom coffee cup or anything you can to make sure and pack it into the pan really well. This will keep it from crumbling when you cut it into slices.
Bake for 10 minutes at 350 or until firm. Allow to cool.
Place the bowl of chilled chocolate cream on to the stand mixer and beat on high for 3-5 minutes or until fluffy. At this point, you can taste to see if you want it sweeter. I tend to favor less sweet desserts, and if you like yours supper sweet, add 1/4 cup sugar and beat until its incorporated into the mousse.
Add the chocolate mousse to the pie crust and spread out evenly, place in the fridge to chill.
In a pot over medium-high heat, add the topping ingredients. Stir until the raspberries and chocolate has melted, the raspberries have broken down, and the mixture has thickened. This will take longer if you are using frozen raspberries because the water content is higher. About 8-12 minutes. Pour the mixture over the mousse and chill until set, about 30 minutes.
Thanksgiving is the perfect holiday because gratefulness is such an underrated personality trait. I wish people admired that quality in others like they admire shoes and jewelry and waist size.
"She is SO grateful! I wish I had that."
We should start the day that like. Before we ever get out of bed, list the things you are thankful for.
If you aren’t feelin' in a Thankful kinda mood right now, this’ll do it:
I’ve know quite a few survivors of the Nazi Holocaust. Most of whom are in their 90’s now. I know a man who was in Auschwitz concentration camp and went to the gas chamber. Twice. Both times, something was broken, and the entire chamber full of terrified, naked, sobbing Jewish men, women and children where told to go back to their cells. To this day, when something goes wrong, a toilet breaks, his phone service is down, his car needs work, he will always say, "Thank God for things that break! Broken pipes saved my life!" Nothing like a concentration camp story to put your life in perspective, right?!
No matter what you are facing, what is wrong, or what is hard to deal with. Take some time to think about what is right in your world. Hold the good closer than you hold the bad. I have so much to be thankful for, and I hope a day never comes that I stop thinking that.
Every Thursday, not just the 4th Thursday in November, we should take some time and to list the things we are thankful for, no matter how long or short that list is.
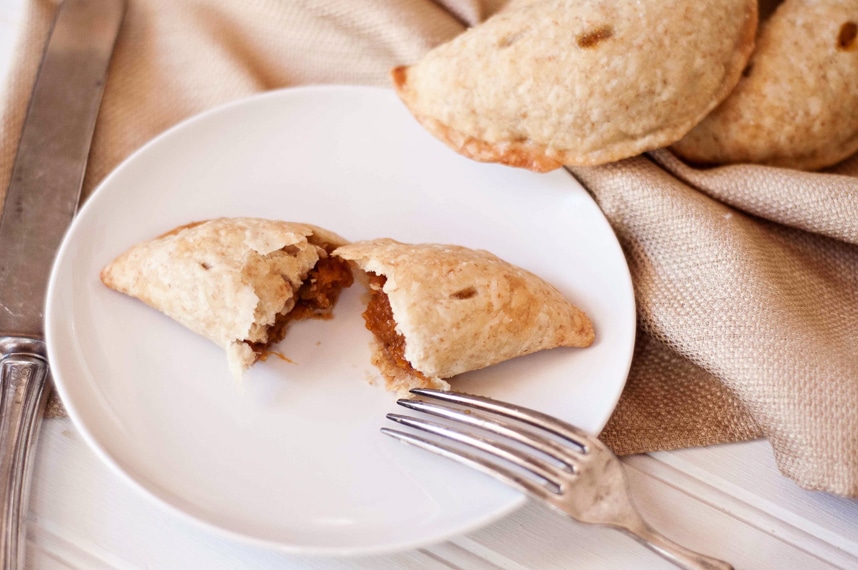
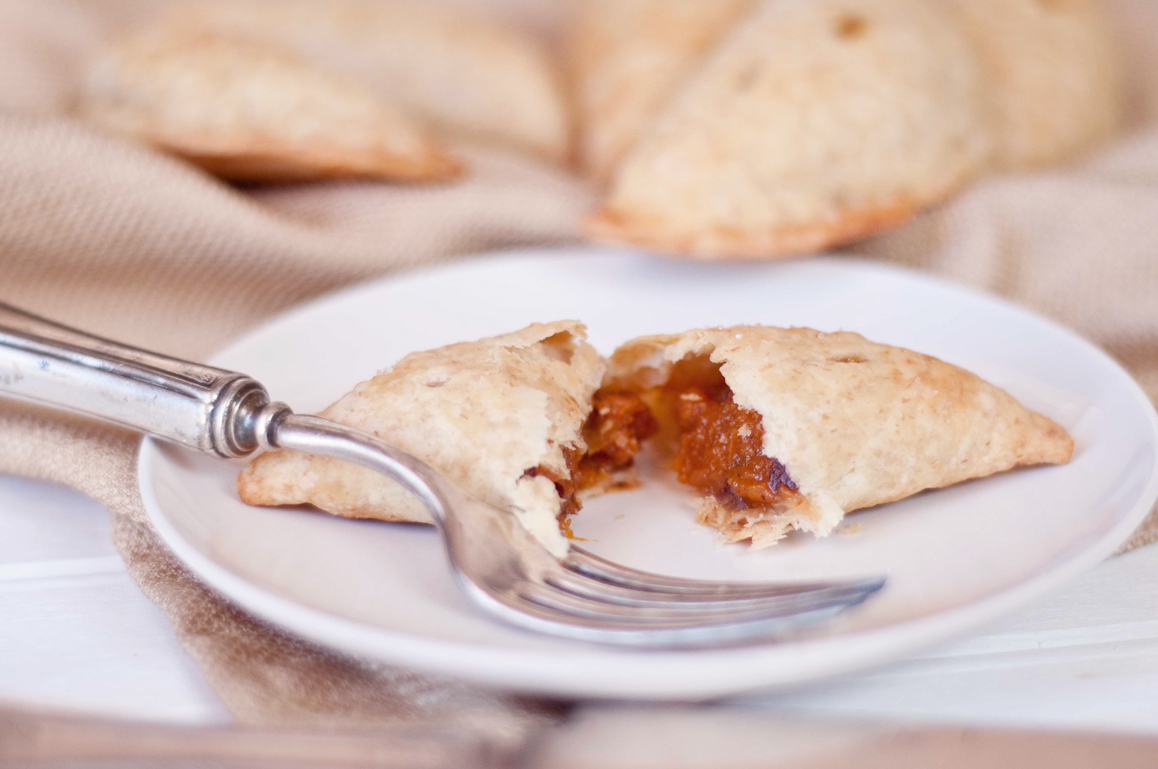
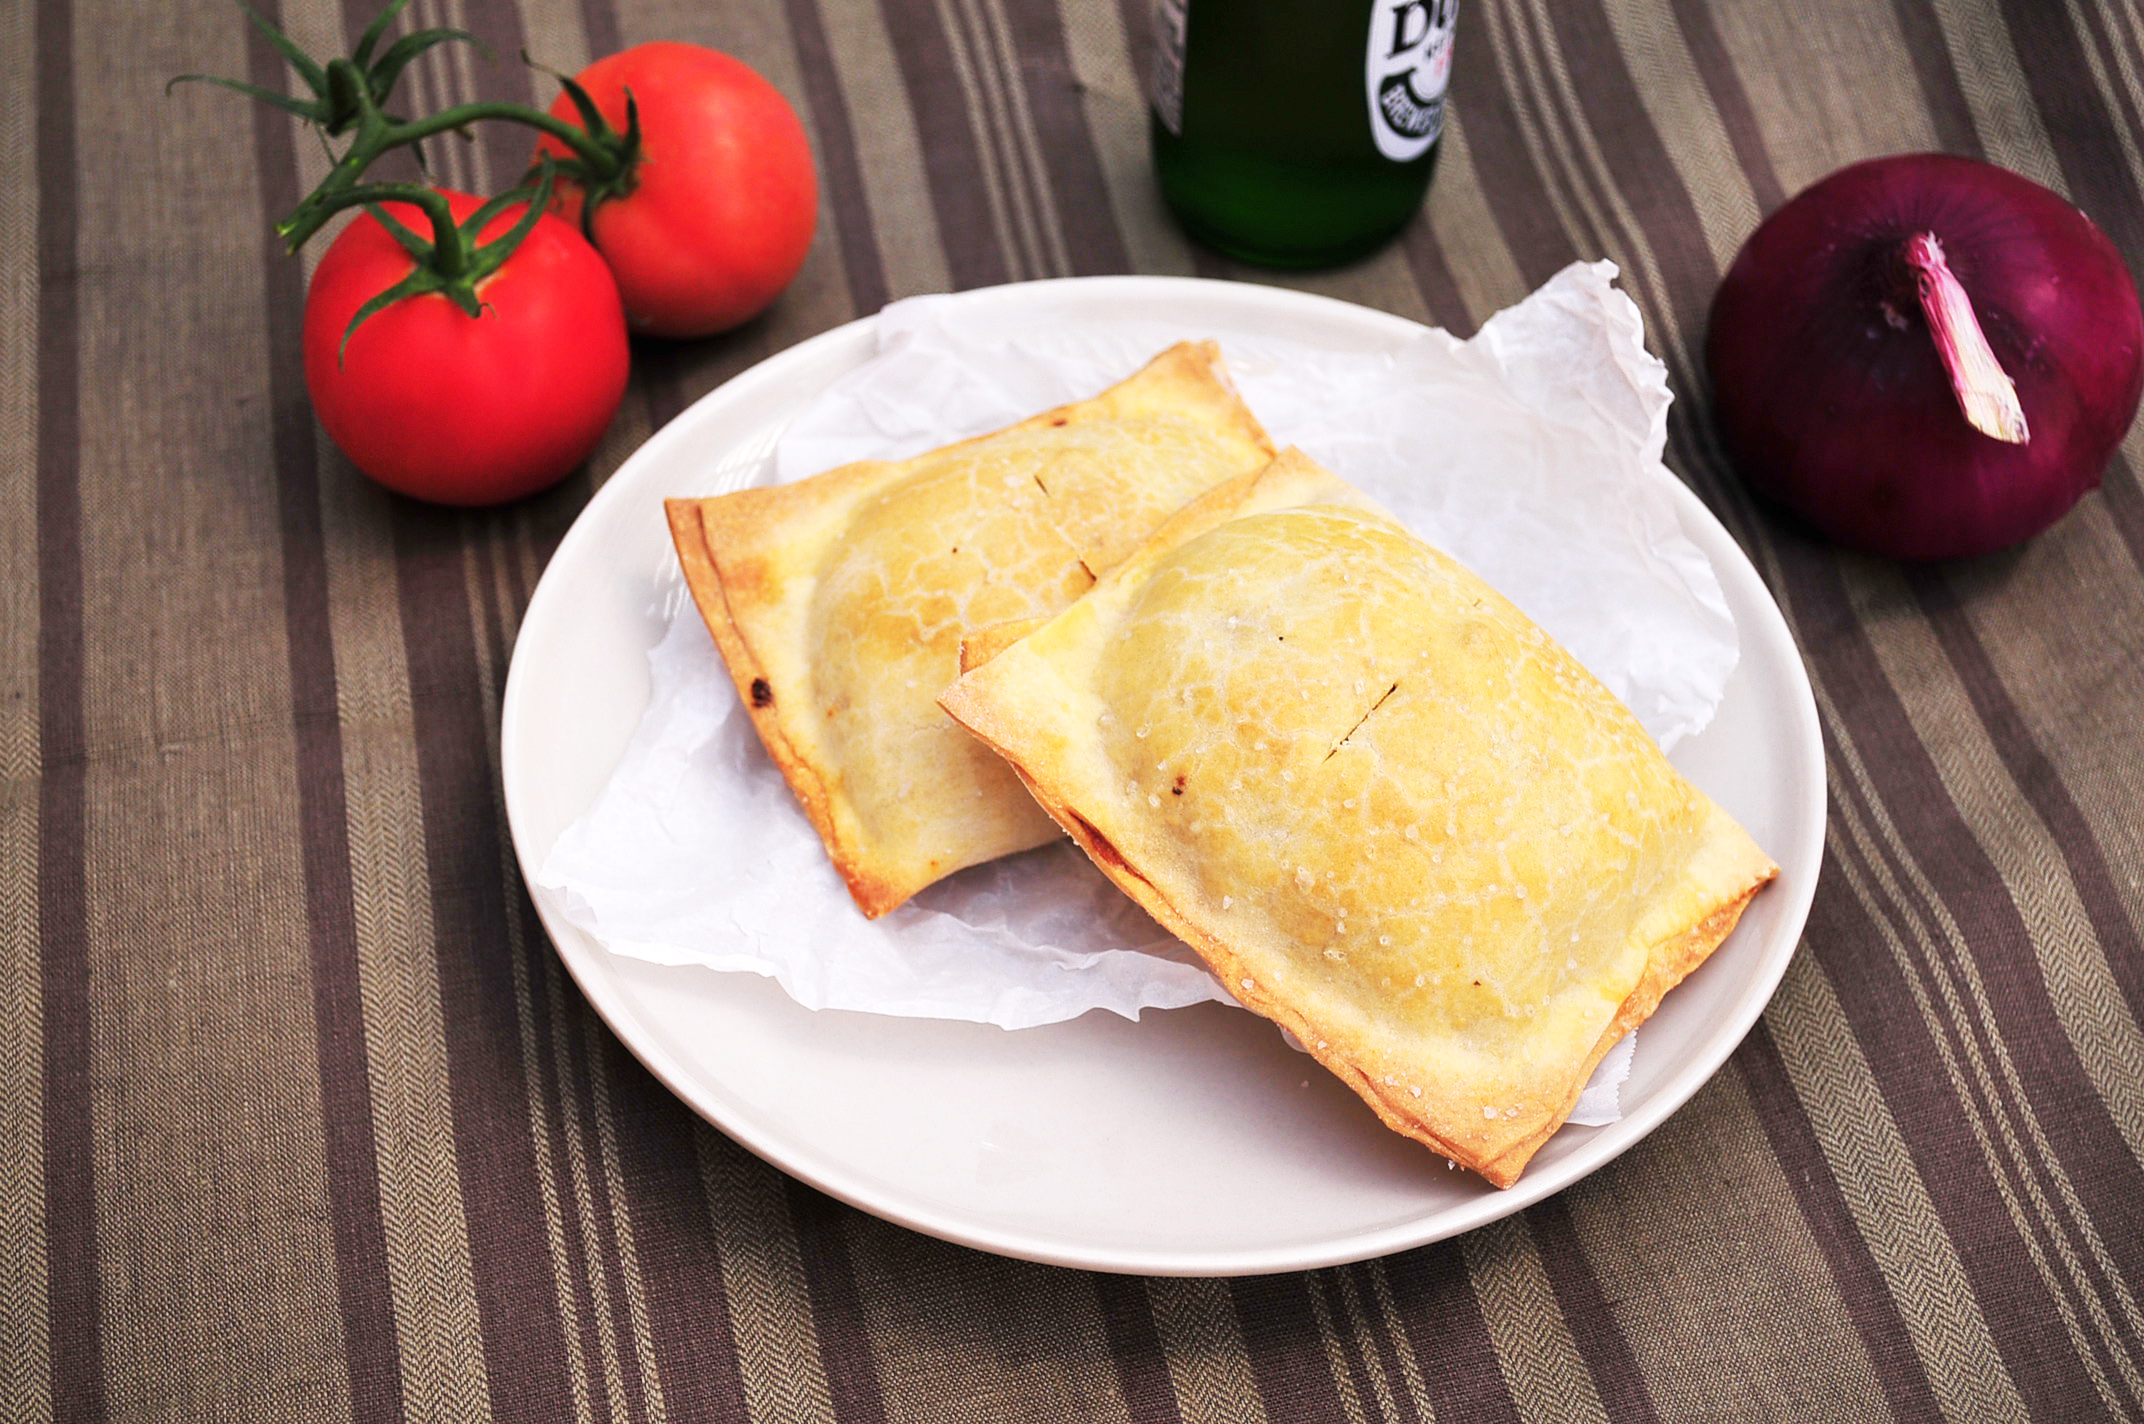
Oh, yeah, food. That’s why you’re here. These little guys are pretty fantastic. Plus, you don’t just have to limit them to your leftover candied yams, fill these with what ever you have. Other great empanada combos:
Turkey (chopped), mashed potatoes & gravy
Stuffing & cranberry sauce
Mac & Cheese
But, even if you didn’t make yams, or you don’t celebrate Thanksgiving and want to make these, I’ll give you an easy candied yam mash recipe that will be perfect for the filling.
Thanksgiving Leftover Empanadas: Candied Yams
For The Dough:
2 1/4 cup flour
1 tsp salt
10 tbs butter, cold, cut into cubes
1 egg
1/3 cup ice water
For the Filling:
2 cups leftover candied yams, Mashed
OR
2 large yams, peeled and chopped (about 4 cups)
1/2 stick butter (4 tbs), chopped into cubes
1/4 cup maple syrup
1/2 cup brown sugar
1/2 tsp salt
1 tsp cinnamon
1/2 tsp nutmeg
1/4 cup pecans
Topping:
1/4 cup maple syrup
1/2 tsp salt
Put 1 1/2 cups of flour and the salt in a food processor, pulse for a second to combine. Add the butter and process until combined. Add the remaining flour and process again. Move to a bowl. In a small bowl, beat the egg and water together until well combined then add the egg/water to the dough with a wooden spoon. If you add the water and egg with the food processor, your dough will turn out crispy and cracker like.
Form into a disk, cover with plastic wrap and chill for at least 1 hour.
Preheat oven to 400.
If you are using leftovers you can skip this next paragraph.
Place your chopped yams in a large loaf pan, sprinkle the top with cubes of butter. Drizzle with the maple syrup and then top with the brown sugar.
Bake, uncovered at 400 for about 40 minutes or until the yams are fork tender. Remove from the oven and allow to cool a bit. Drain off most of the liquid (leaving about 2 tbs in the bottom of the pan). Mash with a potato masher until mixture until creamy, add the pecans, cinnamon, nutmeg and stir.
Once your dough is chilled, roll it out to an even thickness on a flowered surface. Cut out 4 inch circles. I don’t have a 4 inch circle cutter, so I used a margarita glass.
Brush the edges of each circle with water. Put about 2 tbs of filling in the middle, leaving the sides clear. Fold the circle over and press the edges together well to make a secure seal. Put three small slits on the top of the empanadas to allow steam to escape. Place on a baking sheet sprayed with cooking spray (or covered with parchment paper). Brush the top with maple syrup, sprinkle with a small amount of salt.
Bake at 400 for 20-22 minutes or until golden brown. Eat, smile, be thankful.
Take a second to like Domestic Fits Facebook Page to receive info about new post in your feed.
A pie post for you. I feel a little guilty about this, even though I know this is super valuable information if you were, in fact, the person who was chosen to bring the pie this year. Usually, I spend all weekend cooking, baking and photographing to present to you 3 solid posts each week. But, I was at the International Food Bloggers Conference all weekend and I didn’t get a chance to indulge in my weekend food rituals. I did, however, have an awesome non-cooking weekend meeting all of those friends that I only see in the computer, giggling over glasses of wine, eating beautiful & copious amounts of food, making juvenile jokes, and turning on-line friendships into lasting ones.
So, instead of trying to "throw something together" that isn’t worth the web space it takes up, or just forgetting about you and how much I value your visits to my little corner of this huge blogland, I am providing my picks for the BEST pies for Thanksgiving.
Pie that is both familiar and brand new. Three are made from my own hands, and two are picks from other very talented bakers that I love and hope to try out some day.
I do have a great post lined up for Friday, an amazing pre-Thanksgiving appetizer.
And next week I will be bringing to you fun, delicious and inventive ways to use leftovers.
But for today, please enjoy my favorite twists on old favorites. And forgive me for "calling in sick" today.
I’ve already told you all about my deep love for weekend breakfasts. But maybe I haven’t told you why.
I have this amazing husband, that I sometimes think loves me more that I deserve. And I always worry that I’m going to fall off this pedestal he’s placed me on.
And I have this daughter that is already cooler and more spectacular than I will ever be. I know I’ll always be proud of her, but I worry about her being proud of me.
And I have to leave her 5 days a week and go to an office. And help people.
And I worry. About being a good mom. About all the insane things that could happen to Tater, because it happened once to someone, somewhere, one time, 12 years ago.
I worry that I spend too much time away from her. Is she happy enough? Am I doing the right thing by working? Would I lose all sanity if I was a real life Stay At Home Mom? I want her to have all the things that I didn’t, but one of those things is lots of one on one time…
Being a mom is so hard. No matter what your situation.
And even though these scary thoughts consume my drive to and from work, and sometimes make me cry, I always know that I can count on weekend breakfast. I know that no matter what else made me feel like a failure during the rest of the week, I can feel like I did something right.
I cooked yummy food for my little family. We ate it together. And we all smiled. For a small window of my week, we were perfect…. except when Tater put eggs in her Big Girl cup, and threw toast on the ground, and cried because I was taking too long to get it all to the table, and she fed Sophia raisins that could make dogs sick…OK, perfect doesn’t exist when you are a human and being a mom makes you see that gap as a huge chasm that you will never even make it half way across. But weekend breakfast makes it feel smaller.
I know that when I get old, I won’t remember the lack of sleep. The long commutes on LA freeways. The tantrums that drive me to a crazy place. But I will remember that smiling face. The family breakfast. Even though I have less patience than I want to have, and the thought of all the responsibility that goes along with parenting makes me so overwhelmed…. I still believe that theses really are "the good 'ole days." At least that’s how I will remember them. When I live to be 100.
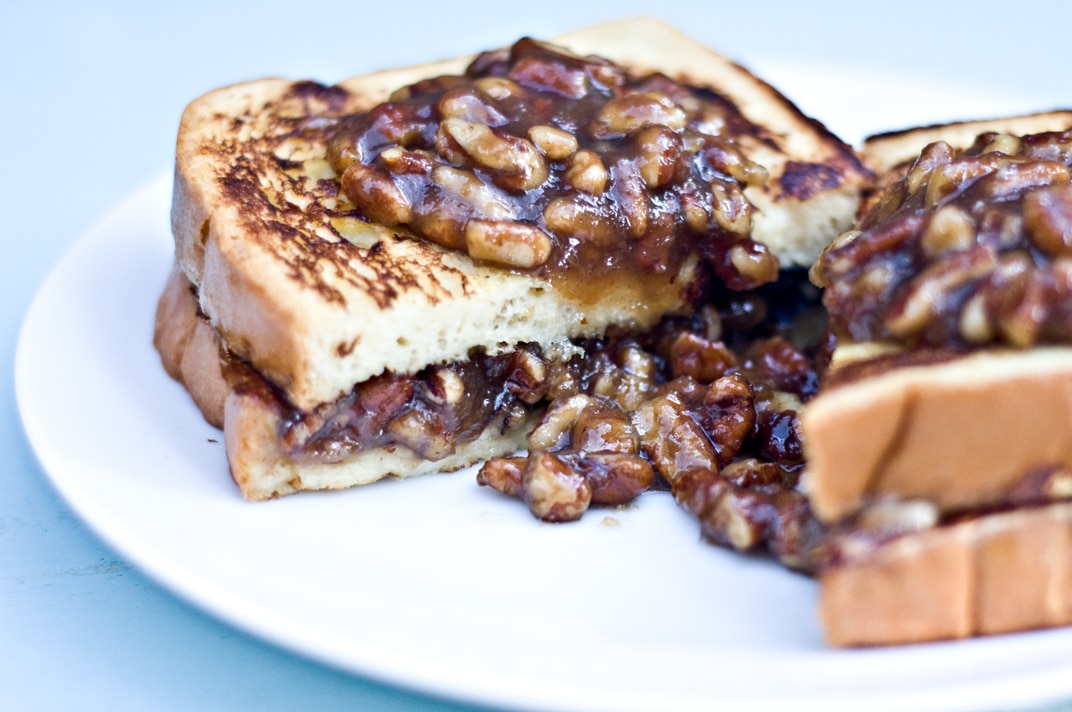
Pecan Pie French Toast
(Will make you feel a little bit closer to perfect.
To be made during those weeks when you need to know that you did at least one thing right)
For the Filling/Topping
1 stick of butter
1 cup of firmly packed brown sugar
1/2 cup light corn syrup (like Karo)
1 tsp vanilla extract
2 cups chopped pecans
2 lightly beaten eggs
For the Toast:
8 slices of thick cut bread
3 eggs
2 cups of milk
1/2 tsp salt
1 tsp vanilla
1 tbs sugar
Preheat oven to 400.
In a large sauce pan over medium high heat, combine butter, brown sugar, and corn syrup. Bring to a boil, stirring frequently, allow to boil for about 3-5 minutes. Remove from heat, stir in the pecans and vanilla and allow to cool to about room temp.
In a large bowl, combine the 3 eggs, milk, 1 tsp vanilla, salt, and sugar and whisk to combine. One at a time, soak each slice of bread for about 30 seconds. Add to a hot pan over medium-high heat, coated with non-stick cooking spray. Cook on each side for about 2-4 minutes or until golden brown. Transfer to a baking sheet, sprayed with non stick cooking spray (slices will be stacked, two slices high, so you only need a baking sheet big enough for 4 slices.) Repeat for all slices.
In a small bowl, beat the 2 eggs until combined. Add to your cooled pecan mixture and stir until well combined (if the pecan mixture is too hot, you will make scrambled eggs, make sure it’s room temp). Return to heat and allow to boil, stirring frequently, for 2-5 minutes or until thickened. Allow to cool a bit.
On one slice of bread, add about 2-4 tbs of the pecan mixture to the center. Top with another slice of toast. Repeat until you have 4 "sandwiches " of pecan pie stuffed french toast on a baking sheet.
Bake in a 400 degree oven for 10-12 minutes.
Add to a plate and top each serving with 2-4 tbs of the remaining pecan mixture.
Enjoy.
Give yourself a break, you are a good human. You made a great breakfast, the rest of the world can wait.
The requirements for party food are pretty simple, but hard and fast.
Yummy
Must travel well
Must have the ability to sit at room temperature for extended periods of time
Bonus if it evokes this sentence from at least one other party goer: "Can I get that recipe from you?"
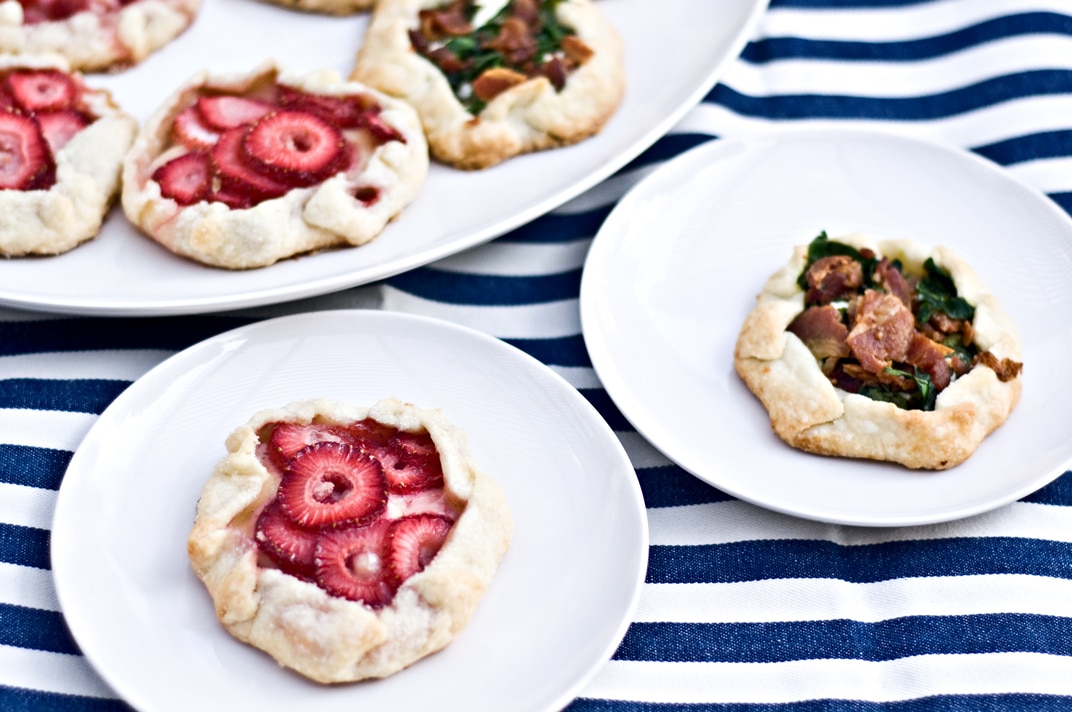
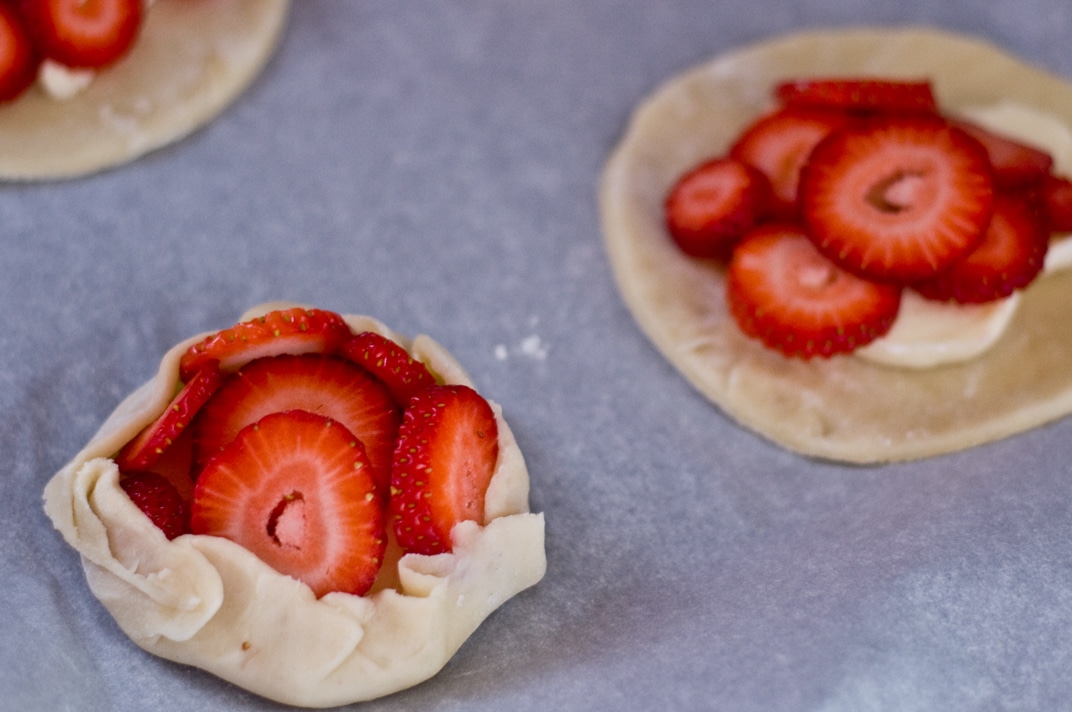
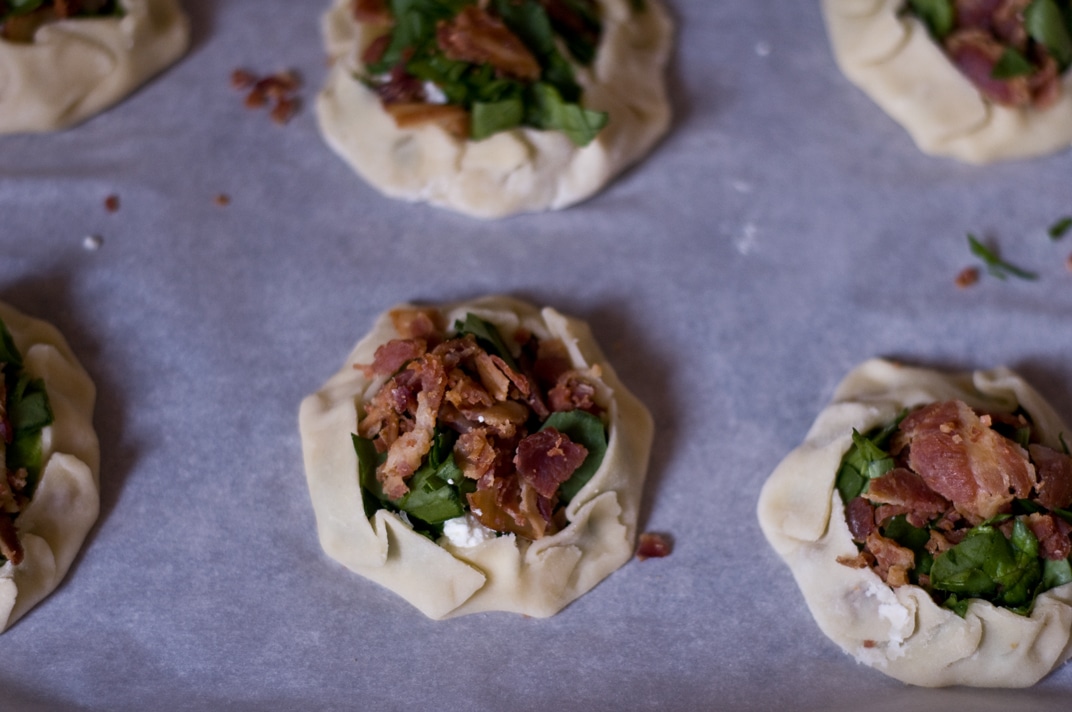
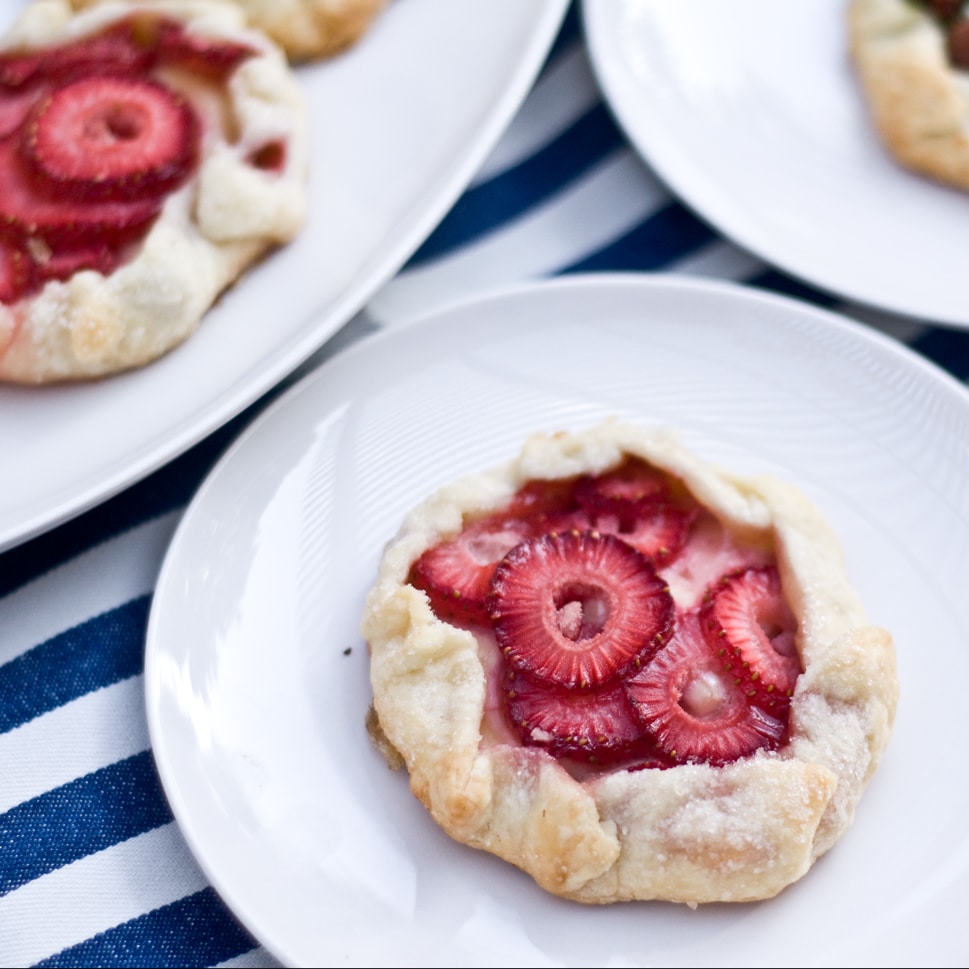
Mini galettes also have the added bonus of being adorable and fairly easy to make. If you want to make them with store bough crust, I may pound on you a little bit. The crust takes about 8 active minutes plus it’s really, really SO much better than store bought.
Feel free to make these your own and use what ever flavor combinations you love.
Miniature Galettes
CRUST
2 cups flour
1 tsp salt
1 tsp sugar
1 1/2 sticks of butter
1/3 cup ice cold water
FOR THE STRAWBERRY BRIE
4 oz brie, cut into slices
3/4 cups strawberries, chopped
1 tbs butter, melted
2 tbs sugar
FOR THE BACON GOAT CHEESE
6 strips of bacon, cooked and chopped
3 oz goat cheese, crummbled
1/2 cup fresh spinach, chopped (don’t use frozen, too much water)
Makes 12 (6 of each)
In a food processor, combine 1 1/3 cup flour, salt, sugar and butter, process until well combined. Add the remaining flour and process again until combined. Transfer to a bowl and add the water with a wooden spoon (don’t add the water while the dough is in the food processor or your dough will be brittle and cracker-like). If the dough isn’t moist enough, you can add more water, a tsp at a time until the consistency is right. Form dough into a disk, wrap with plastic wrap and chill in the refrigerator for at least 2 hours. You can make this up to 5 days ahead of time, just place the dough, wrapped in plastic wrap, in a large zip lock bag.
Place your chilled dough on a well floured surface. Top with more flour and roll until your dough is fairly thin and even. Cut out 12, 4 inch circles. I didn’t have a biscuit cutter that size so I used a margarita glass.
Place the dough circles on baking sheets that are either covered with parchment paper or sprayed with cooking spray.
Strawberry Brie:
A Trader Joe’s just opened on Friday down the street from my house. I am inappropriately excited about living within walking distance from such a fabulous food source. I bought these cute mini brie wheels. These are also fantastic to make mini baked brie out of, but that is for another post.
I cut each wheel into 3-4 slices. If you don’t live by a Trader Joe’s, you can also just use regular brie and cut it into slices small enough to fit inside the circle.
Place about 1 tbs of brie in the center of 6 of the circles. Top with about 2 tbs of strawberries.
Fold the edges up over the filling, leaving the center open. Pleat and press the edges when necessary.
Brush each of the 6 Mini Galettes with melted butter, sprinkle with about 1 tsp of sugar each.
Bacon Goat Cheese:
For the remaining 6 circles, add about 1-2 tbs of goat cheese to each circle. Top with 1-2 tbs of chopped spinach, sprinkle with bacon.
Fold the edges up over the filling, leaving the center open. Pleat and press the edges when necessary.
Brush the folded edge of each of the 6 Mini Galettes with melted butter.
Bake at 350 for 20 minutes, or until the crust is a light golden brown.
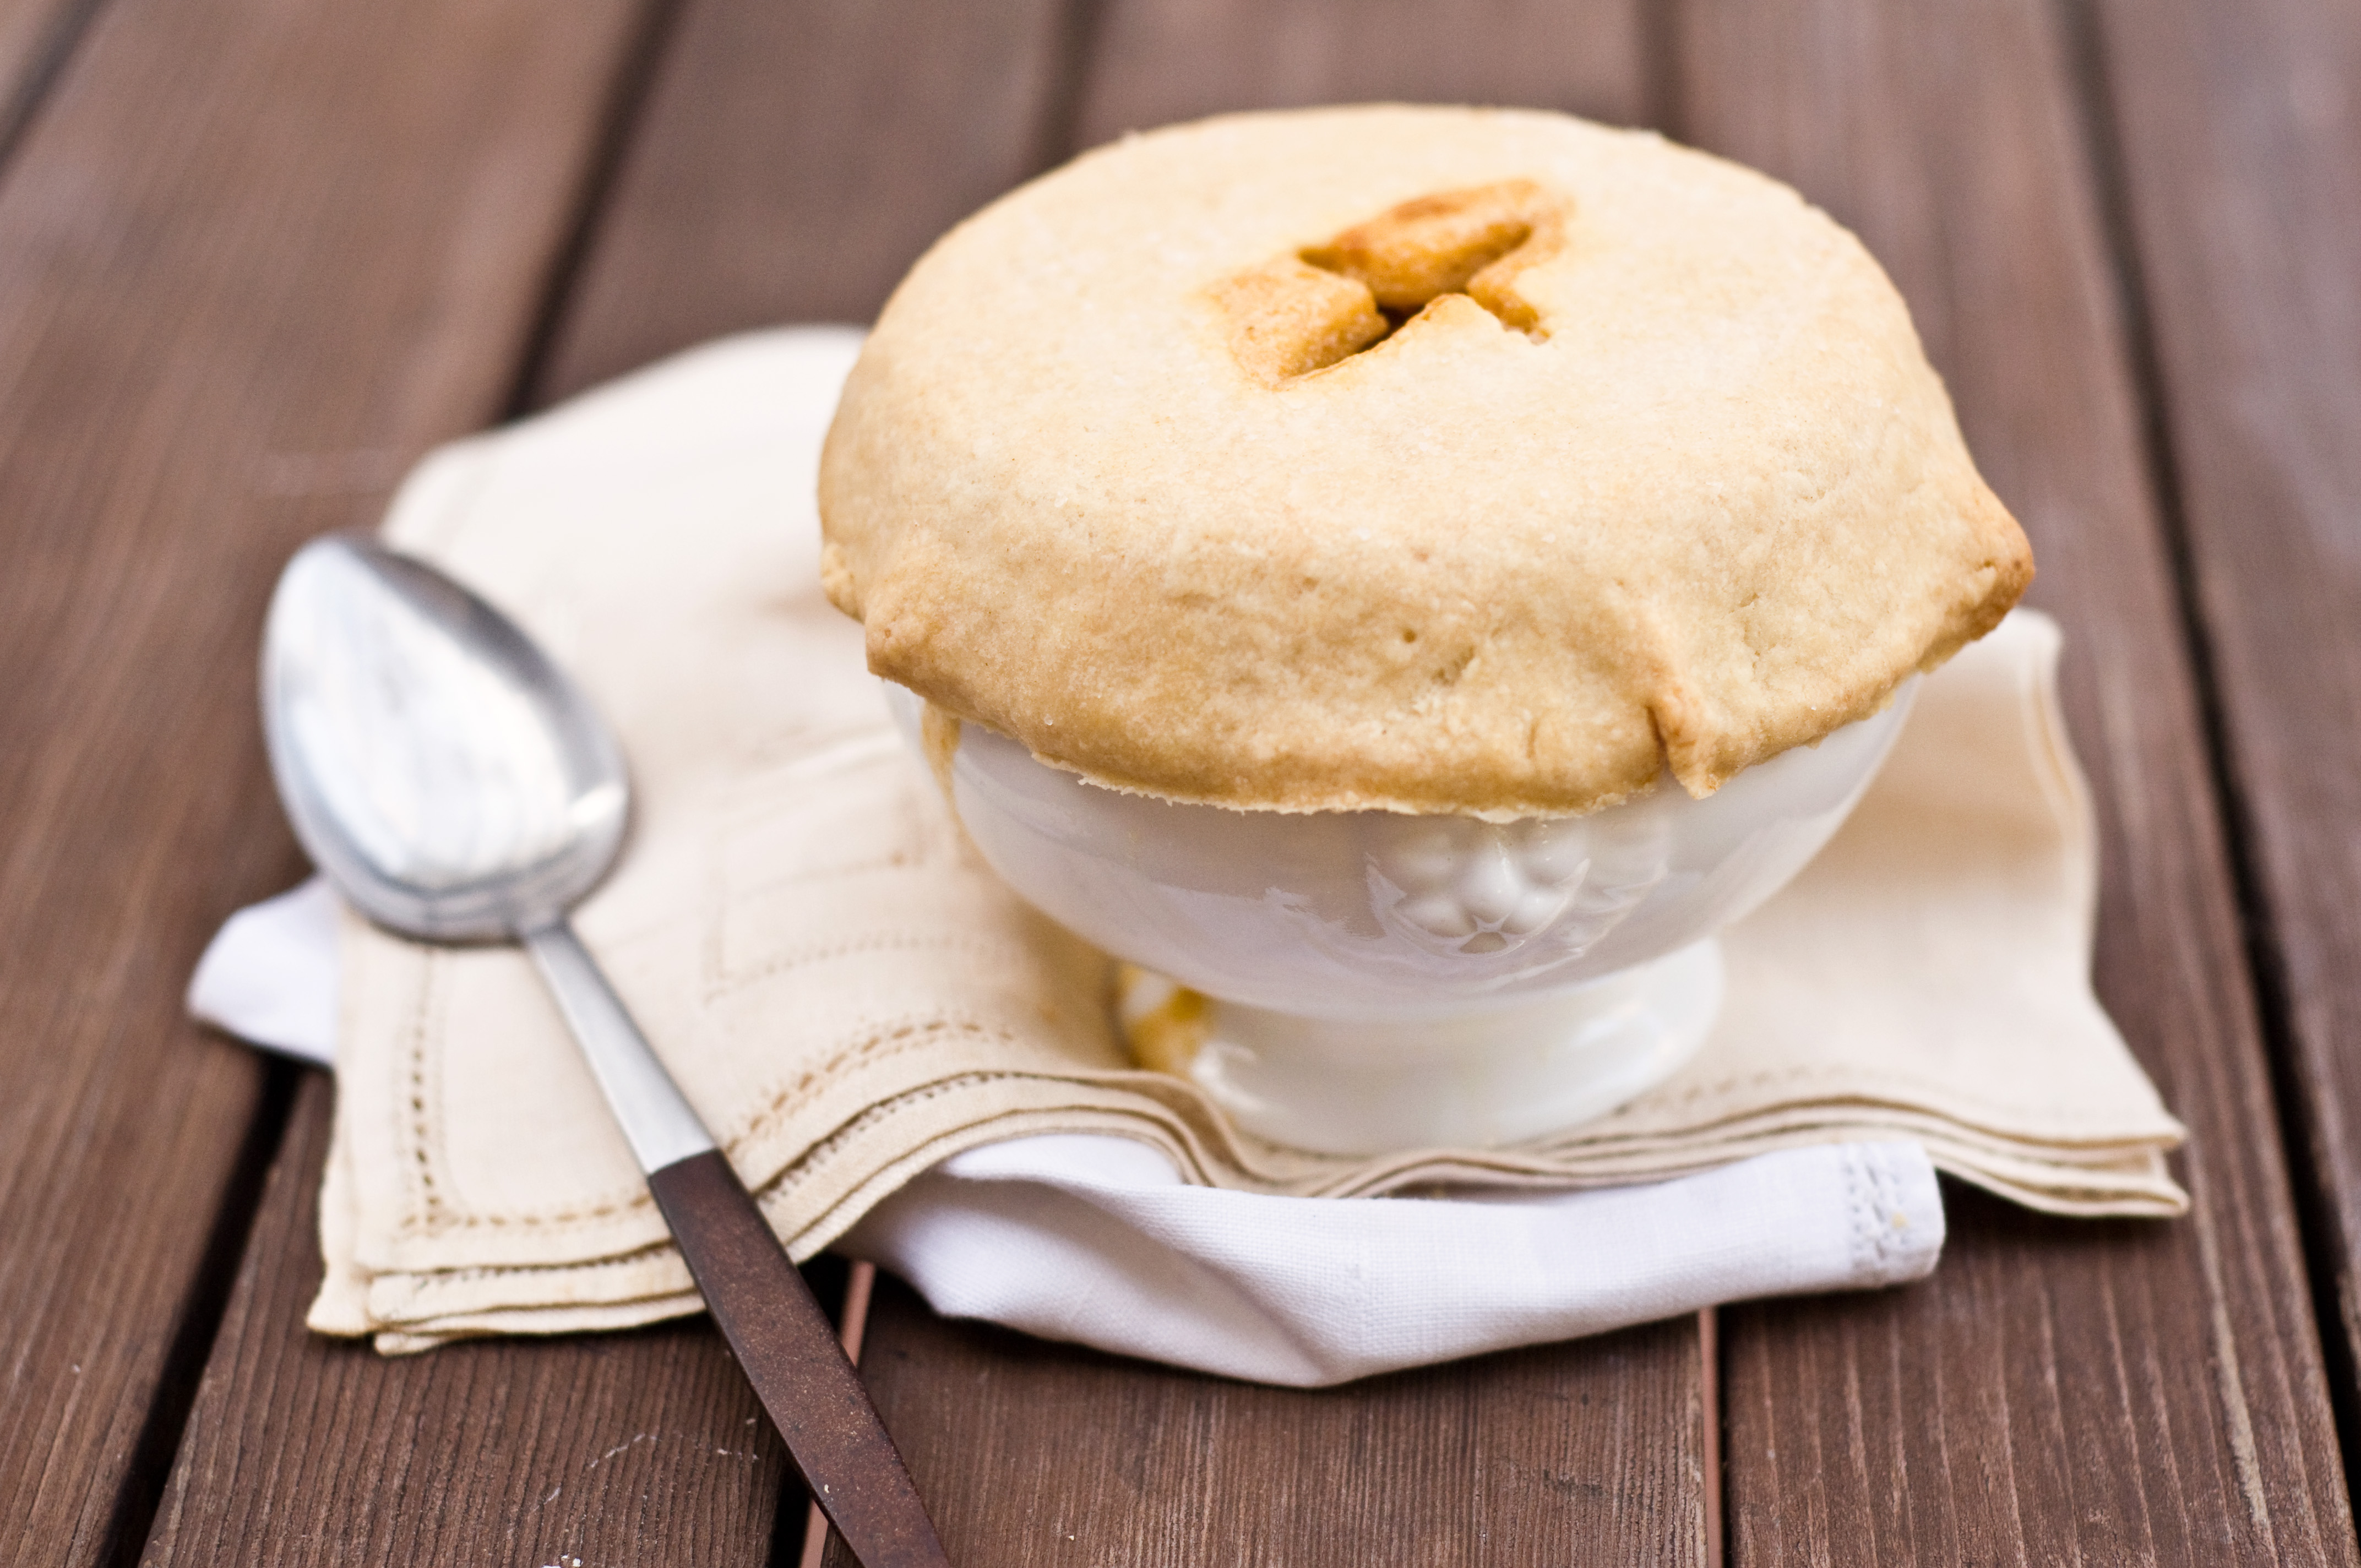
I just realized the perfection of Chicken Pot Pie. Like a creamy soup, with any veggies you want and a beautiful homemade crust on top. I can tell you for sure: This will not be my last pot pie post of the fall.
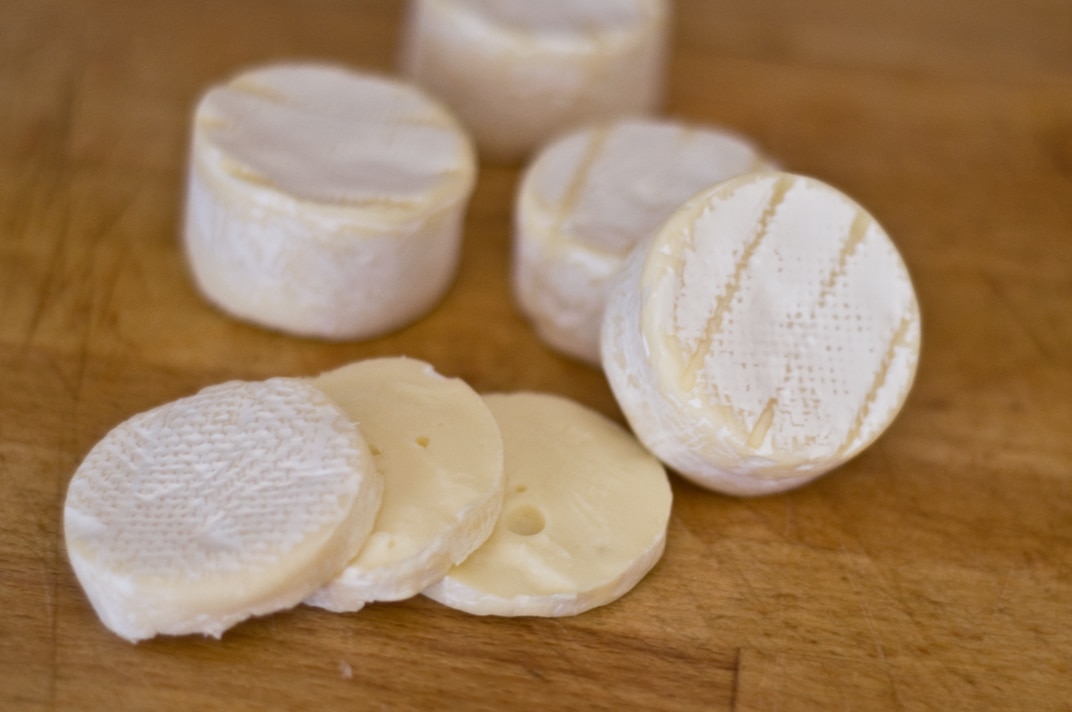
I used another Kerrygold cheese. There are at least two reasons that I love Kerrygold. First, I will always have a place in my heat for Ireland, and Irish people. The first real trip I ever took was to Ireland. I was just out of college and had spend the past 6 months working two jobs, and finishing up my classes, just to buy a plane ticket to Europe and enough money to see me though a few weeks. I landed in Ireland on a drizzely morning, jet lagged and confused. I had no idea where to go, or how to get there. Before I really knew what was happening, I was being dragged though the streets of Dublin by a charming Irishman who was taking me to a youth hostel at the foot of the Guinness brewery. With a smile and a cheerful welcome, he was on his way, leaving me to realized that this kind stranger had walked at least a mile in the wrong direction just to make sure I found a bed for the evening.
OK, so that really has nothing to do with the cheese, but I was able to meet quite a few Irish people and fall in love with them. And Kerrygold is more of a co-op than a corporation and relies on independent Irish dairy farms to source their produces. Second (third?) if you look at the ingredients they are beautifully simple. Milk, cream, salt, all things that I know and can pronounce.
I used Red Leicester, which is a beautiful mild cheddar. Reminds me of the people I met in Ireland, beautiful, honest, full of flavor.
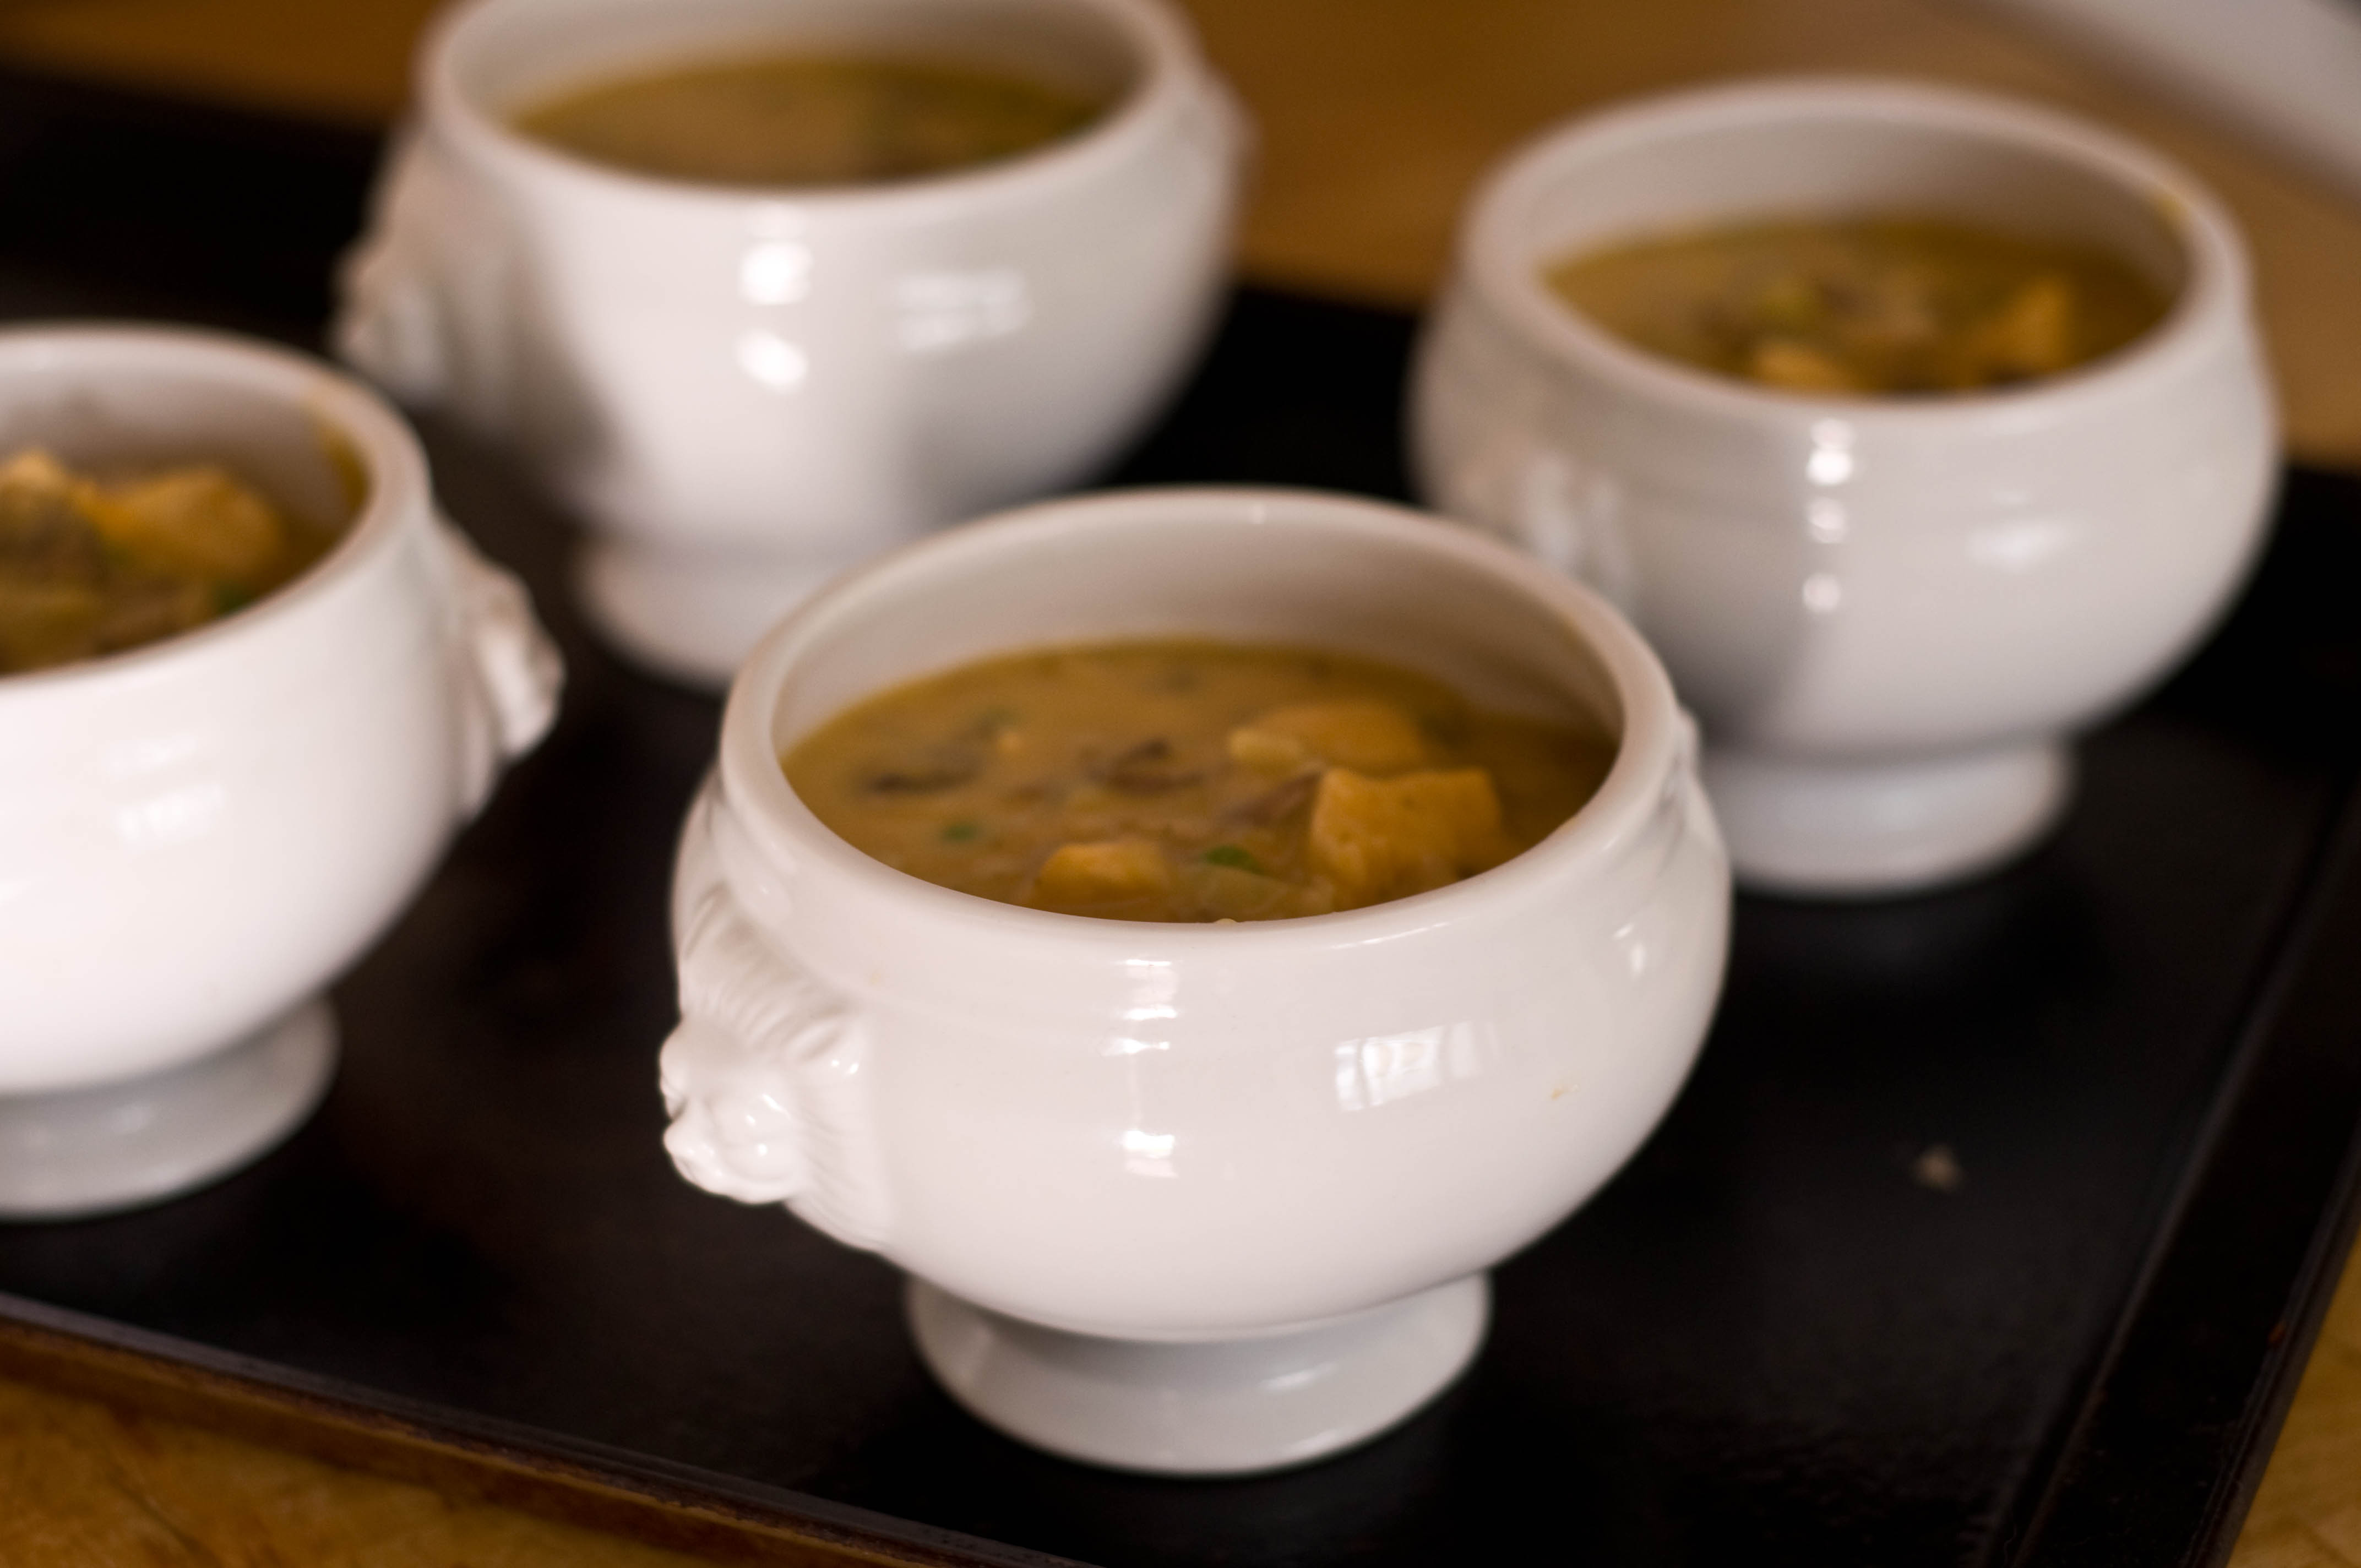
Mushroom Cheddar Chicken Pot Pie
For the Crust:
1 1/2 cups of all purpose flour
1/2 tsp salt
1 tbs sugar
5 tbs butter cold, cut into cubes
1/4 cup shortening
2 tbs vodka
2 tbs cold water
For the Filling:
1 tbs olive oil
½ cup sliced leeks (white and very light green portion only)
3 large cloves garlic, minced
3 cups mushrooms, chopped
3 cups raw chicken, cut into small cubes
2/3 cup broth, plus additional 1 1/3 cup, divided
¼ cup flour
½ cup corn kernels
½ cup peas
2 cups shredded cheddar
1 tsp salt
1 tsp pepper
¼ cup melted butter
1. Combine 1 cups of flour, salt, and sugar in a food processor, pulse a few times until its combined. Add the butter and the shortening and process until it forms a ball around the blade, about 2 minutes.
2. Add the remaining flour and process until well incorporated, about 1 minute.
3. Move to a bowl and add the water and the vodka, combine with a spatula or wooden spoon.
4. Form the dough into a disk. Wrap the disks in plastic wrap and chill until very firm, about two hours.
5. Preheat oven to 400.
6. In a pan over medium, high heat, add the olive oil. Once the oil is hot, add the leeks and the garlic, sauté until leeks are soft.
7. Add the mushrooms and cook until soft and darkened.
8. Add the chicken and sauté until cooked through, about 5 minutes.
9. In a separate bowl, add 2/3 cup of broth and the flour, stir until combined. Pour mixture into the pan through a small mesh strainer to remove any lumps.
10. Add the remaining broth to the pan and stir to combine. Add the peas, corn, cheese, salt and pepper. Stir until the cheese has melted and is well combined with the broth.
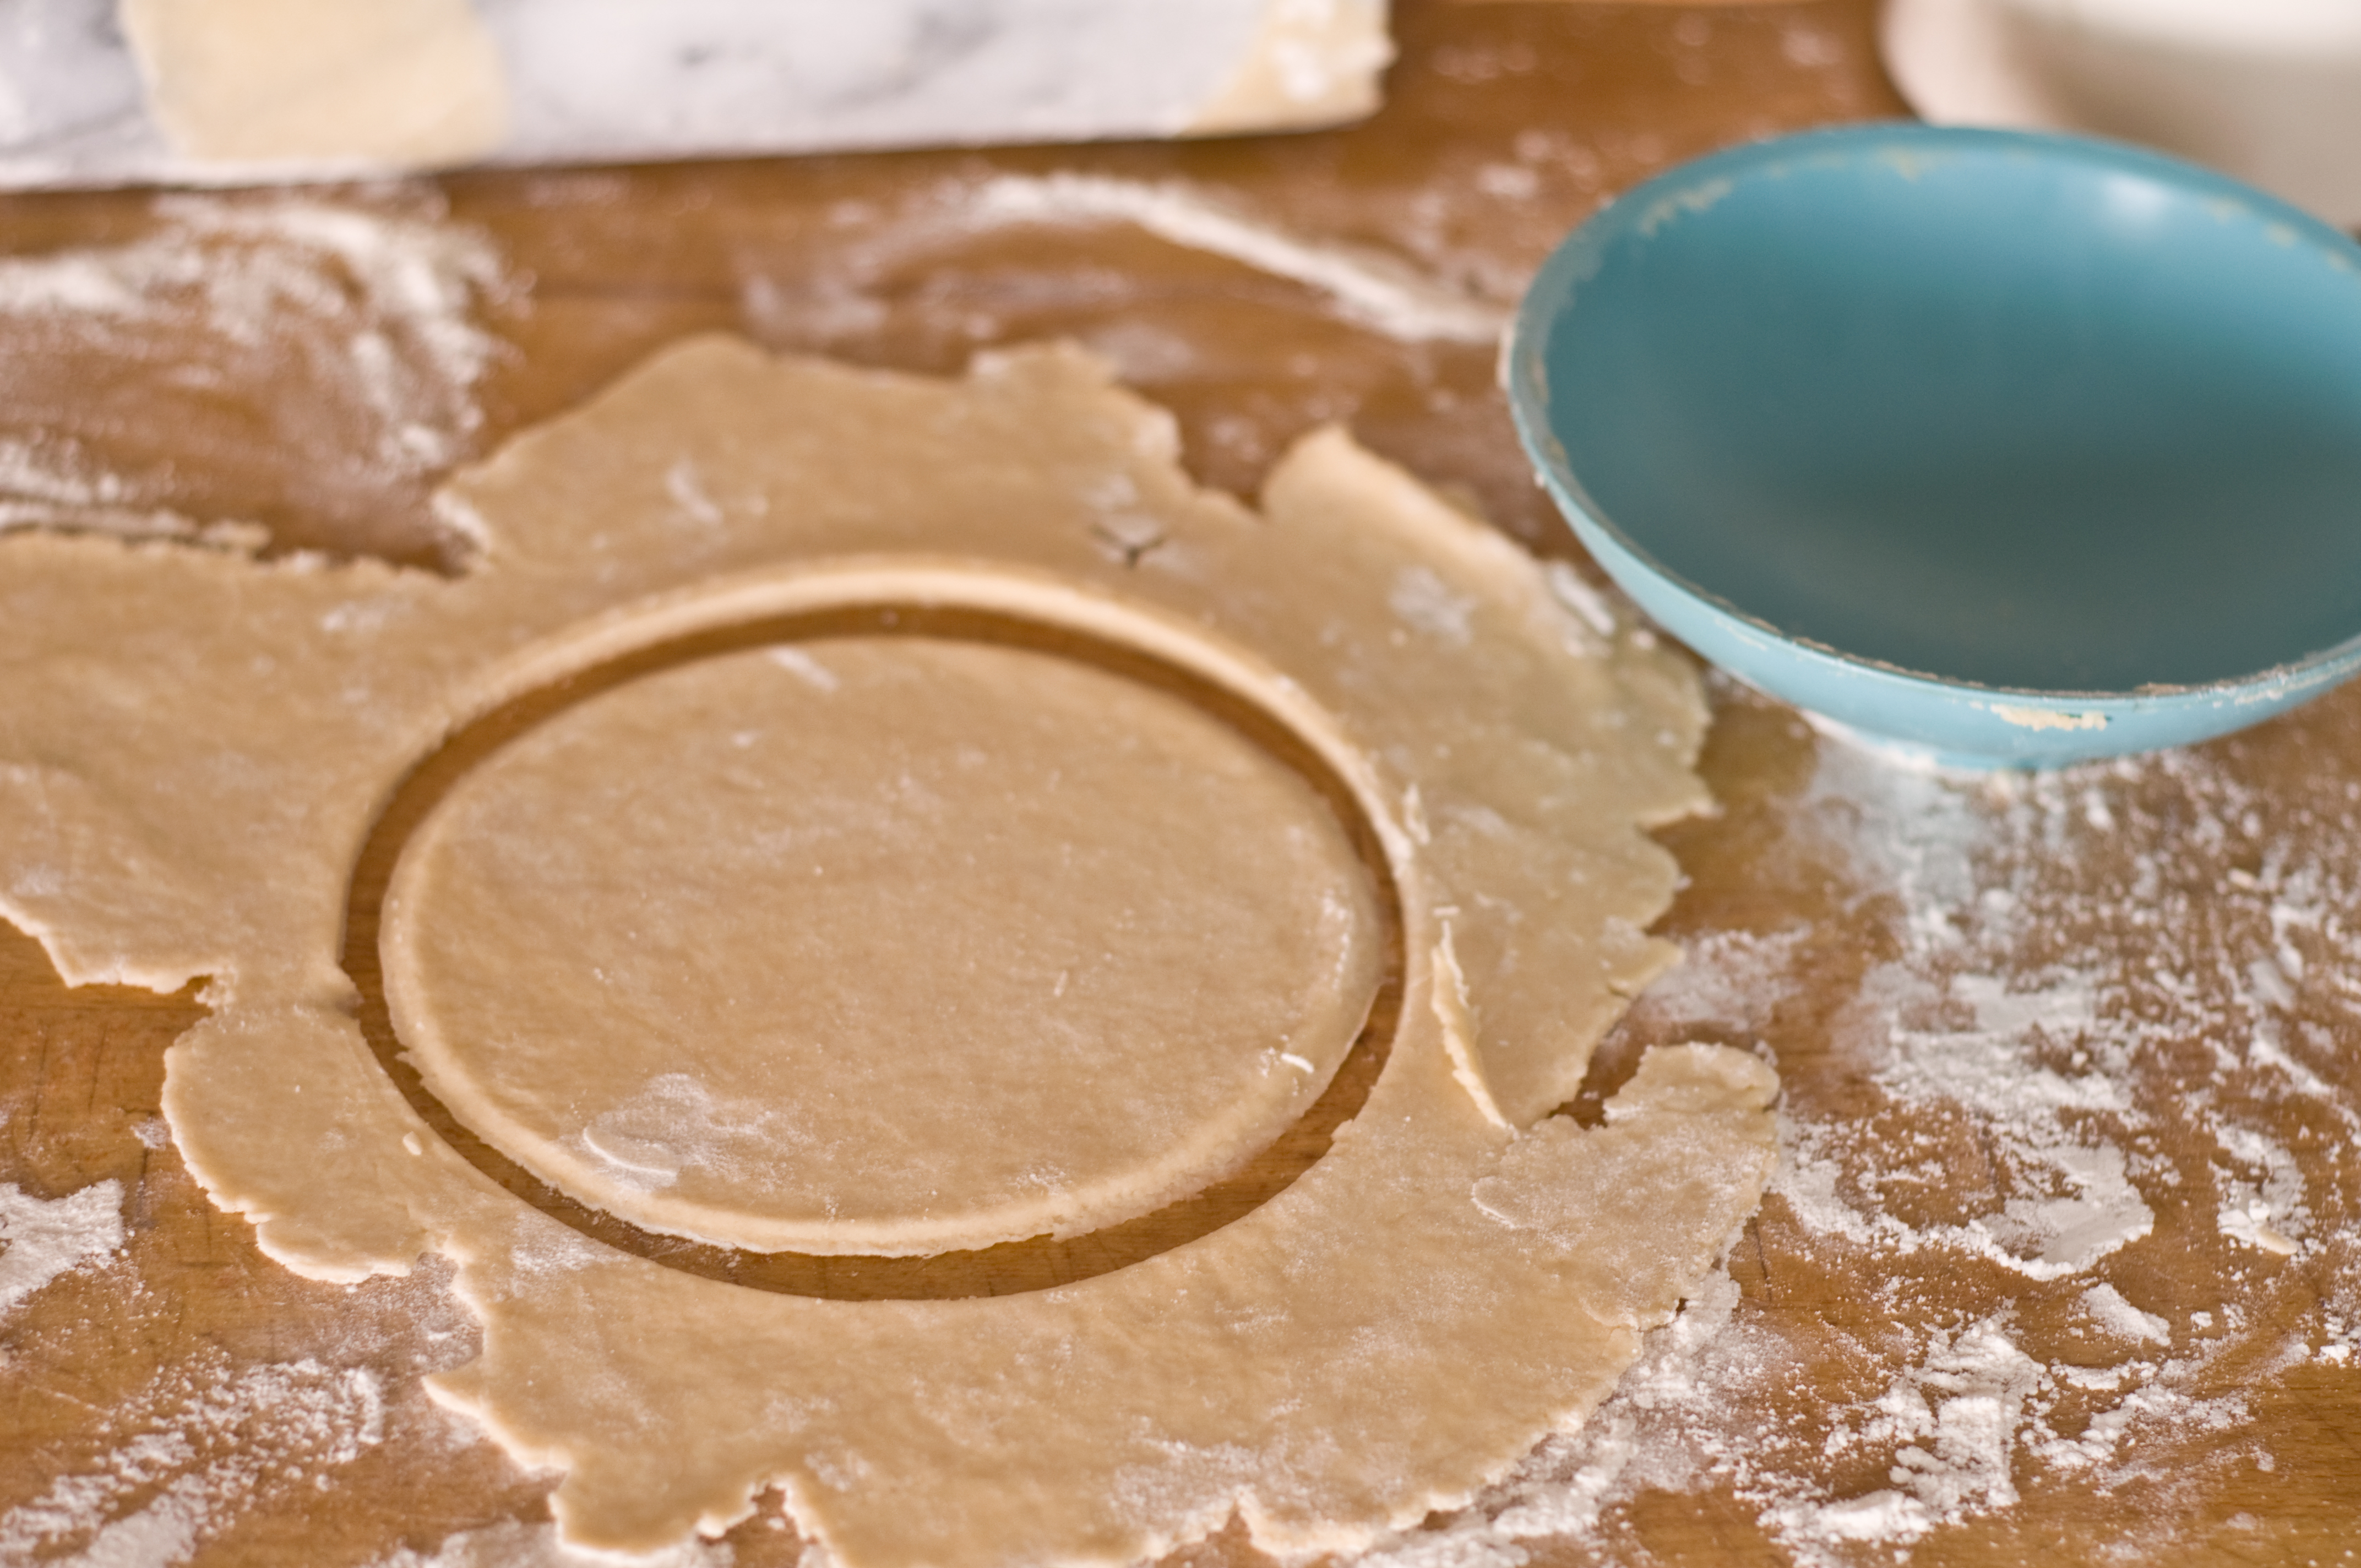
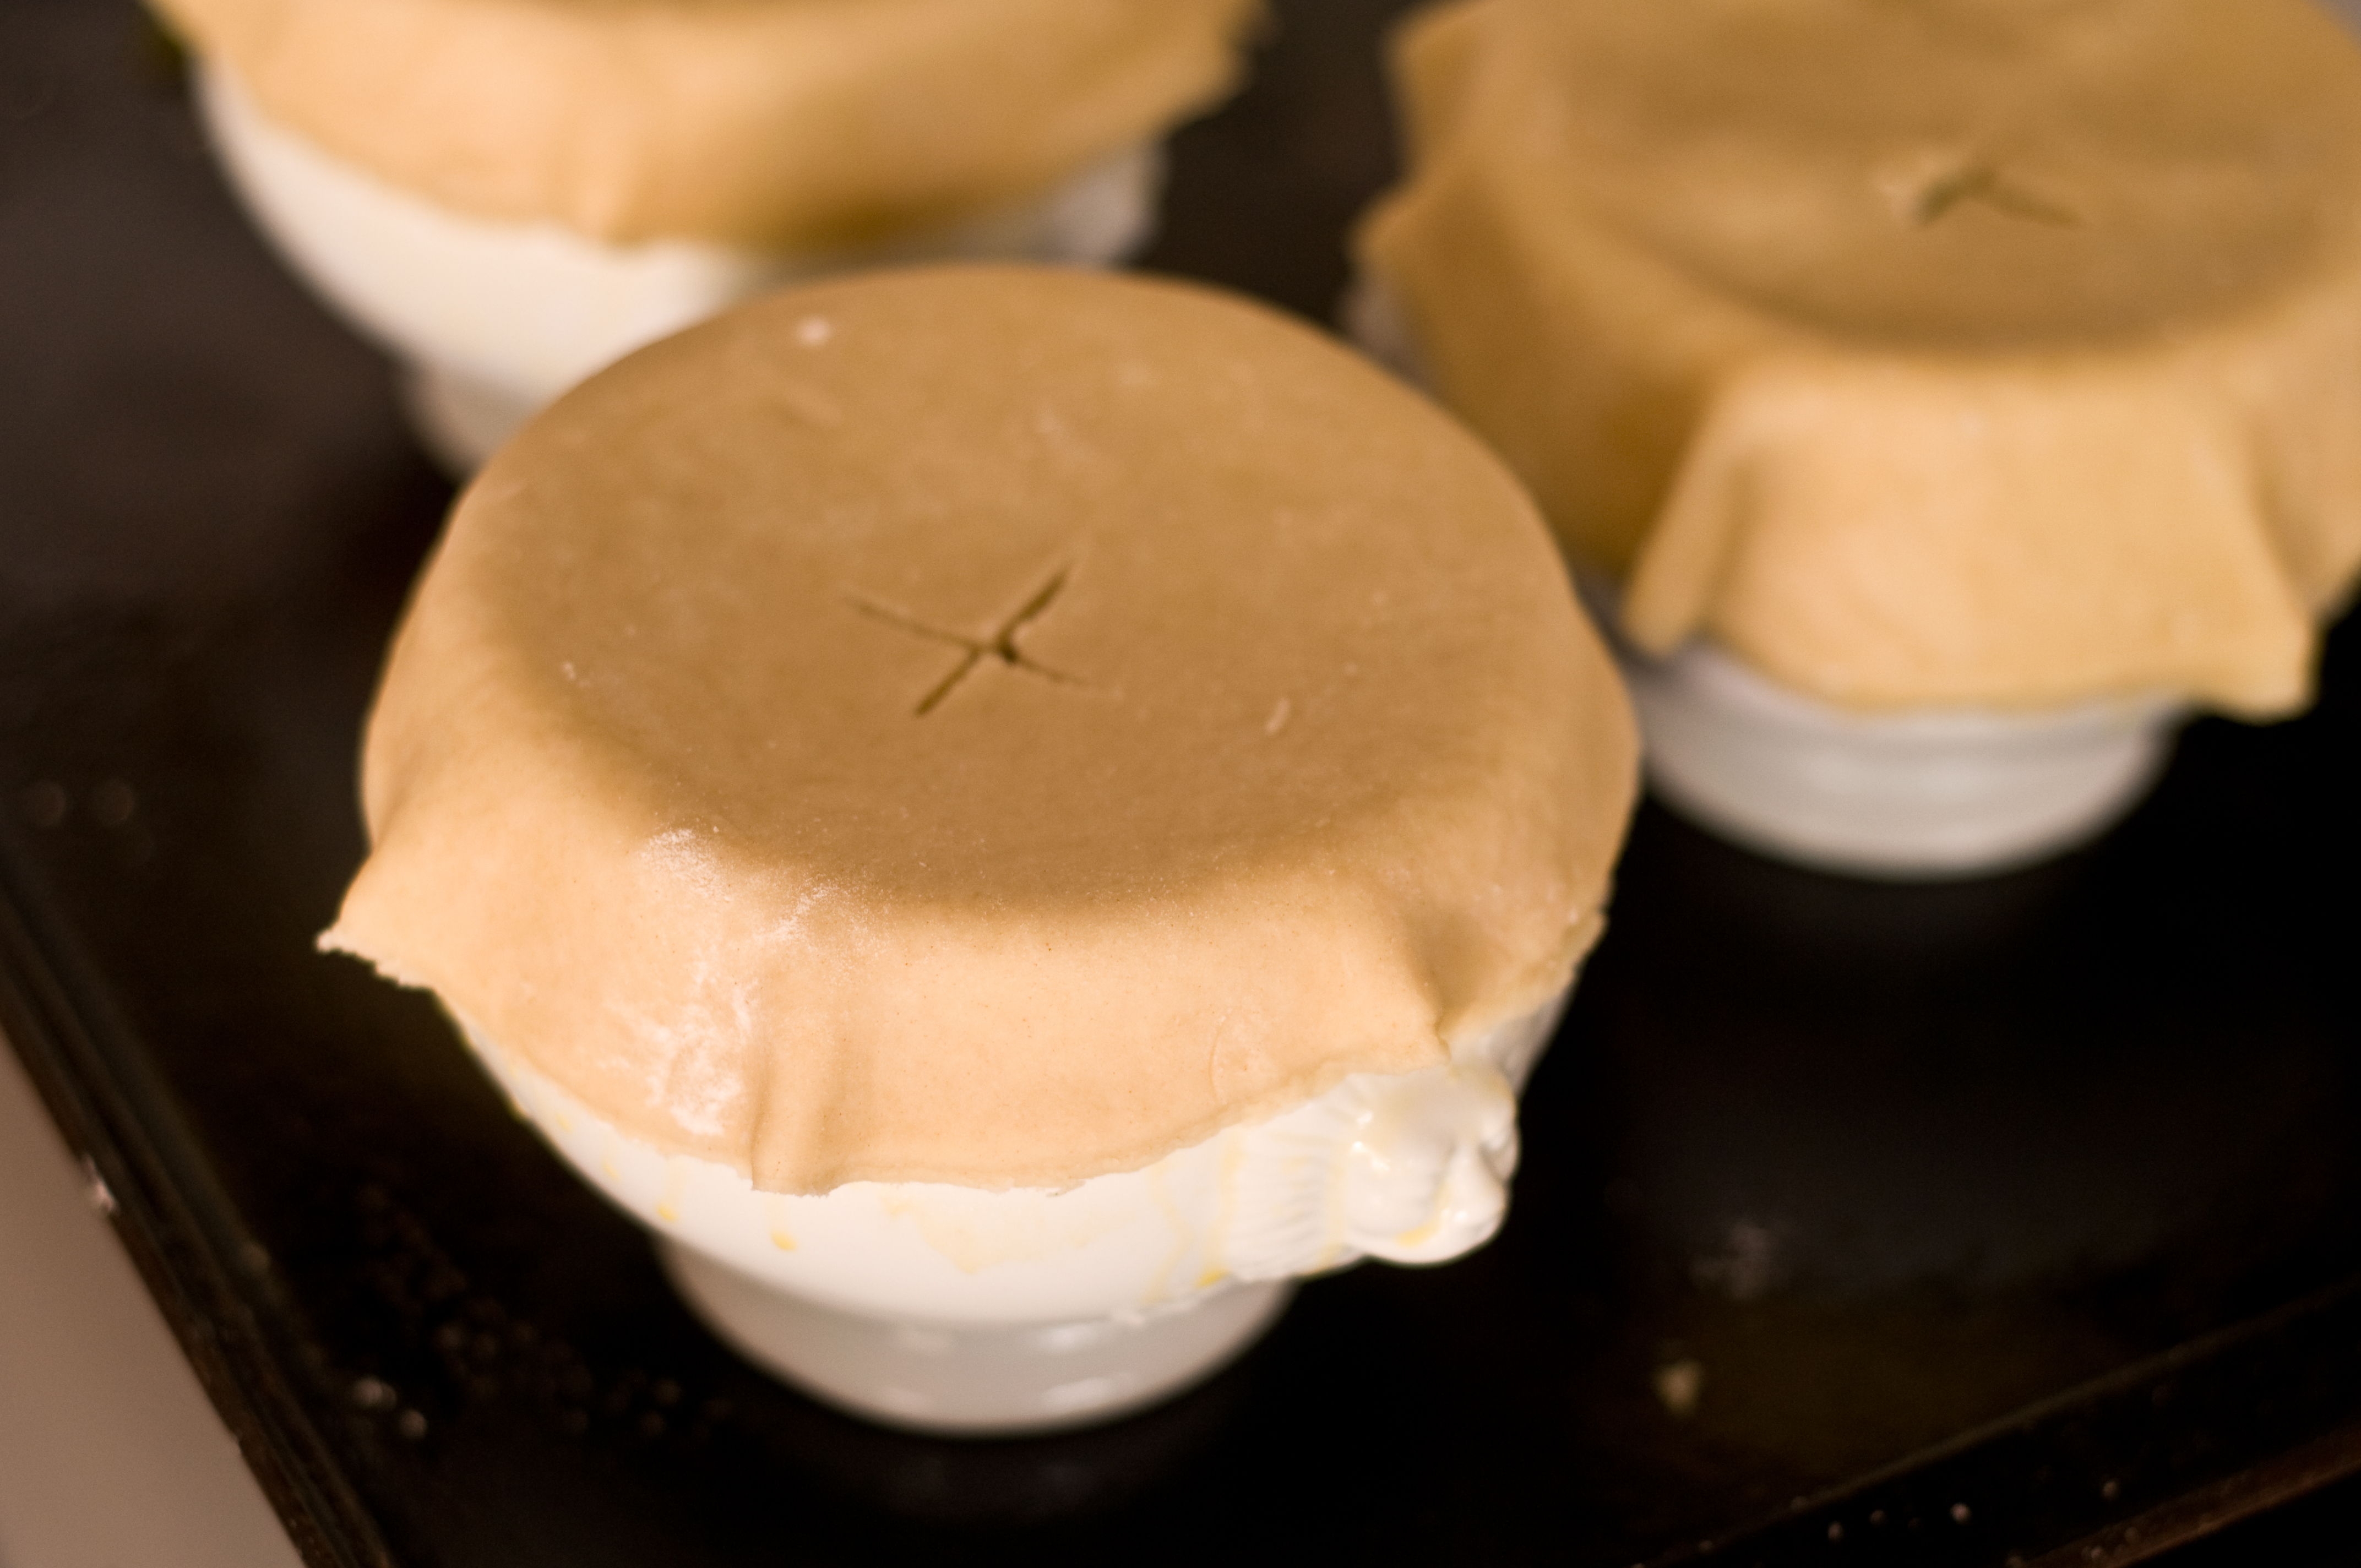
12. Pour into small, portion sized, oven safe ceramic dishes. Makes about 4.
13. Once the dough has chilled, place disk on a very well floured surface, add flour to the top of the disk as well. Roll out into an even thickness.
14. Cut out circles that will cover the dishes with at least a one inch overhang on each side.
15. To prevent sticking, spray the rim of the baking dish with cooking spray.
16. Top each dish with the dough circle, cutting a slit to vent at the top. Then brush the dough with melted butter.
17. Bake at 400 for 20-25 minutes or until the crust is golden brown. Allow to cool a bit before serving.
I figured out how to pronounce Galette. This was becoming an issue for me. How can I go about baking, and writing about, such an amazing food that I can’t even mention in conversation? So I googled it. I found this lovely little website that has a charming French man (just trust me on the charming part) who so beautifully pronounces the word Gal-Let. You’re gonna press play over and over just to make sure he really said Gal-Let and not Guh-Lay. Or maybe that’s just me.
Apple Brown Sugar (Gal-Let) Galettes
For the Crust:
1 1/2 cups flour
2 tbs sugar
1/2 tsp salt
1 stick butter
1/4 cup ice cold water
For The FIlling:
4 cups granny smith apples, cored, peeled and sliced
2 tbs fresh squeezed lemon juice
1 cup brown sugar, packed
3 tbs melted butter.
Make the crust:
In a food processor, combine the flour, sugar and salt. Pulse to combine. Add the butter (ice cold and cut into cubes) and process until combined. Add the remaining flour and process until combined. Move dough to a bowl and add the water with a wooden spoon (don’t add the water with the food processor or your dough will turn into a cracker). If your dough is too dry, or two wet, add a bit of water or flour to achieve the right consistency.
Form the dough into a disk, cover with plastic wrap and chill for at least an hour.
Once your apples and peeled, cored and sliced, add to a bowl with the lemon juice and toss to combine. Add the brown sugar and butter and toss to combine. Let stand at room temp for 20 minutes.
Preheat oven to 400.
Once your dough is chilled, roll out to an even thickness. Cut out 6 inch circles. Use whatever you have that is round and six inches, I used a small plastic bowl. This recipe will make 6-8 mini Galettes.
Arrange the apples in tight circle in the middle of your dough, leaving a one inch boarder around the edges.
Fold the edges over the filling, leaving the center open.
Brush the remaining brown sugar/butter mixture that your apples were sitting in all over the Galettes and the exposed crust.
Bake at 400 for 28-35 minutes or until golden brown.
I could eat pie every day. I love it. It’s my First Love when it comes to desserts and cooking in general. I could have an All Pies blog ("Pie Fits"??) and be perfectly happy. When I was a kid, I didn’t want birthday cake (gasp!!!) I wanted birthday pie. Usually Apple. Not enough people eat savory pie and I want to change that. Hand pies, empanadas and anything else small, savory and portable, should be right there among the sandwich masses. This recipe is easy, and the dough is based off a pie dough, but with a few alterations to make it more like an empanada, and it really is easy and quick. Also, a prefect lunch to pack for a picnic or a hike.
Get moving, eat pie.
Mushroom Pork Hand Pies
For The Dough:
2 1/4 cup flour
1 tsp salt
10 tbs butter, cold, cut into cubes
1 egg
1/3 cup ice water
For The Filling:
2 tbs olive oil (plus more as needed)
1/4 cup onioins, chopped
2 cloves of garlic, minced
1/2 cup mushrooms, chopped
1 cup ground pork (you can sub turkey or chicken as well)
1 cup tomatoes, chopped
1/2 cup roasted red bell peppers, chopped
1 tsp salt
1/2 tsp pepper
1 tsp smoked paprika
1 tsp chili powder
For The Top of Dough:
1/4 cup melted butter
pinch of salt
Put 1 1/2 cups of flour and the salt in a food processor, pulse for a second to combine. Add the butter and process until combined. Add the remaining flour and process again. Move to a bowl. In a small bowl, beat the egg and water together until well combined then add the egg/water to the dough with a wooden spoon. If you add the water and egg with the food processor, your dough will turn out crispy and cracker like.
Form into a disk, cover with plastic wrap and chill for at least 1 hour.
Heat the oil in a saucepan over medium heat. Add the onions and cook until opaque, about 3 minutes. Add the garlic and the mushrooms and cook until the mushrooms are soft, adding a little more oil if the pan gets dry. Add the remaining filling ingredients and cook until warm and combined, about 3 minutes. Allow to cool.
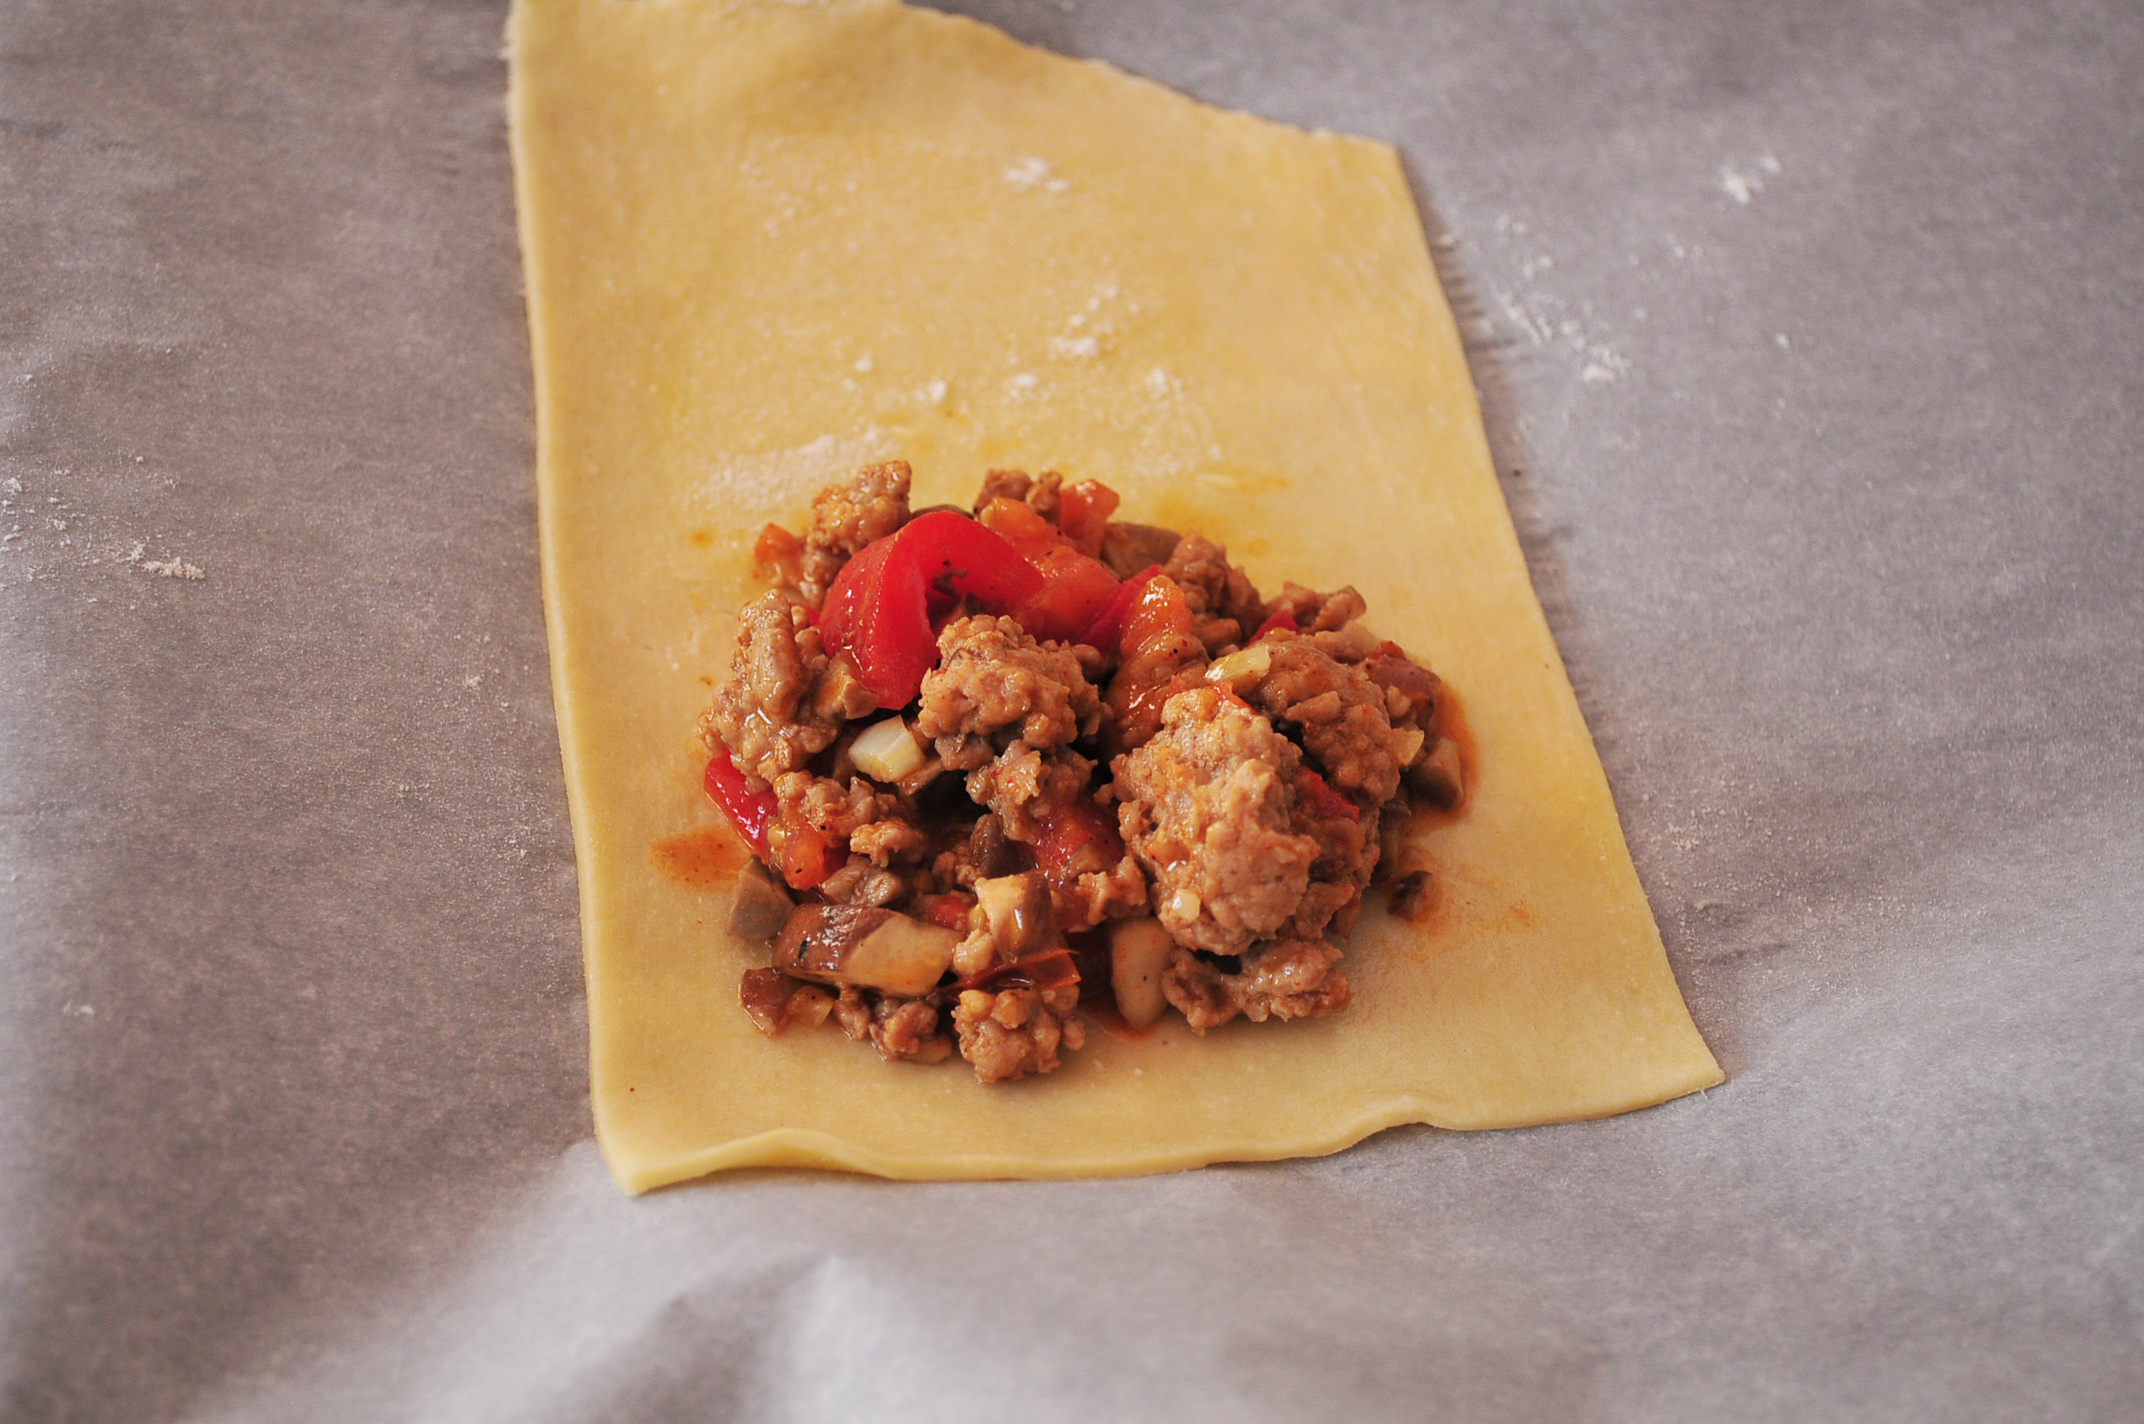
Once the dough is chilled, roll out on a flat surface and cut into sections that are 6 inches by 8 inches. Add 1/4 cup of the filling to one end of the strip, keeping at least an inch between the filling and the edges.
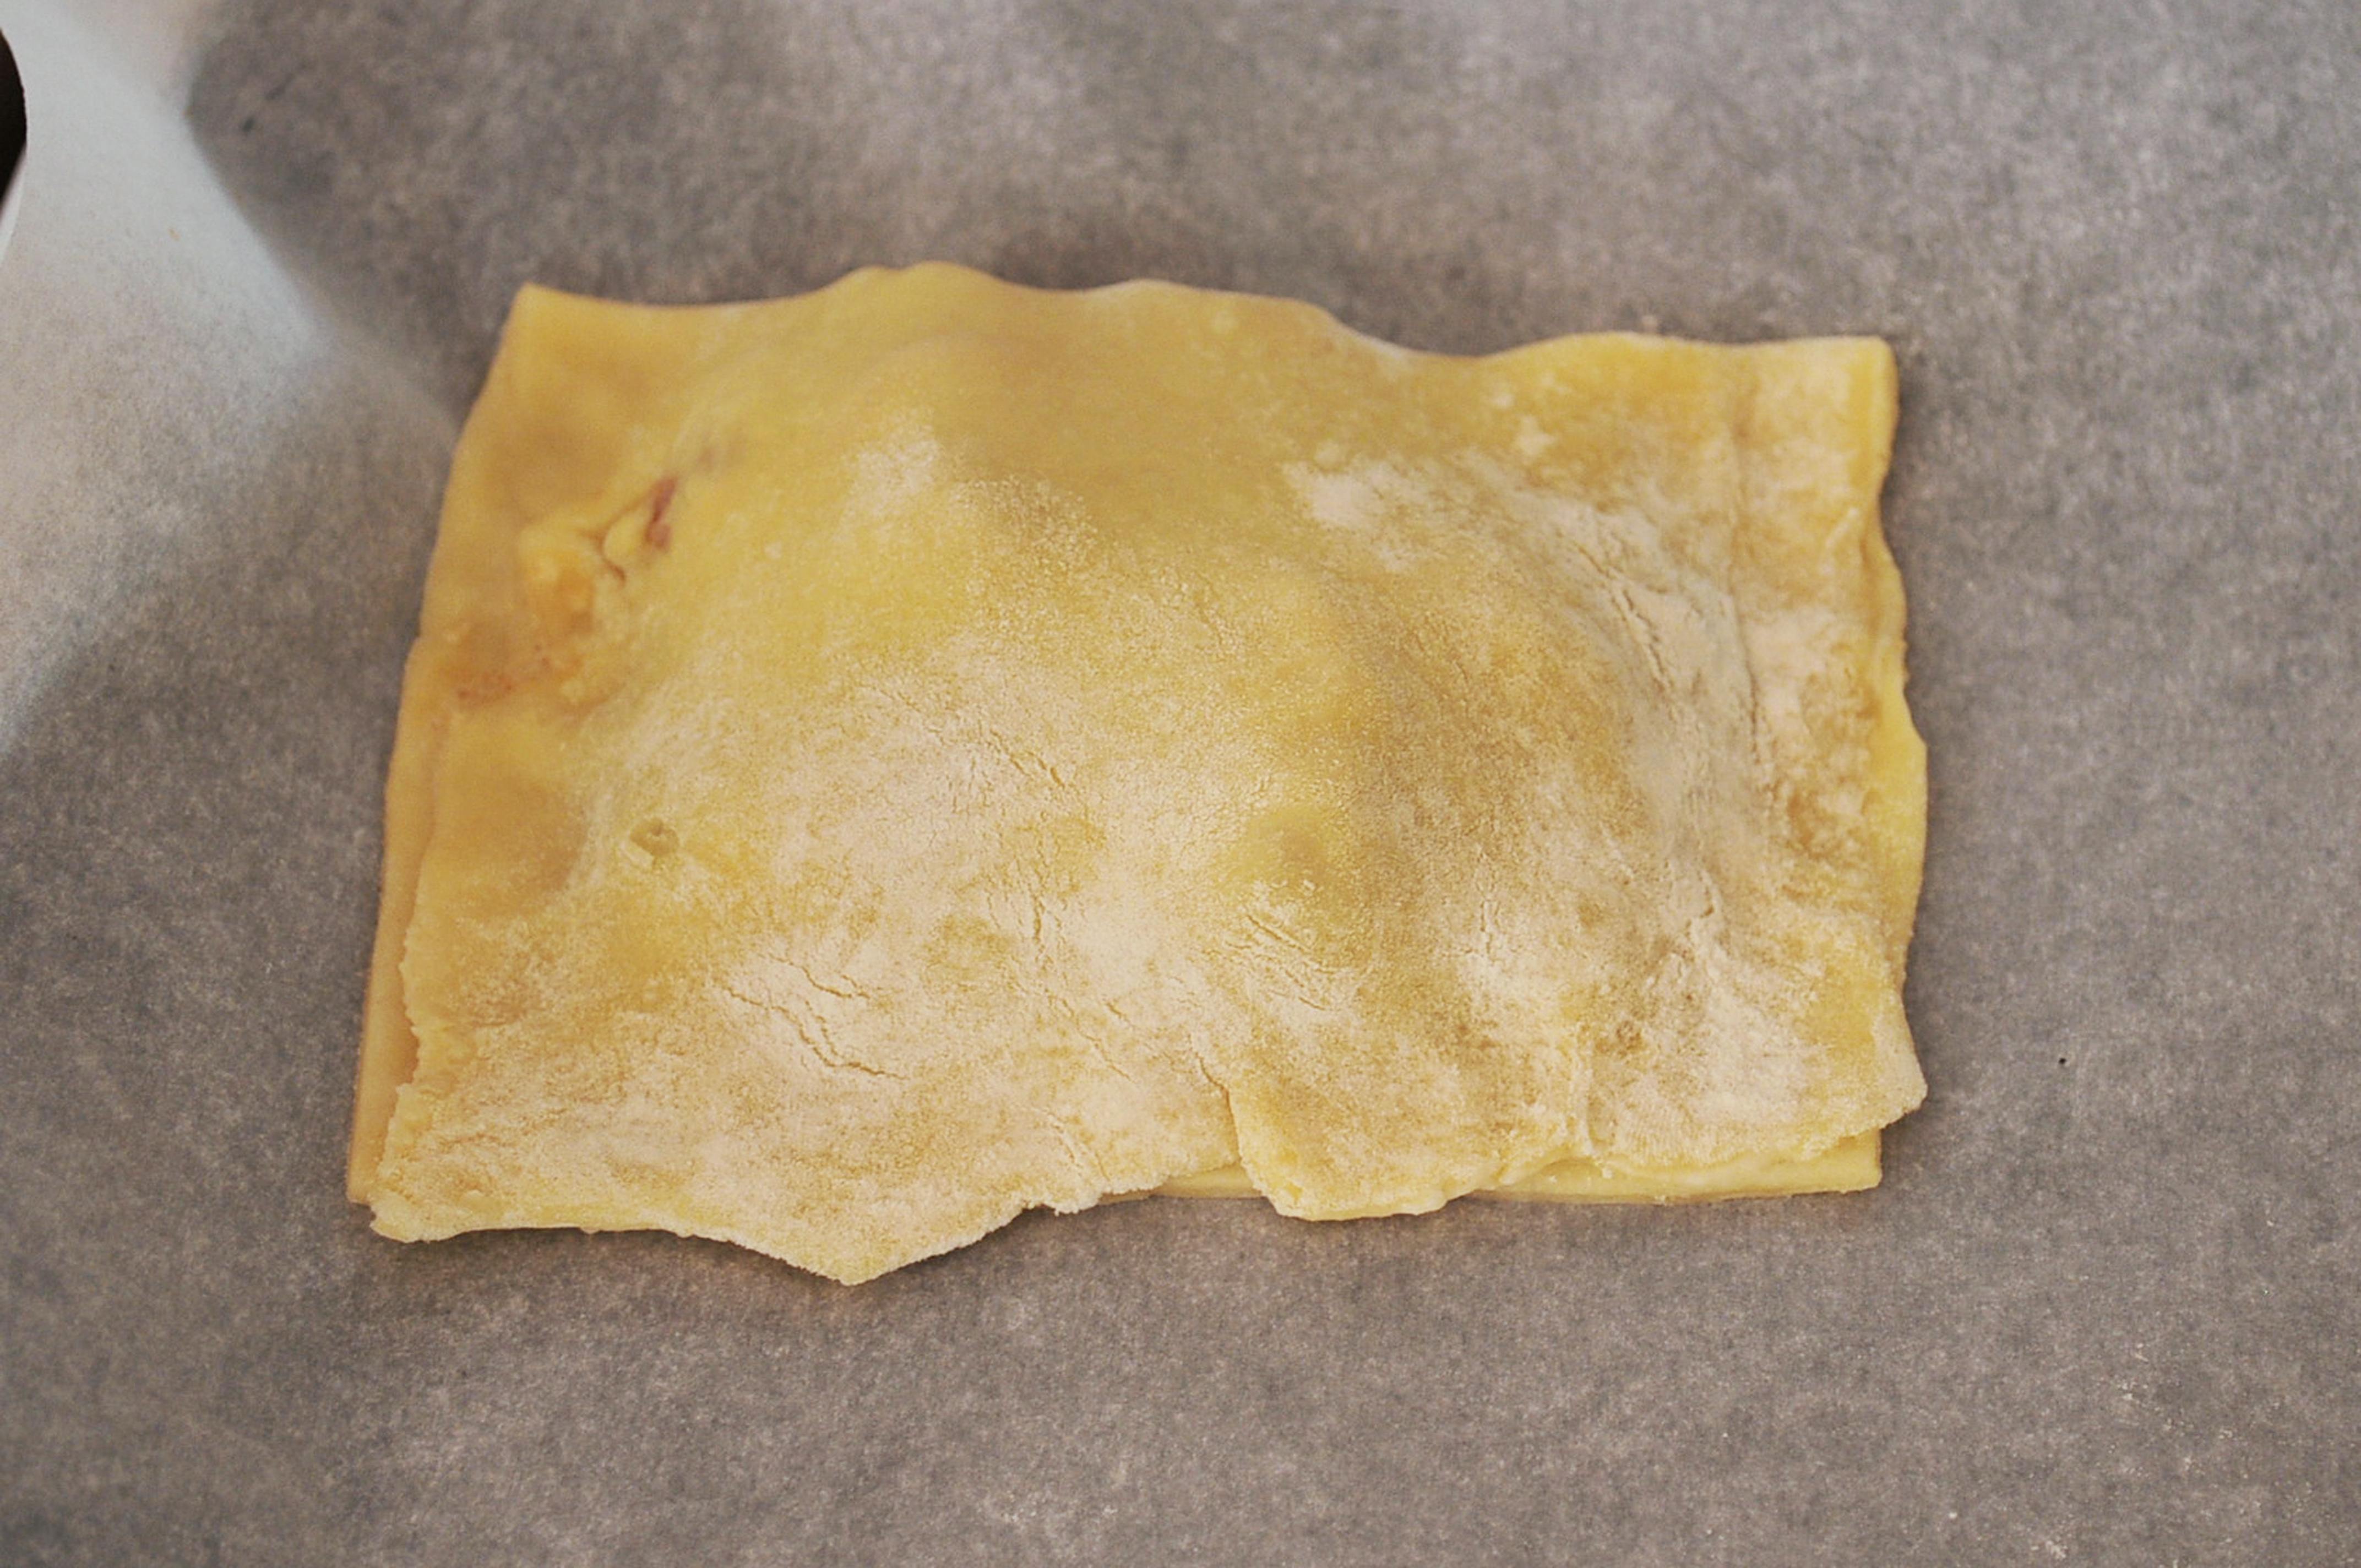
Fold the empty half over the filling and press the edges until secure.
Transfer to a baking sheet (sprayed with cooking spray or covered with parchment paper to prevent sticking).
Repeat until all the dough and filling are used. Brush the tops of the pies with melted butter and sprinkle with a little salt.
Should make between 8 and 10 pies.
Bake at 400 for 20-25 minutes or until golden brown.
Galettes are such an amazing food. Like a tart or a pizza, only much more elegant and easier to make. This dough came out so beautifully, with a buttery flakiness that could be eaten all on its own. There is a very good chance that this Fall will be filled with galettes, sweet and savory.
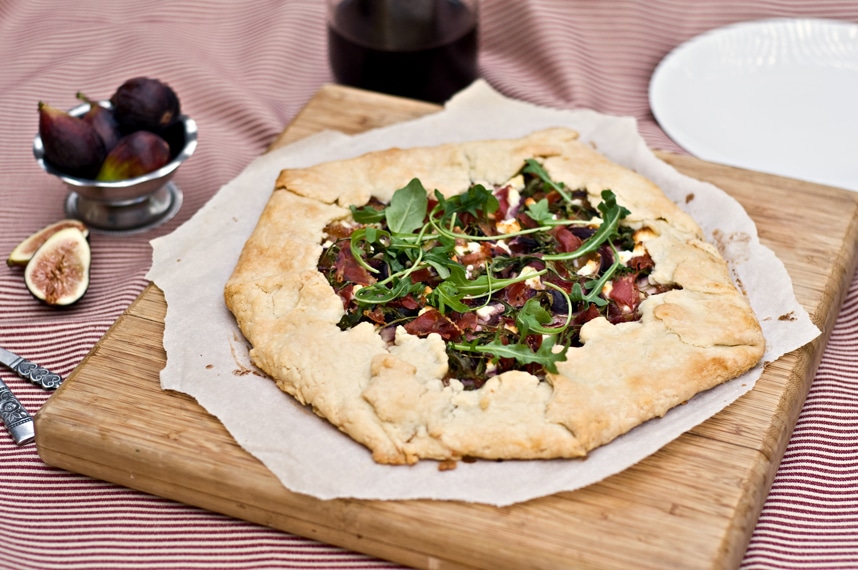
Fig and Goat Cheese Galette
CRUST
2 cups flour
1 tsp salt
1 tsp sugar
1 1/2 sticks of butter
1/3 cup ice cold water
FILLING
1/2 cup ricotta cheese
1 tsp salt
1 tsp pepper
6 figs, sliced
1 tbs raw honey
2 tbs minced red onions
1/2 cup arugula
2 oz goat cheese, crumbled
1 oz prosciutto, chopped.
1 tbs melted butter
In a food processor, combine 1 1/3 cup flour, salt, sugar and butter, process until well combined. Add the remaining flour and process again until combined. Transfer to a bowl and add the water with a wooden spoon (don’t add the water while the dough is in the food processor or your dough will be brittle and cracker-like). If the dough isn’t moist enough, you can add more water, a tsp at a time until the consistency is right. Form dough into a disk, wrap with plastic wrap and chill in the refrigerator for 2 hours.
Preheat your oven to 375.
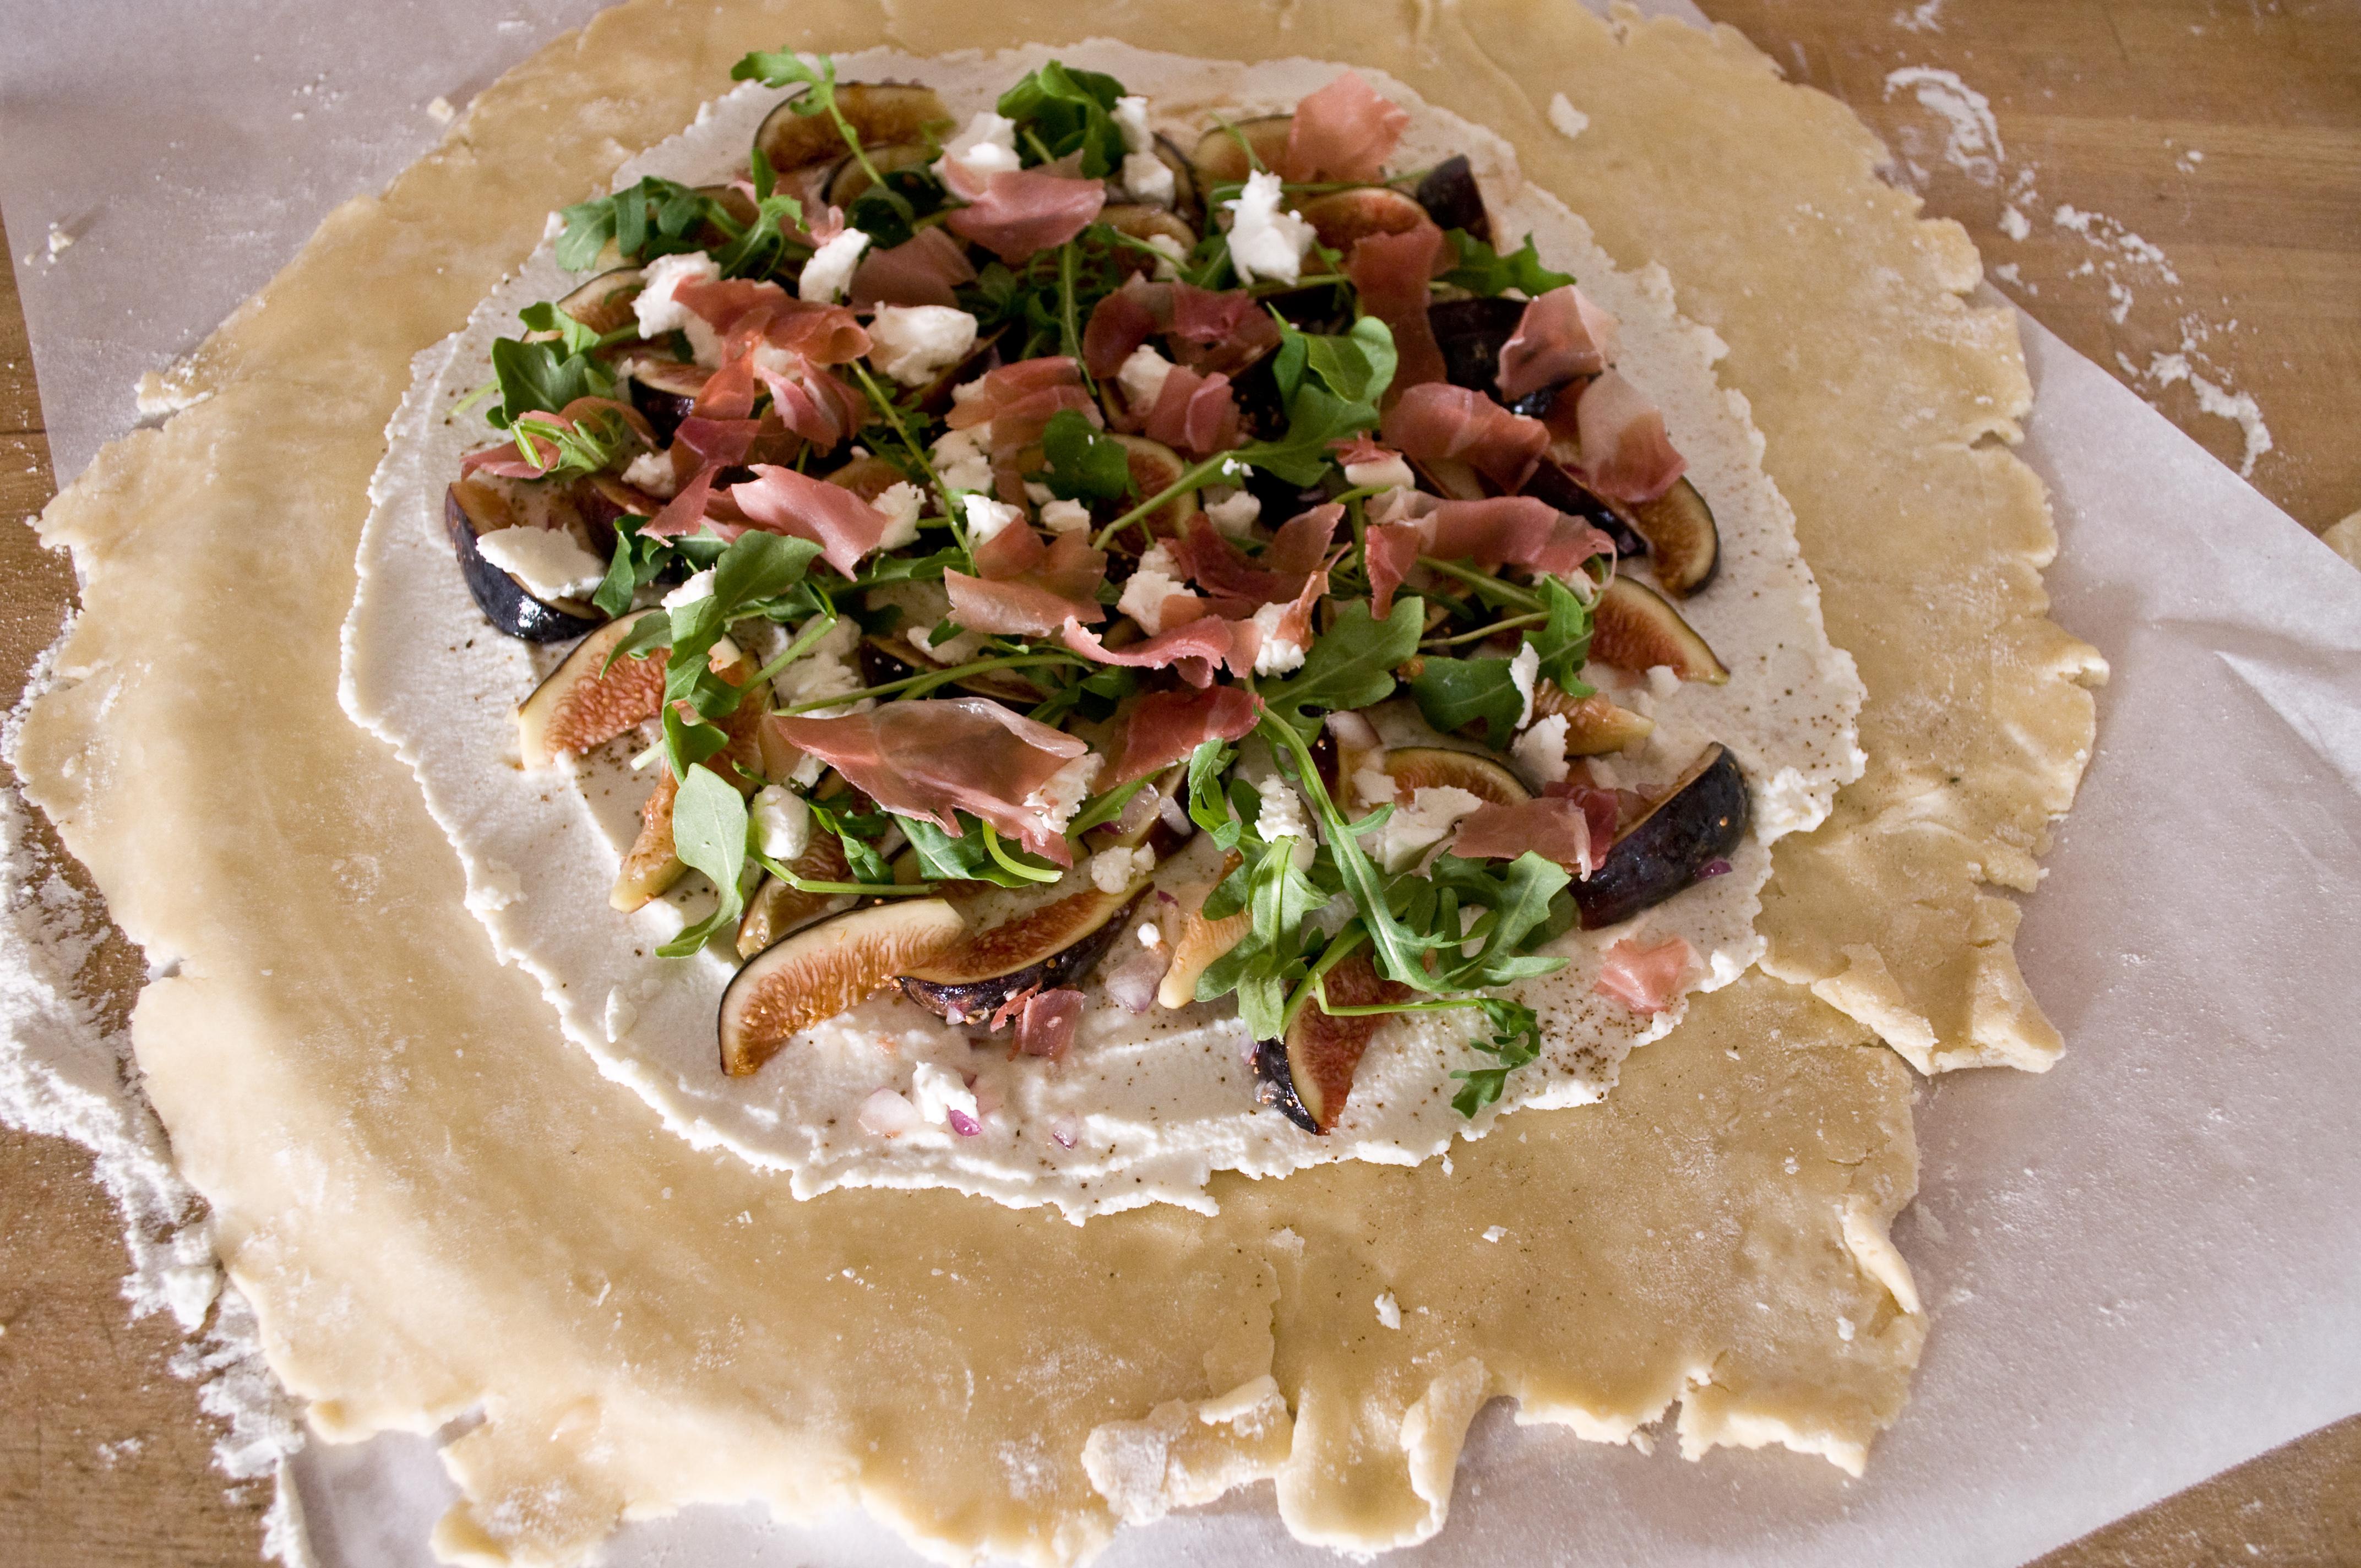
Once the dough is chilled, roll into a "rustic" circle. The great thing about a Galette is that an odd shape looks charming, don’t worry about making it too perfect. Transfer to a baking sheet or a pizza stone covered with parchment paper. Spread the ricotta in the middle, leaving about 2-3 inches on all sides bare. Top with salt and pepper. In a bowl, combine the figs, honey and onions, toss to coat. Add the figs to the top of the ricotta, then add the arugula, goat cheese and prosciutto.
Fold the edges into the middle
Brush the crust with melted butter and bake at 375 for 40-45 minutes or until golden brown. I added additional arugula and goat cheese to the top before serving, but this is completely optional.
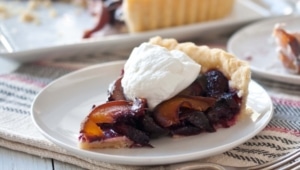
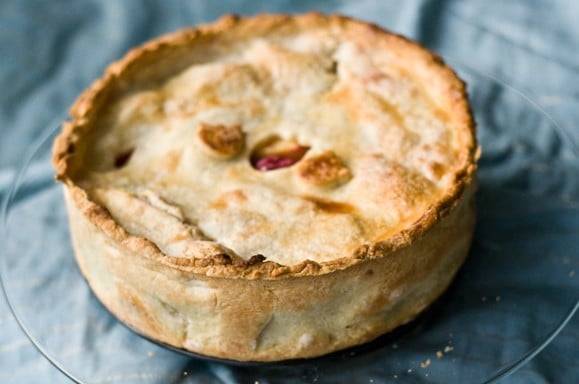
I wrote another article for Honest Cooking. I wrote about this deep dish pie, because I love it so much. The crust is the best part, and making it deep dish adds more of the good stuff, oh, and the filling too. Also, deep dish pies are really impressive. They stand on their own, outside of a pie pan and look like a baked-goods force to be reckoned with. Next time you make a pie from scratch, forget the pie pan and reach for your spring form pan.
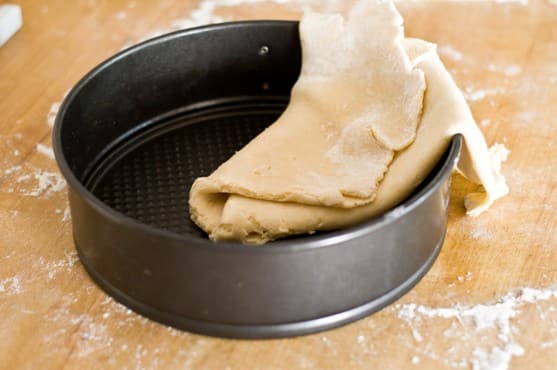
Once your pie dough is completed, chilled and ready to go, roll out one disk (about half of the total recipe) so that it will sit in your spring form pan with about a 1 inch overhang. Fold in half, then in half again to form a triangle. Gently move to the pan with the point of the triangle in the dead center.
Unfold and smooth any rips or tears with your fingers. Set in the fridge to chill until ready to use.
Preheat oven to 375.
In a separate bowl, add the flour, cornstarch, salt, and sugar, then whisk to combine.
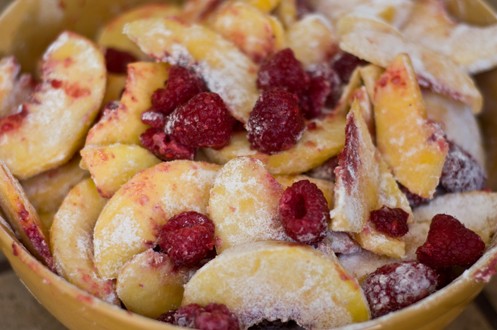
Add the peaches and raspberries and toss to coat.
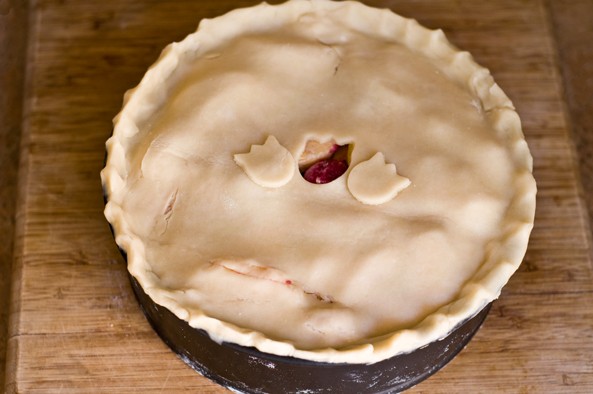
Add the fruit to the spring form pan that is now lined with pie dough. Roll out your remaining dough and place it on the top of the pie, using the same method to move as you did with your bottom dough layer. Using your fingers, squeeze the top and bottom layers of the crust together around the edge of the pan. Make a few slits in the top of the pie dough to release steam. If you want to cut out a shape, as shown below, do so prior to moving your dough.
Bake at 375 for 50-60 minutes or until the top is a golden brown.
Somehow, in the course of my very rushed Deep Dish photo shoot, my peach slices went missing.
I’m not entirely sure who’s belly they ended up in, but either way, a pretty healthy snack.
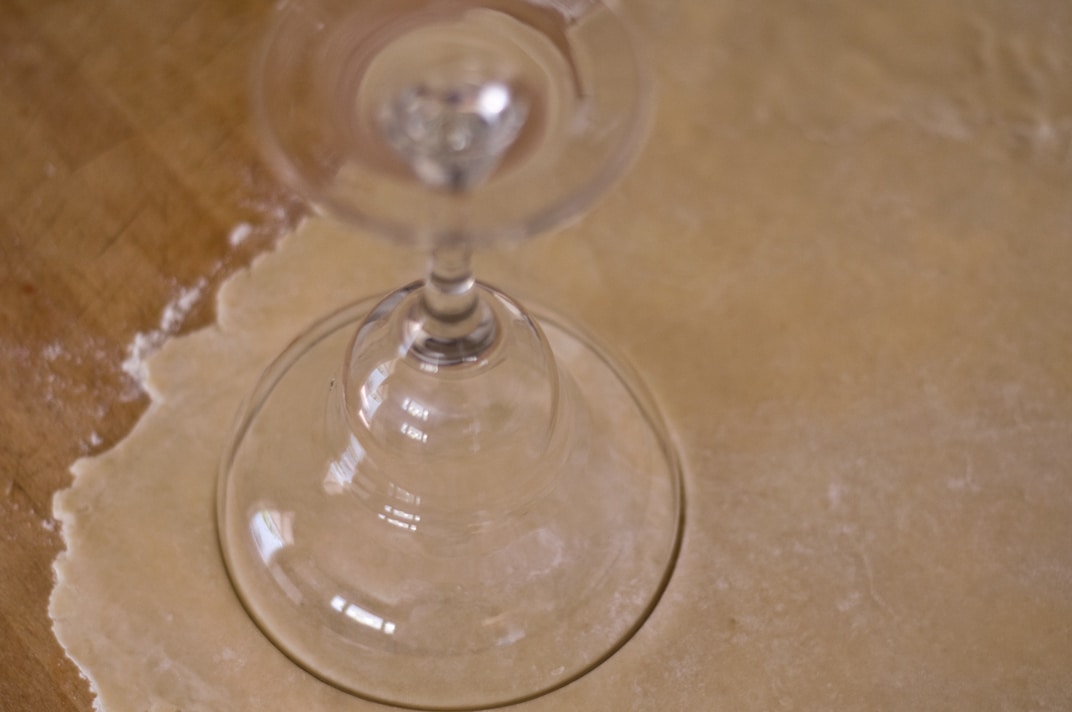
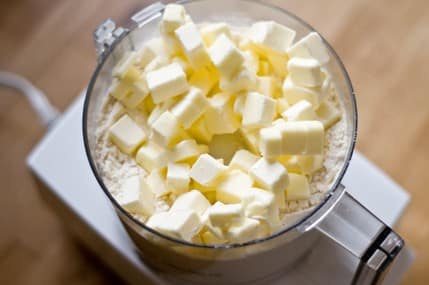
I have a mild obsession with pie dough. Once I started to make (and modify) Cook’s Illustrated’s Foolproof Pie Dough in 2007, I realized that it is not only about a million times better than store bought crust, it takes about 8 minutes of active time. There is no downside. If you have never made pie dough, do it. Seriously, seriously, DO IT. If you are going to go through all of the trouble to make a pie, don’t even think about debasing it with a store bought crust.
I started writing for Honest Cooking this week. My first article is about the science behind pie dough. How the exact same ingredients can give you such different results and how I pledge my baking allegiance to Foolproof pie dough. For that article I wrote about the Cooks Illustrated version. For this post, I will give you my slight variation on that recipe.
3 cups of all purpose flour
1/2 tsp salt
3 tbs sugar
10 tbs butter (1 stick, plus 2 tbs), cut into cubes
1/2 cup shortening
1/4 cup vodka
1/4 cup cold water
Step one: Combine 2 cups of flour, salt, and sugar in a food processor, pulse a few times until its combined. Add the butter and the shortening and process until it forms a ball around the blade, about 2 minutes.
Step two: Add the remaining flour and process until well incorporated, about 1 minute.
Step Three: Move to a bowl and add the water and the vodka, combine with a spatula or wooden spoon.
Combining the liquid in the food process will destroy the effects of the vodka, and your hands may warm the fats too much. The dough will be very moist, but if it is too moist to stay together, add a little more flour.
Step Four: Split into two equal sized portions and form into disks. Wrap the disks in plastic wrap and chill until very firm, about two hours. Because this dough is so soft, it is very important for the pie dough to be very cold and very firm. Step five: On a very well floured surface, place one of the disks, add flour to the top of the disk as well.
Roll out into an even thickness. Marble rolling pins are very cold and don’t disrupt the fat inside the dough, making them an excellent choice for rolling pie dough. When you place your dough in the fridge to chill, add your marble rolling pin as well, allowing it to chill.
Step six: This recipe is very soft and will fall apart while being rolled. Although some people like to use the rolling pin to assist with moving the dough from rolling surface to pie pan, it tends to fall apart too easily with this method. The easiest way is to fold the dough circle in half, then in half again, forming a triangle.
Place the point of the triangle in the center of the pie plate and unfold the dough.
Trim the dough, leaving a half-inch overhang past the edge of the pie pan. Form a fluted edge around the top of the pie crust.
Baking: If you want to bake this before it’s filled, prick several holes in the bottom with a fork. Line the inside with parchment paper and fill with pie weights or dried beans. Bake at 375.
This crust can also be filled and baked immediately, whichever your recipe calls for.
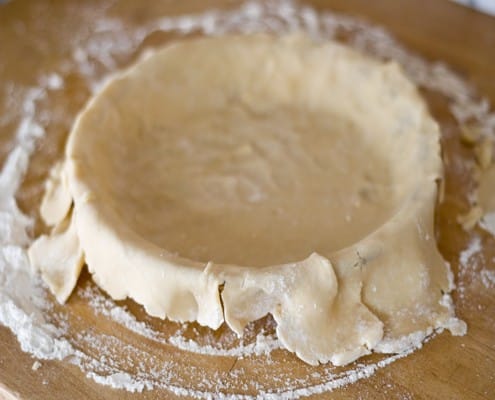
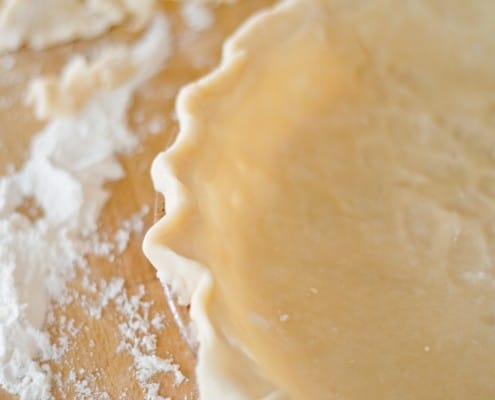
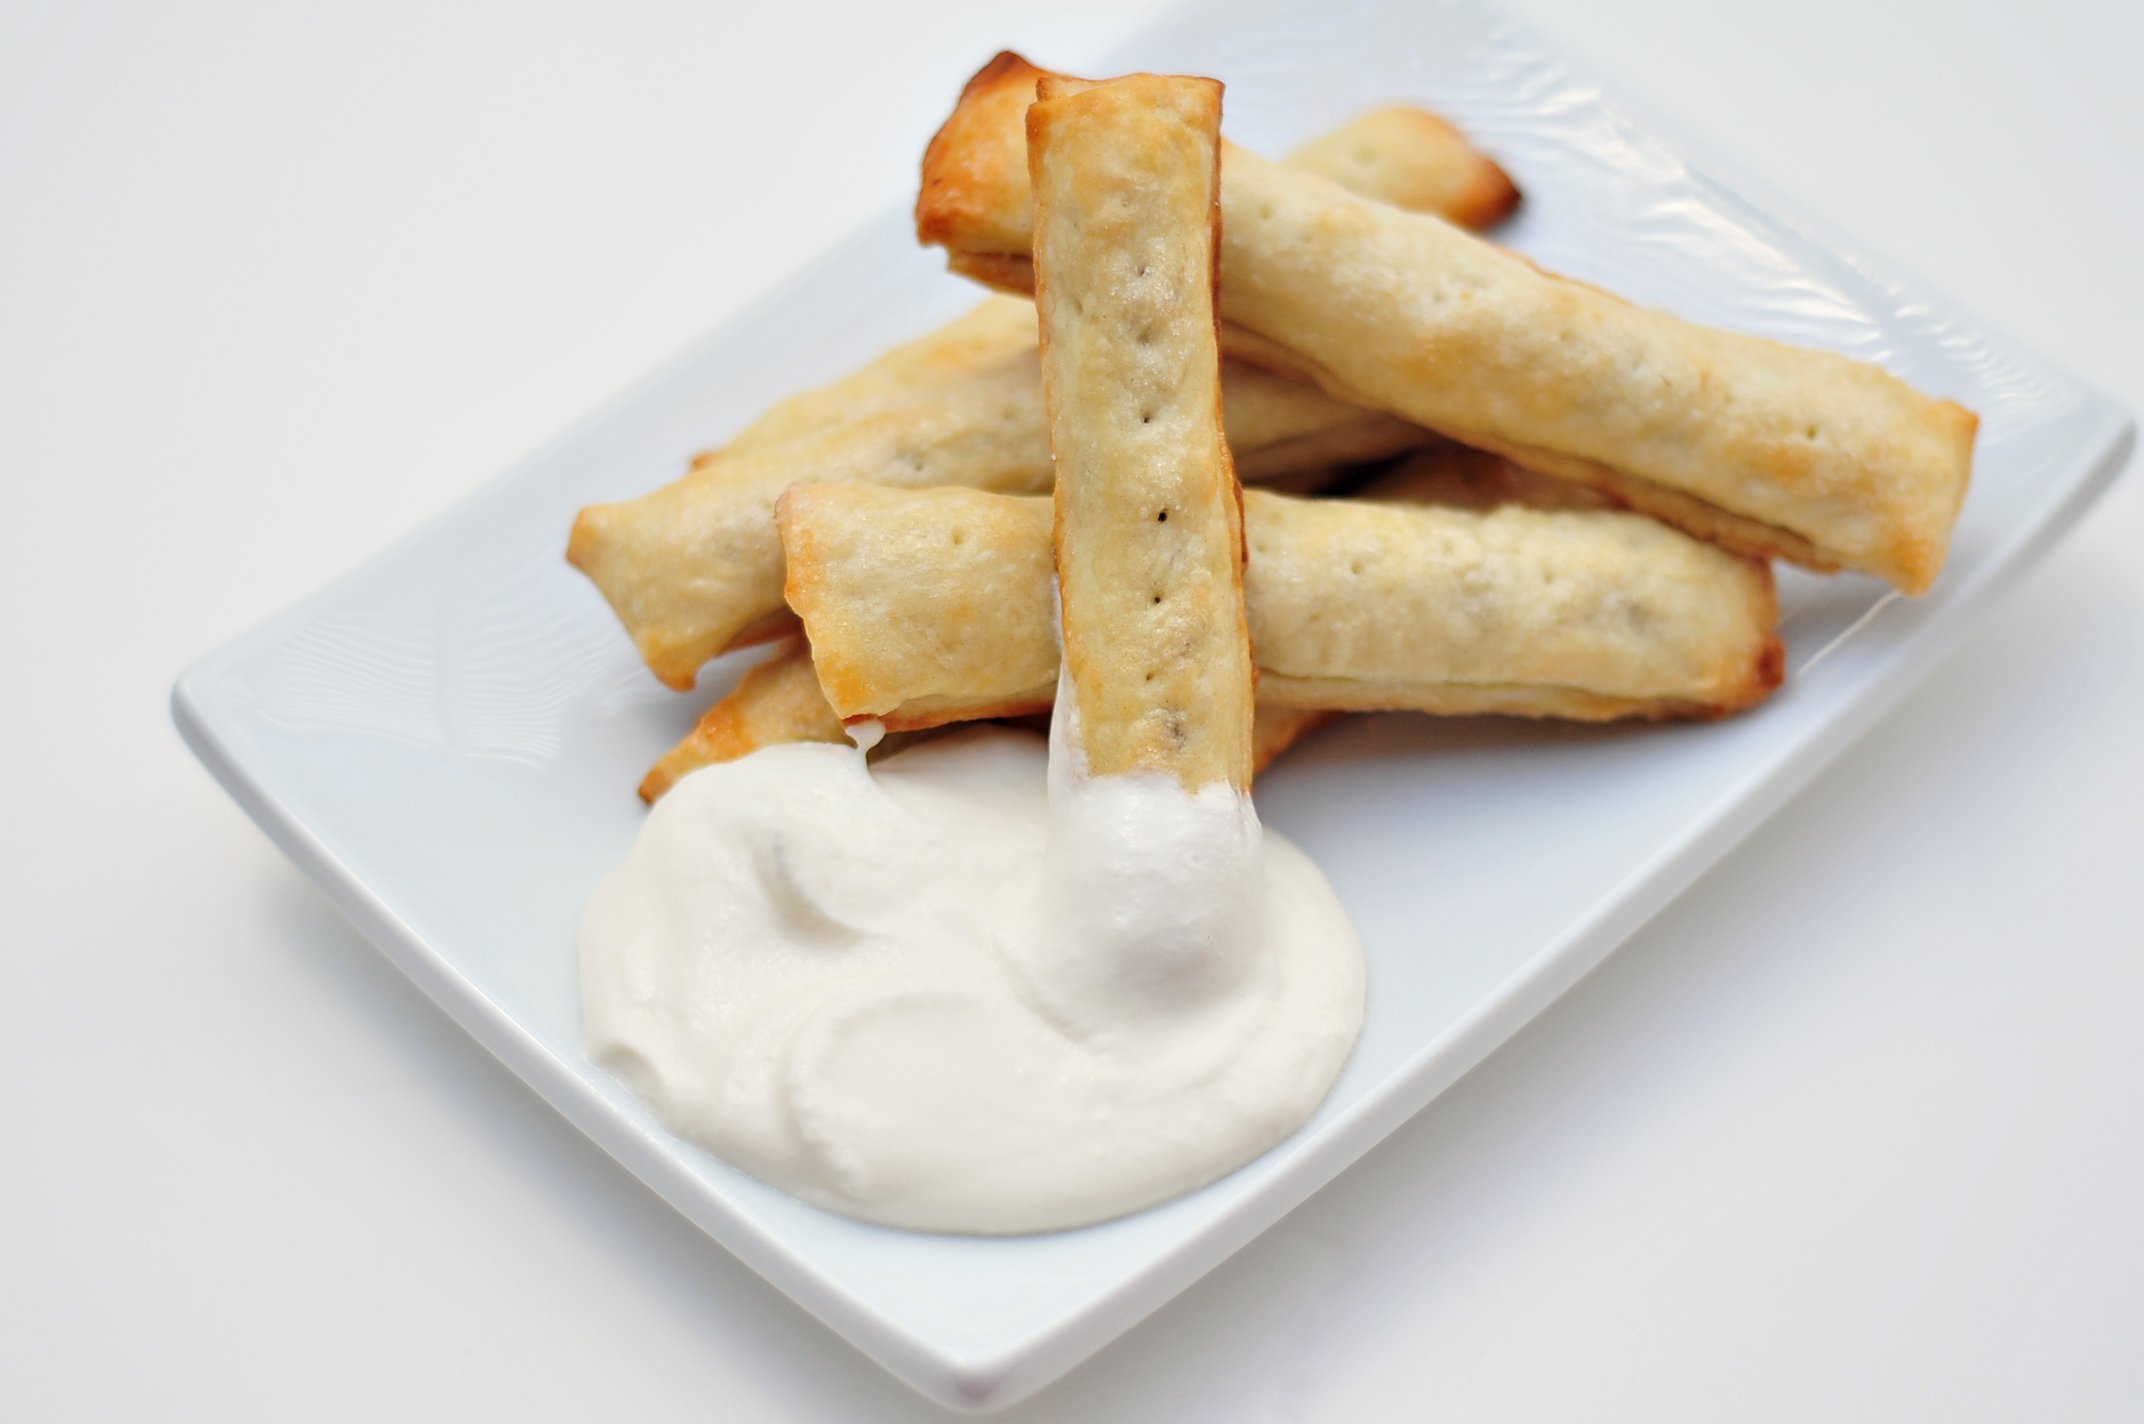
There is a distinct possibility that I am the only person I know that has a problem with left over pie dough. I make pies much more than the average girl, and I always make my crust from scratch. You should too. Really. The only problem is that I always have hunks of dough left over, but I’m never short.
This recipe is meant for those left over scraps that you always have after making pie. You sit there, looking at a heap of dough that you "slaved" over. You feel a brief twinge of guilt about throwing it in the trash, but with a lack of use for 1/2 cup of pie dough, that’s were it ends up.
Look how economical and thrifty we are.
A use for leftover pie dough and a cute portable snack.
Perfect for little hands. Or big ones.
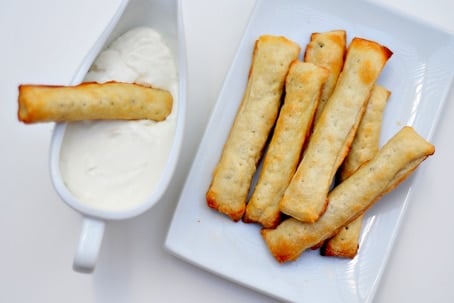
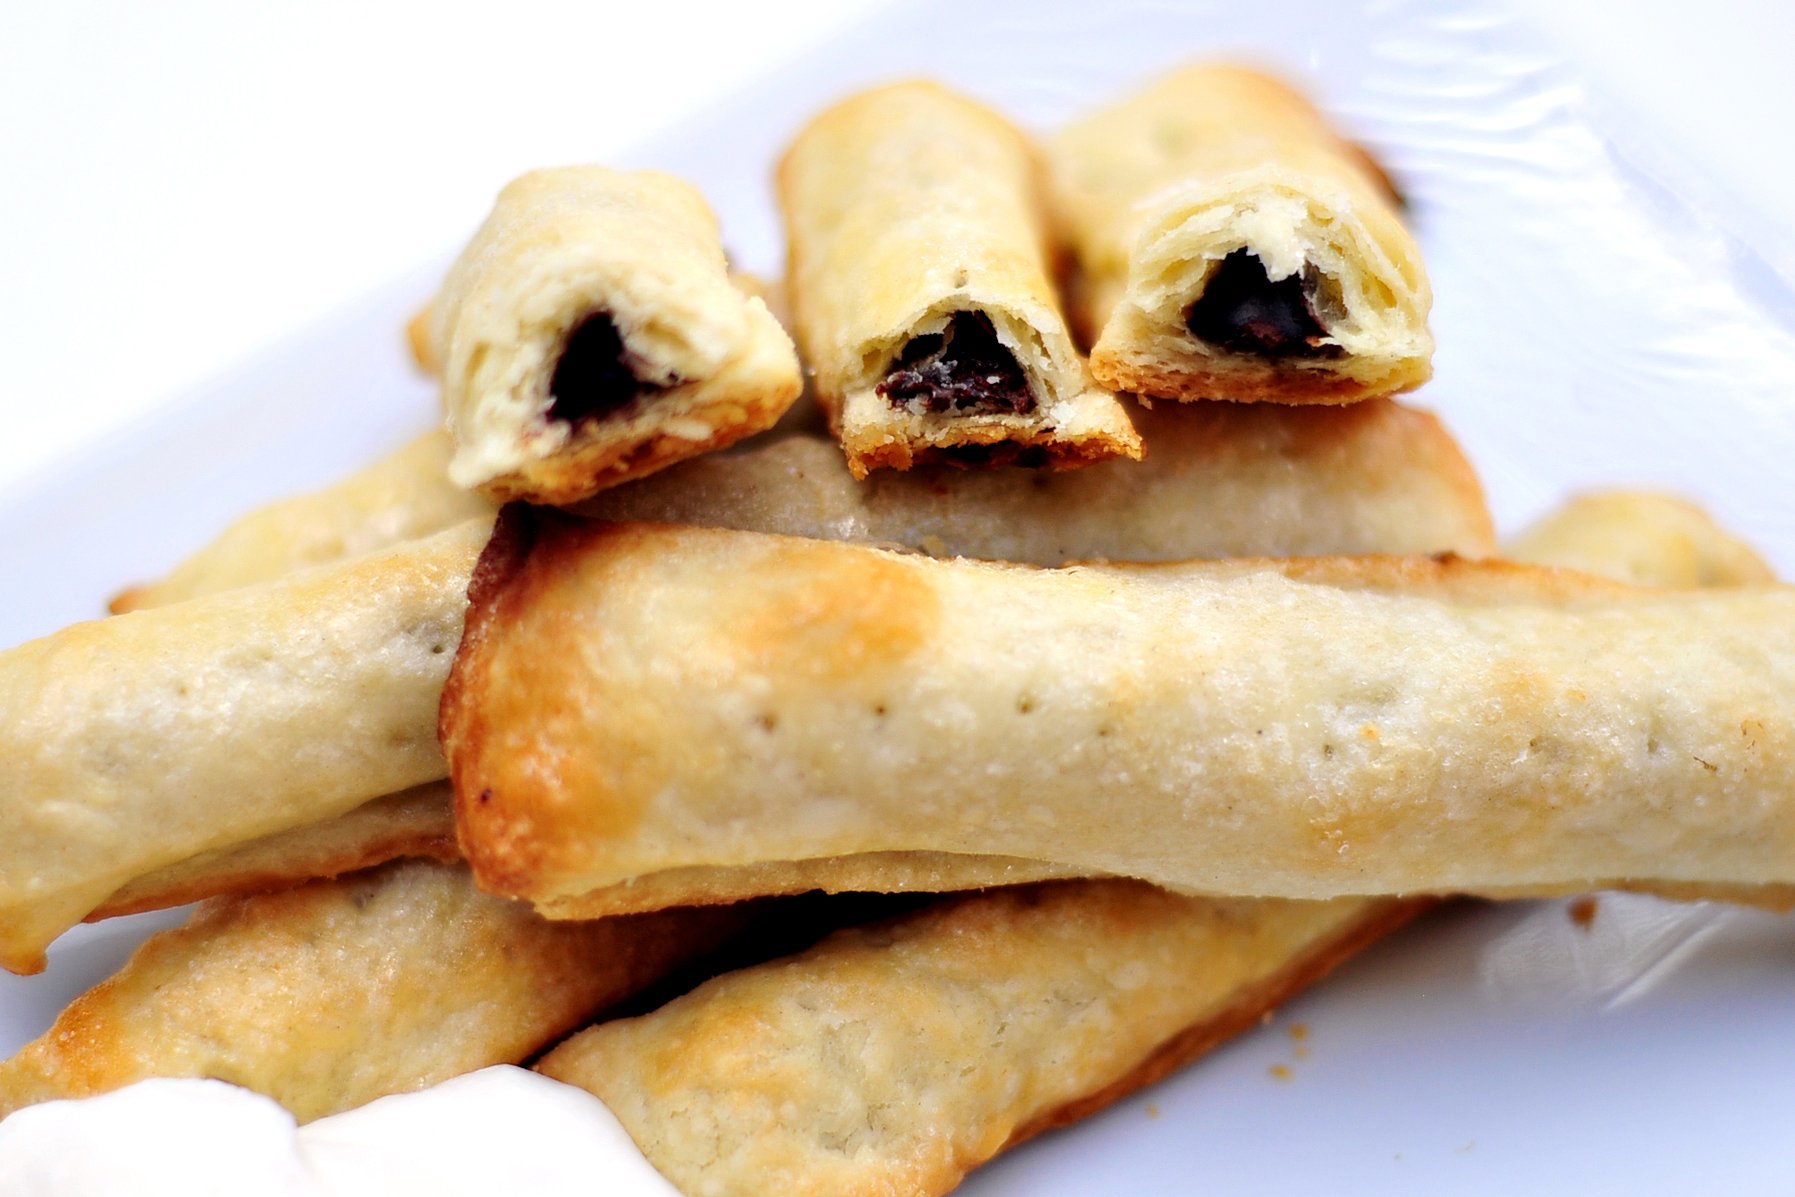
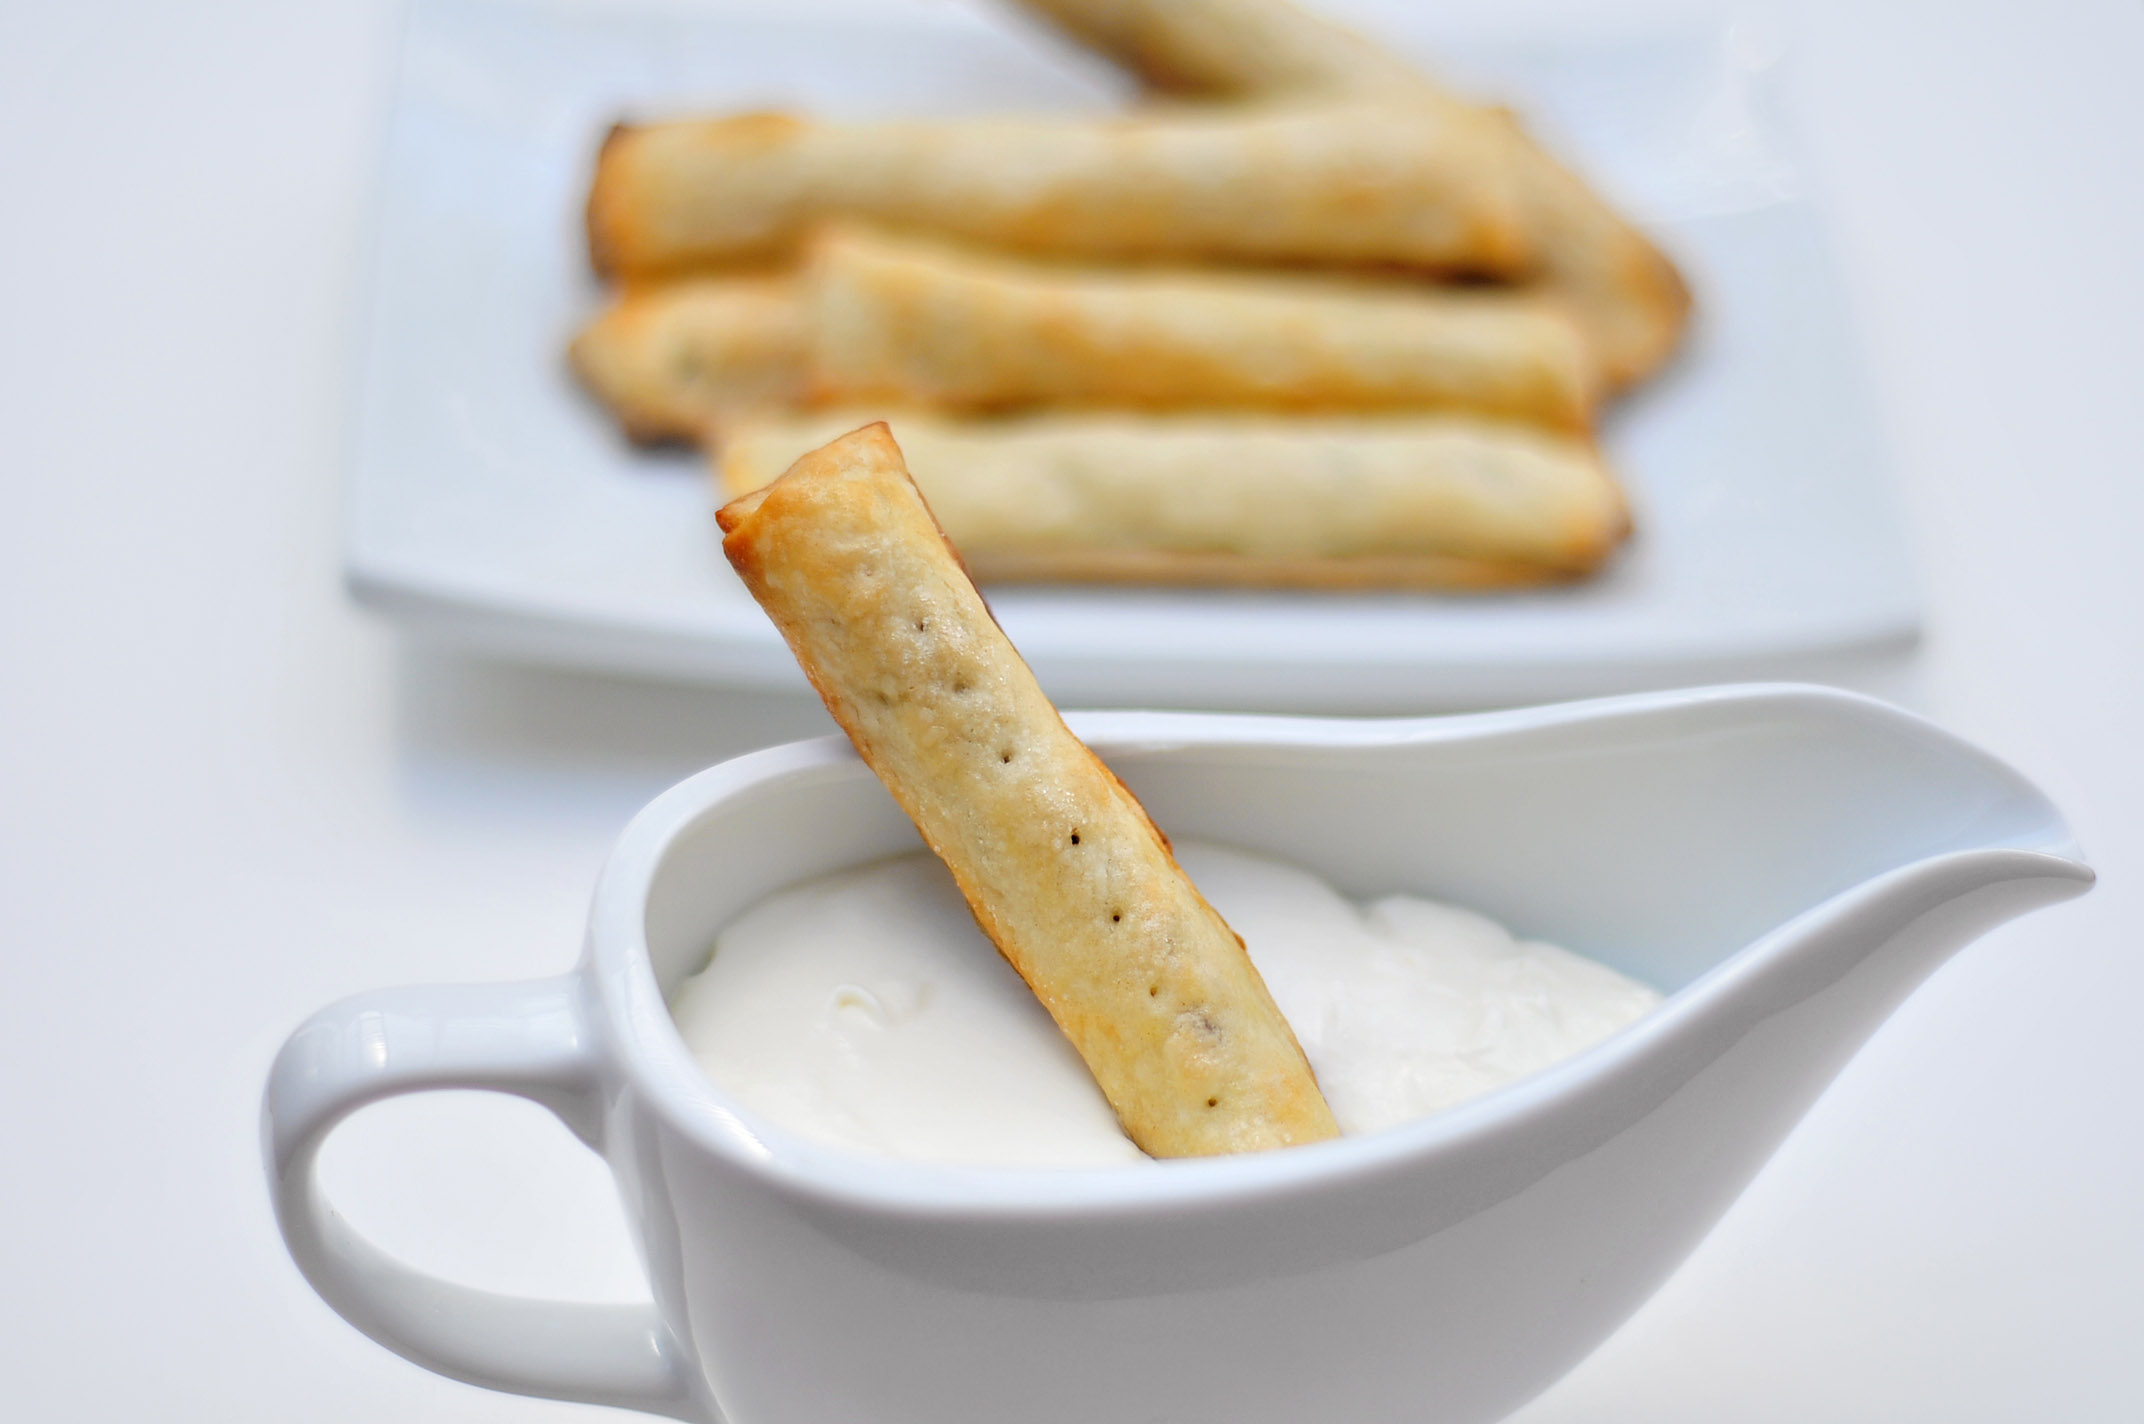
Chocolate Pie Sticks
Use leftover pie dough
If you don’t have it and want to just make these for the fun of it, here is my pie dough recipe:
Pie Dough:
1 cups of all purpose flour
1/4 tsp salt
1 tbs sugar
3 1/2 tbs butter, cut into cubes
2 1/2 tbs shortening
2 tbs vodka
1 tbs cold water
Chocolate chips (not sure how many you’ll need because that depends on how much leftover dough you have)
1 egg
sugar (about 2 tbs?)
If you have your leftover pie dough ready, skip this next paragraph.
If you are making dough:
Break out that food processor and add the flour, salt and sugar and give it a quick pulse until it’s combined.
Add the cubes of butter and the shortening and pulse until combined, about 1 1/2 minutes.
Move the dough to a bowl and add the vodka and water with a spatula. Your dough will be very moist, but you can add a bit of flour if it is too moist to hold together. Then shape the dough into a disk, cover in plastic wrap, and chill for at least 2 hours. If you need to, this can be made up to three days in advance, just store the plastic wrapped disks in a large zip lock bag.
Once you have your dough ready:
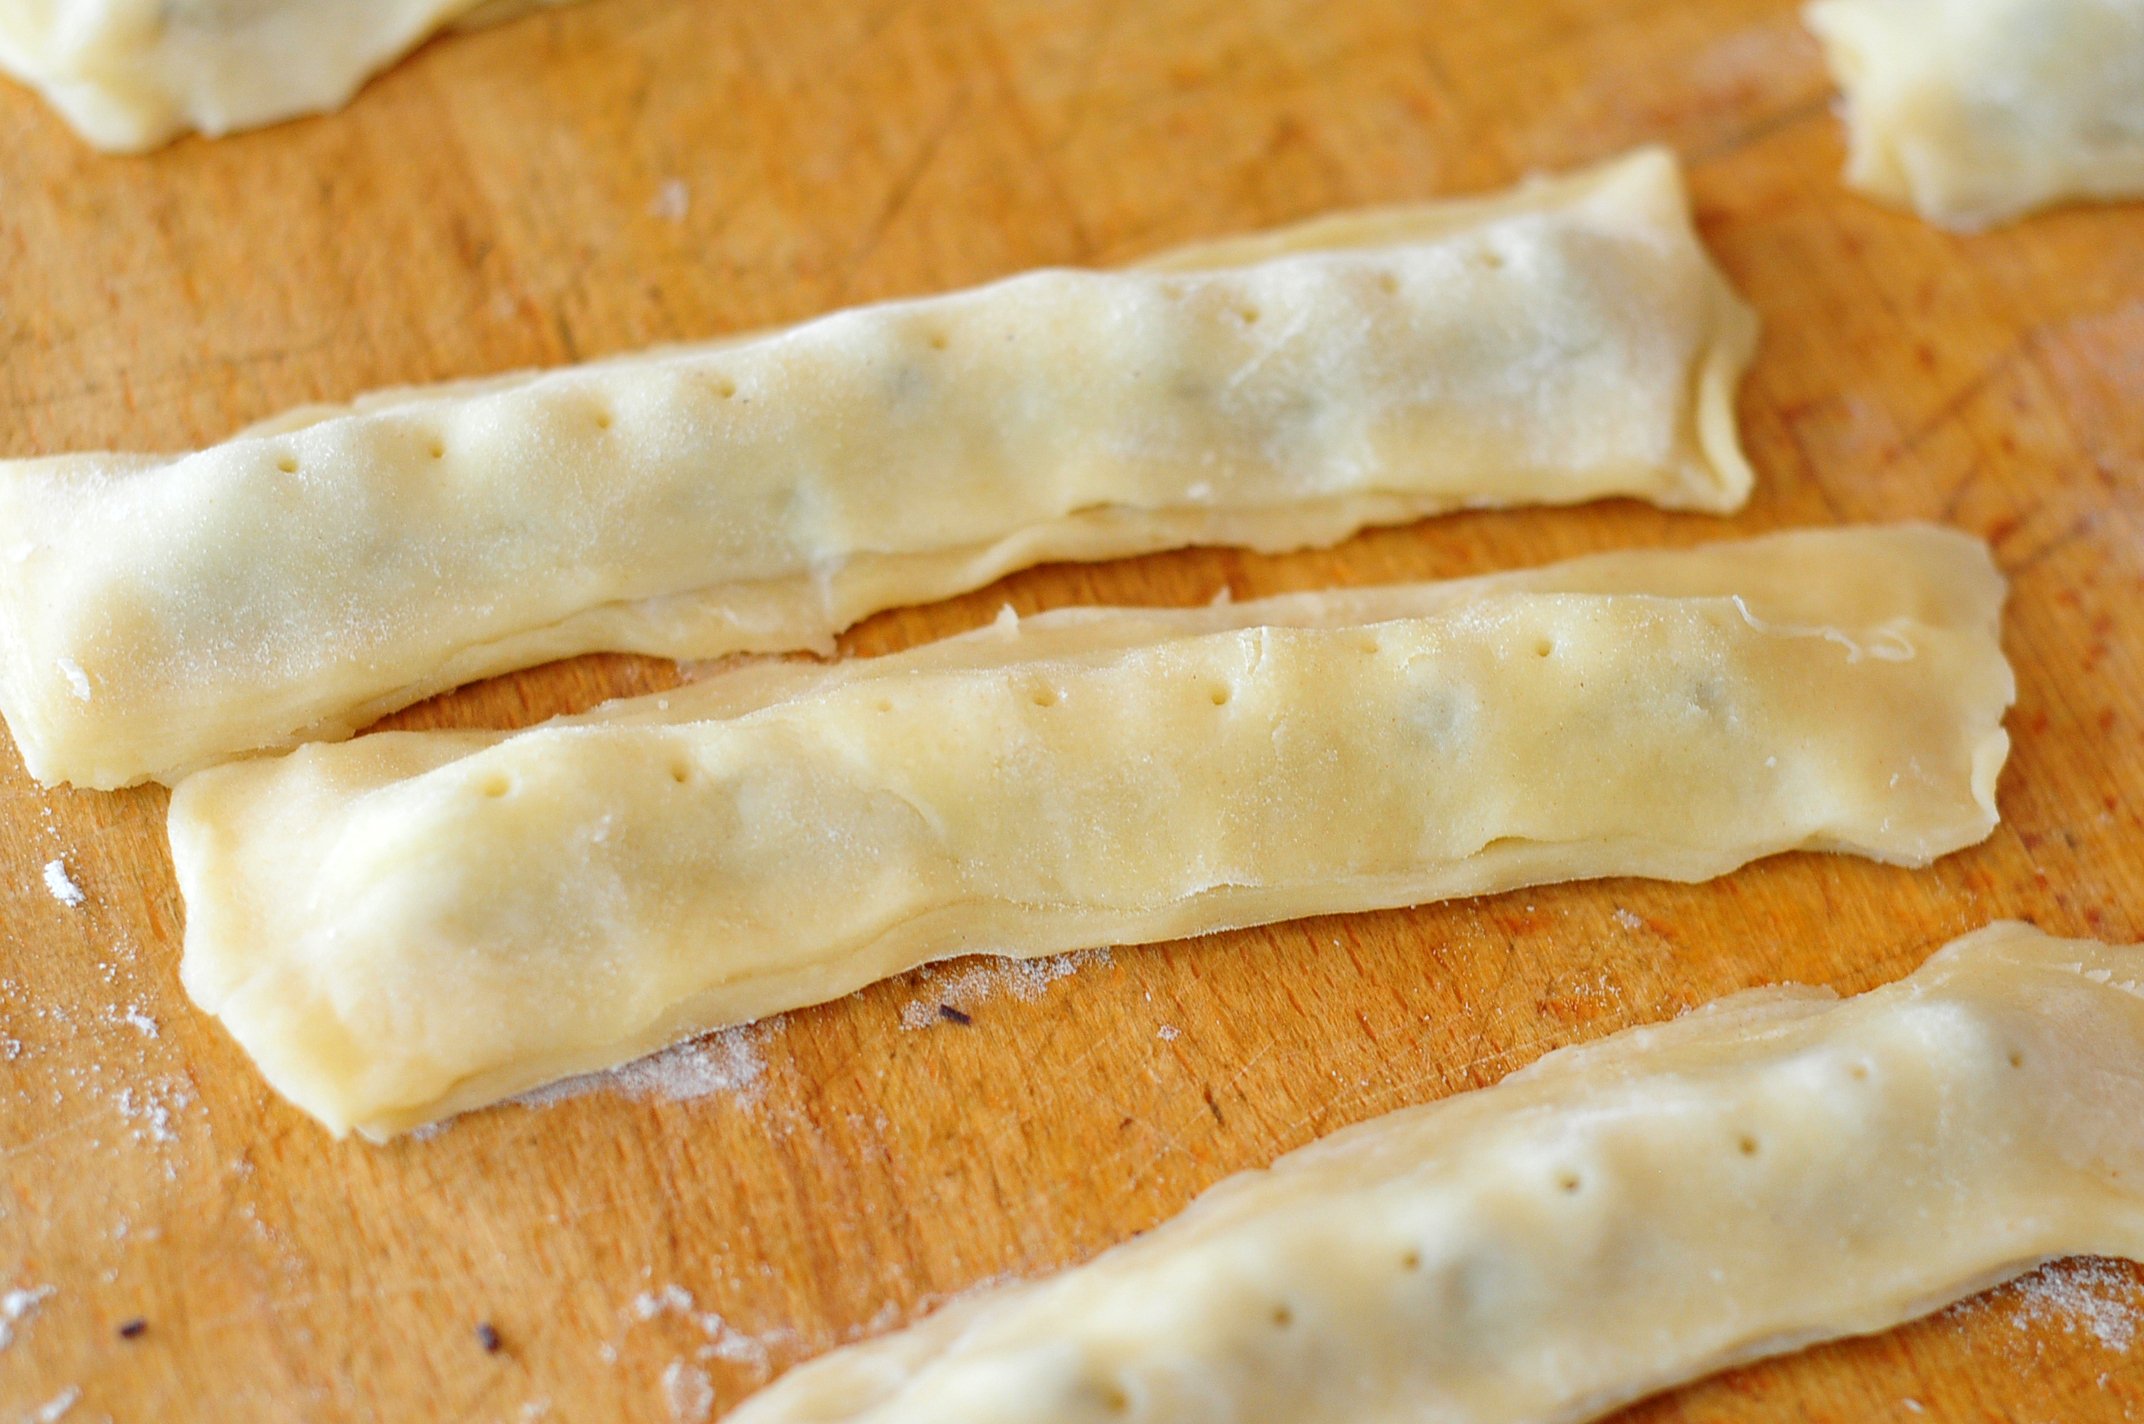
Roll out the dough, just like for a pie, and cut into strips about 1 inch wide and six inches long.
Brush each strip with water, and fill with a row of chocolate chips
Cover each chipped strip with another strip and seal the edges.
Poke holes in the top to let the steam out.
Brush with a lightly beaten egg and sprinkle with sugar.
Put on a baking sheet covered with parchment paper (or sprayed with butter cooking spray)
Bake at 350 for 12-15 minutes or until goldeny brown.
Look how cute Tater is with her pie stick. Yes, I give my kid pie. And fruits and vegetables and chicken. And pie and cupcakes.