There is something so comforting about being busy. A hectic lifestyle reminds me that I’m needed, that I have a function. I was interviewing a brewery owner yesterday for a piece I’m writing for Honest Cooking and he put it into perspective for me. "When I’m old, I don’t think I’ll wish I slept more." Having things to do, people to talk to and jobs to get done is a good place to be. As hard as I try and fight that 5:30am alarm clock, or force myself to shut my eyes when I finally get back in bed, I know I’ll miss it someday.
For now, I’m trying to enjoy the pace my life has taken. The people, places and opportunities that are taking my life down a new and exciting path. And I’m just trying to do it all justice. Approaching it with an open heart and a grateful spirit that will allow me to fully appreciate this time in my life without focusing on what seems to be my near constant caffeine deficiency and lack of "free" time. It all goes back to the motto of my life: figure out what is great about the situation you are in and enjoy the crap out of it.
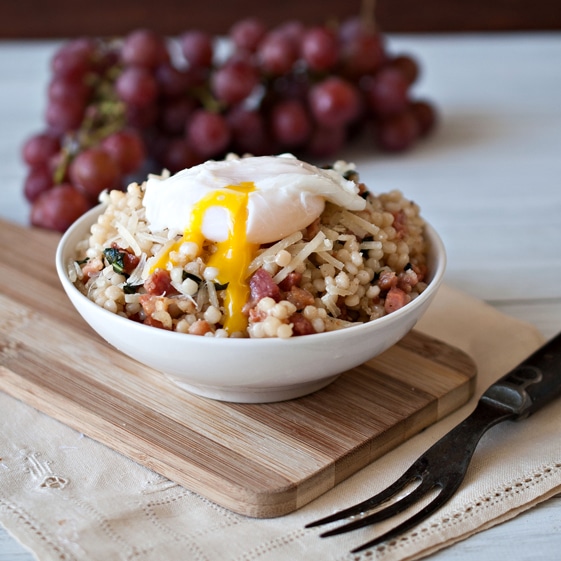
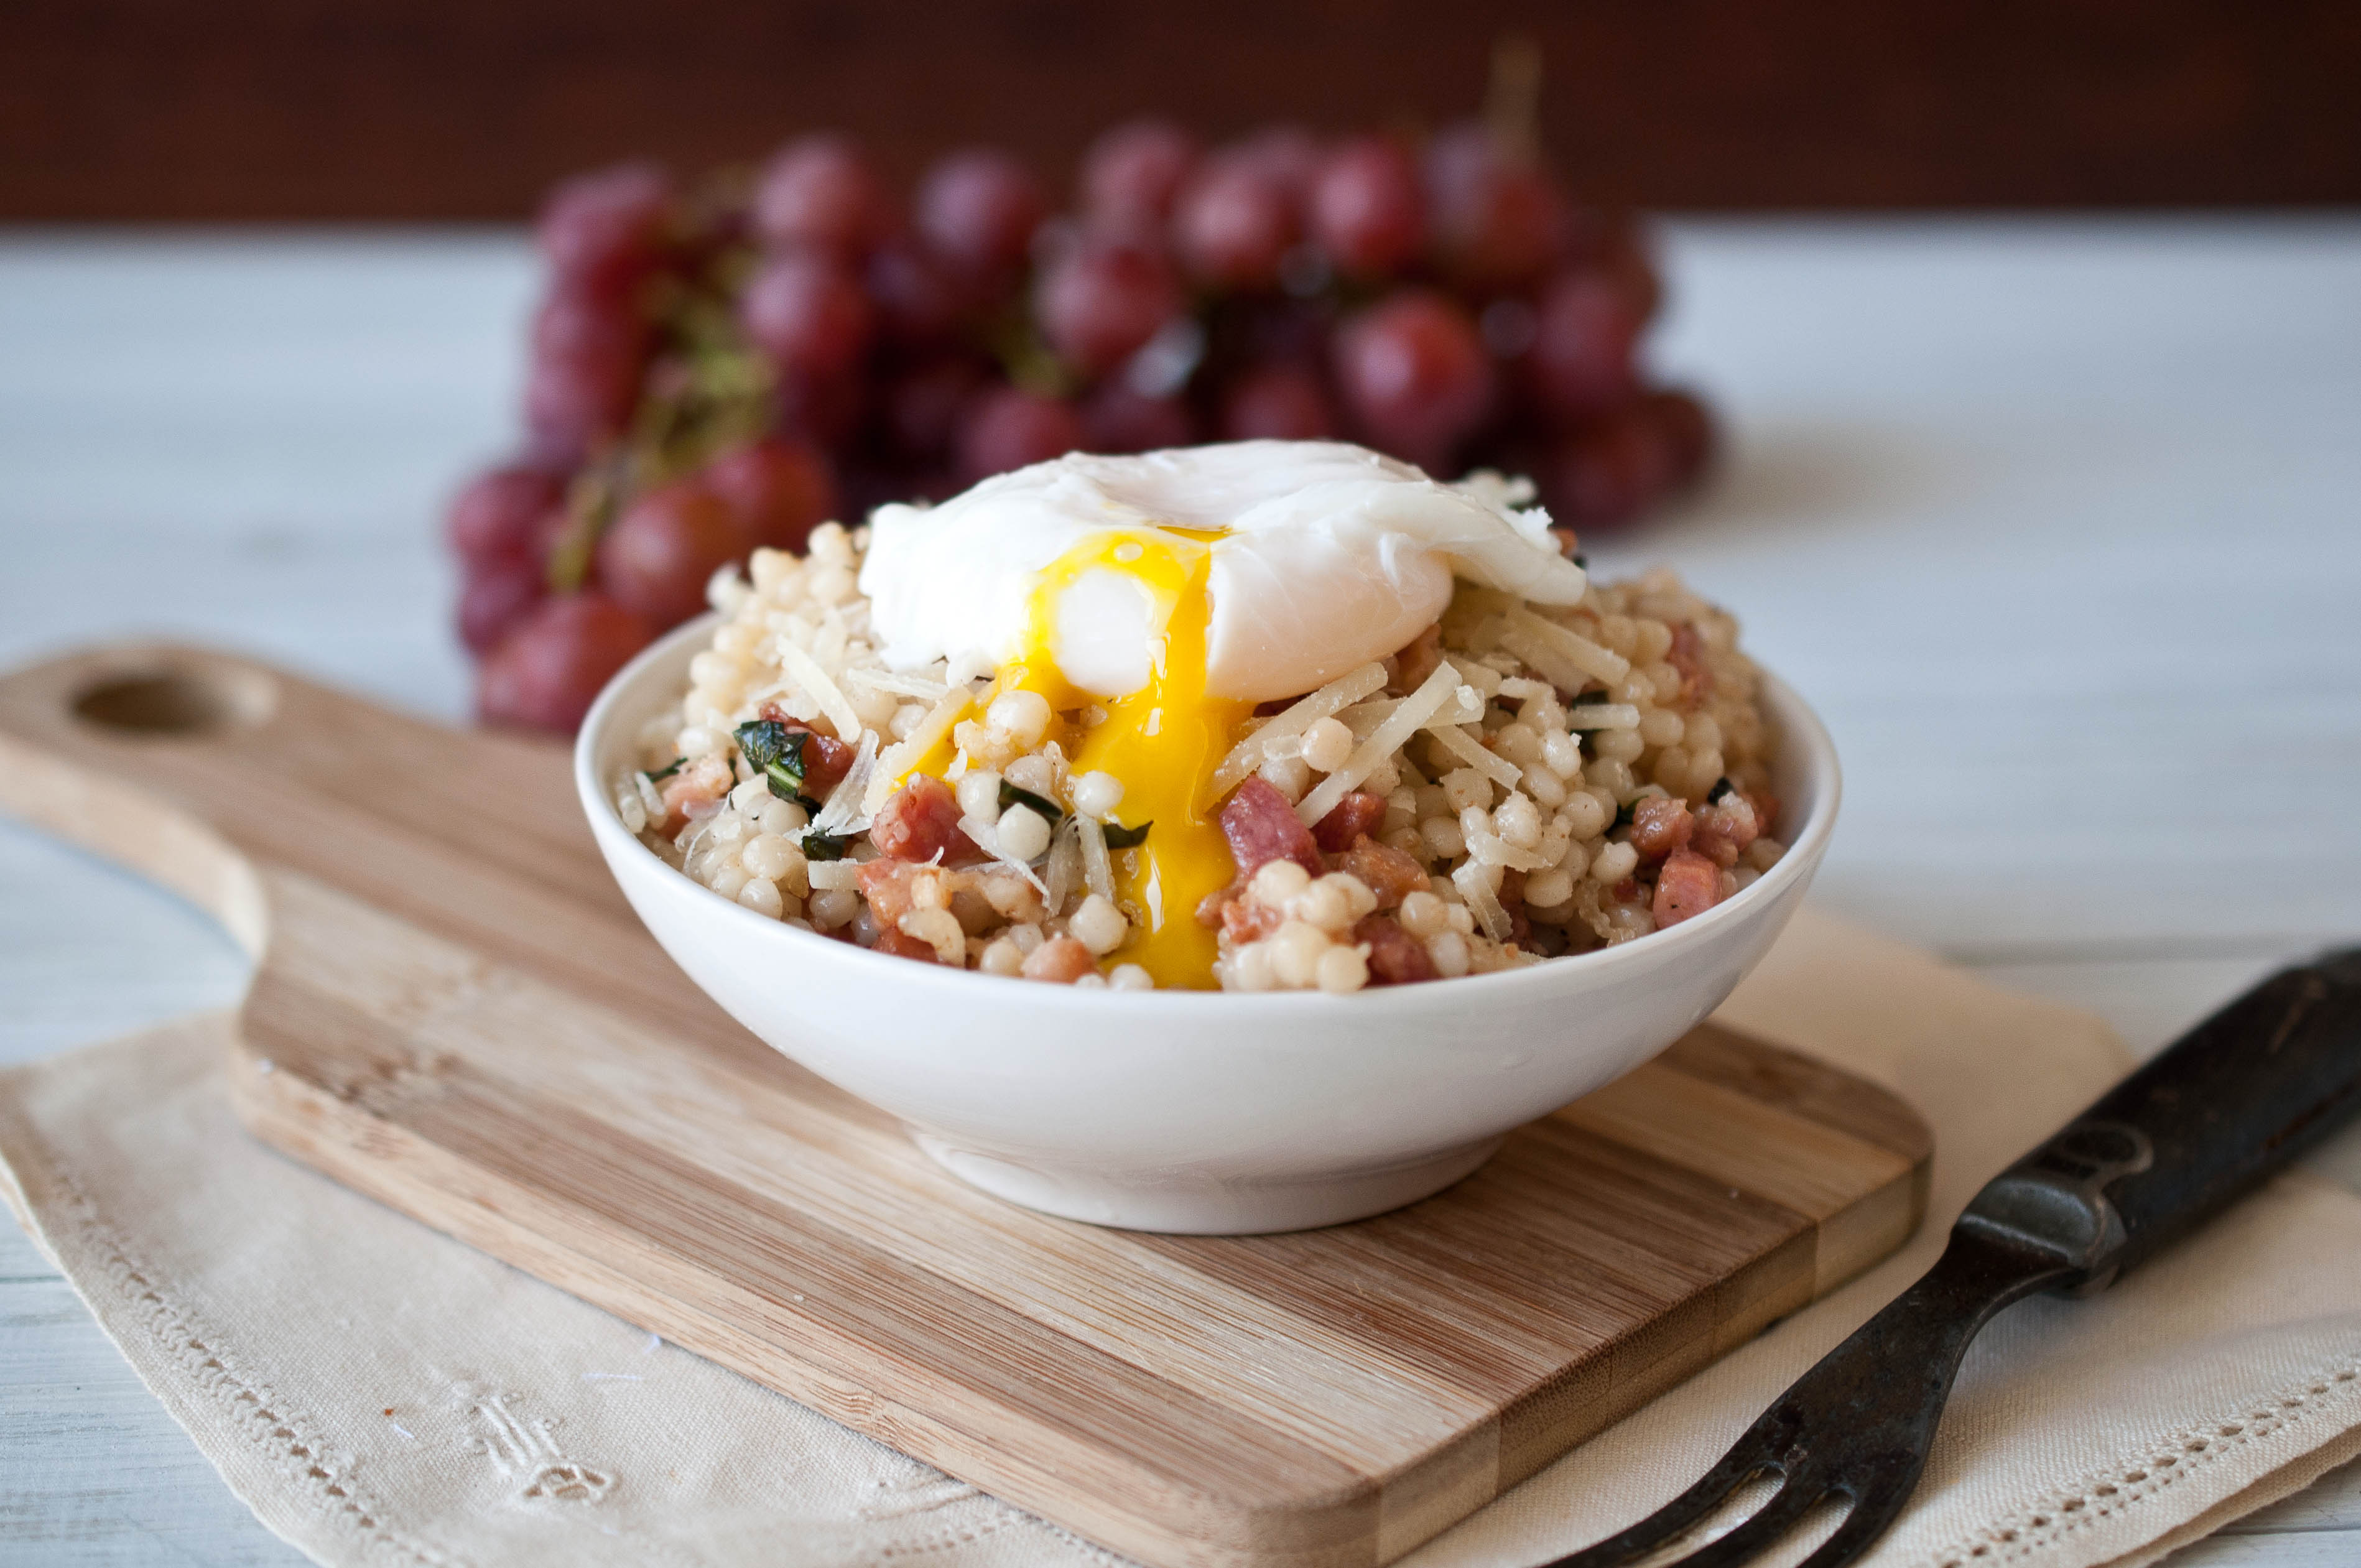
And I have to say, I really enjoyed the crap out of this couscous.
Carbonara Couscous
1 cup dry Israeli (pearl) couscous
1 tbs buter
5 ounces pancetta
5 basil leaves
½ cup parmesan
1 tsp pepper
2 eggs (plus 2 additional if desired for side dish size portions)
Makes 2 entrée portions or 4 side dish portions
Cook couscous according to package direction. In a separate pan, melt the butter over medium-high heat. Add the pancetta and cook until browned, do not drain, add to the couscous. Chop basil leaves, add to the couscous along with parmesan and pepper, stir to combine.
Poach eggs in simmering water.
Distribute couscous equally among dishes, top with poached egg, serve warm.
A really well crafted IPA is a beautiful thing,but this is the style that is most often poorly done. The art of balancing a hop forward beer delicately with its subtle back notes is an art that only a few persistent pros seem to be able to manage. The well crafted, well balanced IPA is an incredible art, that takes the dedication of a thoughtful and persistent brewer to really ace.
I present to you Stone Ruination. It is a Masters level education on how to do the IPA right. Seek it out if you adore the Indian Pale Ale, or even if you tend to avoid it. That’s how you make an IPA.
IPA Marinated Citrus Pork Chops With Peach Poblano Salsa
1 cup chopped fresh yellow peaches (about 1 large peach)
1 cup chopped red bell peppers, stem and seeds removed (about 1 medium sided pepper)
2/3 cup chopped poblano pepper, stem and seeds removed (about 1 large pepper)
2/3 cup chopped red onion (about 1/2 of 1 large onion)
1/4 cup chopped green onion
1/2 tsp salt
2 tbs IPA
1/4 tsp chili powder (add more for a spicier salsa)
In a large bowl or baking dish, combine the IPA, lemon juice, salt, agave, garlic and srirach, stir to combine. Add the pork chops, turning to coat. Place the bowl (or baking dish) in the refrigerator and allow to marinate for 30 minutes.
Add all of the salsa ingredients to a bowl and toss to combine.
In a pan over medium high heat, add the olive oil and allow to get hot but not smoking. Add the pork chops, cooking one or two at a time, don’t crowd the pan. Cook on each side for 3-4 minutes. You want them to still have a slight hint of pink still in the center, pork chops go from undercooked to overcooked really quickly, so keep a close eye on them.
Plate, and top with salsa. You will have more than enough salsa for the chops, serve the excess in a bowl with chips.
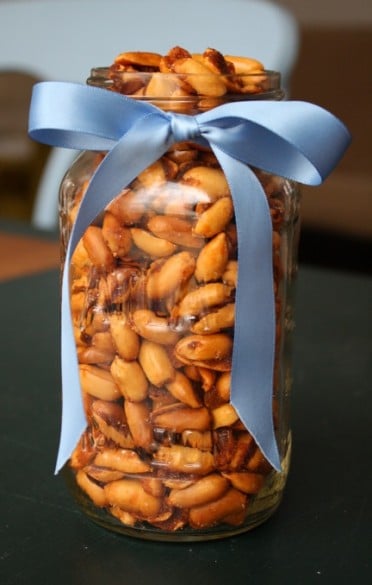
Remember the Beer Cooking Scale I told you about last month, the one I want to invent? The one that would let you know the approximate level of Beeryness the final product has? This recipe is at both ends of that yet-to-be-invented scale’s spectrum. The beer butter has a kick you in the mouth beer flavor that will be heartily enjoyed by beer enthusiast, and the shrimp has a subtle note of beer in it’s finish. If you are a Kick You In The Mouth kinda person, cooking for a Maybe Just A Touch kind of person, this will satisfy you both. You get a butter full of intense beer flavor to slather onto whatever you so choose, and your little friend gets a plate of shrimp with slight notes of beer. Harmony between the two of you once again.
For this recipe I used a Saison brewed with sage, giving really great herb notes to the finished product. This is a special release beer from Epic Brewing called Utah Saison Sage #2.
If you can’t find this beer, look for a Saison with herb or citrus notes.
Roasted Garlic Beer Butter
1 head of garlic
1 tbs olive oil
1/2 cup Saison beer
1 stick of butter, softened
Preheat oven to 425. Rub several layers of the white papery skin off the head of garlic, leaving a light layer still in tact to keep the bulb together. Cut off the top point of the head, exposing the cloves inside.
Place on a sheet of foil, drizzle with olive oil and fold the foil tightly around the garlic. Place in a baking dish and roast in a 425 degree oven until the cloves are soft, about 20 minutes. Remove from oven and allow to cool.
While the garlic is roasting, add the beer to a pot on the stove. Cook until reduced to 3 tbs, about 10 minutes. (To lower the level of beer flavor in the butter, reduce 1/4 cup of beer by half.)
In a food processor, add the softened butter and the beer. Squeeze the head of garlic until the cloves push out, adding just the cloves to the food processor and discarding the papery skin.
Process the butter until smooth. Add to an air tight container and store in the fridge.
Roasted Garlic Beer Butter Shrimp, two methods
3 tbs beer butter
10 shrimp
pinch of salt and pepper
Metohd one: Grilling
Preheat grill. Melt the beer butter in a microwave safe dish. Skewer the shrimp with a heat safe skewers(or water soaked wooden skewers). Sprinkle with salt and pepper, brush liberally with melted butter. Grill until pink and cooked through, about 2-3 minutes per side. Brush occasionally with butter while cooking.
Method two: Stove Top
In a pan over medium high heat, add the butter and stir until melted. Sprinkle the shrimp with salt and pepper, add to the pan and saute until cooked through about 5 minutes.
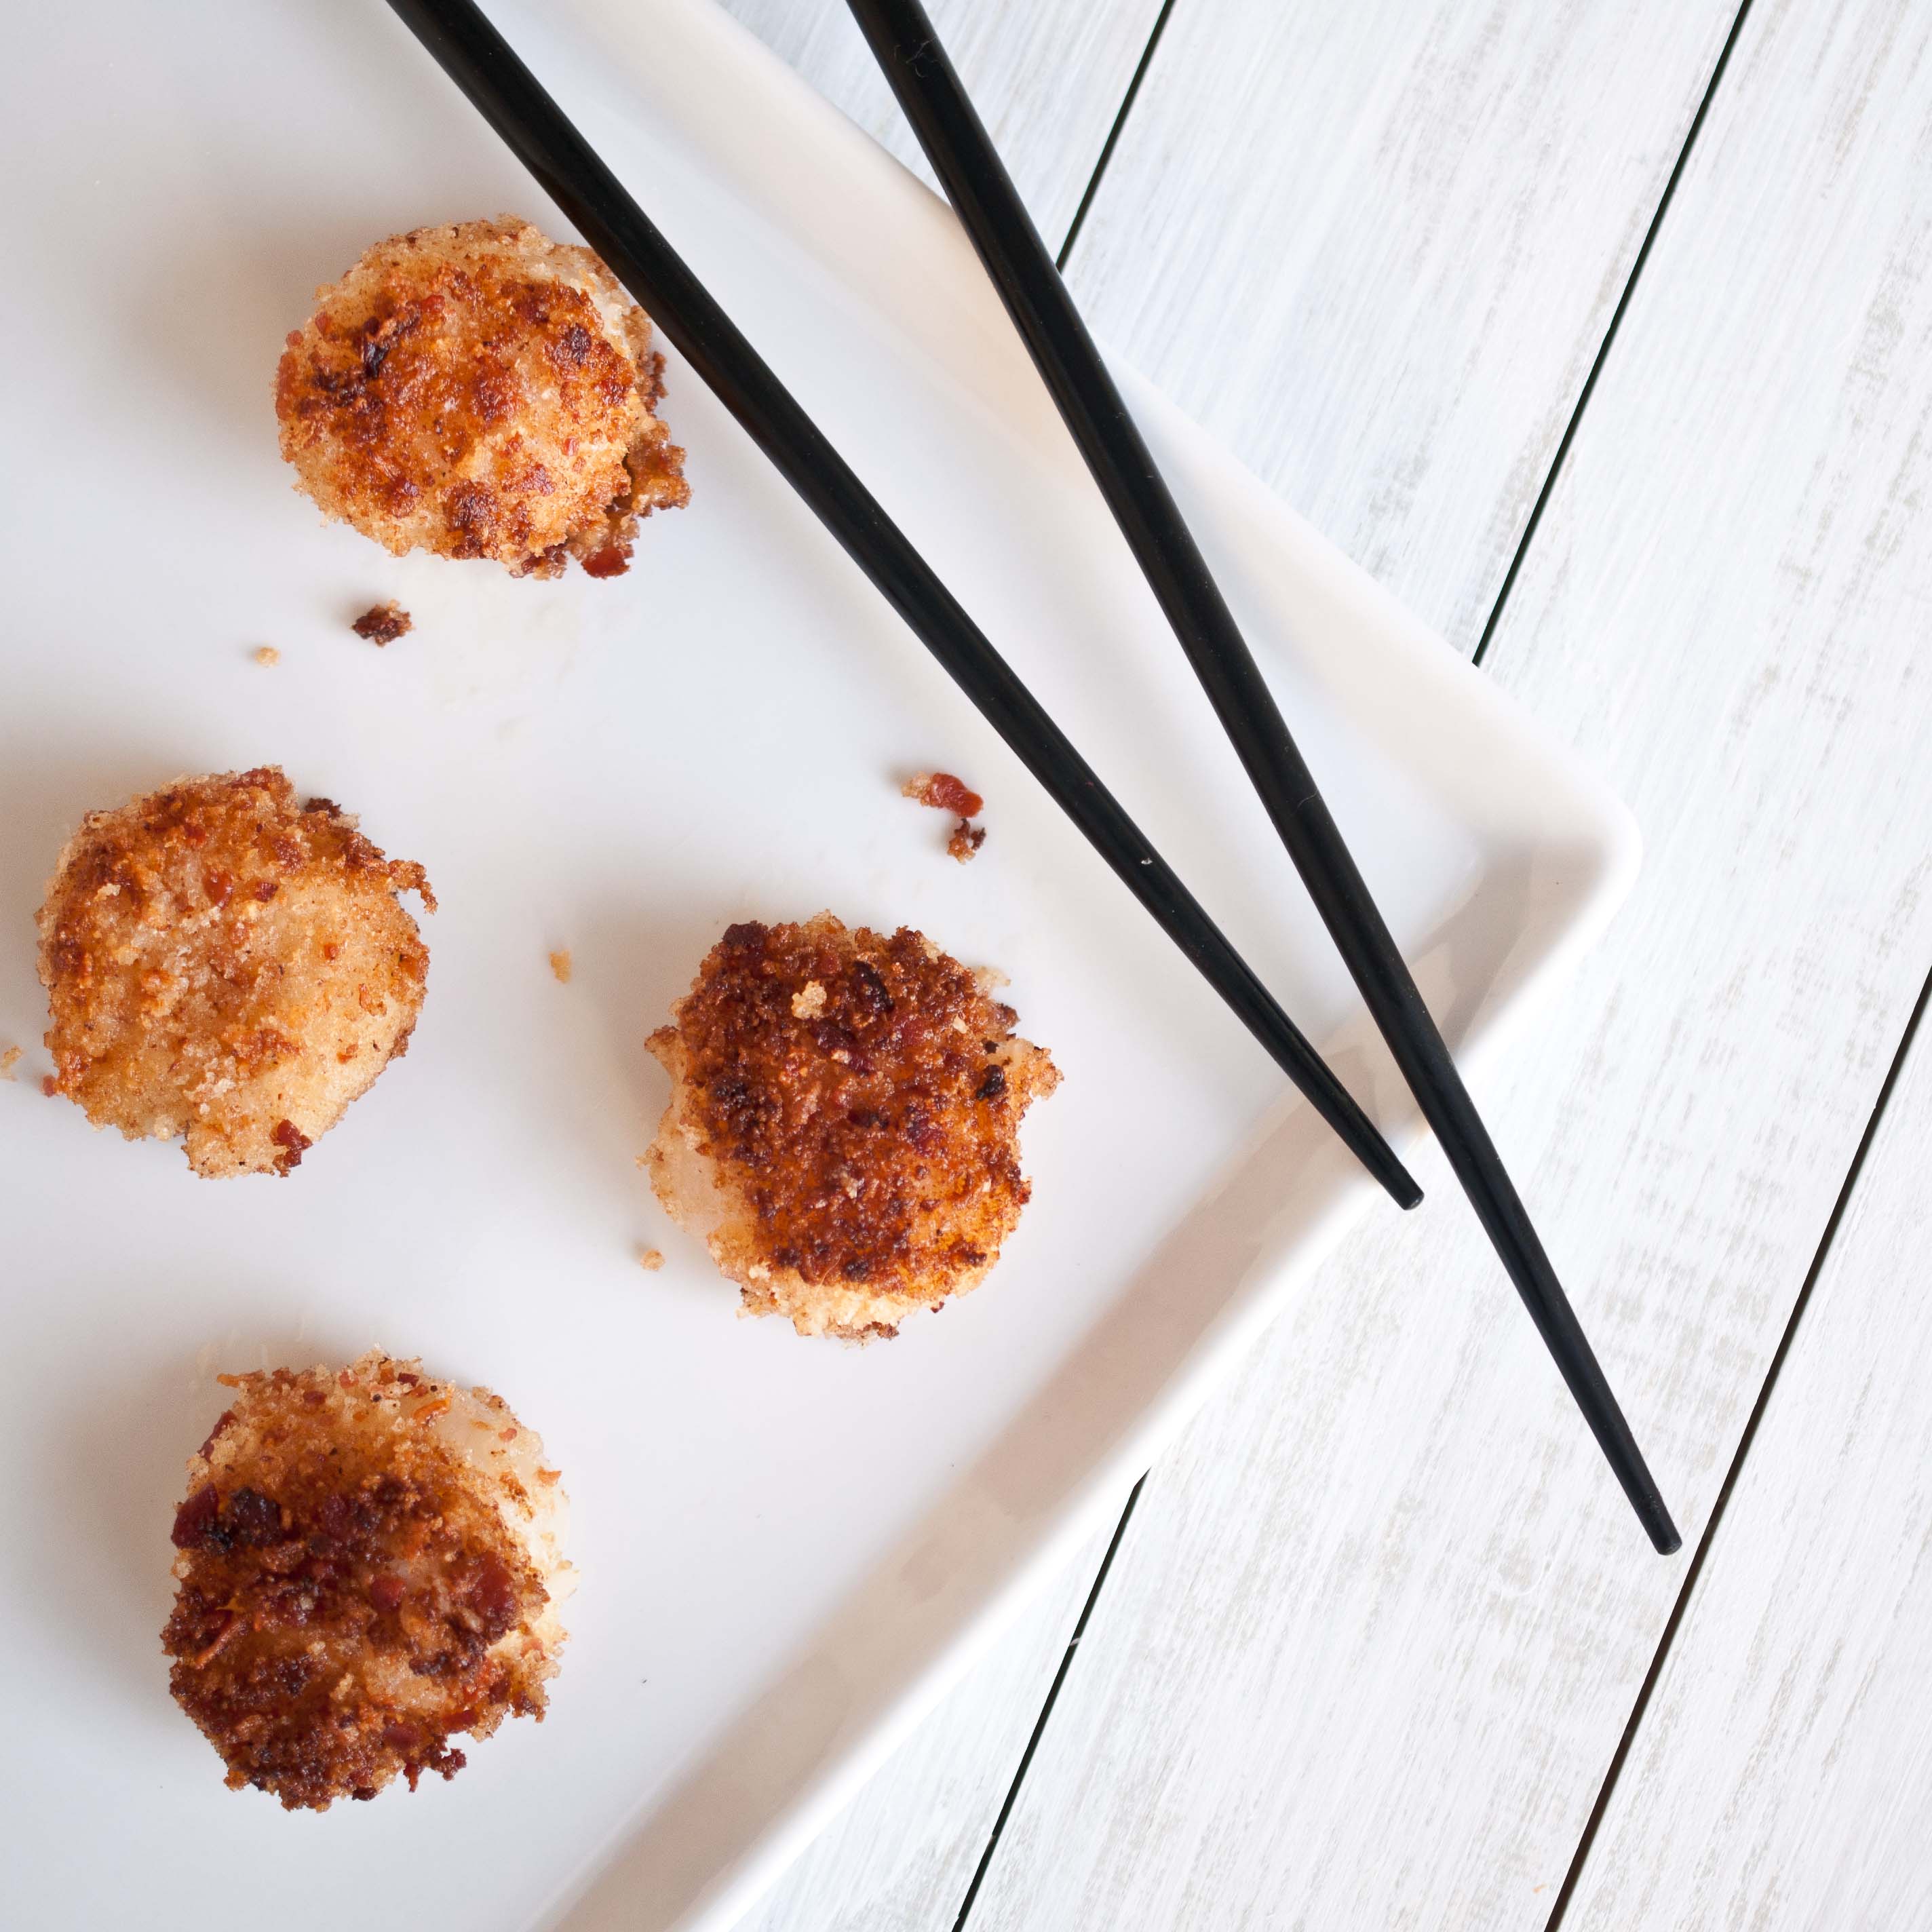
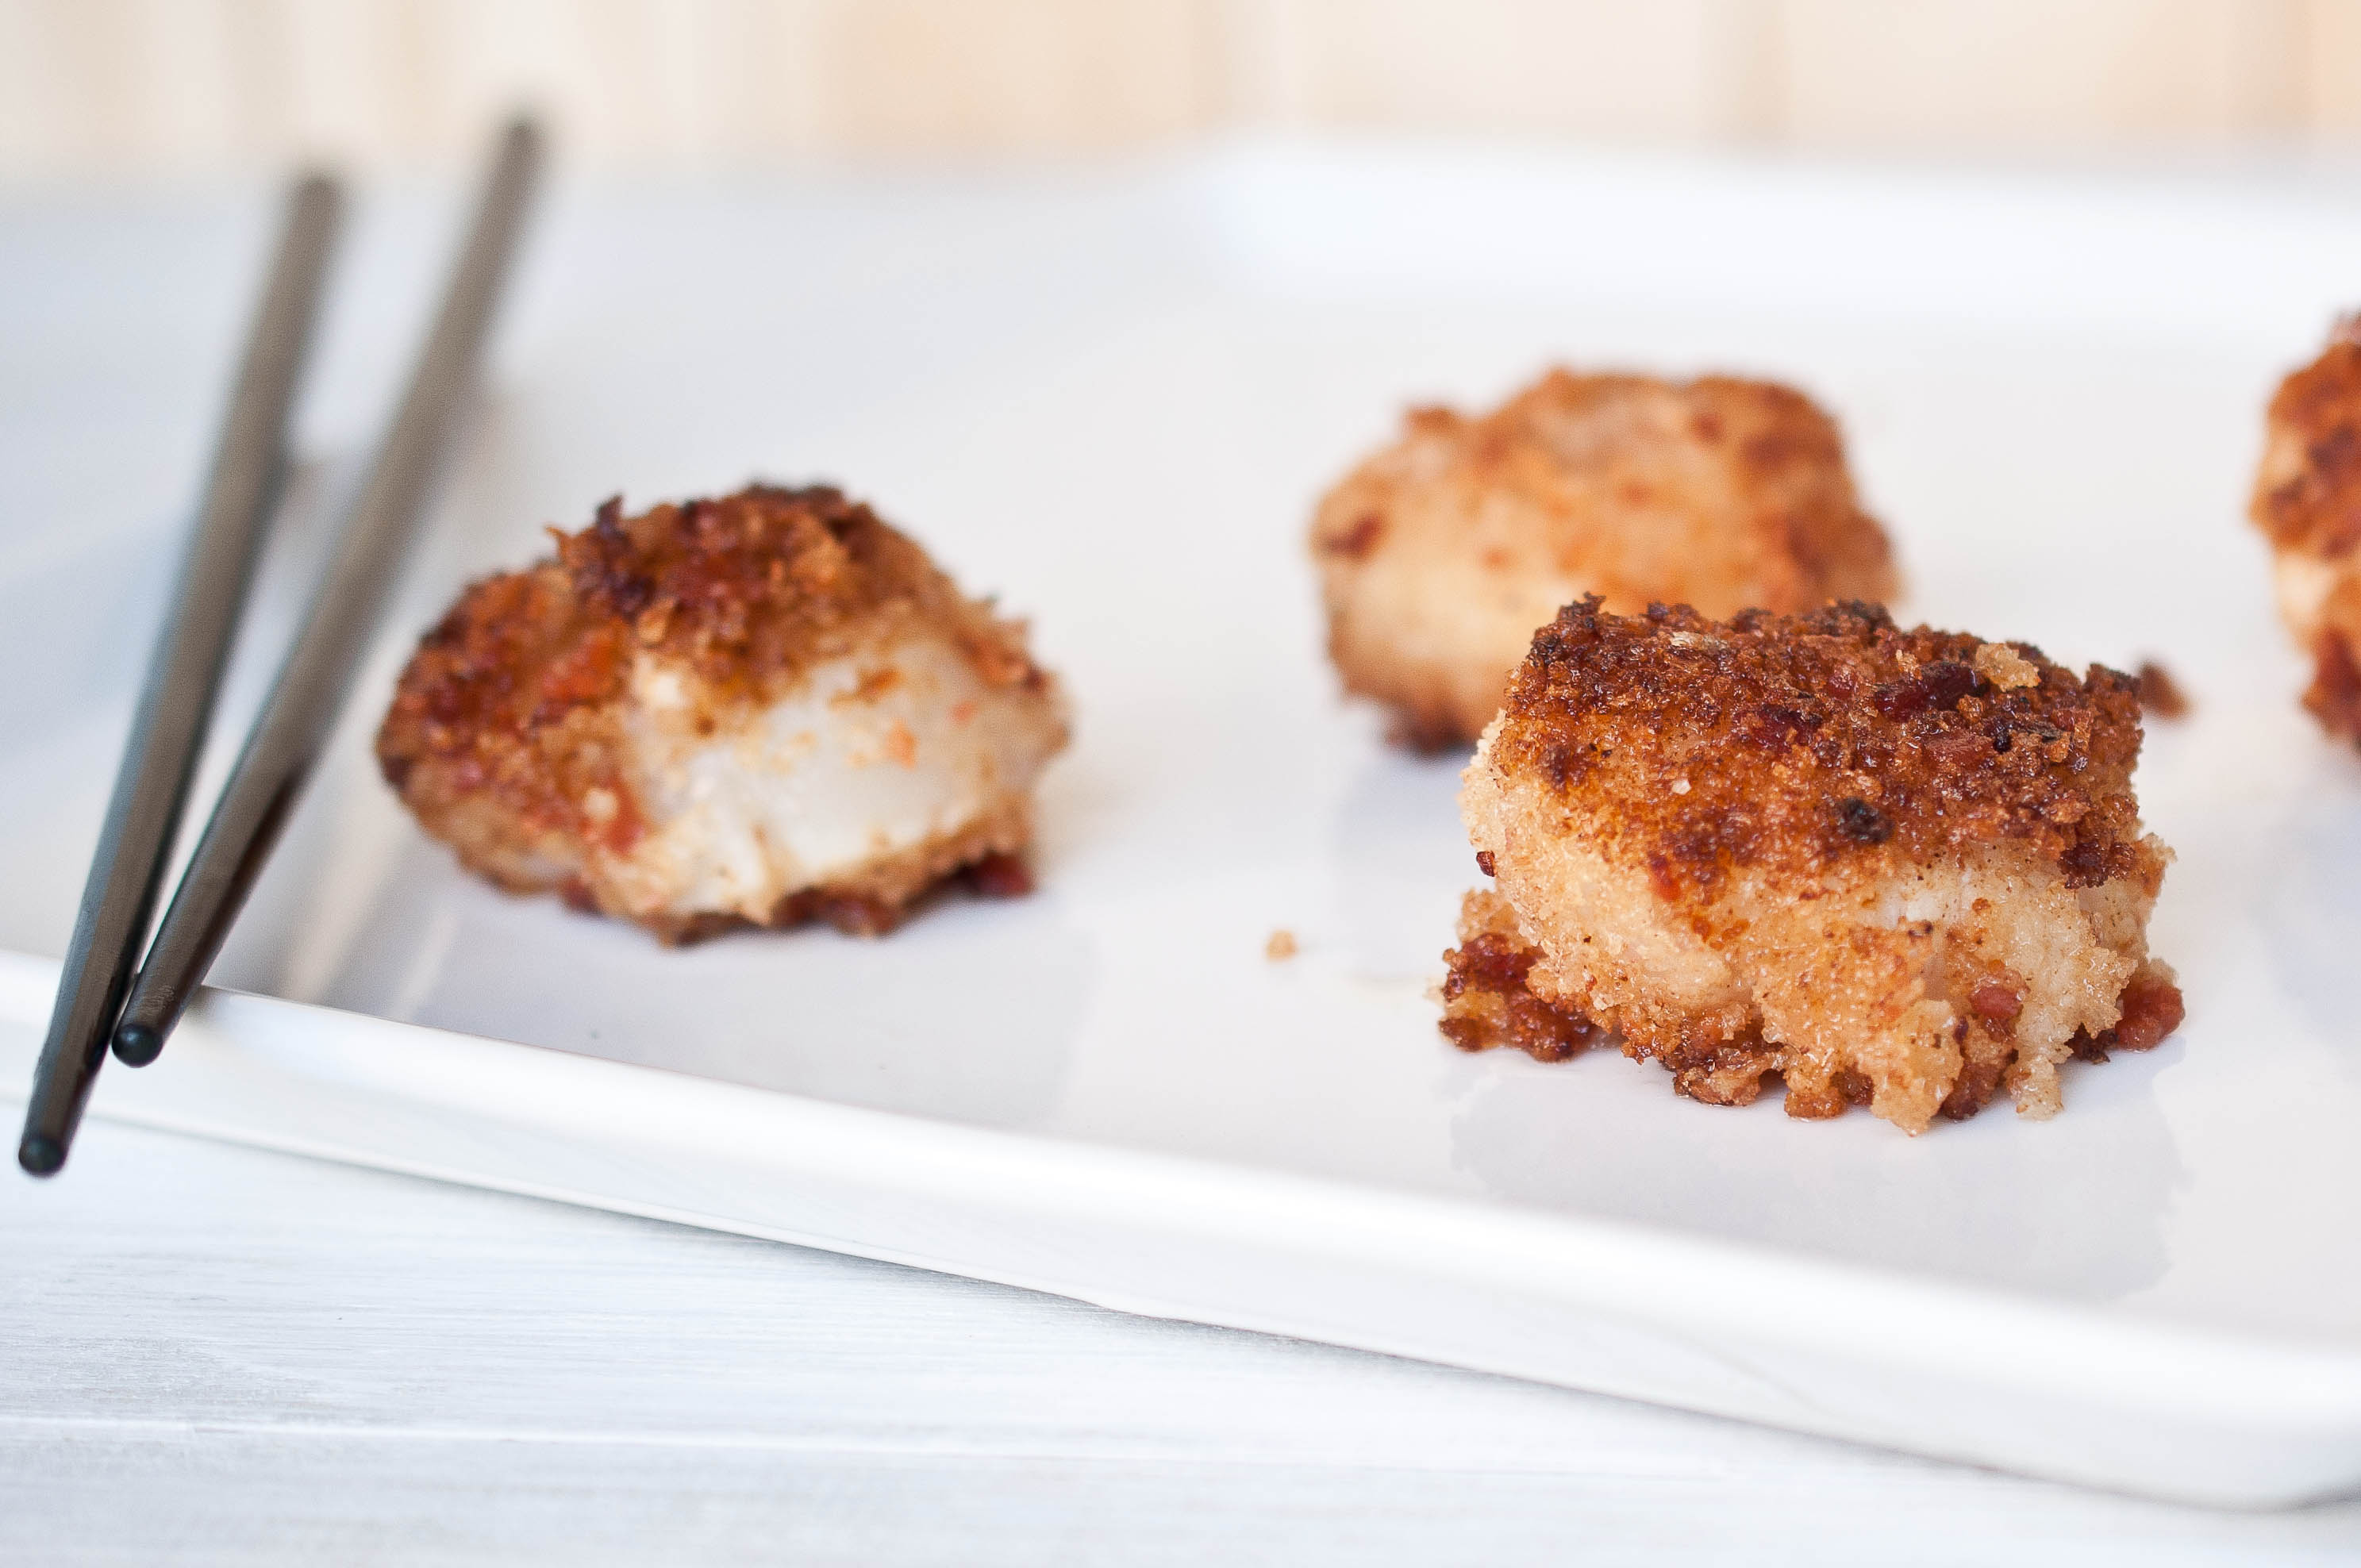
Bacon wrapped scallops sound like such a great idea, don’t they? Two fabulously delicious meats teaming up for one incredible bite. There’s an issue. A huge, unavoidable, technical glitch: the cooking times. Like most great loves lost, the deal breaking fundamental flaw is timing. Bacon takes somewhere around 3 times as long to cook as scallops, giving you two options: Hideously dry, overcooked scallops or semi-raw undercooked bacon. Yum, appetizing.
If you really want to fly in the face of Kosher and wrap your shellfish with pork, you have two really great options:
Wrap your scallops in prosciutto, like I do here, only needing attention on the scallops cooking time since proscuitto can be served any where from raw to cripsy,
or
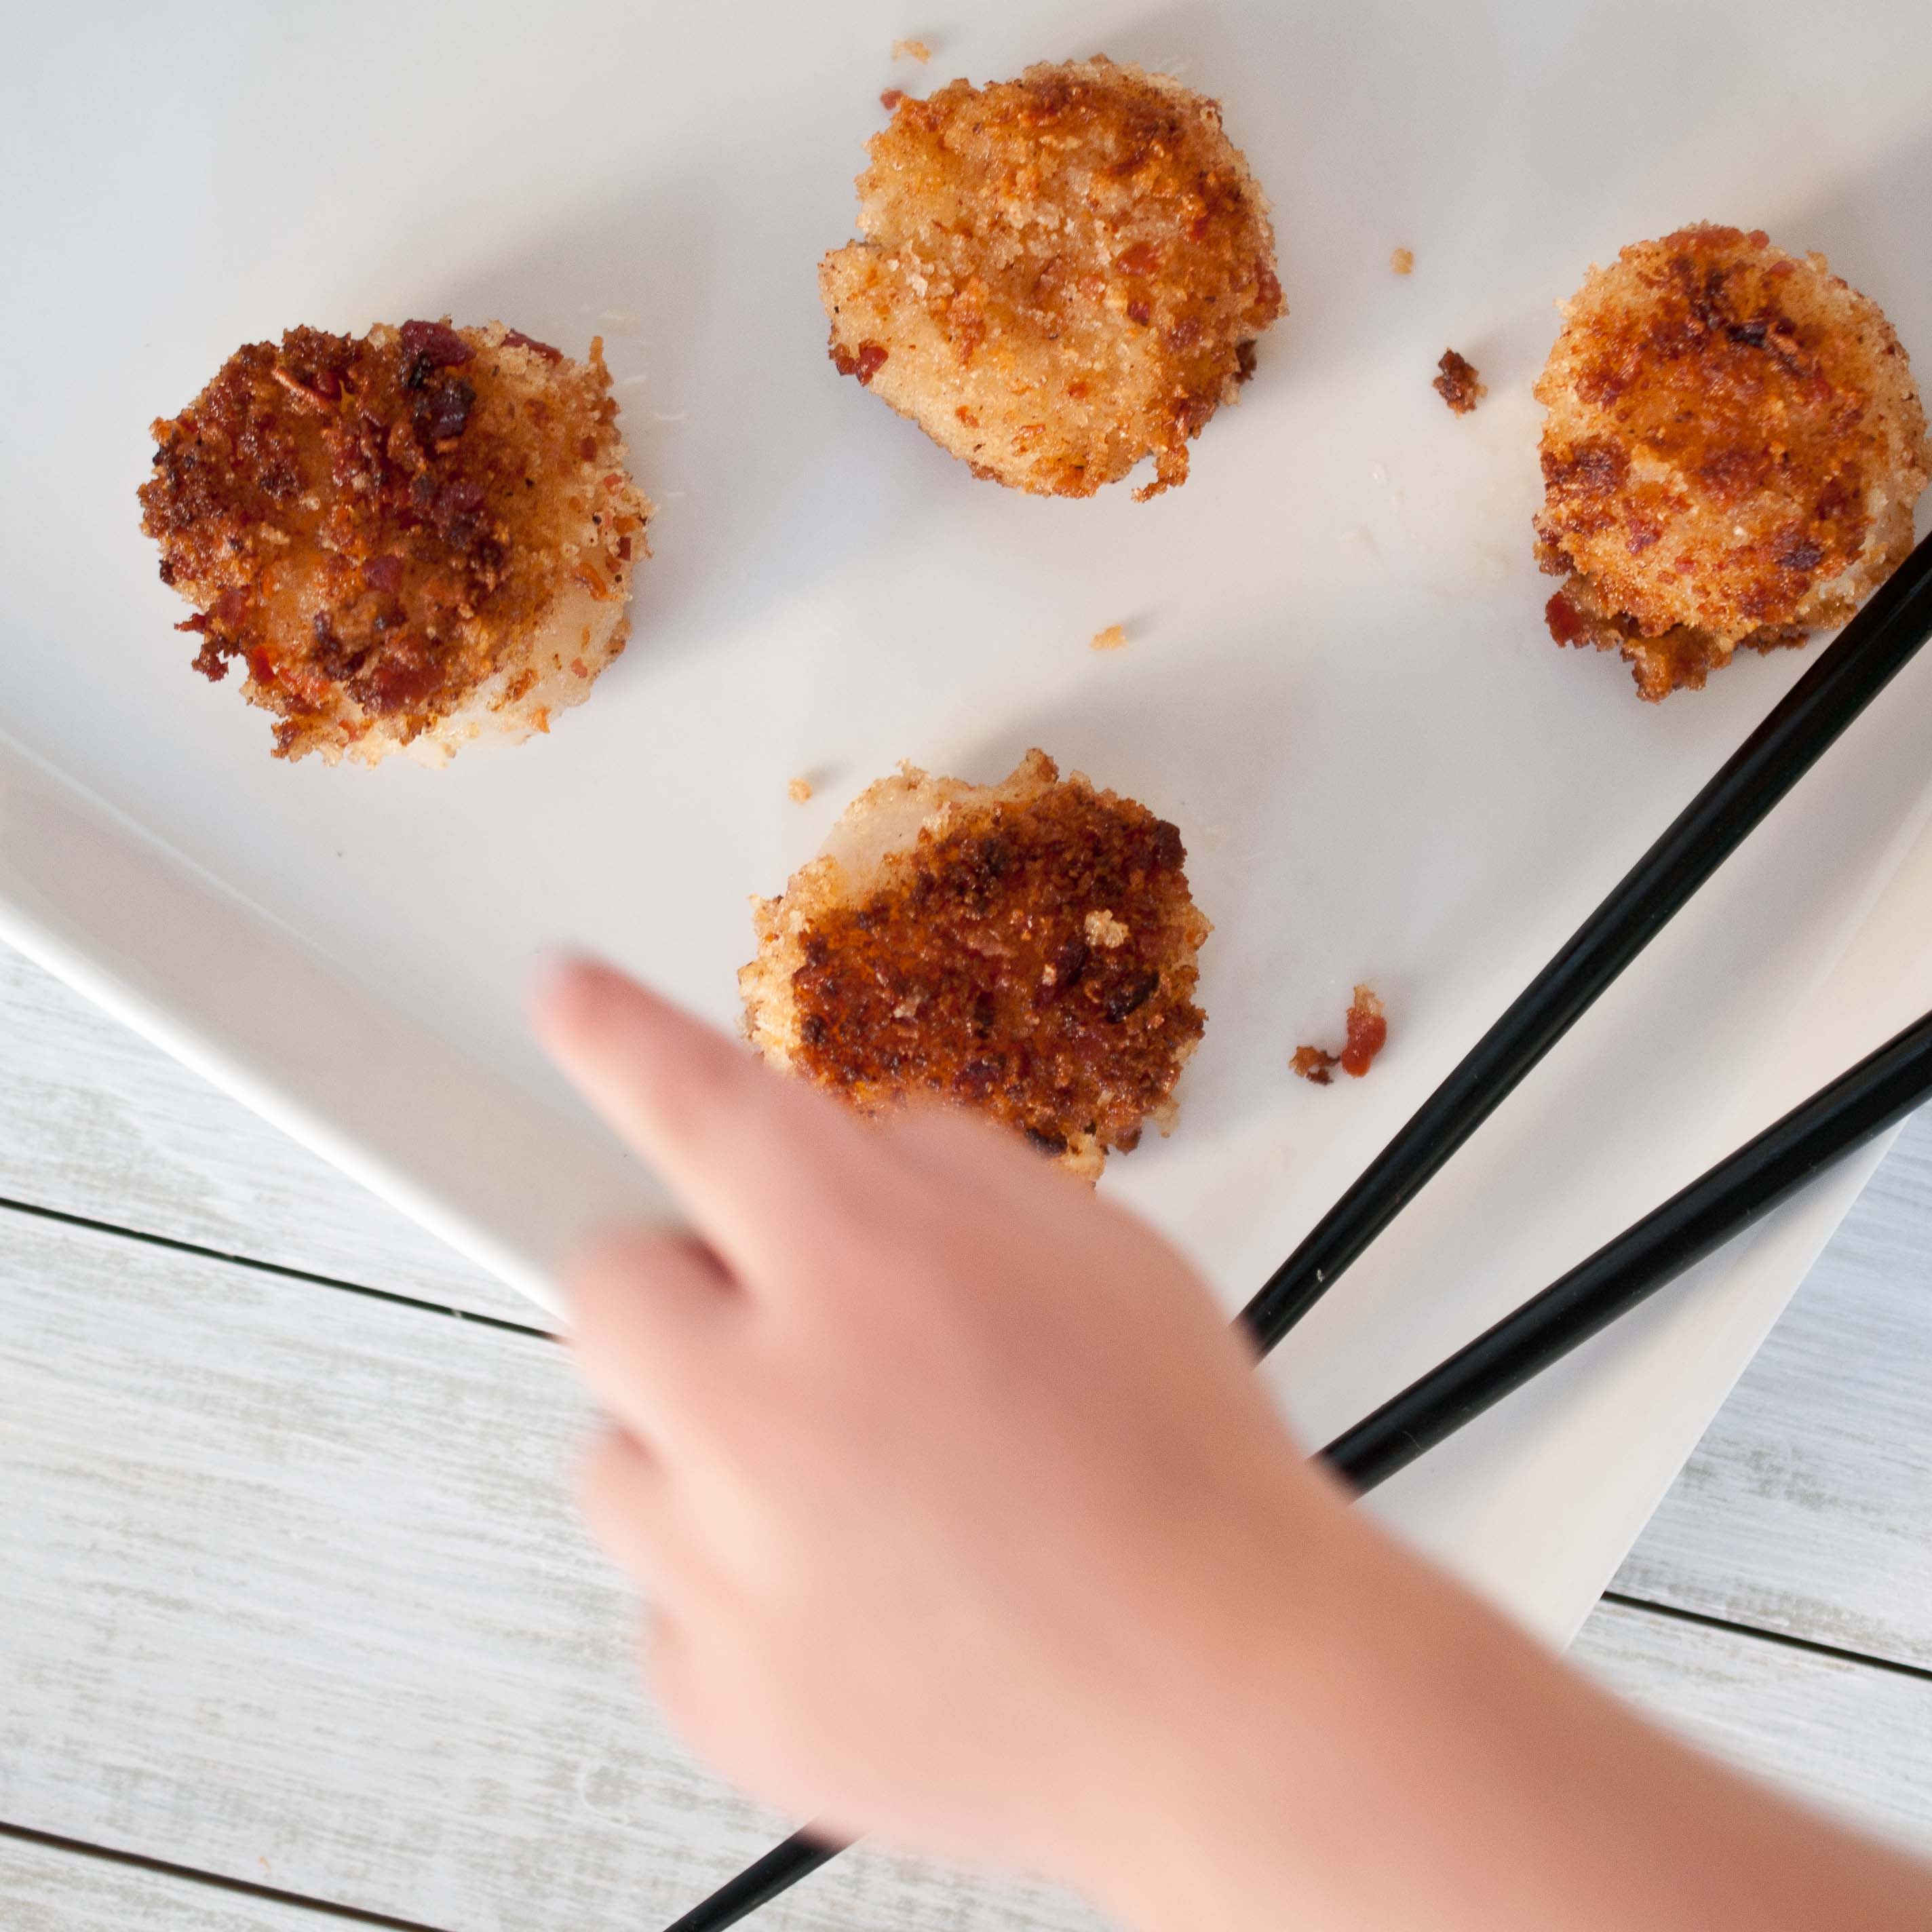
Bread your scallops with crushed bacon and Panko, which I do below.
Either way, pork and scallops are harmoniously reunited. I knew those two crazy kids would work things out.
Bacon & Panko Crusted Scallops
4 strips of bacon, cooked
1/3 cup panko
8 large scallops
1/4 cup flour
1/4 cup milk
2 eggs
1/2 tsp salt
3 tbs canola oil
Roughly chop the bacon and add to a food processor along with the Panko, pulse until well combined and the bacon is reduced to crumbs, remove from food processor and add to a bowl.
Add the flour to a plate.
Add the milk, eggs and salt to a bowl and beat to combine.
Dry the scallops very well and dredge in the flour, knocking off any excess, dip in the milk/egg mixture and then into the Panko/bacon bowl, coating well. Place in the refridgerator for ten minutes to allow the coating to stick.
Heat oil in a skillet over medium-high heat. Cook scallops on both sides until golden brown, about 2 minutes per side, taking care not to over crowd the pan.
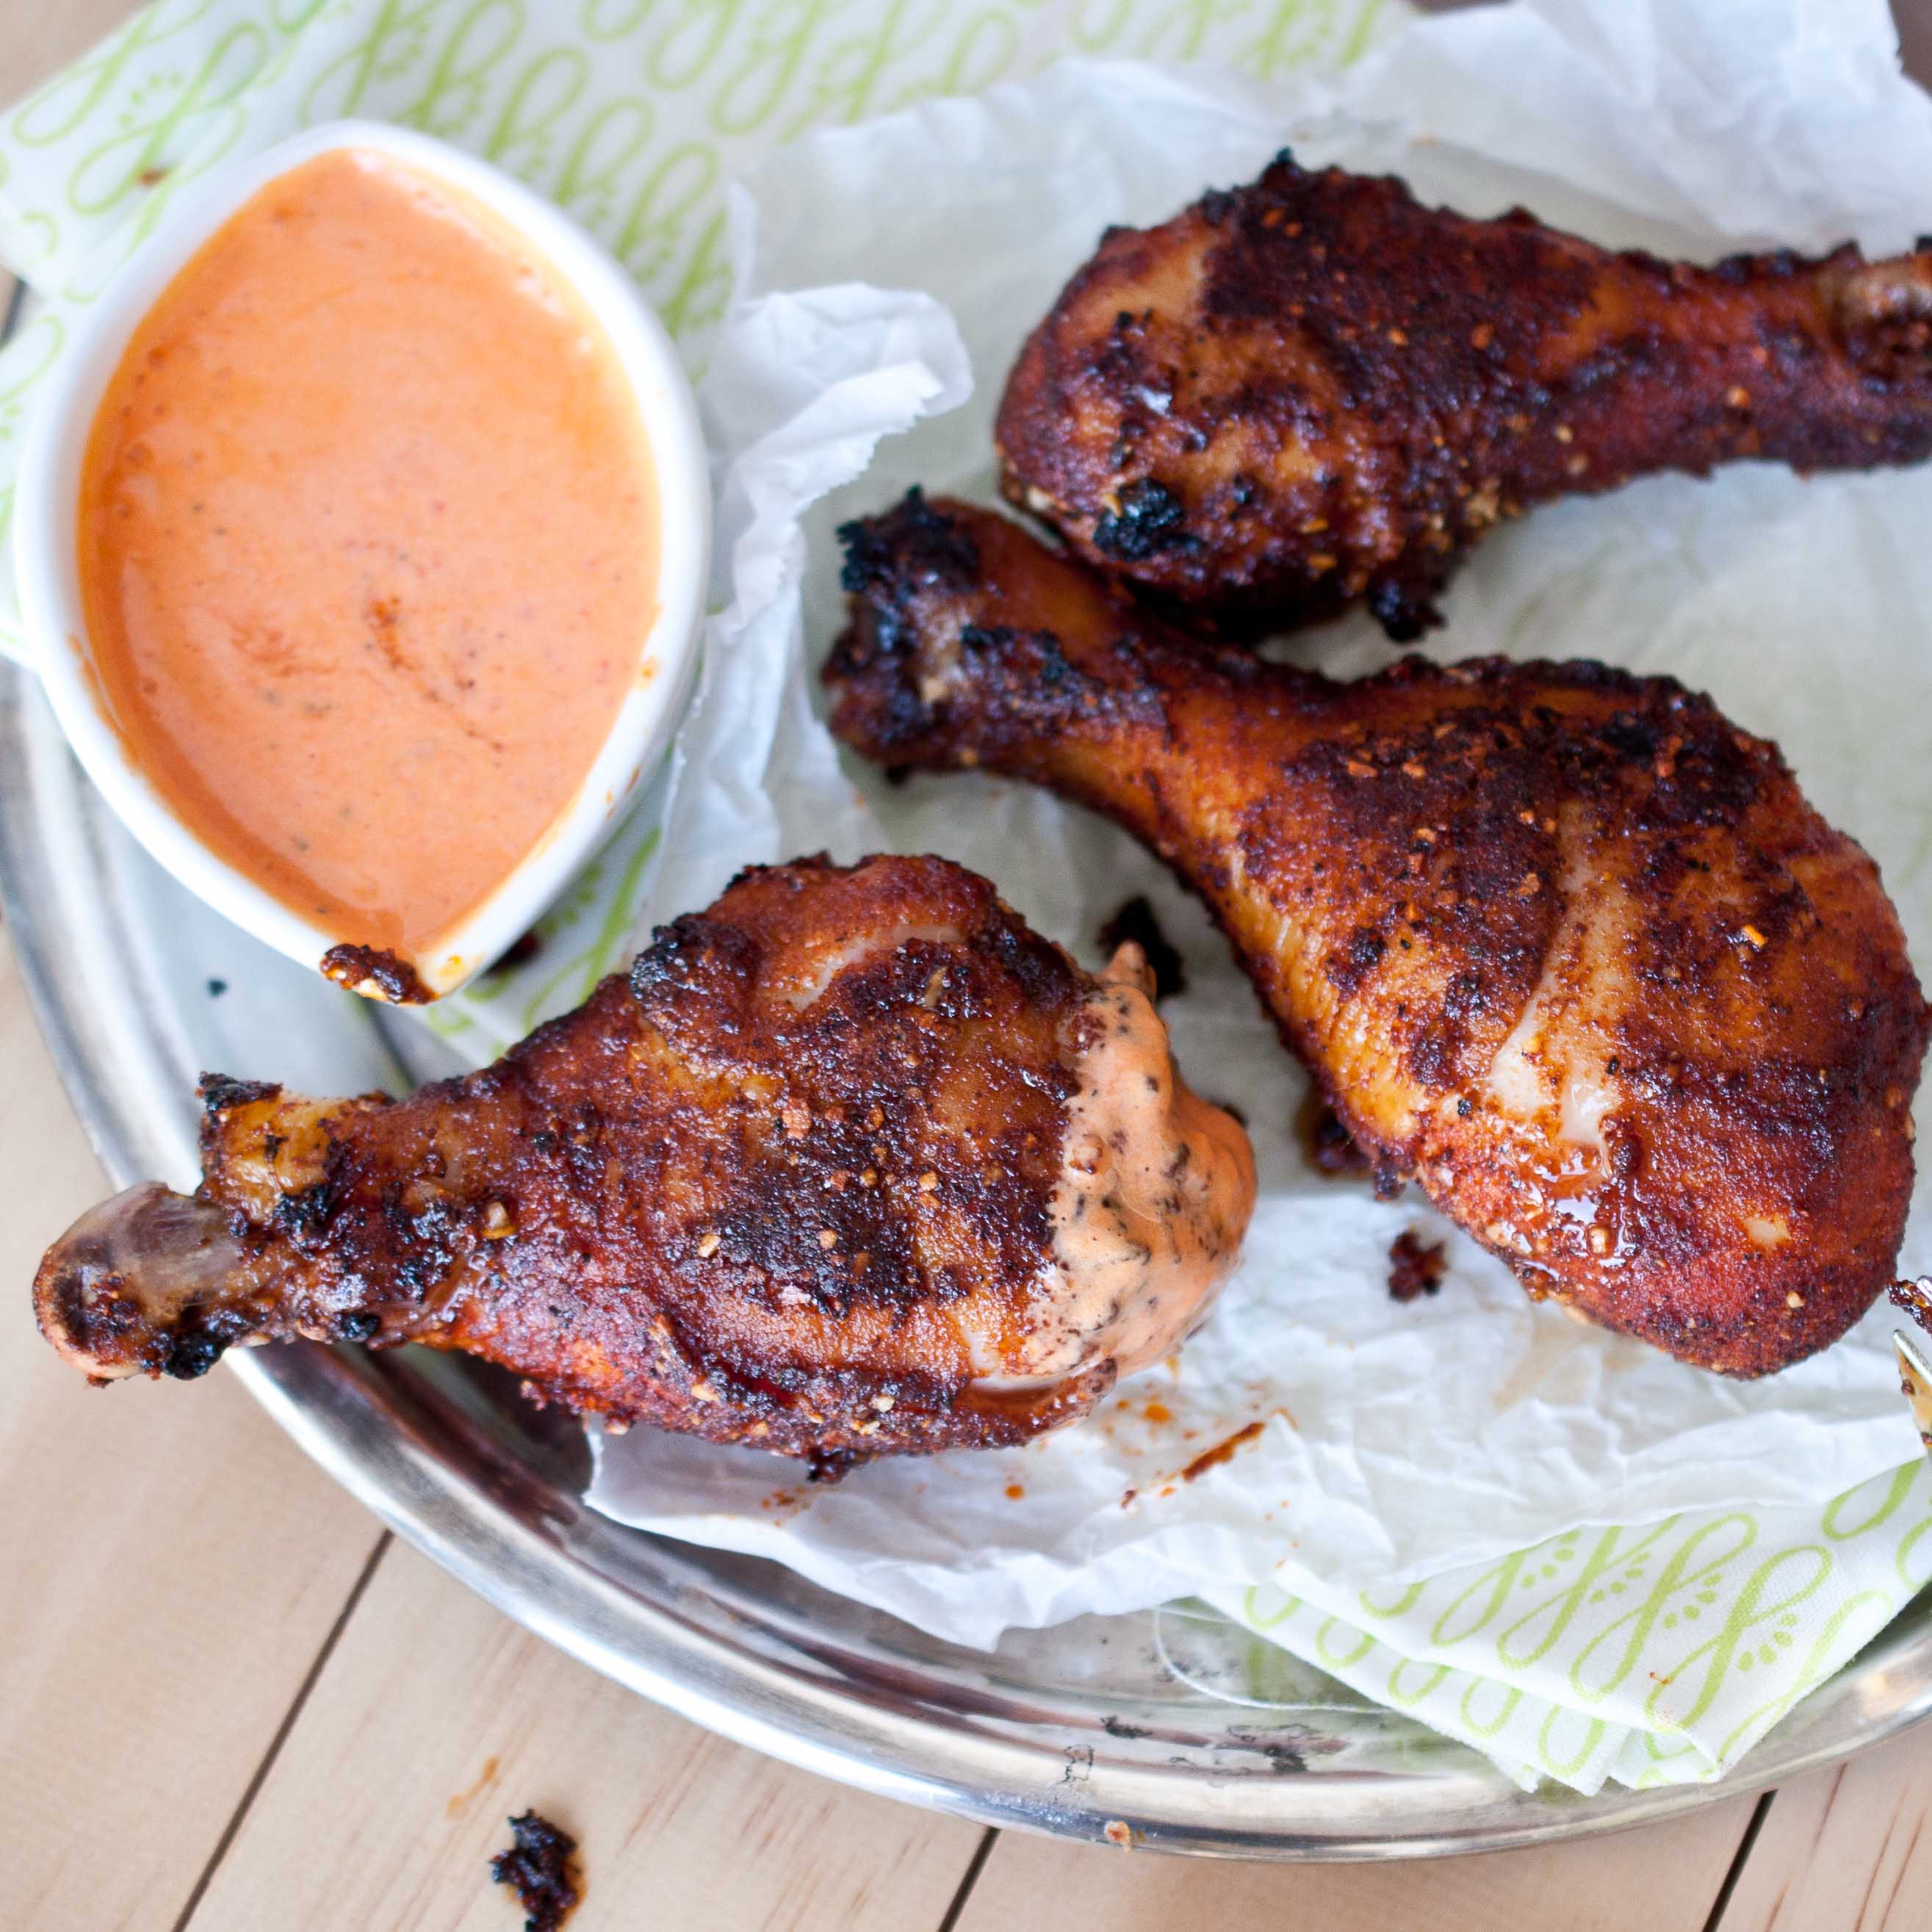
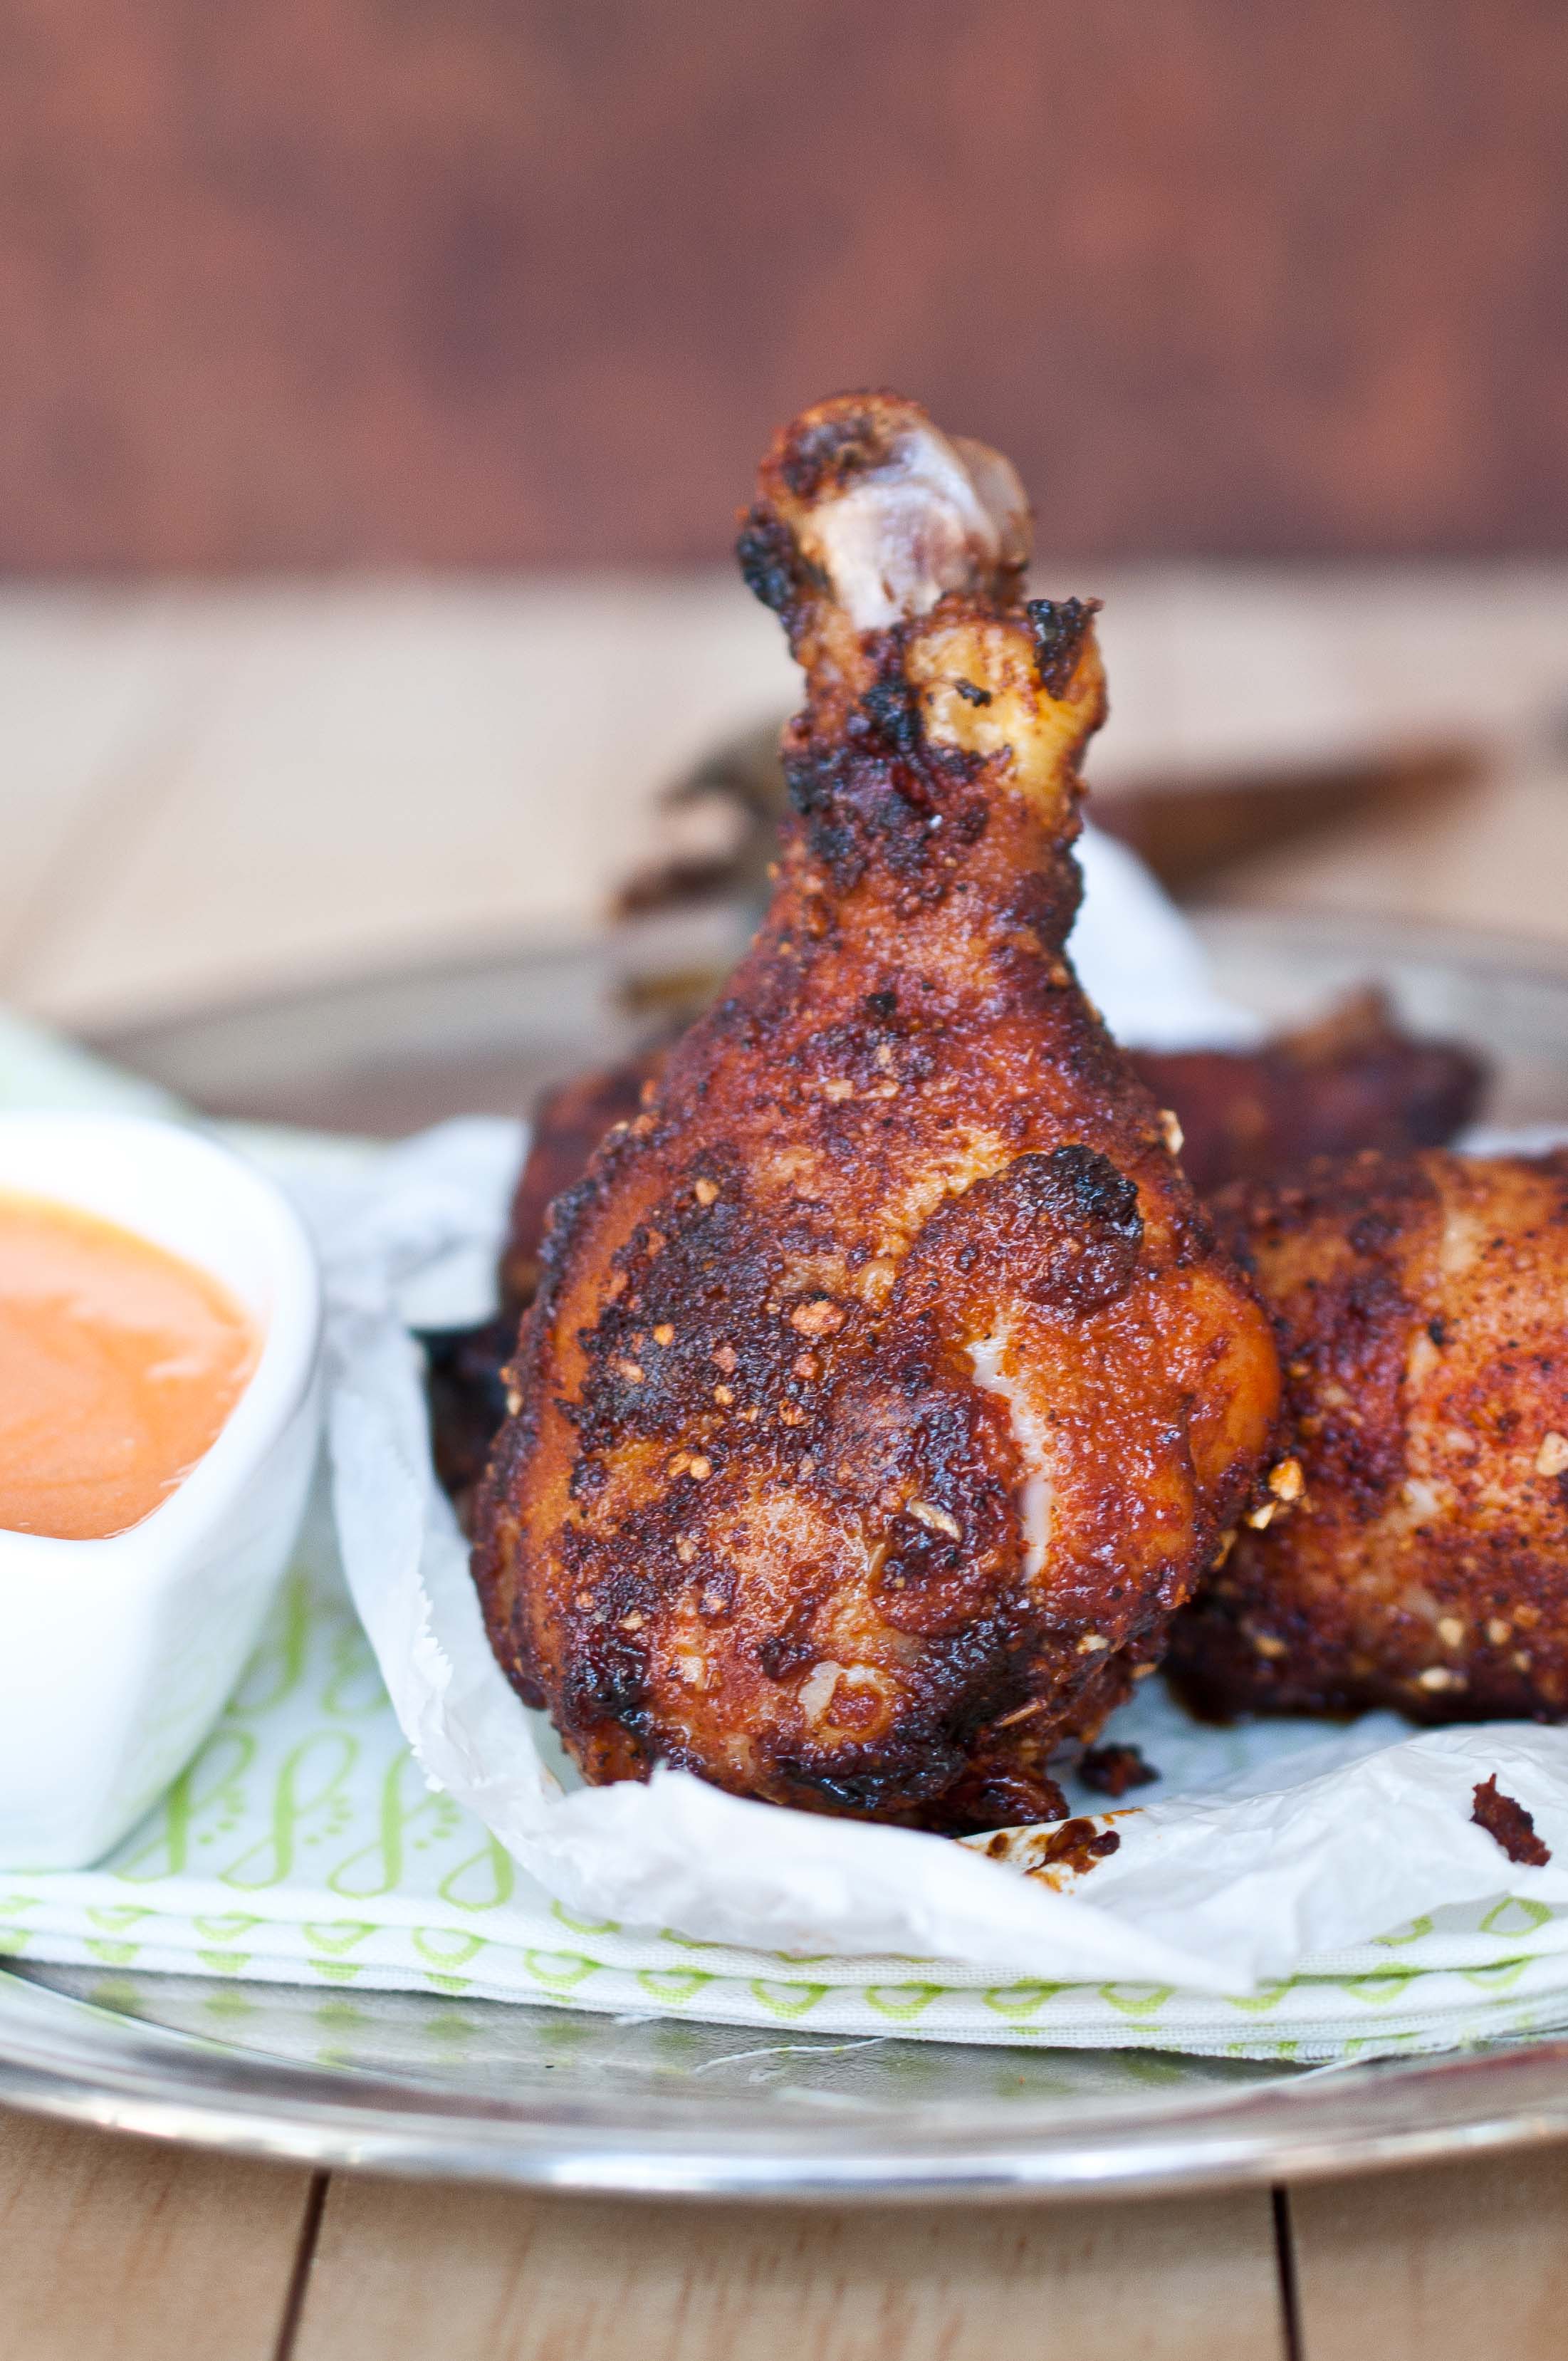
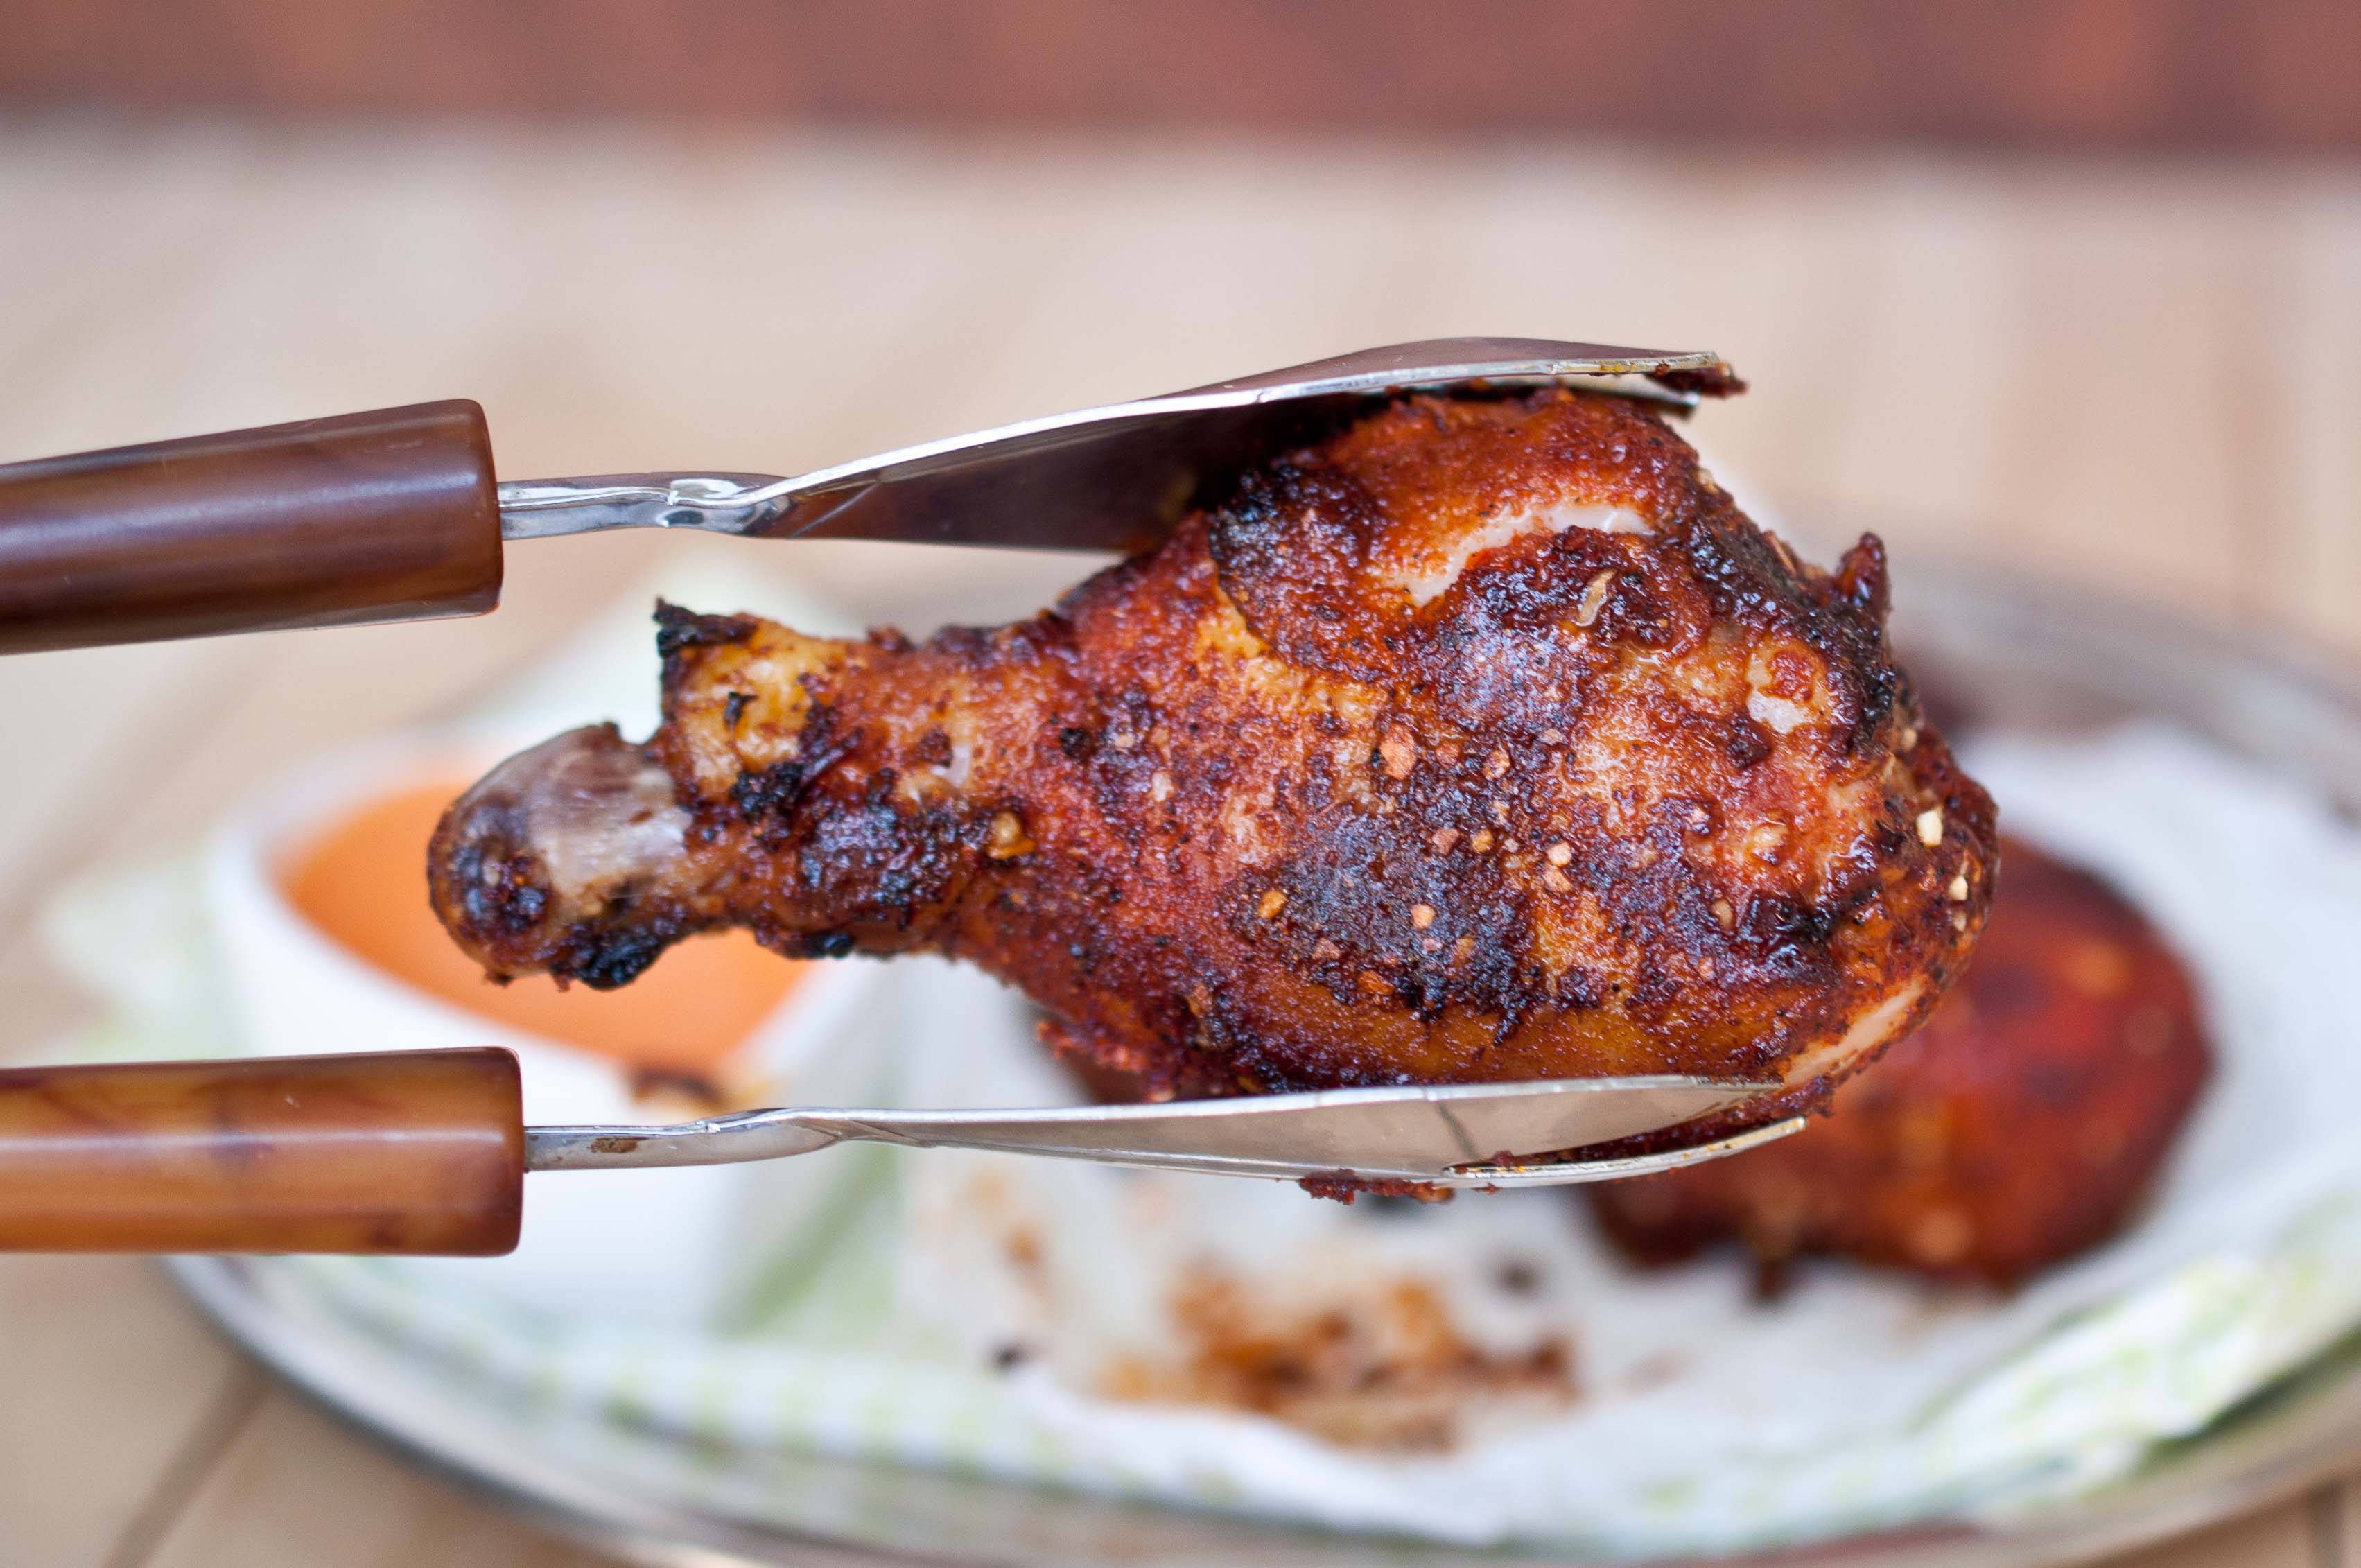
People always ask what I prefer: sweet or savory. The truth is I have a strong pull to mix them together, blur the lines. I add savory ingredients to my baked good and sweet ingredients to my savory dinners.
The best fried or baked chicken recipes there are have a touch of sugar. It’s this magic secret ingredient that just seems way to simple to make such a huge impact. If you already have a baked or fried or even grilled chicken recipe that you are perfecting, add a tsp of brown sugar and see how it gives an entirely new dimension to the flavor.
And the sauce combines two of my favorite kitchen staples: roasted red peppers and goat cheese. Both are savory ingredients with a touch of sweetness.
I baked these, more or less because it was easier. But they would also lend themselves well to frying, if you are brave enough.
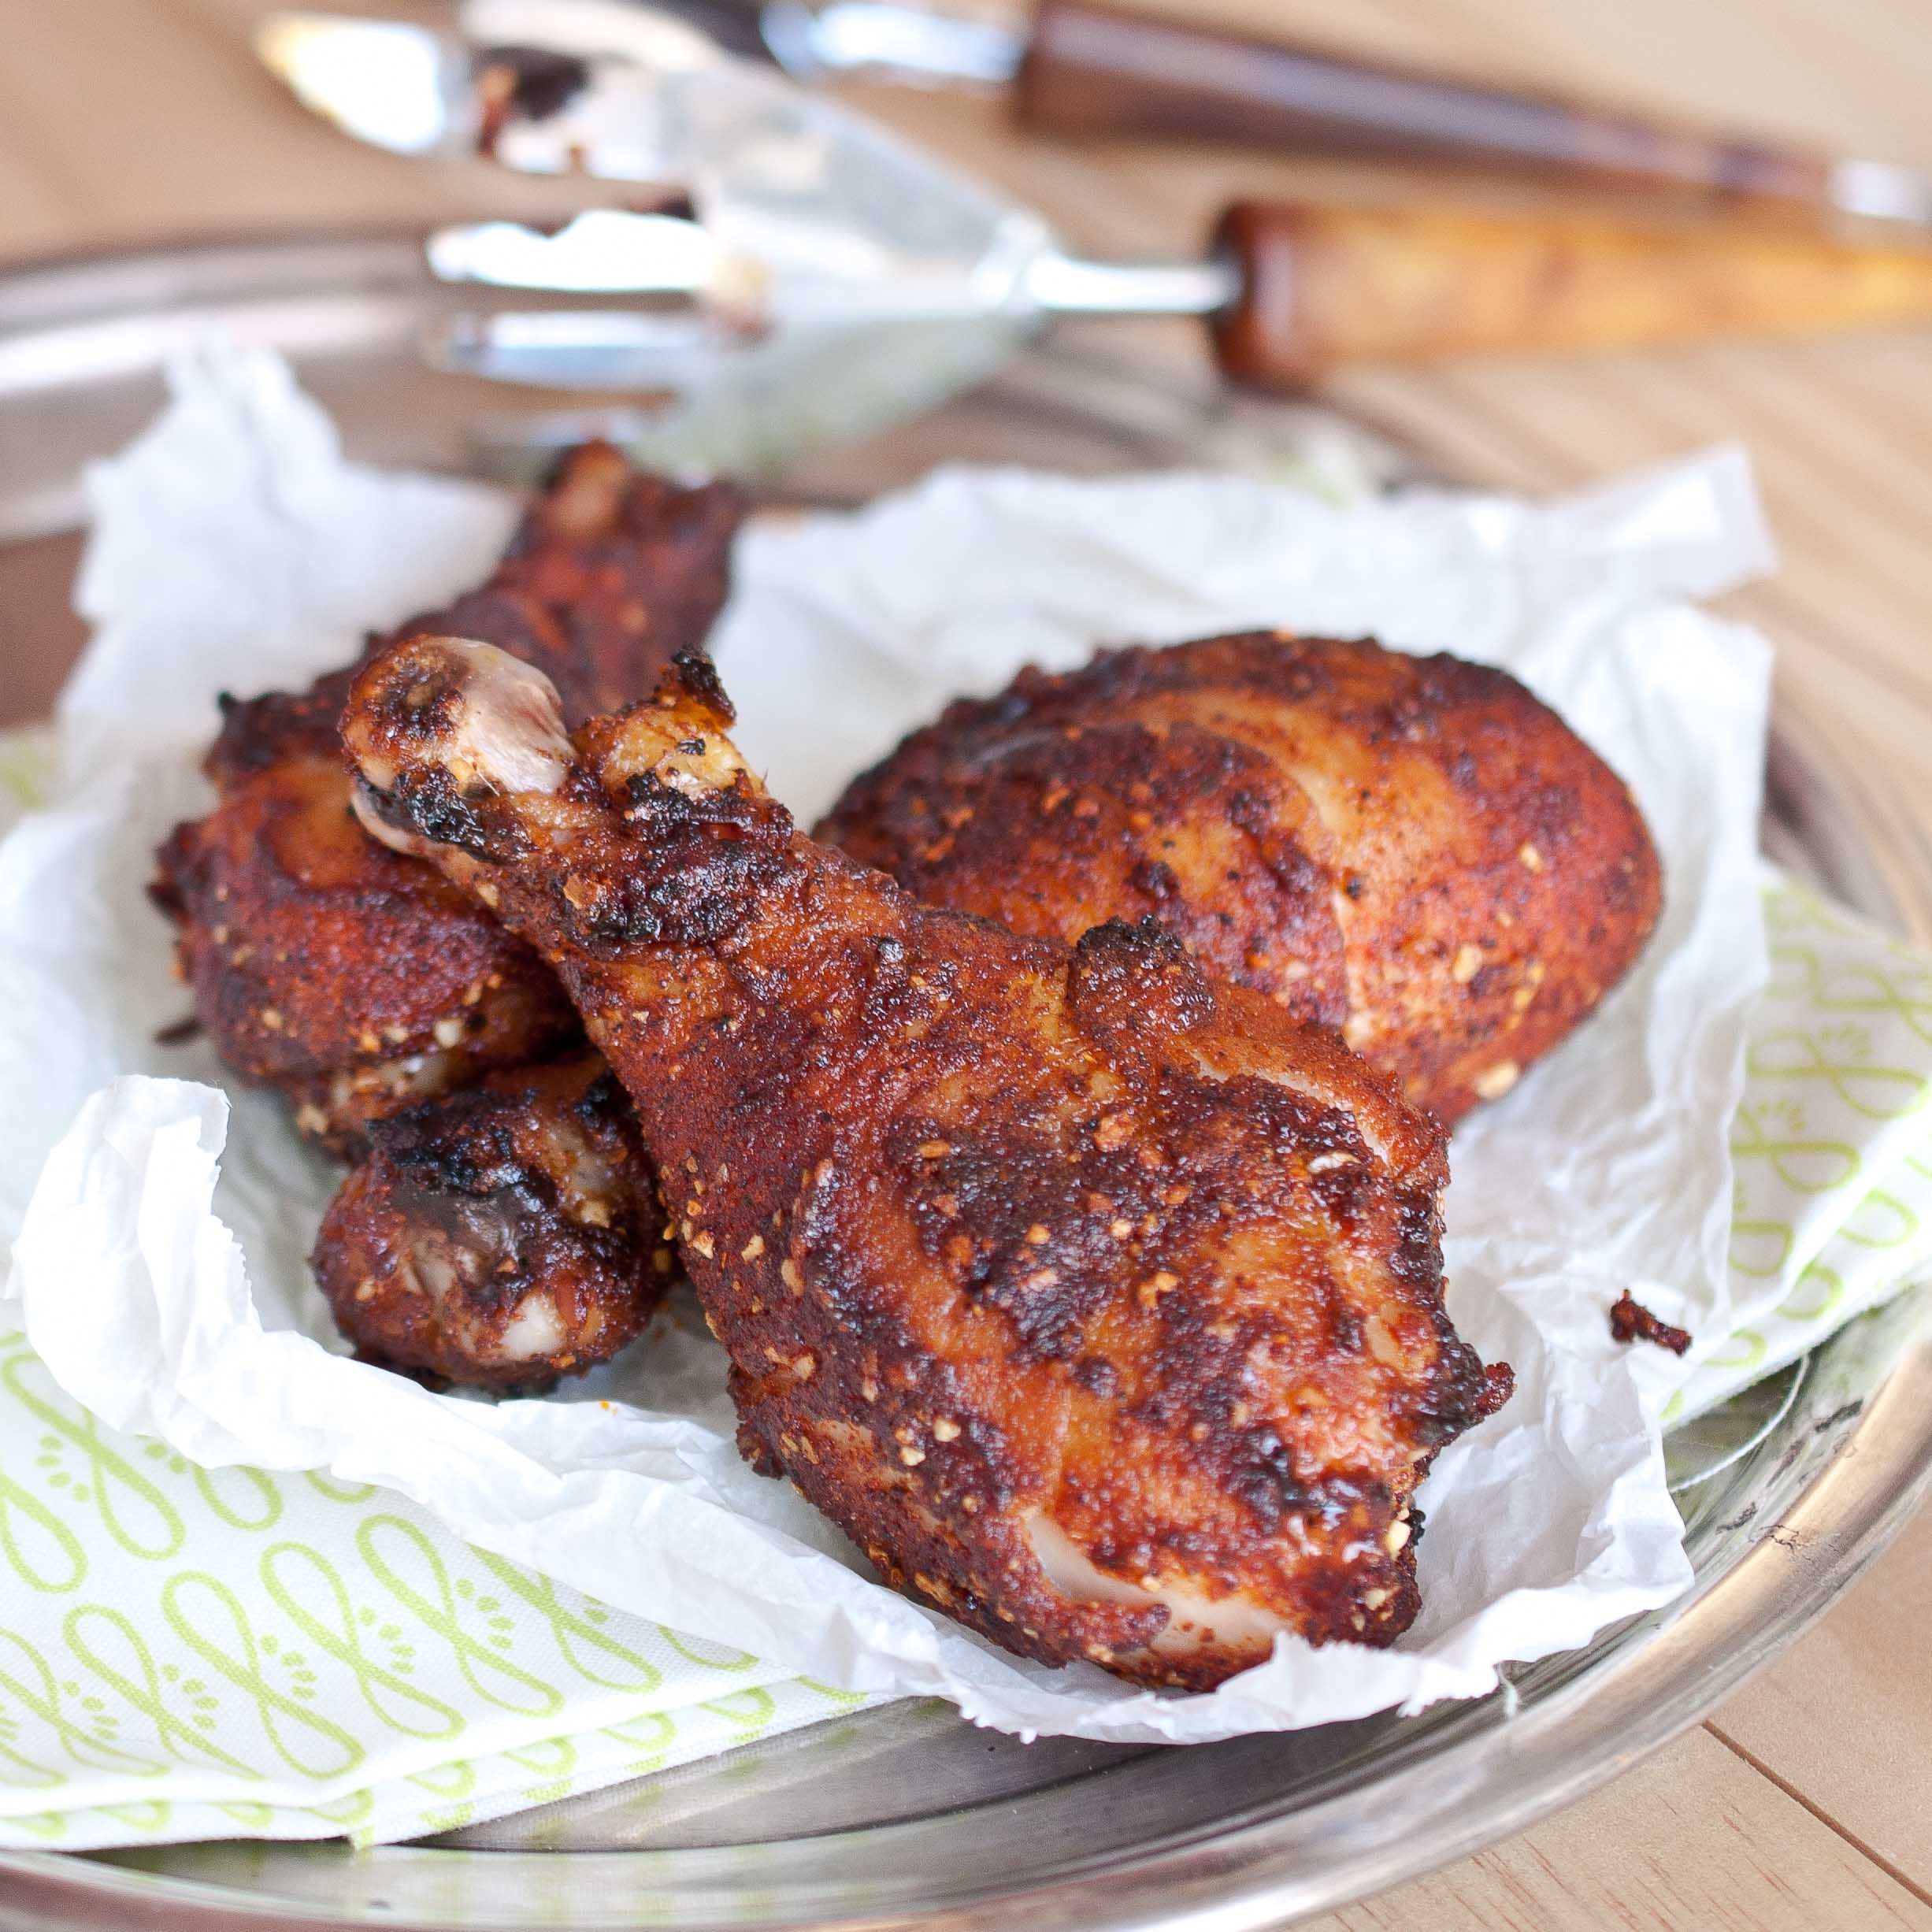
Brown Sugar Chili Chicken
2 tsp brown sugar
1 tsp salt
1 tsp onion powder
2 tsp dried minced garlic
2 tsp smoked paprika
2 tsp chili powder
1 tsp black pepper
2 tbs olive oil
8 chicken legs or wings
1/3 cup roasted red pepper, chopped
2 oz goat cheese
1/4 tsp salt
2 tbs sour cream
Preheat oven to 425.
In a plastic bag, or a bowl, combine the first 7 ingredients. Drizzle the chicken with olive oil and rub to coat. Add the chicken to the bag (or bowl) and toss or shake bag until well coated.
Place on a baking sheet and bake for 12 minutes, turn the chicken over, and continue to bake until cooked through, about 10-15 additional minutes (depending on the thickness of your chicken).
In a food processor, add the roasted red pepper, goat cheese salt and sour cream, process until well combined.
There’s a good chance that when you think about cooking with beer, a meat recipe comes to mind. Your Dad’s beer marinated ribs? Beer can chicken? Beer braised pork? There’s a good reason for that.
Not just for the spectacular flavors that craft beer can impart on the meat, but because beer, especially high acid beer, acts as a meat tenderizer by breaking down tissue.
For this recipe you are free to run the spectrum of beer styles. Most recipes I write will be accompanied by stern warning about using any beer other than the type called for, this isn’t one of those recipes. That IPA I keep shaming you into avoiding? You can even give that a try. My gut instinct with a recipe like this was to use a light, high acid beer with herb notes (basil, sage, oregano) but I opted for a porter to test my "Any Beer Goes" theory.
The porter effect, as I am now calling it, gave a "meatier" quality to the chicken. Which turned out wonderfully, and gave this a bit of a pork taste.
The beer I used for this recipe was the Payback Porter by Speakeasy. It’s a fantastic choice for a porter because the notes are similar to those I see in barbecue sauces and rubs: smoke, coffee, cocoa, and molasses.
Next time I’ll use a beer with a high acid content for a little contrast, but as far as the beer that you pick, experiment and let me know how it goes.
Beer Braised Chicken Sliders With Hoisin Beer Barbecue Sauce
Heat 2 tbs canola oil in large pot or Dutch oven. Sprinkle the chicken with salt on all sides. Place in the pot and cook on each side until browned, about 2 minutes per side. Cover with 1 1/2 cups of beer and 1/2 cup chicken broth, cover and cook for 15 – 20 minutes or until chicken is completely cooked.
While chicken is cooking, prepare barbeque sauce by warming olive oil in large saucepan over medium-high heat. Add garlic and sauté for 30 seconds; add 1 cup beer, hoisin sauce, chili powder and soy sauce. Cook for 10-15 minutes or until thickened and reduced, remove from heat.
When chicken is cooked, remove from pot and allow to cool. Using two forks, shred chicken to as thin slices as possible, then add to hoisin barbeque sauce pan, tossing well to coat.
Split rolls in half across the middle to resemble small sandwich buns, fill with chicken.
Why do I cook with beer? What is it about this fantastic beverage that drives me to create recipe after recipe with beer as a star ingredients? Flavor. Beautiful and complex flavors that take months, even years to perfect by brewers. Aside from that, beer is a natural meat tenderizer, making it the perfect choice for a brining liquid and explaining that Beer Can Chicken recipe you keep seeing at tailgate parties. Due in no small part to the beer in the brine, it’s flavors and tendering properties, this recipe gives you a juicy bird, crispy skin and the perfect level of beer taste. That’s why I can’t stop cooking with beer, it’s just so perfect.
For this recipe I used Alaskan Brewing Company White Ale due to the flavors of citrus, coriander, and a slight sweetness, this beer is a fantastic choice. Choose a beer with similar flavors and low hops, please no IPA’s.
Beer Brined Roast Chicken
5 lb whole roasting chicken
4 cups water
3, 12 oz Alaskan White (or similar white ale with citrus notes, and low hops)
1 tsp whole cloves
1 tbs whole black peppercorns
1/2 cup kosher or sea salt
1/2 red onion
1 whole lemon
1 tsp black pepper
In a pot over medium heat, combine the water, beer, cloves, peppercorn and salt. Cook until the salt has dissolved, and the liquid starts steaming, about 5 minutes. Remove from heat and allow to cool, adding a raw chicken to hot brine will start to cook it prematurely.
Rinse the raw chicken, removing anything that is in the cavity. Place in a large stock pot, bucket or dutch oven that is just taller than the top of the chicken. Pour the cooled brine over the chicken until submerged. Place in the fridge and allow to soak for 12 hours. If the chicken isn’t fully submerge, turn every 4-6 hours to re-distribute the brine.
After 12 hours, remove from brine and rinse thoroughly, pat dry. Place in a roasting rack in a roasting pan and allow to sit, uncovered in the refrigerator until the skin has dried, about 12 to 24 hours. This final step will allow the skin to become crispy during cooking, while the meat is juicy.
Preheat oven to 450.
Squeeze the juice from the lemon over the chicken, place the spent lemons inside the chicken cavity along with 1/2 an onion. Sprinkle the outside of the chicken with pepper.
Roast for 1 to 1 1/2 hours or until a thermometer inserted into the thickest part of the thigh reads 160 degrees, or the breast meat is at 180 degrees. If the chicken starts to brown too quickly, tent with aluminum foil.
In the food world you hear terms thrown around so casually. Words like confit, reduction, braise, semifreddo. I even see those words being used wrong so often, their meanings seem to change as more and more people republish inaccurate content. Braise is one of those terms.
Maybe it’s ignorance, maybe it’s an attempt to fancy-up boiled chicken to make it sound more impressive or maybe it’s just the result of blindly believing everything that’s posted online. As I post the definition of braise, I hope an inherent skepticism creeps into you, it should. Anyone can post anything online and hit "Publish". I have no editor, or fact checker, I don’t even have any consequences if I publish inaccurate content. Just the reputation as a reliable, solid source of information that is important to me, an integrity in writing that I hope to keep in tact. And for that, I’ll give you three sources, that you are free to check at your leisure.
Braise:
A cooking method by which food (usually meat or vegetables)
is first browned in fat, then cooked, tightly covered,
in a small amount of liquid at low heat for a lengthy period of time.
For this recipe I chose Allagash Black, one of my favorite beers of all time. It’s a stout that has notes of caramel, chocolate, coffee and roasted malt and such well-balanced flavors it not only incredibly perfect for mole, it’s a beer I will always list in among my Top 5 of All Time. It’s a beer that I urge you to seek out, whether you decided to make this recipe or not.
If you can’t find Allagash Black, look for a Stout with coffee and chocolate notes. This is a recipe that is on the difficult side and the flavors are in a delicate balance. Choosing the right beer will make all the difference.
Beer Braised Enchiladas with Beer Mole
6 boneless chicken thigh fillets
1 tsp kosher or sea salt
2 tbs olive oil
1/2 to 2/3 cup Stout Beer such as Allagash Black
12 tortillas
2/3 cup mozzarella cheese
For the Mole:
2 dried ancho chilies, stem and seeds removed
2 dried anaheim chilies, stem and seeds removed
2 dried guajillo chilies, stem and seeds removed
4 prunes
1 stick mexican cinnamon
1 cup Stout Beer such as Allagash Black
1/2 cup of water
1/4 cup dry roasted almonds
2 tbs olive oil
1/2 cup onions, chopped
3 cloves of garlic, chopped
1/4 cup bittersweet chocolate
3/4 cup Stout Beer such as Allagash Black
3/4 cup chicken broth
1 tsp sesame oil
1/4 cup tomato puree
1 tsp smoked paprika
1 tbs sugar
1 tbs creamy peanut butter
Toppings (if desired):
1/2 cup mexican crema
2 tbs chopped green onions
In a pot over medium heat, at the 3 types of dried chilies, the prunes, cinnamon stick, 1 cup beer and enough water to submerge the chilies. Bring to a boil, cover and remove from heat. Allow to soak, covered for 20 minutes.
In a skillet, add the almonds and toast over high heat, tossing frequently until toasted, about 5 minutes, remove from skillet and add to a food processor. In the same skillet, add the olive oil and allow to get hot but not smoking. Add the onions and sauté until translucent, add the garlic and cook for about 30 seconds. Add to the food processor.
In a pot over medium high heat, add the 3/4 cup beer, 3/4 cup chicken broth and chocolate. Cook until the chocolate has melted, stirring frequently. Once the chocolate has melted, add the contents of the pot to the food processor along with the sesame oil, tomato puree, smoked paprika, sugar and peanut butter. Removed the chilies and the prunes that have been soaking from the pot and add to the food processor, discard the cinnamon stick. Turn the food processor on and puree until smooth, about five minutes. Add a bit of the soaking liquid from the chilies pot to achieve the right consistency. Return the mole to a pot on the stove to keep warm, adding more soaking liquid or hot water to thin if mole starts to thicken.
To make the chicken:
Sprinkle each side of the chicken thigh fillets with salt. Heat the olive oil in a pot over medium high heat. Add the chicken thighs and cook on each side until slightly browned. Add enough beer to barely cover the chicken, cover and reduce heat to maintain a low simmer. Allow to simmer until cooked through, about 20 minutes. Remove chicken from pan and shred with two forks.
Fill warm tortillas with shredded chicken, and cheese, roll and place 3 or four on each plate. Top with mole sauce, mexican crema and green onions.
I don’t buy many things in cans. I DO buy Chipotle peppers, and those come in cans. I’ve had to become inventive with them, as I try to use the food in my fridge rather than let it go to waste. And although the can these gorgeous smoked Jalapenos come in is rather small, a little goes a long way and I end up with a lot left over.
Seeing as how I am asking you to open a can to make this here sandwich, I also wanted to leave you with a few other things you can do with the rest of that can, once you devour that spicy, smokey grilled cheese.
I rarely do "Internet Round-Ups," But Chipotle peppers and my desire to use the whole can has left me no choice, but has give me quite a few recipes that I can’t wait to try. Check them out:
Now you are fully equipped to use an entire can of Chipotle In Adobo.
Shiitake Mushroom & Chipotle Grilled Cheese
1 tbs olive oil
6-8 large shiitake mushrooms, sliced
2 chipotle peppers in adobo sauce, chopped (use gloves)
2 tbs cream cheese, softened
1 cup shredded cheddar cheese
2 tbs chopped cilantro
4 slices of bread
2 tbs butter, softened
In a pan over medium high heat, add the oil and allow to get hot but not smoking. Add the sliced mushrooms and sautee until dark and cooked through, remove from heat.
In a bowl, add the softened cream cheese and the chipotle peppers, stir until well combined. Add the cheddar cheese, mushrooms and cilantro and stir until combined.
Butter one side of each slice of bread. Return the pan used to cook the mushrooms to medium high heat, add one slice of bread, butter side down to the pan. Carefully slather half of the chiptole cheese mixture onto the bread and top with another slice, butter side up. Repeat for the additional slices of bread. Cook on each side until browned, about 4 minutes per side.
Remove from pan, slice and serve with a cold beer.
I have a confession to make. I haven’t lost my Holiday weight. Granted, my "Holiday Weight" was only 3 pounds, but I still have it. Being a mom, a working mom, a working mom food blogger, I have a hard time finding the time to work out. I used to go to the gym three times a week and run a few miles on my days away from the gym. These days, I have a hard time getting a work out in once a week.
It’s a small price to pay to be the mom to an amazing little human like Tater. But this weekend, as I realized that Bikini season is fearfully close, I’m blogging "Skinny."
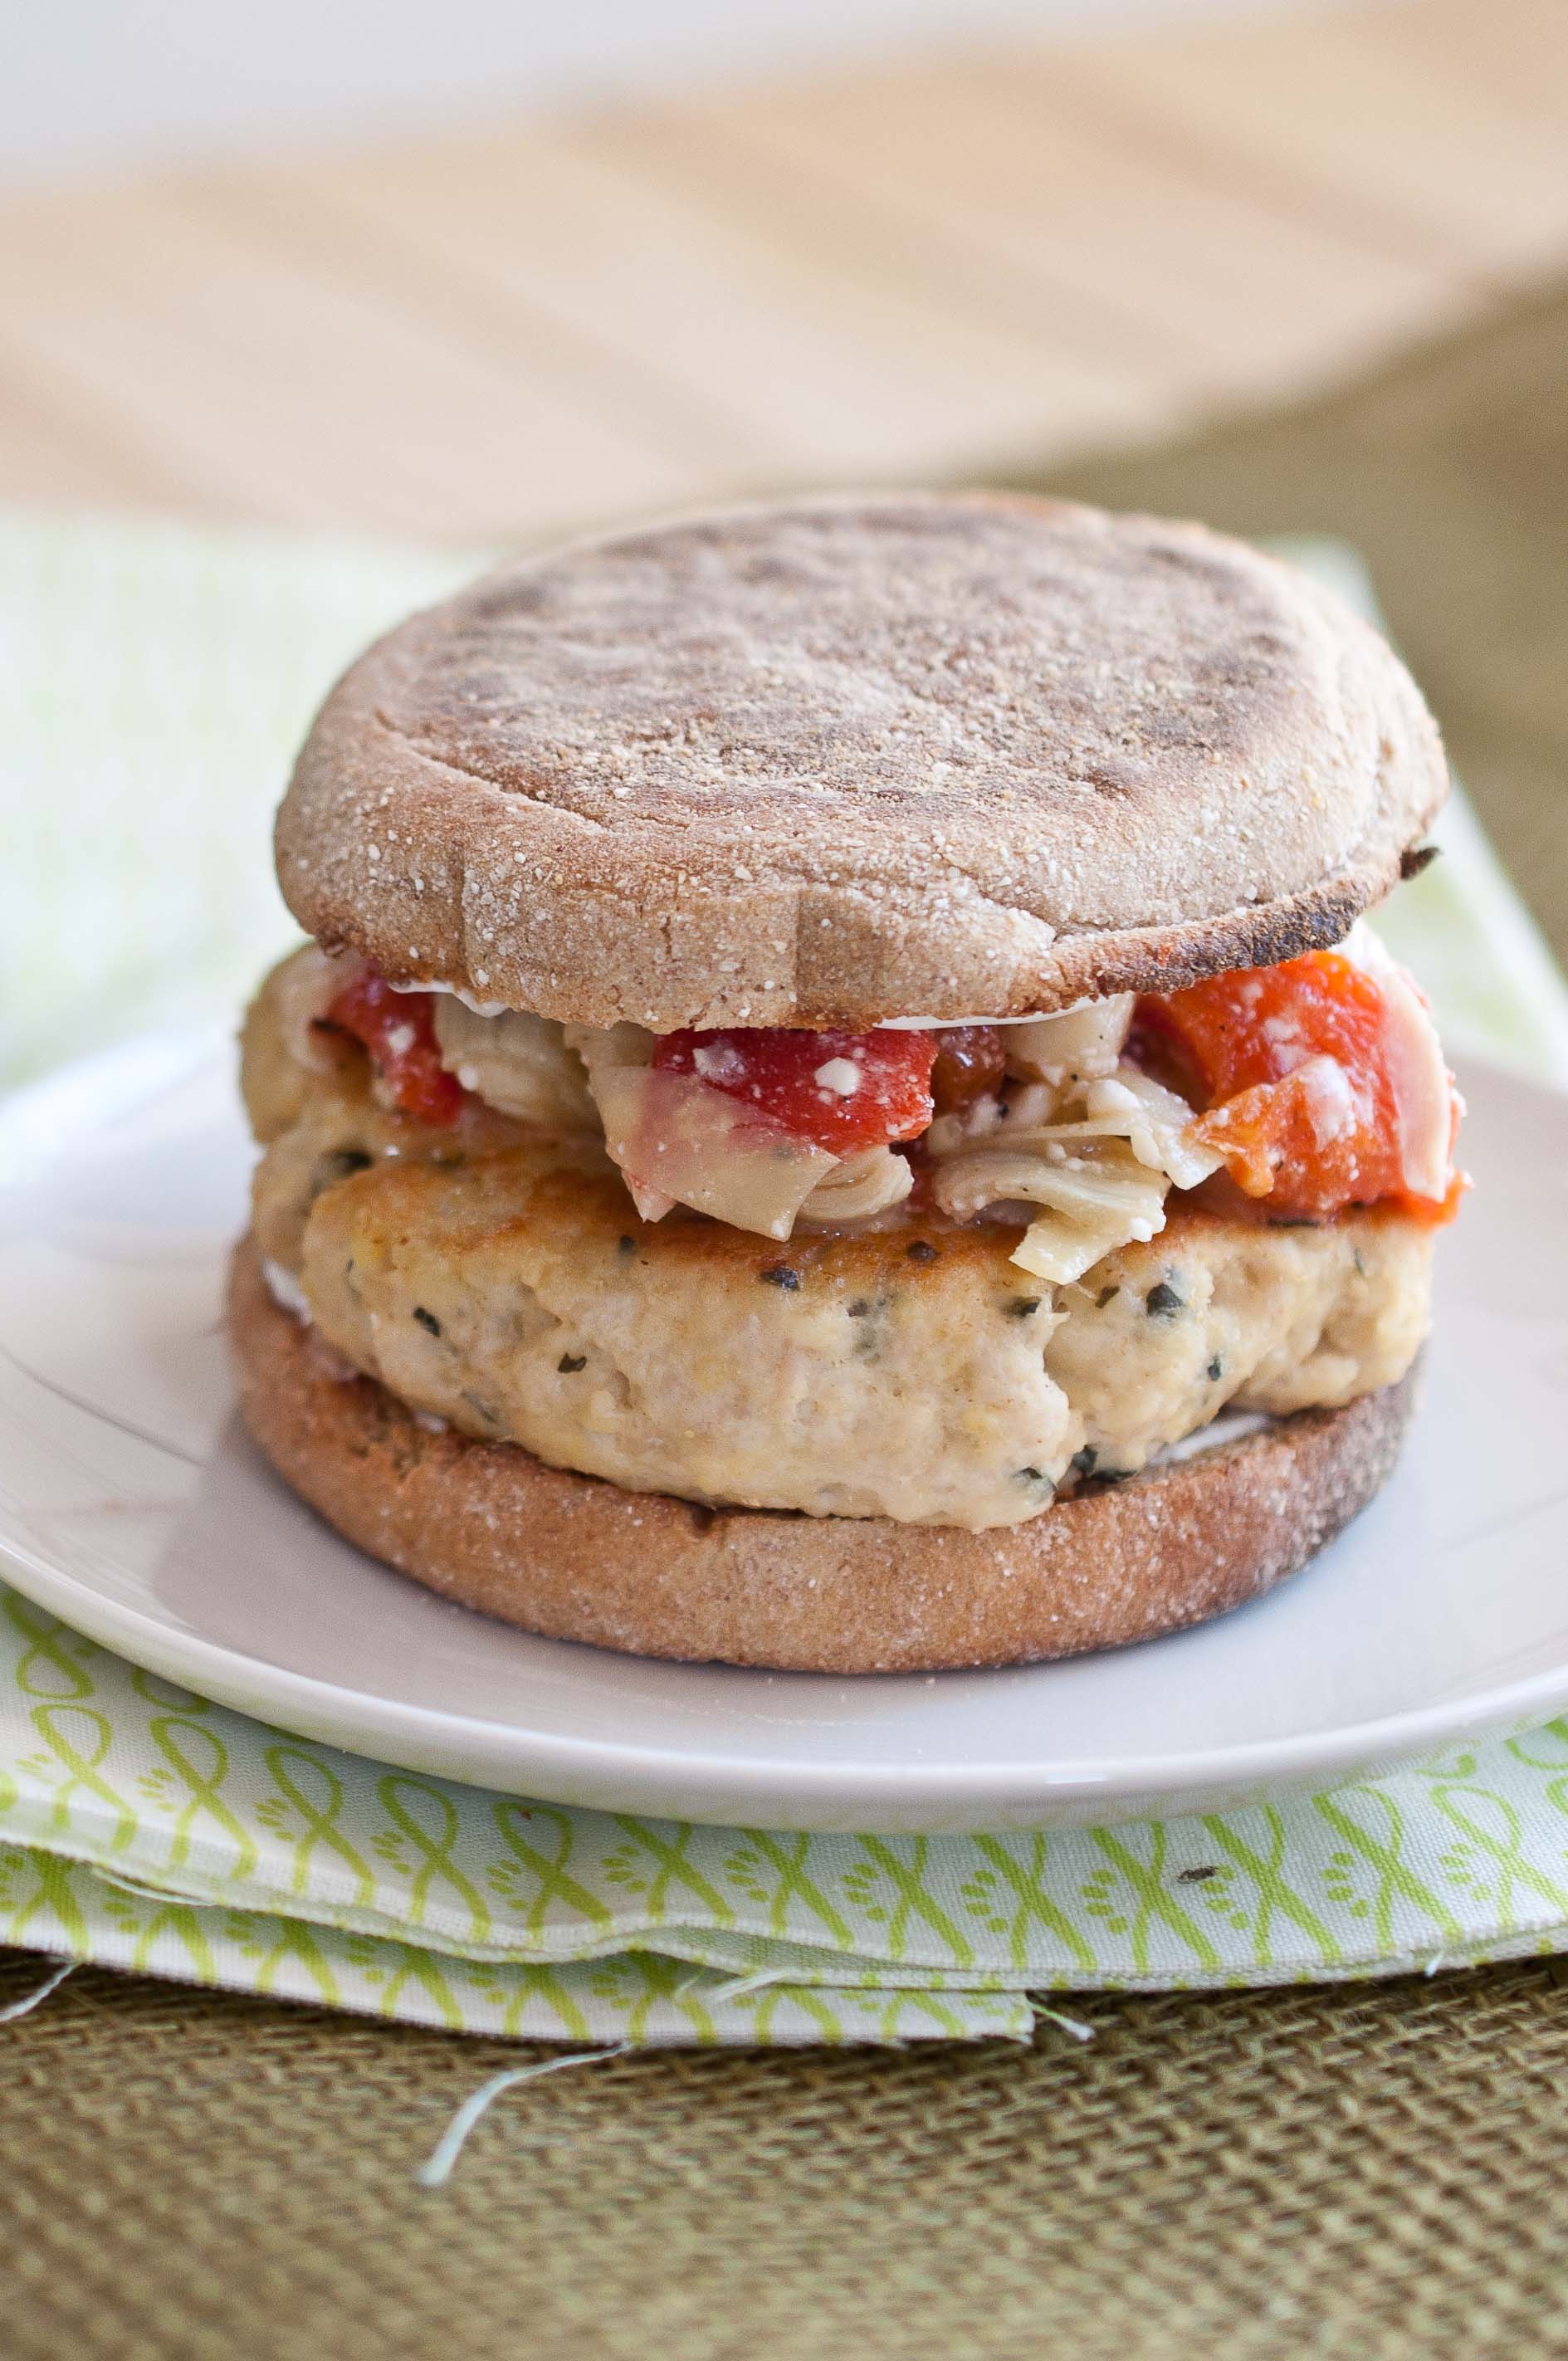
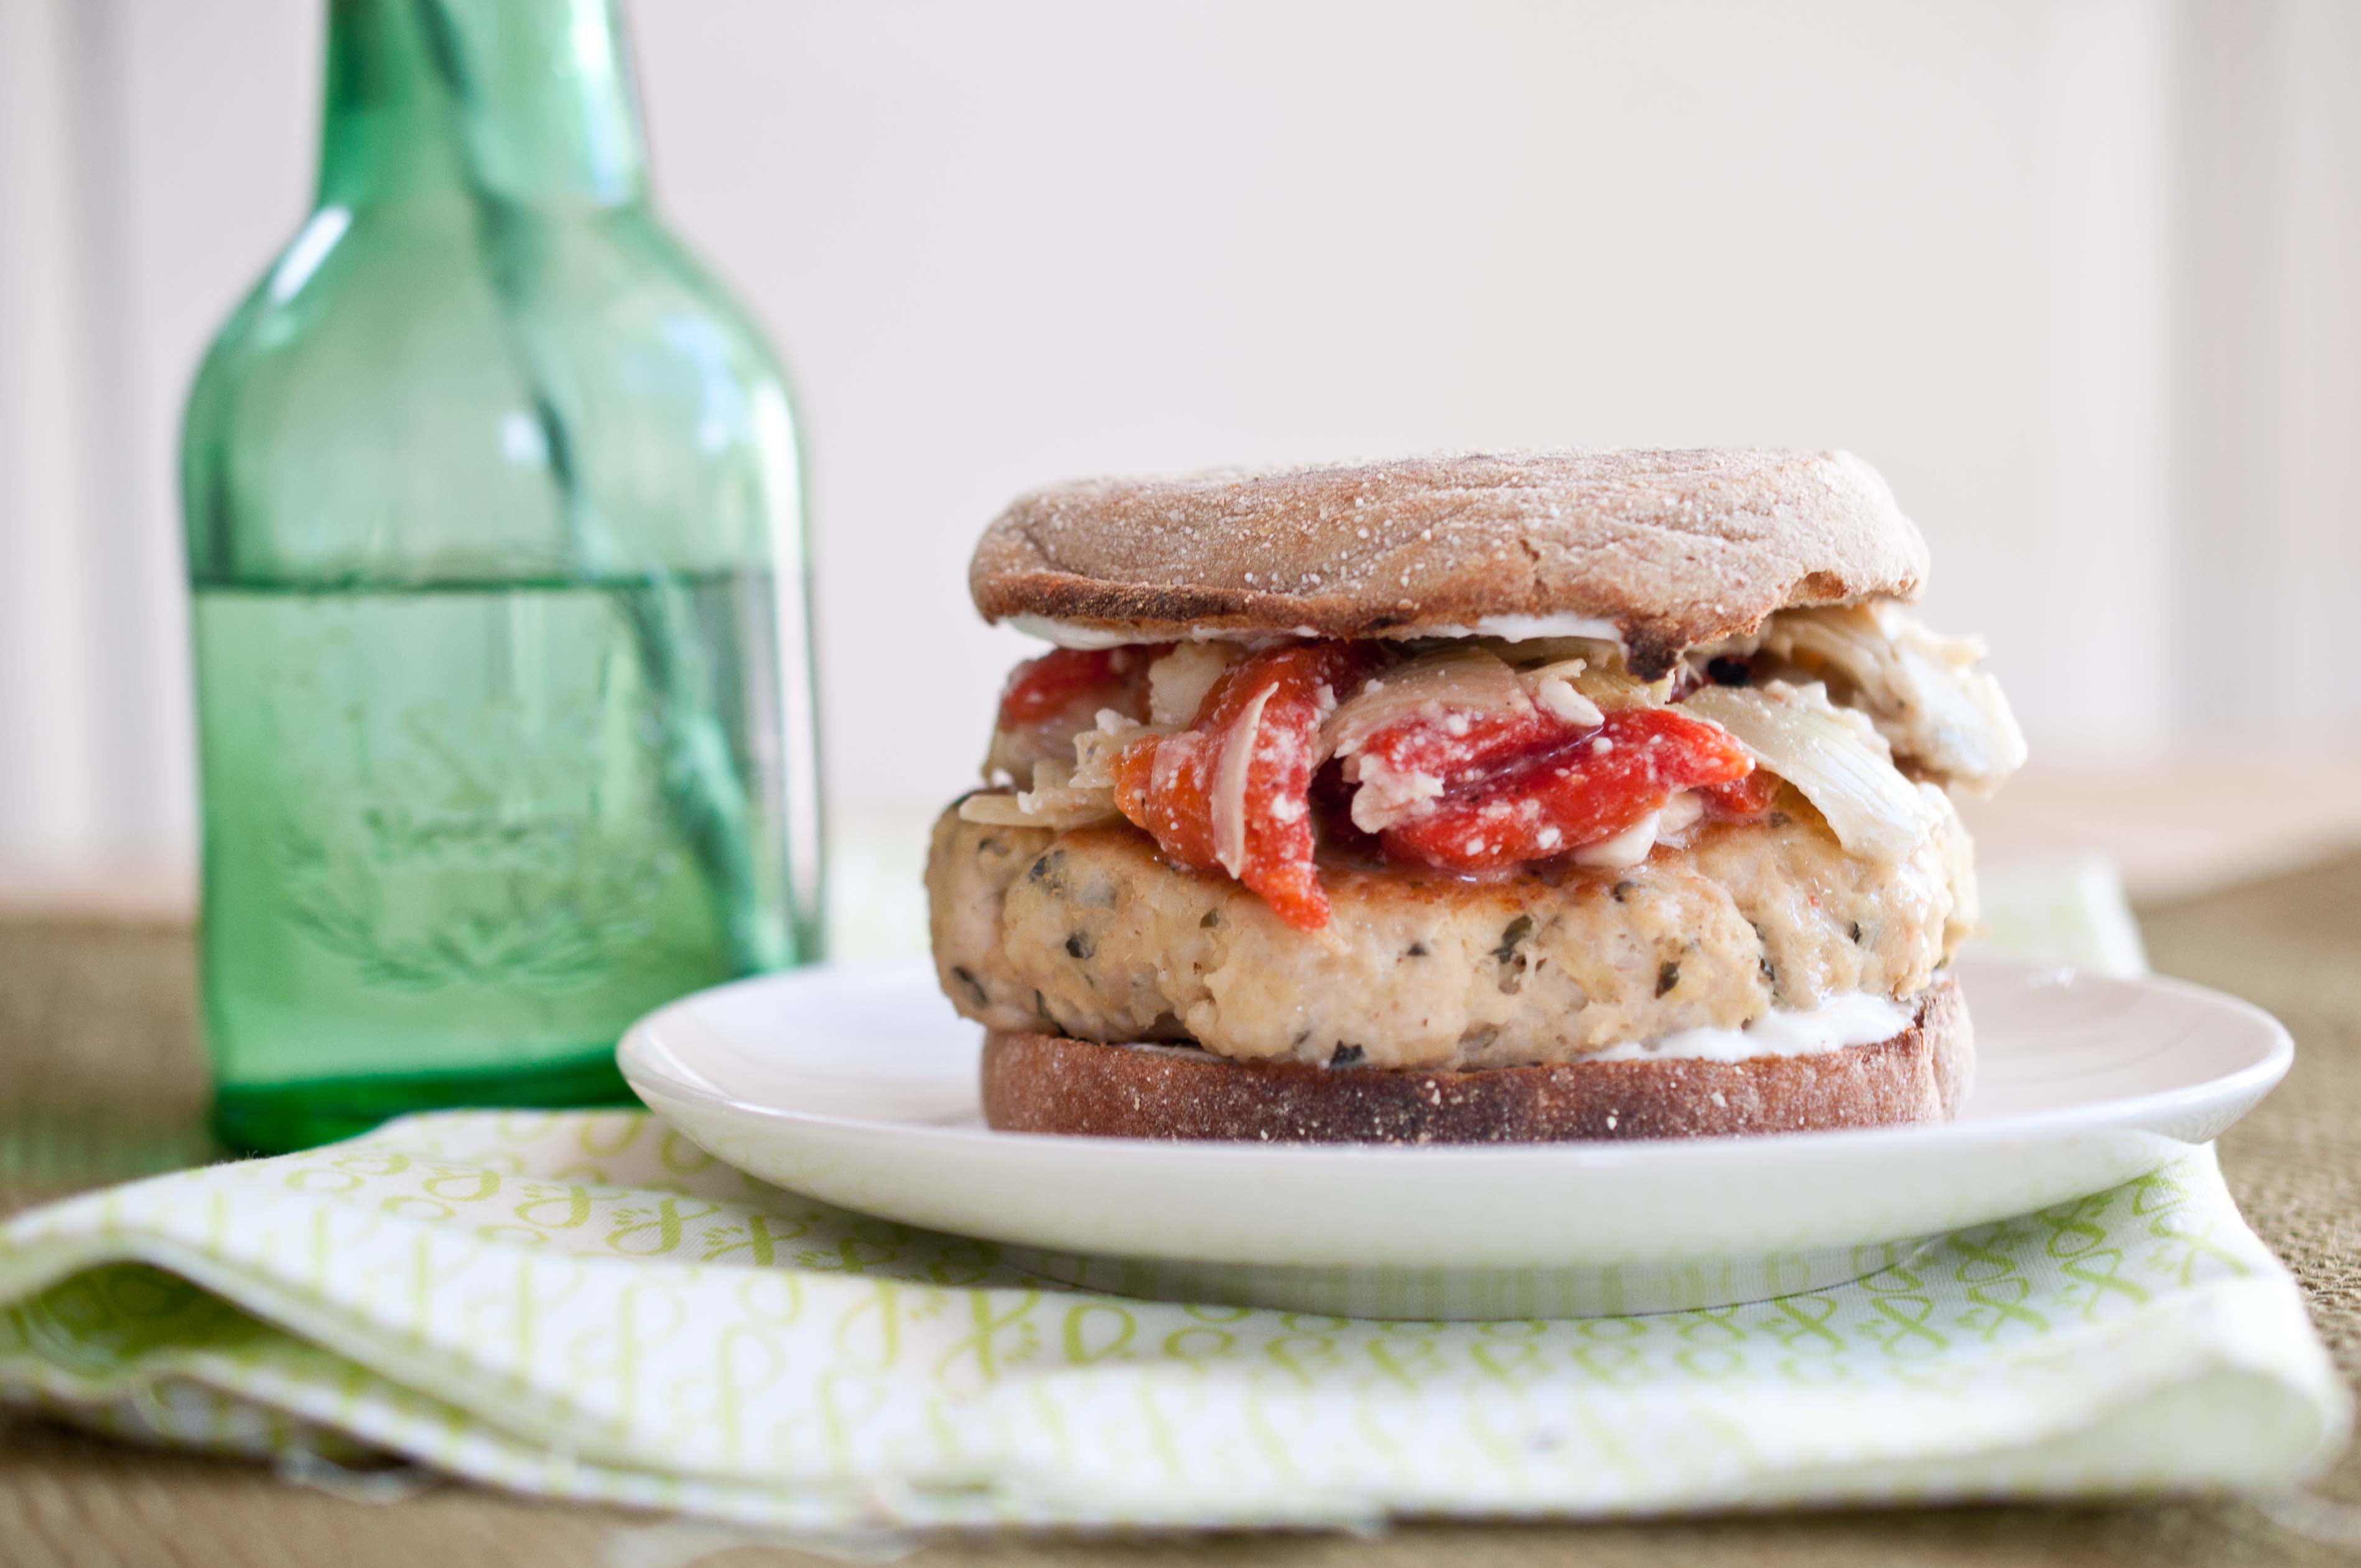
I also have found a way to cook Turkey Burgers so that they’re juicy and not at all dry. And the topping is incredible low calorie. And, English muffins are only about 110 calories. My husband even loved them and to be honest, he isn’t at all afraid of Bikini season.
240 Calories Greek Turkey Burgers
2 cups extra lean turkey (99 Percent Fat Free)
1/2 cup Panko bread crumbs
1 tsp Garlic Powder
1/2 tsp dried oregano
1/2 tsp dried basil
1/2 tsp salt
1 egg
1 cup chicken broth
1/2 cup roasted red peppers, chopped (if you use a jared kind, make sure to get the type that is in water NOT oil)
1/2 cup artichoke hearts, chopped (Again, water, not oil)
In a bowl, add the turkey, Panko, garlic, oregano, basil, 1/2 tsp salt, and egg. Using your hands, mix until combined. Split into four equal portions and form into patties.
You’ll need a skillet that has a lid. Place it over medium high heat and spray with cooking spray. Allow to get hot but not smoking. Cook the patties for about 3 minutes, or until browned. Turn over and cook for another three minutes. Add the chicken broth to the pan, cover and allow to steam for about 10 minutes or until the internal temperature of the patties reaches 165 degreed. Remove from pan and allow to drain on a stack of 3-4 paper towels.
in a bowl, add the artichoke hearts, roasted red peppers, feta, and a pinch of salt and pepper.
Lightly toast the English muffins.
Spread the English Muffins with 1/2 tbs Fat Free Sour Cream on each side.
Place the turkey patties on the English muffins, add the artichoke/red pepper mixture.
For this giveaway, I’m working with the website Big Kitchen. With my crazy schedule and my propensity to take on way to much, most of my shopping is done online at the end of the day. Big Kitchen has just been added to my list of sites to browse in the free moments that I do have. Along with the wide array of items that you would expect from an online kitchen store, they also have a good selection of items made from recycled and sustainable materials.
And I’m sort of in love with these bowls and I want this because it reminds me of The Wizard Of Oz, and how have I lived my entire life without one of these?
You see how it goes.
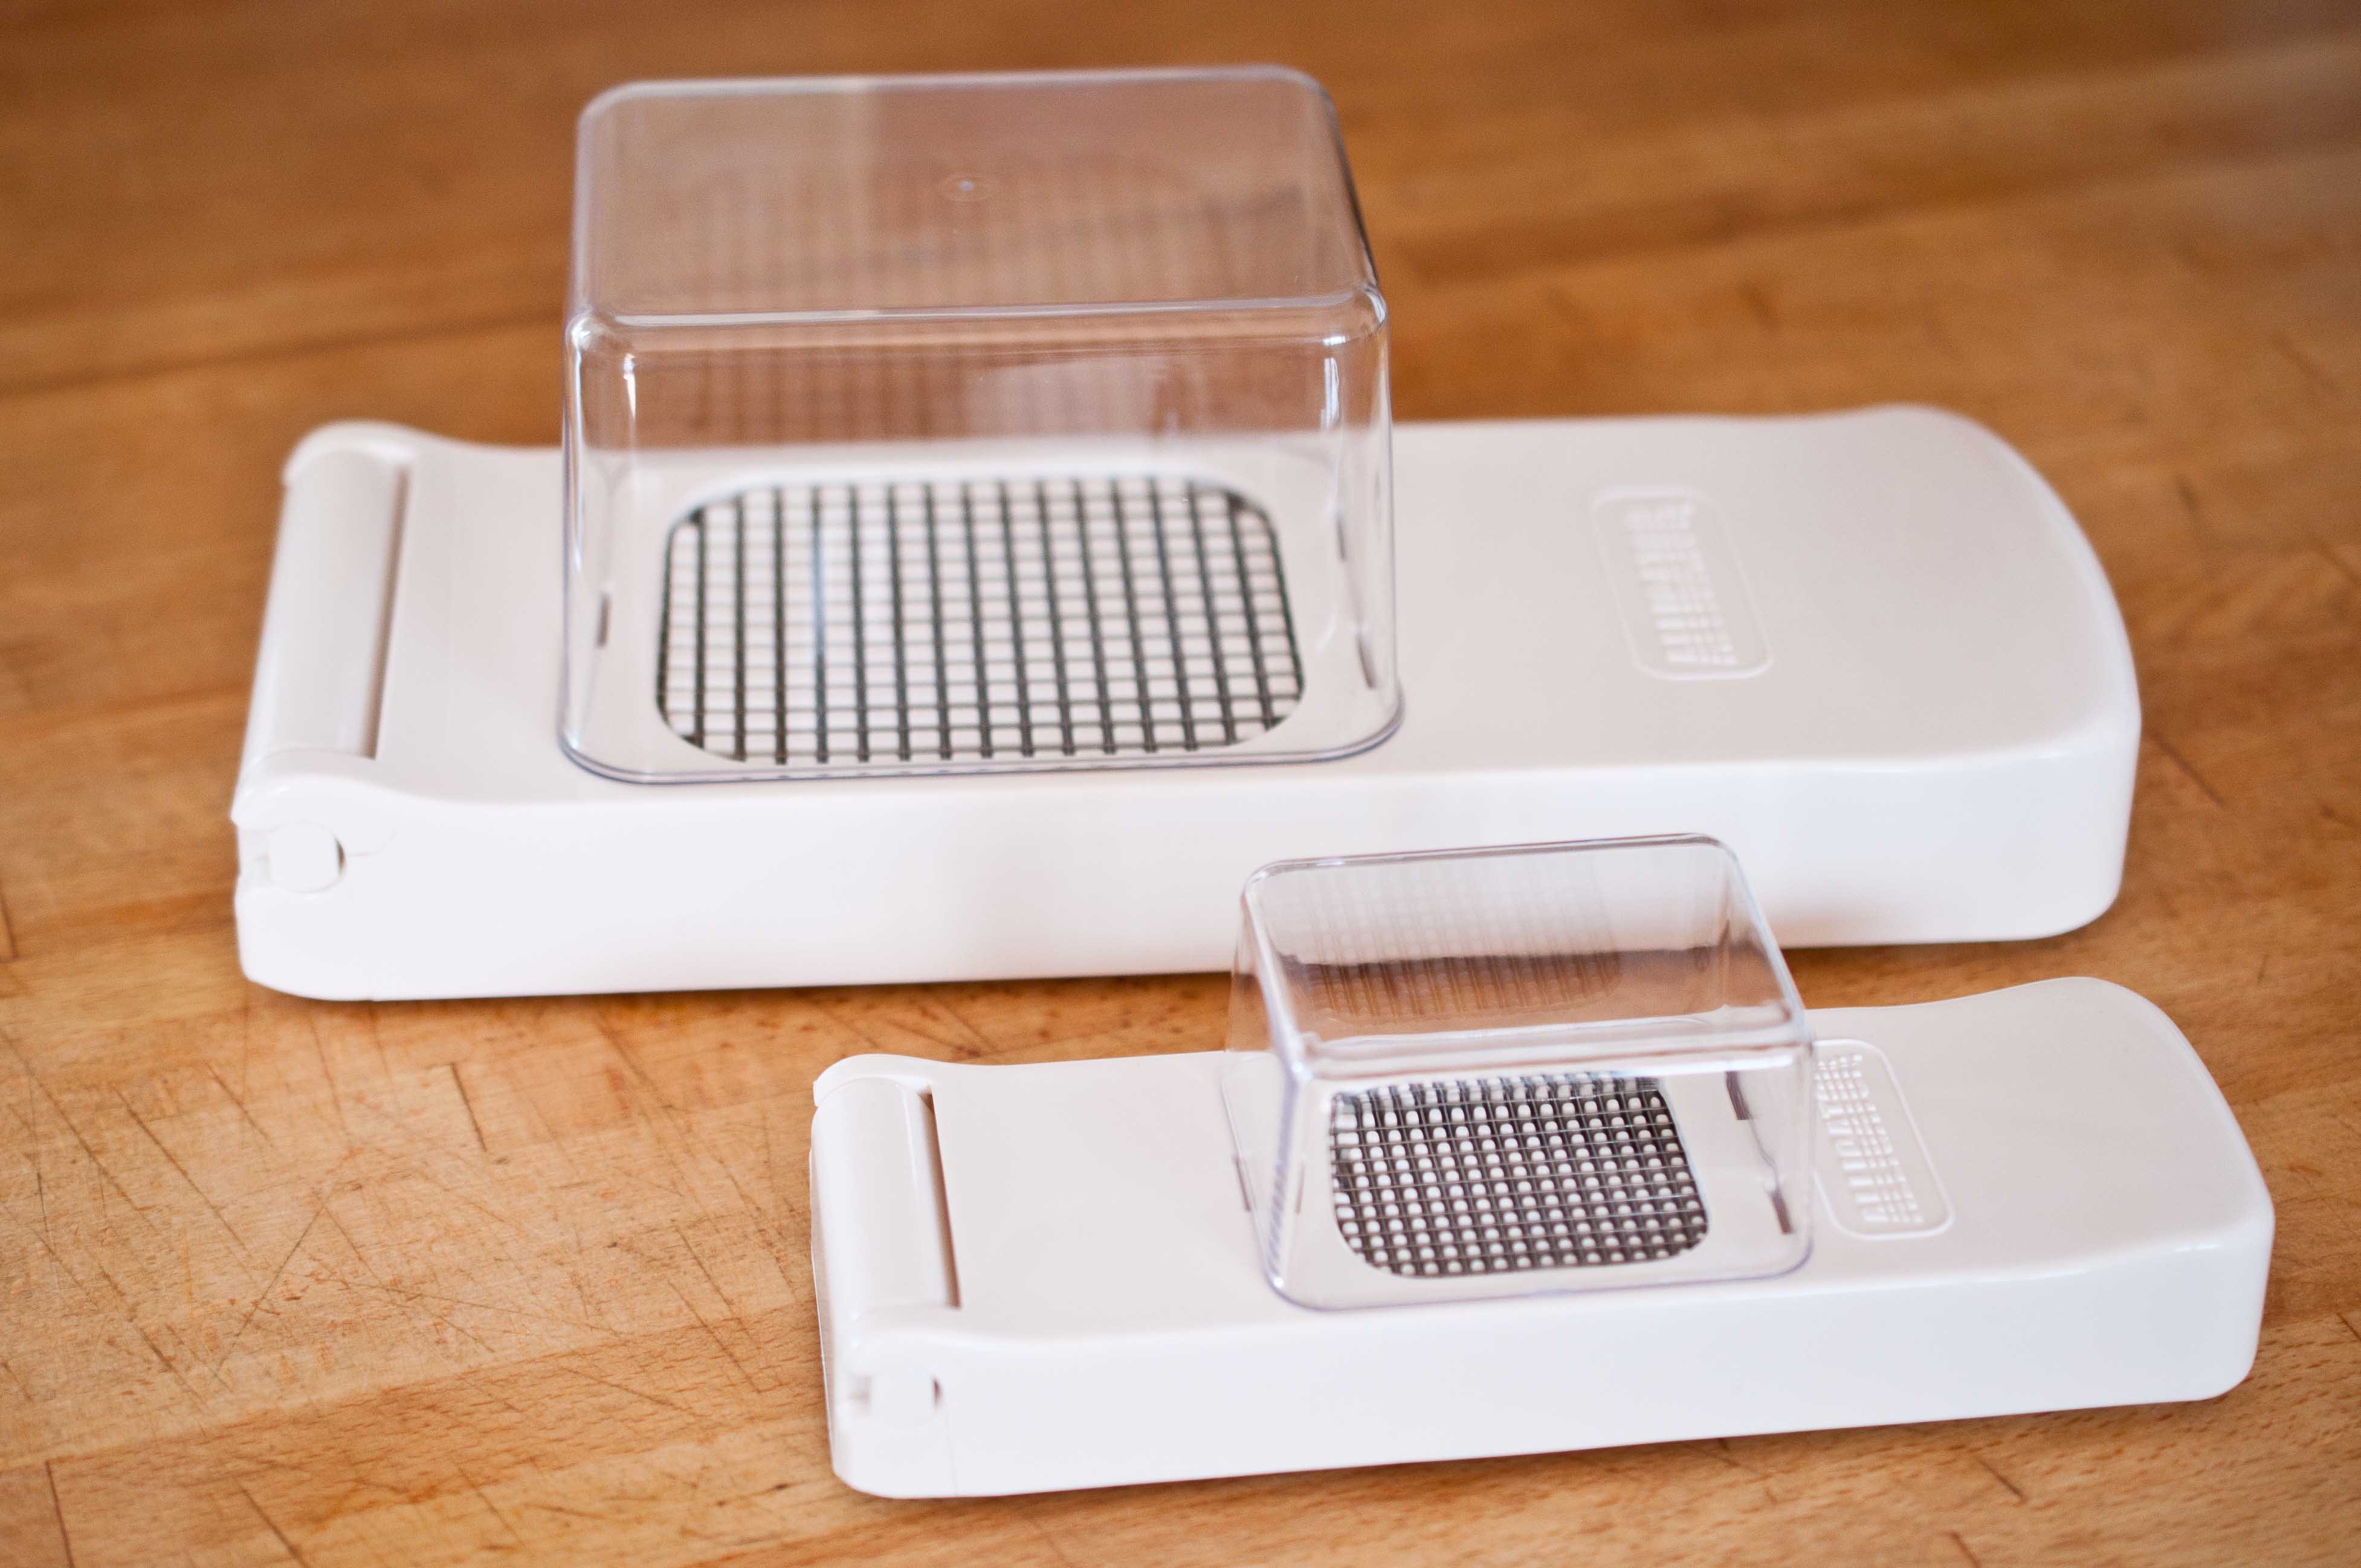
The lovely people over at Big Kitchen sent me a set of Alligator Dicers to play with, that I have since started to refer to as my "Food Chompers." AND they are also going to send a set, one small and one big, to one of you! SO nice.
If you are the lucky winner, here is what you will get:
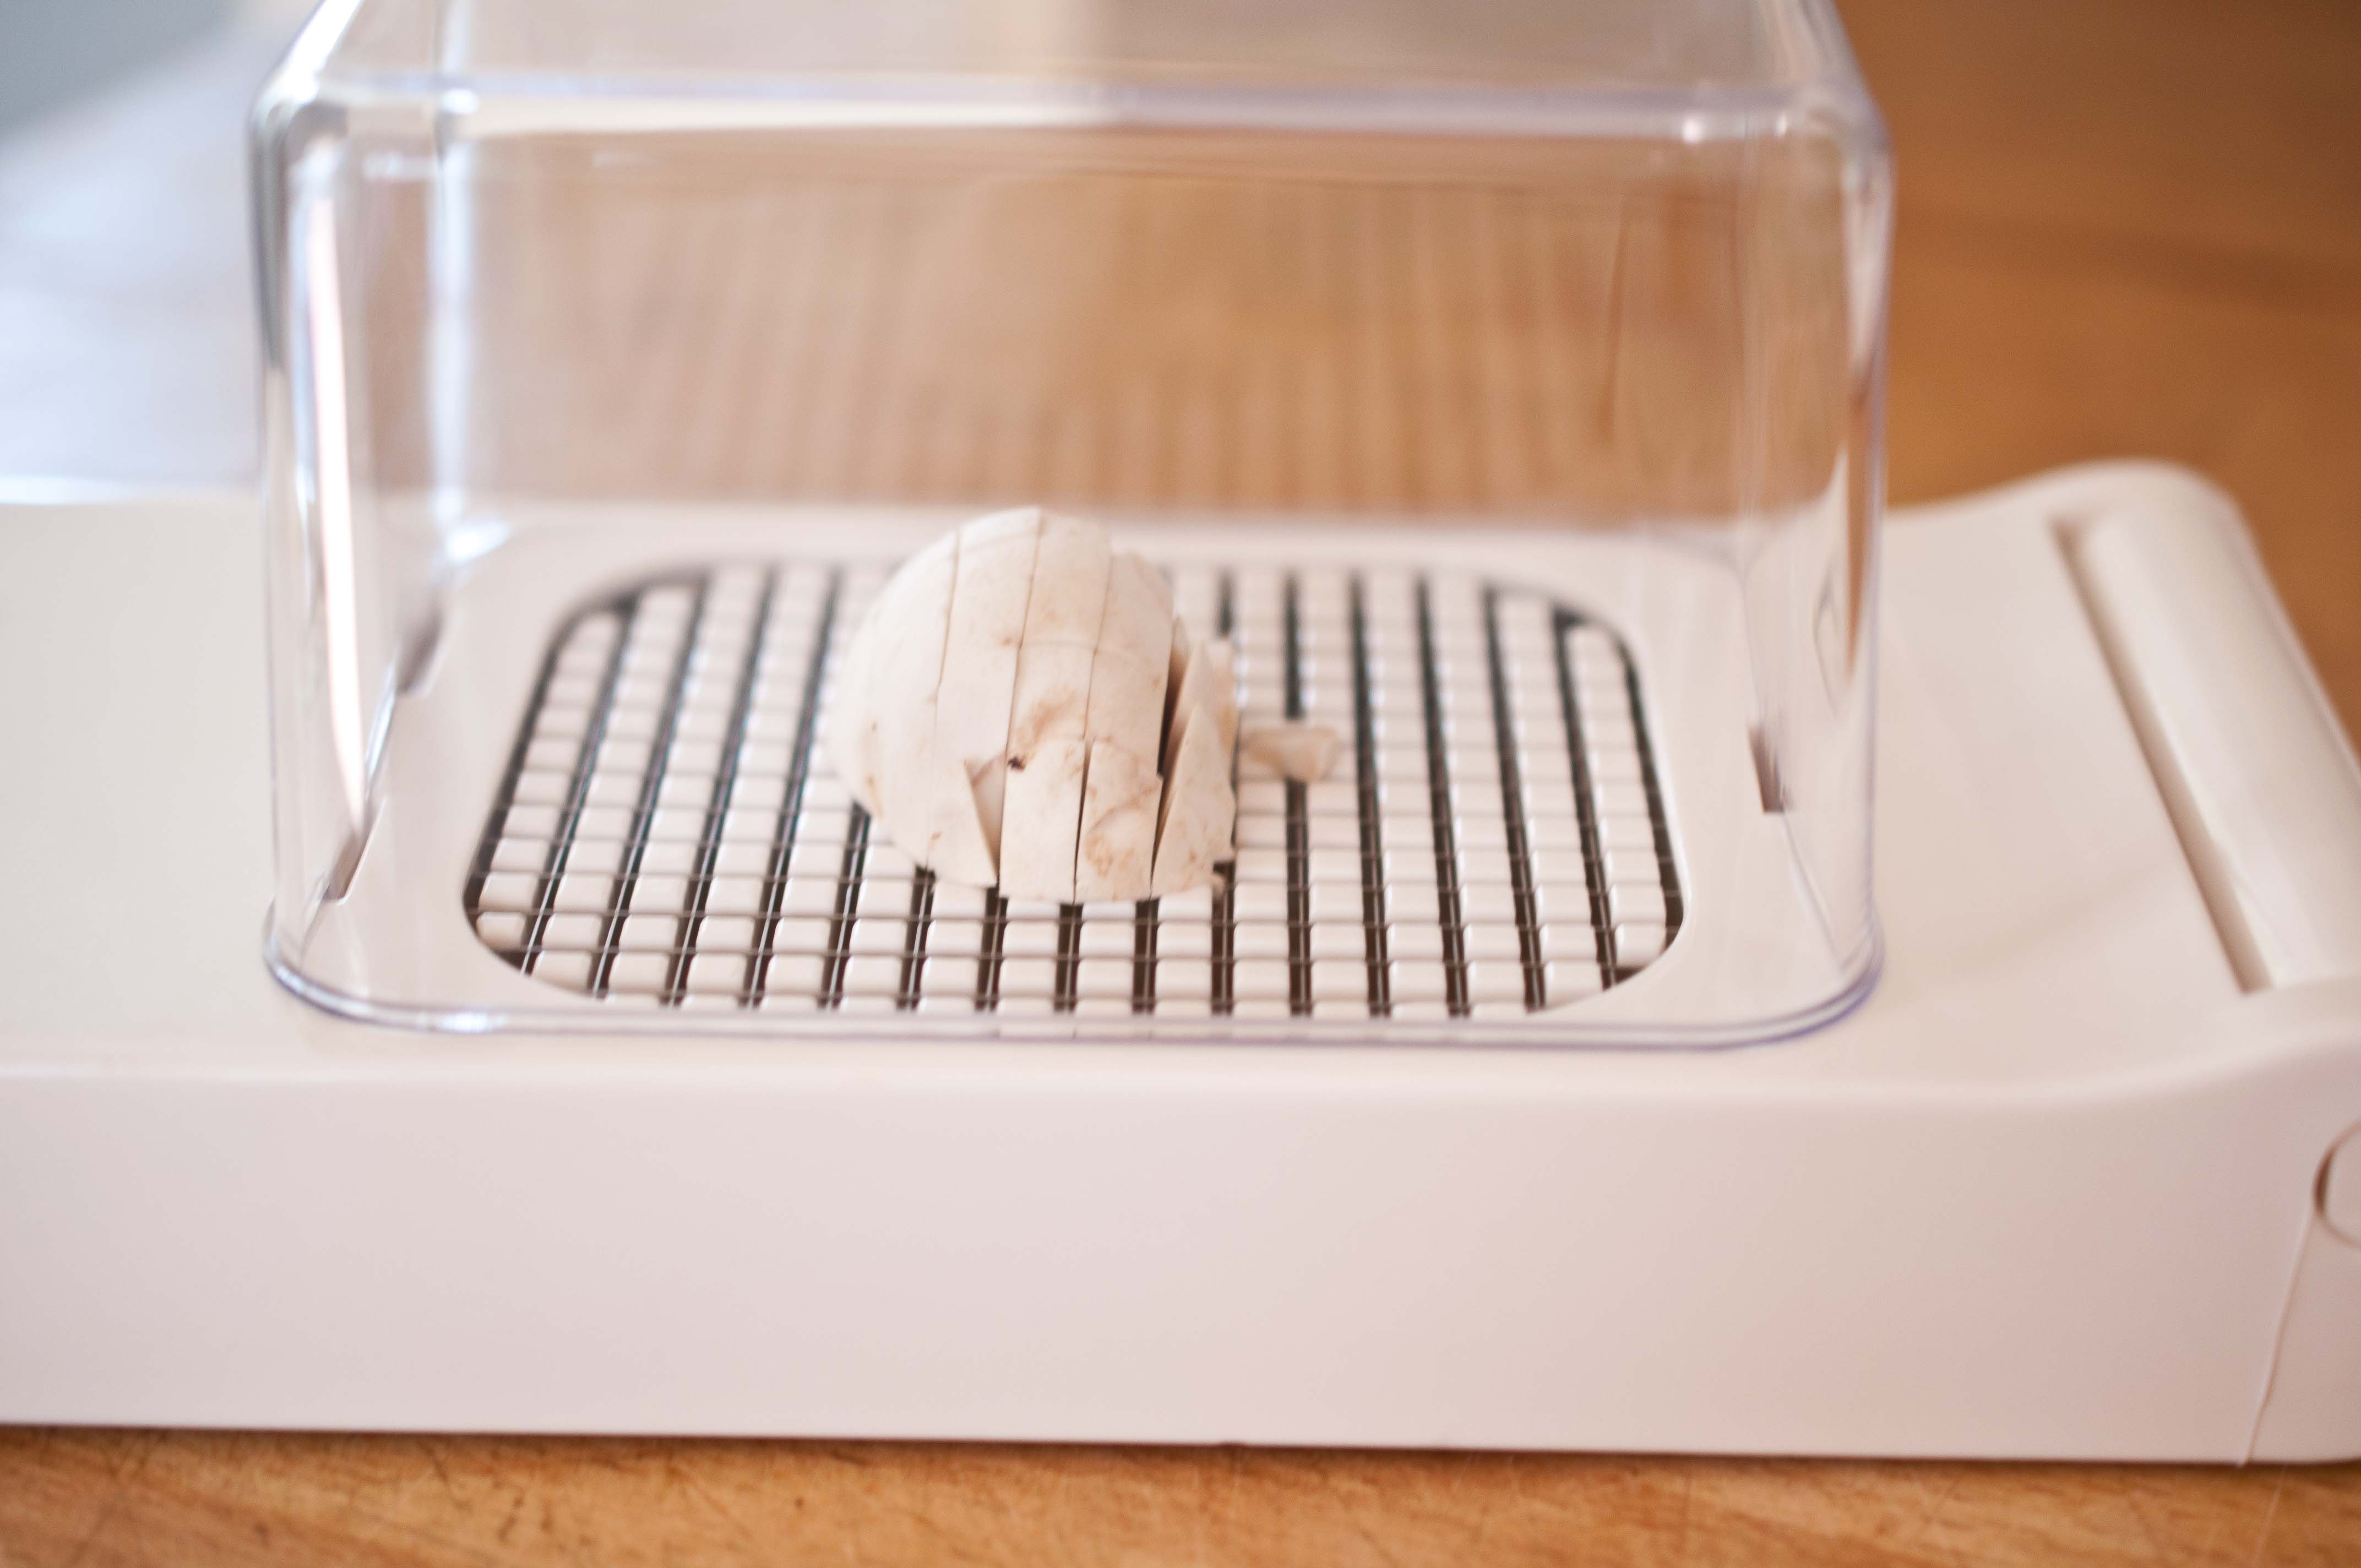
I used my iPhone for a scale reference to get a more accurate idea of size.
There is a mushroom, cut in half and place on the chomper plate to show you the size difference.
To use the chomper, just place the food on the plate, and press down, the food that is diced goes into a collection bin that is attached.
The Mini dicer is above, and the large dicer is below.
Here are the two collection bins side by side.
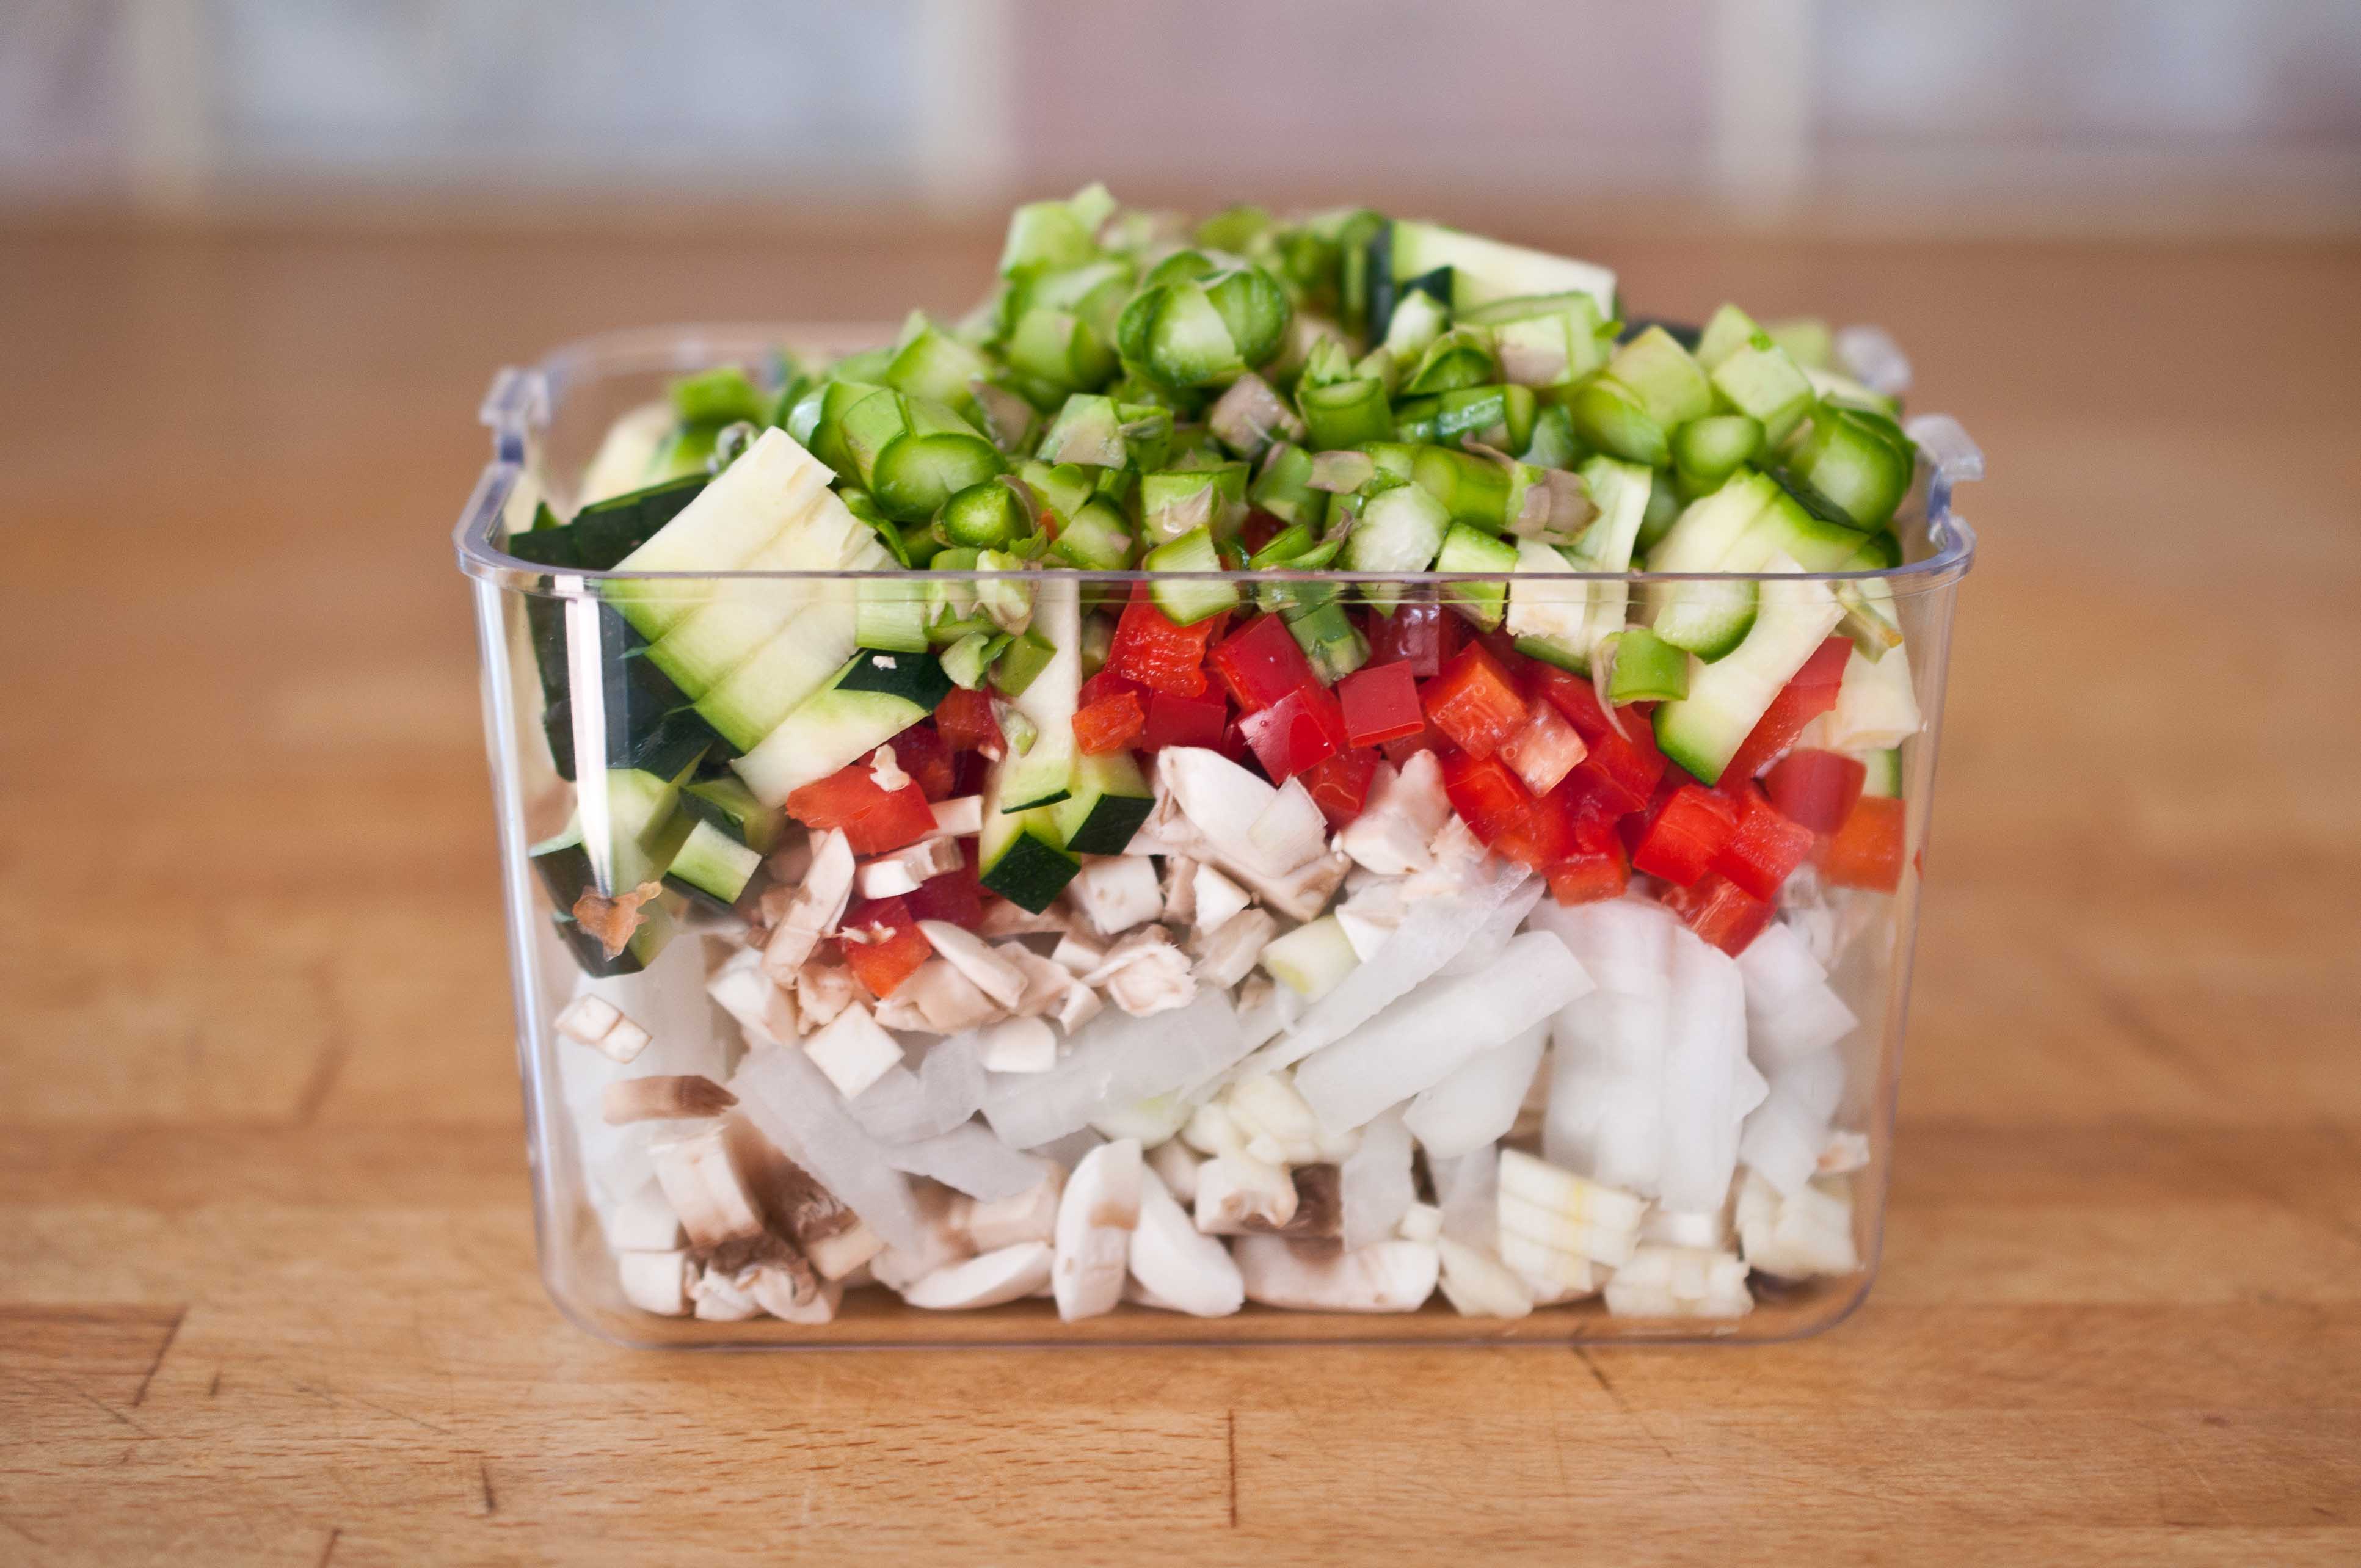
As you can see, with a half of a mushroom (or if you used a whole mushroom for that matter, you don’t really get a dice as much as "strips." I like this cut for the Quinoa salads I seem to make 5 times a week.
I also Chomped a bell pepper, and asparagus spears and those gave me a really great, consistent dice.
The best use for the Alligator Dicers is garlic and onions. I tend to need minced garlic and chopped onions on a near daily basis, and these dicers do a fast and efficient job.
I use the small one for the garlic
and the large one for the onions
This is especially helpful for those recipes that call for 6 cloves of garlic, minced and 2 onions, chopped. Not only a huge time saver but all of the pieces are the same size, which is important to insure that they cook evenly.
For the below recipe, I chopped: red bell pepper, asparagus, zucchini, garlic, onions, and mushrooms.
The dicers cleaned up easily with a hand washing and are small enough to store just about anywhere. While I do really love having these, I will probably still just use a knife if I have only a few vegetables to chop. When it comes to those recipes that call for a large amount of diced vegetables, these dicers are great to have around.
To enter the giveaway, just leave a comment on this post. Unfortunately, we are only able to ship to US addresses. Giveaway closes at 3-27-12, at 5:00 PM, PST.
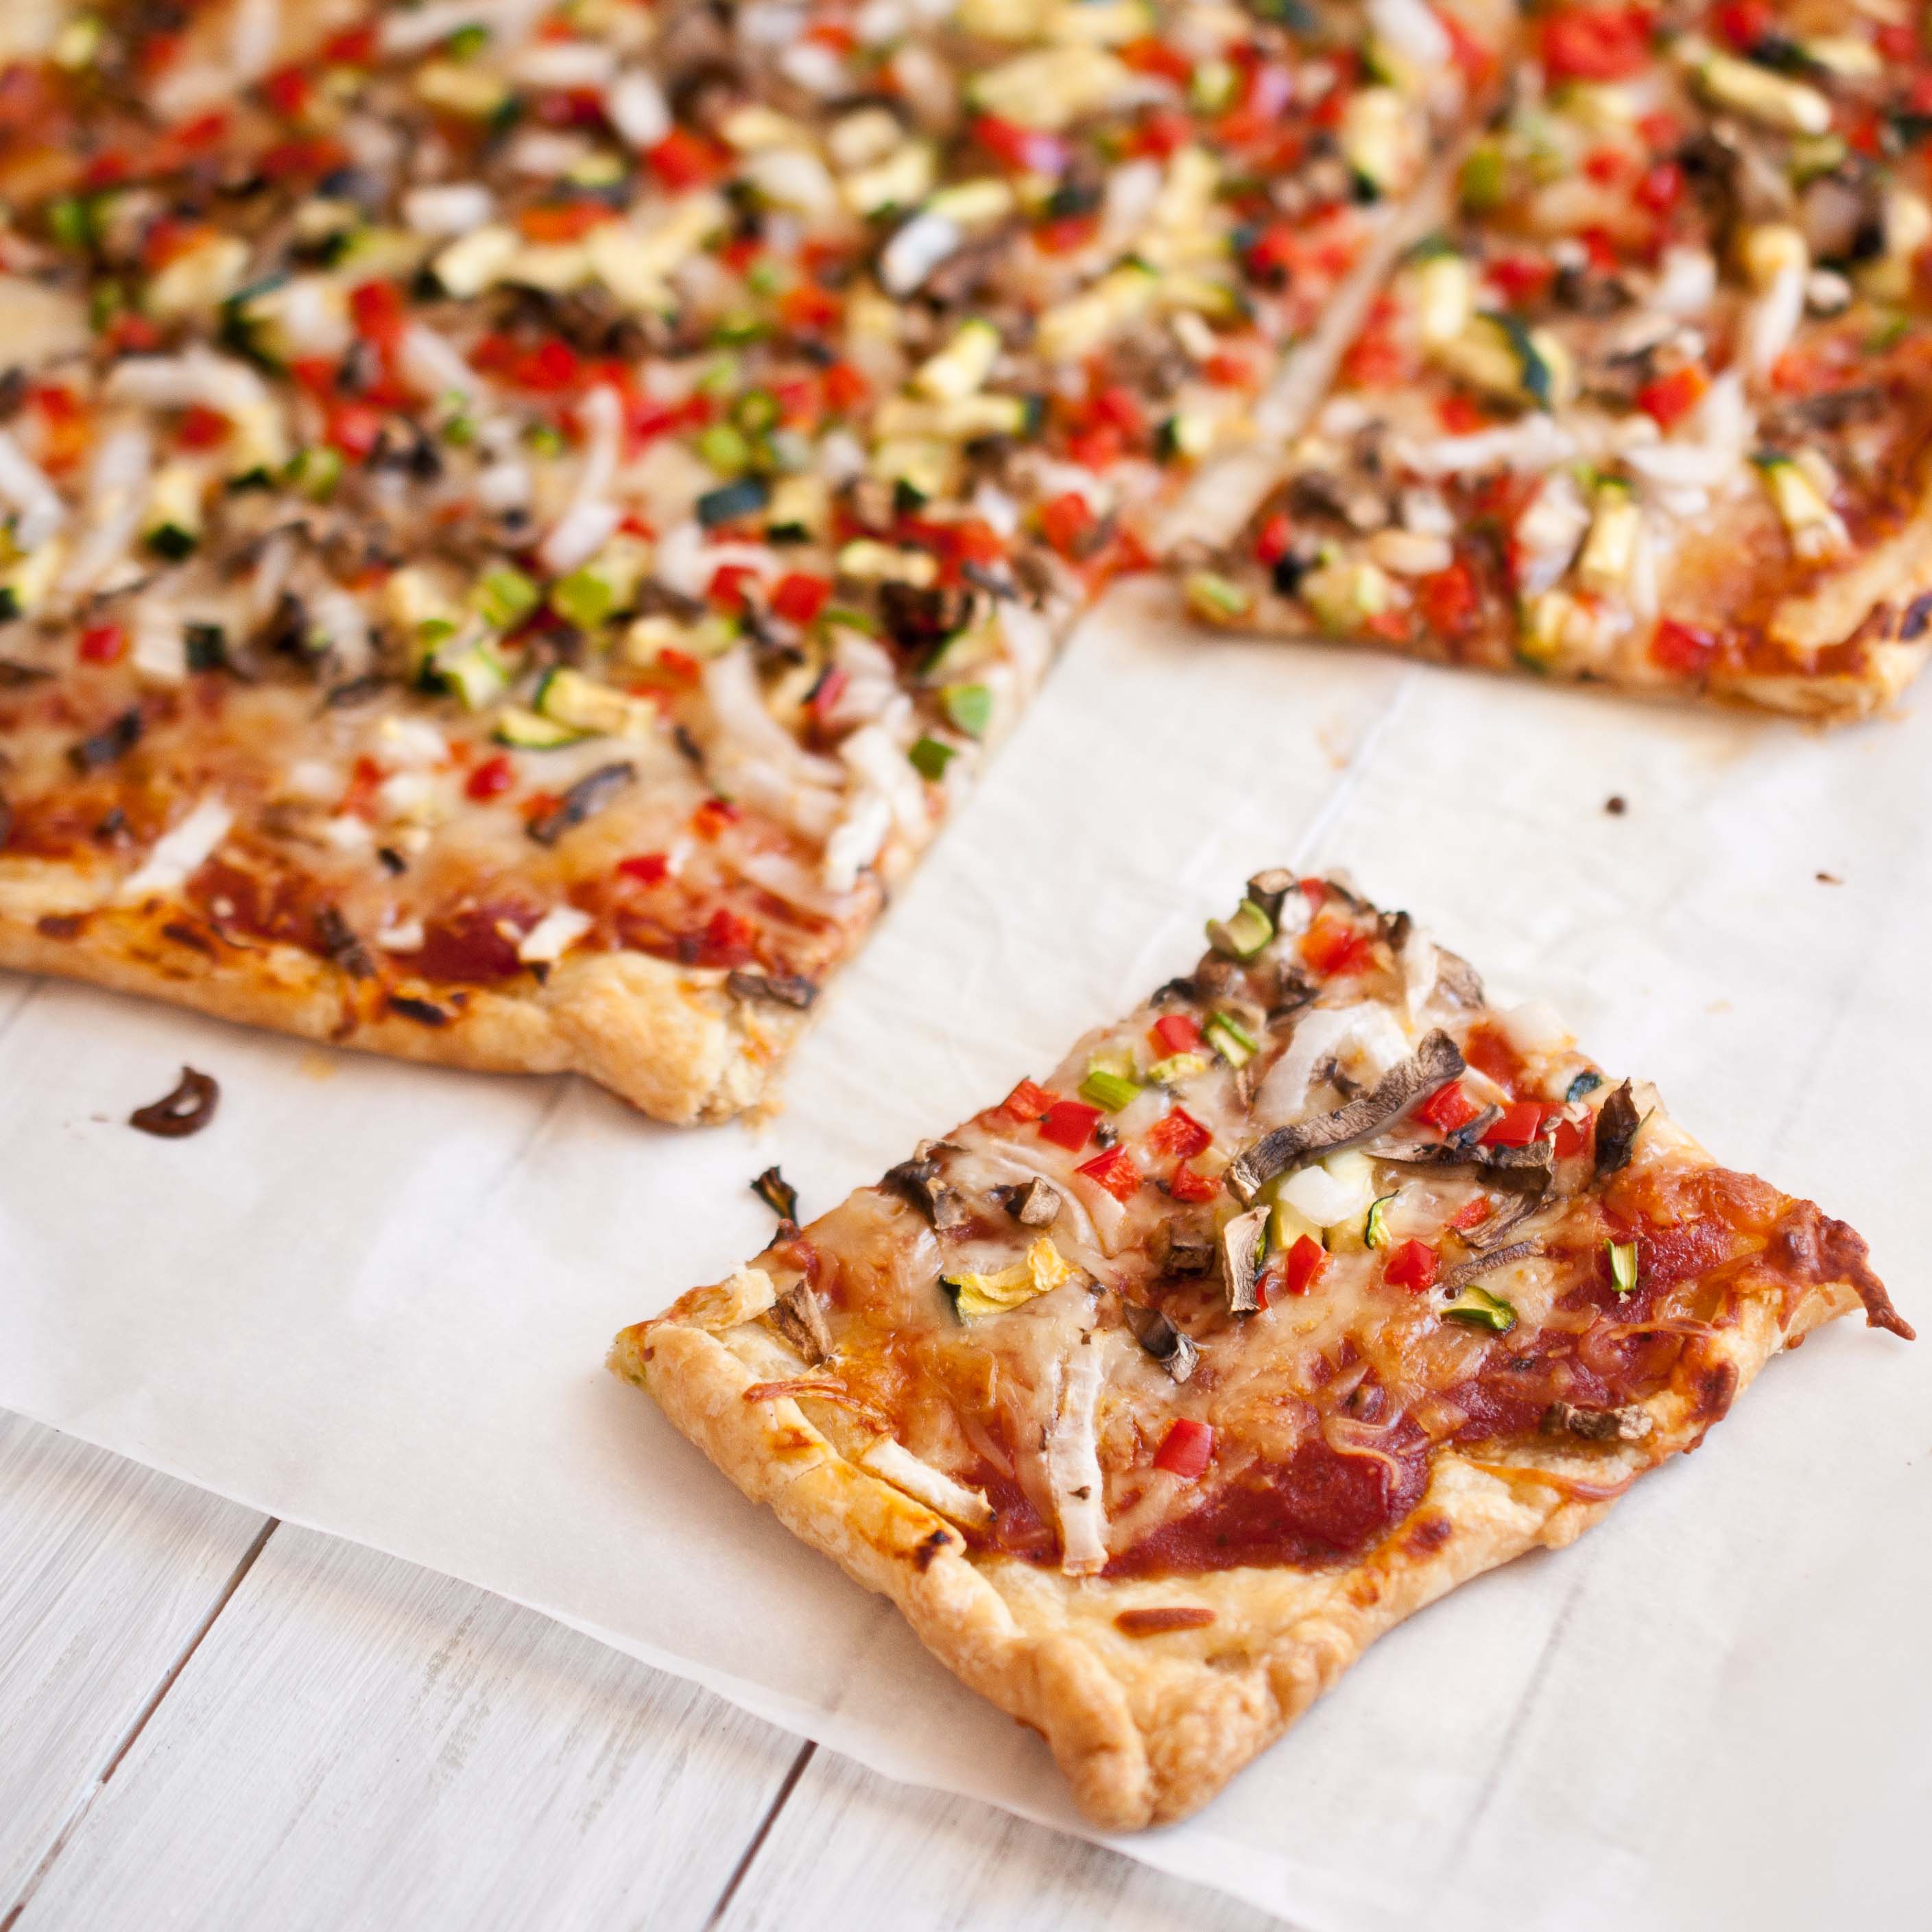
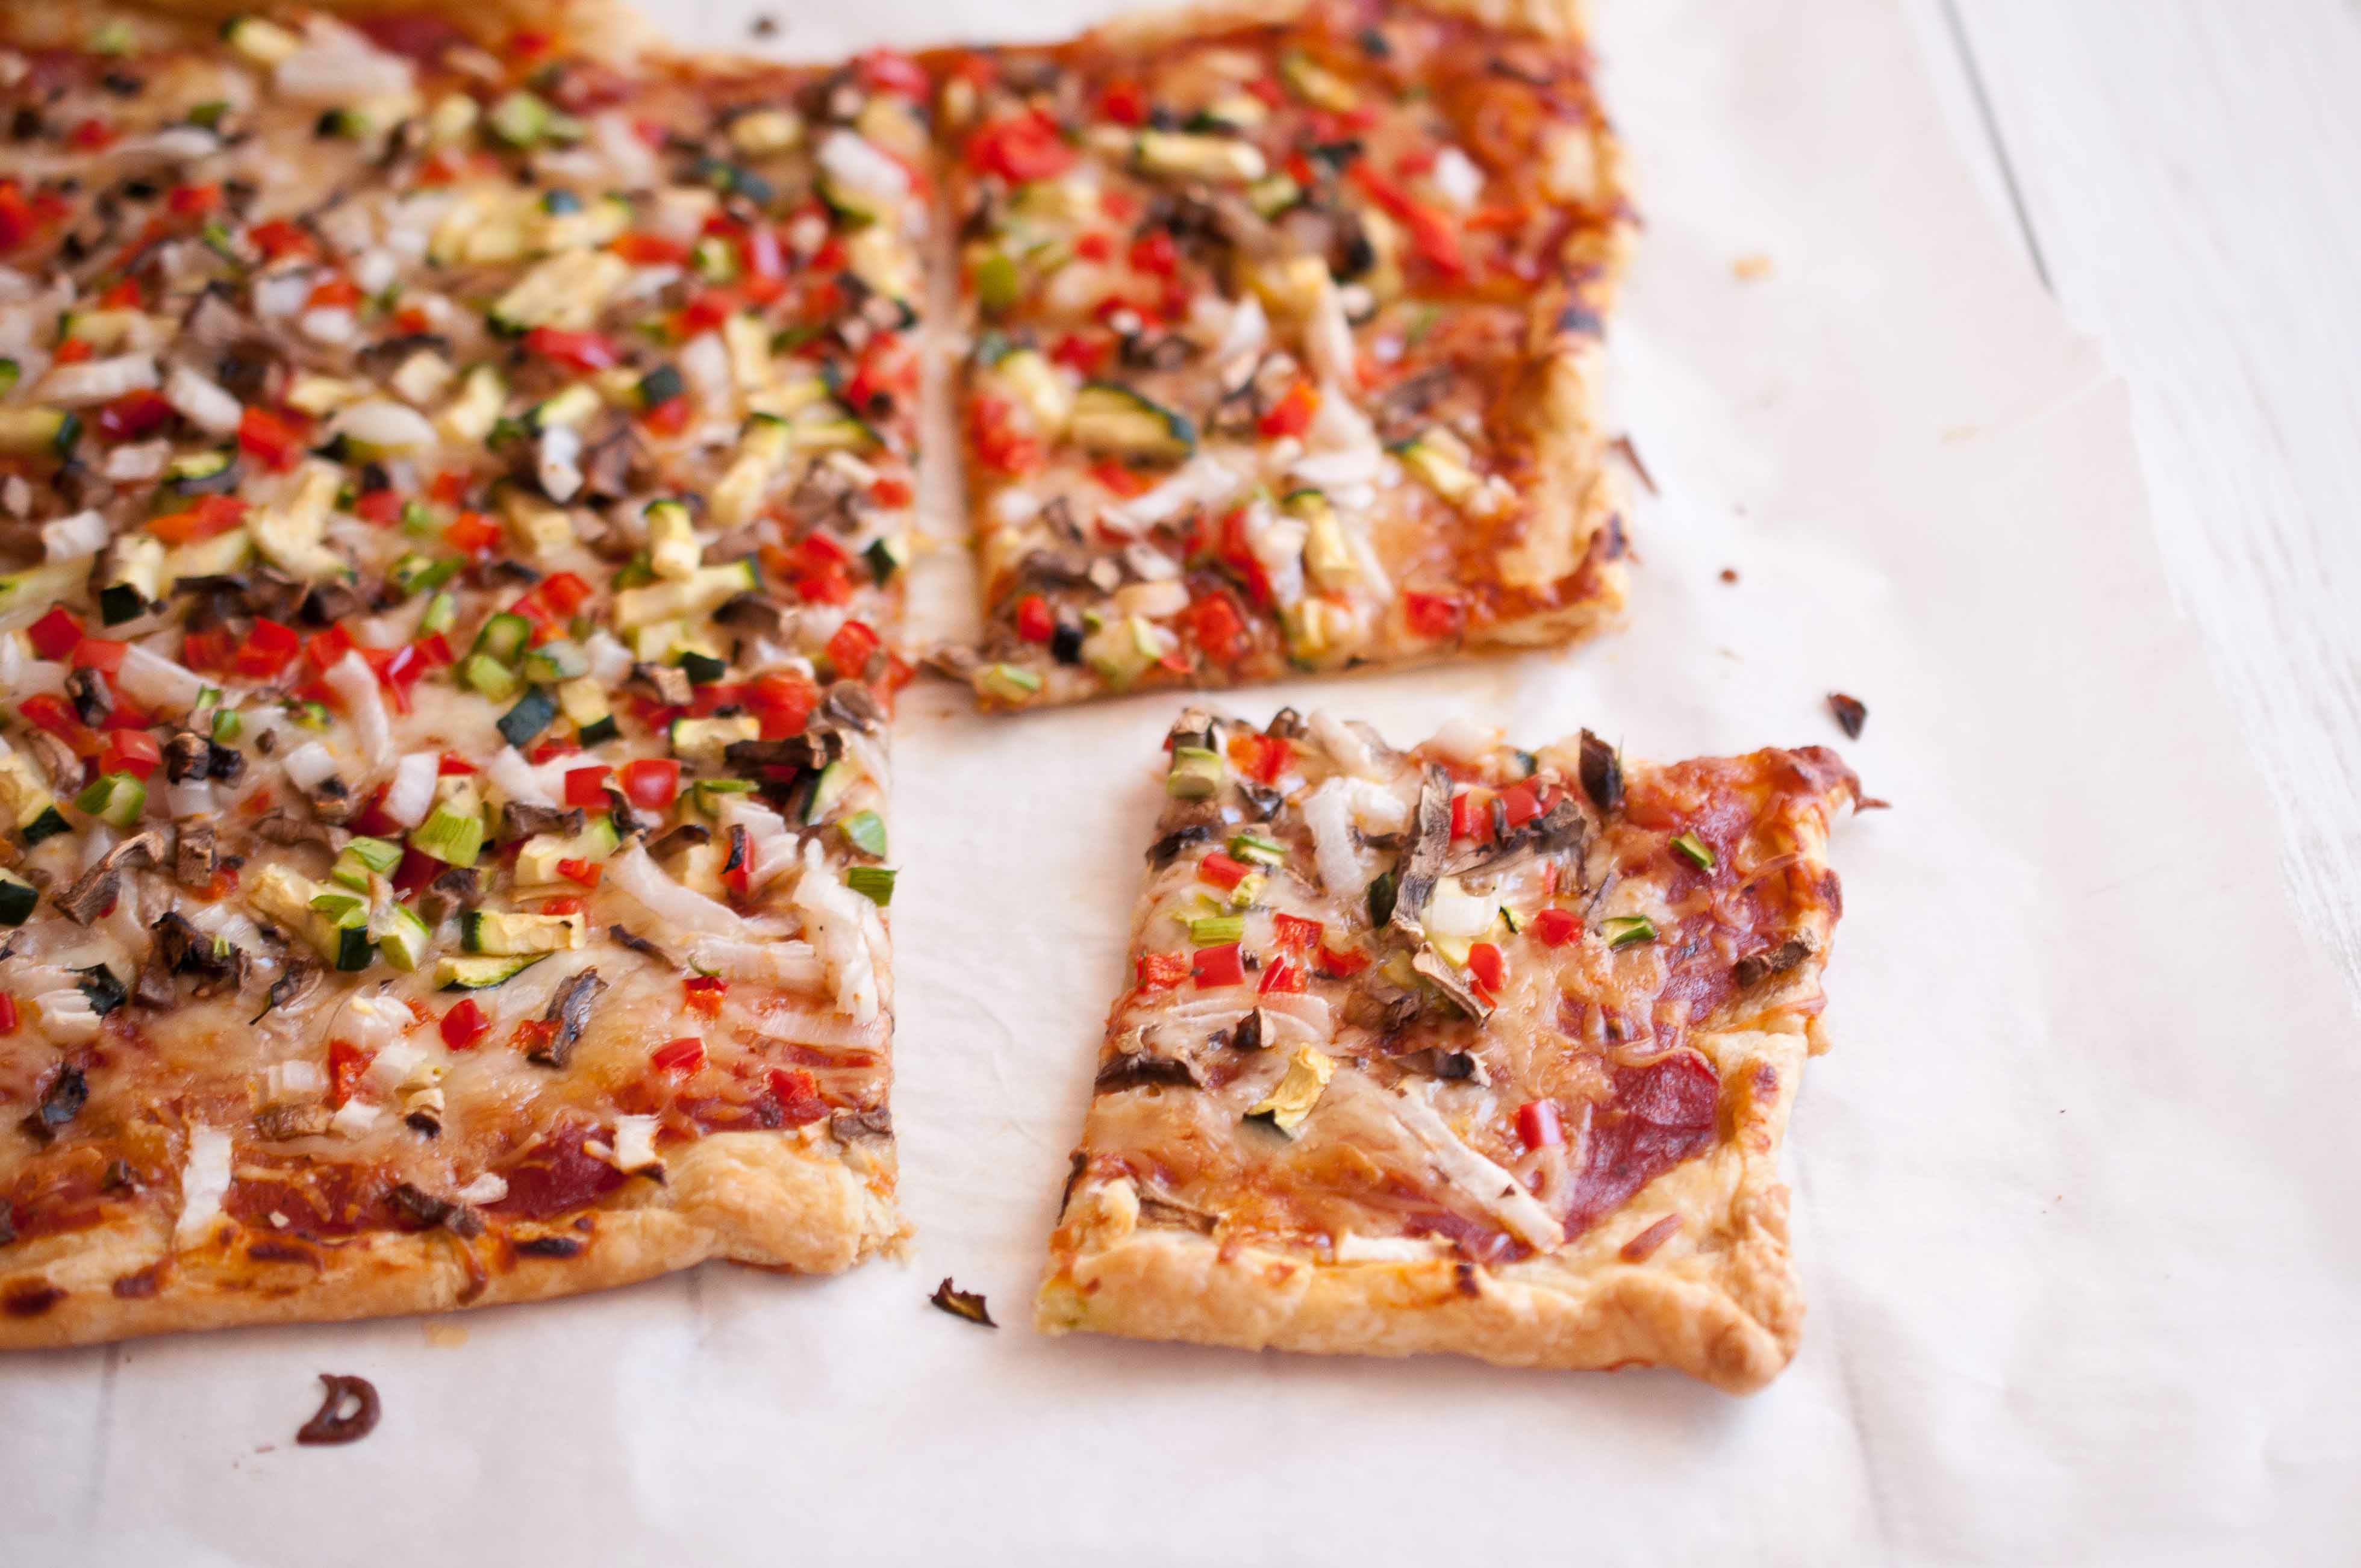
This is an easy, weeknight meal that you can throw together in just a few minutes. I used the vegetables I chopped with the Alligator Dicer as toppings.
Puff Pastry Pizza
1 sheet puff pastry, thawed
2/3 cup red pizza sauce
1 1/2 cup shredded mozzarella cheese
5 spears asparagus, trimmed and chopped
5 mushrooms, diced
1 clove of garlic
1/4 of a whole white onion chopped
1/2 one large zucchini, chopped
1/2 1 red bell pepper, chopped
2 oz goat cheese
Preheat oven to 400.
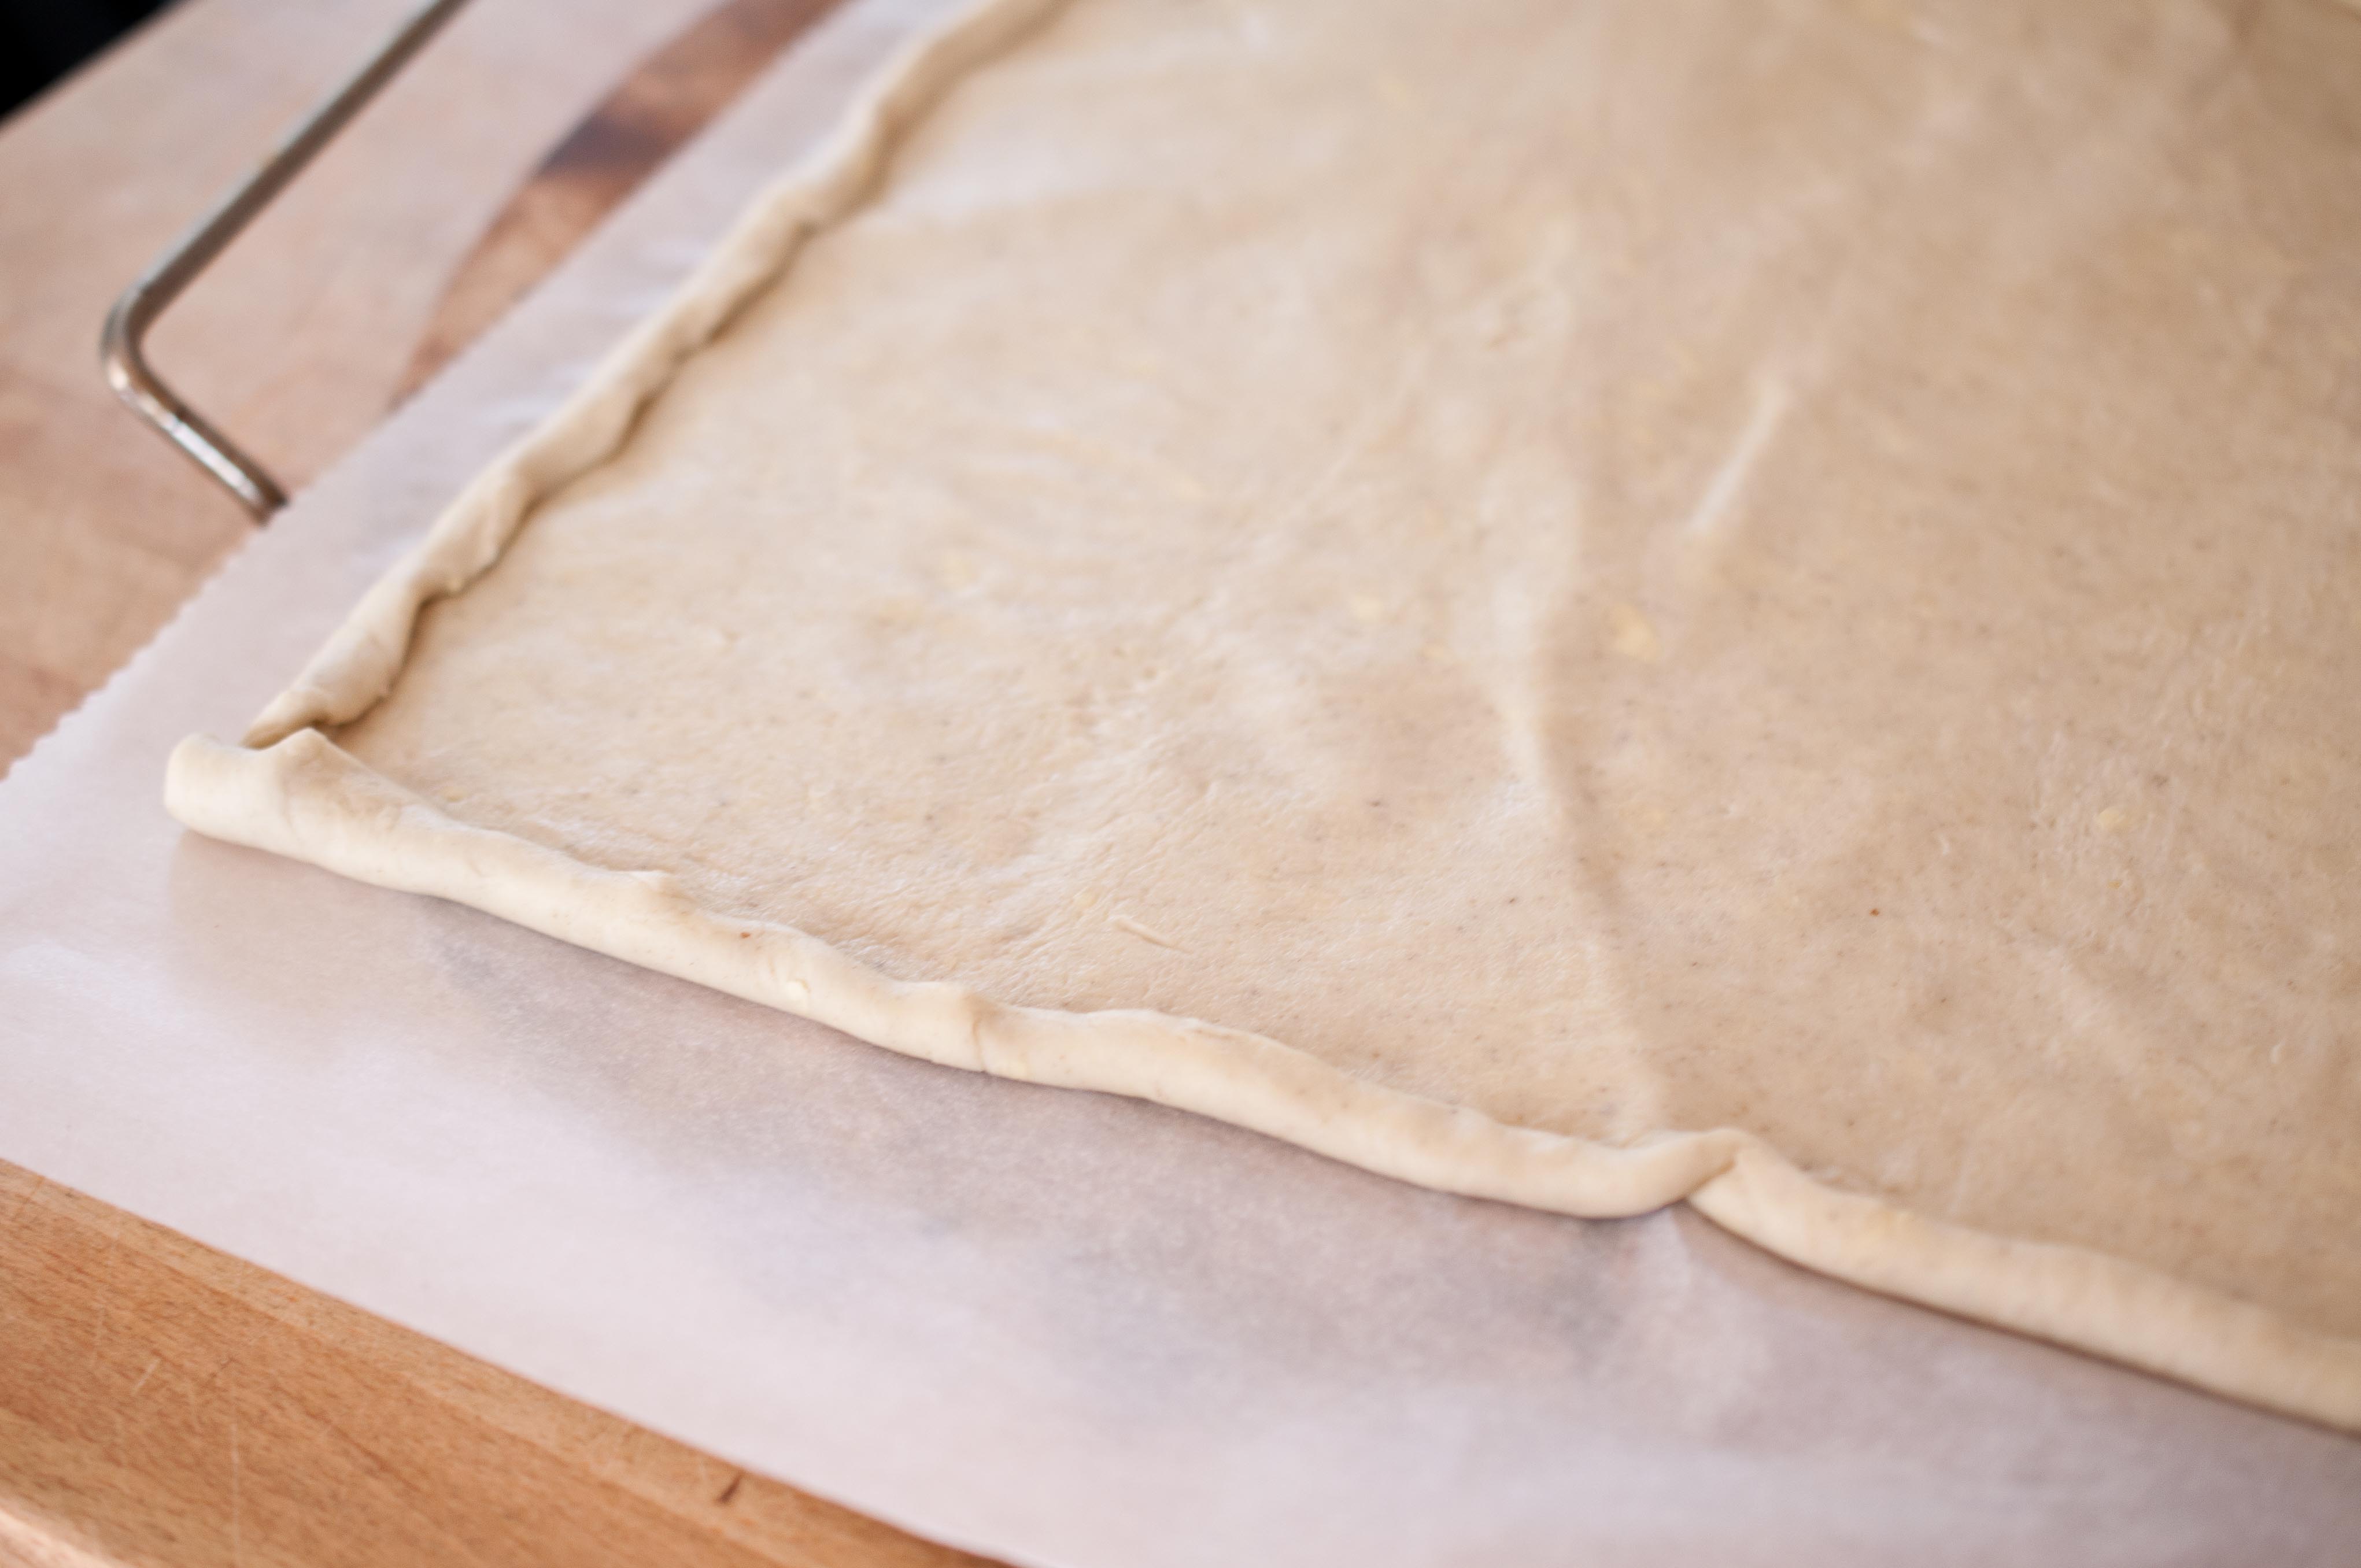
Place a sheet of parchment paper on the counter with one end hanging off the counter in front of you. Place the puff pastry on the parchment paper. Press your body against the parchment paper to keep it from sliding around and roll the puff pastry in both directions 4-5 times each way to make the puff pastry thiner, wider and longer. Transfer puff pastry on the parchment paper to a pizza stone of baking sheet. Roll the edges inward slightly
Bake for 10 minutes or until the puff pastry has turned a light golden brown.
Remove from the oven and top with sauce, then mozzarella cheese, then all of the chopped vegetables and then dot with goat cheese.
Bake for an additional 5 minutes or until cheese has melted.
Let’s start by talking a little bit about steak, and how to cook it at home. Before you even start your meal, you need to know how to buy steak and what those stickers on the package mean.
If you are lucky enough to be cozy with your local butcher, you can disregard this next bit of trivia. If you buy your steaks at the grocery store, you’ll need to know this in order to get an amazing steak on to your dinner plate.
While I’m the first in line to let everyone know that cheap cuts of meat can turn in to fantastic meals, this is not a dish that will give you memorable results with low quality beef. You must spend on steak.
That being said, the most expensive cuts of meat aren’t always worth the price but knowing how to decipher the labeling will help you balance price vs quality.
Prime, Choice, and Select.
Prime is the best meat for that cut and will, most likely, taste the best once cooked, but it almost always cost the most.
Don’t even bother with Select, it’s the lowest quality of meat. Unless you are a "well-done" steak person, then it doesn’t really matter, an overcooked piece of meat taste the same regardless of quality.
Choice is a great option and a middle ground between price and quality if you are on a budget. It’s far better than Select, but not as expensive as Prime.
Don’t fall for the “Inspected by USDA” sticker, all meat is inspected by the USDA and that sticker just means that quality was so poor, it didn’t even qualify for a "Select" sticker. If there is no indication if the meat is Prime, Choice or Select, the odds are that the meat didn’t meet standards for any of those categories. In other words: don’t buy an unmarked steak.
Another important step in pan-searing a steak at home is removing excess moisture from the outside of the steak. I know that it seems counter-intuitive to remove moisture when the goal is a juicy steak, but this is the only way to get a good sear and avoid gray meat. Pat the steak dry with paper towels before seasoning it.
Salt is another essential component in making steak, regardless of the cooking method. Salt the outside of your meat generously. This will tenderize the steak, brighten, and enhance the natural flavors. Without it, your meat will be slightly tougher and have much more of a "flat" taste to it.
A hot pan and a 350°F degree oven is the combination that you need to achieve a crust on the outside and the perfect amount of pink on the inside of the steak.
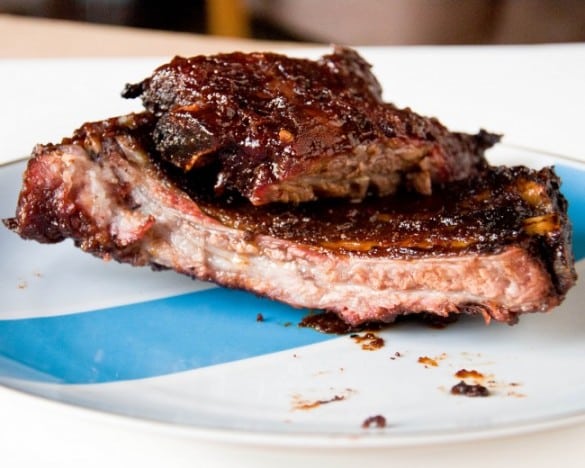
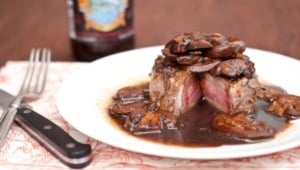
For the mushrooms sauce, I used Steelhead Extra Stout by Mad River Brewing. A smooth, creamy stout with a surprisingly light finish. A stout lover’s dream, a great beer to drink with dinner or dessert.
Pan-Seared Steak with Stout Beer Mushroom Sauce
Doneness is a hard thing to explain, but there are several ways to know if your steak is where you want it to be without the dreaded slice through the middle that will compromise your overall results.
First, there is the temperature check, but this does require a stab to your meat which will allow some juices to flow out, but far less than cutting it open. Get out an oven-safe thermometer and push it halfway through the middle of your steak. Keep in mind that your meat will continue to cook an additional 5 degrees once remove from the oven so keep that in mind when your test the temperature, removing the meat about 5 degrees before it reaches the level you want it.
126°F Rare
131°F Medium Rare
145°F Medium
154°F Medium Well
The second way is the feel test. This is what I use, and if you cook enough steak, you will be familiar with how your steaks feel once they are done. Here is an old line cook secret to understanding how a steak should feel once it’s done:
Put your thumb and forefinger together. With your other hand, feel the fleshy part of your palm, just below your thumb. That is what a rare steak will feel like. Then put your thumb and middle finger together. The fleshy part of your palm will now feel medium-rare. Thumb and ring finger: medium-well. This is a way to get the doneness you want without having the unsightly cut marks in your beautiful steak.
Here is a great article about the feel test, with pictures of what I’m talking about.
Allow your steak to rest for five minutes while you finish the sauce.
Top each steak with mushroom sauce, serve with stout beer.
In a pan over medium heat, melt 3 tbs butter. Add the shallots and cook until softened, about 3 minutes. Add the garlic and stir. Add the mushrooms and cook until the mushrooms are soft and dark brown, about 5 minutes. Add the olive oil if the pan starts to get dry. If you add the beer before the mushrooms are cooked through, they will absorb too much of the beer flavor.
Reduce heat to medium and add the beer and broth, allow to cook until reduce by more than half, about 10 minutes. Stir occasionally. You can cook the steaks while the sauce is reducing (see below).
Once the sauce has reduced, add the remaining ingredients and stir to combine.
Pat the steaks dry with a paper towel, and season all sides generously with salt. Sprinkle liberally with pepper.
In a sperate pan, heat 1 tbs butter until melted and the pan is very hot but not smoking. Add the steaks and cook on each side until a brown seared crust has formed, about 2 minutes per side. Don't crowd the pan or the the cooking temperature will fall below what the steaks need for a good sear. Cook in two batches if necessary. Move steaks to a sheet pan or baking dish.
Cook in the oven for 5-7 minutes, or until desired level of doneness. Allow to rest for at least 5 minutes.
This has been a long week for me. I’ve been in the process of hiring a new person at work. Through out the interview process, from reading resumes to second interviews, I’ve been able to learn quite a bit about the behind-the-scenes-process. It is incredible what people think is completely acceptable behavior in an interview, here are some examples:
In response to the question, "Where do you see yourself in 5 years?" Here are some of the responses I got:
"Oh…I’m going to win the lottery. I am. But don’t worry, I’ll give you a big donation, It’s a tax write off."
"Ummm…A lawyer? I think maybe I’ll be a lawyer." (I don’t work for law firm and we don’t employ lawyers)
"I don’t know. I mean, I only want this job for like…18 months? But don’t worry, I’ll help you find someone really good to replace me!"
I’ve never been a "tell me what I want to hear" kind of person, but this really comes down to professionalism and good judgement. If you aren’t able to answer that question correctly, It makes me worry about how you will answer more difficult questions that clients may ask you.
The correct response, in one form or another: "I am looking to find a company that I can work for long-term. I want to be at my next job, hopefully, for the rest of my career so I’m looking for a place that has opportunities for advancement and will allow me to grow as a professional."
Proper attire:
Don’t wear a shirt that intentionally shows your bra. I don’t care if it is La Perla.
6-inch platform Lucite heels are not a good choice for interview footwear.
For the LOVE OF GOD do not, under any circumstances, wear a BLUETOOTH in an interview. Unless you hold the keys to missile defense, you are not that important. I promise.
Written communication, the first impression:
Before you even get an interview, your resume, cover letter and initial email will give the first impression. Here are some tips to make sure you aren’t weeded out right of the bat:
Make sure everything is spelled correctly.
Write a cover letter, this alone will put you above half of the other applicants and give you a voice.
Change the "Objective" field to fit the company you are applying for. It is a huge red flag if it does not match who we are. Either you are sloppy and have no attention to detail, or you really don’t want to work for us.
If you have a email address, such as ChicanaSkank69@[domain].com don’t put it on your resume, take the ten minutes to set up a free, more professional looking email address using your name, for instance: [email protected]. That was an actual email address I got from one of the applicants (domain has been changed to protect the obviously not so innocent).
If I call you for an interview, don’t wait 3 days to respond. I’m not some chick you banged in the bathroom of a TGIFridays, the three day rule does not apply.
If you say that you are "Detail Oriented" at least spell both words correctly.
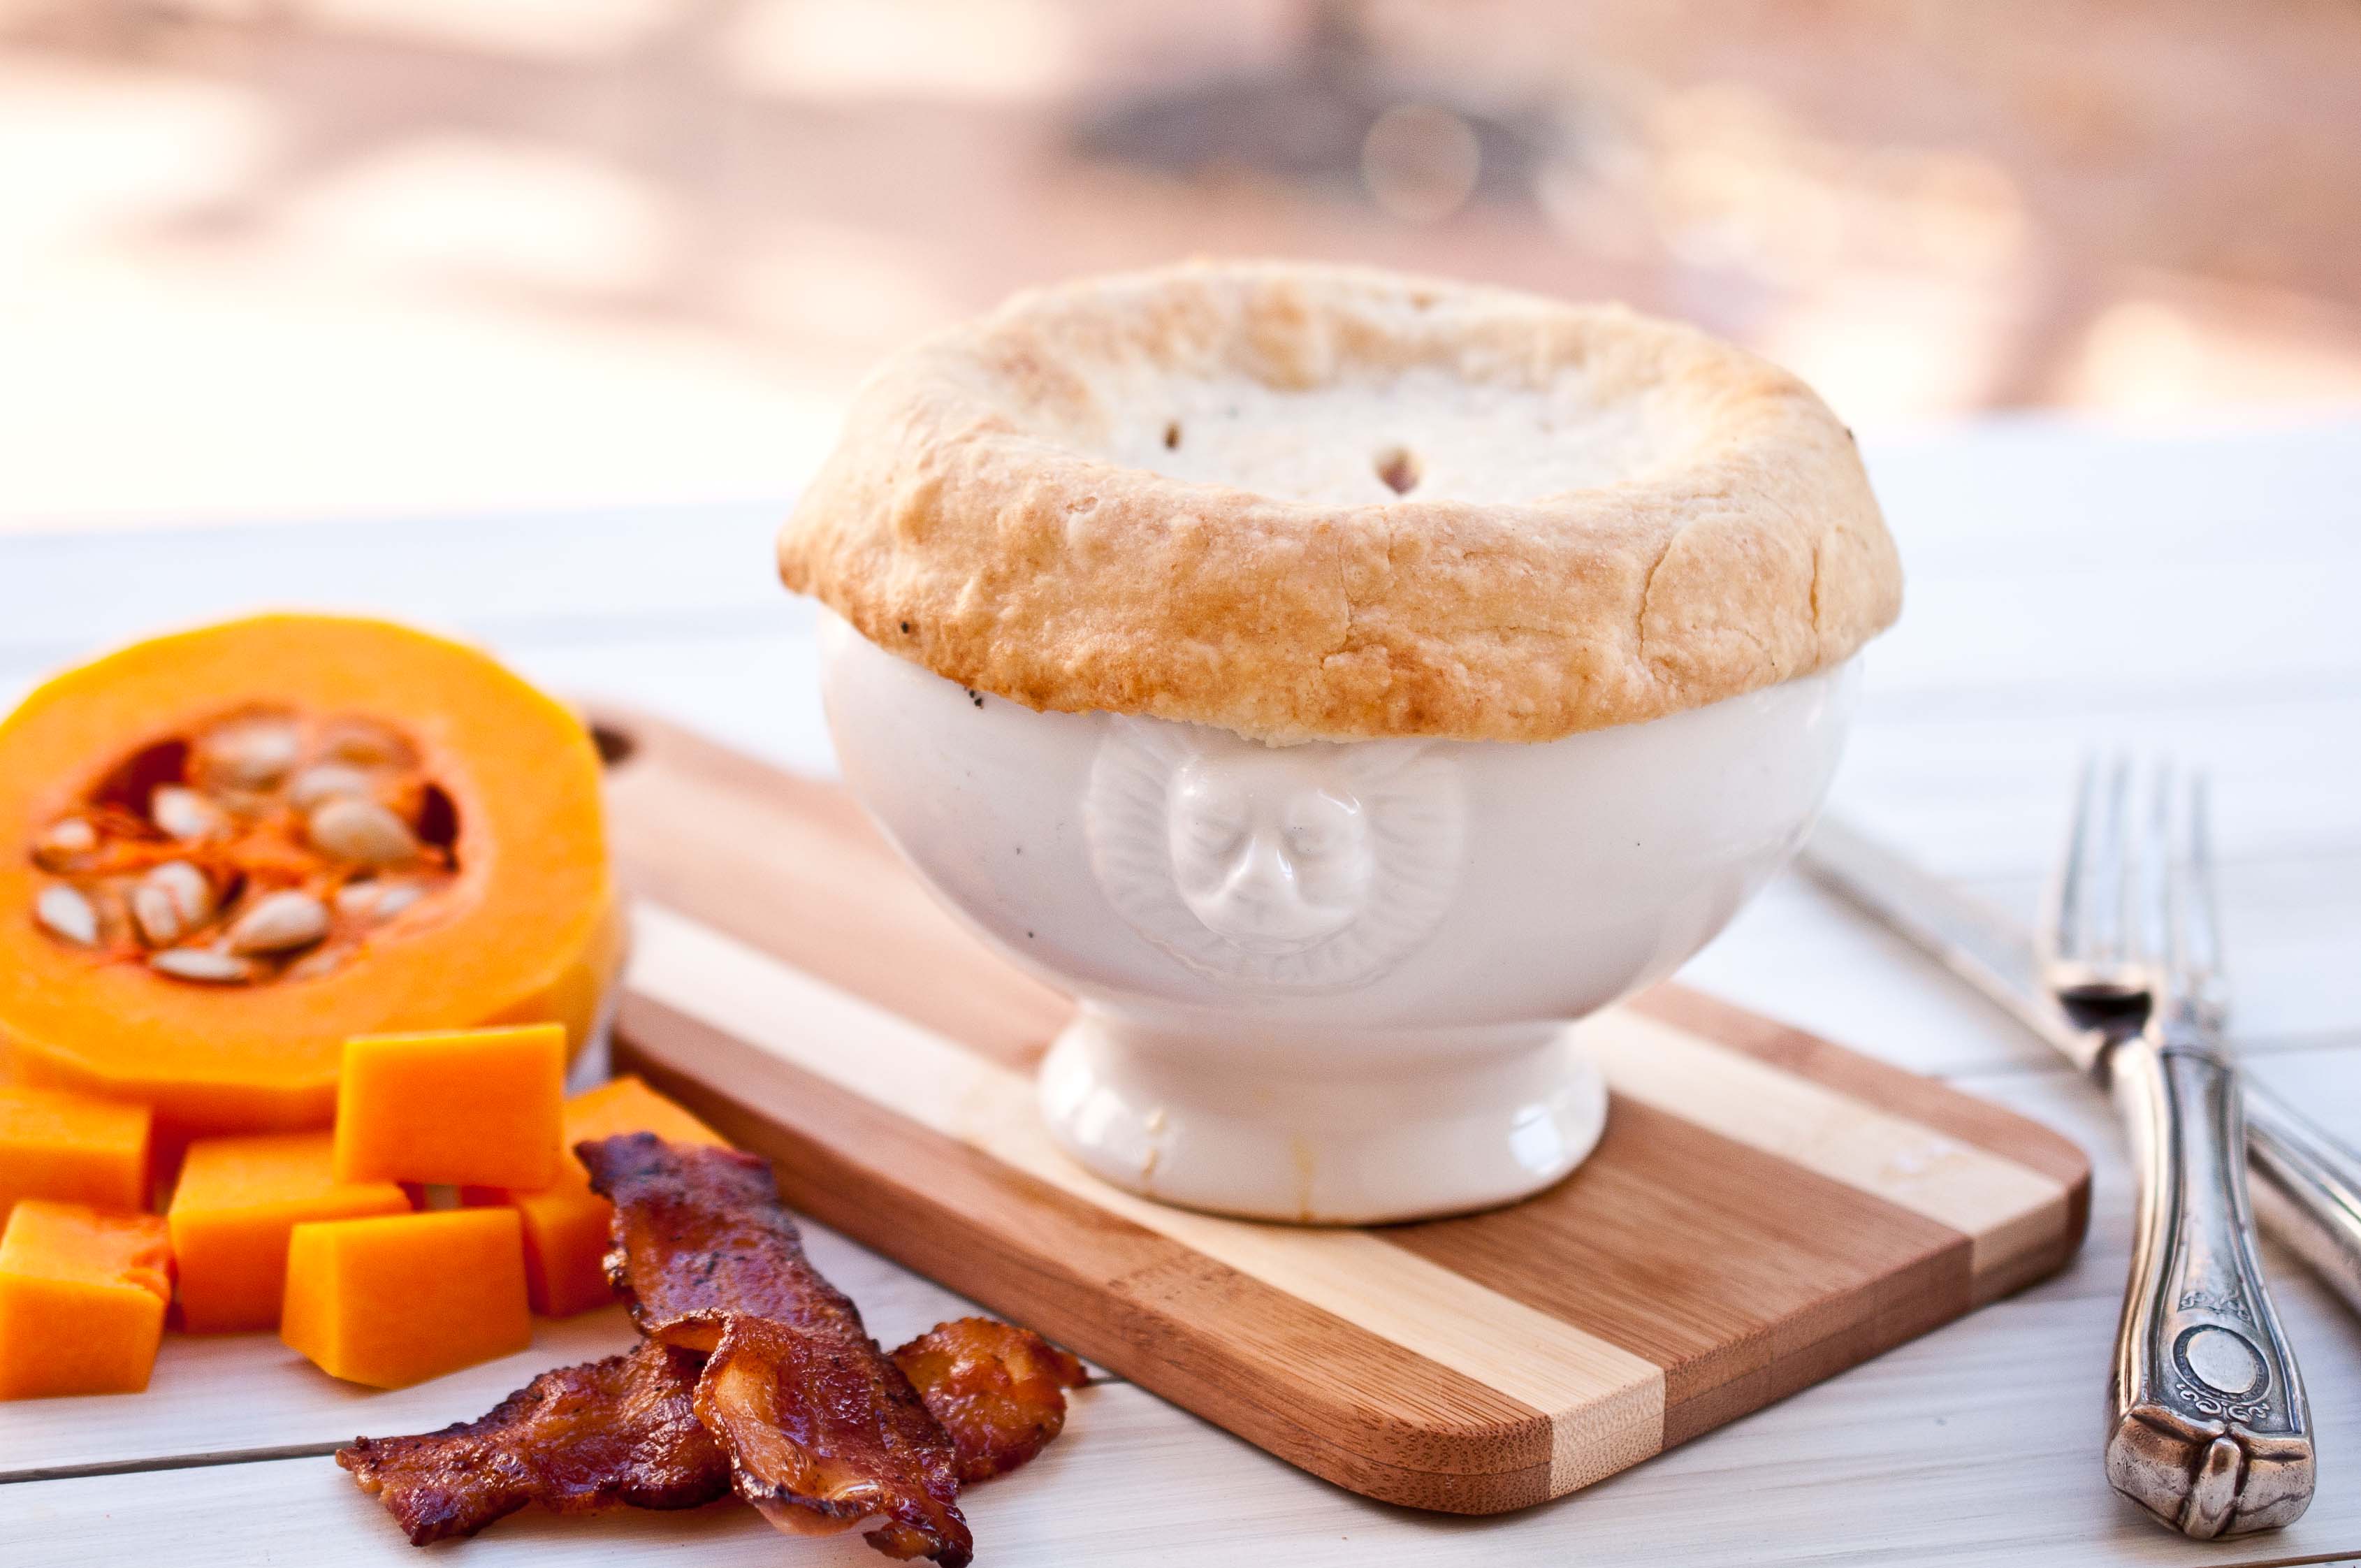
Ugh. I have lost a bit of my faith in man kind after this week. But I have not lost my faith in a good soup with a pastry crust. And bacon makes everything better.
1 medium carrot, peeled and chopped into 1/2-inch pieces
3 cloves garlic, minced
3 1/2 pounds butternut squash, peeled, seeded, and cut into 3/4-inch pieces (about 7 to 8 cups)
6 cups low-sodium chicken broth
1/4 cup chopped fresh sage leaves
½ tsp smoked paprika
salt and pepper to taste
Preheat oven to 400.
In a dutch oven, over medium heat cook the bacon until most of the fat has been rendered. Remove from heat, allowing to drain and cool on a stack of 2-3 paper towels.
Drain off most of the bacon fat, leaving only about 3 tbs in the pot.
Turn the heat up to medium-high and add the onions and carrots to the pot, cooking in the bacon grease until opaque. Add the garlic and cook just until you are able to smell them, about 30 seconds. Add the chicken broth and squash, allowing to simmer until the squash is very tender, about 20 minutes. Remove from heat. Using an immersion blender, blend until smooth. Add the smoked paprika, and sage, stir to combined. Add the salt and pepper, seasoning to taste.
Chop the bacon into small pieces, add to the pot and stir.
Place four ceramic, oven safe bowls on a baking sheet. Divide the filling equally between the four bowls.
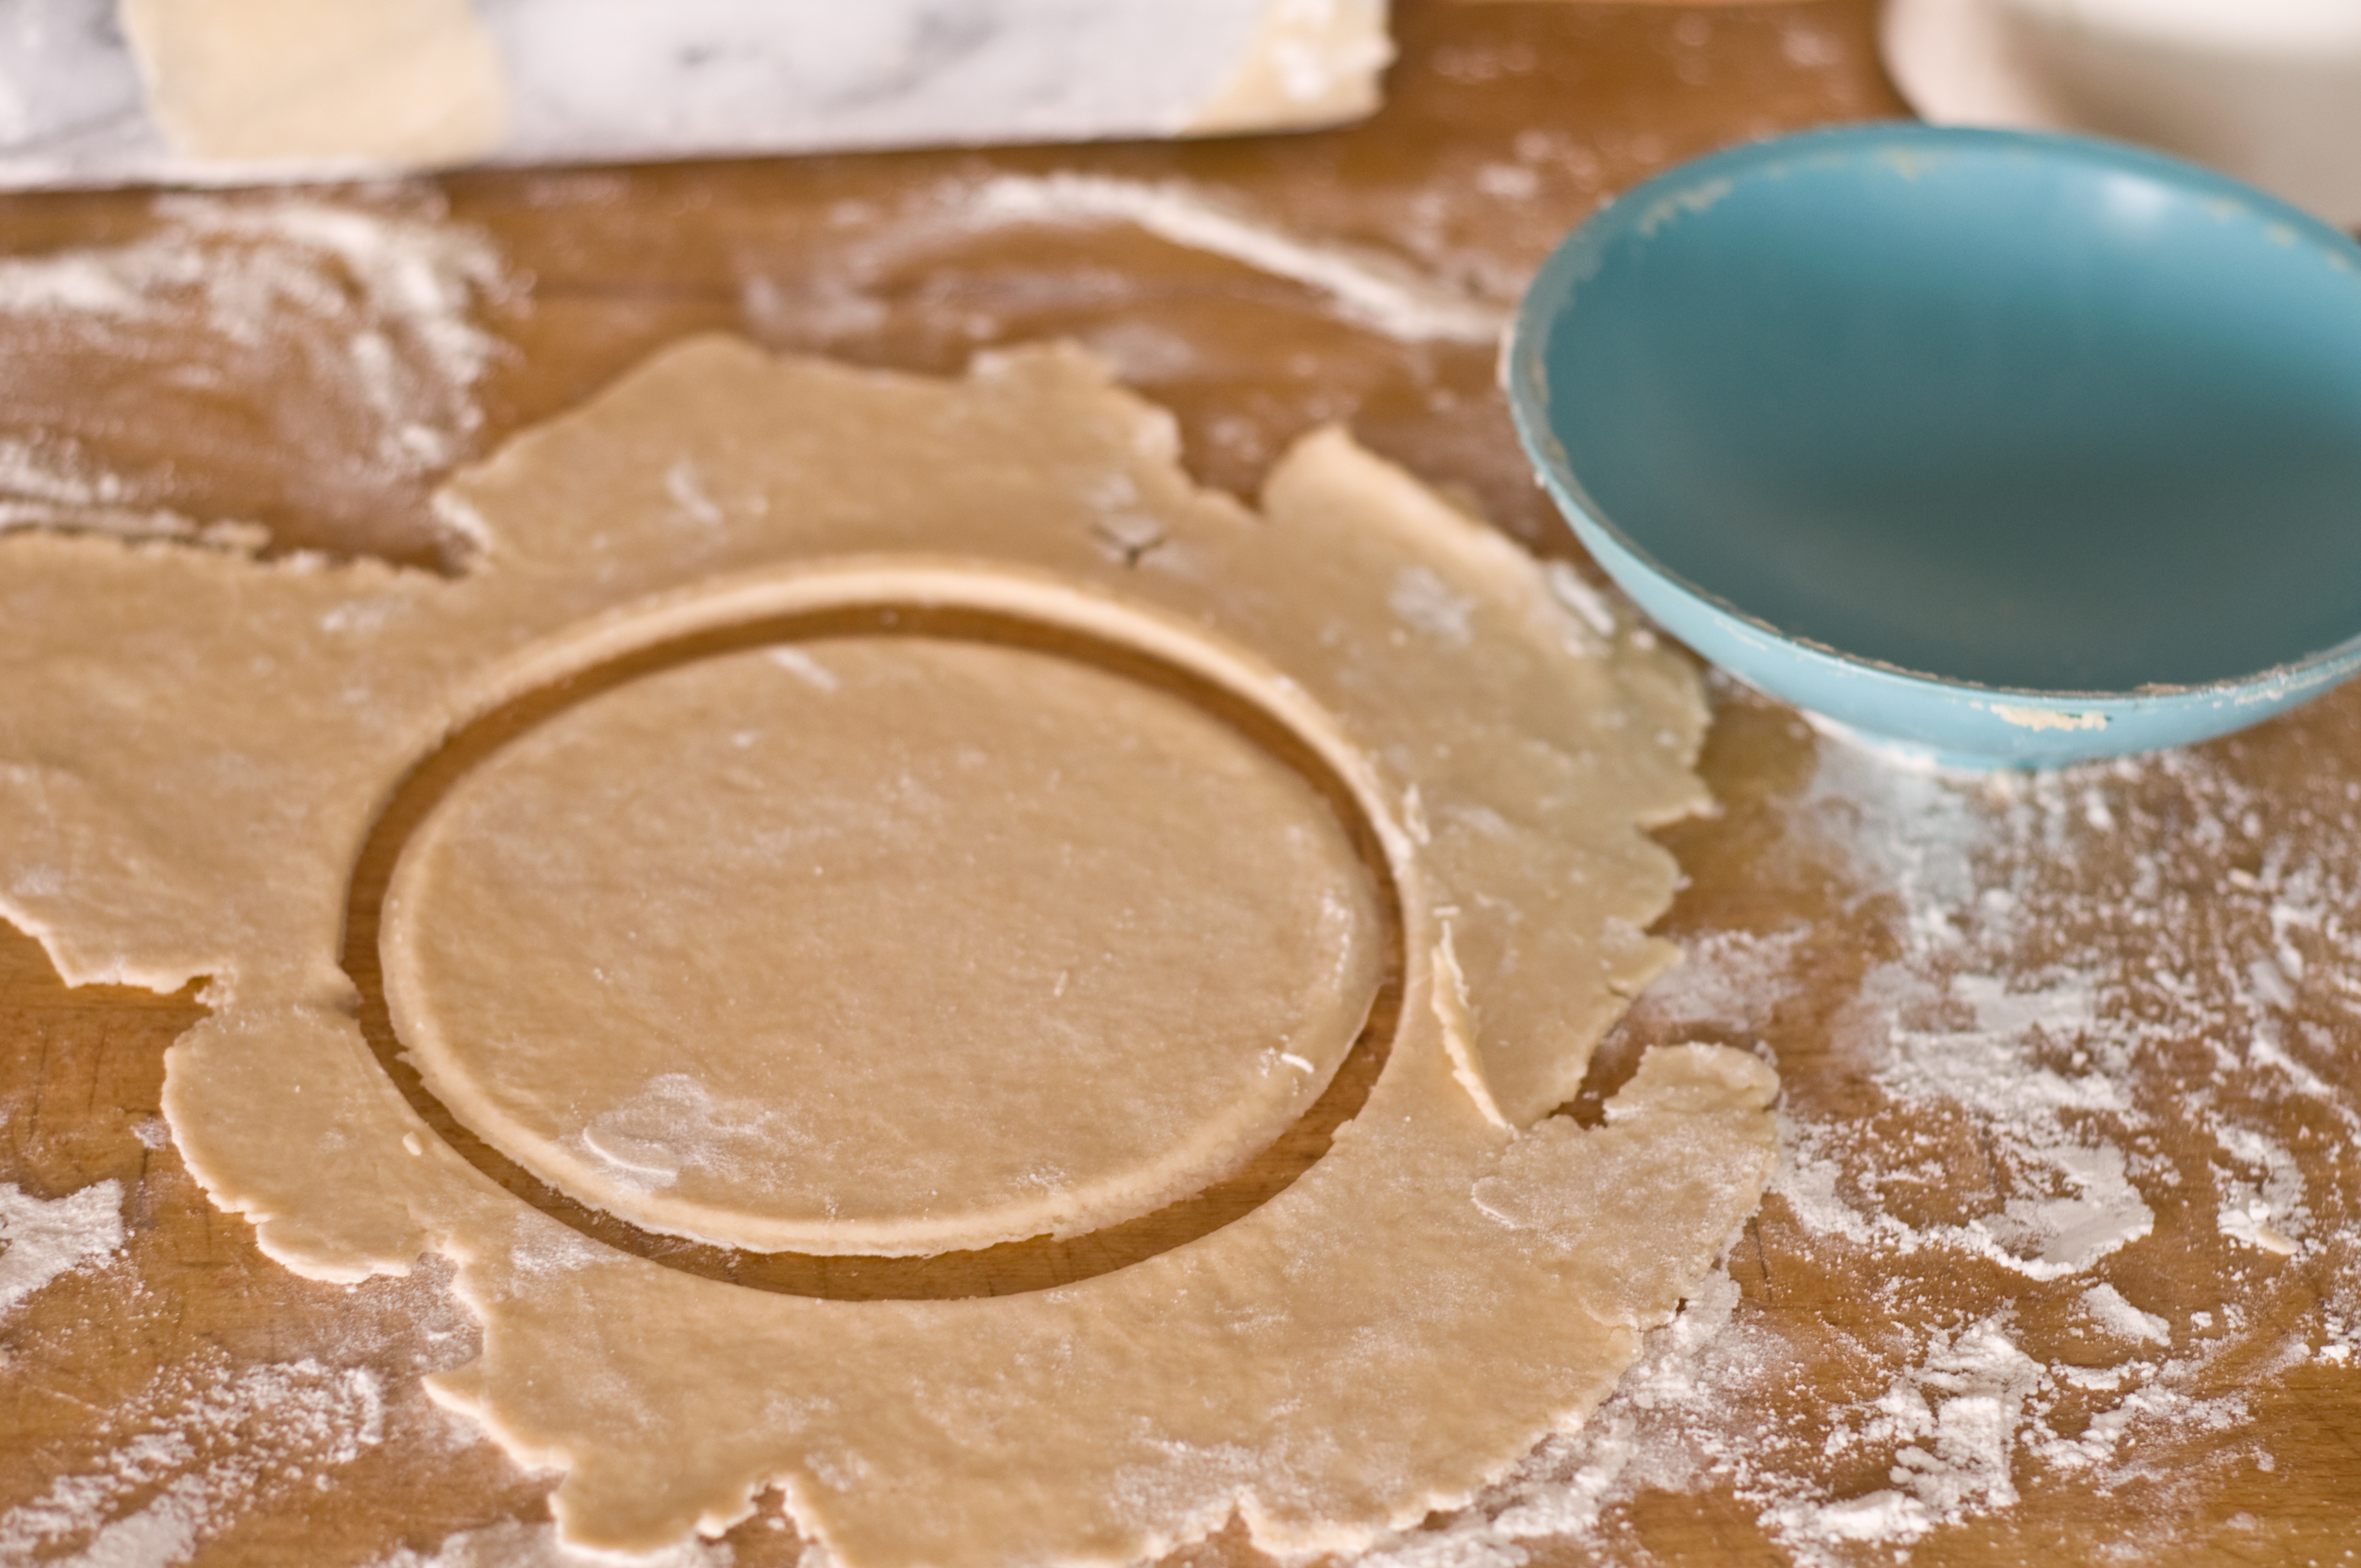
Place desire pot pie crust on a well floured surface, add flour to the top of the disk as well. Roll out into an even thickness.
Cut out 4 circles that will cover the dishes with at least a one-inch overhang on each side.
To prevent sticking, spray the rim of the baking dish with cooking spray. Top each dish with the dough circle, pressing into shape. Cut a few slits in the top to vent heat. Brush with melted butter.
Cook at 400 for 20-22 minutes or until golden brown.
Forcing someone to say "I Love You" is about as meaningful as buying your own Grammy on eBay and pretending you actually won. The entitlement and expectation take all of the romance out of it. In just the same way that the show The Biggest Loser has had more successful marriages than The Bachelor series has, some things just cant be forced.
My husband and I did away with giving into the societal expectation years ago, much preferring to go out to dinner on nights that don’t include 2 hour waits and $65 pre fixe menus. He’s romantic in the little ways, negating my need for Valentines day pageantry. He will "borrow"my car in order to take it to get washed and the oil changed. He’ll get up with Tater on a Saturday and let me sleep in. When I’ve had a hard day he’ll do the dishes, giving me time to play blocks with Tater instead of spend what little time I have after work in the kitchen.
Now that I have a daughter, the focus of Valentines day is more fun and childish, more of the cartoon that it has become, and I like it that way. I buy Tater a bag of Valentines Day toys, and write her a card about how much I love her. I look forward to helping with her elementary school Valentines Days, the decorated shoe box receptacles, the paper cards, the drama of who wrote "XOXO" and who just signed their names. The sorting out of conversation hearts according to what is ok to give the boys and what is not. Because, everyone who has been a 3rd grader knows that slipping candy with messages on them into paper envelops is a big deal. And when you are required to give one to everyone in the class, even the boys you can’t stand and the boys you just pretend like you can’t stand, everyone know that you NEVER give a "Kiss Me" heart to a boy! Seriously, tragedy would in sue. Because you will also be reading every single heart that is the envelopes you got from the boys with the secret hopes that the boy who sits behind you didn’t just give you the "Nice Day" heart but intentionally slipped the "Be Mine" candy into the envelope with your name on it. In 3rd grade, risking possible social, school yard torture via teasing to let the little girl who sits in front of you know you like her is so romantic.
When you grow up, and have kids and a house and a job, romance is different. It’s the consideration that tends to wain as we grow comfortable with each other. Romance is that person who has woken up next to you for years actually seeing you. As special and important and desireable. It’s someone feeling lucky to be the one who wakes up in your bed, and eat the food you make and parent along side you.
Romance isn’t feeling required to bring home red flowers on the second week February, it’s running to the store late at night for flour because we’re out your wife is behind on blog posts.
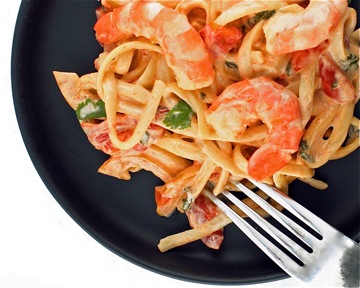
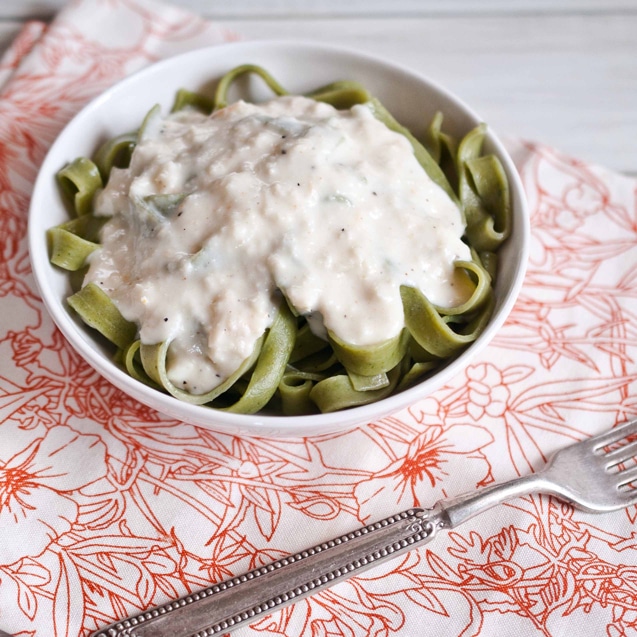
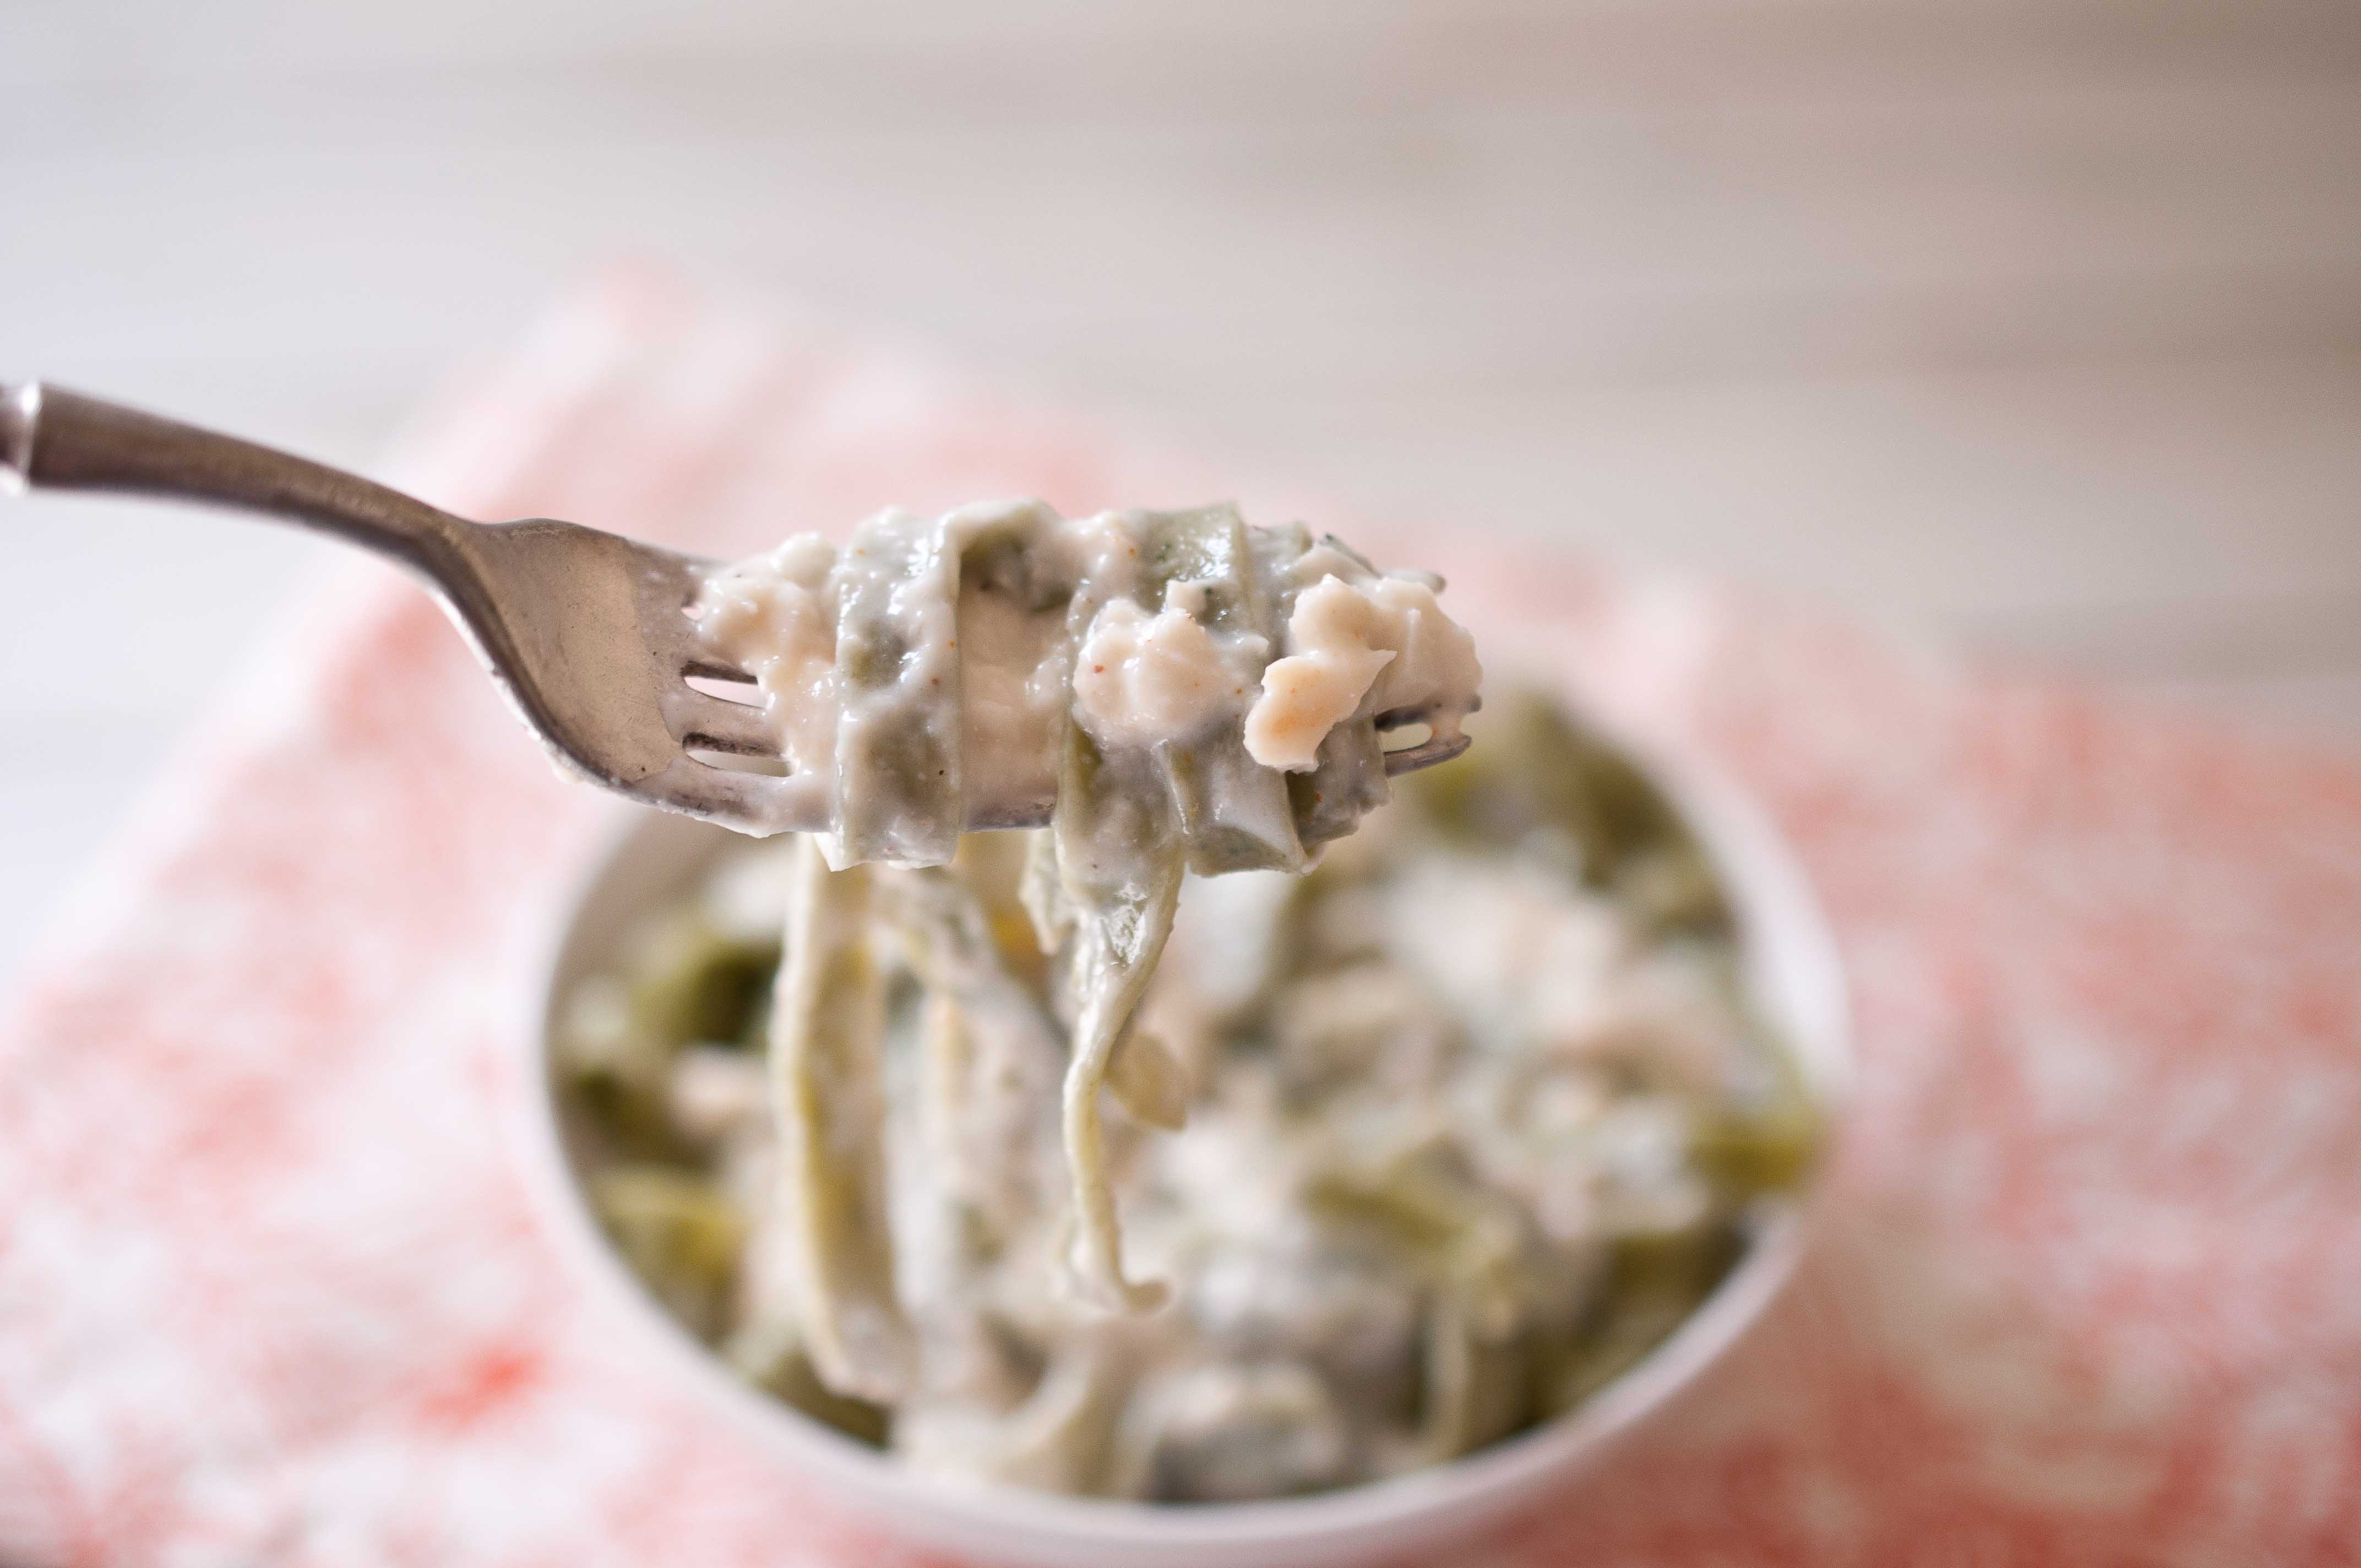
Even though Valentines day is in the middle of the week this year, and like me, you may have about 20 minutes between the time you get home from work and the time your family is expecting to be fed, this dish takes about that much time. But it feels special. Crab Alfredo in 15 minutes.
Crab Alfredo
3 tbs butter
3 large cloves of garlic, minced
1 tbs, plus 2 tsp flour
1/2 cup whole milk
1/2 cup heavy cream
1/2 cup parmesan cheese
1/2 tsp lemon juice
Pinch Cayenne pepper
6 oz crab meat, drained well
salt and pepper to taste
Pasta for serving
(makes two large or four small servings)
Cook pasta according to package directions.
In a skillet over medium/high heat, melt the butter. Add the garlic and stir, allowing to cook for about 30 seconds. Add the flour and whisk until well combined with the butter, don’t allow to brown. Add the milk and cream and stir to combine. Add the lemon juice, cayenne and cheese, cooking until the cheese has melted. Add the crab meat, stir until the crab is warmed up and remove from heat. Salt and pepper to taste. If sauce is too thick, add milk about 1 tbs at a time to thin.
I love the huge array of flavors that we now have in our Craft Beers. Chipotle? Yes please. Coffee? Couldn’t live without it. Both of these flavors, along with the fact that beer is a natural meat tenderizer make this Black Phoenix Chipotle Coffee Stout the perfect beer for the job of making tacos.
Bootleggers Brewery makes this fabulous taco braising liquid that also doubles as a smooth drinking Stout Beer. Pretty handy. If you can’t seem to get your hands on this stuff, and I DO recommend that you try, look for a dark stout that has spicy or coffee notes. This is no task for a pale ale.
Chipotle Stout Braised Beef Tacos With Fresh Pico De Gallo
Chipotle Stout Braised Beef Tacos With Fresh Pico De Gallo
1Large Bottle1 pint, 6 oz Dark Stout such as Bootleggers Black Phoneix
1/2cupbeef broth
6clovesof garlicpeeled
1large white onionpeeled and quartered
2large Chipotle Chilies in Adobo Saucechopped, plus 1 tbs Adobo sauce
12 6inchtortillas
For the Pico De Gallo:
1large jalapenostem and seeds removed, chopped
1/2cupchopped red onion
2tbslemon juice
1/2tspsalt
1/2cuptomatoeschopped
1/4cupcilantrochopped
Instructions
In a large pot or cast iron enamel dutch oven, heat the olive oil over high heat until hot but not smoking. Sprinkle the roast on all side with salt and pepper. Sear the meat on all sides until browned, about 4 minutes per side.
Add beer and broth, bring to a simmer, reduce heat to maintain a low simmer. Stir in the garlic, onions, chilies and adobo sauce, add the lid at a vent.
Allow to simmer until fork tender and falling apart, about 2 1/2 to 3 hours. During the cooking process, turn the meat over about every 30 minutes. If the liquid in the pot gets low, and too thick, add additional beer or hot water.
Once the meat is done, shred in the pot using two forks, remove any large pieces of fat that have not rendered. Cover and simmer for about 5 minutes.
While the meat is cooking, make the Pico De Gallo by placing all ingredients in a bowl and stir to combine.
Remove meat from pot, serve inside tortillas, covered with Pico De Gallo.
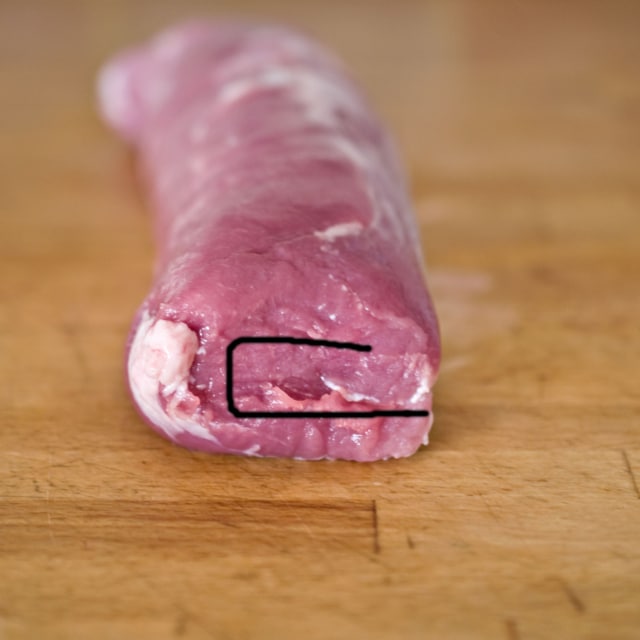
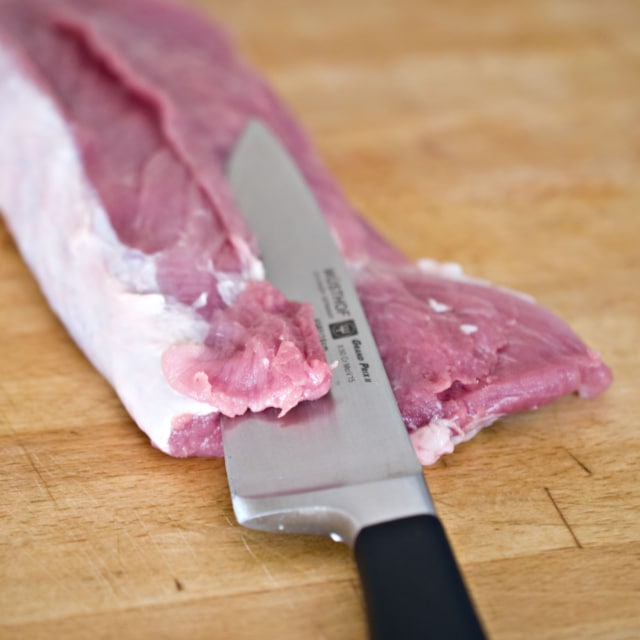
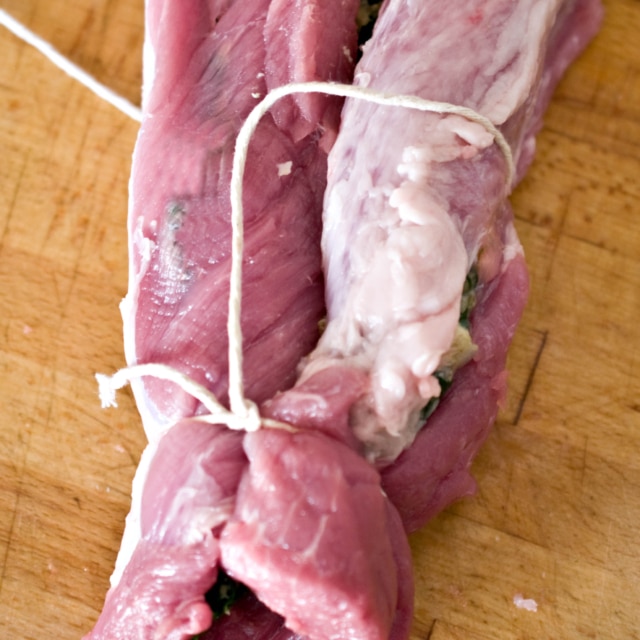
This isn’t a recipe. Not really. It’s how to actually cut this sucker so you can stuff food inside of it.
What you’ll need:
1.5 lb pork loin
Sharp knife
Kitchen twine
Whatever you are going to stuff your pork with
Bread crumbs
Baking dish
Preheat oven to 375.
Place your pork loin on a cutting surface. This is a basic diagram of where you will be cutting.
Start cutting closest to the cutting board, about 1/4 to 1/2 inch above the bottom of the loin
Don’t cut through, stop with about 1/2 inch to go. Then open the loin like a book that you are about 3/4 of the way through, with more pages on the left than the right.
Make your final cut, bisecting the thicker side of the loin.
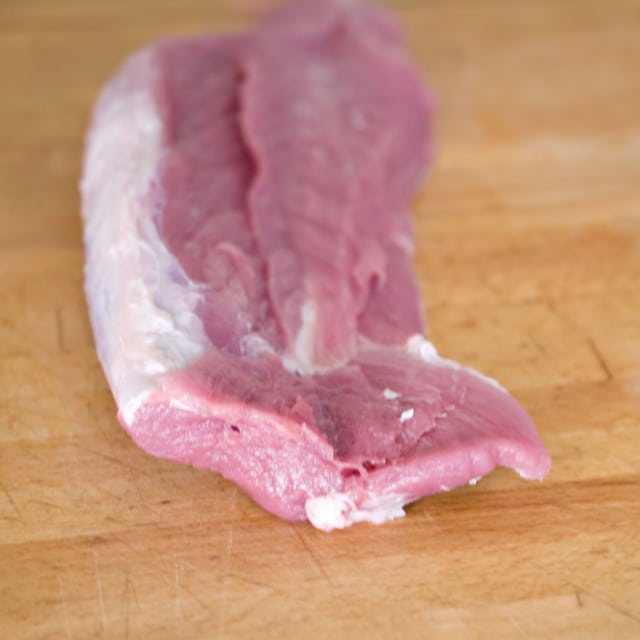
Open the final flap.
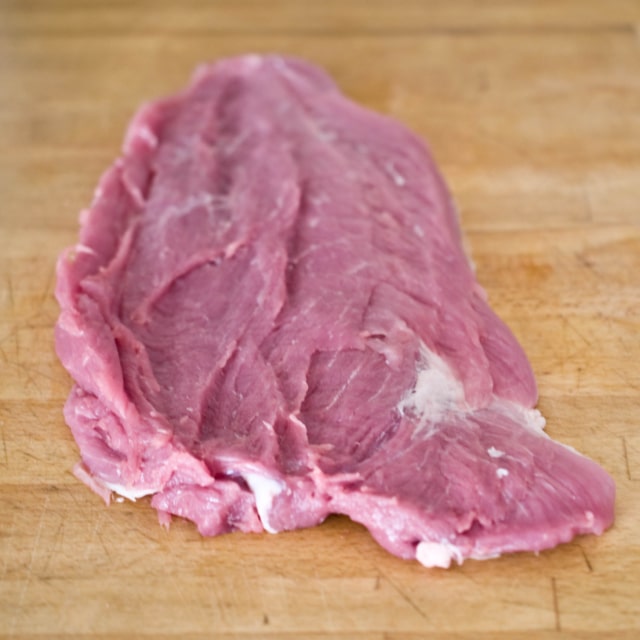
I like to trim off the uneven front and back, making it cleaner and easy to stuff
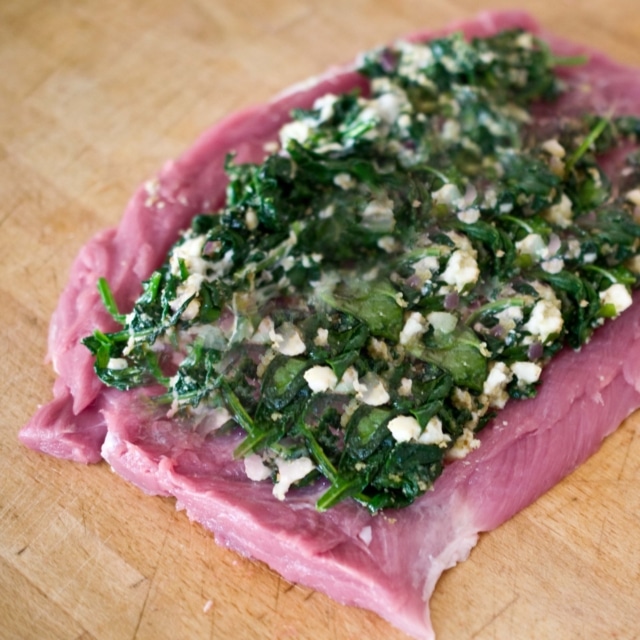
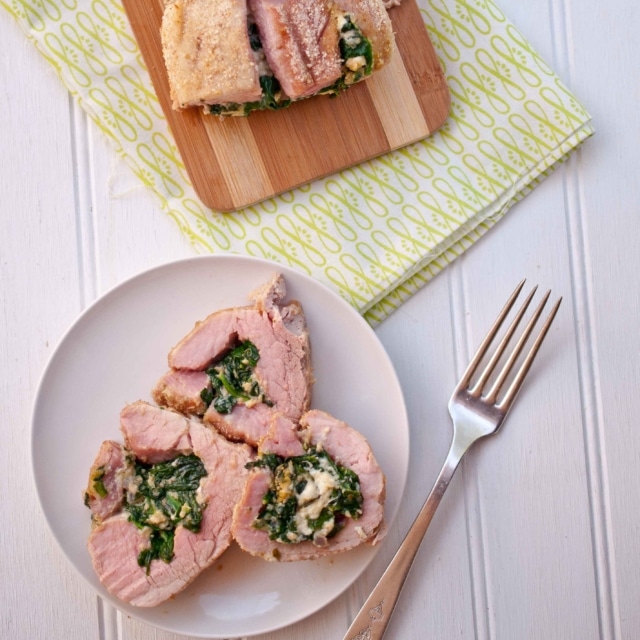
Stuff your pork with your stuffing.
Then fill your open pork loin with your desired filling, leaving about 1/2 inch on all sides.
My filling is just a simple olive oil, garlic, spinach, gorgonzola and bread crumbs.
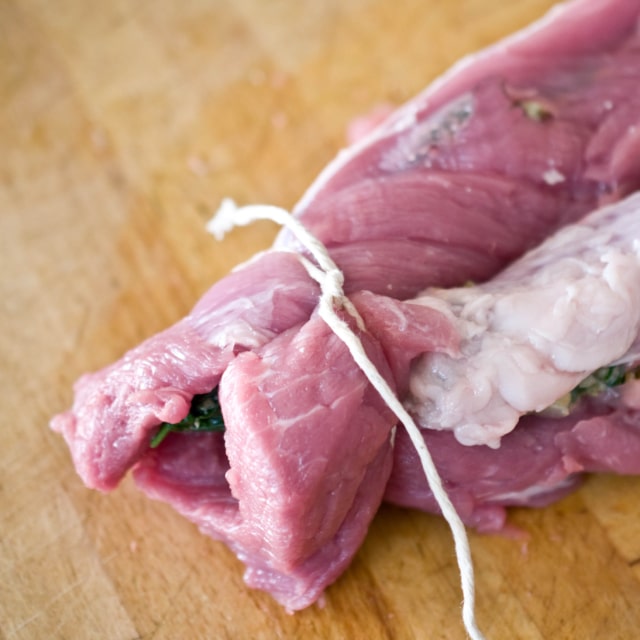
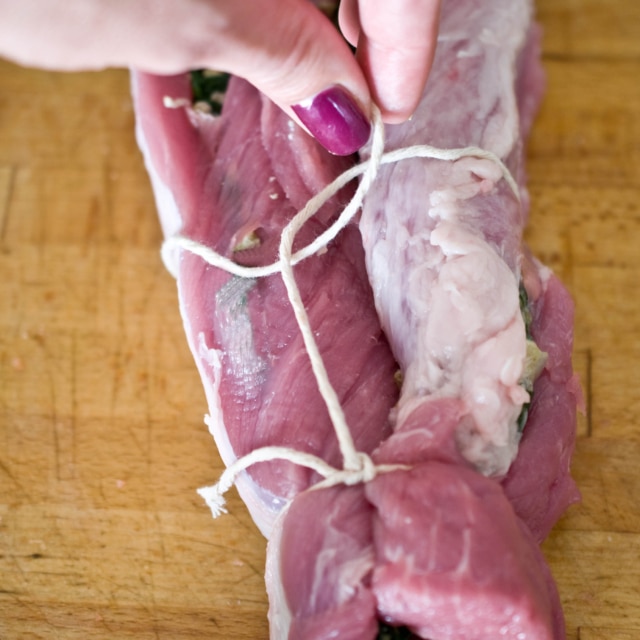
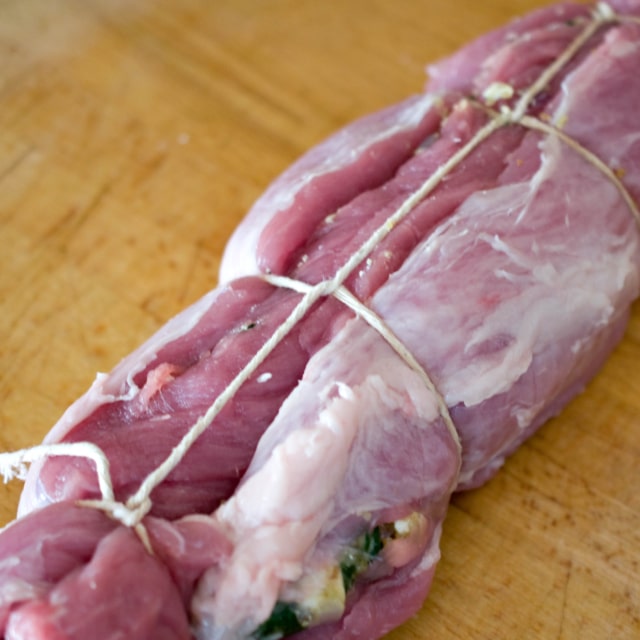
Starting at the side closest to you, roll the pork tightly.
Once that is rolled, cut about 2 feet of kitchen twine.
Tie one end of the twine tightly around one end of the loin.
Place the long end of the twine about two inches down the top, center of the loin. Securing the two inch line in place with your thumb, bring the rest of the twine underneath the loin.
Bring the kitchen twine back underneath the twine elbow you just created and pull tightly.
Continue this process two of three more times down the length of the loin until you reach the end. Secure tightly at the far end.
Roll the loin in bread crumbs and bake at for 30-40 minutes of until the internal temp is about 160. You still want a slight hint of pink in the center of the loin.
(30 votes, average: 4.80 out of 5) You need to be a registered member to rate this.Loading...
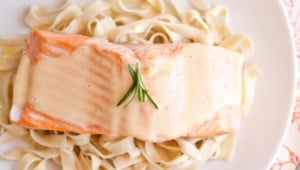
There are always exception to even the most powerful rules. This leaves a movement and an honestly to the lives we live, without the guilt of hypocrisy. The rule I am adding an addendum to is my strong allegiance to West Coast beers. Although great beer can be found nearly everywhere in the world these days, I have a powerful draw to local food and drink. I’ll make a unabashed exemption to my locavore attitude in support of my love for Allagash. In fact, Allagash Black was one of the beers I choose for my profile shot, and a fabulous example of a well crafted stout. If I ever make it up to Portland Maine, I’ll be making a very long stop at the brewery.
Today, I used Allagash’s freshman beer, their first ever product that was an undeniable success and pioneer in American Brewed Belgian Wheat Beers, The Allagash White.
Ale Steamed Salmon With Belgian Wheat Beer Bearnaise
4 Salmon Fillets, about 3 oz each
2 bottles of Allagash White
2 tbs vinegar
1 tbs finely chopped shallots
1/4 tsp white pepper
2 tbs fresh tarragon
1 tbs chervil
1 sprig fresh parsley
4 egg yolks
1/2 tsp salt
2 sticks unsalted butter
Rice or pasta for serving
Preheat oven to 350.
Place a wire rack over a rimmed baking sheet, place the salmon fillets on the rack. Pour one bottle of Allagash White in the bottom of the baking sheet, making sure that the beer does not submerge the wire rack. You want at least 1/2 inch between the beer and the top of the wire rack.
Cover the baking sheet with aluminum foil, making sure to tent the foil over the salmon so that the foil does not touch the fish at all. Secure tightly, in order to trap the steam inside the foil.
Bake for 15-18 minutes or until the salmon flakes easily with a fork.
While the salmon is cooking, make the Bearnaise.
Add ½ cup of the remaining Allagash beer, the vinegar, shallots, pepper, tarragon, chervil, and parsley to a pan over medium heat. Allow to simmer and reduce until about 2 tbs of liquid remain, about ten minutes. Pour through a fin mesh strainer to remove the solids, allow to cool.
In a food processor add the 2 tbs of liquid, egg yolks and salt. Melt the butter in a sauce pan until very hot and just starting to bubble. Remove the stopper from the top of the food processor lid. Turn on the food processor, allowing to process for a few seconds before beginning to slowly pour the melted butter into the food processor while it is still running. Allow to process until well combined and frothy, about 3 minutes.
Plate the salmon over rice or pasta, pour about ¼ cup sauce over each plate.
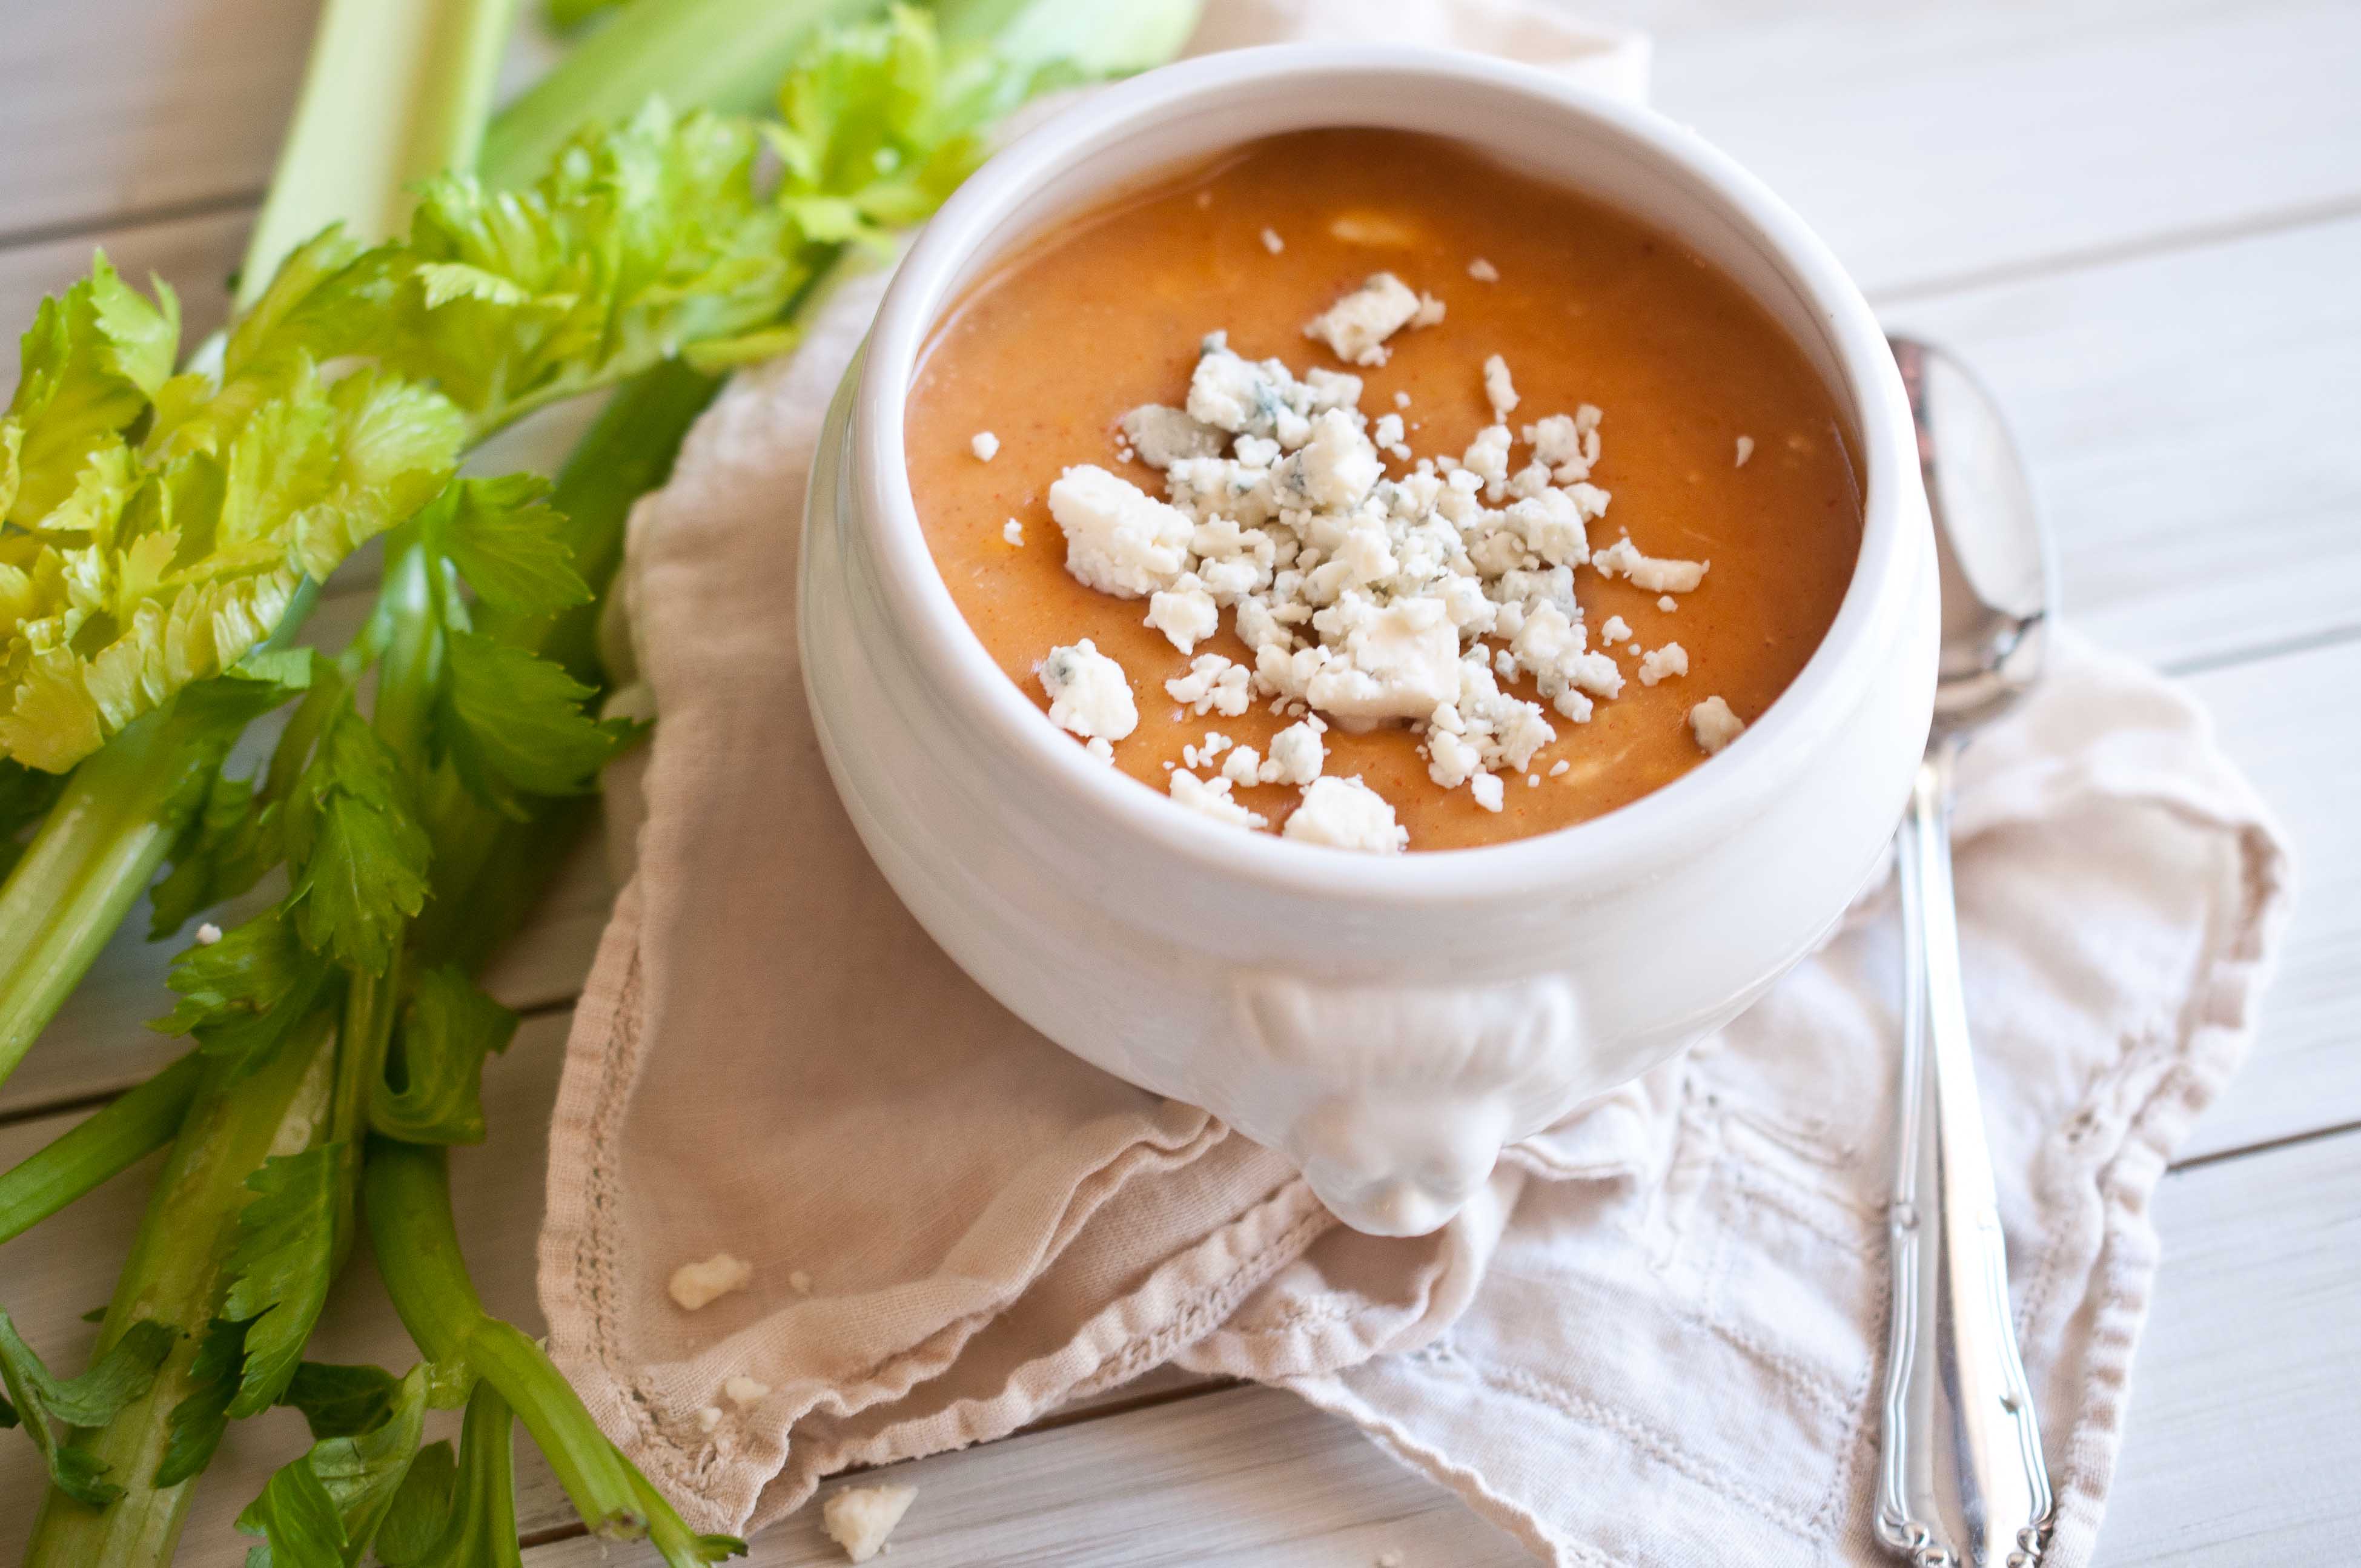
I was craving chicken wings AND pot pie (since pot pie is my new found love) and I just figured they would be super-awesome-amazing mixed together.
But I didn’t want to just say, "1/2 cup of hot sauce" because it felt like I wasn’t really doing enough. Plus, all hot sauces are not created equal and I didn’t want to start down that spiral of over analyzation that I tend to get sucked into.
I think too much.
I just made my own. Which ended up being a hybrid of the ingredients listed on the hot sauce containers I had in the fridge and the ingredients I had in my pantry. Turned out pretty great, and so did that soup.
If you have a favorite hot sauce, one that you just adore so much you are even tempted to put it on your waffles in the morning, feel free to use that instead.
Or you can even make the non-pot pie version, and it’s a creamy, yummy soup.
3 cups red potatoes, peeled and chopped into cubes
2 cups raw, diced chicken
½ cup celery, chopped
½ cup blue cheese crumbles
Salt and pepper to taste
Preheat oven to 400.
In a large pot, or Dutch oven, melt the butter over medium high heat. Add the onions, stirring occasionally, until opaque. Add the garlic and stir. Add the flour and whisk until well combined with the butter. Add the chicken broth and bring to a simmer. Add the potatoes and cook until very soft. Remove from heat and blend until smooth with an immersion blender.
Return to heat and add the buffalo sauce and the chicken cubes and allow to cook until the chicken is cooked through. Remove from heat and stir in the blue cheese and celery. Place four ceramic, oven safe bowls on a baking sheet. Divide the filling equally between the four bowls.
Once the dough has chilled, place disk on a very well floured surface, add flour to the top of the disk as well. Roll out into an even thickness. Cut out 4 circles that will cover the dishes with at least a one-inch overhang on each side.
To prevent sticking, spray the rim of the baking dish with cooking spray. Top each dish with the dough circle, pressing into shape. Cut a few slits in the top to vent heat. Brush with melted butter.
Cook at 400 for 20-22 minutes or until golden brown.


