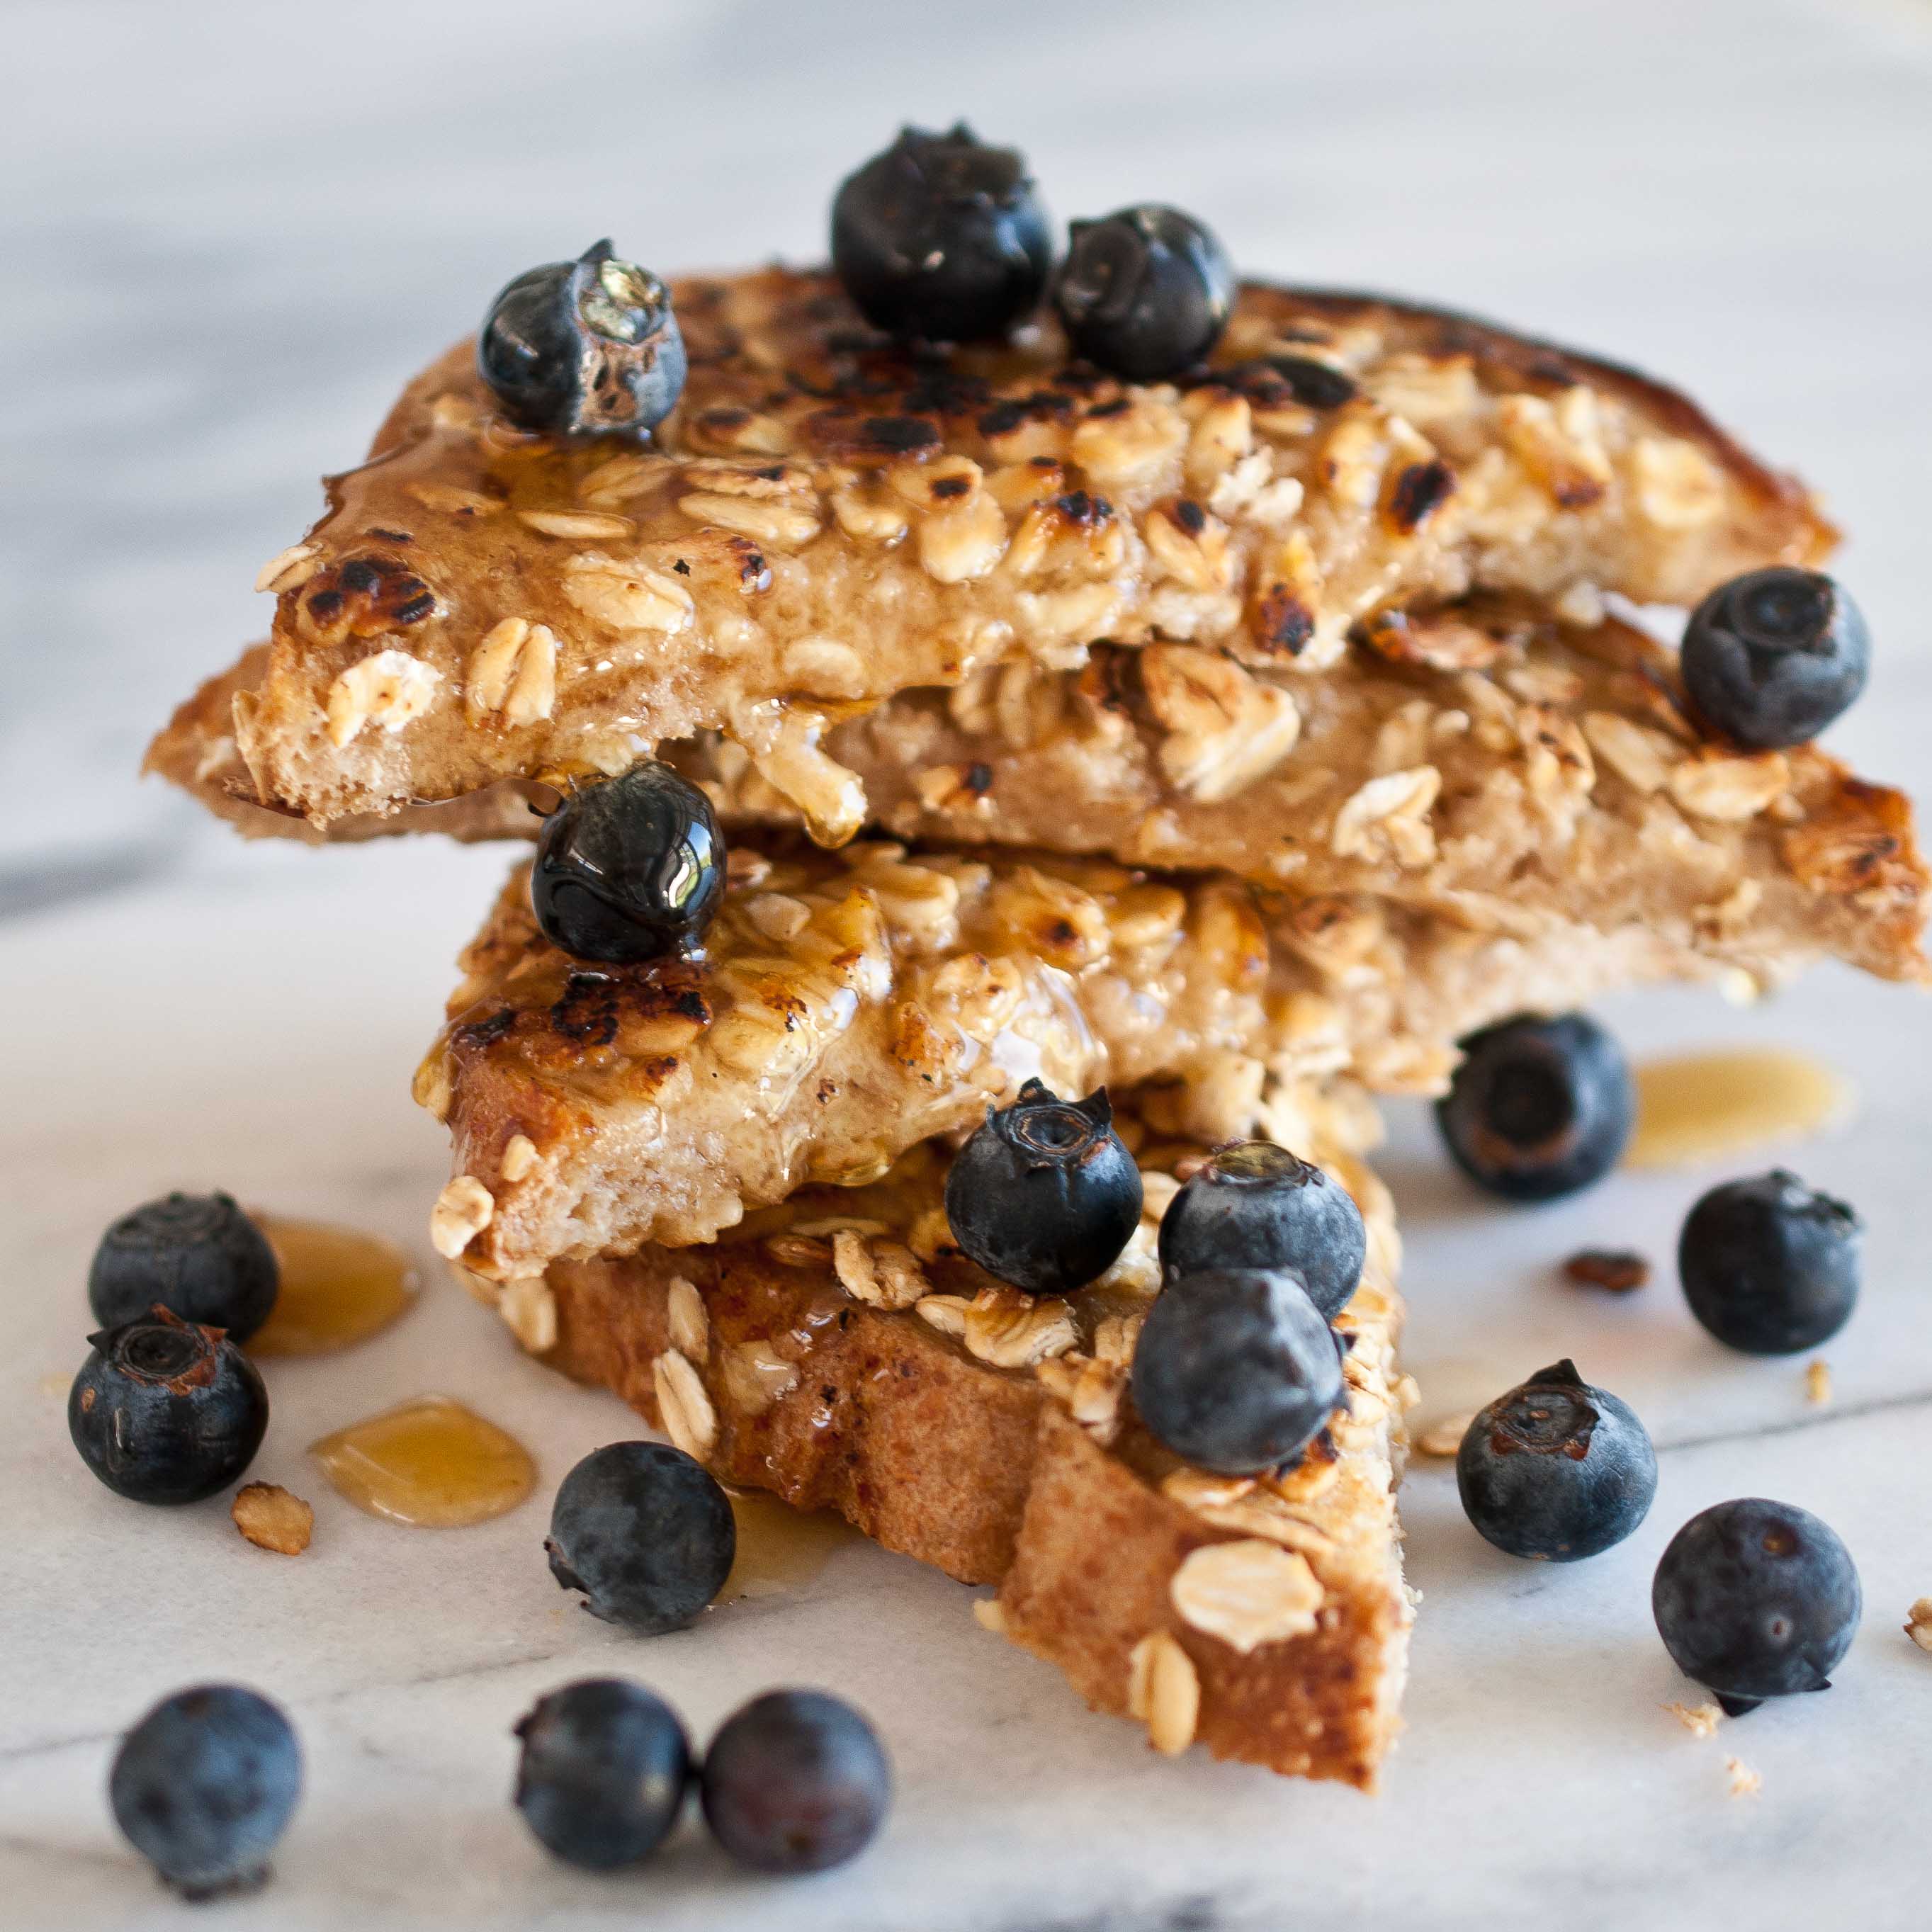
Every once in a while this happens. I made a recipe I love, and then it sort of slips away and never gets posted. This is one of those recipes. I can’t even remember why it didn’t get posted, maybe because I don’t really like the photos (sorry my ego got in the way of sharing a great dish with you .)
But I DO remember really loving it. Not just because it had a ton of flavor, and was really delicious, but because it’s low calories, naturally dairy and gluten-free AND it is packed with an insane amount of antioxidants, heart healthy foods, and that good stuff we need to shove into our bodies after the collective gluttony we all gleefully participated in over the past few days.
It’s like detox, but really, really delicious.
To be honest, the only reason I remember that it was buried in the recesses of my Dropbox, is an email I got from a PR person at the Blueberry Councill about a recipe contest. And although I have been drawn to a recipe contest or two in my day, I really don’t have the time for that right now. SO, it seemed to be fate that I had one. A really fabulous, healthy and delicious blueberry recipe all ready to go. So thank you, Blueberry Council, for the fabulous berries and the timely reminder.
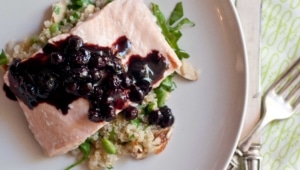
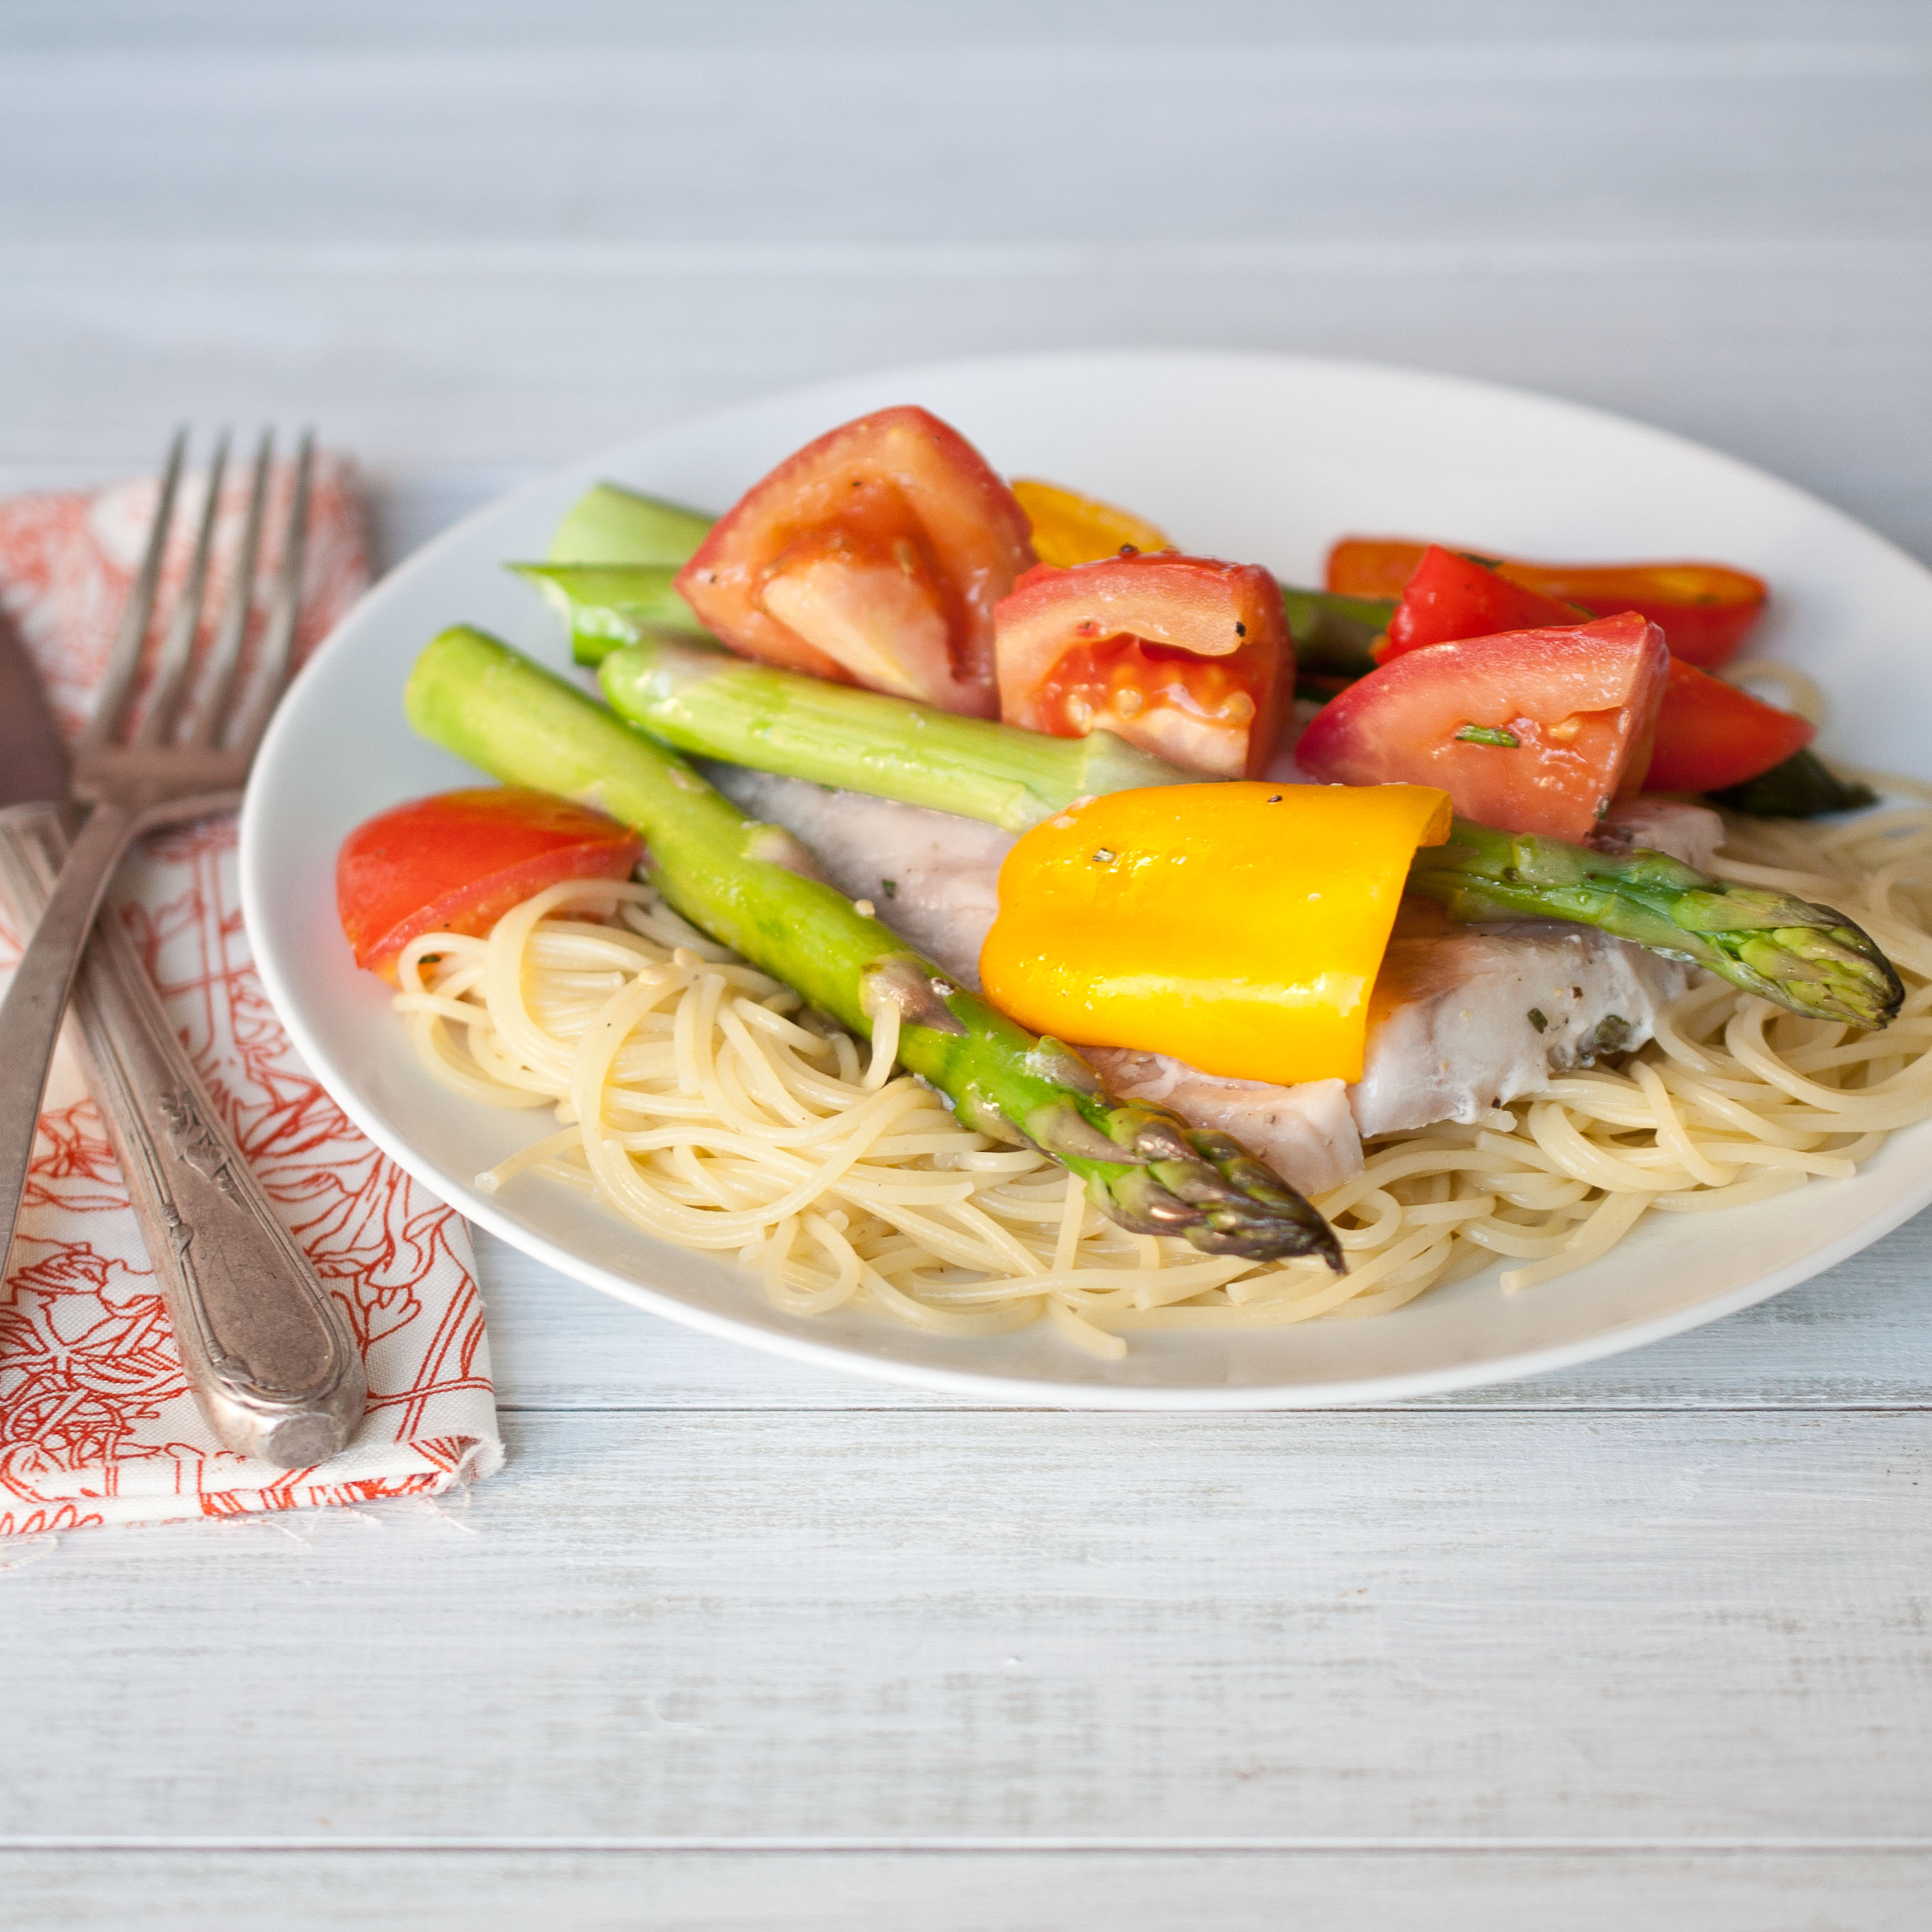
Oven Steamed Salmon with Blueberry Balsamic Reduction
Ingredients
For the Salmon:
4, 3 oz Salmon Filets, skinless
2-3 cups low sodium vegetable broth
For the Sauce:
1 medium shallot, minced (about 1 tbs)
1 tsp olive oil
1 cup fresh blueberries
¾ cup balsamic vinegar
½ tsp black pepper
For the Salad:
1 ½ cups cooked quinoa
1 cup chopped arugula
½ cup shelled Edamame beans
½ cup dry roasted almond slivers
½ tsp sea salt
(Makes 4 servings)
Instructions
Place a wire rack over a rimmed baking sheet , place the salmon fillets on the rack. Pour the vegetable broth in the bottom of the baking sheet, making sure that the broth does not submerge the wire rack. You want at least 1/2 inch between the liquid and the top of the wire rack.
Cover the baking sheet with aluminum foil, making sure to tent the foil over the salmon so that the foil does not touch the fish at all. Secure tightly, in order to trap the steam inside the foil.
Bake for 15-18 minutes or until the salmon flakes easily with a fork.
In a pan over medium high heat, add the oil and allow to get hot but not smoking. Add the shallots and sauté until opaque. Add the blueberries and balsamic, reducing heat to maintain a low simmer. Cook until reduce until about half, and thickened. Remove from heat and stir in the black pepper.
Combine all of the salad ingredients in a bowl and toss to combine. Divide the salad among four plates. Top the salad with a salmon fillet and top each salmon fillet with the blueberry balsamic reduction.
Before we get started on the essential skill of making your very own batch of candied bacon, I need to pause to tell you some amazing news:
I signed a cookbook deal last week.
And so begins the frantic, not enough time, spending to much money on groceries, stress, lack of sleep that has nothing to do with my toddler, phase of my life. The book is focused on cooking with craft beer, the subject of my other blog, The Beeroness, from which the book truly sprang.
Even with all the warnings from those who have gone before me, all the friends I have who have written cookbooks, novels, non-fiction research books, I am thrilled. Even though I realize that writing a book is light years more work and far less money than anyone ever thinks, I’ll never stop being grateful for being given this opportunity.
Now all I have to do is write it.
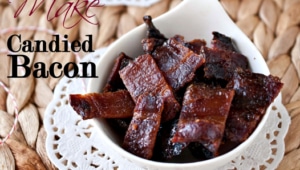
So for now, lets make some candied bacon.
First, what do you DO with candied bacon? The better questions is, what wouldn’t you do with candied bacon?
For starters, here are some fabulous ideas:
Candied bacon topped brownies (just sprinkle on top of your favorite brownies before baking)
Candied bacon & Vanilla ice cream
Candied bacon sprinkled on maple doughnuts
Candied bacon mixed into your favorite pancake batter
Candied bacon waffles
Candied bacon on salad (for real)
Candied bacon chocolate chip cookies
Candied Bacon sprinkled on a chocolate tart
It’s endless.
Ingredients:
12 strips of bacon
1/4 to 1/2 cup brown sugar
Preheat oven to 350.
Sprinkle one side of the strips of bacon with brown sugar.
Press it into the bacon well.
Place the bacon, sugar side down, on a wire rack on top of a baking sheet. You are going to want to cover the baking sheet with a Silpat or aluminum foil, the drippings will burn and be difficult to clean.
Top the other side of the bacon (the side facing up) with more brown sugar and press into the bacon.
Bake at 350 for 15 minutes.
Using a pair of tongs, turn each slice and continue to bake until a dark brown and cooked through.
Bacon will not crisp in the oven. Bacon will not get crispy until it cools and the sugar has hardened.
Allow bacon to cool, chop and use in all sorts of amazing ways.
Living in LA during "fall" makes you feel like a bit of crazy person.
I’ll pull on my tall boots and a chunky sweaters that I am rightfully entitled to wear in late October, later realizing that the weather will creep up into the 80’s by mid day. And I’m the crazy lady at Starbucks ordering a pumpkin latte, wearing vintage Frye boots, jeans and a thick wool sweater while I could be wearing a jersey knit sundress like the normal, non-crazy, girl behind me in line.
And still, I persist. I even go home and make soup. Sweating the entire time I eat it. In my sweater, with the air conditioner running.
I spent three years as a vegetarian. The best thing I ever did when it comes to cooking, it opened up a world of produce to me and reminded me of all the foods I would often overlook just because they didn’t contain meat. To this day there are still things I prefer in a vegetarian or vegan form.
When it comes to thai cooking, fish and oyster sauce are frequently called for. Here is an article about how to make those, DIY style in your own kitchen using non-meat products.
1 tbs fish sauce (For vegan, use adaptation listed in above post)
1/4 cup roasted peanuts, crushed
1/4 cup green onions
1 tsp crushed red peppers
Instructions
In a large pot or dutch oven, heat the oil. Add the garlic and stir. Add the egg and cook until softly scrabbled. Add the tofu (or chicken), cook until lightly fried about 3 minutes.
Add the broth, then add the noodles, soy, sriracha, fish sauce, and peanuts. Cook until noodles have softened, about 5 minutes.
Serve topped with peanuts, green onions and red chili flakes.
I’ve had a busy week, and my body has decided to request that I slow down.
On Friday, I was asked to do a cooking segment on CBS news in Los Angeles. I’ve spent the week preparing. My husband helped me run through the segment in the evenings, and for an entire week my drive home consisted of me practicing my talking points, out loud, looking like a crazy person, on an LA freeway. It all seemed to work, the segment went well:
As soon as I started my drive home from the studio, I started to crash. The next morning I lay in bed as my incredible husband got up with Tater, and I was able to sleep until the late, late hour of 8:45. In Mom Time, that’s pretty close to sleeping until noon. As I lay in bed, trying to pull myself together and trick myself into thinking I’m not actually sick, I watched this, this and this, and laughed so hard I think it worked. Maybe it’s true what they say about laughter and that whole "Best Medicine" thing.
And on Thursday I leave for the Foster Farms Cook-Off. I’ll be competing against 4 other cooks for $1,000 and a trip to Napa for the Cook Off Finals with a prize of $10,000.
Wish me luck! I’ll be posting on twitter and instagram as the contest goes along.
And now, the recipe. I bought a huge bag of Masa to make corn tortillas with, and if you have never made corn tortillas, you really, really need to . They’re so good, nothing like those cardboard disks they sell at the store, and they take about 5 minutes. The flavor is so good, I’ve been throwing the corn flour into everything, I’m totally in love with it. And the Jalapeno Peach Jam I also used on pork chops. So Good.
Coconut Cornmeal Shrimp With Jalapeno Peach Jam
Ingredients
For The Jam:
3 cups peaches, skin removed, chopped
2 tbs fresh lemon juice
1/4 cup sugar
1 jalapeno, stem and seeds removed, diced
1 tsp cornstarch
For The Shrimp:
1 can coconut milk
2 lbs raw shrimp, shell and tail removed
1 cup Masa Harina
1/2 cup shredded coconut
1/2 tsp salt
1/2 tsp pepper
pinch cayenne pepper
1/4 cup oil
Instructions
Add the raw shrimp and coconut milk to a bowl. Chill in the fridge for about 45 minutes while you make the jam.
In a pot over medium high heat, add all of the jam ingredients. Stirring occasionally, allow to simmer (not boil) until thick, and the peaches have broken down, about 45 minutes. Smash peached with a potato masher until a jam like consistency is reached. Remove from heat and set aside.
In a bowl, combine the masa, coconut, salt, pepper and pinch cayenne. One at a time, remove the shrimp from the coconut milk and allow to drain a bit before adding to the cornmeal mixture. Coat the shrimp well in the corn meal mixture.
Heat oil in a large skillet over medium high heat. Add the shrimp and cook until golden brown, about 3 minutes per side.
Remove from heat. You can either top the shrimp with the jam or serve the jam as a dipping sauce.
My two-year old has started to name her stuffed animals.
While the majority of two-year olds default to naming stuffed animals after physical attributes (Spot, Stripes, Blackie, Snowy), Tater has decided, all on her own, on the following names for her 5 favorite stuffed animals, who she collectively refers to as her "Pals:"
Dobies, Rocket, Stewie, Sam and Zach
I have no idea where these names came from and to my knowledge she knows no one by those names. I’m constantly impressed by her and inspired to push the boundaries of my own creativity. Because if she has already started to eclipse the limits of my own ability to innovate what will I have to offer her in the years to come?
While Tater and Stewie (the bear) helped me make these pork chops I needed to add something new. I dug out some peaches and made a little jam with some jalapeno.
Not as creative as a two-year old naming Pillow Pet "Dobies", but pretty tasty and I’ll have to work on upping my game so I’m not out crafted by my offspring, who requested "Chocolate Bacon Pancakes" for breakfast on Saturday morning.
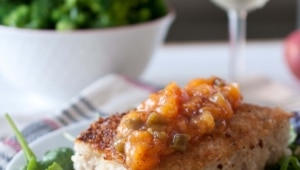
Panko Pork Chops With Jalapeno Peach Jam
Ingredients
For The Jam:
3 cups peaches, skin removed, chopped
2 tbs fresh lemon juice
1/4 cup sugar
1 jalapeno, stem and seeds removed, diced
1 tsp cornstarch
For The Pork Chops:
1 egg
1 cup Almond Milk (can use regular whole or 2% milk cow’s milk)
4 Boneless Pork Loin Chops
1 tsp salt, plus one tsp salt, divided
1 1/2 cups Panko Bread Crumbs
1 tsp pepper
pinch cayenne
1/4 cup oil
Instructions
In a pot over medium high heat, add all of the jam ingredients. Stirring occasionally, allow to simmer (not boil) until thick, and the peaches have broken down, about 45 minutes. Smash peached with a potato masher until a jam like consistency is reached. Remove from heat and set aside.
In a bowl, combine the milk and egg, beat well. Sprinkle the pork chops on all sides with salt and add to the milk mixture. Place in the fridge and allow to marinate for one hour.
In a bowl mix the bread crumbs, remaining 1 tsp salt, pepper, and pinch cayenne. Remove the chops from the milk mixture, allowing excess milk to drain off. One at a time add to the bread crumbs and toss to coat.
In a skillet with a lid, heat the oil over medium heat (not too hot or the bread crumbs will burn). Add the Panko coated chops to the pan and replace the lid. Cook until the underside is golden brown, about 4 minutes, carefully turn the chops and replace the lid, allow to cook until cooked through but still moist in the center, about 4 additional minutes.
I’ve spent all day with an internal struggle about the limits of my acceptance of other people. Probably a much too serious intro for a post about pancakes, but bear with me, you might have some insight I could really use.
I’ve always prided myself on being a person who is able to see people for who they are, in the context of their own culture and life experiences and find beauty, talent and value without the qualification and framework of my own situation.
Whether it be a trailer park in South Central Los Angeles, a cave in Morocco, or a bus bench in Greece I’ve always been able to do that. Easily.
But today I was challenge with a though: what about hateful, small-minded, bigoted people?
What about racists?
The homophobic?
Are those people I should love and keep in my life?
I had an interaction with someone who left me wondering about my assertion that I have the anthropological capacity to care about other people regardless of who they are, what their beliefs or culture dictates, without judgement.
Can I judge someone merely for judging others? Isn’t that the epitome of hypocritical?
Isn’t the greater definition of open-minded and open-hearted to love those who are a challenge to love? I do believe that there is good in everyone. But is it worth it to try to dig past the hate and anger of a racist or homophobic friend or family member, or is that level of toxicity a fundamental deal breaker?
If you have some insight, let me know. For now I will proceed with caution, because the bottom line is I want to love everyone. I don’t want anyone, or any group of people, to be designated as a group I should hate. Because hate just breeds more hate.
Oatmeal Cookie Pancakes
Ingredients
1 cup flour
1/2 cup quick cooking oats
1/2 tsp salt
2 tsp baking powder
3 tbs brown sugar
1 tsp cinnamon
1/2 tsp nutmeg
1 egg
1 1/4 cup milk (use coconut milk for dairy free, this is what I used)
1 tsp vanilla extract
1/3 cup raisins (plus more for garnish)
Instructions
In a bowl add the flour, oats, salt, brown sugar, baking powder, brown sugar, cinnamon, and nutmeg, mix until well combined. Make a well in the dry ingredients, add the milk, egg and vanilla, stir until just combined. Add the raisins and stir.
Heat a griddle or skillet over medium heat, coat with cooking spray.
Drop about 1/4 cup of batter on the hot griddle. Cook until dry on the edges and bubbles start to form in the center. Flip and cook on the other side until cooked through, about 2 more minutes.
Julia Child would have turned 100 today. She’s an inspiration, not just for those of us who cook, but for anyone who is sitting in an unfulfilling life wondering how then ended up where they did. Anyone who thinks they are "too old" to start a new path.
Julia didn’t start cooking until she was 32 and she didn’t enter culinary school until she was 37. And just look at how that turned out for her, I’d say pretty well. What if she had felt "too old" to start learning how to cook? Would we still be putting canned pineapple slices on ham and eating Sarah Lee on special occasions?
Laura Ingalls Wilder didn’t start writing until she was in her 40’s and her Little House books weren’t written untill she was in her 60’s.
Martha Stewart was a stock broker until she started working on renovating a farm house at the age of 32.
Andrea Bocelli didn’t start singing opera until he was 34.
Grandma Moses didn’t start painting until she was 70.
Makes me feel like I have an early start on this career change I want to make. Instead of thinking "Who am I to do that?" Start thinking, "Why not me?" If they can do it, why not you?
Reminder: If you are in San Diego and want tickets to the Foster Farms Cook Off on September 7th, check this out.
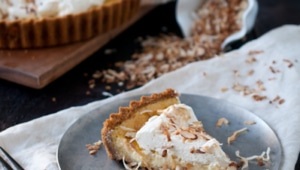
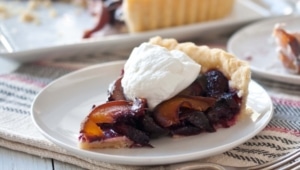
Cherry Peach Tart With Coconut Cointreau Whipped Cream (Vegan)
Ingredients
Crust:
2 cups flour
1 tsp salt
1 tsp sugar
3/4 cup of vegetable shortening (can sub butter for non vegan)
2 to 4 tbs ice cold water
For the filling:
3 cups cherries, halved and pitted
1/3 cup powdered sugar
1 tbs flour
2 yellow peaches, sliced
For the whipped cream:
1 can full fat coconut milk, chilled in the fridge overnight (important) (can sub 1 cup whipping cream for non vegan)
Chilled bowl (like the bowl of a stand mixer, just place it in the fridge for a few hours)
3 tbs powdered sugar
1 tbs Cointreau
Instructions
In a food processor, combine 1 1/3 cup flour, salt, sugar and shortening, process until well combined. Add the remaining flour and process again until combined. Transfer to a bowl and add the water with a wooden spoon (don’t add the water while the dough is in the food processor or your dough will be brittle and cracker-like). If the dough isn’t moist enough, you can add more water, a tsp at a time until the consistency is right. Dump the dough into the bottom of a 9 inch tart pan with 1 1/2 inch high sides, sprayed with cooking spray. Starting with the sides first then the bottom, form the crust into the pan. Chill the crust for 2 hours in the fridge. (If you haven’t yet, put a bowl in the fridge to chill to make the whipped cream)
(*Note: if you have a smaller tart pan, mine seems to be quite large, you will need less tart dough, pull out any excess and make a mini tart in a muffin tin. You can also double the recipe, form the excess into a disk, cover with plastic wrap, place in a Ziplock freezer bag and freeze. should keep up to two months)
Preheat oven to 350.
Add the cherries, sugar, and flour to a bowl and toss to coat. Add the cherries to the tart crust. Top with sliced peaches. Bake at 350 for 25-30 minutes or until tart crust is a light golden brown. Allow to cool before removing from tart pan.
Make the whipped cream.
Open the can without shaking. Scrap only the fat layer at the top and into the chilled bowl, do not include any of the water in the bottom of the can, just the fat layer. Using a hand mixer, on high, whip until light and fluffy. Add the powdered sugar and whip until combined. While the mixer is running, slowly add the Cointreau until combined.
First, I am still wrestling with this realization that I actually DO like coconut after years of testifying to my hatred for it. But it turns out that I love it, and my favorite of all the coconut products is coconut milk. And although I still loath "coconut" candy and all the oddly texture invasive disgust that it has assaulted my mouth with over the years, but I can’t hold that against the amazing substance that is coconut milk.
I can’t stop putting it in things and my fervent adoration has only grown once I have discovered what it does once it hits my KitchenAid Ice Cream maker (affiliate link).
A creamy texture that is much better than any cow’s milk product I have ever made. You’ve seen a can of full fat coconut milk, and that creamy layer on the top, it’s beautiful. And it’s incredible in ice cream, with a smooth and rich flavor that reminds me of the gelato I had in Italy.
You will love this and everyone will be shocked that it’s vegan. I can’t even believe it.
Chocolate Coconut Ice Cream
Ingredients
2 (13.5 oz) cans of full fat coconut milk
1 1/4 cup sugar
1/2 cup good quality unsweetened cocoa powder
Yield: About 2 1/2 cups
Instructions
In a pot over medium heat, add all the ingredients and stir. Allow to simmer until thickened slightly, about 8 minutes.
Place in a container and refrigerate until cold, about 4 hours.
Add to an ice cream maker and churn until set, about 15 to 20 minutes. Freeze until desired consistency is reached
*Note: I use a Kitchen Aid Ice Cream maker: churn time was 15 minutes for a "soft serve" consistency and another 2 hours of freeze time for a harder scoop style ice cream.
At the end of the month I have this little cooking on TV gig that I’m incredibly excited about. And as much as I strive to be unique and impervious to social pressure, none of that has been able to penetrate my own vanity. After the initial shock of being asked to cook on CBS, Los Angeles wore off my first very female thoughts went something like this:
"What am I going to wear?"
"The camera adds ten pounds. Awesome."
So here I am, trying to stay as healthy as possible until I can school the Los Angeles metro area on the mid-day news with an introduction to cooking with beer all while still trying to run two food blogs that dazzle you with fun and delicious food. Not as easy for me as I’d like.
I did, however, discovered that if I give up dairy, which I already find skeevey in it’s unmanipulated state, the battle to lose those last few pounds becomes much easier. Butter and goat cheese have been the only real sacrifices, the rest has been easy to ignore or replace.
Don’t forget to come back on Wednesday when I give the best chocolate ice cream I have ever had that happens to be dairy free. It’s insane how creamy it is. You’ll want that recipe.
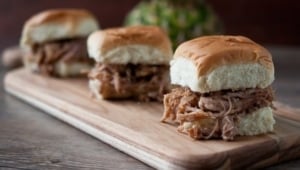
This recipe, which is dairy and gluten-free, gives you this delicious little mini burgers that are only about 90 calories each. And I am now one step closer to cooking on TV and not crying about it.
Chicken Sliders With Zucchini Buns
Ingredients
For The Patties
1 lb ground lean chicken
1 egg
1/4 cup panko (for GF, use crushed potato chips)
1/2 tsp salt
1/2 tsp pepper
1/2 tsp dry oregano
1/2 tsp dry basil
1 cup fat free chicken broth
Condiments & Toppings
1 to 2 large zucchinis, cut into 1/4 inch rings (buns)
Avocado Slices
BBQ Sauce
Pickled Jalapenos
Tomato Slices
Instructions
In a bowl, combine all the the patti ingredients (except the chicken broth) with your hands until well combined.
Spray the inside of a skillet (with a lid) with cooking spray, allow to get hot but not smoking.
Form the chicken mixture into patties about the width of your zucchini slices and about 1/2 inch thick. Cook on one side until browned on the bottom, flip and allow to cook for about 1 minute. Add the chicken broth until about half way up the sides of the chicken patties. Cover with a lid and allow to steam for about 3 to 5 minutes or until chicken patties are cooked through. Because fat is responsible for moist patties, very lean meat becomes dry very easily. This is the method I use to make sure the chicken is cooked through but is not dry.
Remove from pan and allow to drain.
Add the patties to the zucchini slices, top with condiments and serve.
I’m not much of a hard liquor drinker. That was something I inadvertently gave up when I became a mom, along with sleeping past 7am, peeing alone, and buying anything for myself without feeling selfish. It’s worth the price of admission, this tequila free/up at dawn/spectated toilet runs/"why am I buying this for myself when I could be buying something for my kid," life that I live as a person who grew another human in her guts.
Because she’s really amazing.
(Me & Tater in the healing waters of Santa Barbara a few days ago)
So I drink beer (the good stuff) or wine (the cheap stuff) unless you tell me that there is a cocktail on the menu that’s spicy. I love a nice hot cocktail. Lately, jalapenos have been popping into drinks all over the country and I couldn’t be happier about it.
My undying love for the Rooster Sauce put the idea for a red hot cocktail in my head a few months ago. And adding strawberries gave the perfect balance. Be careful, alcohol intensifies heat so start with a small amount (this recipe calls for only 1/2 tsp) and then decide if you want to add a bit more.
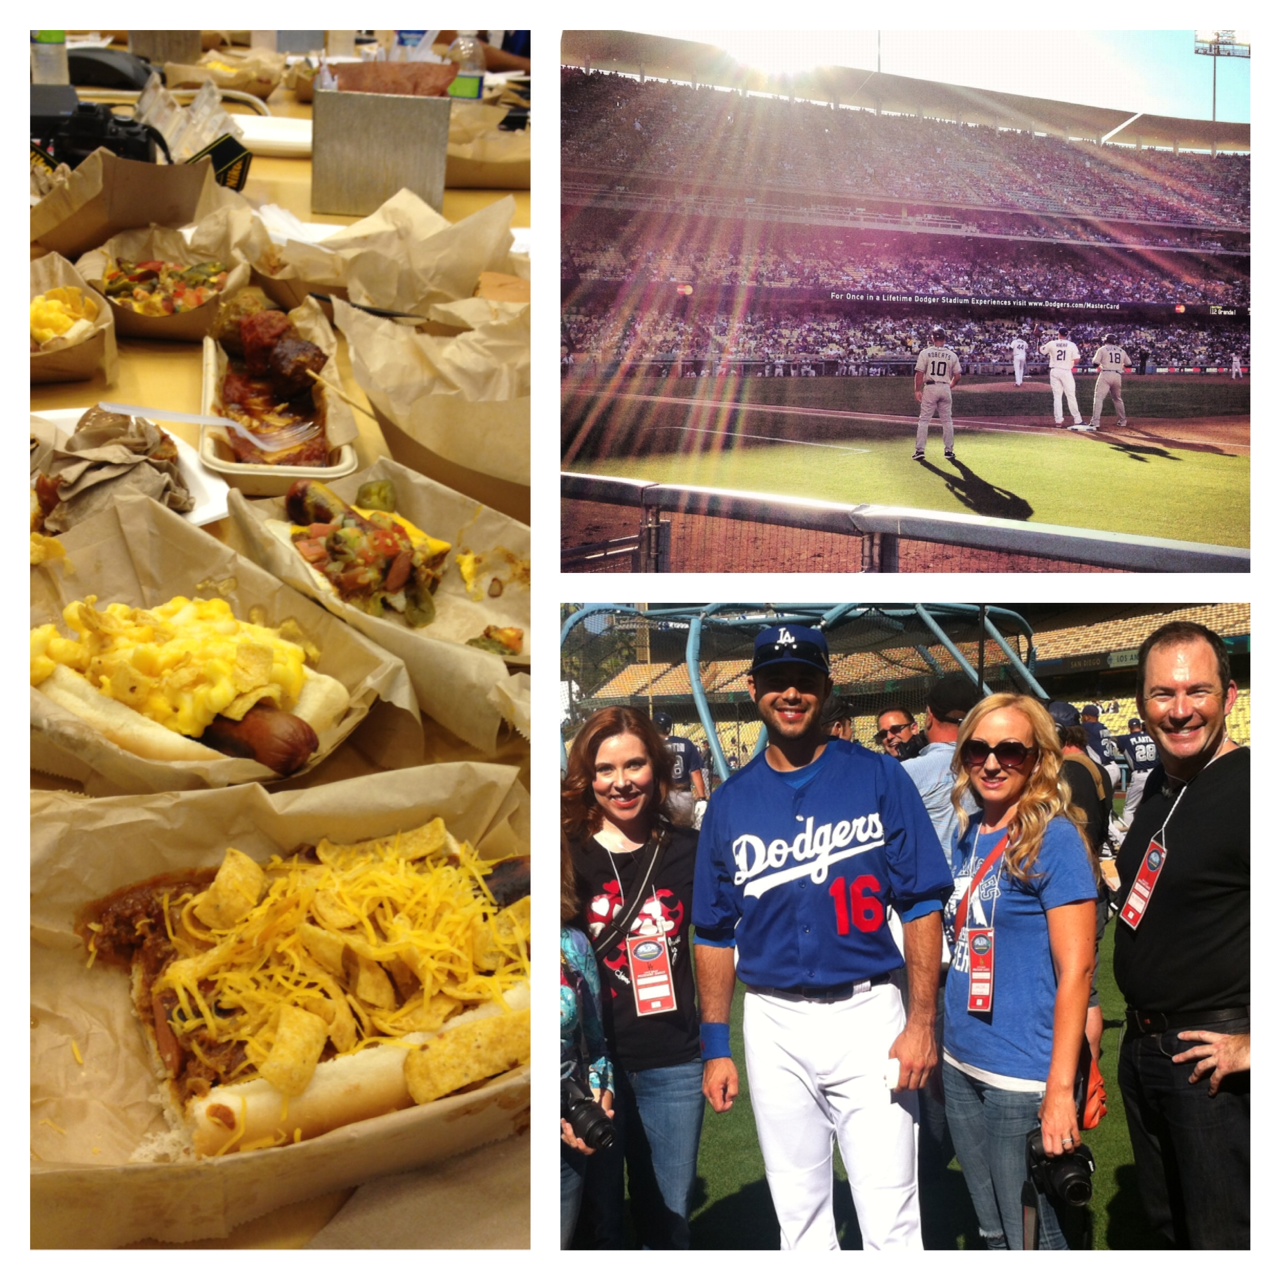
Not just Went. I was asked to attend a VIP tour of Dodger Stadium for a Food Bloggers event that included hanging on the field, a tour of all of the exclusive restaurants, a buffet of all of the incredible hot dog creations the stadium chefs can dream up (macaroni and Fritos dog?!) and even a chat with Andre Ethier. Who told me he doesn’t drink beer (I’ll forgive him, kid can play some ball). And to top it all off, we got to sit in box seats right on the field.
If you follow me on instagram (@JackieJDodd), these pictures will look rather familiar.
Moments like these remind me to take a second to just sit and be grateful. Even when I feel like I am nowhere near the goals I have set for myself I always take time to appreciate what I have. The opportunities, people and experiences that give so much more to my life than I even deserve. I just finished Marcus Samuelson’s Yes, Chef and was incredibly inspire by his work ethic: "Always chase one shot of good luck with two shots of hard work" Great advice, Marcus. I’ll take it. Sitting side stage at America’s Favorite Past Time felt like a shot of good luck, so this week I’ll chase it with an even harder push towards my goals.
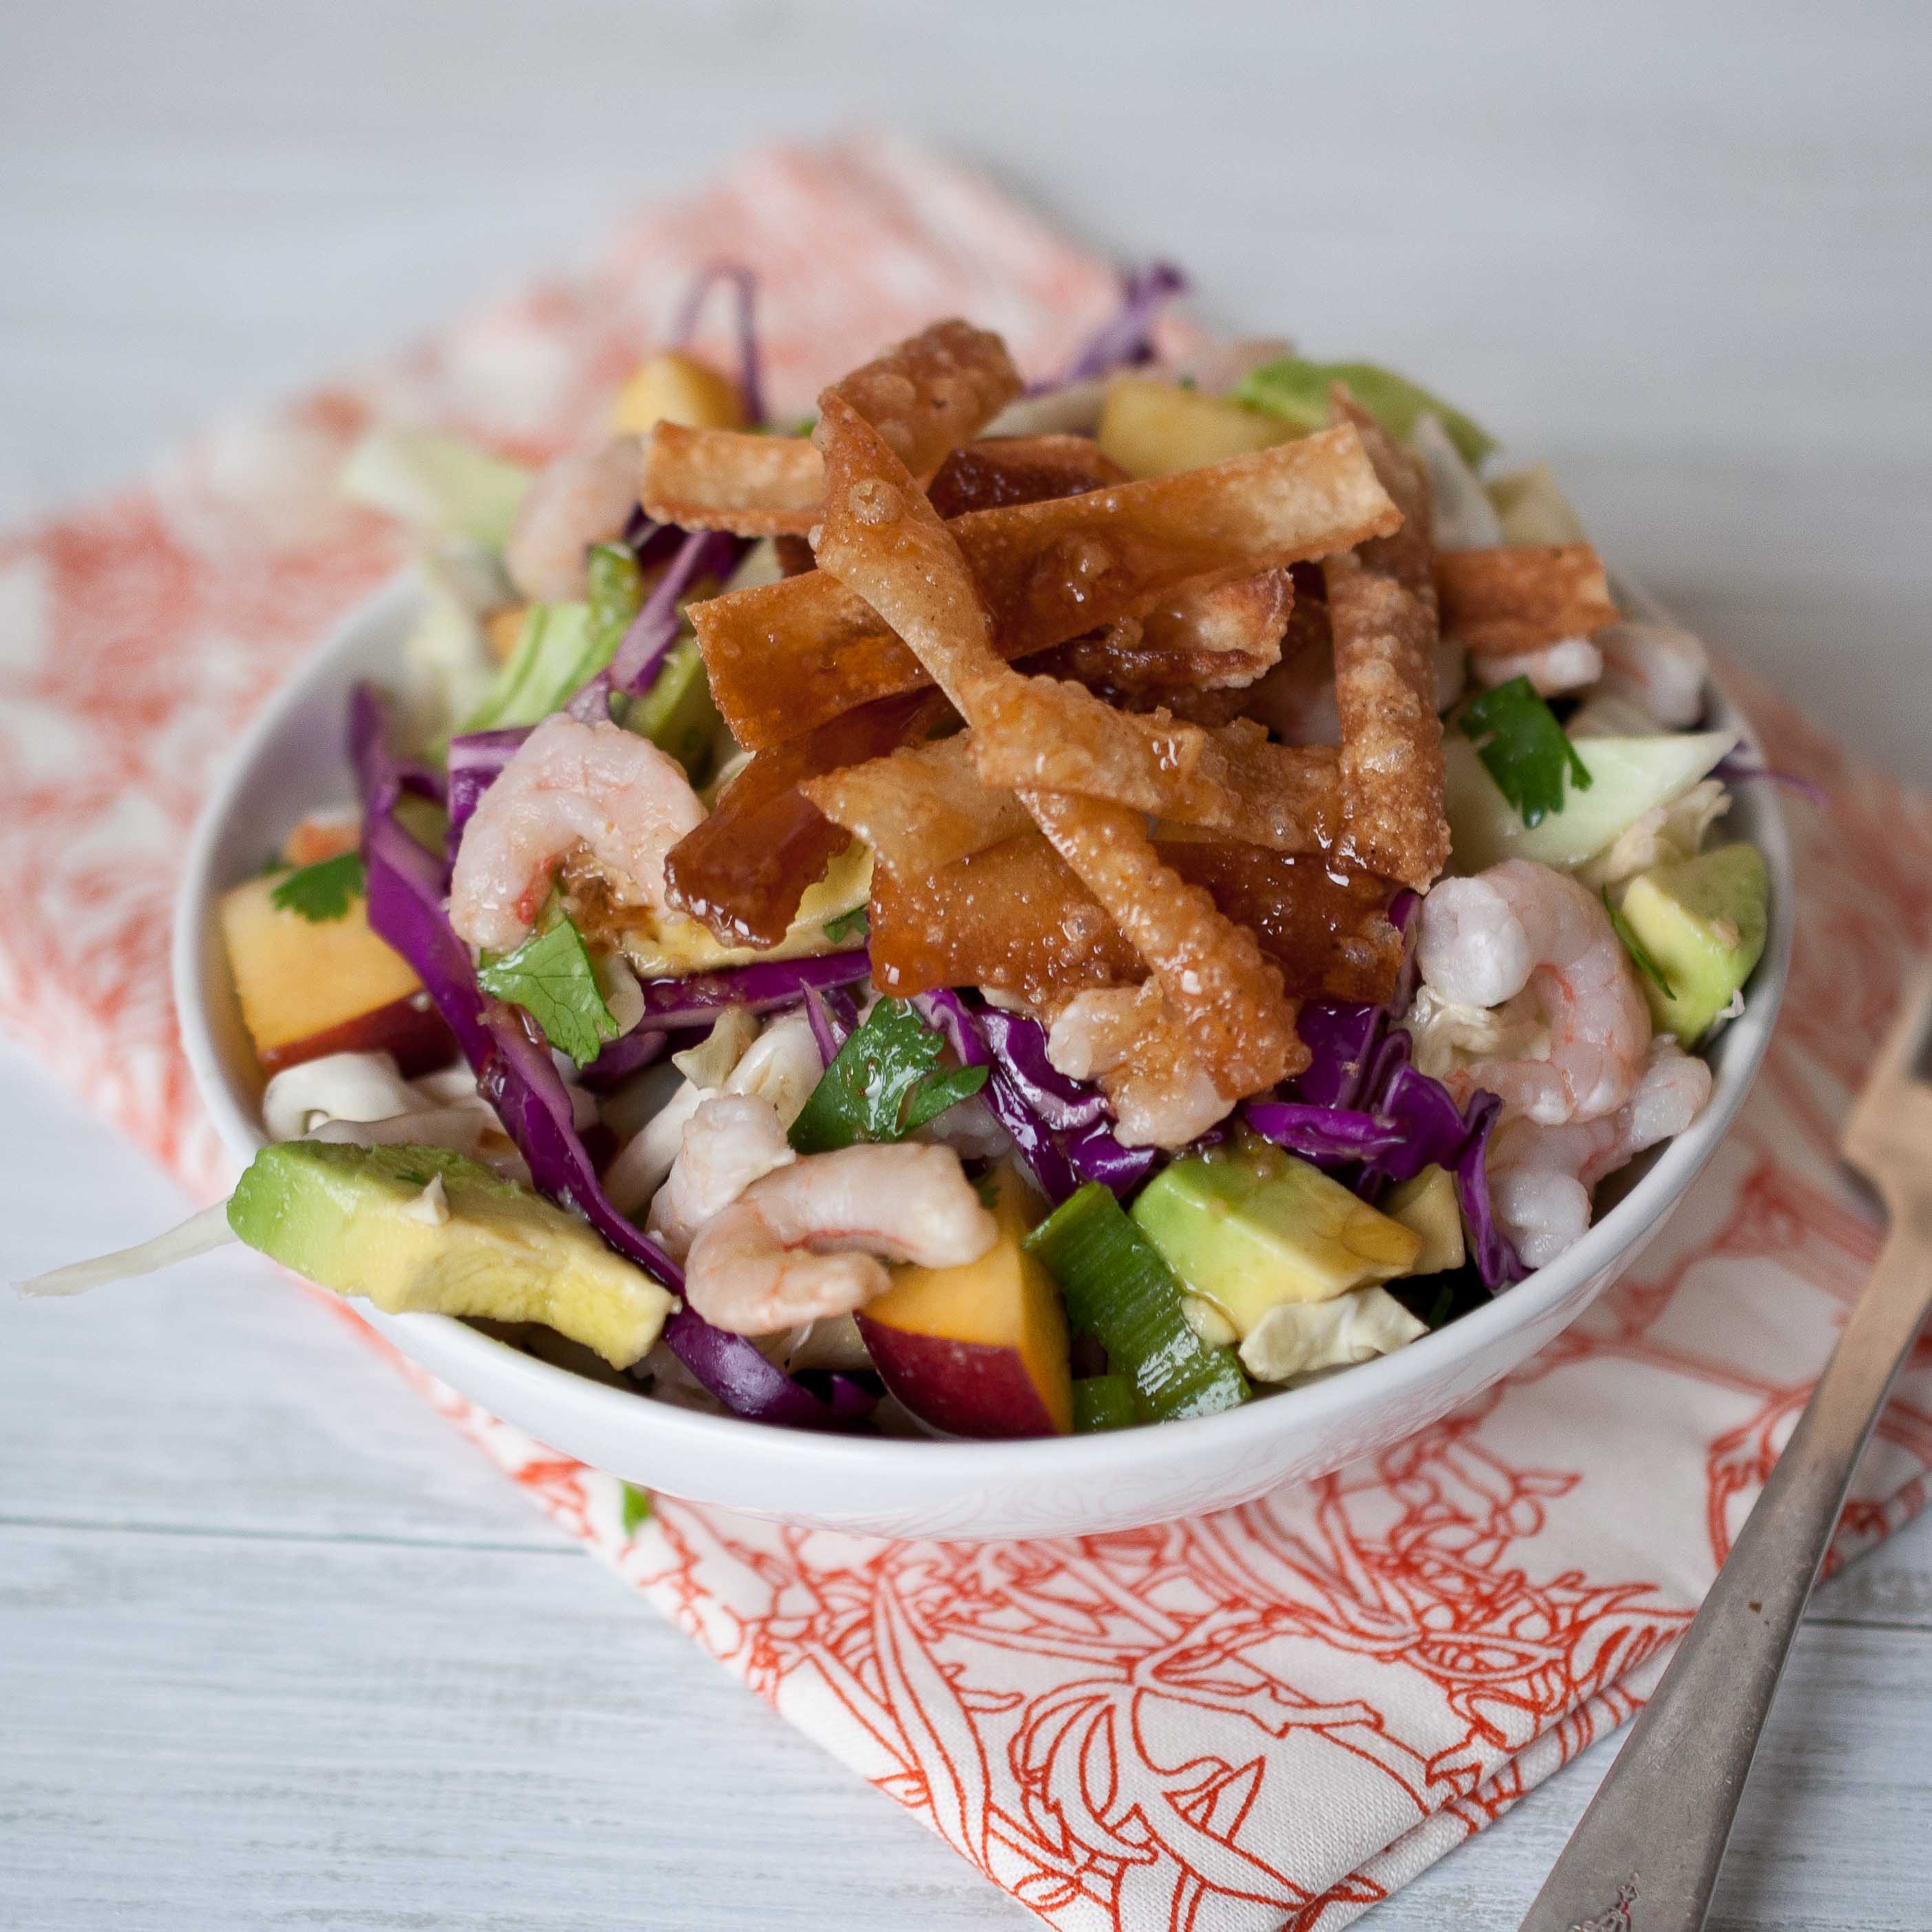
And after eating my body weight in hot dogs and chocolate cake at the Stadium, I needed a salad to balance it all.
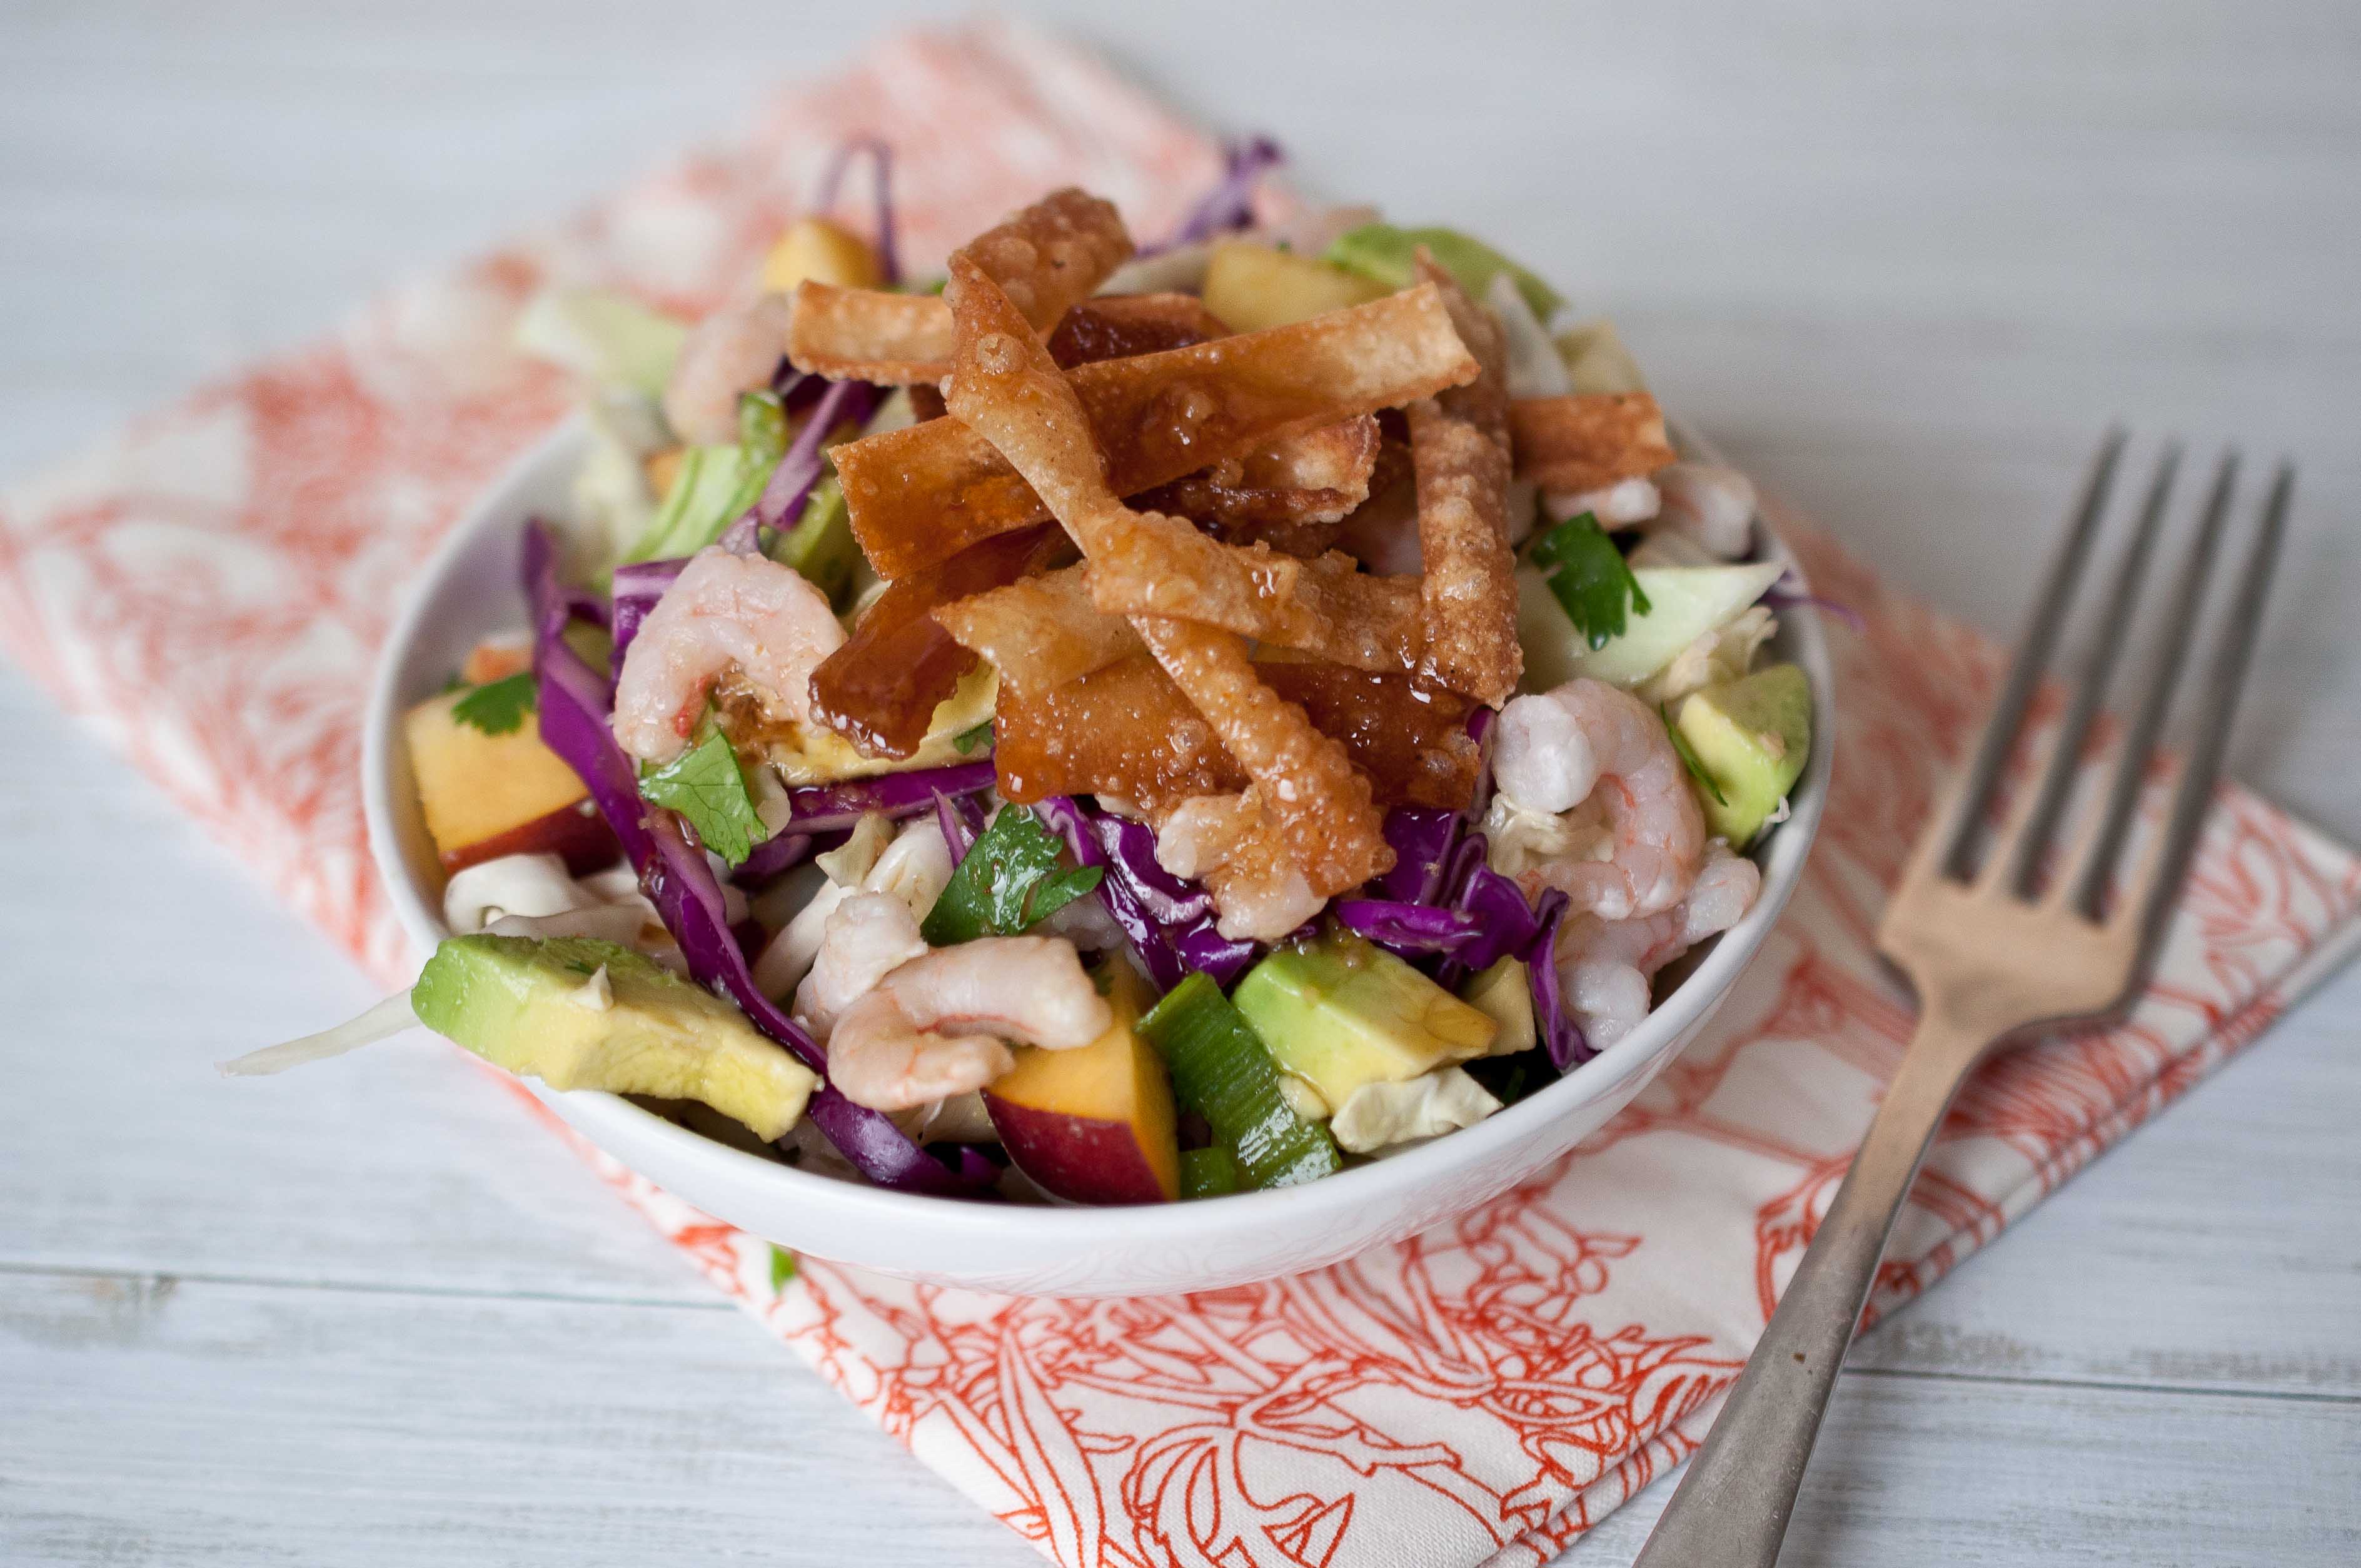
And I know that I don’t have to tell you that Chinese Chicken Salad is much more about the dressing than it is about the chicken (which I replaced with shrimp).
This dressing, THIS dressing is so easy and so good you will never even be tempted to buy it pre made ever again.
And I also decided that I am also going to chase one negative though about myself with two positive ones. I like that formula, after all he is a Top Chef Master.
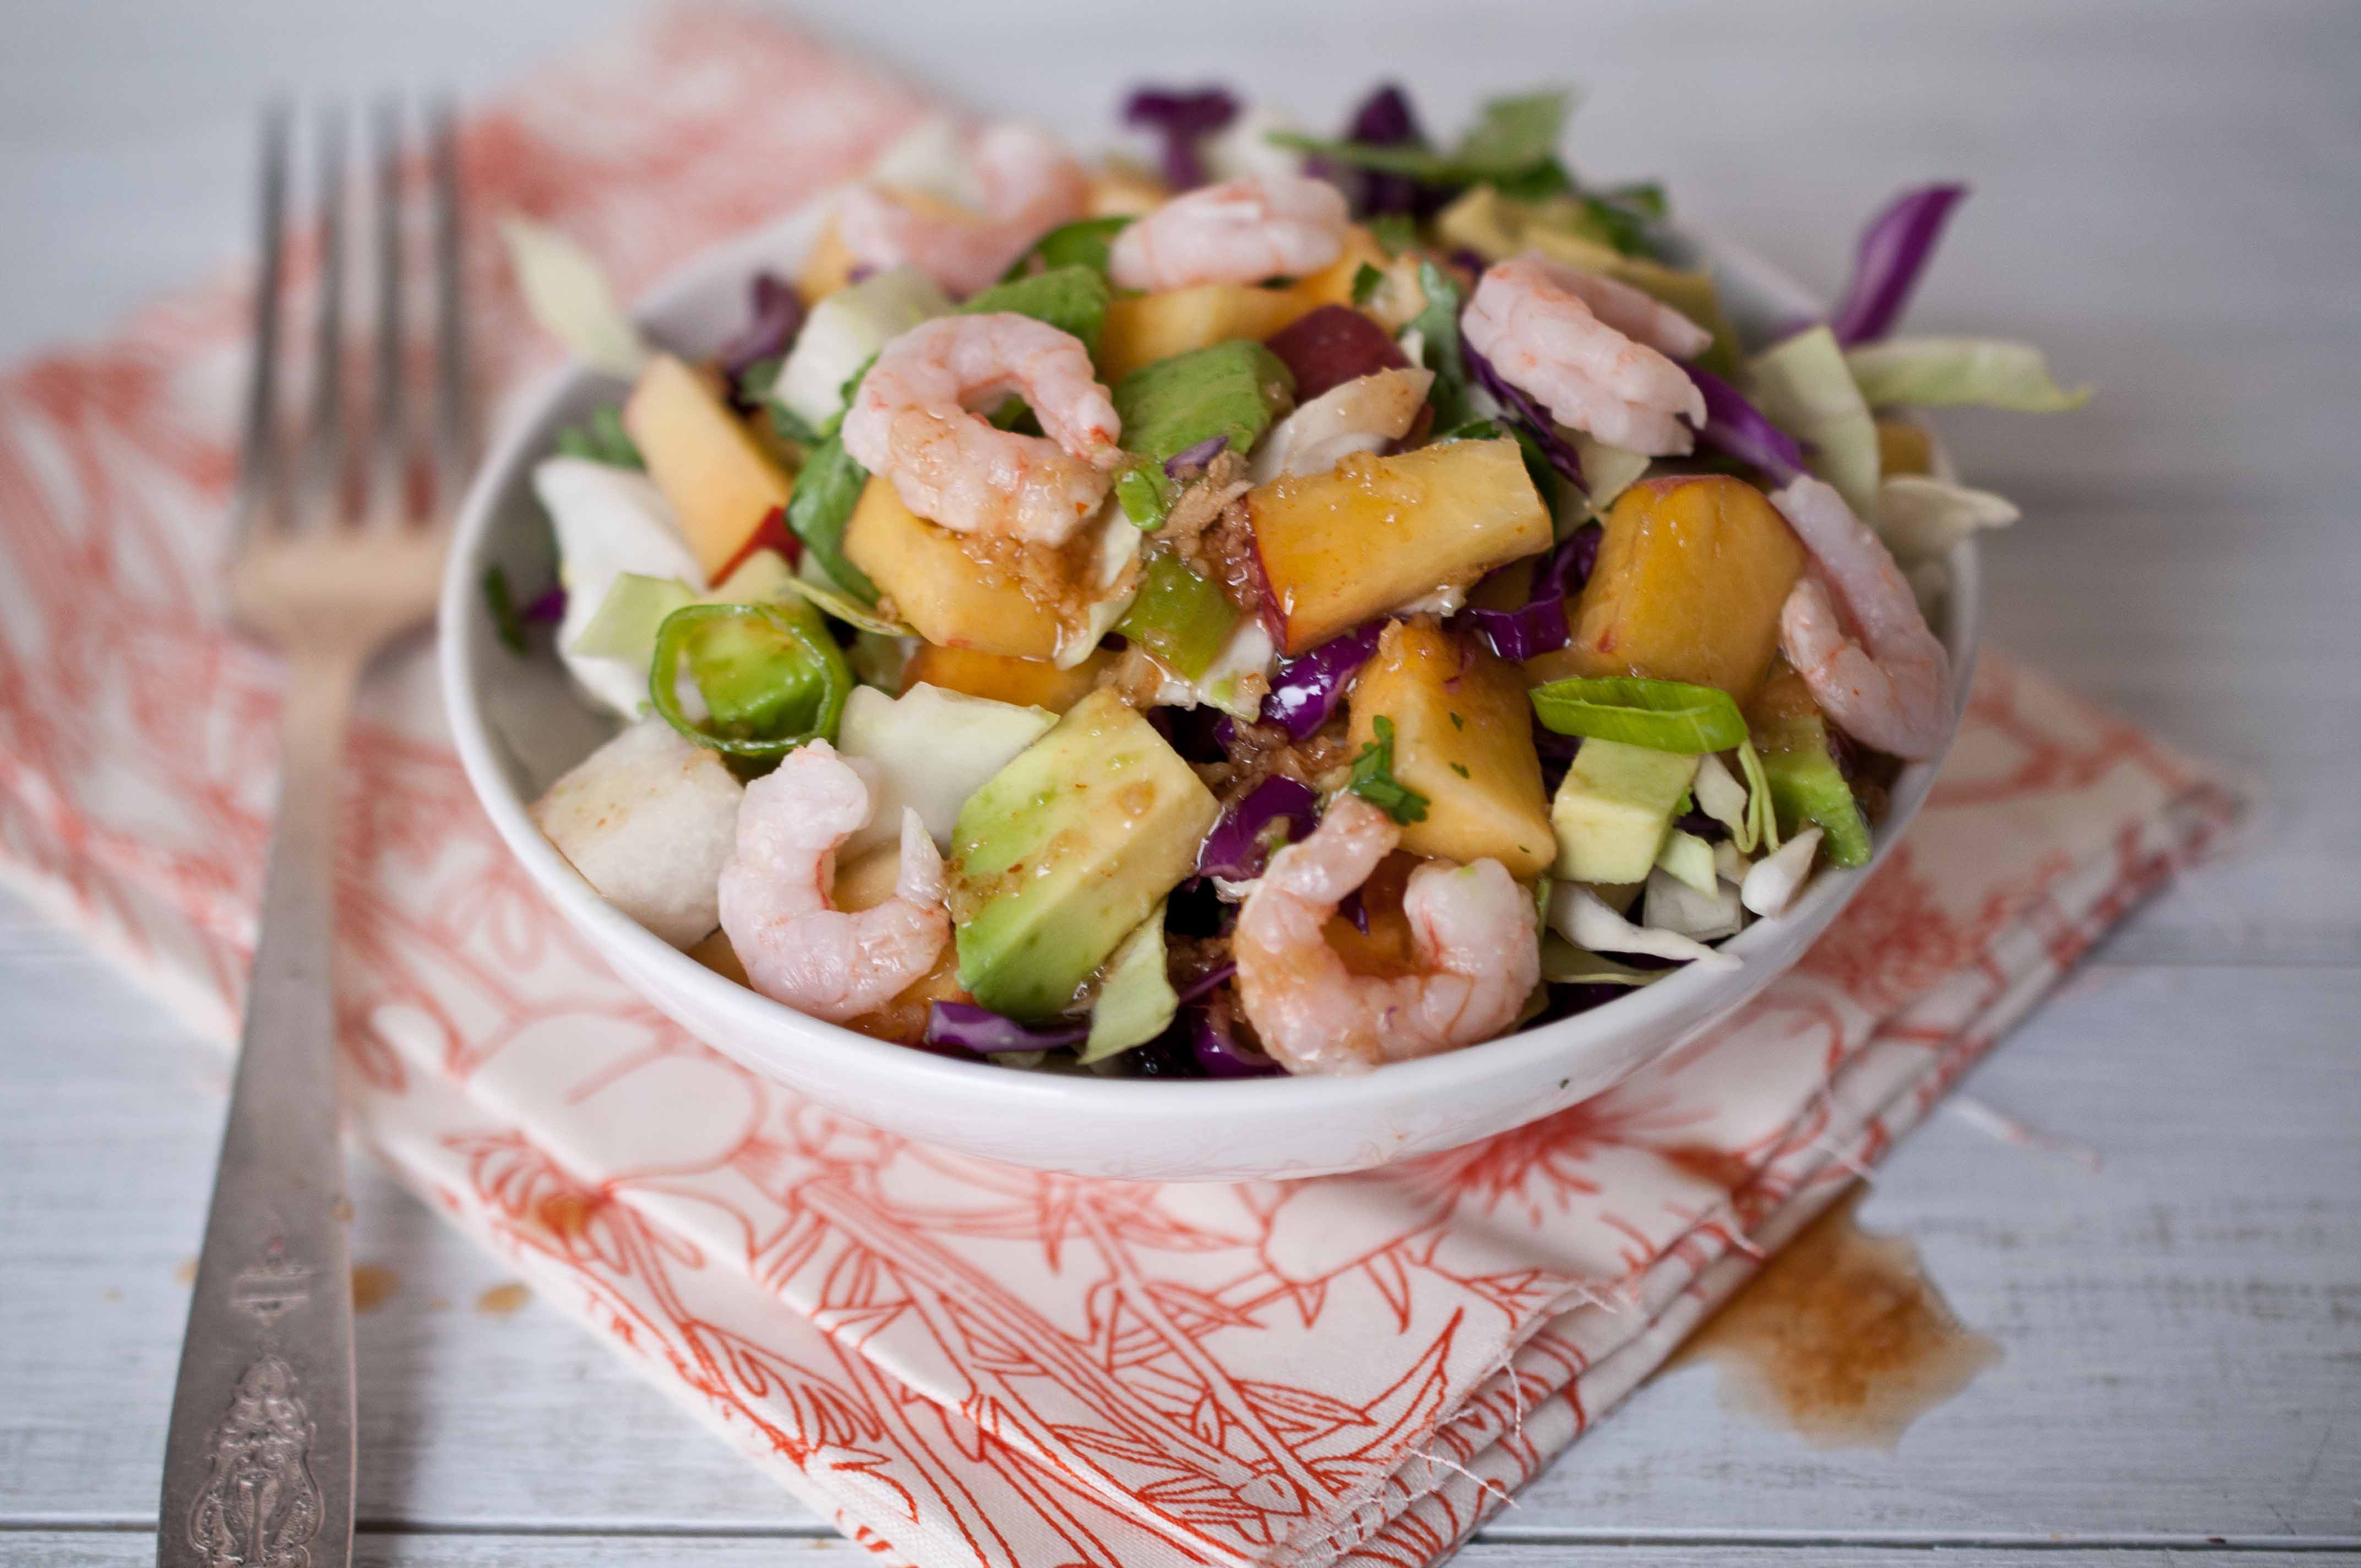
Chinese Shrimp Salad
3 cups green cabbage, chopped
3 cups red cabbage, chopped
1 cup jicama, peeled and diced
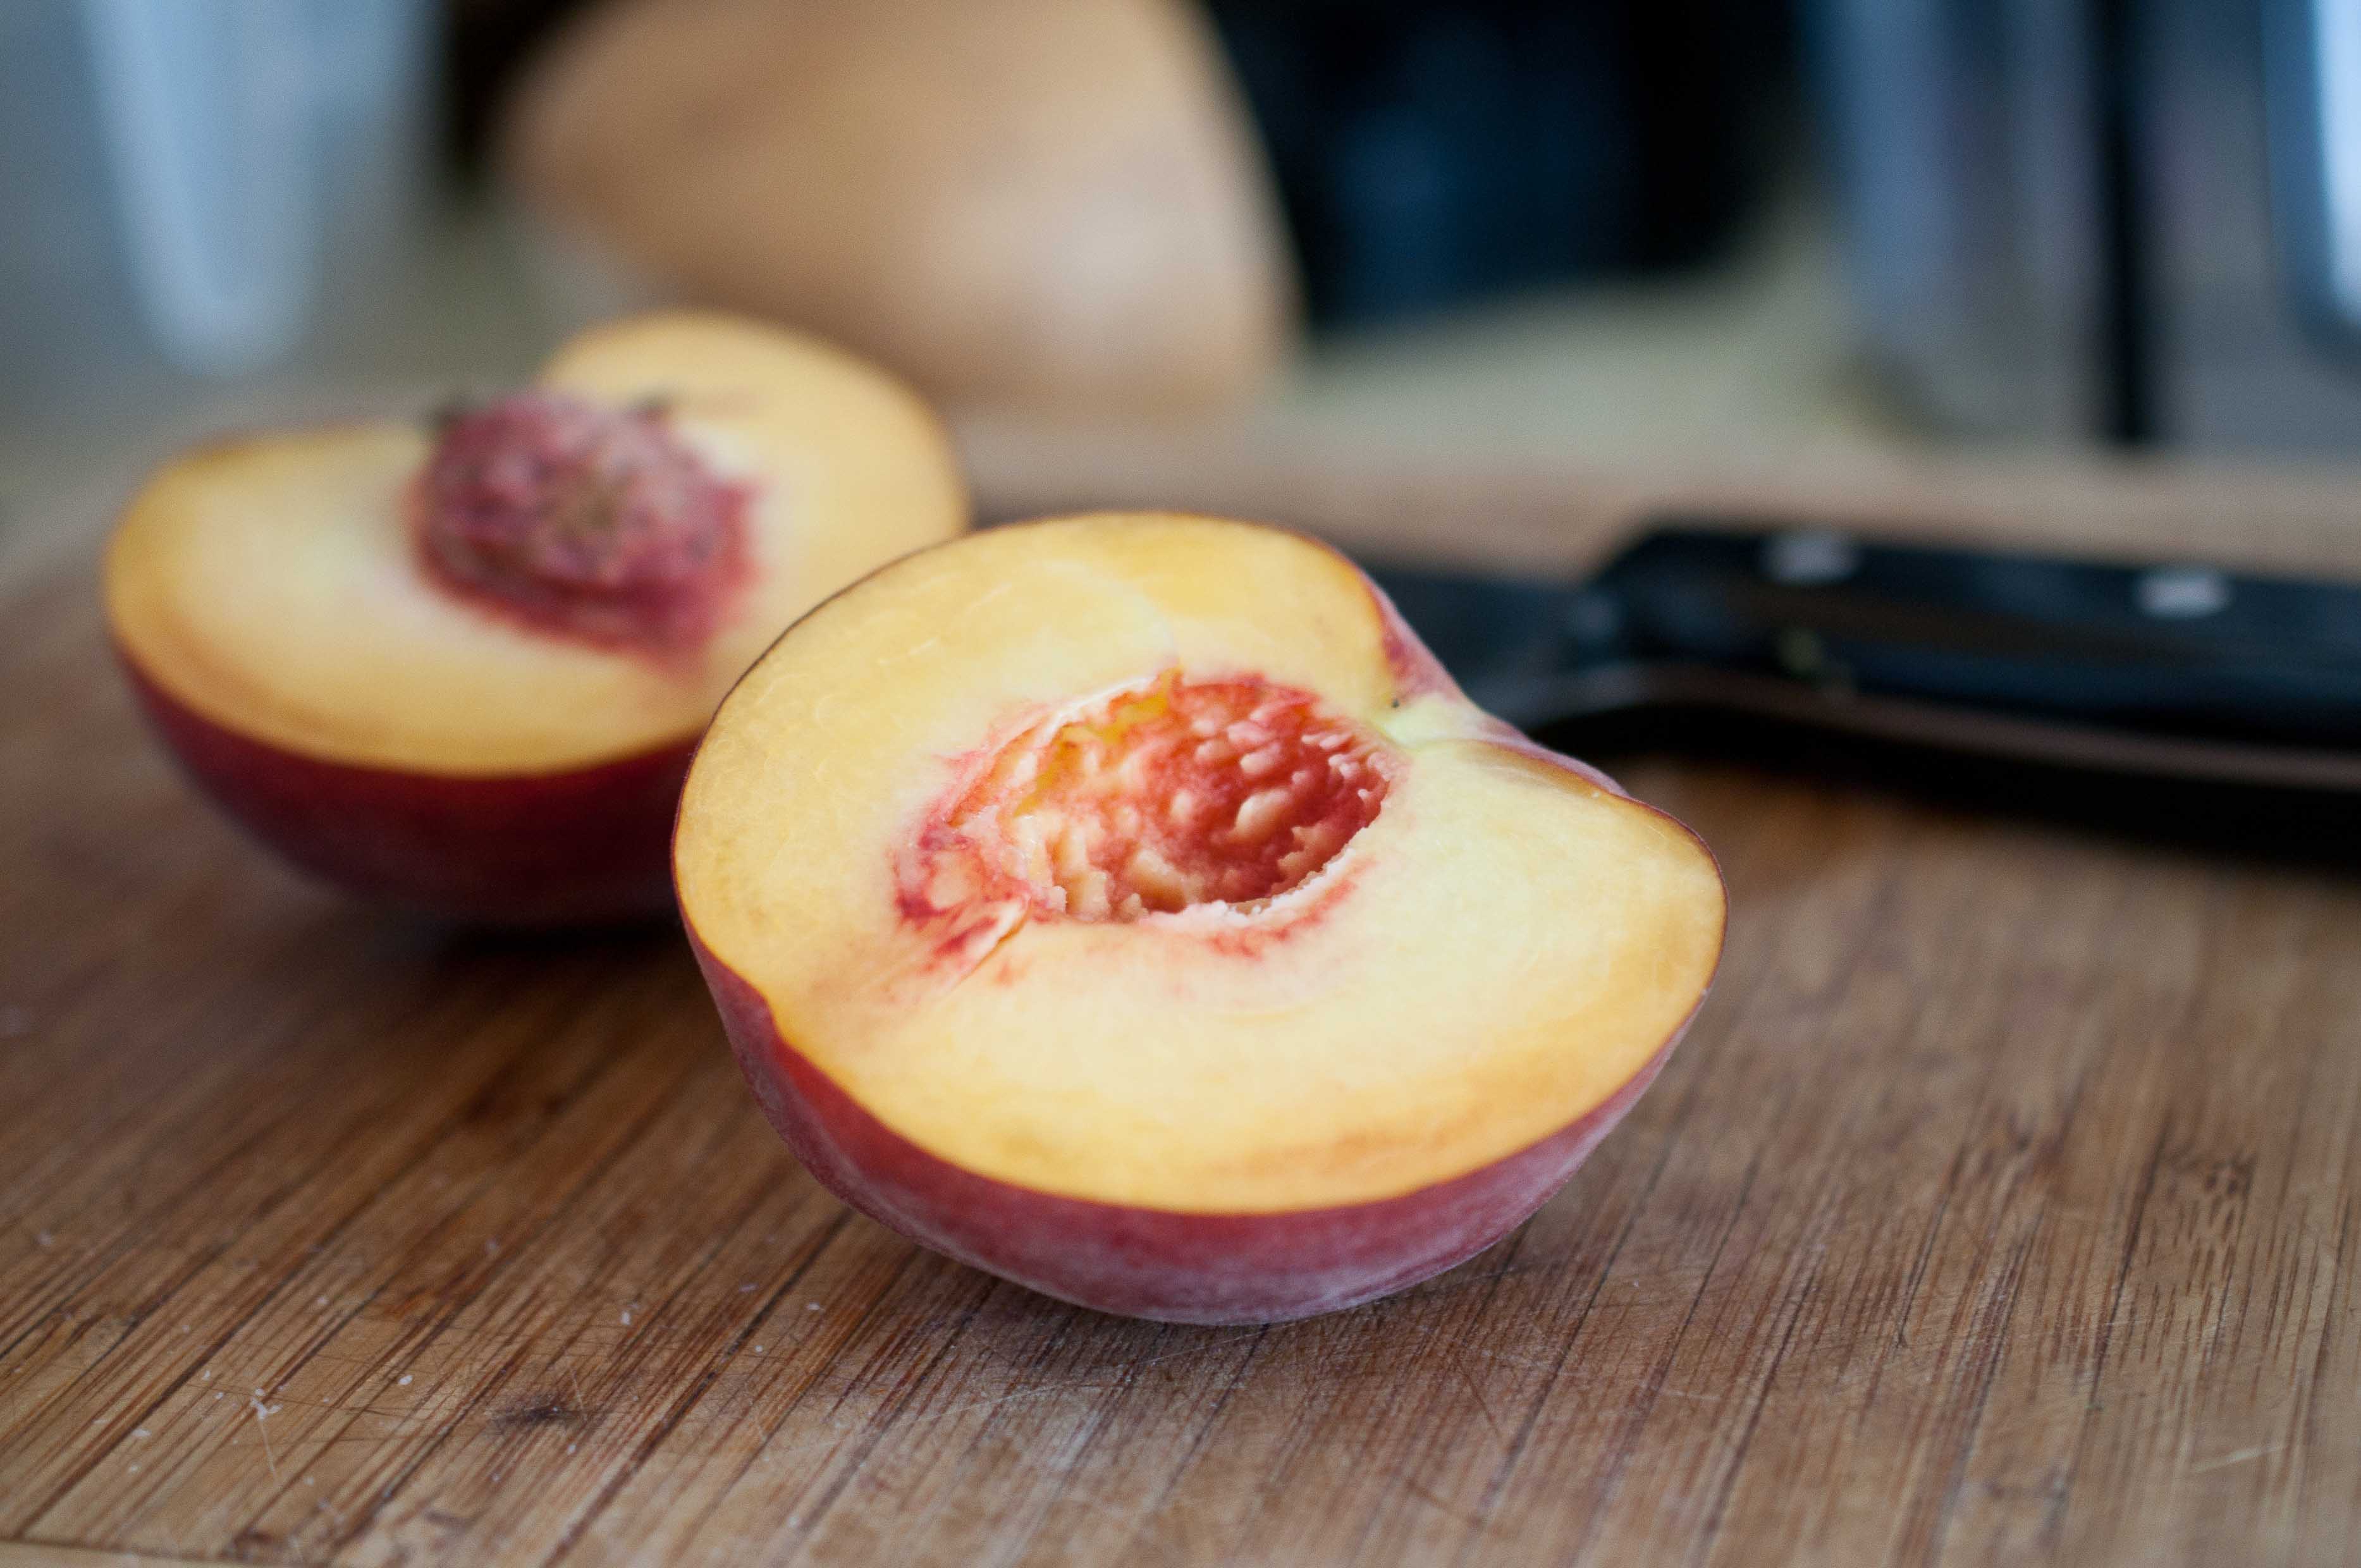
2 cups yellow peaches, chopped (about 2 large)
1 large avocado, chopped
1/3 cup green onion, chopped
1/3 cup cilantro, chopped
3/4 cup cooked bay shrimp
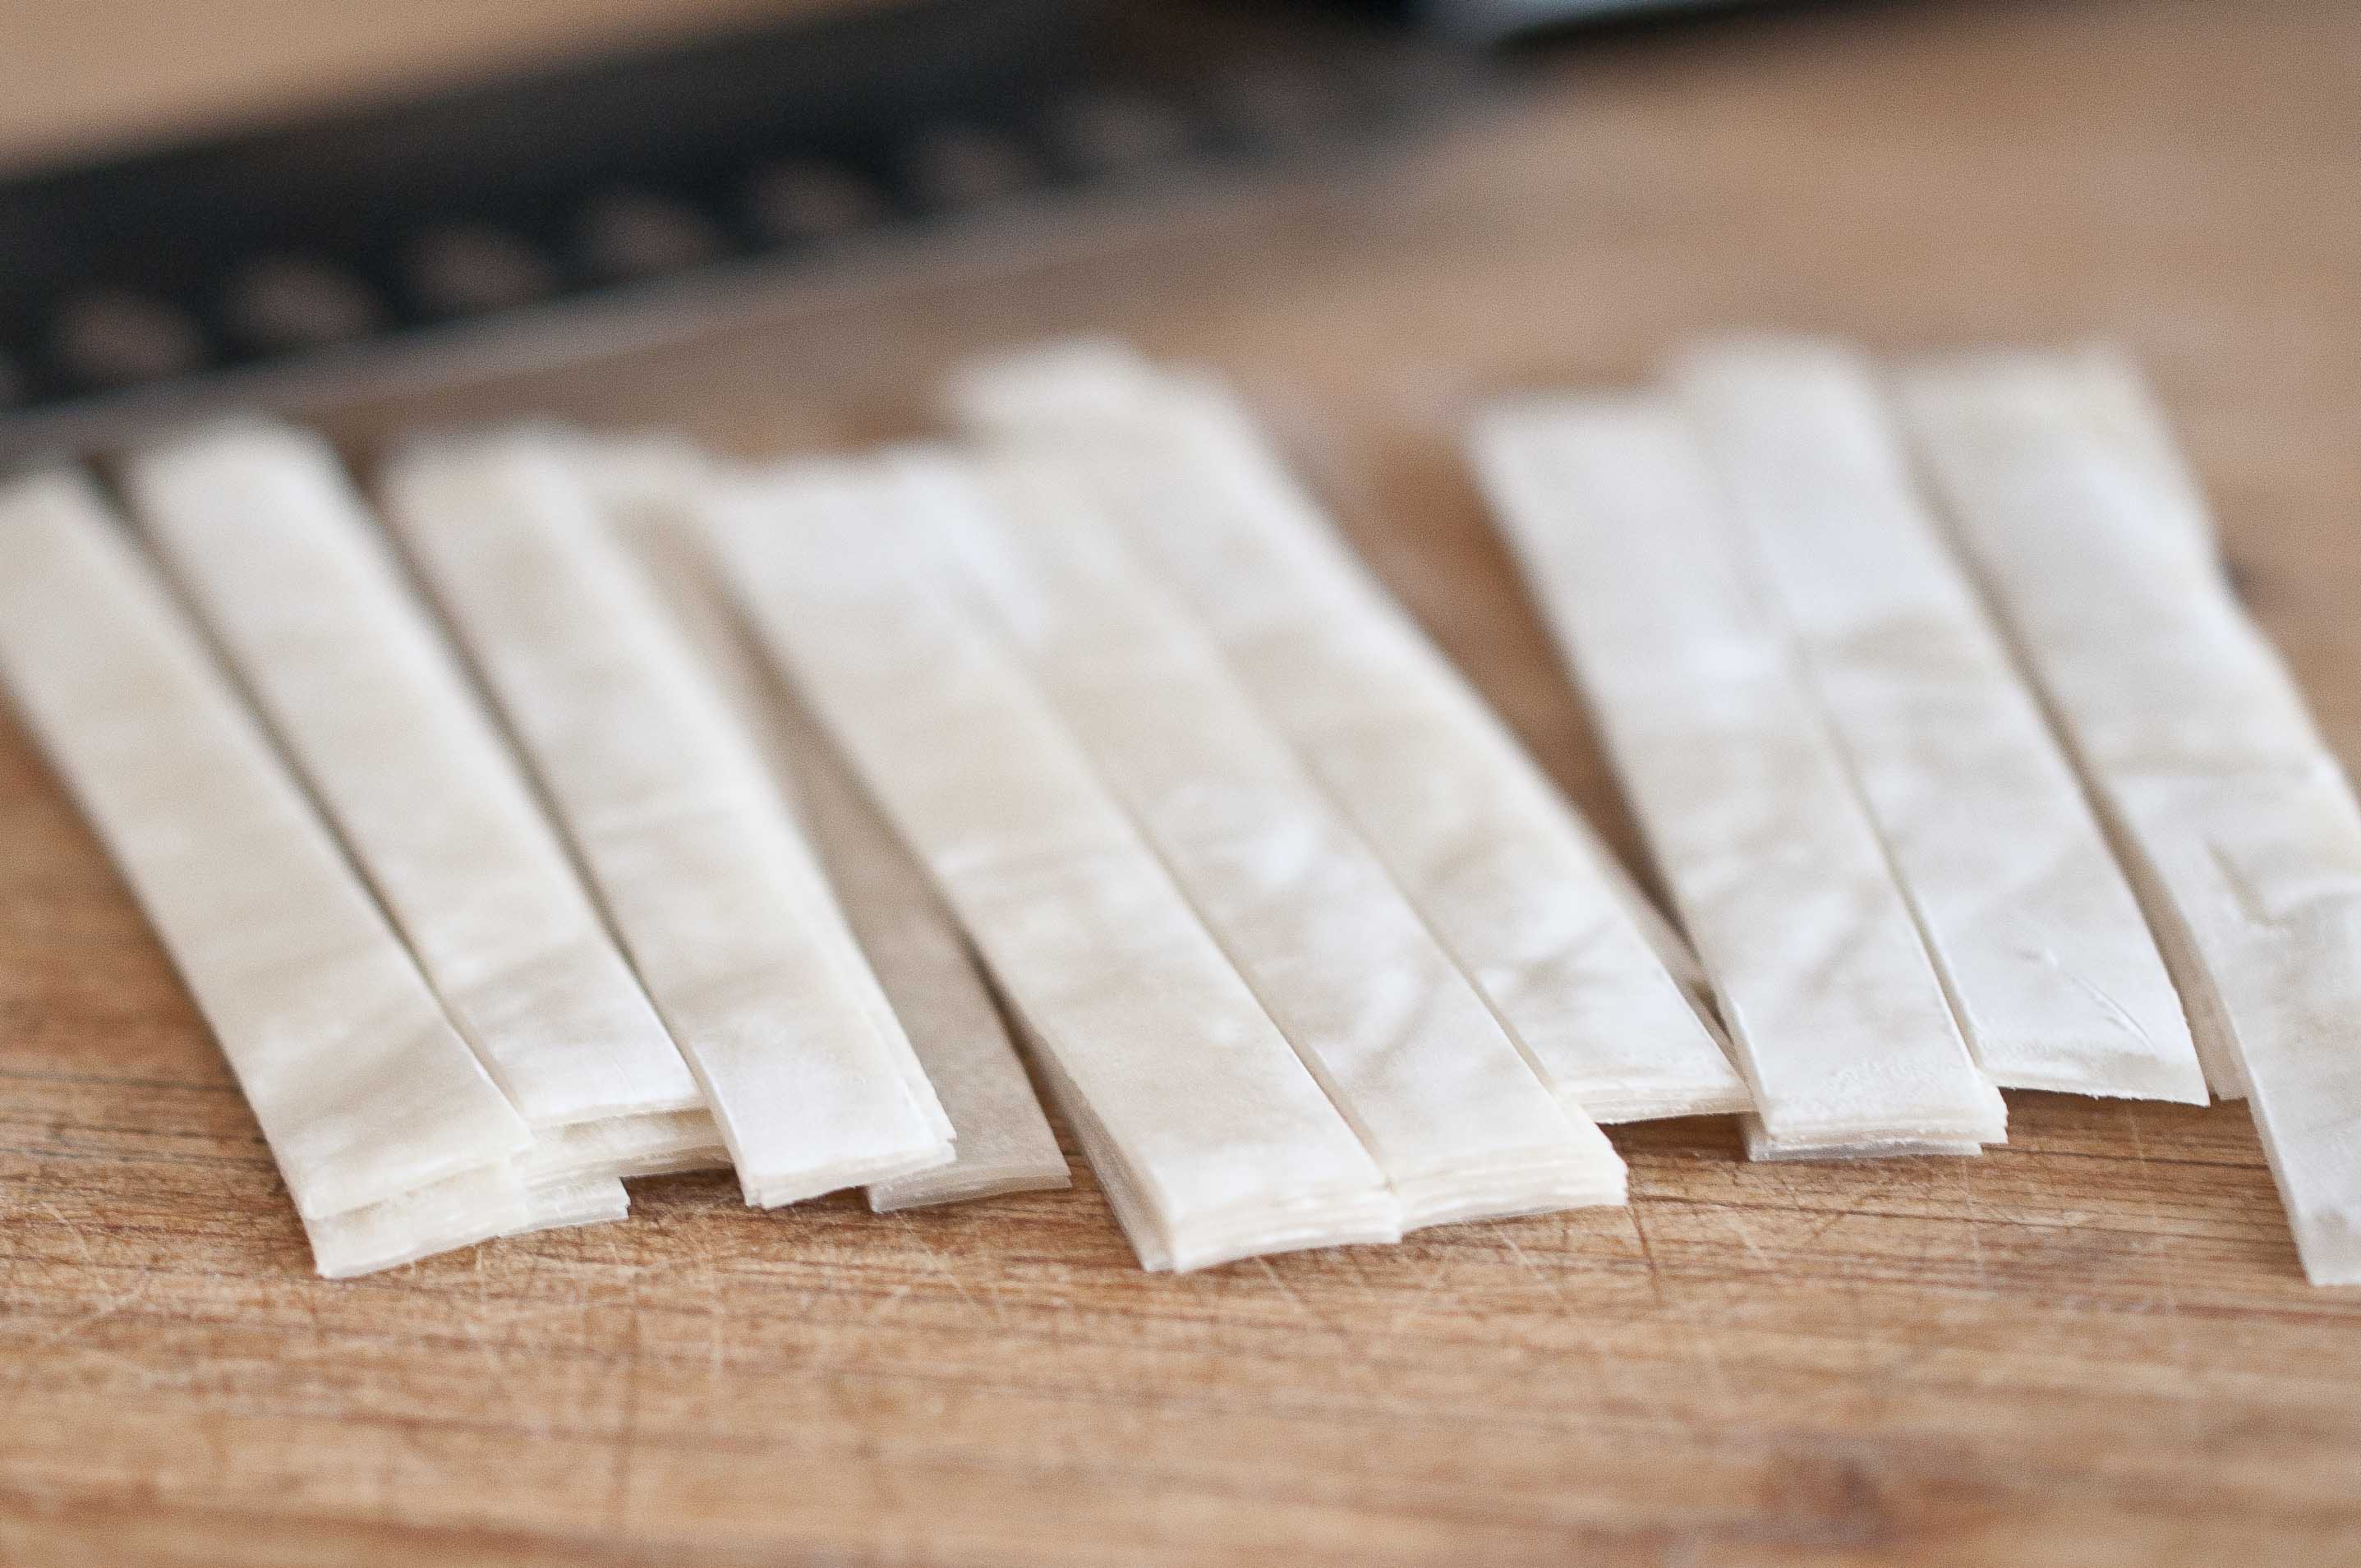
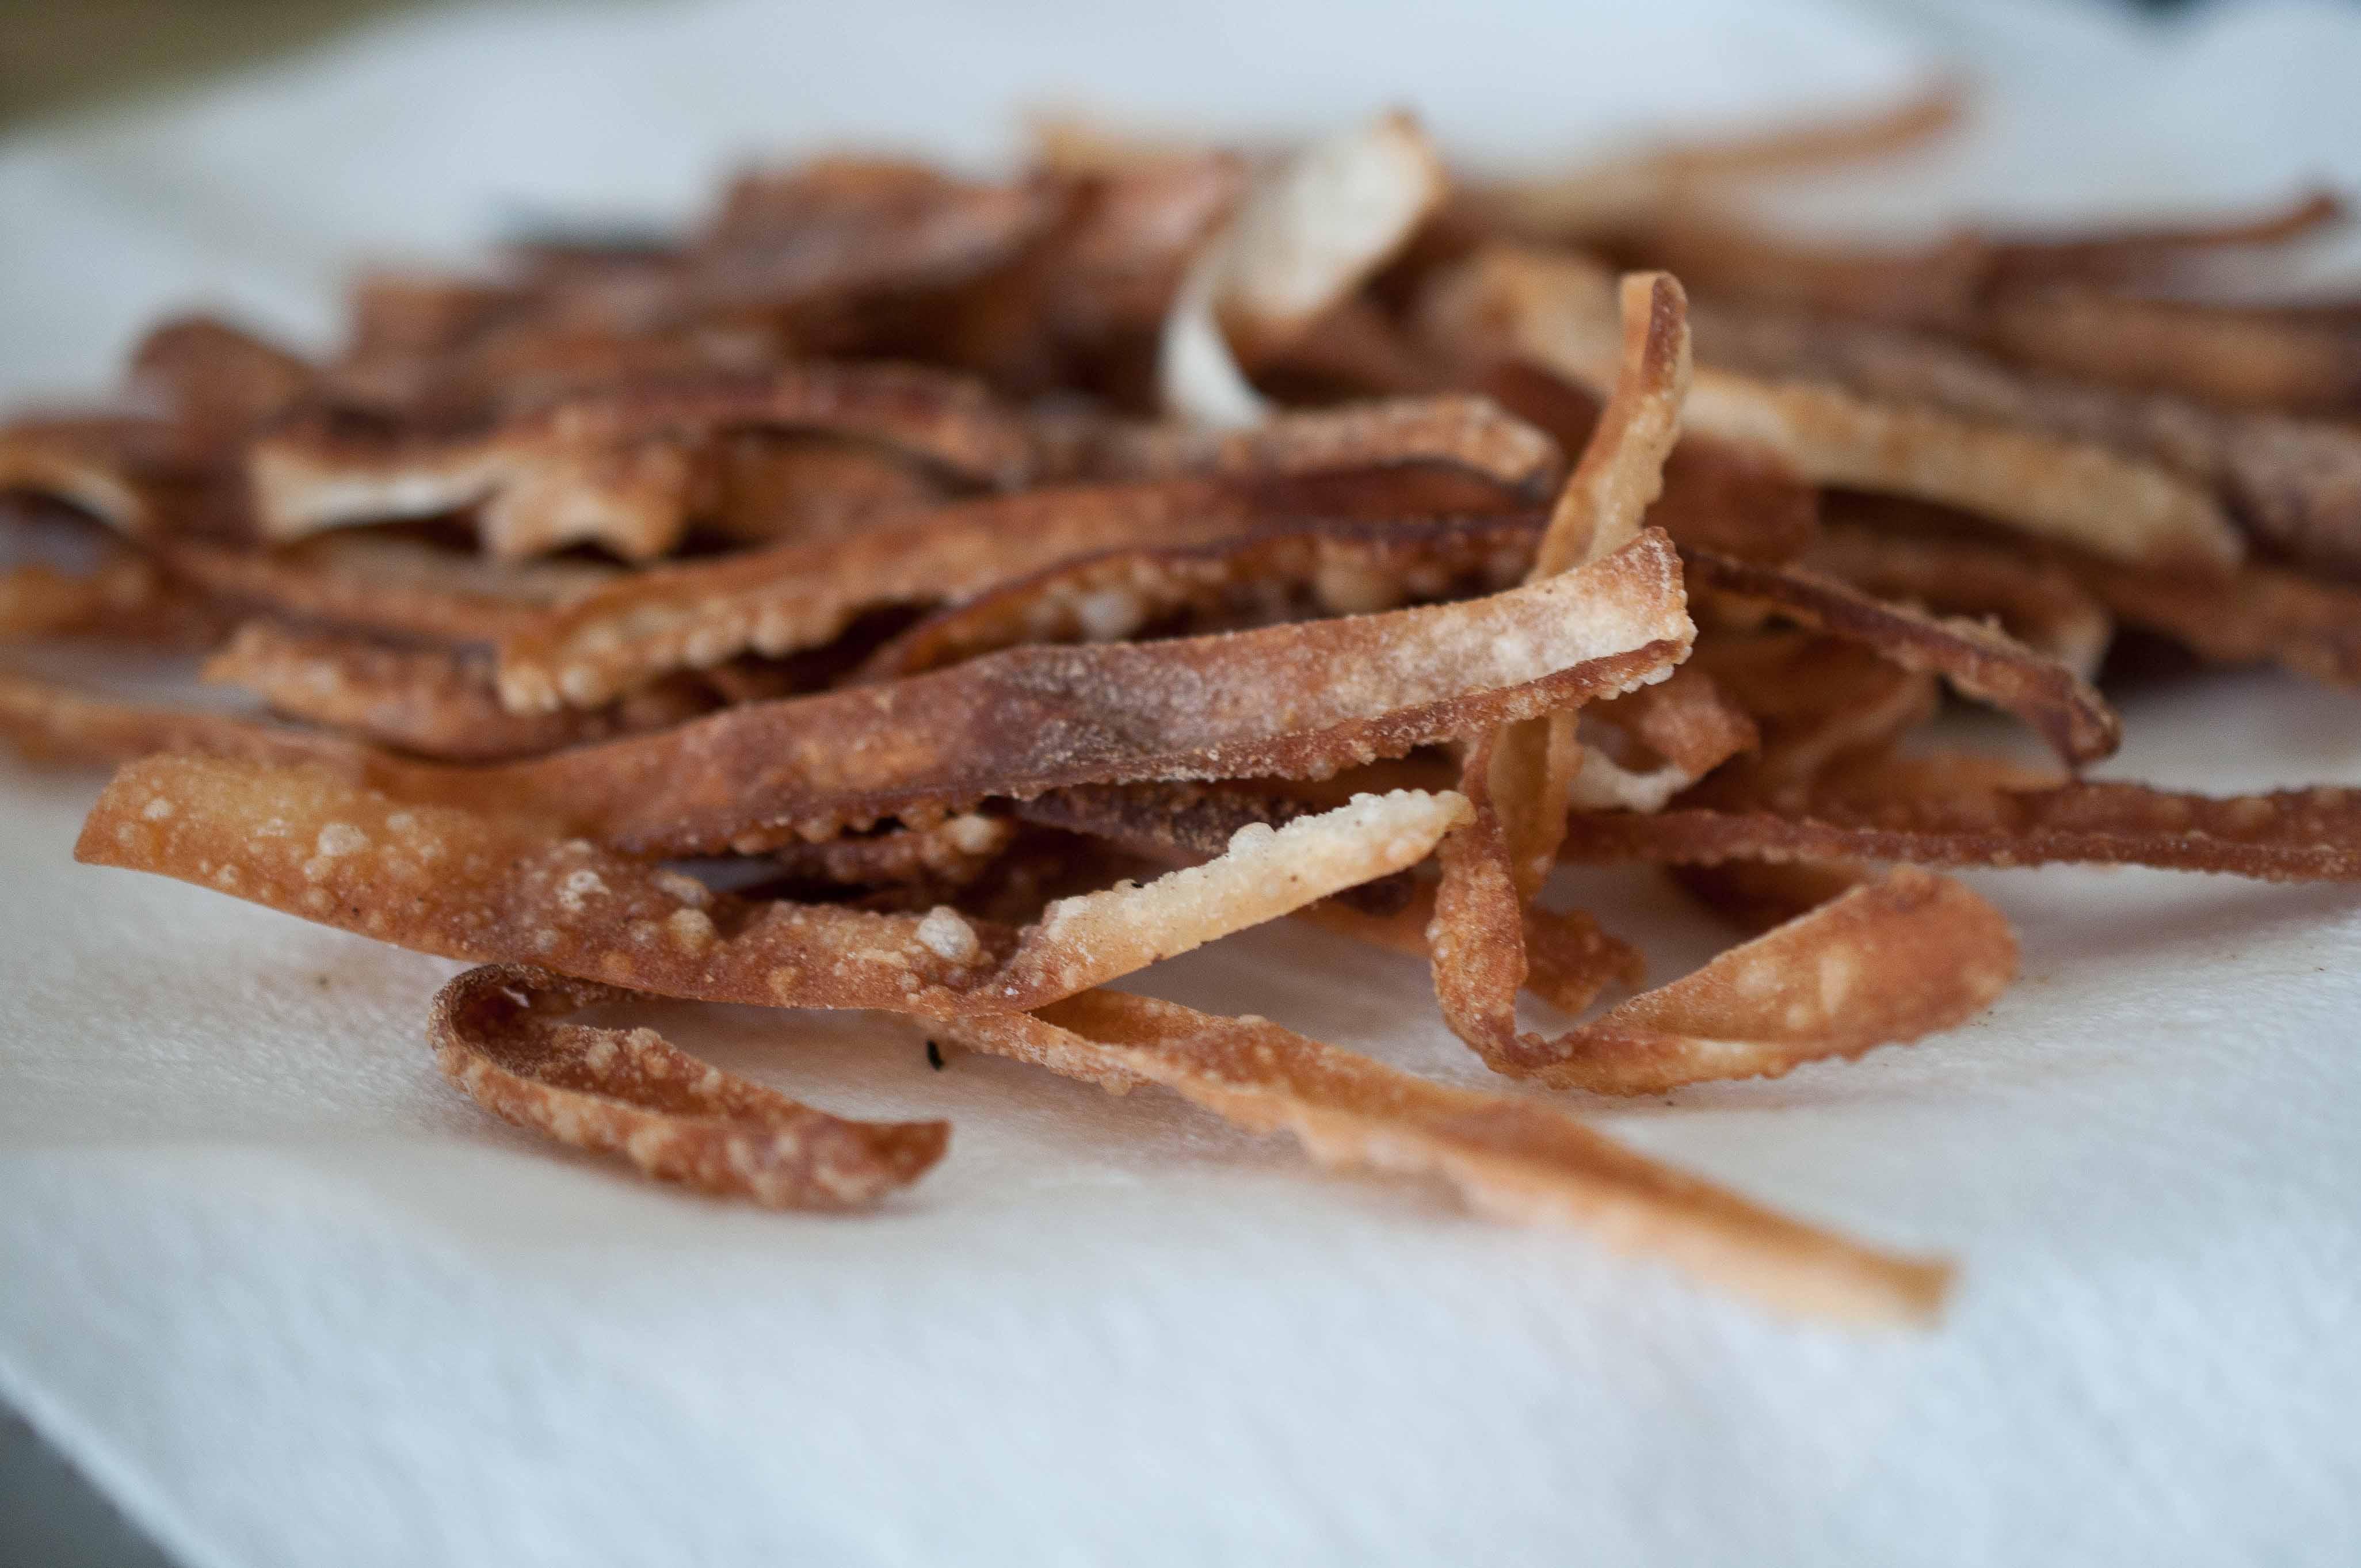
5 wonton wrappers, cut into 1/4 inch strips and lightly fried
For The Dressing:
3 tbs rice wine vinegar
2 tbs brown sugar
3 tbs ponzu sauce
1 tsp sriracha
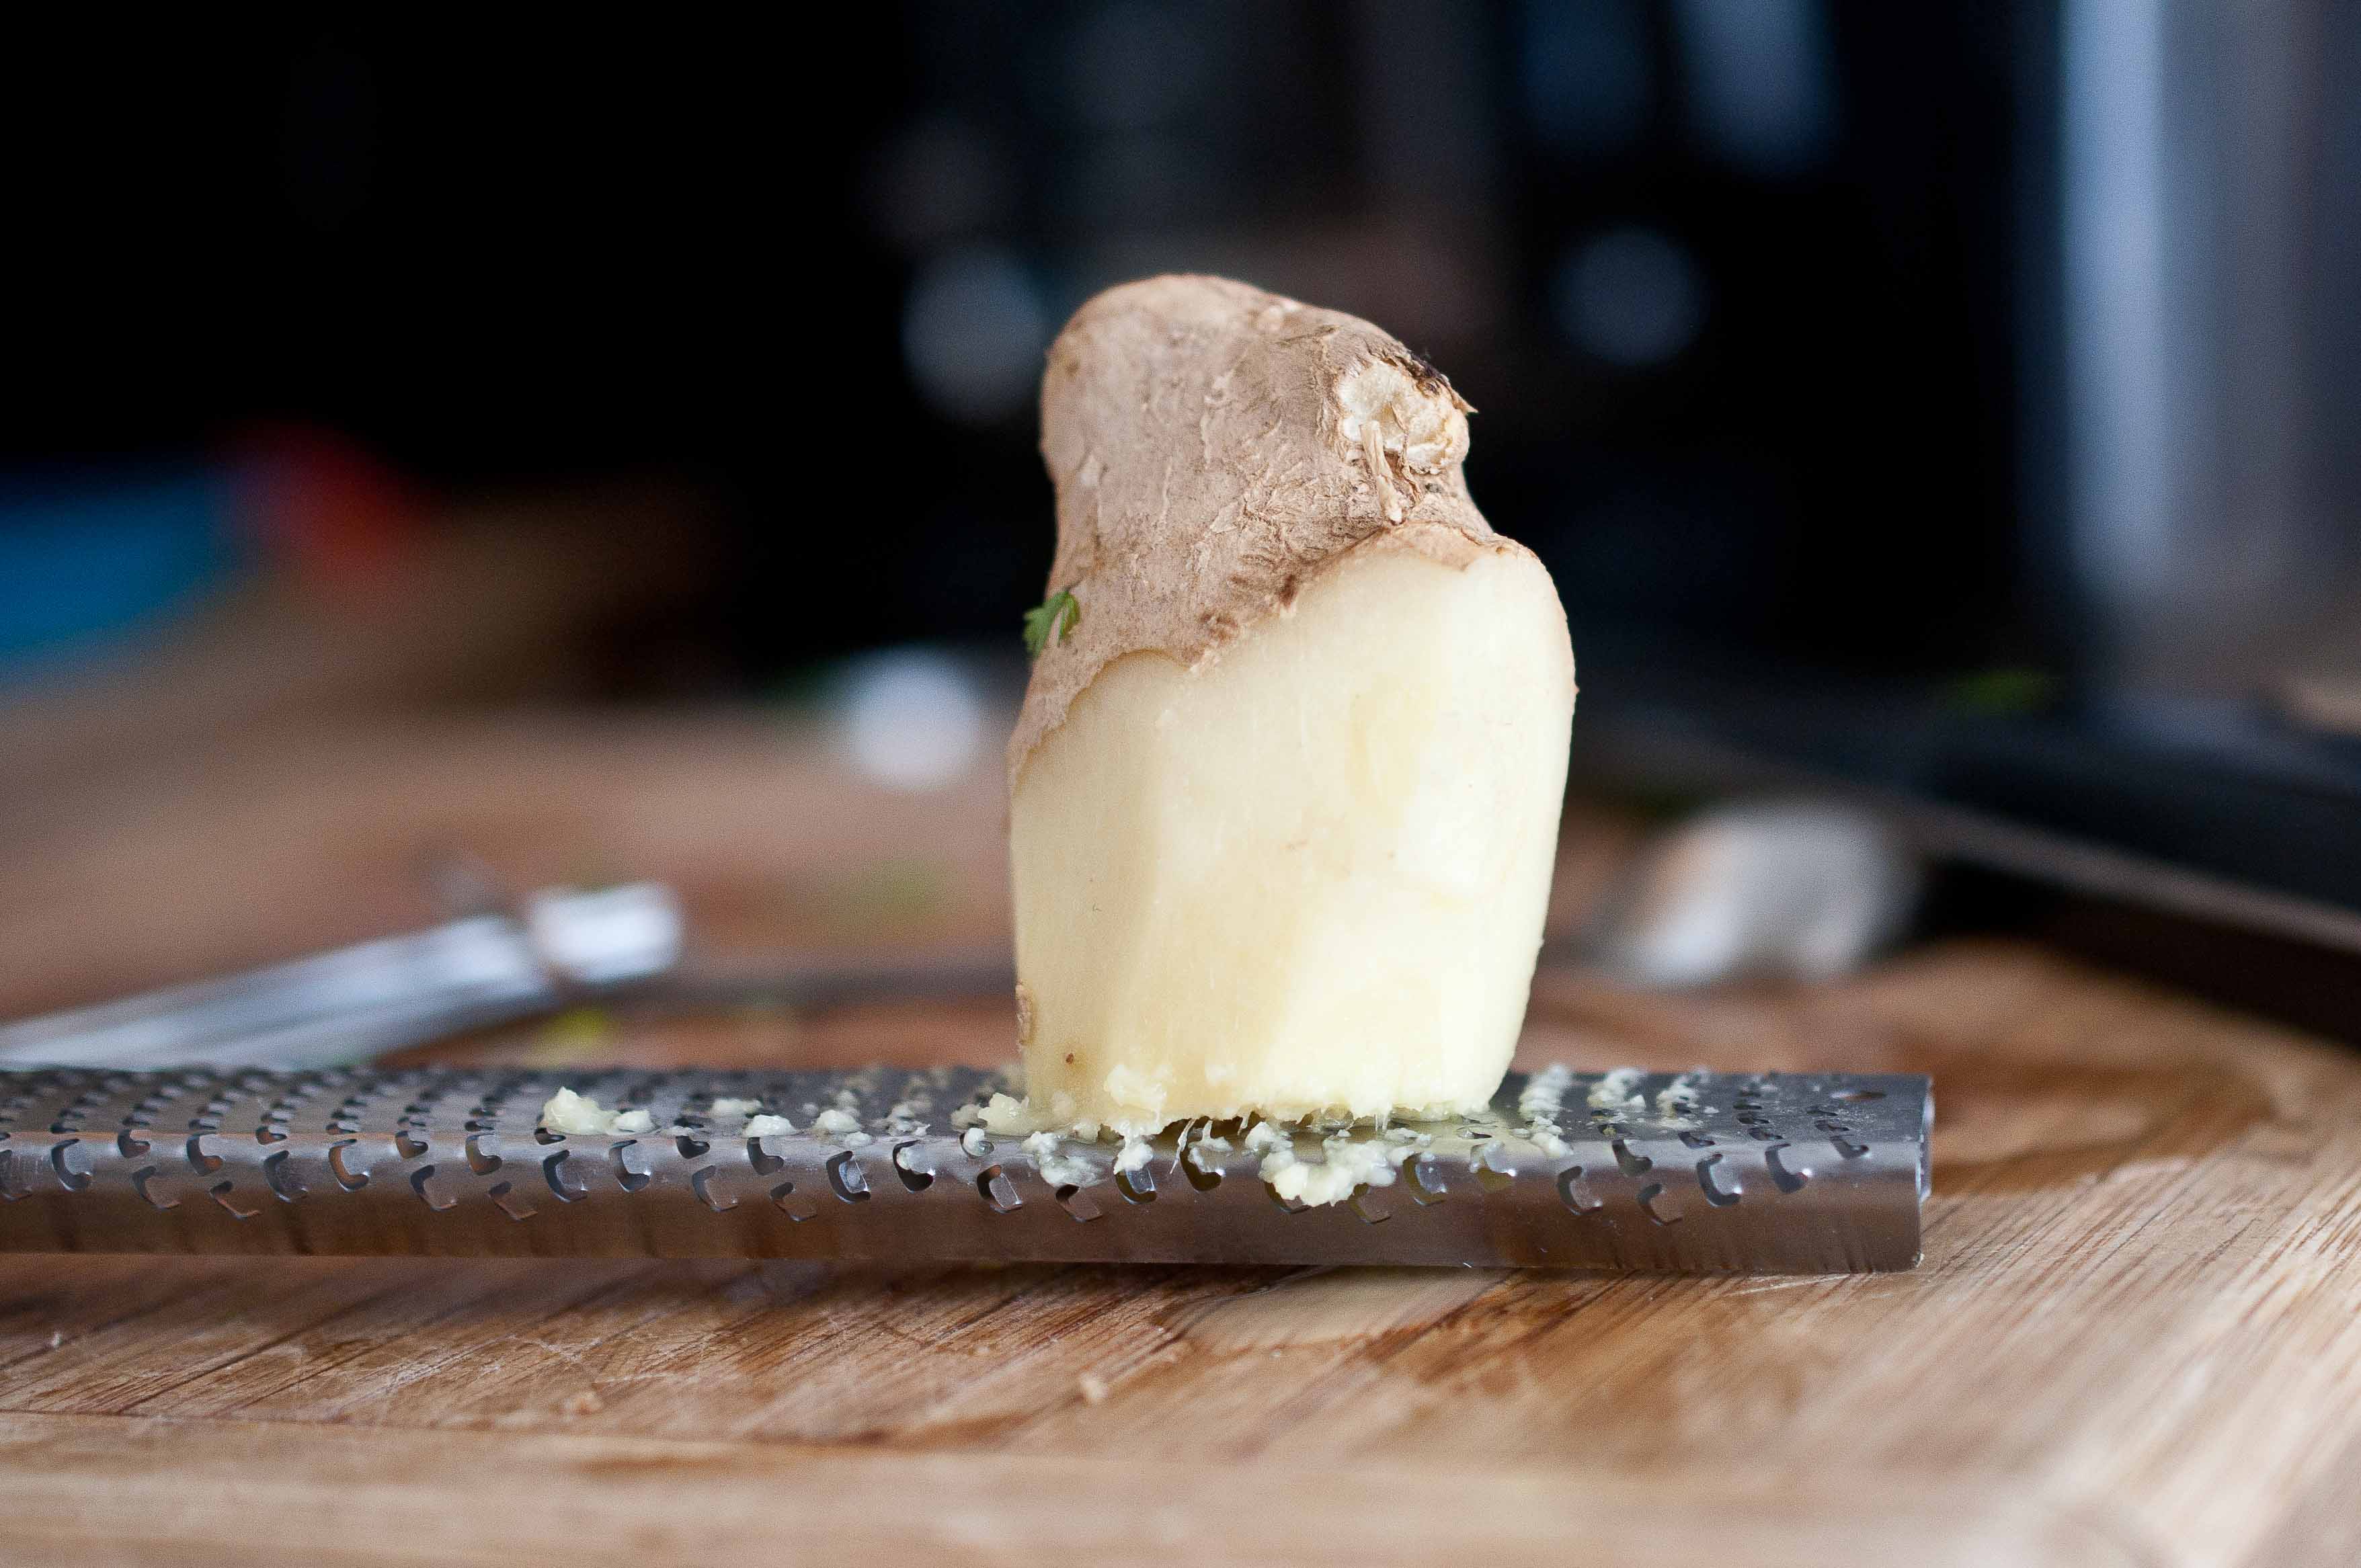
1 1/2 tsp grated ginger
2 tsp sesame oil
(you can also make a double recipe and save half in an air tight container in the fridge, should last about 1 month)
Add all of the salad ingredients (except the fried wontons) in a bowl, toss to combine. Top with wontons.
Add all of the dressing ingredients to a bowl, stir to combine. Drizzle over the salad. Serve cold.
I told you all about my plan to try and limit my dairy intake. There are, however, some things that I will never part with, like goat cheese. I might crawl across broken glass for goat cheese. And homemade whipped cream, especially Candy Cane Whipped Cream, is a joy I will indulge in for the rest of my life.
But milk, I could take it or leave it. In fact, most of the time I would rather leave it. Not just because the idea of drinking a tall glass of un-manipulated milk makes me want to gag, but because I have found so many alternatives that I enjoy so much more.
Coconut milk is an amazing substitute for milk, and the flavor is beautiful. Almond milk adds a new dimension to dishes that I adore.
For now, I will be making my french toast with coconut milk, I loved the way it tasted.
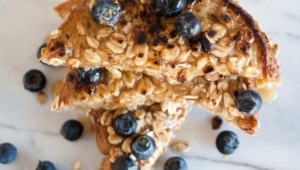
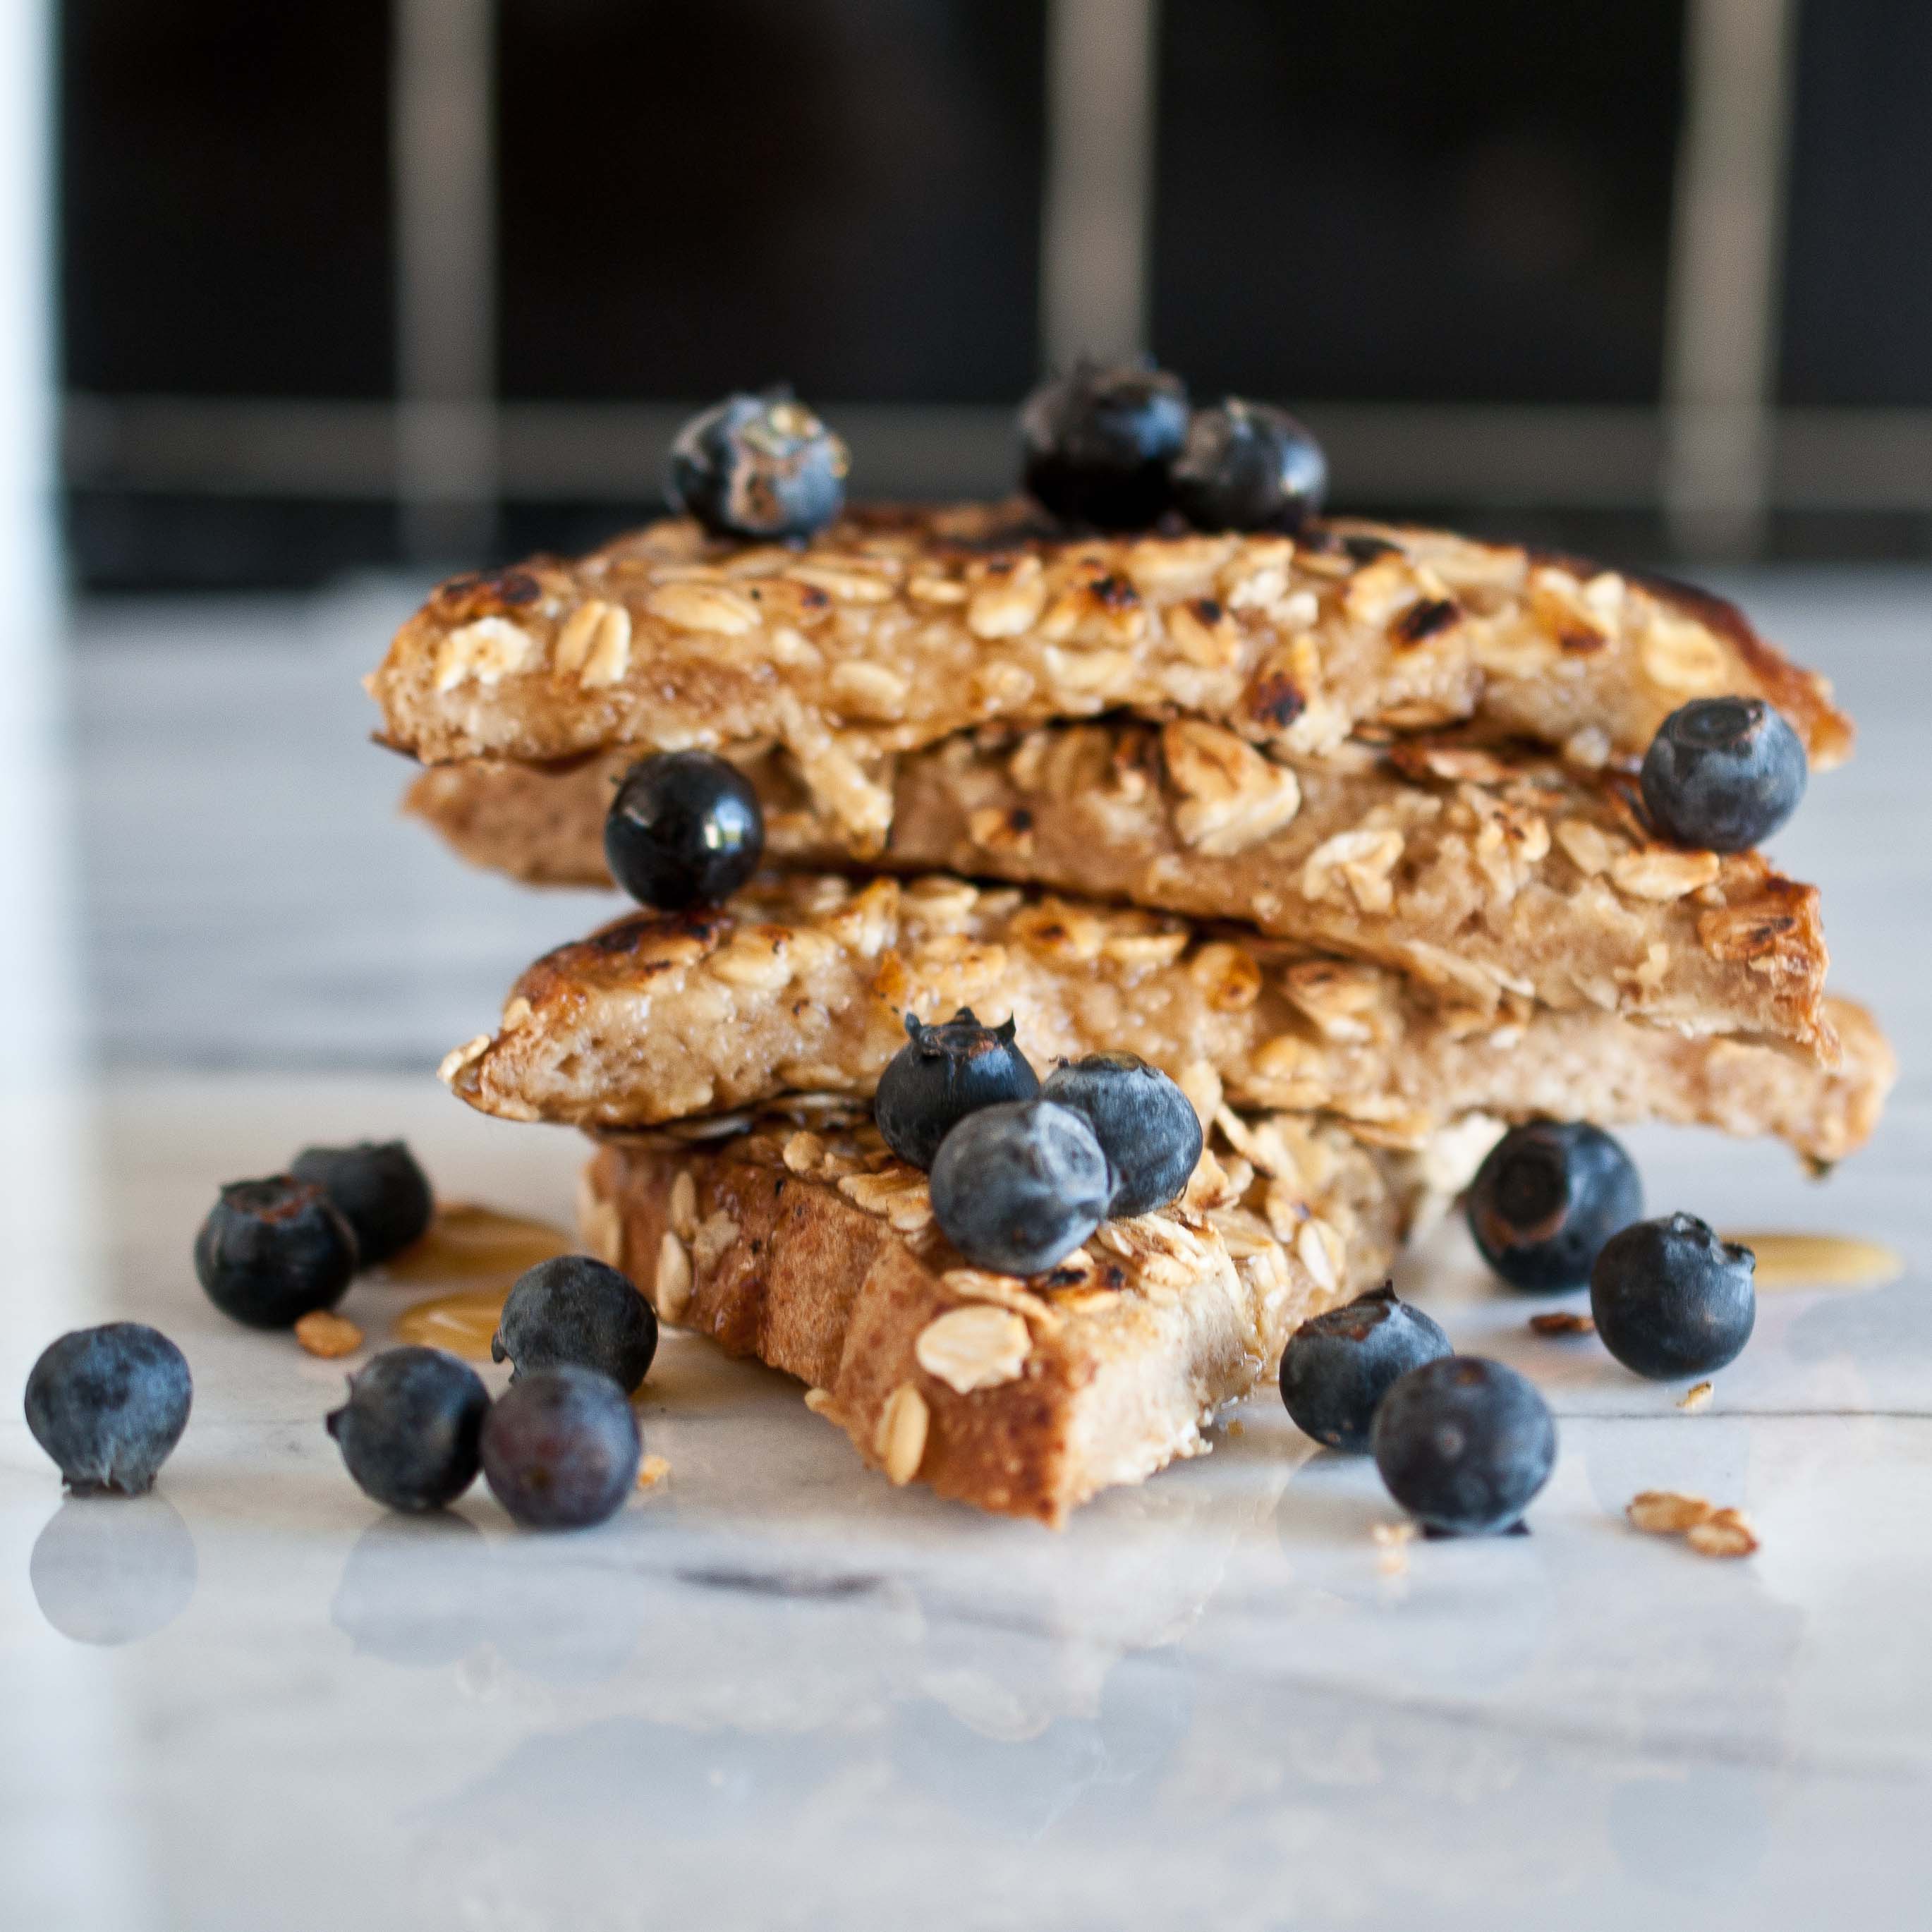
Coconut Oat French Toast
1 can light coconut milk
1/4 cup brown sugar, plus additional 1/4 cup divided
1 tsp vanilla
2 eggs
12 slices of bread
1 cup quick oats
Add the coconut milk, 1/4 cup brown sugar, vanilla and eggs to a bowl, whisk until well combined.
Place the oats and remaining brown sugar on a plate or in a shallow dish, stir until well combined.
Heat a skillet (with a lid), sprayed with butter flavored cooking spry, over medium high heat until hot but not smoking.
Two at a time, soak the bread in the coconut milk mixture for about a minute. Remove from the milk and allow excess to drain off, place on the oat plate, turn to coat.
Add the french toast to the hot pan, replace the lid and cook for two minutes. Turn the french toast, replace the lid and cook for an additional two minutes, or until cooked through. Turn the heat down on the pan if the oats start to brown too quickly.
I worked at a little cafe in college. It was a run by an odd man, who was largely absent, with questionable ethics and strange business practices. Which all ended up working to my benefit. I was young and slightly lazy, as long as I showed up for my shift and turned in the appropriate amount of money every day, I was lavishly ignored. There were no comment cards, focus on customer service, or unnecessary protocol, I did what I wanted. And what I wanted, other than giving out free muffins every time I forgot to ring in an order, was to spend time in the kitchen.
It was a small, poorly run brunch spot in Old Town Pasadena, right on the Rose Parade route. Our biggest draws were Granola French Toast with Vanilla Bean Sauce, Sour Dough Toads in A Hole With Chorizo Gravy, Pumpkin Pancakes year round and fantastic cappuccinos as well as a kitchen expertly managed by our overworked chefs Nacho & Sergio.
I take pride in the fact that I was one of the few waitresses that they liked. I brought them "water" when we were busy, made runs to our inappropriately far away walk-in and took the blame for spoiled food when the boss would eventually show his face. The cooks, after all, were the heart of the place. I could be replaced in a heartbeat, but the entire restaurant pulsed through Nacho & Sergio.
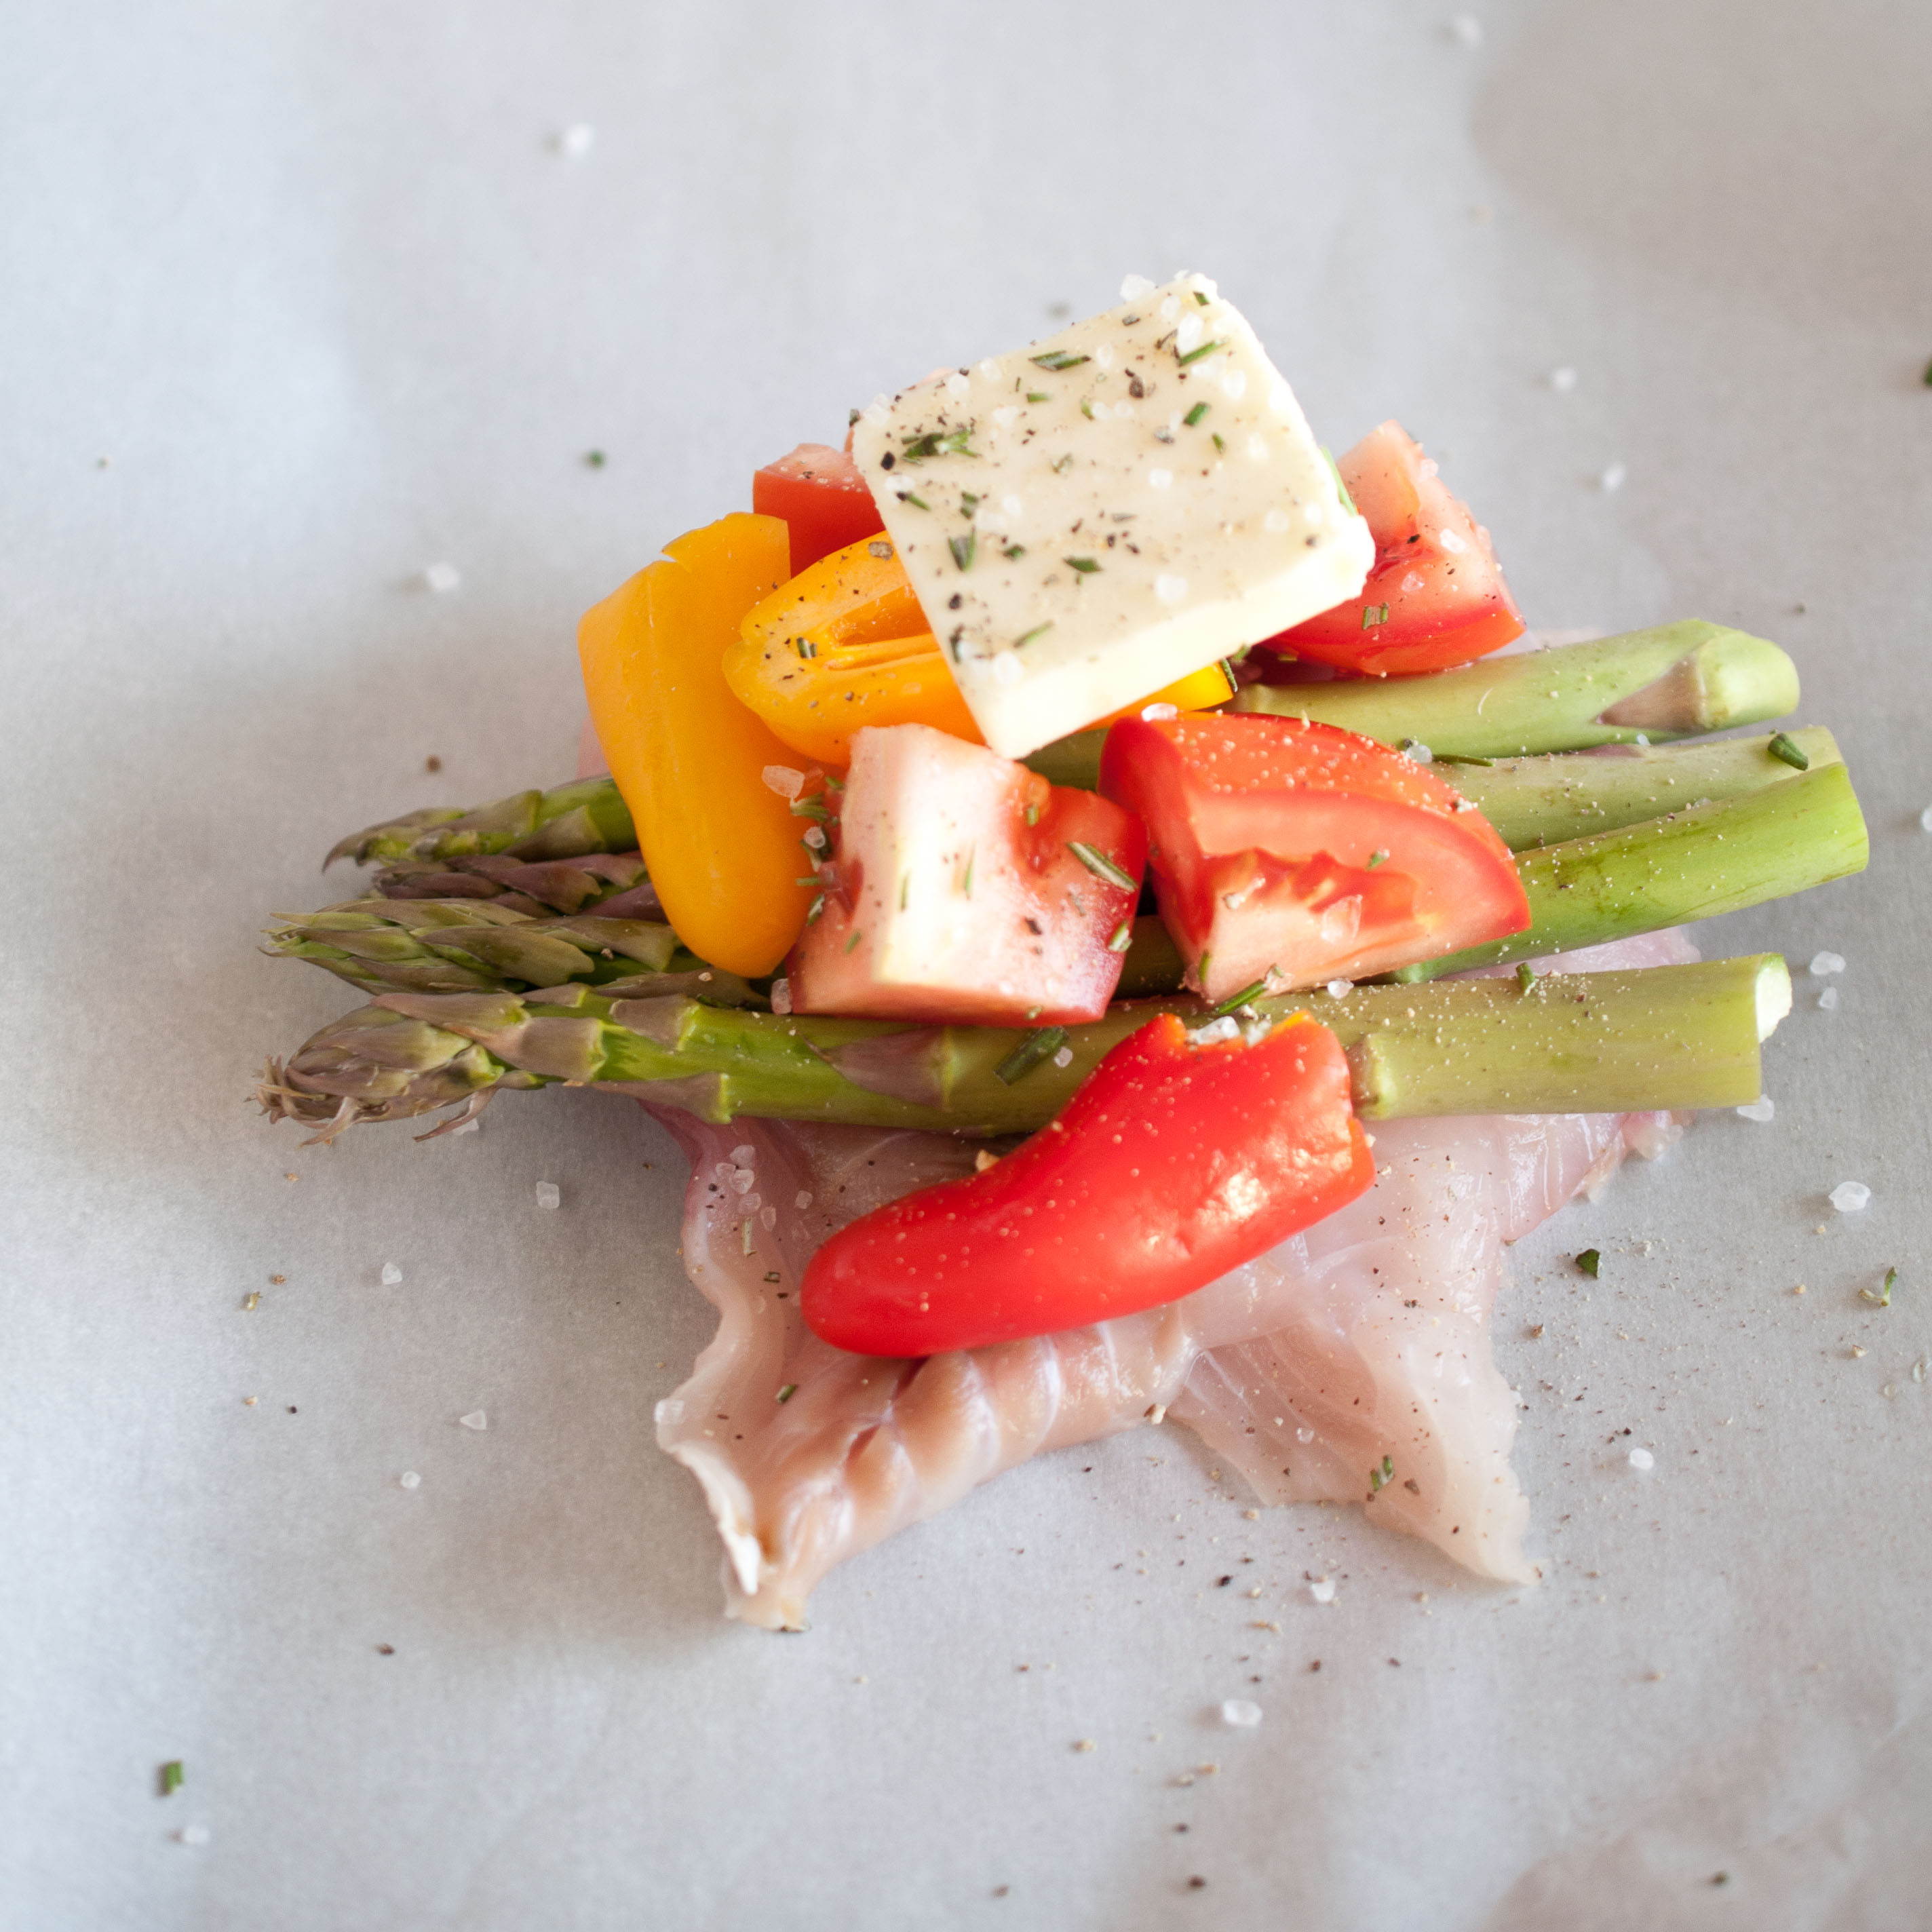
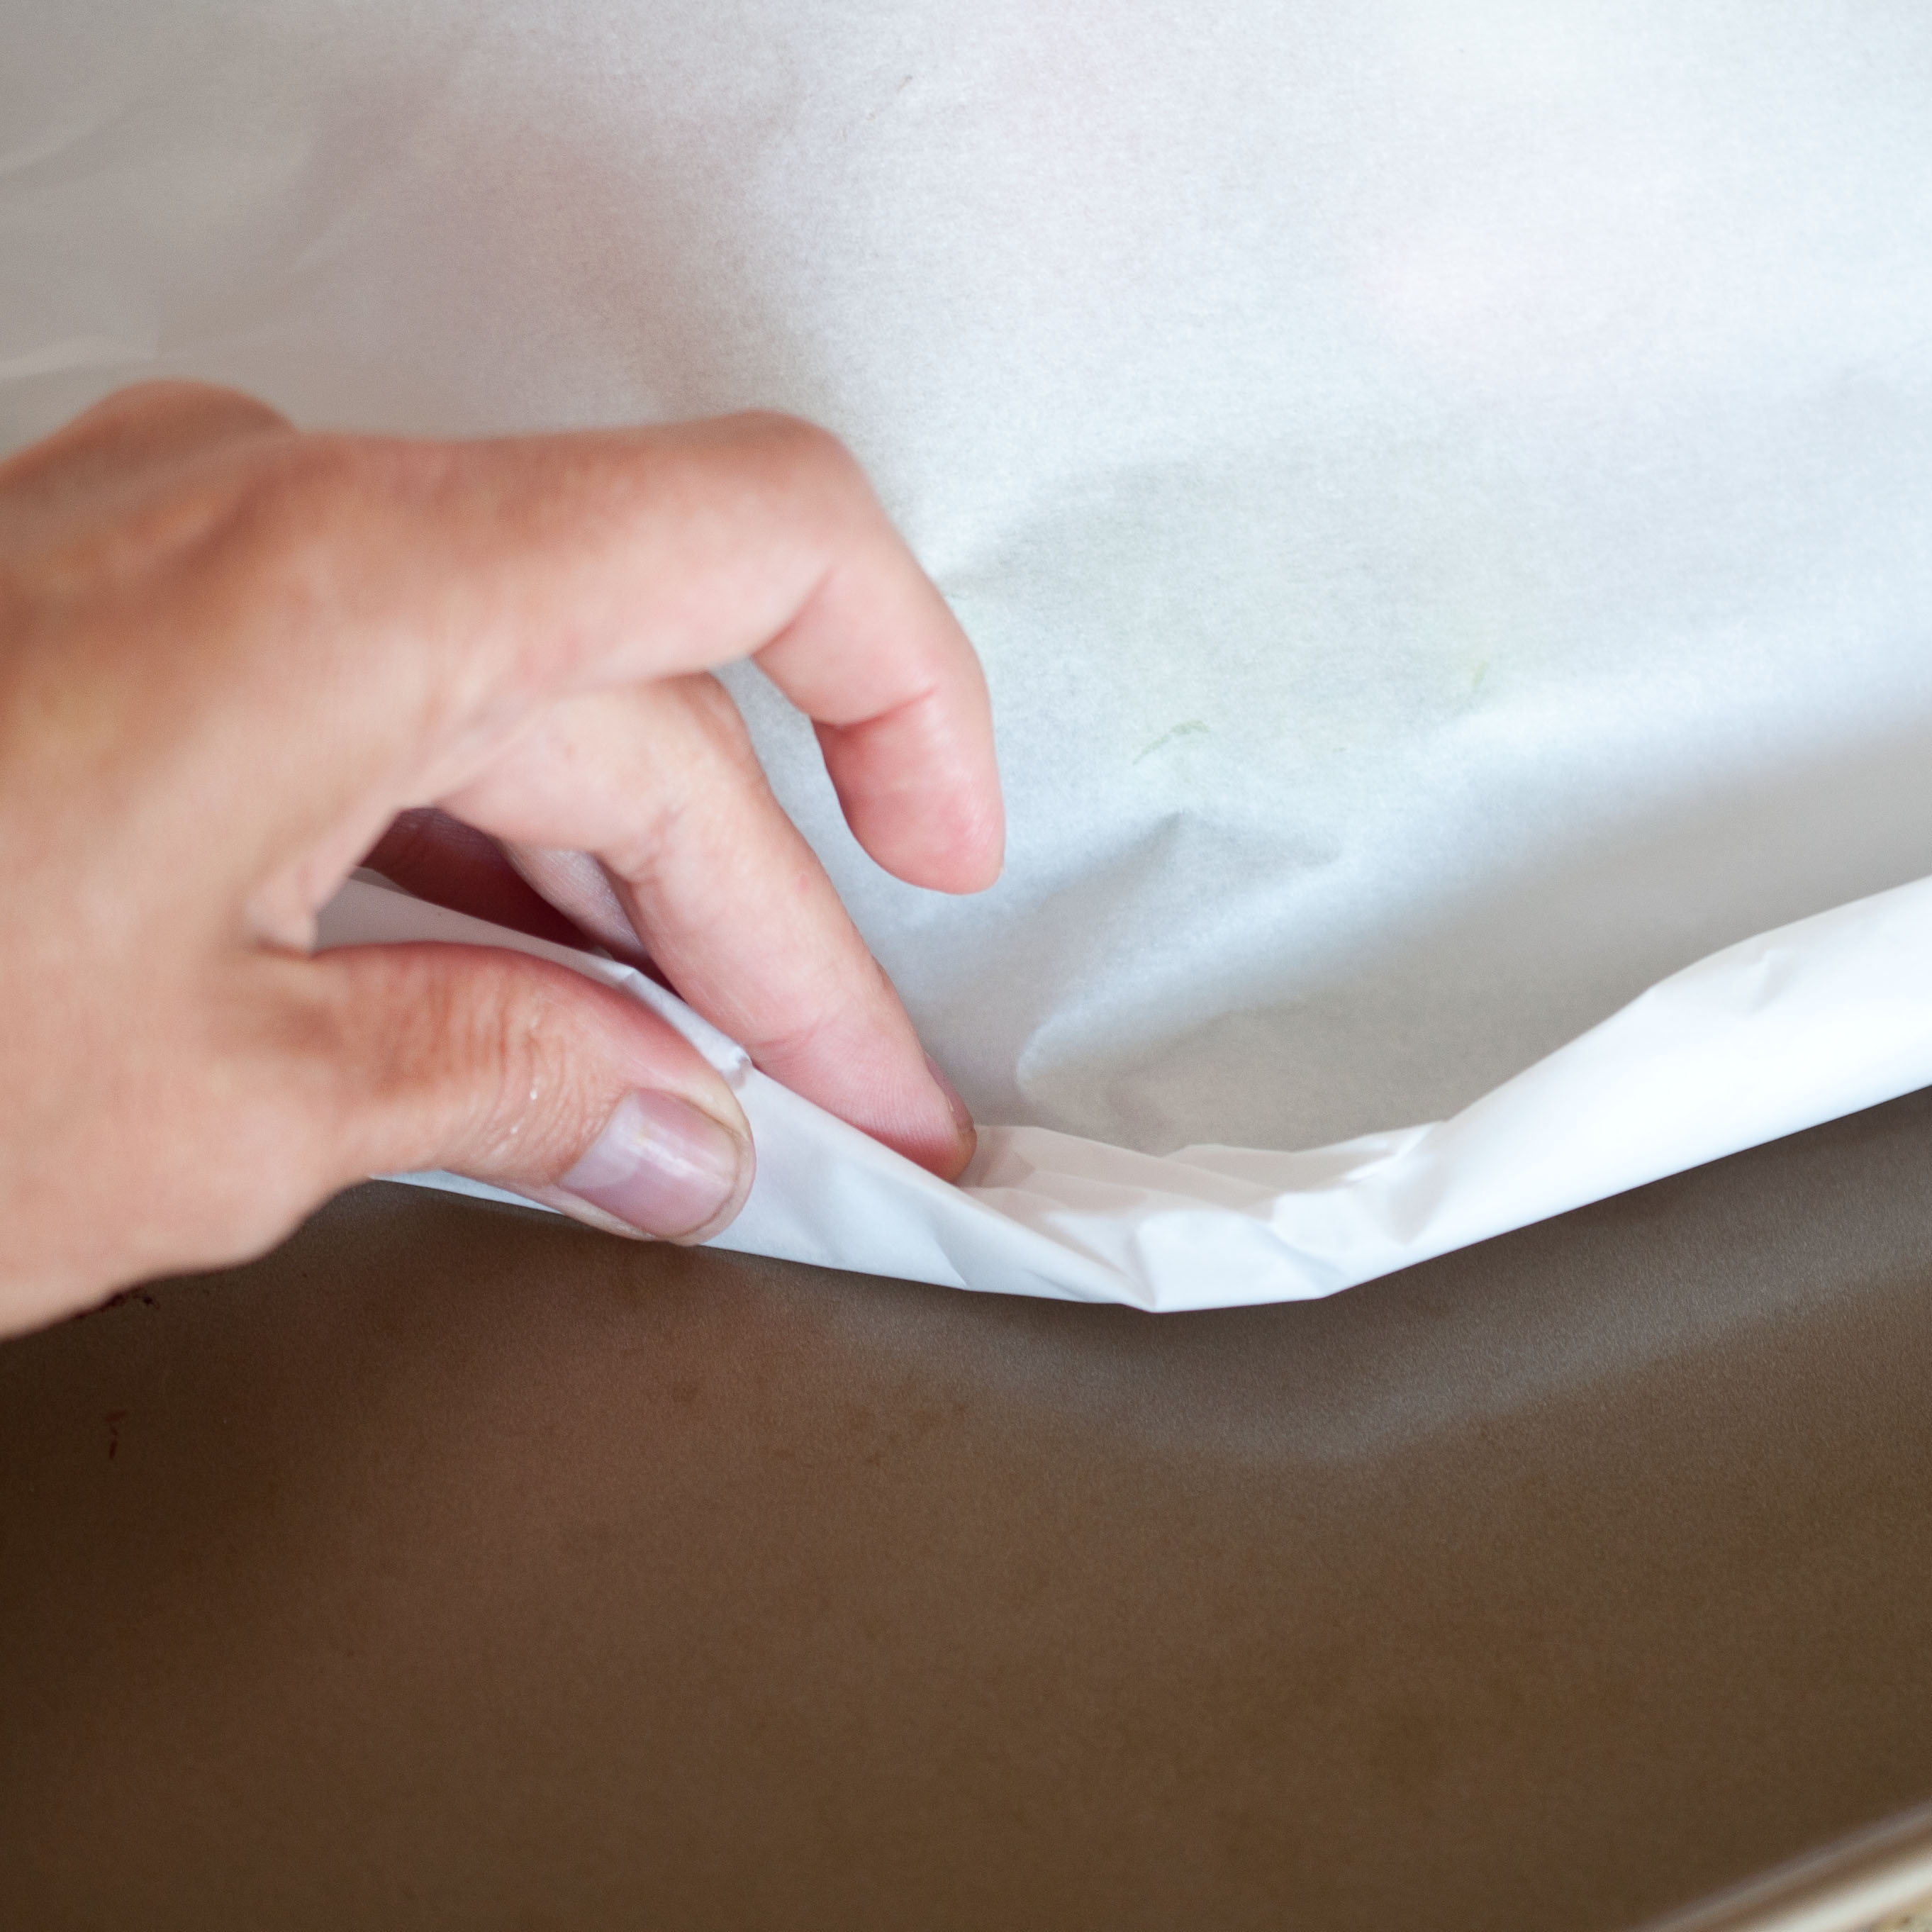
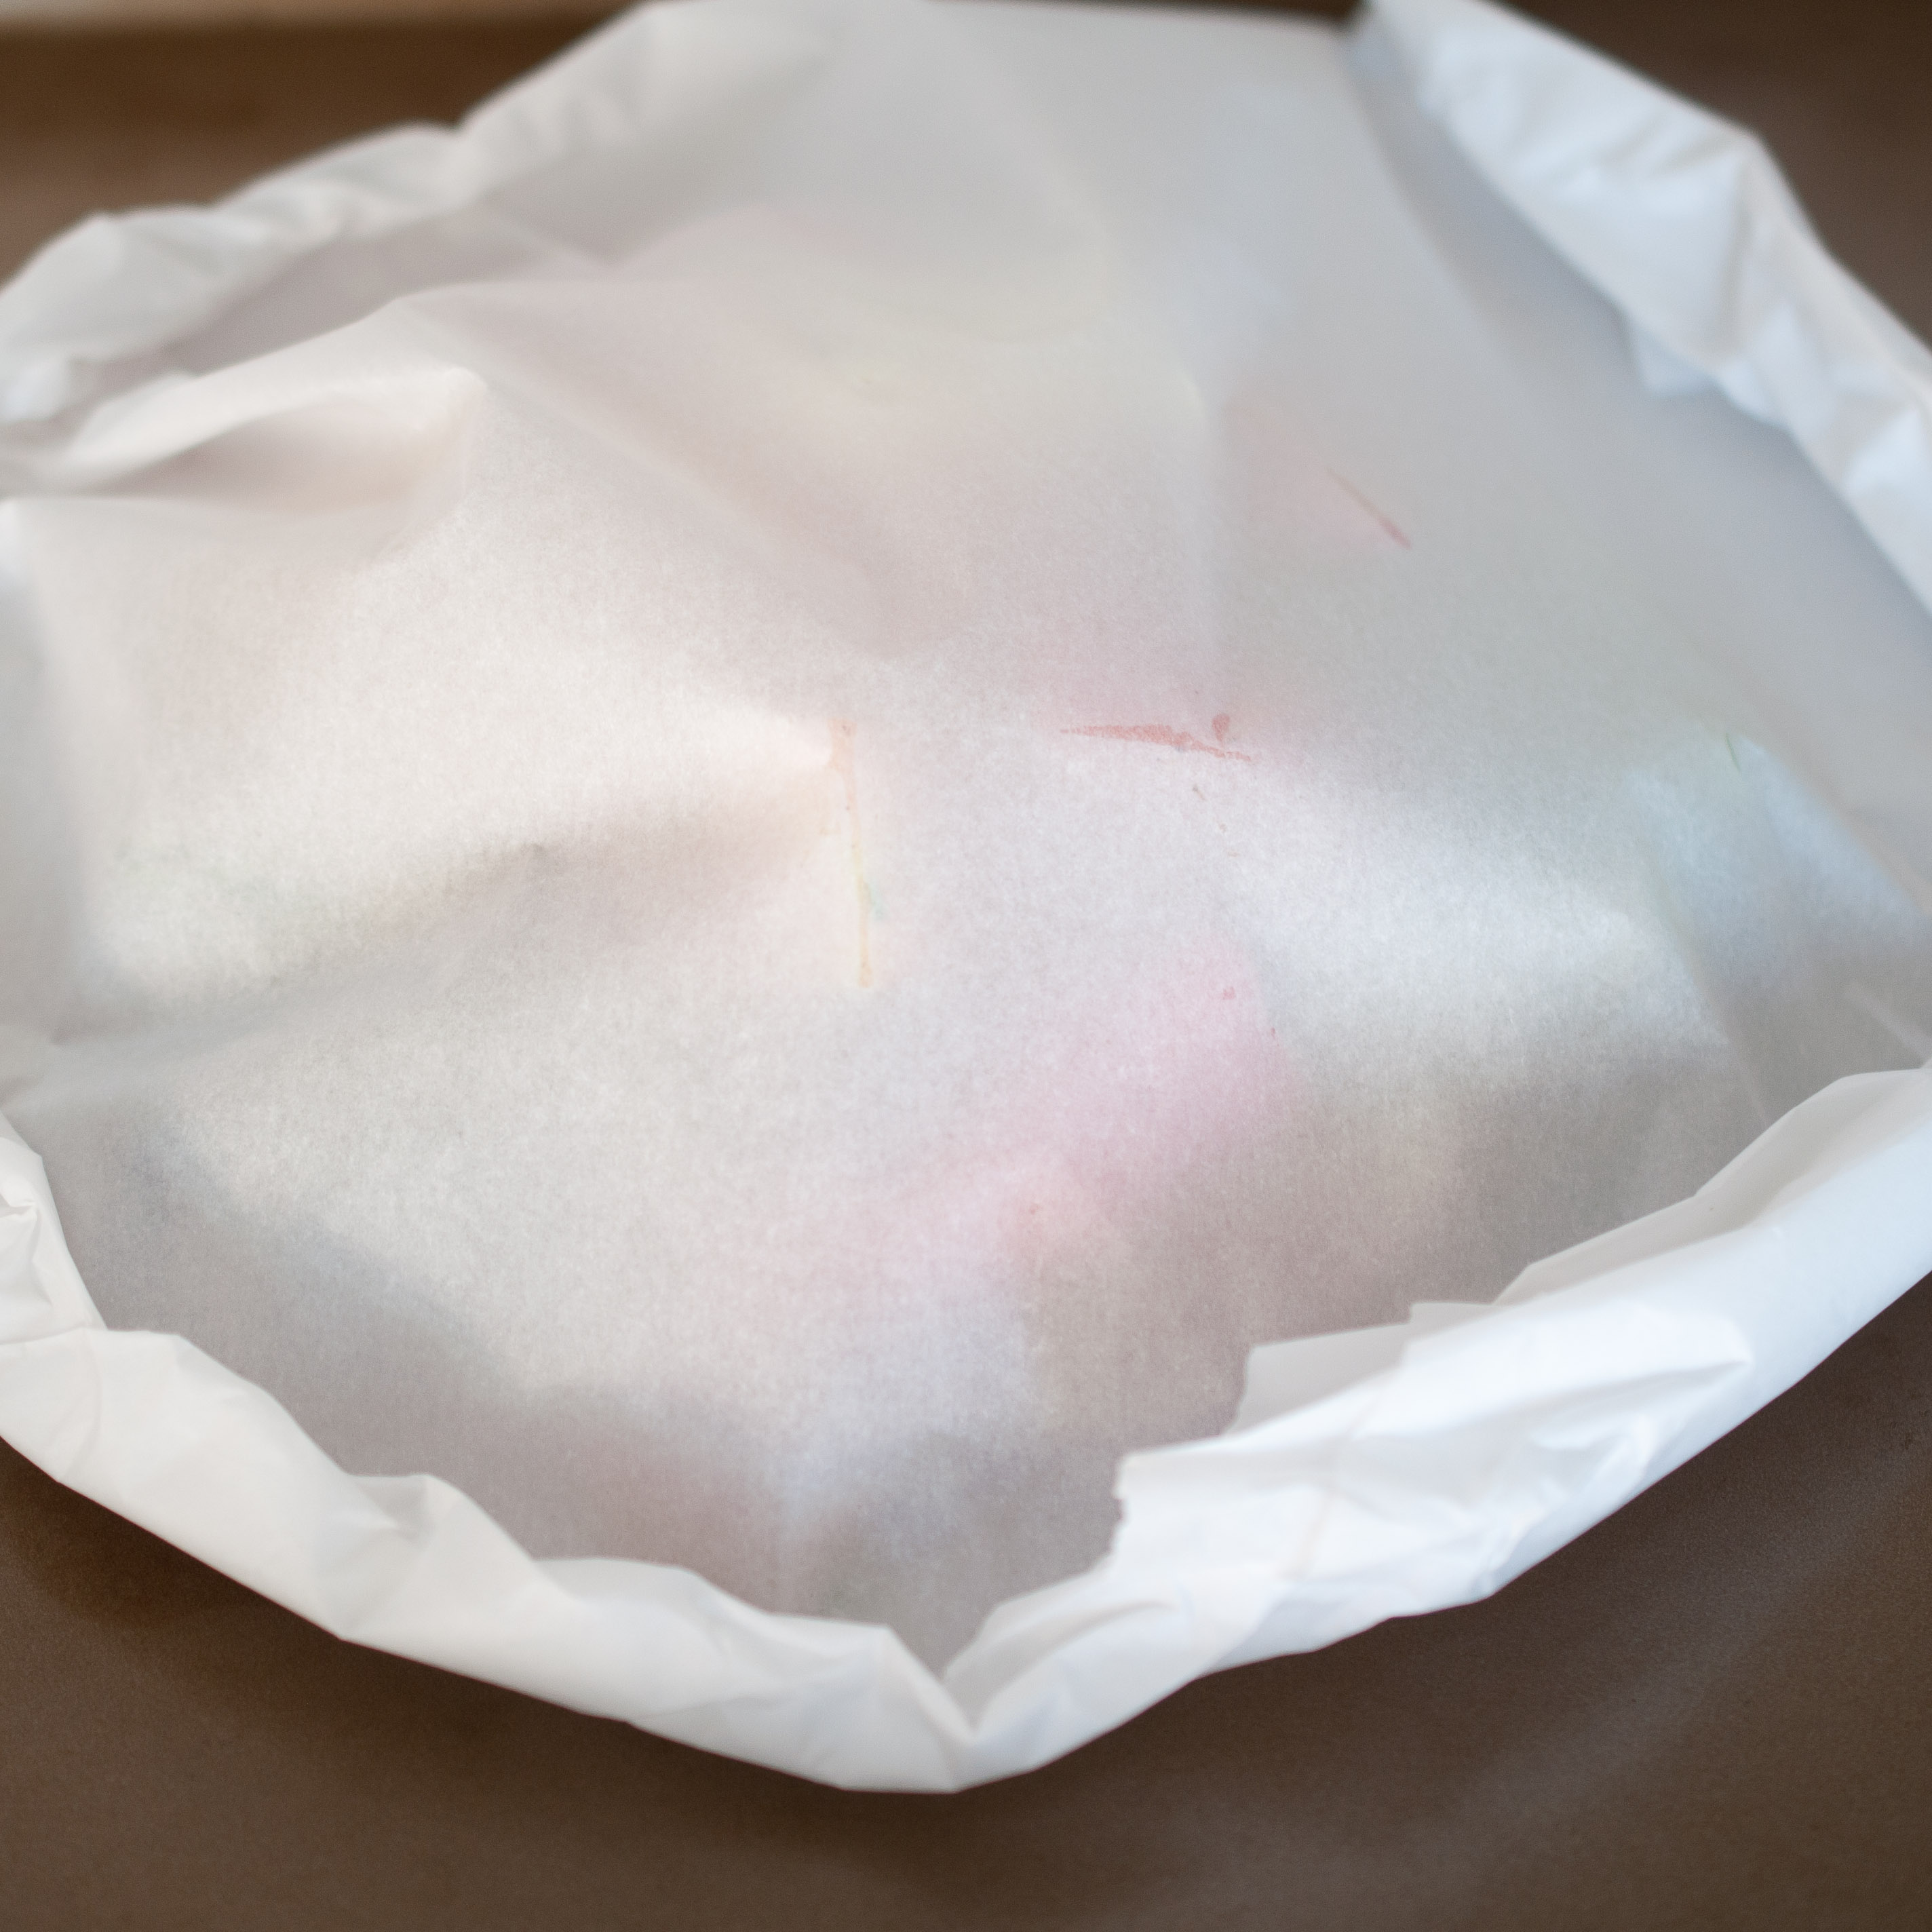
Late one afternoon, as our new and overly ambitious new manager-of-the-moment decided to dust off the chalkboard sign to institute a Daily Specials program, I begged Nacho to teach me something. He laughed. And then put me to work making Red Snapper packets with parchment paper, butter and some vegetables. To this day, I still make these. Easy, healthy and ready to adapt to in-season produce.
To see my Coconut Oat French Toast, click on the picture:
Why would a meat eating cheese monger such as myself want to make something vegan? Several reason, not the least of which are my friends and family who can’t or wont eat dairy. As meat eaters, it is even more important for us to experiment with vegan and vegetarian food and not hang on the crutch of animal products with the exclusion of other foods. We need to have all types of recipes in our arsenals, not just to accommodate those who might be guest at our tables, but in order to discover foods that we didn’t know we loved, because we didn’t think food with "vegan" labels applied to us. In exploring vegan cooking I have discovered what an amazing texture vegetable shorting lends to frosting, how rich and beautiful coconut milk tastes, and how fruit purees can be a flavorful stand in for butter.
Dairy free baking is something I want to lean towards more. Only using milk products when other substitutions would compromise the overall product, but in many cases vegan substitutions make the end result just as good or even better. Plant based foods just feel better in my body and if the taste of the food isn’t harmed then why would I make any other choice?
I started exploring dairy free cooking when three friends where coming over for dinner. One was kosher (meat and dairy can not be served together) one was allergic to cow’s milk and the other was breast-feeding a baby who couldn’t have dairy. All three needed a dairy free meal. I realized how much dairy I use. Why? I love plants, produce, vegetables, fruit…why all the milk?
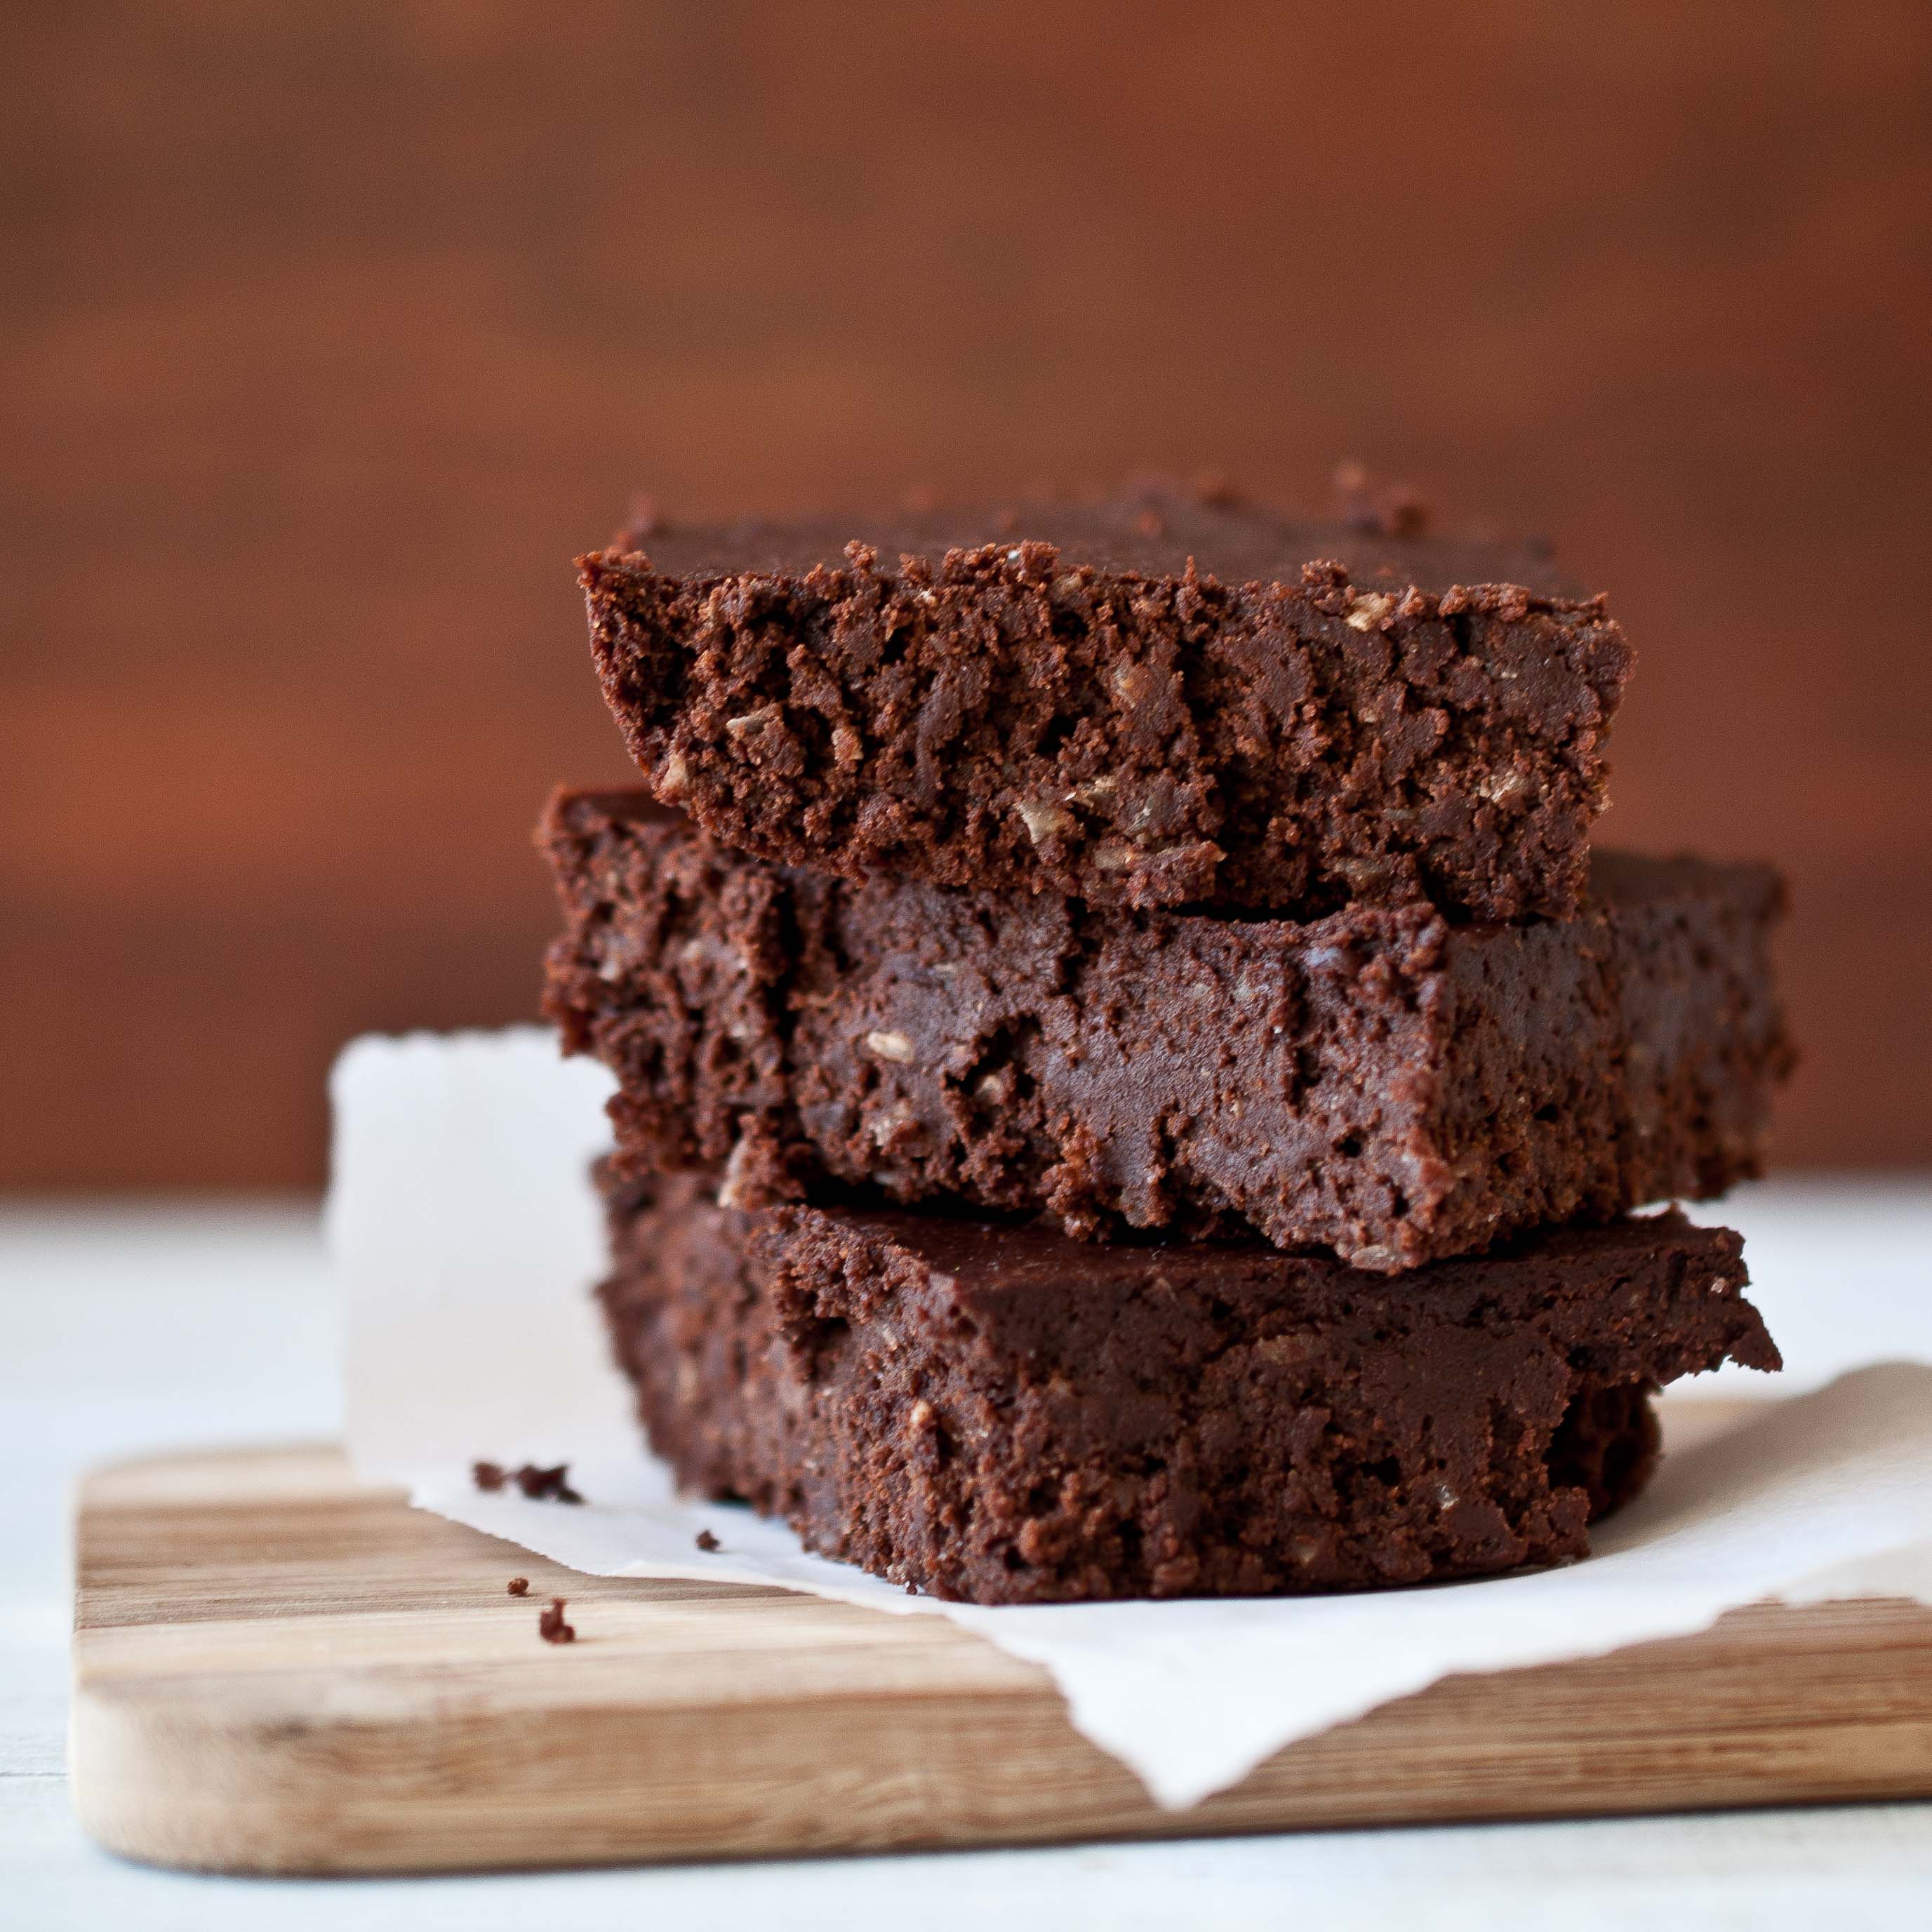
These brownies where really good. Not just "good for vegan" but just really good. So fudgy and intensely chocolatey, even Tater couldn’t keep her little fingers off them.
She took a bite and then carefully put it right back where I had place it. So cute, I love that kid.
Chocolate Coconut Vegan Brownies
1/3 cup coconut oil
1 cup agave nectar
1/2 cup unsweetened soy milk (can sub coconut milk)
1/3 cup strong coffee*
1 cup cocoa powder
3/4 cup whole wheat flour
1/2 cup unsweetened shredded coconut (I used Bob’s Red Mill)
1/2 tsp salt
In a bowl, beat together the coconut oil and the agave nectar until well combined. Add the soy milk and coffee and beat again. in a separate bowl, add the cocoa powder, flour, shredded coconut and salt and stir to combine. Add the dry ingredients to the wet ingredients and stir until just combined, don’t over mix.
Spray a 8×8 inch baking dish with cooking spray (or line with parchment paper) and pour bater into prepared pan.
Bake at 350 for 16-18 minutes. You don’t want to overcook these or they will be too dry. Allow to cool before cutting into.
For an extra treat, serve warm topped with coconut milk ice cream.
*Note: Coffee intensifies the flavor of chocolate, with no trace of a coffee taste. If you don’t like coffee, or don’t have a coffee maker, stop by a Starbucks and order a black coffee, use 1/3 of a cup and freeze the rest in ice cube trays for use in future chocolate baking.
I stole this idea from my friend Tori. She is the genius behind The Shiksa In The Kitchen. And if you watch the morning news, anywhere in America, there is a chance she cooked up something special on your TV. She is a big hit in New York and San Francisco especially, but can you blame them? She’s gorgeous, smart and nicer than you could ever expect.
Even when the inevitable day comes when she gets her own cooking or travel show, she will be the girl who sits in the airport terminals between flights and answers your cooking question via twitter, because she’s that nice.
We met over crayons and wide ruled paper in Mrs. Newets 4th grade class room. We lost touch when I moved to Eastern Washington, because we are both older than the internet, but met up again through blogging. Which is one of the reasons I love blogging. And why I love when my friends in the computer, become real life humans who call me on the phone and invite me to have lunch with Mario Batali.
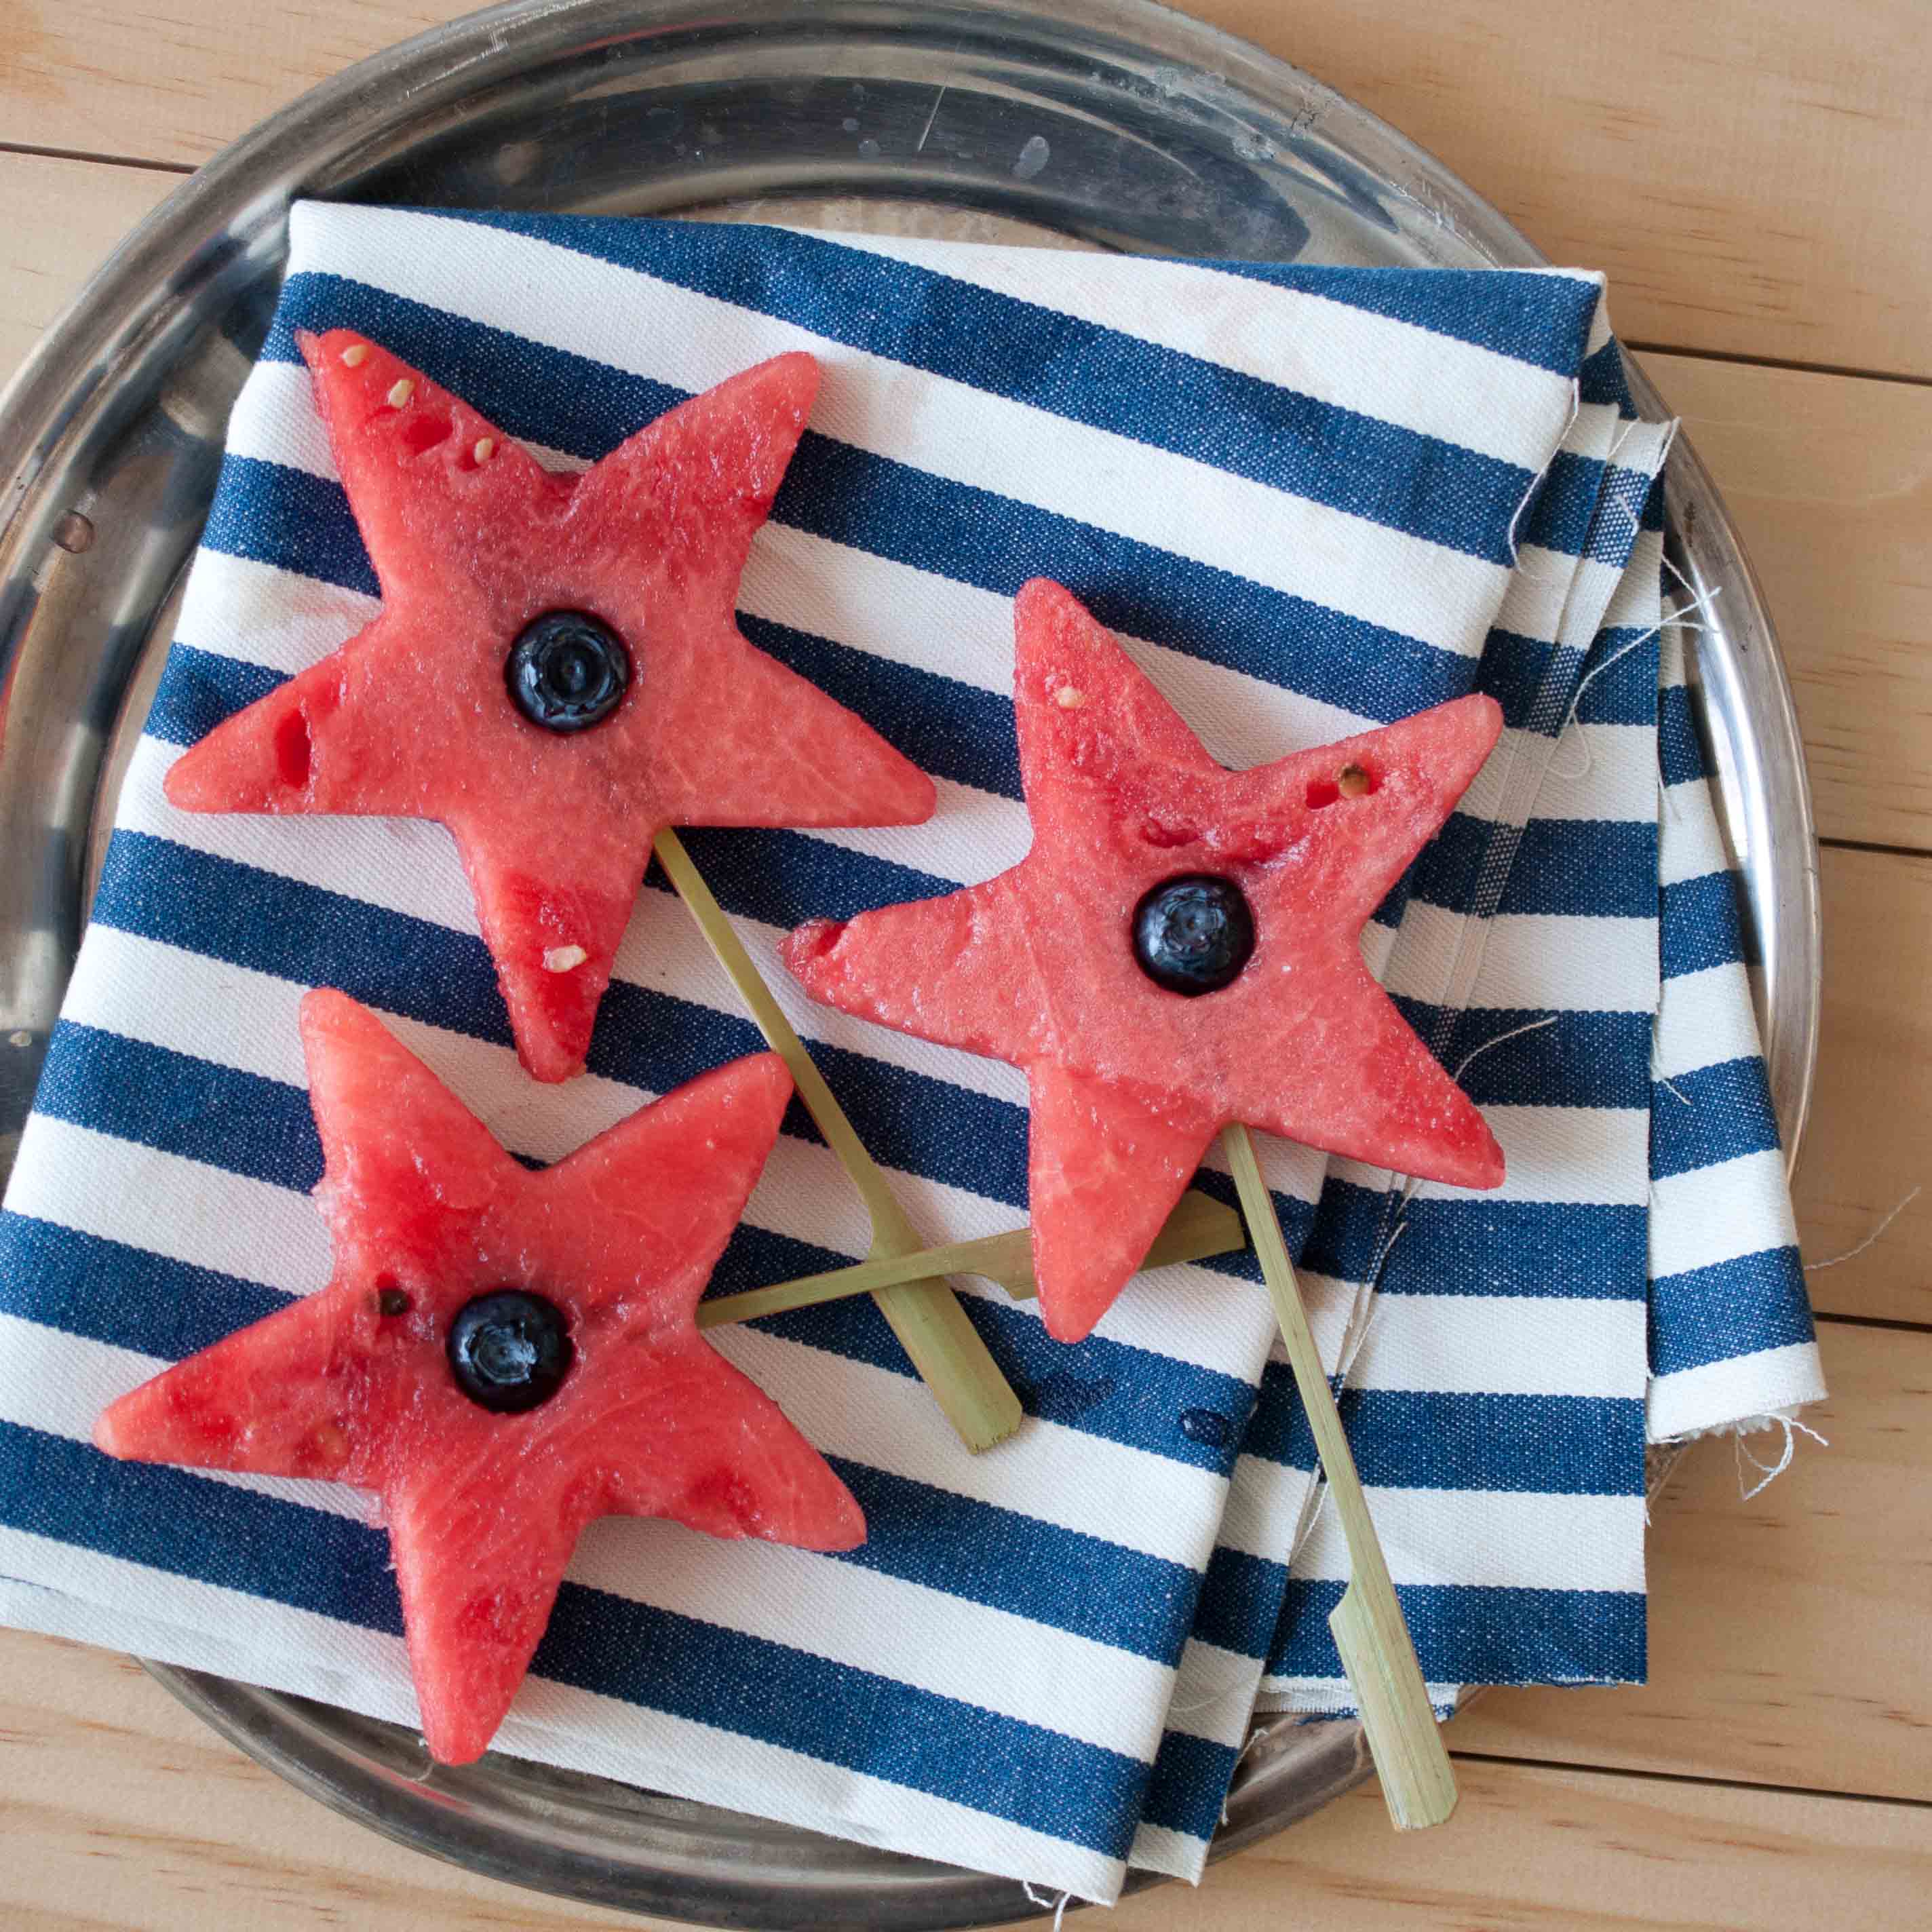
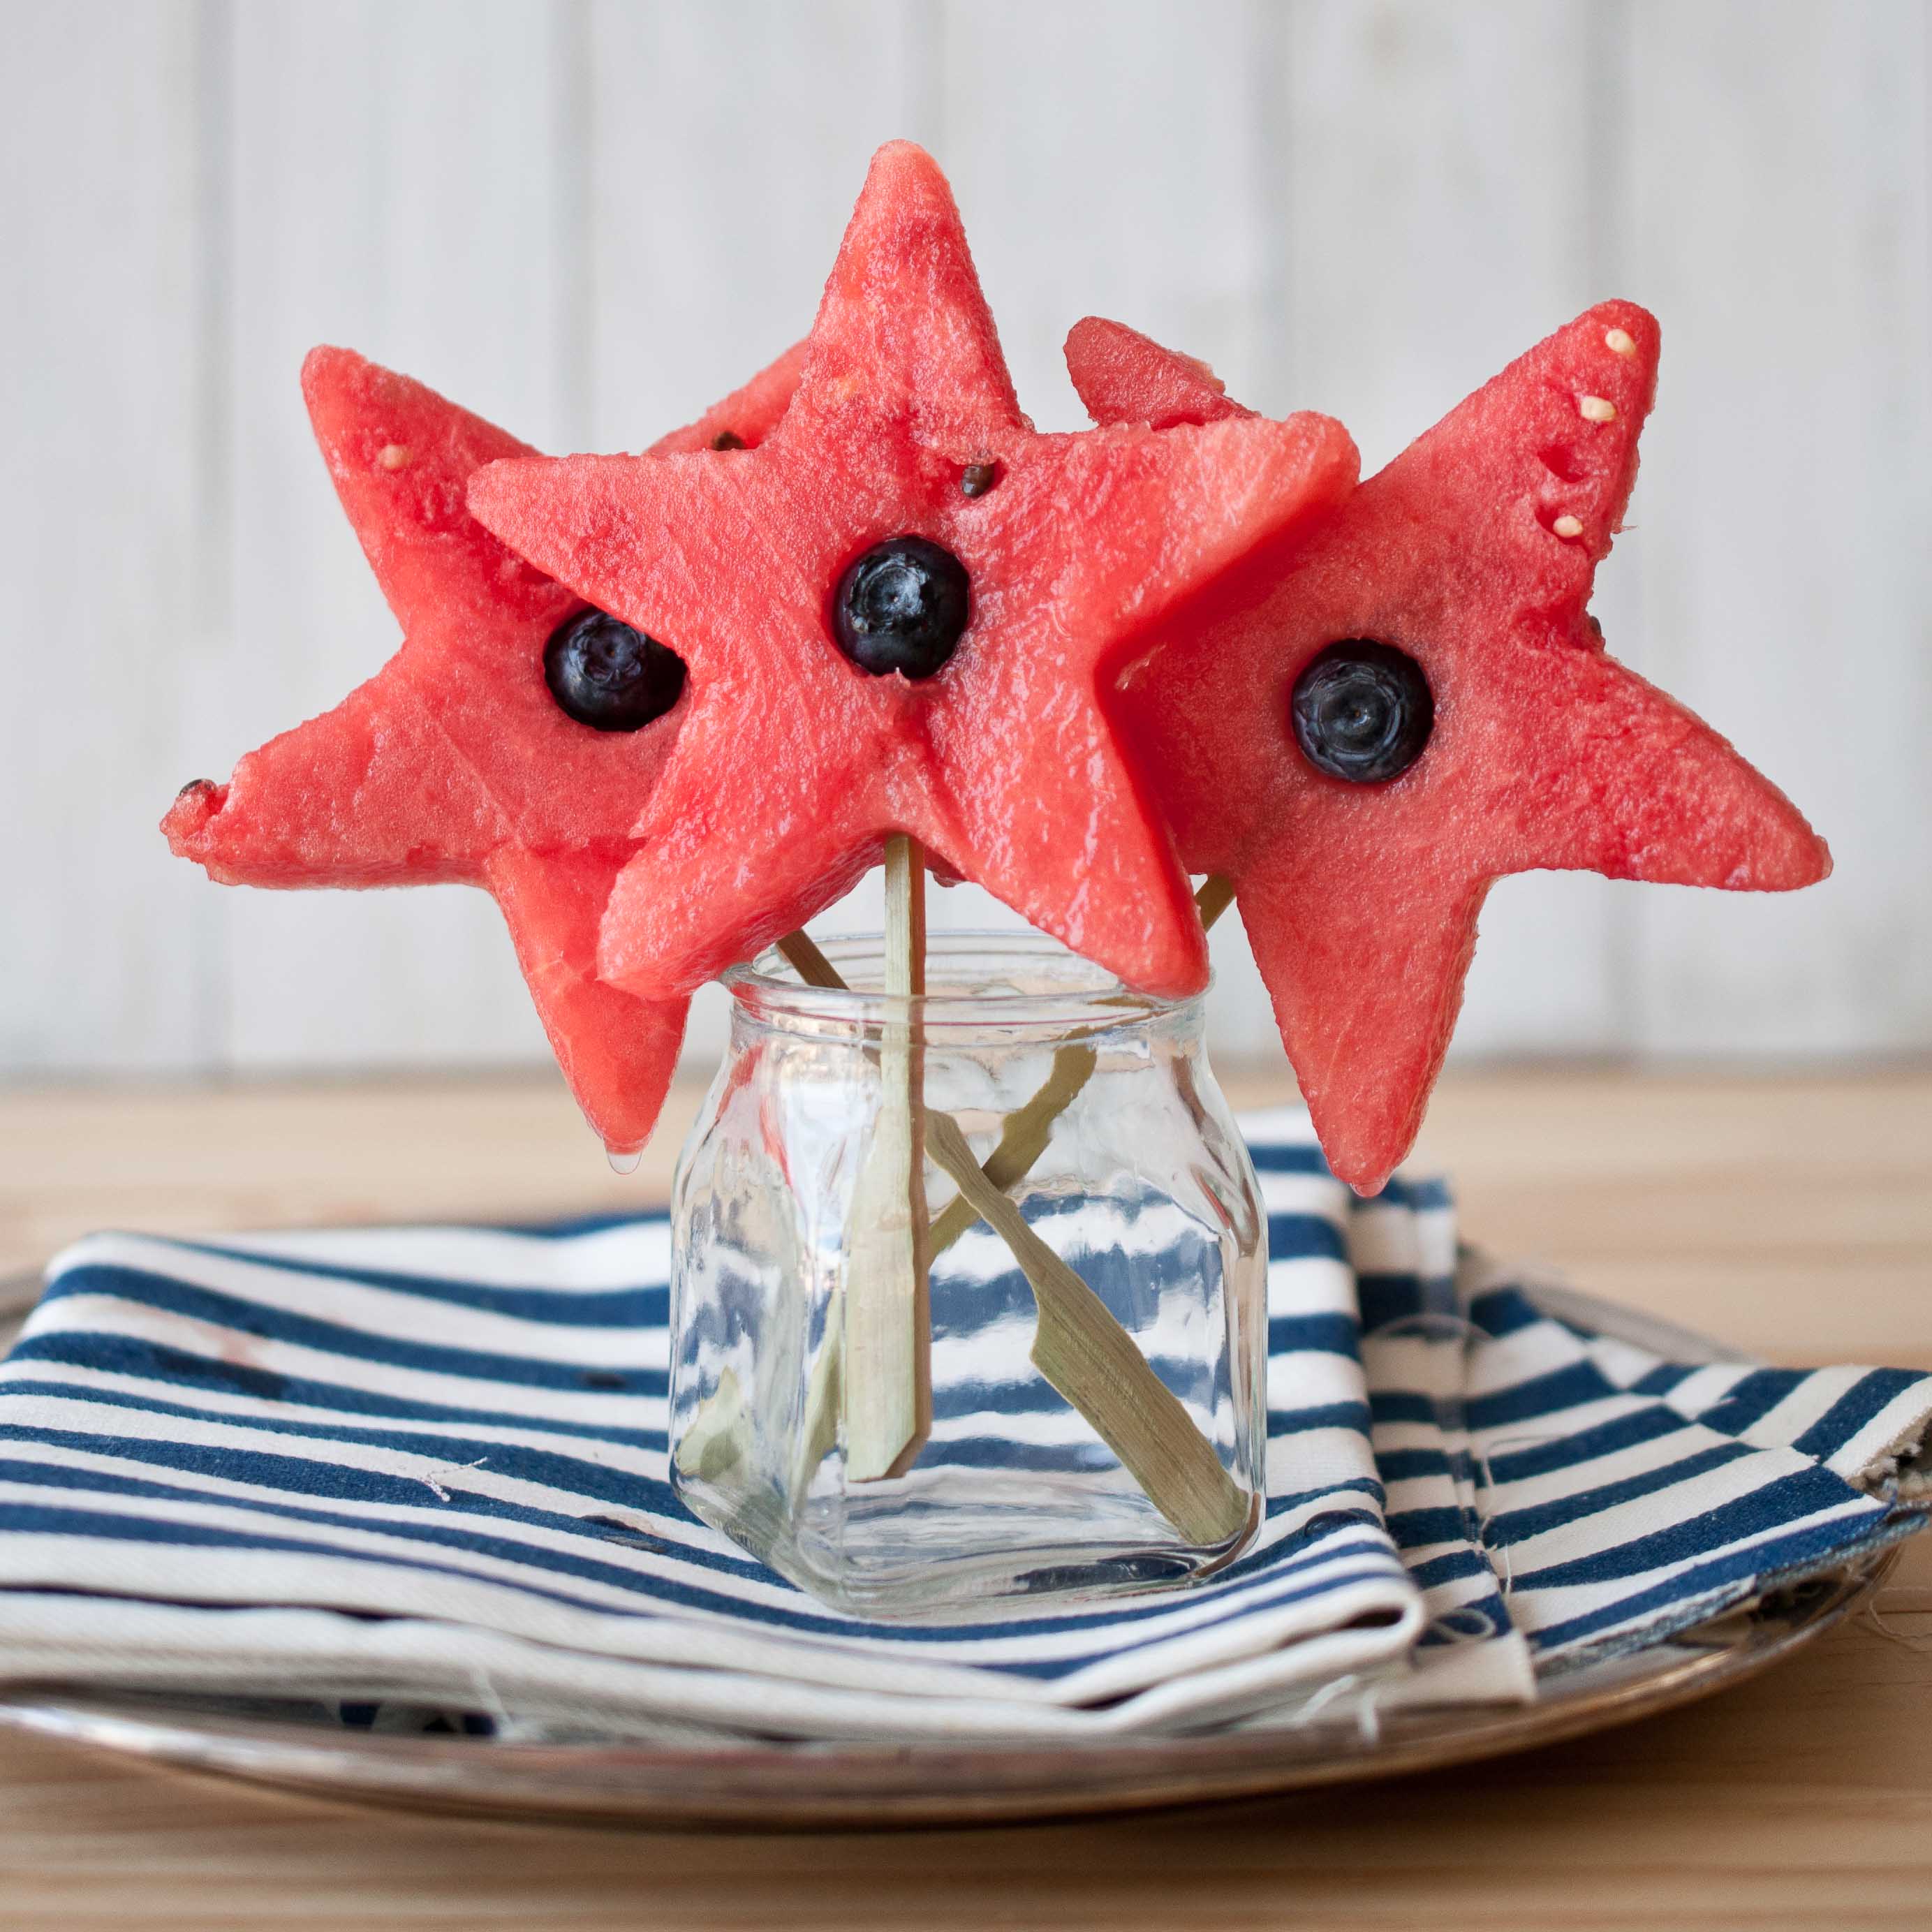
I’m going to show you how to make these watermelons into stars for that I Heart America holiday that is rapidly approaching, but you’ll have to go over to her blog to find out how to put booze in them
Make sure you do, because whats more American than produce and booze? Good Bless the USA.
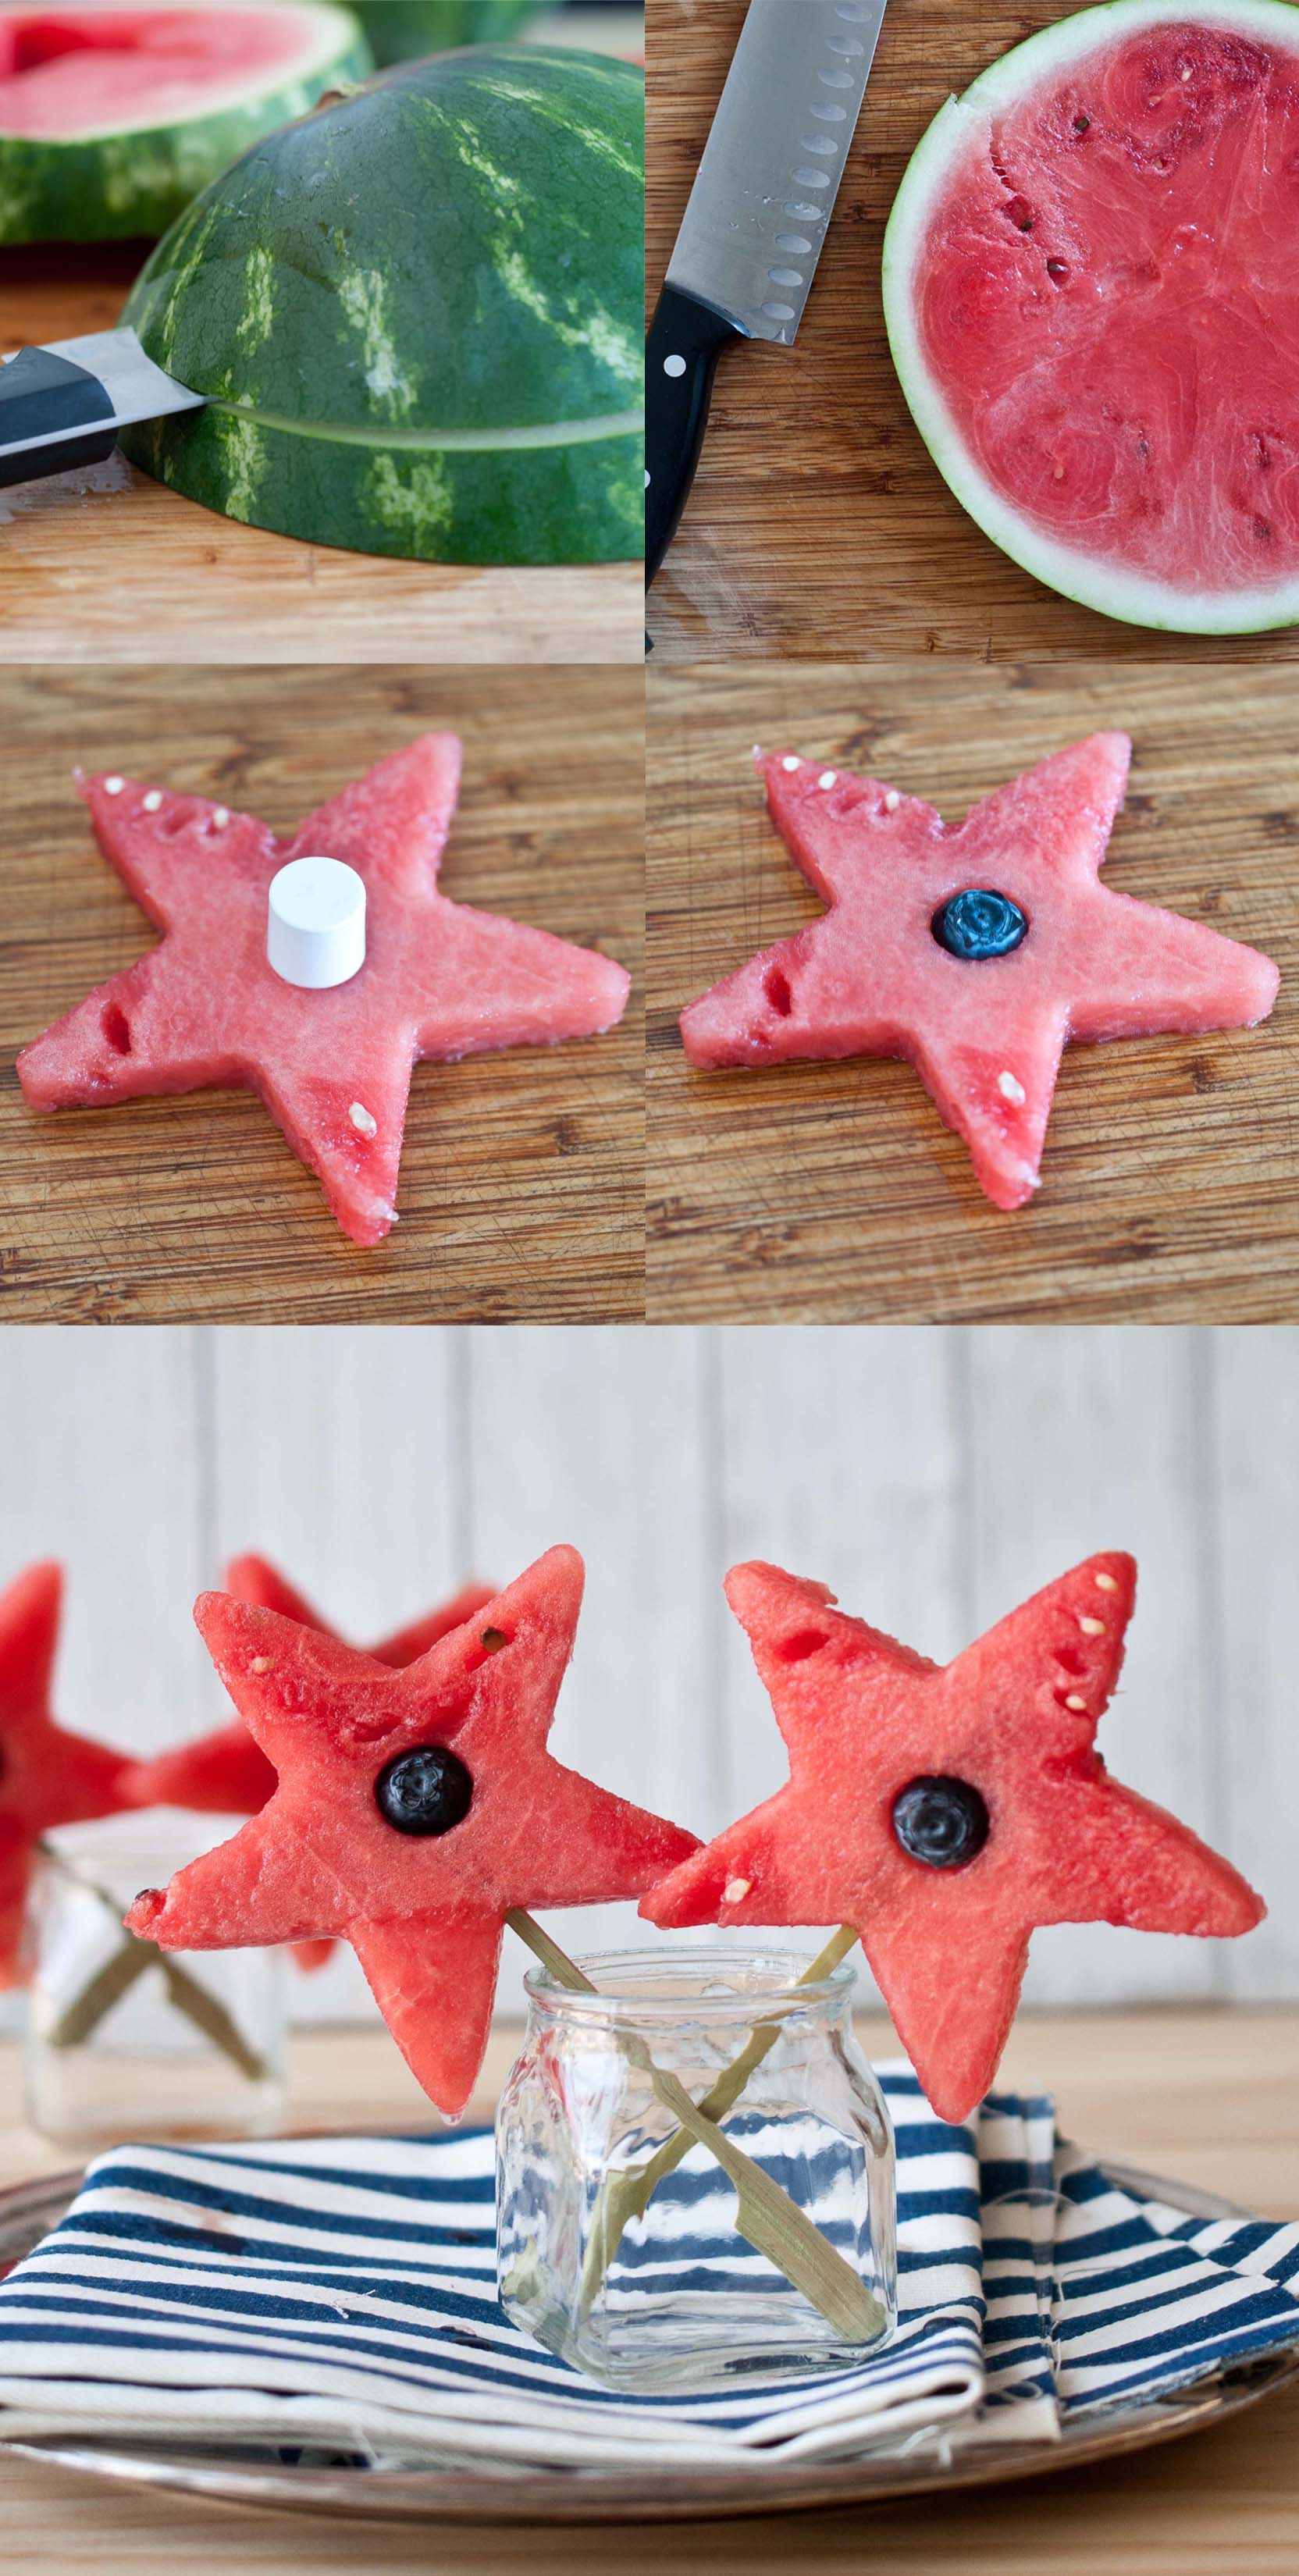
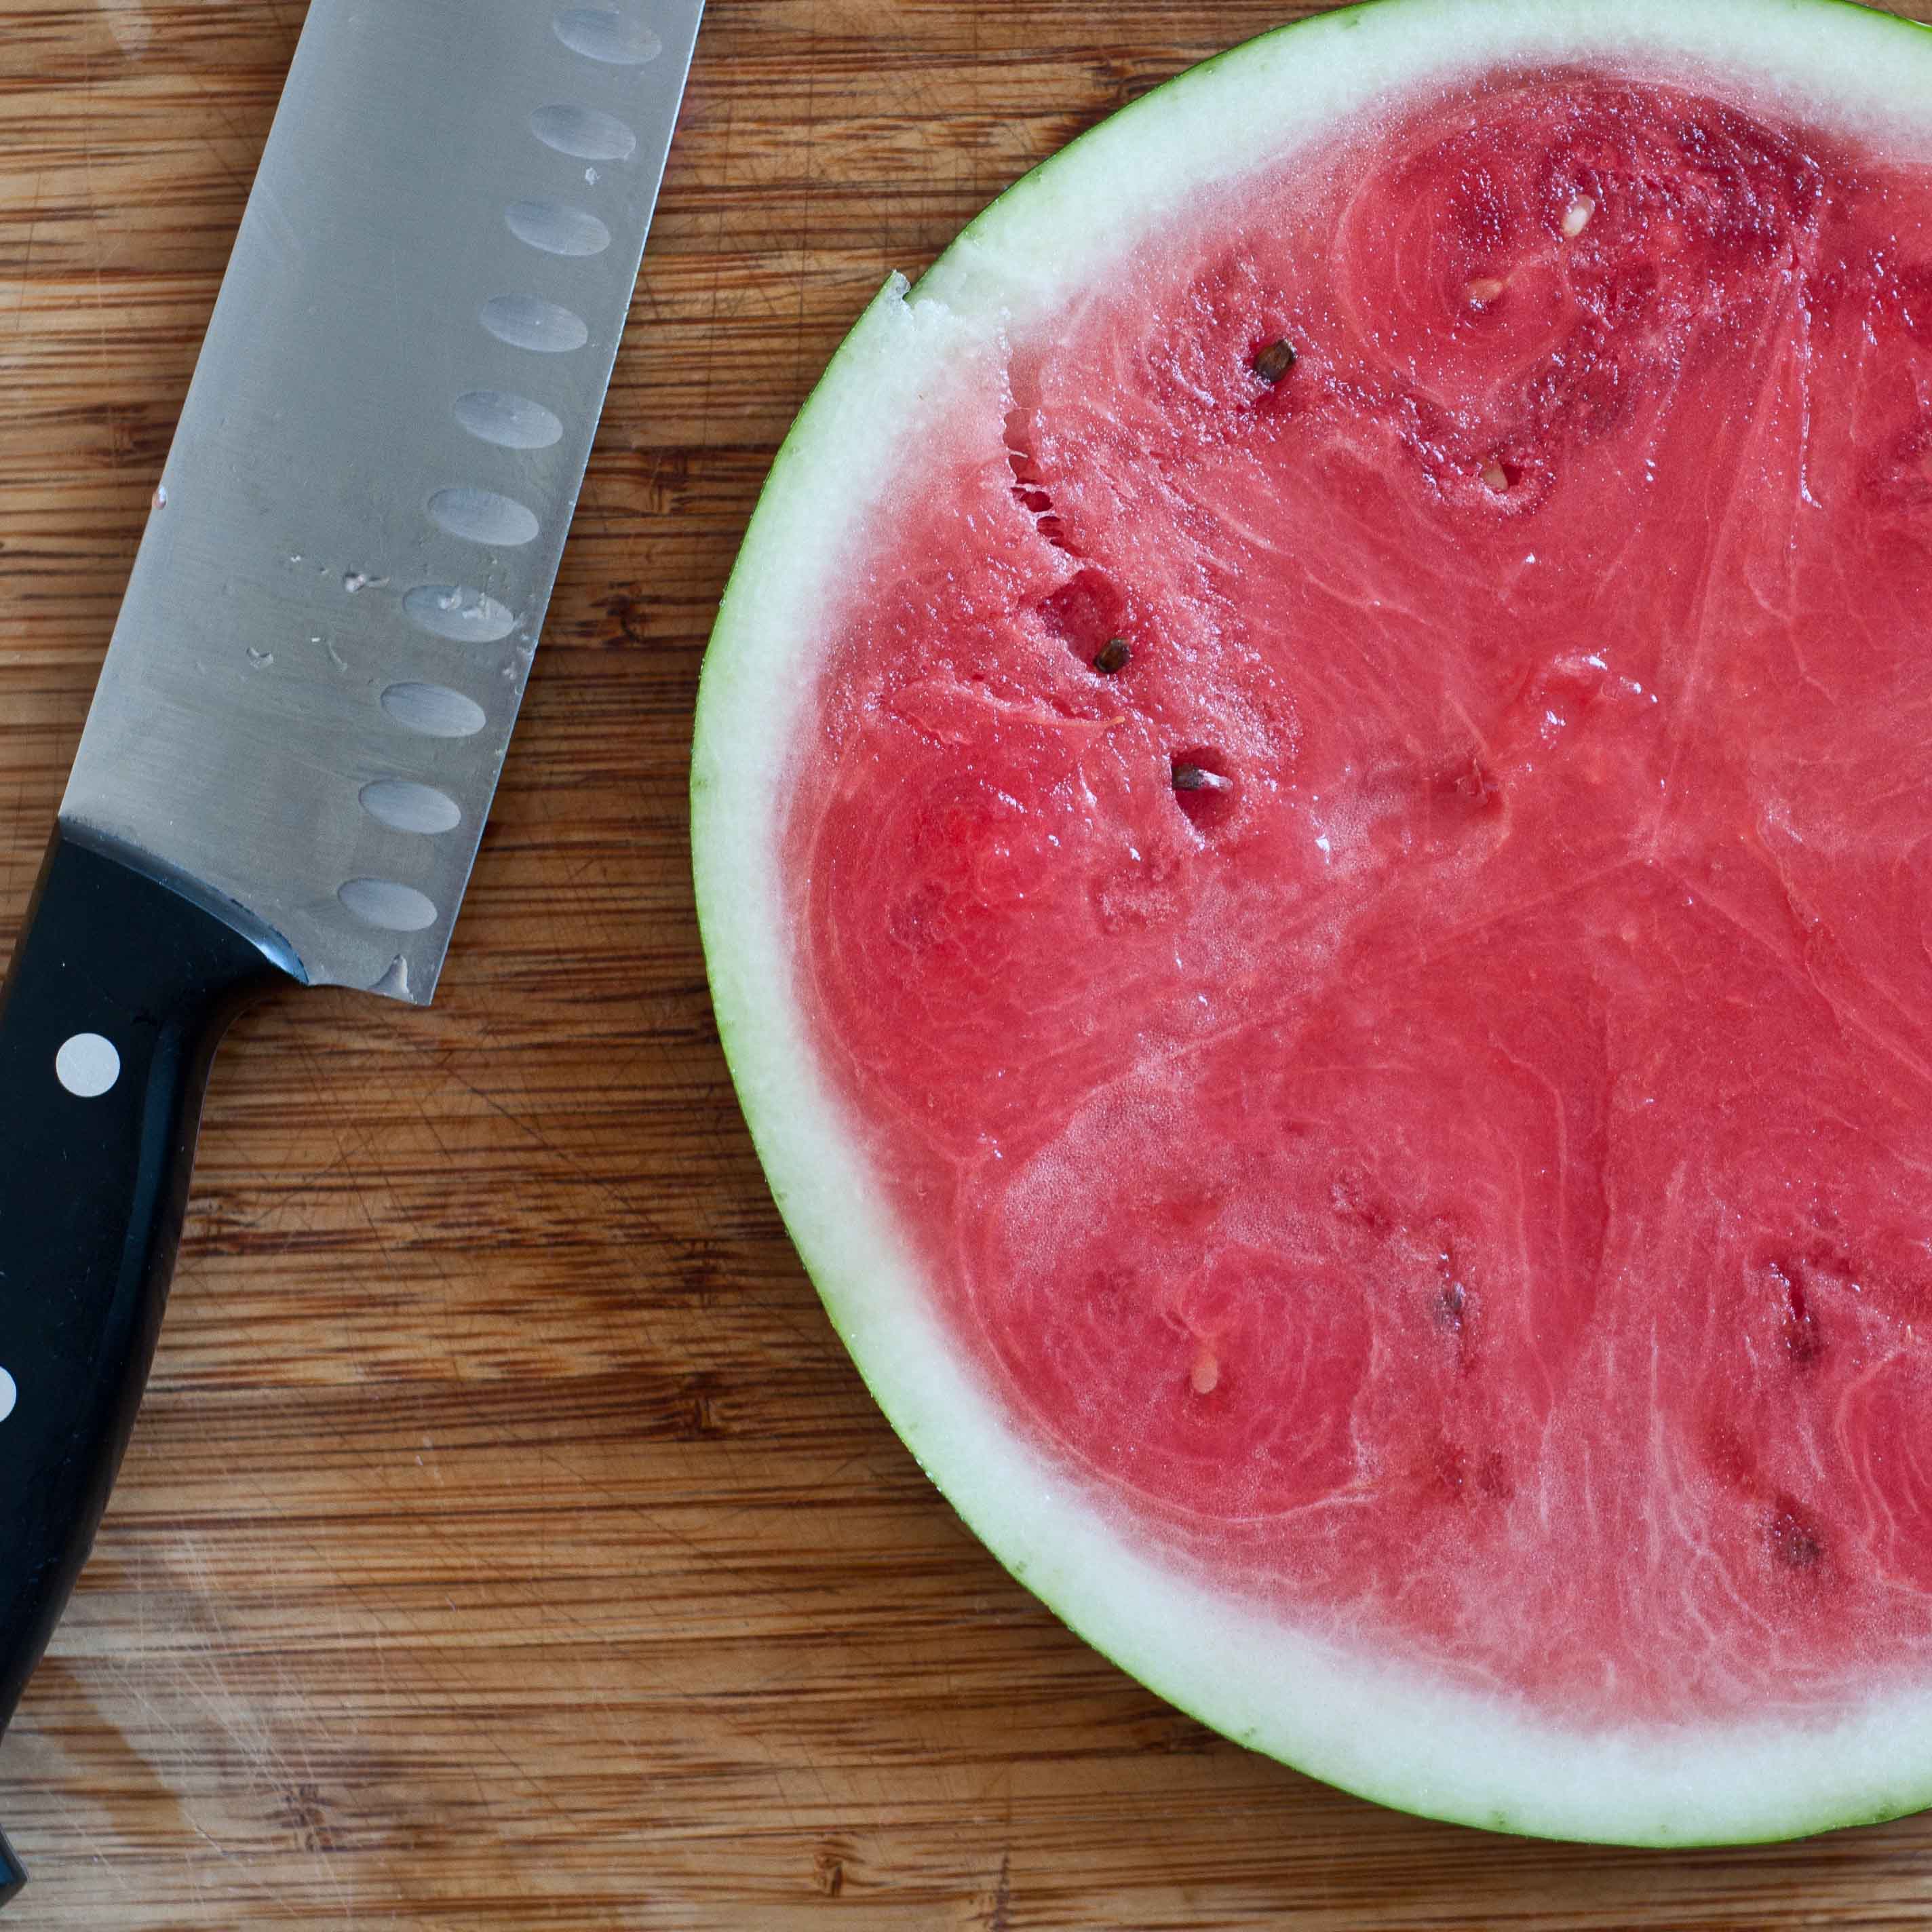
Lay the rings on a flat surface and cut out as many stars as you can with a Star shaped cookie cutter. You should be able to get two or three stars out of each ring. If the stars are too fat, cut them in half width wise to make two thinner stars. Be sure to reserve the watermelon "scraps."
Step Three:
I know this is a little skeevey, but bear with me, use the cap to a Chapstick tube to cut out a hole in the center of your star. It’s odd that I’m asking you to go find a tube of Chapstick to add to your kitchen equipment, but if you are anything like me, you have handfuls of those things in every drawer and purse in your house.
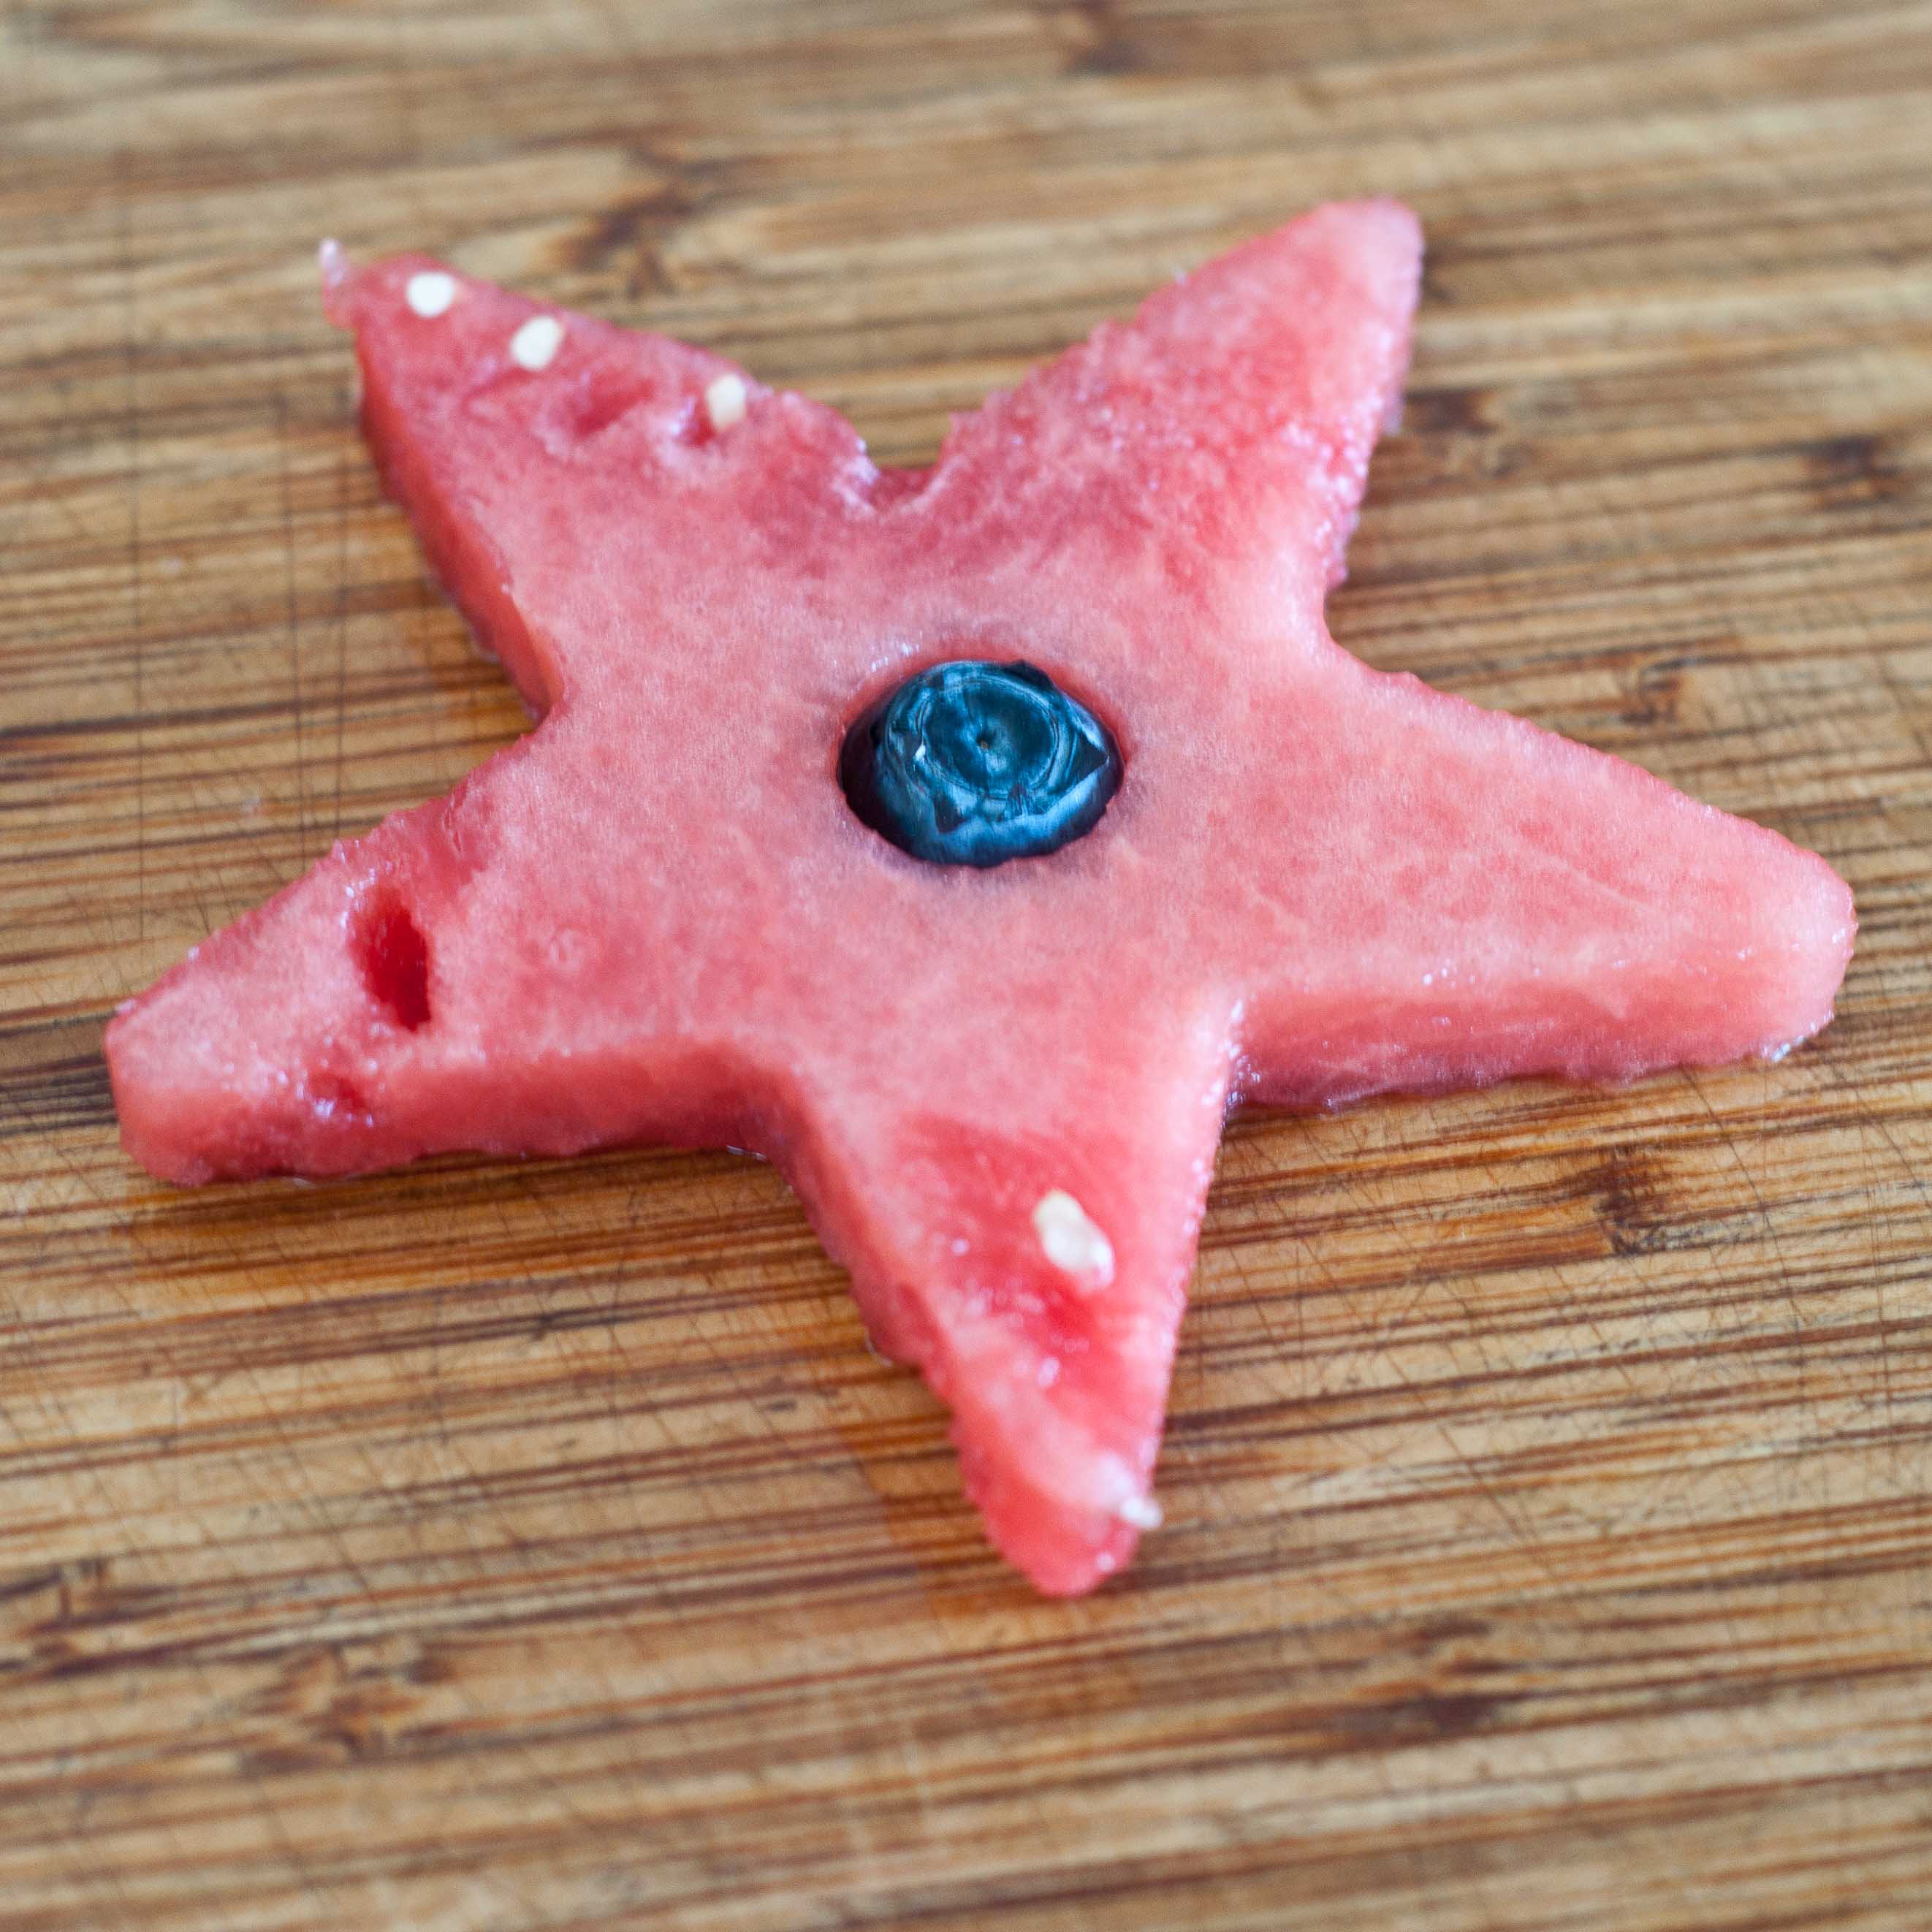
Just push the cap all the way through the center of the star. The hole is the perfect size for a large blueberry.
Step Four:
Place a blueberry in the hole in the center of the star.
Step Five:
Press a six inch skewer into the watermelon and through the blueberry.
Step Six:
Go to Tori’s site and she will tell you how to turn these suckers into boozy treats!
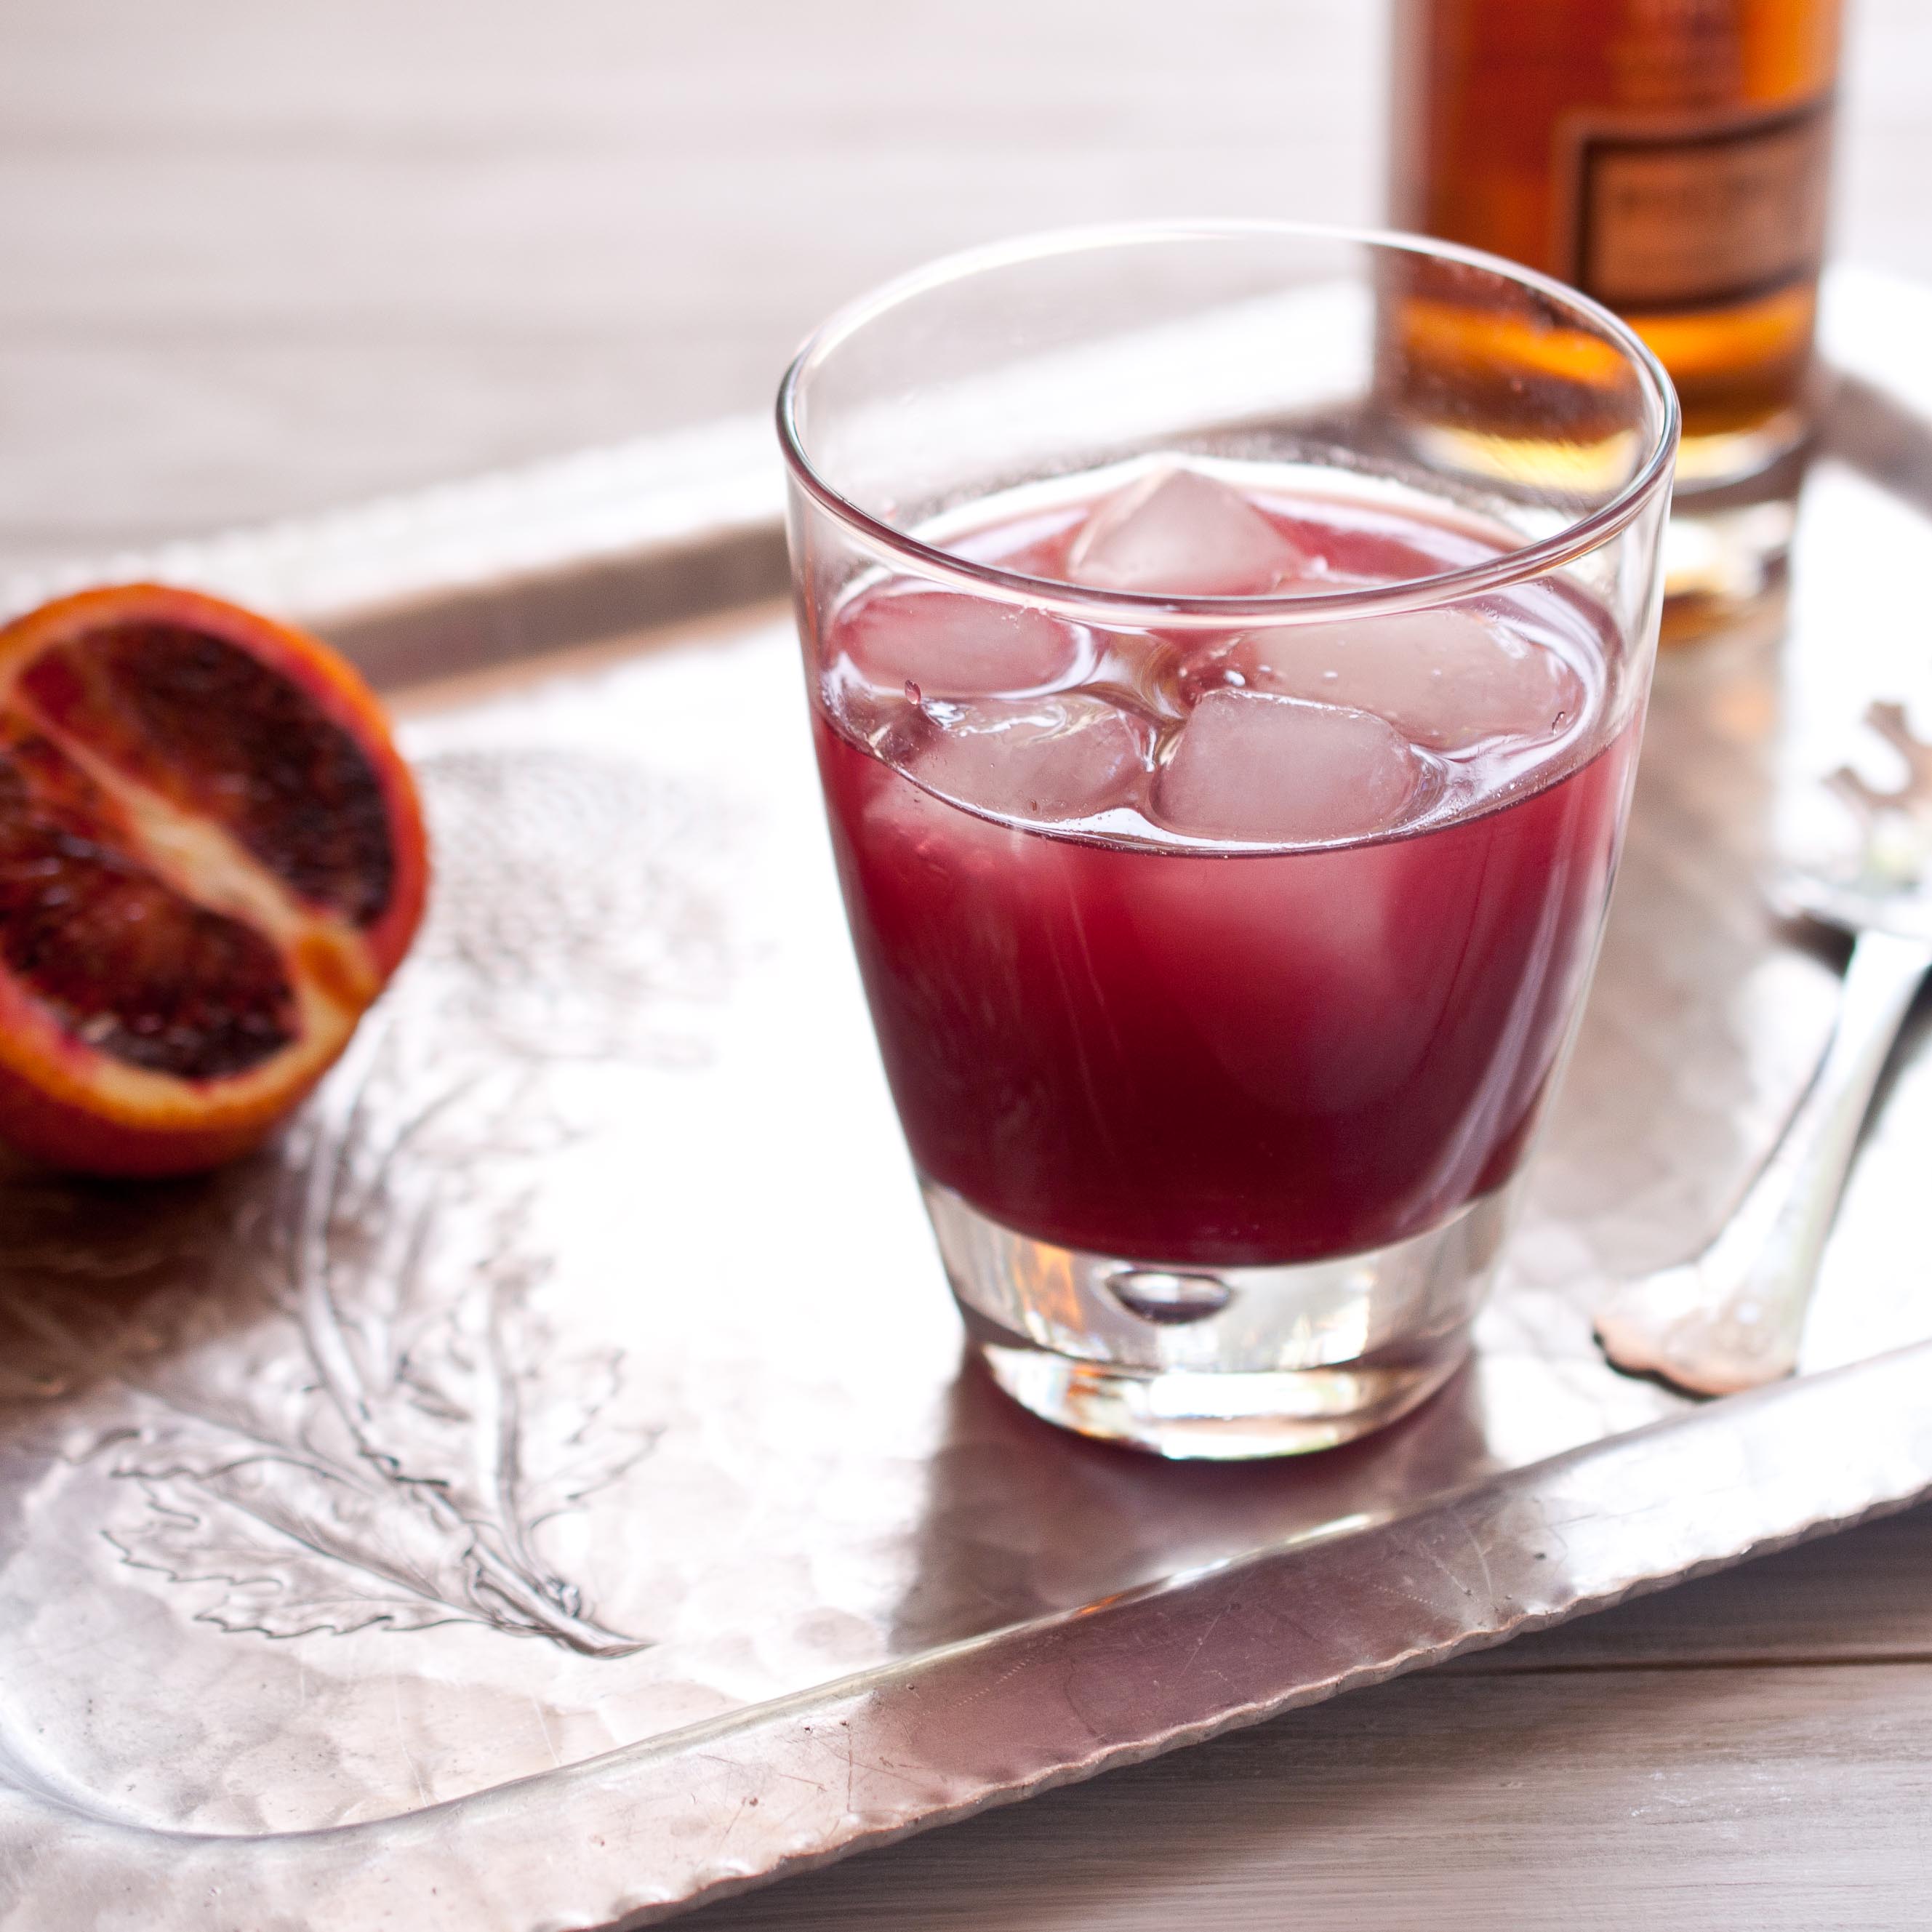
What to do with all those leftover Watermelon scarps:
I don’t have a name for this drink. I like names. I love this cocktail. So you can see what type of conundrum this has created in my life. I’ve even gone against suit and made this three times since it’s invention two weeks ago.
If you have a creative, fun name for this cocktail, let me have it. I’ll give you full credit and I will finally be able to refer to this properly when I make it for guest.
Update: This drink now has a name: Hot Blooded
I’ve also learned a few things about drink making with peppers, something I am completely and whole heartedly in love with. Spicy drinks have even lured me away from my one try love of the drink world: Craft Beer. While beer will still hold the number one rank in my drinking life, spicy cocktails have snuck into a close second spot. But there are rules when concocting libations from such unpredictable ingredients. Here are some rules to keep in mind:
1. Most of the heat from pepper are in the seeds. The more seeds you leave in, the hotter it will become. Exponentially.
2. When peppers sit in alcohol it only takes seconds for the heat level to go from hot to way too hot. It happens faster than you would expect.
3. No two peppers are the same and there is no way to predict how hot the ones you have chosen will be.
4. Alcohol intensifies heat. I learned this when writing an article about How To Pair Food & Wine, high alcohol beverages increase the heat level in food. The same rule applies to making cocktails with peppers.
5. Sugar mellows heat. Adding more sugar can lower the heat level a bit.
6. Use gloves. For the LOVE. You only have to forget once, and then try to take your contacts out a few hours later to NEVER do that again. If you do forget, the best way to remove the peppers evilness from your fingers is to rub copious amounts of olive oil into your hands for about 5 minutes, and then wash the olive oil off with very warm water and dish soap.
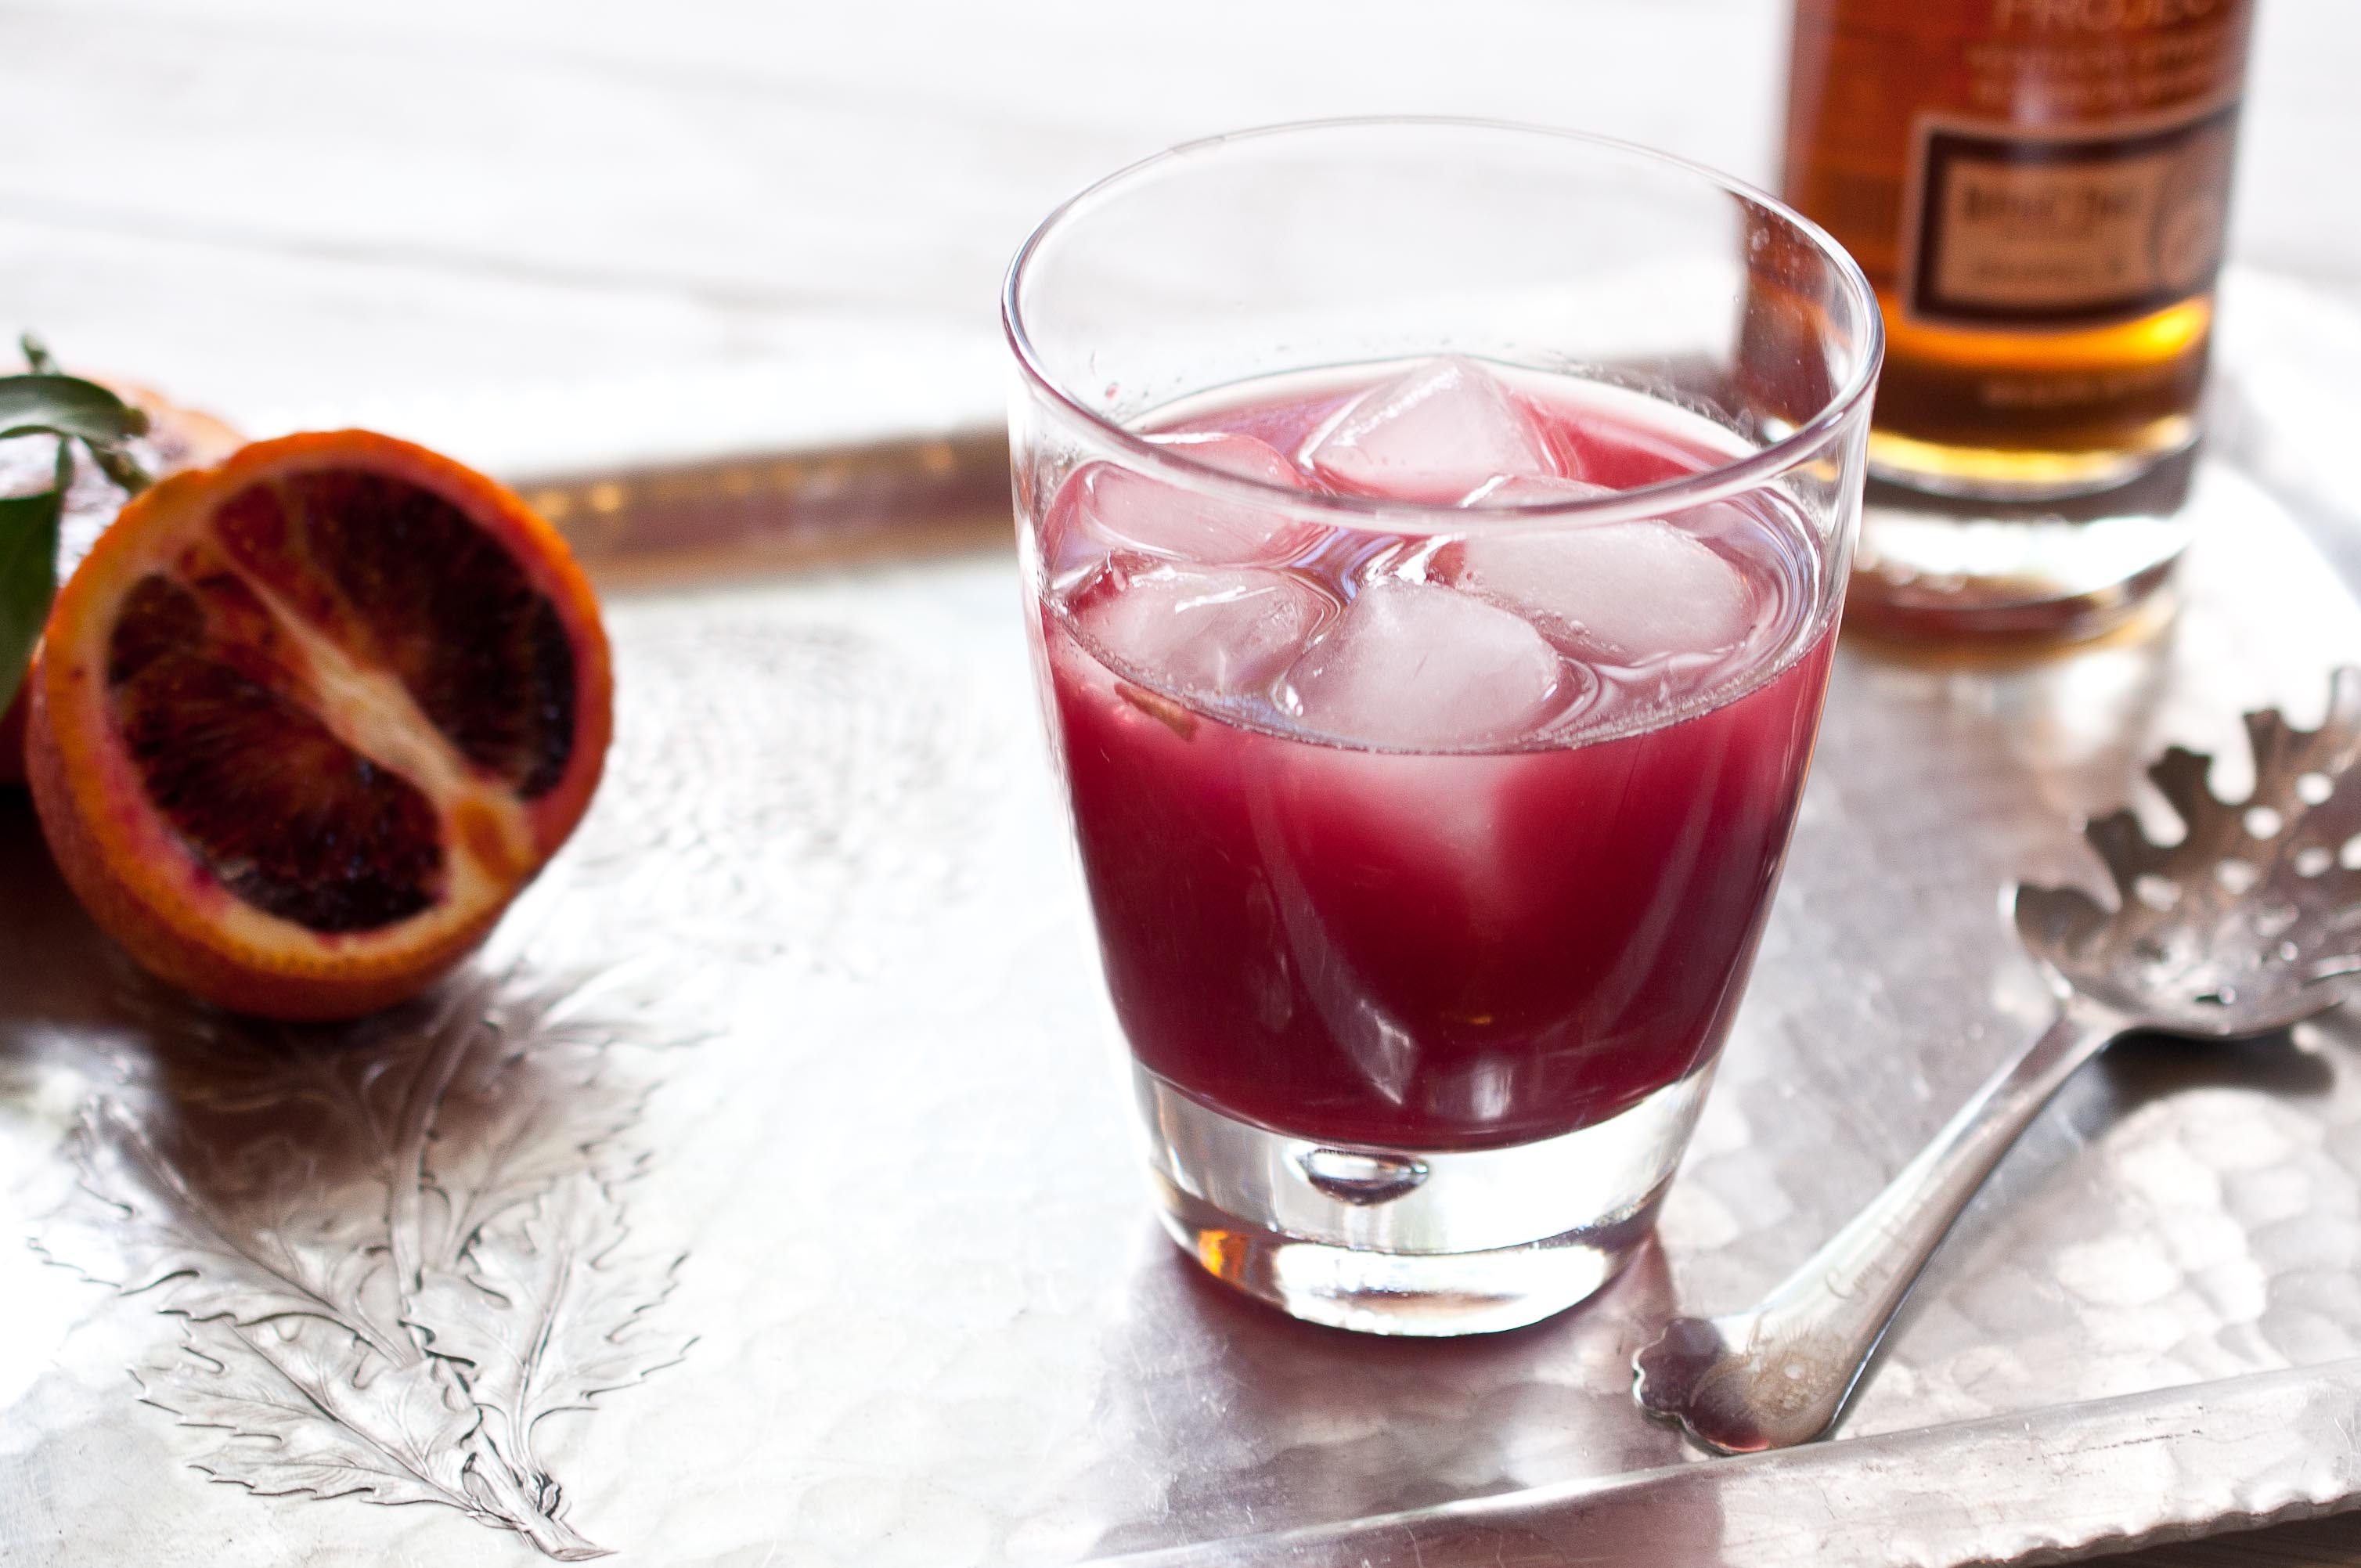
Hot Blooded:
Jalapeno, Blood Orange & Whiskey
(Named by Seth)
1 cup fresh squeezed blood orange juice
2 tbs Agave
1/2 cup whiskey
1 medium sized jalapeno, chopped, stem removed (about 2 tbs)
In a cocktail shaker, add the blood orange juice, agave and whiskey, stir until combined. Add the jalapenos, replace the shaker cap and shake three times, immediately pour through a strainer into highball glasses filled with ice, straining out the jalapenos. Discard the jalapenos.
*I made this cocktail three times. The first time I made it with hand squeezed blood oranges, by far the best choice. Knowing that blood orange season is on it’s last legs, I wanted an alternative. I made it with regular orange juice and it just wasn’t as good. I also made it with Tropicana Trop50 Red Orange, while not as good as hand squeezed blood oranges,it was much better than regular orange juice, a fine substitute. And you can buy it in most grocery stores.
Update: I think we have a name. I had so much suggestions sent to me via email, Facebook, twitter and comments, but the one I can’t get out of my head is: Hot Blooded. Thanks in no small part to Foreigner. I also LOVED the idea of a TrueBlood name, since I am shamelessly addicted to that show, Bon Temp Sunrise?? Maybe not. Thank you to Seth for the new name! I can now get some rest.
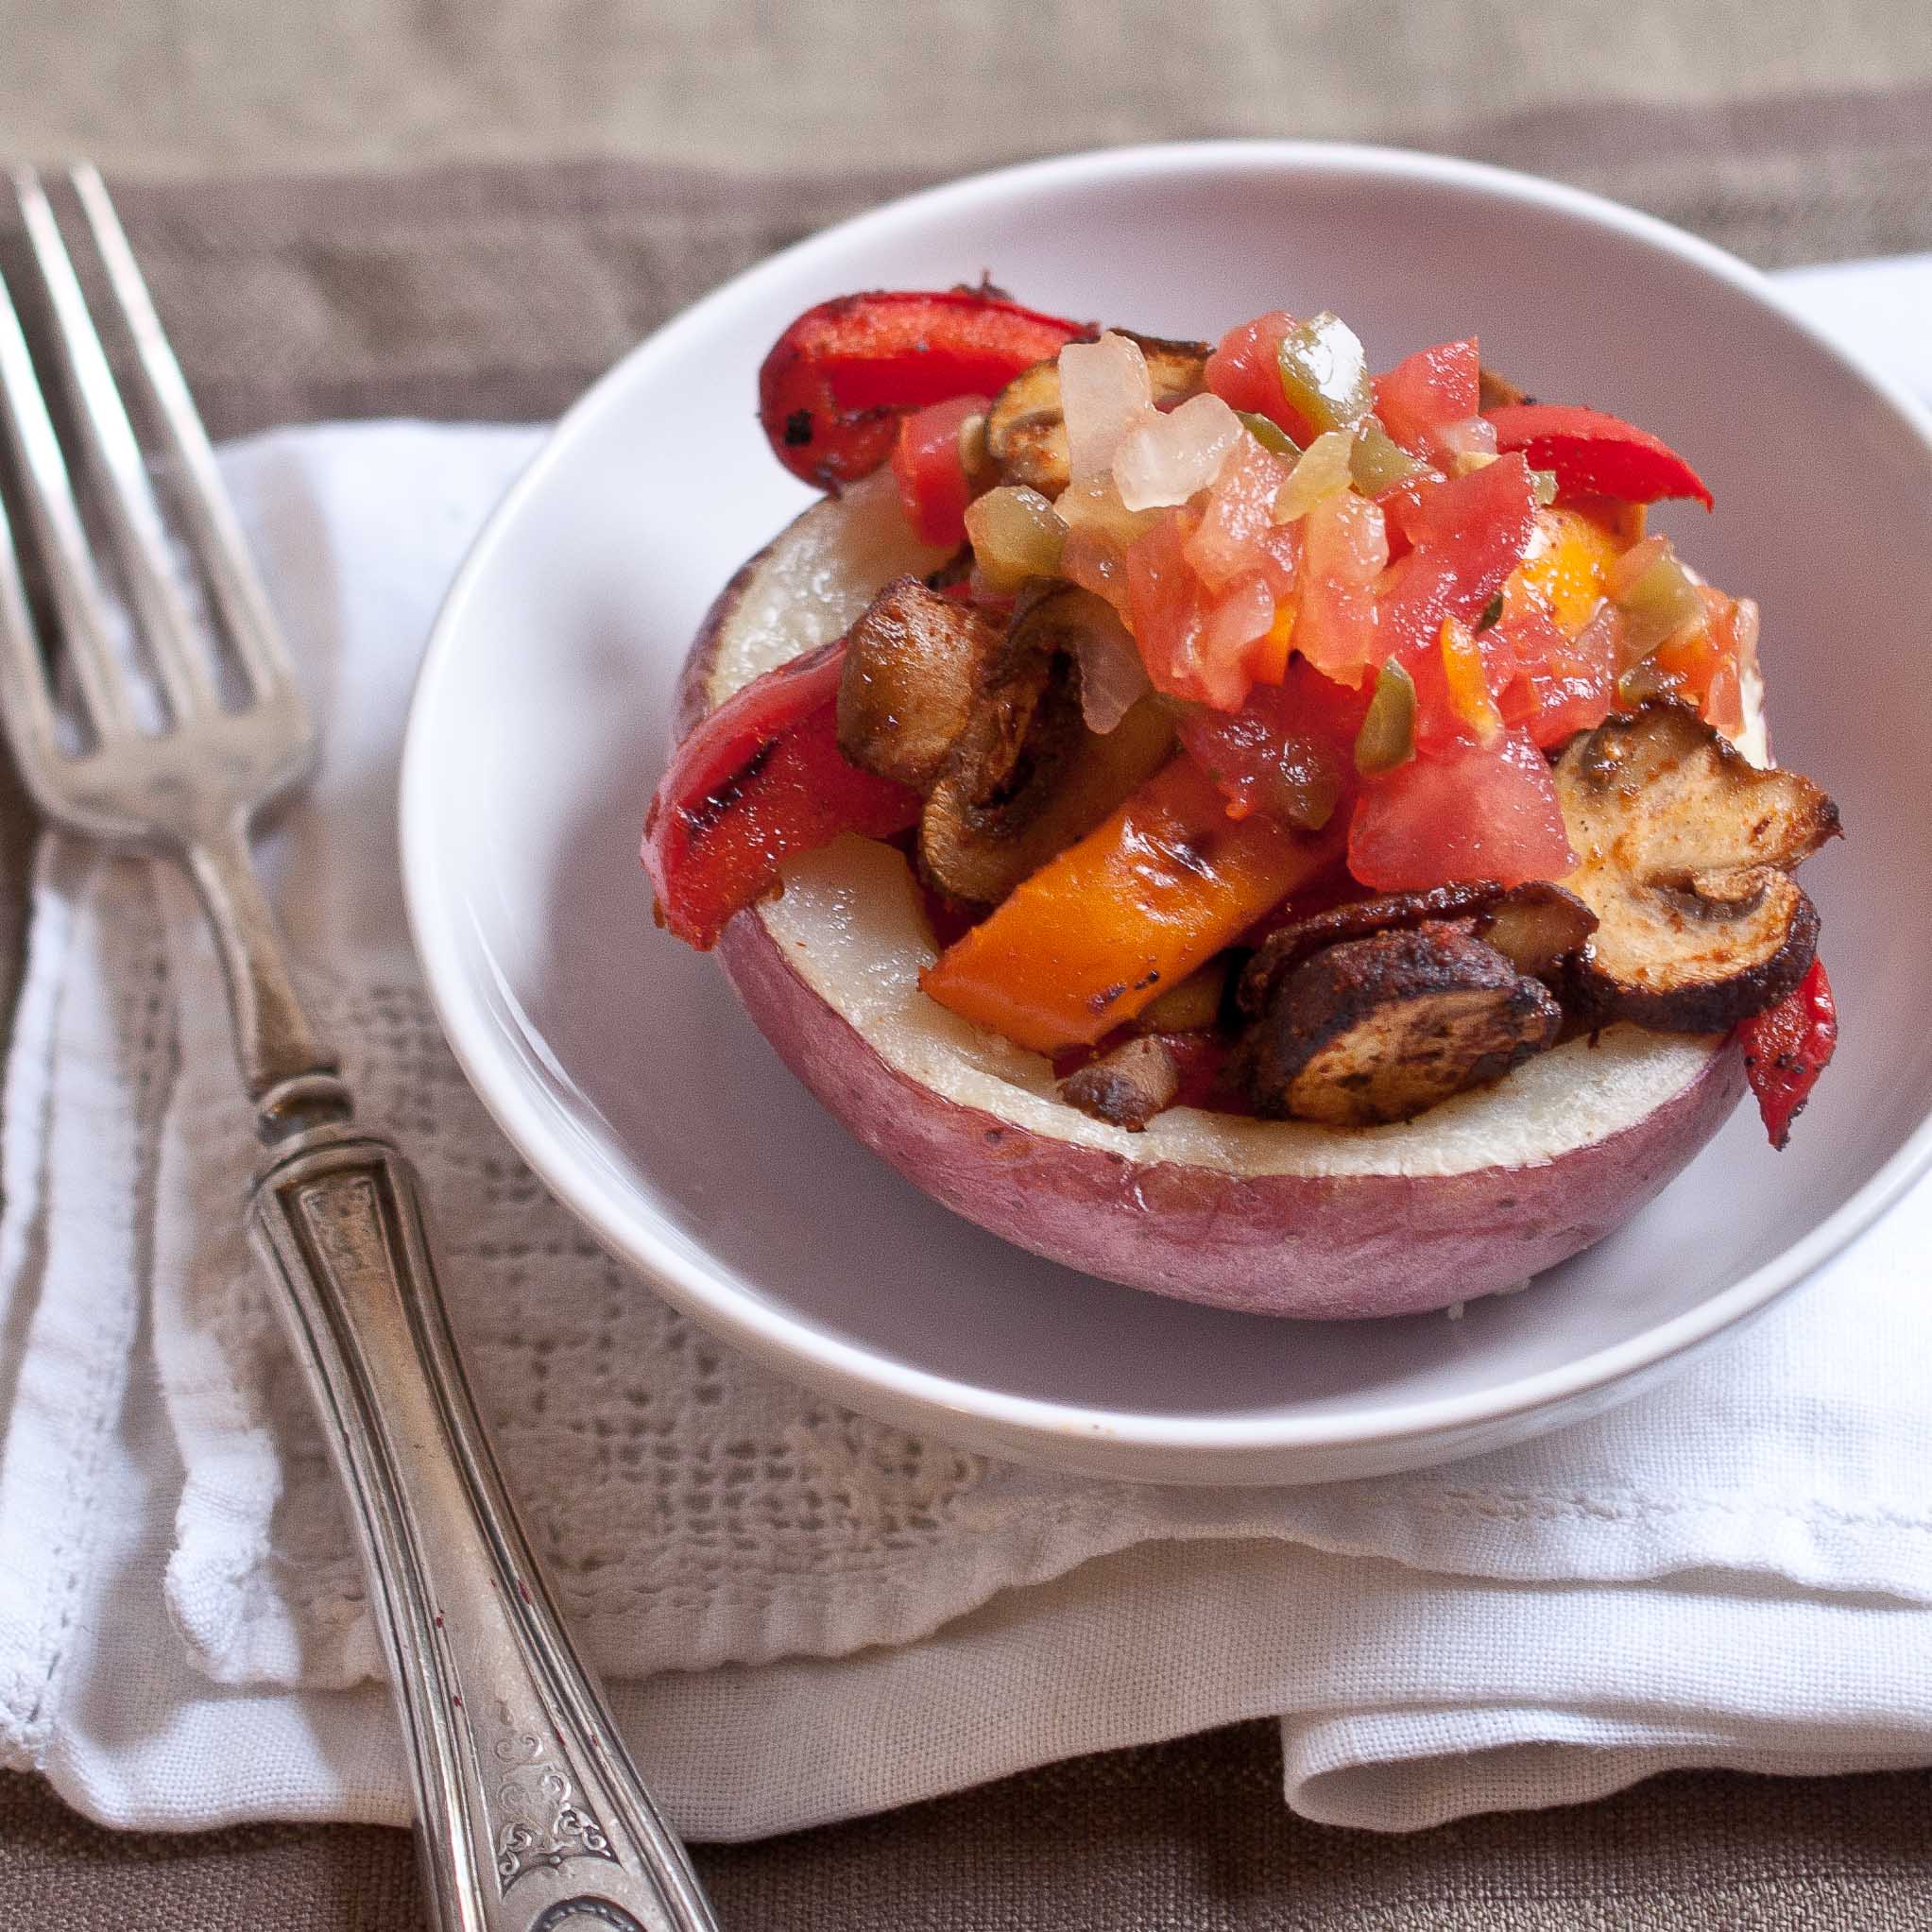
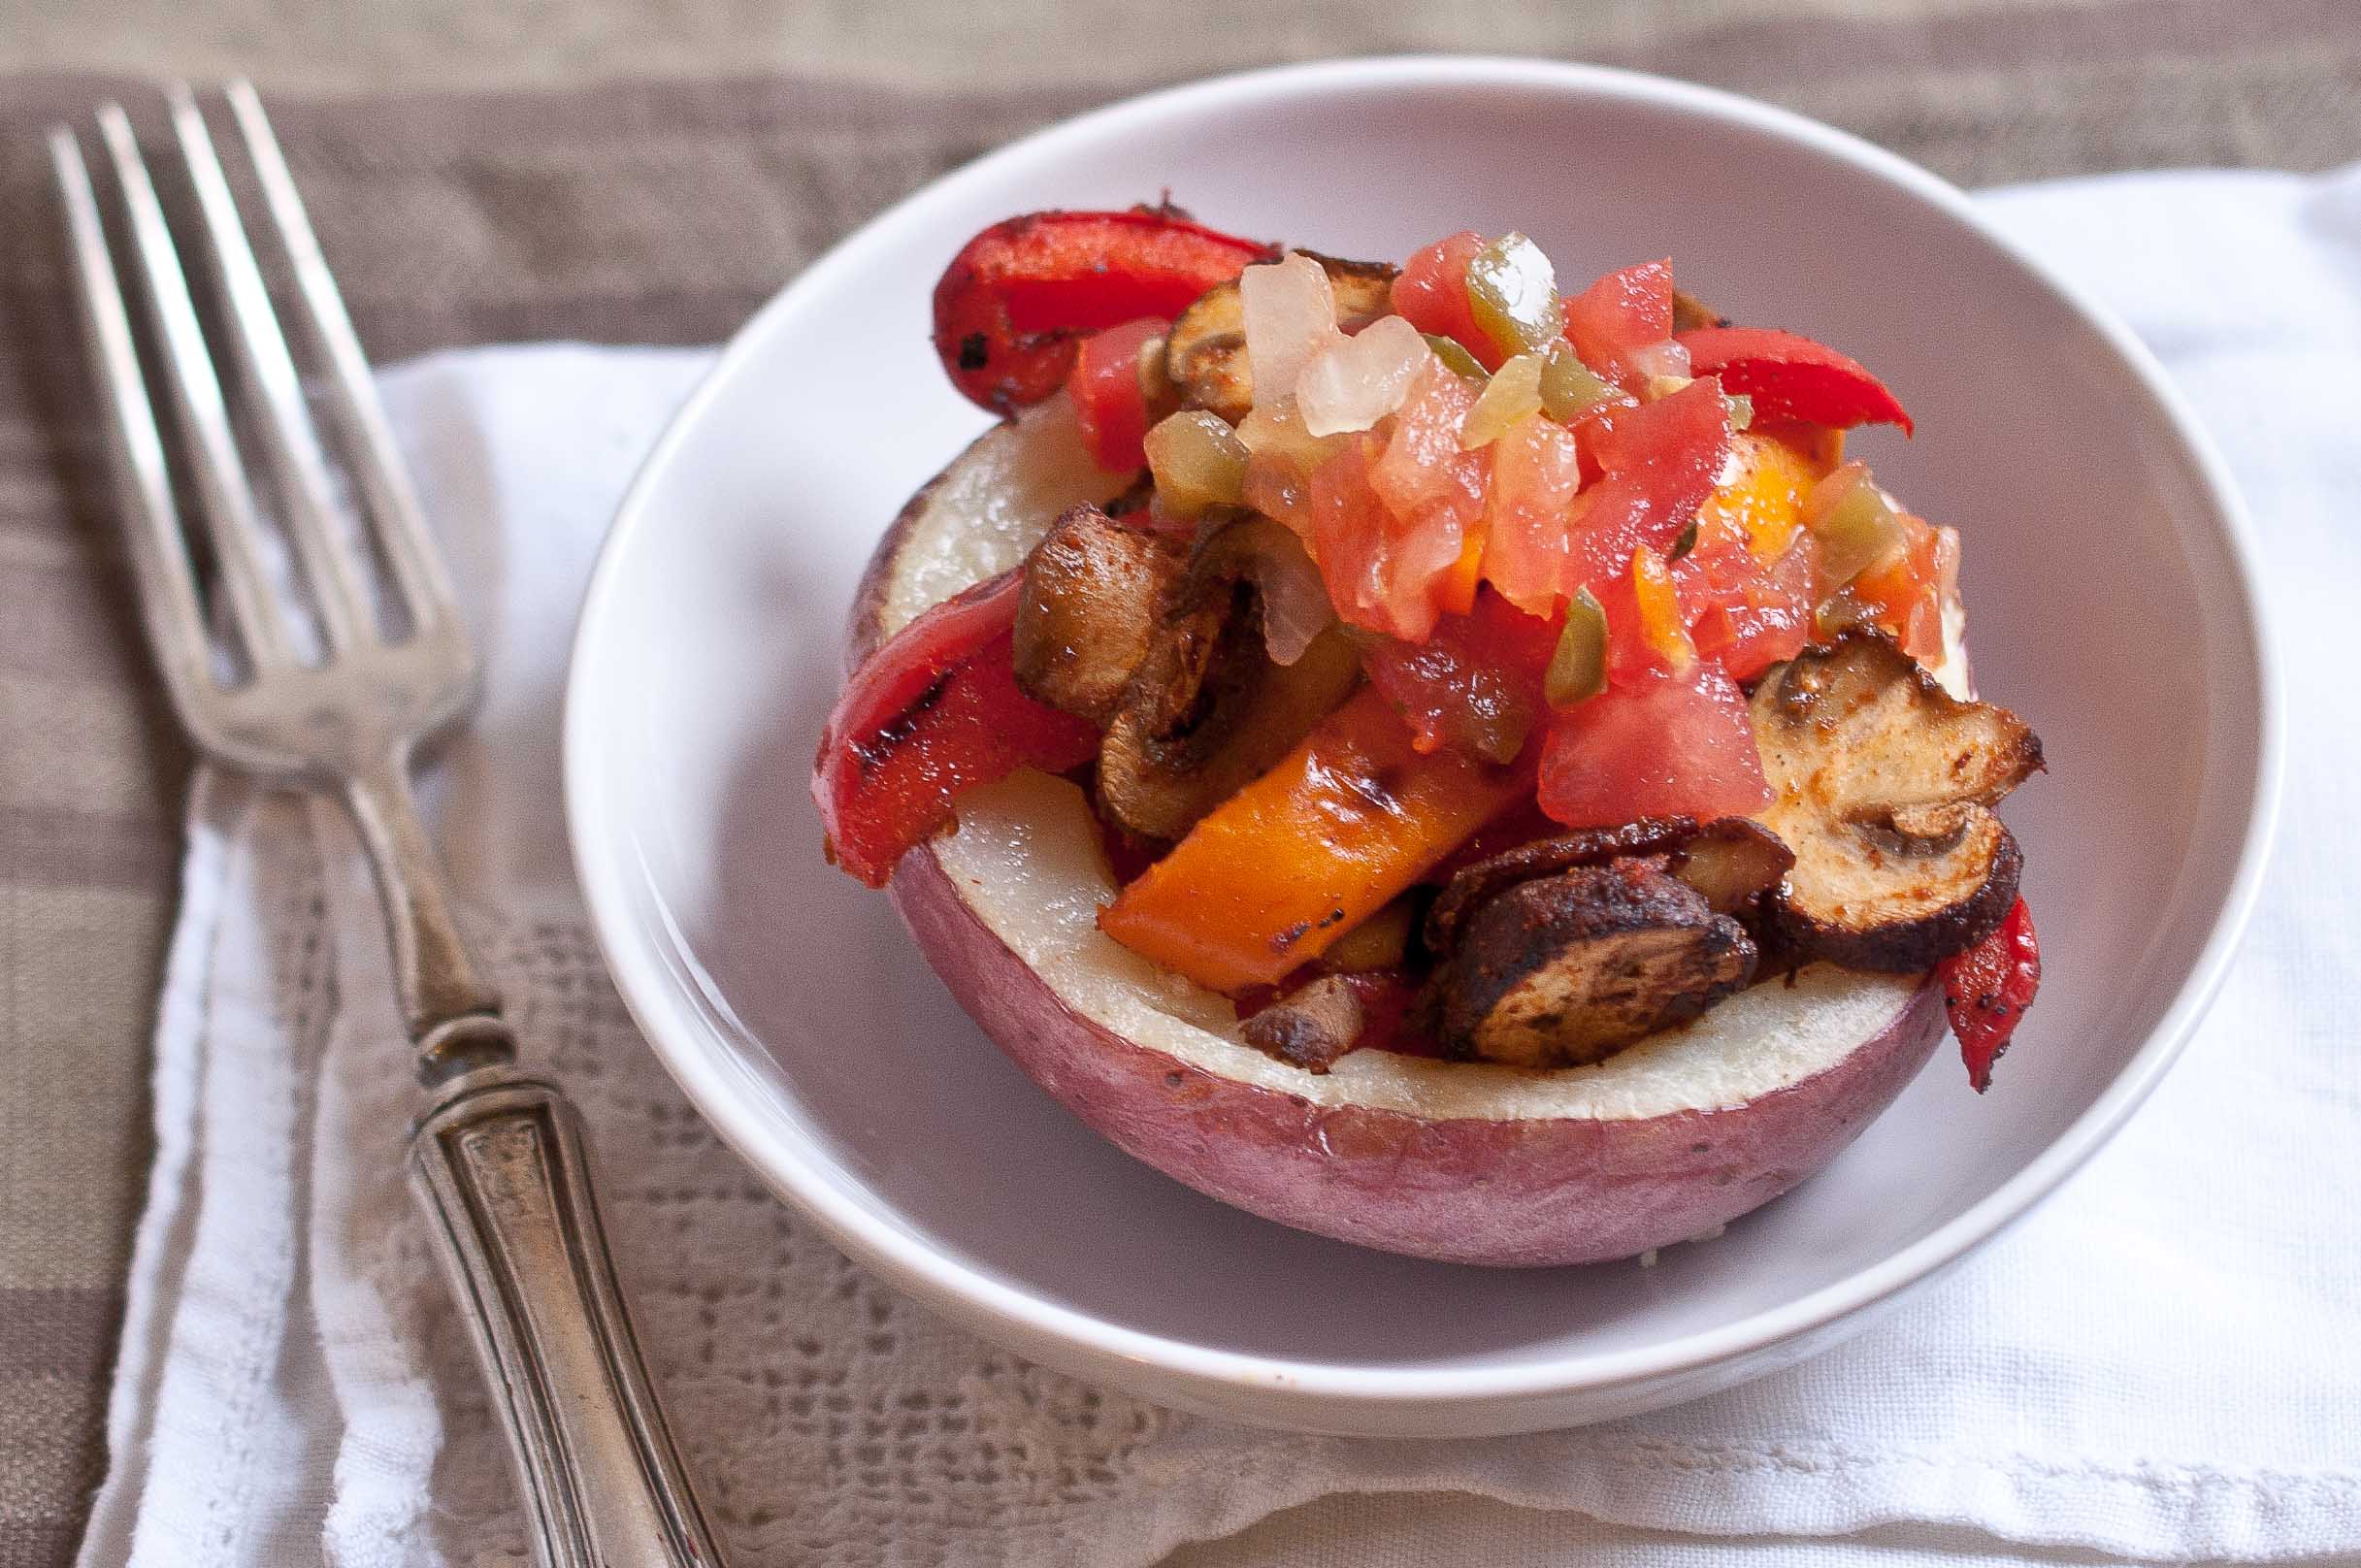
I’m not going to sit here and pretend that these are as good as the real thing. Those potato skins loaded up with bacon, sour cream and cheese that are somewhere around 62 calories per bite. But these make a great lunch durring my "I am GOING to lose those final 3 pounds" week. And they reheat really well, so you can make a batch on Sunday, and reheat them through out the week for lunch. With a side of this salad.
I’ve run the numbers and have come up with 62 calories each potato half, but that completely depends on the size of your potato and the amount of flesh you scoop out of it.
My Husband added fat free sour cream and shredded cheese. If you add a tbs of fat free sour cream and a tsp of shredded part skim mozzarella cheese, it will about double the calories in the potato. But, if you like it more and that will make you eat less, it may be worth it.
Also, this dish is:
Gluten Free
Vegan
Kosher for Passover
Skinny jeans friendly
Skinny Potato Skins
4 large red potatoes
1 large red bell pepper, thinly sliced, stem removed
1 large yellow bell pepper, thinly sliced, stem removed
Pierce the potatoes a few times with a fork and microwave on high for 5-7 minutes or until cooked through. Remove and allow to cool until enough to handle. Cut in half and scoop out most of the insides, leaving about 1/4 inch of the walls in tact. You can save the potato middles for mashed potatoes or potato cakes.
Place thinly sliced bell peppers, mushrooms, and garlic on a baking sheet. Spray lightly with olive oil cooking spray and sprinkle with fajita seasoning (or the homemade blend) and toss to coat.
Roast the vegetables in the oven for 15 minutes or until soft and the mushrooms have browned, tossing every 5-8 minutes with a heat safe spatula.
Place the skins on a baking sheet and brush the insides with melted smart balance light, sprinkle with salt. Bake at 400 for 10 minutes, allow to cool slightly.
Fill each potato skin with fajita veggies and top with Pico De Gallo.
The night after I joined the Bone Marrow Donor registry I had a dream that I was a Bone Marrow match for a little boy who was dying of Leukemia. But in my dream, I had joined the registry one month after he died of the disease. I had the lifesaving cure just walking around in my body and I had no idea until it was too late.
Horrible, I know. But It happens, I’m sure. This morning, when I woke up, I got an email for the registry, and whenever that happens I have a flicker of hope that I am one of those people who has the opportunity to donate. I want to. I want to use the marrow I grow so easily in my bones to save the life of someones else’s Tater, because I would want you to do that for me, if she is ever in need. Of course, if I ever am a match, I’m sure the news won’t come via email so as you have probably suspected the email was just an update about the progress being made by the Be The Match foundation.
Now that I have this platform, I want to use it to reach out. To help save the life of someones baby. What if it is you. What if you are the one who holds the key to a cure inside your bones.
Here was how simple it was for me to get on the list:
Go to a donation center, give blood, sign a form.
It can be even easier for you. You can click here, fill out a form online and order your cheek swap kit through the mail. It’s so easy.
It took about twenty minutes. Although it did cost me about $50 at the time, I can now put my mind at ease that I am doing what I can. $50 is a lot, more to some people than to others, but it was worth it for me know that I wasn’t the reason that someone was dying. That I wasn’t caring the lifesaving cure inside of me while someone was dying, over a mater of $50.
Click here to find out how you can get on the list of Bone Marrow Donors.
Here are some simple facts about Bone Marrow Donation and how and why to get on the list:
Q: If I join the Be The Match Registry, how likely is it that I will donate to someone? A: On average, one in every 540 members of Be The Match Registry in the United States will go on to donate bone marrow or peripheral blood stem cells to a patient. We cannot predict the likelihood that an individual member will donate because there is so much diversity in the population. However, if you are between the ages of 18 and 44, you are 10 times more likely to be called as a marrow donor than other members of the Be The Match Registry. That’s because research shows cells from younger donors lead to more successful transplants.
Every person who joins the registry gives patients hope, and new patient searches begin every day. You may never be identified as a match for someone, or you might be one of a number of potential matches. But you may also be the only one on the registry who can save a particular patient’s life.
Q: How do I become a bone marrow donor? A: The first step to become a bone marrow donor is to join the Be The Match Registry. Doctors around the world search our registry to find a match for their patients. If a doctor selects you as a match for a patient, you may be asked to donate bone marrow or cells from circulating blood (called PBSC donation).
Q. Does bone marrow donations involve surgery?
A: The majority of donations do not involve surgery. Today, the patient’s doctor most often requests a peripheral blood stem cell (PBSC) donation, which is non-surgical.
Q. Is Donating painful or involve a long recovery?
A: There can be uncomfortable but short-lived side effects of donating PBSC. Due to taking a drug called filgrastim for five days leading up to donation, PBSC donors may have headaches, joint or muscle aches, or fatigue. PBSC donors are typically back to their normal routine in one to two days.
Q. Is donating dangerous or weaken the donor?
A: There are rarely any long-term side effects. Be The Match® carefully prescreens all donors to ensure they are healthy and the procedure is safe for them. We also provide support and information every step of the way.
Q. Once you have been chosen as a match do donors have to pay to donate?
A: Donors never pay to donate. We reimburse travel costs and may reimburse other costs on a case-by-case basis.
Q: Does race or ethnicity affect matching? A: Racial and ethnic heritage are very important factors. Patients are most likely to match someone of their own race or ethnicity. Today, there simply aren’t enough registry members of diverse racial and ethnic heritage. Adding more diverse members increases the likelihood that all patients will find a life-saving match.
Members of these backgrounds are especially needed:
Black or African American
American Indian or Alaska Native
Asian, including South Asian
Native Hawaiian or other Pacific Islander
Hispanic or Latino
Multiple race
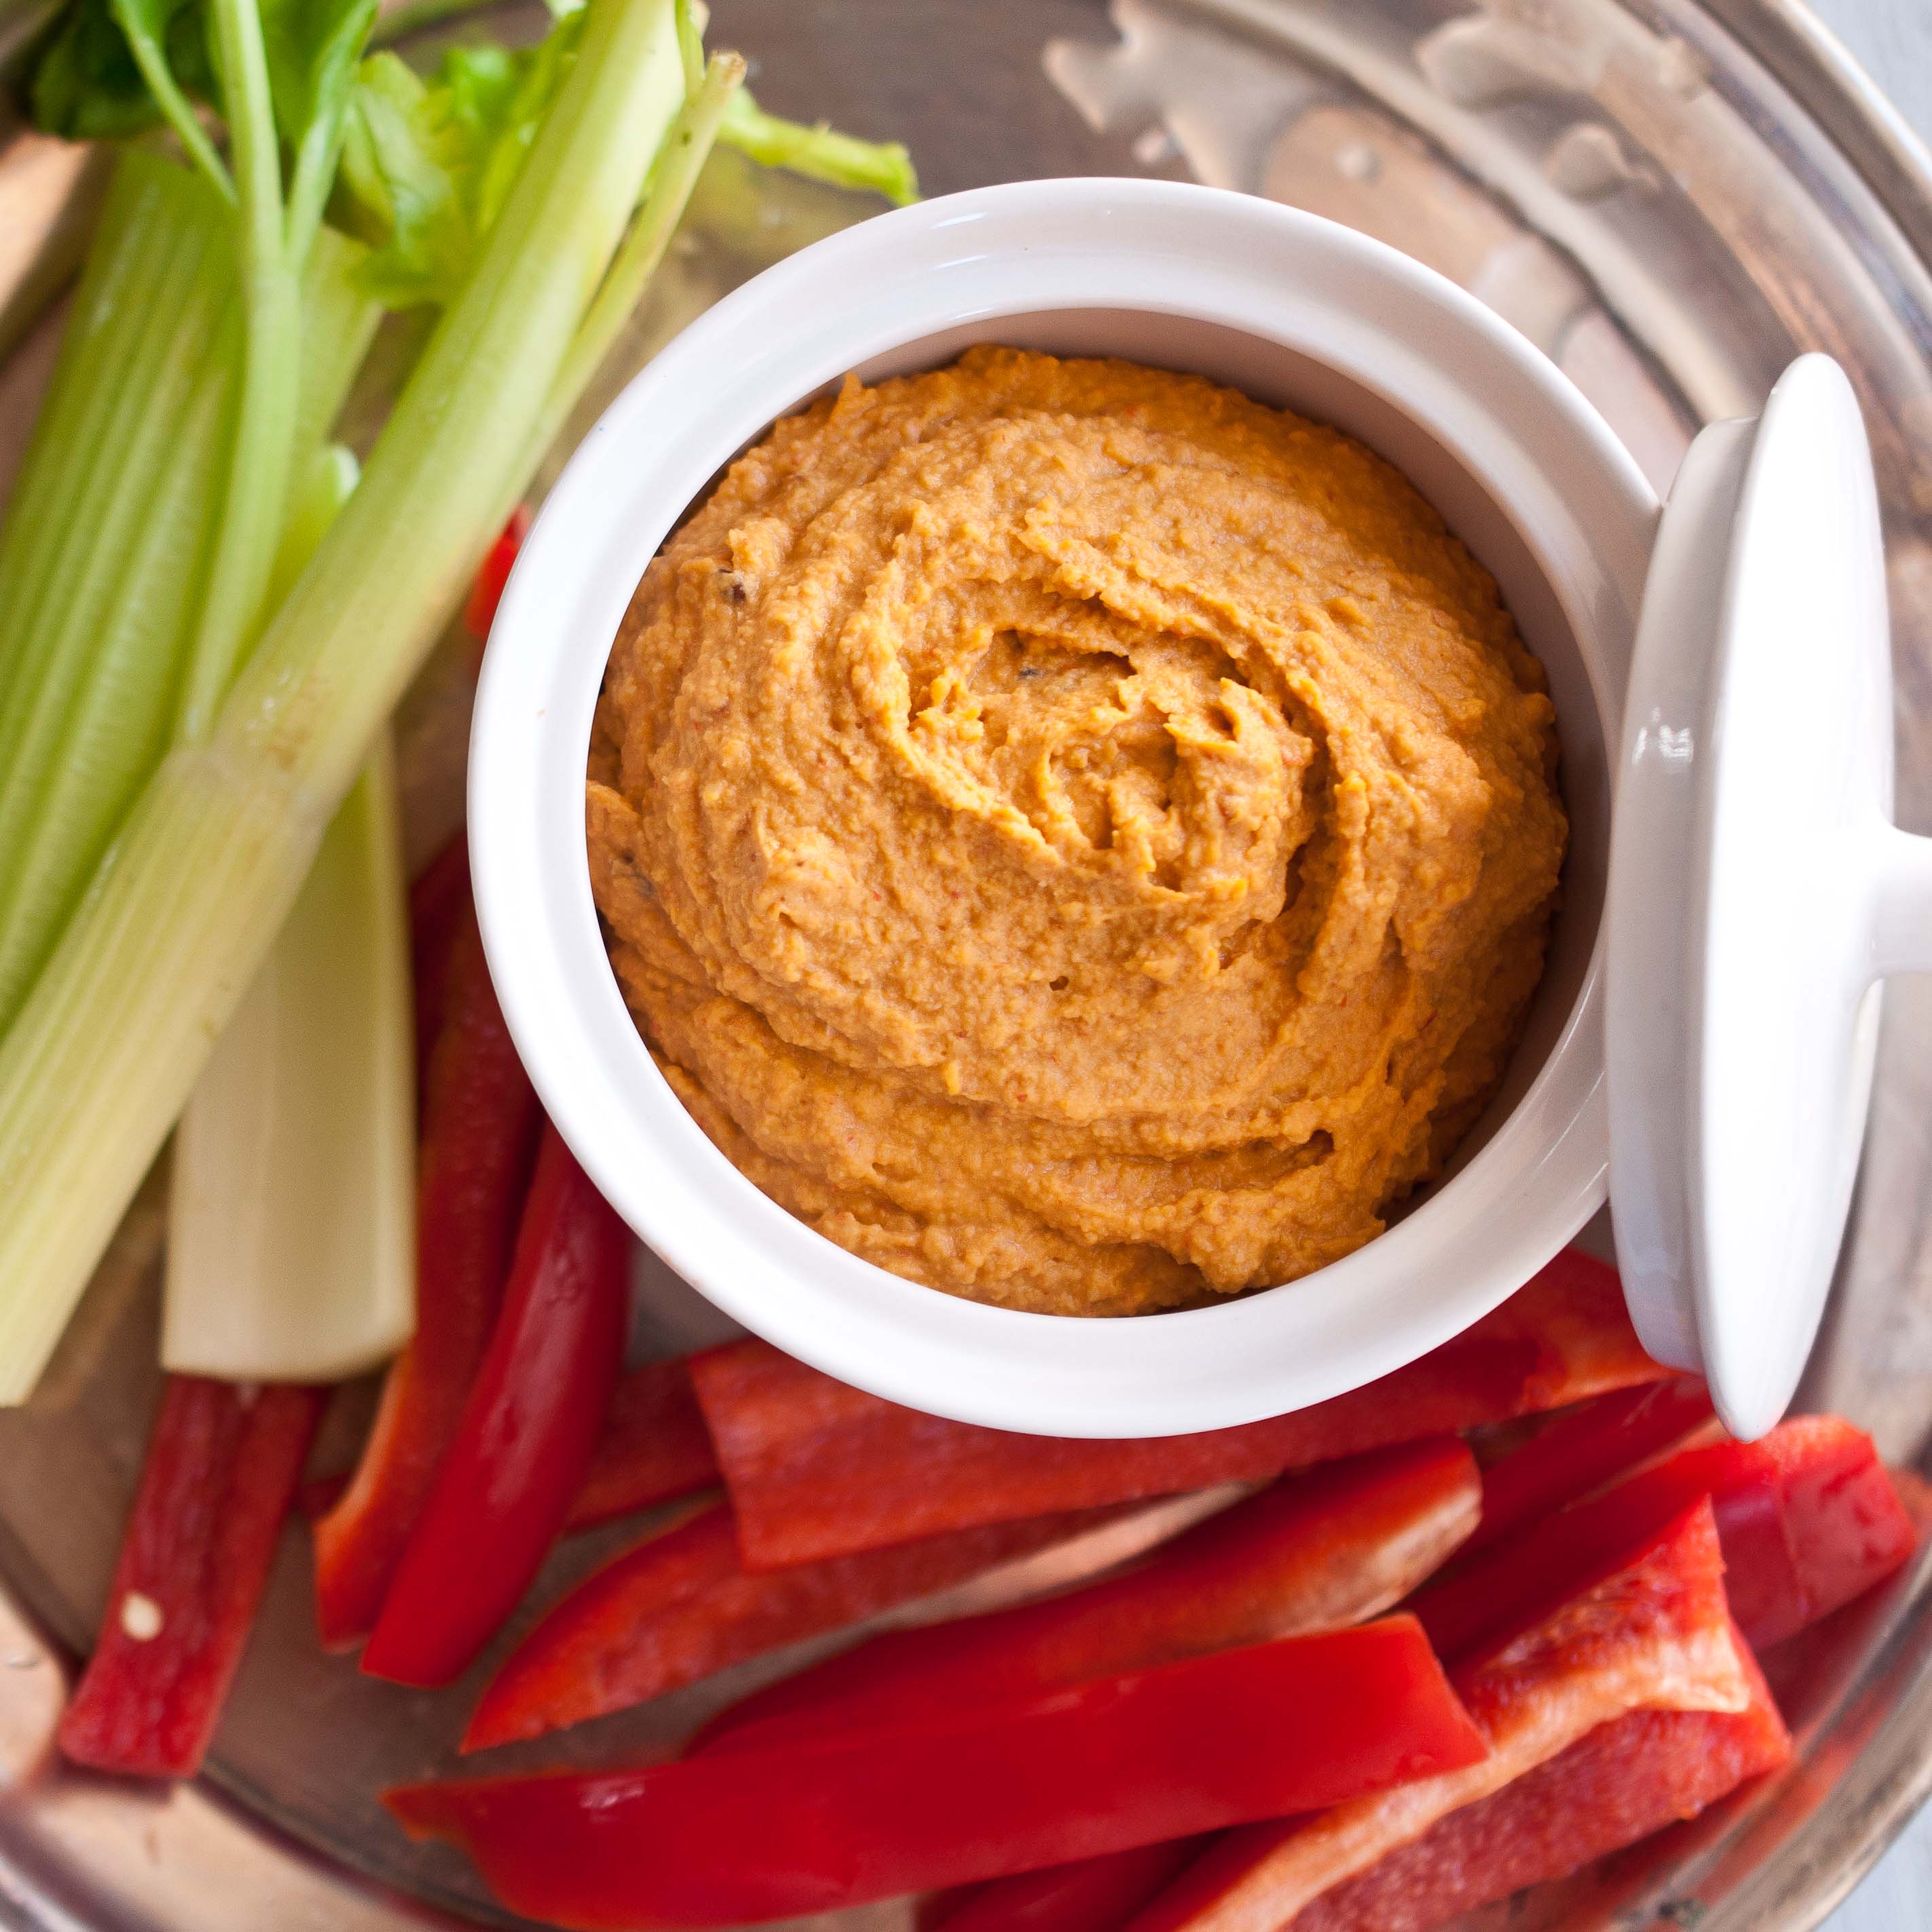
This in no way relates to Chipotle Hummus. Except that maybe those lazy summer days, hanging out with friends, enjoying a spicy dip, are gifts that you maybe able to give another person, if you are a match. And if you get on the registry, and get to donate marrow and save someones life: I will be really jealous.
Chipotle Hummus
15 ounces garbanzo beans
1/4 cup tahini
3 chipotle chilies in adobo sauce
1 tsp garlic powder
1/2 tsp cumin
2 tbs olive oil
1/4 cup lemon juice
1-3 tbs water
salt and pepper to taste
Crudites for serving
In a food processor, add the garbonzo beans, tahini, chilies, garlic, cumin, olive oil, lemon juice and process until smooth. Add the water until you reach the consistency that you prefer, more water will equal a creamier hummus. Salt and pepper to taste.
I find that this dip tastes best with the cool crunch of fresh vegetables such as cucumber slices, sliced peppers and carrot sticks.


