
Cupcakes/Cakes

Two Peas In A Pod: Twin Girl Baby Shower

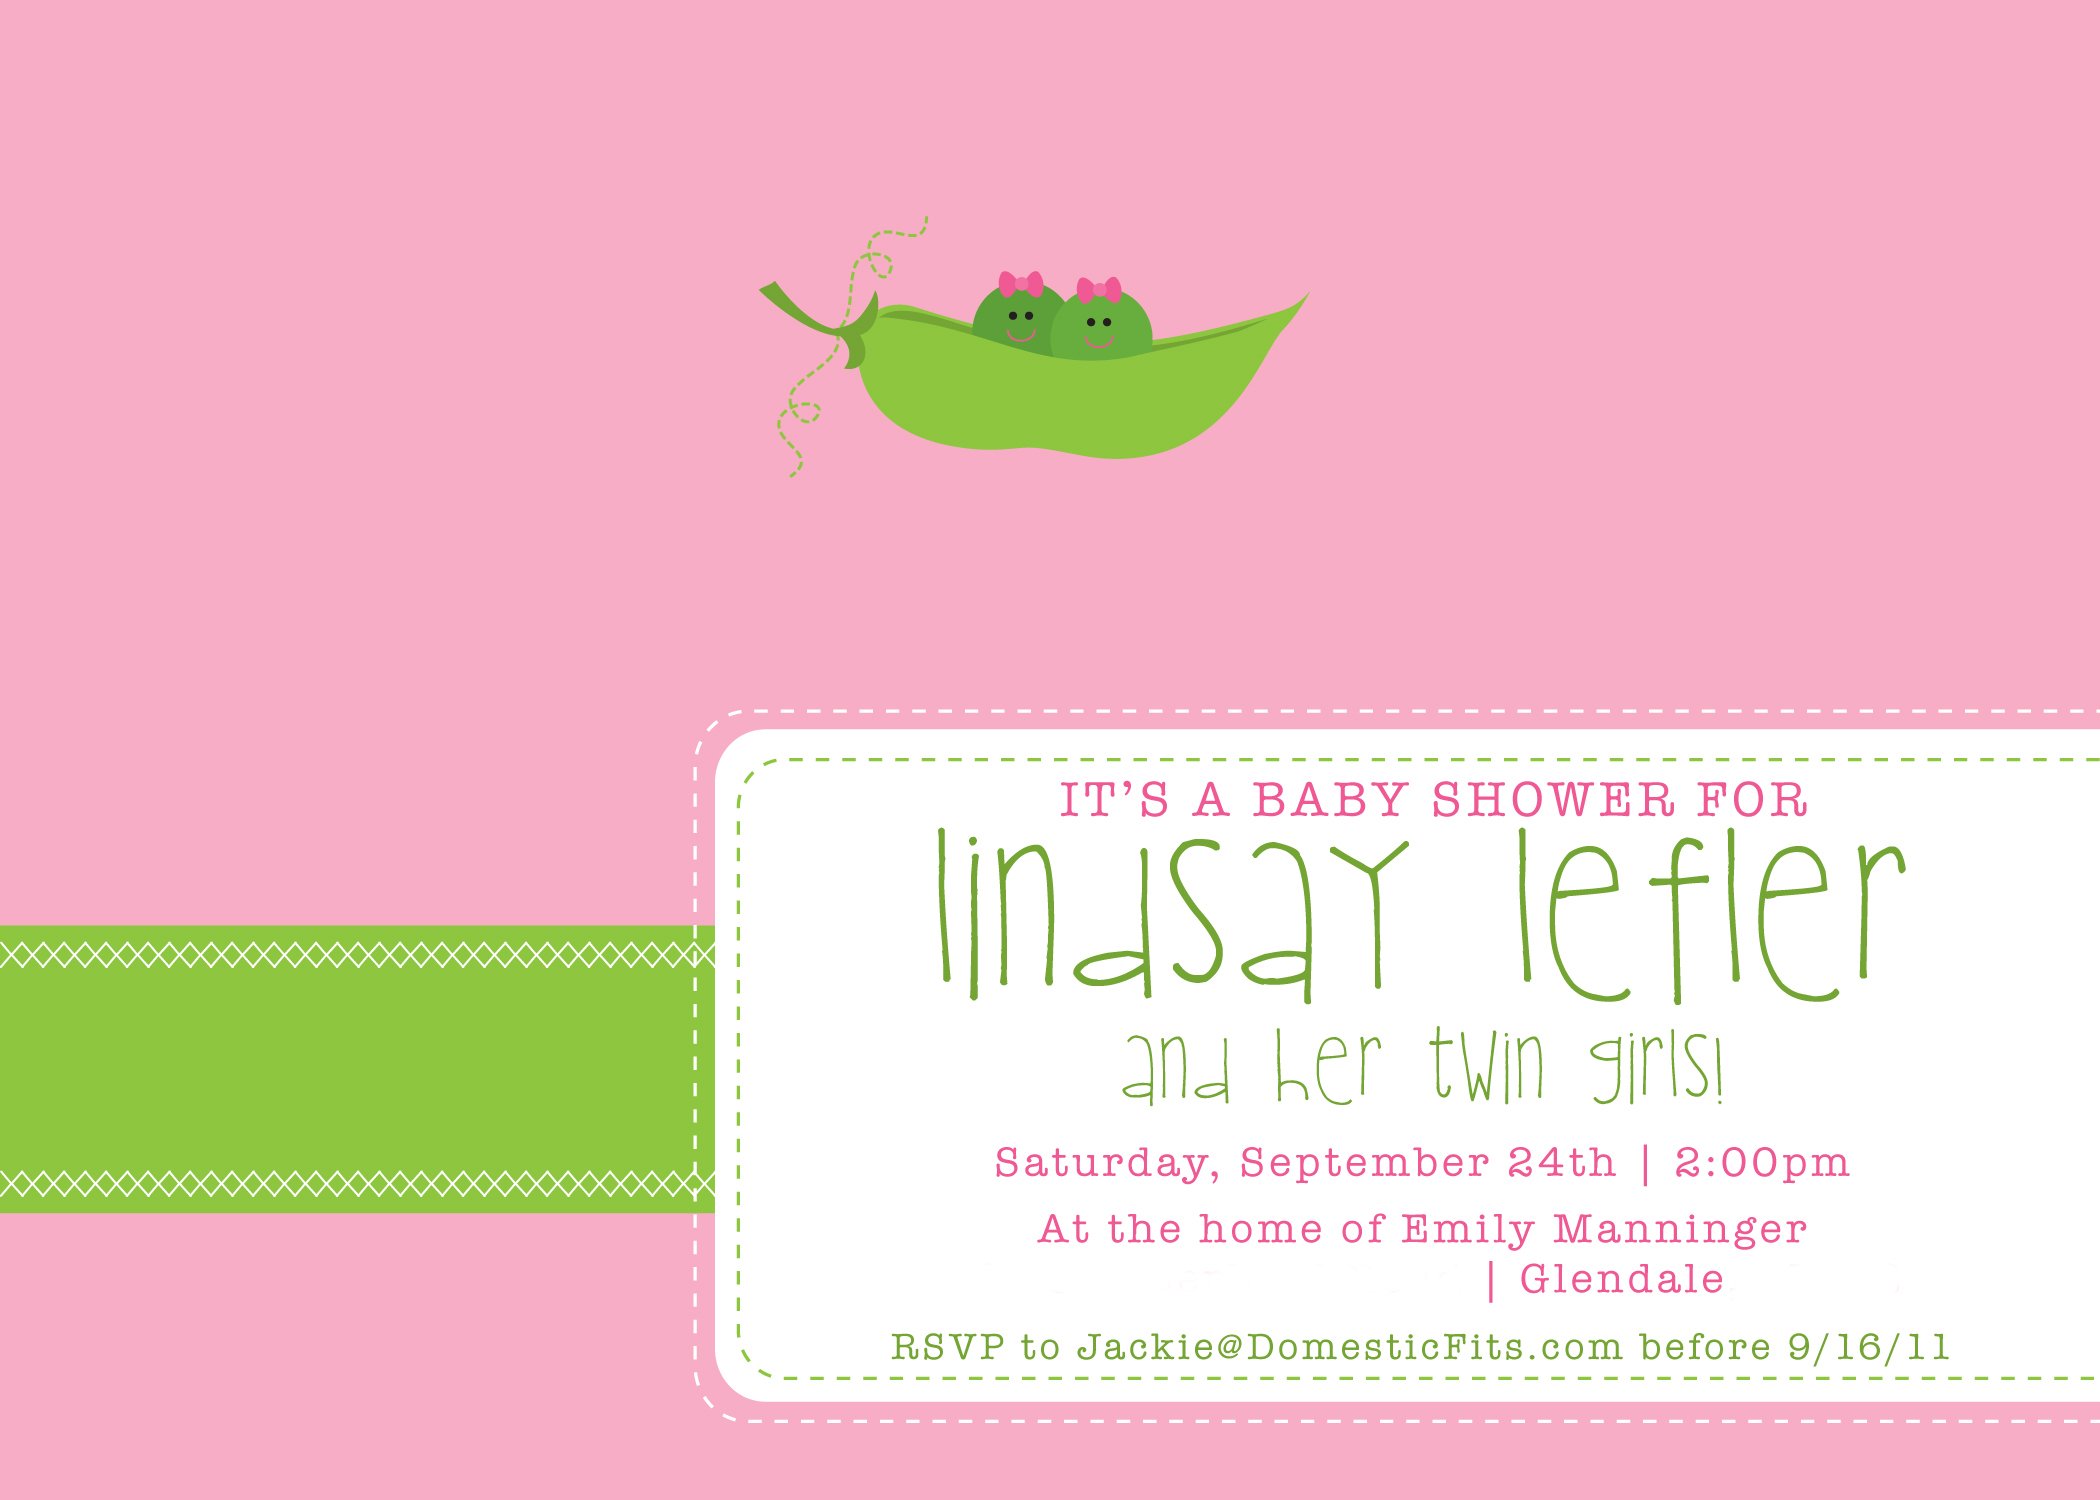
(The above invitation was made by Kim Nelson)

My friend Lindsay is pretty amazing. I mean, how many people can say they got pregnant twice in the same week? Thats pretty efficient if you ask me. She is due with her twin girls pretty soon and I was one of the lucky ladies (along with my friend Emily, who is gorgeous, and her house is so beautiful it made any type of decorations borderline unnecessary) who got to throw this amazing Mom a baby shower.

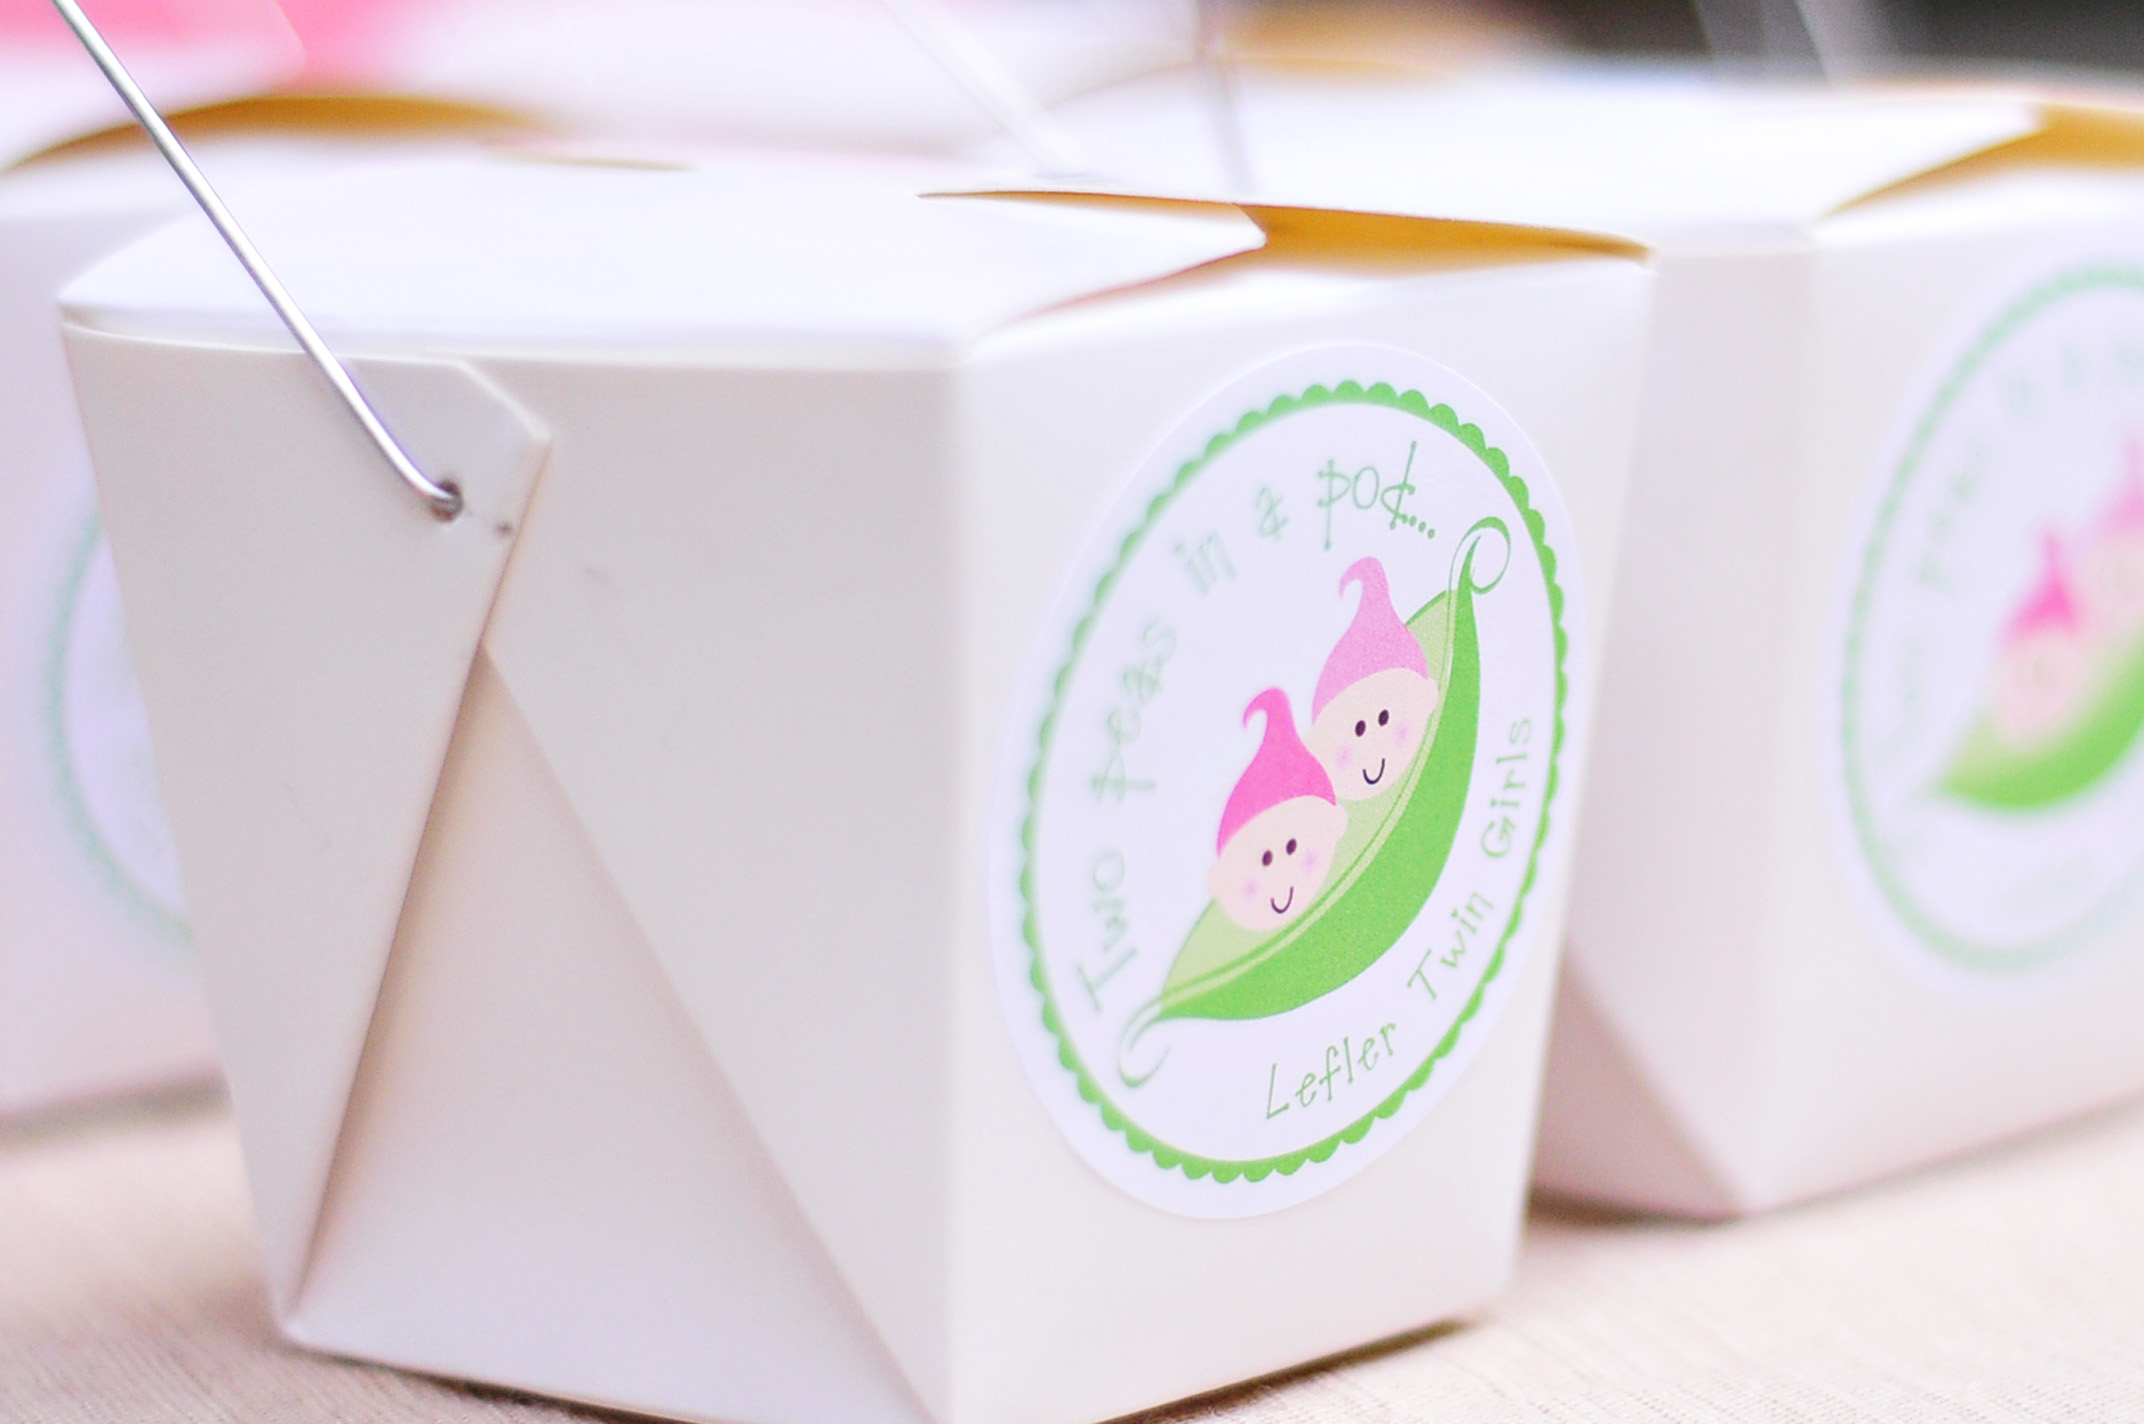
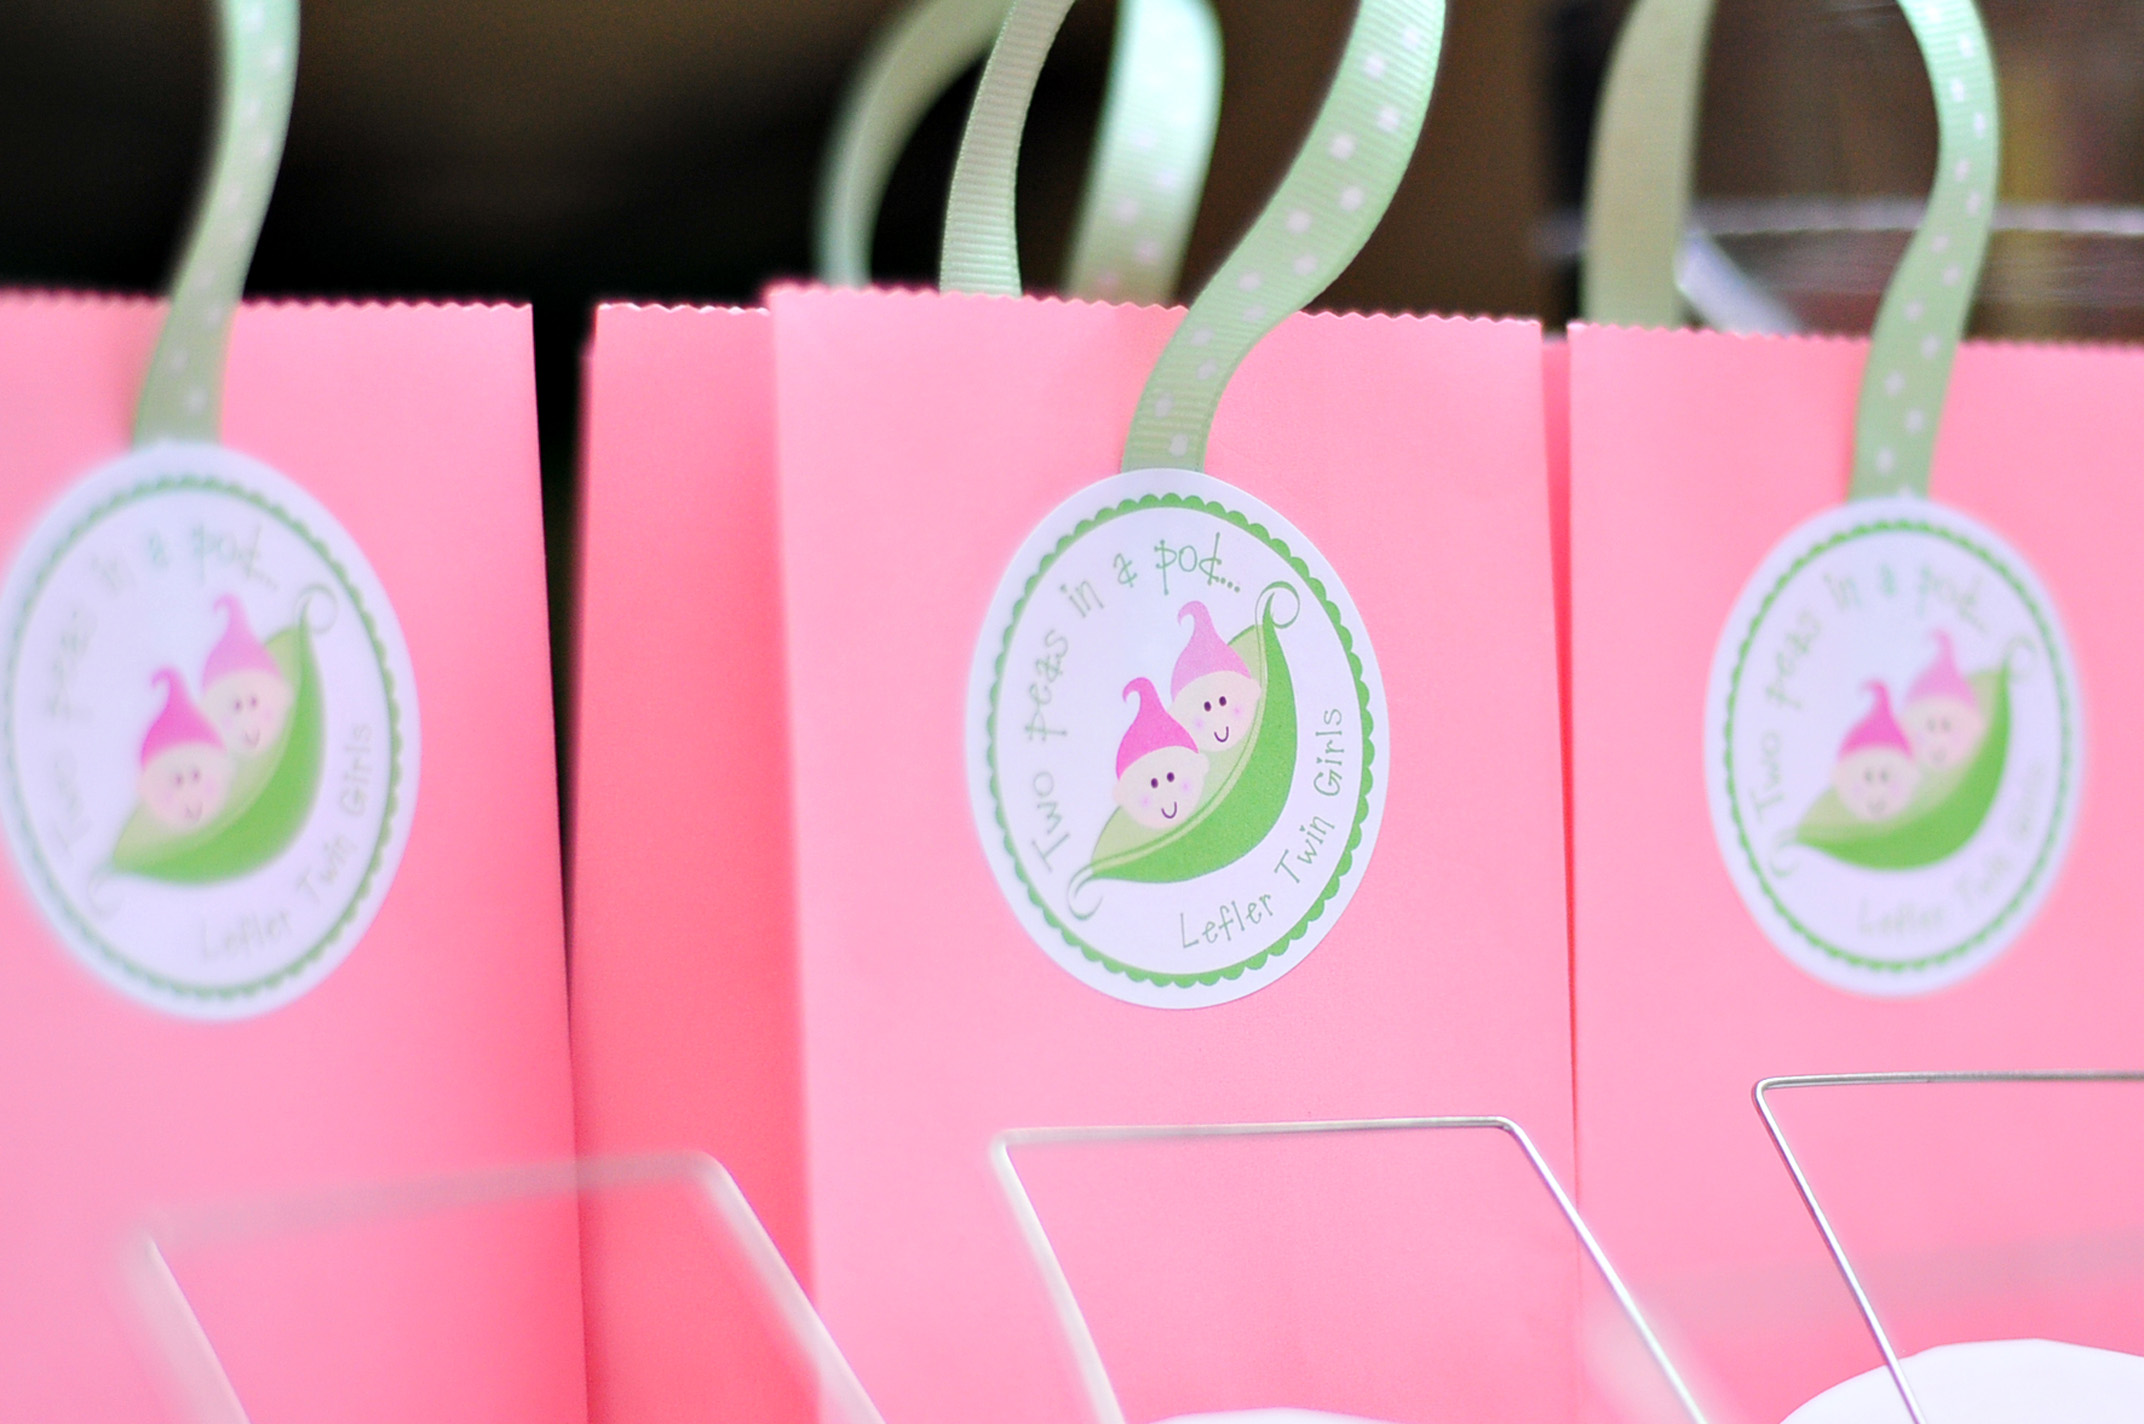
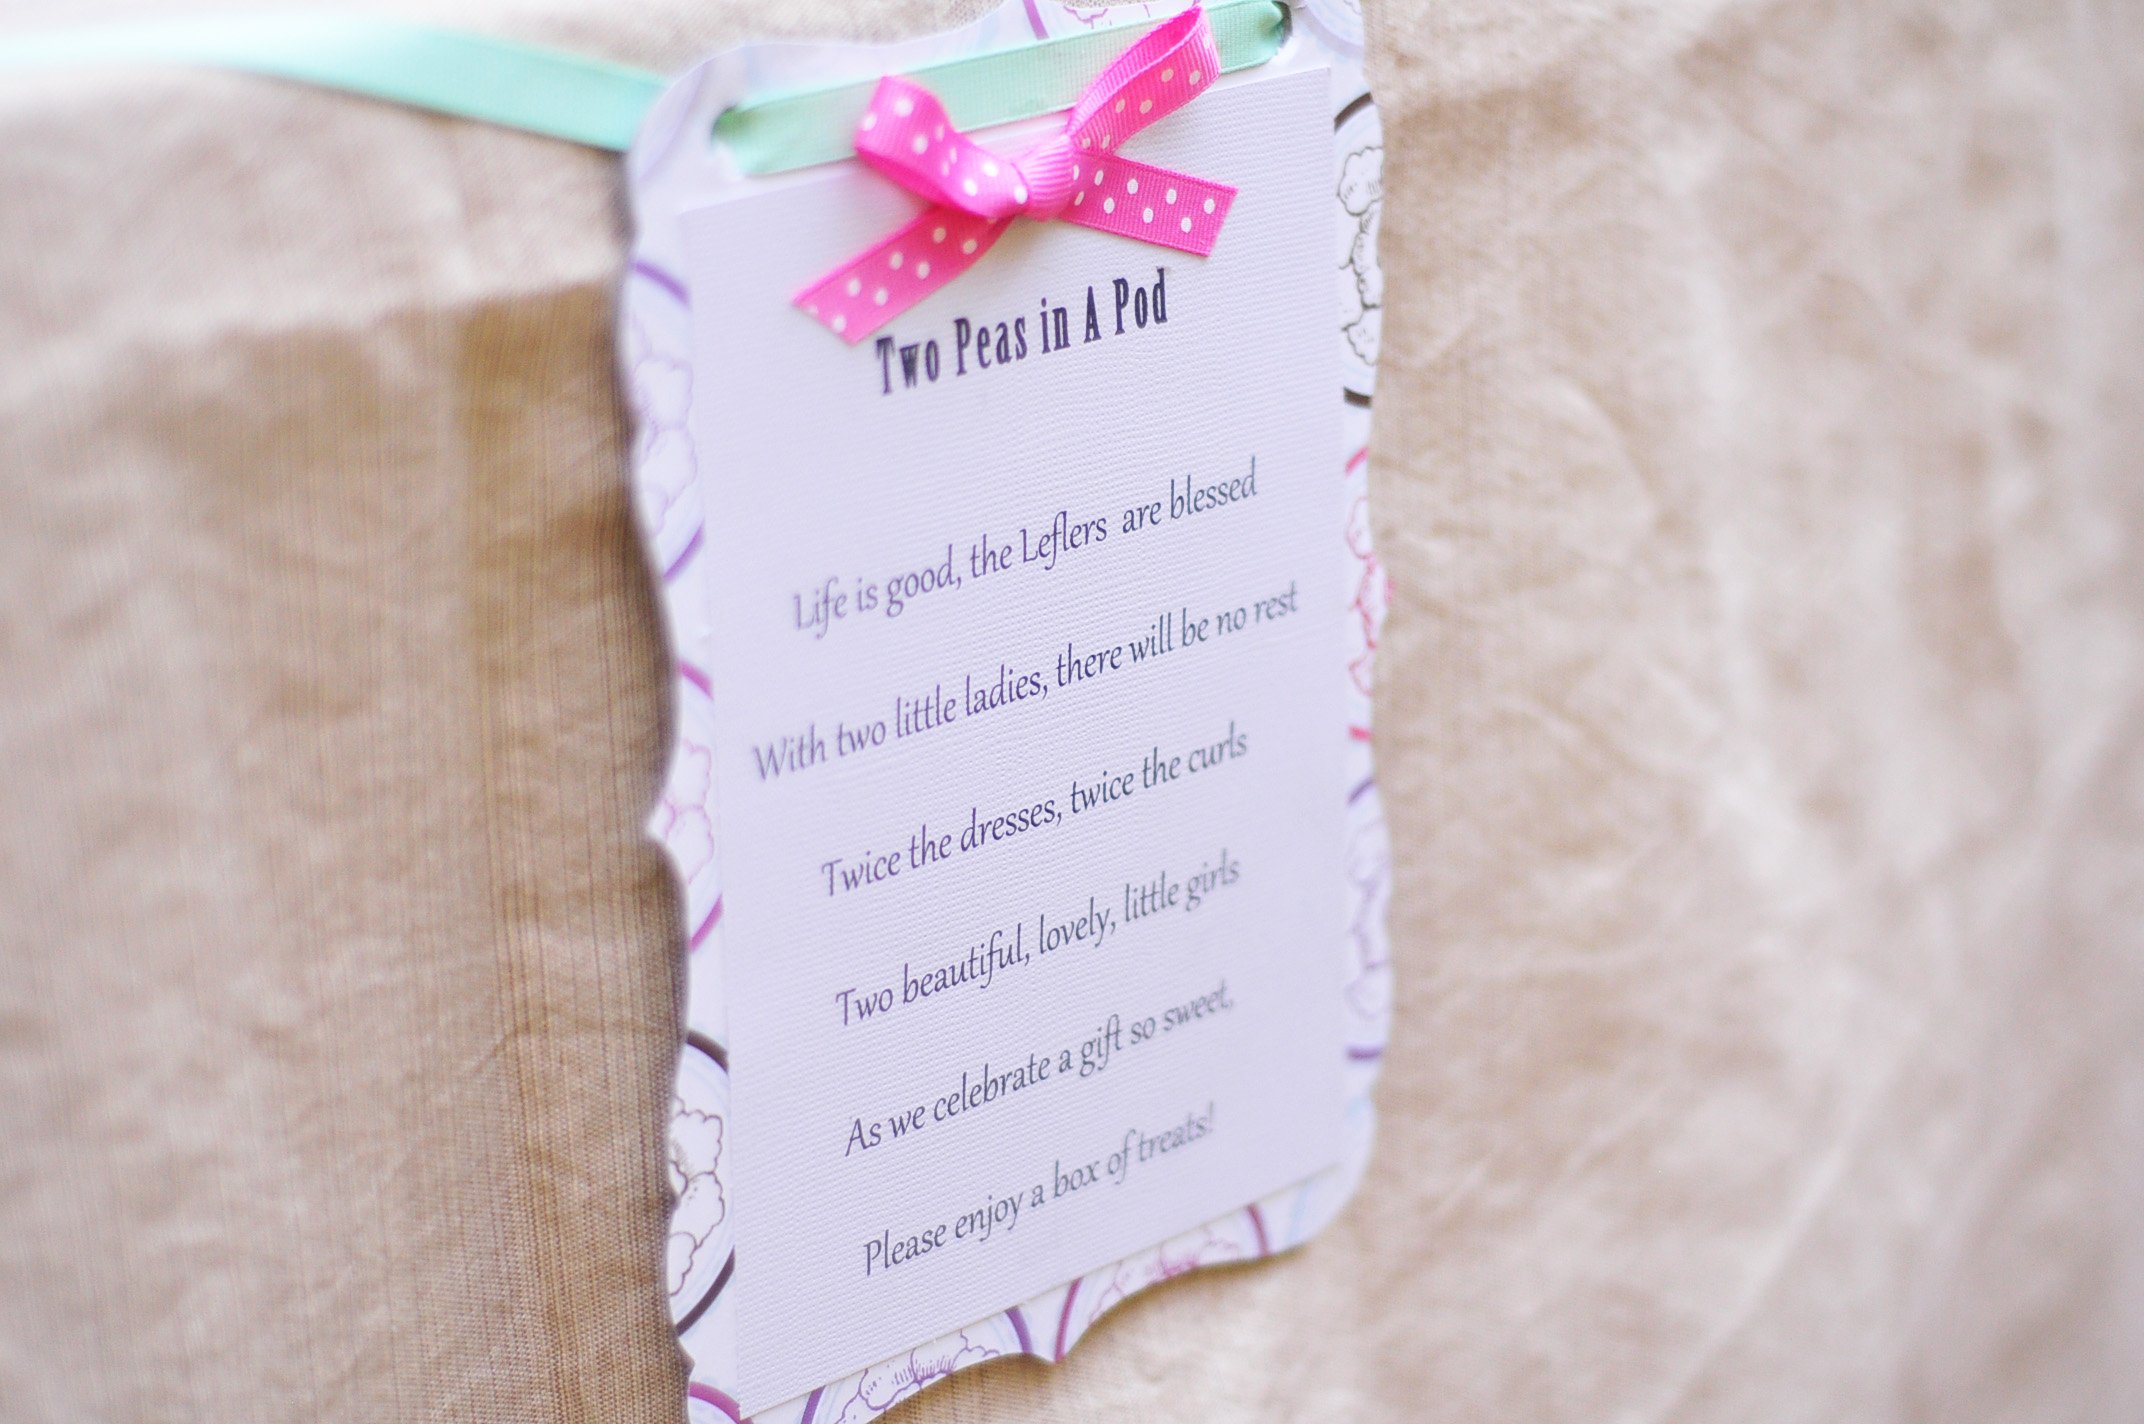
Two Peas in a Pod was a fun theme, however, it was pretty hard to find adorable embellishments to go along with the party so I had to rely on Etsy and my own craft prowess to get me through.

I ordered stickers from Autumnleah On Etsy that said, "Two Peas In A Pod, Lefler Twin Girls." Adorable. I used them on mini takeout boxes for the candy buffet,

I also used the stickers to make take away cupcake bags using mini pink lunch bags and ribbon.

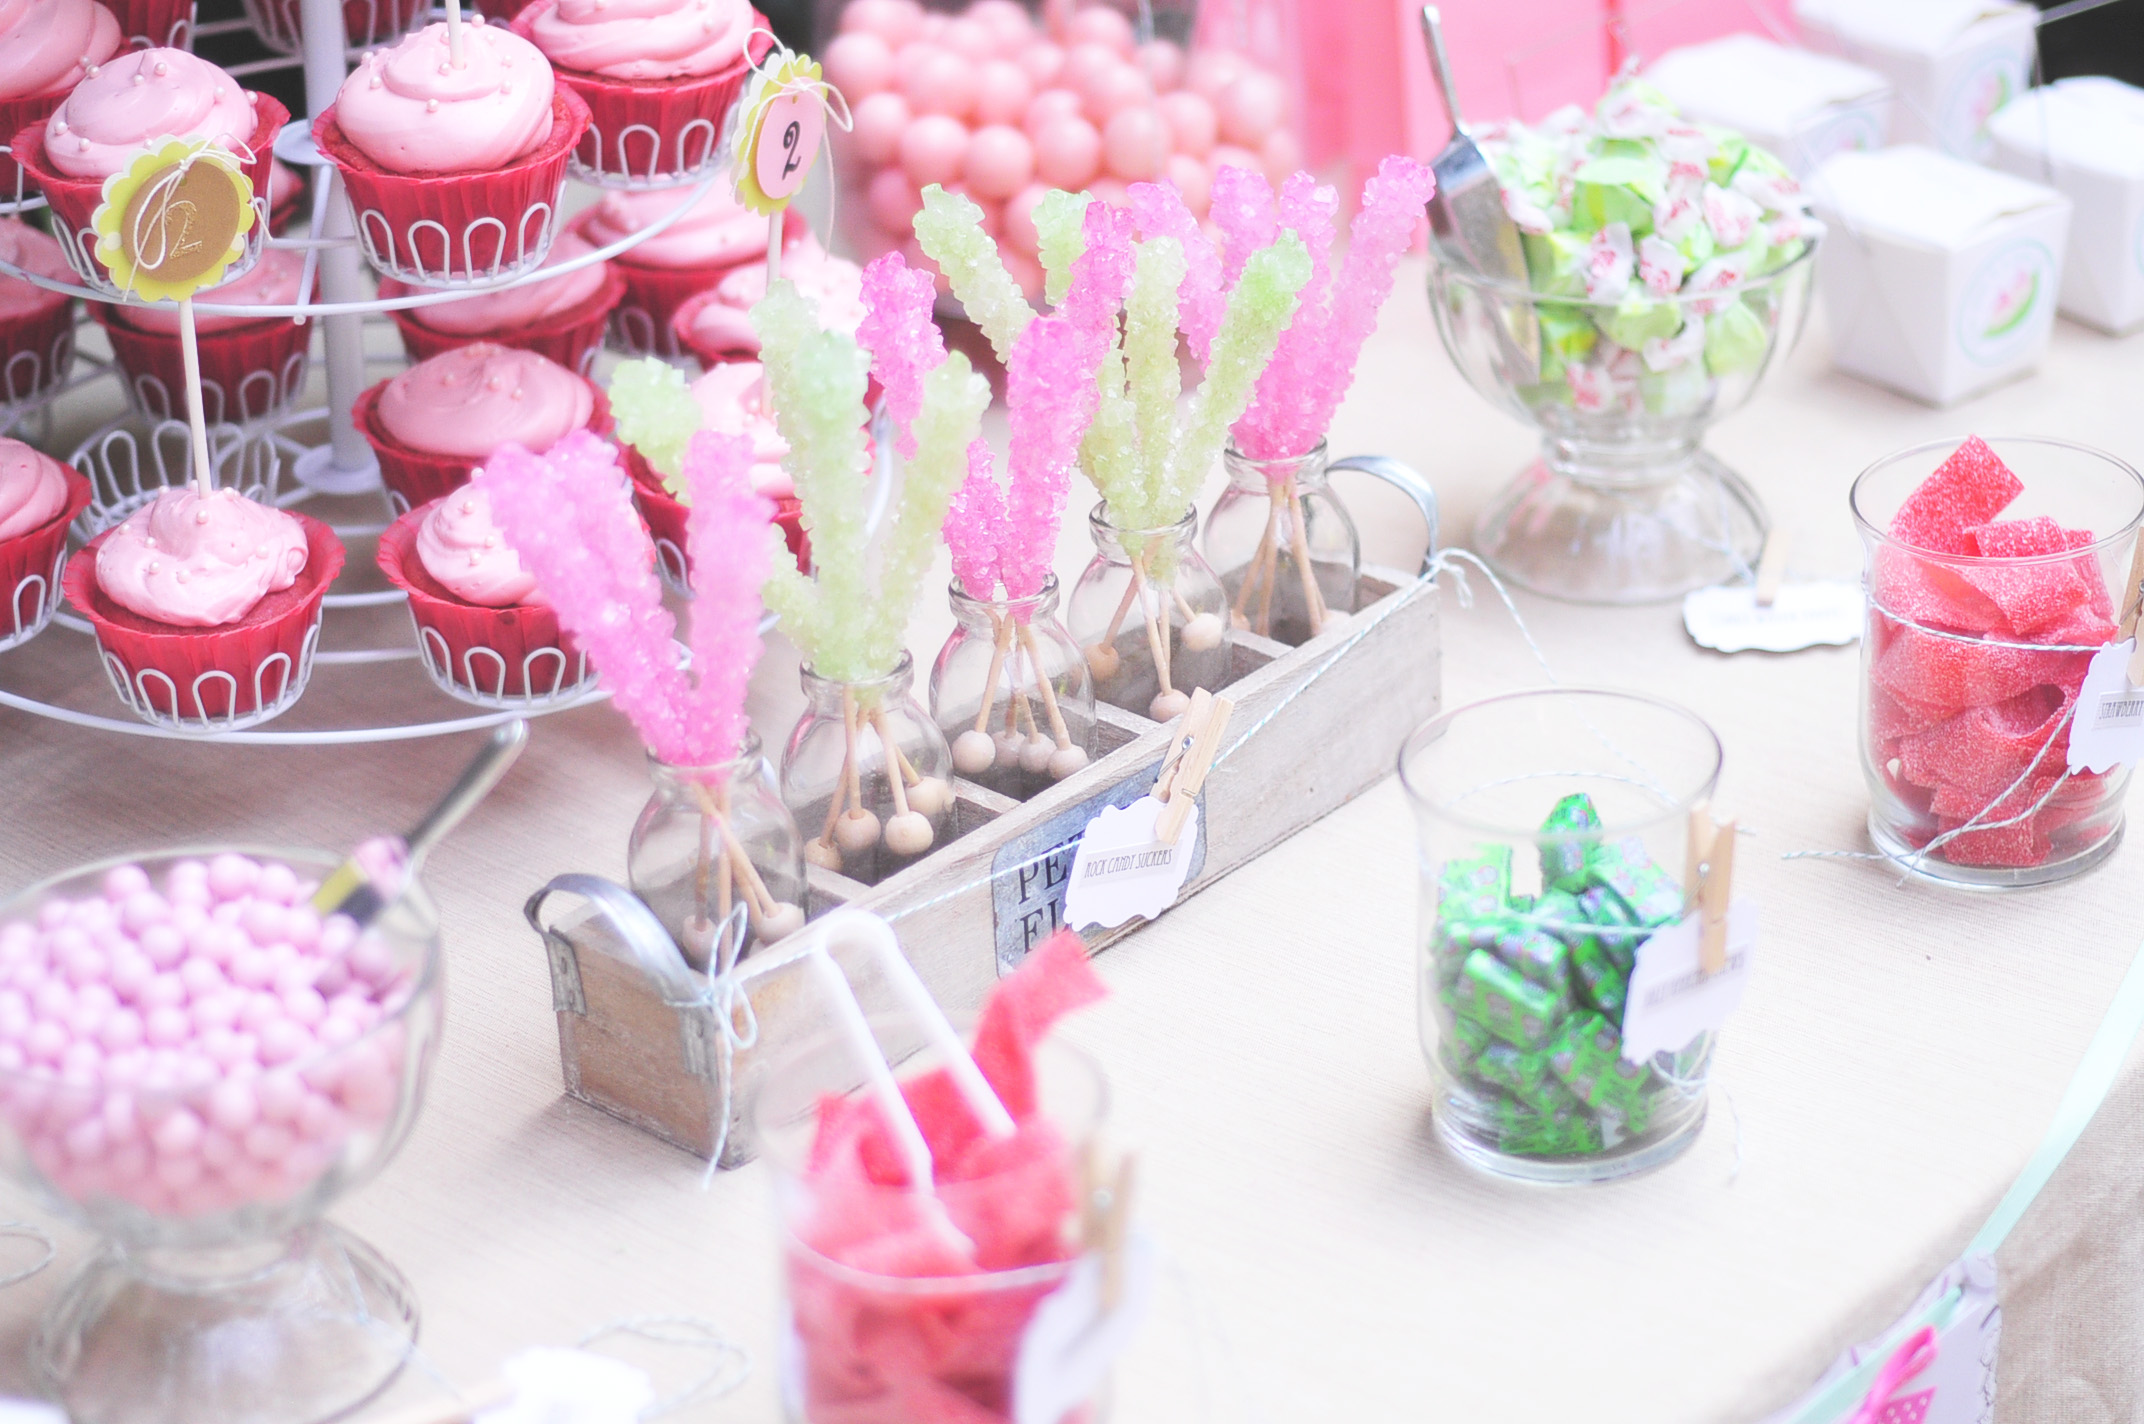
Of course, the candy buffet was pink and green and a big hit.

I made a sign for the candy buffet that said:

Two Peas in A Pod

Life is good, the Leflers  are blessed

With two little ladies, there will be no rest

Twice the dresses, twice the curls

Two beautiful, lovely, little girls

As we celebrate a gift so sweet,

Please enjoy a box of treats!

I made cupcake toppers with supplies from Paper Dozen on Etsy.

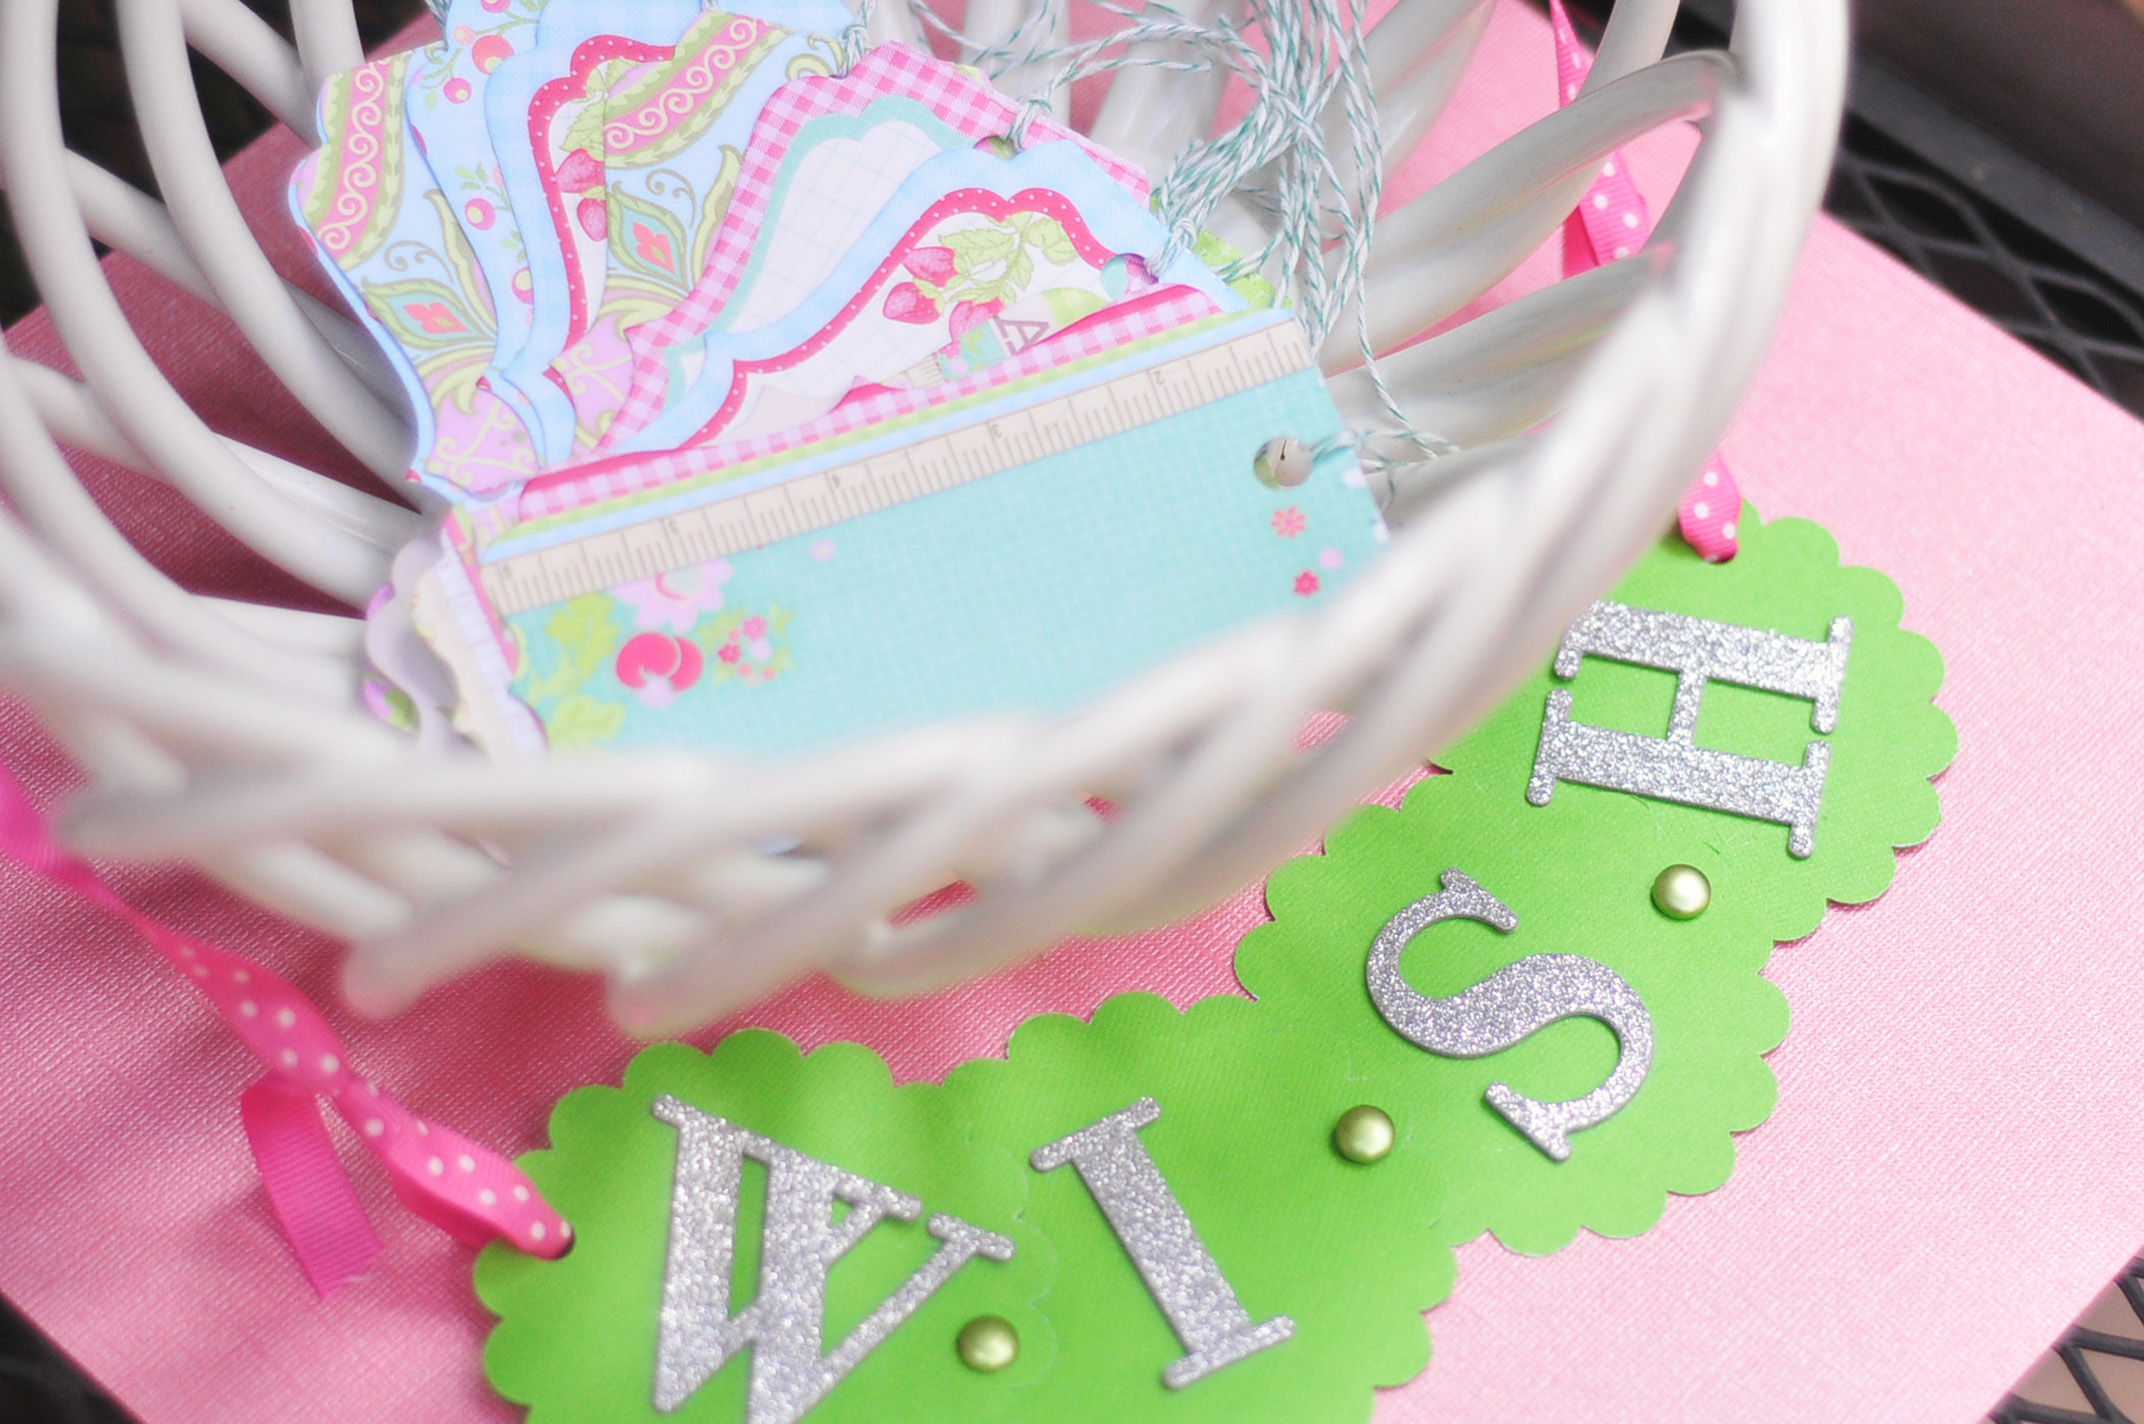
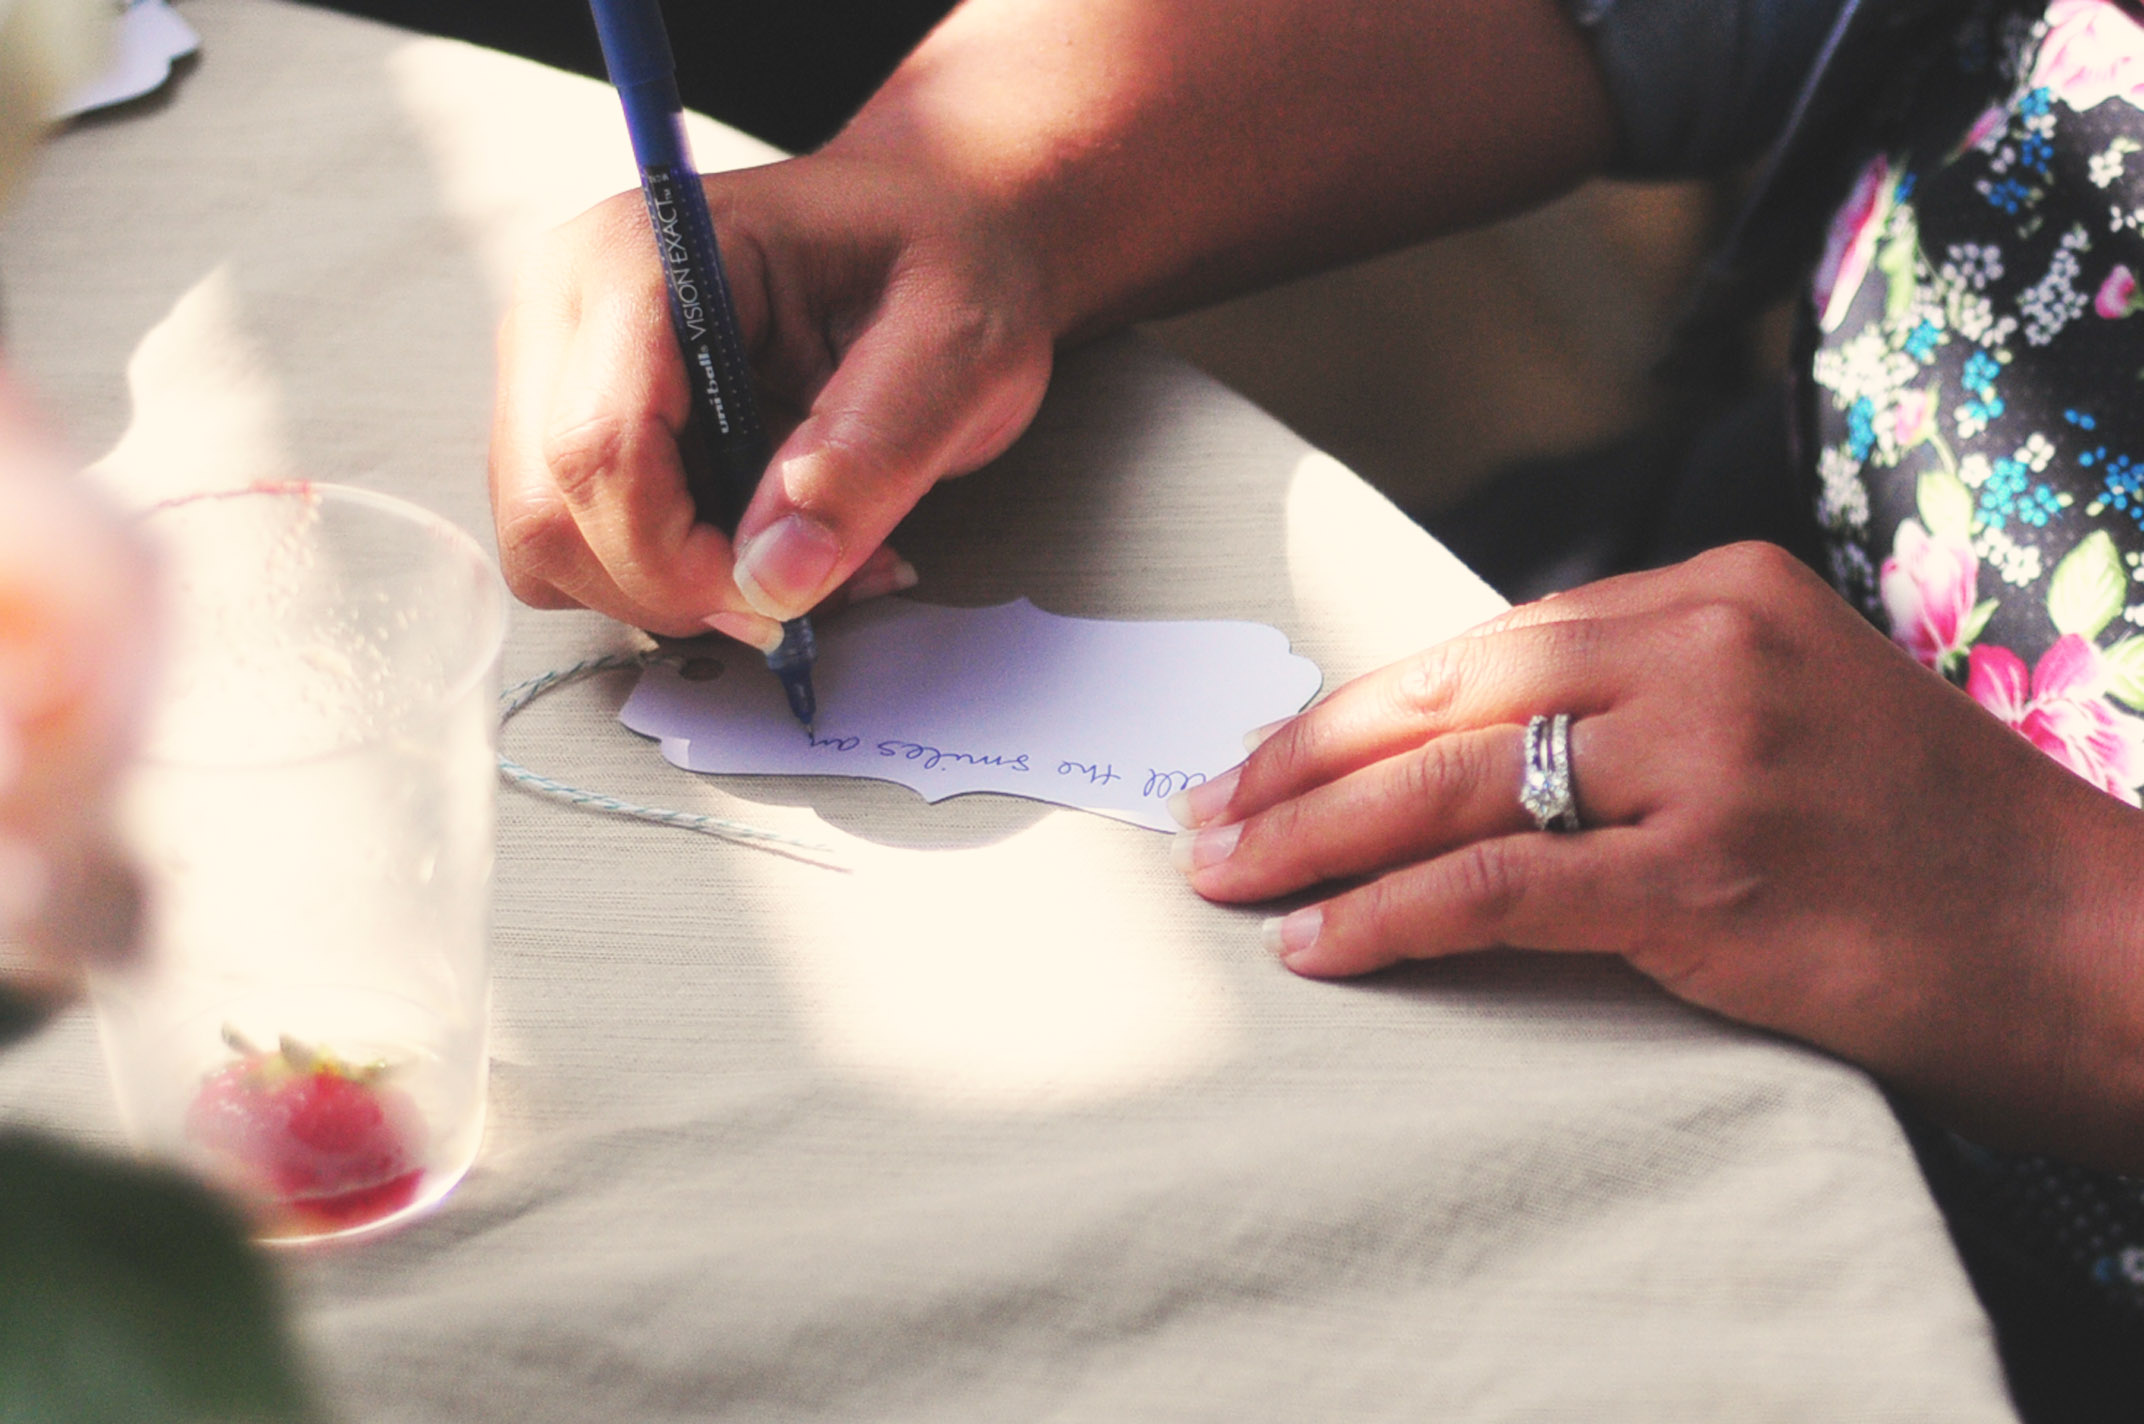
We also had people write down wishes and prayers for the Lefler family, easily my favorite activity of the day. I made the wish sign from chipboard letters, ribbon, brads, and scalloped circles from JCSkyline on Etsy. I heart Etsy and those crafting geniuses who sell their wares.


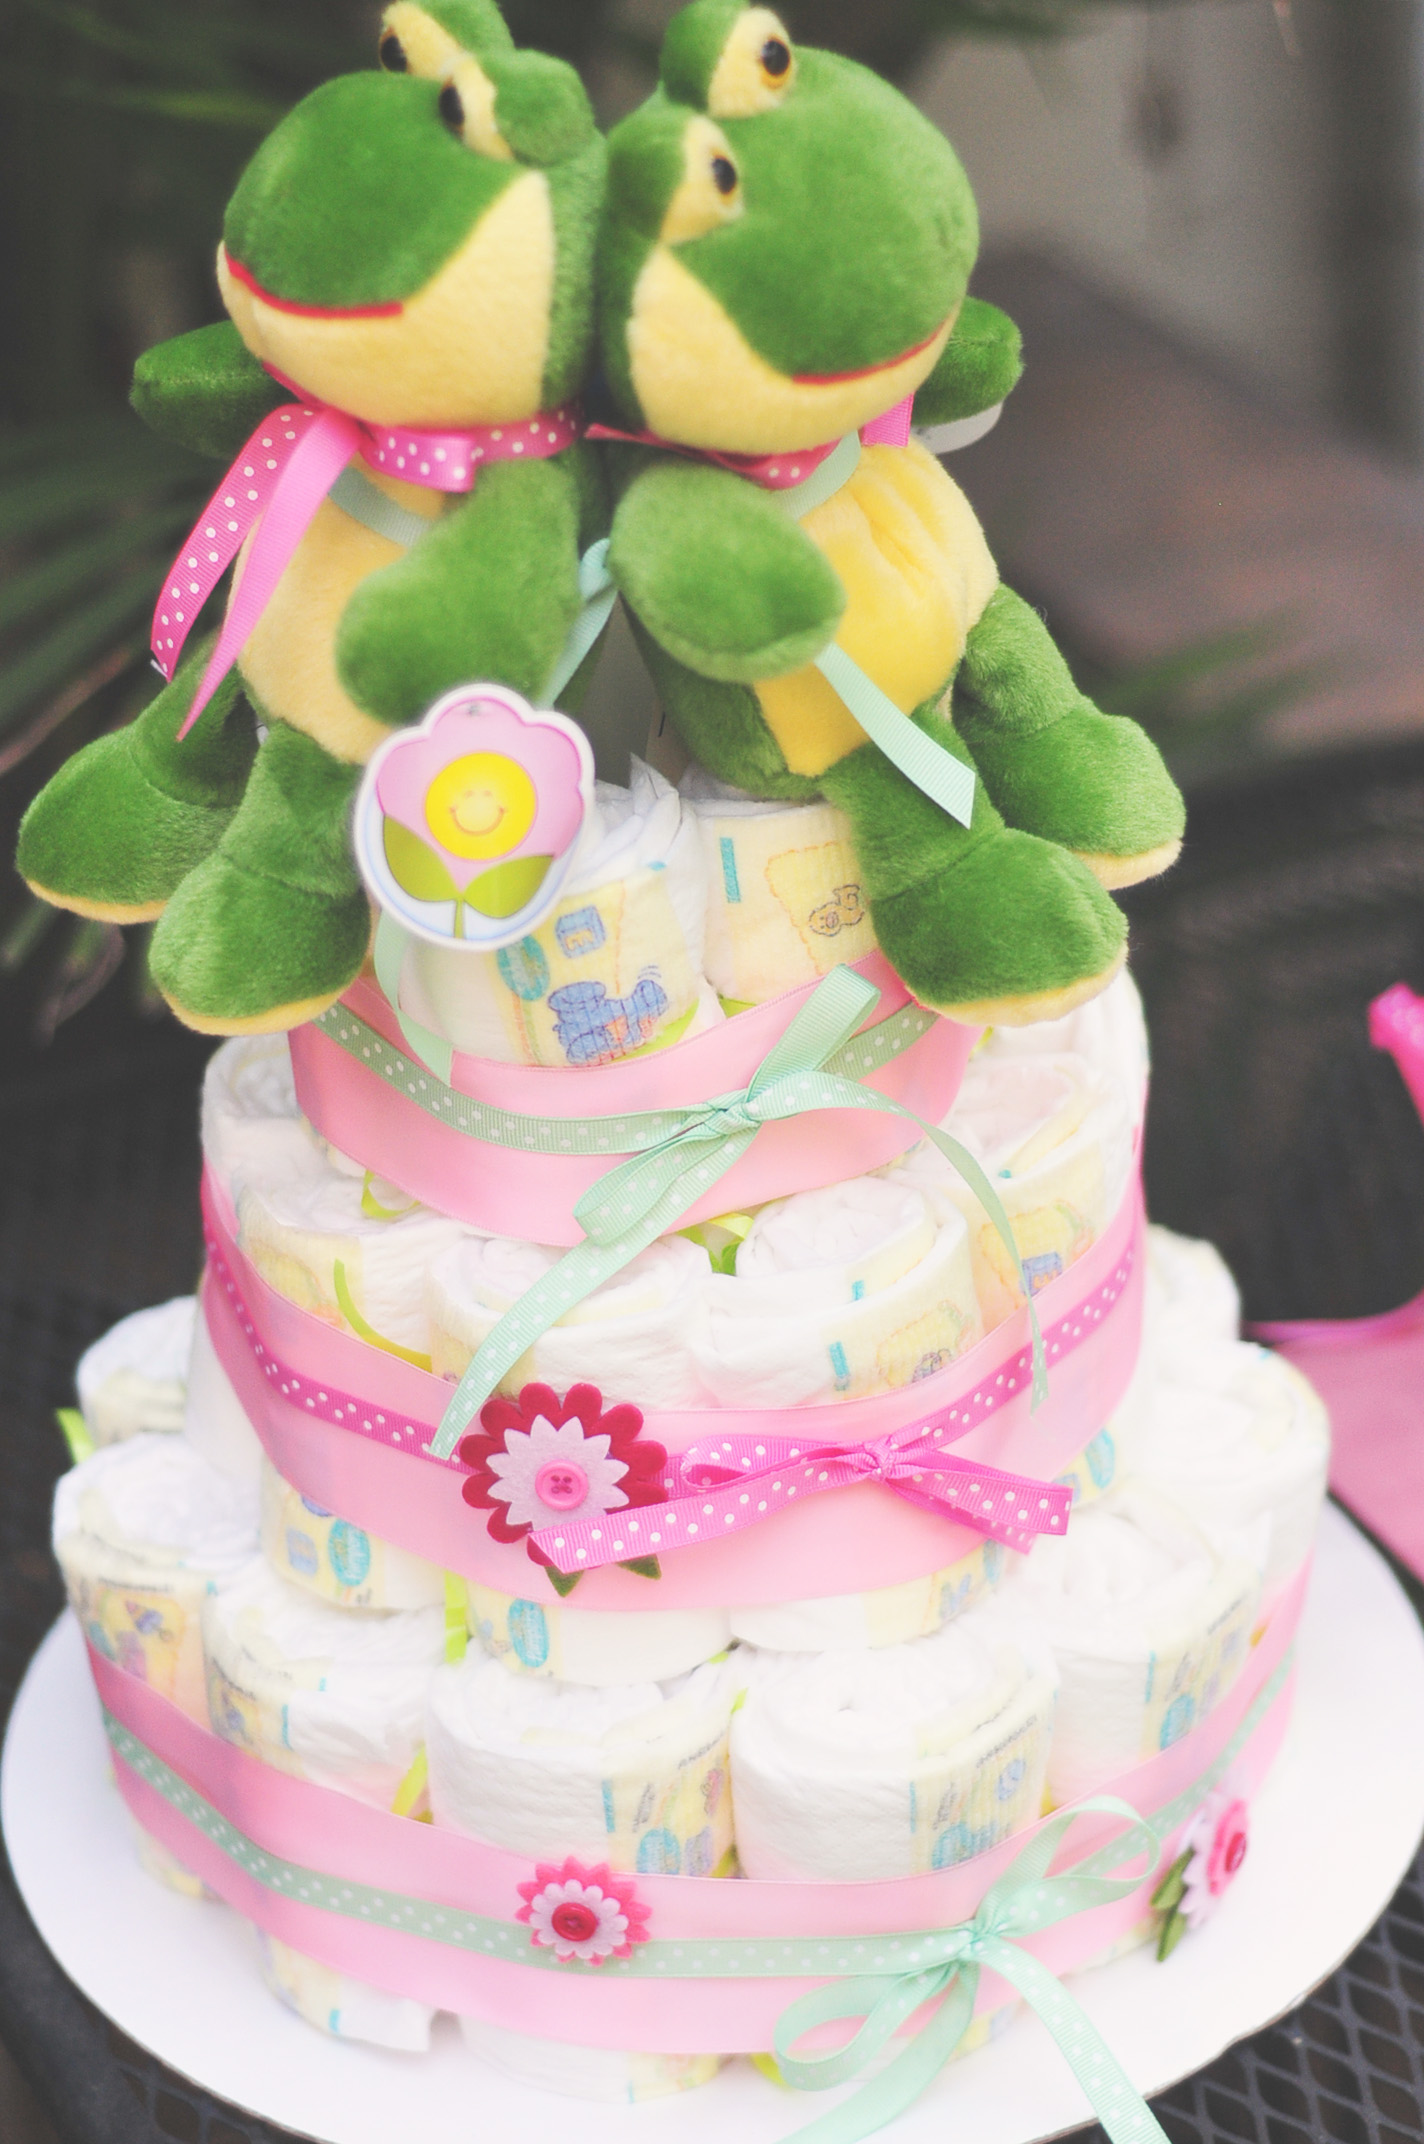
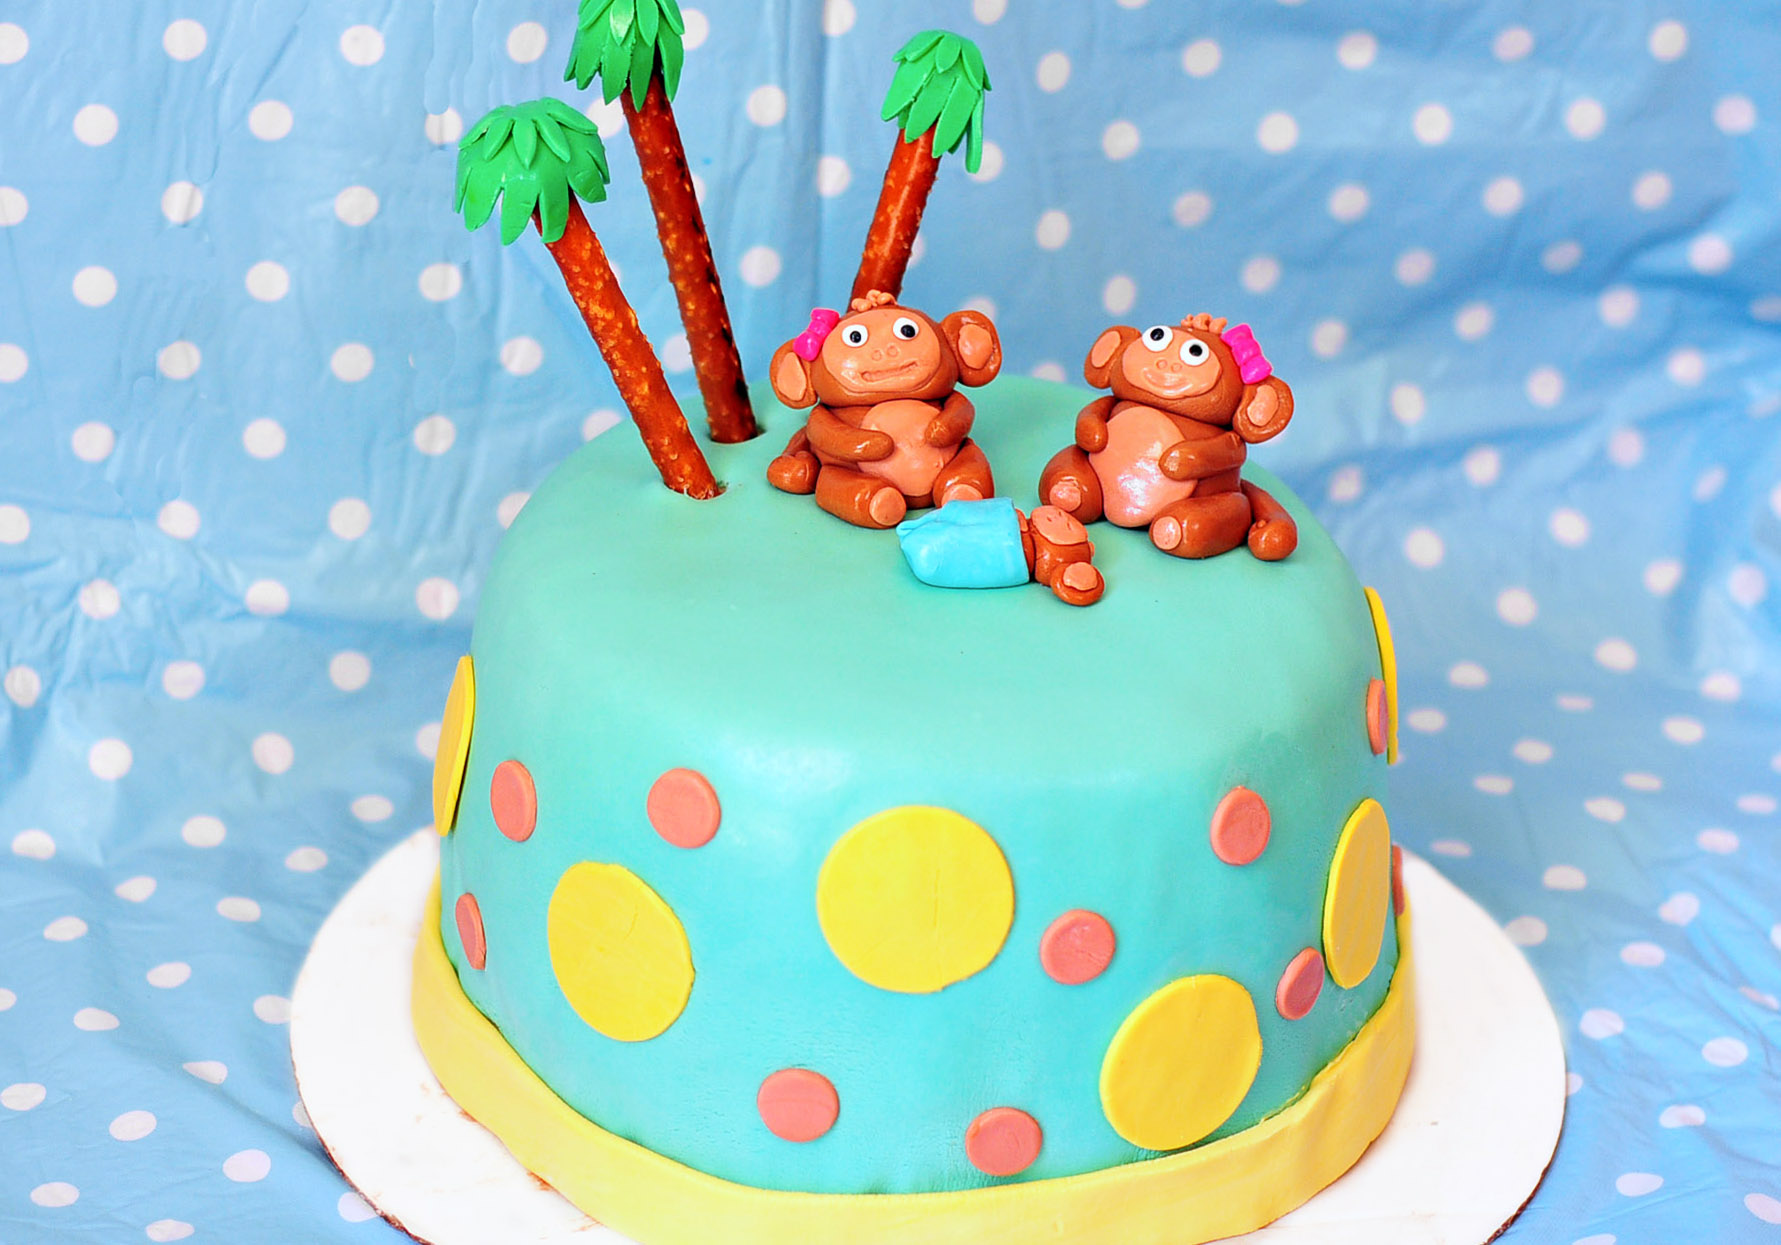
I also made my very first diaper cake. Tater picked out the frogs for the top, although I’m pretty sure she had no idea I would ask her to part with them. I did distract her with fresh strawberries and a juice box.

Now, no one really tells you this, but it turns out that photographing a 15 foot banner is actually harder than making a 15 foot banner. Here is my best attept. Although it’s hard to see, I was pretty dang proud of that banner. I use scrapbook paper, pink paper circle coaster from the Martha Stewart Crafts collection, sparkly chipboard letters, grosgrain ribbon and tiny little clothespins.

It says, "Welcome Sweet Peas." Anytime you have to actually explain what’s in a photo, it’s not a good photo. Sorry, Nikon, it wasn’t your fault.

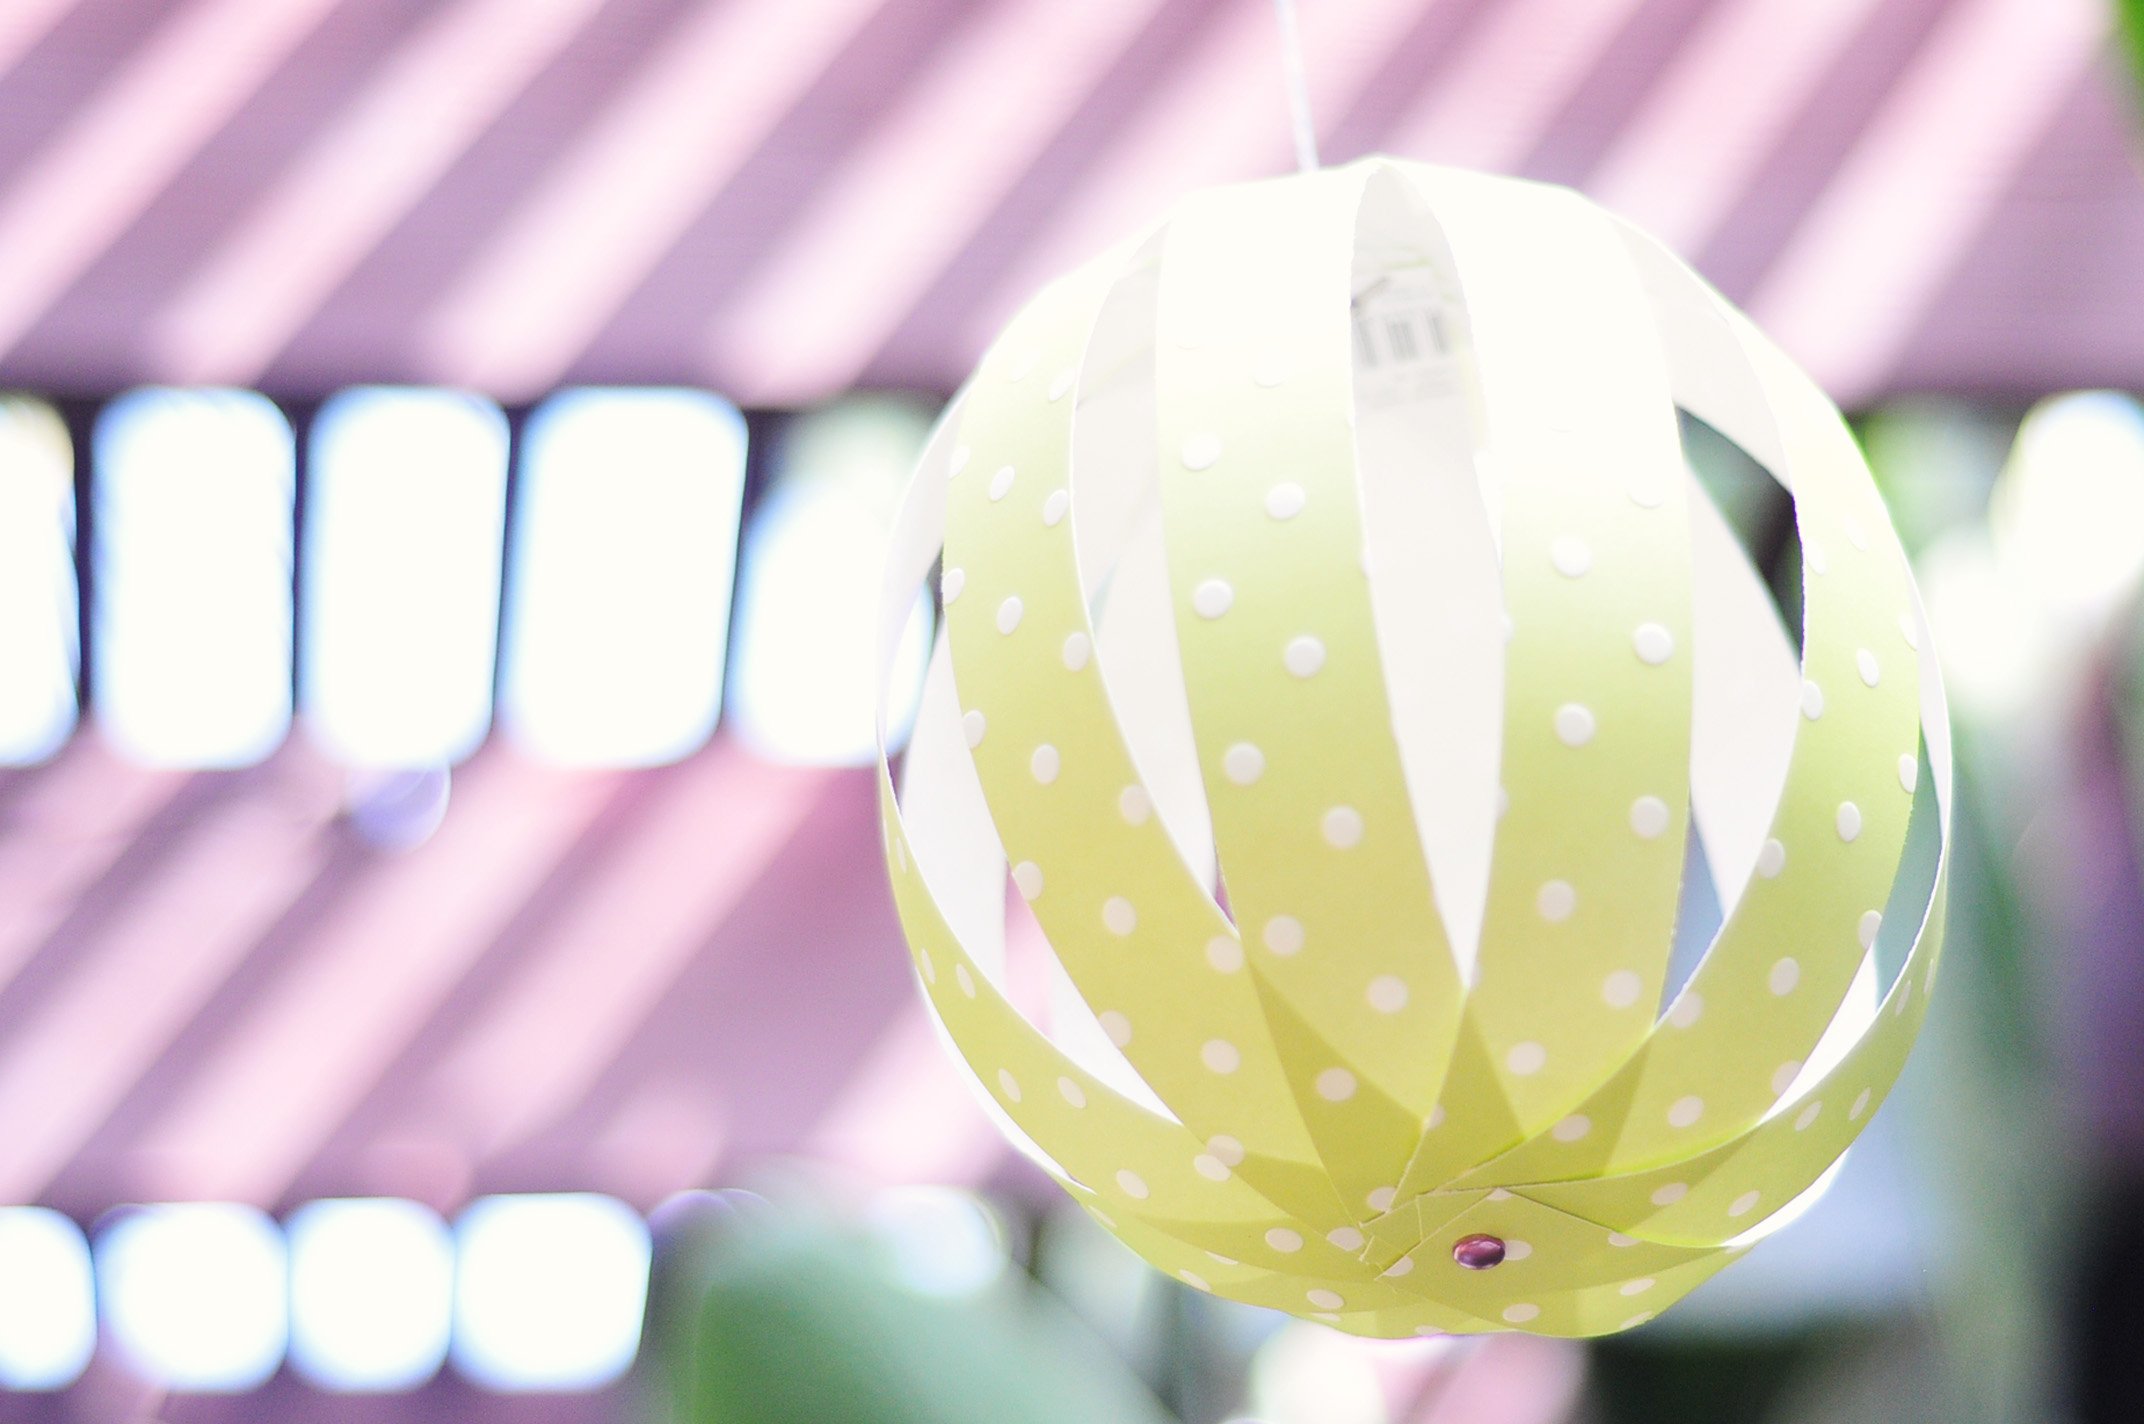
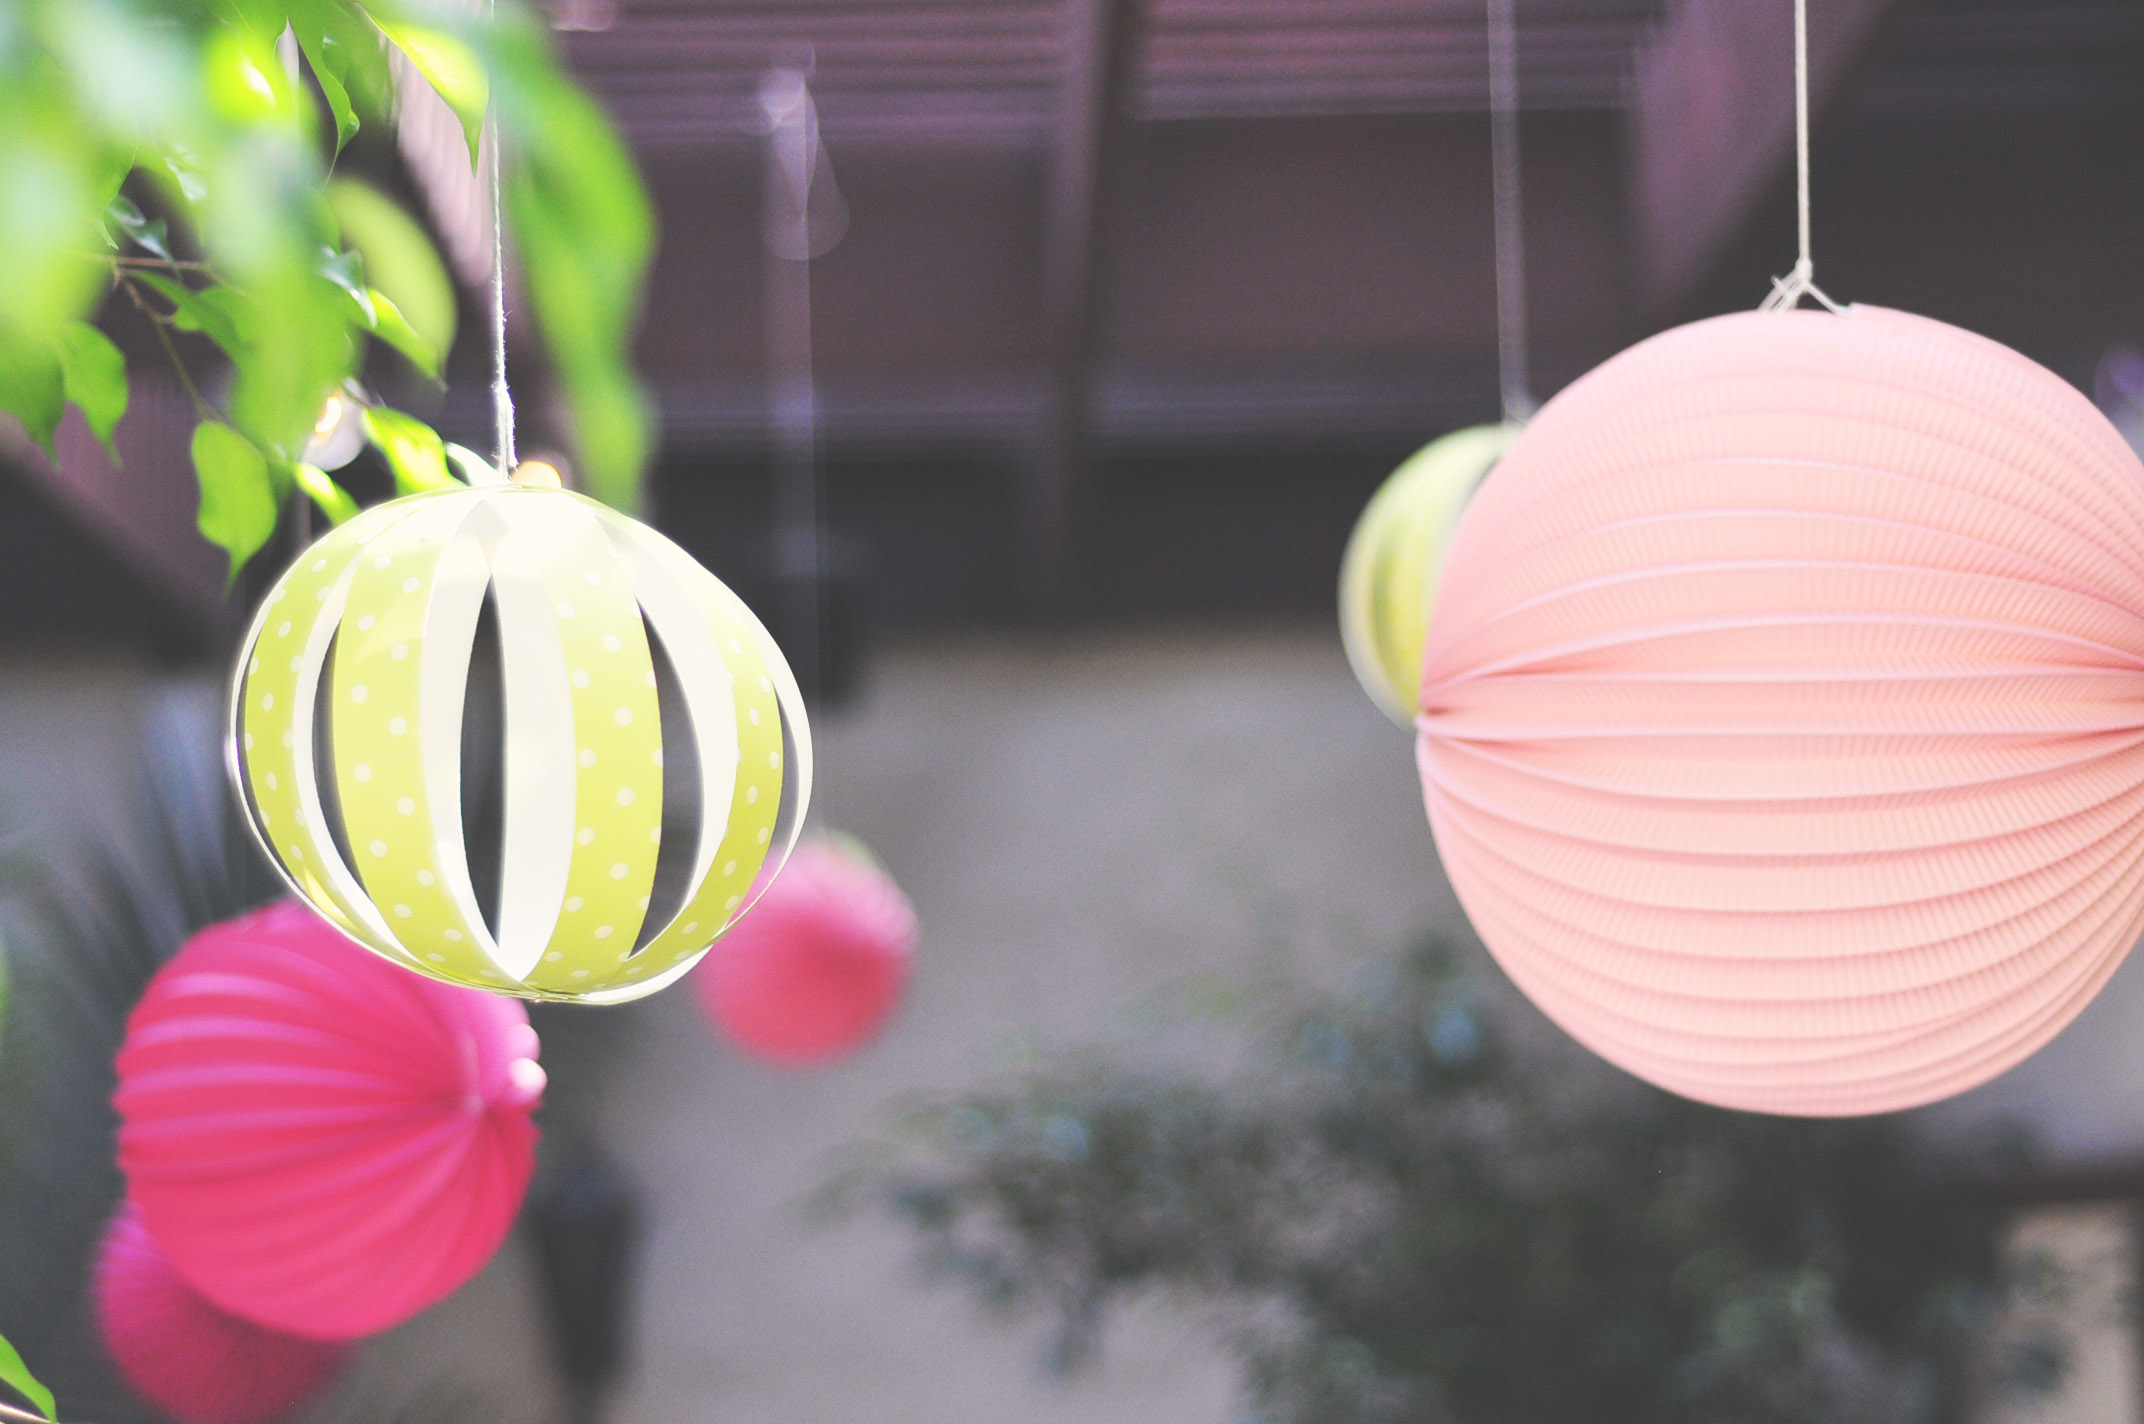
I also made hanging paper lanterns, the green ones not the pink one. My crafting skills aren’t quite that good yet. I used the same techniques that I used in this hanging paper lantern tutorial. If you want to make super duper cheap lanterns for your own party, it is super duper easy.


We also had food. I know, we’re pretty crazy.
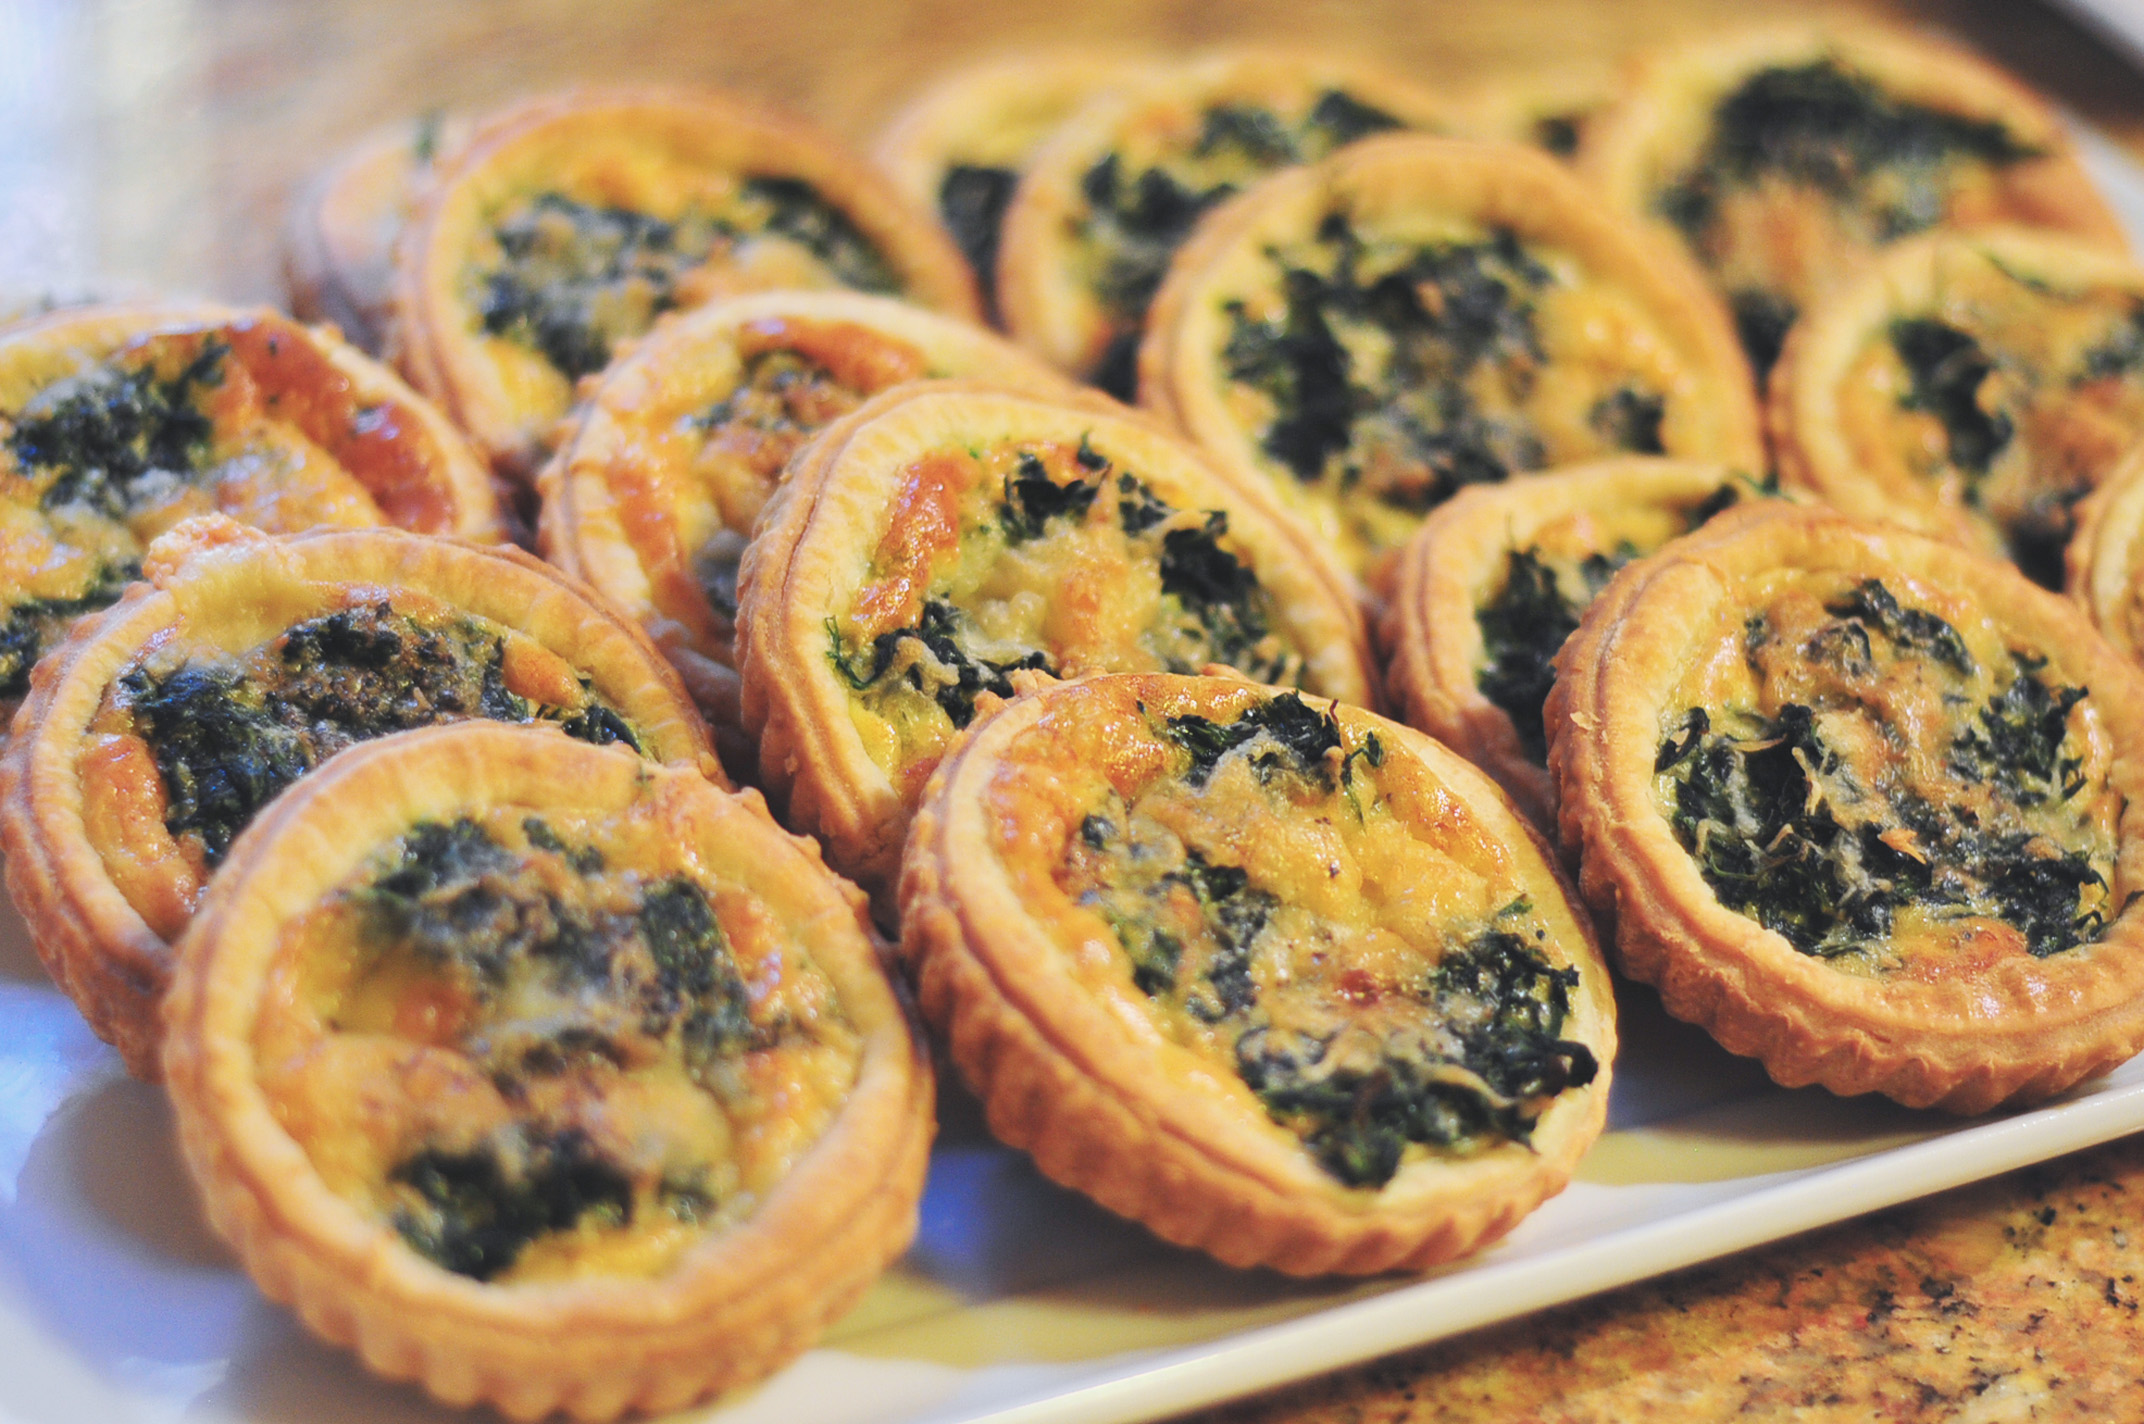
Mini quiches

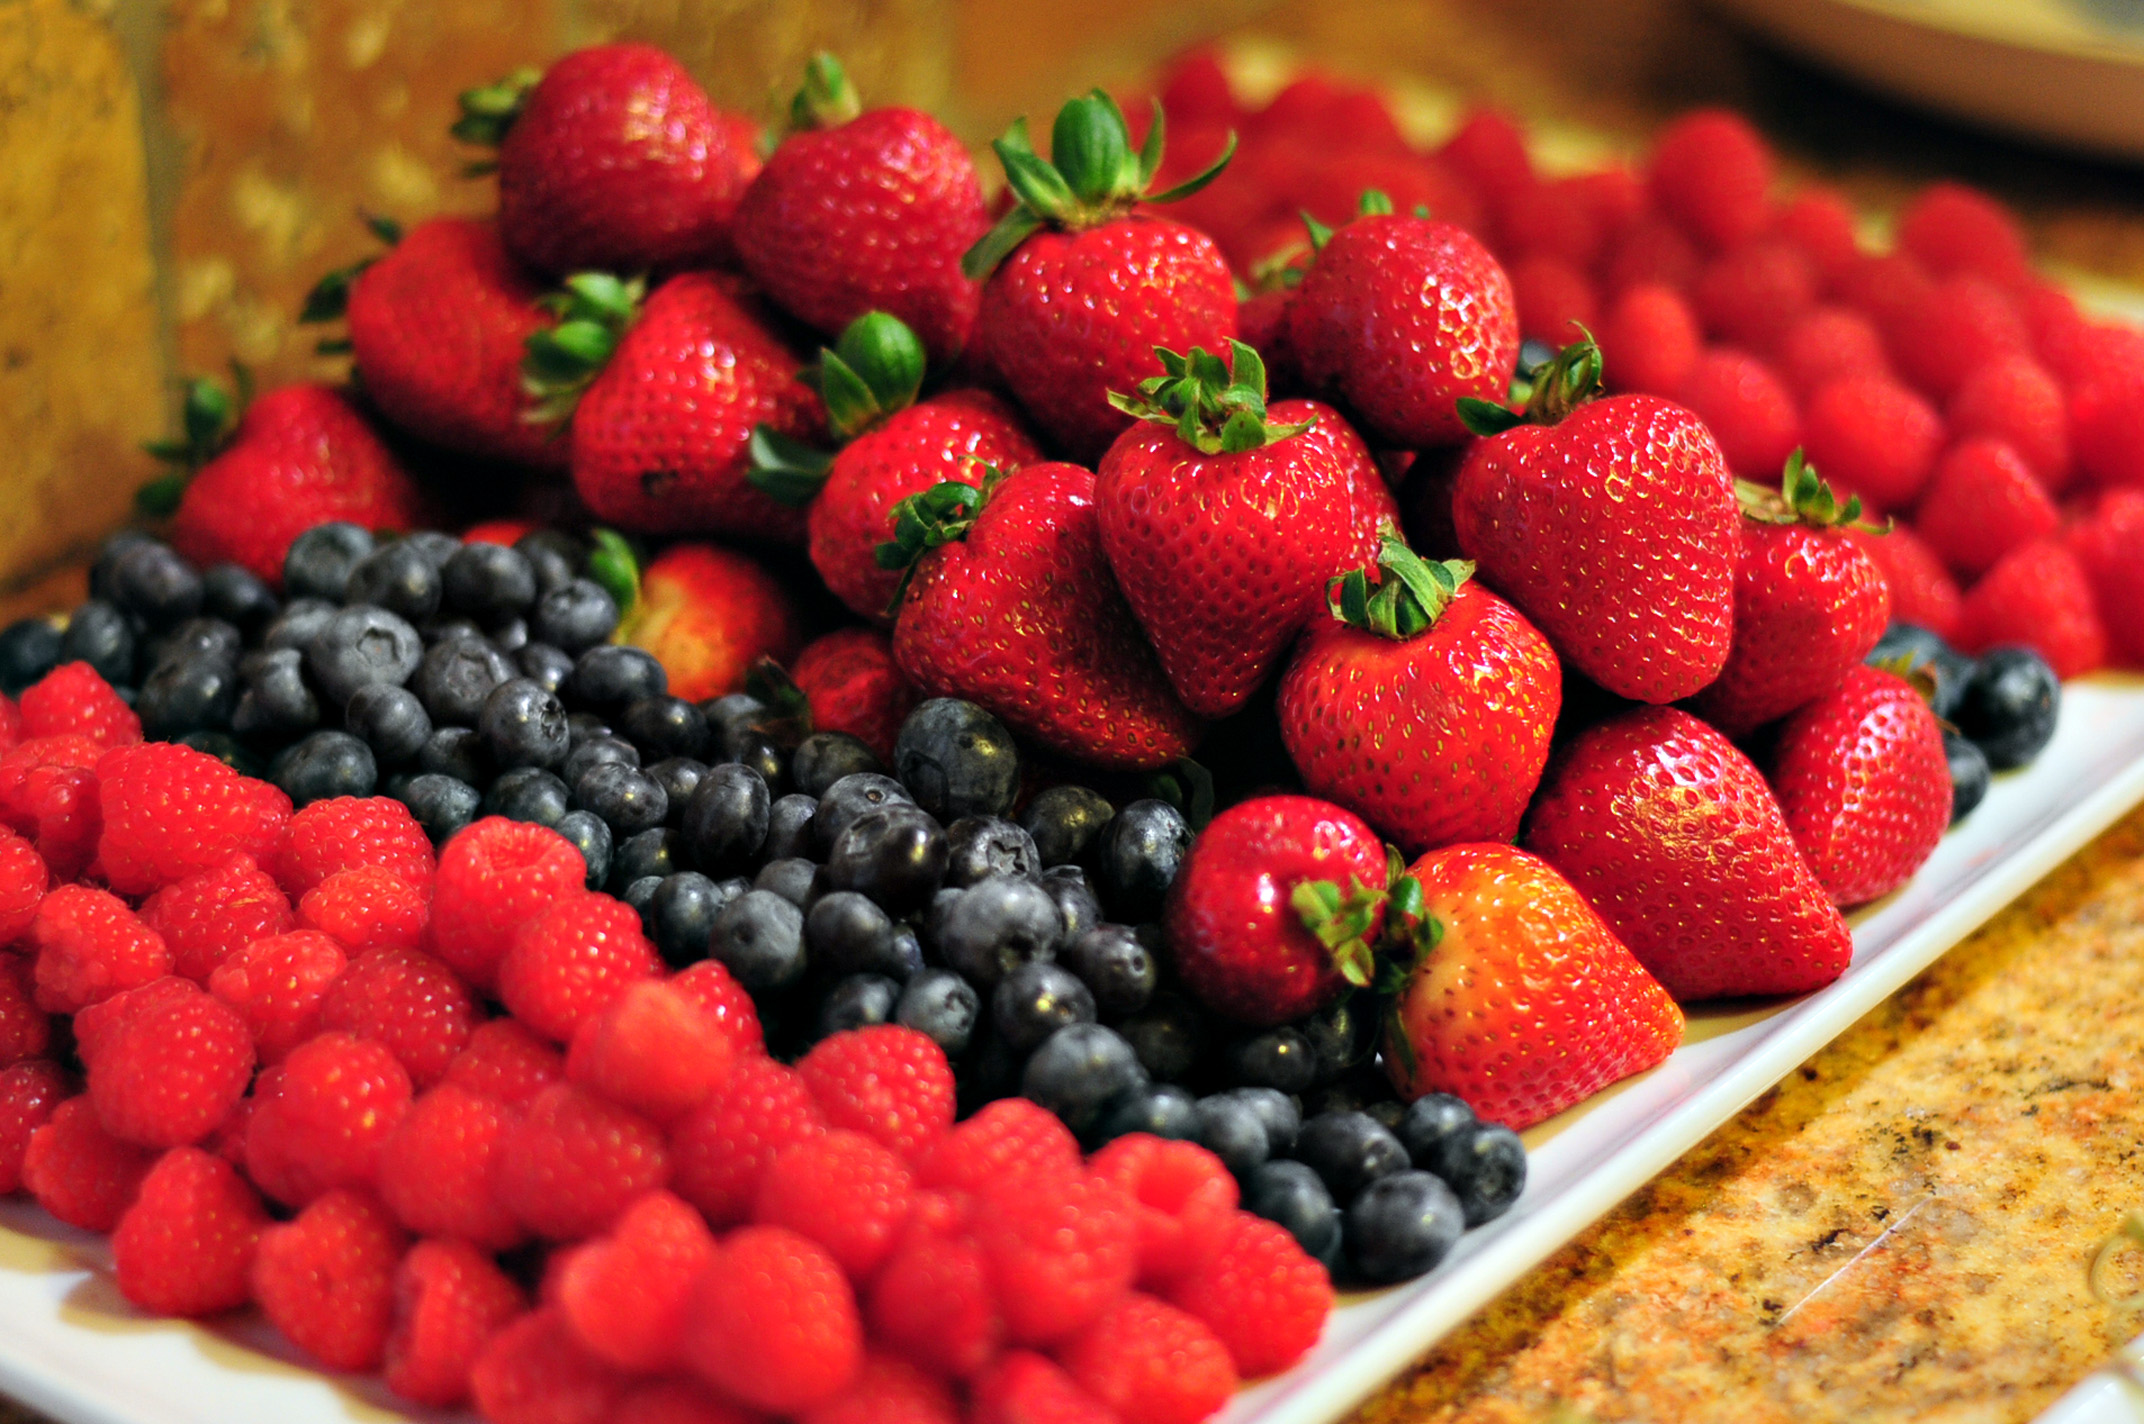
Berry platter that was as much of a decoration as it was a food item, so beautiful.

I made two kinds of Salad Skewers, Goat cheese, Roasted Beet & Arugula as well as the ever popular Caprese Skewers.

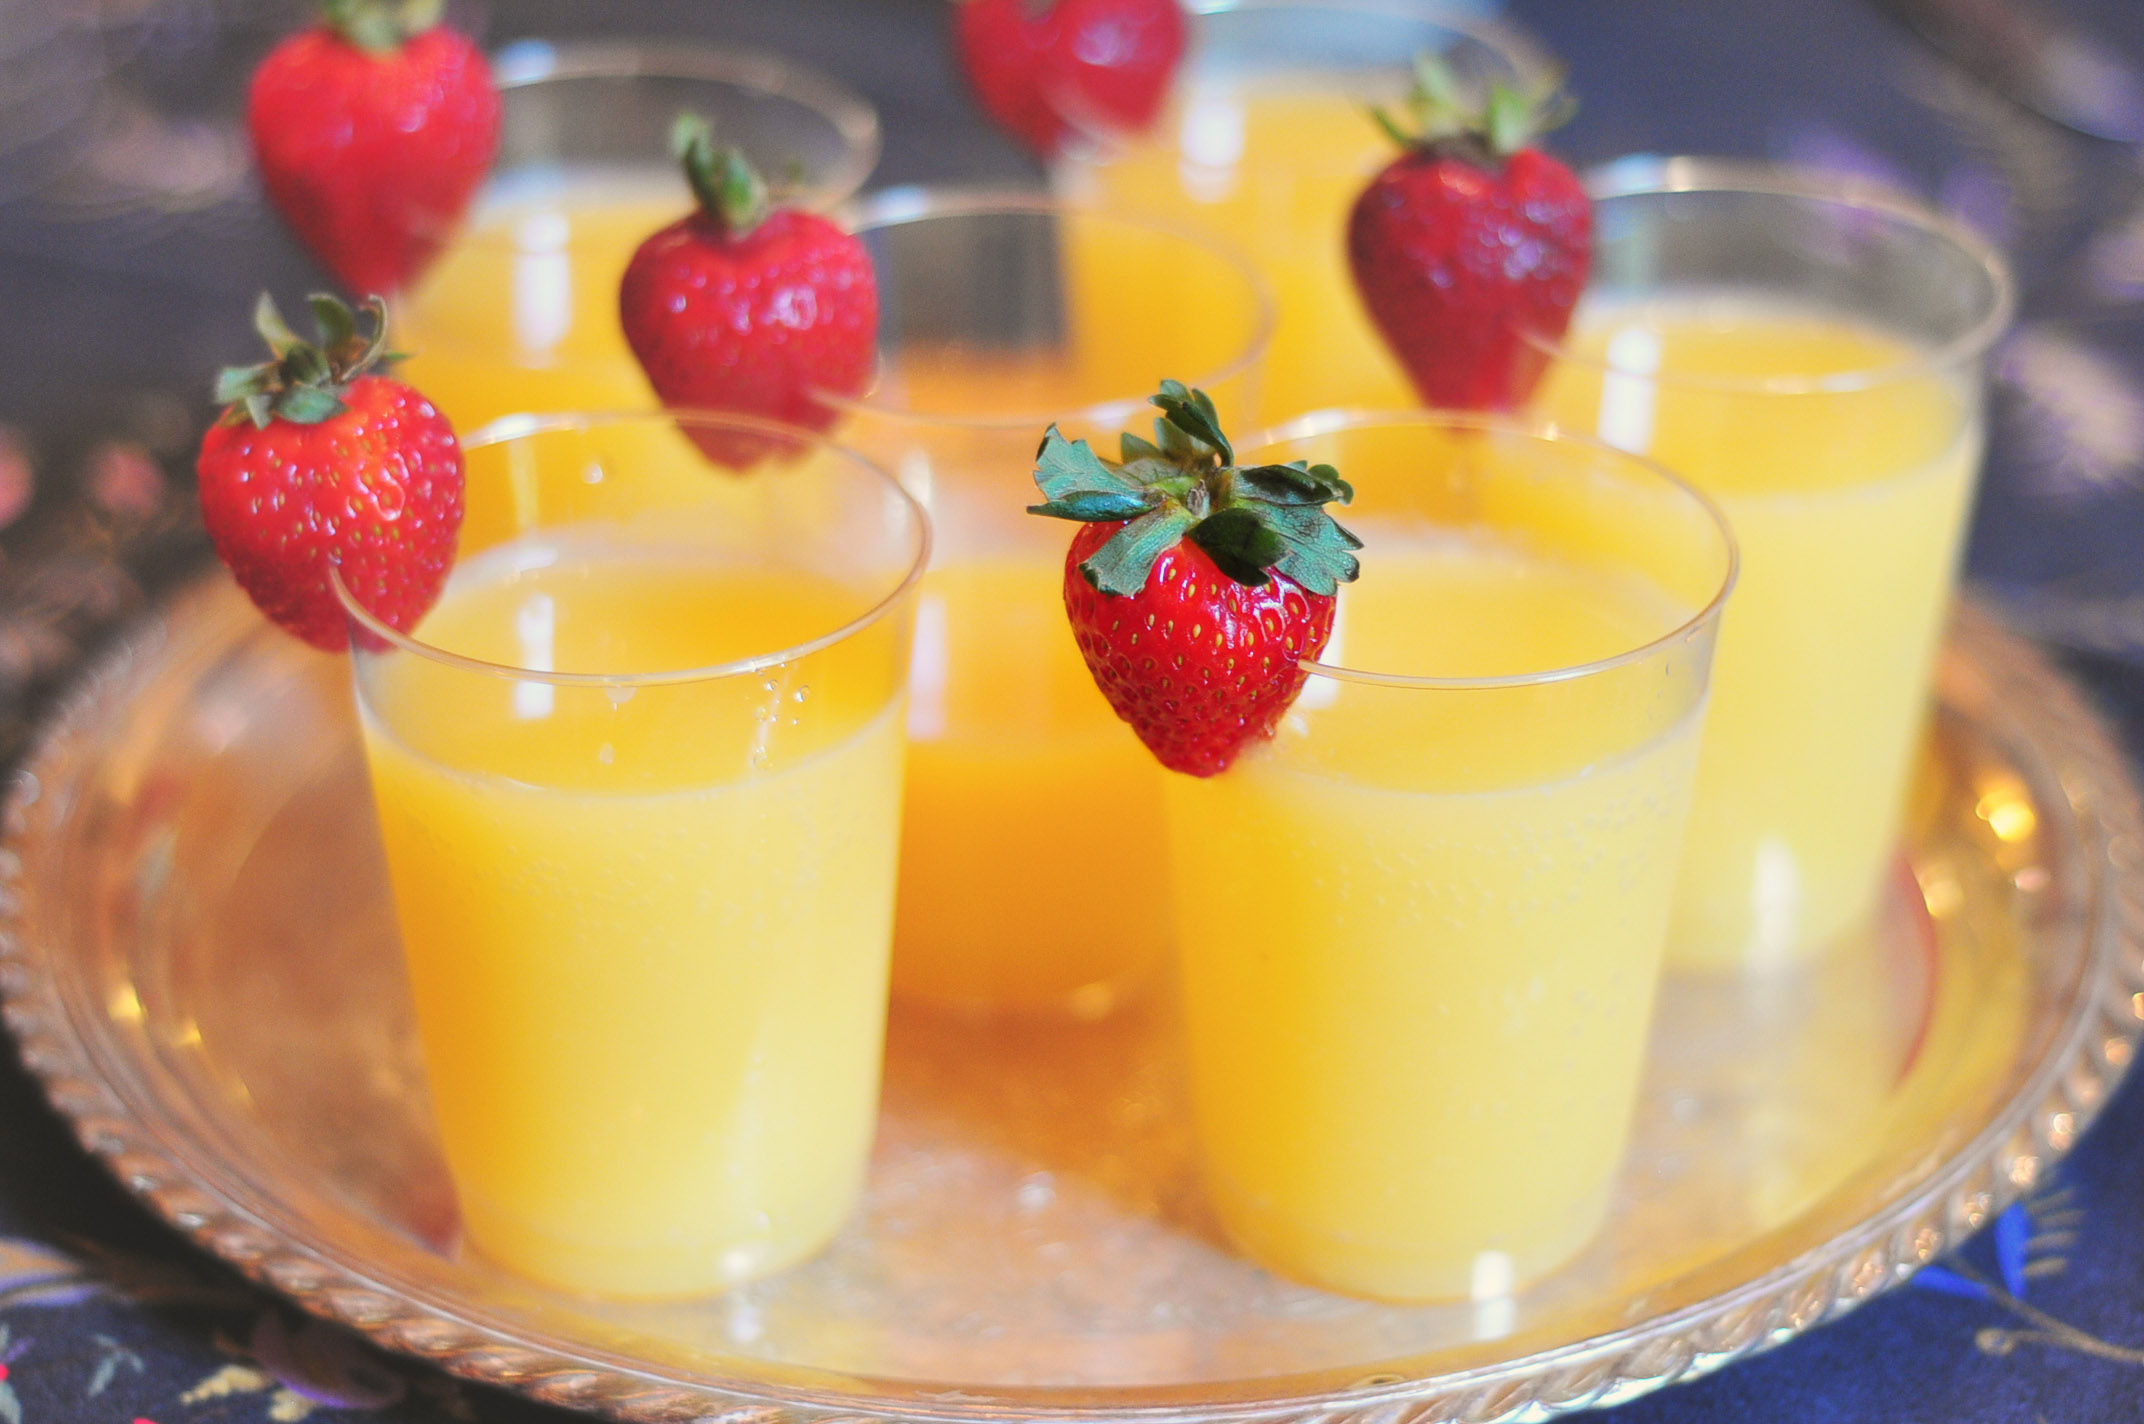
We also had delicious mimosas, some made with real life champagne and others with pregnancy friendly sparkling cider.

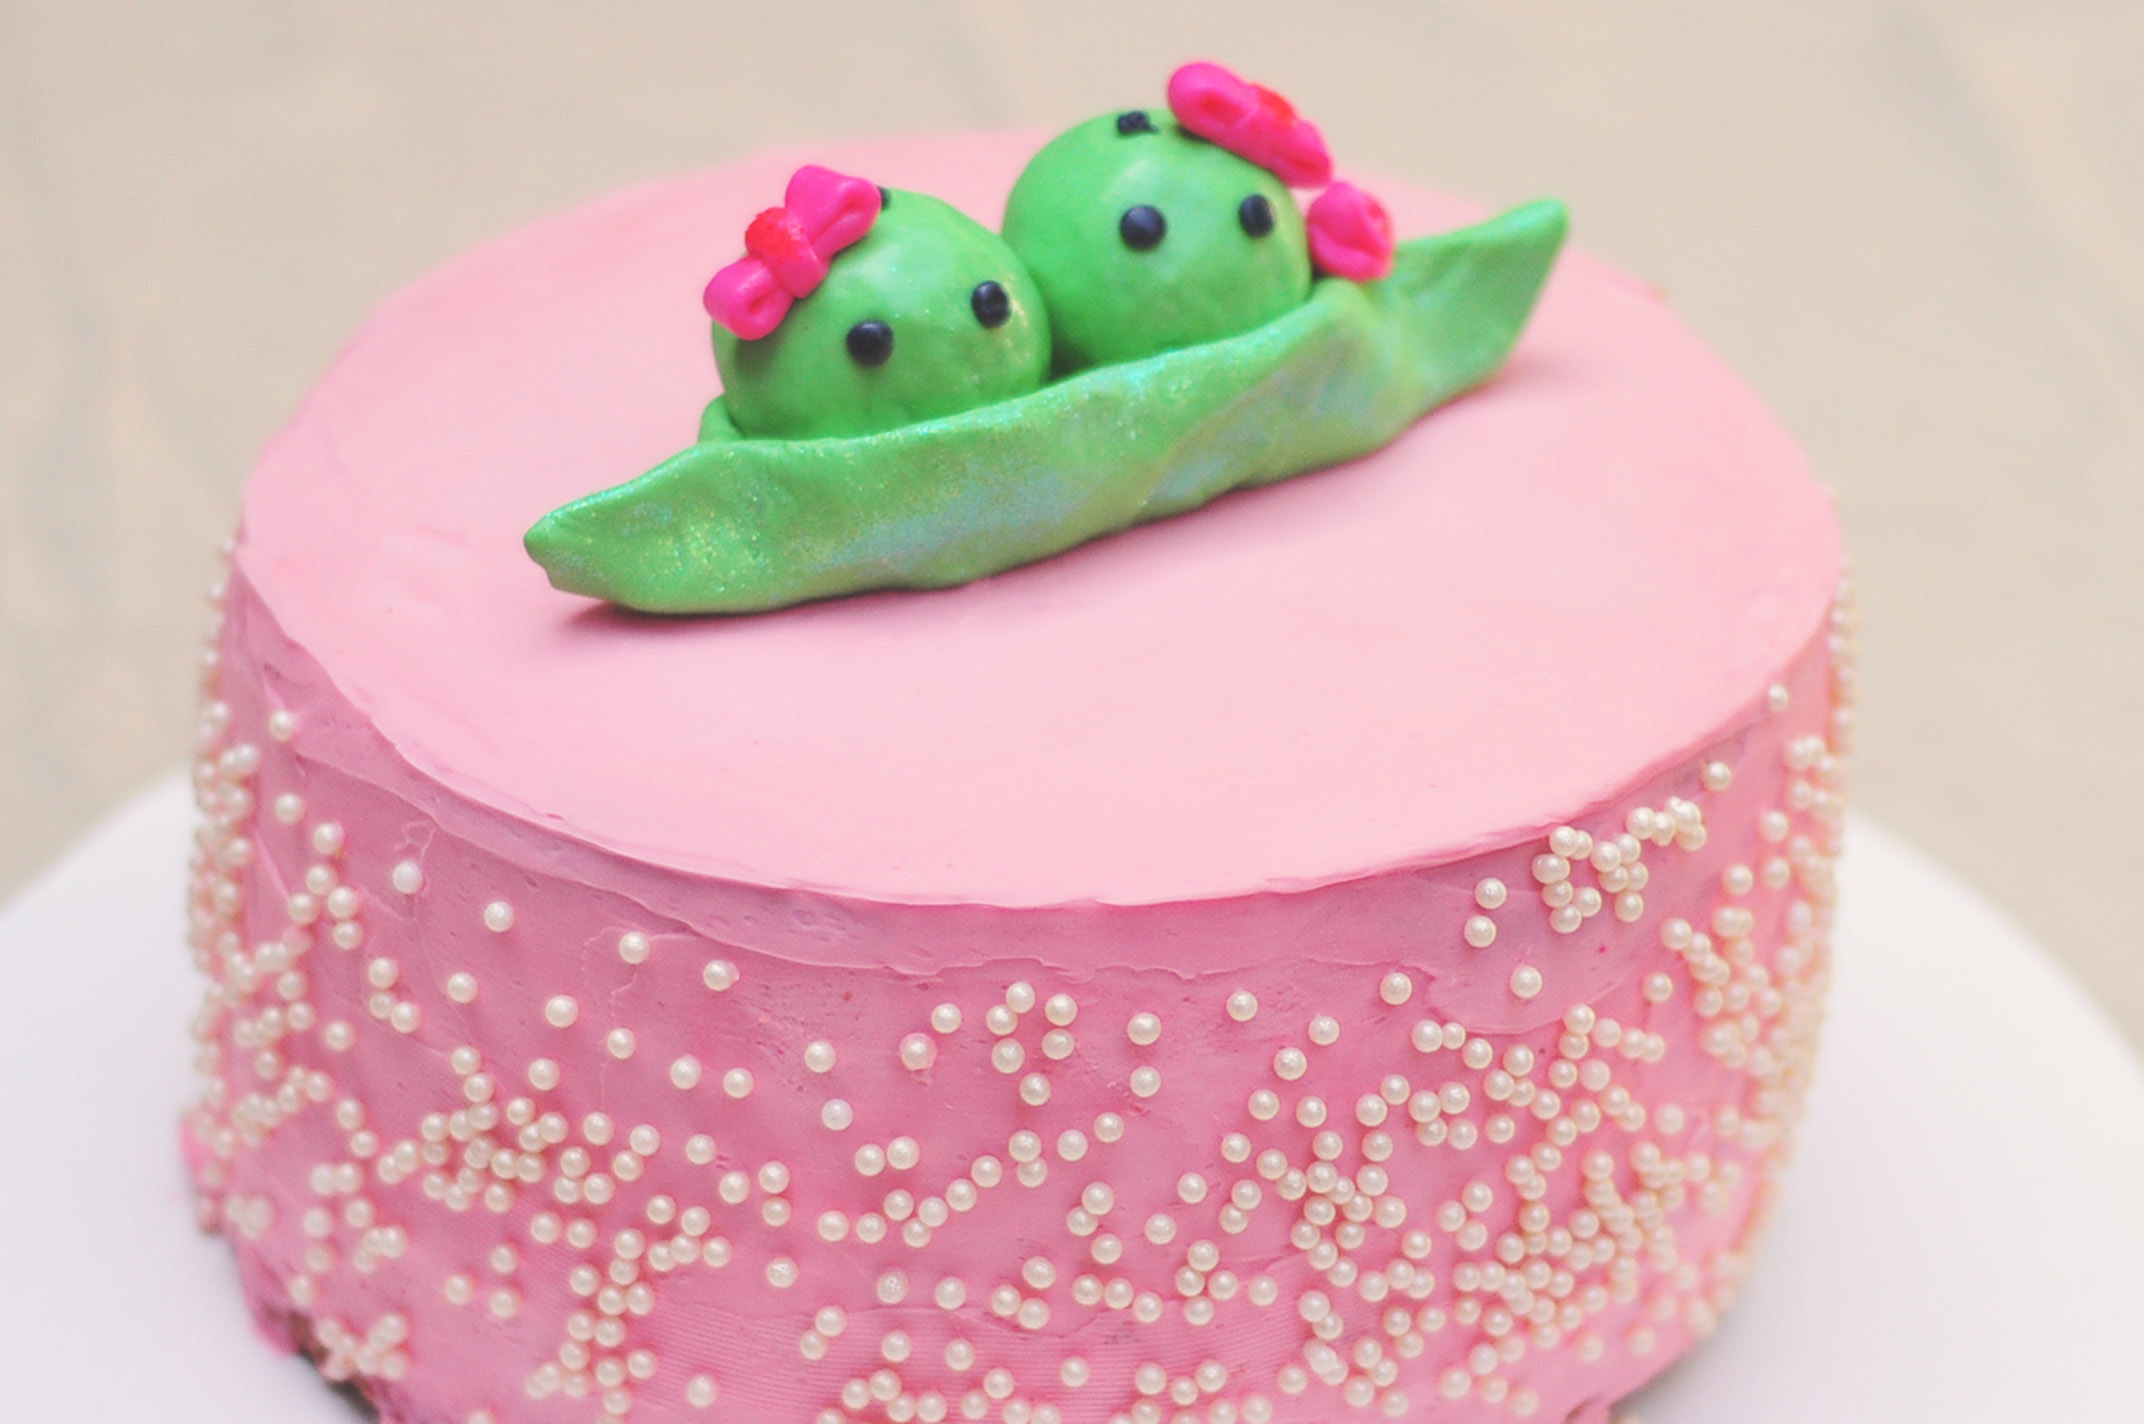
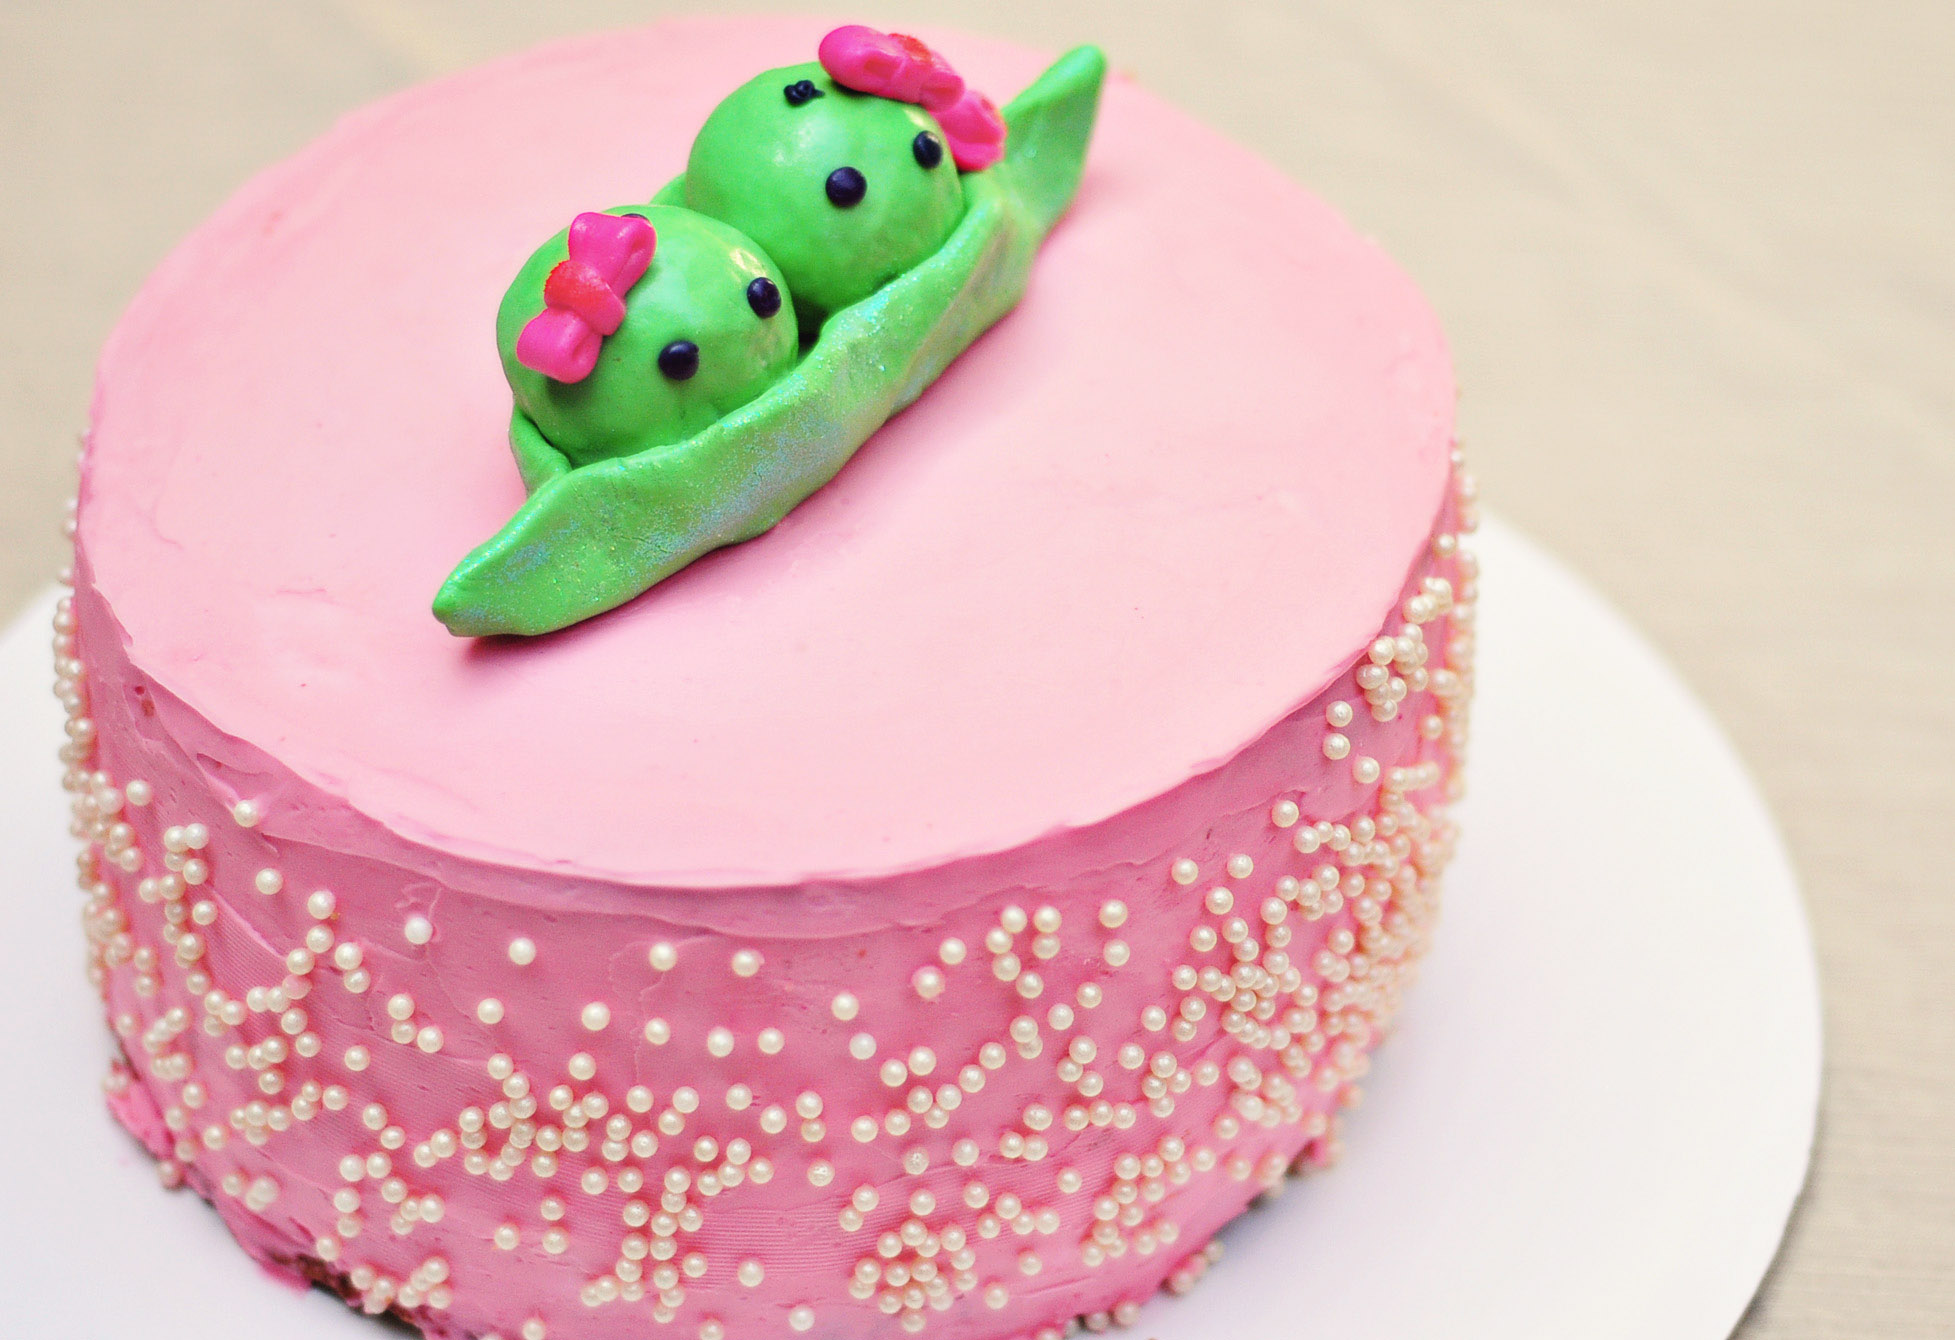
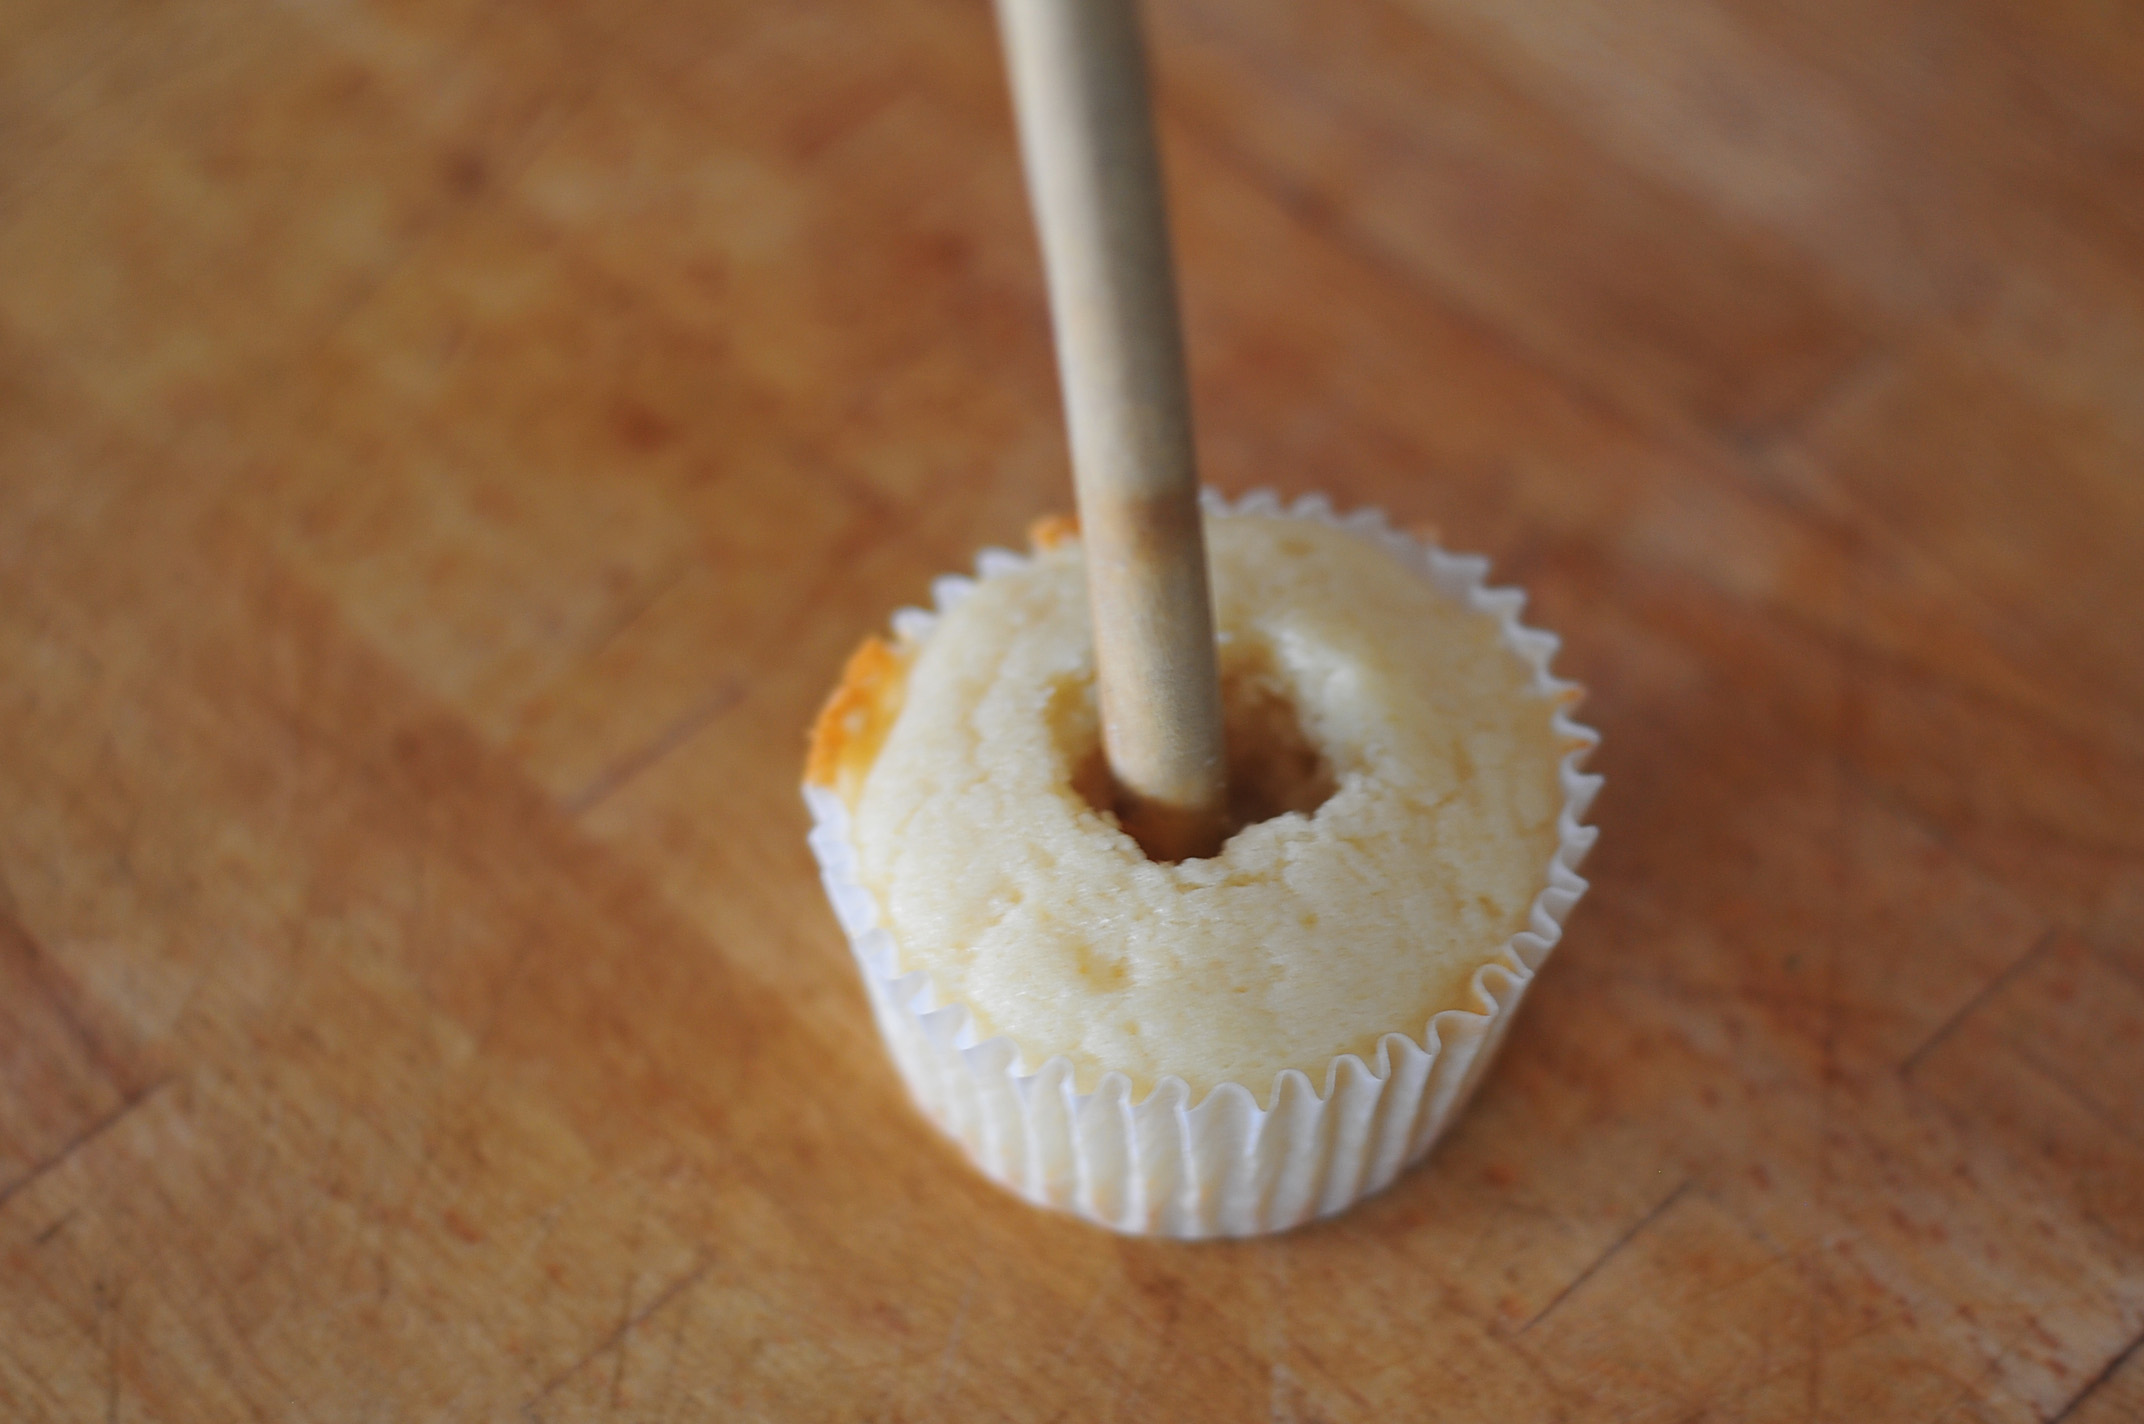
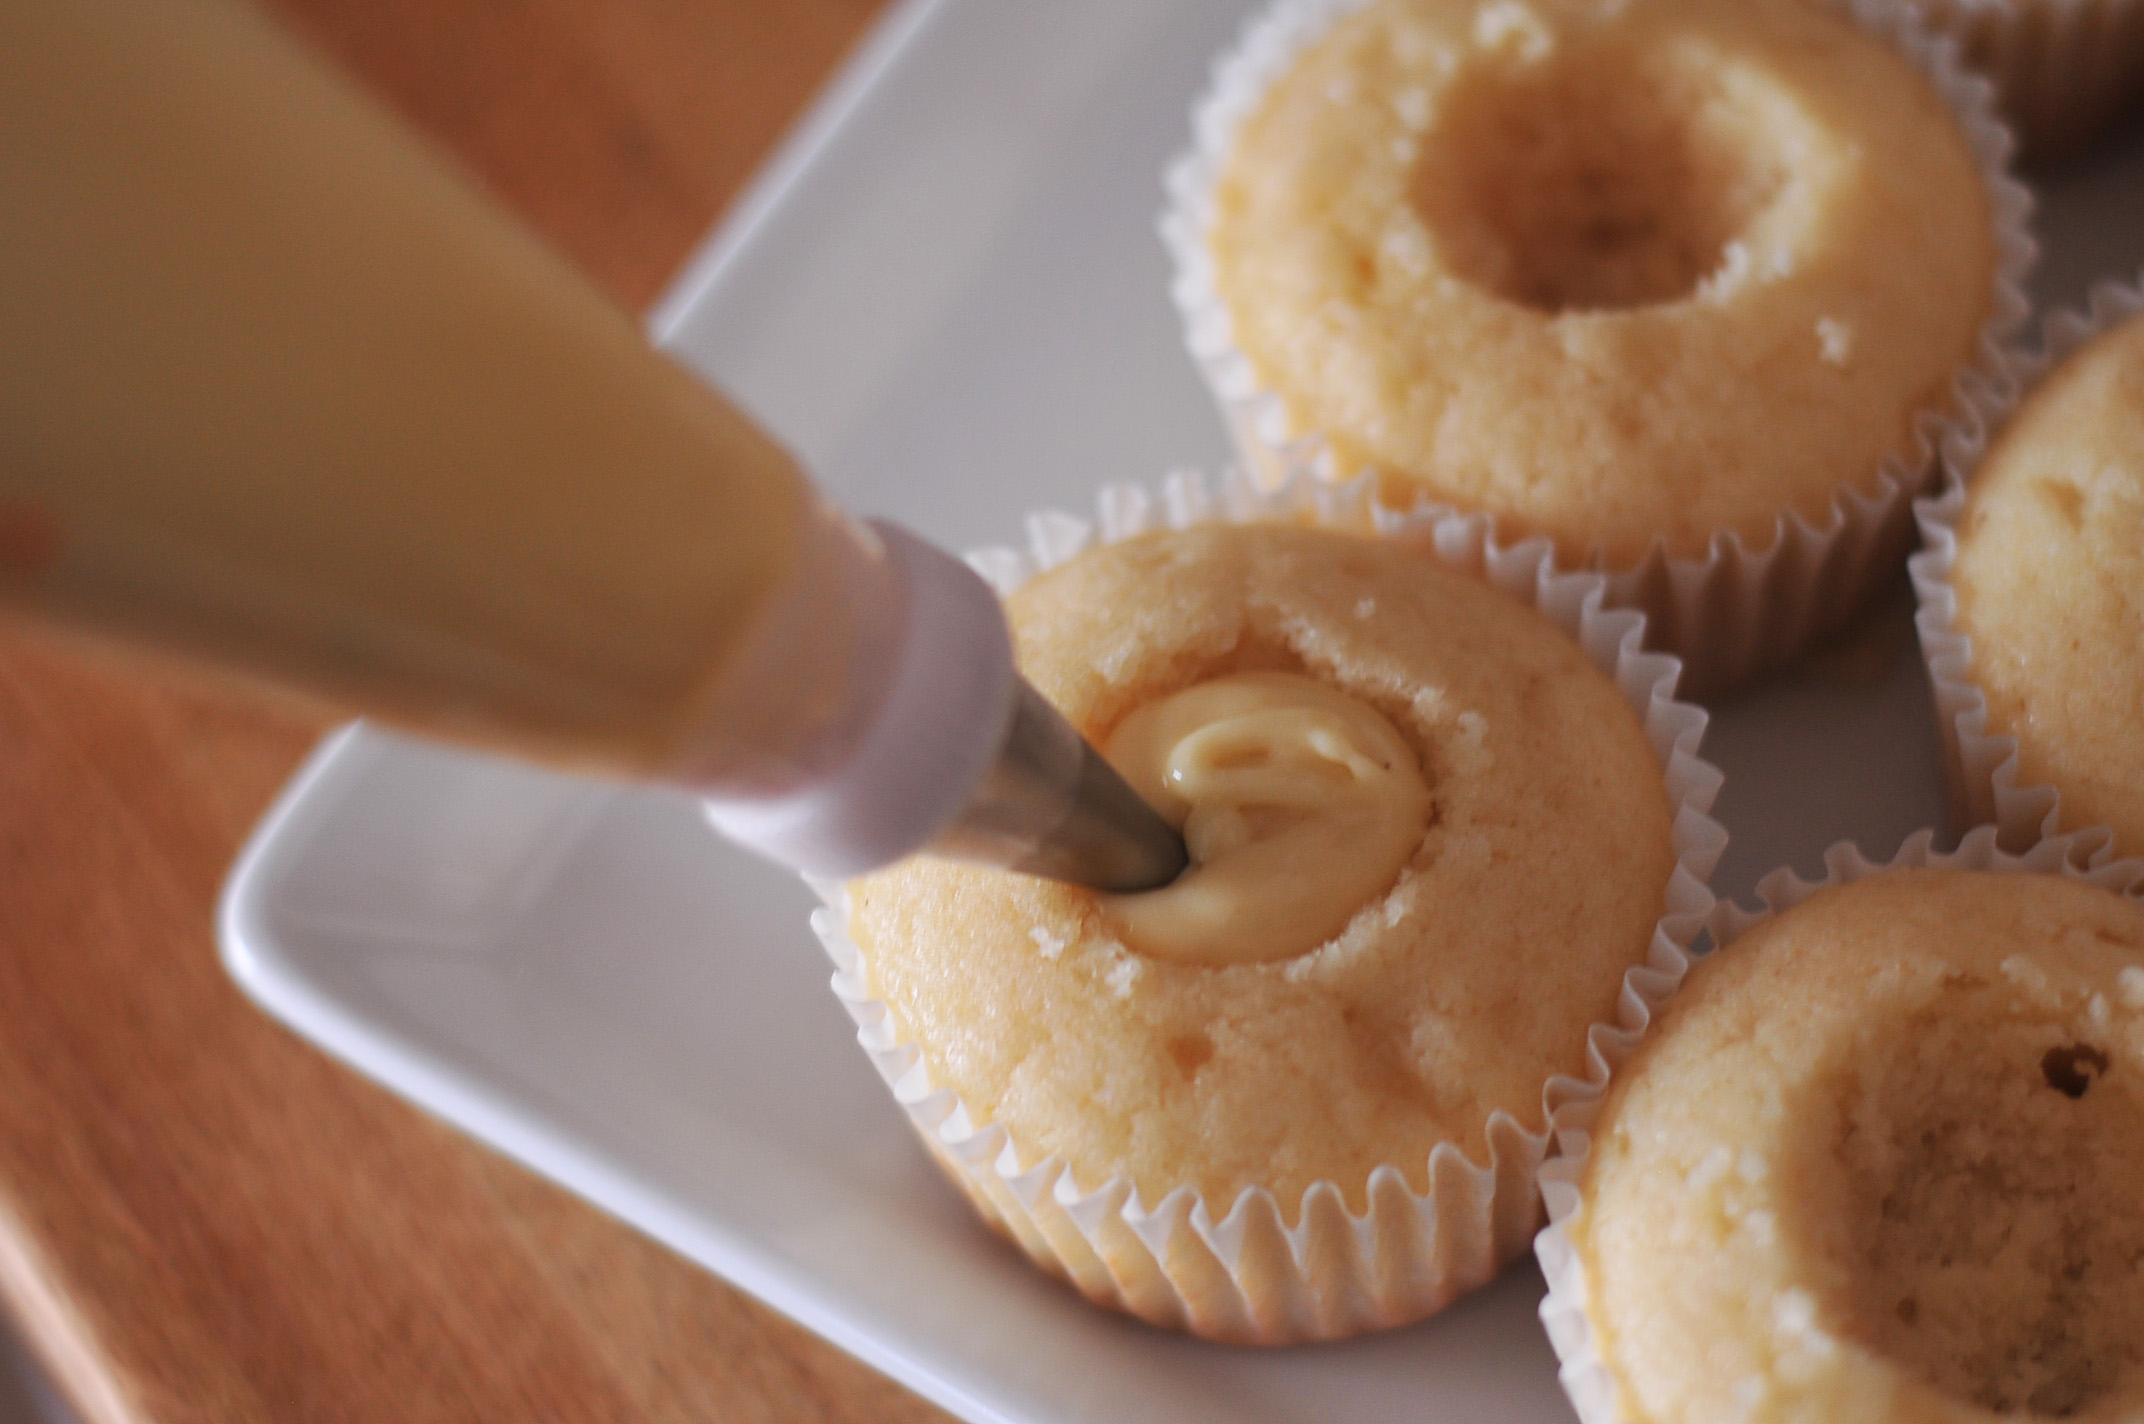
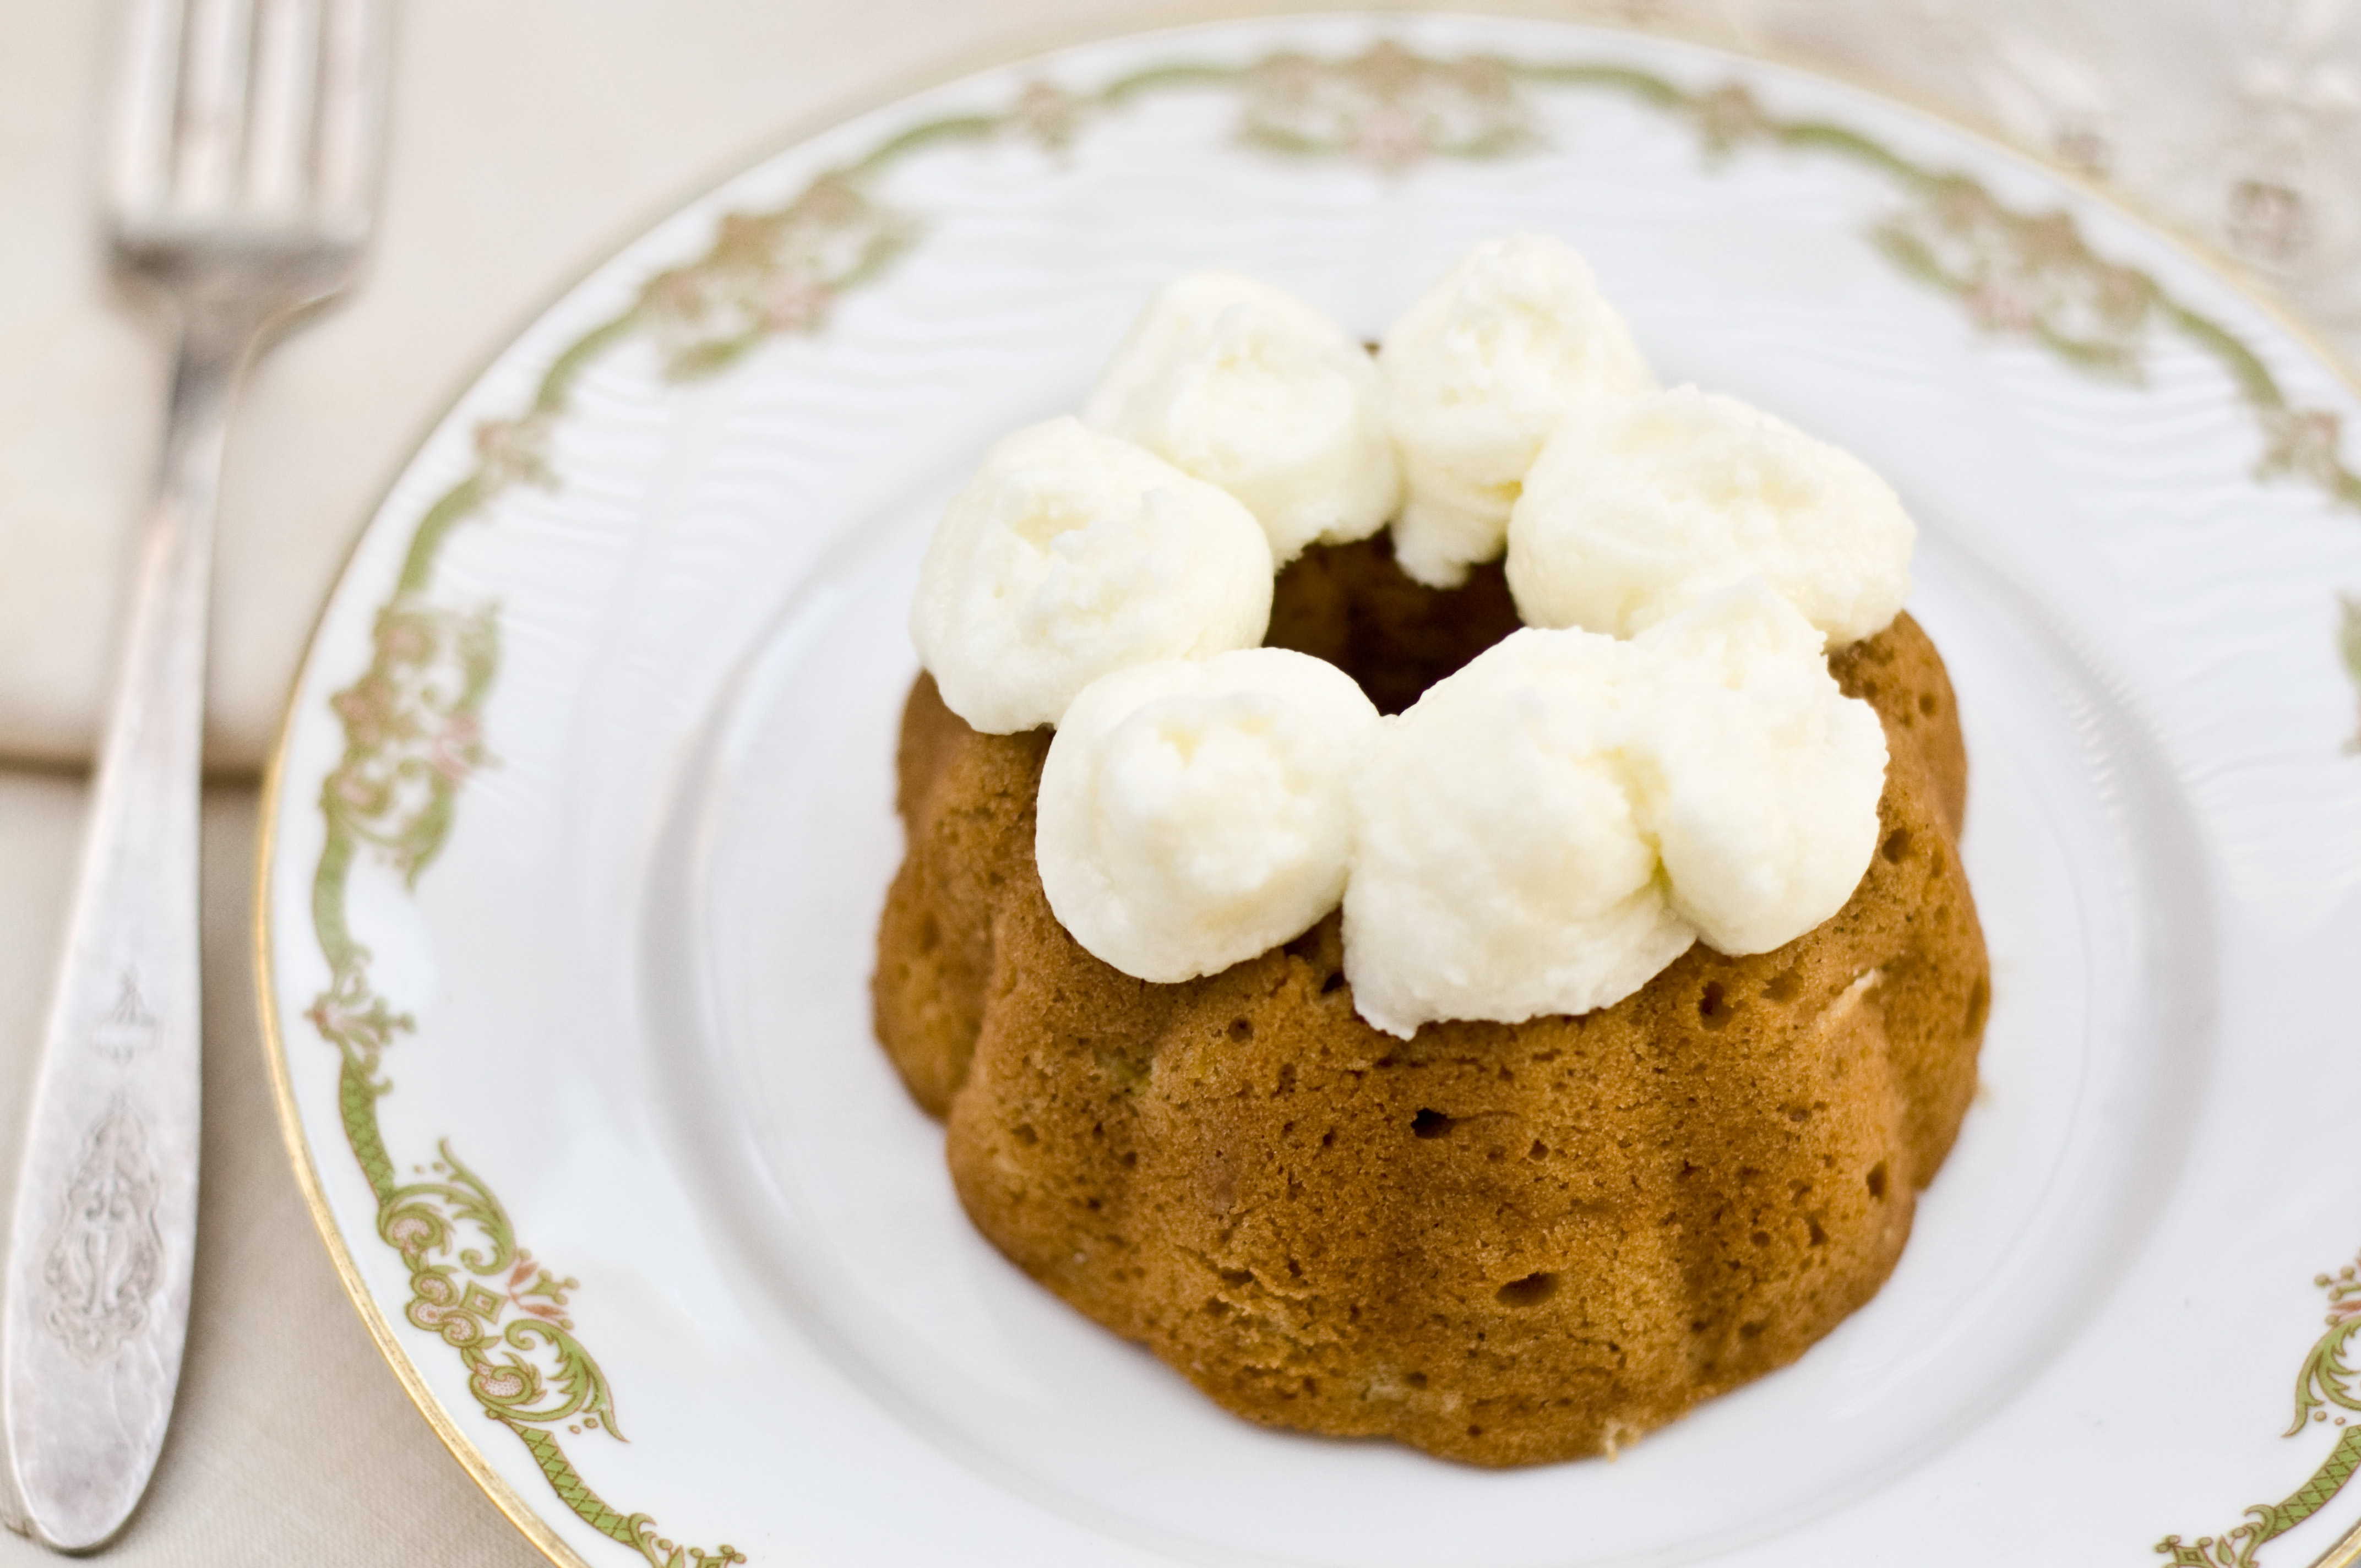
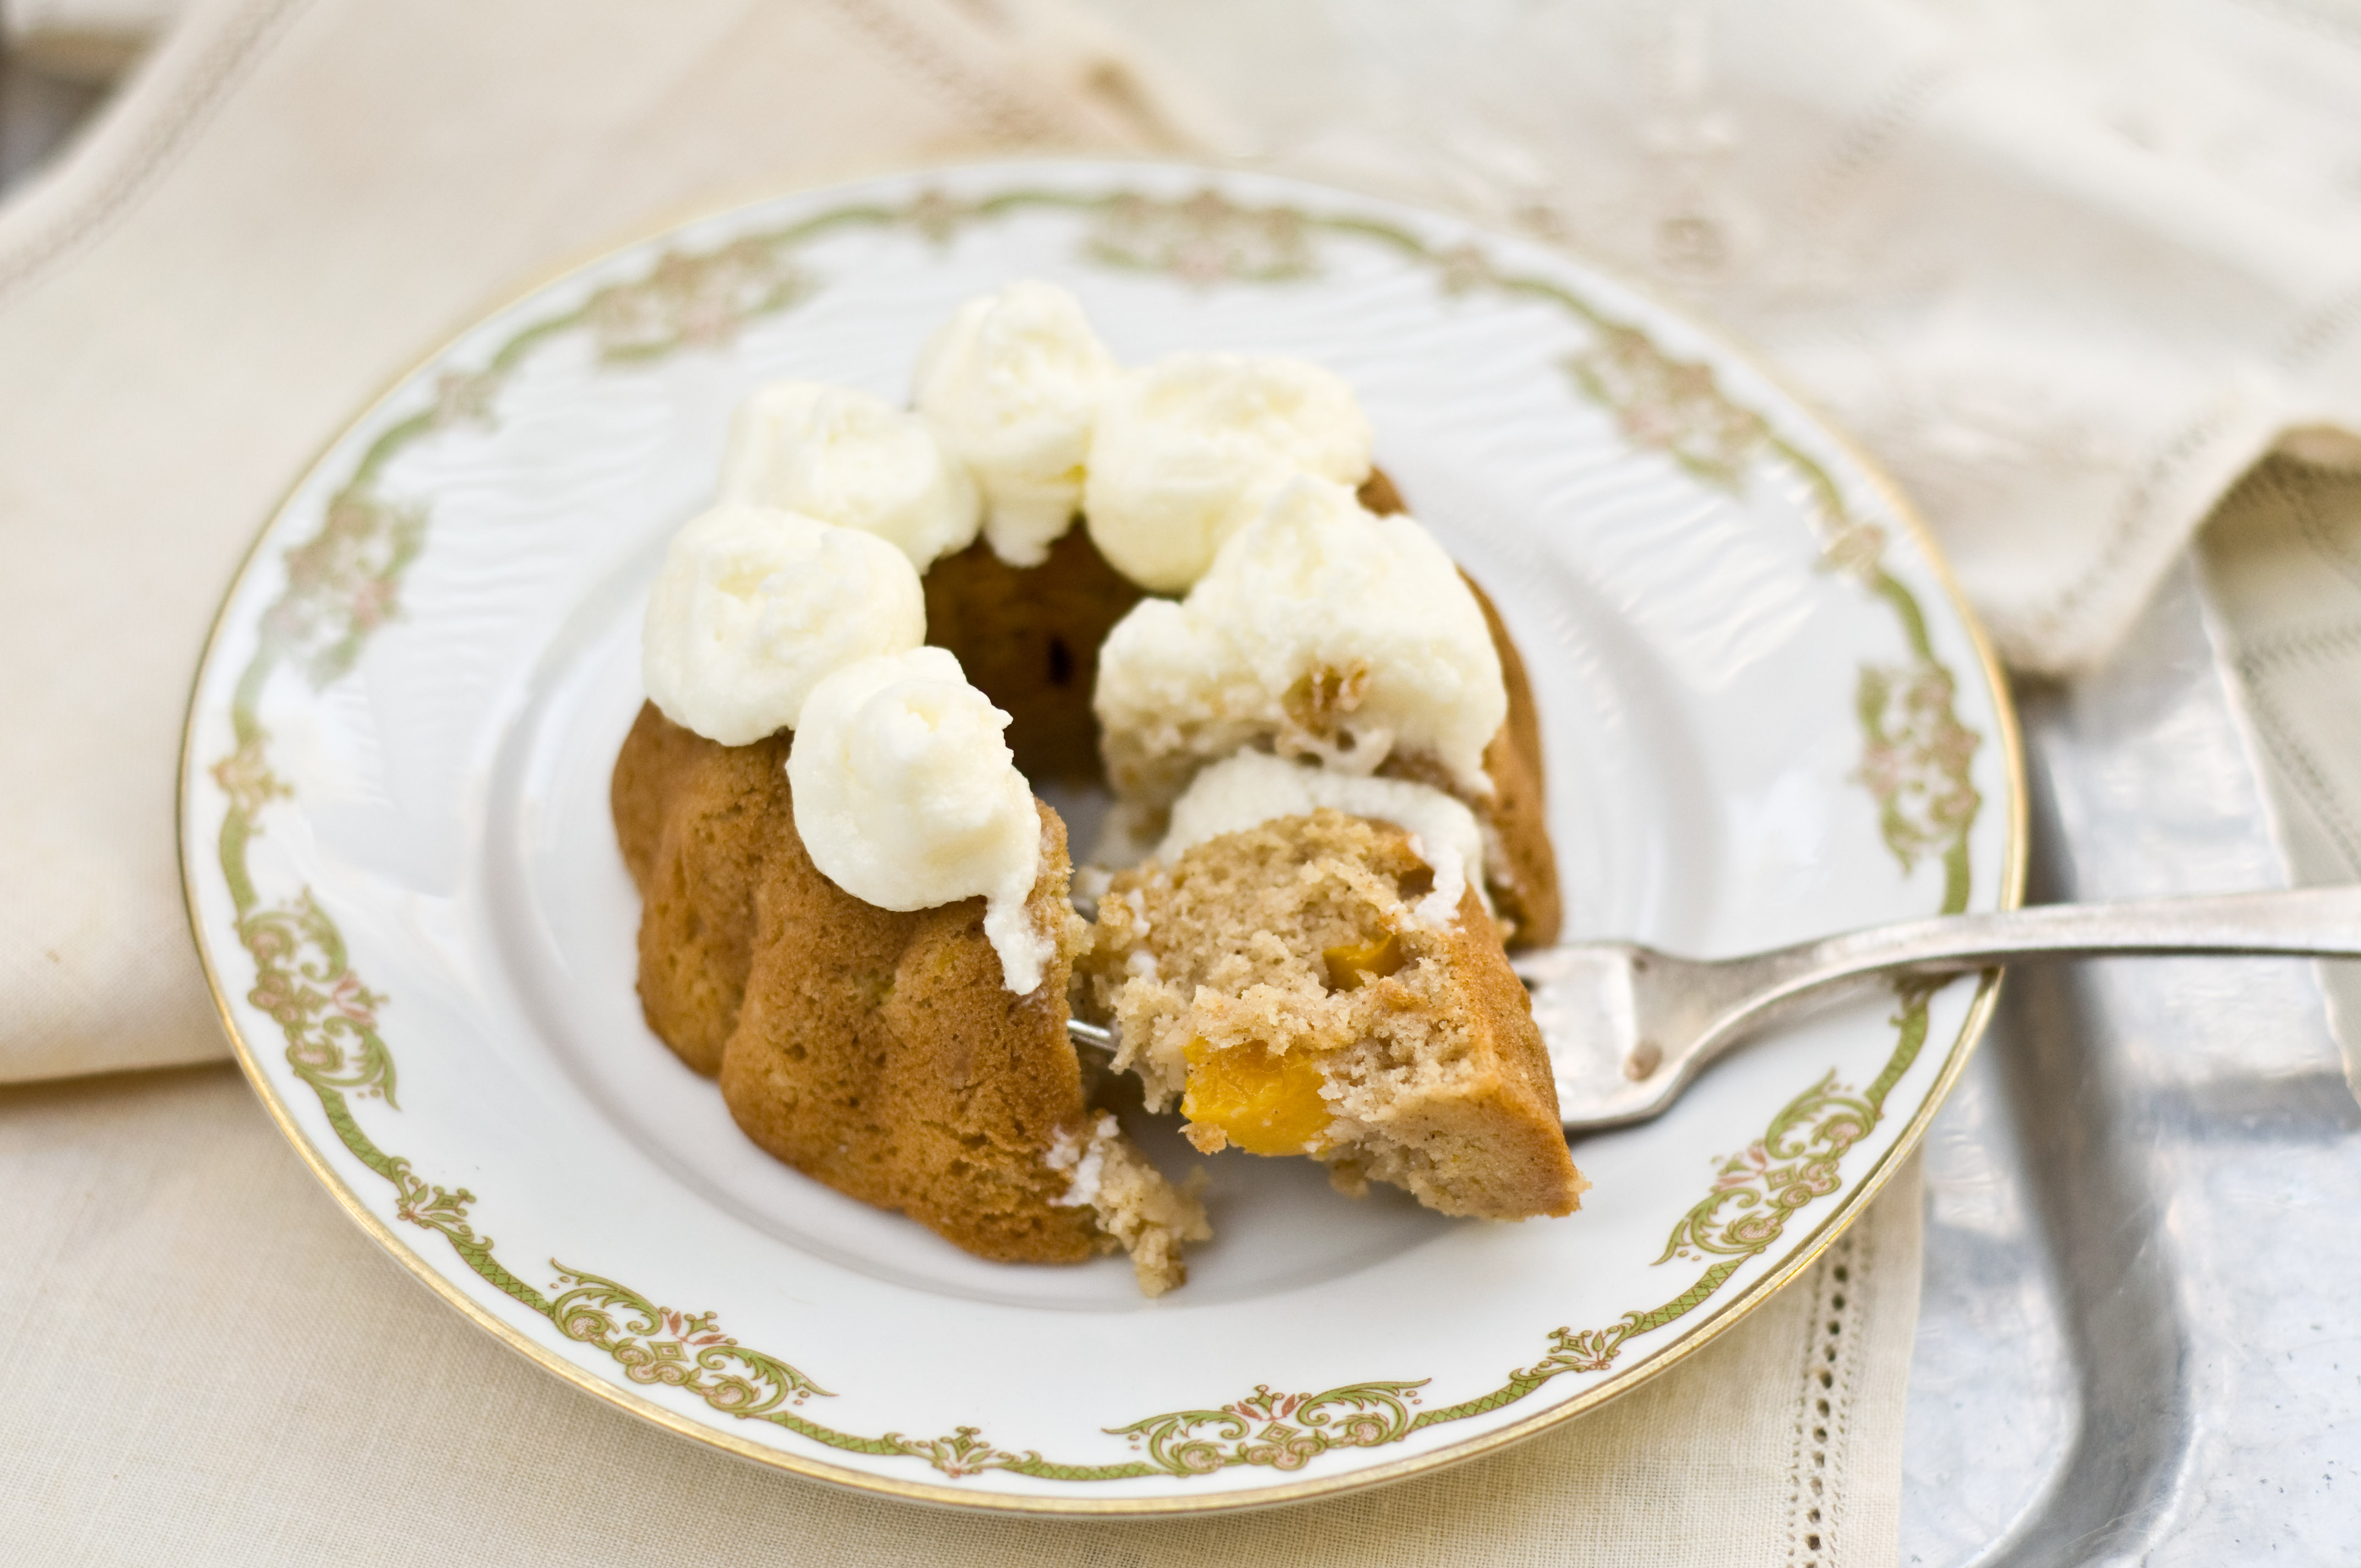
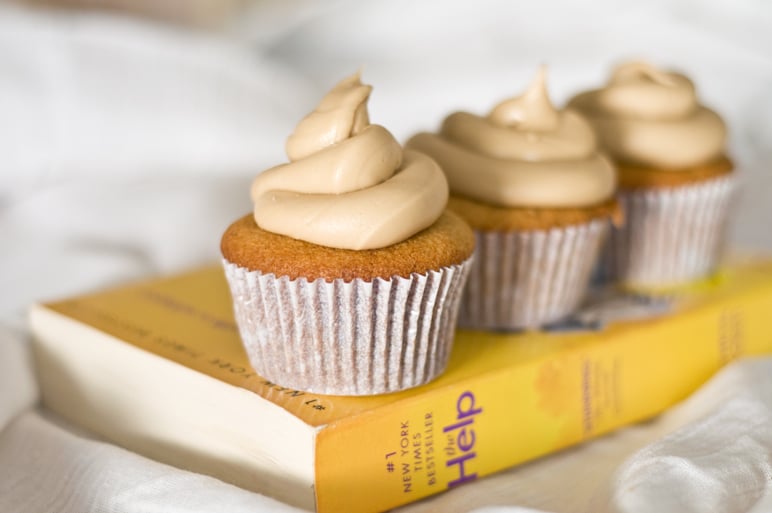
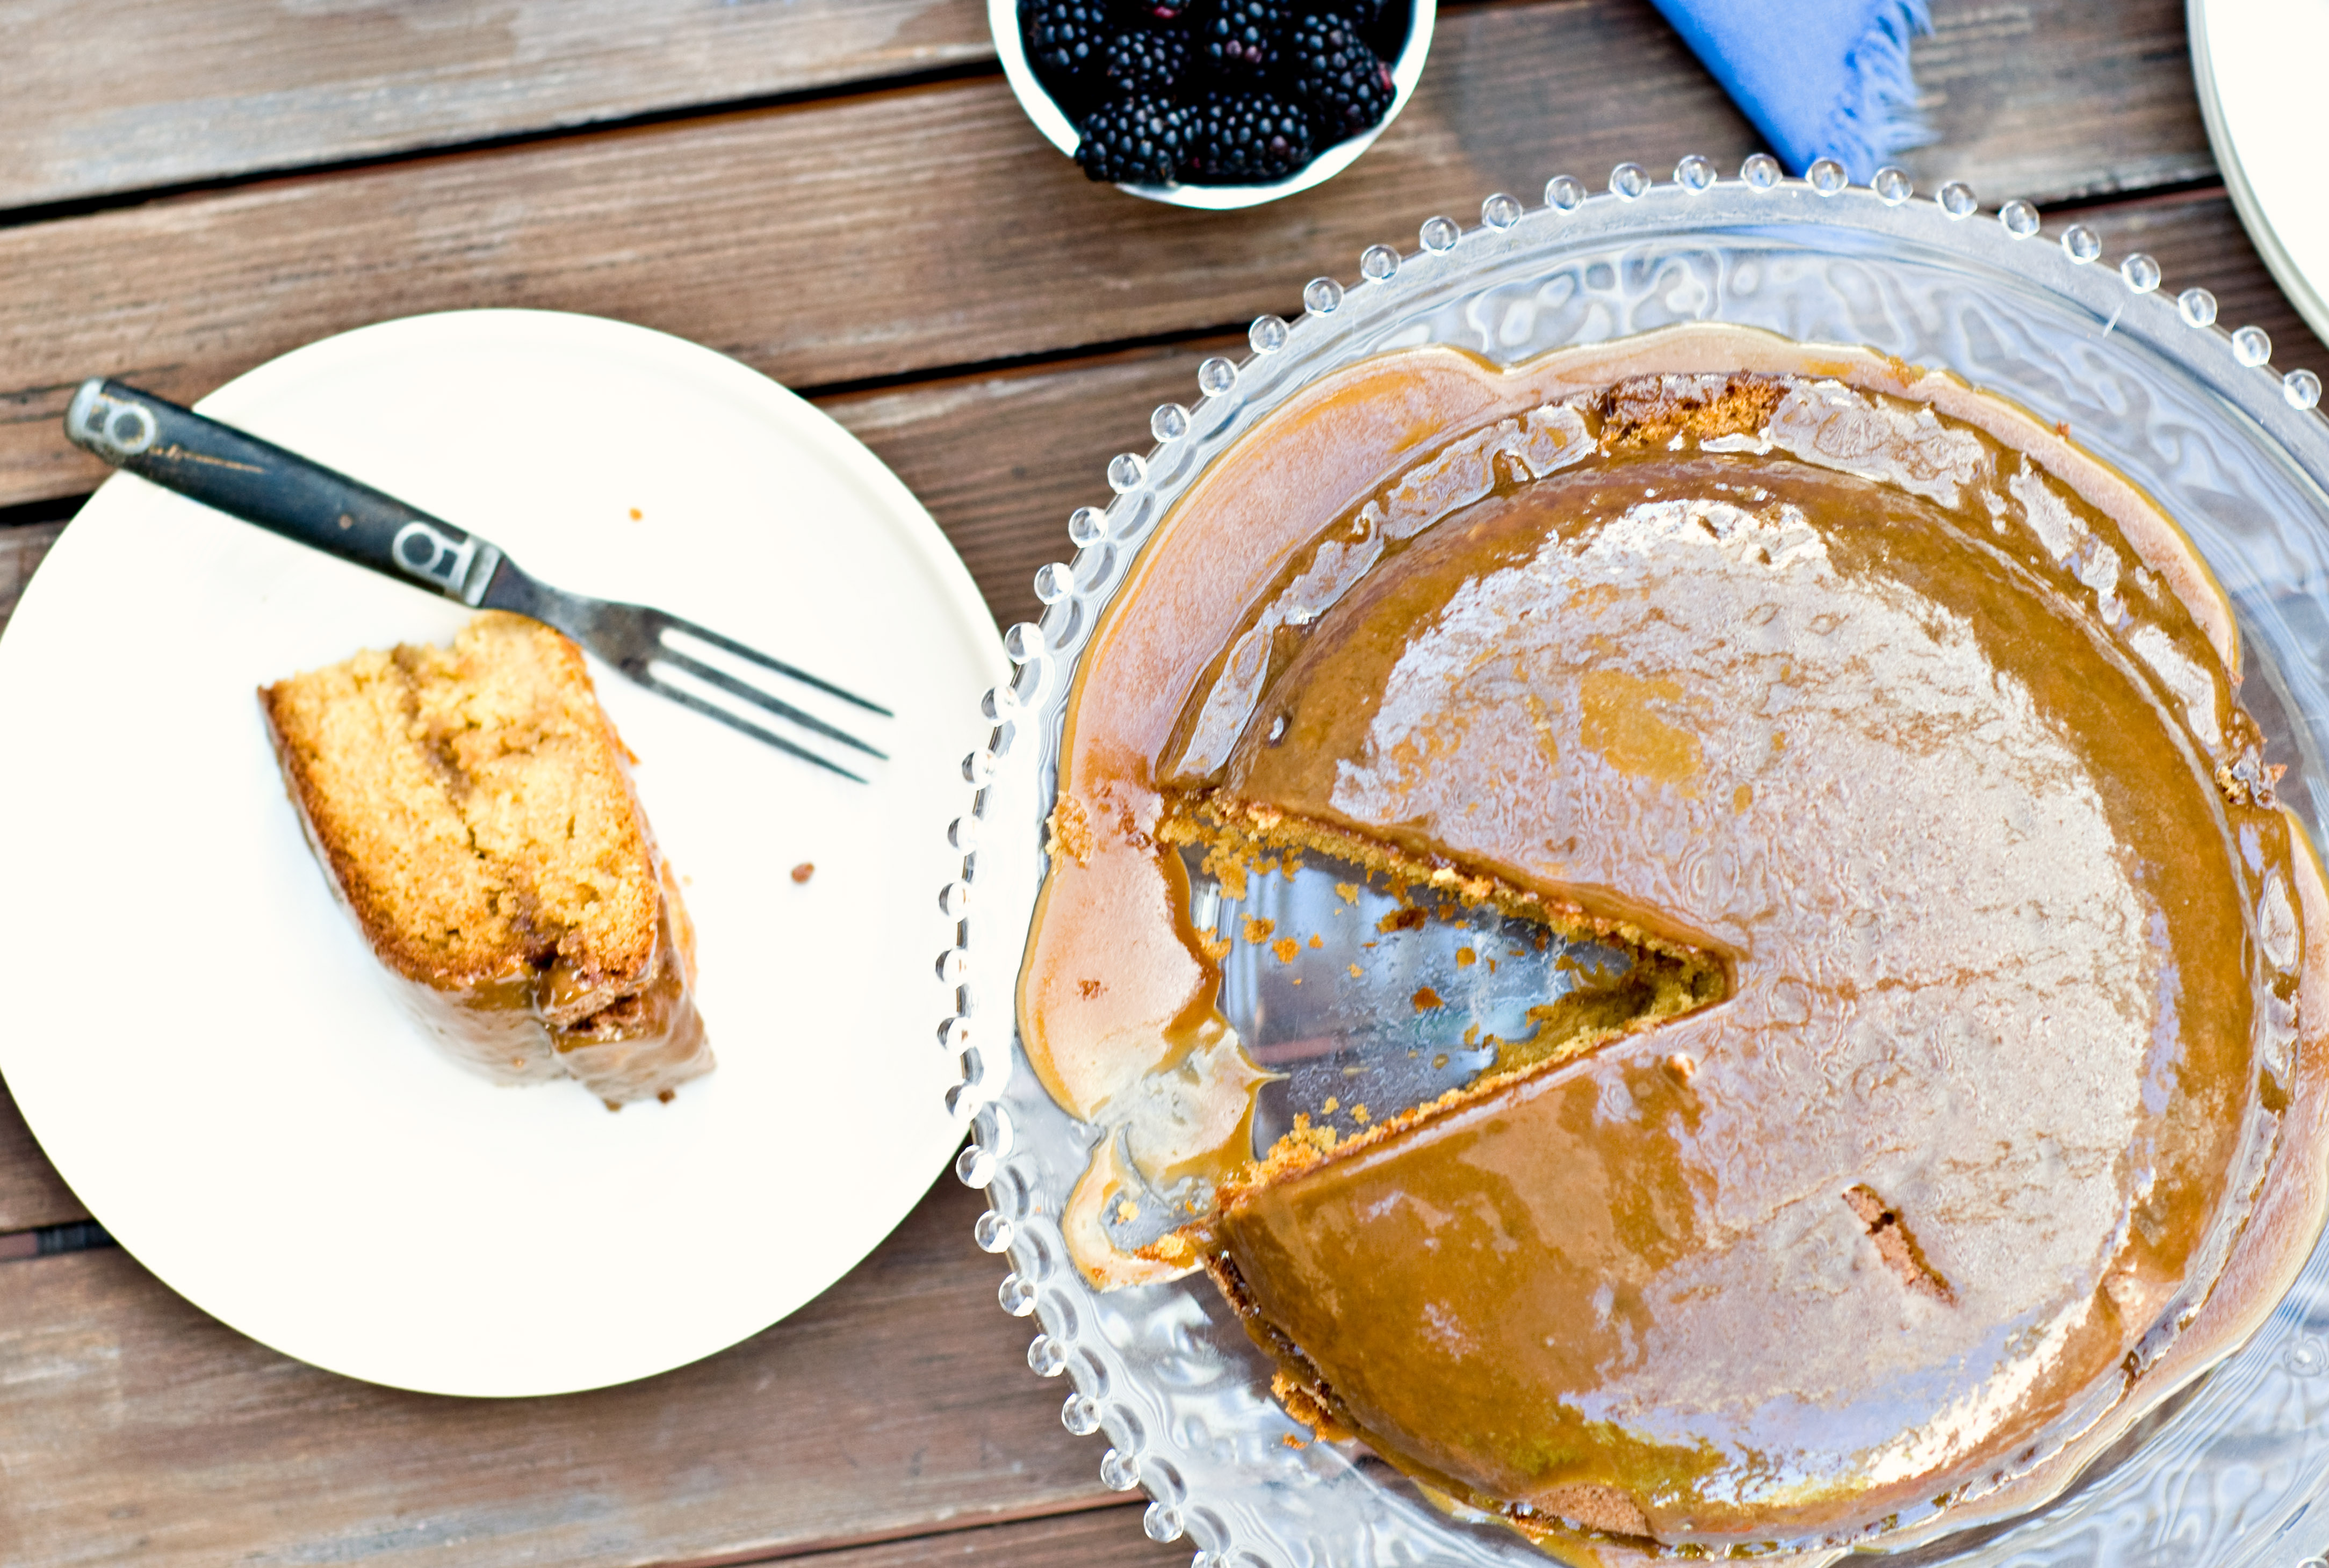
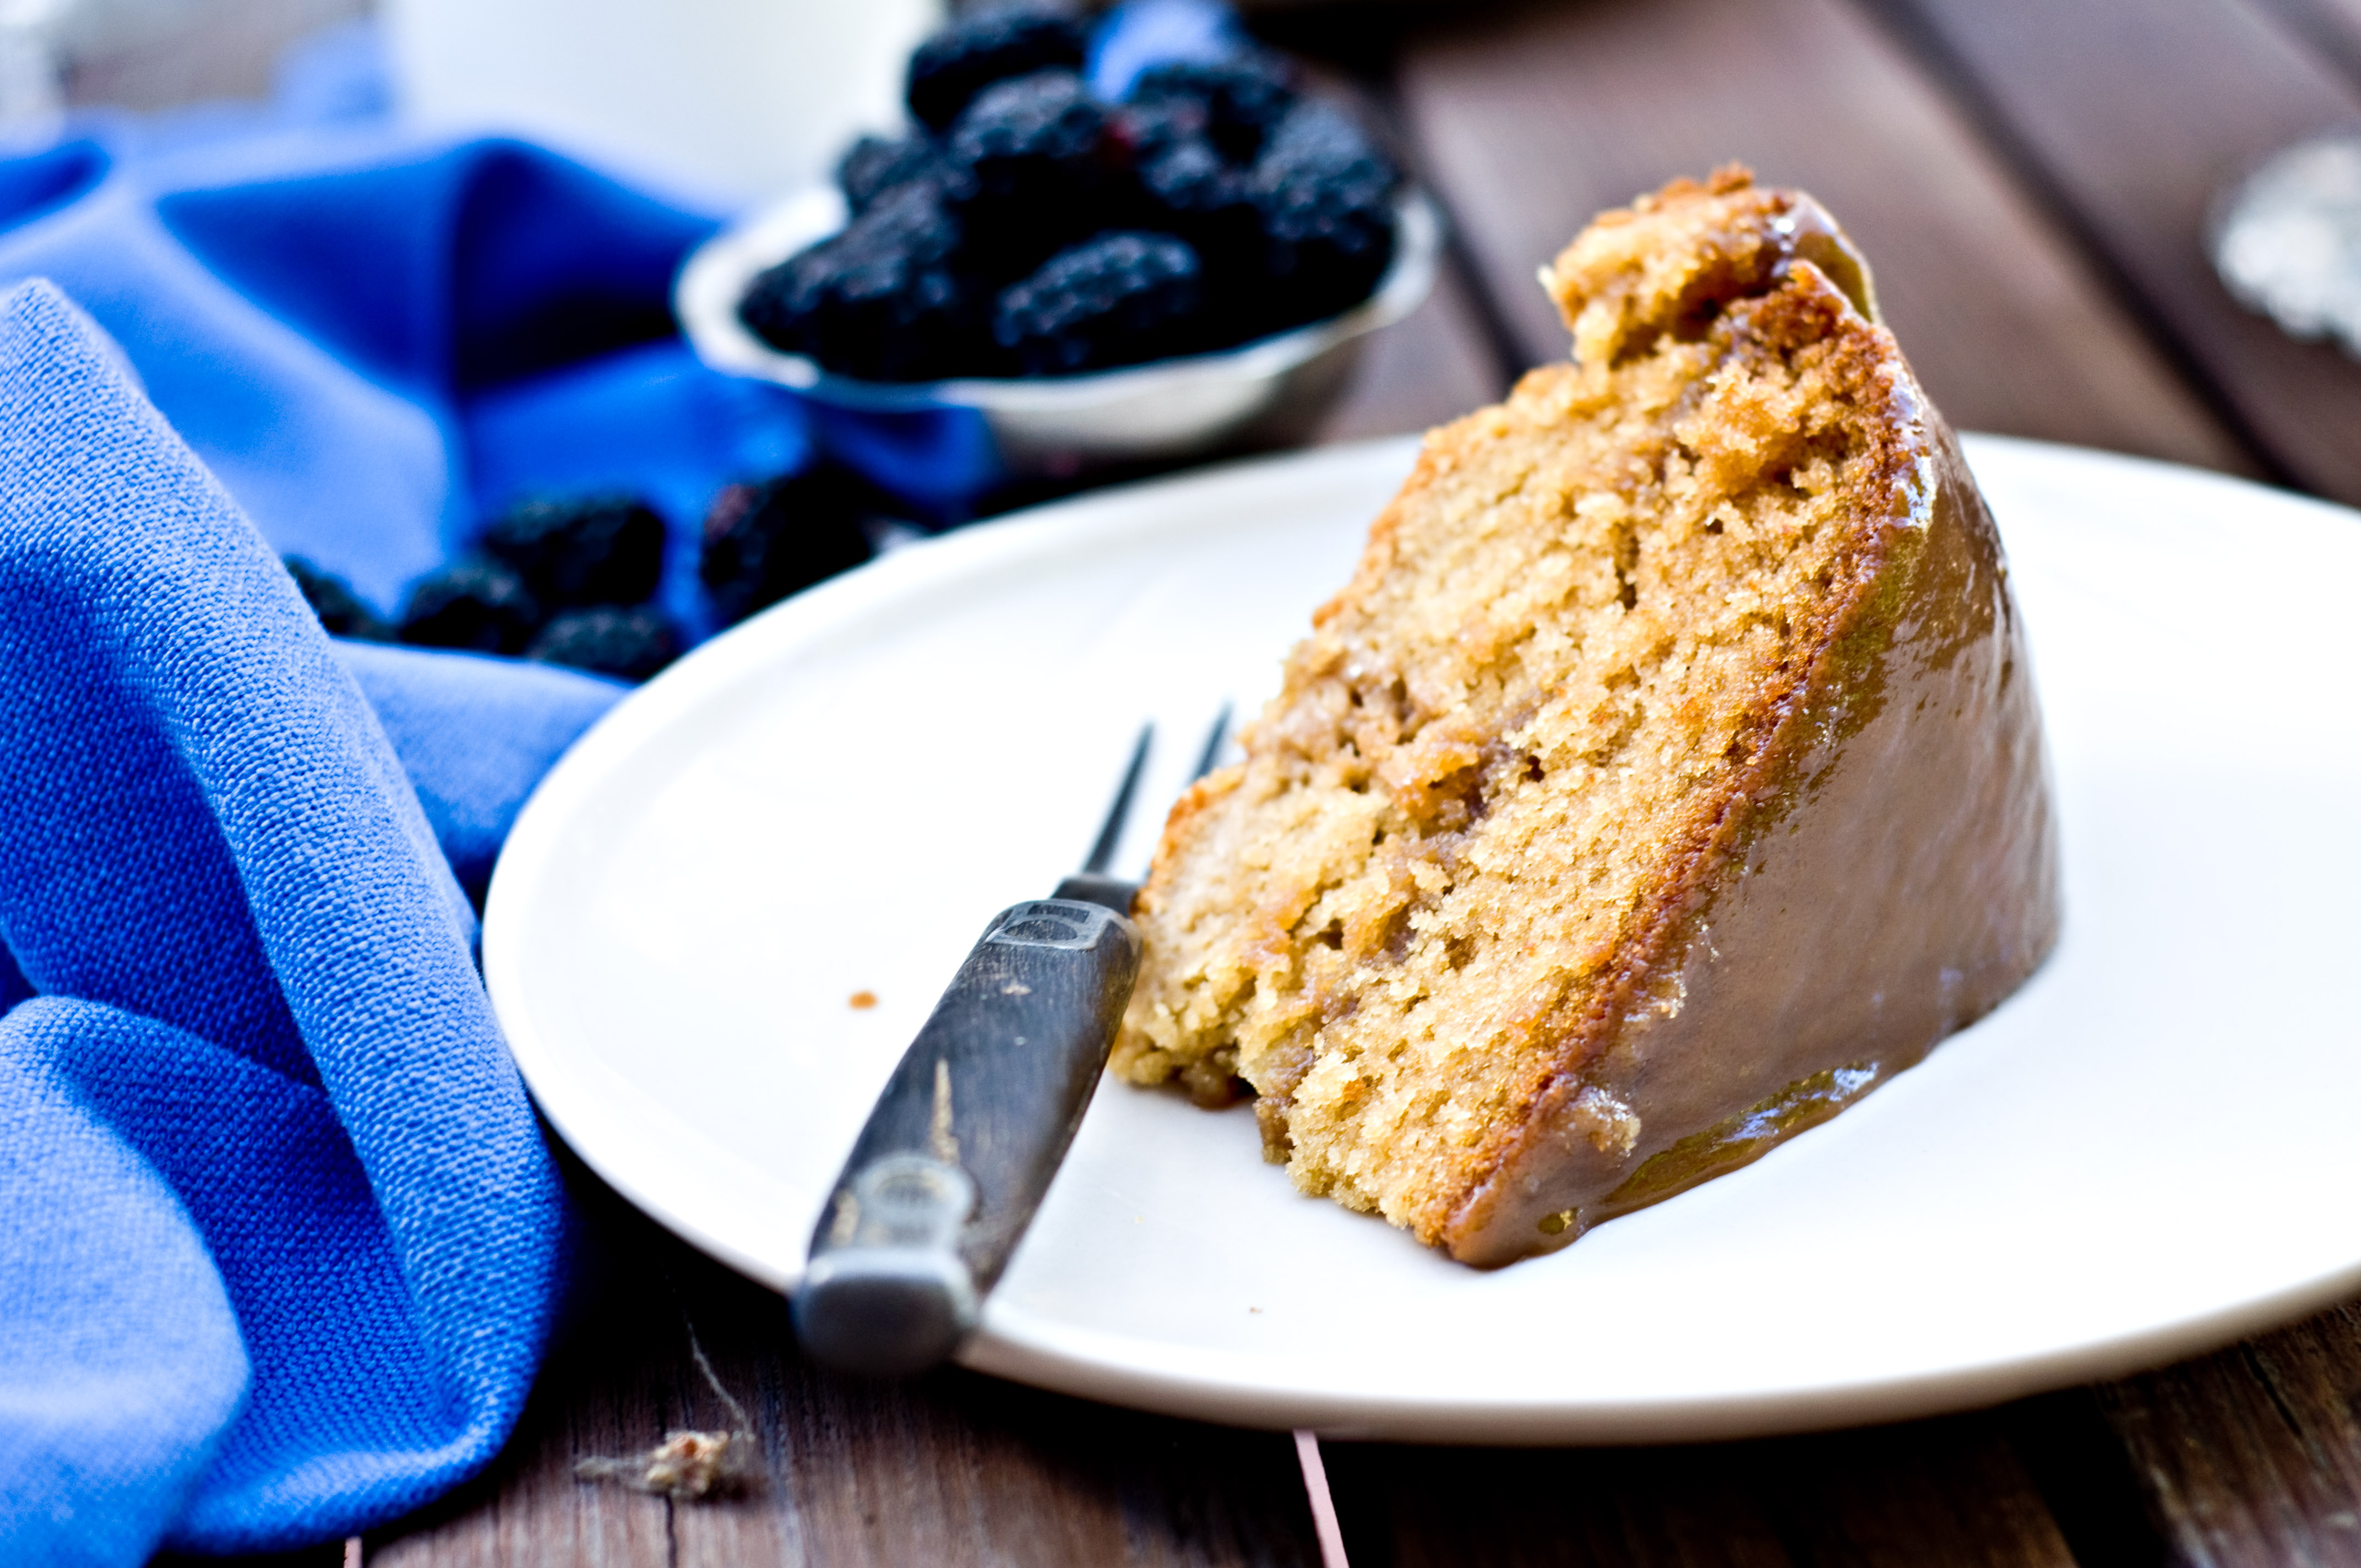
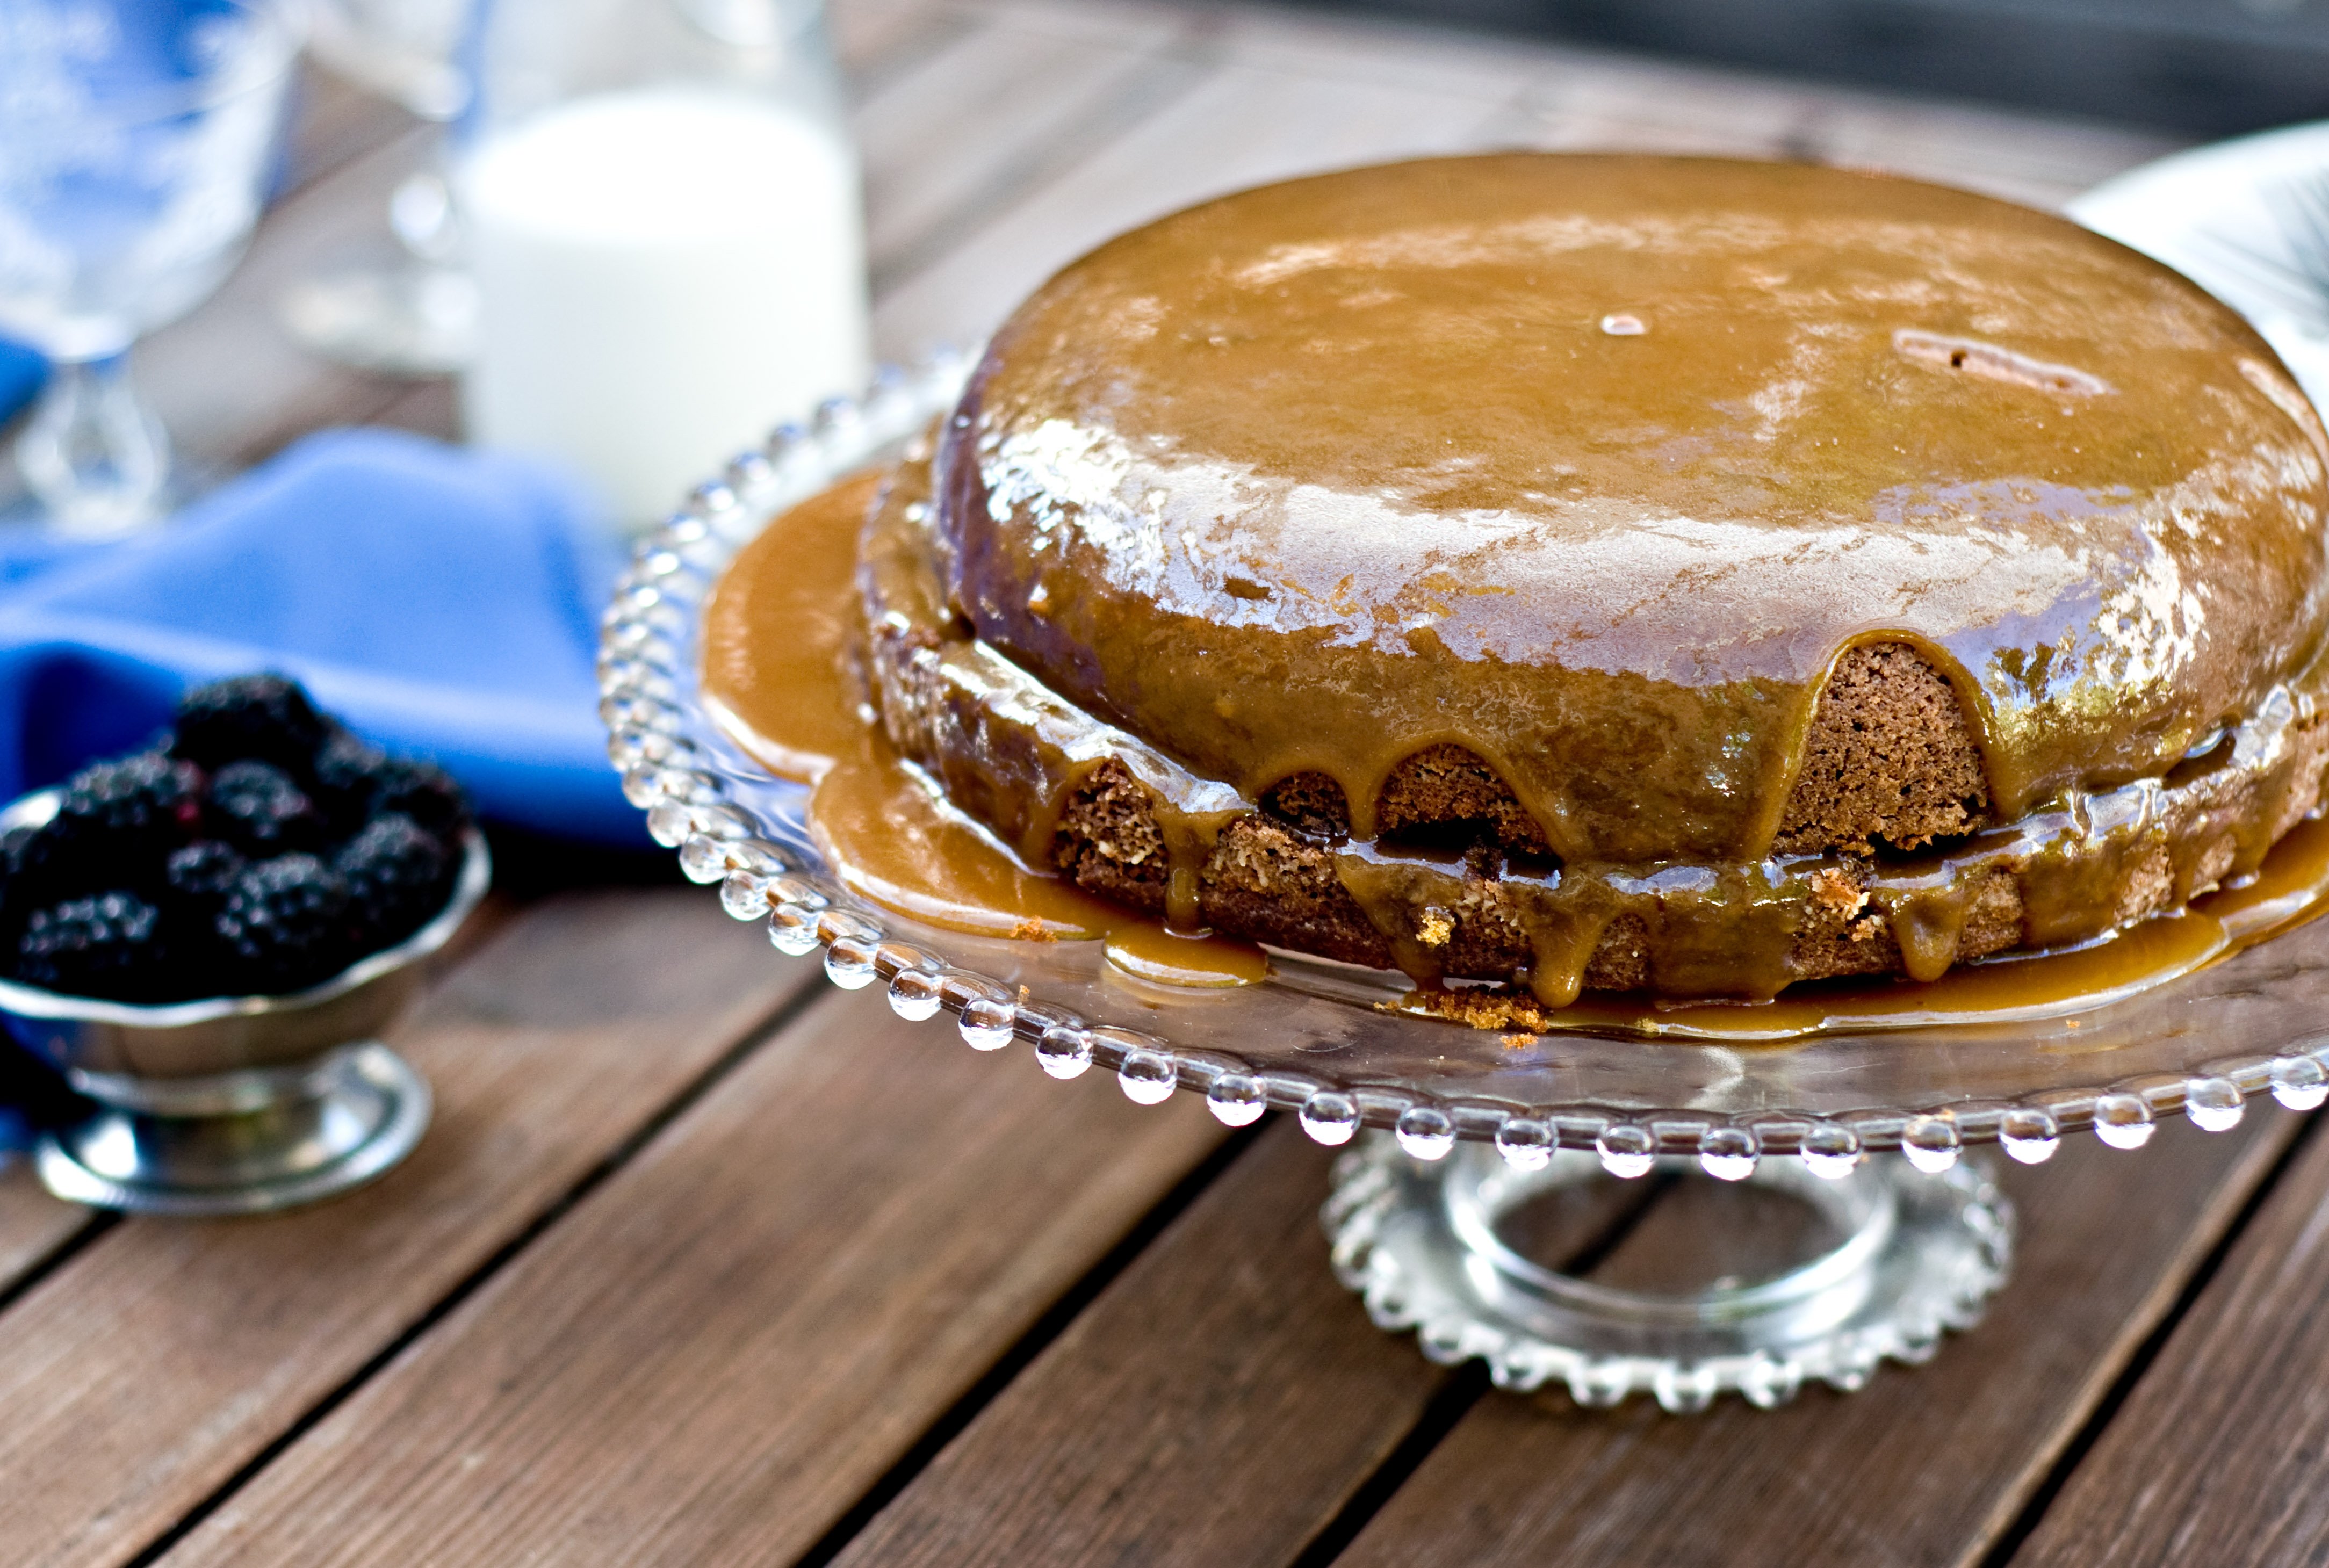
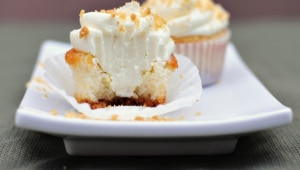
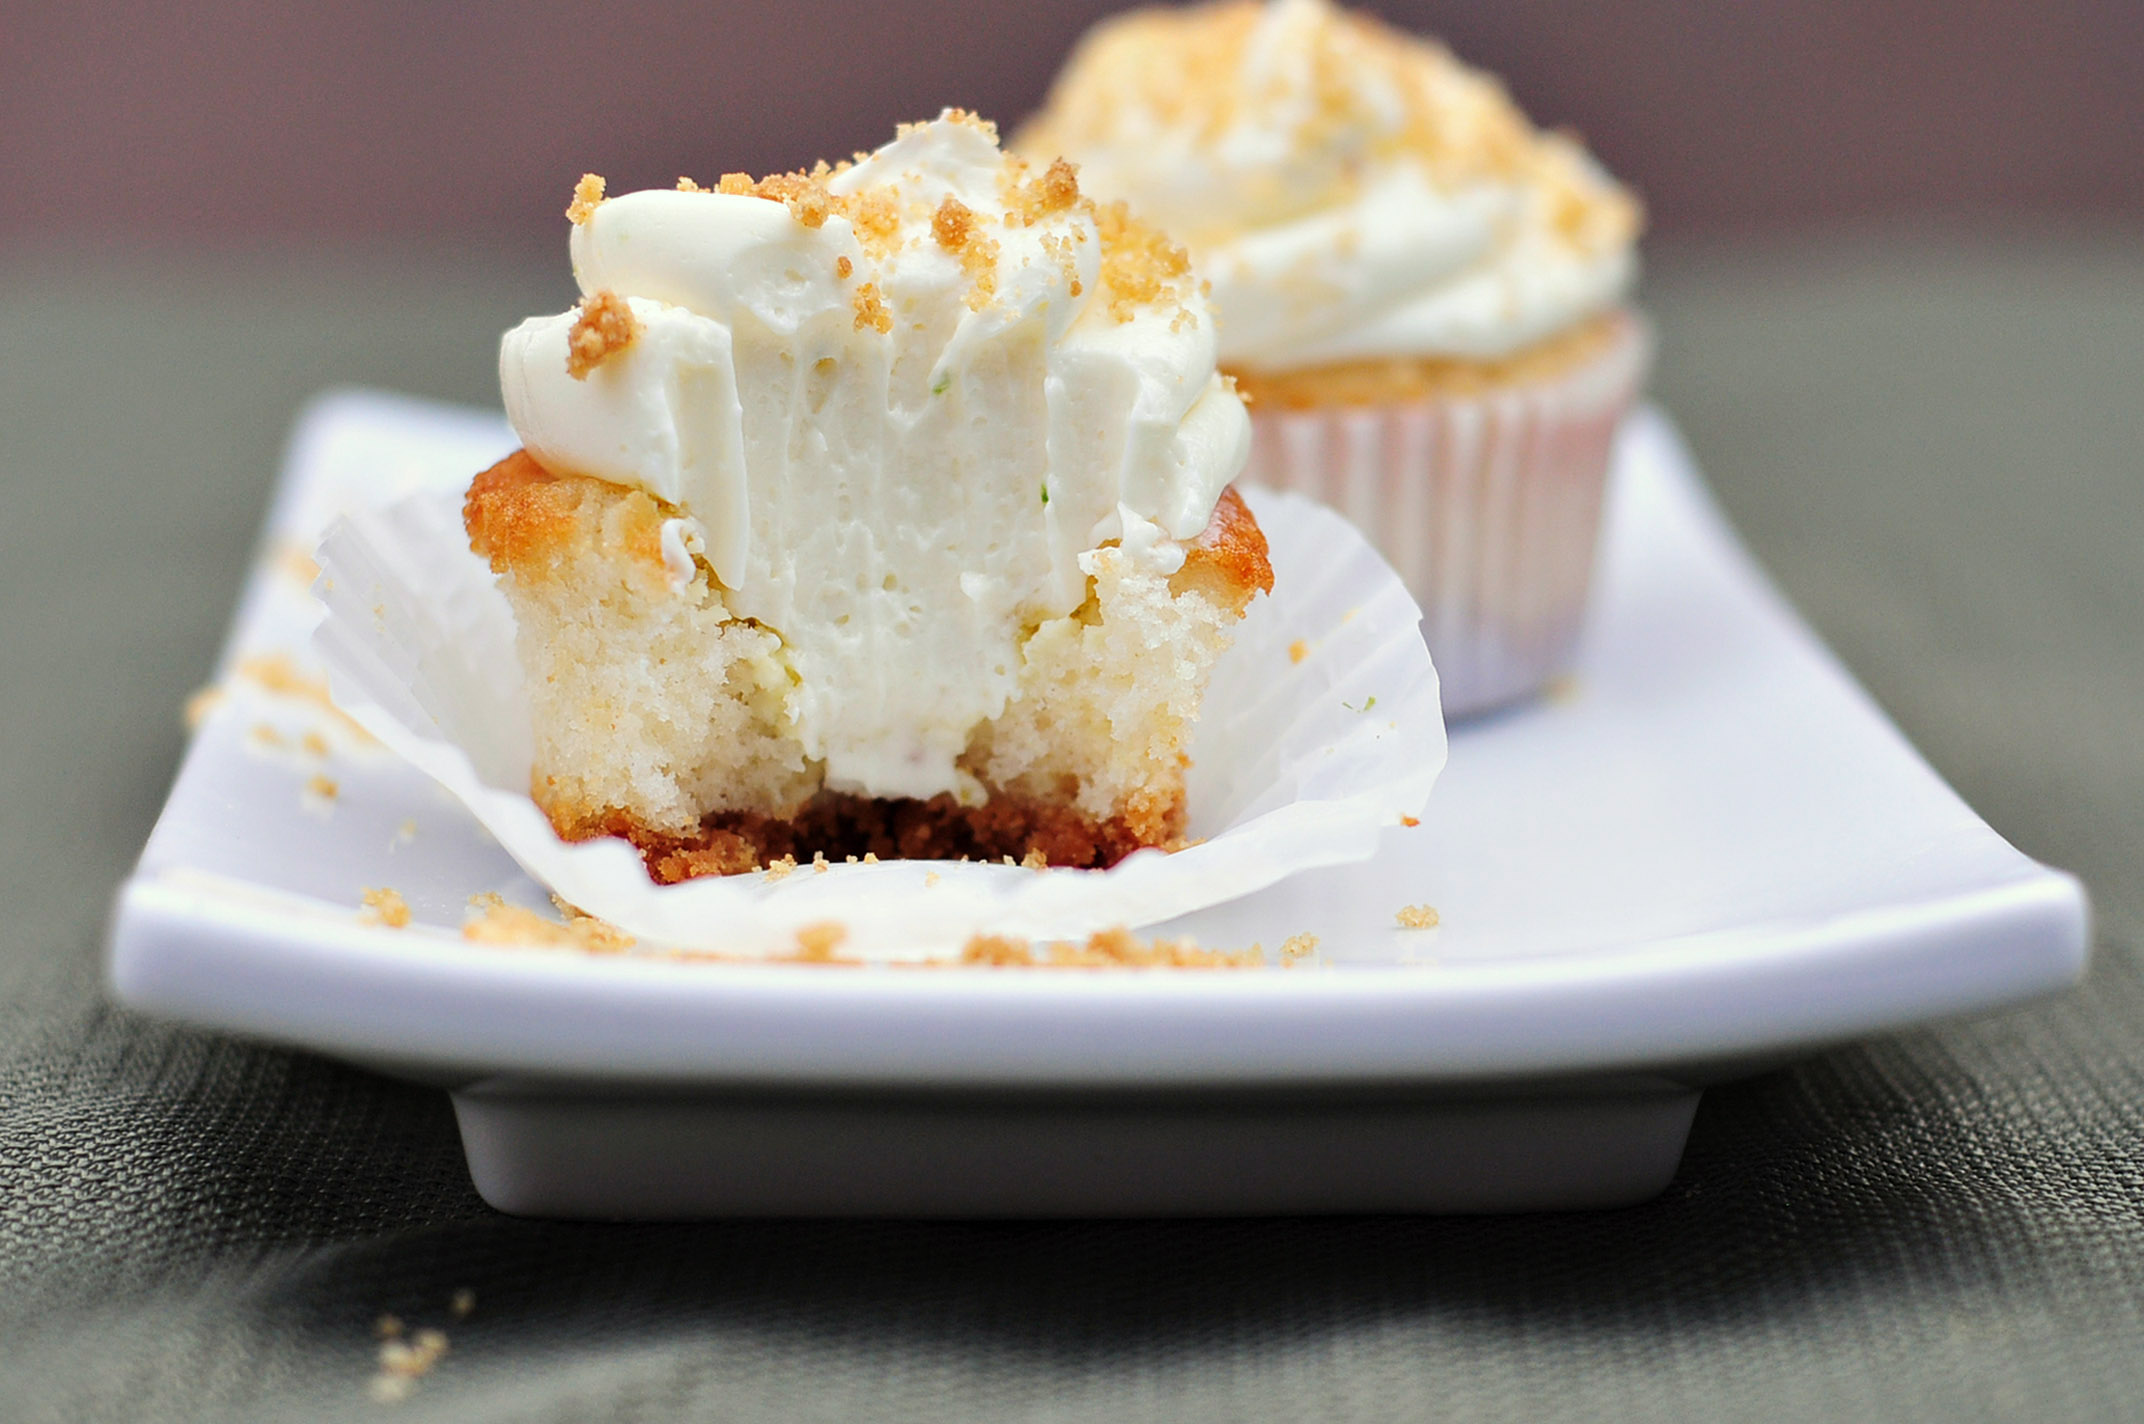
And I made a cake! Shocking, I know. It was a white cake with a vanilla pastry cream filling and a brown sugar buttercream frosting. I used the same cake batter recipe I used for these cupcakes, the same  frosting as with these cupcakes (the NON-beer version) and I decided to post a How To on making pastry cream because that dang cream was so good it was the true star of the cake. I made the peas in a pod out of fondant and doughnut holes, and brushed them with luster dust.

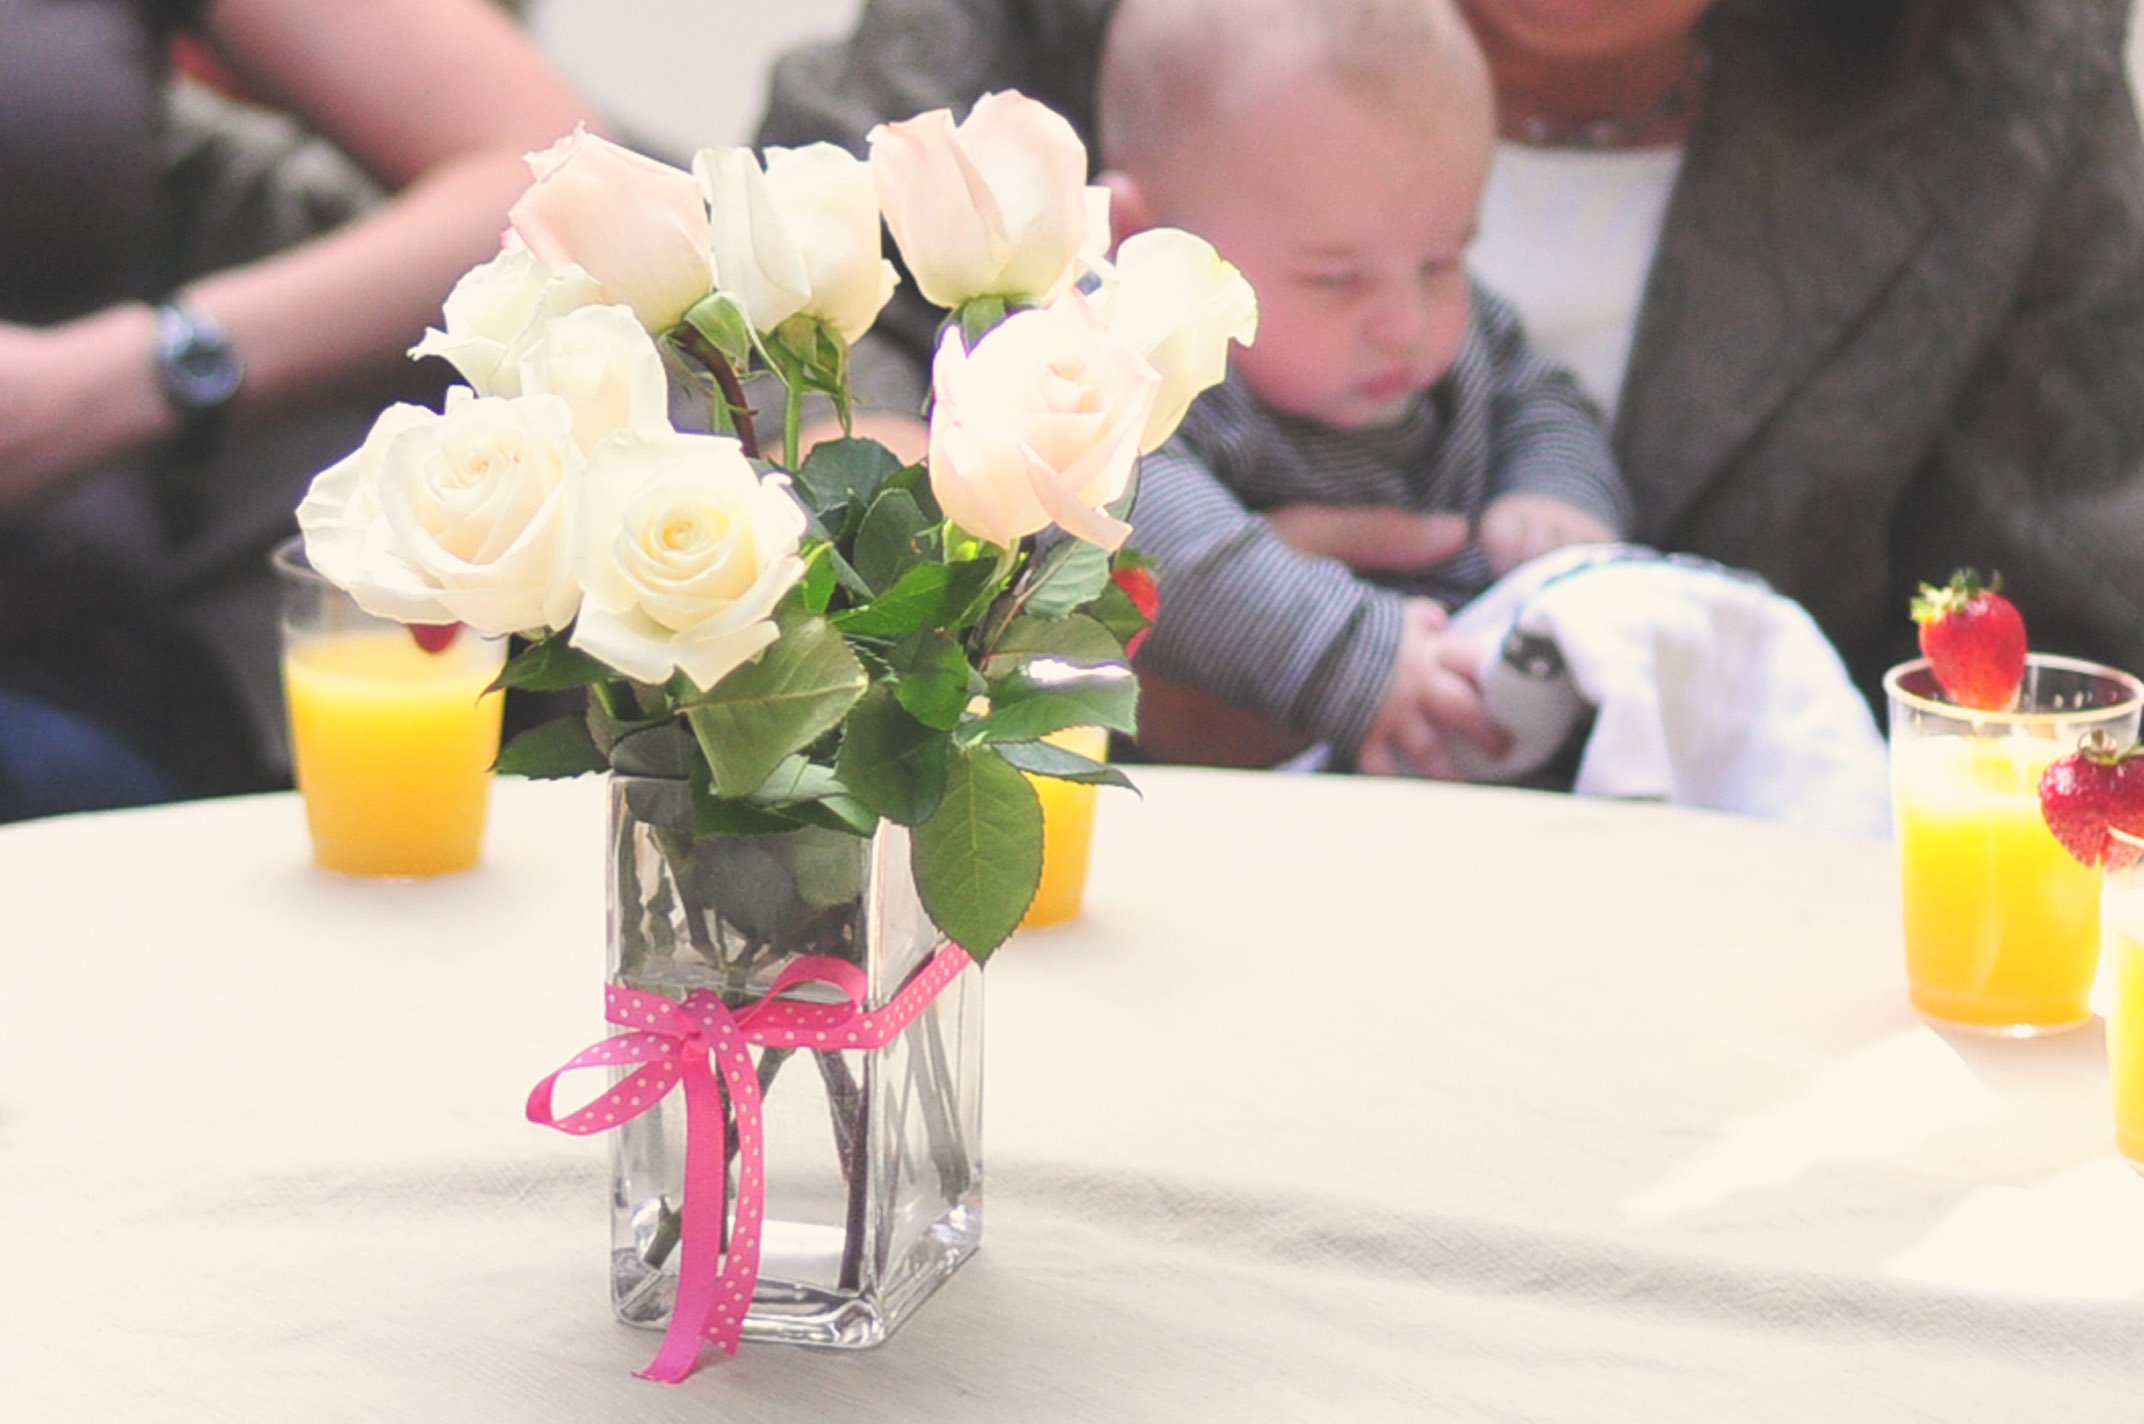
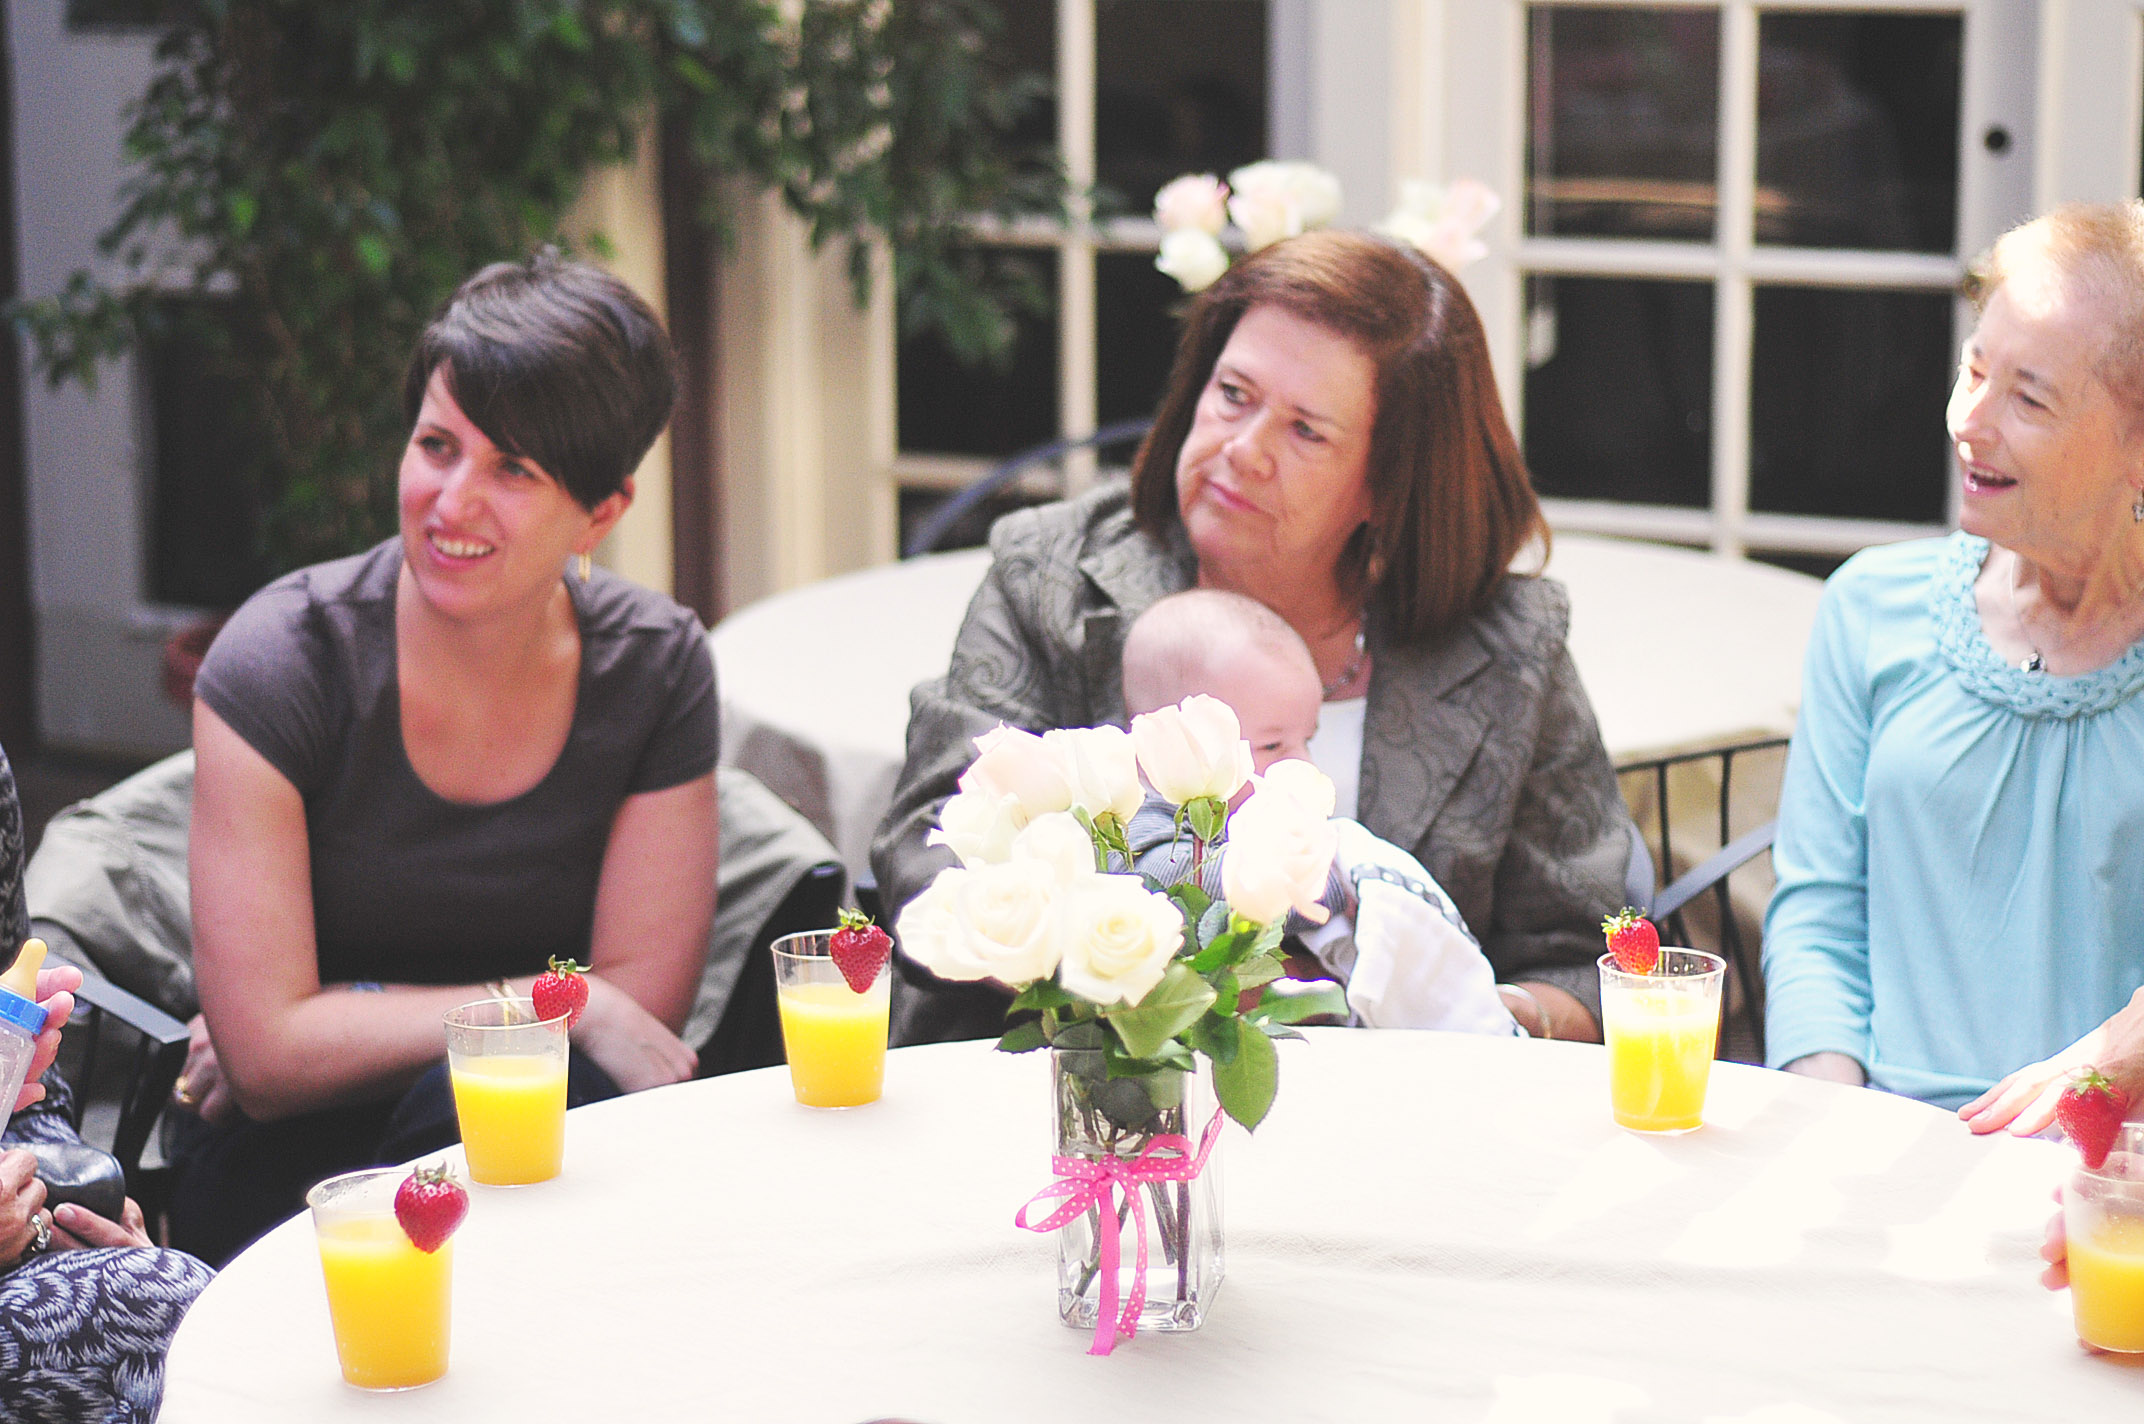
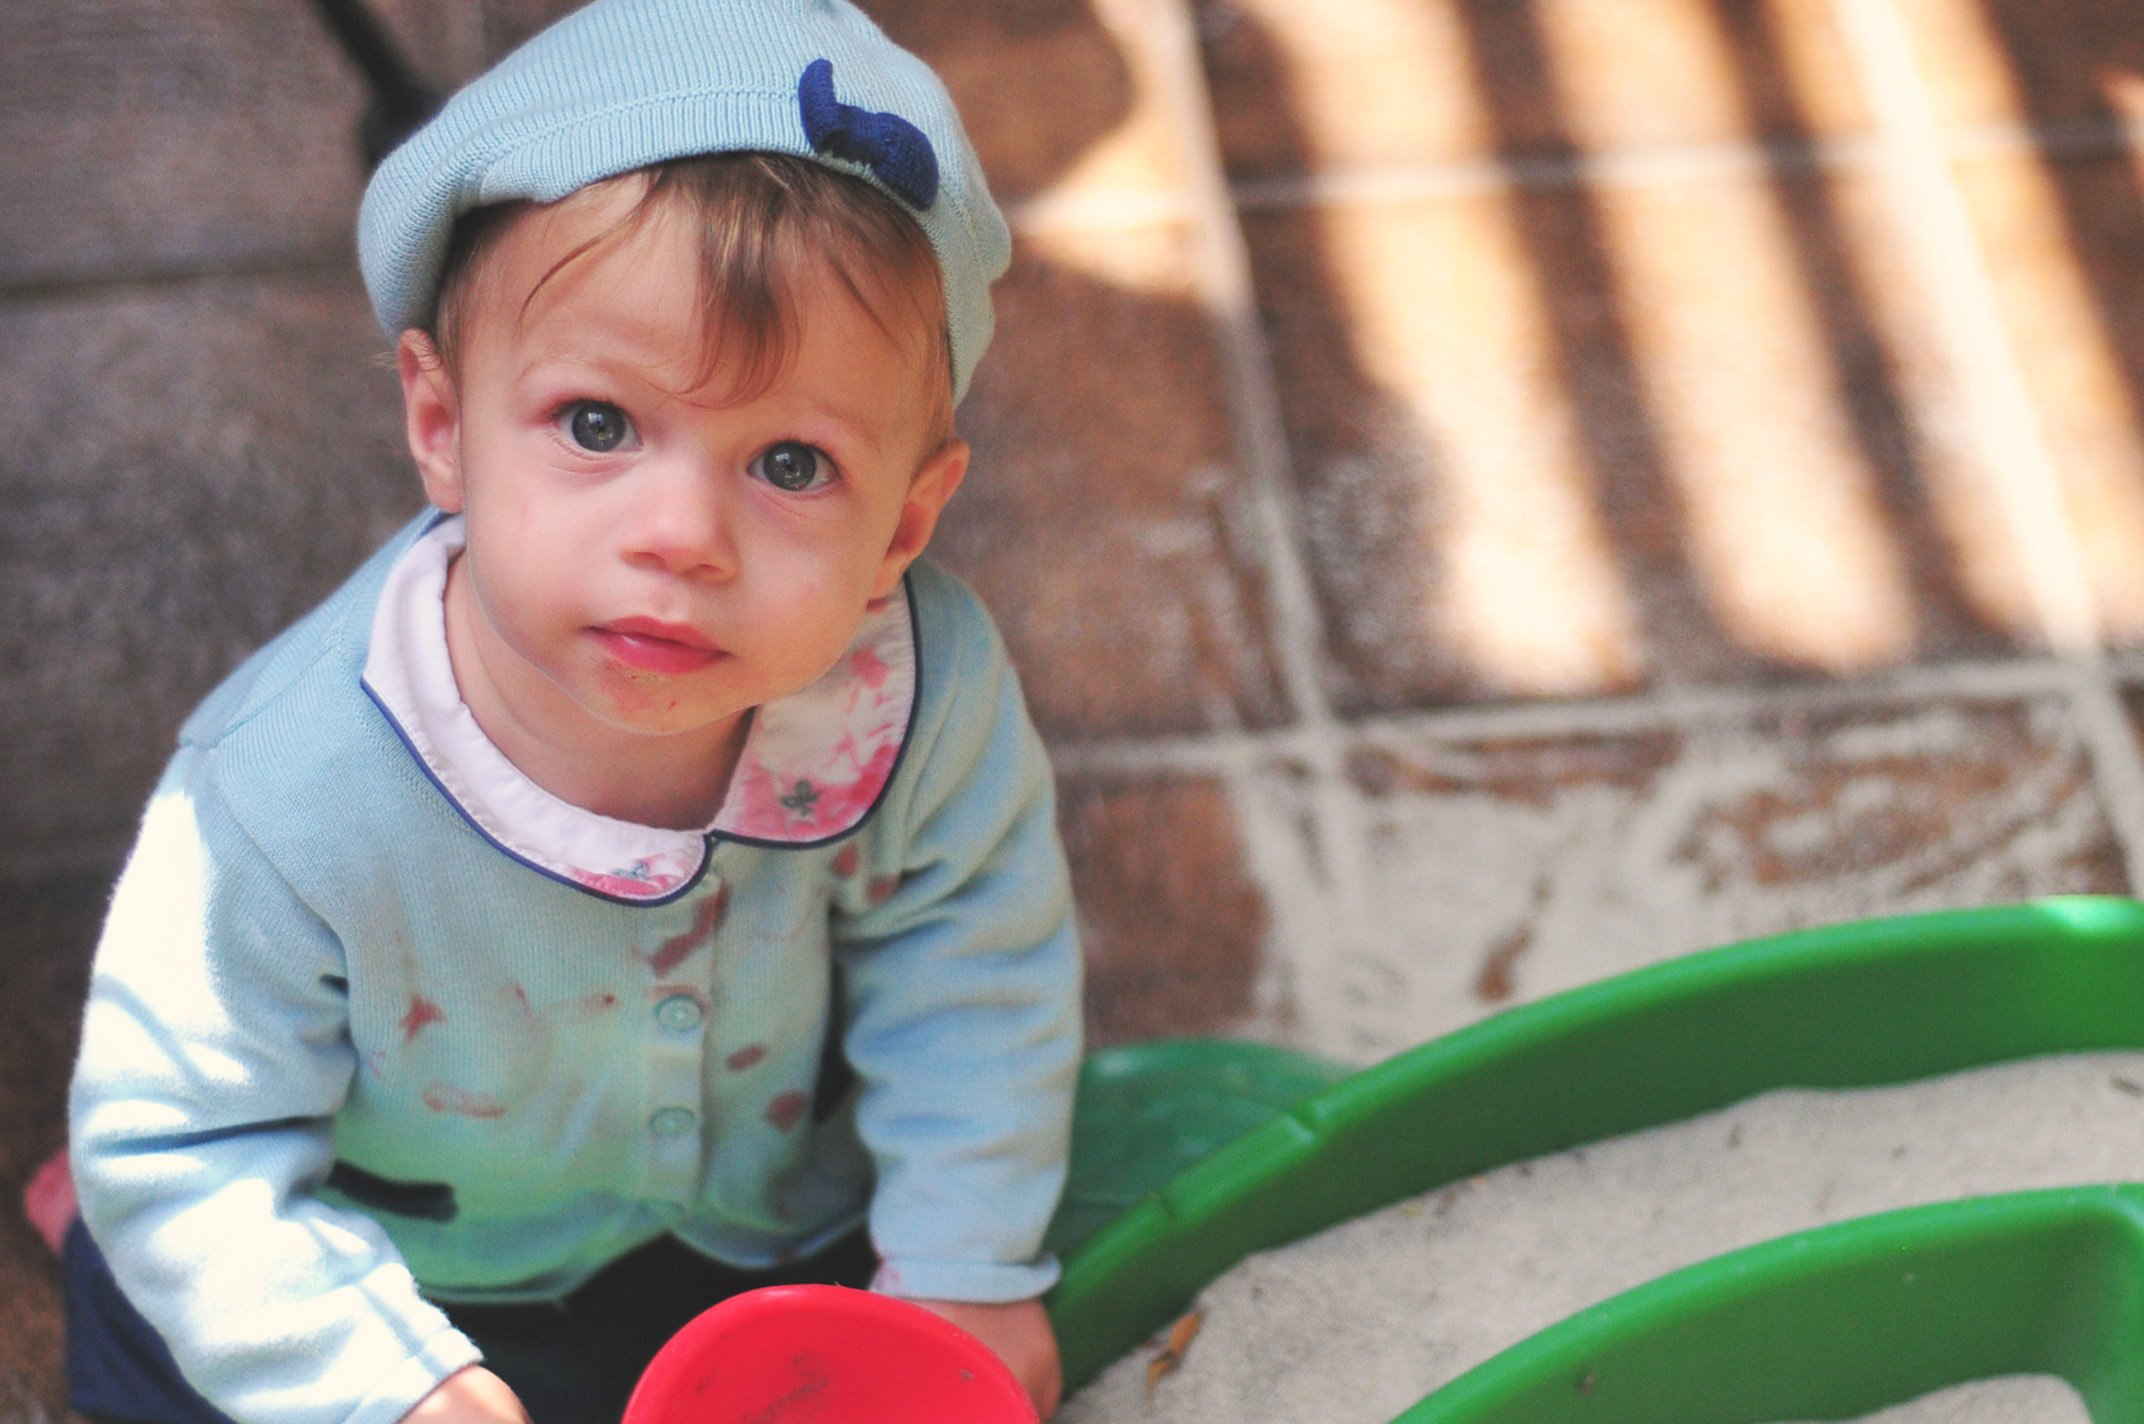
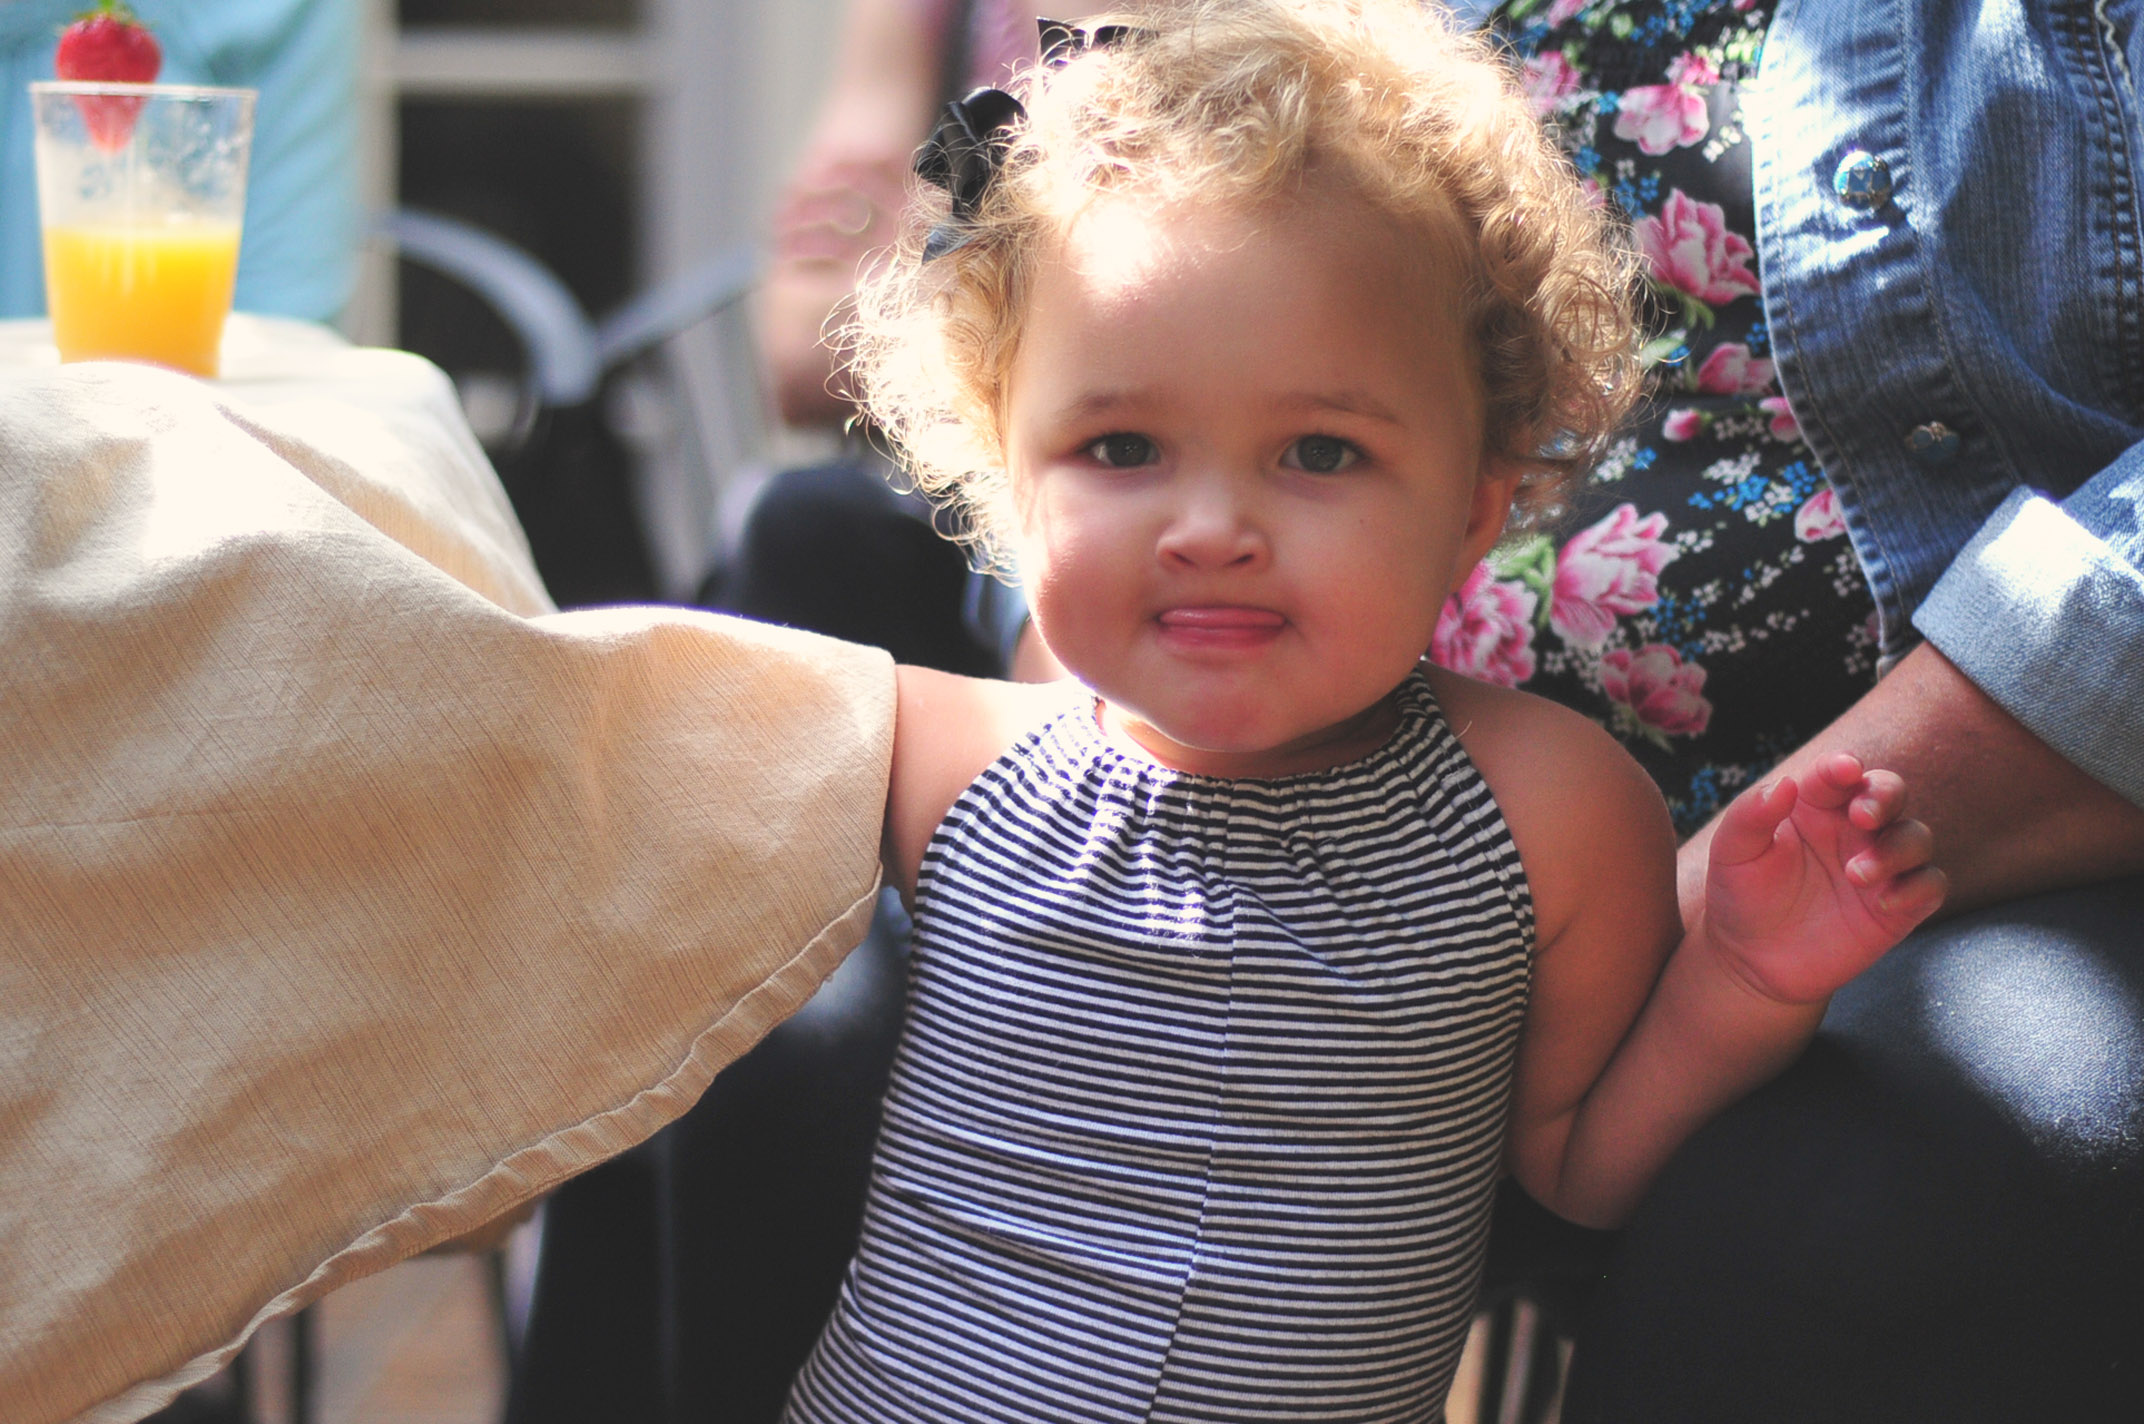
Oh yeah, there were people there too, and some super cute babies.

For the Lefler Family, My wish to you:

I Wish You Well, By Bill Withers

I wish you flowers sunshine and smiles
I wish your children that grow to make you proud
I wish you pretty things to wear
Sweet things to smell

I wish you well (oh I wish you well)
I wish you well (well)

I wish you good friends that always treat you fair
Wanna wish you ribbons to tie around your hair
I wish you, truckloads of cheer
and many happy years

I wish you well (oh I wish you well)
I wish you well (well)

I wish you freedom to do the things you love
Wanna wish you blessings and kindness from above
Wanna wish you sunlight through the clouds
I hope you laugh out loud

I wish you well (oh I wish you well)
I wish you well (well)

How To: Make Stuffed Cupcakes

If you are a cupcake person, learning to stuff them is just an essential skill. Really, ESSENTIAL. Slight exaggerations aside, stuffing cupcakes brings them to the next level, adding another flavor, another texture and another dimension.

I’m going to highlight three common cupcake stuffin' techniques today, each one  has advantages and it will largely depend on what you are stuffing with to decide which one to go with.

The first method is to stuff pre-cooking. This only works with a filling that can be baked. I use this a lot to stuff cupcakes with cheesecake. Yep, cheesecake stuffed cupcakes.

First, you will need your two components, the cupcake batter and the filling batter (like cheesecake, or cookie dough). These can be the same flavor of different flavors. For my Key LIme Pie cupcakes, I used a white cake batter and a key lime cheesecake batter.

First, fill your cupcakes only half way full

Using a spoon, make a well in the middle but pushing the batter up onto the sides of the cupcake papers.

Fill the well with about 1 tbs of the cream cheese mixture.

Bake until the cupcake batter is done, the cheesecake filling will cook at about the same rate. You want to make sure not to over cook your cupcake batter. 

The second method is to bake the cupcakes and fill them later. Once your cupcakes have baked and cooled, you can create a hole in the middle in two ways.

The first way is to use a paring knife to remove a cone shaped section of the middle of the cupcake.

Don’t remove the bottom of the cupcake.

The second method of stuffing pre-cooked cupcakes if to smash a hole in the middle with the handle of a wooden spoon.

This does create a denseness at the bottom of the cupcake, but that can work to your advantage if you are using a particularly moist filling, like jam.

Use a piping bag to fill the hole that you have created in your cupcake. If you don’t have a piping bag, you should get one, but in the mean time use a Ziplock bag with a bit of the bottom corner cut off.

Then, just frost as usual. I used chocolate ganache to frost these, but this also makes for a great filling.

Enjoy!

Do you have a How To that you want to see? Email it tome at [email protected] or leave it on my Facebook wall at:

http://www.facebook.com/pages/Domestic-Fits/230654216968376

Miniature Mango Rum Cakes

I couldn’t possible eat everything I make for this blog. As much as I love to bake, I love to give it away just as much. When I’m invited to someones house, I come bearing a tray of baked goods, requested or not. These cakes needed to leave my house as soon as I had the first bite. I had to find someone to take them off my hands and save me from eating a dozen Mango Rum Cakes with Lemon Butter cream. I made 6 in mini bundt cake pans and 8 in cupcake form. Dangerous.

This is how these cakes grew as an idea in my head:

I want to make a rum cake.

But, how do I make it different?

I have a gorgeous mango, I should use that.

And the frosting?

OOOOhhh…lemons!

Lemon buttercream. Mango, rum, lemon! It’ll be like a one of those umbrella drinks pool side at a resort.

OK, who do I give these to? I will eat them ALL if they stay in my house. The Movies and Bingo group.

I know a group of senior ladies that meet a few days a week to watch movies and play bingo. I dropped them off to them, as I did with the Caramel Cake I made a few weeks ago. Elena, at 68 years old is one of the younger, spunkier ladies. She took one look at these mini cakes and said, "Rum cake? Next time put my rum on the side and make it a double!"

Mini Mango Rum Cakes With Lemon Buttercream Frosting

For the Rum Cake:

1 stick of butter, softened

1 cup of sugar

2 eggs

1 tsp vanilla

2 cups of flour

1 tsp baking powder

1 tsp baking soda

1/2 tsp salt

1 tsp cinnamon

1 cup rum

1/2 cup vegetable oil

1 cup of mango, diced

For the Lemon Buttercream:

2 sticks of butter, softened

1/4 cup fresh squeezed lemon juice

1/2 tsp salt

1/4 cup of whole milk

2 1/2 cups of powdered sugar

Preheat oven to 350.

In the bowl of a stand mixer, cream the butter and sugar. Add the eggs, one at a time, beating well between each addition. Add the vanilla and beat some more. In a sperate bowl, add the flour, baking soda, baking powder, salt and cinnamon, mix well. In another bowl, add the rum and the oil. Starting and ending with the dry ingredients, add both the dry and wet ingredients to the stand mixer, a bit at a time, alternating between the two until all is combined in one bowl. Add the mango and stir until just combined.

Add your batter to either mini bundt cake pans (spray with butter flavored cooking spray), or muffin tins lined with cupcake papers. Fill 3/4 of the way full.

Bake for 18-25 minutes (depends on the size of your pan) or until top springs back when touched.

Allow to cool completely.

Combine all the ingredients for the lemon butter cream in a stand mixer. Mix on low speed until mostly combined, the raise to high speed and whip until light and fluffy.

Pipe on the top of the cakes.

The Help: Caramel Cake, Cupcake Edition

I’m in a book club. I know, such a grown up, right? When I was on my way to my very first Book Club meeting my husband asked, "So what REALLY goes on there? There has to be some type of illicit element? You can’t really just be sittin' around talking about a book, can you?" Other than the calorie content in my version of Minny’s Caramel Cake: Cupcake Edition, noting illicit at all.  Just a bunch of girls sittin' around chatting.

When I finished the book, I made a full size version of Minny’s Caramel Cake. For the cupcakes, I made some alterations. I wanted a frosting that could be piped on, so I added some powdered sugar. AMAZING. I really liked this version of the caramel frosting. I also substituted buttermilk for heavy cream, just because I felt like it.

Minny’s Caramel Cake: Cupcake Edition

1 cup of butter

1 cup brown sugar

1/2 cup white granulated sugar

4 eggs

1 tbs molasses

1 tsp vanilla extract

1 cup buttermilk

1/2 cup oil

1/2 cup whole milk

3 cups of flour

2 tsp baking powder

1 tsp baking soda

1/2 tsp salt

Caramel Frosting:

2 cups brown sugar, packed

1 cup of cream

3 tbs butter

1 tsp vanilla extract

2 cups powdered sugar

Pre heat oven to 350.

In the bowl of a stand mixer, add the butter, brown sugar and white sugar, beat on high until well creamed. Add the eggs one at a time, mixing well between each addition. Add the molasses and vanilla and mix until combined.  With the mixer on low speed, add the buttermilk, oil and milk and mix until well combined. In a seperate bowl, sift together the flour, baking powder, baking soda and salt and mix until combined. Add the flour mixture to the batter and stir until just incorporated. Add to muffin tins (lined with cupcake papers) filling each about 2/3 of the way full (about 1/4 cup).

Bake at 350 for 20-25 minutes or until the top springs back.

To make the frosting, combine the brown sugar and cream in a pot. Stir over medium high heat until it starts to boil. Allow to boil, without stirring (this is the hard part for me) until the temperature reaches about 210 (about 7-10 minutes). Remove from heat and stir in the butter and the vanilla. Allow to cool until thickened. Add to a stand mixer, along with the powdered sugar and beat on high until well combined. This frosting will continue to harden and thicken until cooled.

Chocolate Beer Cupcakes and An Auction for a Grieving Family

These cupcakes are now for sale to the highest bidder, 4 dozen of them. You pick the beer (or no beer is fine too) and I will deliver them anywhere within Los Angeles County, or you can pick them up. Why? Because, you see, there is this woman, a brave food writer, a mom, who is now a grieving widow.

Do I know her? No, just through her posts and writings. But I know her girls, in a way. I was one of her girls once. I was once a little girl, who’s dad died suddenly. I was a girl with a grieving mom who couldn’t get out of bed. I was a girl who’s big sister taught her to make cereal on the kitchen floor because we wanted mom to sleep, because she didn’t do that too often anymore. I was a girl who didn’t go to the father daughter dance. I was a girl who walked down the isle on her wedding day alone. But Jen, if you read this, I want you to know that I am also a girl who is OK, I grew up to be happy, married a good man, have a little girl of my own and so did that sister who taught me to make breakfast early in the morning on a linoleum floor. Your girls will be OK too. They will cry, they will laugh, they will grieve and they will be OK.

Me and Daddy:

The last thing you should have to worry about when the love of your life dies, when you are parenting grieving children, is money. Here is a bit about what Jen and her family are facing right now, financially:

Written by her friend Shauna:

“As you can imagine, Jennie is overwhelmed not only by her grief, and the sudden responsibility of raising two children by herself, but she is also struggling with this financially. She just learned that she cannot collect widow’s benefits from Social Security because she earns too much money each year. The health insurance for her and her kids runs out in December and she just learned that the total she will have to pay [for health insurance] will be even more than her mortgage. It’s possible she’ll have to pay off the entire mortgage in one lump sum because the apartment was in his name alone.

And more than anything, Mikey wanted Jennie to continue living her dream of being a food writer. And he wanted to make sure his kids were taken care of well. That’s why he worked as hard as he did."

Here is a link to Jen Perillo’s website and a bit about her story:

http://www.injennieskitchen.com/

How can you help?

  1. Bid on these cupcakes (leave your bid in the comment section, starts at $40)
  2. view the other auction items on the BWOB site:http://www.bloggerswoborders.org/2011/08/project-summary-a-fund-for-jennie/
  3. Click on the BWOB badge on my home page (right side) and just give a few bucks
Cupcake auction rules:
  • Claim your prize wtihin 6 months
  • Give 1 week advanced notice for order
  • Enjoy your warm fuzzy feeling that goes along with charitable giving
  • Auction ends September 5th at high noon
  • Perfect for an upcoming party!
On to my original post about these cupcakes:

I love beer. I love cupcakes. It’s only natural that I put these too together. If you don’t like beer, this recipe can be made without and I have to say that brown sugar buttercream is amazing. SO amazing that I even called my sister to tell her about how much I love it and how I want to make a huge vat of it and swim around in it. If you want to make this without the beer, just use 1/2 cup of really hot water, add the brown sugar and stir until dissolved, then follow the rest of the recipe.

Chocolate Cake with Beer Brown Sugar Buttercream

For the Cupcakes:

1 stick of butter

1 cup of sugar

2 eggs

1 tsp vanilla

1 1/3 cup flour

1 tsp baking powder

1/2 tsp baking soda

1/2 tsp salt

2/3 cup cocoa powder

1/2 cup milk

1/2 coffee

1/2 cup oil

For the Frosting:

1 cup of ale or blonde style beer

1 cup of brown sugar

3 sticks of butter softened

1 tsp salt

2 cup powdered sugar

Preheat the oven to 350.

In the bowl of stand mixer, combine the butter and sugar, and cream until combine. Add the eggs one at a time, blending well after each egg. Add the vanilla and mix again. In a separate bowl, add the flour, baking powder, baking soda, salt and cocoa powder. in another bowl, combine the milk, coffee and the oil. With the mixer on low, add the dry and wet ingredients a bit at a time alternating between the two.  Line muffin tins with cupcake papers and fill each one with about 3/4 of the way full (about 1/4 a cup of batter).

Bake for 18-22 minutes or until the cupcakes spring back when touched. Allow to cool completely before frosting.

To make the frosting, put the beer in a sauce pan over high heat and allow to boil until reduced by half. I used a Firestone Pale Ale, microbrews are great for this recipe but IPA’s may be too hoppy and "light/lite" beers won’t have enough flavor. While the beer is still very hot, add the brown sugar and stir until completely dissolved. Allow to cool to room temperature. Again, for the non beer version, just add the brown sugar to 1/2 cup of super hot water and stir until dissolved. Microwave it if you need to.

In the bowl of a stand mixer, cream the butter, salt and powdered sugar until combined. Add the beer/sugar mixture and mix slowly until mostly combined, then turn the mixer on high and then whip until the frosting is fluffy and well combined.

Pipe the frosting onto the cooled cupcakes.

I prefer these at room temperature, but they are still pretty great chilled.

The Help: Minny’s Caramel Cake

I just finished The Help, by Kathryn Stockett. Great. Now what I am going to struggle to stay awake to read at 1am when I know I should be sleeping because Tater is a 6am girl? There is always this vague grief that goes along with finishing a book that has attached itself to you. You start to watch the pages on the right side thin. At first you’re excited that you are so close to knowing whats gonna happen, and then you resist it, knowing you aren’t ready to let go. You read the last page slowly, savoring the last minutes you will ever spend with the characters and then you just sit, one hand on the cover. Smooth it with your hand, think about what the characters will likely do next, briefly wish for a sequel, and then…bake a cake.

In the book, Minny is a sass mouth southern maid that can bake her way out of just about any situation her impetuous tongue can put her in. I love her. In the movie, Hollywood cast her with Octavia Spencer, my brain cast her with Gabourey Sidibe.

I thought a lot about what kind of cake Minny would make for that caramel cake of hers. Definitely not a white cake. Not just for the obvious double entendre, but because it calls for dissposing of the egg yolks. Minny would never do that. She would never NOT use something as lovely and perfect as an egg yolk. She would have used whole eggs, butter, oil, cream and molssas. I also saw this as a cake that would stand on its own, with a mild caramel flavor, even without the lovely caramel icing.

Here is my version of the world famous cake:

Minny’s Caramel Cake

1 cup (2 sticks) of butter

1 cup brown sugar

1/2 cup white granulated sugar

4 eggs

1 tbs molasses

1 cup heavy cream (or buttermilk)

1/2 cup oil

1/2 cup whole milk

3 cups of flour

2 tsp baking powder

1 tsp baking soda

1/2 tsp salt

Caramel Frosting:

2 cups brown sugar, packed

1 cup of cream

3 tbs butter

1 tsp vanilla extract

 Pre heat oven to 350.

In the bowl of a stand mixer, add the butter, brown sugar and white sugar and cream until well combined. Add the eggs one at a time, mixing well between each addition. Add the molasses and mix until combined.  With the mixer on low speed, add the cream, oil and milk and mix until well combined. add the flour, baking powder, baking soda and salt and mix until just incorporated. Add evenly between two greased and floured 8 inch round cake pans. Bake for 25-30 minutes or until a tooth pick come out clean. Allow to cool.

To make the lovely frosting, and I really think that I want to take a bath in this stuff, combine the brown sugar and cream in a pot. Stir over medium high heat until it starts to boil. Allow to boil, without stirring (this is the hard part for me) until the temperature reaches about 210 (about 7-10 minutes). Remove from heat and stir in the butter and the vanilla. Allow to cool until thickened. Pour half the caramel over the first layer, stack the second layer on top and then pour the rest over that.

Yum. I want to make cupcake versions of this soon.

Nebraska Beer Cake

I have this fascinating friend named Mike. He’s done quite a few interesting things in his life: bass player for a Grammy winning artist, handy man extraordinaire, one-true-love to a 96 year old Cuban woman.  His next interesting venture: moving to Nebraska.

Why Nebraska? You ask.

He must have a job offer out there? Nope.

Well, then family? Not one.

Then….why is he moving to Nebraska? The better question, I say, is: Why not Nebraska? It’s a perfectly wonderful place to live.

I do predict that Mike and his super adorable wife are going to love the mid-west. They will  “Win” at Nebraska. And those two California natives will freeze. Their. Asses. Off.

Obviously this cake is in the shape of Nebraska, but there is a little more of that corn husker state in there than meets the eye. I made it with Nebraska’s own Black Betty Imperial Stout. Black Betty is still a smaller craft brew so if you aren’t able to find it, use a dark beer or a chocolate stout.

Cake:

3 cup flour

1 tbs baking powder

2 tsp baking soda

¼ cup unsweetened cocoa powder

1 tsp kosher salt

2 sticks (16 tbs) unsalted butter

2 cup sugar

4 eggs

1 1/2 cup (2 3.5 oz bars) 72%  dark chocolate, chopped

1 1/2 cup dark stout beer

1 cup of brewed coffee, cooled

Ganache:

2 cups of dark chocolate chips

2 cups of dark beer

Crust:

9 graham crackers

2 tsp salt

1 tbs brown sugar

Frosting:

4 cups cream cheese room temperature

2 cups butter, room temperature

8 cups powdered sugar

1 tablespoon vanilla extract

Cake:

First, preheat the oven to 350, and then combine flour, salt, baking powder, baking soda and the cocoa powder in a bowl and whisk until well combined. In the bowl of a stand mixer add the butter and sugar and cream until well combined. Add the eggs one at a time, beating well after each egg. In a microwave safe bowl, put the 72% chocolate. Microwave for 30 seconds, remove and stir. Repeat until the chocolate is melted. Add the melted chocolate to the sugar/egg mixture and blend well. While the mixer is on a medium-low setting, add the stout and then the coffee, continue to combine until well mixed, then add the flour mixture a little at a time until well combined. Grease and flour the cake pans that you are using. I used two 9×13 inch sheet pans. Bake for between 25 and 35 minutes (depending on your cake pan size) or until the cake is set in the center. Remove from oven and allow to cool.

Ganache:

Place chocolate chips in a heat safe bowl. In a pot on the stove, add the 2 cups of beer and cook over medium heat until reduced by half, stirring frequently, about 10 minutes. Pour the beer, that you have reduced to 1 cup, over the chocolate chips and stir until well combined. Place in the fridge and allow to cool completely about 30 minutes.

Cream cheese frosting:

Place all the icing ingredients in the bowl of a stand mixer and beat on high until well combined and creamy. You really, really need softened butter and softened cream cheese. If either of those are cold, your frosting will have lumps in it.

Crust:

I used this on the outside of the cake, but it’s optional. Just place all the crust ingredients in your food processor and process until all combined.

Assembly. This will be the easiest if everything is cold. Also, I like to use a piping bag to help with the first layer of frosting (I always do 2 layers of frosting). Put about half of your frosting in a piping bag with a large opening tip. You can also use a large zip lock bag with the corner cut off, like this:

[singlepic id=378 w=520 h=440 float=]

works great.

On your bottom layer of cake, put a rim of frosting around the edge, that’ll make it easier to keep the ganache in the center.

[singlepic id=438 w=520 h=440 float=]

Add the ganache to the center of your frosting ring and allow to spread out evenly over the layer. If your ganache was warm at all, it would be a good idea to place the cake in the fridge at this point to allow to cool before proceeding. Top with the second cake layer, then add the first layer of frosting to your cake with the piping bag and smooth out with an off set spatula. Some people call this a crumb coat, because crumbs will invade this layer. I call it the dirty ice, because it sounds more fun. Place the cake in the fridge and allow the first ice to set, about 1 hour. Once you are ready for your final icing, use an off-set spatula and try to make it as smooth as possible. Before the final frosting layer has set, add the crust to just the sides with your hands, using as much as will stick to the sides. Allow the final ice to set before decorating as you wish.

Fondant Basics

I am not usually a baker for hire. Especially cakes. They take so long and frustrate me. I can never get them as perfect as I want and I end up feeling (in a very overly dramatic fashion) that they are a complete disaster. A friend of Mr. Fits asked me to make a Monkey Cake for the baby shower she was throwing for her sister and her sisters wife to welcome their baby boy. Maybe it was the mushy soft spot that I now have for babies since Tater was born (this did not really exist prior to birth of my adorable little lady) or maybe it’s how easy it is to guilt me into baking by merely asking, but I said yes. *sigh*

Fondant 101

If you’re not sure what the stuff is that covers those cakes, it’s fondant. It’s a sugar dough that is rolled out like cookie dough to cover a cake and can even be sculpted, like clay, for decorations. If you have an interest in giving it a try, you should. It takes a little practice but general gives a very impressive look to your cakes.

I have been working with fondant for about 5 years and I have learned a thing or two about this sugar dough that I’ll share with you all.

First, it’s not very tasty. Really, even the good kinds don’t really add to the taste of a great cake. I have never, ever heard anyone say, "This cake tastes really good, but you know what it needs? A nice layer of fondant." It’ll never happen. It’s use is purely aesthetic. If you can perfect the technique of buttercream your cake can look just as good and taste somewhere around a million times better, but that’s for a different post.

Fondat can be difficult to work with, but if you really want to make a cake that  has a professional look to it, this is a great option.

There are three brands of fondant that I have worked with, and as far as my experience goes, these are the three main brands:

Wilton

Satin Ice

 Fondx

The basic rule, when it comes to yummy vs easy, is that the better it tastes the more difficult it is to work with.

Wilton is at the bottom of the yumminess food chain. It tasted like sugary play-dough. I would however, suggest you start here if you have never given fondant a try. Wilton fondant is a tank compared to the other two. It’s forgiving and tough. Use it your first time to get a feel for how to use fondant then move on when you think you’re ready.  Just let your guests know that, although it is edible, you would recommend peeling it off before eating the cake.

Satin Ice is far superior to Wilton in the taste department, but, it’s a bitch to work with. I’ve renamed it Satan Ice and probably won’t use it for cake covering ever again. It has a great flavor and tends to blend well with the frosting but it is extremely fragile, cracking and tearing easily. It is a great option for molding decorations or adorable little monkey mommas and babies.

Fondx, and Elite by Fondx are my favorite. Not as yummy as Satin Ice (although some would disagree), but much easier to work with. It isn’t as hearty as Wiltons, but it is much tastier.

Fondant comes in nearly every color you can imagine and is much easier if you buy it pre-colored. The draw back to this is cost. If you look at the monkey cake picture, you can see there are 9 different colors. If I was to buy 9 different colors of fondant it would cost me about $150. Since I’m pretty sure no one wants to pay that much for a cake that only serves a few dozen, coloring fondant is the way to go. I buy white and then use gel food coloring to achieve the color I want. The use of gel is important in order to keep a solid consistency to your fondant, instead of turning your fondant to a sticky mess with too much liquid. Just add a bit of the gel to your white fondant and knead until the color is consistent. If it starts to turn mushy, add some powdered sugar.

You need to ice your cake at least two separate times. Some call the first icing a crumb coat, because the cake crumbs will invade this first layer, and others (including myself) call it dirty ice, because it sounds more fun. Allow first layer of icing to set completely, about an hour.

The next coat is your final coat and it helps to smooth everything out and cover any bumps or holes in your cake. Think of fondant as that super shiny, thin bridesmaid dress that makes you look awful and shows every flaw, and you would never be caught dead it in it, let alone PHOTOGRAPHED in it over and over, if you didn’t really love your friend–and the final ice is the Spanx that allowed you to keep your sanity and hit on the cute bartender. The final ice is the compression garment of the cake world, makes everything look smooth and pretty.

Fondant will show every imperfection so make sure your final ice is as smooth as you can make it. If you need to go for round 3 on icing, then do that.

Roll out your dough, on a flat surface covered with powdered sugar, the way you would roll out pie dough. Make sure that you roll out a circle large enough to cover your cake with at least a two inch overhang on all sides.  To transfer your dough to your cake, you can either use an extra set of hands, or you can try and slide a large cardboard sheet (like a cake board) underneath.

Once its over your cake use your hands to smooth it down the cake. Start at the top and work your way down.

Using a sharp paring knife or a pizza cutter, remove the excess fondant.

The bottom will probably look a bit rough. Making a perfectly even cut around the bottom is very difficult so don’t beat yourself up about it, just cover it up. To do this, I have used the following:

Long strip of fondant

Small balls made of fondant

Candy gumballs

Marshmallows

Mini cupcakes

If you look at novelty cakes, most of them have some type of bottom boarder.

To get that powdered sugar off the cake, I use a clean make-up blush brush that I bought specifically for the job.

To make the cake shine, spray the fondant with vodka. The alcohol will evaporate so you don’t have to worry about getting the pregnant lady drunk at her own baby shower. I use a small travel sized spray bottle that was probably intended for transporting hairspray across TSA lines.

If you have ever used clay, fondant reacts in similar ways when sculpted. There is an adorable British girl who has several You Tube posts about making fondant animals.

Good luck in your caking adventures. Remember that every cake is a learning process and your first cake won’t be perfect, it’ll be a starting point.

Junior Mint Cupcakes


I have a confession to make. I really don’t like mint. I respect mint as a flavor and agree with the idea of it…but I don’t love it. There was on ordeal a few years ago when I was in Middle Atlas, Morocco that will always be refereed to as the Moroccan Mint Experience. Overall, I would classify this episode in the "good experience" category, but either way, I have a hard time eating mint ever since. Mr. Fits, however, is a huge fan. And although I don’t prefer mint, I still really loved these cupcakes.

How cute are those cupcake papers? I got them at Bake it Pretty. I love baking cupcakes in something other than standard cupcake papers, makes them feel special.

Junior Mint Cupcakes

Chocolate cake:

2 2/3 cup flour

1 1/4 cup unsweetened cocoa powder

2 tsp baking powder

1 tsp baking soda

1 tsp salt

1 cup buttermilk

1 1/4 cup of brewed coffee, cooled

1/4 cup vegetable oil

2 sticks of unsalted butter

2 1/2 cups of sugar

1 tsp vanila extract

2 eggs

Mint Buttercream:

2 sticks of unsalted butter, softened
5 cups powdered sugar, sifted
1/3 cup milk
1/4 tsp natural mint extract

Chocolate Sauce:

1 cup dark chocolate chunks

2/3 cup heavy cream

Garnish with Junior Mints if desired.

Preheat the oven to 350. in a large bowl, add the flour, cocoa powder, baking soda, baking powder, and salt. Sift to combined. in another bowl, add the buttermilk, coffee and oil. In a stand mixer, add the butter and cream until light and fluffy. Add the vanilla and while the mixer is on high, slowly add the sugar and cream until well combined. Add the eggs one at a time. With the mixer on medium speed, alternating between the wet and dry ingredients, add each a bit at a time until all three are well combined in the stand mixer. If you are using the cute brown floret baking cups, just place them on a baking sheet, they don’t need to go in a muffin tin. If you are using standard cupcake papers, just line them in the muffin tin as normal. Fill standard cupcake papers 2/3 of the way full and cute floret papers only 1/2 full. Bake until tops spring back when touched, about 20-25 minutes.

Mint Buttercream

In a stand mixer, cream the butter until light and fluffy. Your butter needs to be softened, cold butter won’t work. With the mixer on a low speed, slowly add the powdered sugar until all combined (you can add less if you prefer a less sweet frosting). Then add the milk and the extract and beat until well combined.

Chocolate sauce

Place the chocolate in a heat safe bowl. Heat the cream until hot and steam, but not boiling (microwave is fine but you can also heat on the stove) and pour the hot cream over the chocolate. Stir for about 3 minutes or until well combined. If you have never made ganache or chocolate sauce you may get a bit concerned about half way through. It is completely normal for your sauce to look like chunky chocolate milk for the first few minutes, just keep stirring and it’ll all work out.

Once your cupcakes are cool, pipe the buttercream on, top with a spoon full of the chocolate sauce then a Junior Mint, if you’d like.

Key Lime Pie Cupcakes

I’ve had a thing for citrus lately. I can’t stop thinking of all the yummy food that can be made with lemons and limes. Maybe its my way of sending good vibes to the lime tree that I planted three years ago that has produced all of 2 limes it’s entire life. I admit that even though I grew up on some what of a farm (old tractor from my parents farm as quasi proof)

I have managed to kill nearly everything I have ever planted. Although, I am holding out hope for my little lime tree.

Ingredients:

Cake batter:

2 cups of flour

1 1/2 tsp baking powder

1 stick of butter

1/2 cups of sugar

1/4 tsp salt

1/2 tbs vanilla extract

4 egg whites

3/4 cup of whole milk

1/4 cup of oil

Crust:

3 1/2 cups of lemon shortbread cookies

1 tbs brown sugar

6 tbs melted butter

Filling:

8 oz of softened cream cheese

1/4 cup of sugar

1 egg

2 1/2 tbs lime zest

1/4 cup of lime juice

Lime Buttercream:

4 sticks of butter

3 cups of powdered sugar

1 tbs lime zest

1/3 cup of lime juice

1/2 cup of milk

Preheat oven to 350.

You’ll need a lot of limes for this recipe, I used about 12, but it all depends on size. Start with the crust. Put the shortbread cookies and the brown sugar in a food processor and process until nothin is left but crumbs.

tart-lemon-cookiesAdd the melted butter and pulse until it looks like wet sand.

line muffin pan (this recipe should make 24) with cupcake papers. Add 1/2 tbs of the crust to the bottom of the papers and pack well. Save the left over crust to sprinkle on top of the finished cupcakes.

klc-crust-in-papersMake the cake batter. I have been playing with my vanilla cake recipe for years and this might be the winner. I’ve always used a combo of whites and yolks, but because I wanted it really light I just used whites and it turned out beautifully.

In the bowl of a stand mixer, add the butter (softened!) and sugar and cream until light and fluffy. In a separate bowl combine the flour, baking powder and salt. Whisk until well combined. In another bowl, add the milk and oil.

A bit at a time, add the egg whites to the butter and beat on high until well combined and fluffy. With mixer on medium, add the flour mixture and the milk mixture, alternating between the two until everything is just combined (don’t over beat).

Add the batter to the cupcake papers until about 1/2 filled.

klc-batter-in-tinsMake the cheesecake filling.

In a stand mixer, cream the cream cheese and the sugar until well combined. Add the egg, lime juice, and lime zest and beat until combined. And please, please, please use real limes and not that stuff that comes in a bottle or a plastic squeezey lime.

Back to the batter in the cupcake papers. Using a spoon, make a well in the middle but pushing the batter up onto the sides of the cupcake papers, try not to disturb the crust but if you expose it, its fine.

klc-batter-wellFill the well with about 1 tbs of the cream cheese mixture.

klc-poBake the cupcakes for about 35 minutes or until the cake part is springy and slightly golden brown, the filling will still be jiggly.

klc-ooWhile that’s baking, make the frosting. I have to say that although these cupcakes turned out amazing (I would even go as far as to say top 5 I’ve ever made) my only complaint was that there wasn’t a huge differentiation between the filling and the frosting. I’ve used this method to fill cupcakes with cheesecake before and I really like it. I always top my cheesecake filled cupcakes with a whipped cream frosting and I’m not sure why I went to butter cream. Next time I make these I’ll make a lime whipped cream (2 cups of heavy cream, 1 cup of sugar, 1/4 cup lime juice, 1 tsp lime zest in a stand mixer on high for 3 minutes). Here is the butter cream steps, feel free to use whichever frosting you like. Both are super yummy.

In a stand mixer (that stand mixer got quite a work out today, unlike myself) add the softened butter and beat to make sure all the lumps are out. You HAVE to use soften, borderline warm, butter or your frosting will have the consistency of ground beef. Add the sugar and cream.

klc-batter-in-kaThen add the lime juice, zest and milk then beat until well combined.

My cheater piping bag is just a large ziplock bag with a corner cut off. It makes frosting cupcakes really easy, they look amazing AND I don’t have to dig out my really piping bags or clean them later.

klc-piping-bagklc-pre-toppingSprinkle with the left over crust and enjoy.

My floating cupcake shot:

klc-finished-floatingklc-one-biteklc-one-bite-top

Girly Pink Skull Cake

Somehow, over the past half a decade, the iconic symbol of rebellion, mayhem and destruction has morph itself into an adorable emblem of girly fun. I’m not sure who does PR for the Skull, but BRAVO! This cultural make-over surpasses even Mark Wahlbergs move from the Funky Bunch to Oscar Nominee. My current cake creation was in celebration of my wonderful friend, (who is a symbol of Girly Fun times in my life) and her most recent birthday.

To start, I made a four layer lemon cake. I decided to make Mango Cream Cheese frosting because that is a favorite of the birthday girl. It was good, but the mango bits made the frosting a bit chunky and it wasn’t mango-y enough. If you like  mild mango flavor, here is the recipe. To mango it up a notch, you can add Mango Extract: http://www.amazon.com/Natural-Mango-Extract-29-Fl/dp/B002BX351A

In a sauce pan over low heat, add 2 cups of sugar, 1/4 cup of butter and one large mango, diced, skin removed. Stir infrequently until the mango chunks are super soft and falling apart, about 30 minutes. I left this on the stove, semi-forgotten, while I gave Tater a bath, so you really don’t need to babysit it as long as the heat is on low and you stir it occasionally. Let it cool to room temperature, then puree in a food processor until as smooth as you can make it. The biggest rule for making cream cheese frosting is that your ingredients NEED to be at room temperature. You can’t cheat and try and trick your frosting, you’ll end up with a big mess the consistency of ground beef.  In a stand mixer, put 32 ounces of room temp cream cheese 2 sticks of room temp butter and mix well. Then add the room temp mango mixture and blend well. Everyone likes a different sweetness level on their frosting, I like mine closer to savory than overly sweet. I added about 1 cup of powdered sugar to this, taste and add more depending on your preference. I also added quite a bit of pink food coloring

pink-frostingStarting with a white 14 inch cake board circle (you can buy at cake supply stores or Michaels Arts and Crafts) I stacked up the layers with a hefty amount of frosting in between each layer. After that,  I iced the cake completely, this will be the first coat. Some call it crumb coat, because the cake crumbs will invade this first layer, and others (including myself) call it dirty ice, because it sounds more fun. Allow that to set completely, about an hour.

dirty-iceThe next coat is your final coat and it helps to sooth everything out and cover any bumps or holes in your cake. Think of fondant as that super shiny, thin bridesmaid dress that makes you look awful and shows every flaw, and you would never be caught dead it in it, let alone PHOTOGRAPHED in it over and over, if you didn’t really love your friend–and the final ice is the Spanx that allowed you to keep your sanity and hit on the cute bartender. The final ice is the compression garment of the cake world, makes everything look smooth and pretty.

cake-final-iceFondant is tricky and unforgiving. There are several different kinds of fondant, including homemade. The easiest to work with, although the yuckiest to eat, is Wilton’s. It would probably be the most accessible for you because it is the most widely carried. I do recommend using it for beginners because it is the most forgiving and will allow you to get a feel for fondant work before moving on the bitchier fondants. Just tell your guest that it is edible, but that you recommend they peel it off and don’t eat it. I used Fondx, actually pretty tasty but very soft and unforgiving. You can buy it in all different colors but I would recommend white and then color it yourself. Just use gel food coloring instead of liquid and if it gets too goopy, add powdered sugar. Then grab an unspecified amount (just gonna have to guess based on your cake size) and put on a clean surface dusted with powdered sugar. I used a softball size, colored hot pink

fondant-ballThen roll it as close to a circle as you can. I would highly recommend the use of a marble rolling pin.

pink-rolled-fondantSlowly  and carefully pick it up (you can use your rolling pin for assistance) and move to the cake. Here is a good picture tutorial from Satin ice: http://www.satinfinefoods.com/how.htm

Starting at the top, gently smooth the fondant. This will cause the bottom of your fondant to have bit of a ruffle effect

cake-fondant-precutTo cut the ruffle off, I use a sharp paring knife that I push the fondant a bit under the cake. A lot of people use a pizza cutter. Just use what works for you.

bottom-fondant-cutYou will notice quite a bit of powdered sugar left on your pretty cake. You can buy a brush at cake supply stores, I used a clean make-up blush brush. Just brush the cake until all the sugar is gone. You will still have a light layer. The next step is vodka! Not a shot for the weary baker, but a spray for the cake. Vodka is used in nearly every bakery to clean up cakes and give them a pretty shine. I use a small travel size spray bottle, probably intended to transport hairspray across FAA lines, but works really well in my kitchen. Just spray a light layer over your cake for a pretty, powder sugar free shine

cake-fondant-coveredI rolled a small hunk of white fondant on my cuttin’ surface and used a skull cookie cutter to cut out some decorations for the cake.

fondant-skulls-cut-outI used food coloring and a small artist brush to make a boy skull and a girl skull as well as left over fondant to make little bows

fondant-skulls-just-madeI decided that the boy and girl skulls made for a Hot Topic Wedding Cake look that I wasn’t diggin’ so I just used the girl skulls

fondant-skulls-no-mini-cupcakesAt some point in this decorating furry, I managed to make about 18 mini cupcakes and 3 regular sized cupcakes in black cupcake papers. I also ran out of pink frosting, as well as cream cheese, so I made Vermouth Whipped Cream. Sounds super hard and fancy, right? Not really. In a stand mixer, combine 2 cups heavy cream (or whipping cream, both will work just fine), 1 cup of sugar, 1 shot of vermouth and I added the pink food coloring. beat on high for about 4 minutes or until stiff peaks form. Opposite of the cream cheese, the cream has to be chilled or you’ll be churning butter. Then spoon it into a large Ziplock bag for the cheater piping bag. Cut the corner off, about the size of your pinky nail. Then pipe the whipped cream on in a swirl pattern. Looks SO fancy and it’s easier and faster than any other frosting method.

cheater-piping-bagThen I sprinkled the cupcakes with small pink sugar pearls. I placed them on the cake board at the base of the cake, securing them the the Wilton’s Candy melts that I use so often for my pastry glue. Just put a small amount of candy melts in a glass bowl, microwave for 30 seconds, stir and repeat until melted. Smear a bit on the bottom of each cupcake and place on the cake board.

fondant-skulls-on-cakeThe top cupcakes I used a wooden skewer to secure in place, I didn’t want those babies going anywhere

cupcake-skewerI used those same Wilton’s candy melts in a Pirate Skull Pick Mold

http://www.wilton.com/store/site/product.cfm?id=1E26F64B-1E0B-C910-EA95C108A7B263D0&killnav=1

and stuck two of them in each of the cupcakes to make a two sided skull topper

cupcake-topIt didn’t look quite done so I made some black fondant and cut out three hearts to add balance. DONE!! Happy Birthday Kelly!!

cake-done-6cake-donecake-done2cake-done3
cake-done4

The Very Hungry Caterpillar Cake


The adorable Miss Emmi turned 1 just a few days after Tater. Emmi loves the Very Hungry Caterpillar more that I have ever seen a kid love a book, it’s quite adorable. She’s that bugs #1 fan. So of course, her party had to follow suit. Tater and I spent Saturday afternoon hagnin’ out with Emmi and her fabulous mother and we made a cake.

First, I made a 20 inch 2 layer strawberry cake

hc-cake-base-cake

The we covered it in cream cheese frosting and then a layer of white fondant and put brightly colored gumballs at the bottom

hc-cake-gumballs

We then cut out three inch circles from another sheet cake, cutting off the rounded top and cut those circles in half

hc-cake-circles

We frosted those half circles and then covered them in different shades of green fondant

hc-cake

We covered one of the cake circles in red fondant to use as the head

hc-cake-just-head

On went the body

hc-cake-body-part-way-on

Although Miss Emmi’s house is filled with every baby toy imaginable, the ladies spent most of the day playing on the stairs

claire-emmi-stairs

Emmi’s mom was a quick study with the fondant and was able to make her name, Caterpillar legs, antennae and eyes as well as an adorable sun

emmis-party-9

And check out that mini smash cake, made by Emmi’s aunt. Very adorable!

Happy first year Emmi!

Competitive baking

I have a strong resolve to actual WIN a recipe contest some day. I only enter the big ones, Cooking channels, big time cooking magazines, national competitions, I don’t bother with the little guys. Possibly a very flawed strategy, but if I win, I want to win big. This year, I was a finalist in the Scharffen Berger/Tootii Foodie/Food Network Magazine Cupcake Adventure contest. Not exactly a win, but I am working my way towards the top. Here is the link as proof of my upward climb:

http://www.chocolateadventurecontest.com/2010_Finalists.aspx

I know, I AM towards the bottom, but making the list made my week! Next, I’ll be attempting to "Make the List" for three other contest this year, more about that at a later time. For now, here is the recipe for my "I made the list" Cupcakes:

Churros Con Chocolate Picante Cupcakes

Churros:

1 Stick of butter

½ cup filtered water

½ cup whole milk

¼ tsp salt

1 tbs sugar

1 cup all purpose flower

2 tbs cinnamon

5 eggs

Butter flavored cooking spray

Metallic Cupcake Papers

1/4 cup sugar

1 tsp cinnamon

¼ tsp fresh ground nutmeg

1/8 tsp chili powder

Chili Chocolate Mousse:

¾ cup butter

2 tbs chopped red chili peppers, seeds removed

6oz of a Scharffen Berger 70% Bittersweet Dark Chocolate Bar, chopped

¼ cup coffee, brewed with Sumatra beans

¼ cup Chocolate liqueur

4 eggs, separated

3/4 cup sugar plus add. 2 tbs, divided

Spiced Whipped Cream:

1 tbs chopped red chili peppers, seeds removed

1 ½ cups heavy cream

¾ cup sugar

½ tsp cinnamon

¼ tsp fresh ground nutmeg

2 tsp Scharffen Berger Unsweetened Natural Cocoa Powder

Make Churros:

Put the oven rack at the lowest position and preheat the oven to 400 degrees.

In a good quality saucepan, bring the butter, water, milk, salt, and sugar to a slow boil then turn heat to low. Add the flower and stir until combined. Move the flower mixture to a stand mixer and add cinnamon then each of the 5 eggs one at a time, mixing until well combined between each egg. Line muffin tins with cupcake papers (remove the paper liner and just use the metallic part), lightly pray each paper with the cooking spray. Drop two tbs of the dough into each cup. Mix the next 4 ingredients together in a small bowl. Add 1 tsp of the sugar mixture to the top of each dough filled cupcake paper. Bake until the top of the cupcakes have puffed completely, about 30-33 minutes.  Remove from oven and allow to cool completely.

Make the mousse:

Put the butter and the chili in a saucepan over medium low heat and heat until hot but not boiling, stirring constantly for about 5 minutes. Remove from heat and allow to steep for 20 minutes, then strain the butter removing the chilies and discarding them. Put the chocolate and the coffee in the top of a double boiler and heat until the chocolate is melted. Stir in the strained butter until well combined and then set aside. In a double boiler, beat the eggs yolks, chocolate liqueur and ¾ cups of sugar beat until the mixture is pale yellow and well combined. Remove from heat and continue to beat until thickened and cooled. Slowly add the chocolate mixture to the egg mixture and stir until well combined. Beat the egg whites until soft peaks form, then slowly add the 2 tbs sugar and continue to beat until stiff peaks form. Gently and slowly fold the egg whites into the chocolate mixture using about ¼ of the egg whites at a time. Cover the mousse and chill for at least two hours.

While the mousse is setting, make the whipped cream. In a sauce pan, heat the chili and the cream until hot and steamy but not boiling. Stir over low heat for about 5 minutes. Remove from heat and allow to cool at room temperature for 30 minutes. Strain cream, removing and discarding the chili, and then chill in the refrigerator until completely cool, at least two hours. Combined the cream, sugar, cinnamon, nutmeg and coco powder in a bowl and beat on high until set, about 4 minutes. Set aside.   Gently spoon the mousse into a piping bag with a metal tip. Most of the cupcakes should have holes in the top, revealing a large cavity in the center of the cupcake (like a popover). If no holes appear, make a small slit in the center. Pipe in the mousse into the center of the cupcakes, filing the cavity, refill the piping bag as needed. Top cupcakes with the whipped cream.