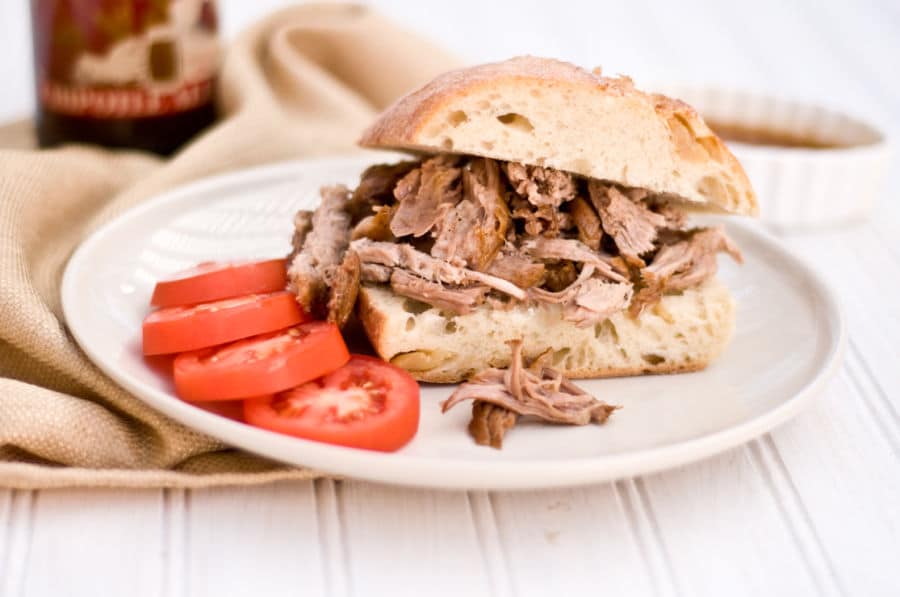
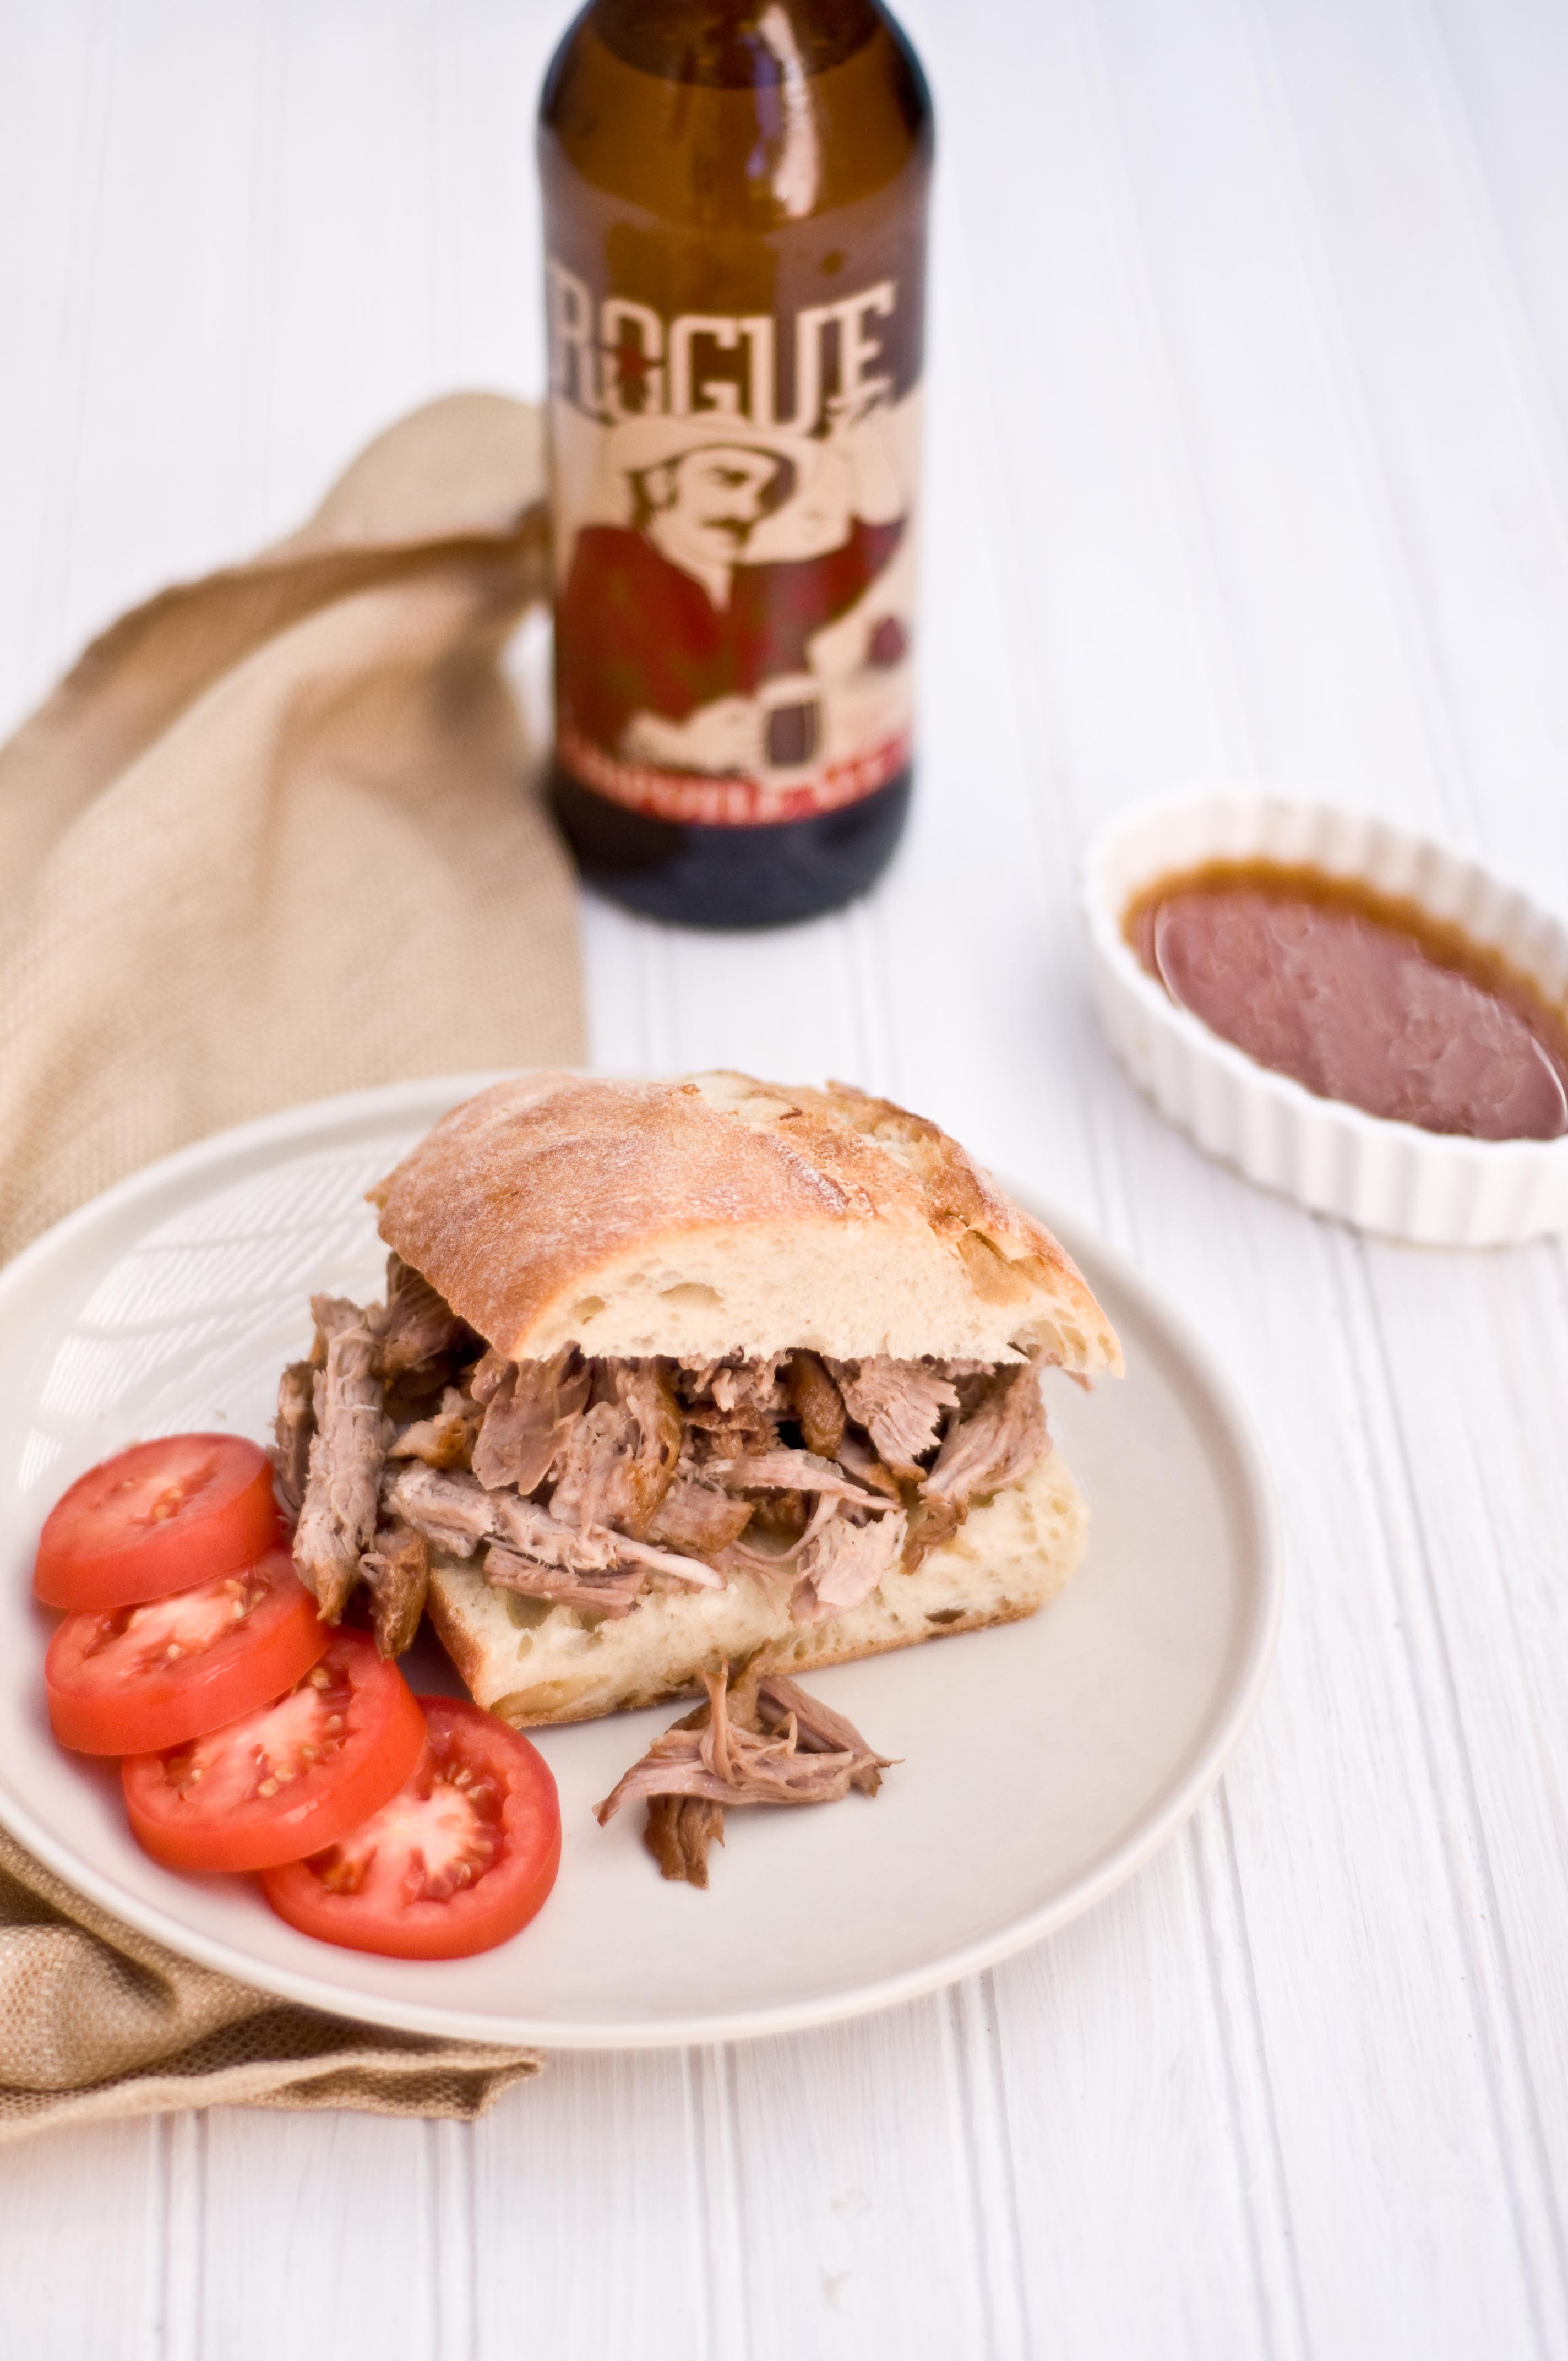
My favorite thing about pulled pork is that it takes a long time. You didn’t read that wrong, I LIKE that it takes hours. Probably because I tend to over-committ myself, double book myself, take on too much, then feel guilty that I am not able to give 100% to everything and I need to remember to slow down. I work full time, I have this blog that I love more that anyone will know, I write for Honest Cooking, and for the Glendale Examiner, AND I am a mom. When I have decided to make a recipe like pulled pork I HAVE to stay home, play in the backyard with Tater, ignore my phone and listen to excessive amounts of Led Zeppelin. I need to make pulled pork more often.
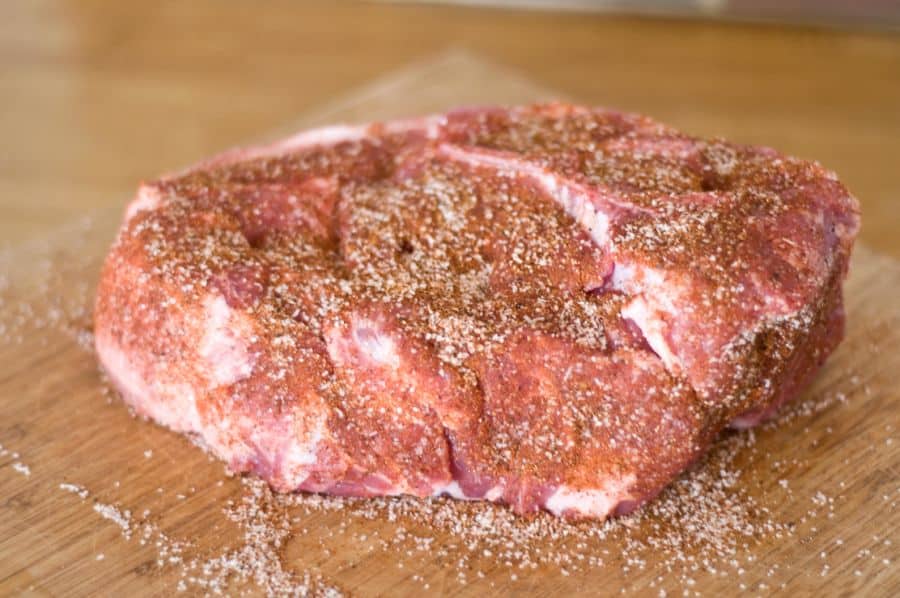
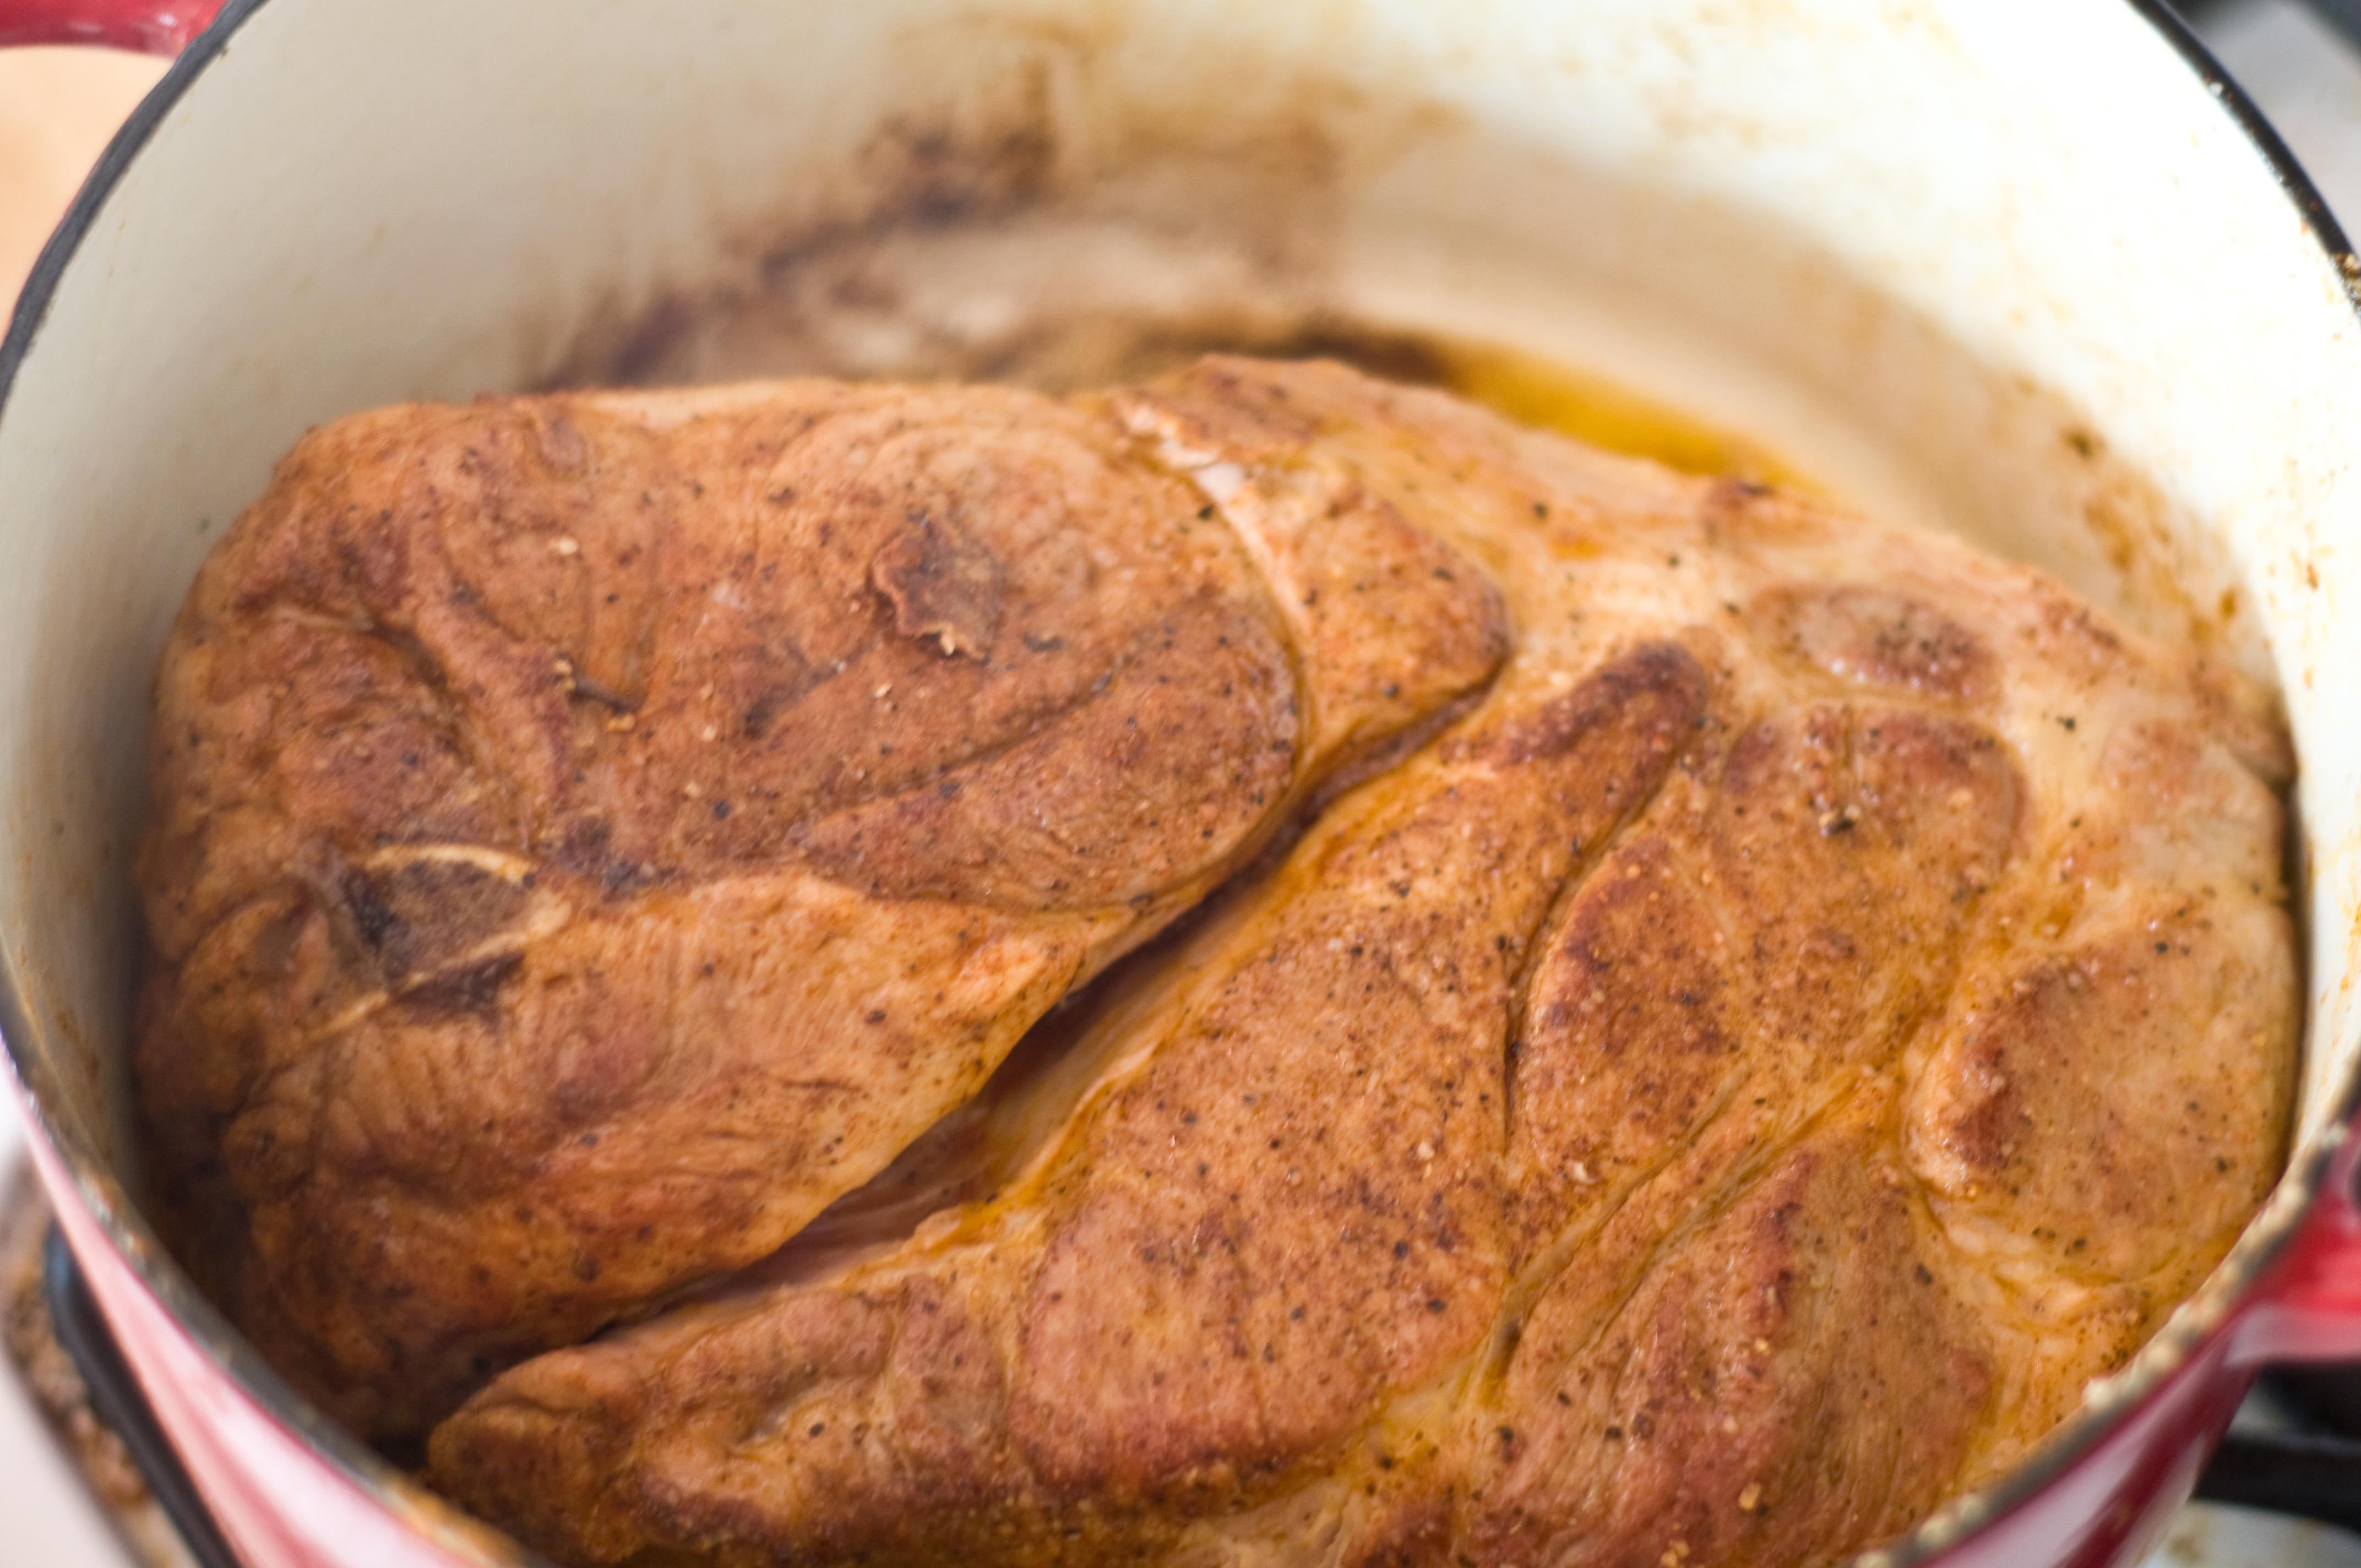
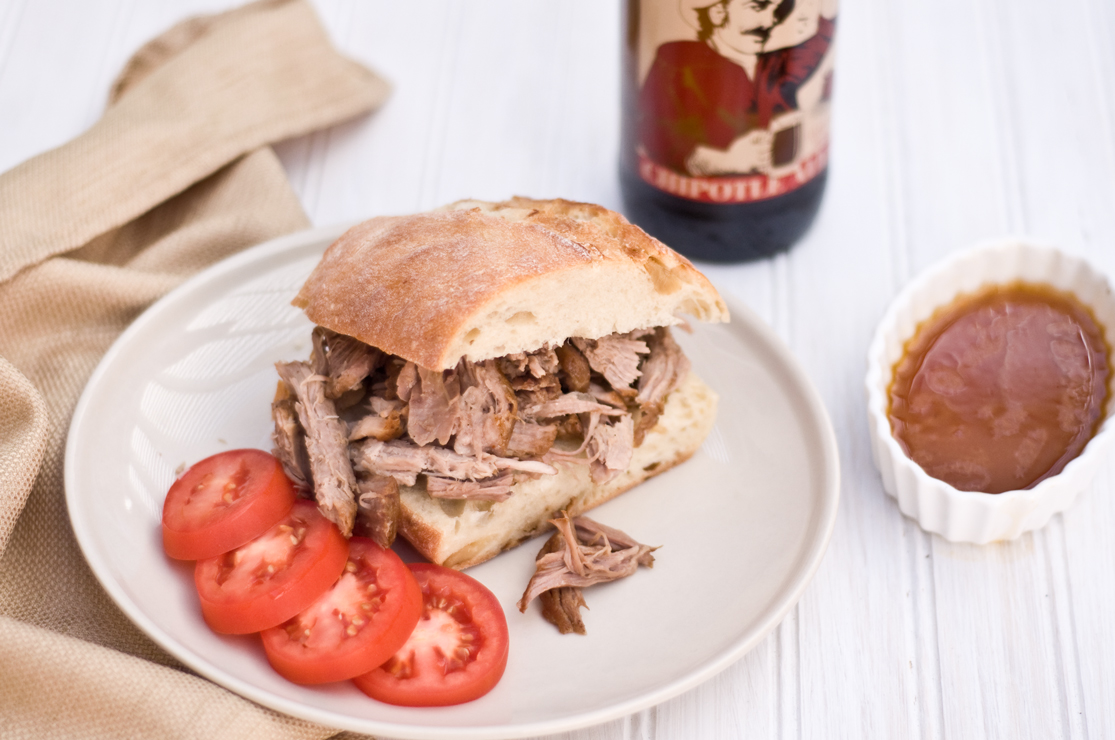
What does braising mean? What a good question. Braising just means to sear meat at a very high heat and then cook it slowly at a low heat until cooked through. I used another amazing craft beer for this recipe. Rouge’s Chipolte Ale:
I have had a soft spot for Rouge brewery for years. Rouge is beer lovers beer, and dedicated to the art of the craft. Actual real life people making really good beer. If you live on the West Coast, this Portland Oregon brewery’s beer is probably at your local grocery store. It’s one of the few great craft beers that I have a fairly easy time getting my hands on. In fact, the very first time I decided to cook with beer (I made a chocolate beer cake), I used Rouge’s Chocolate Stout. I do believe that I owe Rouge for my fascination with cooking with beer.
Thank you Rouge, you’re Pulled Pork thank you card is in the mail.
I used this meat in three ways, on italian bread as a delicious sandwich, over rice and beans, and in a burrito. Other ideas for pulled pork include:
Pulled pork nachos
Pulled pork sliders
Pulled pork tacos
Pulled pork enchiladas
Pulled pork flatbread pizza
Pulled pork hand pies
Seriously, you could go all Bubba Gump about this and it would be endless. There is no shortage of uses for Pulled Pork.
My message of the day is this:
Slow down, eat good SLOW food, Drink great beer and don’t forget to play in the back yard with your daughter while listening to Over The Hills an Far Away (OK, maybe that last one was just for me).
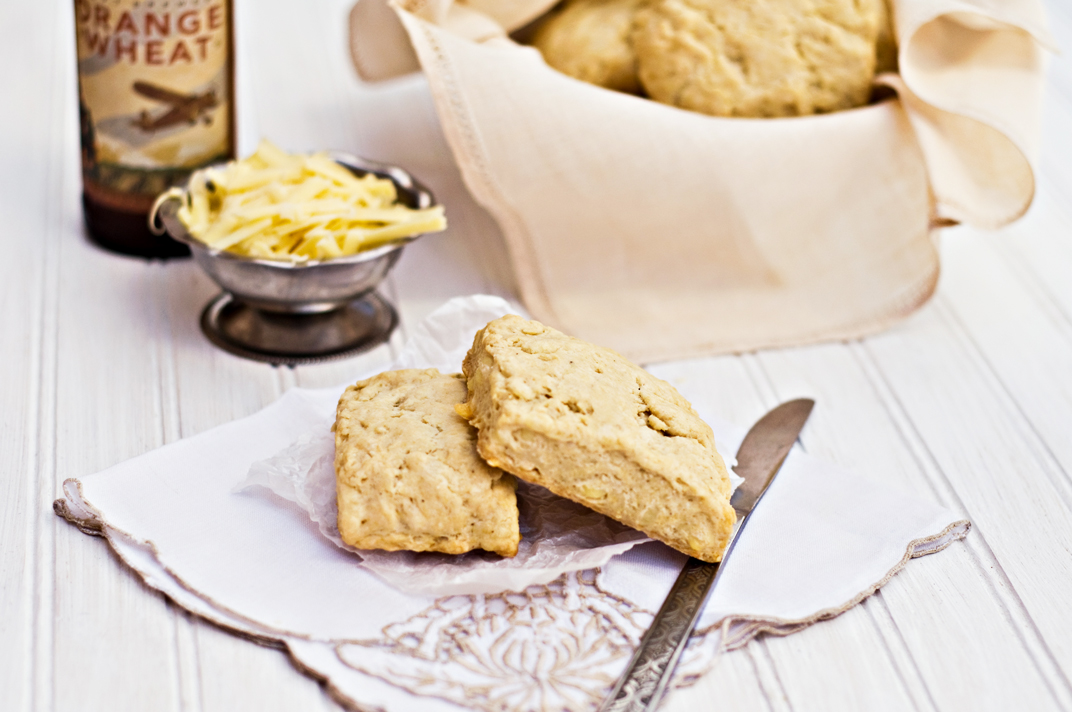
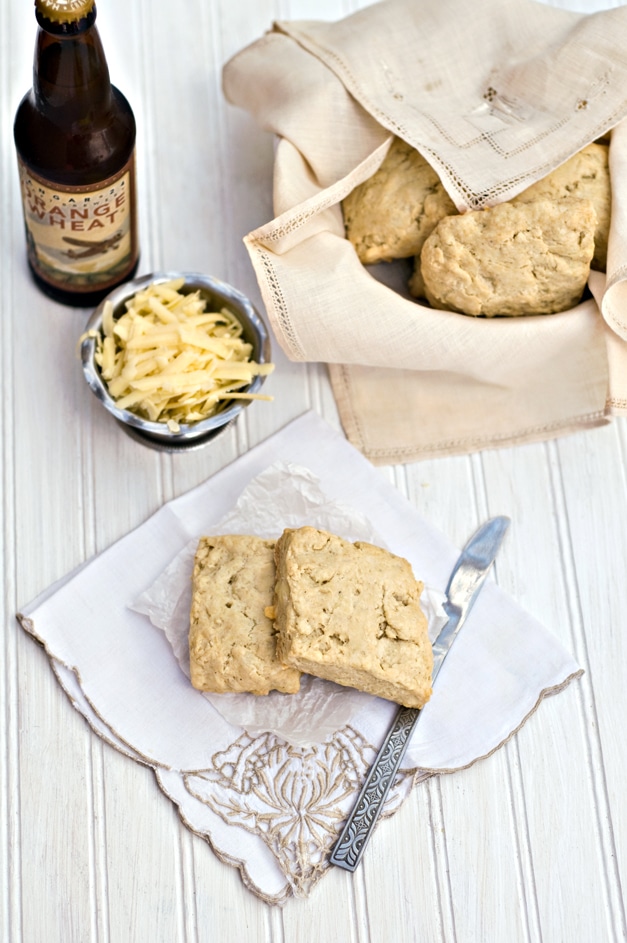
When you go about baking biscuits, beer is a great addition. Not only because beer is fantastic will every possible edible substance, but because the the carbonation is an amazing leavening agent that lends itself well to culinary beer usage.
For this recipe I used a Orange Wheat beer from Hangar 24, a Southern California based brewery. The beer was beautiful and the flavors where perfect for these biscuits. When I pick up a beer with fruit on the label, I am initially a touch apprehensive. I wait for the possibility of a Hard Cider like taste with the hesitation of a contused prostitute, before taking a sip. I am HAPPY to report that the natural orange was perfectly subtle and a well balanced citrus flavors, with a clean, crisp finish.
Even after cooking, the flavors stayed intact and complimented the white cheddar beautifully.
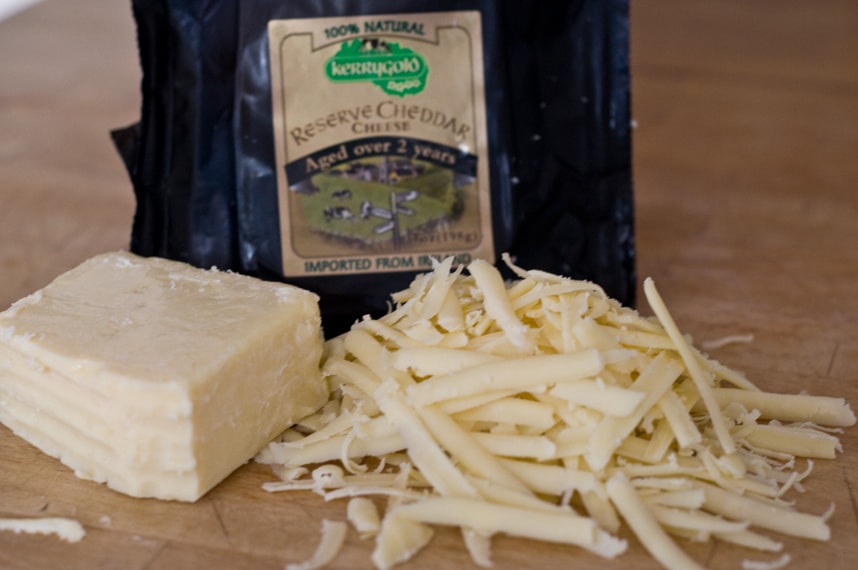
I also used Kerrygold cheese, although this has nothing to do with Oktoberfest, it’s just really great cheddar. The flavors are perfect for this recipe.
Cheddar Beer Biscuits
2 cups of flour
1/2 tsp sea salt
1 1/2 tsp black pepper
1/2 tsp baking powder
1/2 tsp baking soda
1 tsp sugar
1 stick (8 tbs) butter, cut into small cubes
1/2 cup craft wheat beer (Orange Wheat from Hanger 24 preferred)
1/2 cup white cheddar (Kerrygold reserve preferred)
Preheat oven to 400.
Put the flour, salt, pepper, baking powder, baking soda and sugar in your food processor and pulse until combined. Add your butter cubes and process until the butter is evenly distributed, about 1-2 minutes.
Move to a bowl and add the cheese and beer and stir until combined.
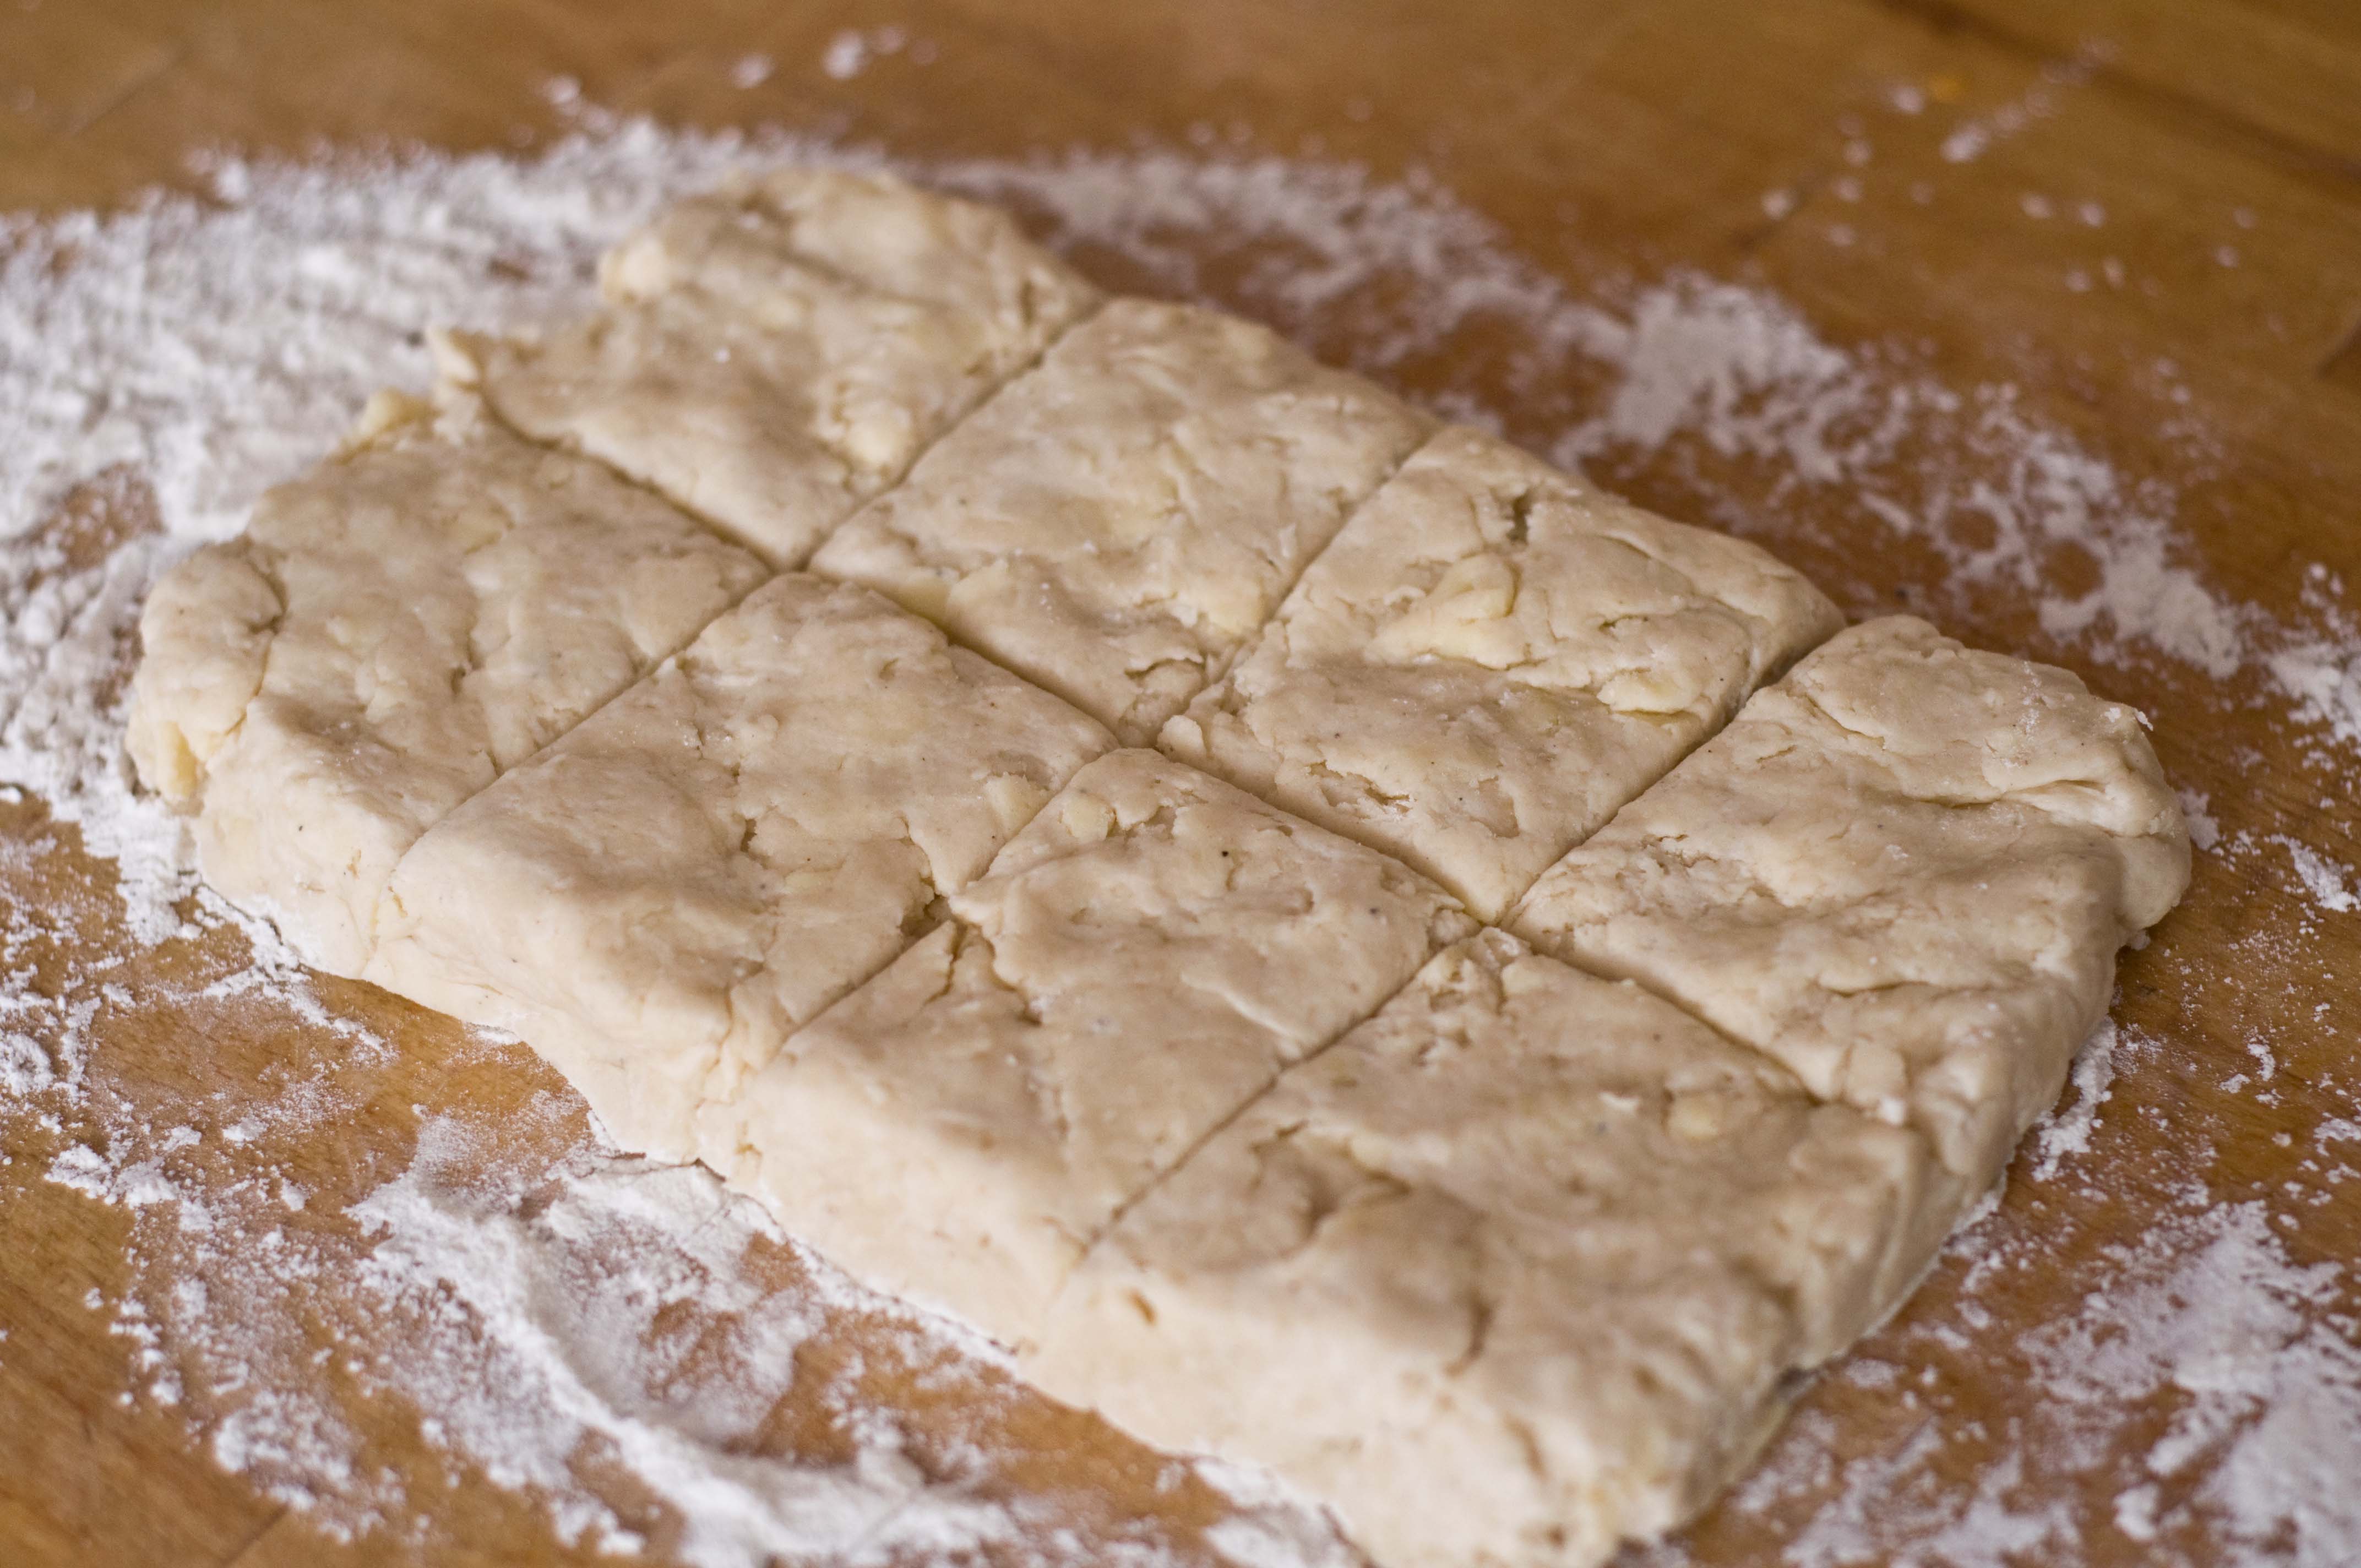
Dump the dough onto a floured surface. Squish together with your hands to form a ball and then flatten into a rectangle about 6 inches wide and 10 inches long and 2 inches high. Use a sharp knife to cut the biscuits into squares.
You can make them as big or small as you want, but this recipe will make 6-8 average sized biscuits.
Place the biscuits on a baking sheet covered with parchment paper. Sprinkle the top with a bit of sea salt and pepper.
Bake for 12-14 minutes or until light golden brown.
I know that Oktoberfest started as the celebration of a royal wedding that would have put the recent William/Kate union to shame. I also know that it is not an actual proper Holiday.
But for those of us completly in love with all things Beer, it might as well be.
Oktoberfest, as in the one that takes place late September to Early October in Munich, is about LOCAL beer. I love all beer, but I have a special affinity for beer brewed close to home. Although this beer isn’t actual German beer, being that I am in California, it is in line with the locavore spirit of Oktoberfest and their rule for never serving any beer at the official Oktoberfest Festival that is not brewed in their own backyard. And that backyard would be the Munich City limits.
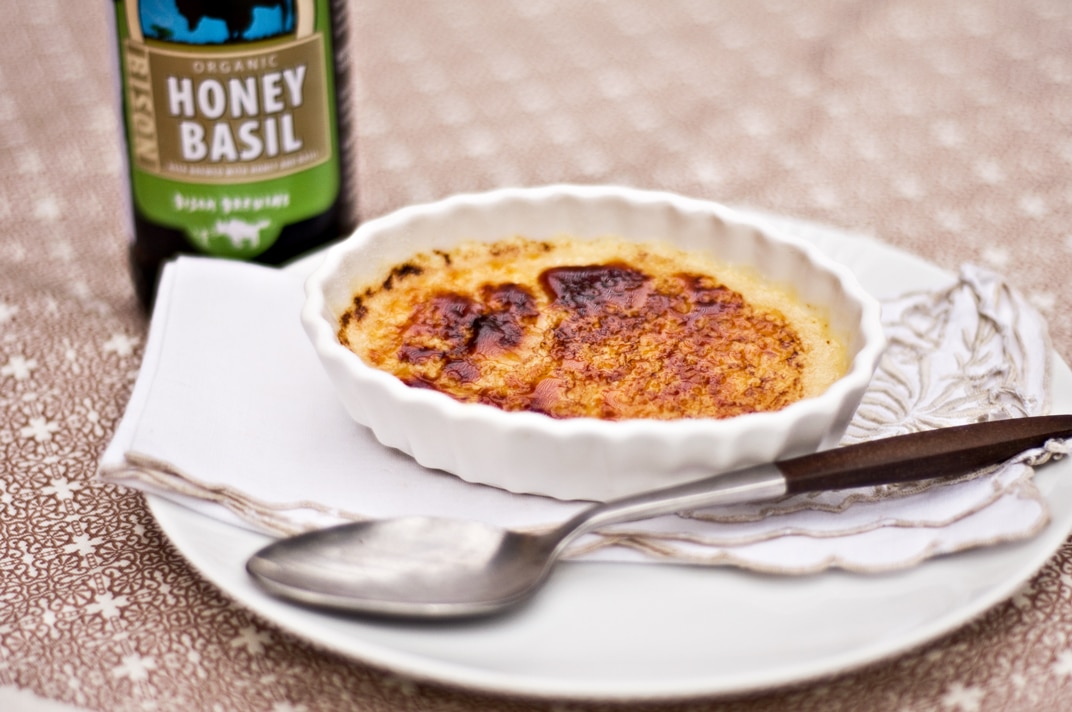
For this recipe, which I loved SO much, I used another incredible local craft beer, this one came from Bison Brewing. Honey Basil Beer. It’s local (to those of us in California), it’s organic and the flavors are amazing.
Beer Creme Brulee: Creme Beer-lee
3/4 cups heavy cream
3/4 cup Bison Honey Basil Beer (can sub German style wheat beer)
5 egg yolks
1/2 cup sugar, plus another 1/4 cup for the topping
Preheat the oven to 300.
Put the cream, and beer in a sauce pan over medium heat. Cook just until its bubbly around the edges but not boiling. Remove from heat, cover and allow to cool for about 15 minutes.
In a bowl, combine the egg yolks, and 1/2 cup of sugar. Whisk until frothy, about 3 minutes.
While continuing to whisk, slowly add the cooled cream mixture until well combined.
Put 8 ceramic ramekins in a baking dish, filling the baking dish with about 1 inch of water (don’t get any water in the ramekins).
Pour your custard through a mesh strainer into ramekins.
Cover the baking dish with aluminum foil and bake for 40-45 minutes or until the edges are set and the middle is still slightly wobbly.
Remove from oven and allow to cool, at room temp, in the water filled baking dish for 30 minutes. Transfer to a plate and allow to chill and set in the fridge for 4 hours. Right before serving, cover the top of your set custard with an even, thin layer of sugar (about 1/2-1 tsp). Then run a culinary torch over your sugar, slowly, until it melts and turns an amber color.
Notes
Cooking tip: Don’t brulee the sugar until you are ready to serve. After about an hour of sitting, the sugar will start to liquefy again.
Germany is goregous. I was lucky enough to have the opportunity to visit this amazing Country a few years ago. I even took a 7 hour train ride across the contry side on a beautiful day in September. And although tourist are flocking to Munich by the millions this month, and no offense to the Capitol City, my favorite place was Idar Oberstein. I like to travel off the beaten path, although the Festival in Munich does sound like a helluva good time.
For this recipe, which I loved SO much, I used another incredible local craft beer, this one came from Bison Brewing. Honey Basil Beer. It’s local (to those of us in California), it’s organic and the flavors are amazing.
Oktoberfest started this past Saturday, September 17th, marking the 201st anniversary of this high holiday devoted to beer. In honor of the German festivities, I am declaring this week "Beer Week" on Domestic Fits.
I have a love and a passion for really fantastic craft beer that started while working as a waitress at a micro brewery when I was in college. I was able to get a tour of the brewery and a crash course in beer making from two very excited, self proclaimed "Beer Geeks." Up until this point the idea of a "Beer Guy" conjured up images of frat boys playing beer pong, but the Geeks changed all that for me. They were excited about the beer, the flavors, the process of it and the difference between an Ale and a Lager (FYI: there are several differences but the main difference is a Lager is brewed longer). I was hooked and a world of flavors opened up. Lucky for me, the West Coast has a fantastic, seemingly endless, supply of craft beers. If you are ever so lucky to visit us, and you love the art of beer, take a tour of a microbrewery. Beer guys are the nicest breed.
Although the true Oktoberfest celebrations won’t allow any beer to be served at the festival that aren’t brewed within the Munich City limits, I decided against using German beer. I love German beer, its lovely, but the locavore spirit of using what is close by is what I wanted to capture. For this recipe I used a Orange Wheat beer from Hanger 24, a Southern California based brewery. The beer was beautiful and the flavors where fantastic for these biscuits
I also used Kerrygold cheese, although this has nothing to do with Oktoberfest, it’s just really great cheddar. The flavors are perfect for this recipe.
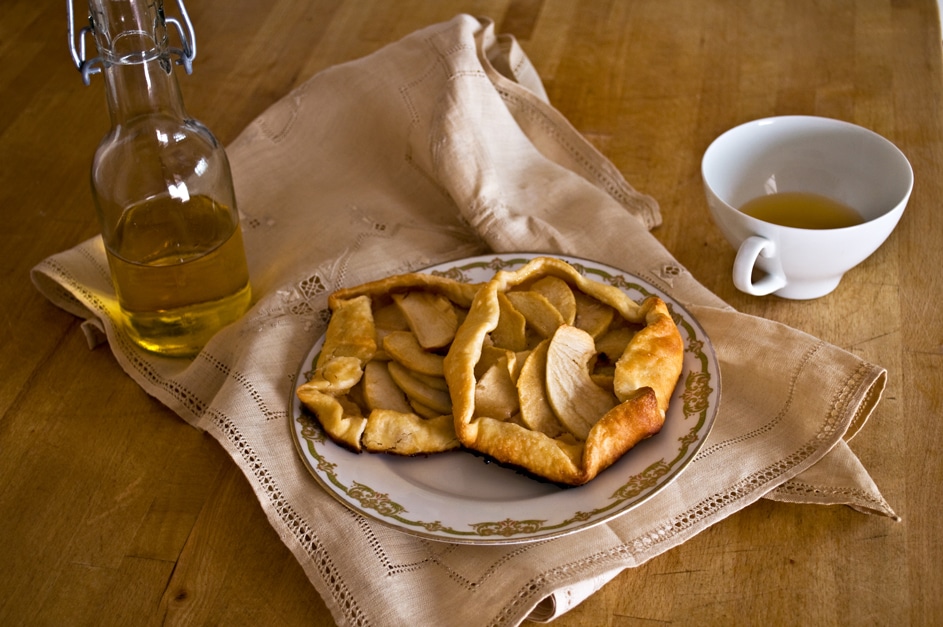
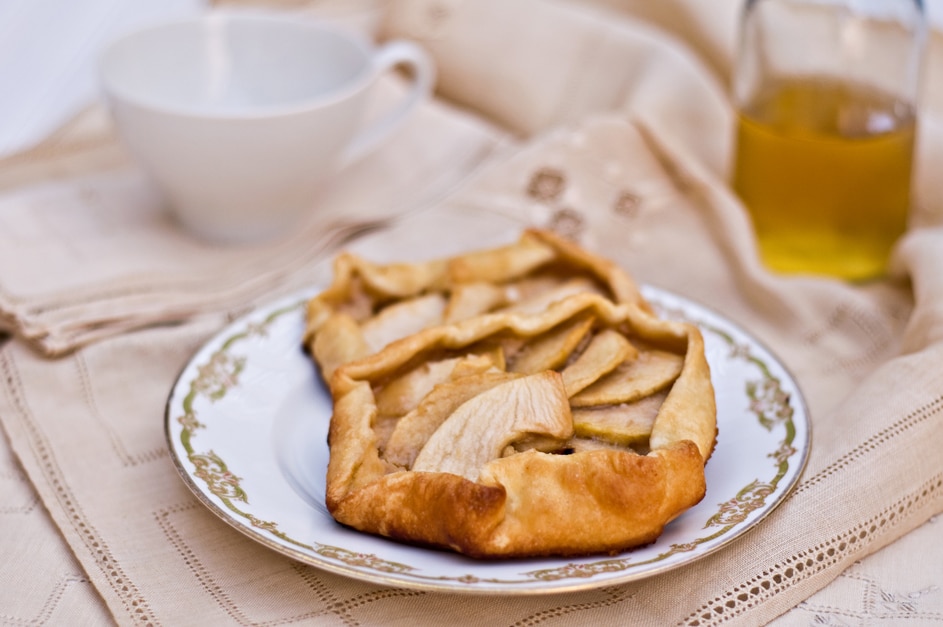
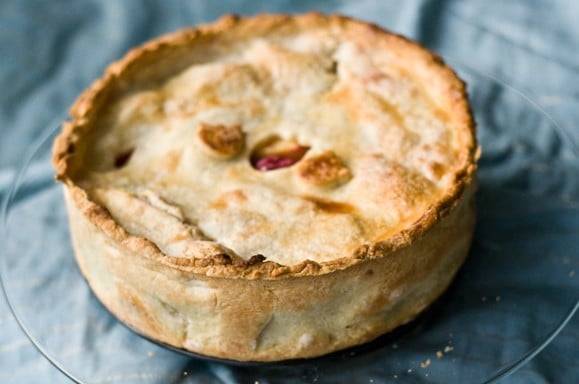
I figured out how to pronounce Galette. This was becoming an issue for me. How can I go about baking, and writing about, such an amazing food that I can’t even mention in conversation? So I googled it. I found this lovely little website that has a charming French man (just trust me on the charming part) who so beautifully pronounces the word Gal-Let. You’re gonna press play over and over just to make sure he really said Gal-Let and not Guh-Lay. Or maybe that’s just me.
Apple Brown Sugar (Gal-Let) Galettes
For the Crust:
1 1/2 cups flour
2 tbs sugar
1/2 tsp salt
1 stick butter
1/4 cup ice cold water
For The FIlling:
4 cups granny smith apples, cored, peeled and sliced
2 tbs fresh squeezed lemon juice
1 cup brown sugar, packed
3 tbs melted butter.
Make the crust:
In a food processor, combine the flour, sugar and salt. Pulse to combine. Add the butter (ice cold and cut into cubes) and process until combined. Add the remaining flour and process until combined. Move dough to a bowl and add the water with a wooden spoon (don’t add the water with the food processor or your dough will turn into a cracker). If your dough is too dry, or two wet, add a bit of water or flour to achieve the right consistency.
Form the dough into a disk, cover with plastic wrap and chill for at least an hour.
Once your apples and peeled, cored and sliced, add to a bowl with the lemon juice and toss to combine. Add the brown sugar and butter and toss to combine. Let stand at room temp for 20 minutes.
Preheat oven to 400.
Once your dough is chilled, roll out to an even thickness. Cut out 6 inch circles. Use whatever you have that is round and six inches, I used a small plastic bowl. This recipe will make 6-8 mini Galettes.
Arrange the apples in tight circle in the middle of your dough, leaving a one inch boarder around the edges.
Fold the edges over the filling, leaving the center open.
Brush the remaining brown sugar/butter mixture that your apples were sitting in all over the Galettes and the exposed crust.
Bake at 400 for 28-35 minutes or until golden brown.
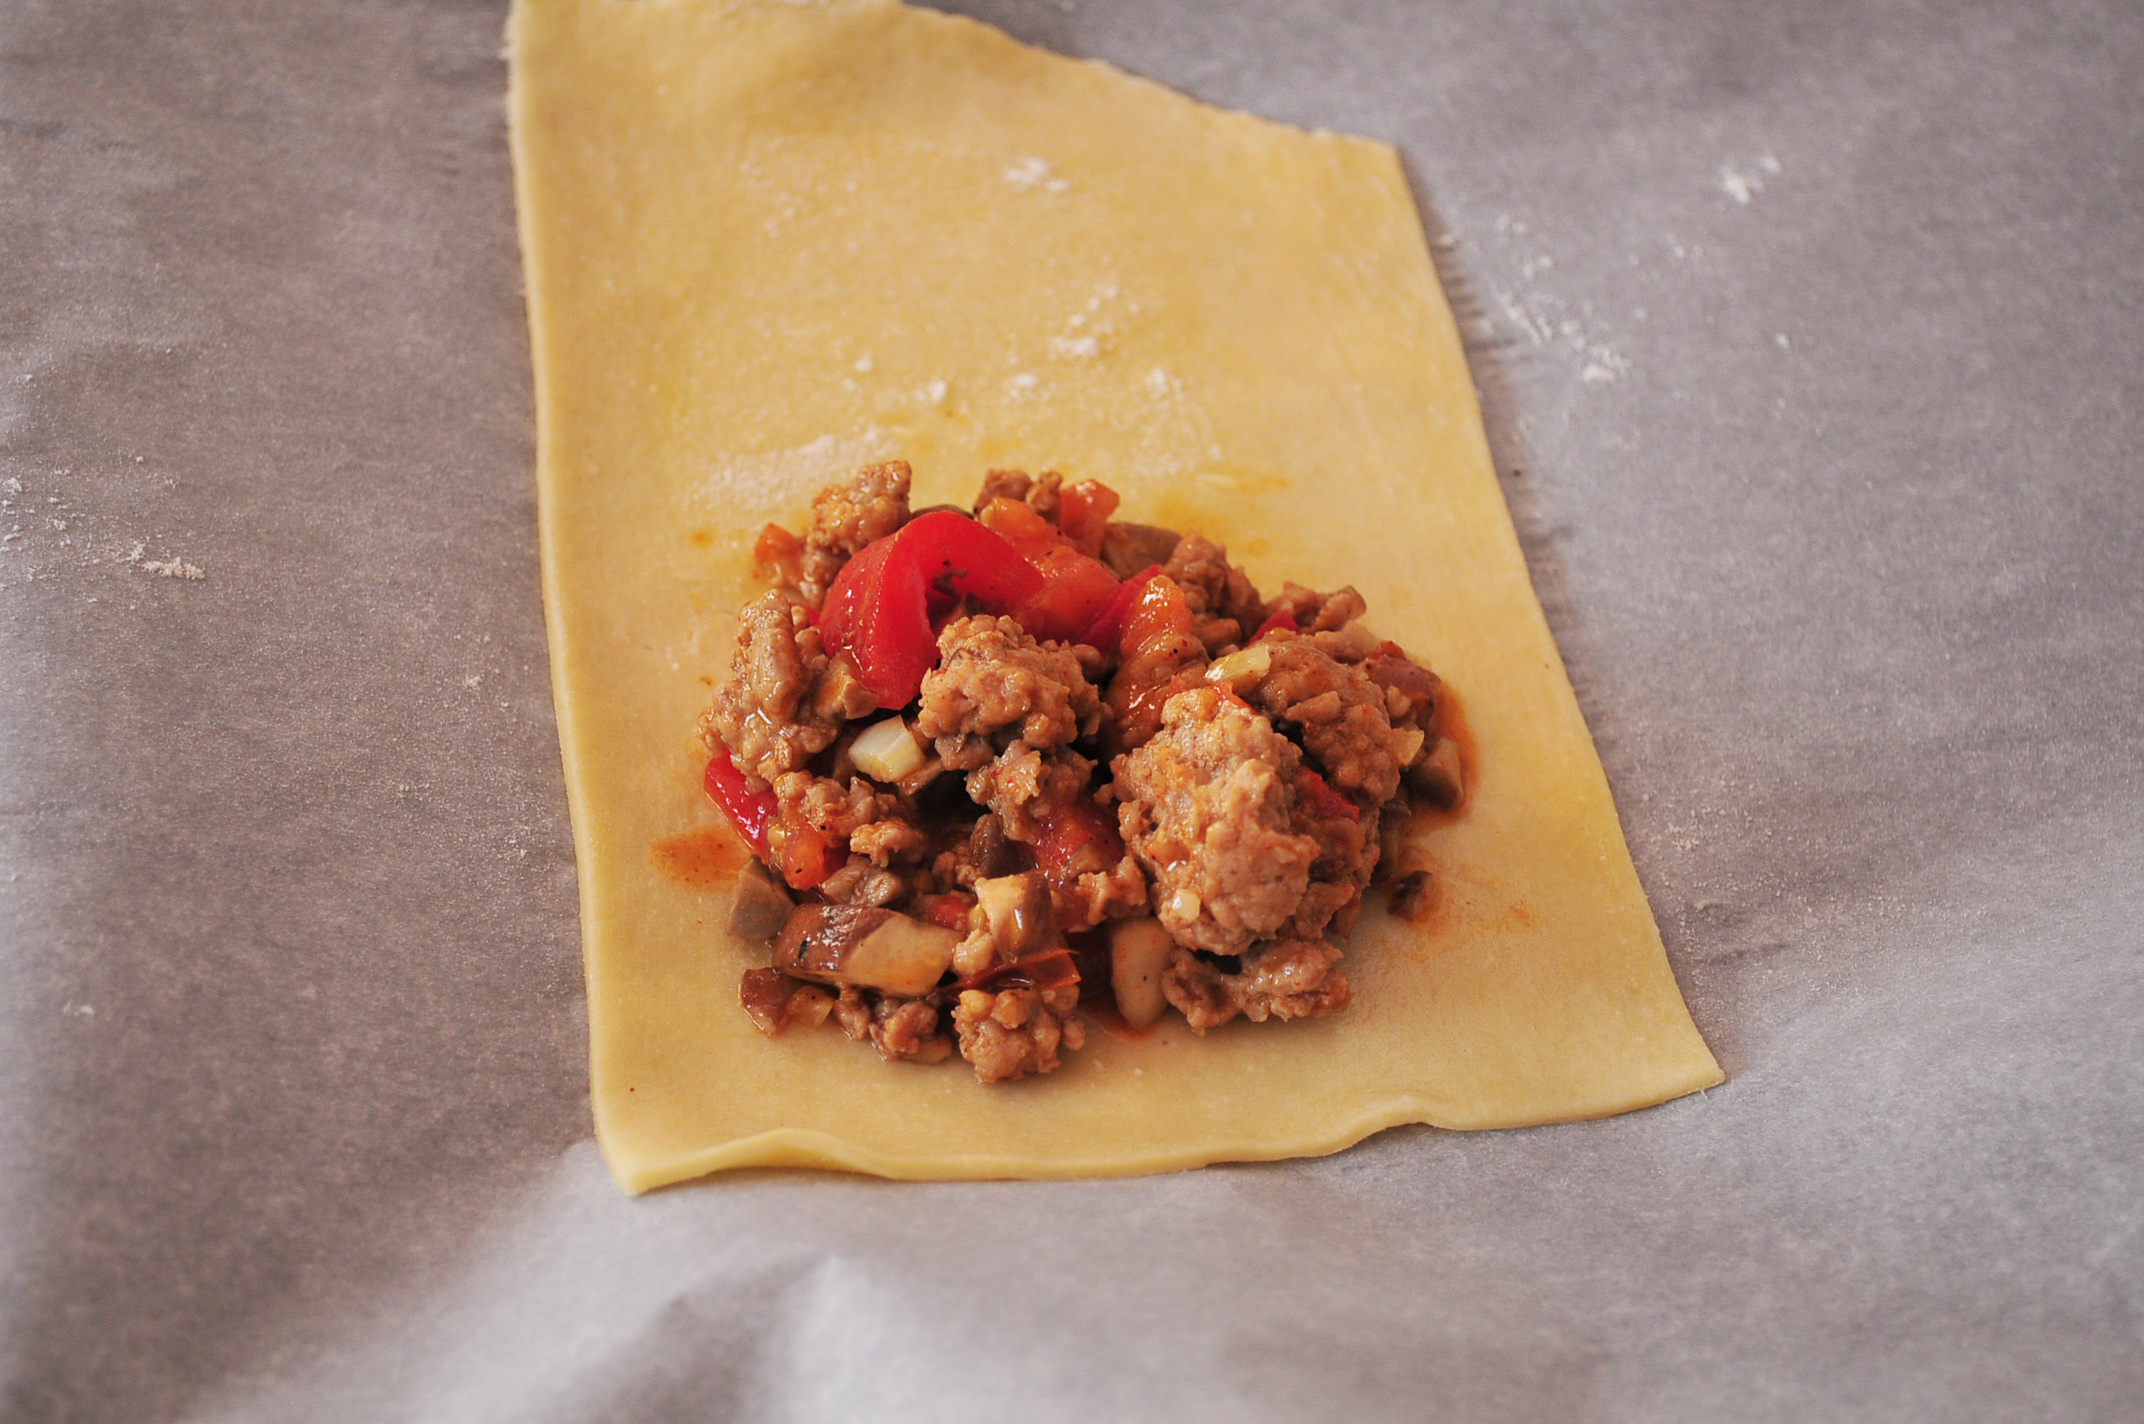
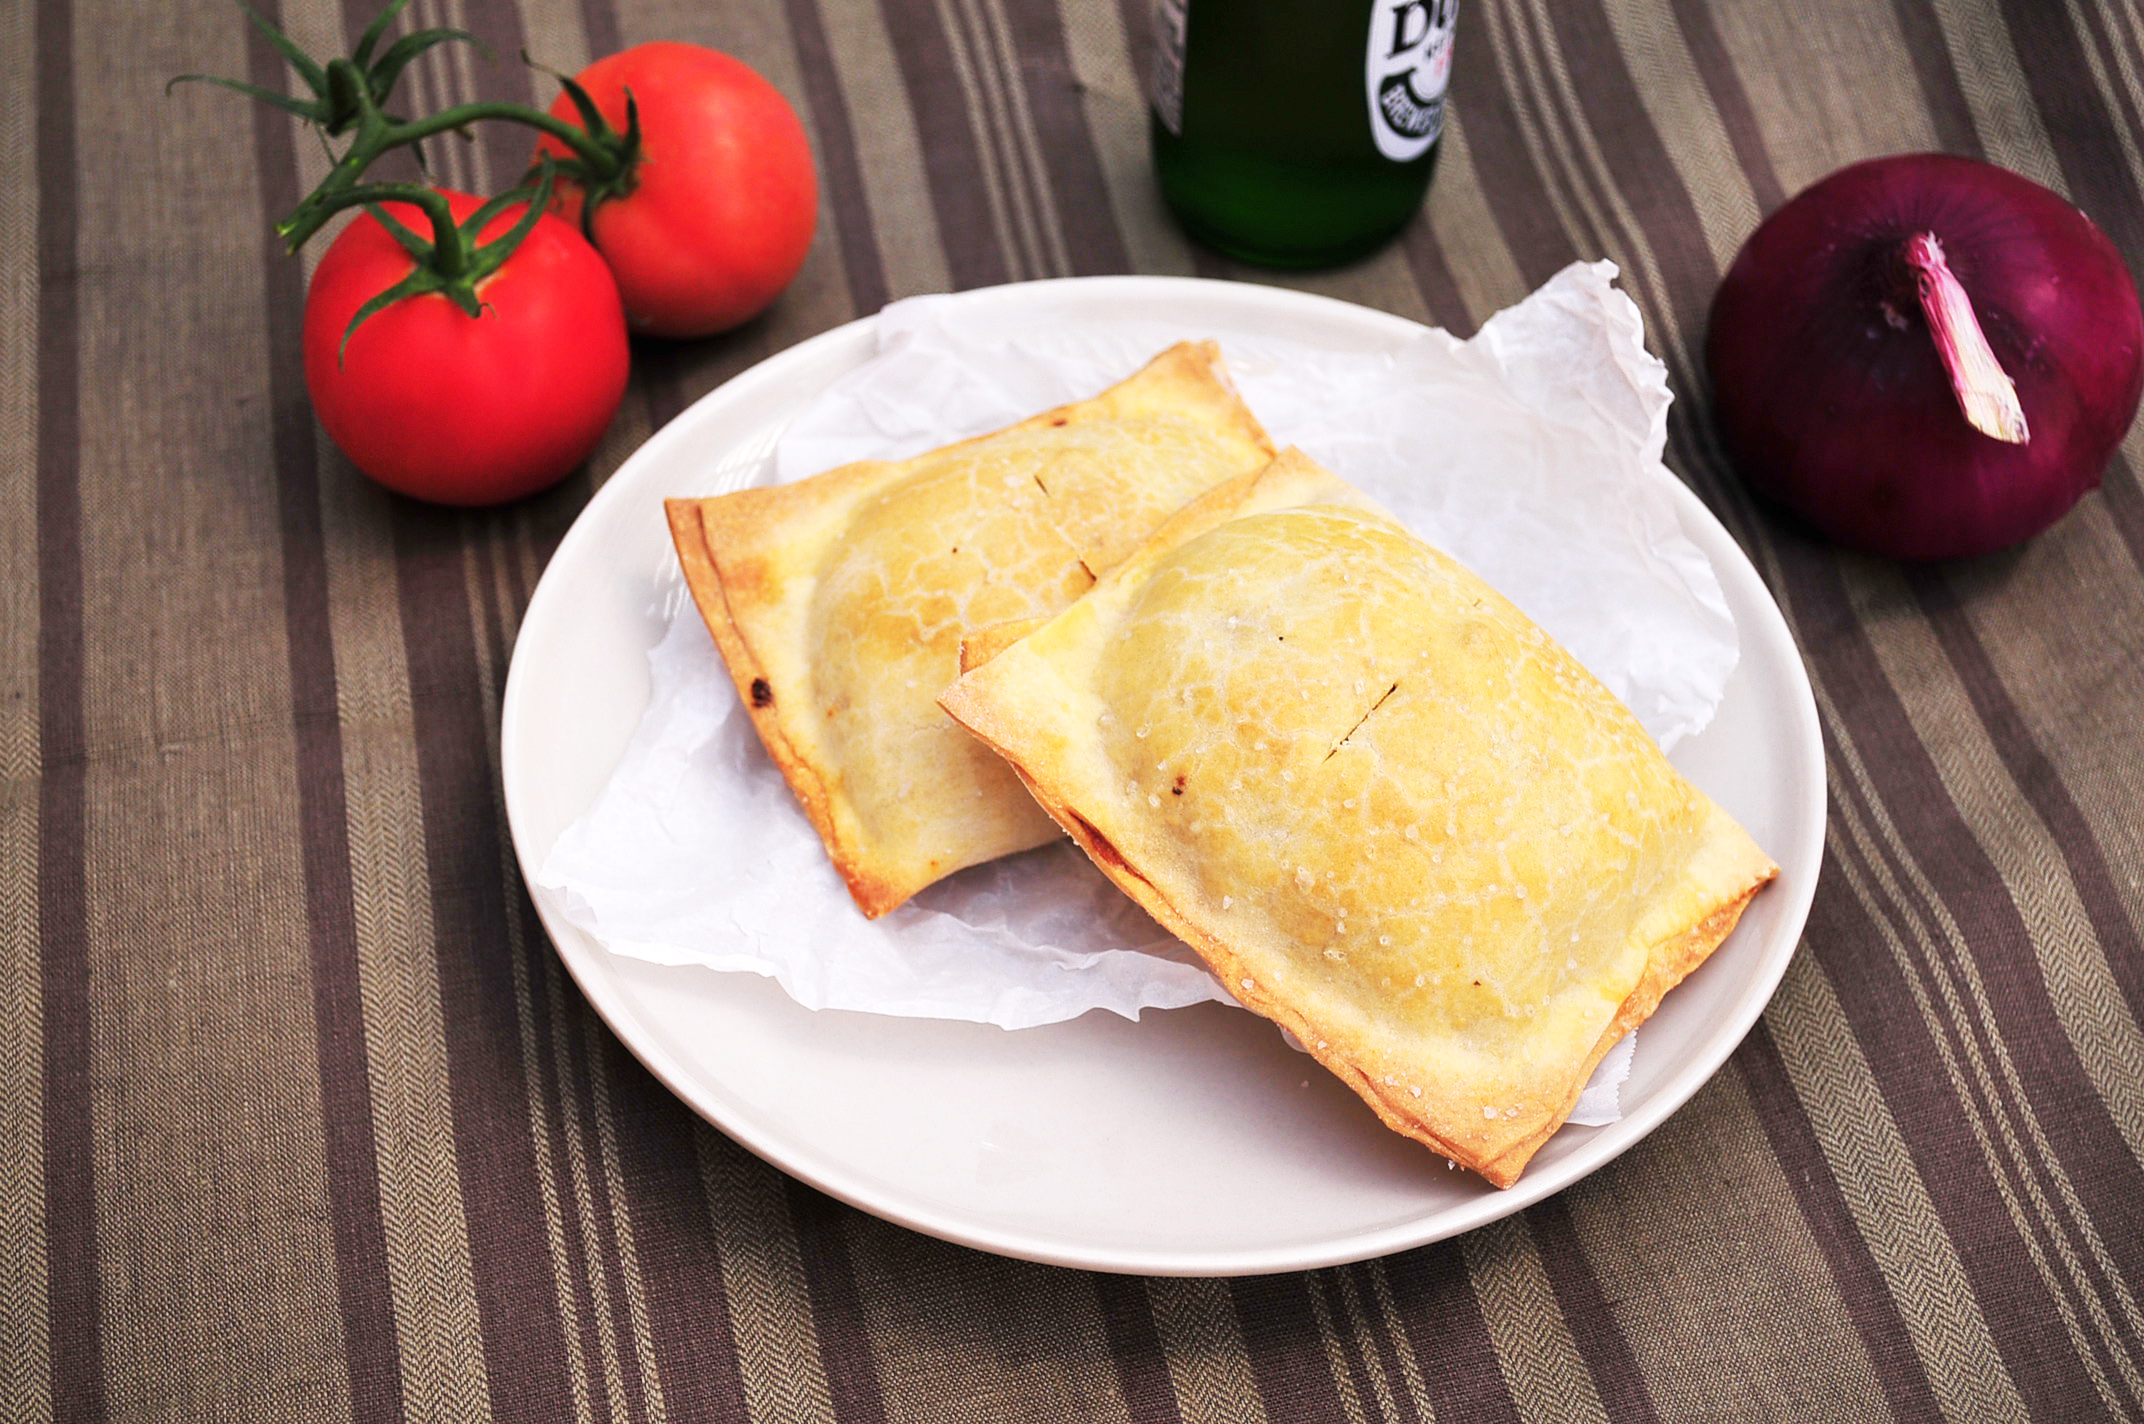
I could eat pie every day. I love it. It’s my First Love when it comes to desserts and cooking in general. I could have an All Pies blog ("Pie Fits"??) and be perfectly happy. When I was a kid, I didn’t want birthday cake (gasp!!!) I wanted birthday pie. Usually Apple. Not enough people eat savory pie and I want to change that. Hand pies, empanadas and anything else small, savory and portable, should be right there among the sandwich masses. This recipe is easy, and the dough is based off a pie dough, but with a few alterations to make it more like an empanada, and it really is easy and quick. Also, a prefect lunch to pack for a picnic or a hike.
Get moving, eat pie.
Mushroom Pork Hand Pies
For The Dough:
2 1/4 cup flour
1 tsp salt
10 tbs butter, cold, cut into cubes
1 egg
1/3 cup ice water
For The Filling:
2 tbs olive oil (plus more as needed)
1/4 cup onioins, chopped
2 cloves of garlic, minced
1/2 cup mushrooms, chopped
1 cup ground pork (you can sub turkey or chicken as well)
1 cup tomatoes, chopped
1/2 cup roasted red bell peppers, chopped
1 tsp salt
1/2 tsp pepper
1 tsp smoked paprika
1 tsp chili powder
For The Top of Dough:
1/4 cup melted butter
pinch of salt
Put 1 1/2 cups of flour and the salt in a food processor, pulse for a second to combine. Add the butter and process until combined. Add the remaining flour and process again. Move to a bowl. In a small bowl, beat the egg and water together until well combined then add the egg/water to the dough with a wooden spoon. If you add the water and egg with the food processor, your dough will turn out crispy and cracker like.
Form into a disk, cover with plastic wrap and chill for at least 1 hour.
Heat the oil in a saucepan over medium heat. Add the onions and cook until opaque, about 3 minutes. Add the garlic and the mushrooms and cook until the mushrooms are soft, adding a little more oil if the pan gets dry. Add the remaining filling ingredients and cook until warm and combined, about 3 minutes. Allow to cool.
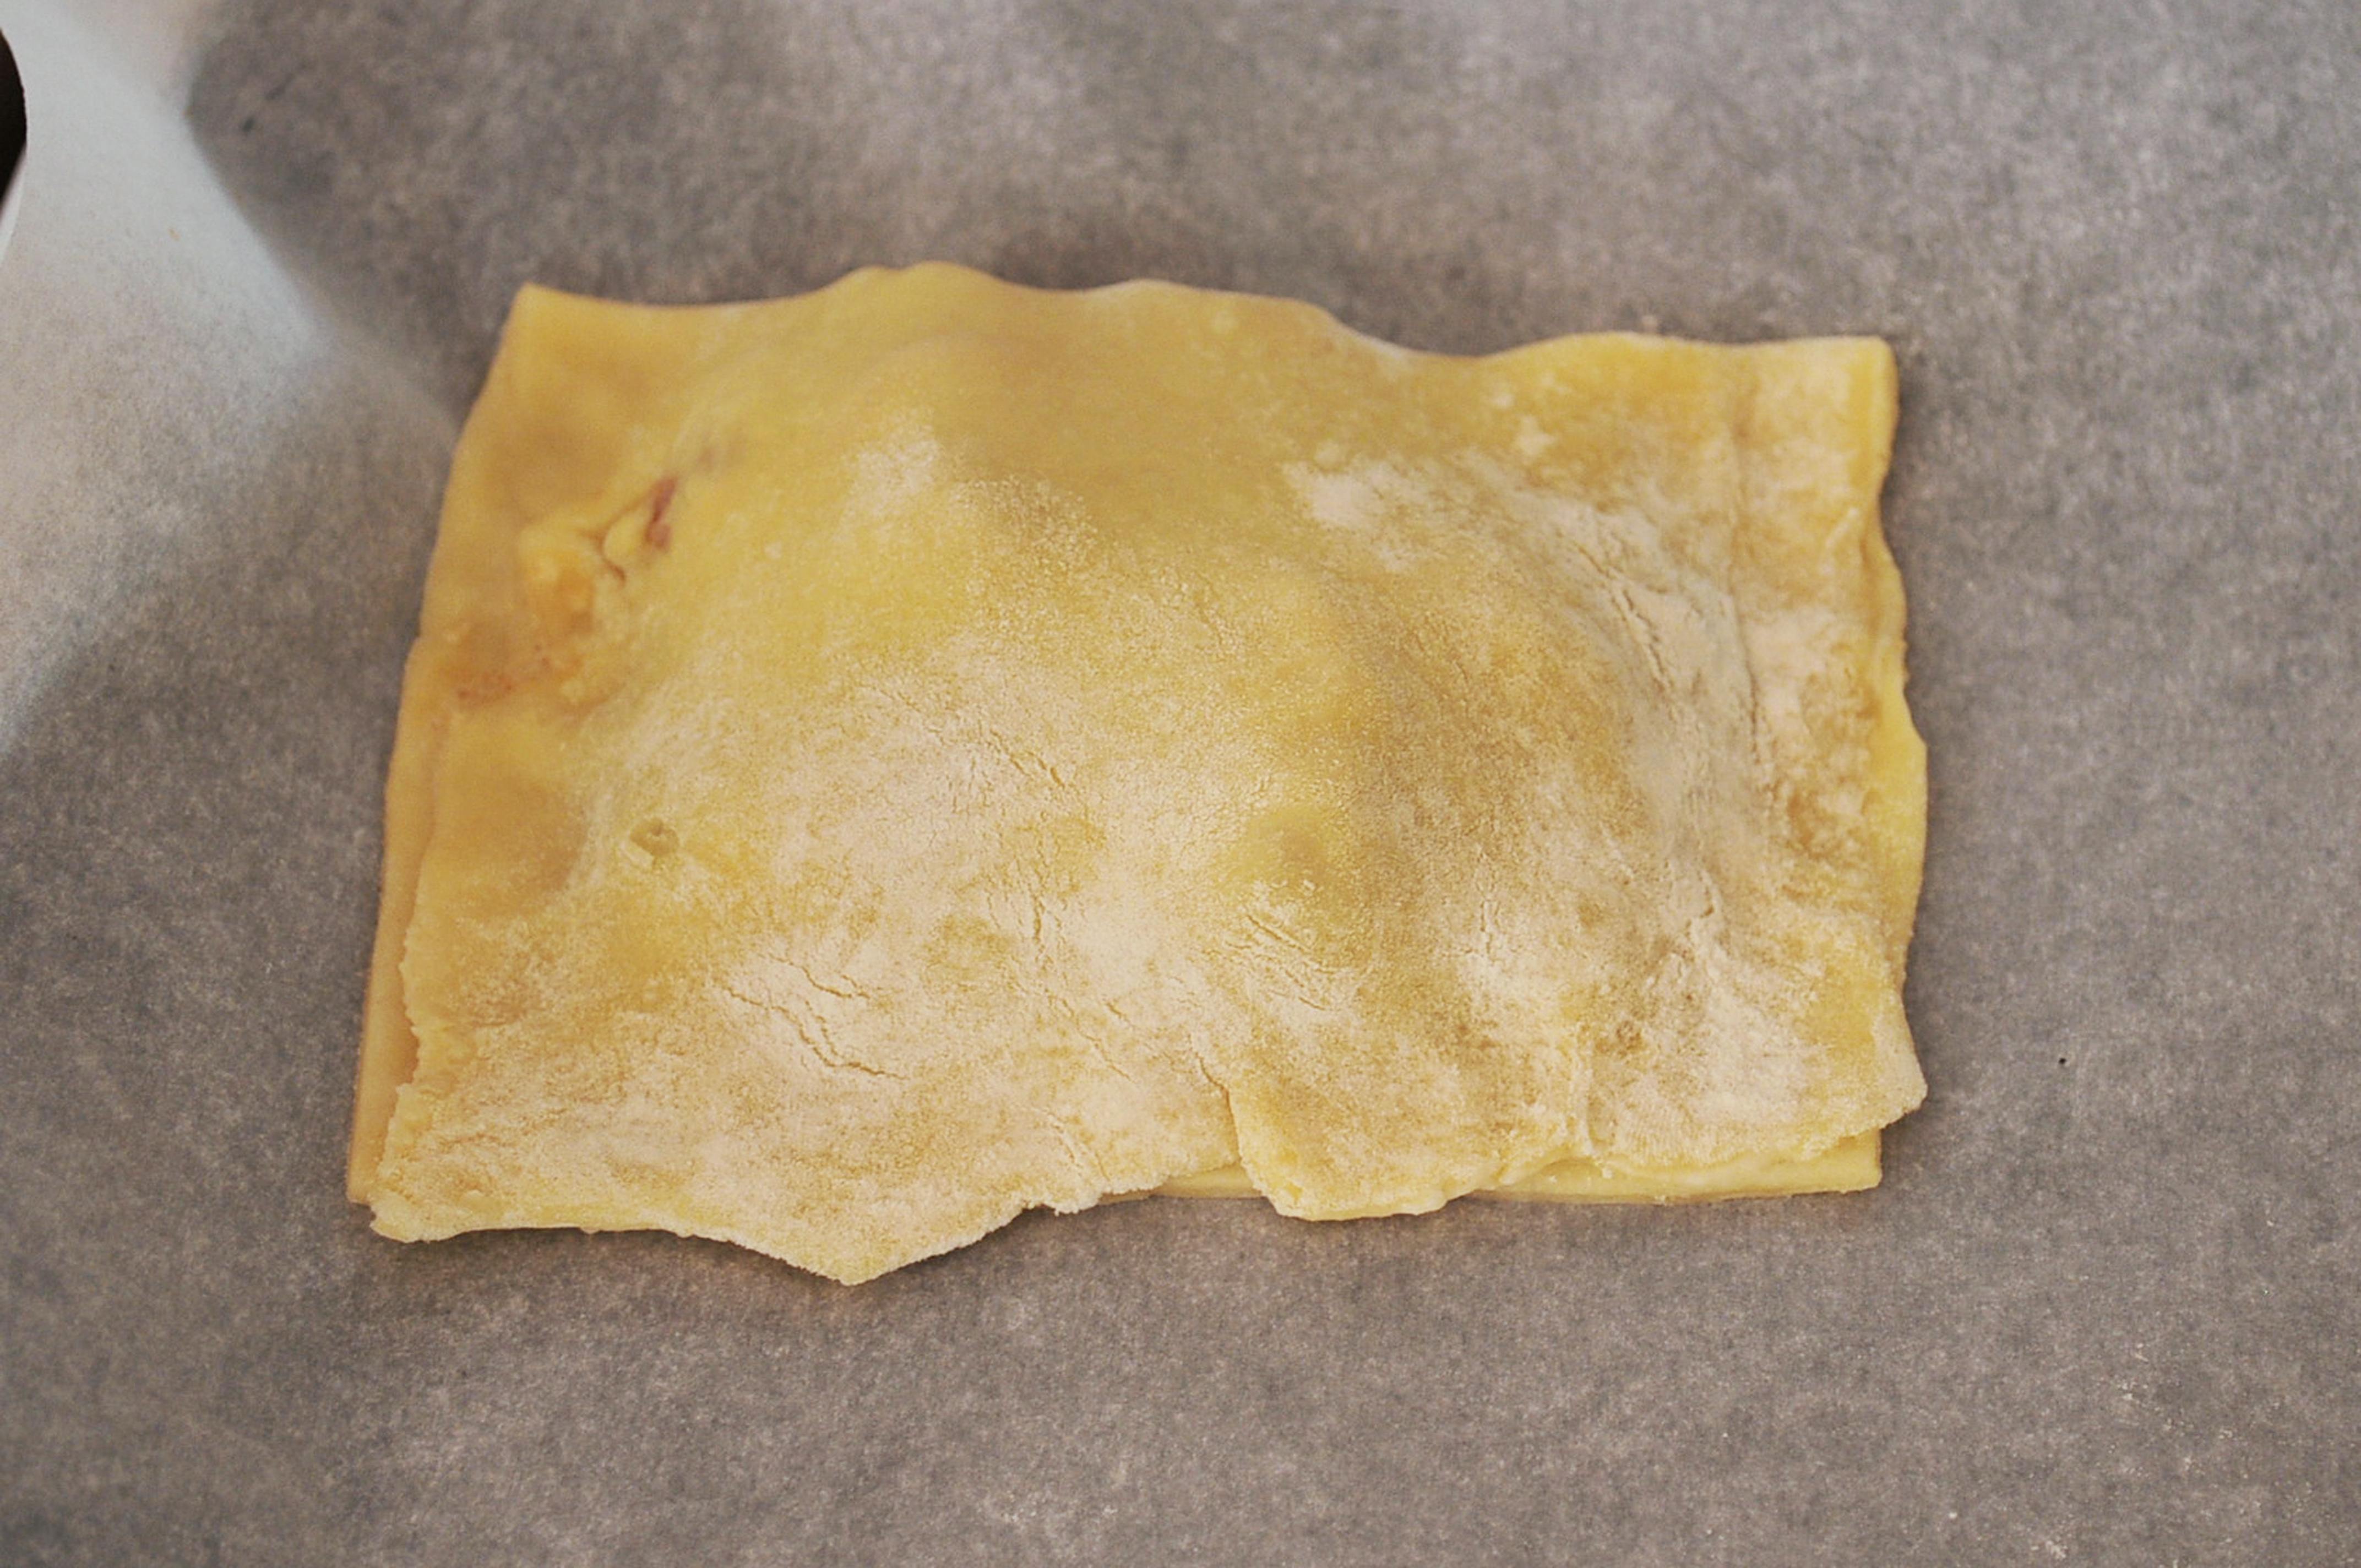
Once the dough is chilled, roll out on a flat surface and cut into sections that are 6 inches by 8 inches. Add 1/4 cup of the filling to one end of the strip, keeping at least an inch between the filling and the edges.
Fold the empty half over the filling and press the edges until secure.
Transfer to a baking sheet (sprayed with cooking spray or covered with parchment paper to prevent sticking).
Repeat until all the dough and filling are used. Brush the tops of the pies with melted butter and sprinkle with a little salt.
Should make between 8 and 10 pies.
Bake at 400 for 20-25 minutes or until golden brown.
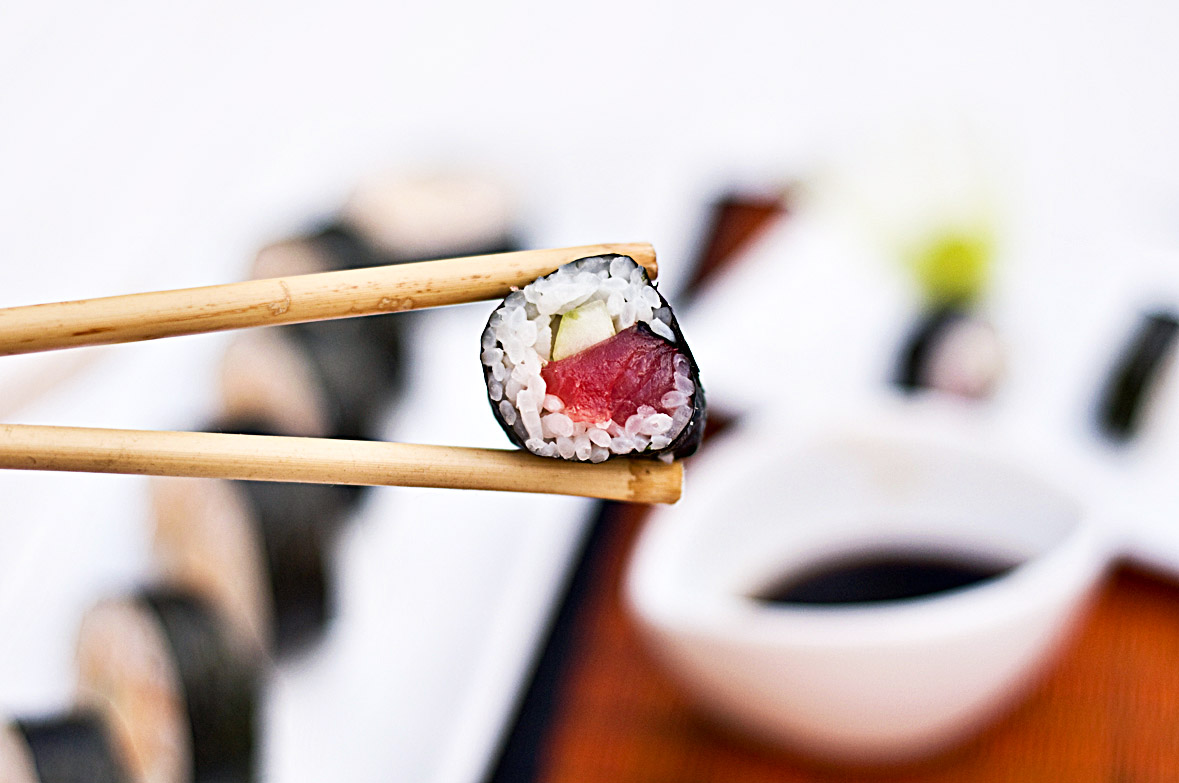
Sushi making is an art. A beautiful, delicious art. I’m not going to sit here and pretend that one little post will ever get anyone near the magic that happens behind a real sushi counter, but I WILL tell you that making a simple roll is easy enough to do at home. If you dare.
Make The Rice
Sushi rice isn’t like your every day rice and isn’t cooked the same way. The cooking method is different, and it is finished with a shot of sake (optional) and a vinegar dressing.
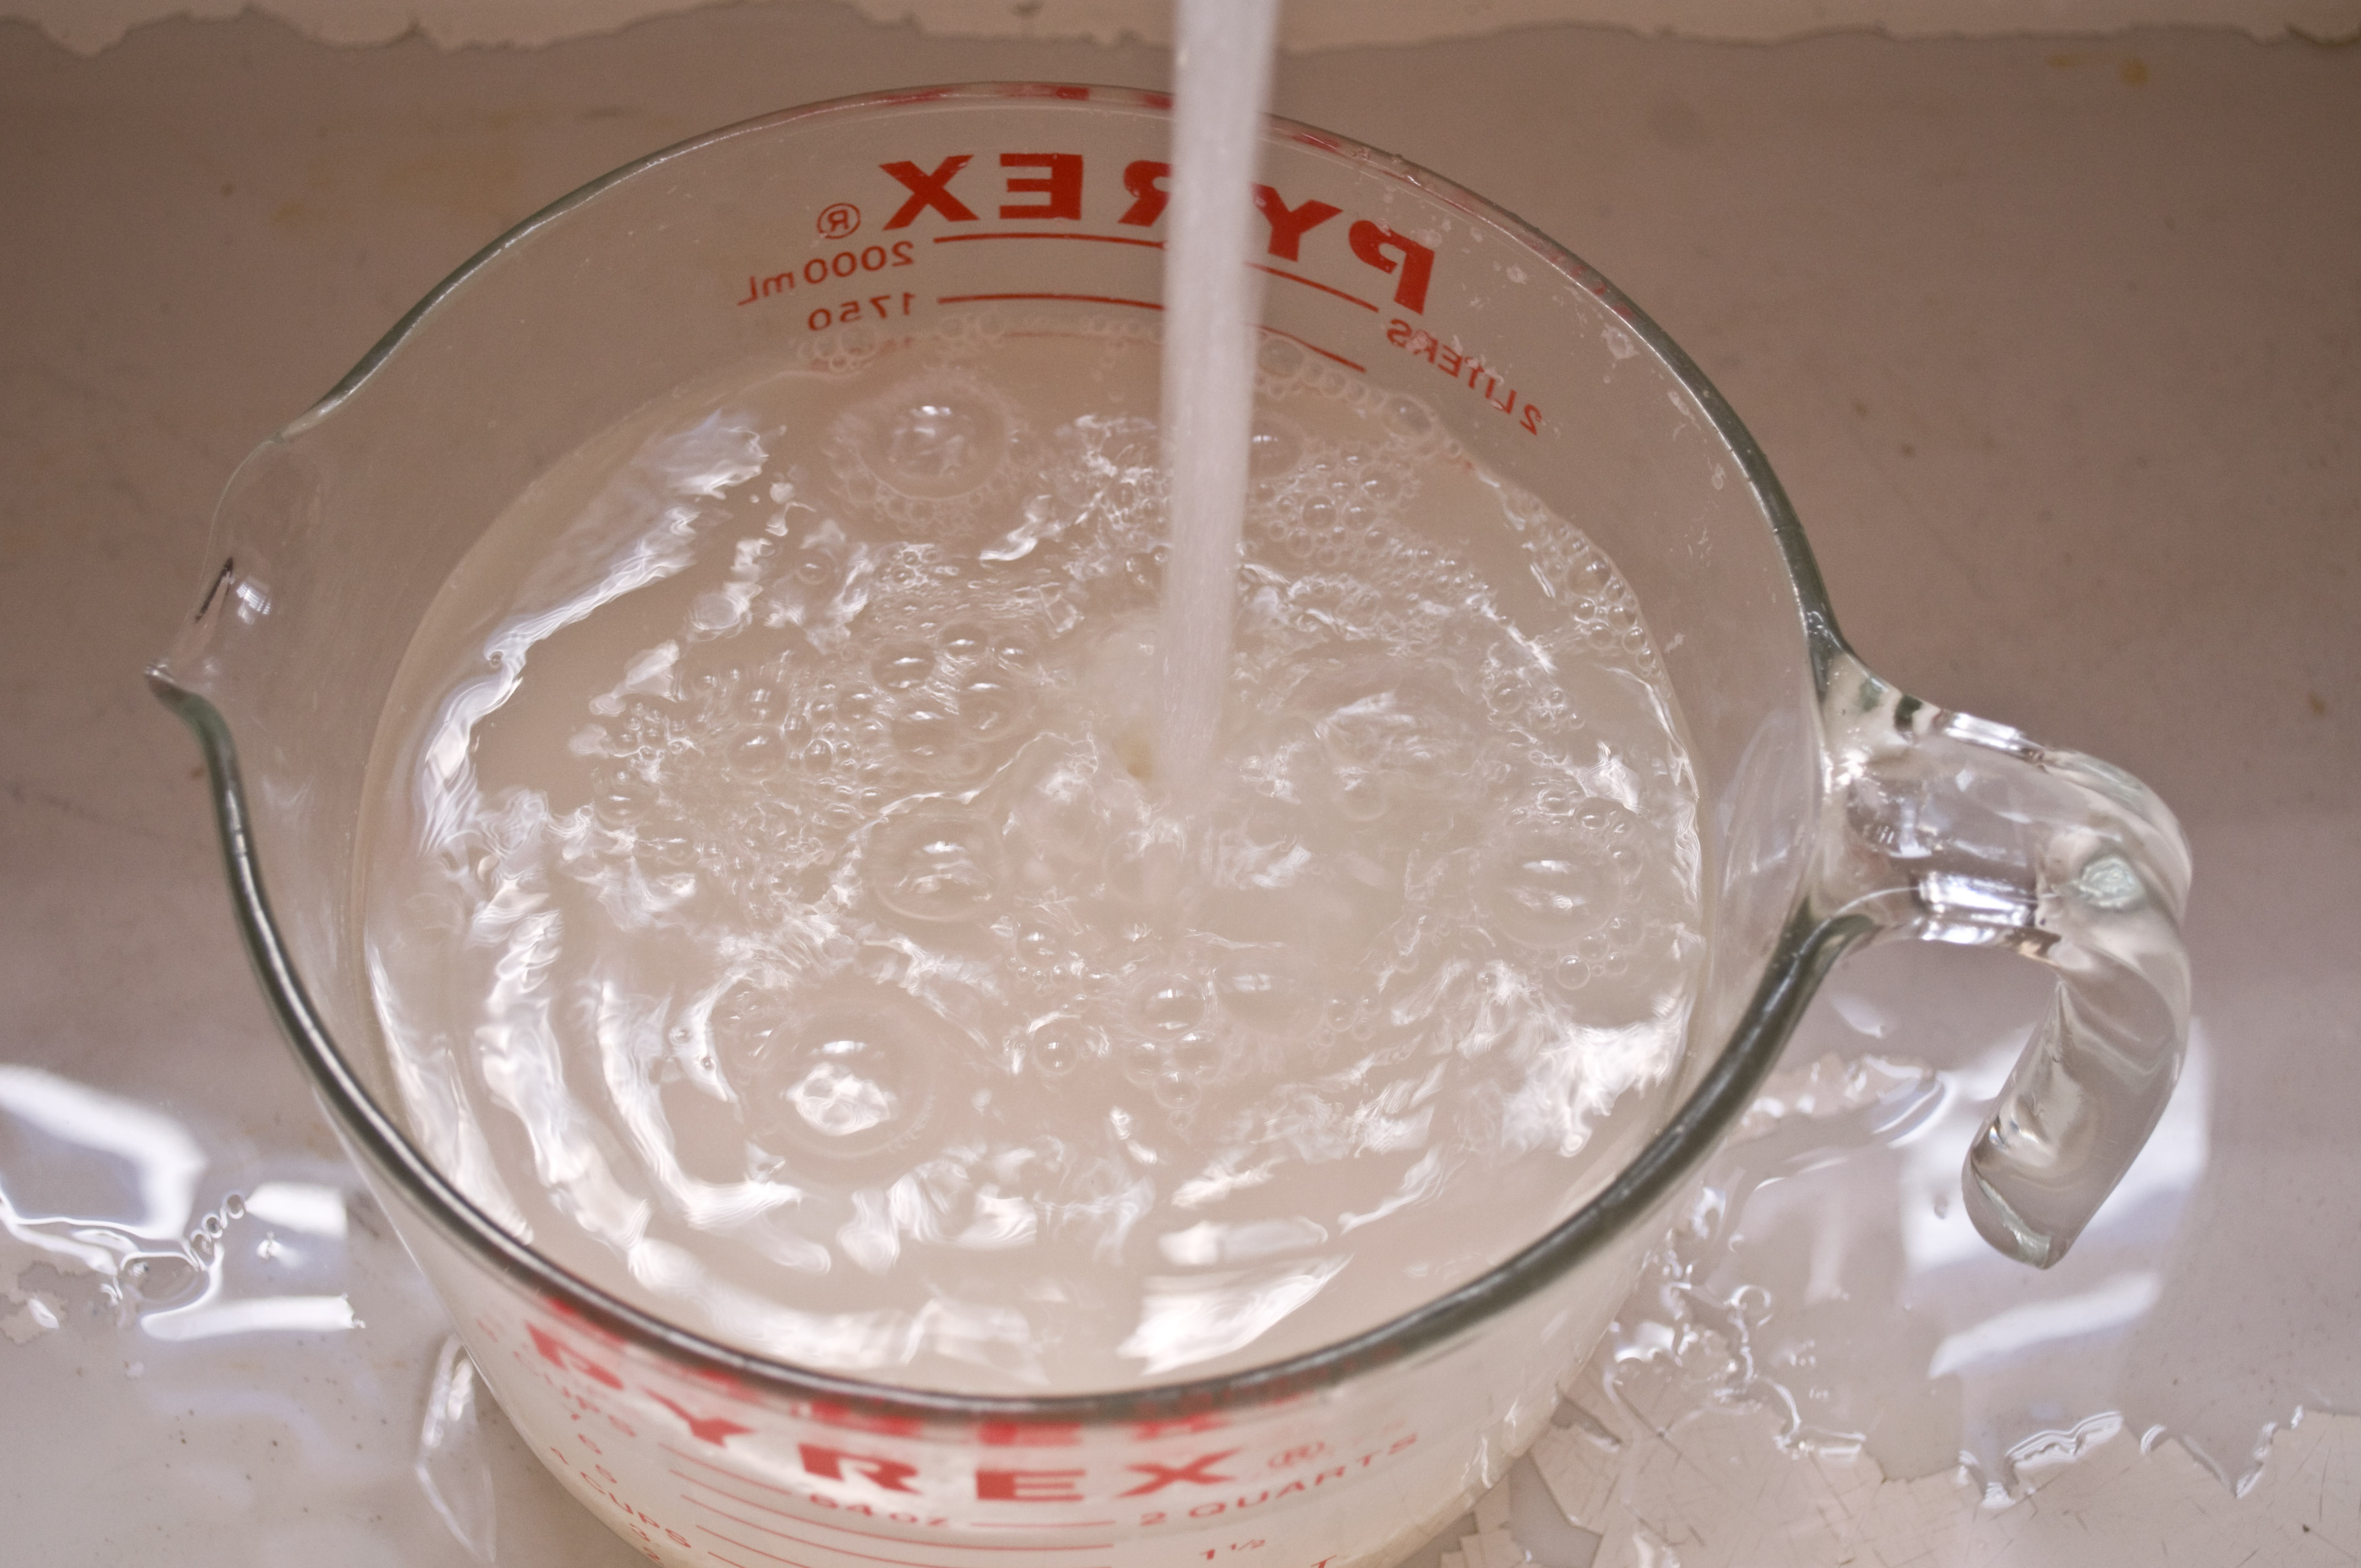
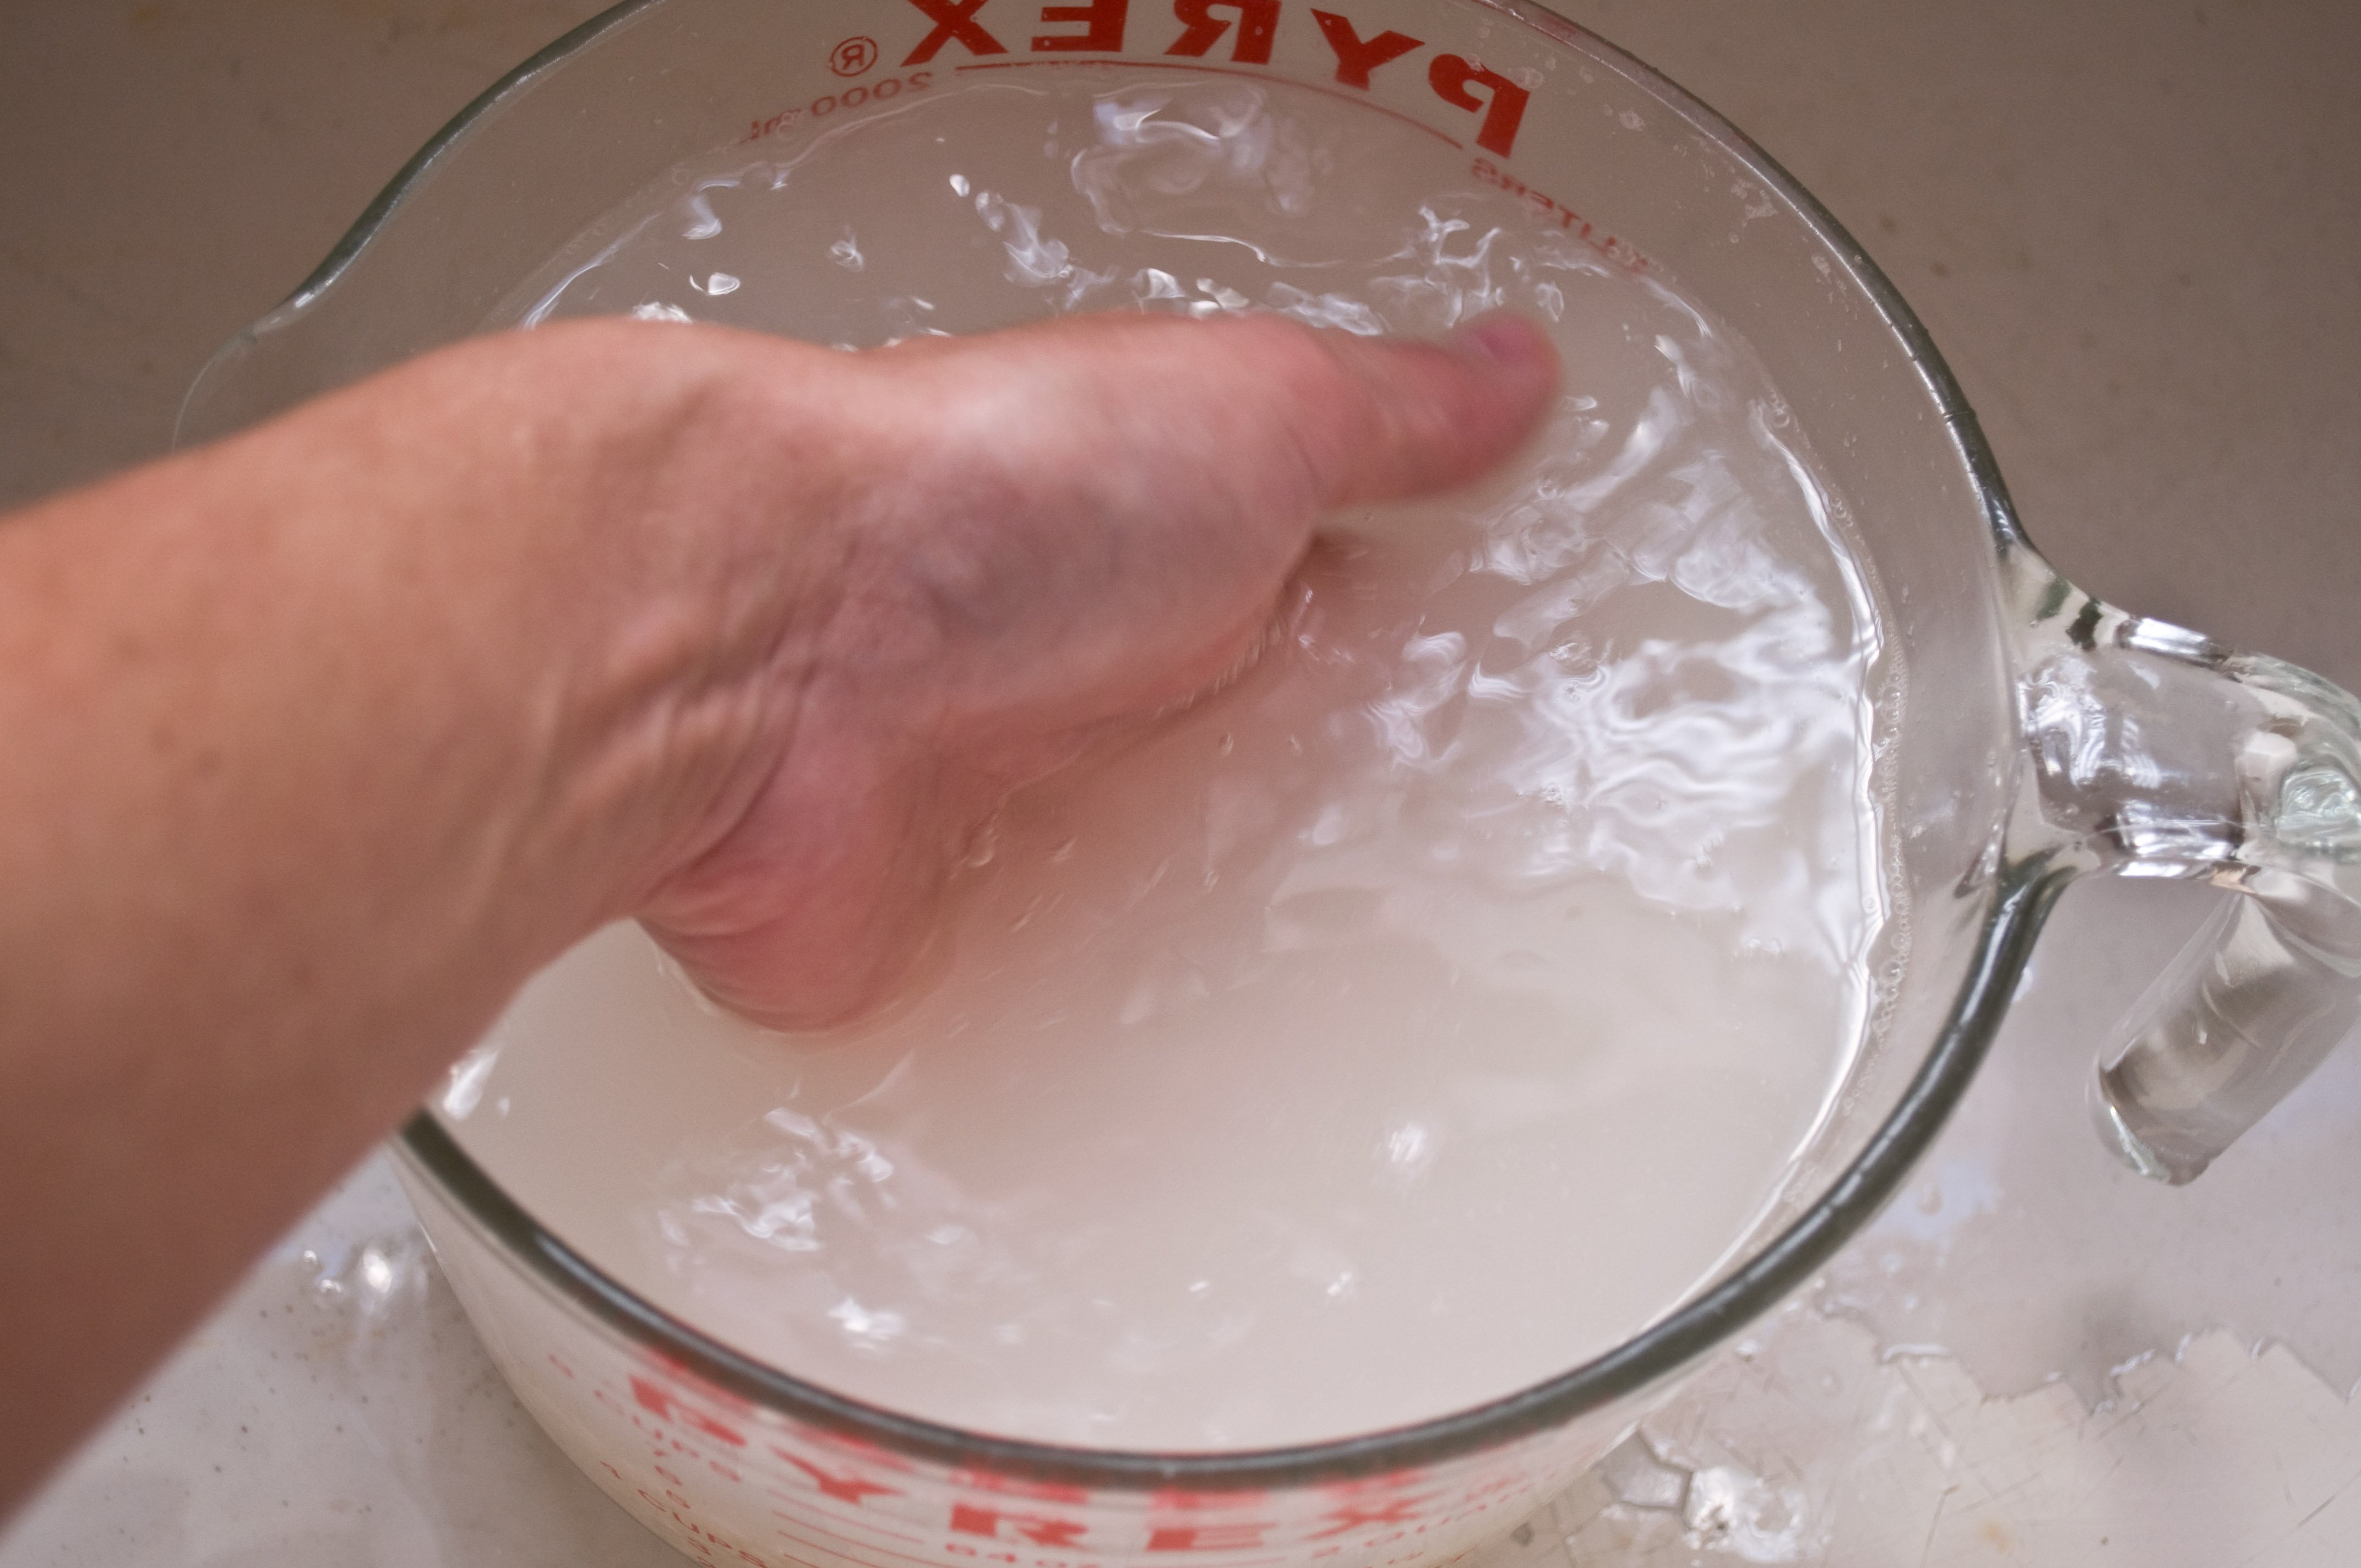
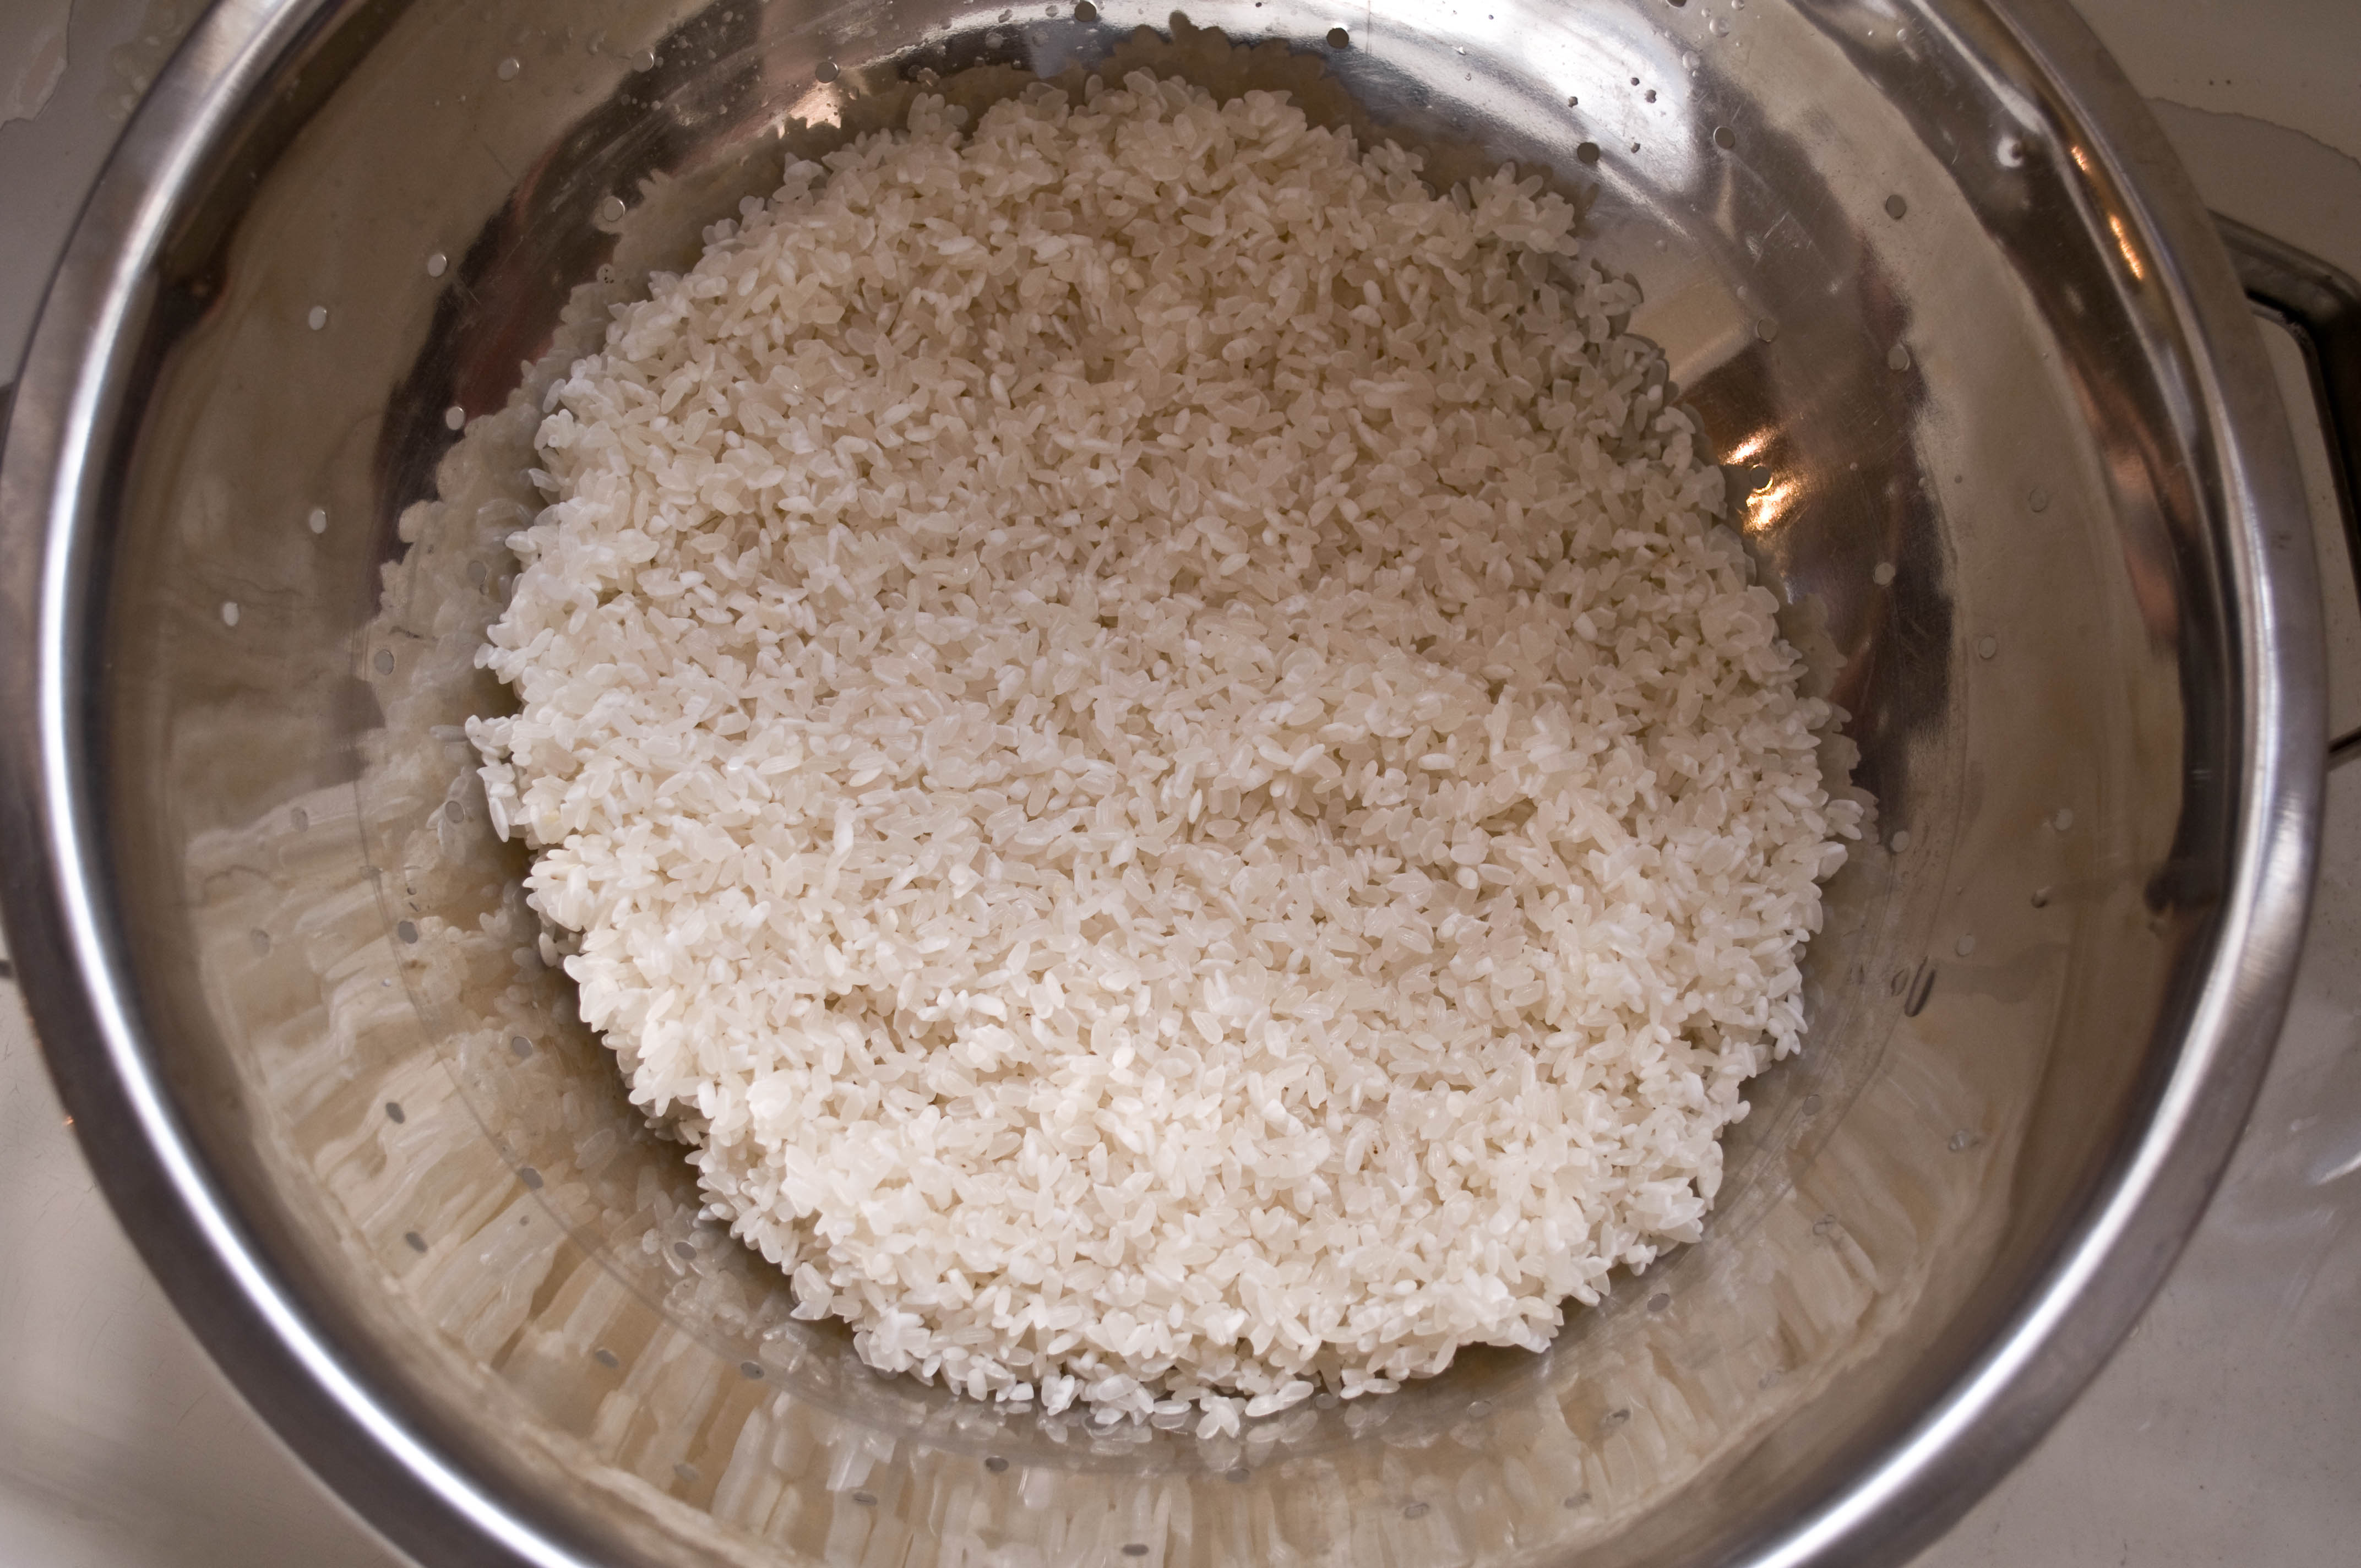
Put the rice in a large bowl and cover with cold tap water.
Swirl with your hands to remove any debris.
Drain the water off, using your hand to keep the rice in the bowl
Repeat two more times. By the third time, the water should be much less cloudy.
Put rice in a colander and allow to drain and dry, about 30 minutes.
Now here is where things get a little wierd. By all accounts, in my previous rice-cookin past, the ratio is 1 part rice to 2 parts water, right? Well, not in sushi land. Put your 3 cups of rice in a large sauce pan and cover with 3 cups of water. Yep, thats 1 part to 1 part. Don’t worry, it all works out.
Bring to a boil over high heat.
Cover and allow to boil over high heat (resist the urge to turn the heat down) for three minutes.
Then turn the heat to medium and cook for an an additional 5 minutes (I sure hope you have a kitchen timer).
Then turn the heat to low and cook for another 8 minutes.
There should be no visible water left. If you have a shot of Sake, drizzle it over the rice at this point. If you don’t have any Sake, don’t worry about. Remove from heat.
Cover with a towel or a cheese cloth, put the lid back on and allow to rest for ten minutes.
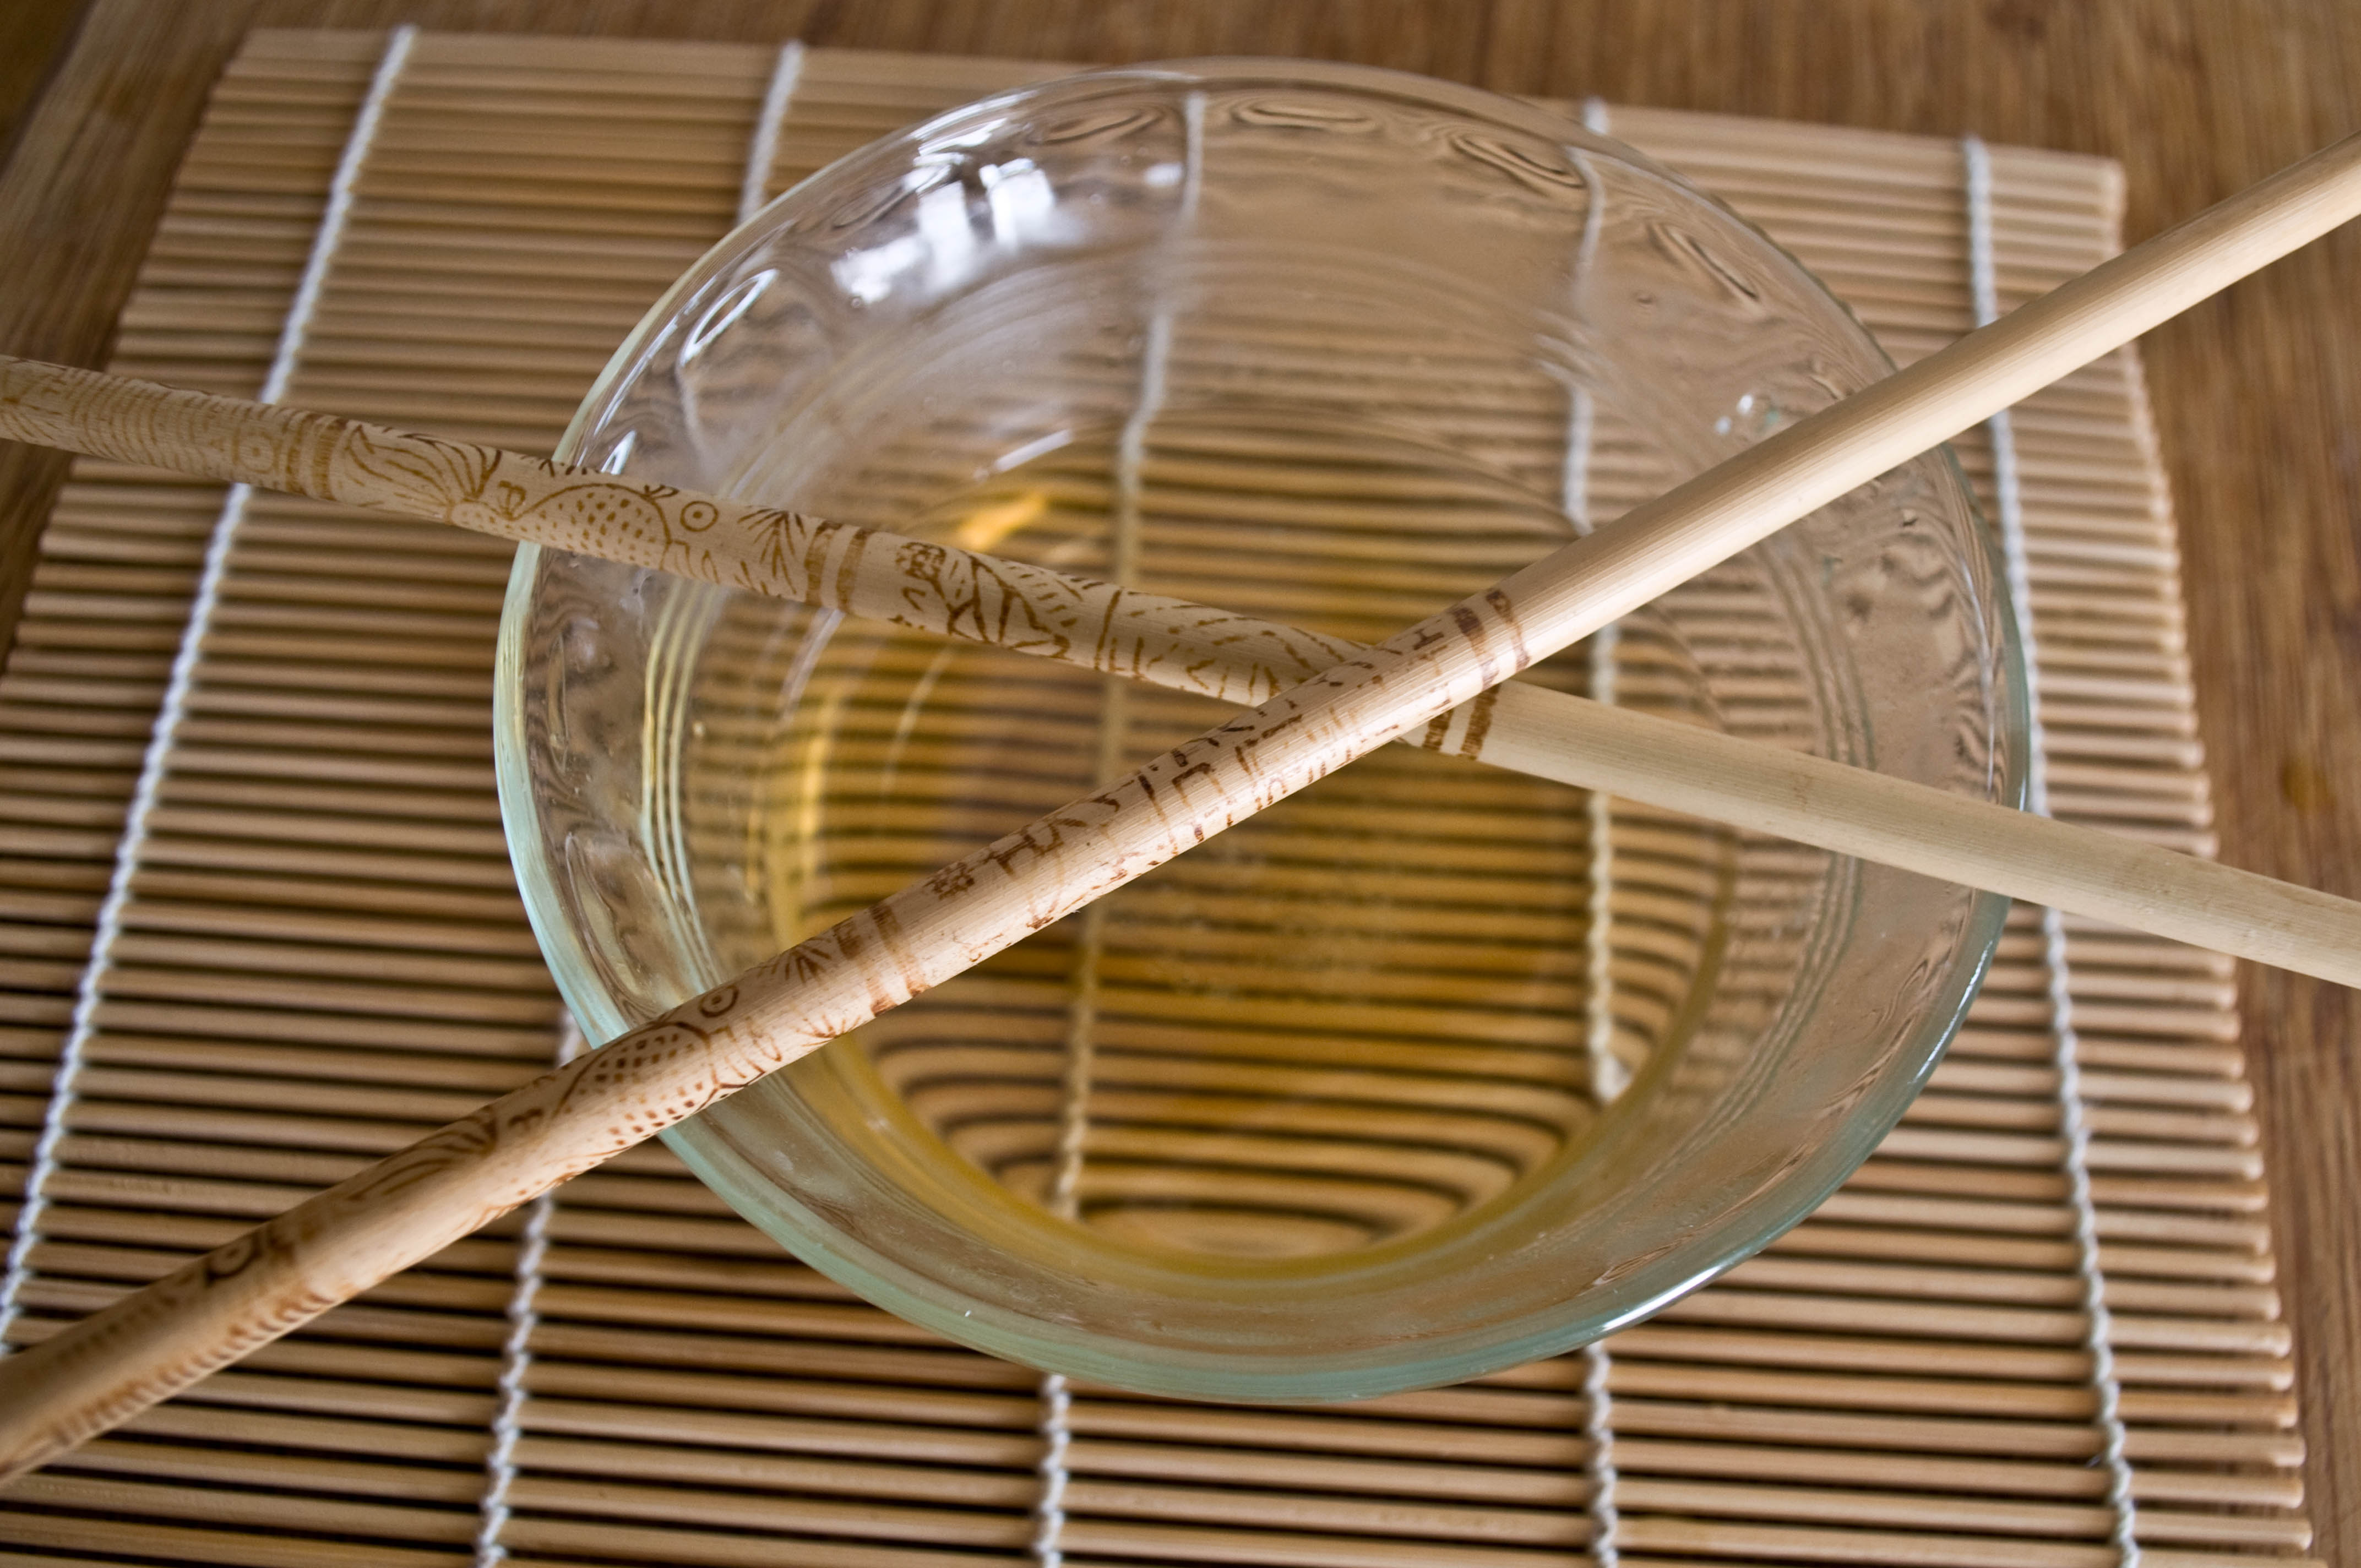
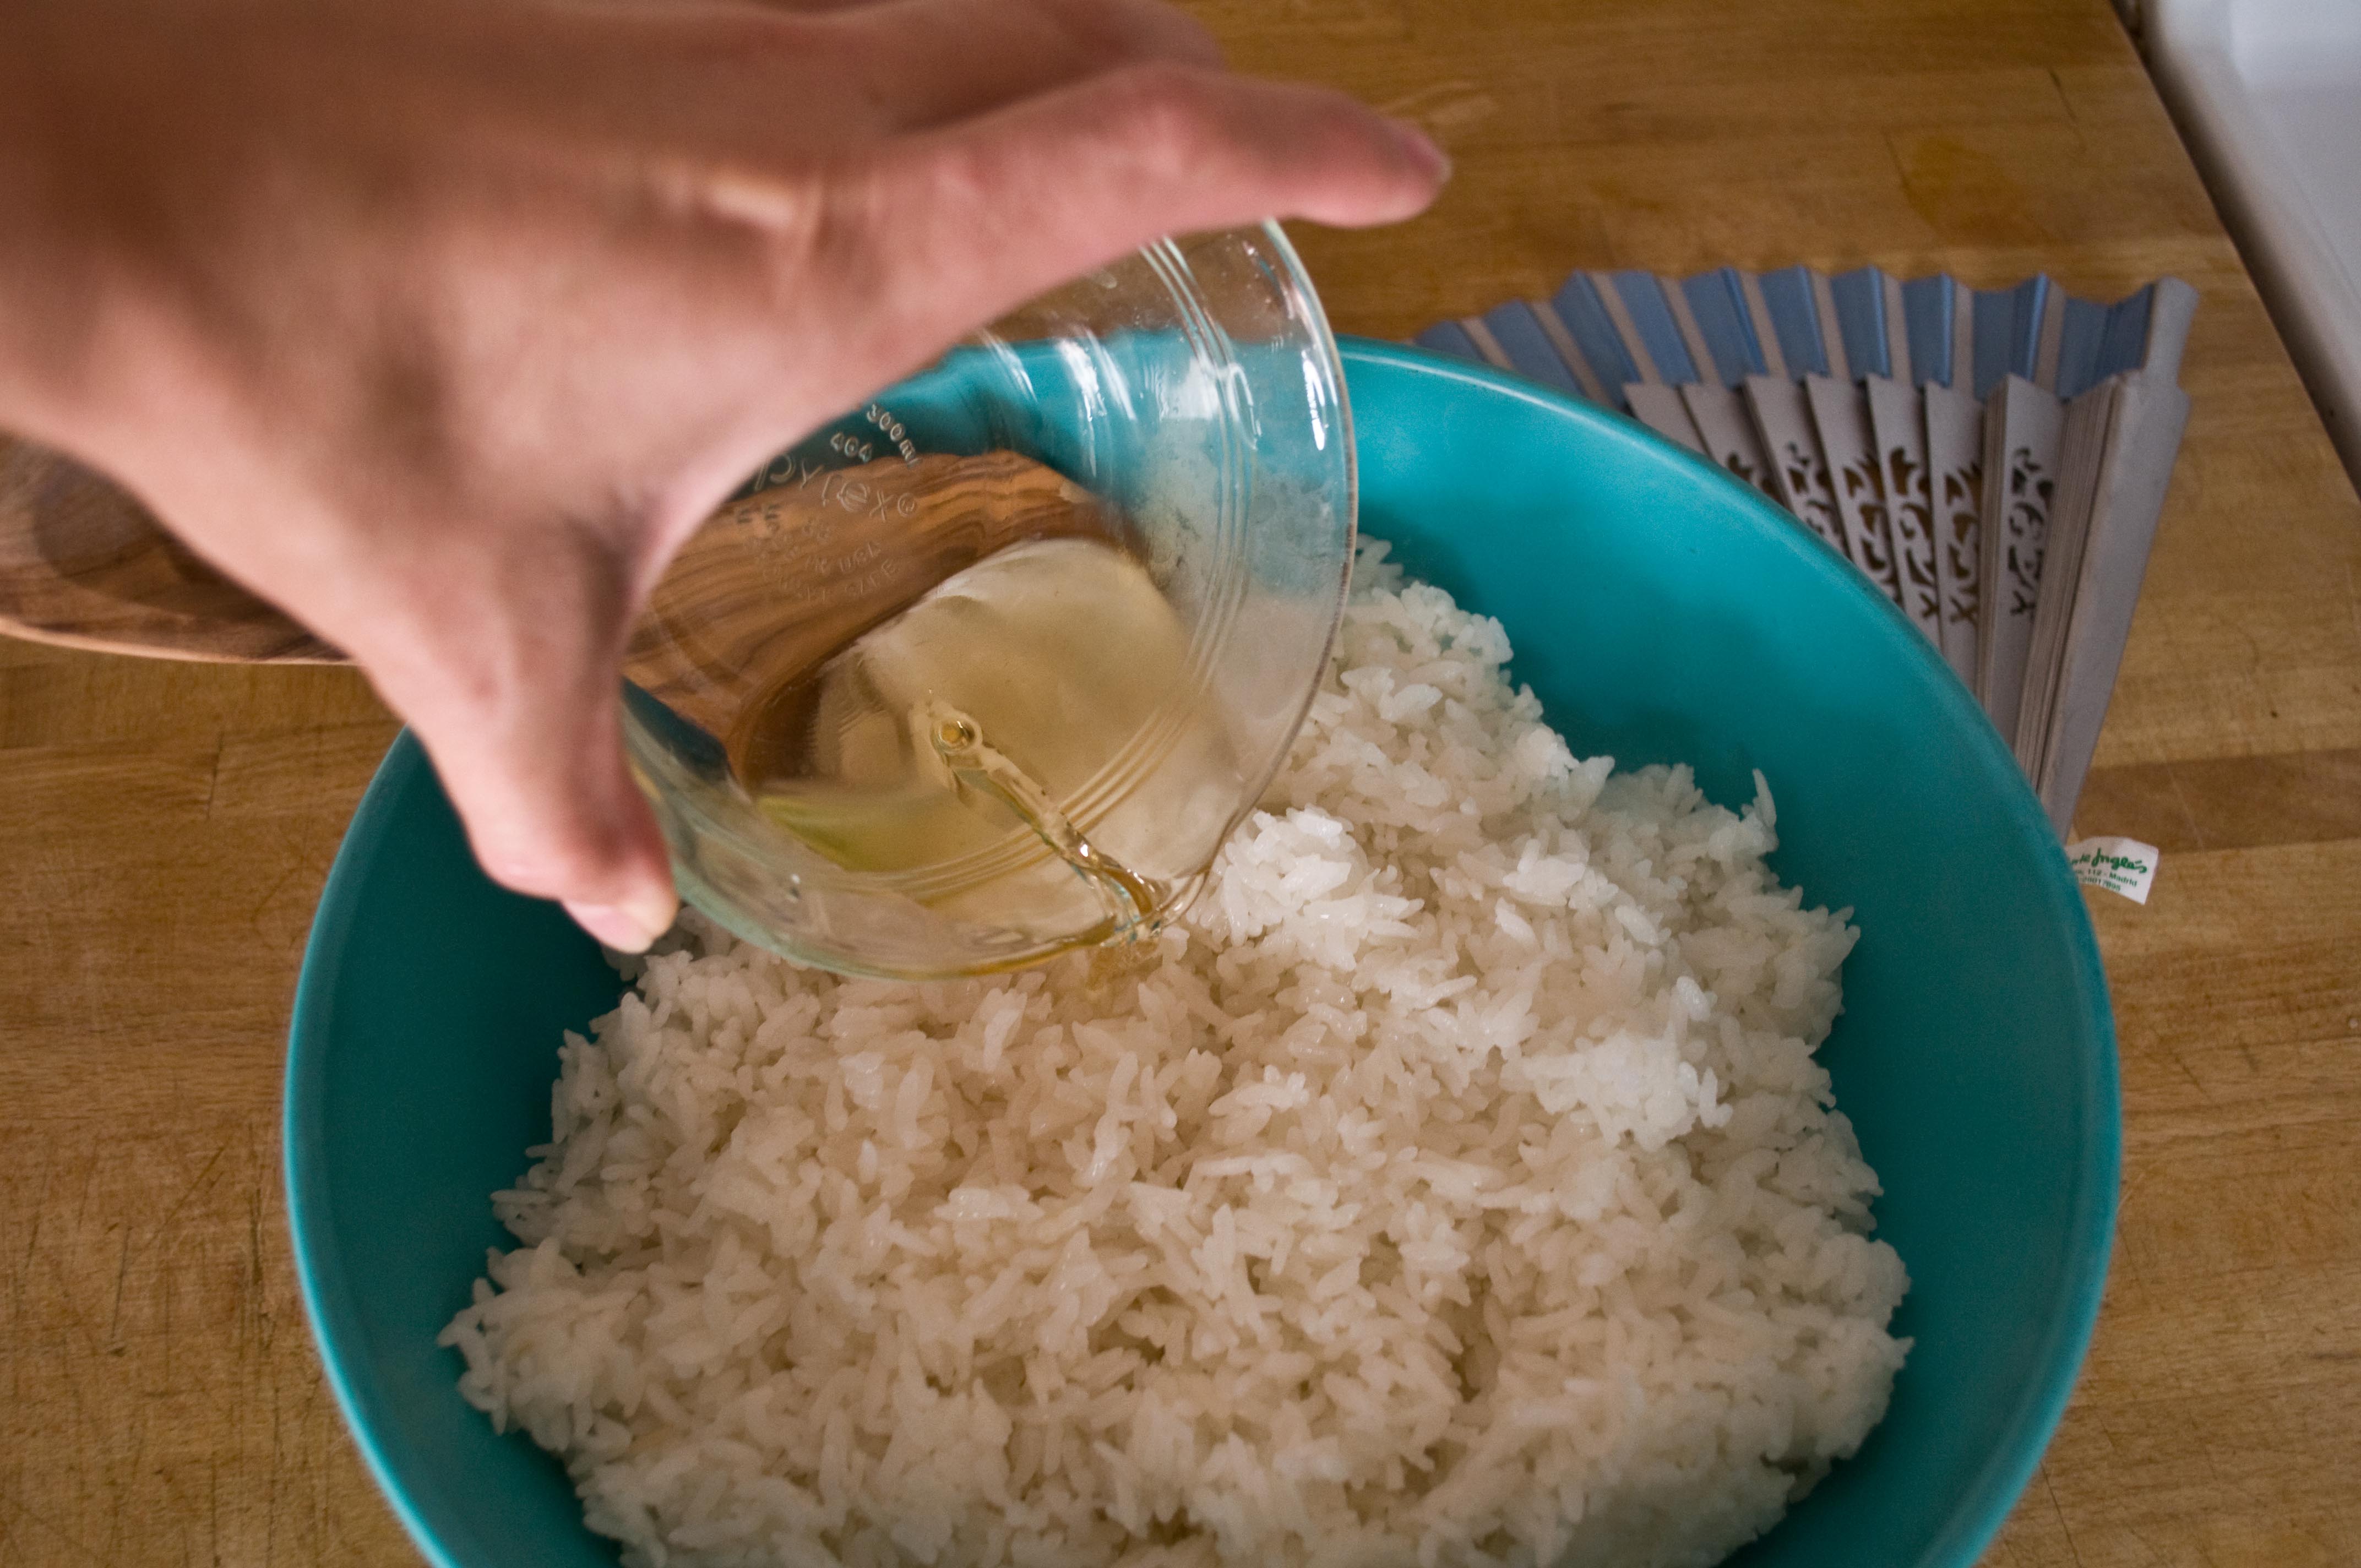
While your rice is cooking, make the dressing. Combine the vinegar, salt and sugar in a small bowl and microwave on high for 30 seconds. Stir until dissolved and allow to cool.
Once the rice has rested, transfer to a large, flat bottom bowl.
Pour the dressing over the rice.
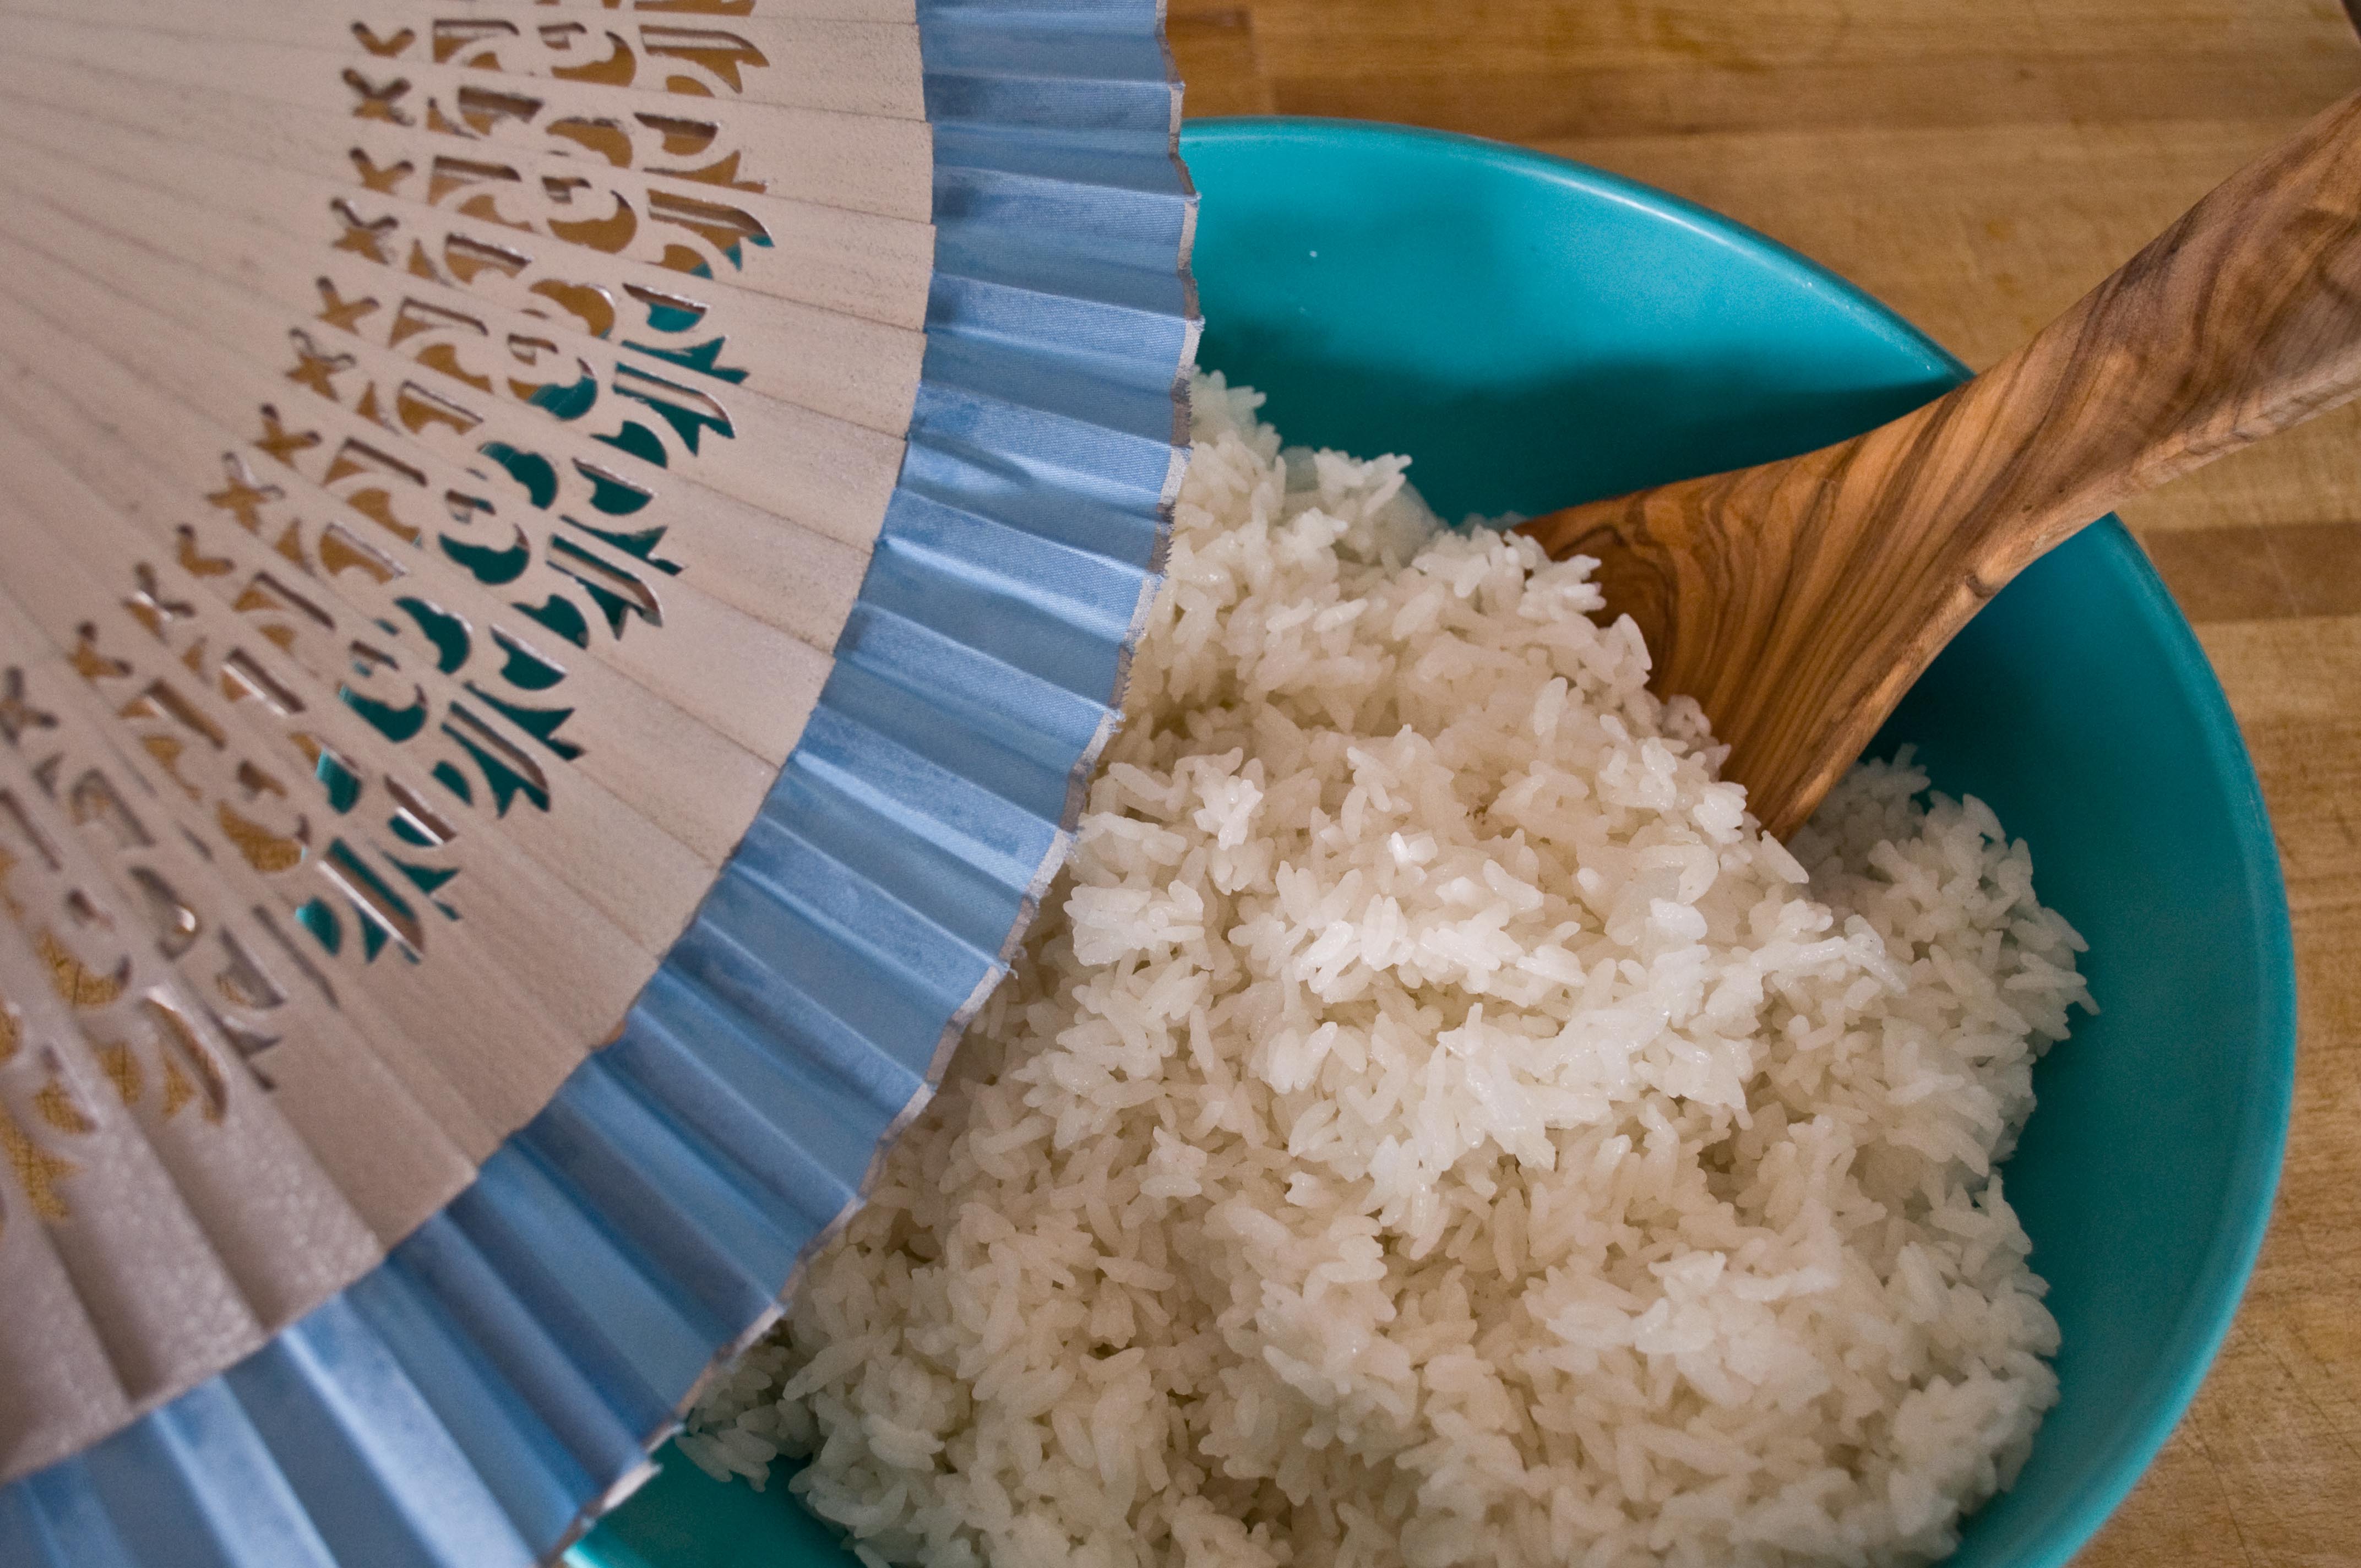
Stir the rice with a wooden spoon to distribute the dressing evenly, while fanning with a fan to cool. If you don’t have a fan a piece of cardboard will work just fine.
Repeat until rice is at body temperature.
Make The Roll
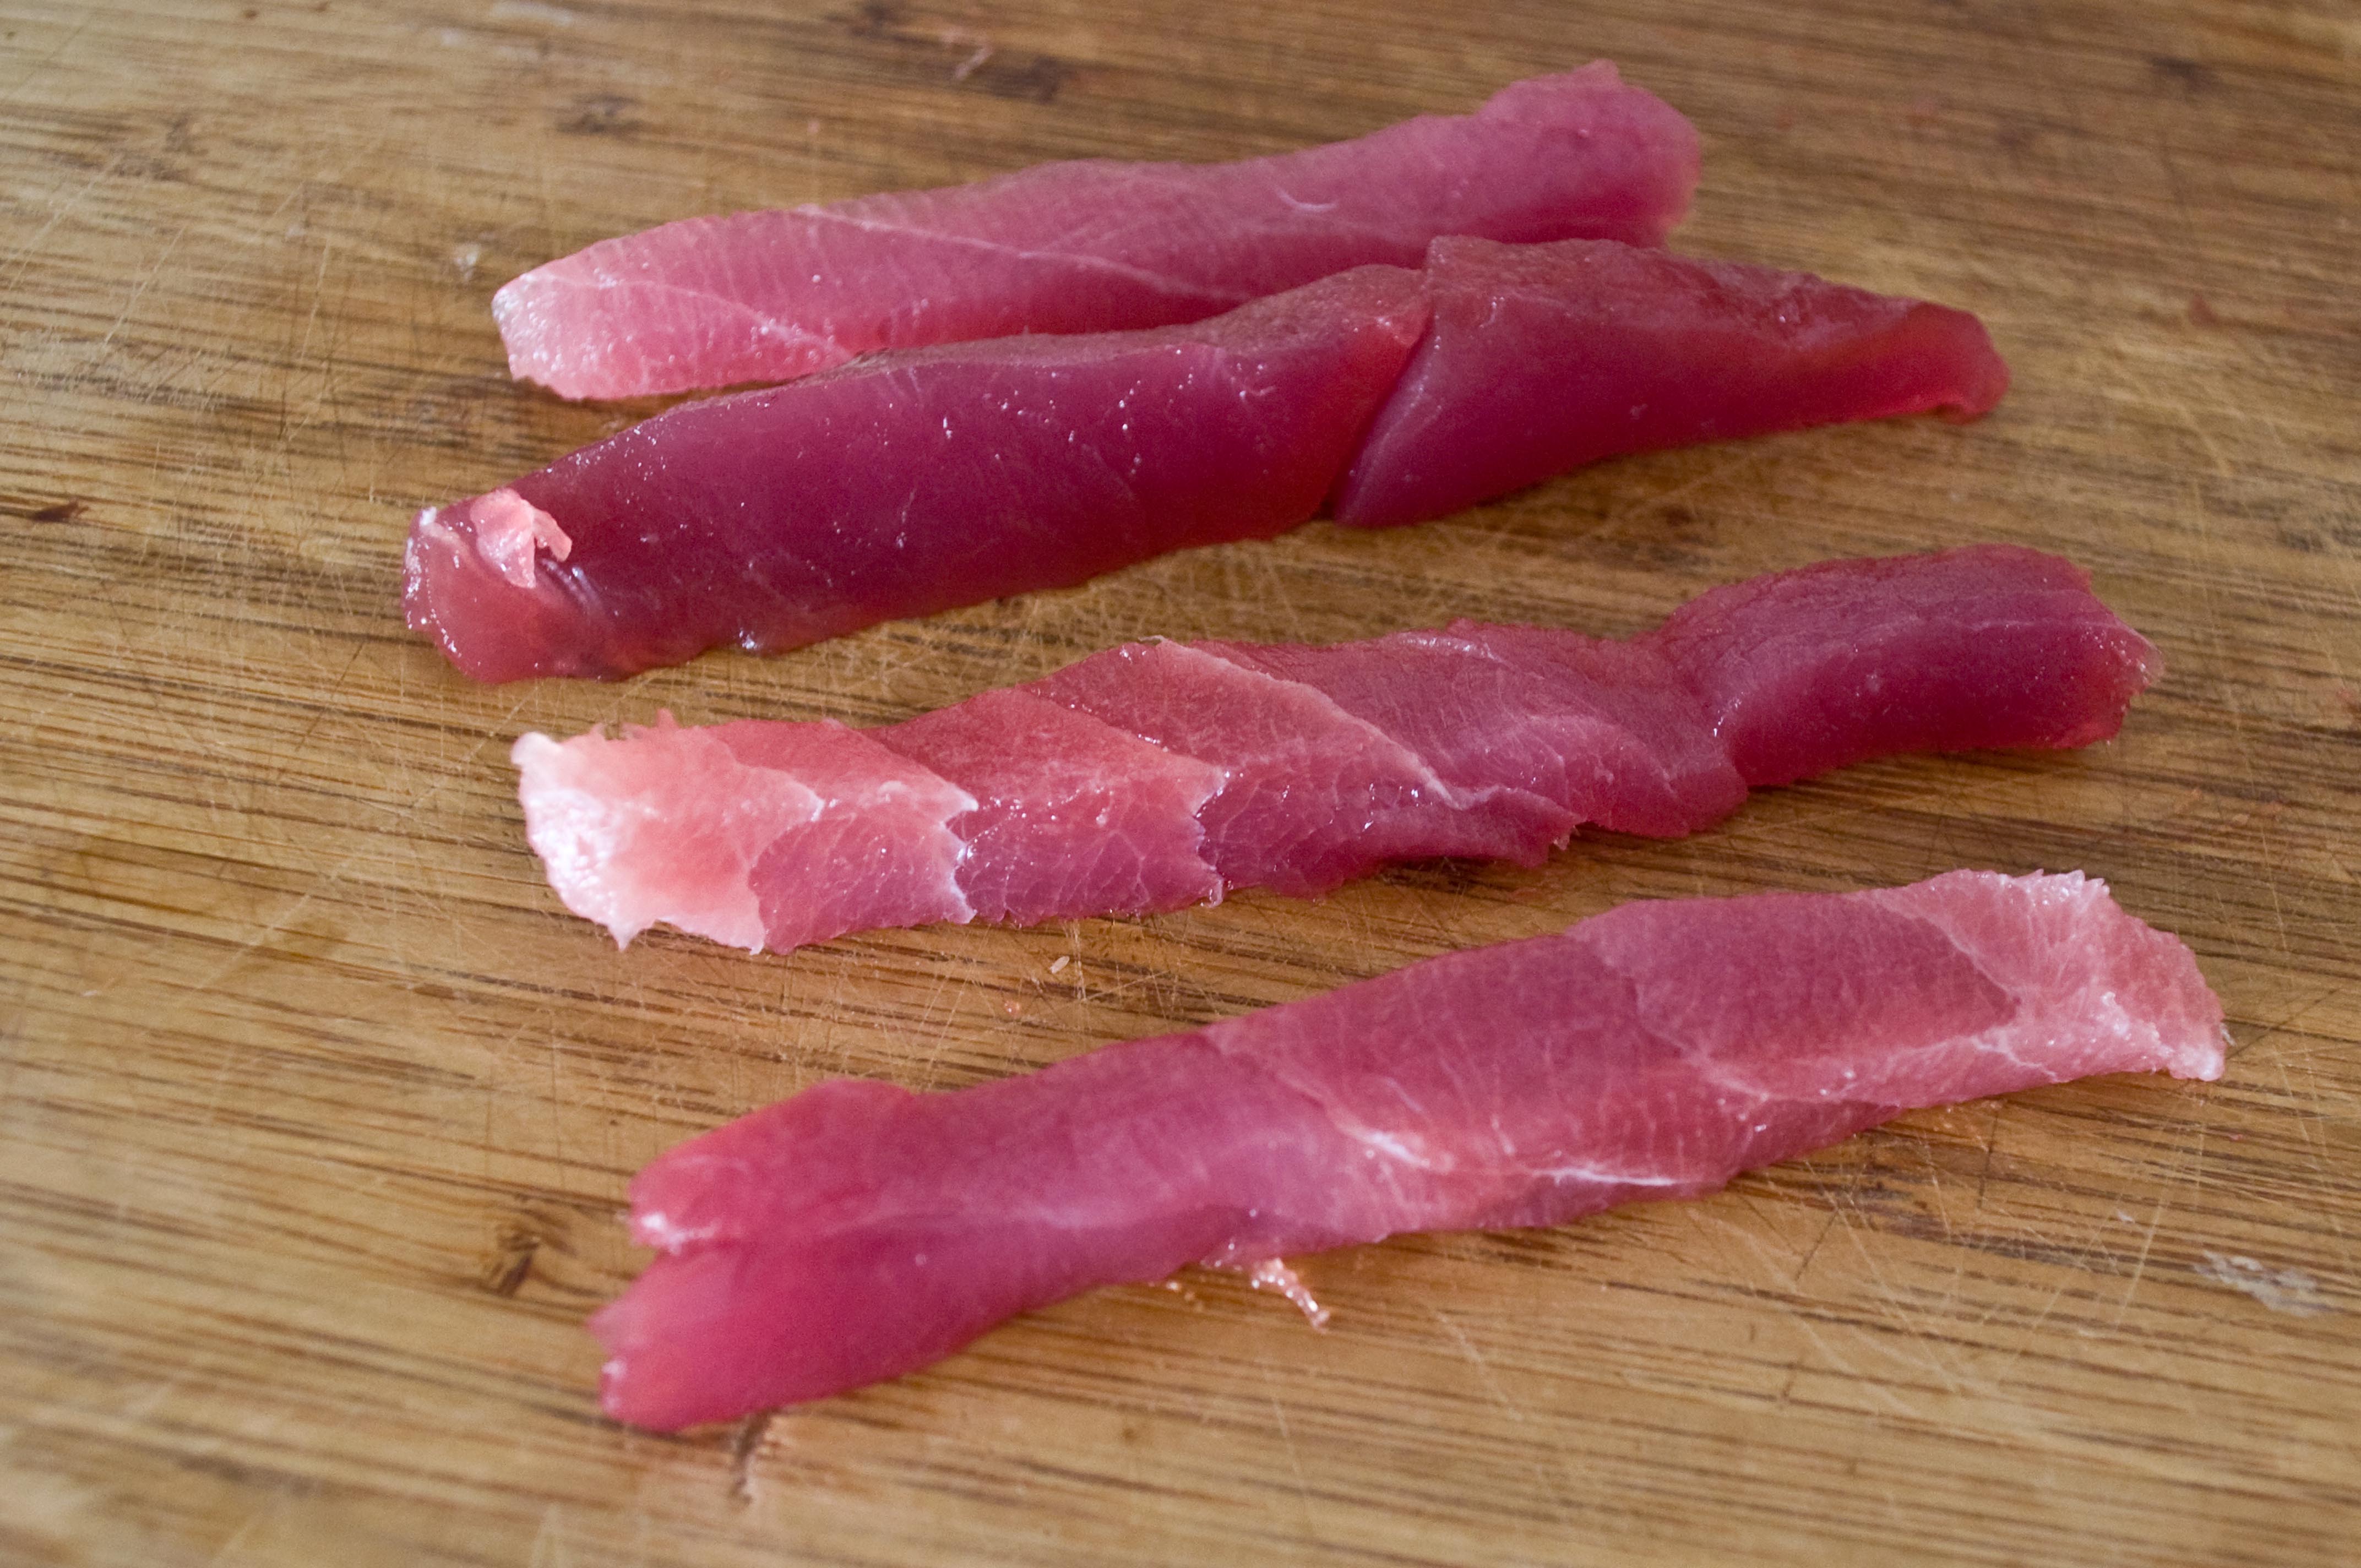
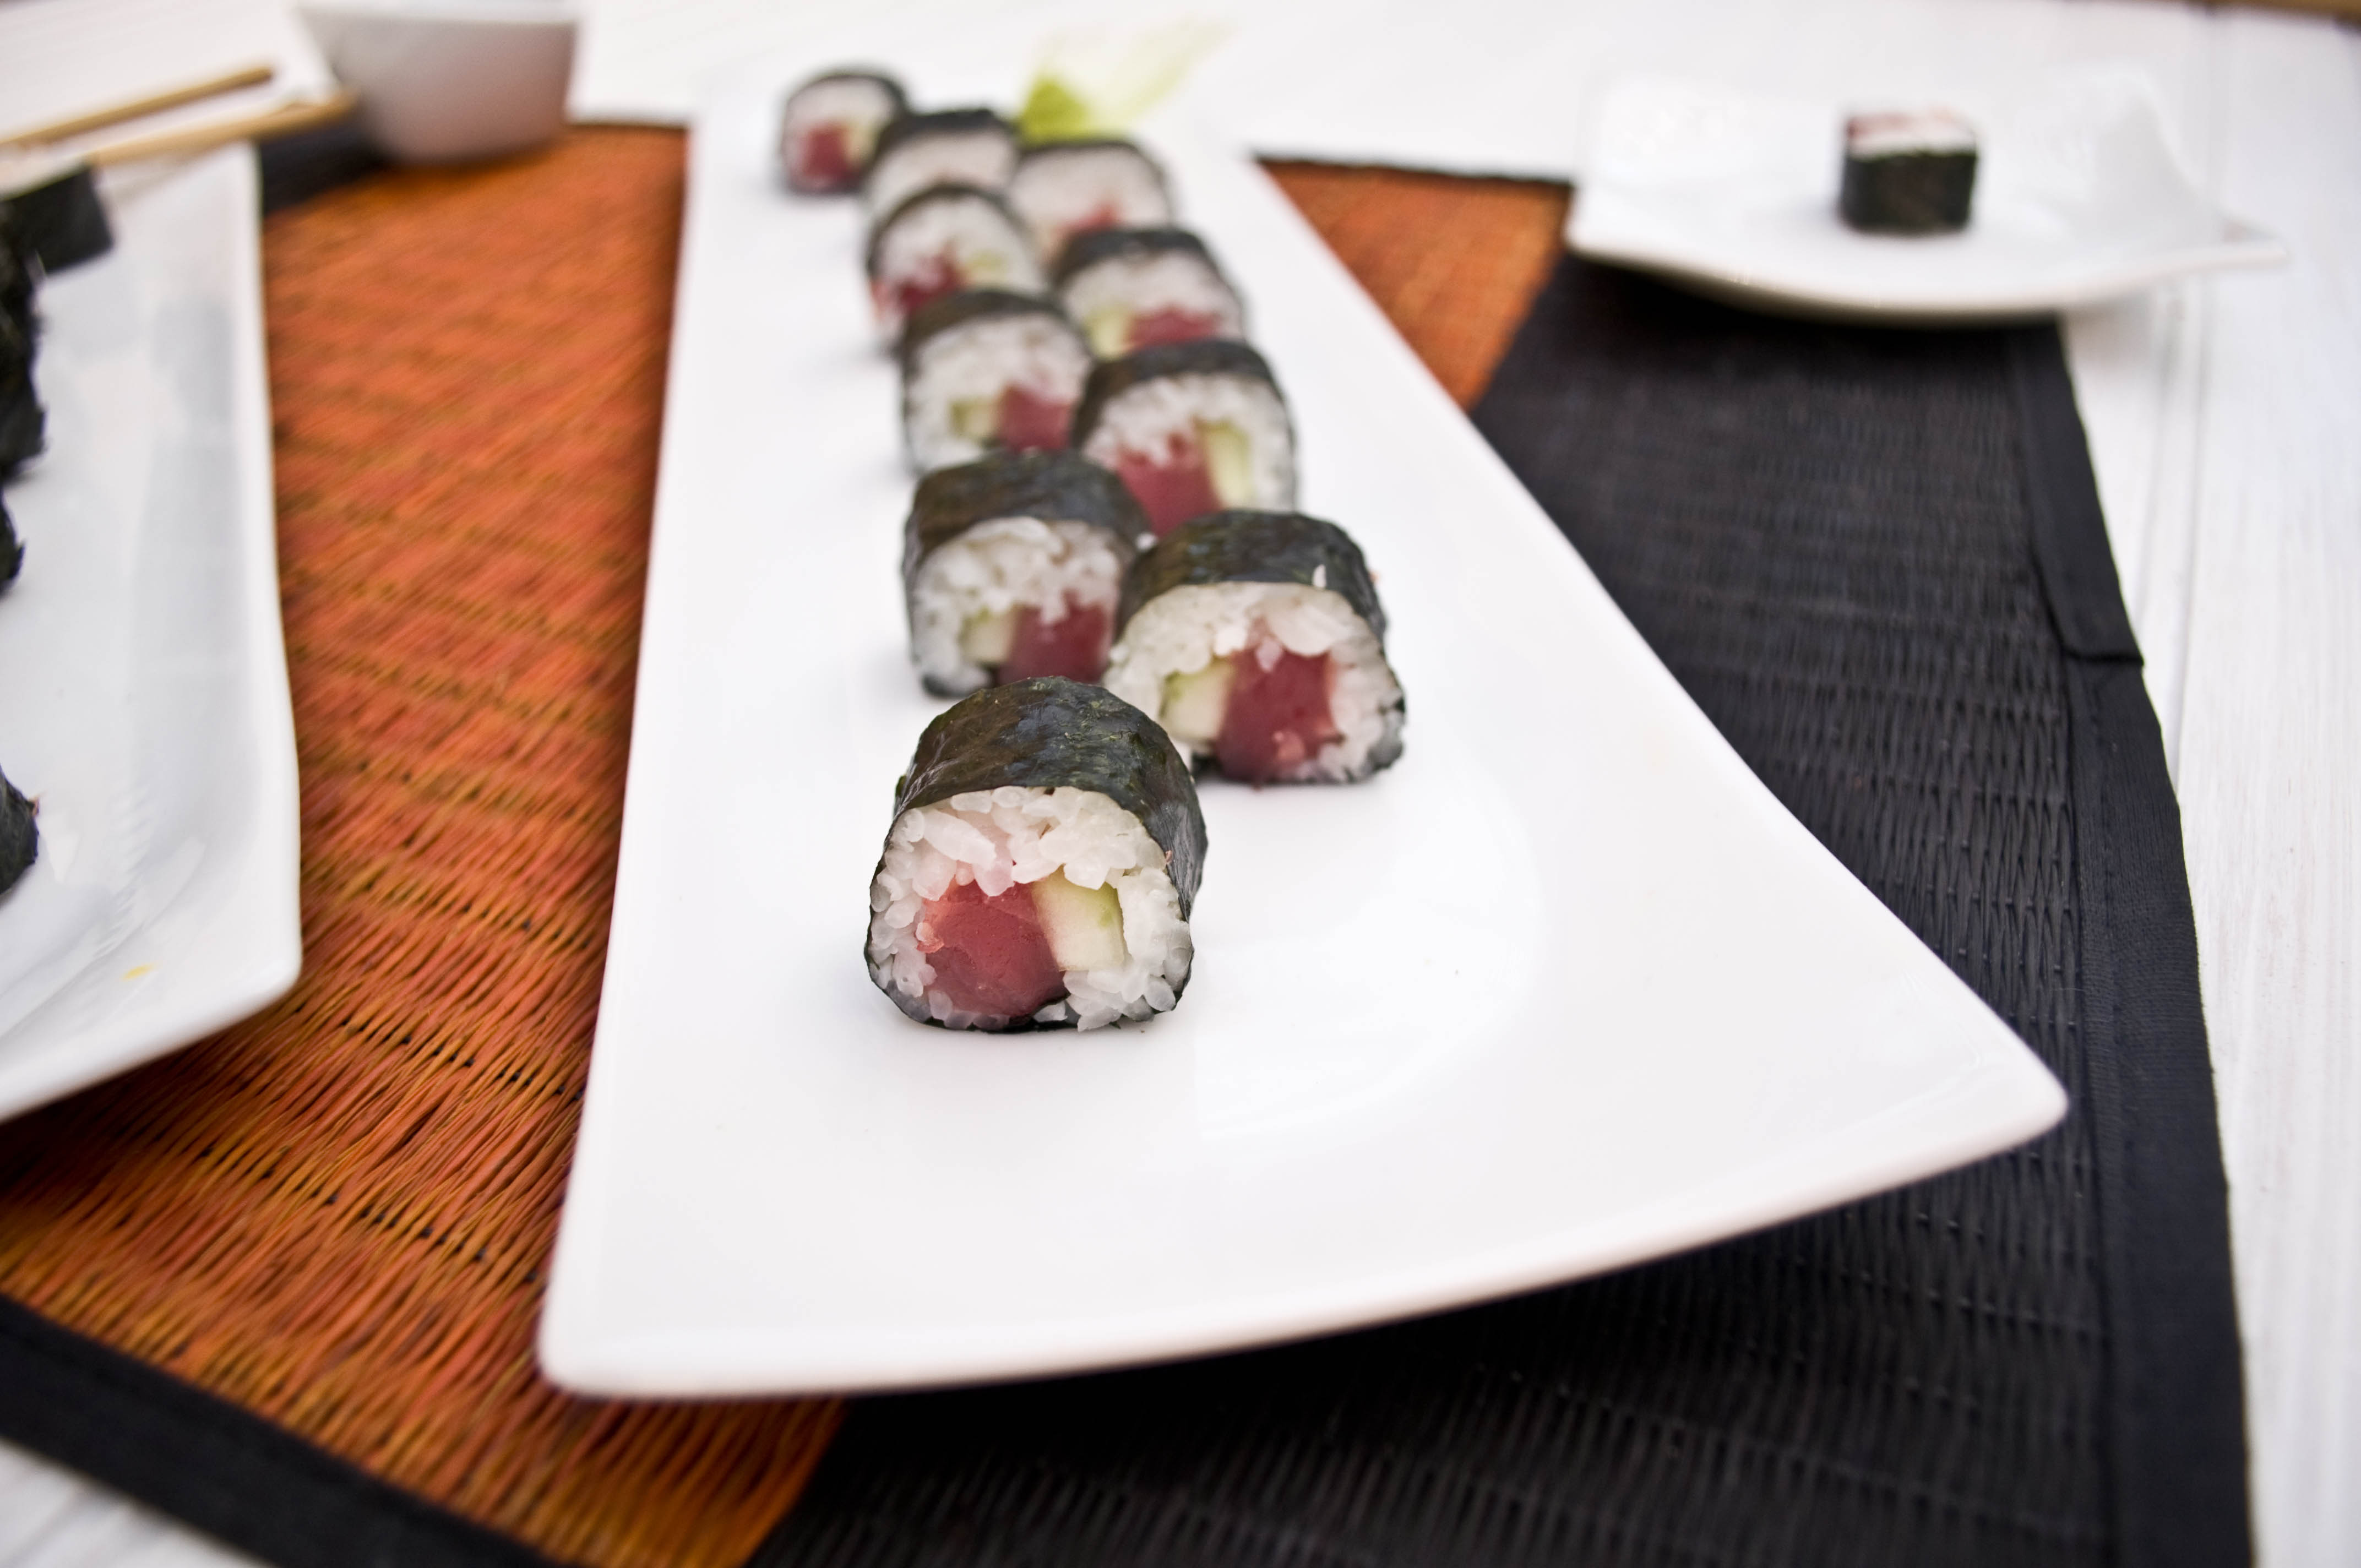
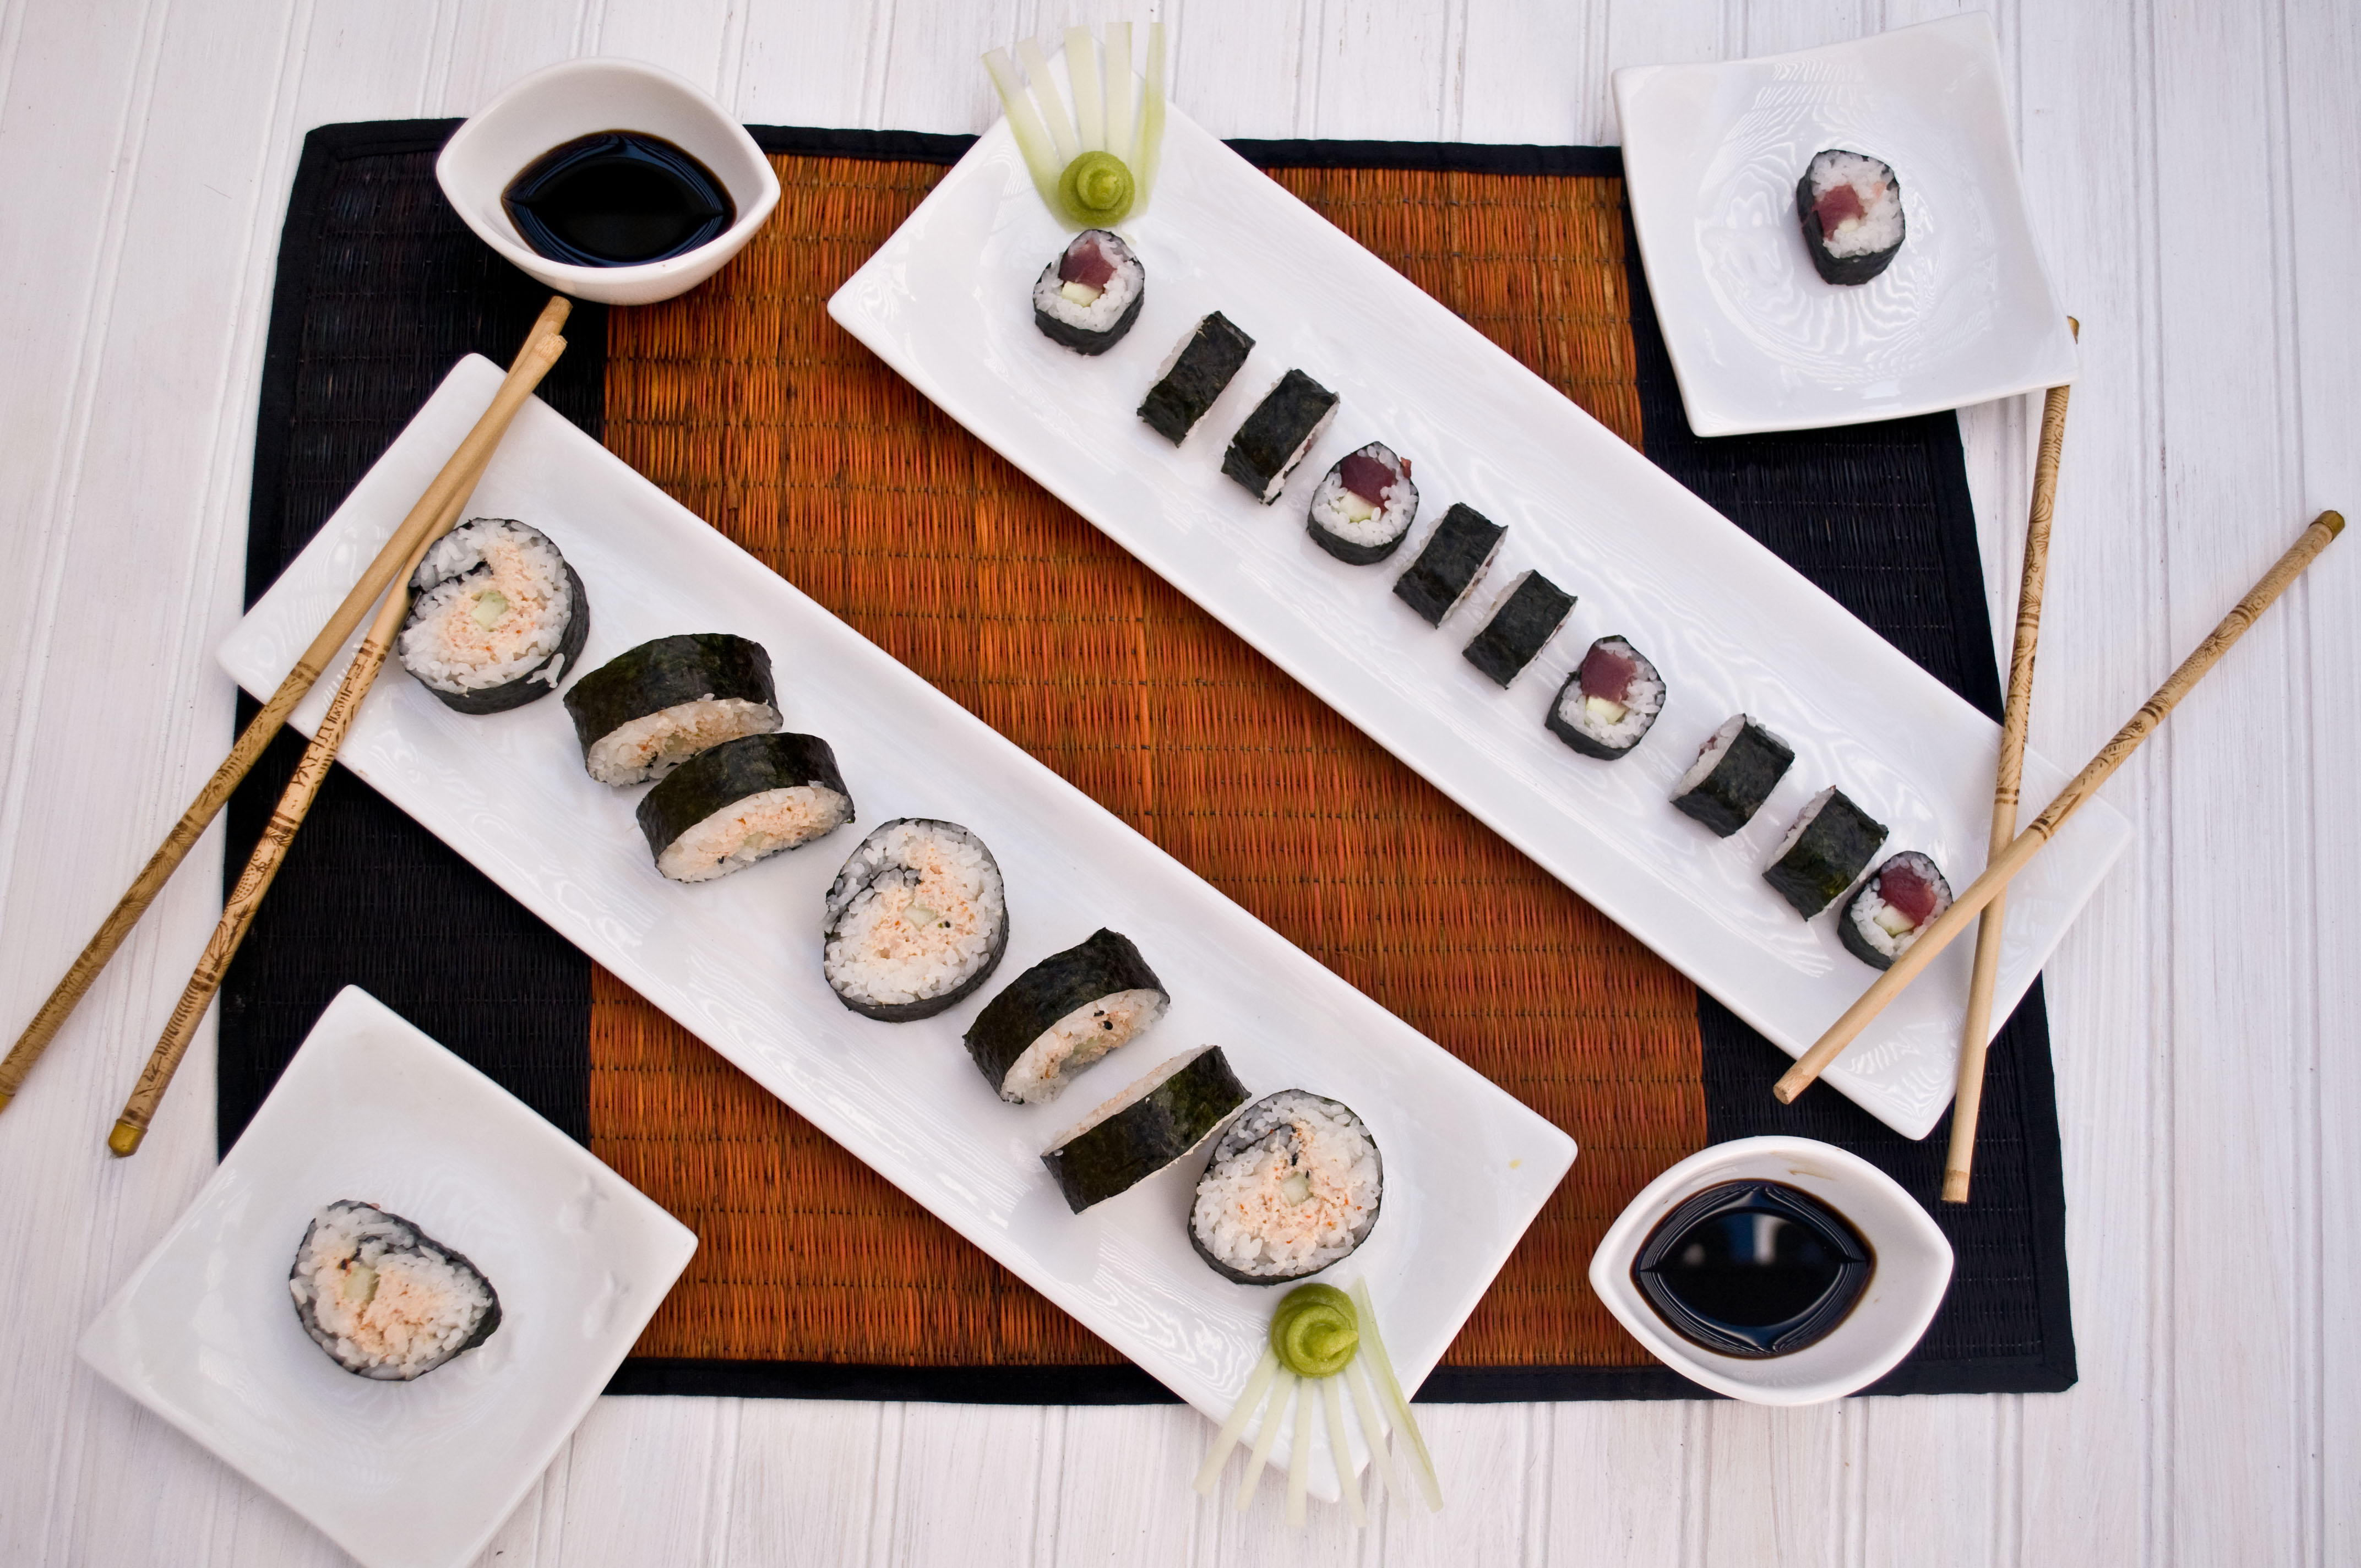
First, lets talk about fish. For this post I made two kinds of sushi, a basic Ahi Tuna Roll and a Spicy Crab roll. You can fill your sushi with just about anything you want, including other types of meat and vegetables. If you want to use raw fish, buy the best stuff you can find, really, this is no place to bargain shop. Go to the best fish market in your town and asked what they have that is Sashimi grade and of that, what is the freshest and highest quality. Don’t go in with your heart set on a certain kind of fish, you may not get the best quality. If you really want Ahi, but they just had a beautiful Yellow Tail come in, get that. You don’t need a lot, I was able to make 5 rolls from less than a half a pound of Ahi.
Cut your fish into long thin strips, the width of about your pinky. If you don’t have a long enough piece of fish to cover the entire length of the roll, you can use segments.
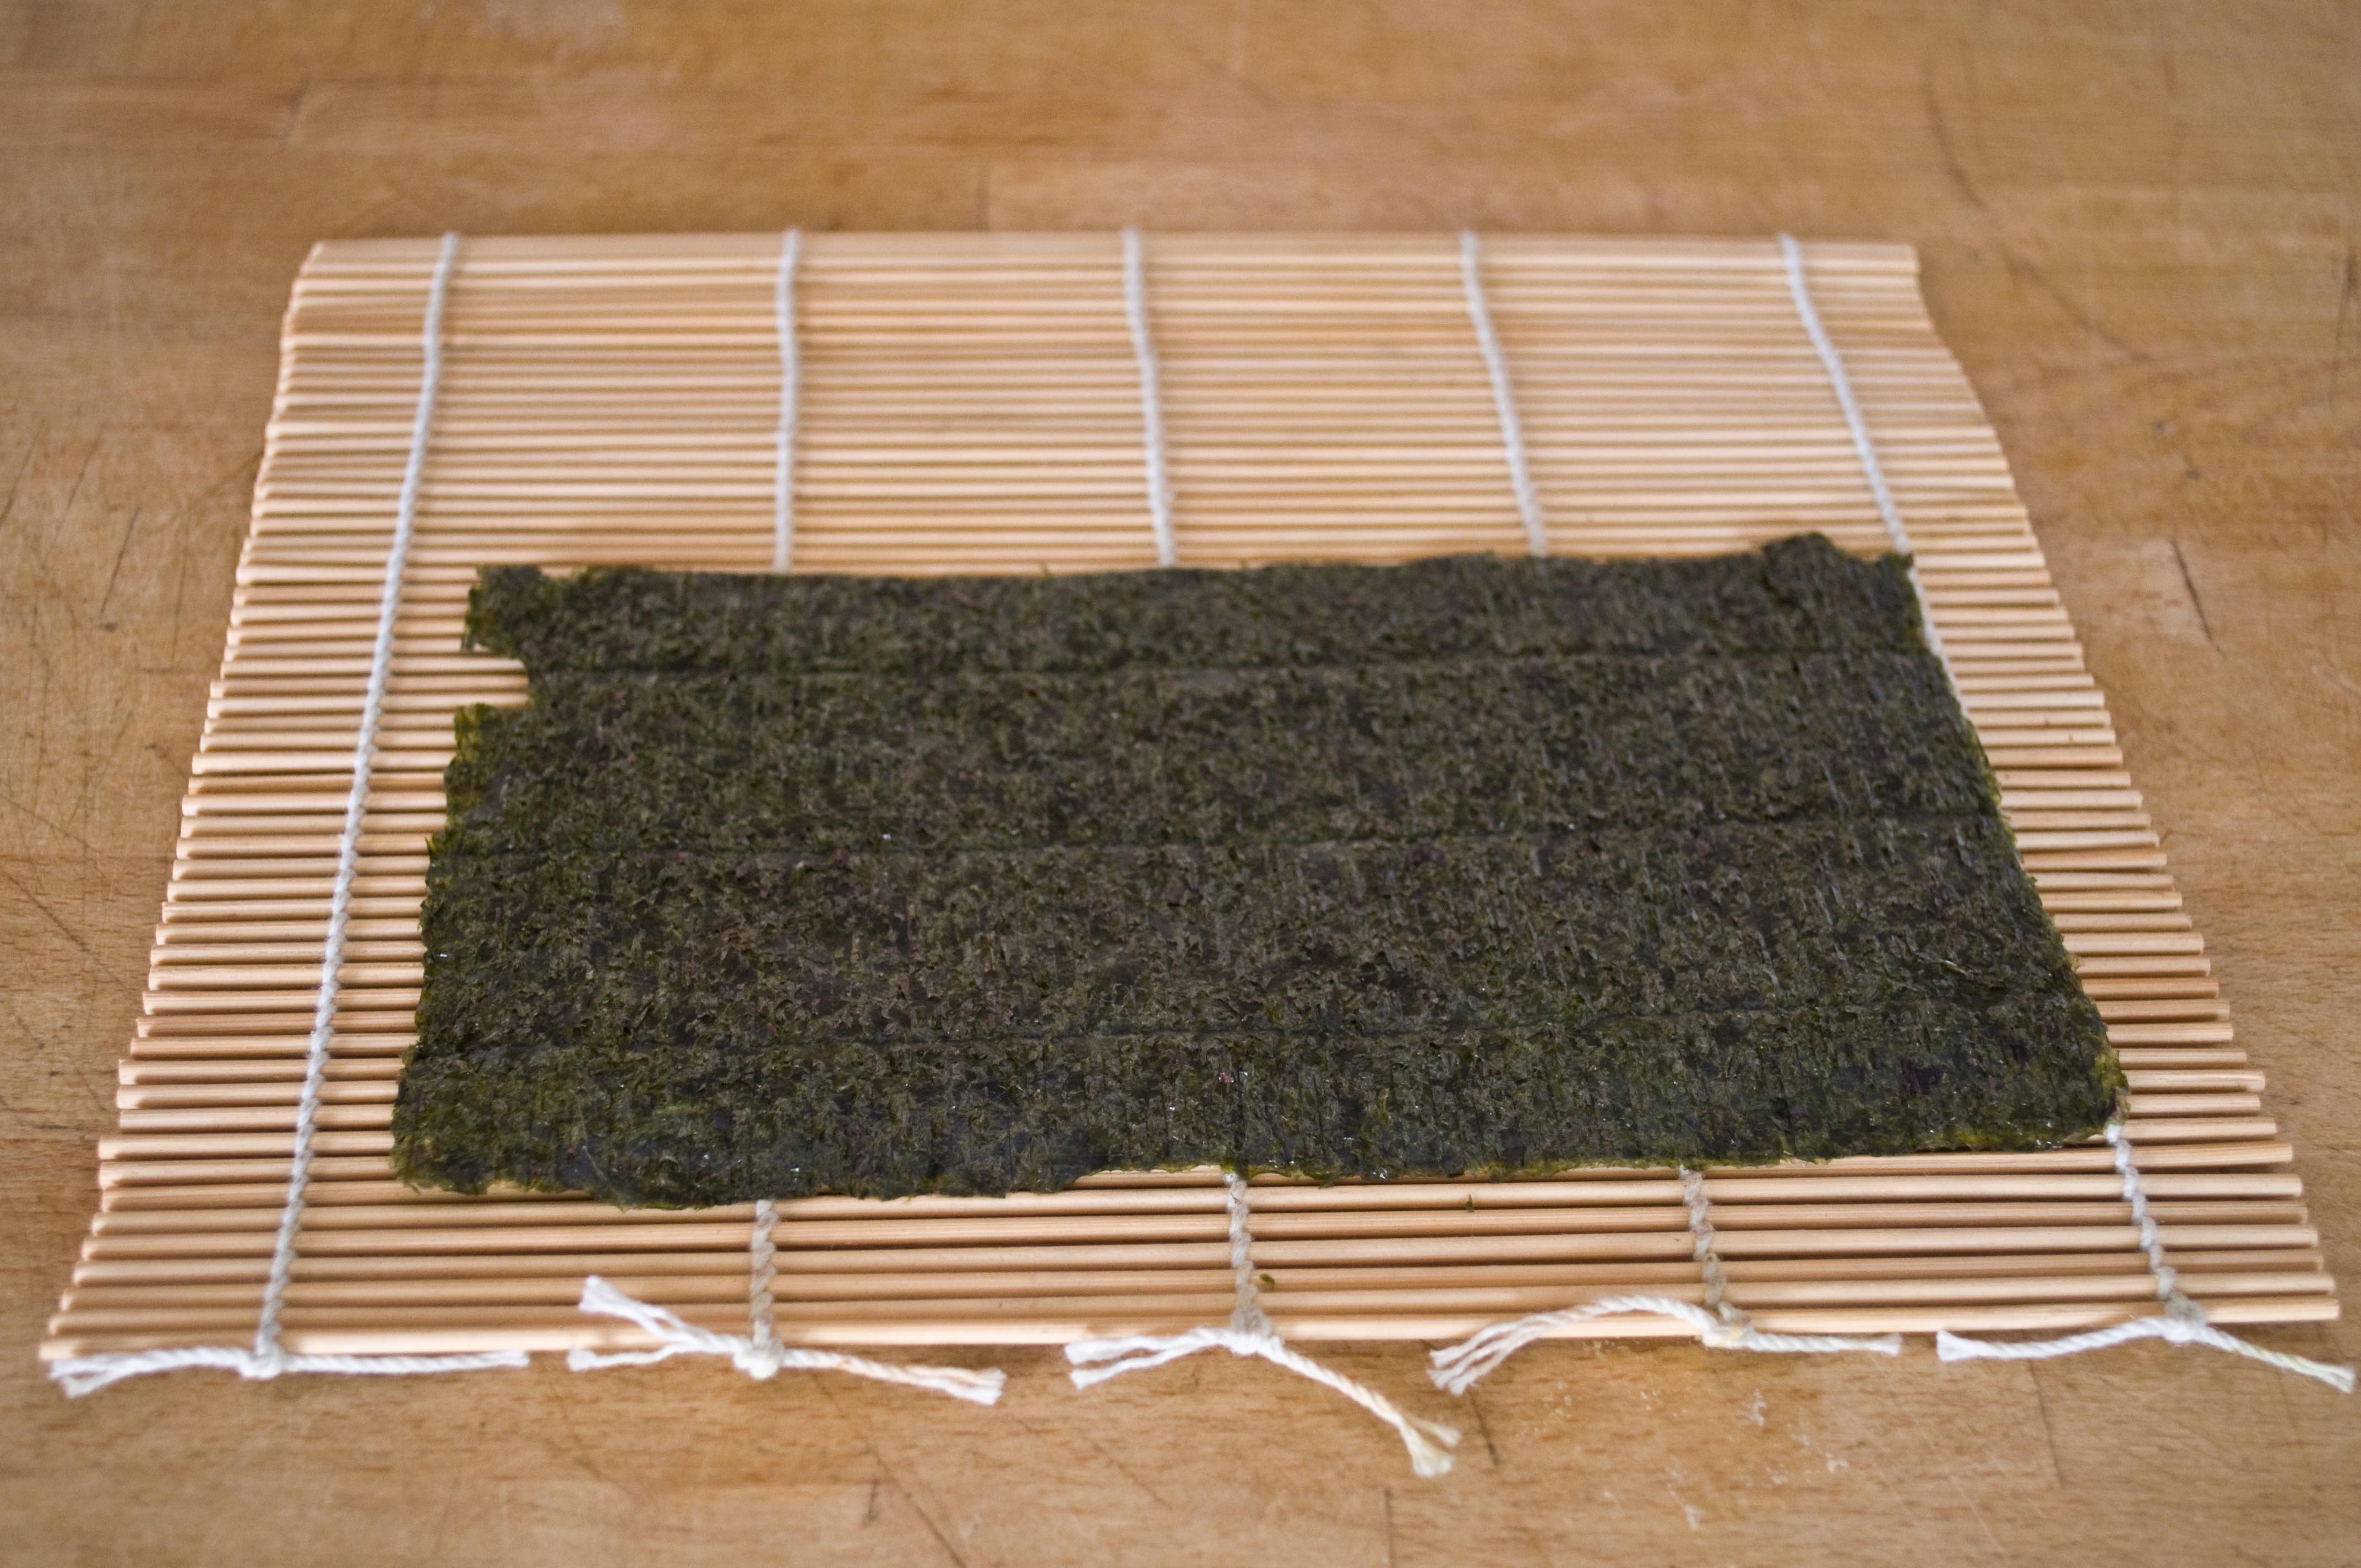
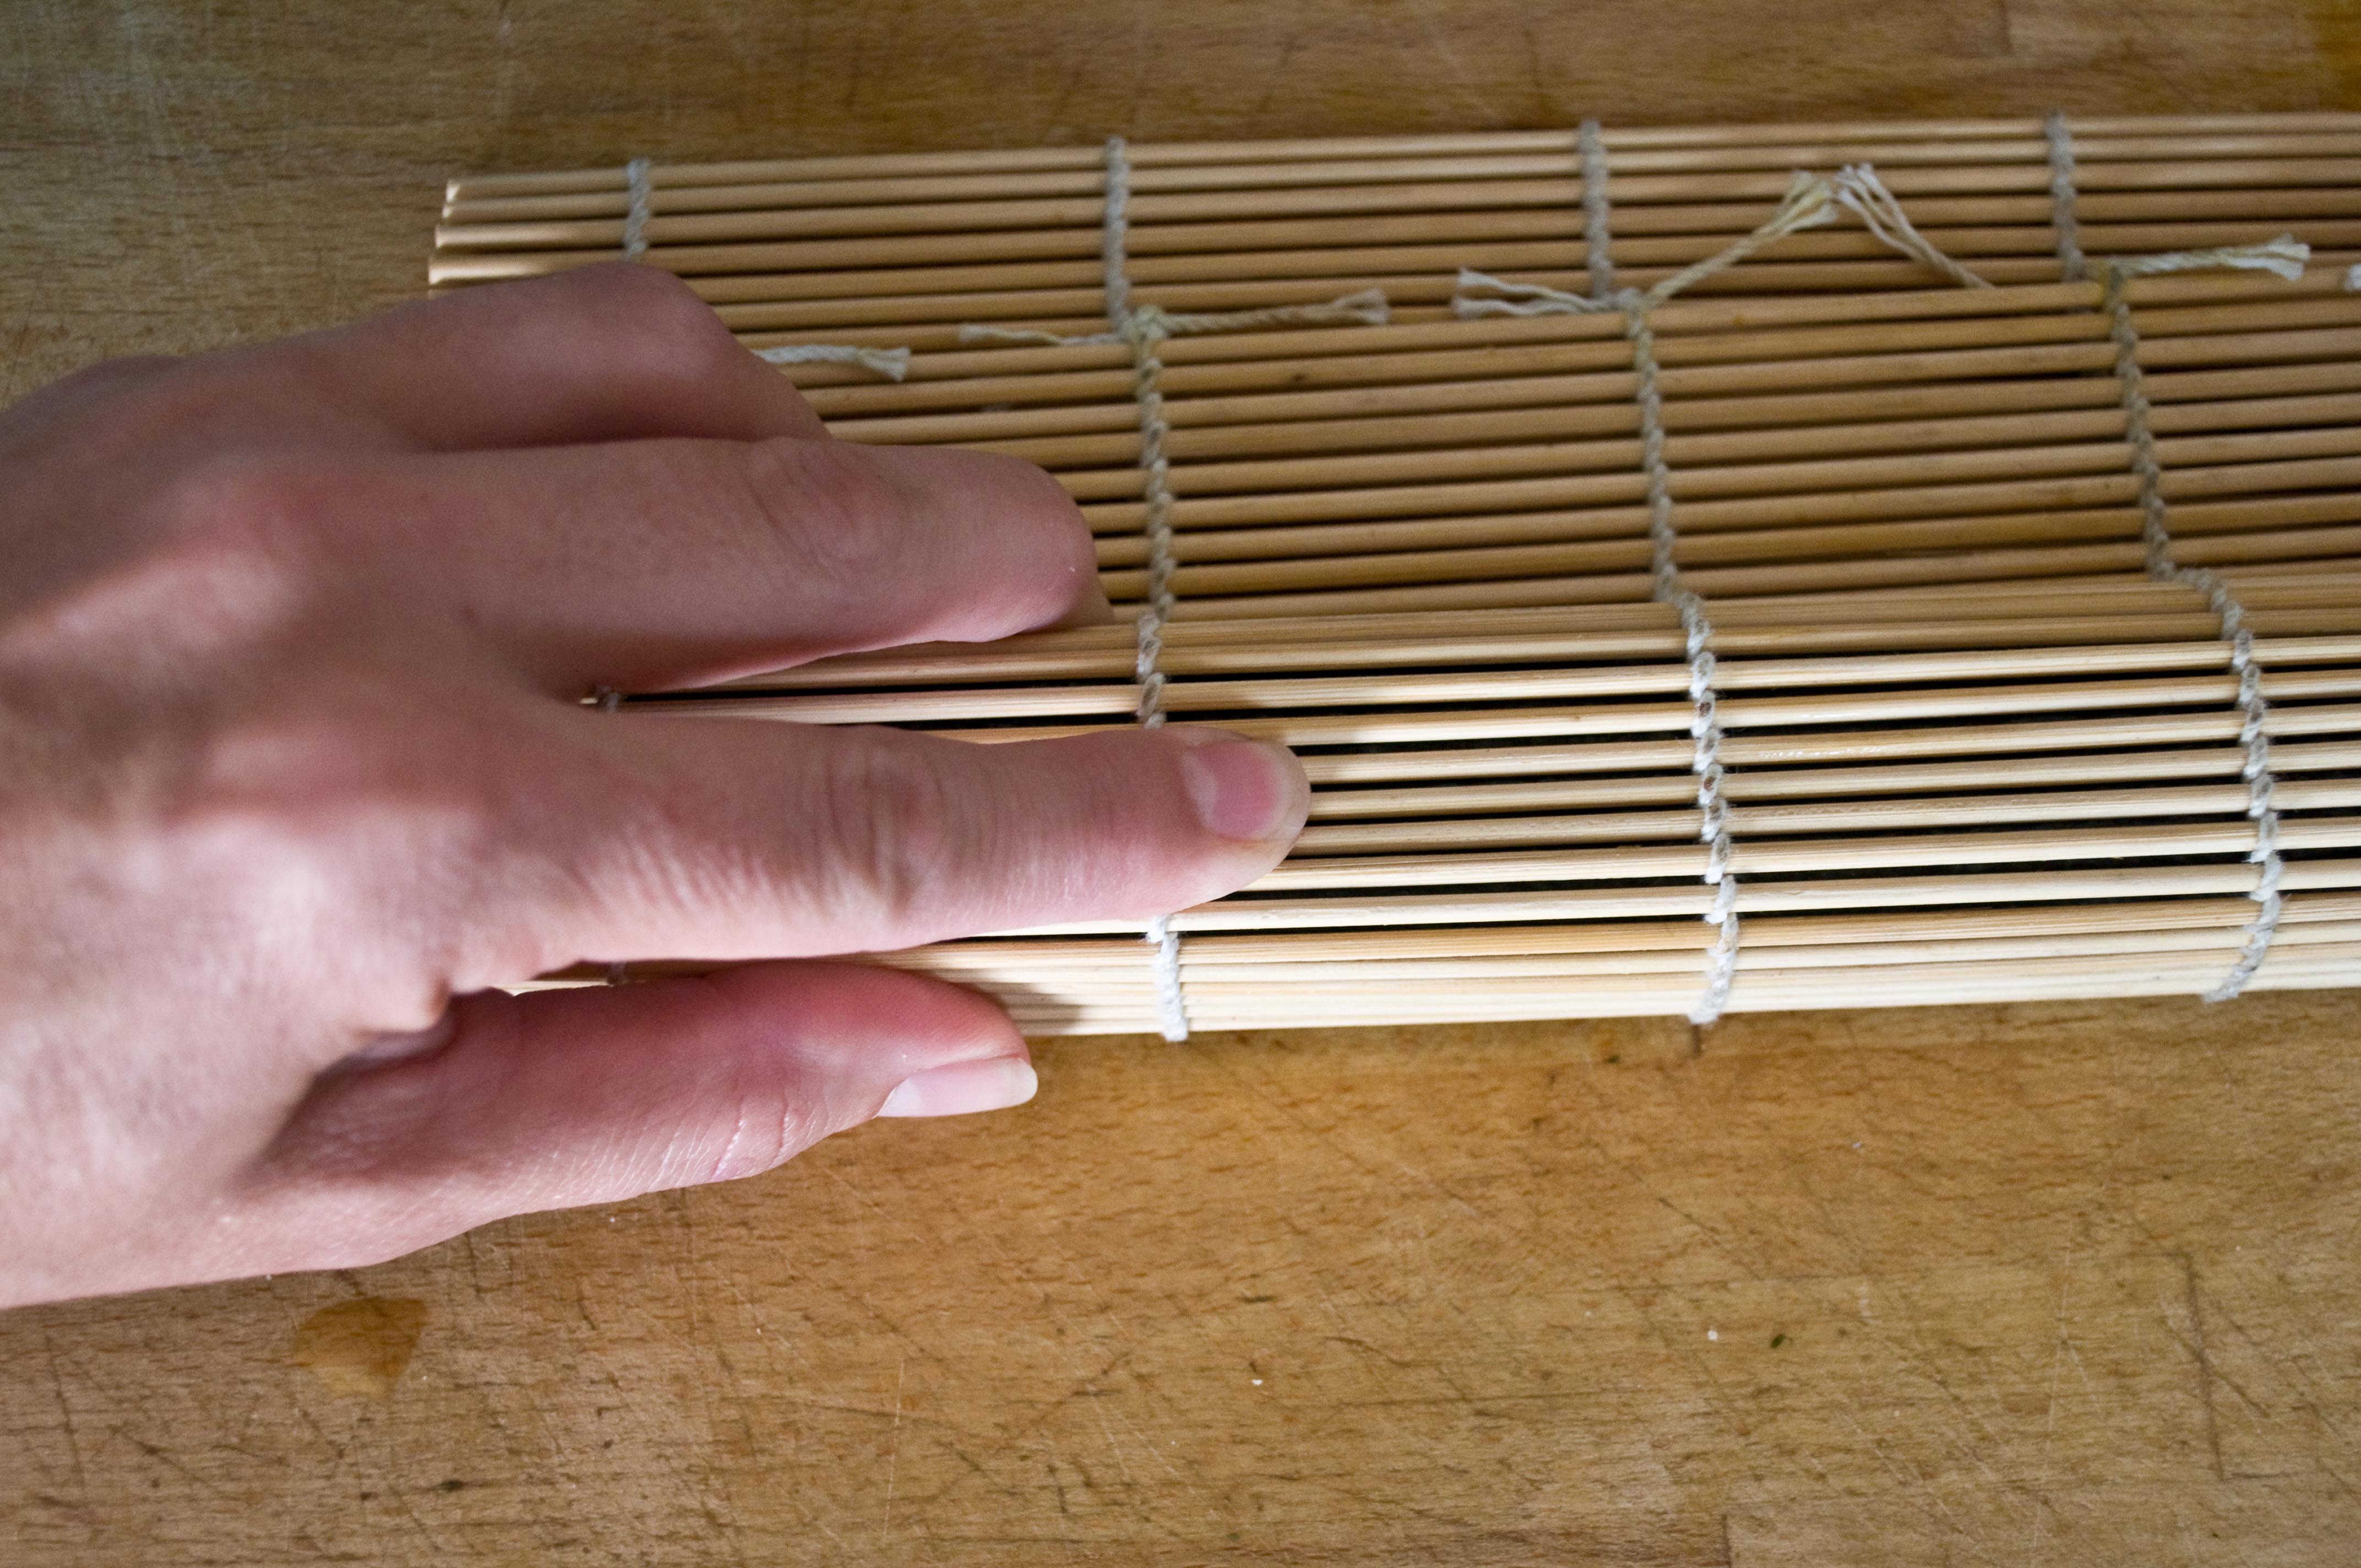
You’ll will need sheets of Nori and a bamboo rolling mat. Most large chain grocery stores carry both of those in their Asian sections. You can also try your local Japanese markets.
For the smaller, basic Ahi roll, use one sheet of Nori, cut in half width-wise.
Place this on your bamboo rolling mat.
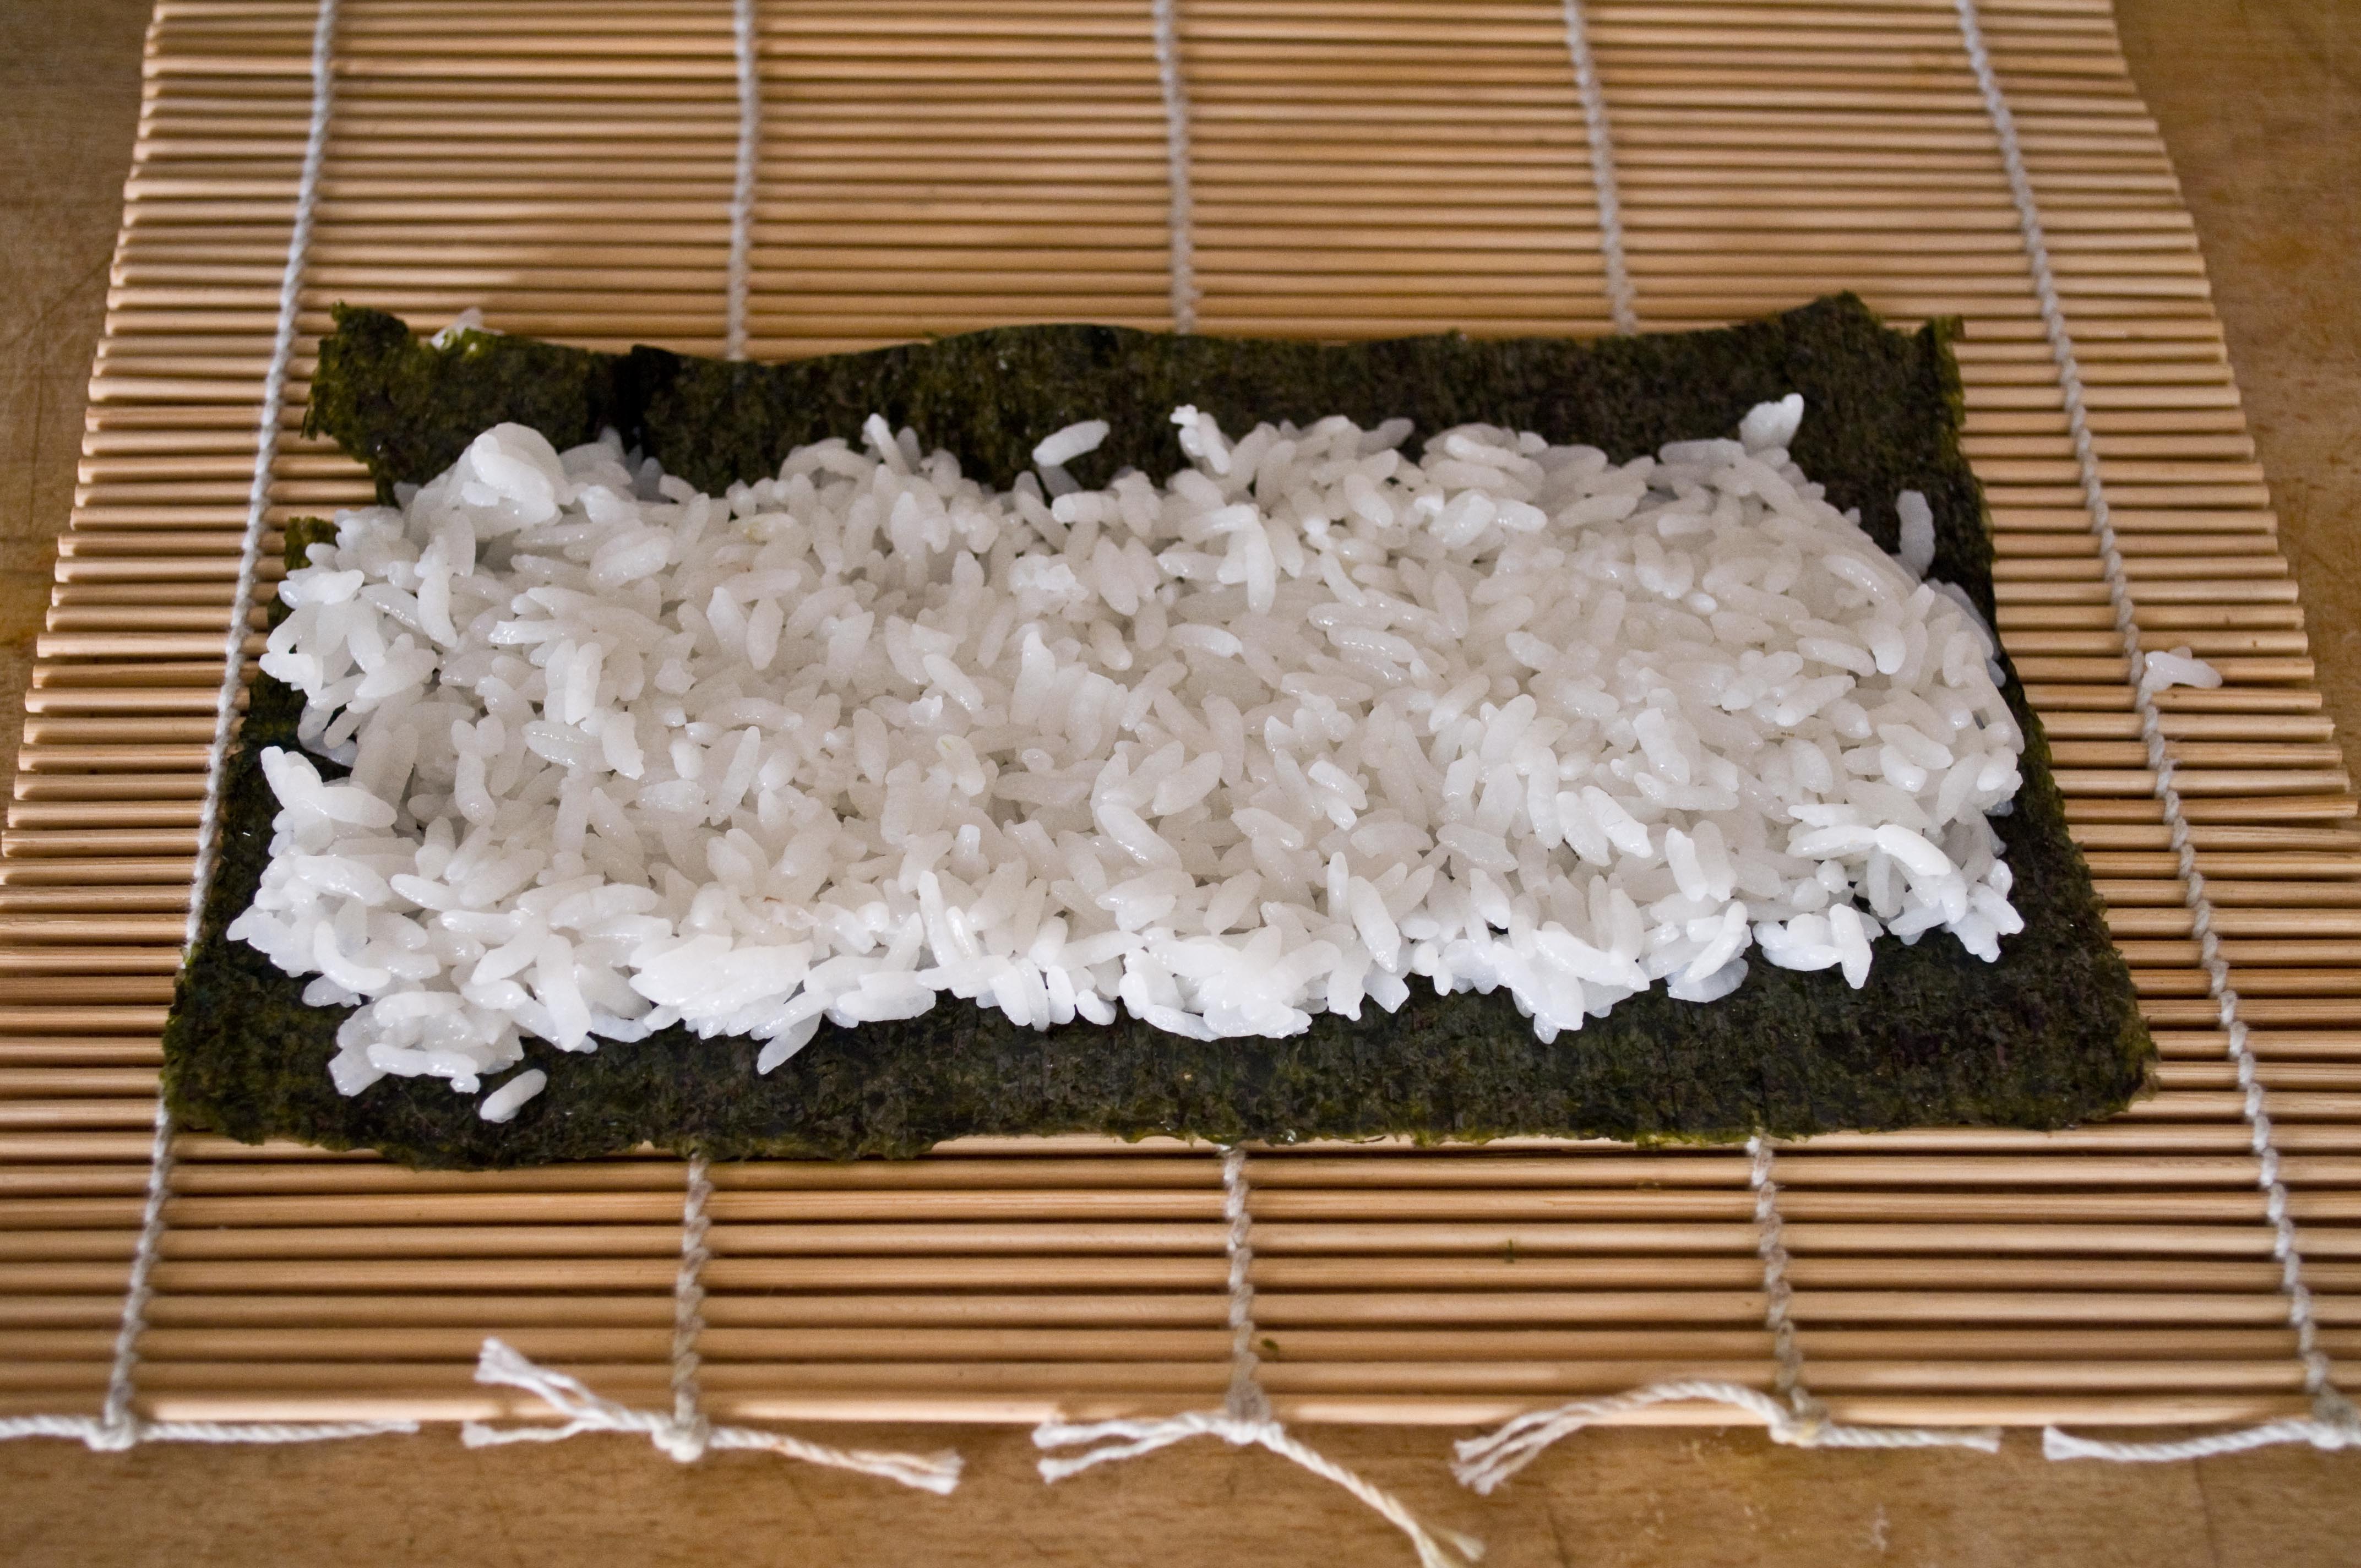
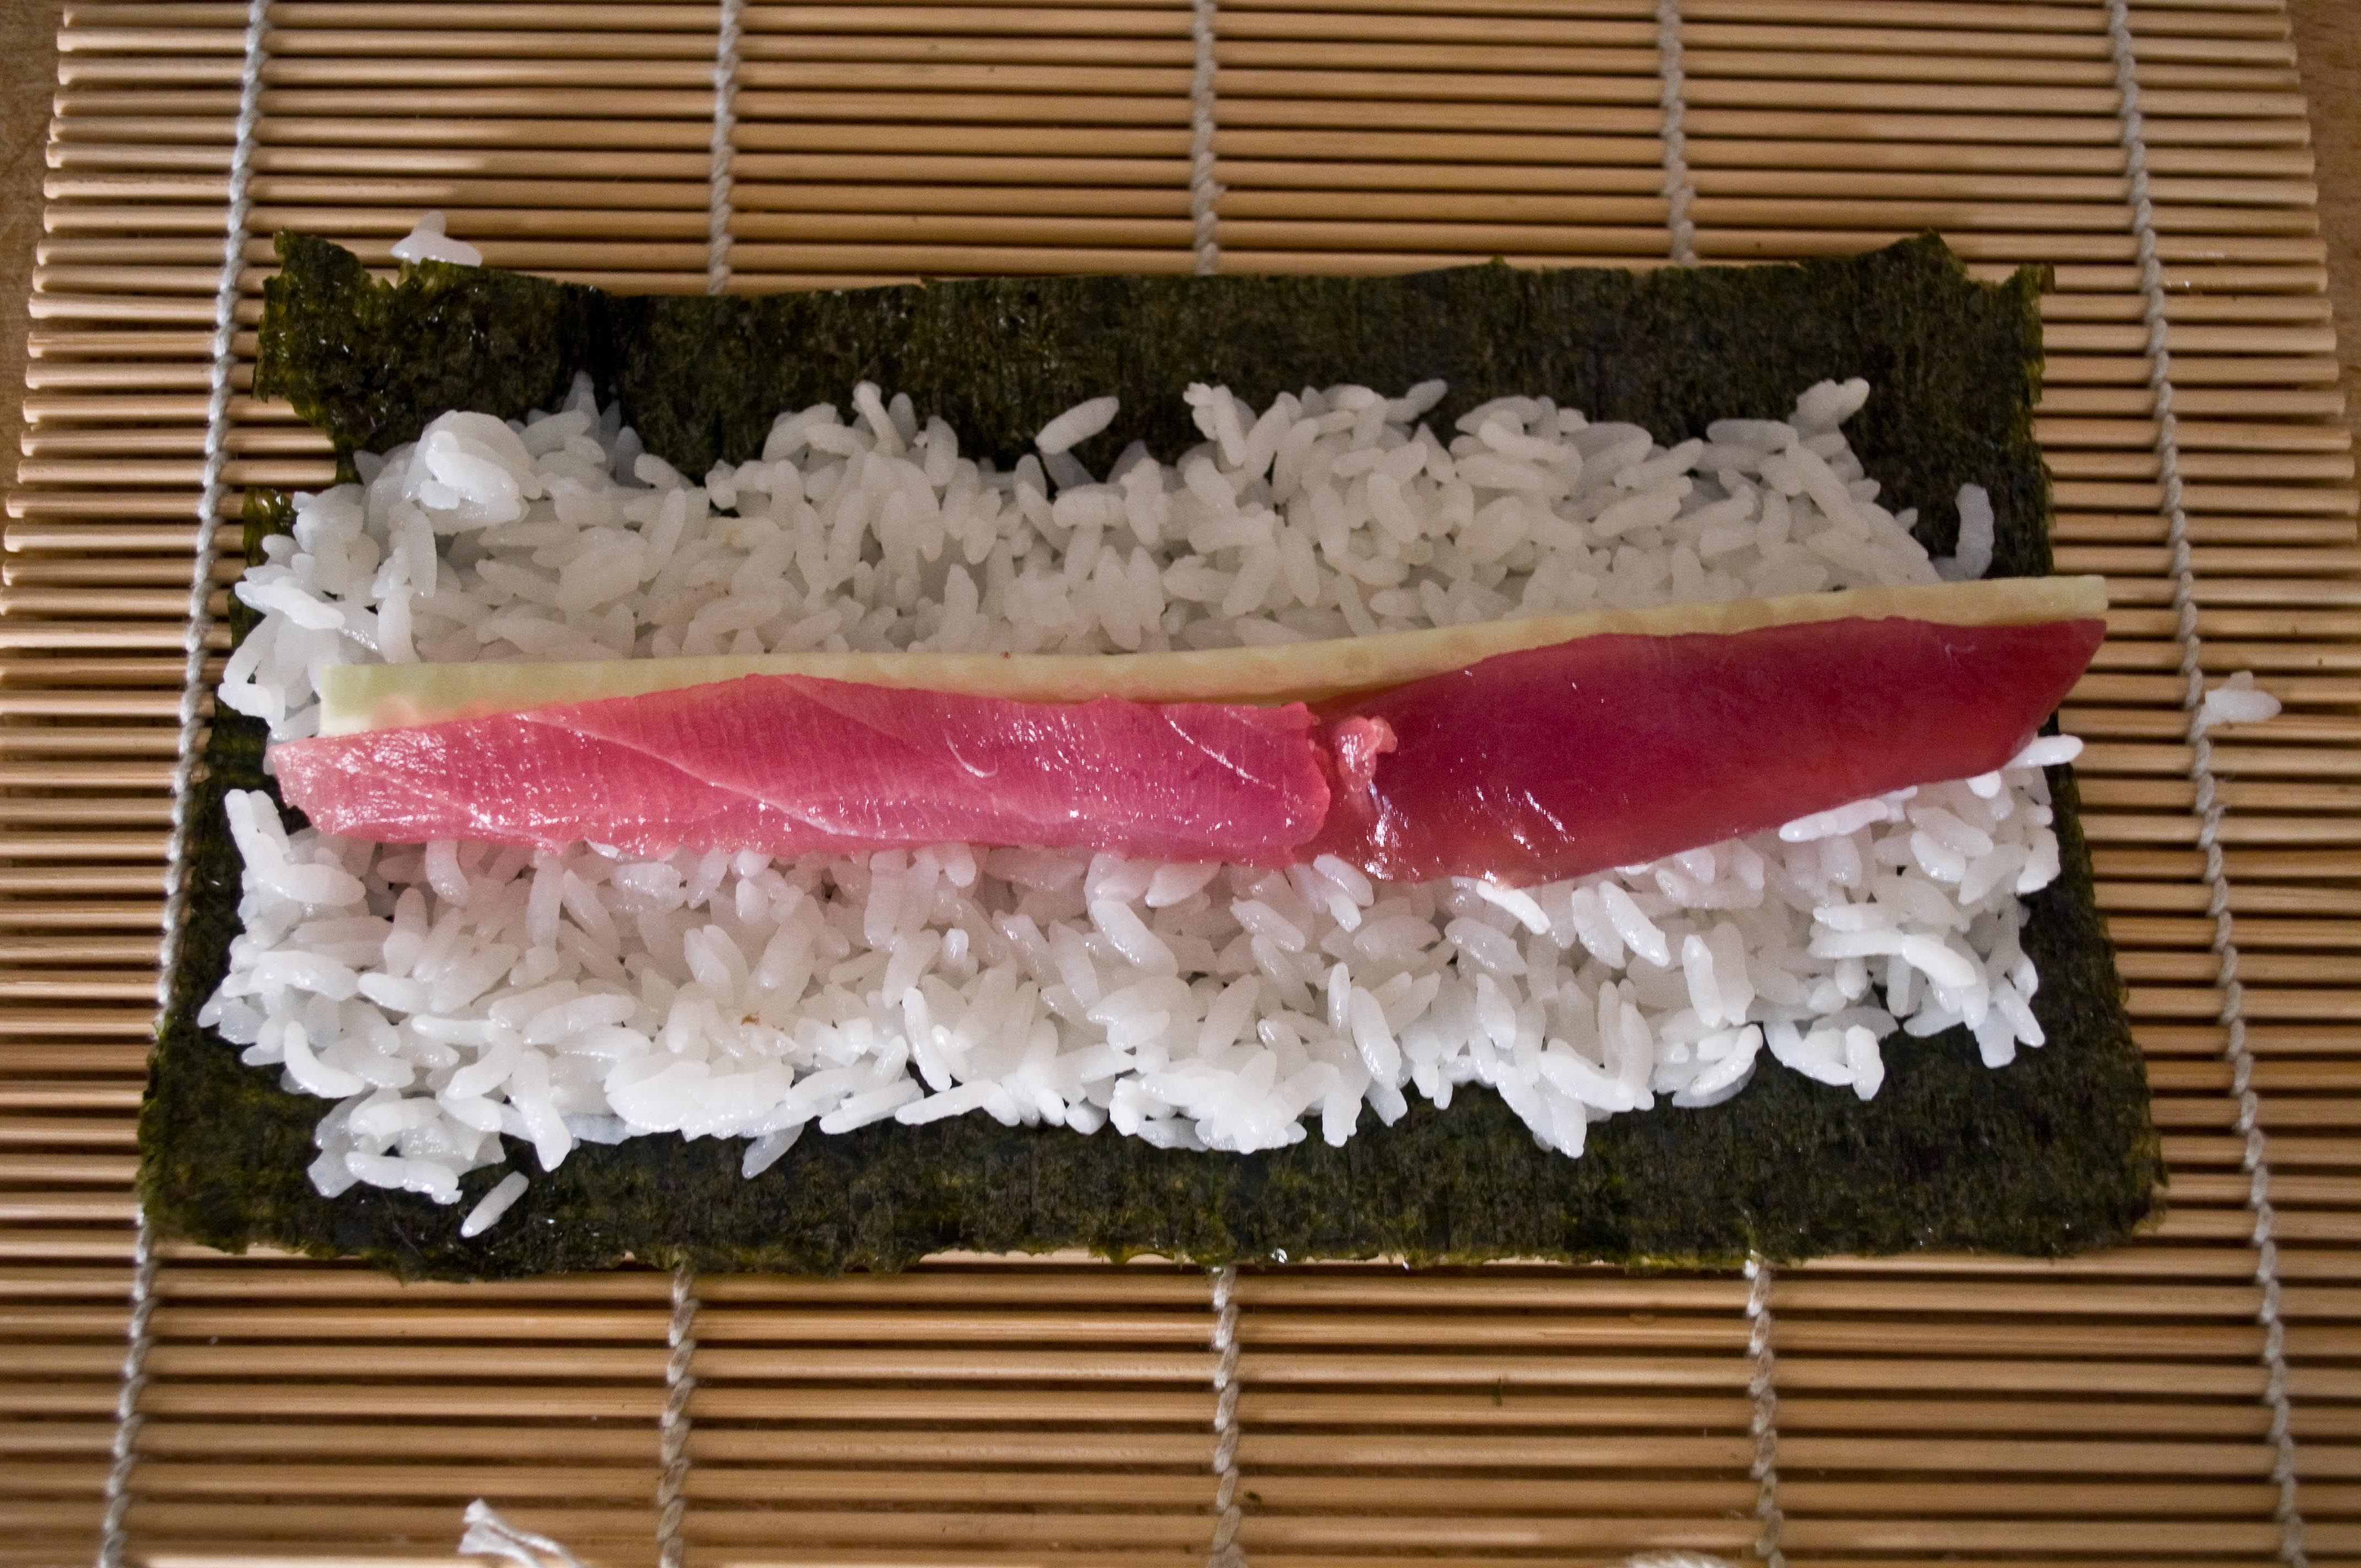
You will NEED a small bowl of cold water. This is so that the very sticky rice doesn’t stick to your fingers. Dip your fingers, as needed, into the water and transfer enough rice to make a thin layer of rice over the sheet of Nori while leaving a small blank margin along all sides.
Place your thin strips of fish in the center. I also placed a long thin strip of cucumber for a little crunch.
Roll away from you, using the mat as a guide. Apply firm pressure to shape the roll.
While the roll is still in the bamboo mat, form into a square with firm pressure.
For the Spicy Crab FIlling:
This is much more accessible and easier to find in most of the United States, regardless of how far you are from the ocean.
This is a basic spicy crab recipe, with sour cream as a substitute for the more commonly used mayonaise. If you want to use mayo, it will work just fine as well. I just have a very strong aversion to mayo in general, store bough being at the top of my hit list.
1 six ounce can of lump crab meat, or claw meat (please don’t use the fake stuff Krab just doesn’t taste the same)
2 tbs of sour cream
1 tsp Nanami Togarashi (Don’t be scared, most grocery stores have it in the Asian section)
Pinch of salt
Squeeze the crab meat to remove as much water as you can. This will help your filling to stay together and not become a soupy mess.
Add the sour cream, nanami and salt and stir to combine.
Use a full sheet of Nori for this roll, but use the same steps as with the Ahi roll.
I used a thin strip of cucumber for this roll as well. Just because I had it already cut and I wanted to add a little crunch.
Roll the same as before, but there is no need to make the larger rolls square.
Use a very sharp knife to cut the rolls, you may need to run the knife under hot water in between cuts.
Whats up with Wasabi?? There are two kinds that are pretty readily available at most grocery stores. The squeeze tube kind and the powder kind that you mix with water. I find the squeeze tube kind to have an odd, over powering taste. I very much prefer the powder kind.
You now know how to make sushi. Go impress your friends.
Do you have a How To that you want to see? Email it to [email protected] or leave it on my Facebook wall at:
Galettes are such an amazing food. Like a tart or a pizza, only much more elegant and easier to make. This dough came out so beautifully, with a buttery flakiness that could be eaten all on its own. There is a very good chance that this Fall will be filled with galettes, sweet and savory.
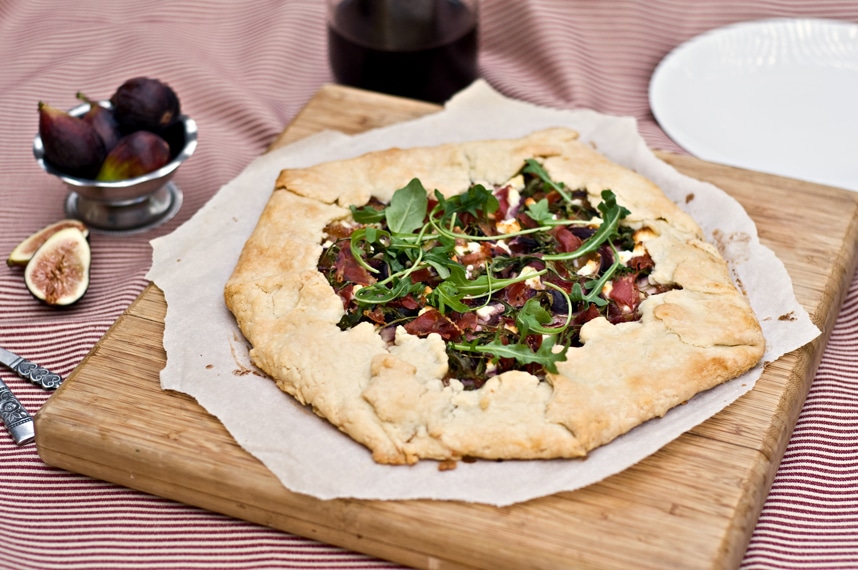
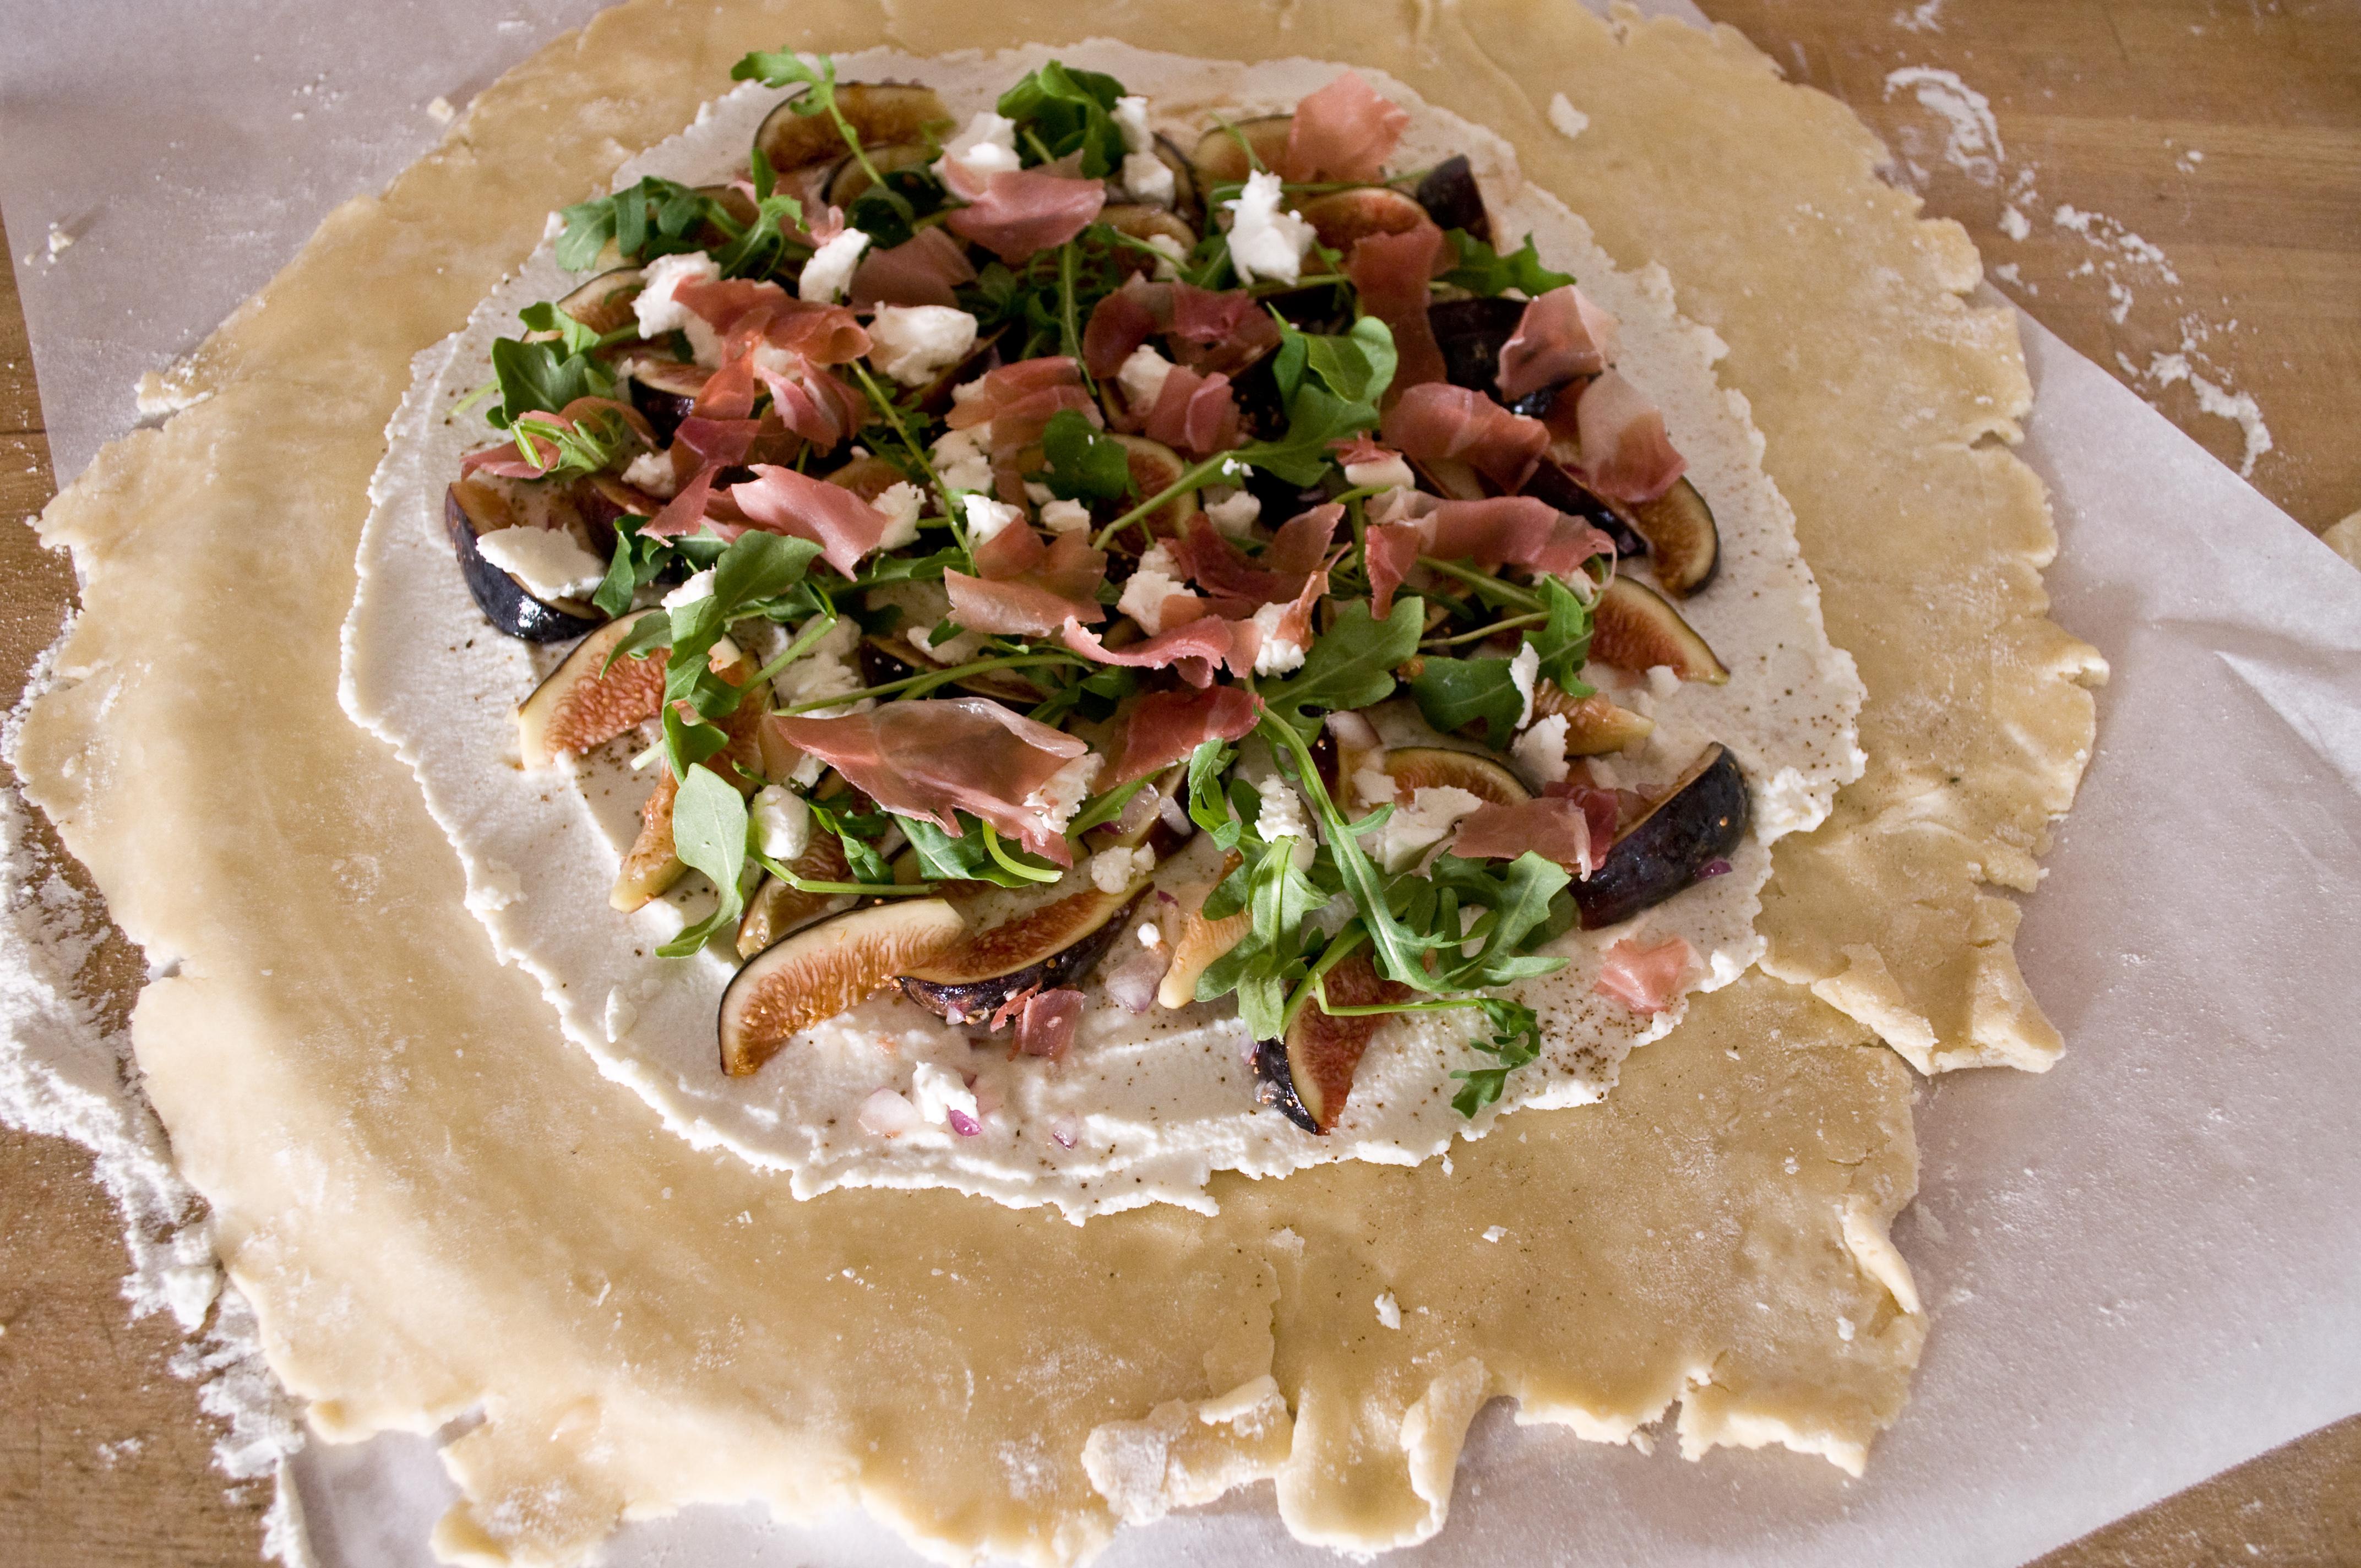
Fig and Goat Cheese Galette
CRUST
2 cups flour
1 tsp salt
1 tsp sugar
1 1/2 sticks of butter
1/3 cup ice cold water
FILLING
1/2 cup ricotta cheese
1 tsp salt
1 tsp pepper
6 figs, sliced
1 tbs raw honey
2 tbs minced red onions
1/2 cup arugula
2 oz goat cheese, crumbled
1 oz prosciutto, chopped.
1 tbs melted butter
In a food processor, combine 1 1/3 cup flour, salt, sugar and butter, process until well combined. Add the remaining flour and process again until combined. Transfer to a bowl and add the water with a wooden spoon (don’t add the water while the dough is in the food processor or your dough will be brittle and cracker-like). If the dough isn’t moist enough, you can add more water, a tsp at a time until the consistency is right. Form dough into a disk, wrap with plastic wrap and chill in the refrigerator for 2 hours.
Preheat your oven to 375.
Once the dough is chilled, roll into a "rustic" circle. The great thing about a Galette is that an odd shape looks charming, don’t worry about making it too perfect. Transfer to a baking sheet or a pizza stone covered with parchment paper. Spread the ricotta in the middle, leaving about 2-3 inches on all sides bare. Top with salt and pepper. In a bowl, combine the figs, honey and onions, toss to coat. Add the figs to the top of the ricotta, then add the arugula, goat cheese and prosciutto.
Fold the edges into the middle
Brush the crust with melted butter and bake at 375 for 40-45 minutes or until golden brown. I added additional arugula and goat cheese to the top before serving, but this is completely optional.
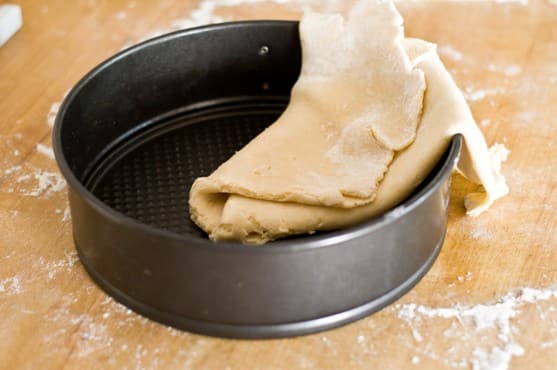
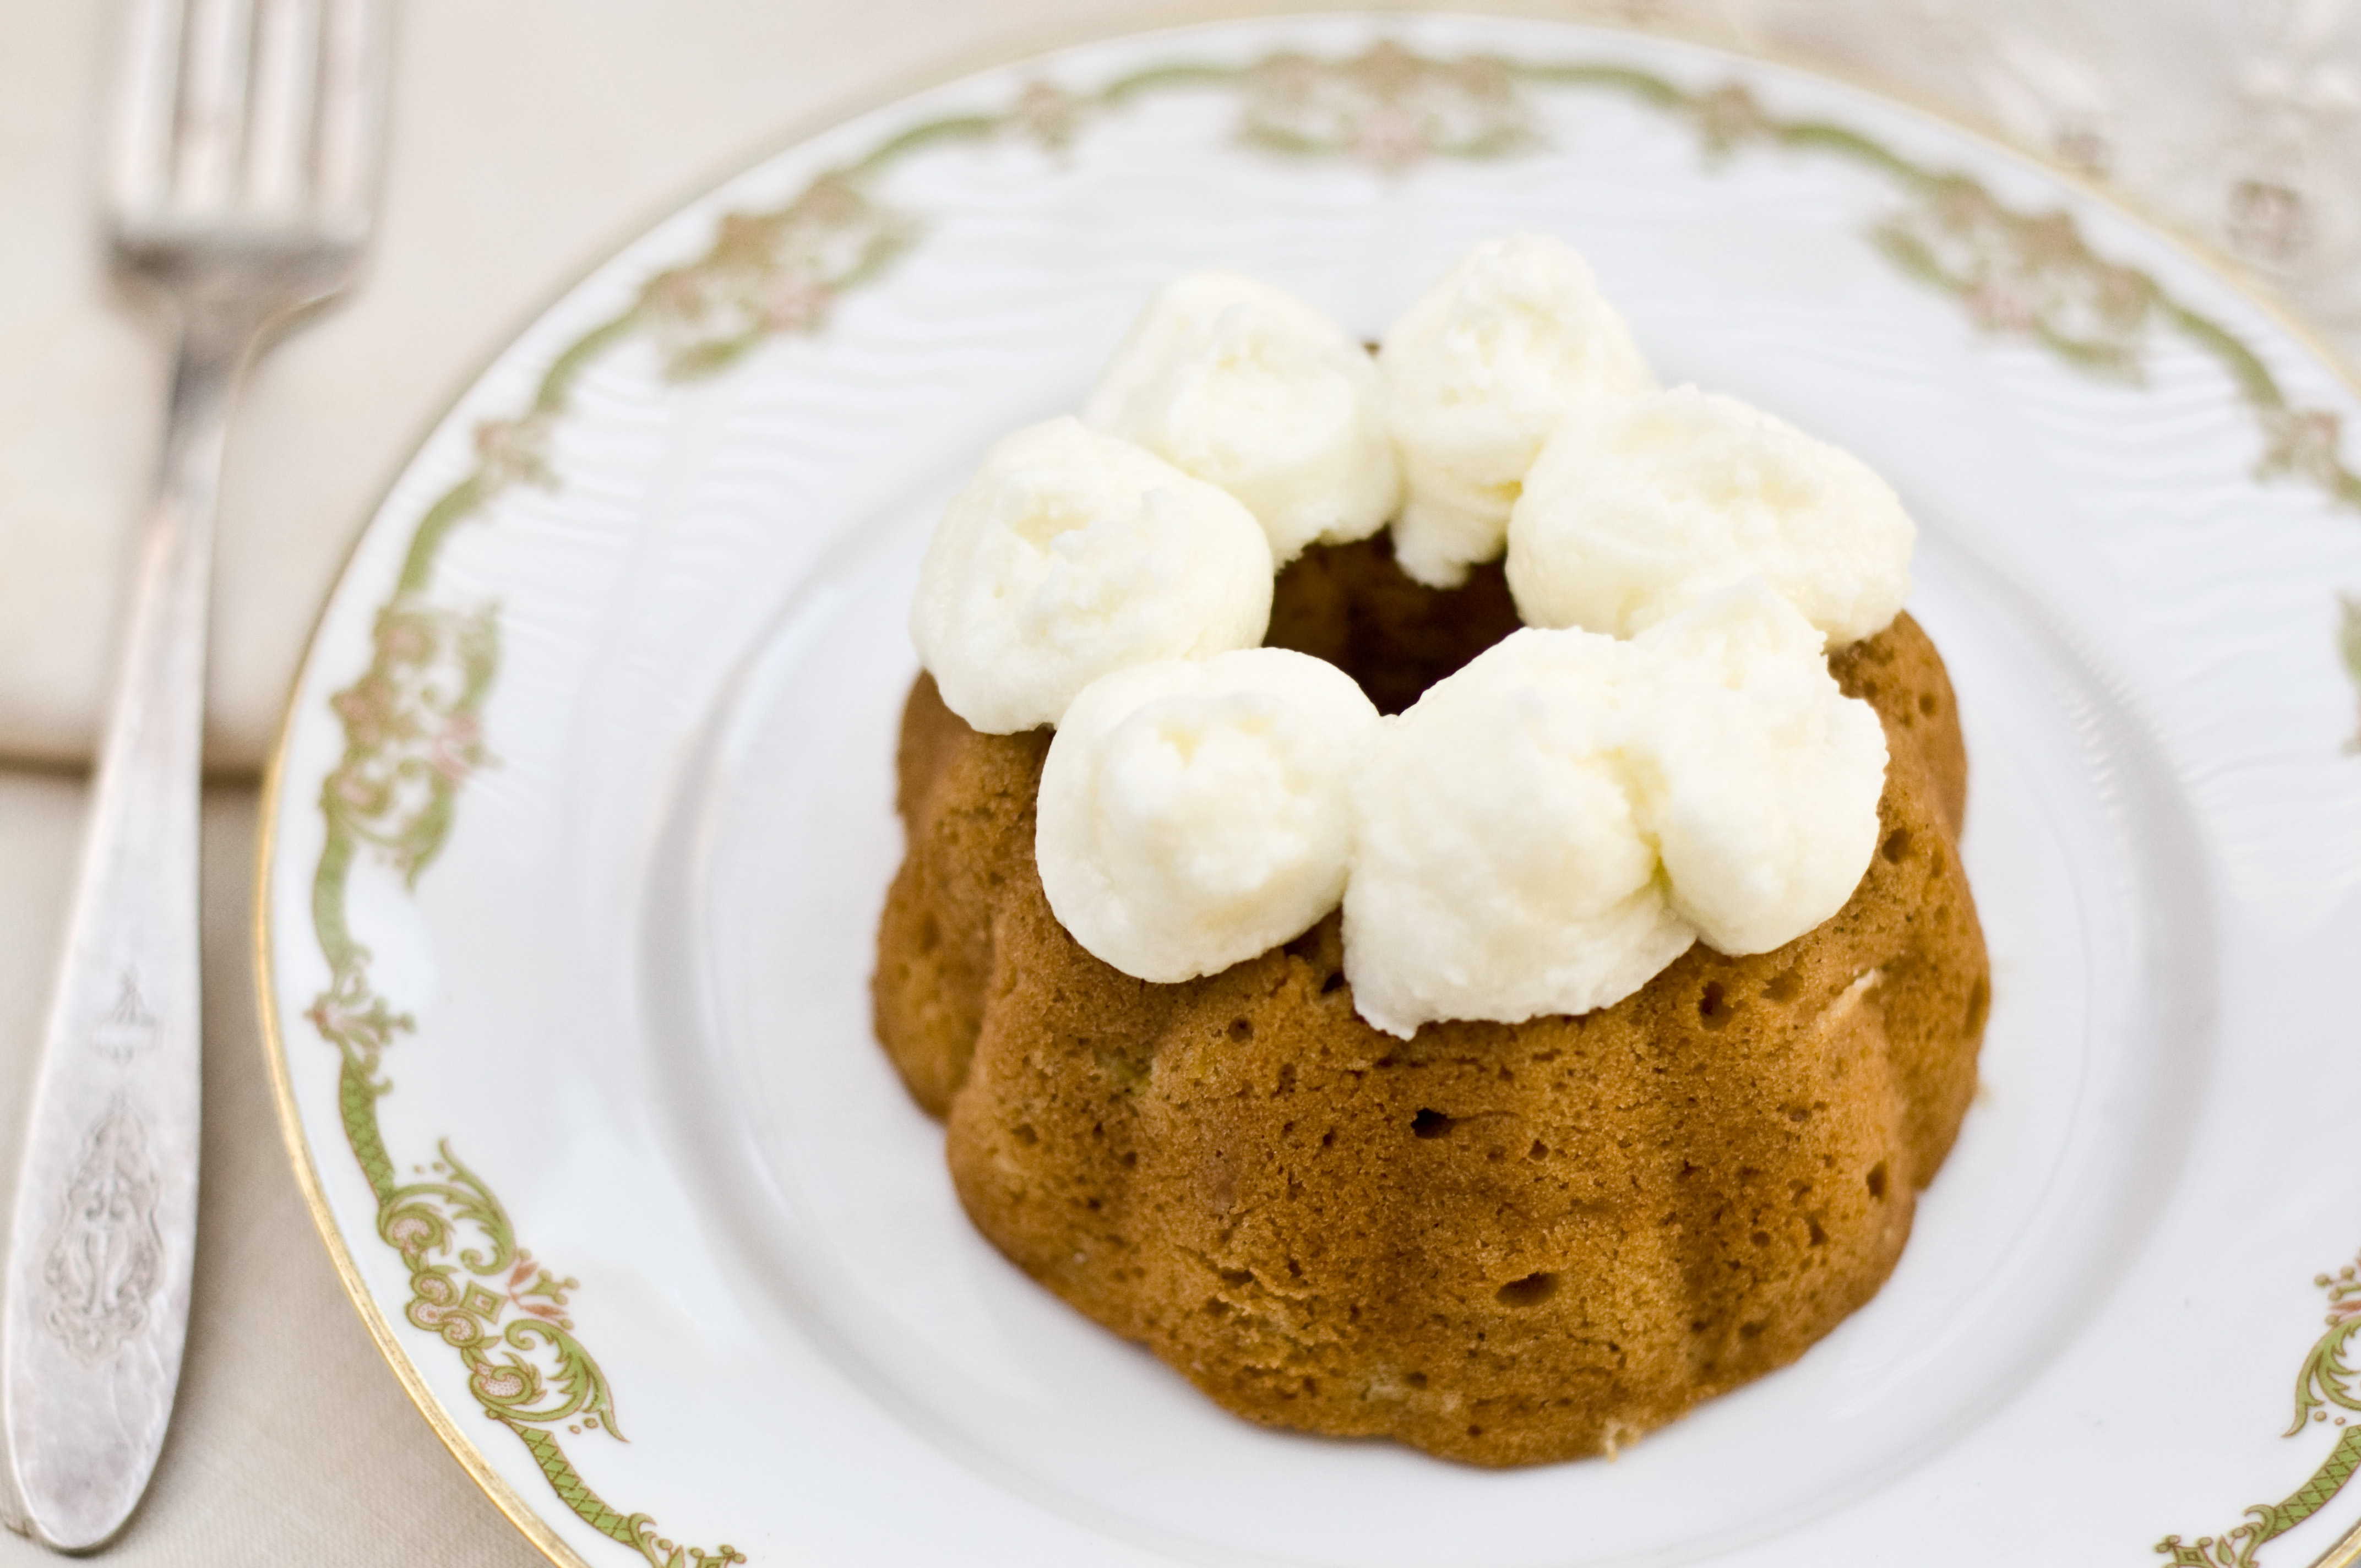
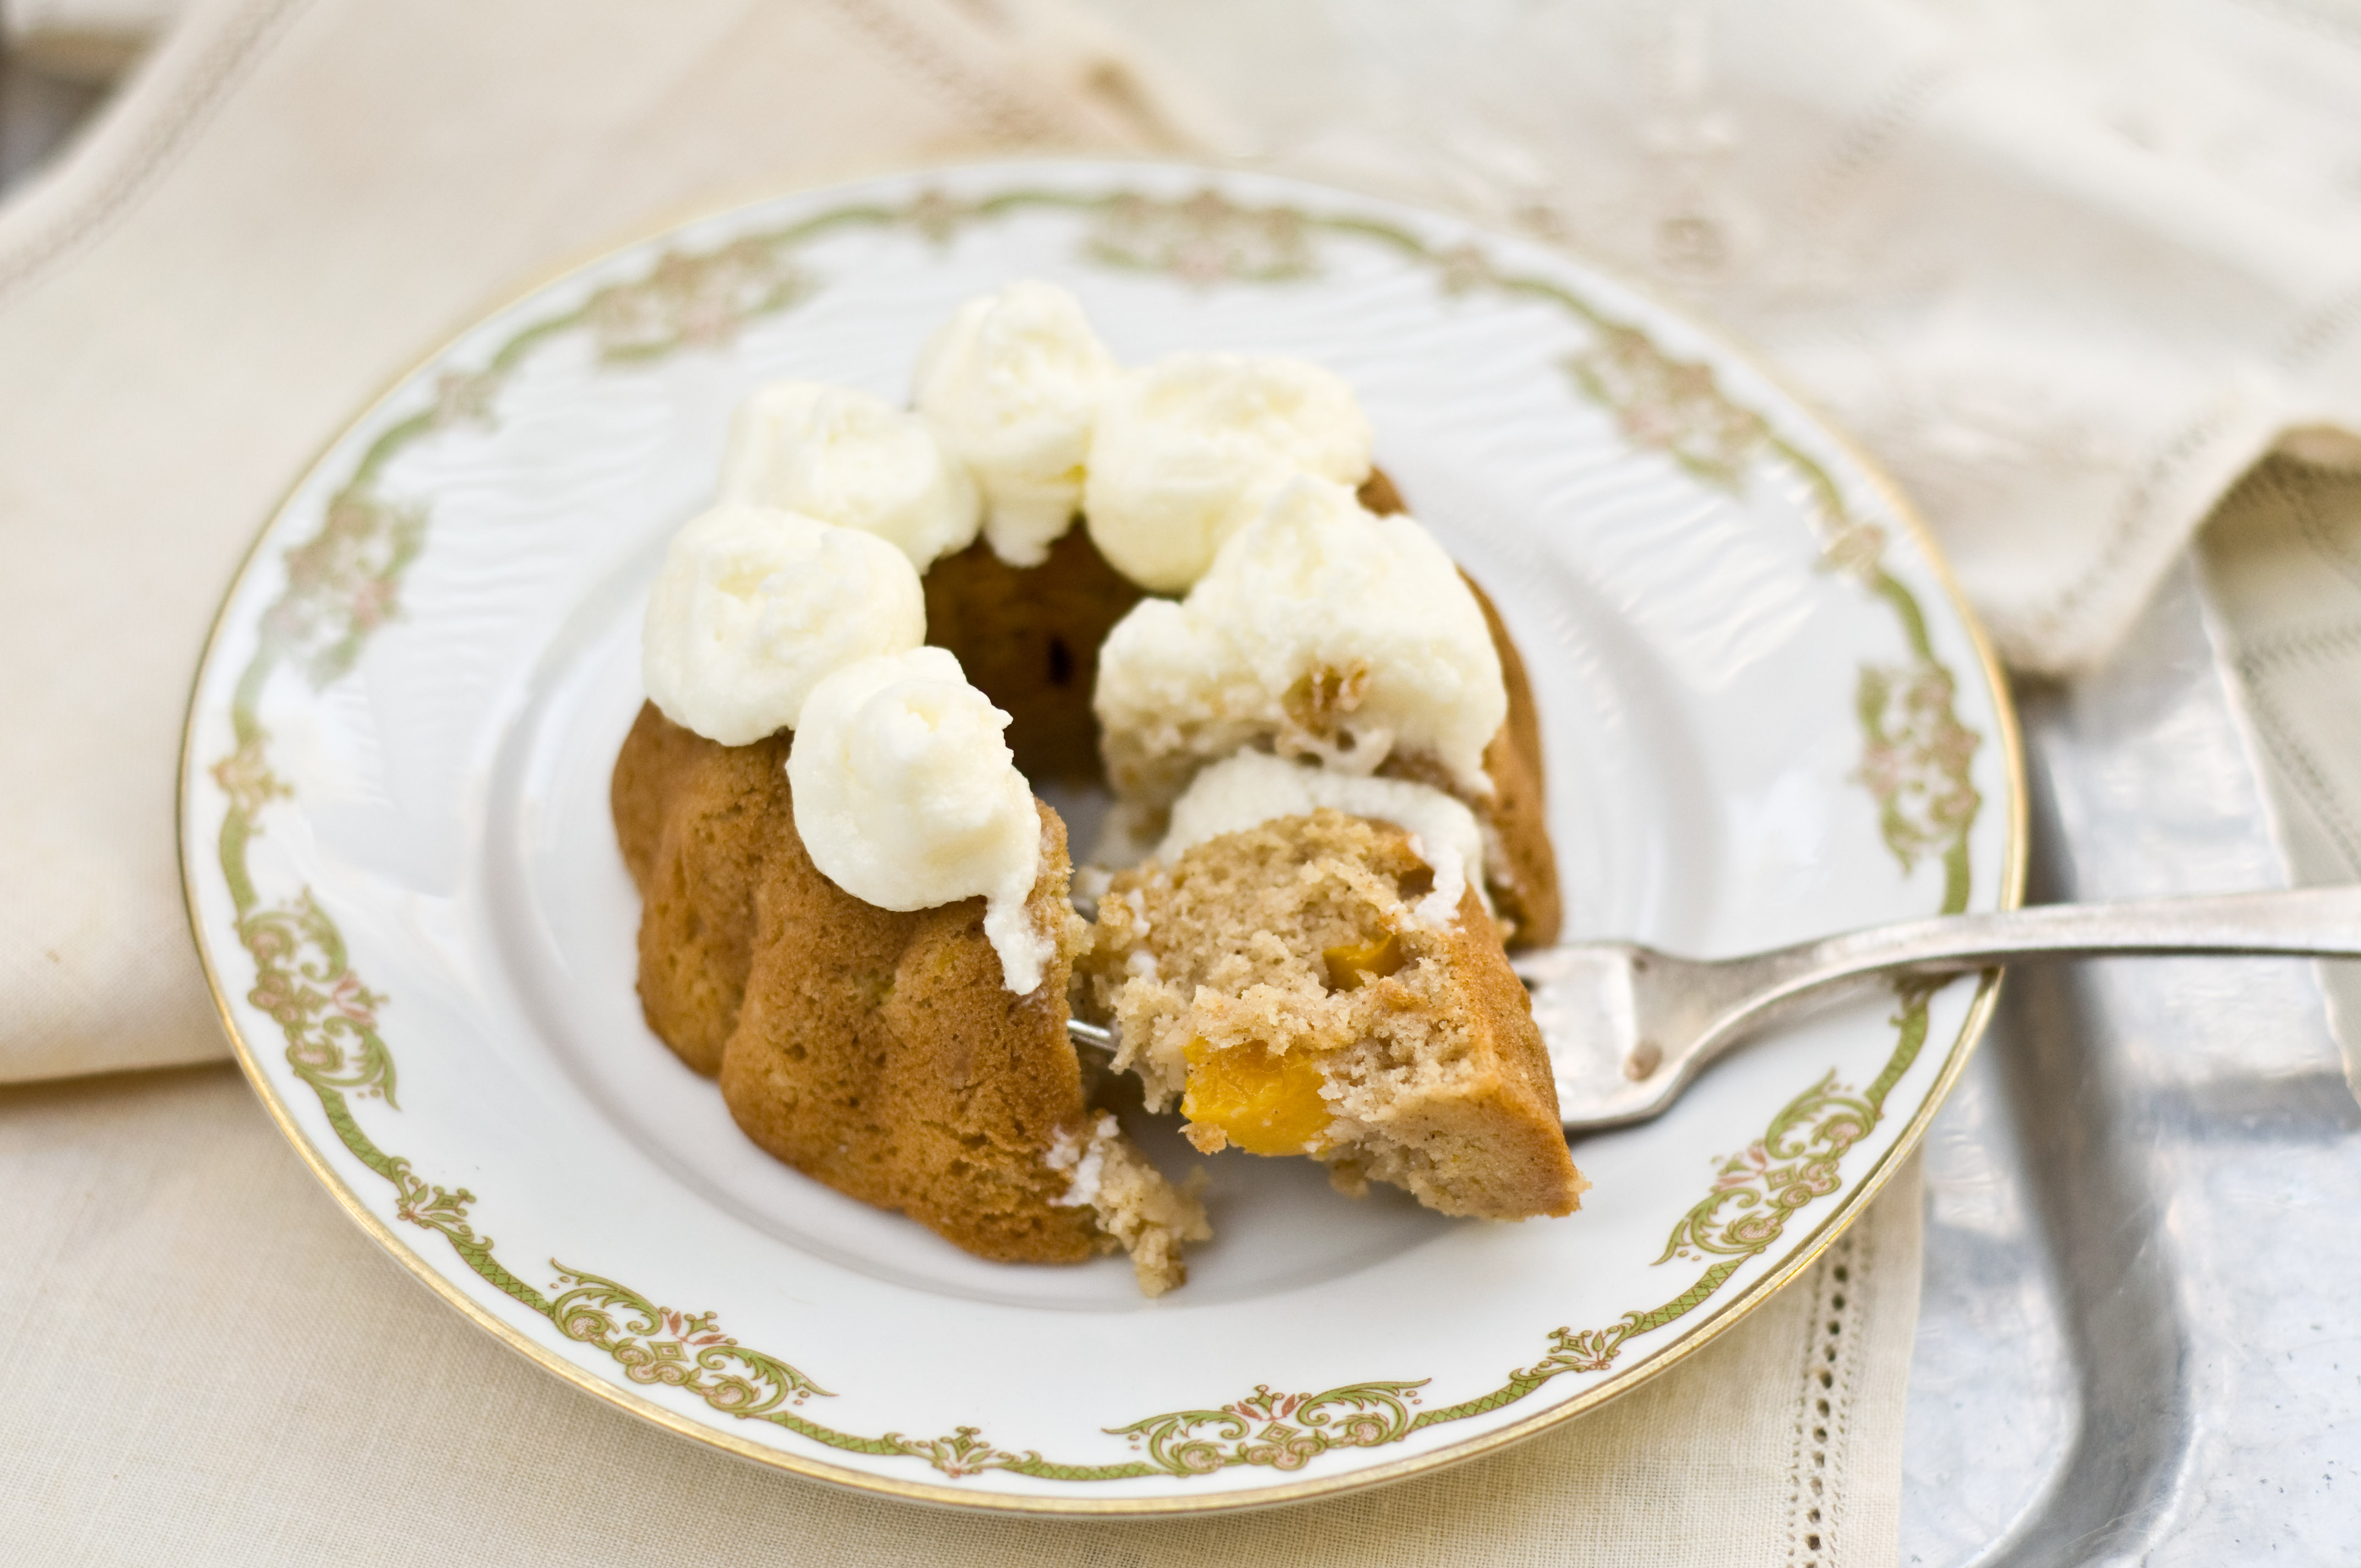
I wrote another article for Honest Cooking. I wrote about this deep dish pie, because I love it so much. The crust is the best part, and making it deep dish adds more of the good stuff, oh, and the filling too. Also, deep dish pies are really impressive. They stand on their own, outside of a pie pan and look like a baked-goods force to be reckoned with. Next time you make a pie from scratch, forget the pie pan and reach for your spring form pan.
Once your pie dough is completed, chilled and ready to go, roll out one disk (about half of the total recipe) so that it will sit in your spring form pan with about a 1 inch overhang. Fold in half, then in half again to form a triangle. Gently move to the pan with the point of the triangle in the dead center.
Unfold and smooth any rips or tears with your fingers. Set in the fridge to chill until ready to use.
Preheat oven to 375.
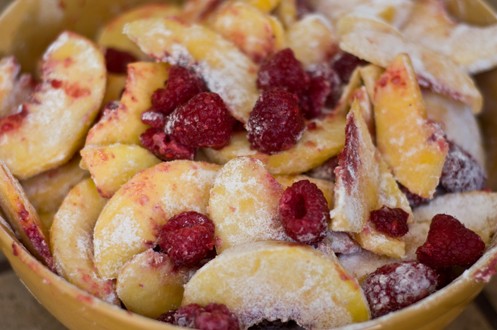
In a separate bowl, add the flour, cornstarch, salt, and sugar, then whisk to combine.
Add the peaches and raspberries and toss to coat.
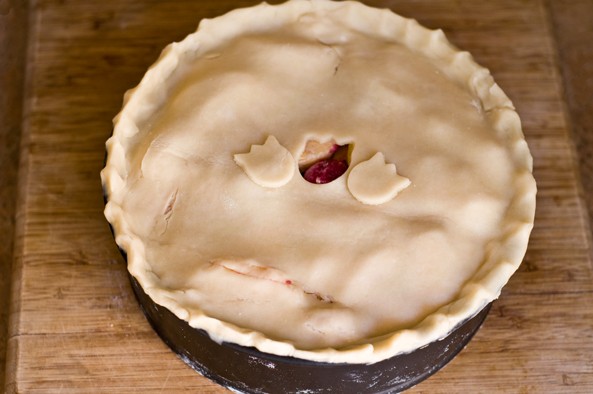
Add the fruit to the spring form pan that is now lined with pie dough. Roll out your remaining dough and place it on the top of the pie, using the same method to move as you did with your bottom dough layer. Using your fingers, squeeze the top and bottom layers of the crust together around the edge of the pan. Make a few slits in the top of the pie dough to release steam. If you want to cut out a shape, as shown below, do so prior to moving your dough.
Bake at 375 for 50-60 minutes or until the top is a golden brown.
Somehow, in the course of my very rushed Deep Dish photo shoot, my peach slices went missing.
I’m not entirely sure who’s belly they ended up in, but either way, a pretty healthy snack.
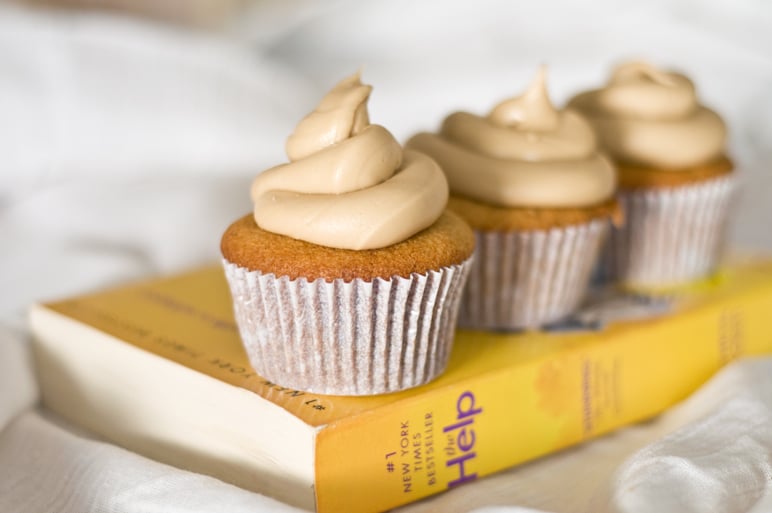
I couldn’t possible eat everything I make for this blog. As much as I love to bake, I love to give it away just as much. When I’m invited to someones house, I come bearing a tray of baked goods, requested or not. These cakes needed to leave my house as soon as I had the first bite. I had to find someone to take them off my hands and save me from eating a dozen Mango Rum Cakes with Lemon Butter cream. I made 6 in mini bundt cake pans and 8 in cupcake form. Dangerous.
This is how these cakes grew as an idea in my head:
I want to make a rum cake.
But, how do I make it different?
I have a gorgeous mango, I should use that.
And the frosting?
OOOOhhh…lemons!
Lemon buttercream. Mango, rum, lemon! It’ll be like a one of those umbrella drinks pool side at a resort.
OK, who do I give these to? I will eat them ALL if they stay in my house. The Movies and Bingo group.
I know a group of senior ladies that meet a few days a week to watch movies and play bingo. I dropped them off to them, as I did with the Caramel Cake I made a few weeks ago. Elena, at 68 years old is one of the younger, spunkier ladies. She took one look at these mini cakes and said, "Rum cake? Next time put my rum on the side and make it a double!"
Mini Mango Rum Cakes With Lemon Buttercream Frosting
For the Rum Cake:
1 stick of butter, softened
1 cup of sugar
2 eggs
1 tsp vanilla
2 cups of flour
1 tsp baking powder
1 tsp baking soda
1/2 tsp salt
1 tsp cinnamon
1 cup rum
1/2 cup vegetable oil
1 cup of mango, diced
For the Lemon Buttercream:
2 sticks of butter, softened
1/4 cup fresh squeezed lemon juice
1/2 tsp salt
1/4 cup of whole milk
2 1/2 cups of powdered sugar
Preheat oven to 350.
In the bowl of a stand mixer, cream the butter and sugar. Add the eggs, one at a time, beating well between each addition. Add the vanilla and beat some more. In a sperate bowl, add the flour, baking soda, baking powder, salt and cinnamon, mix well. In another bowl, add the rum and the oil. Starting and ending with the dry ingredients, add both the dry and wet ingredients to the stand mixer, a bit at a time, alternating between the two until all is combined in one bowl. Add the mango and stir until just combined.
Add your batter to either mini bundt cake pans (spray with butter flavored cooking spray), or muffin tins lined with cupcake papers. Fill 3/4 of the way full.
Bake for 18-25 minutes (depends on the size of your pan) or until top springs back when touched.
Allow to cool completely.
Combine all the ingredients for the lemon butter cream in a stand mixer. Mix on low speed until mostly combined, the raise to high speed and whip until light and fluffy.
I’ll end the suspense. I didn’t win. I had a great time and the competition was fierce. Well, they were actually really nice, lovely people, but people who had run themselves around this recipe circuit quite a bit. One woman, Roxanne, Has over 800 winning recipes to her name! Pascal owns a restaurant, Jennifer and Jamie have both made names for themselves winning dozens of recipe contests all over the country. Me? This was the 4th recipe contest I’ve ever entered. I was the rookie for sure. It was a fantastic experience for, I met some great people, had a wonderful trip to San Diego, I have such a better understating of what the judges are looking for and I am ready for the next contest, bring it on.
They even put me up in a fabulous hotel the night before the event. Here is Tater and I, enjoying the room:
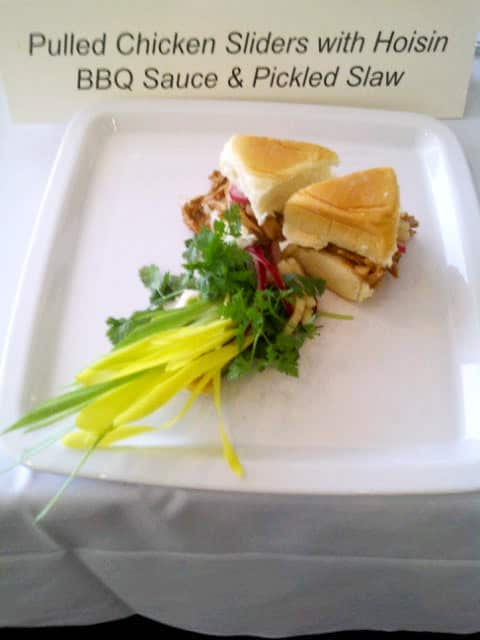
For those of you want to try out my Semi Finalist Chicken Sliders, I am now able to post the recipe:
Pulled Chicken Sliders with Hoisin BBQ Sauce & Pickled Slaw
Serves 4 – 6
4 Foster Farms chicken breast halves, boneless and skinless
1 ½ cups red onion, peeled and sliced into thin rings
2 cups cucumber, peeled and cut into matchstick sized pieces
¼ tsp salt
1/3 cup lemon juice
3/4 cup apple cider vinegar, plus ¼ cup, divided
2 tbsp sugar
8 whole dried allspice berries
1 tsp whole cloves
½ tsp black peppercorns
2 tbsp extra-virgin olive oil
1 tsp fresh garlic, minced
1 cup hoisin sauce
1 tsp chili powder
¼ cup low sodium soy sauce
1 tsp sesame oil
20 mini Hawaiian bread rolls
In medium bowl, combine onion, cucumbers, salt and lemon juice. Let stand and room temperature 30 minutes.
In small saucepan over medium high heat, combine ¾ cup apple cider vinegar, sugar, allspice, cloves and peppercorns. Bring mixture to a boil and cook for 30 seconds. Remove from heat and cool to room temperature. Strain the liquid to remove the cloves and allspice then pour over the onions and cucumbers and refrigerate mixture for 30 minutes.
Meanwhile, place chicken in large pot or Dutch oven. Fill with water to completely cover chicken. Place on stove over medium-high heat and bring to a slow boil. Cover and cook for 15 – 20 minutes or until chicken is completely cooked.
While chicken is cooking, prepare barbeque sauce by warming olive oil in large saucepan over medium-high heat. Add garlic and sauté for 30 seconds; add remaining vinegar, hoisin sauce, chili powder and soy sauce. Cook for 3 minutes or until thickened, remove from heat and add sesame oil and stir well to combine.
When chicken is cooked, remove from water and allow to cool. Using two forks, shred chicken to as thin slices as possible, then add to hoisin barbeque sauce pan, tossing well to coat.
Split rolls in half across the middle to resemble small sandwich buns. Fill each bun with about 2 tablespoons of the chicken and top with pickled slaw.
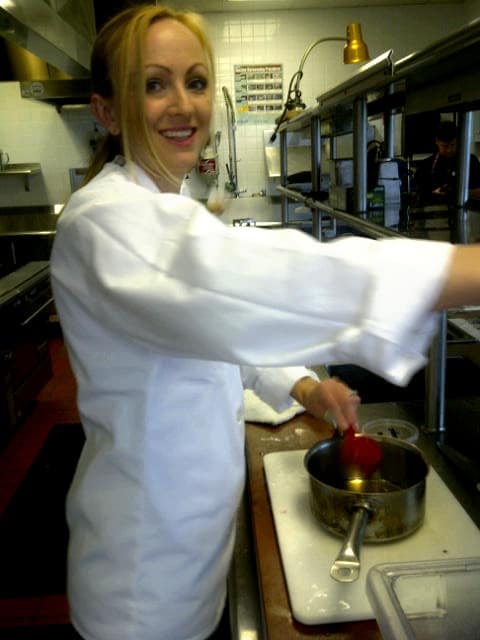
Cookin in the fancy kitchen:
*The slider pictures, as well as the above picture of me cooking were taken by a photographer for Foster Farms, Charlie. Here is his website for more information: http://www.charliegesellphotography.com/#
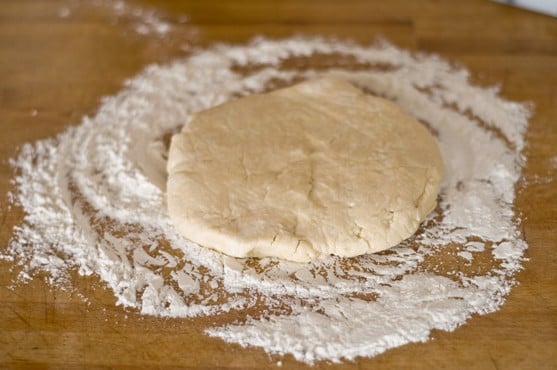
I have a mild obsession with pie dough. Once I started to make (and modify) Cook’s Illustrated’s Foolproof Pie Dough in 2007, I realized that it is not only about a million times better than store bought crust, it takes about 8 minutes of active time. There is no downside. If you have never made pie dough, do it. Seriously, seriously, DO IT. If you are going to go through all of the trouble to make a pie, don’t even think about debasing it with a store bought crust.
I started writing for Honest Cooking this week. My first article is about the science behind pie dough. How the exact same ingredients can give you such different results and how I pledge my baking allegiance to Foolproof pie dough. For that article I wrote about the Cooks Illustrated version. For this post, I will give you my slight variation on that recipe.
3 cups of all purpose flour
1/2 tsp salt
3 tbs sugar
10 tbs butter (1 stick, plus 2 tbs), cut into cubes
1/2 cup shortening
1/4 cup vodka
1/4 cup cold water
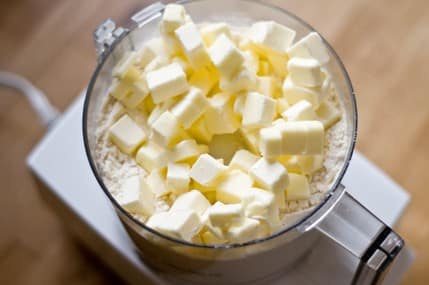
Step one: Combine 2 cups of flour, salt, and sugar in a food processor, pulse a few times until its combined. Add the butter and the shortening and process until it forms a ball around the blade, about 2 minutes.
Step two: Add the remaining flour and process until well incorporated, about 1 minute.
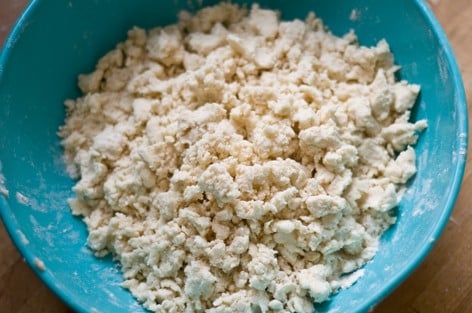
Step Three: Move to a bowl and add the water and the vodka, combine with a spatula or wooden spoon.
Combining the liquid in the food process will destroy the effects of the vodka, and your hands may warm the fats too much. The dough will be very moist, but if it is too moist to stay together, add a little more flour.
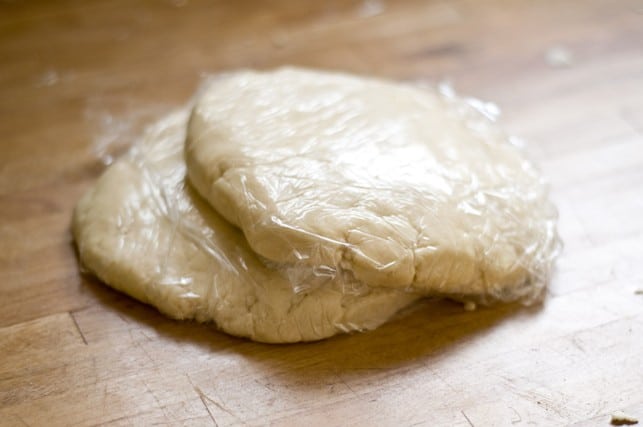
Step Four: Split into two equal sized portions and form into disks. Wrap the disks in plastic wrap and chill until very firm, about two hours. Because this dough is so soft, it is very important for the pie dough to be very cold and very firm. Step five: On a very well floured surface, place one of the disks, add flour to the top of the disk as well.
Roll out into an even thickness. Marble rolling pins are very cold and don’t disrupt the fat inside the dough, making them an excellent choice for rolling pie dough. When you place your dough in the fridge to chill, add your marble rolling pin as well, allowing it to chill.
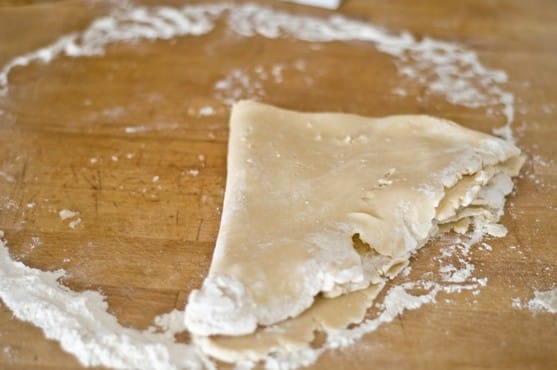
Step six: This recipe is very soft and will fall apart while being rolled. Although some people like to use the rolling pin to assist with moving the dough from rolling surface to pie pan, it tends to fall apart too easily with this method. The easiest way is to fold the dough circle in half, then in half again, forming a triangle.
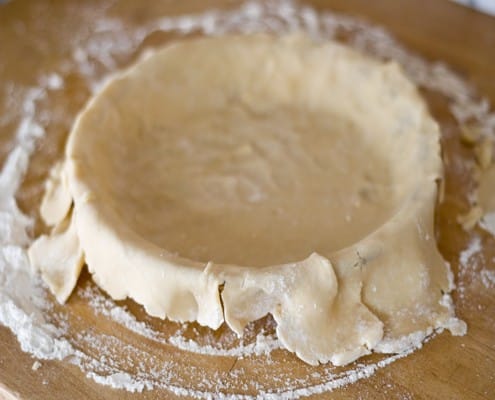
Place the point of the triangle in the center of the pie plate and unfold the dough.
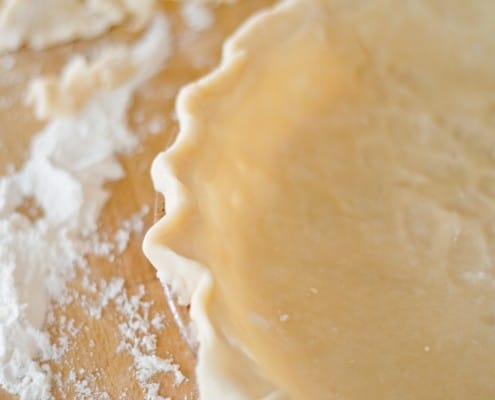
Trim the dough, leaving a half-inch overhang past the edge of the pie pan. Form a fluted edge around the top of the pie crust.
Baking: If you want to bake this before it’s filled, prick several holes in the bottom with a fork. Line the inside with parchment paper and fill with pie weights or dried beans. Bake at 375.
This crust can also be filled and baked immediately, whichever your recipe calls for.
I’m in a book club. I know, such a grown up, right? When I was on my way to my very first Book Club meeting my husband asked, "So what REALLY goes on there? There has to be some type of illicit element? You can’t really just be sittin' around talking about a book, can you?" Other than the calorie content in my version of Minny’s Caramel Cake: Cupcake Edition, noting illicit at all. Just a bunch of girls sittin' around chatting.
When I finished the book, I made a full size version of Minny’s Caramel Cake. For the cupcakes, I made some alterations. I wanted a frosting that could be piped on, so I added some powdered sugar. AMAZING. I really liked this version of the caramel frosting. I also substituted buttermilk for heavy cream, just because I felt like it.
Minny’s Caramel Cake: Cupcake Edition
1 cup of butter
1 cup brown sugar
1/2 cup white granulated sugar
4 eggs
1 tbs molasses
1 tsp vanilla extract
1 cup buttermilk
1/2 cup oil
1/2 cup whole milk
3 cups of flour
2 tsp baking powder
1 tsp baking soda
1/2 tsp salt
Caramel Frosting:
2 cups brown sugar, packed
1 cup of cream
3 tbs butter
1 tsp vanilla extract
2 cups powdered sugar
Pre heat oven to 350.
In the bowl of a stand mixer, add the butter, brown sugar and white sugar, beat on high until well creamed. Add the eggs one at a time, mixing well between each addition. Add the molasses and vanilla and mix until combined. With the mixer on low speed, add the buttermilk, oil and milk and mix until well combined. In a seperate bowl, sift together the flour, baking powder, baking soda and salt and mix until combined. Add the flour mixture to the batter and stir until just incorporated. Add to muffin tins (lined with cupcake papers) filling each about 2/3 of the way full (about 1/4 cup).
Bake at 350 for 20-25 minutes or until the top springs back.
To make the frosting, combine the brown sugar and cream in a pot. Stir over medium high heat until it starts to boil. Allow to boil, without stirring (this is the hard part for me) until the temperature reaches about 210 (about 7-10 minutes). Remove from heat and stir in the butter and the vanilla. Allow to cool until thickened. Add to a stand mixer, along with the powdered sugar and beat on high until well combined. This frosting will continue to harden and thicken until cooled.
These cupcakes are now for sale to the highest bidder, 4 dozen of them. You pick the beer (or no beer is fine too) and I will deliver them anywhere within Los Angeles County, or you can pick them up. Why? Because, you see, there is this woman, a brave food writer, a mom, who is now a grieving widow.
Do I know her? No, just through her posts and writings. But I know her girls, in a way. I was one of her girls once. I was once a little girl, who’s dad died suddenly. I was a girl with a grieving mom who couldn’t get out of bed. I was a girl who’s big sister taught her to make cereal on the kitchen floor because we wanted mom to sleep, because she didn’t do that too often anymore. I was a girl who didn’t go to the father daughter dance. I was a girl who walked down the isle on her wedding day alone. But Jen, if you read this, I want you to know that I am also a girl who is OK, I grew up to be happy, married a good man, have a little girl of my own and so did that sister who taught me to make breakfast early in the morning on a linoleum floor. Your girls will be OK too. They will cry, they will laugh, they will grieve and they will be OK.
Me and Daddy:
The last thing you should have to worry about when the love of your life dies, when you are parenting grieving children, is money. Here is a bit about what Jen and her family are facing right now, financially:
Written by her friend Shauna:
“As you can imagine, Jennie is overwhelmed not only by her grief, and the sudden responsibility of raising two children by herself, but she is also struggling with this financially. She just learned that she cannot collect widow’s benefits from Social Security because she earns too much money each year. The health insurance for her and her kids runs out in December and she just learned that the total she will have to pay [for health insurance] will be even more than her mortgage. It’s possible she’ll have to pay off the entire mortgage in one lump sum because the apartment was in his name alone.
And more than anything, Mikey wanted Jennie to continue living her dream of being a food writer. And he wanted to make sure his kids were taken care of well. That’s why he worked as hard as he did."
Here is a link to Jen Perillo’s website and a bit about her story:
Click on the BWOB badge on my home page (right side) and just give a few bucks
Cupcake auction rules:
Claim your prize wtihin 6 months
Give 1 week advanced notice for order
Enjoy your warm fuzzy feeling that goes along with charitable giving
Auction ends September 5th at high noon
Perfect for an upcoming party!
On to my original post about these cupcakes:
I love beer. I love cupcakes. It’s only natural that I put these too together. If you don’t like beer, this recipe can be made without and I have to say that brown sugar buttercream is amazing. SO amazing that I even called my sister to tell her about how much I love it and how I want to make a huge vat of it and swim around in it. If you want to make this without the beer, just use 1/2 cup of really hot water, add the brown sugar and stir until dissolved, then follow the rest of the recipe.
Chocolate Cake with Beer Brown Sugar Buttercream
For the Cupcakes:
1 stick of butter
1 cup of sugar
2 eggs
1 tsp vanilla
1 1/3 cup flour
1 tsp baking powder
1/2 tsp baking soda
1/2 tsp salt
2/3 cup cocoa powder
1/2 cup milk
1/2 coffee
1/2 cup oil
For the Frosting:
1 cup of ale or blonde style beer
1 cup of brown sugar
3 sticks of butter softened
1 tsp salt
2 cup powdered sugar
Preheat the oven to 350.
In the bowl of stand mixer, combine the butter and sugar, and cream until combine. Add the eggs one at a time, blending well after each egg. Add the vanilla and mix again. In a separate bowl, add the flour, baking powder, baking soda, salt and cocoa powder. in another bowl, combine the milk, coffee and the oil. With the mixer on low, add the dry and wet ingredients a bit at a time alternating between the two. Line muffin tins with cupcake papers and fill each one with about 3/4 of the way full (about 1/4 a cup of batter).
Bake for 18-22 minutes or until the cupcakes spring back when touched. Allow to cool completely before frosting.
To make the frosting, put the beer in a sauce pan over high heat and allow to boil until reduced by half. I used a Firestone Pale Ale, microbrews are great for this recipe but IPA’s may be too hoppy and "light/lite" beers won’t have enough flavor. While the beer is still very hot, add the brown sugar and stir until completely dissolved. Allow to cool to room temperature. Again, for the non beer version, just add the brown sugar to 1/2 cup of super hot water and stir until dissolved. Microwave it if you need to.
In the bowl of a stand mixer, cream the butter, salt and powdered sugar until combined. Add the beer/sugar mixture and mix slowly until mostly combined, then turn the mixer on high and then whip until the frosting is fluffy and well combined.
Pipe the frosting onto the cooled cupcakes.
I prefer these at room temperature, but they are still pretty great chilled.
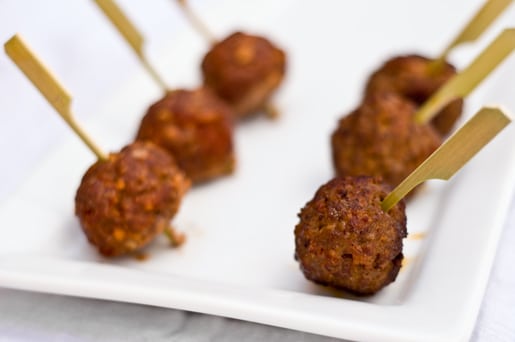
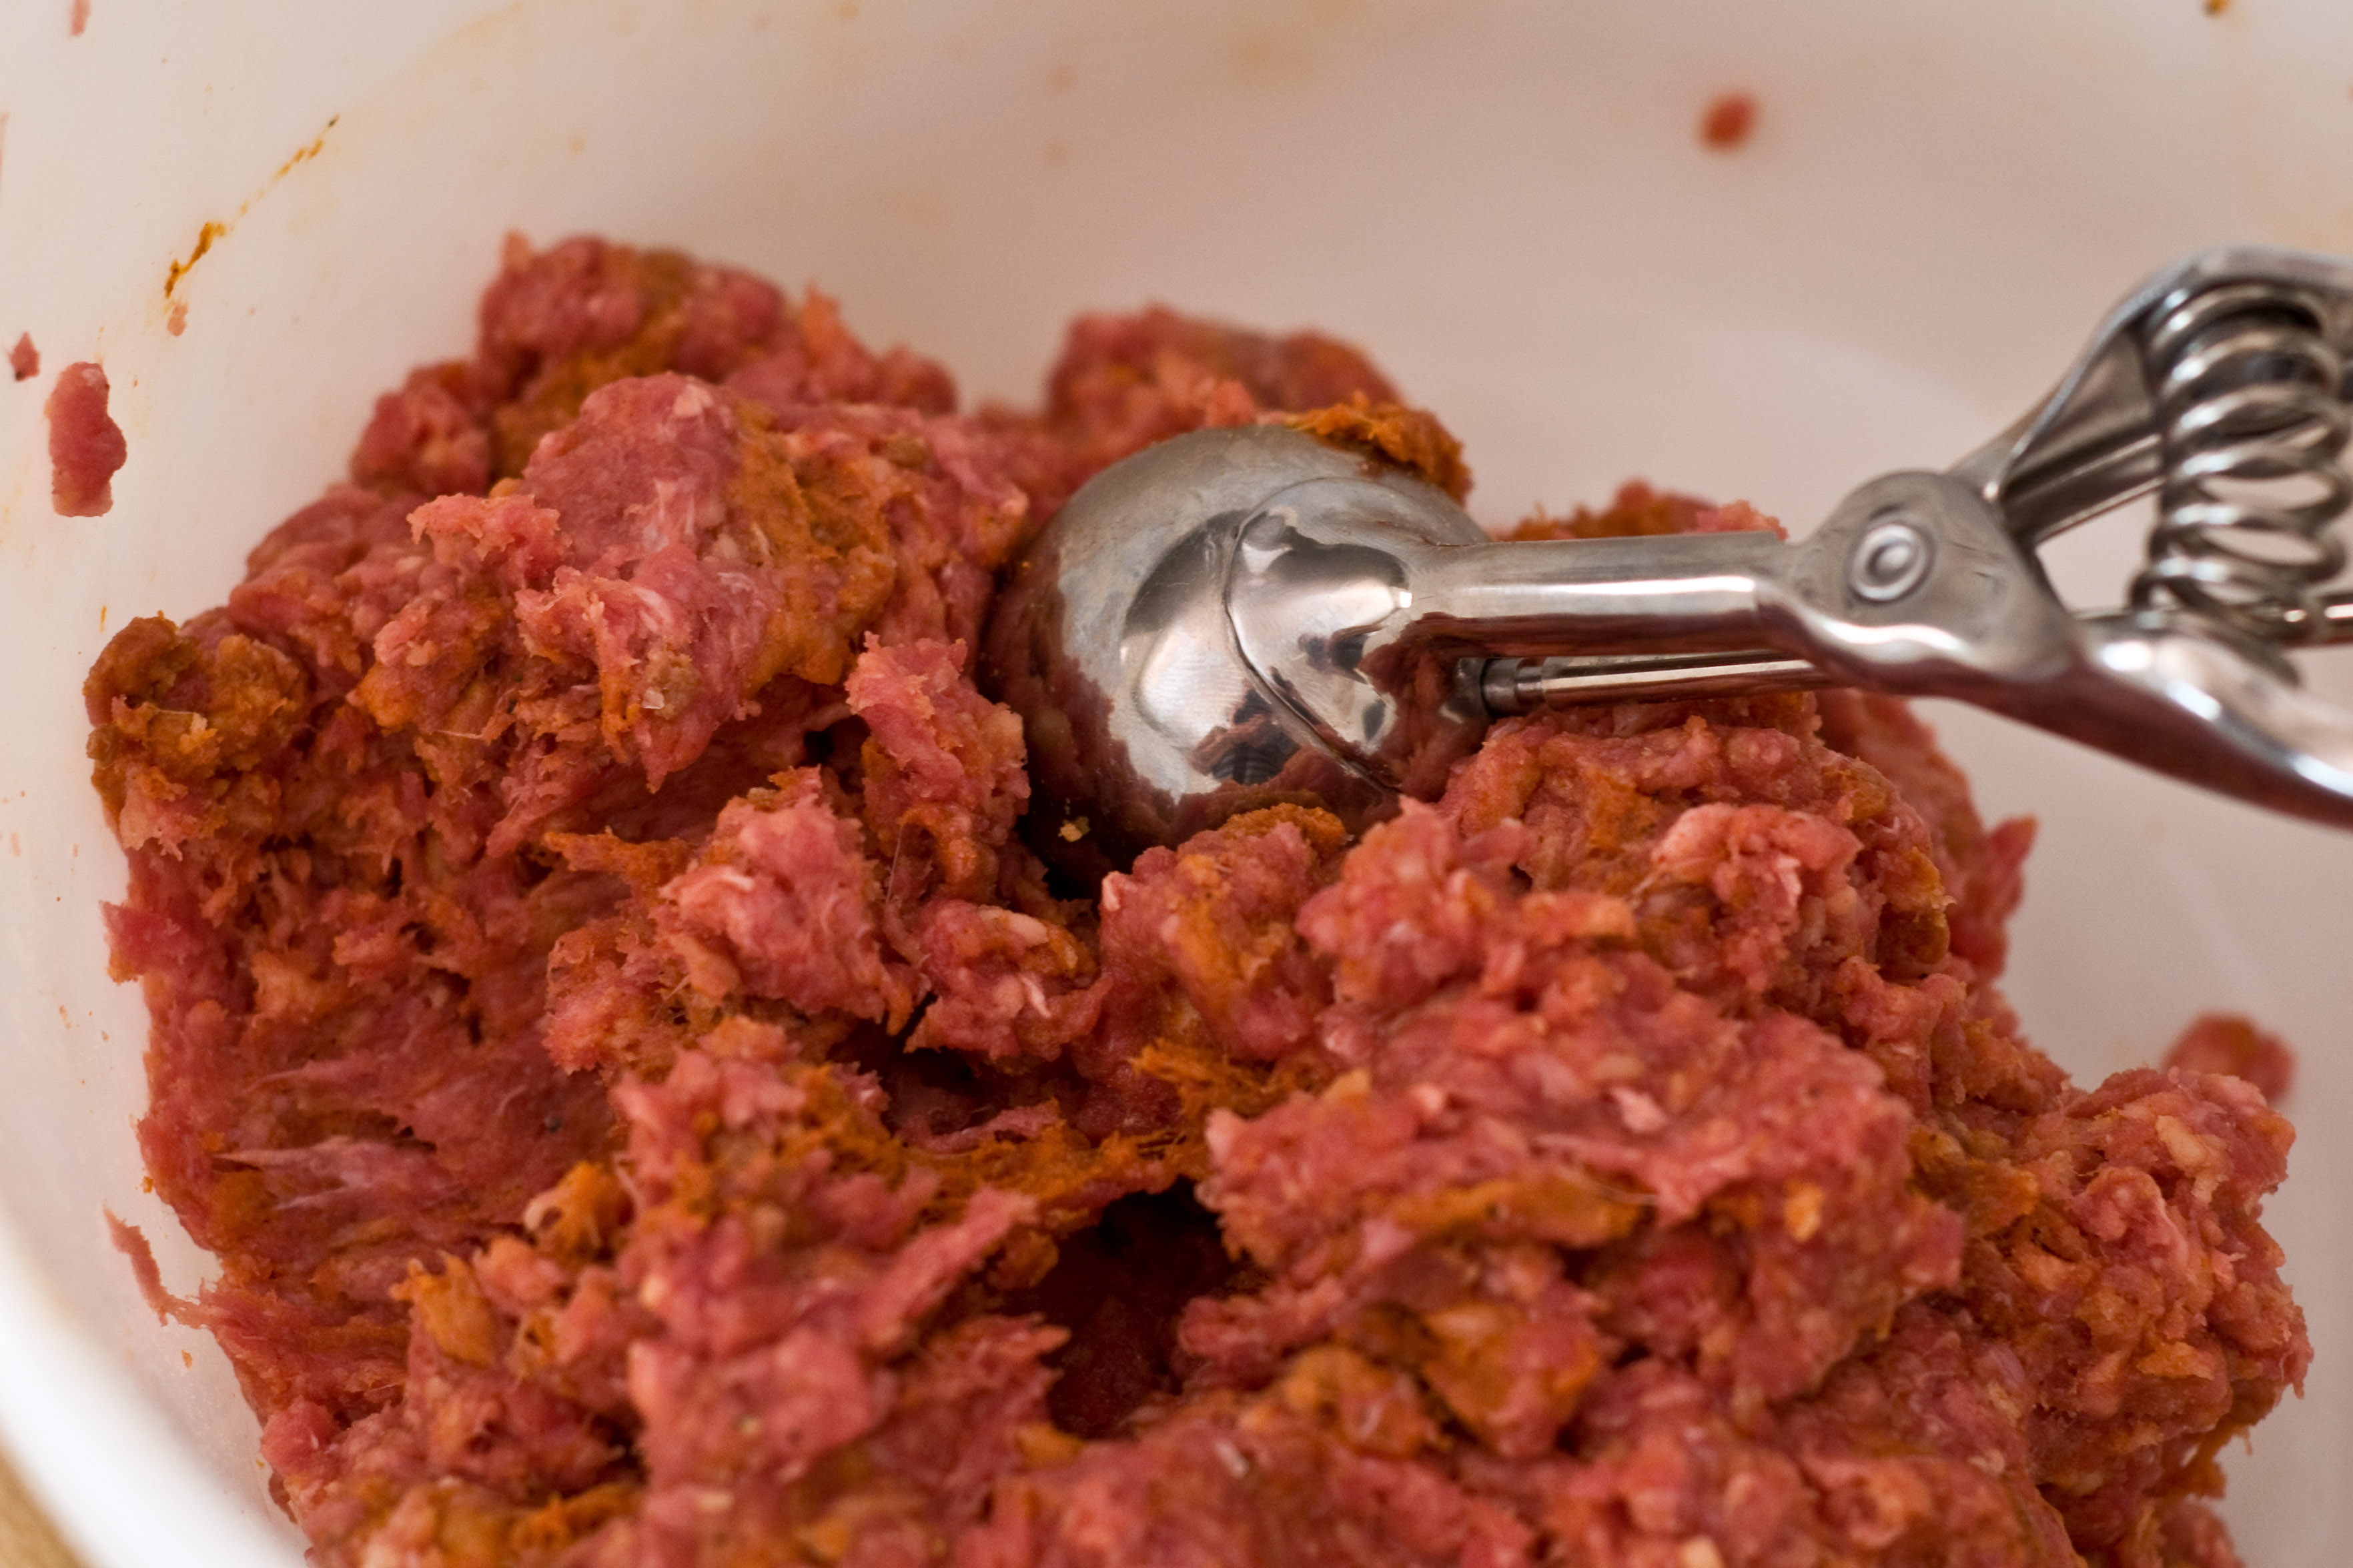
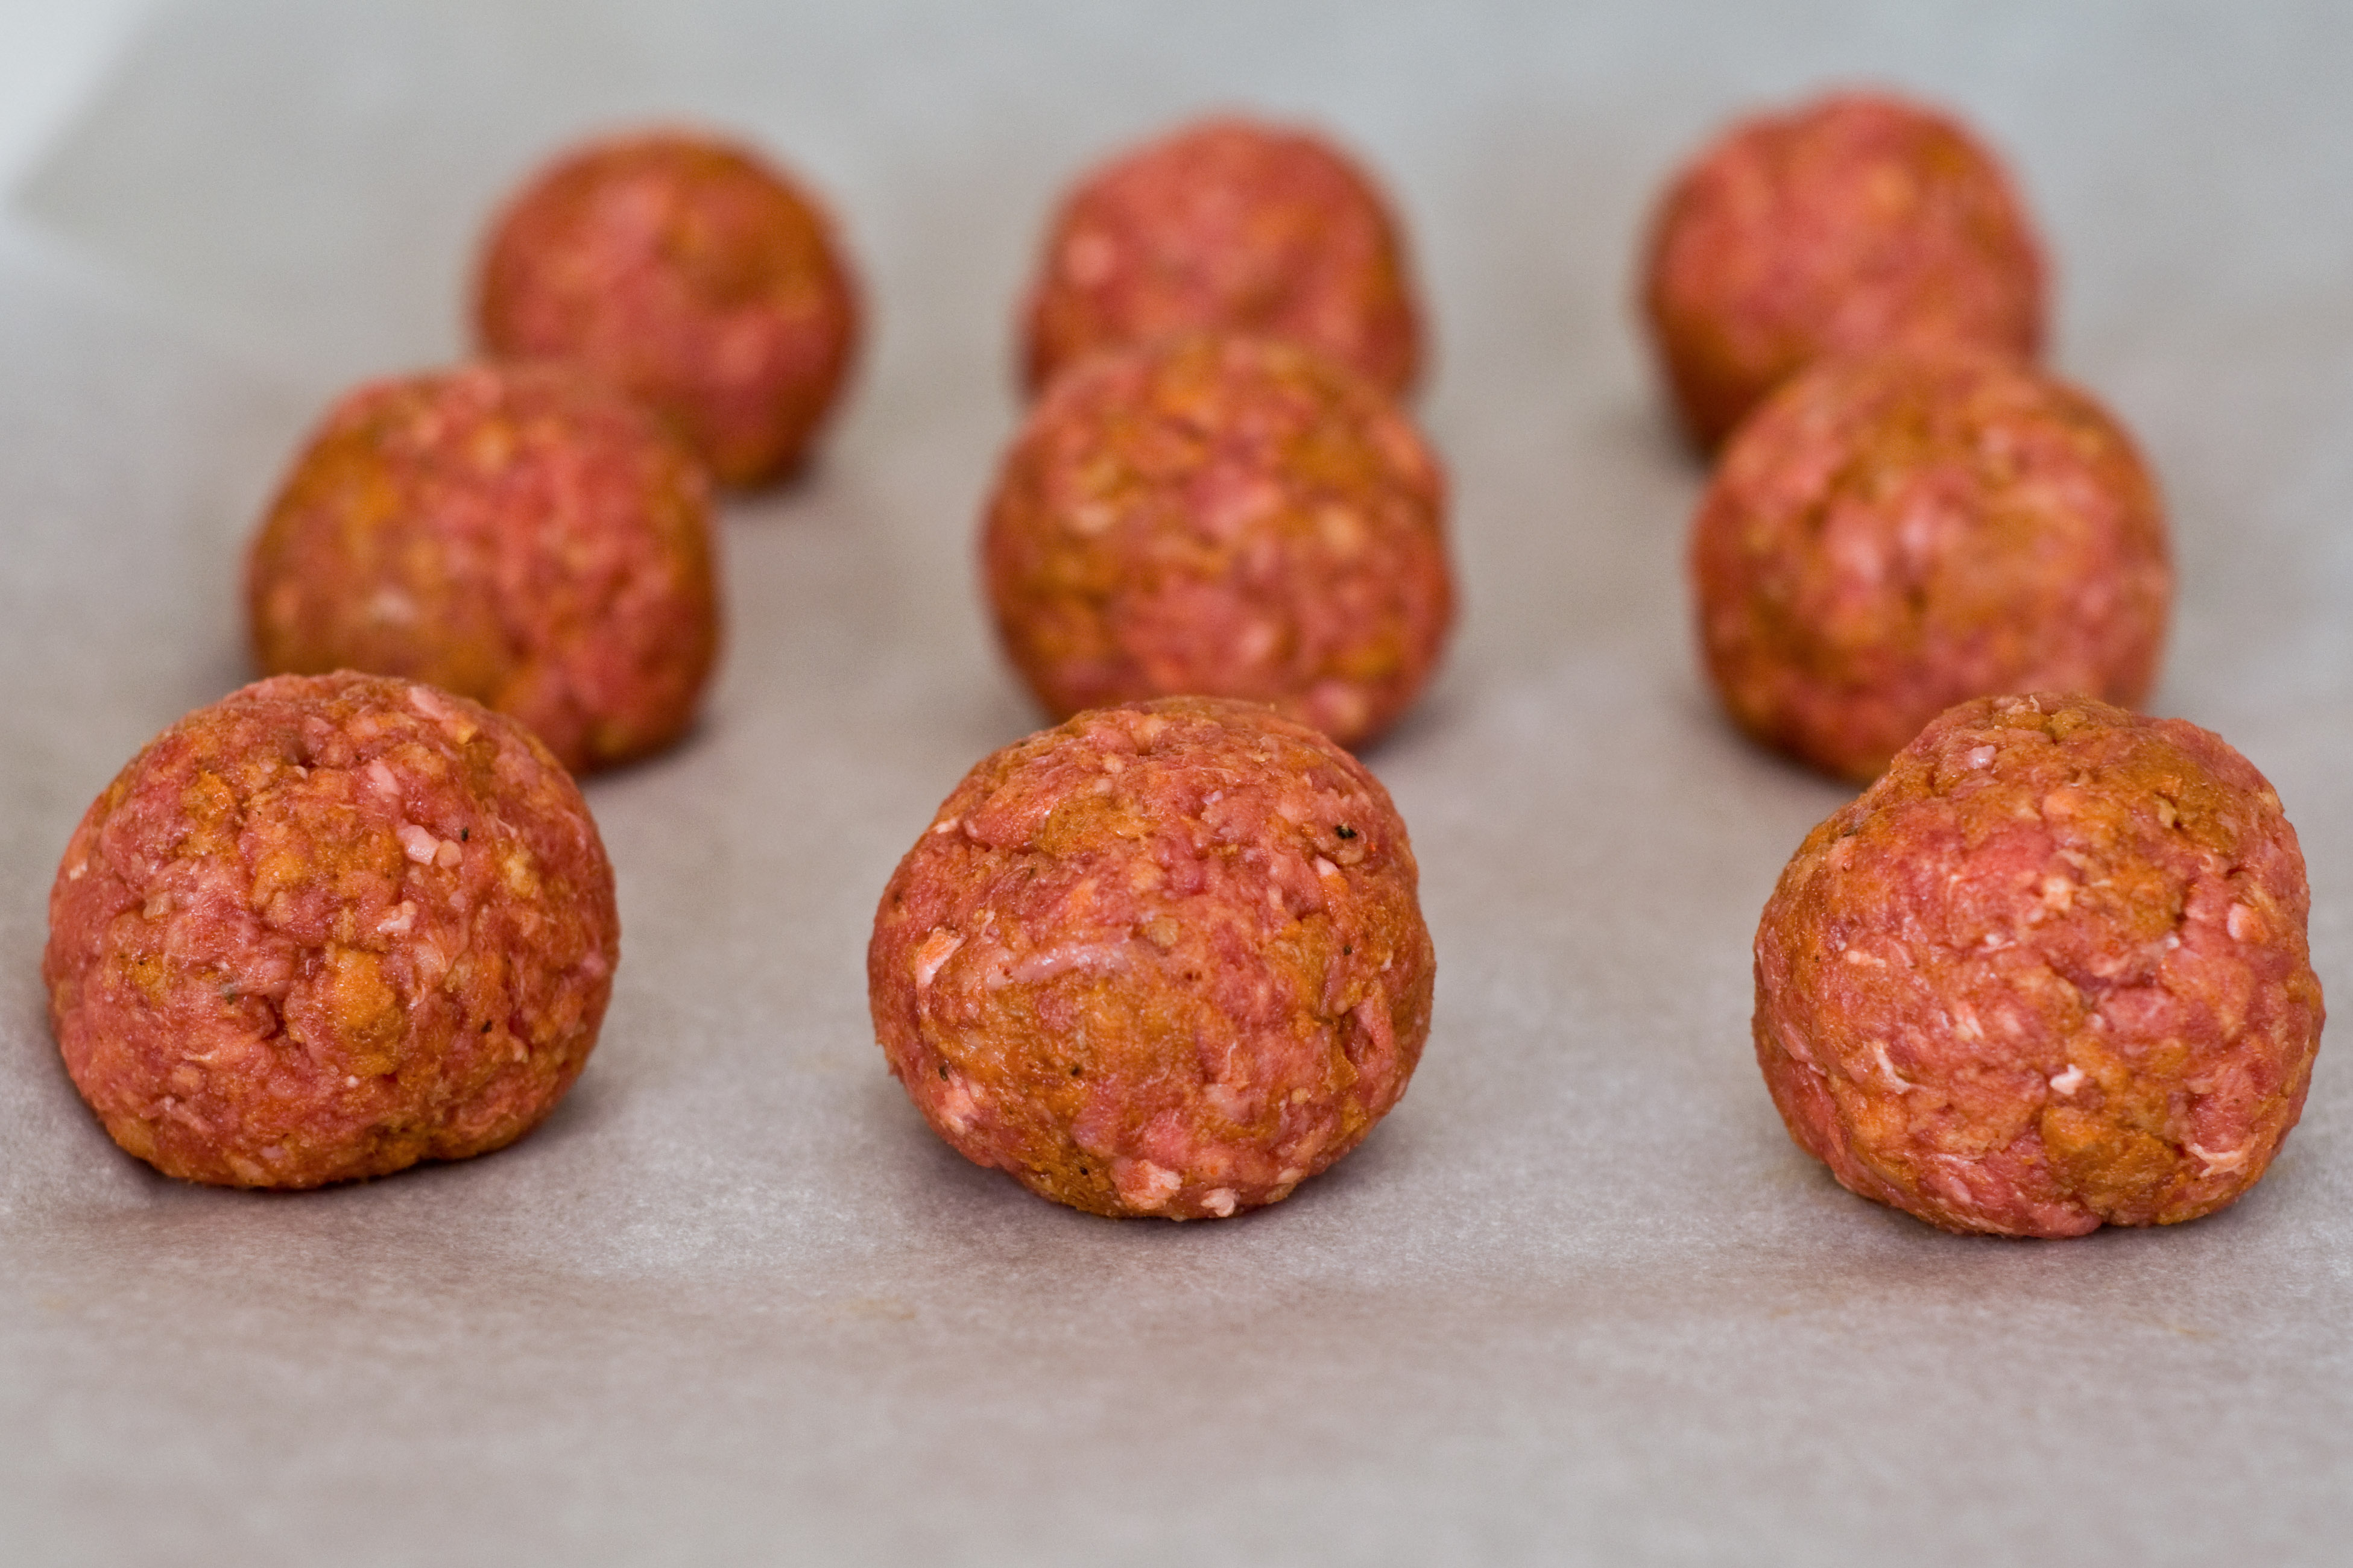
I got a request last week (yay!) for a How To post about round meatballs. Most pan fried meatballs have the same issue, flat on three sides, in a pyramid shape, as opposed to the pretty round ones.
There are three methods to making meatballs round, but all start the same way.
Mix up your favorite meatball recipe making sure to use a binding agent (such as bread crumbs, oatmeal or even rice). For this post, I used the following:
2 cups lean ground beef
3/4 cup sweet italian sausage, casing removed
1 tsp salt
1/2 cup panko bread crumbs
1 tsp salt
1/2 tsp black pepper
1/2 tsp smoked paprika
1 egg
Mix it up really well (your hands work best for this) and use a small cookie scoop to grab a meatball sized portion.
This will allow you to have uniformly sized meatballs.
Roll them in your hands to make them as round as possible.
This is where the methods will deviate.
Method 1
The first method is to boil them. This will give you perfectly round meatballs without much fuss. Just drop your meatballs in a pot of boiling liquid. You can use the sauce you intent to serve them with, water or broth and cook until the internal temp reaches 165 or until, well, they are cooked when you break them open (about 6-10 minutes depending on size)
This method works great to give you really pretty and uniform meatballs, as well as infusing liquid to make them juicy. As for me, I like the caramelized char of a pan fried meatball, so I’d take a misshapen one over a boiled one any day, but if looks are what you are going for, boiling is a great options
Method 2
Baking. Some people swear by this method and love the way the meatballs taste after baking. Next to boiling, it is a really healthy method, saving the calories of the oil in pan frying. Heat your oven to 350, place your meatballs on a baking sheet covered with parchment paper and bake for about 15-18 minutes. I baked half of my meatballs, and pan fried the rest. The baked meatballs did still have a slight flat spot where they sat on the pan but the flavor was great. They did lack that browning on the outside that I love.
Method 3
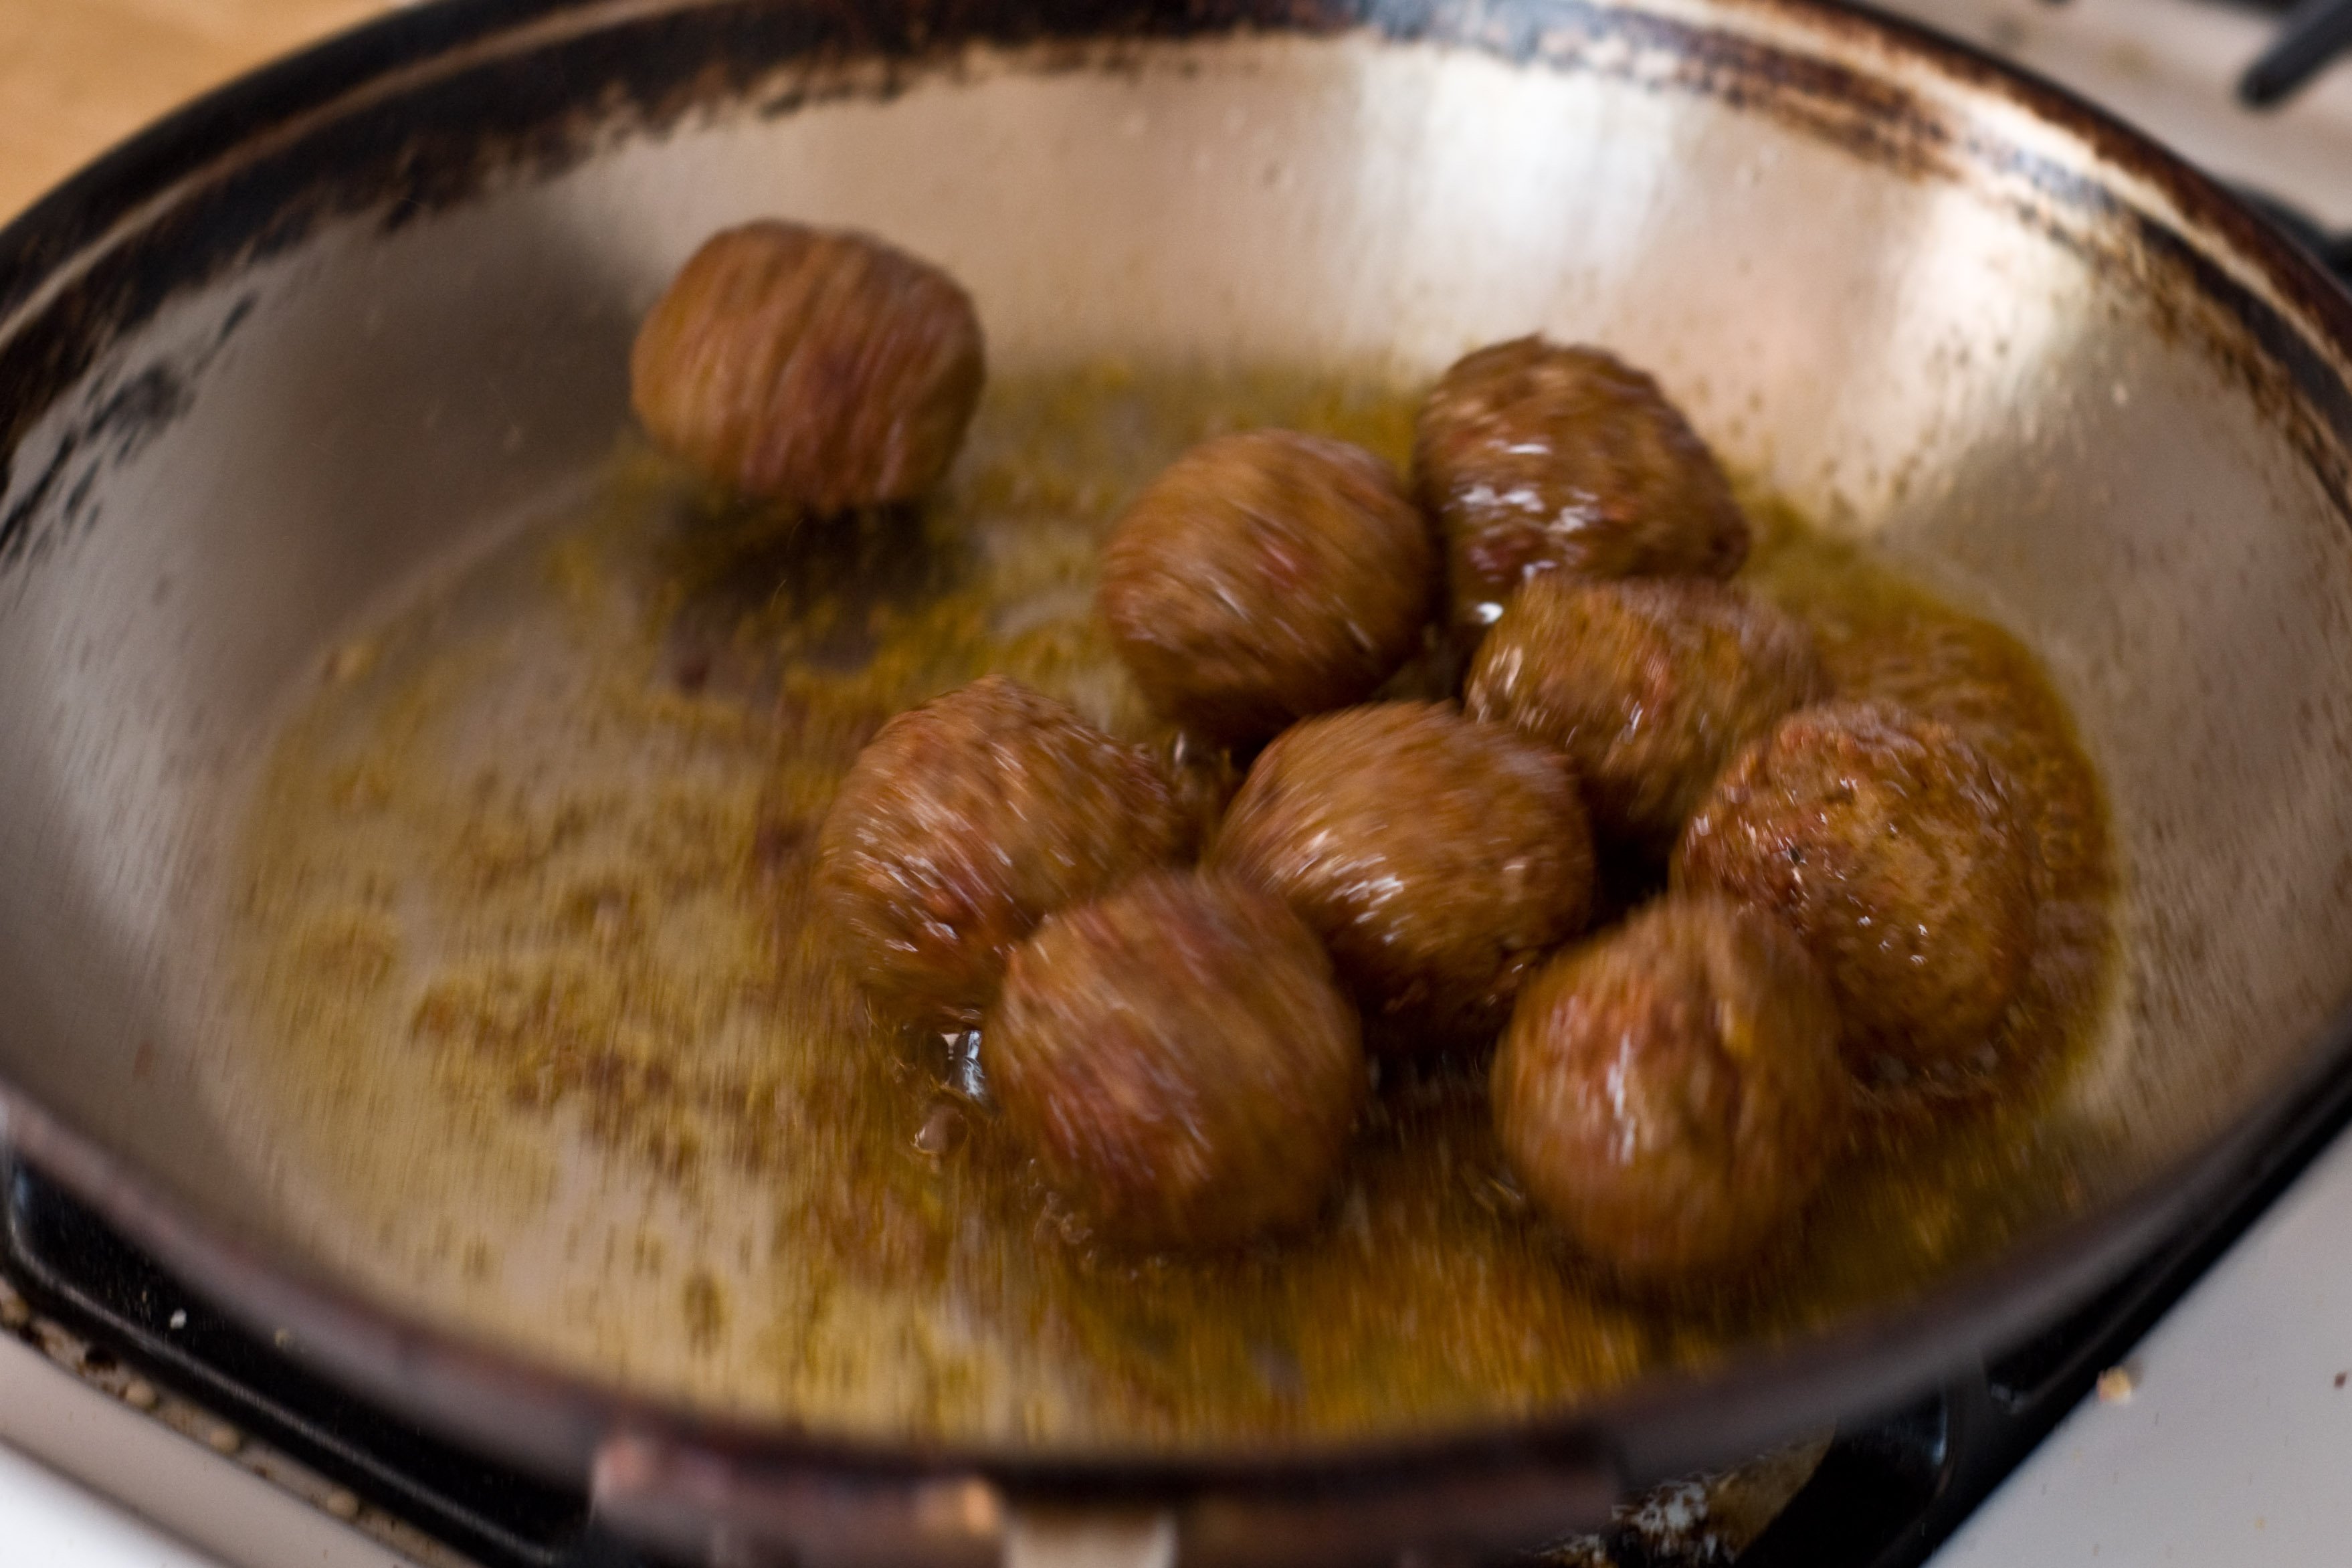
Chill then pan fry. Place the meatballs on a plate and chill in the fridge for at least two hours. You want to be able to brown the outside before the inside knows whats going on and has a chance to sag. Heat 2 tbs of oil in a pan until it is very hot and almost smoking. Get your meatballs out of the fridge and place them in the hot pan. Grab the handle of the pan and pull it back and forth over the burner so that your meatballs never have a chance to settle.
Cook for about 5-8 minutes, make sure that the meatballs are cooked through before serving. I just broke one open but you can also break out the thermometer and make sure the temp is at least 165.
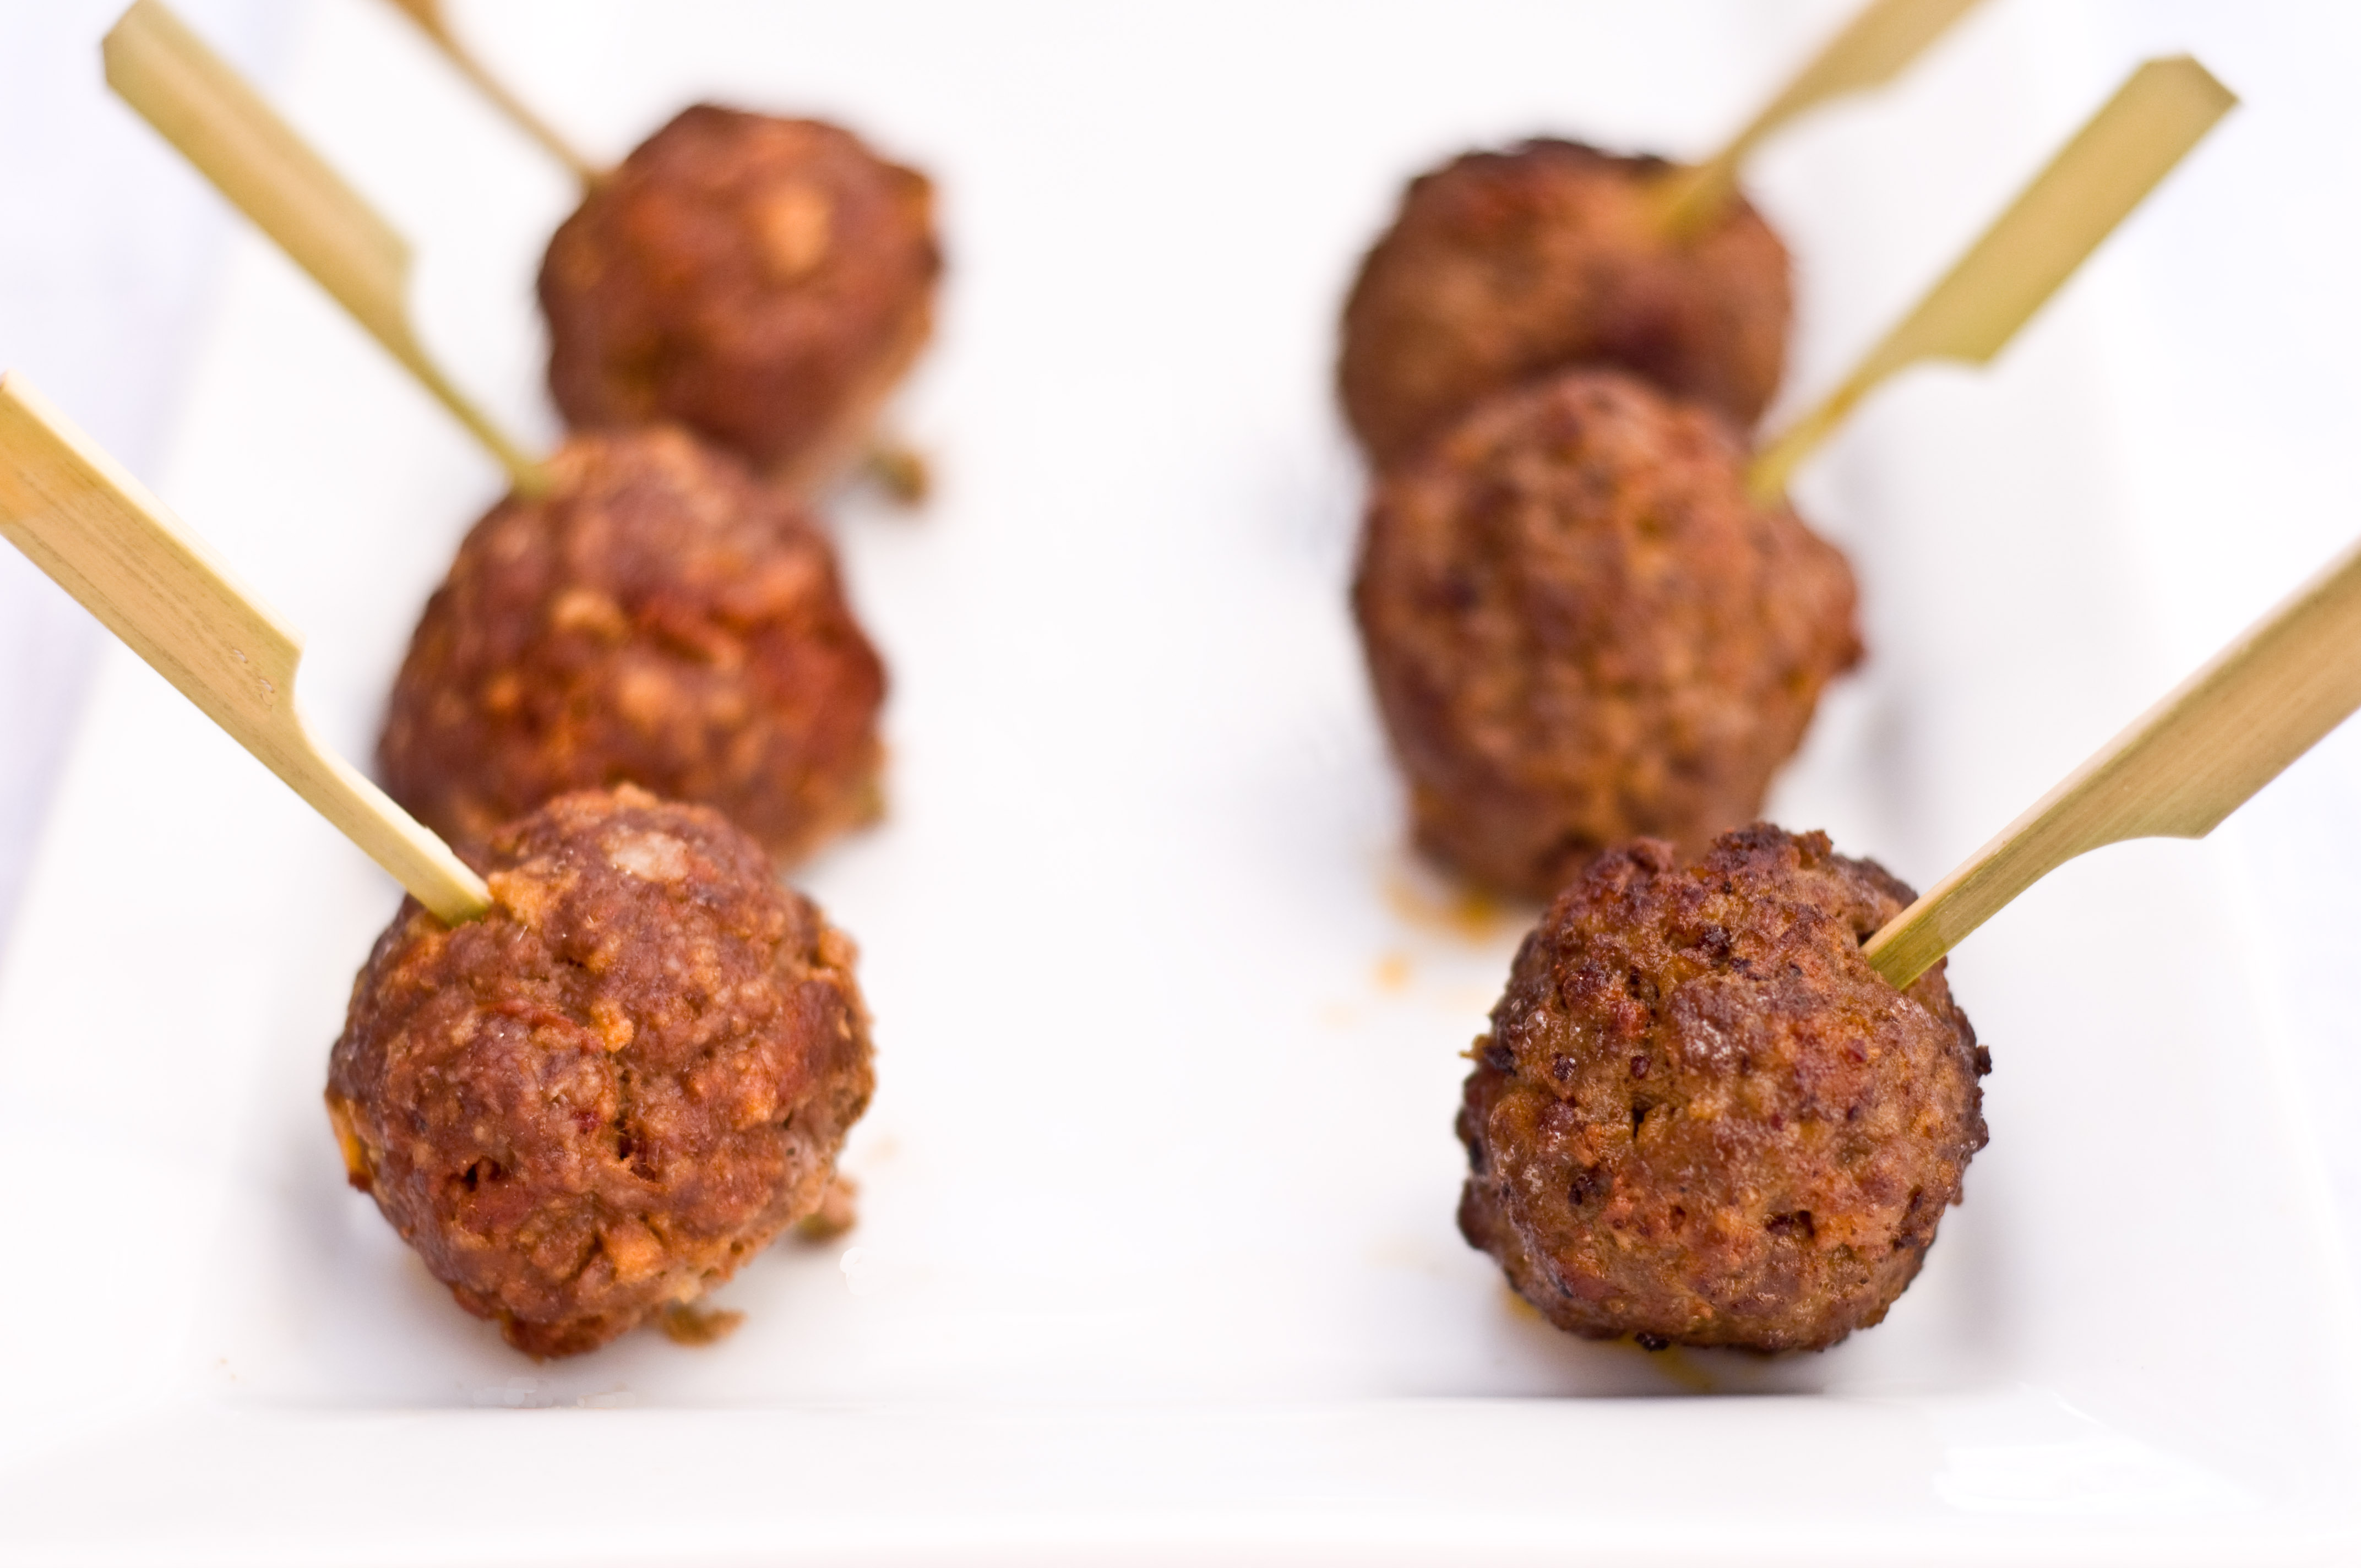
Here are the final product of Method 2 (baking) and Method 3 (chill then pan fry).
Method 2 is on the left and Method 3 is on the right.
Of all the methods, chilling and pan frying was my favorite. They aren’t as perfectly formed as boiled ones,but that browning taste that I love came through beautifully. Another factor to keep in mind is that lean meat cooks better, while fattier meat may leave empty pockets where the fat has melted, making your meatballs misshapen.
If you have a request for How To Mondays, you can email it to me at [email protected] or leave it on my Facebook wall at
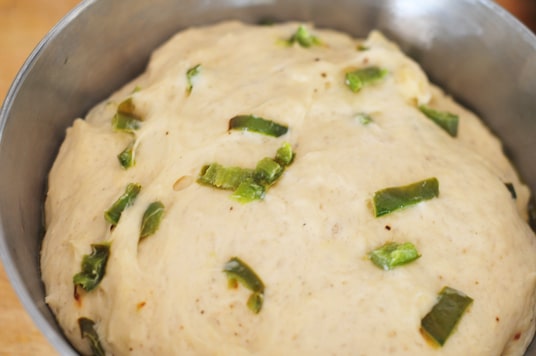
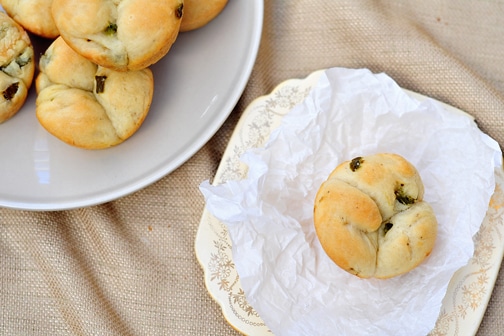
Happy National Spicy Food Day! Seriously, its a day. August 19th is dedicated to the celebration of spicy food. I love spicy food, and have a tendency to look at a dish and think, "And how would this taste with jalapenos?" Which is where these rolls came from. I took perfectly innocent, delightful brioche rolls and corrupted them with jalapenos. Just like I did with that Mac N Cheese, and those cornbread muffins. It might be a sickness.
Jalapeno Brioche Rolls
1/4 cup chopped jalapenos
2 tbs butter
1/2 tsp salt
1/4 cup water
1/4 cup milk
2 tablespoons sugar
1 envelope of dry active yeast (2 1/4 tsp)
3 cups all purpose flour
1 teaspoons salt
3 large eggs
2 sticks unsalted butter, softened
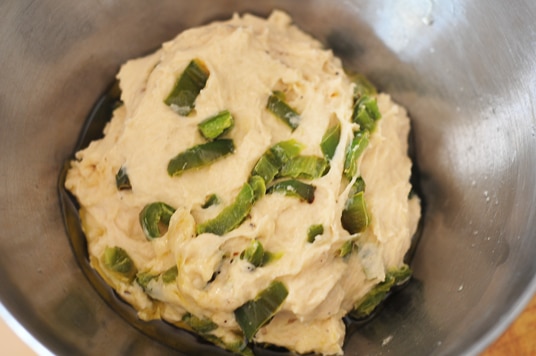
Chop the jalapenos, removing the seeds.
Heat 2 tbs of butter in a pan over medium heat until melted. Add the jalapenos and sauté until softened, about 5 minutes. Allow to cool. Combine the milk and the water and heat in the microwave for 10 seconds, test the temperature (you want it between 105 and 110) and repeat until the desired temperature is reached. Put your warm milk/water and sugar in the bowl of a stand mixer.
Sprinkle the yeast on top and allow it to get foamy, about 5 minutes.
Add the flour and with the dough hook attachment, mix on low speed until its combined into a flaky ball (about 1 1/2 minutes).
Add the eggs, one at a time, mixing until combined.
Add the softened butter (softened is important) and the jalapenos, beat until the dough gathers around the hook and is smooth and shiny.
Coat the inside of a bowl with olive oil and place the dough ball in it
Wrap with plastic wrap leave in a warm place until it’s double in size, about 1 1/2 hours.
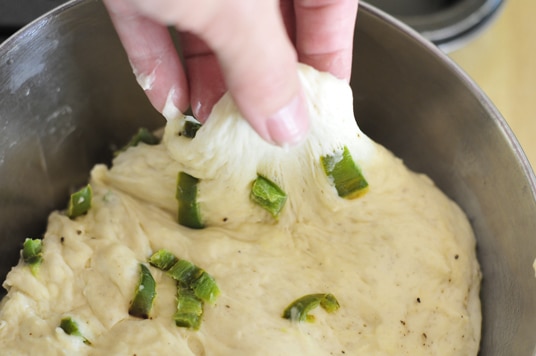
Grab the dough at the sides until it has deflated.
Allow to rise a second time at room temperature, until it has doubled in size, about 45 minutes.
Remove from the bowl and shape into a long log, about 4 inches wide and 1 foot long.
Using a sharp knife, cut in 3 equal sized pieces.
Then cut each of those pieces in half (you will now have 6 pieces.)
Now cut each of those pieces in half and you will have 12 equal sized pieces.
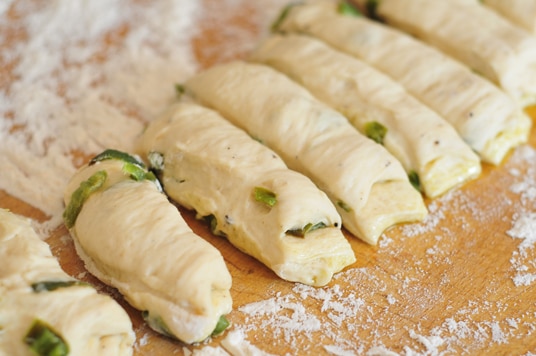
Each of these pieces will be a roll, but you have to make some more cuts first.
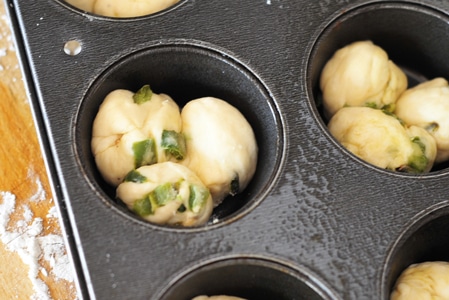
Cut each slice into 3 equal sized pieces, rolling each into a ball and placing all three into the same well of a muffin tin. Repeat for each slice.
Cove with plastic wrap, place in the fridge and allow to double in size, about 1 1/2 hours.
Preheat the oven to 400. Bake for 20 minutes or until golden brown.
There is a distinct possibility that I am the only person I know that has a problem with left over pie dough. I make pies much more than the average girl, and I always make my crust from scratch. You should too. Really. The only problem is that I always have hunks of dough left over, but I’m never short.
This recipe is meant for those left over scraps that you always have after making pie. You sit there, looking at a heap of dough that you "slaved" over. You feel a brief twinge of guilt about throwing it in the trash, but with a lack of use for 1/2 cup of pie dough, that’s were it ends up.
Look how economical and thrifty we are.
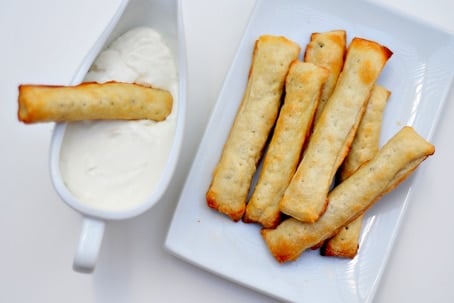
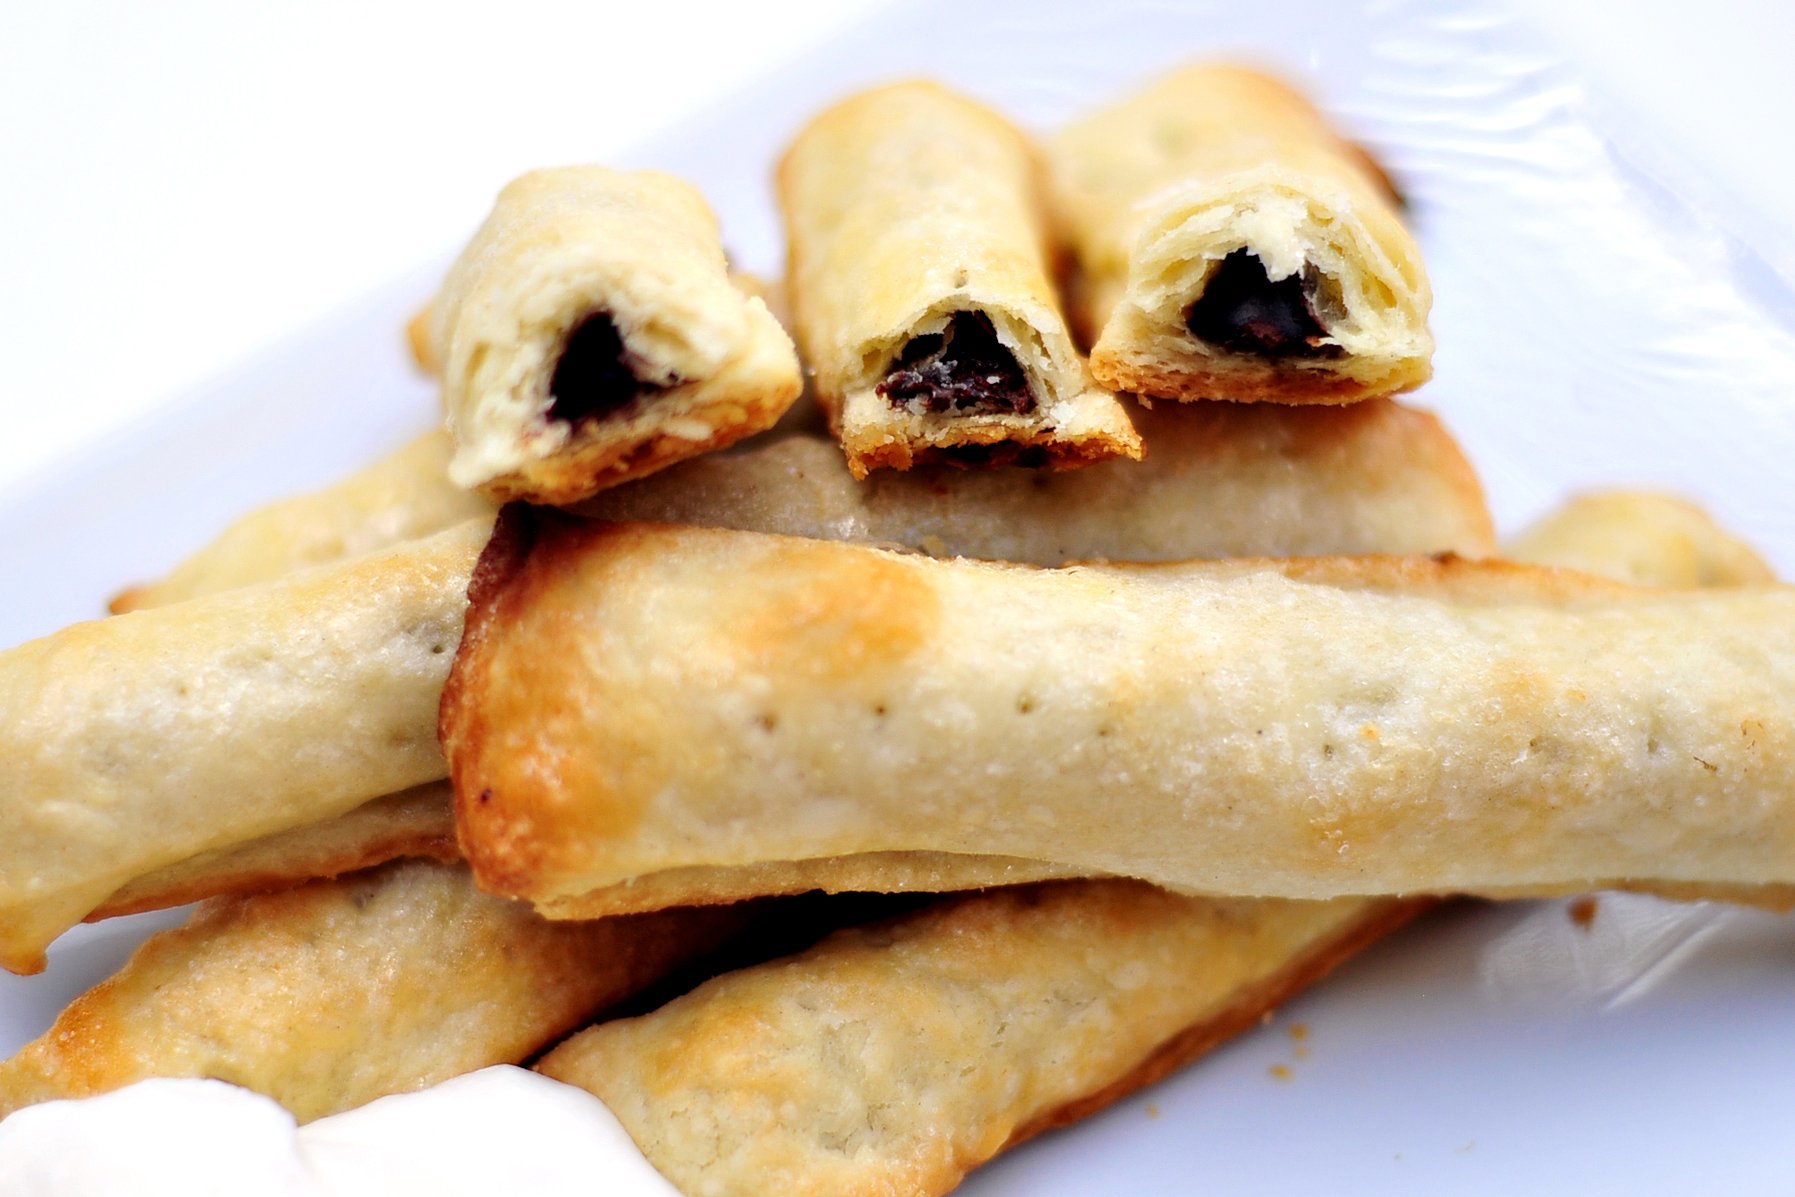
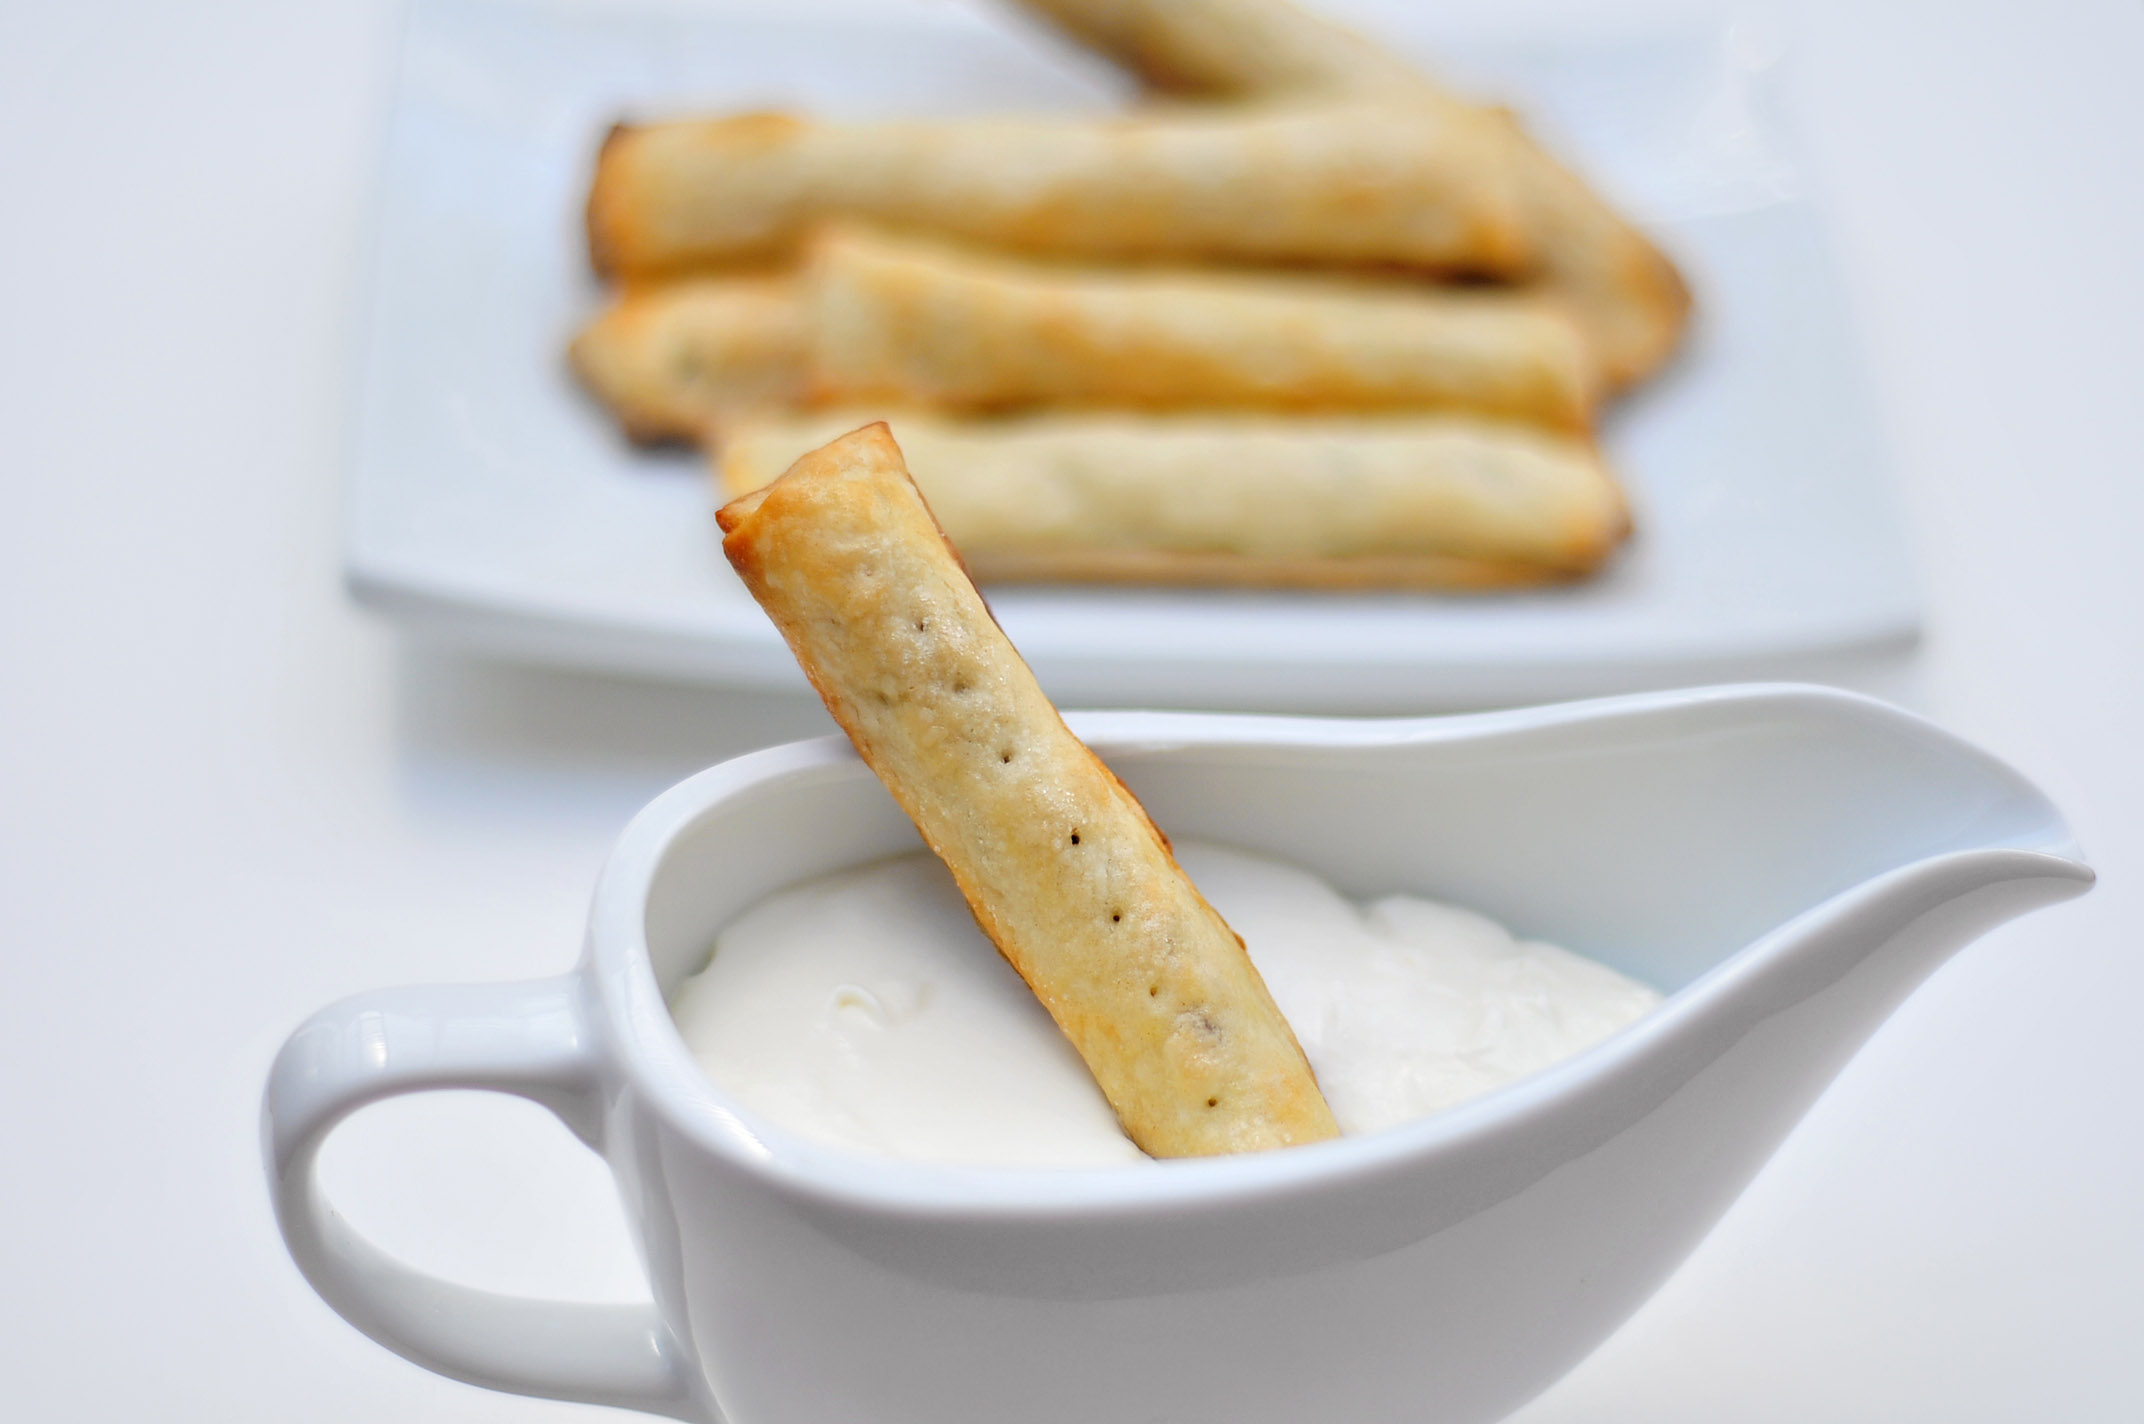
A use for leftover pie dough and a cute portable snack.
Perfect for little hands. Or big ones.
Chocolate Pie Sticks
Use leftover pie dough
If you don’t have it and want to just make these for the fun of it, here is my pie dough recipe:
Pie Dough:
1 cups of all purpose flour
1/4 tsp salt
1 tbs sugar
3 1/2 tbs butter, cut into cubes
2 1/2 tbs shortening
2 tbs vodka
1 tbs cold water
Chocolate chips (not sure how many you’ll need because that depends on how much leftover dough you have)
1 egg
sugar (about 2 tbs?)
If you have your leftover pie dough ready, skip this next paragraph.
If you are making dough:
Break out that food processor and add the flour, salt and sugar and give it a quick pulse until it’s combined.
Add the cubes of butter and the shortening and pulse until combined, about 1 1/2 minutes.
Move the dough to a bowl and add the vodka and water with a spatula. Your dough will be very moist, but you can add a bit of flour if it is too moist to hold together. Then shape the dough into a disk, cover in plastic wrap, and chill for at least 2 hours. If you need to, this can be made up to three days in advance, just store the plastic wrapped disks in a large zip lock bag.
Once you have your dough ready:
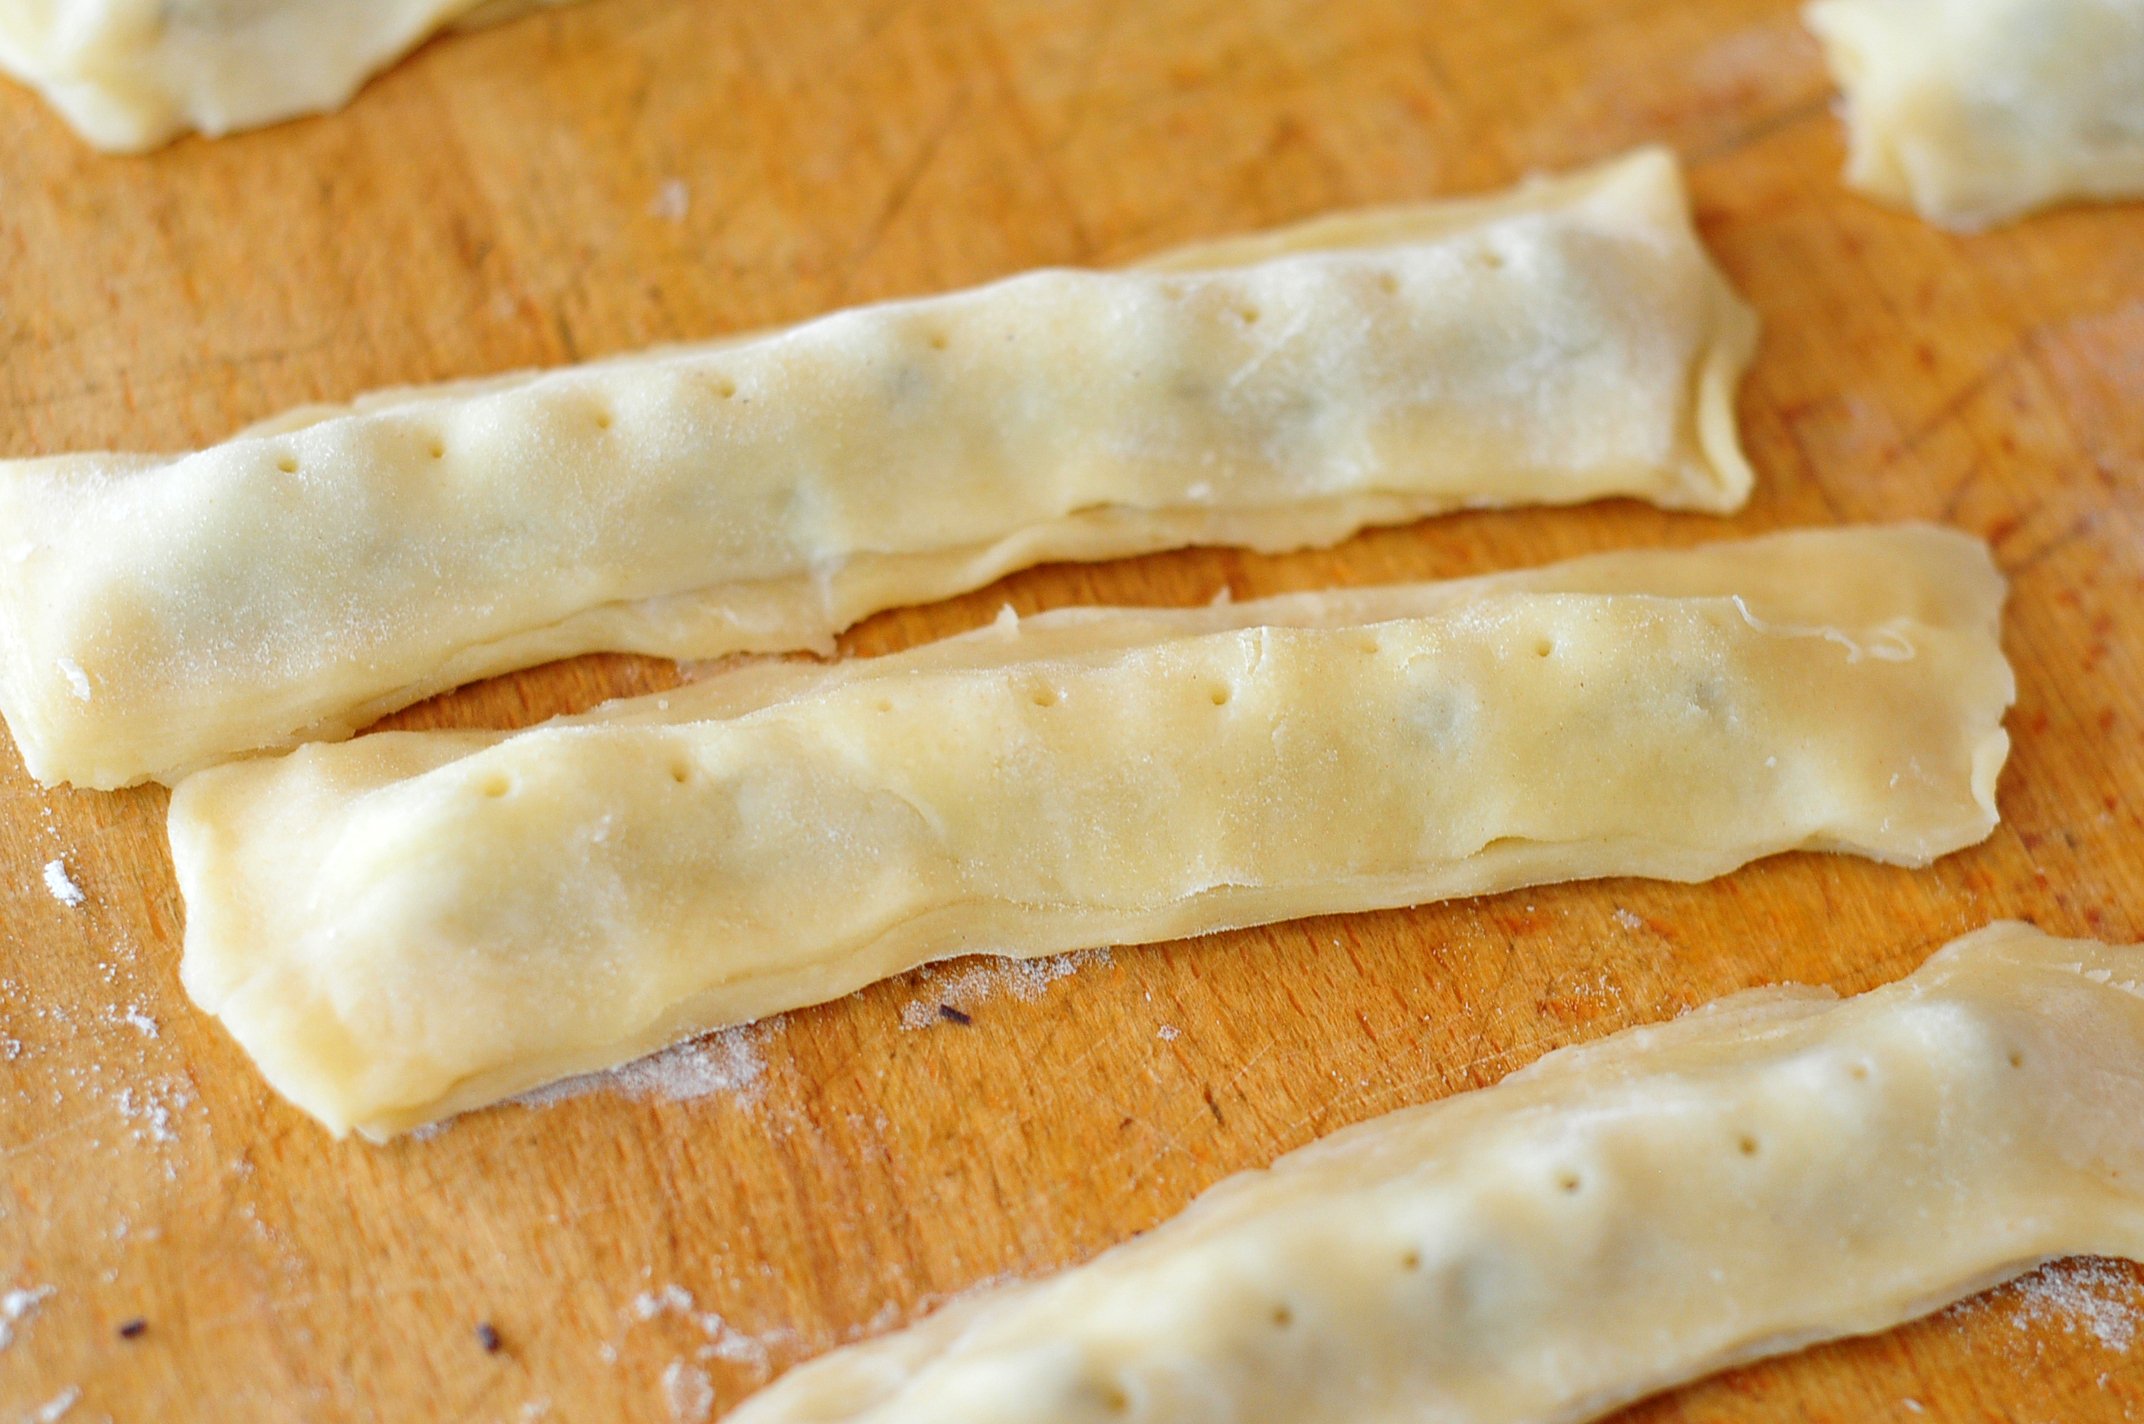
Roll out the dough, just like for a pie, and cut into strips about 1 inch wide and six inches long.
Brush each strip with water, and fill with a row of chocolate chips
Cover each chipped strip with another strip and seal the edges.
Poke holes in the top to let the steam out.
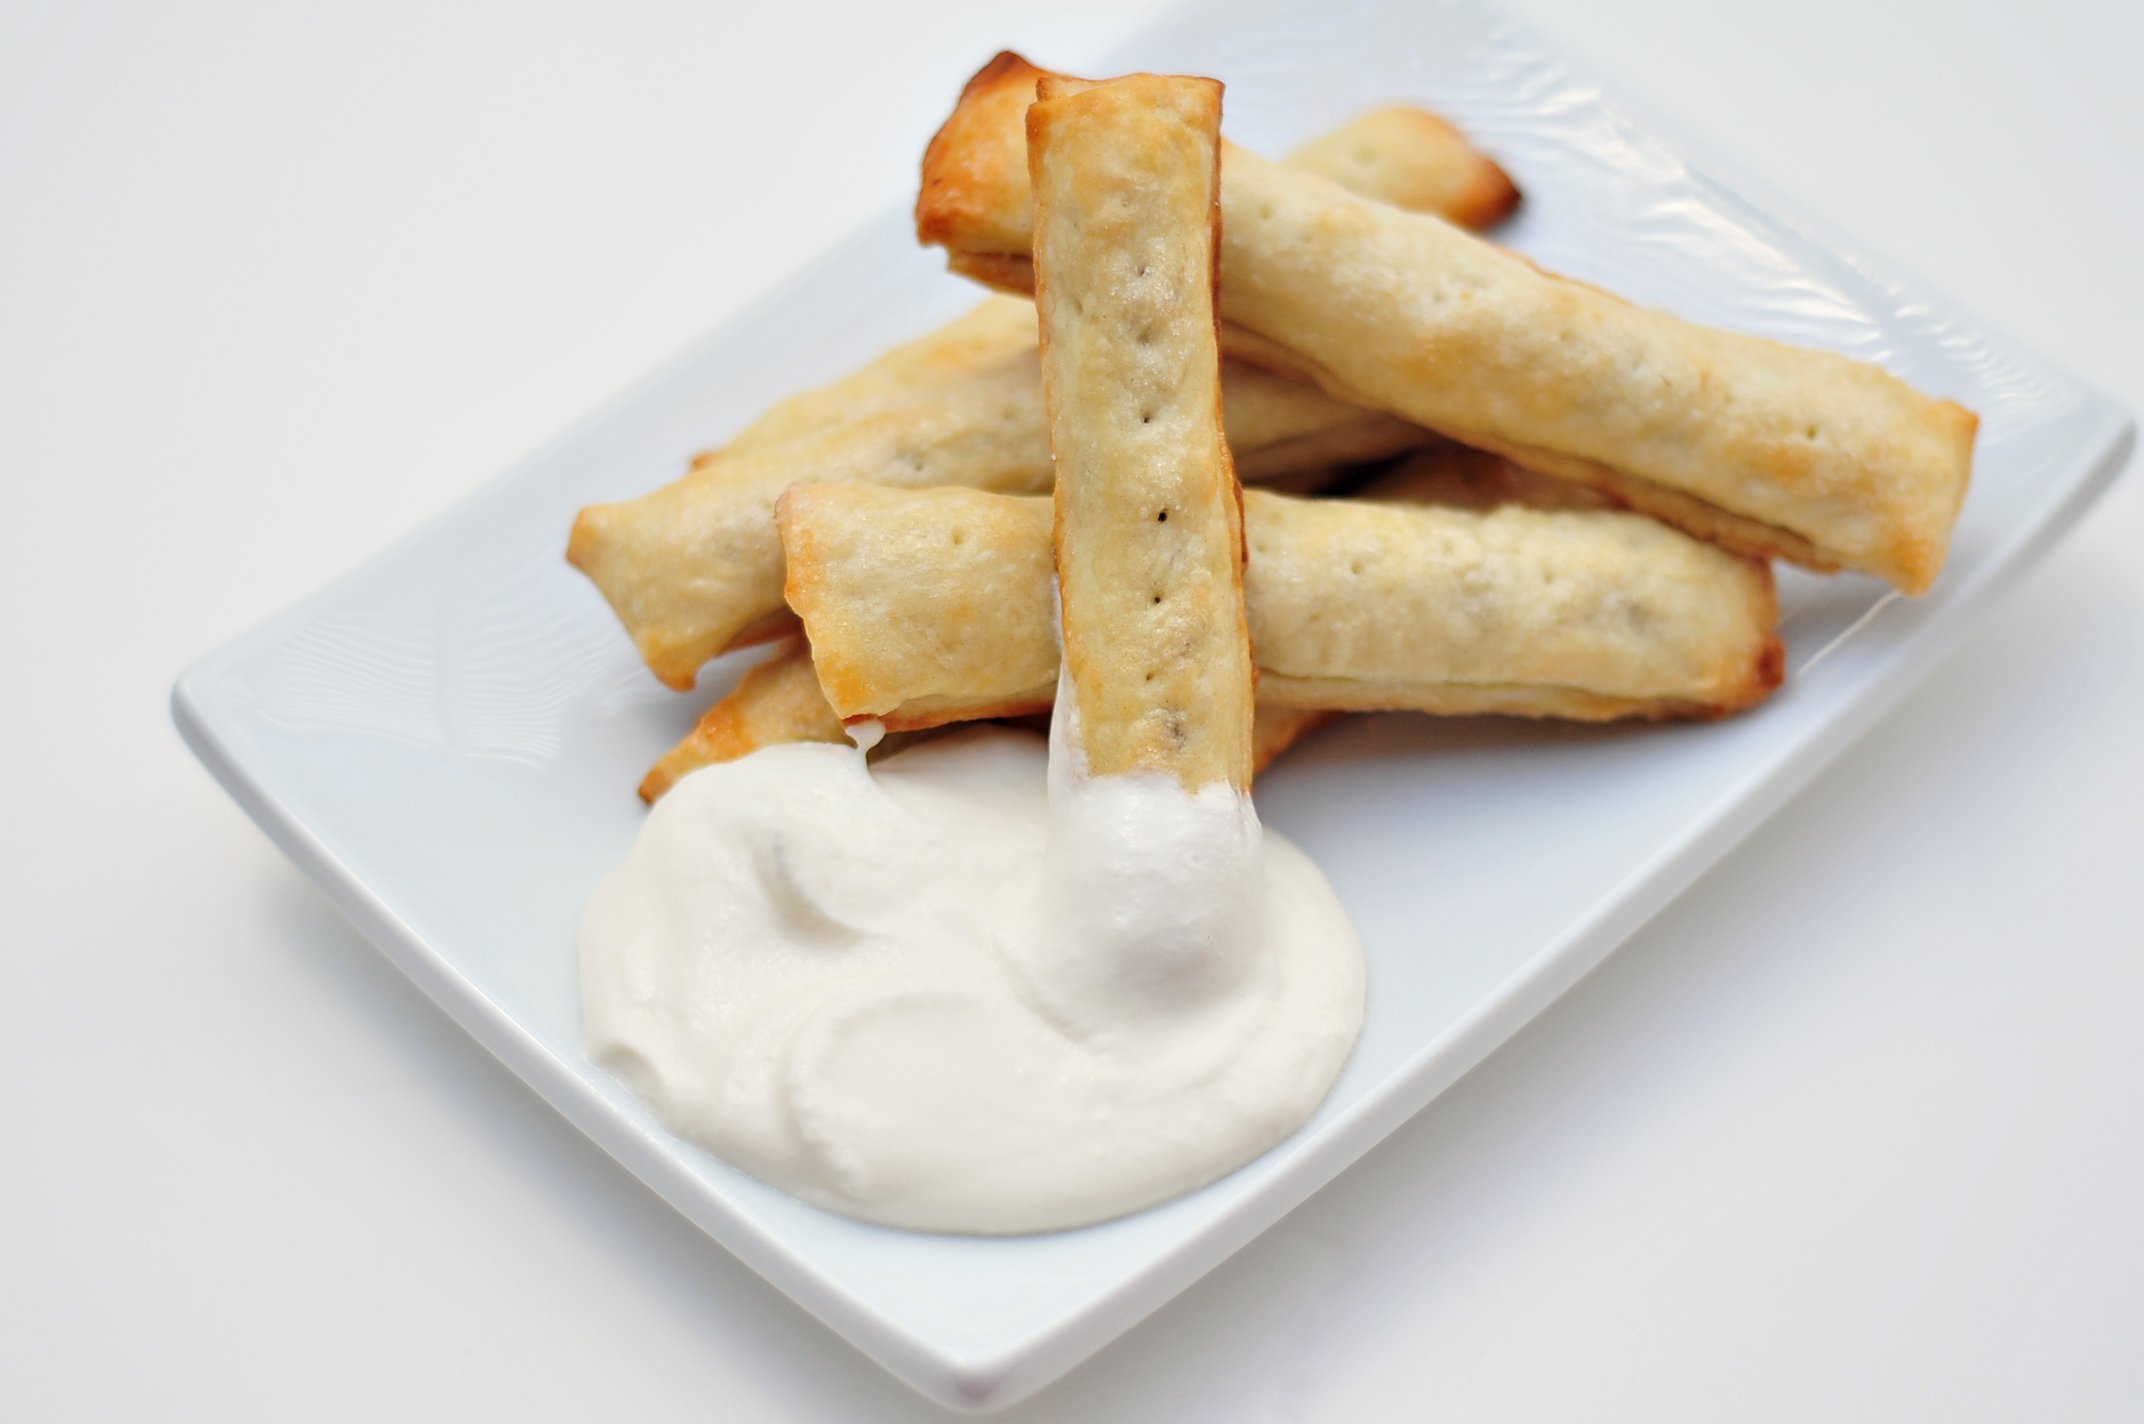
Brush with a lightly beaten egg and sprinkle with sugar.
Put on a baking sheet covered with parchment paper (or sprayed with butter cooking spray)
Bake at 350 for 12-15 minutes or until goldeny brown.
Look how cute Tater is with her pie stick. Yes, I give my kid pie. And fruits and vegetables and chicken. And pie and cupcakes.


