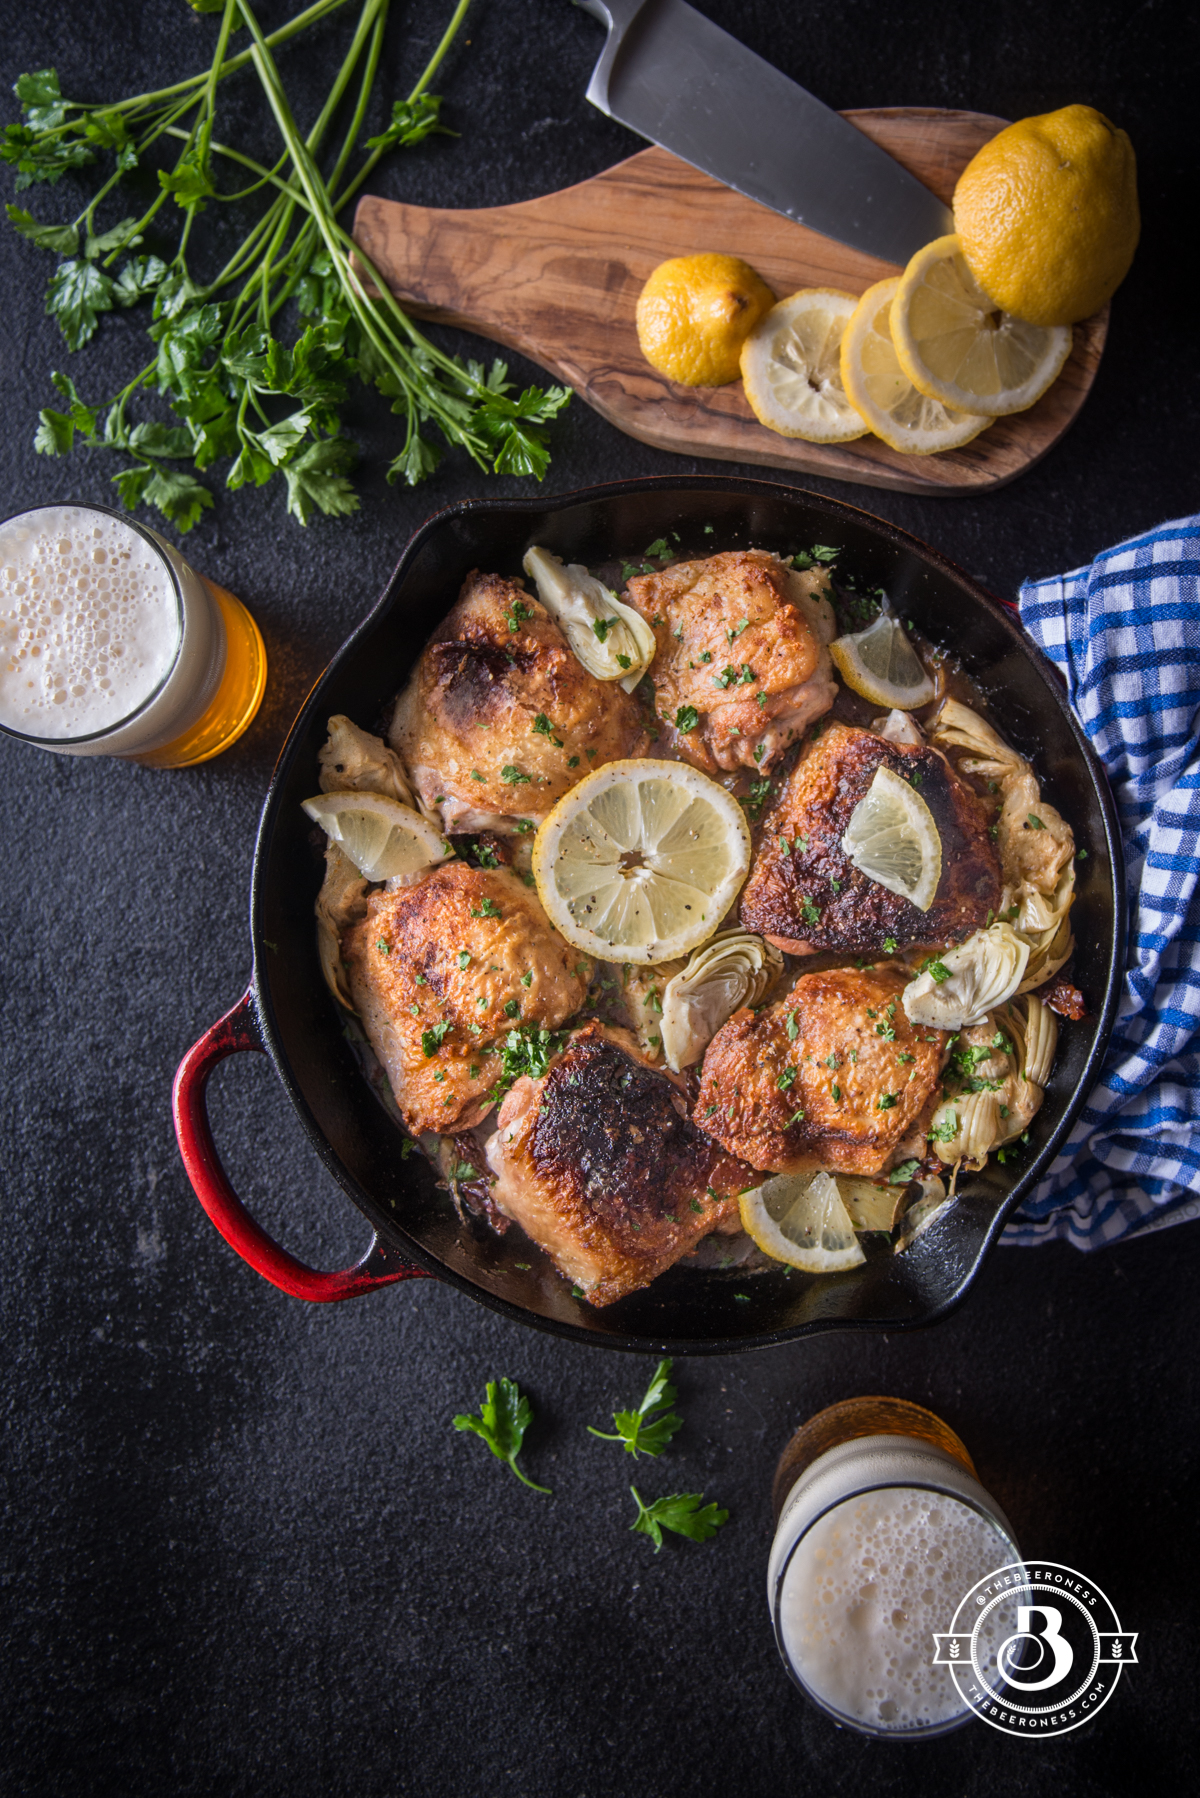
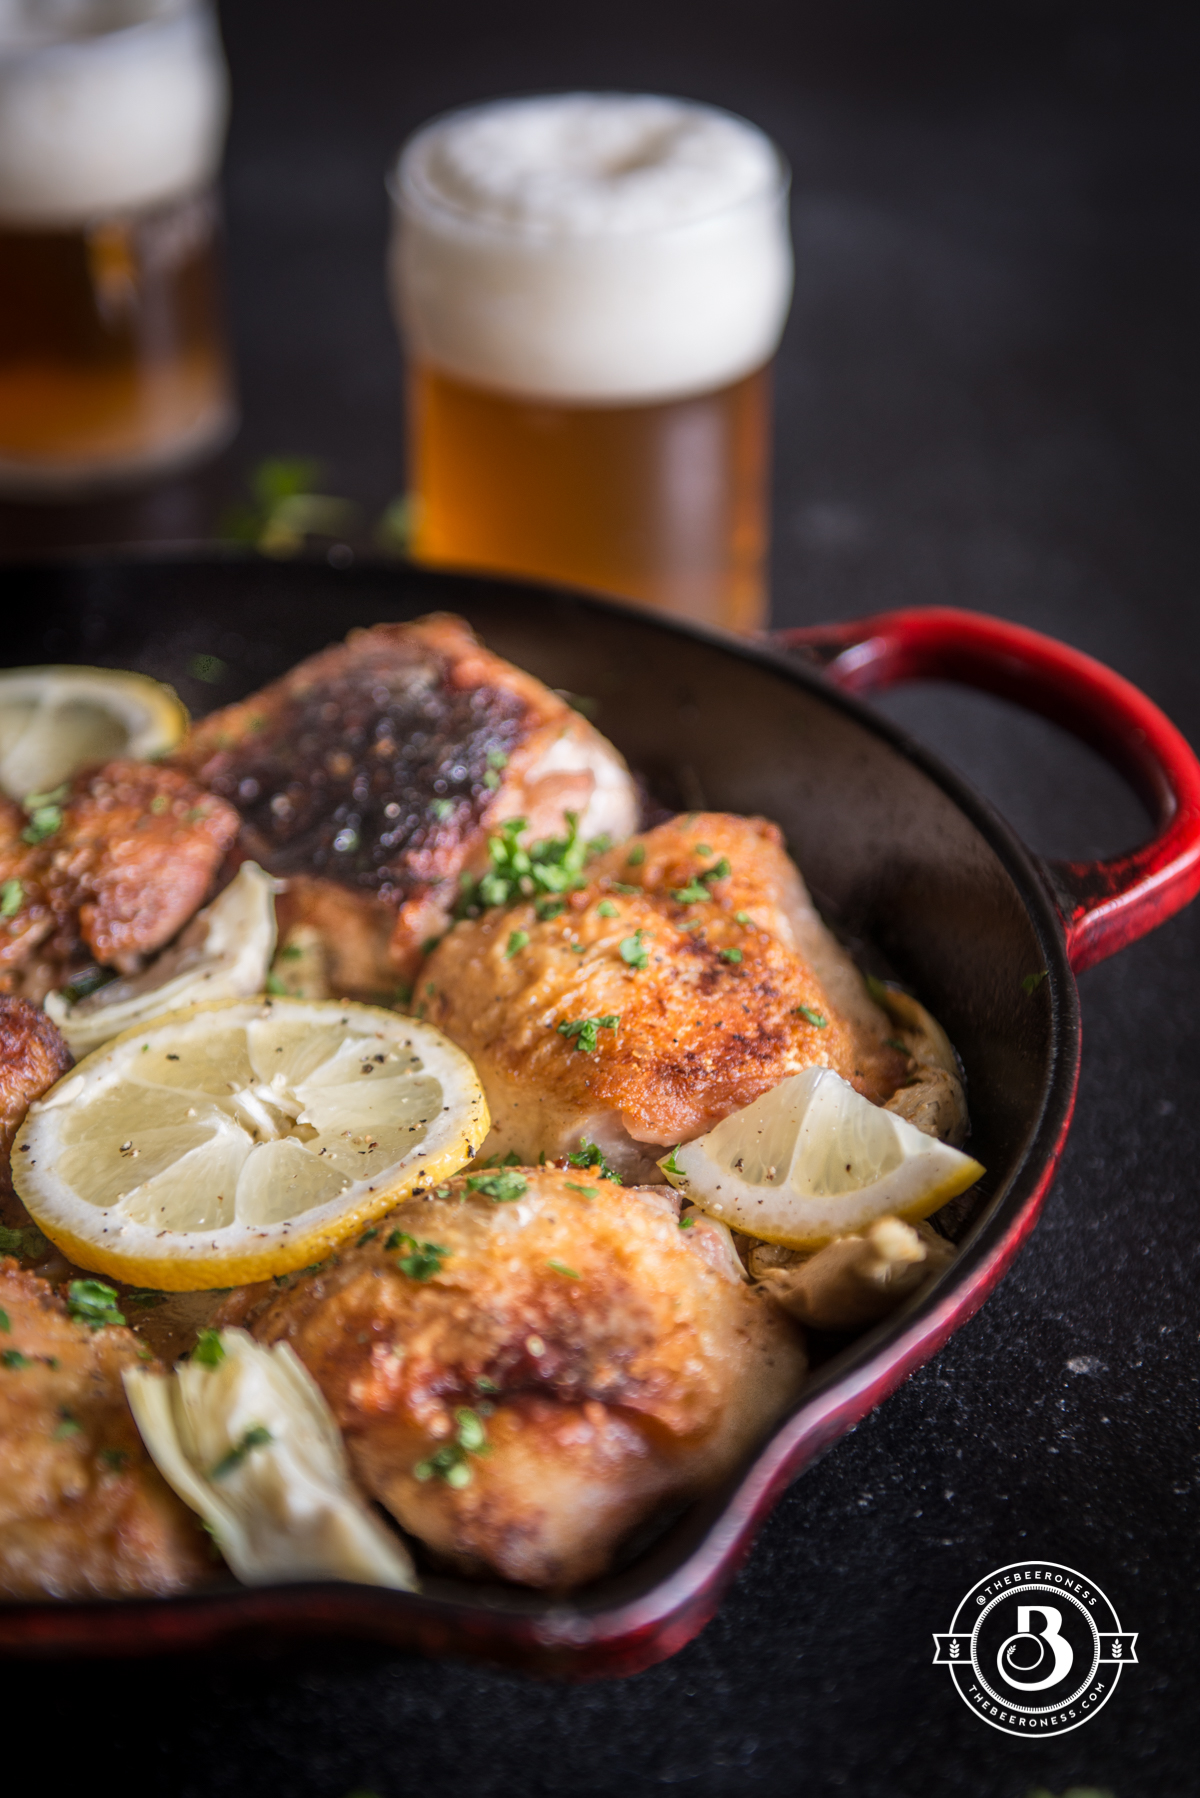
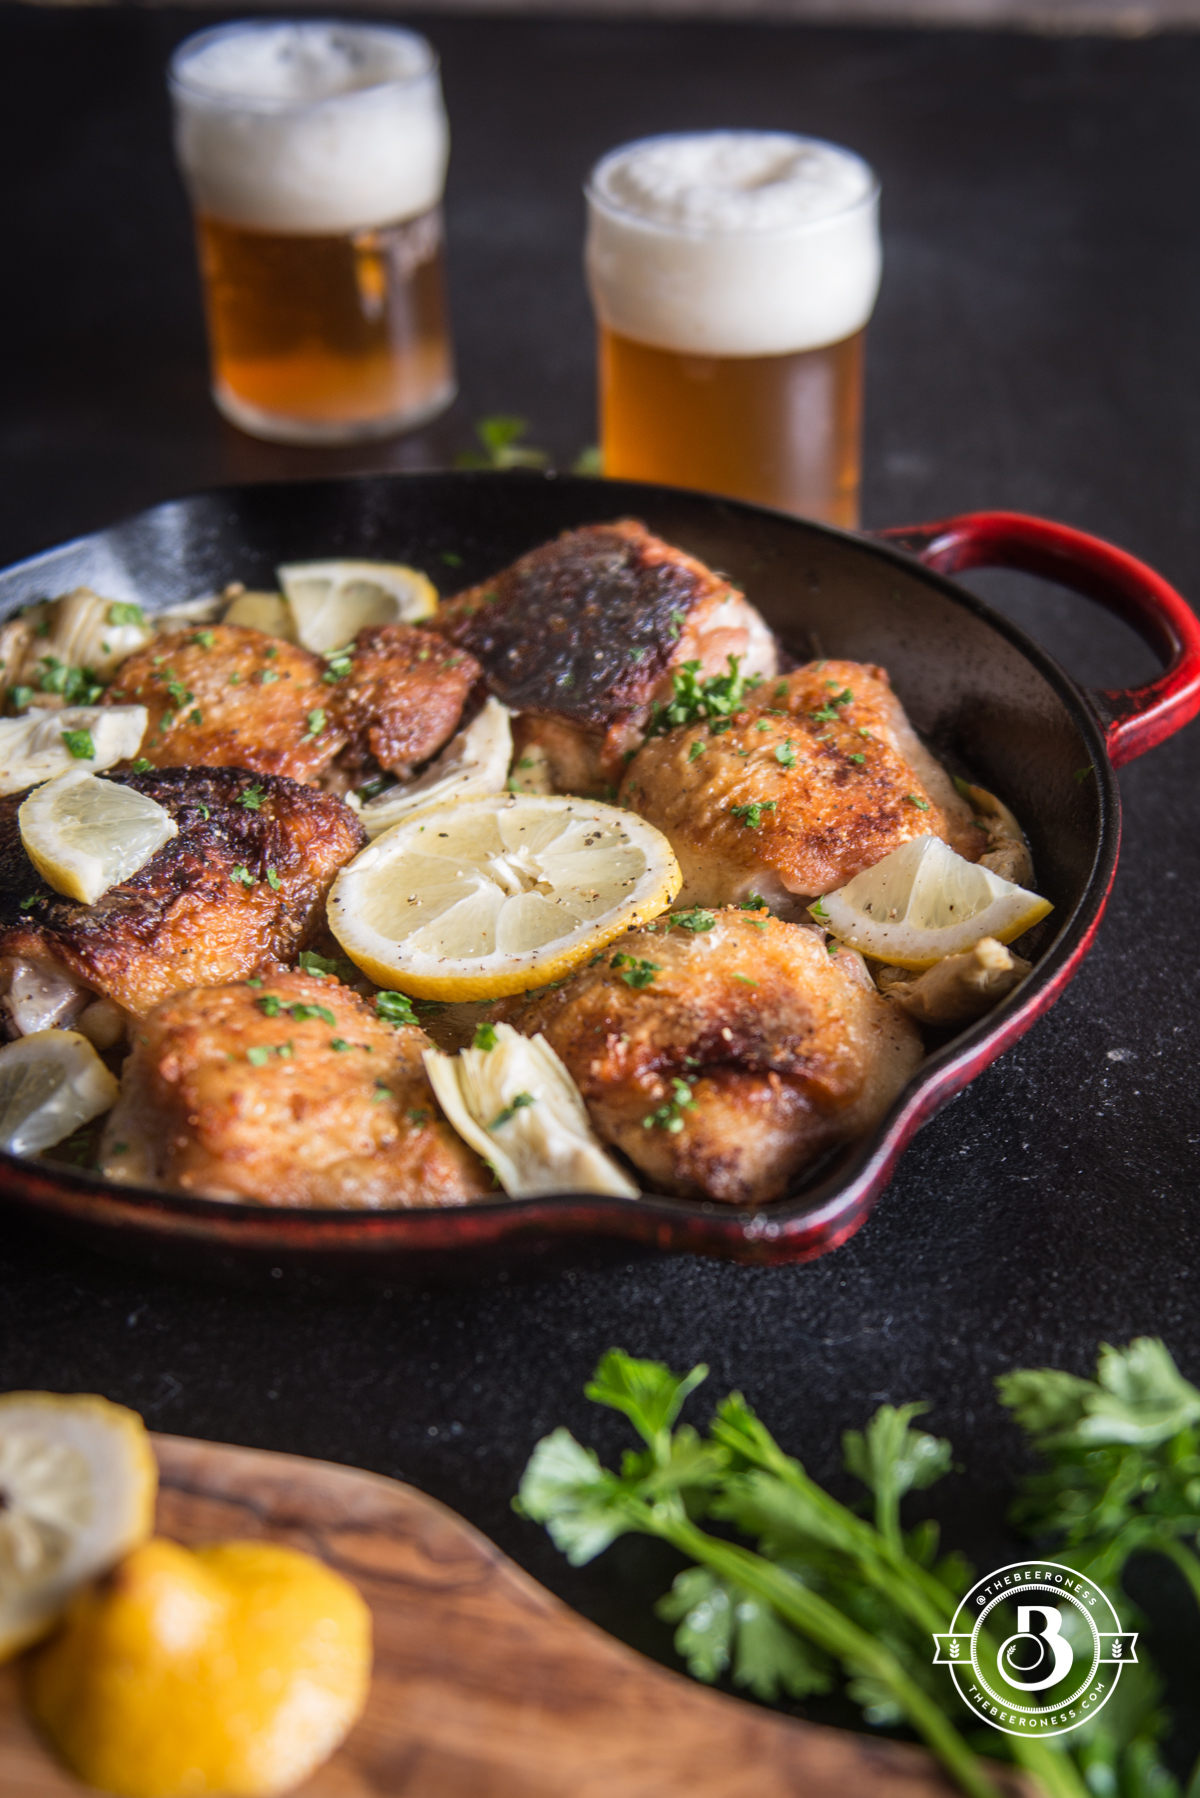
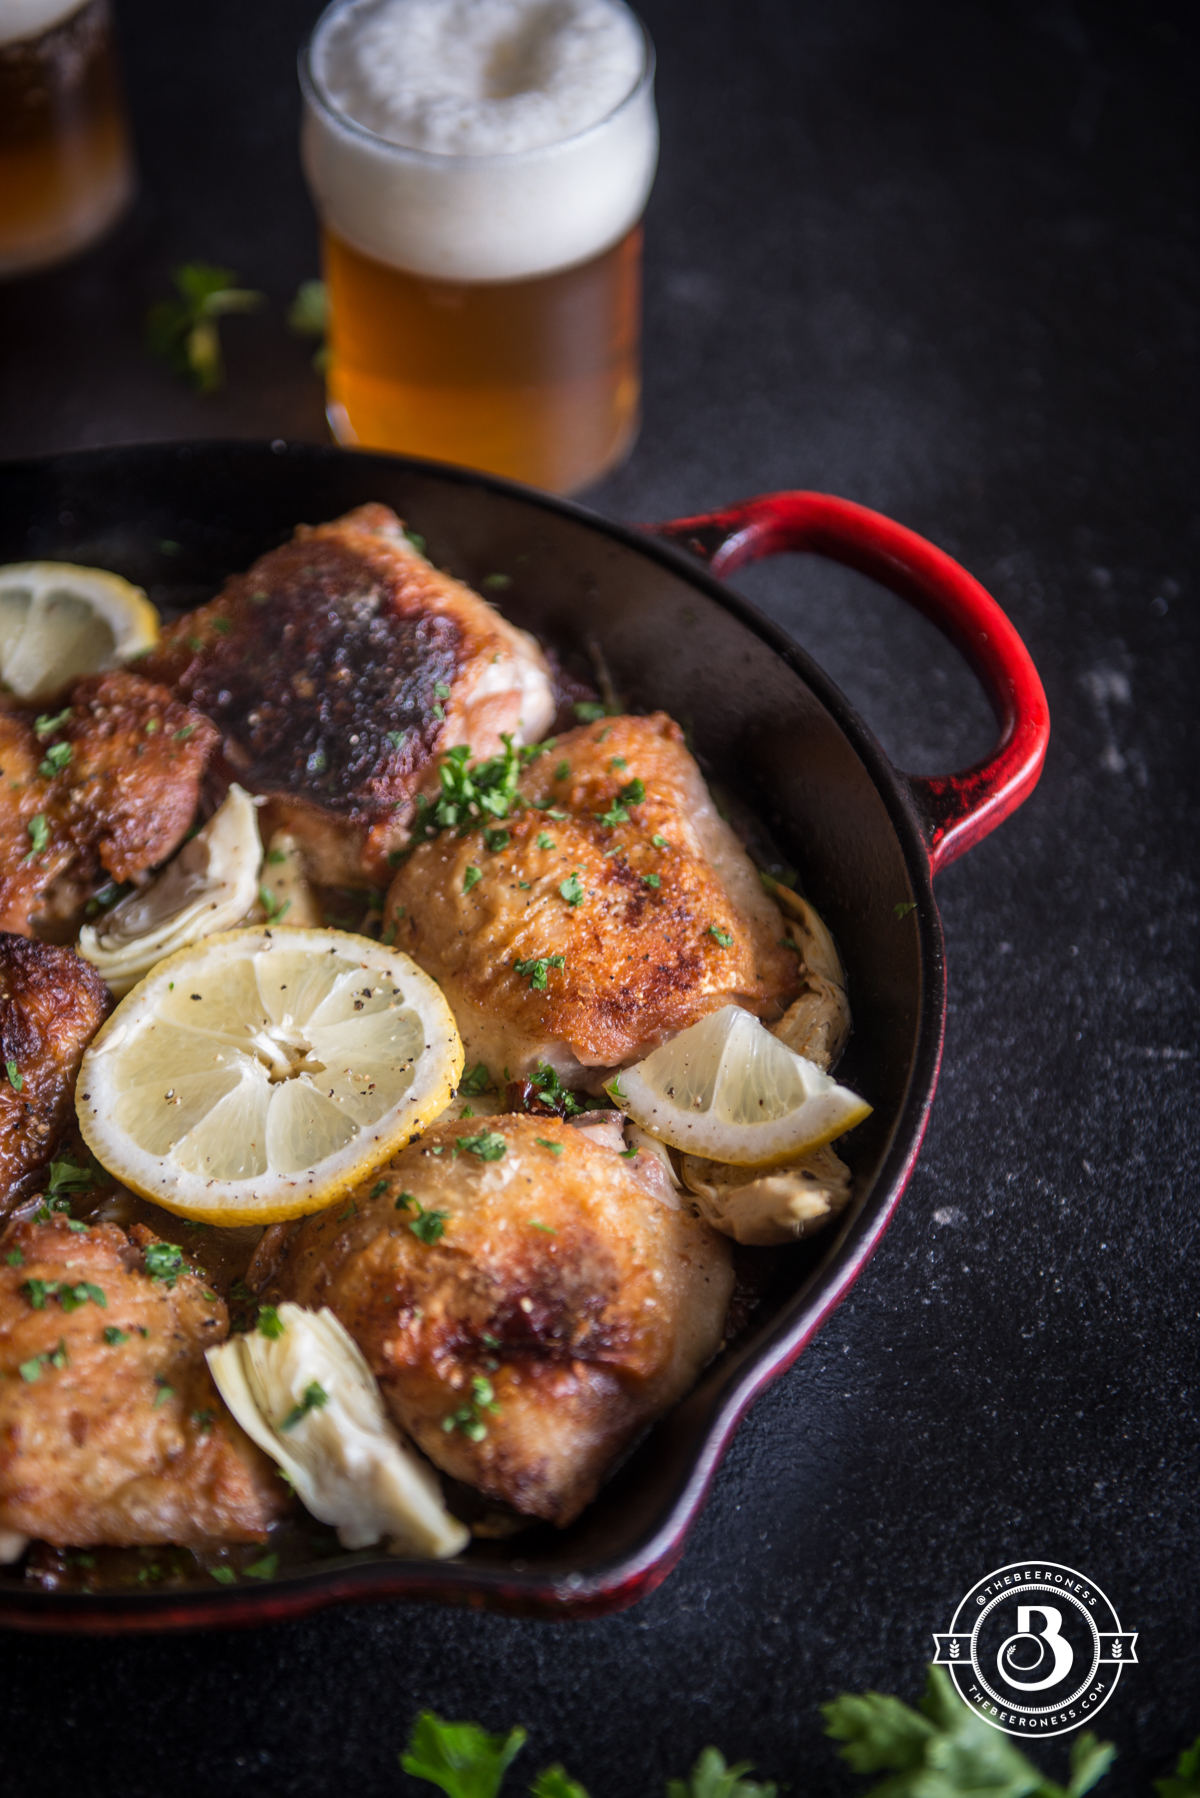
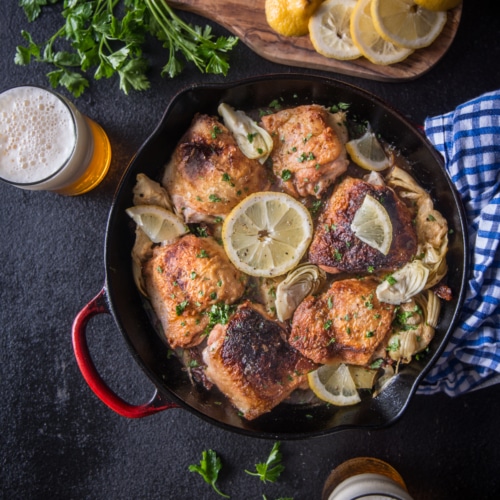
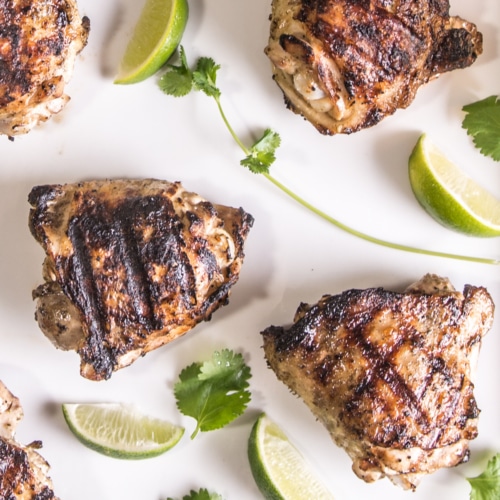
Life is too short for soggy chicken skin, this is a fact. Crispy chicken skin is the only way to live life, and I have the secret. It’s a cold pan. Not a "put in the fridge" cold, but now that you say that, I do want to try that. It’s "cold" as in: not on a heat source. That’s the secret, and once you trust me and cook your chicken in a cold-not-cold pan, you won’t turn back.
Letting the chicken skin cook as the pan heats up slowly renders the fat and allows the skin to slowly crisp and turn golden (I like a DARK golden, but feel free to aim for the medium gold) and this will rid your life of that gross, chewy, gummy skin with pieces of fat that you pretend aren’t there in order to enjoy the rest of your meal.
After you begin with your cold pan, don’t rush it. Just let that sucker sit at medium heat (invest in a splatter guard if you don’t already have one. Trust!) until it’s ready, not letting it get too hot or the chicken will burn before it’s done crisping and rendering. It’s a job that it does all on its own while you are free to do other things, like make sauce, or a cocktail, or impulse buy sequin pants on Amazon. You know, whatever strikes your fancy.
Now that you are in on this crispy-skinned secret, it’s time to give it a try. You can even add your own favorite sauce or spice rub, or just eat it over the sink in your yoga pants while drinking your cocktail. It’s your world, and it now has crispy skin chicken for life.
Sprinkle the chicken on all sides with salt. Place in a skillet, off heat, skin side down.
Add to the stove over medium heat (if the heat is too high the skin will burn before it is able to render the fat, slower cooking will allow for crispier skin). Add a splatter guard if you have one.
Cook until the skin has browned, 15 to 20 minutes. Turn over, cooking on the other side until chicken is cooked through.
While the chicken cooks, make the sauce.
Add the chicken broth, beer and cornstarch to a large bowl, whisk to combine. Add the remaining ingredients (except the parsley and rice), stir to combine.
Remove the chicken thighs from the pan, pour off all the rendered fat. Return the pan to heat, raise the heat to medium high. Add the sauce, stir to remove the brown bits from the bottom of the pan. Stir until the sauce has thickened.
Add the chicken back to the pan, cooking until the chicken has warmed. Add to a serving plate, sprinkle with parsley, serve over rice or pasta.
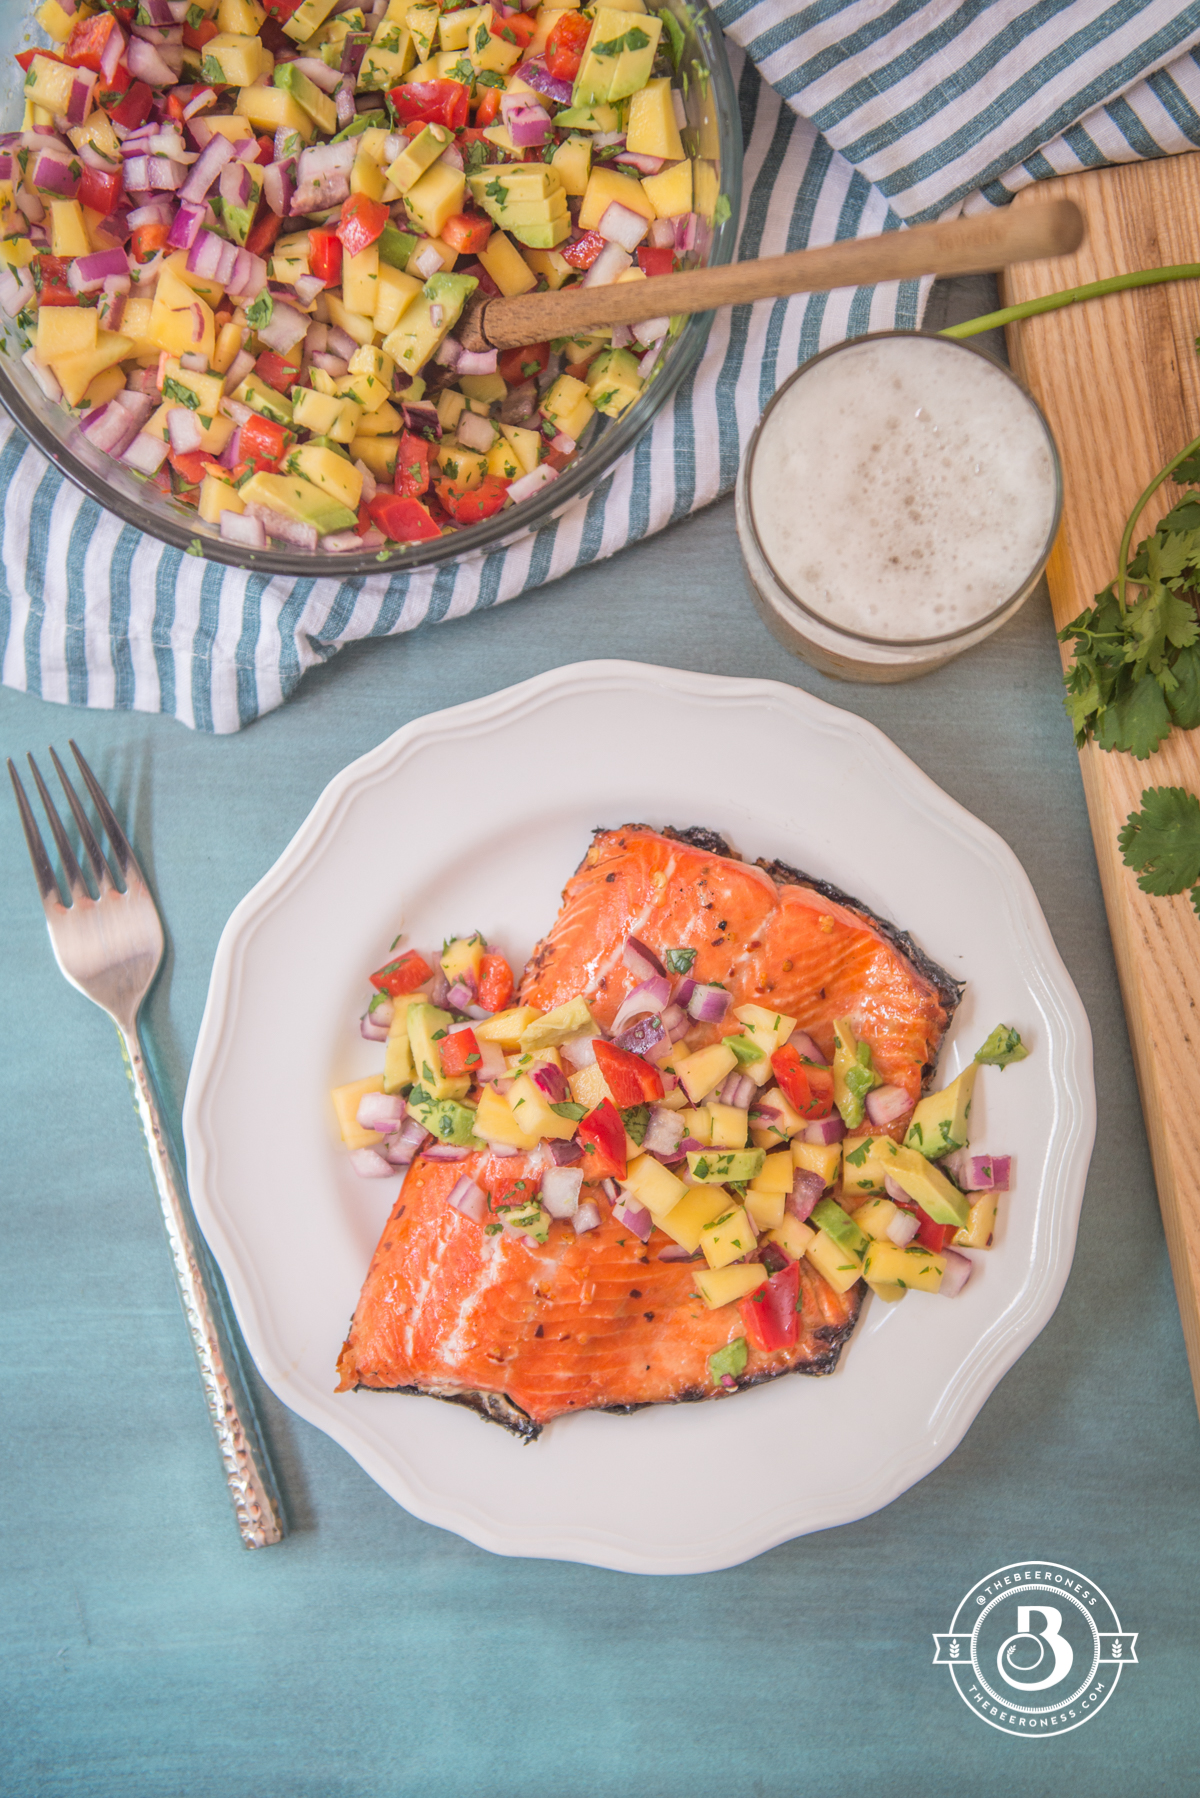
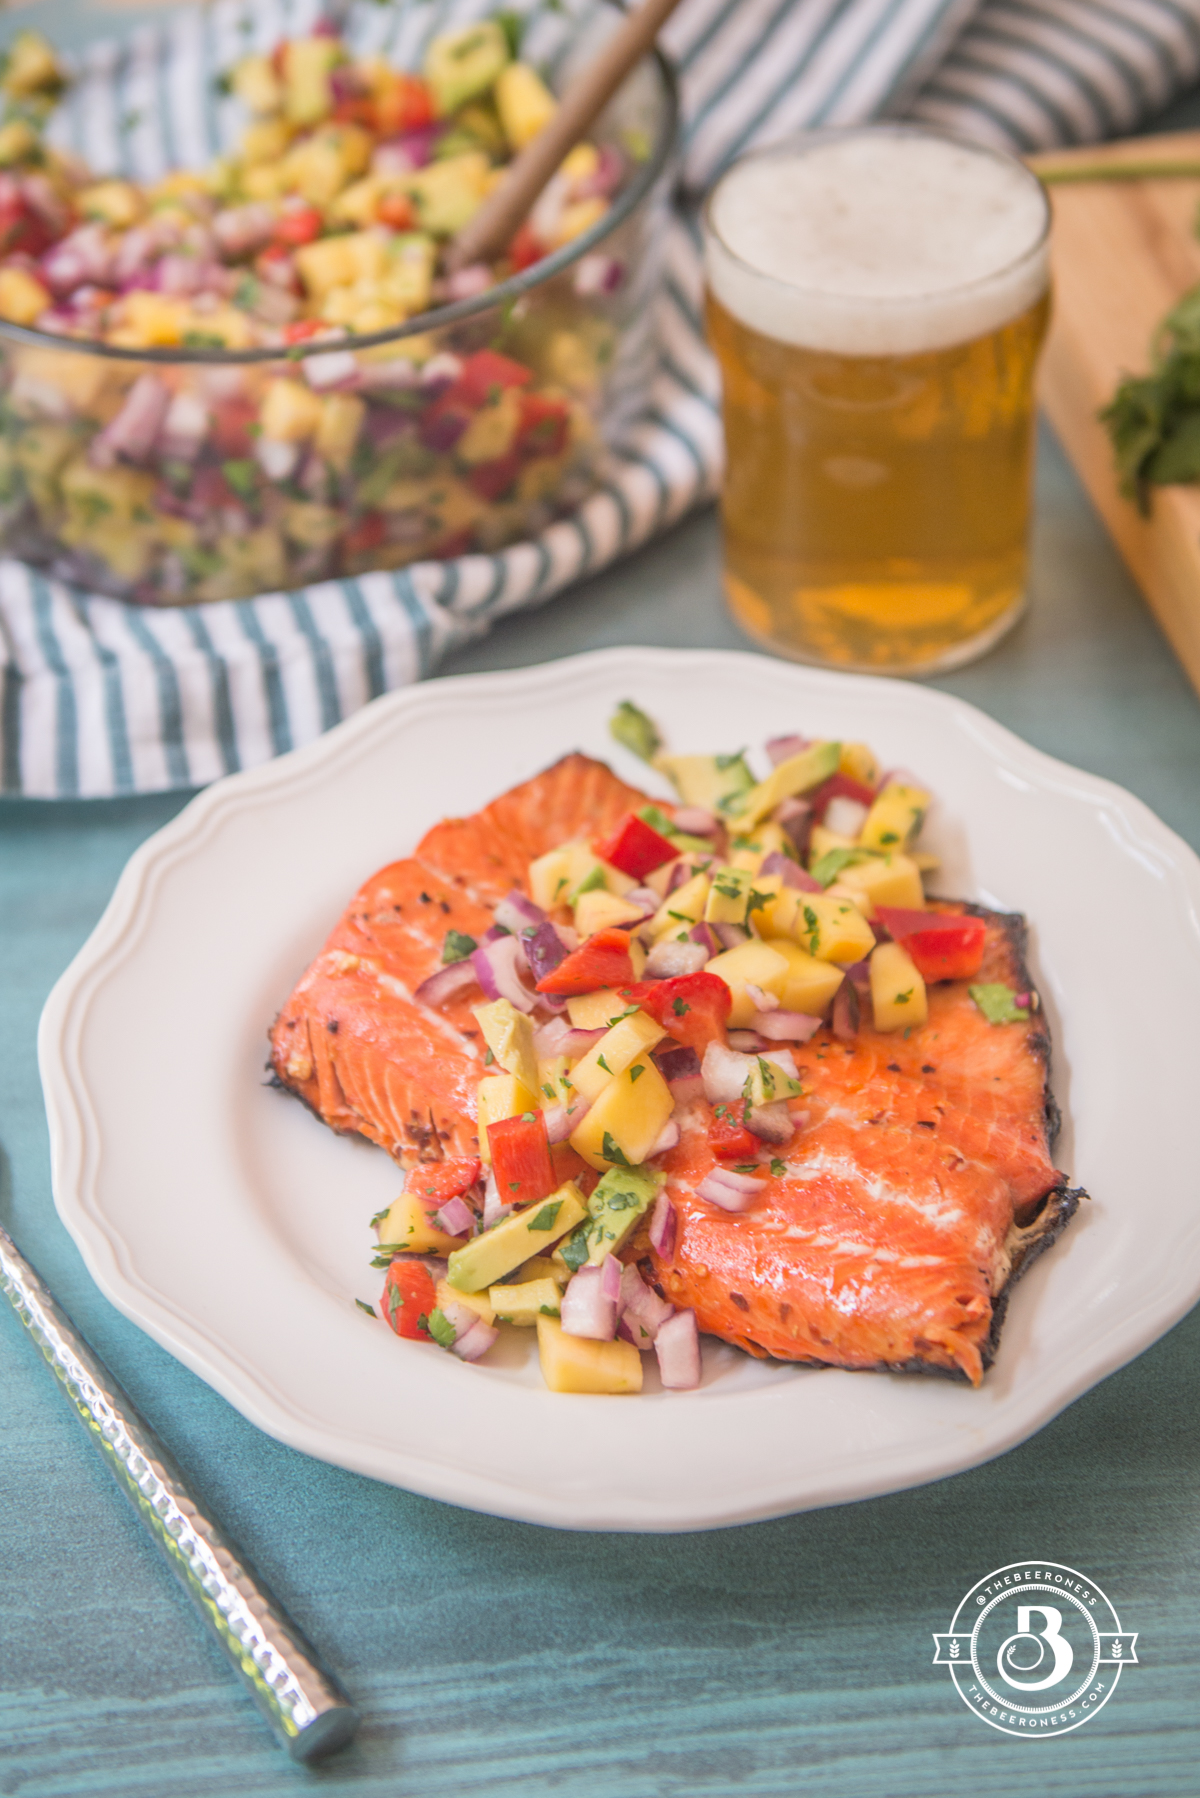
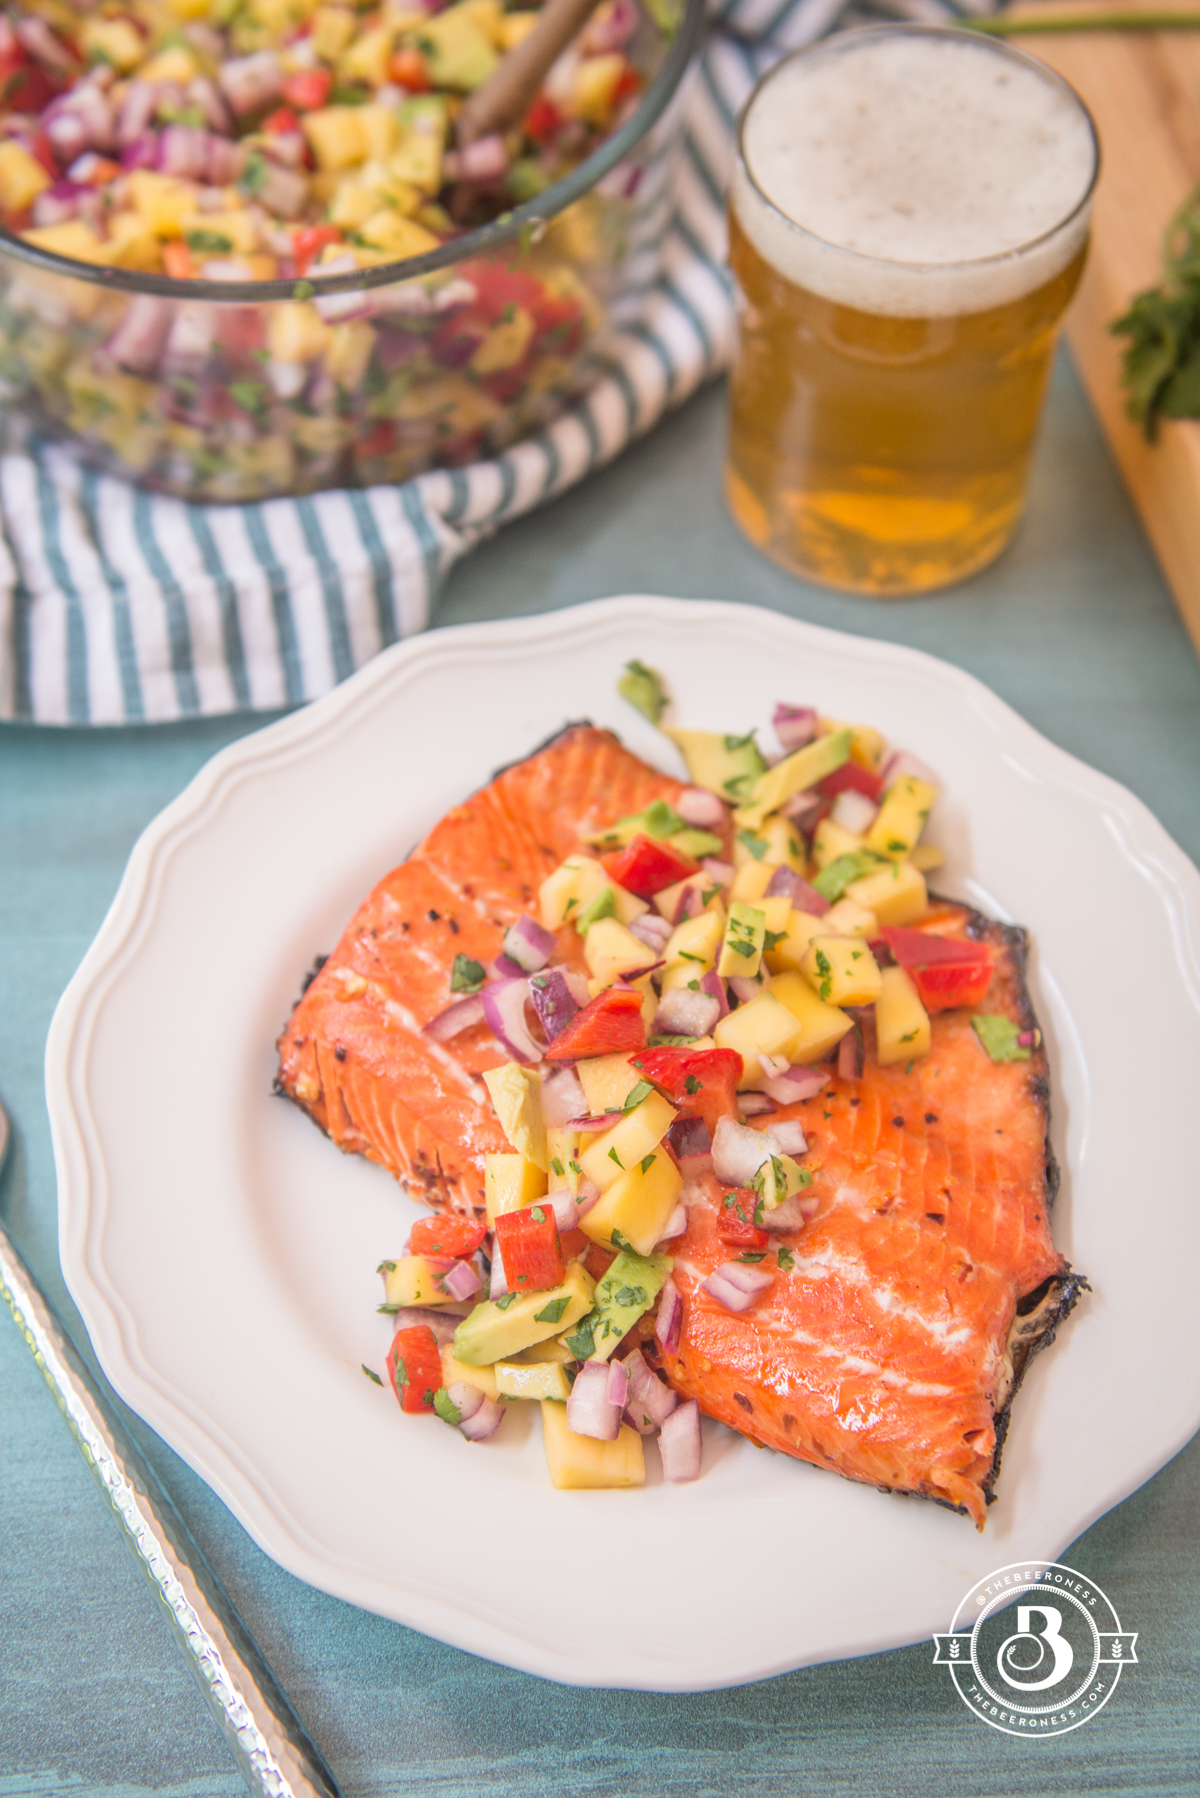
I need this, it’s rather necessary. Since I spend my life contractually obligated to drink beer and eat foods like this and this, I need recipes like this Salmon with Mango Avocado Salsa. For the sake of my liver and my skinny jeans, it’s important. But I can also act like a spoiled child when it comes to food and really need something that tastes fun and indulgent.
So I make these recipes that I get really excited about and hope that I don’t notice that it’s also rather healthy, much in the same way you smuggle cauliflower into your toddler’s mashed potatoes and hope they don’t notice. I do this with myself, I’m really good it. I don’t even notice that I’ve made a healthy meal because I got so excited to make it in the first place.
I know, it’s ridiculous. But I have to do what I can before my liver figures out how to call the cops on me for widespread abuse.
Add the honey, beer, salt, and pepper to a wide, shallow bowl. Stir to combine (heat slightly if the honey is resisting combining with the beer. Make sure to cool before adding salmon to prevent the marinate cooking the salmon).
Add the salmon, turn over a few times to fully coat the fish. Cover and chill for 1 to 24 hours.
Preheat the grill to medium-high.
Add the salsa ingredients to a large bowl, toss to combine.
Place the salmon on the grill, skin side down. Close the cover, cooking until the salmon is cooked through (no need to flip over, the salmon will cook with the grill cover closed).
Remove from grill, add to a serving plate. Top with salsa before serving.
Somedays the internet is just pug videos and Game of Thrones memes and other days it feels so full of trolls lurking just under the surface, waiting with their beady little eyes for the chance to pounce. On the bad days, I have to believe those of us who are willing to mama-bear the good people and come out in force against the trolls are much larger in quality and quantity than former.
Let’s just make that agreement, shall we? As we make our pulled pork and drink our beer that we’ll look out for each other. We’ll stick up for someone who’s being bullied online and push the trolls back into the caves from which they came.
There are days when I want to be the kind of person that will love the trolls so hard they will crack wide up and shed their skin like a snake and evolve into a self-aware human.
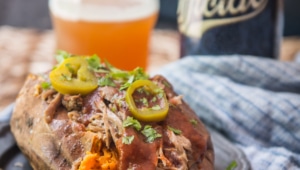
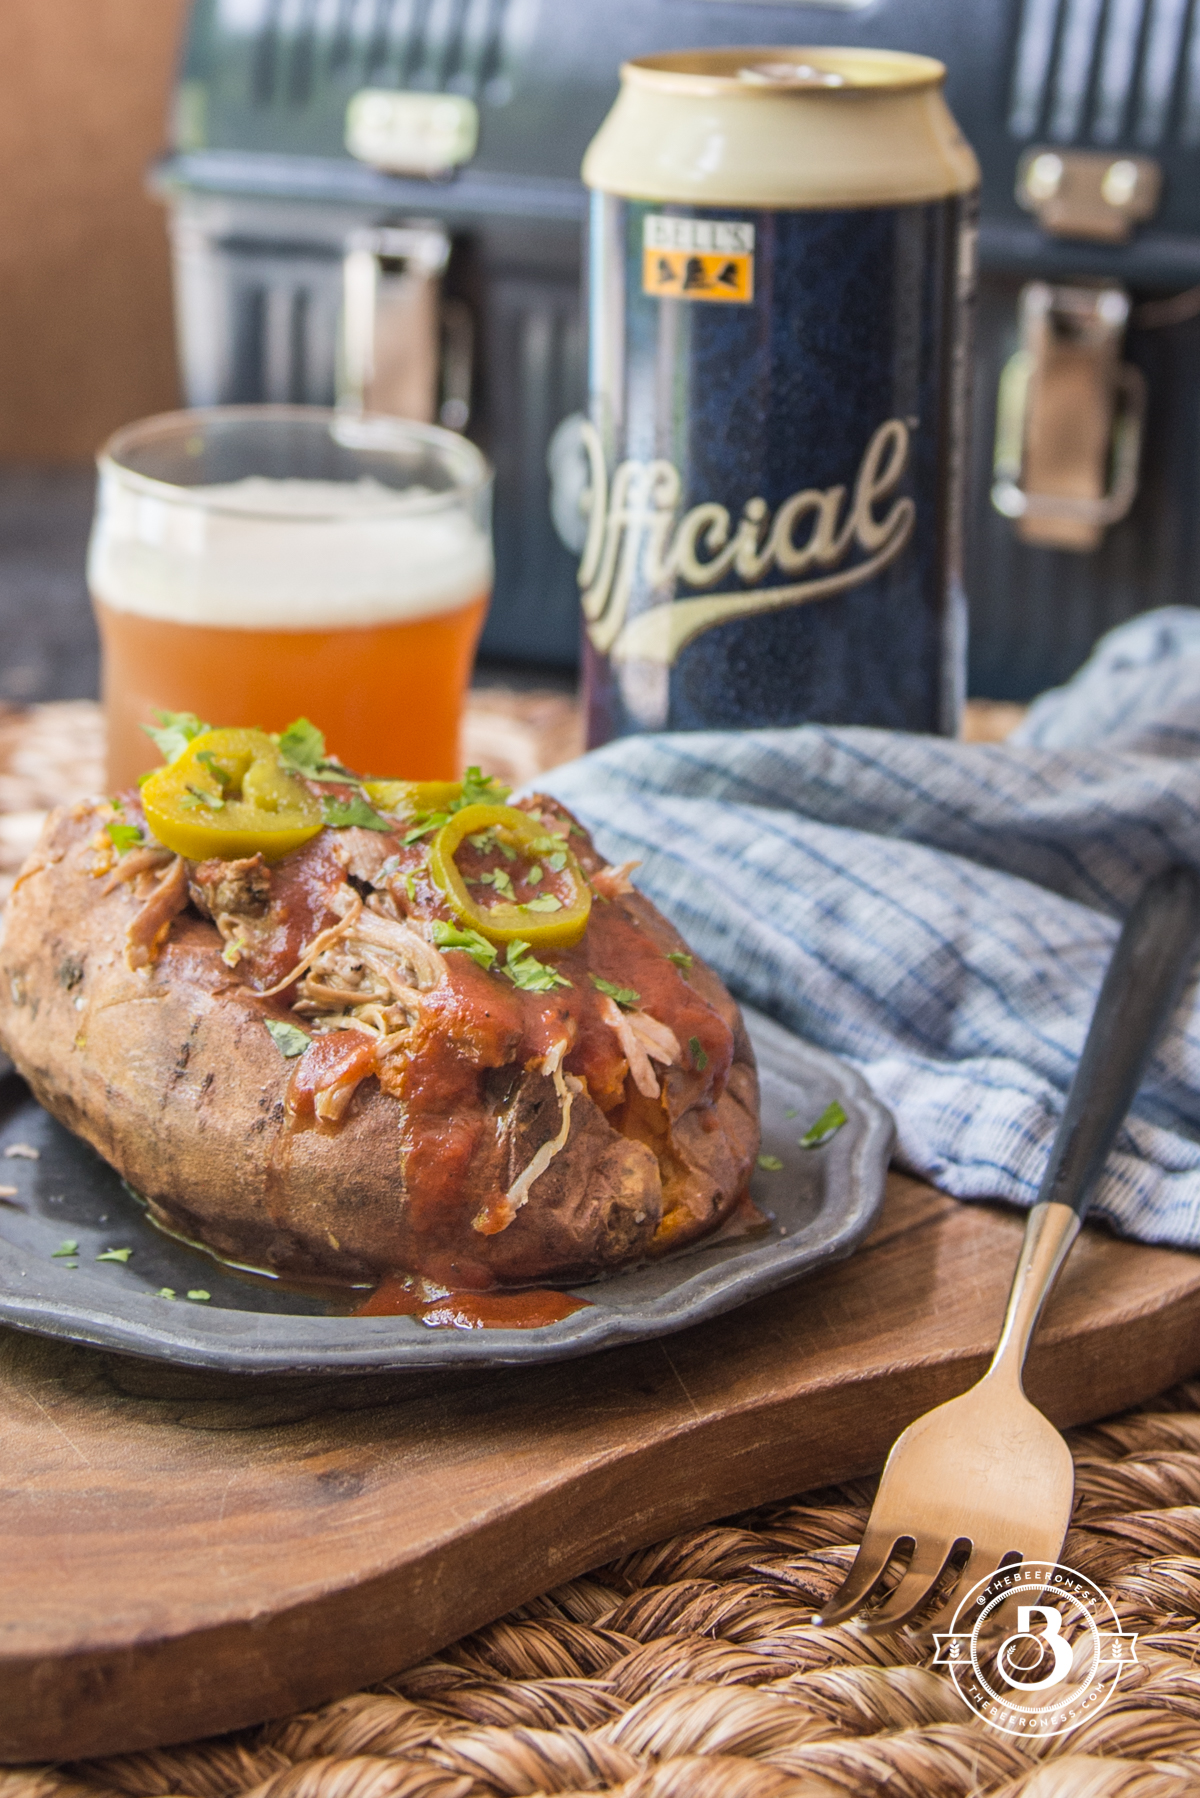
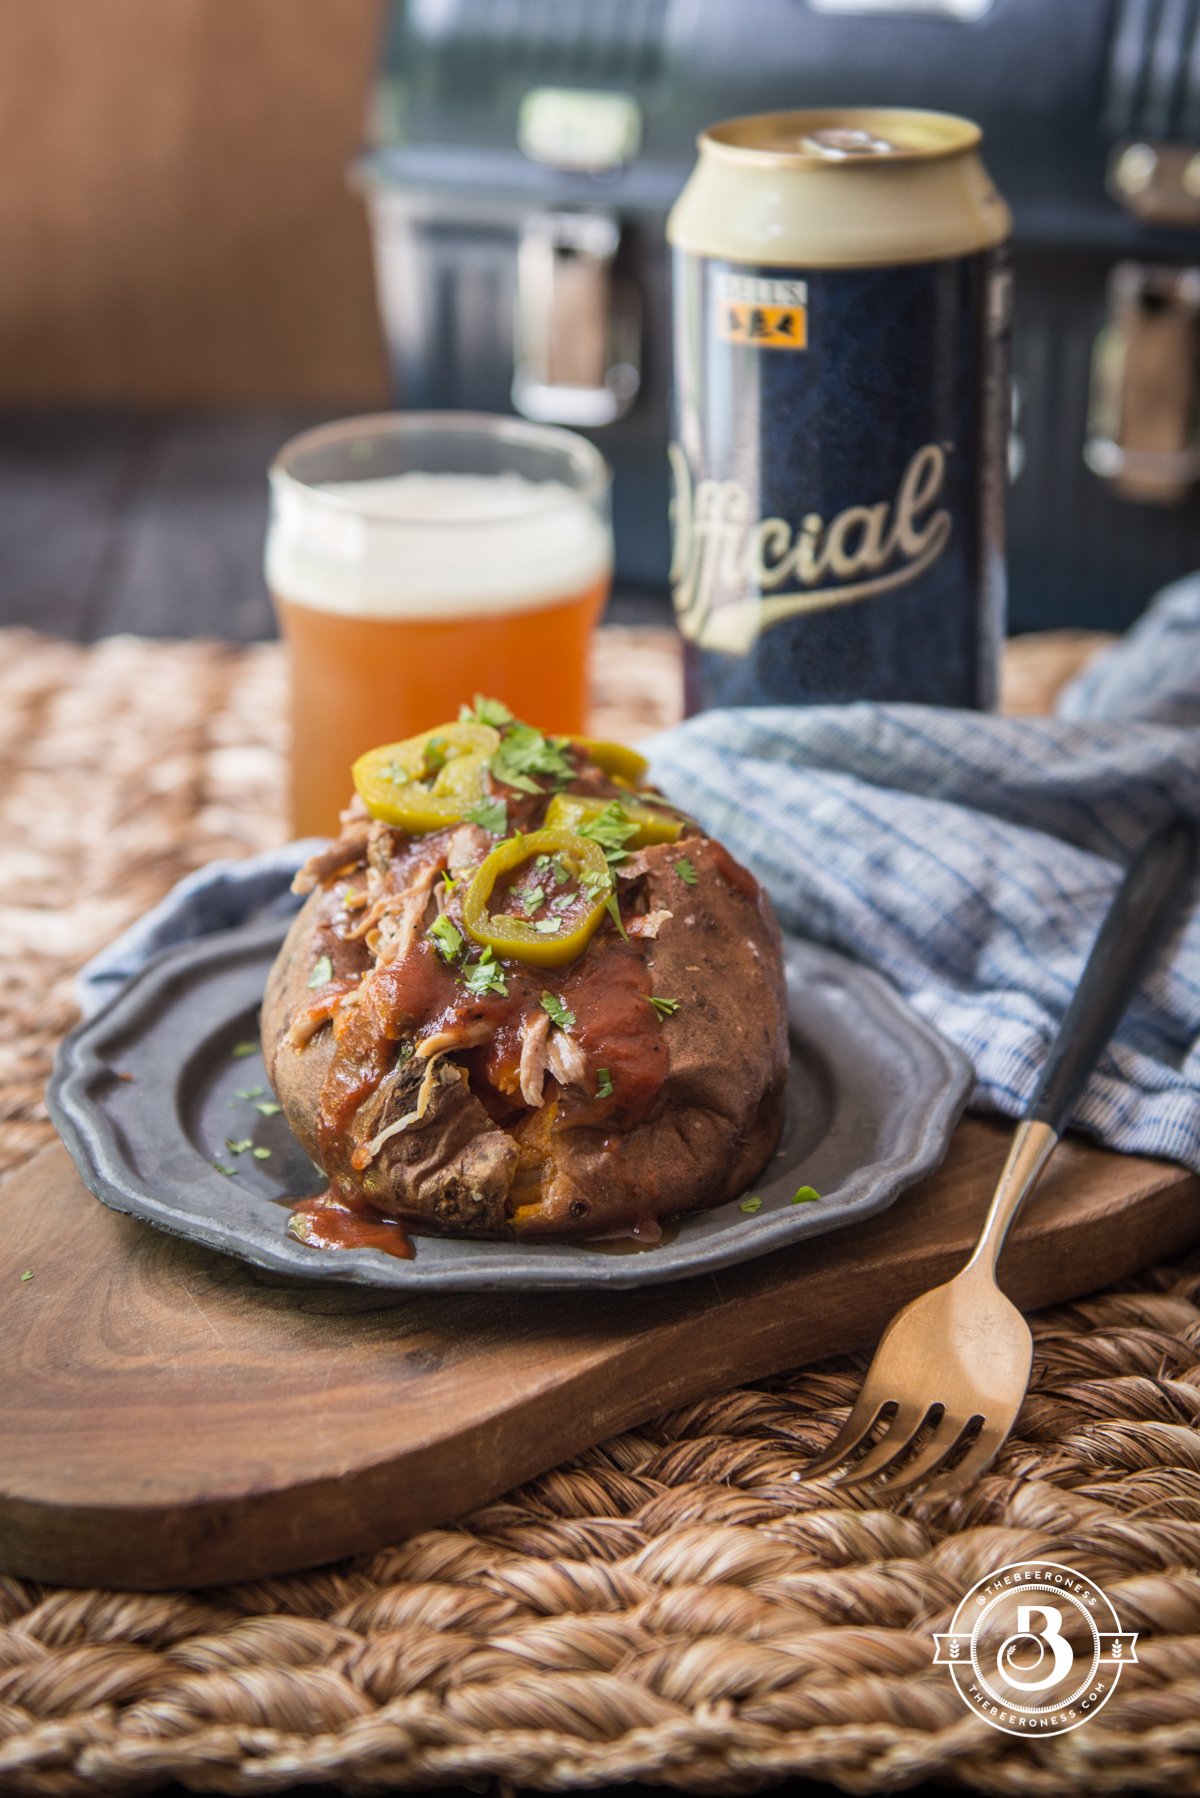
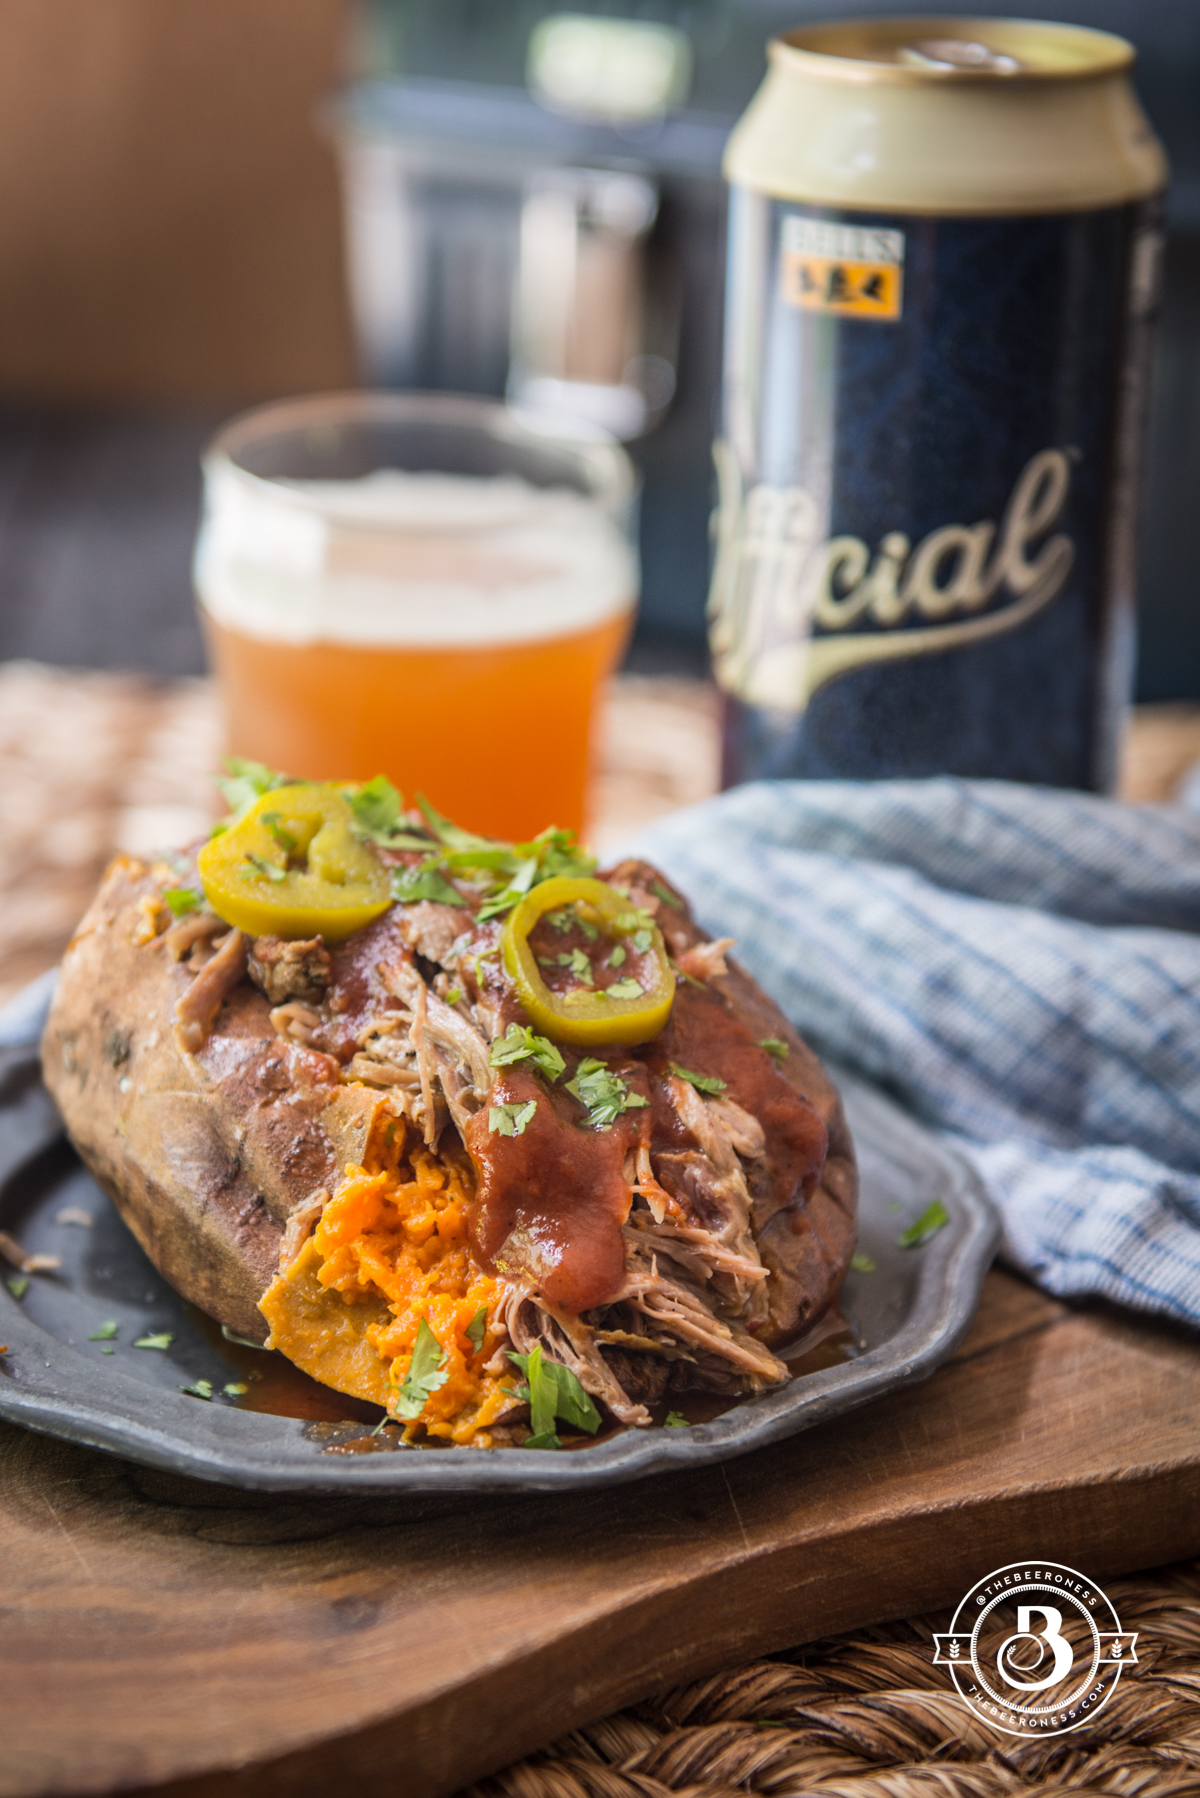
But other days I don’t have the strength. I just want to hand you my beer and wreck shop. I find the restraint and often channel that rage into cooking. So I rage cooked you some stuffed sweet potatoes and served them with this amazing hazy IPA from bells called Official Hazy IPA. It’s one of those beers that makes everything right in the world.
¼cuppickled jalapenosfor beer pickled jalapenos, link above
Instructions
Make the pulled pork:
In a small bowl stir together the salt, brown sugar onion powder, chili powder, cumin, pepper, smoked paprika and mustard powder together until combined, set aside.
Take out your pork and stab 6, 2-inch deep holes fairly evenly spaced through the meat. Push a clove of garlic into each hole until no longer visible.
Rub the entire surface of the meat with the spice mixture, using it all.
In a large Dutch oven, heat the olive oil until very hot. Sear all surfaces of the meat, even the sides, until browned. The entire process will probably take about 10-15 minutes. Pour the beer over the meat, cover and reduce heat to medium-low. Cook for about 3 hours, turning the meat over about every 30 minutes, until the meat is tender and falling apart.
Once the meat is tender remove from heat, use two forks to shred into pieces while still in the pot (or remove, shred and return to pot). Return to the pot to heat and allow to simmer for about 5 minutes. Remove the meat from the pot, add to a servings bowl.
If planning on store the meat, reserve ½ cup of the cooking liquid to add to the meat while storing.
Make the potatoes:
Preheat the oven to 400°F.
Pierce the potatoes all over with a small knife.
Add the potatoes to a wire rack over a baking sheet. Drizzle with olive oil, sprinkle with salt.
Bake for 40 minutes or until fork tender ( the time will depend on the size of your potatoes, larger ones can take up to 30 minutes longer).
Top the potatoes:
Slit the potatoes lengthwise. Add 1 tablespoon of butter to the center of each, sprinkle with salt. Mash the butter and salt into the sweet potato with a fork.
Add desire amount of pulled pork to each potato, top with cilantro, barbeque sauce, and jalapenos.
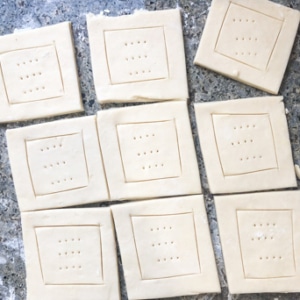
Mini Chorizo Stout Breakfast Tarts (with vegetarian option)
It happens to all of us, right? One day we’re young and cool and the next day we’re deciding which grocery store to go to based on home much we like the carts. PLANNING on having people over for breakfast is another one of those things.
One day, the only time you make breakfast for your friends is when you’re all hungover and they’re still at your place because they were too drunk to drive home the night before (that was a good call), and the next day you’re planning a menu for people who will wake up sober and then drive to your house for brunch.
Look at how much we’ve grown up, I’m proud of us.
This breakfast is actually quite perfect for either scenario. You can make the puff pastry in ten minutes (or, buy it from the store and keep it in your freezer for just such an occasion), chorizo or soyrizo is pretty much something you should always have, and of course, you already have eggs.
So, you’re all set. Ready to bake a grown-up breakfast in just 20 minutes, even if all of your guests are hungover and you’re the only responsible one. It’s not like that has never happened before.
1sheet puff pastry, store bought or homemade (Pale Ale Puff Pastry Recipe link above)
1(9oz) package pork chorizo (for a vegetarian I use Trader Joe’s Soyrizo)
¼cupstout or porter beer
¼cupshredded cheddar cheese
9egg yolks
2tablespoonschopped chives
Instructions
Preheat oven to 400°F.
Roll the dough into a rectangle about ¼ inch thick. Cut into 9 equal sized squares. Score a border about ½ inch from the edge (do not cut all the way through) prick the center with a fork. Evenly space on a baking sheet that has been covered with parchment paper. Chill while you prepare the filling.
Remove the chorizo from the casing, add to a pan over medium-high heat. Add the beer.
Stir until chorizo is cooked through and thickened.
Spoon about 2 tablespoons into the center of each of the tarts, avoiding the border.
Sprinkle with cheeses.
Bake for 10-12 minutes or until the pastry has puffed and is just starting to brown but is not yet golden brown.
Add one yolk to the center of each tart, making a well in the chorizo with the back of a spoon if necessary.
Bake for 5 additional minutes or until the pastry has browned and the yolk is warmed but still runny.
I go through phases of grilling all the things. And by ALL, I pretty much mean it. I once grilled garlic. Nothing edible is safe when I’m in this phase. I always grill my homemade pizza, all fruit is better grilled, I’ve even grilled all the ingredients for guacamole, and then did it all again with all the ingredients for sangria (except the wine, but I thought about it!) because "guac, chips, and sangria" are better as "grilled guac, chips, and grilled sangria". I promise.
If you’re between grills right now, don’t sad-face me. Figure out how to get your grubby paws on one. Craigslist (ok, but be careful!), Facebook Market Place (way better, you can facebook stalk for safety), Amazon (really safe as long as your delivery guy is cool). It’ll be worth it when you’re finally able to grill all your things, too.
You can stop at normal things like meat and veggies. But if you want to grill pie or salad, I would approve. Just make sure to share it with me on Instagram.
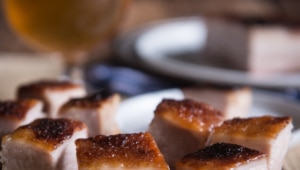
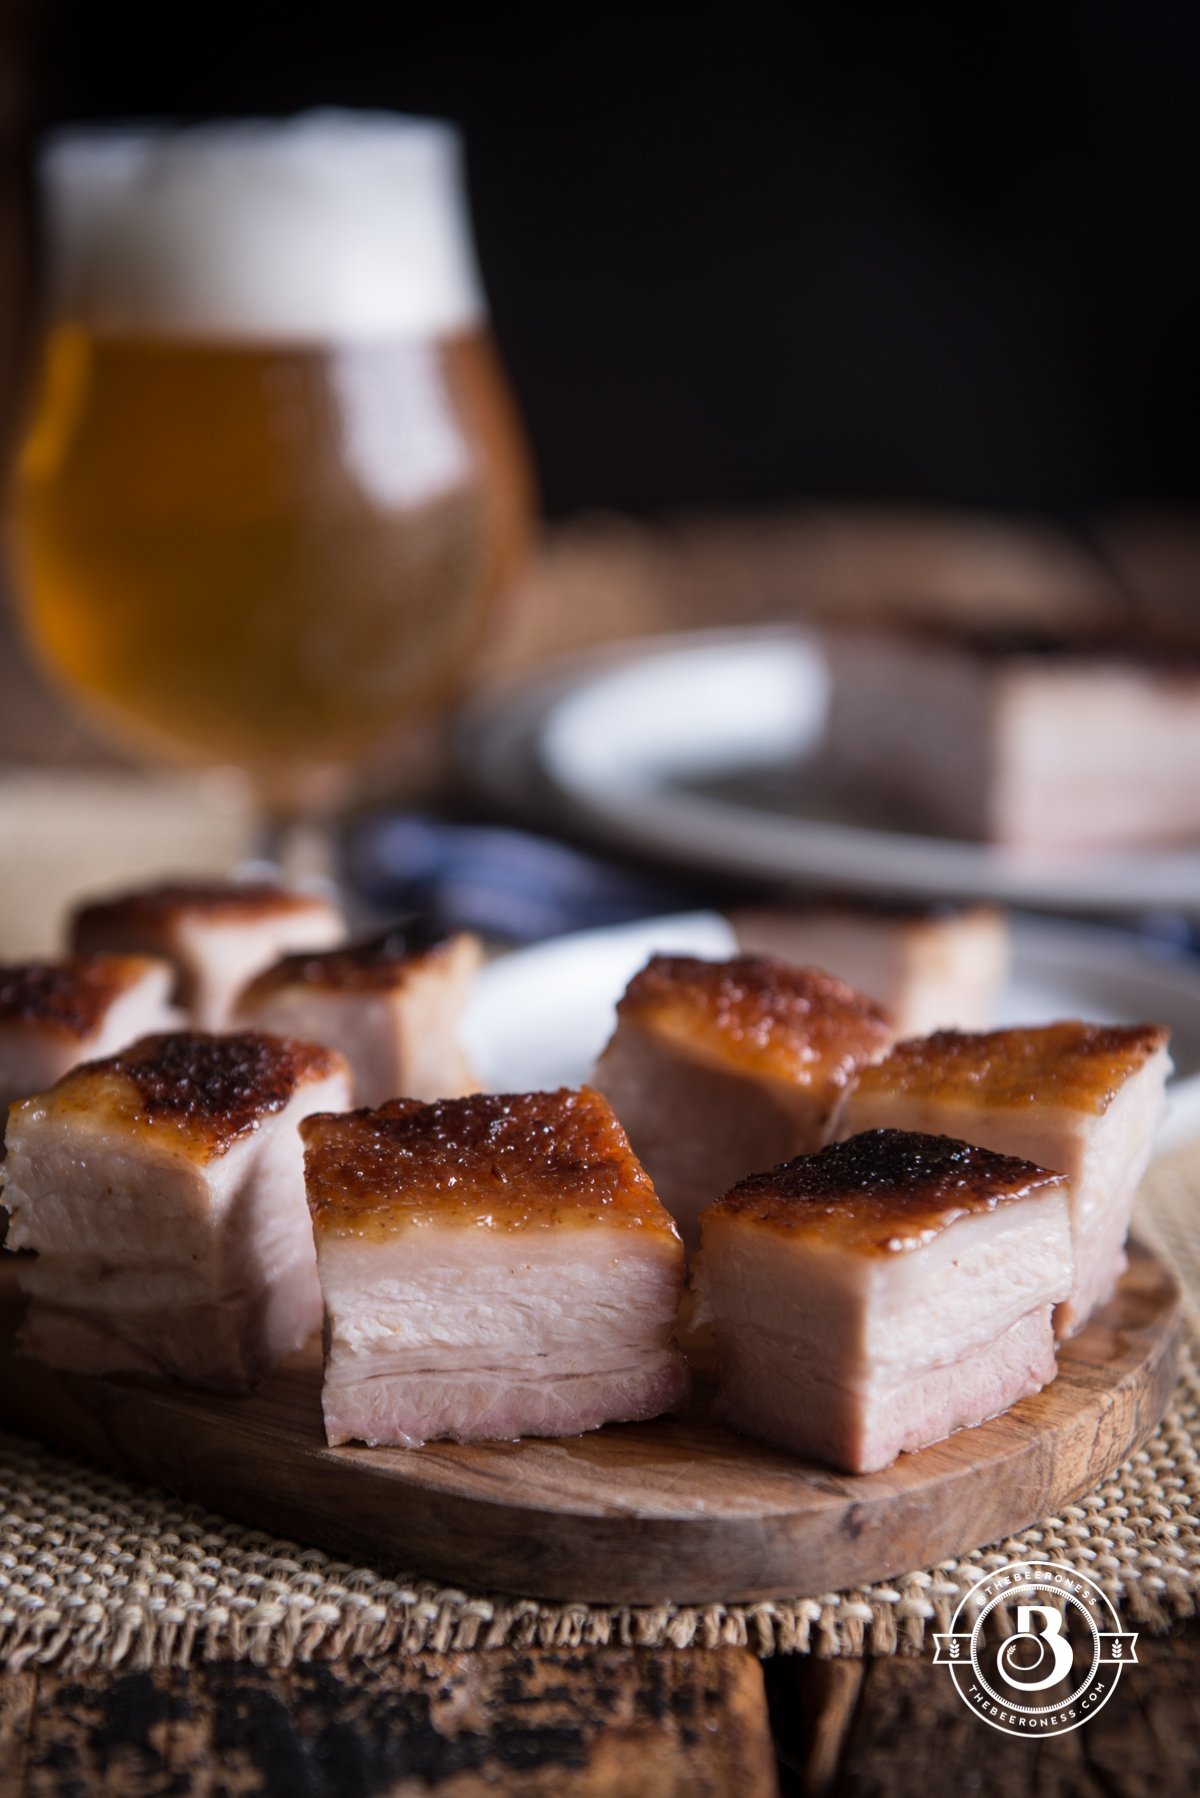
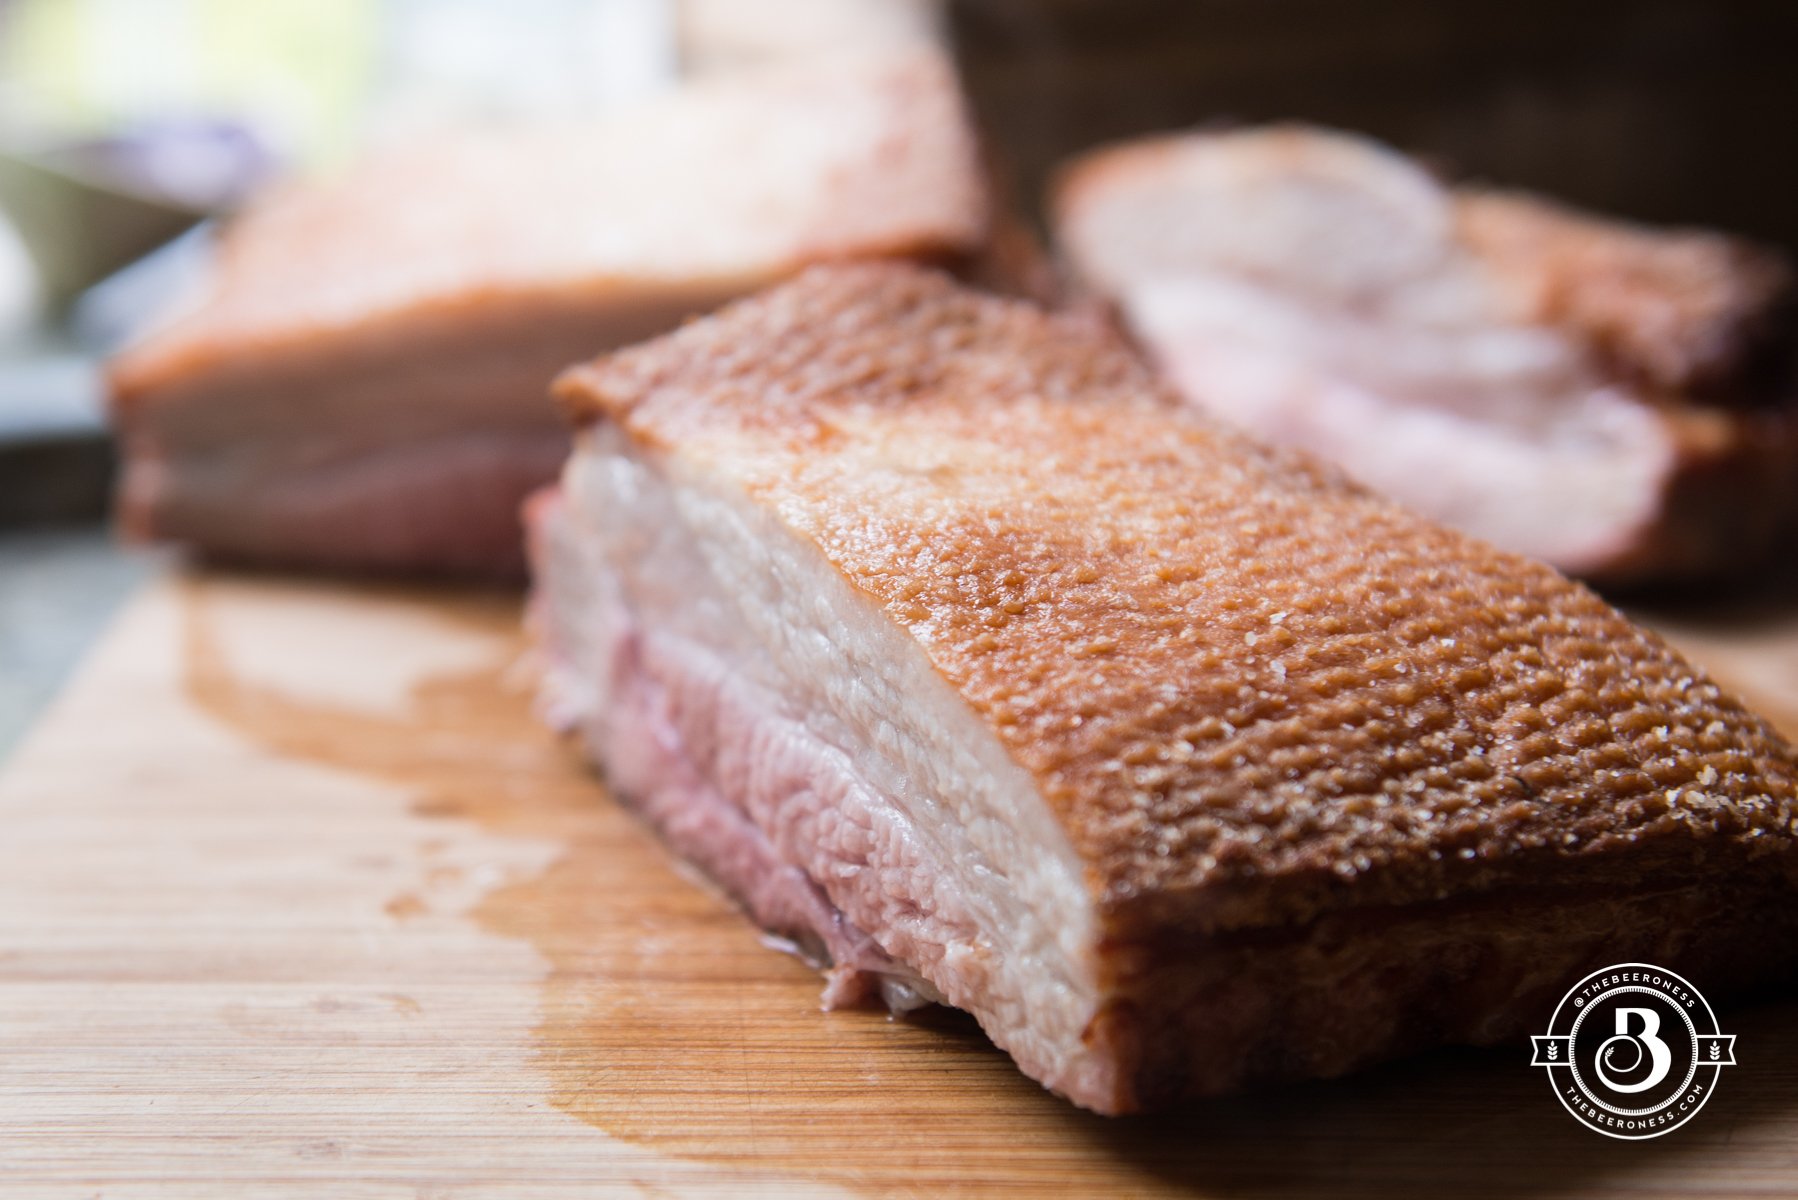
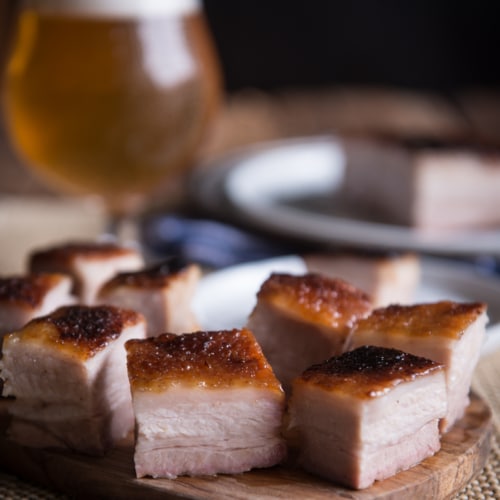
Maple Beer Glazed Crispy Pork Belly, the easiest and tastiest pork belly I’ve ever made!
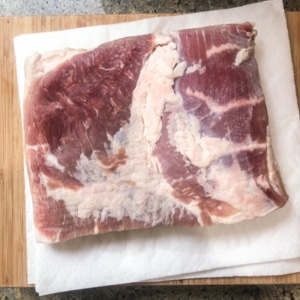
Pork belly is an investment. Not financially—it’s actually pretty inexpensive—it’s a time investment. One that’s well worth the effort with the right recipe. I’ve made pork belly so many times over the years and I’ve learned that patience is key to getting what you want. That is if what you want is juicy pork with crispy skin.
I usually source my pork belly from a local restaurant supply store, it’s a great place to shop if you want to buy your body weight in pork products. Why yes, yes I do want more pork belly than I can safely lift without a spotter! With a recipe that takes this much time, I want to test it to make sure it’s right when you finally make the investment of time it takes to get this done.
If you do find that an overly ambitious trip to a pork belly purveyor straddled you with more pork than anyone can safely eat in a lifetime, just remember that it freezes really well. Just wrap it better than you think is necessary and it should be fine for a few months.
After several rounds of testing, this was the winner. Juciy meat: check. Crispy skin: so much. Easy recipe that doesn’t involve scoring, poking, vinegar or excessive steps: absolutly.
Add the pork belly to a large bowl or baking dish.
In a large bowl stir together the hot water, salt, cloves, and allspice, make sure the salt is completely dissolved. Pour in the cold beer. Make sure the brine temperature is below room temperature to avoid prematurely cooking the pork.
Pour the brine over the pork. Cover and refrigerate for 12 to 24 hours.
Preheat oven to 300°F
Remove the pork from the brine, add to a stack of paper towels, rind side down for 10 minutes to dry the skin.
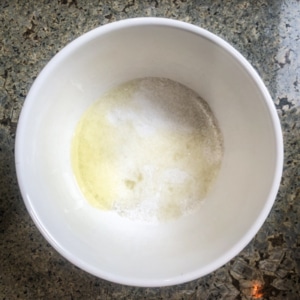
In a small bowl stir together the kosher salt and egg whites until well combined.
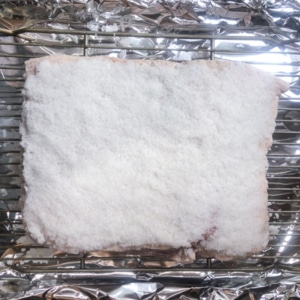
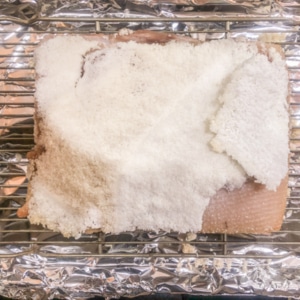
Place a wire rack over a baking sheet that has been lined with aluminum foil. Place the pork on the rack, rind side up.
Pack the salt on top of the rind until completely covered and slightly compacted.
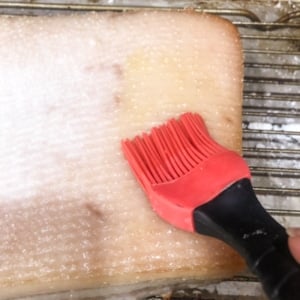
Bake for 3 hours. Remove from oven, raise temperature to 400°F. Gently pull the salt pack off the pork. It will be a hard crust at this point and should remove easily in a few large chunks.
Brush off any remaining salt with a clean kitchen towel or paper towel. Brush with olive oil.
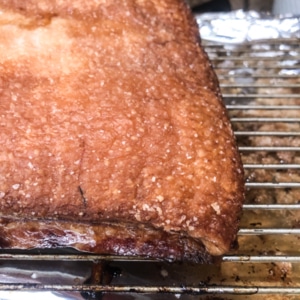
Bake for 20-30 minutes or until the rind is a dark golden brown.
Stir together the maple syrup, 2 tablespoons beer, and mustard. Brush the top liberally with glaze.
Turn the broiler to high. Broil in the top 1/3 of the oven (a few rungs down from the very top) until the glaze has caramelized. Re-brush every 5 minutes. Broil until caramelized and dark.
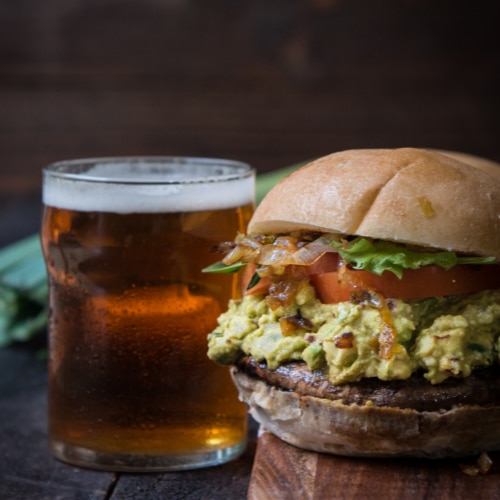
Balsamic Stout Mushroom Sandwich with Chipotle Guac and Caramelized Leeks
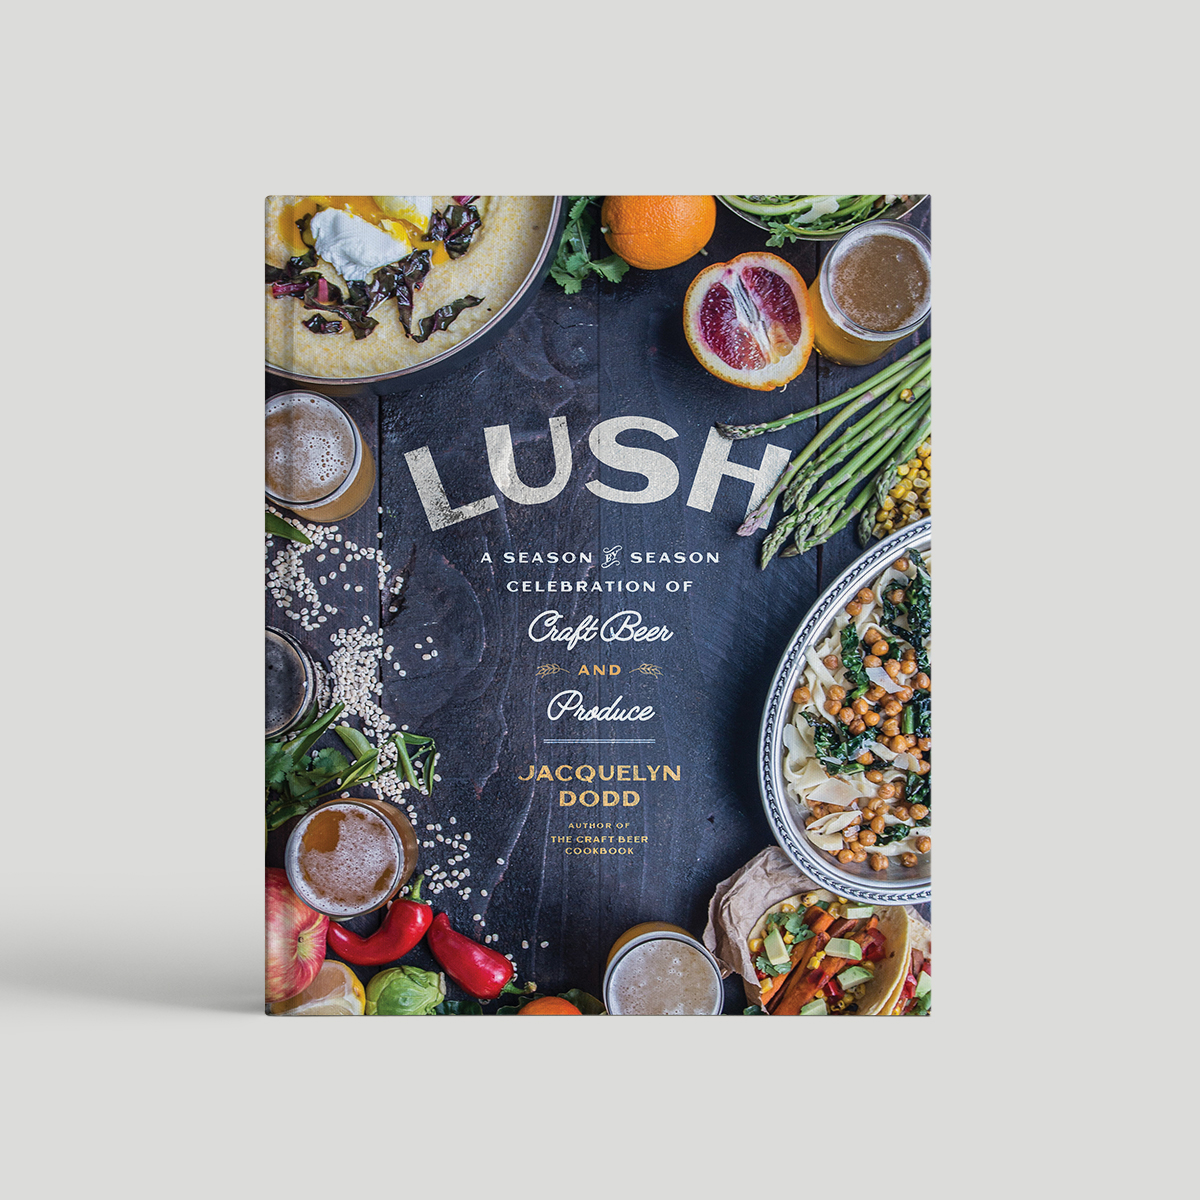
It’s (almost) here. After more than 2 years in the making, it’s finally coming together. The cookbook that started with a vague idea and morphed into Lush: A Season-by-Season Celebration of Craft Beer and Produce is coming to life. It’s up for pre-order on Amazon, and even though I have to wait a few more months before I get a physical copy in my grubby paws, I’m SO thrilled to see the cover come to life, see the design of the inside page, and have it available to order!
It’s a book full of the amazing craft beer I love, the seasonal produce I can’t get enough of, and the recipes I can’t wait to share with you. It’s by far my favorite thing I’ve ever done in my professional life.
You have been amazing through this process. From the first post when I was just starting to write Lush, to the encouragement you give me daily on Instagram.
So, thank you, this book is for you, for coming on this journey with me. I’m so excited to see what’s next.
Balsamic Stout Mushroom Sandwich with Chipotle Guac and Caramelized Leeks
In a large Ziplock bag add the beer, balsamic, salt, garlic powder, and pepper.Add the mushrooms, sealing the bag to remove as much air as possible.Allow to marinate at room temperature for one hour or in the fridge overnight.Remove mushrooms from marinade.
While the mushrooms marinate, make the leeks. Cut the root off and slice lengthwise to expose the inner layers where dirt hides. Wash well under cool water making sure to remove the grit between the leaves. Thinly slice the leeks, discarding the dark green portion.
Heat the oil in a skillet over medium heat. Add the leeks, salt and sugar, cooking until the leeks have softened and are starting to brown. Add the beer. Cook until the leeks have turned a dark golden and the beer is gone. Make sure to cook over medium to medium-low heat, if the heat is too high the leeks will burn before they caramelize.
Heat the oil in a large skillet over medium-high heat until very hot. Add the mushrooms, cooking on each side until seared and softened, about 3 minutes per side (mushrooms can also be cooked on a hot grill with oiled grates).
Add the flesh of the avocados, cilantro, chipotle peppers, salt, and lime juice to a bowl. Mash with a vegetable masher until well combined.
Add the mushrooms to the buns, top with guacamole and tomatoes. Serve immediately.
This is your reminder not to take things too seriously. You know, the "don’t sweat the small stuff, also it’s all small stuff," reminder that we should all just relax and take it easy. On ourselves, on strangers, on the internet people who seem crazy but maybe they’re just having a bad day.
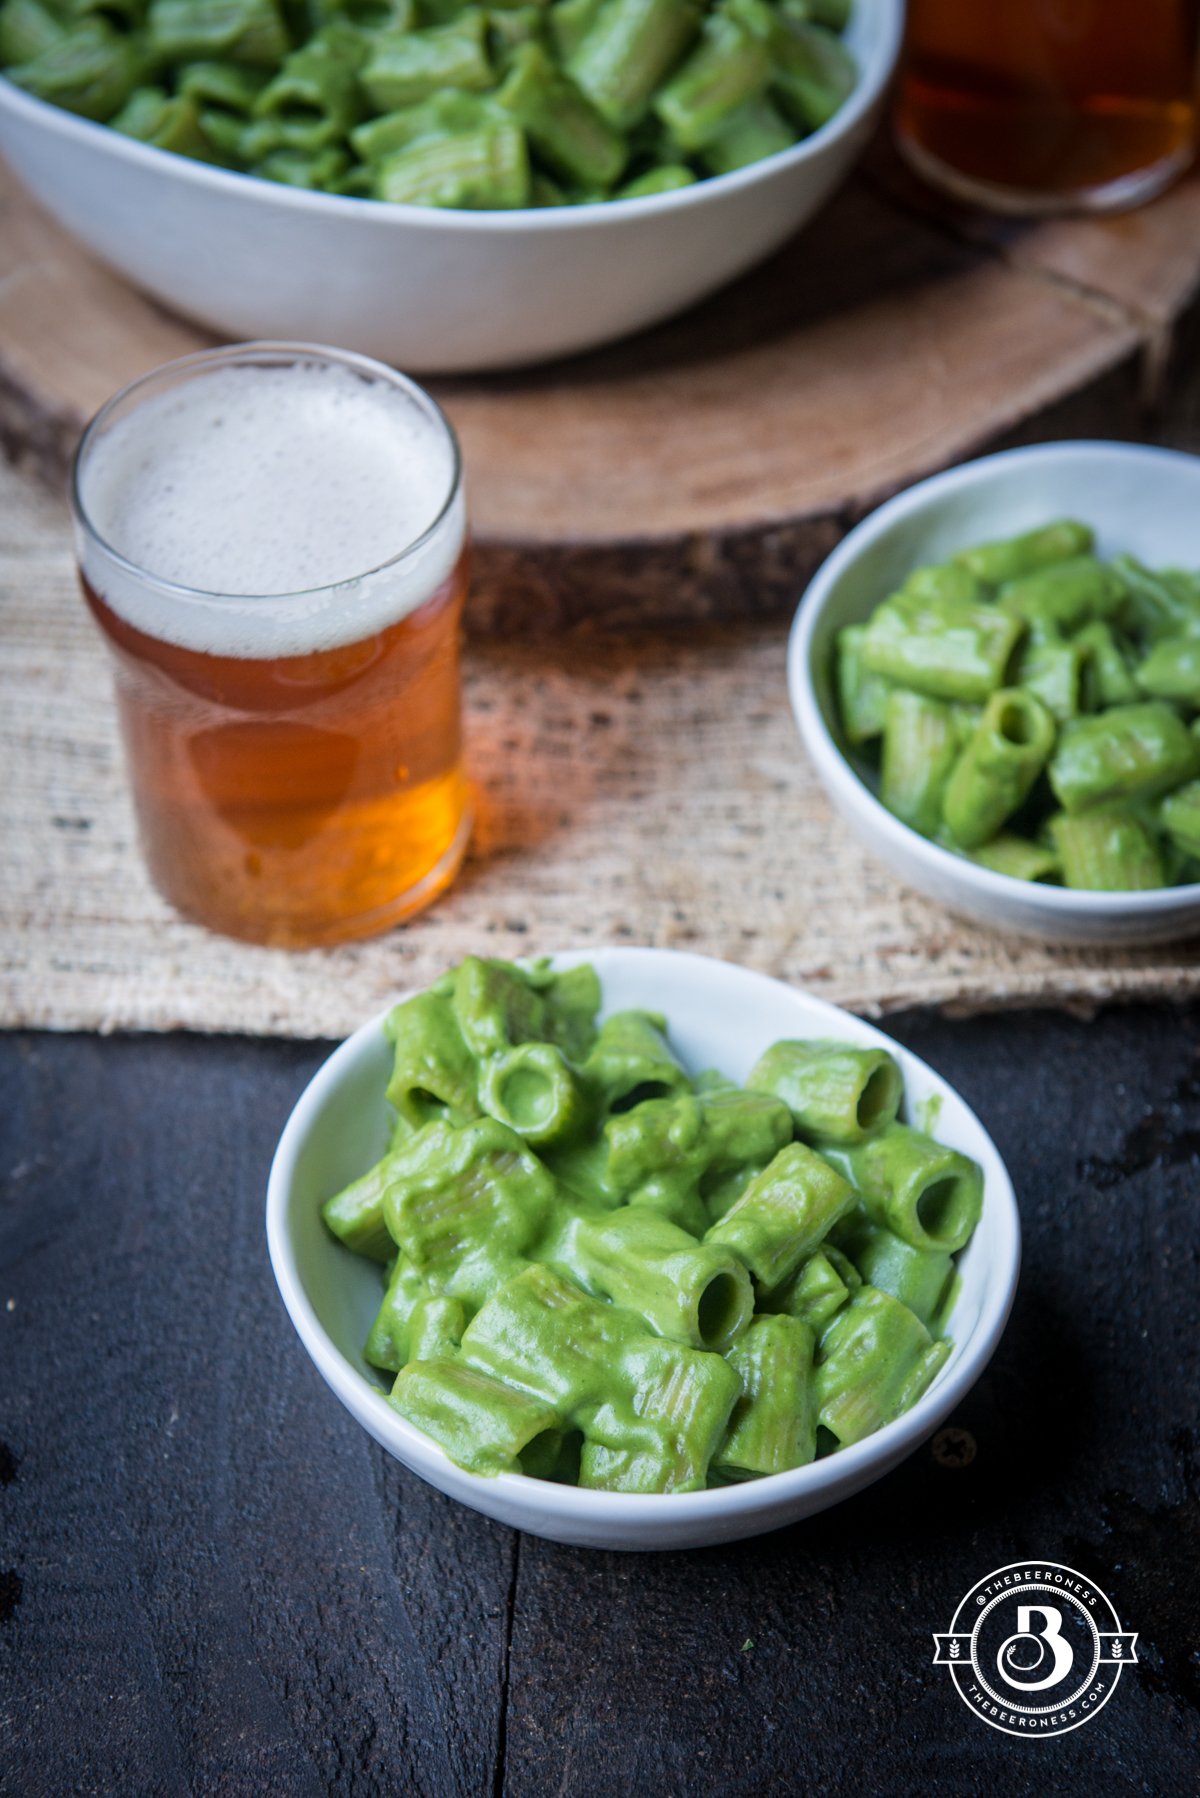
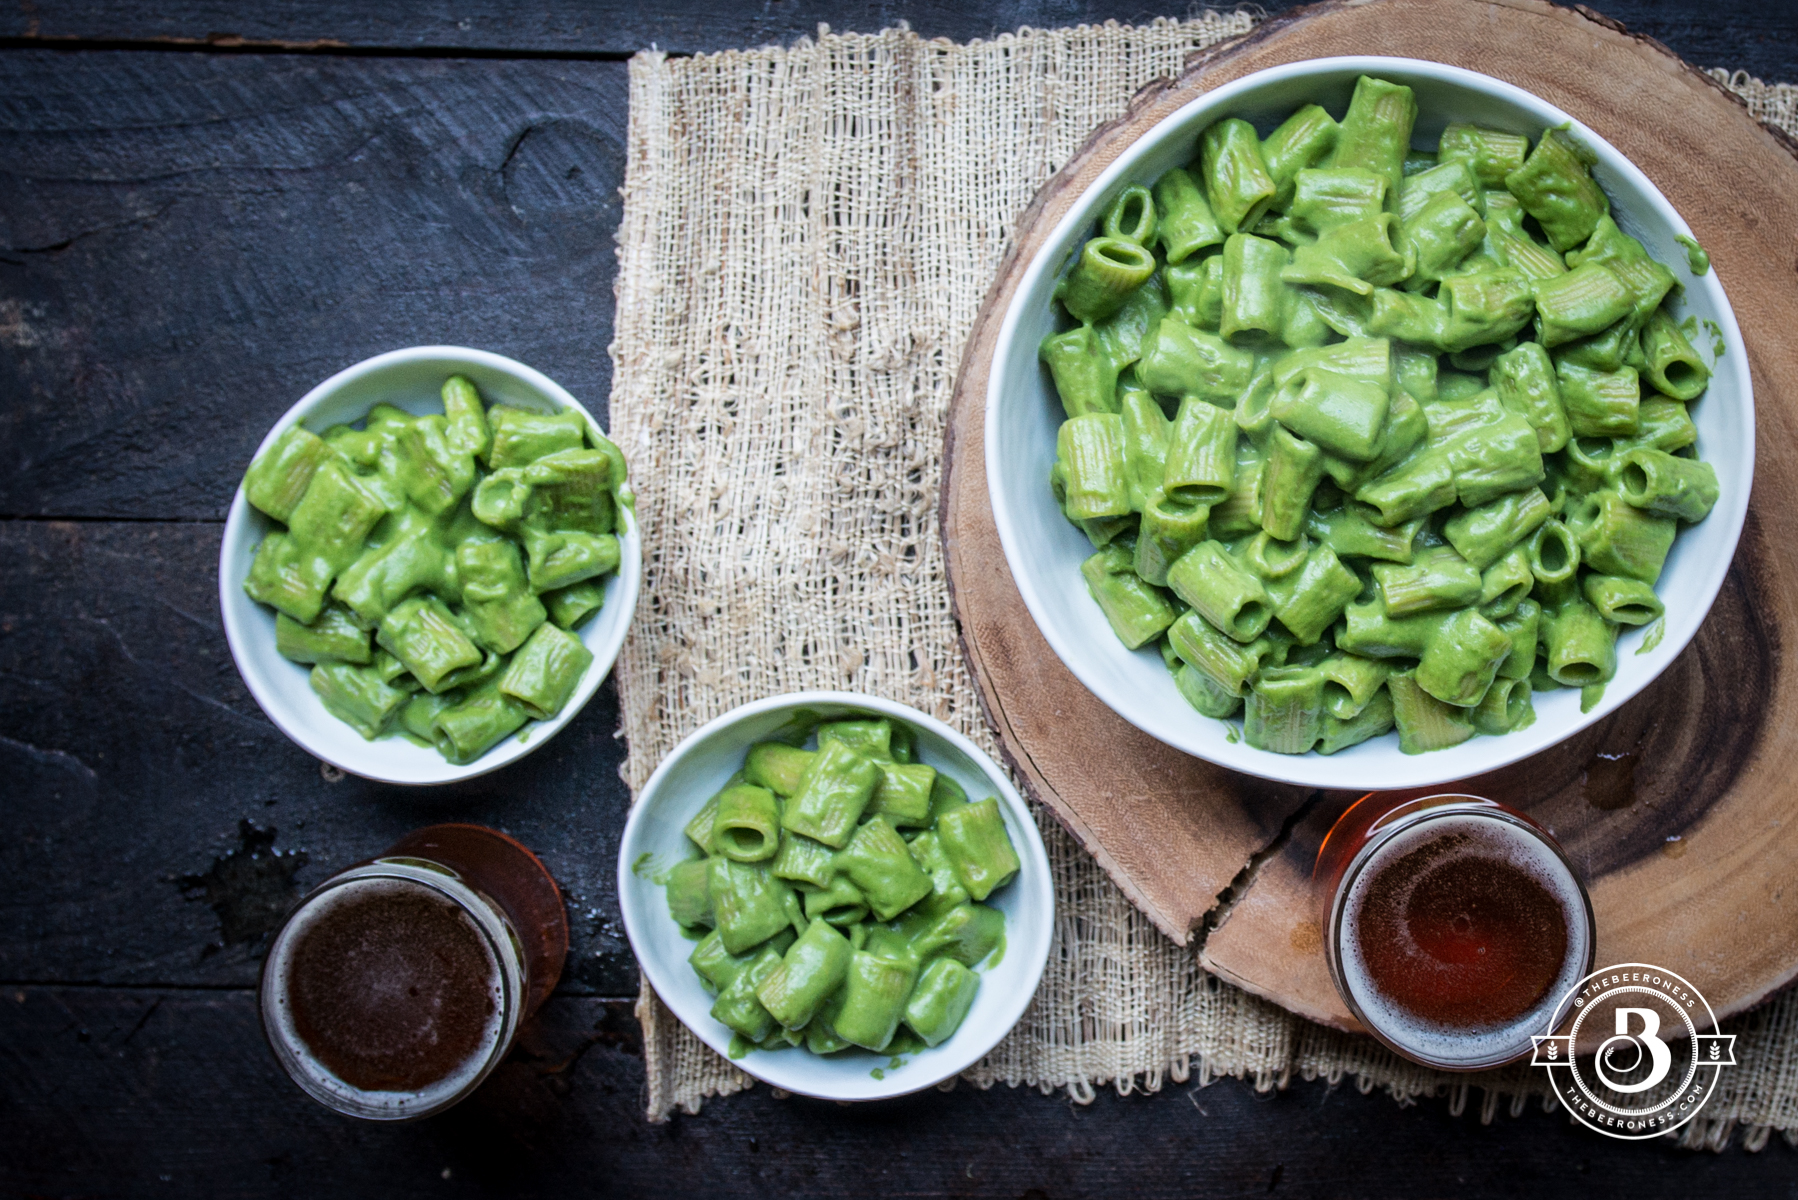
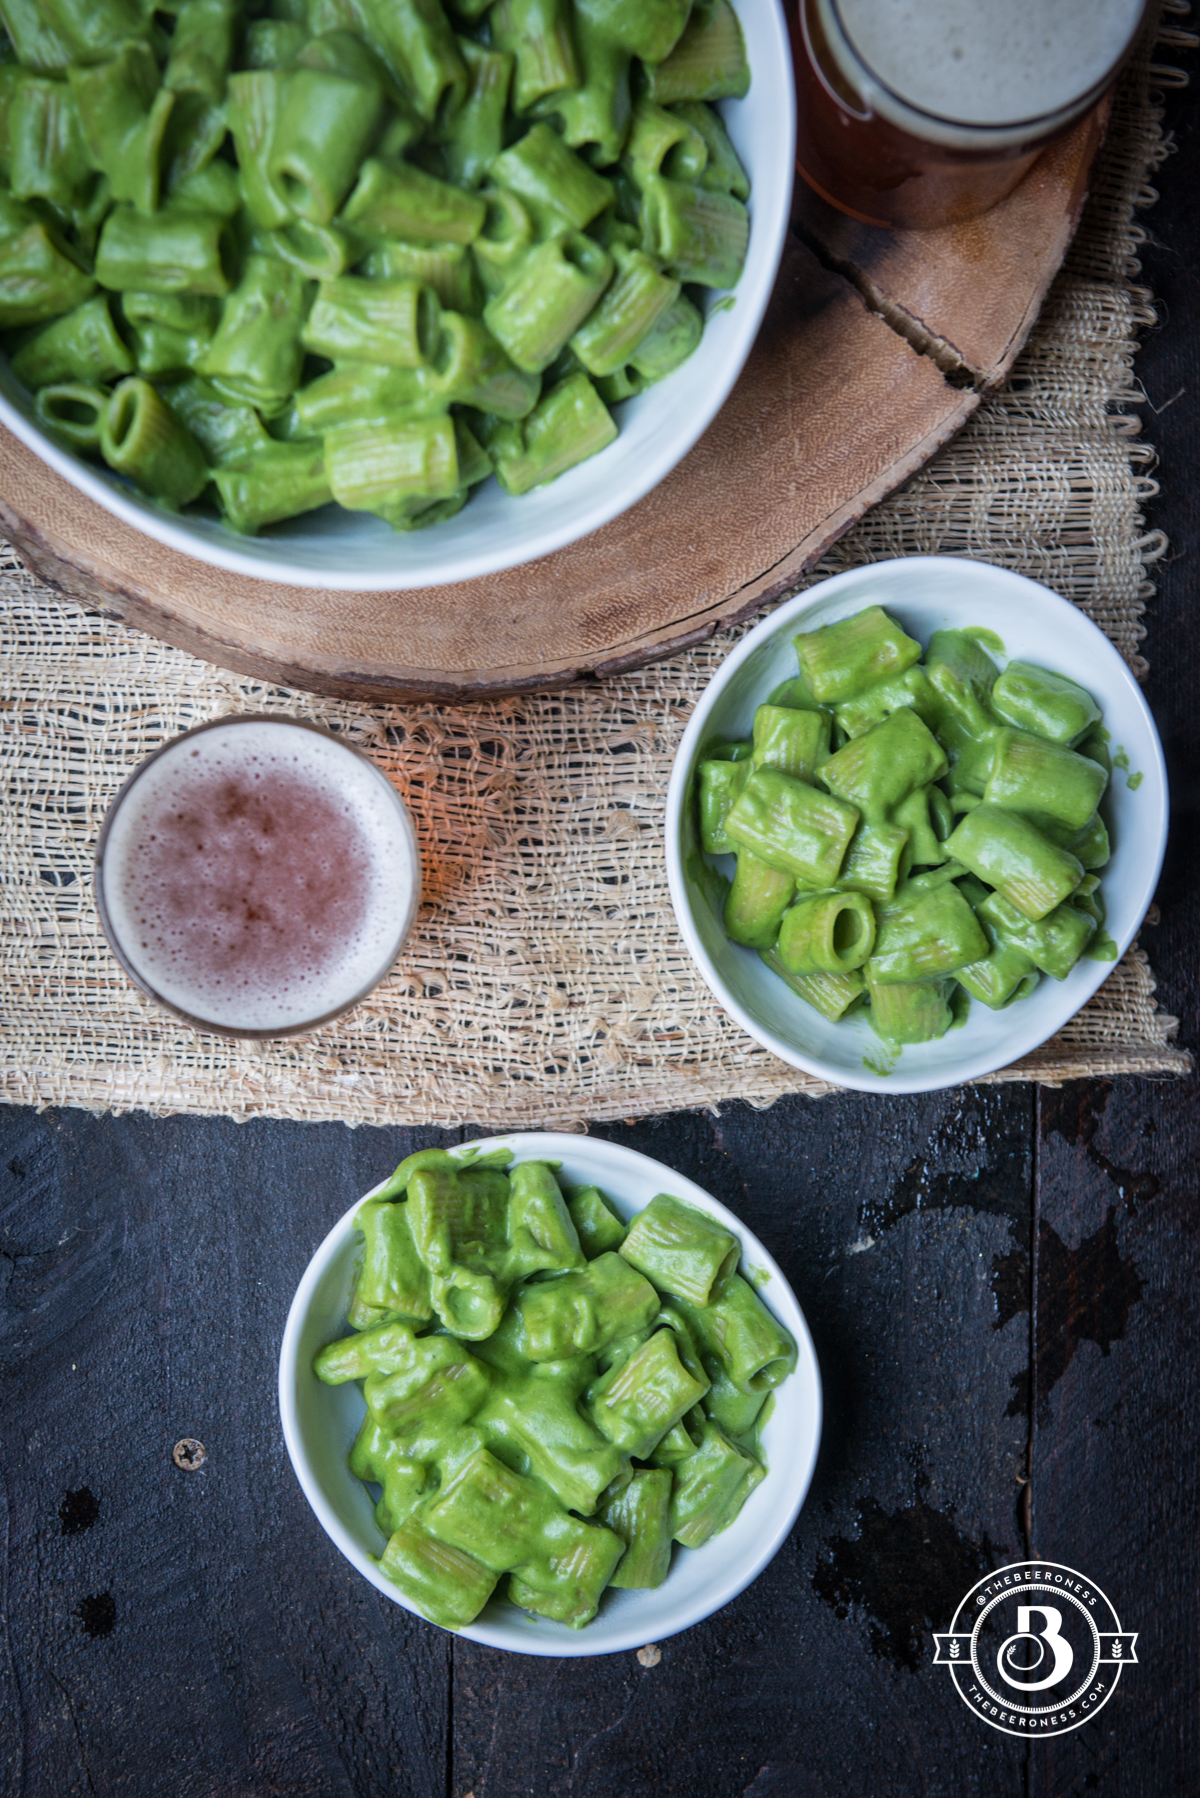
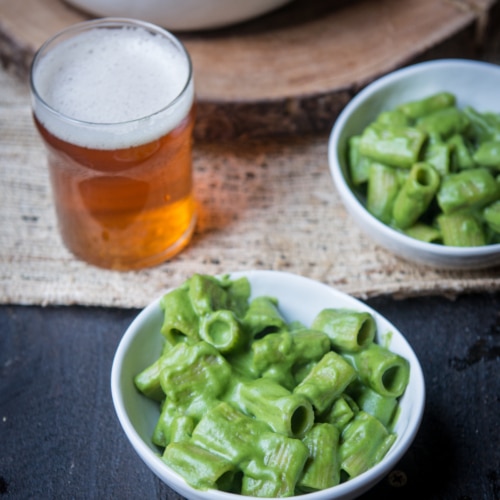
Make the Green Beer Mac N Cheese because it’s fun and because it’s almost Saint Patrick’s Day and maybe we should all just celebrate small things and get over the worry that keeps us from living in the good moments.
Do you remember what you were worried about this time last year? No? If yes, did it work out? Probably. Most things just find a way to work themselves out. Years ago, when I was in the midst of a crisis that was, at the time, fairly significant, a friend said to me, "No matter what, no one is going to die or go to jail, so it’ll be fine." That’s now my benchmark. Is there a possibility that someone will die or go to jail? No? Then it will work out.
Just relax, take a break, and trust yourself. You’ll be fine. It will work out, and you will make it. Someday you might not even remember this specific brand of worry that you’re consumed with. So make some food just because it’s fun, have a beer and give yourself a break.
2/3cup (6oz)beer(pale ale, pale lager, wheat beer)
1cup (20g)chopped flat leaf parsley
1lbslarge elbow macaroni
Instructions
1. Add the cheese, cornstarch, garlic powder, evaporated milk, beer, and parsley to a blender. Blend on high until well combined and smooth, about 3 minutes. 2. Cook the macaroni until just before al dente, about 3 minutes less than stated on the package directions. 3. Drain the noodles and return to the pot. Pour in the cheese sauce. 4. Bring to a simmer, cooking until thickened and the noodles are cooked through. About 5 minutes.
Notes
Try not to use anything too hoppy (like an IPA) or the beer flavor will be VERY strong. Unless that's what you want, then you do you.
Do you ever wonder how long you’d live in a zombie apocalypse? Everyone imagines themselves surviving far into the future of the new world, rebuilding alongside fellow badass humans who have managed to evade bitey undead soldiers. But, most people are wrong. The only people whom I have full confidence in thriving in a zombie infestation are Jason Moma and this good friend of mine. Other than that, you’re all probably doomed.
Me? I think I’d be a solid medium. Due to my mostly feral upbringing, I have outstanding problem-solving skills that would carry me farther than most, but I’m also careless and disorganized. I’d leave the door open, or forget to grab my knife, or accidentally set off the car alarm. That would take me down.
But my tribe would miss me because I would be the one would could cook an edible meal with just pantry scraps and questionable meat. That’s really my only useful post-apocalyptic skill. I can’t grow things, or shoot things, or build things, but I can cook things. So, give me a fire and anything even edible adjacent, and I can work some magic. As long as someone else is looking after the locks and the loud noises.
Maybe it’s because I’m re-watching The Walking Dead on the treadmill this week (it legit makes me run faster), but that’s what came to mind when I decided to just use what I had on hand to make this. What can I make without going to the store? WHAT IF THERE WAS NO STORE?! I’M STILL MAD ABOUT CARL!!
So I bring you this chicken made with stuff you should always have on hand, as well as meaningless rambling, you’re welcome.
Also, how long would you last if the zombies took over?
2lbschicken thighs or chicken legs (bone in, skin on)
1teaspoonsalt
1tablespooncornstarch
1/3cuppale ale
1teaspoonred chili flakes
1/2teaspoonchili powder
2/3cupThai sweet chili sauce*
2tablespoonssriracha
2tablespoonschopped green onions
Instructions
Add a wire rack over a baking sheet, spray with cooking spray. Add the chicken, skin side up, on the rack. Sprinkle liberally with salt.
Place in the oven, then set the temperature to 300°F, set a timer for 25 minutes (allowing the chicken to cook in the oven while it preheats helps to render fat and make the skin crispier).
Add the cornstarch and beer to a saucepan, whisk until combined. Stir in the chili flakes, chili powder, sweet chili sauce, and sriracha.
Bring the mixture to a simmer over medium-high heat, stirring frequently until thickened, about 5 minutes.
After 25 minutes, remove the chicken from the oven, raise the heat to 400°F. Brush the chicken with glaze. Bake for 20 minutes.
Brush again with glaze, turn on the oven broiler.
Place the chicken under the broiler for 2-3 minutes or until the sauce starts to caramelize.
Remove from oven, add to a serving platter, sprinkle with green onions.
Notes
Thai sweet chili sauce is found in the Asian section of the grocery store. I tend to favor a brand called Mae Ploy that can be found everywhere from Whole Foods to Target. But if you want to make it from scratch, I suggest this Sweet Chili Sauce recipe from Serious Eats.
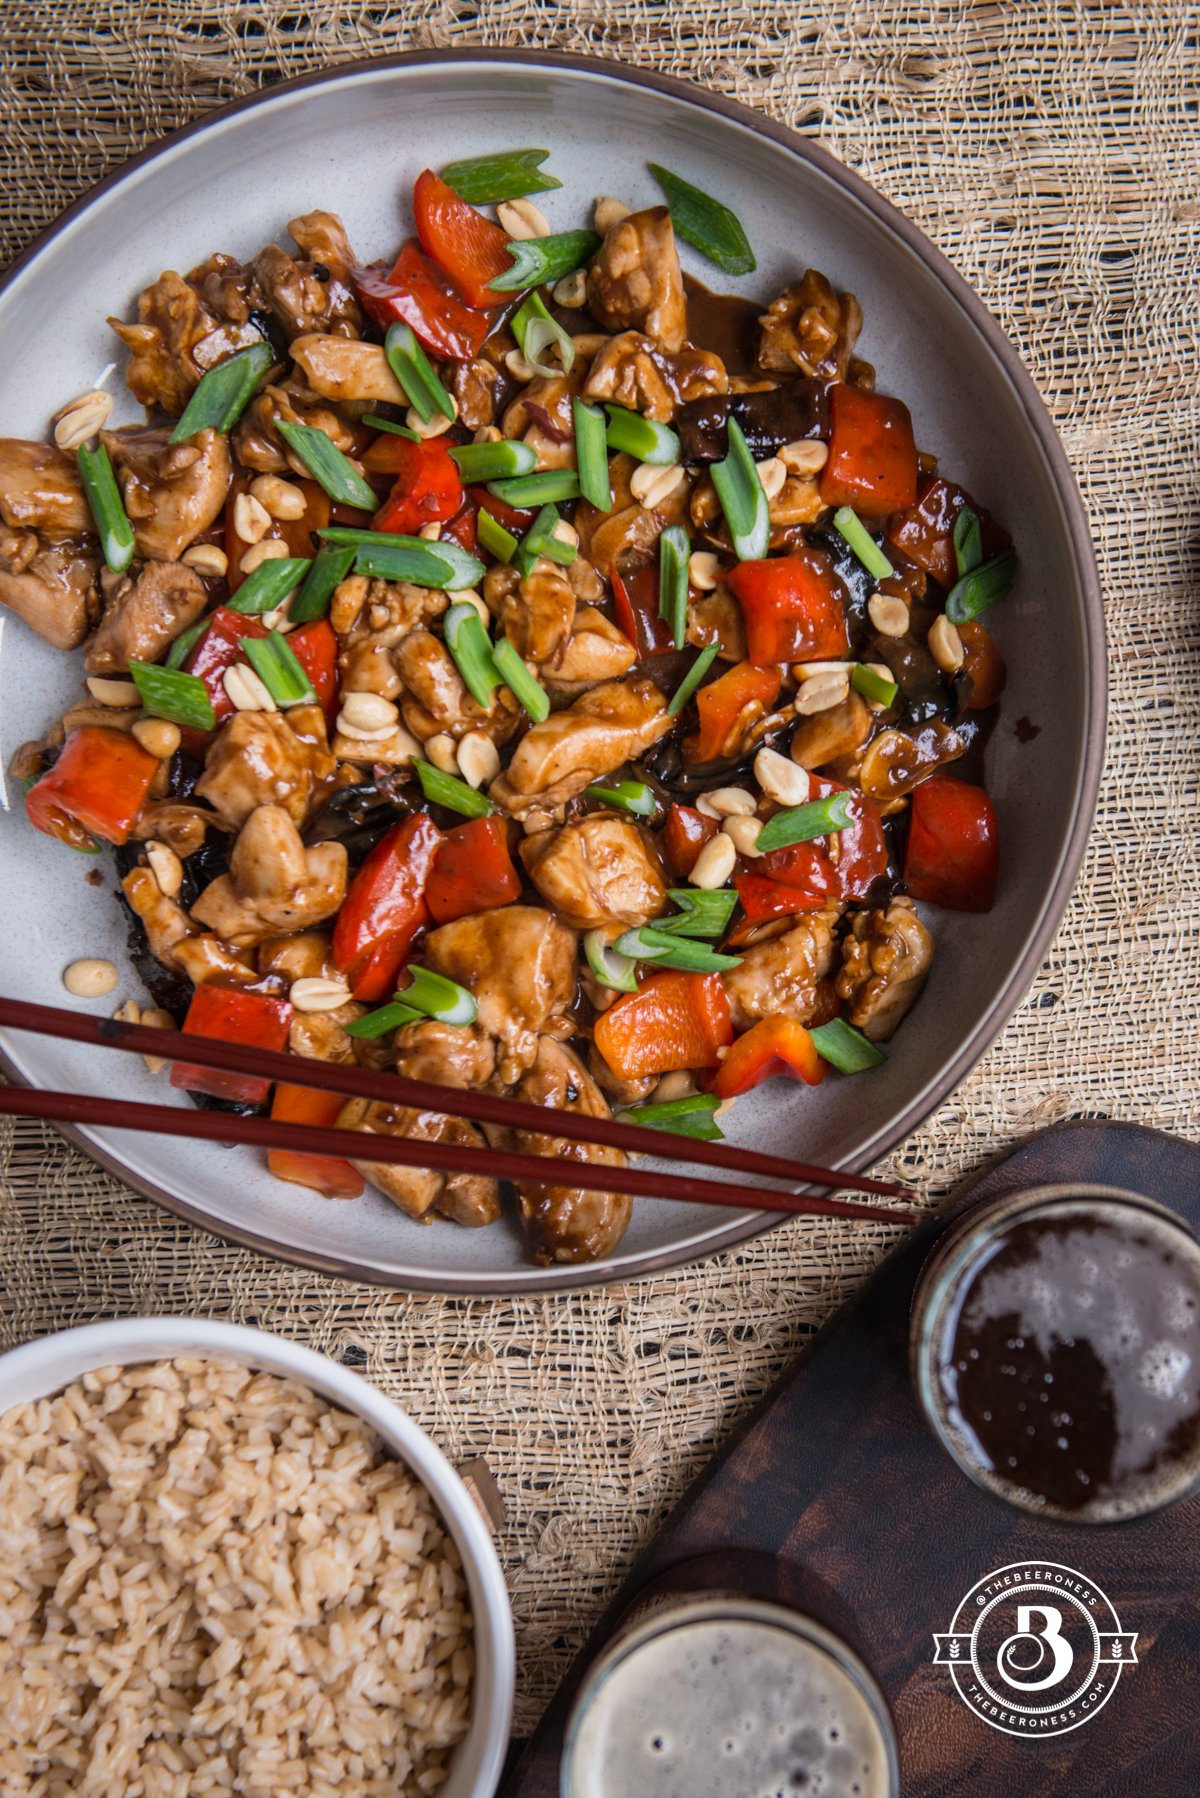
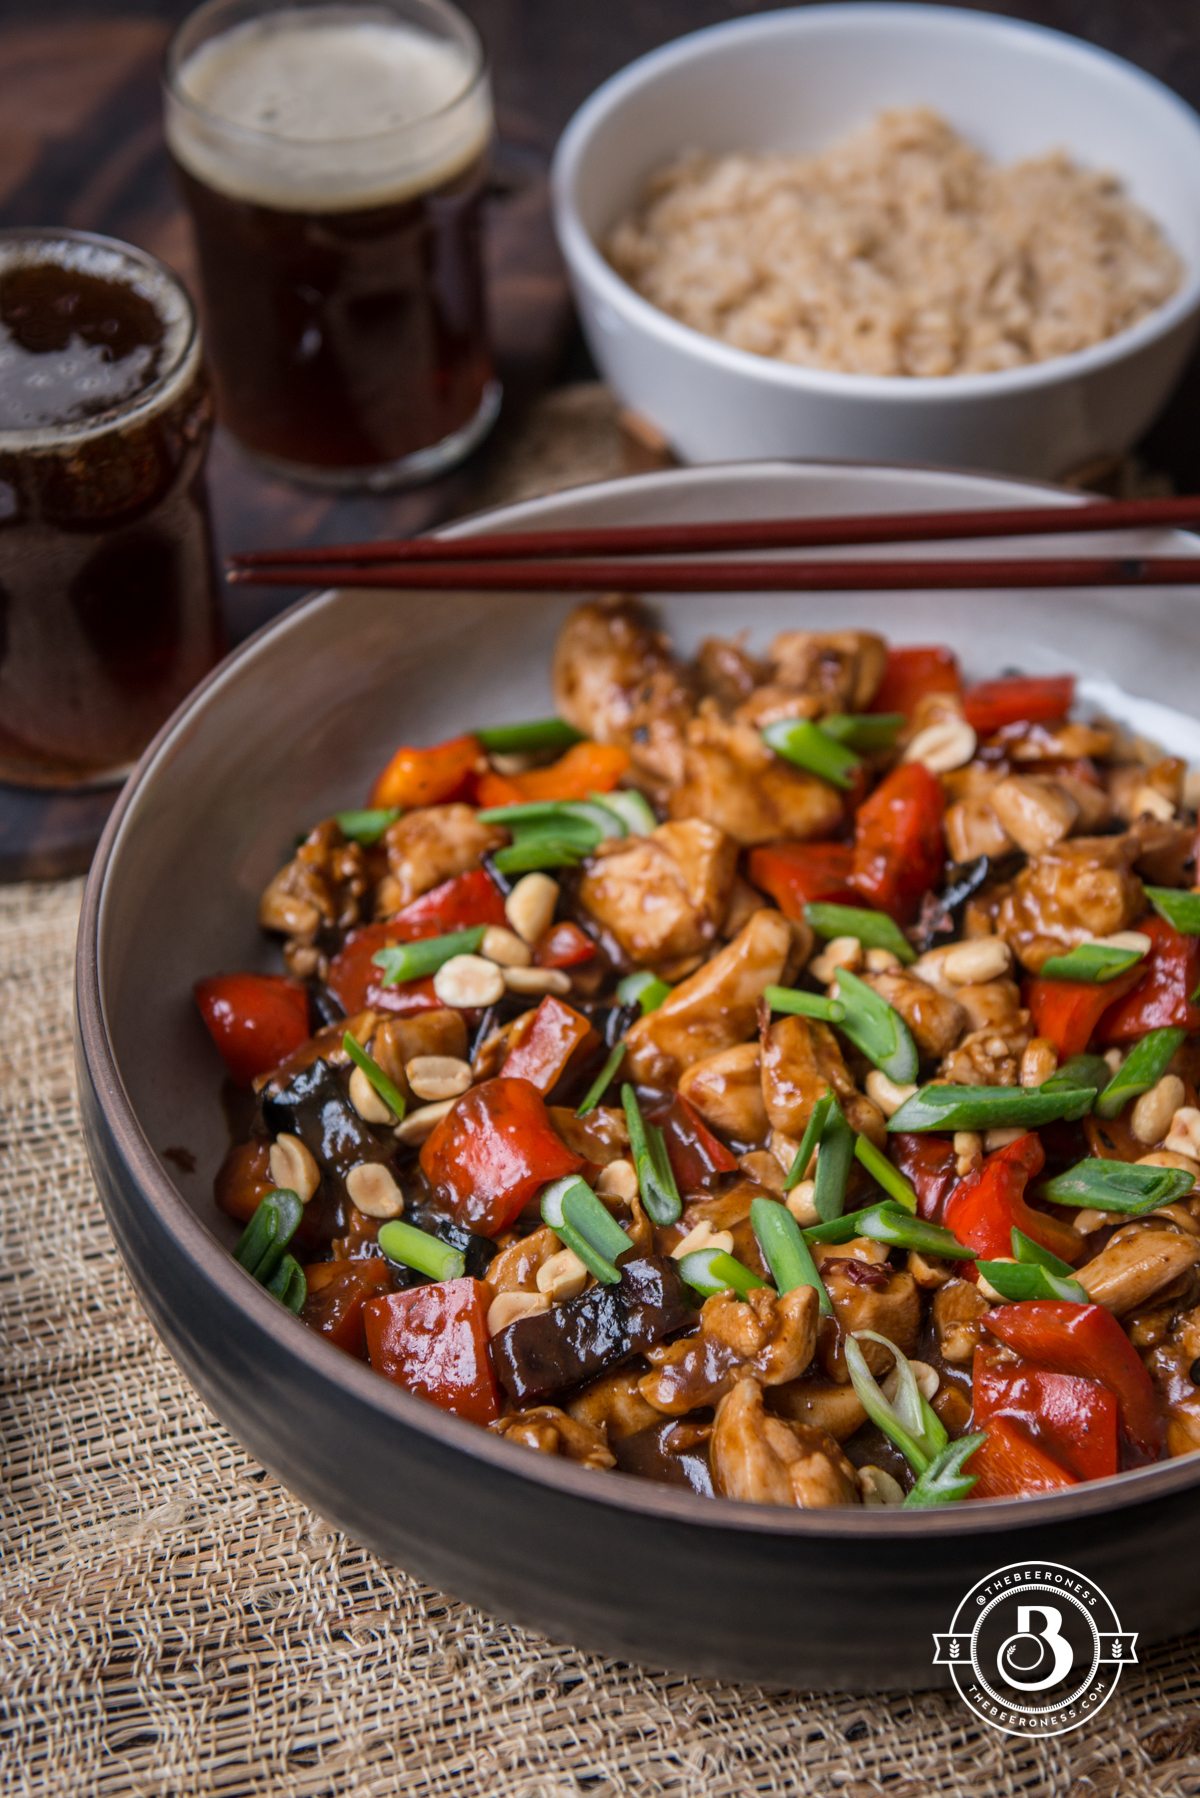
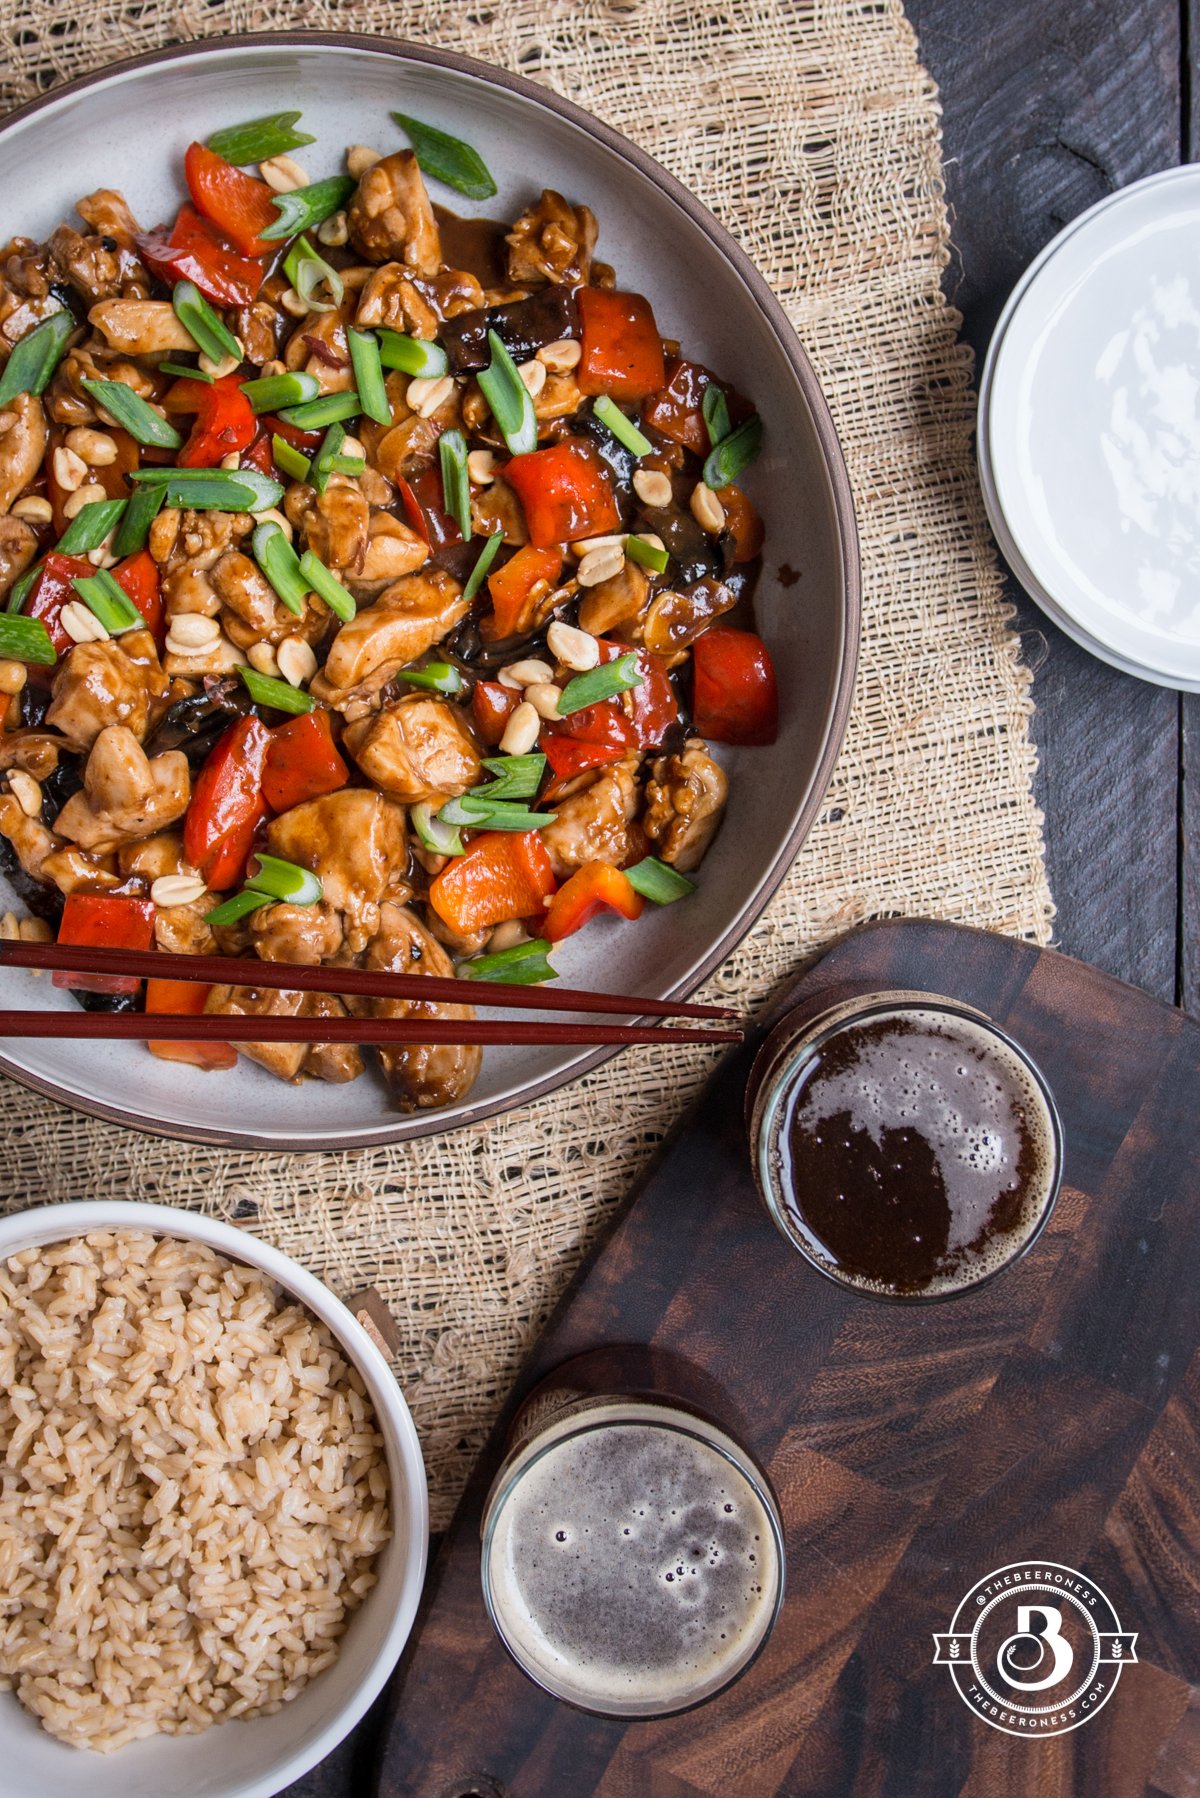
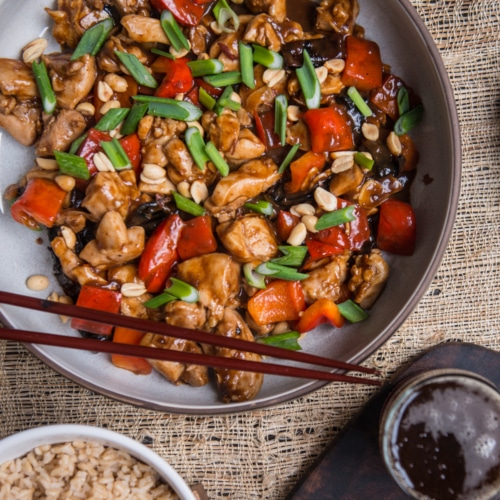
We ALL have that food. The food that you hated as a kid, assuming that you hated all such foods, and then you grew up and realized that you didn’t hate it all all. You had just been force-fed some horrendous version of said food, and once you had a well-made version you realized the error of your ways. Or the error of your primary-caregiver-who-fed-you ways.
For me, it’s Chinese food. Growing up I only had that horrible stuff that pretended to be chow mein, sloshed out of a large tin can, encased in an unidentifiable gelatinous substance. If you don’t know what I’m talking about, I envy you. This "meal" was always served with previously frozen egg rolls that were mostly filled with mushy cabbage. I know, sounds fabulous, right? I was convinced that I must just hate Chinese food. Until I realized that I actually love it, and crave it on a regular basis, I just hate crappy supermarket version of food that should never be served in a can.
I was 18, freshly living on my own (when "on my own" meant three roommates and a crappy apartment), and a friend brought it over in a white plastic bag, with those adorable take-out containers. What? Nope. No. I can’t. I just…but it smelled so good! Not like the roughage and slime I’d been previously served. I figured I’d try it, I could always apologize for gagging and offer up some dessert.
It was fantastic. And by that, I mean, fairly average Chinese take out that had spent zero time in a tin can. I was astonished and vowed to pretty much try anything offered to me from then on. Which probably led to my eating roasted ants in Bogota. Or maybe I just have questionable judgment and a penchant for danger. Either way, I’m all in when it comes to Chinese food and pretty much anything you can serve out of those little white take-out containers.
1largered bell pepper, diced (stem and seeds removed)
¼cupthickly sliced green onions
2largeclove garlic, thinly sliced
½cupshelled, roasted peanuts
rice for serving
Instructions
1. Whisk together the cornstarch, soy sauce, and beer in a small bowl.2. Sprinkle the chicken on all sides with salt, add to the marinade, toss to coat.3. Whisk together the sauce ingredients in a small bowl, set aside.4. Heat the sesame oil in a large skillet or wok over medium-high heat until hot but not smoking. Add the dried chilies, cooking until fragrant, about 2 minutes. Add the bell peppers, stirring frequently until softened. Stir in the garlic.5. Add the chicken and marinade, cooking for about 2 minutes.6. Pour in the sauce, reduce heat to maintain a simmer. Cook until the sauce has thickened and the chicken is cooked through, about 10 minutes. Stir in the peanuts.7. Add to a serving bowl, top with green onions. 8. serve over rice
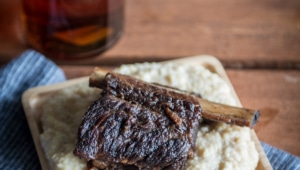
Stout Braised Short Ribs over Creamy Pale Ale Polenta
I accidentally found my new favorite get-away town on Monday. A four-hour drive to interview a brewery owner for an article I’m writing turned into an overnight stay in a Northern Oregon. A little town that I’m convinced haphazardly, and purely by accident, wound its way into being excessively charming. As if one day the residents of this little river town, this former not-more-than-a-train-stop location woke up, looked at the row of shops and cafes adjacent to the water, the glorious views of the surrounding mountains, the outstanding breweries, and said, "well, look at that! We’re adorable."
I’d HEARD of Hood River, Oregon. I’d even stopped in once on a road trip because I NEEDED to visit Pfriem. But I’d never been there long enough to look around, long enough to really see it.
Then, I was there. A Monday night, alone except for this beast, and my gypsy soul decided to stay the night. Chatting with locals for a while, drinking the beer, and realizing why I moved to Seattle in the first place. You just stumble into these little towns that make you feel like you’re a lifetime away from the place you started.
Then I realized that it’s been almost 5 years since I moved here, packed my little car and my bulldog and headed north. I realized how lucky I am to live here, to have the people in my life that currently occupy space in my surroundings, and how even when your life feels like it’s accidentally happening to you, even when things feel haphazard, you can one day wake up and realize how great they really are.
Stout Braised Short Ribs over Creamy Pale Ale Polenta
1. Preheat the oven to 325° F.2. Generously sprinkle salt on all sides of the ribs.3. Add the cornstarch to a wide bowl, toss the ribs in the cornstarch until well coated.4. Heat the olive oil in a Dutch oven over medium-high heat. Sear the ribs on all sides, remove from the pan, set aside.5. Add the carrots, celery and onions, cook until browned and starting to caramelized, about 15 minutes.6. Pour in the beer, scraping to deglaze the pan. Stir in the broth.7. Add the ribs into the pot, add the thyme and rosemary, add the lid onto the pot.8. Place the pot in the oven, cooking until the ribs are very tender and easily pull away from the bone, 3 to 4 hours. 9. Remove the ribs. Strain the sauce into a pot, removing the solids and any large pieces of fat, discard the fat.10. Separate the fat from the sauce, either spoon it off (it’s lighter color and will sit on top), or if making in advance, add to the fridge and allow to cool, peel the fat layer off the top and discard.11. Add the broth and ribs to a serving platter (add the carrots and celery to the serving platter, if desired).
Make the polenta:
1. In a pot over medium heat, melt the butter. Add the beer and milk, bring to a simmer.2. Whisk in the polenta. Simmer until polenta is tender and thickened, whisking occasionally, about 25 minutes.3. Stir in the parmesan, salt and pepper
I’m not sure why I do these things. It’s that part of me that leans toward obsessing, and it’s a small but powerful part. Mini but mighty.
Food, in one form or another, often finds it’s way into that space. Duck confit, pickling weird foods, doughnuts, bolognese, you really never know when something will settle into my major obsession zone.
When I do have things fall into the crack in my personality that sucks up obsessions, it doesn’t let them go (see also: beer, early rock photography, serial killers, bulldogs. It’s Ok to dislike me based solely on that list).
Right now, it’s Banh Mi, or if I use it as a command: BANH ME! It should be a socially acceptable command that you’re allowed to yell at people until they give you a Vietnamese-French fusion sandwich. But it’s not, so don’t try it.
After making a vegan Mushroom Bahn Mi sandwich for my book that’s in the processing of being published, I want to Bahn Mi all the things. ALL THE THINGS. I’m going to try to keep this obsession in check, but it has leaked through today, onto you so I hope you’re OK with that.
Beer Braised Meatball Banh Mi Sandwiches
Banh Mi and Meatballs in one sandwich with a sweet and spicy beer glaze!
1.5lbsfrozen mini meatballsI used pork, but beef, chicken or vegetarian is fine
1/2 cupbeer(lager, pilsner, pale ale)
For the sandwiches
1/4 cup sour cream
2tablespoonssriracha
1largecarrotgrated with a box grater
1/4cup chopped cilantro
1 largejalapeno
4crusty sandwich rolls
Instructions
1. Add the hot water, sugar and salt to a small bowl, stir until dissolved.2. Stir in the beer and vinegar, add the shallots. Cover and refrigerate for one hour and up to 3 days.3. In a small bowl stir together the chili sauce, brown sugar, and fish sauce, set aside.4. Heat the oil in a large skillet over medium-high heat. Add the meatballs, pulling the pan back and forth until starting to sear.5. Lower heat the medium, pour in the beer. Allow to simmer until most of the beer is gone, stirring occasionally.6. Pour the sweet chili mixture over the meatballs, raising the heat slightly, adjusting to maintain a low boil.7. Cook until the sauce has thickened and the meatballs are well coated.8. In a small bowl stir together the sour cream and sriracha (can be done up to 3 days in advance).9. Spread the sriracha sour cream inside the rolls, fill with meatballs, carrots, cilantro, pickled shallots and jalapenos.
Pressure Cooker Stout Pho (AKA-The best and easiest way to feed a group)
I have a confession. You won’t be surprised, it’s very typical of who I am. The last THREE times I’ve had people over for dinner, this is what I made. All three times. And then I acted like it was creative and inspired when I really just wanted to eat this again.
Luckily, these three groups of people don’t know each other and won’t be able to compare notes and realize that I’m not as creative as I pretend to be. I also have a large pot of this in my freezer, just in case I need to feed more people at the last minute. Or in case I just want to feed my own face at the last minute.
The thing about this Pressure Cooker Stout Pho, is that it’s the easiest way to get that broth, and we all know that Pho is all about the broth, once you have that handled, the rest is quick. You can even make it in a huge batch, then freeze it for when you know you’ll have to pull this off in less than 30 minutes, it’s completely doable. And you’ll look like a rock star, even if you do it three times in a row.
Just serve it with good beer and no one will say a word.
Pressure Cooker Stout Pho (AKA-The best and easiest way to feed a group)
Add the beef bones to a stock pot, cover with salted water. Bring to a boil for ten minutes, discard the water, rinse the bones, set aside (this is the only way to get rid of the scum that happens when making beef broth).
Turn the Instant pot or Multi-Cooker to sauté (this can also be done in a pan on the stove top), add 1 tablespoon olive oil. Once hot, add the oxtails, cooking until browned on all sides.
While the oxtails cook, char the ginger. Slice the ginger lengthwise into 4 strips, add to a baking sheet along with the quartered onions.
Using a kitchen torch, char ginger and onions on all sides until blackened. You can also add the baking sheet to an oven with a pre-heated broiler, broiling until blackened, turning the ginger and onion pieces to make sure they char on all sides.
Once the oxtails have cooked, add the beer, stirring to deglaze the bottom of the pot.
Add the charred onions and ginger, beef bones, the fish sauce, soy sauce, anise, coriander, cinnamon, water and 2 teaspoons salt.
Add the lid tightly to the pressure cooker. Set the pressure cooker to cook for 60 minutes. Once the cooking has finished, vent to release pressure then remove the lid. Drain, removing the solids and saving the broth (broth freezes well, it can be made in advance and frozen for up to a month).
While the broth cooks, make the steak and noodles.
Dry the steak well on all sides with paper towels. Sprinkle liberally with salt. Allow to sit at room temperature for 30-60 minutes.
Preheat the oven to 350°F.
Add the remaining olive oil to a cast iron skillet or other oven-safe pan over high heat until just before smoking. Add the steak, cooking for 2 minutes on each side. Add pan to the oven, cooking in the oven for 6 minutes. Remove the steak, add to a cutting board, allow to rest for 5 minutes. Slice very thinly, add to a serving plate.
Cook the rice noodles in boiling salted water until al dente, drain and add to a large bowl. Toss with oil to prevent sticking (store noodles separate from the broth to prevent over cooking).
Serve broth along side the steak, herbs, sprouts, limes, peppers and sauces, allowing all guests to build their own bowls.
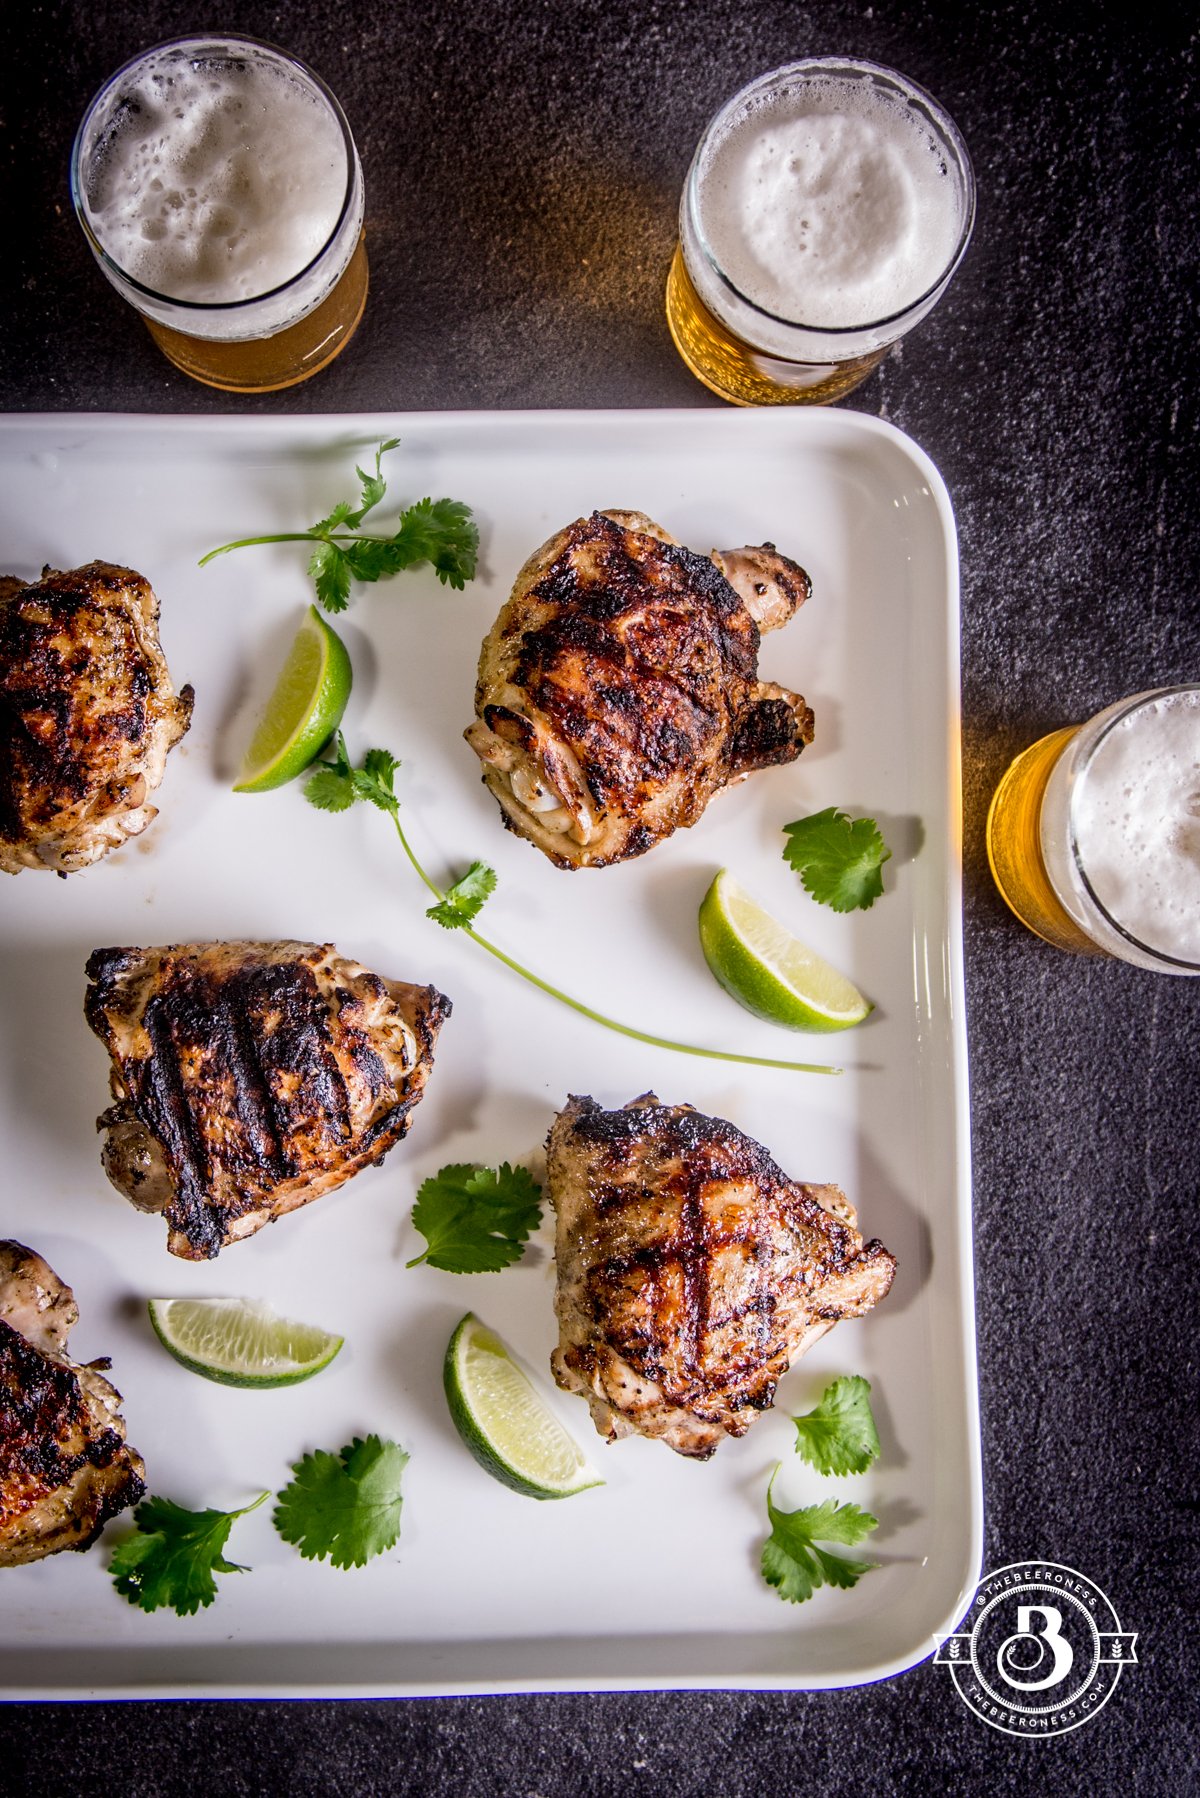
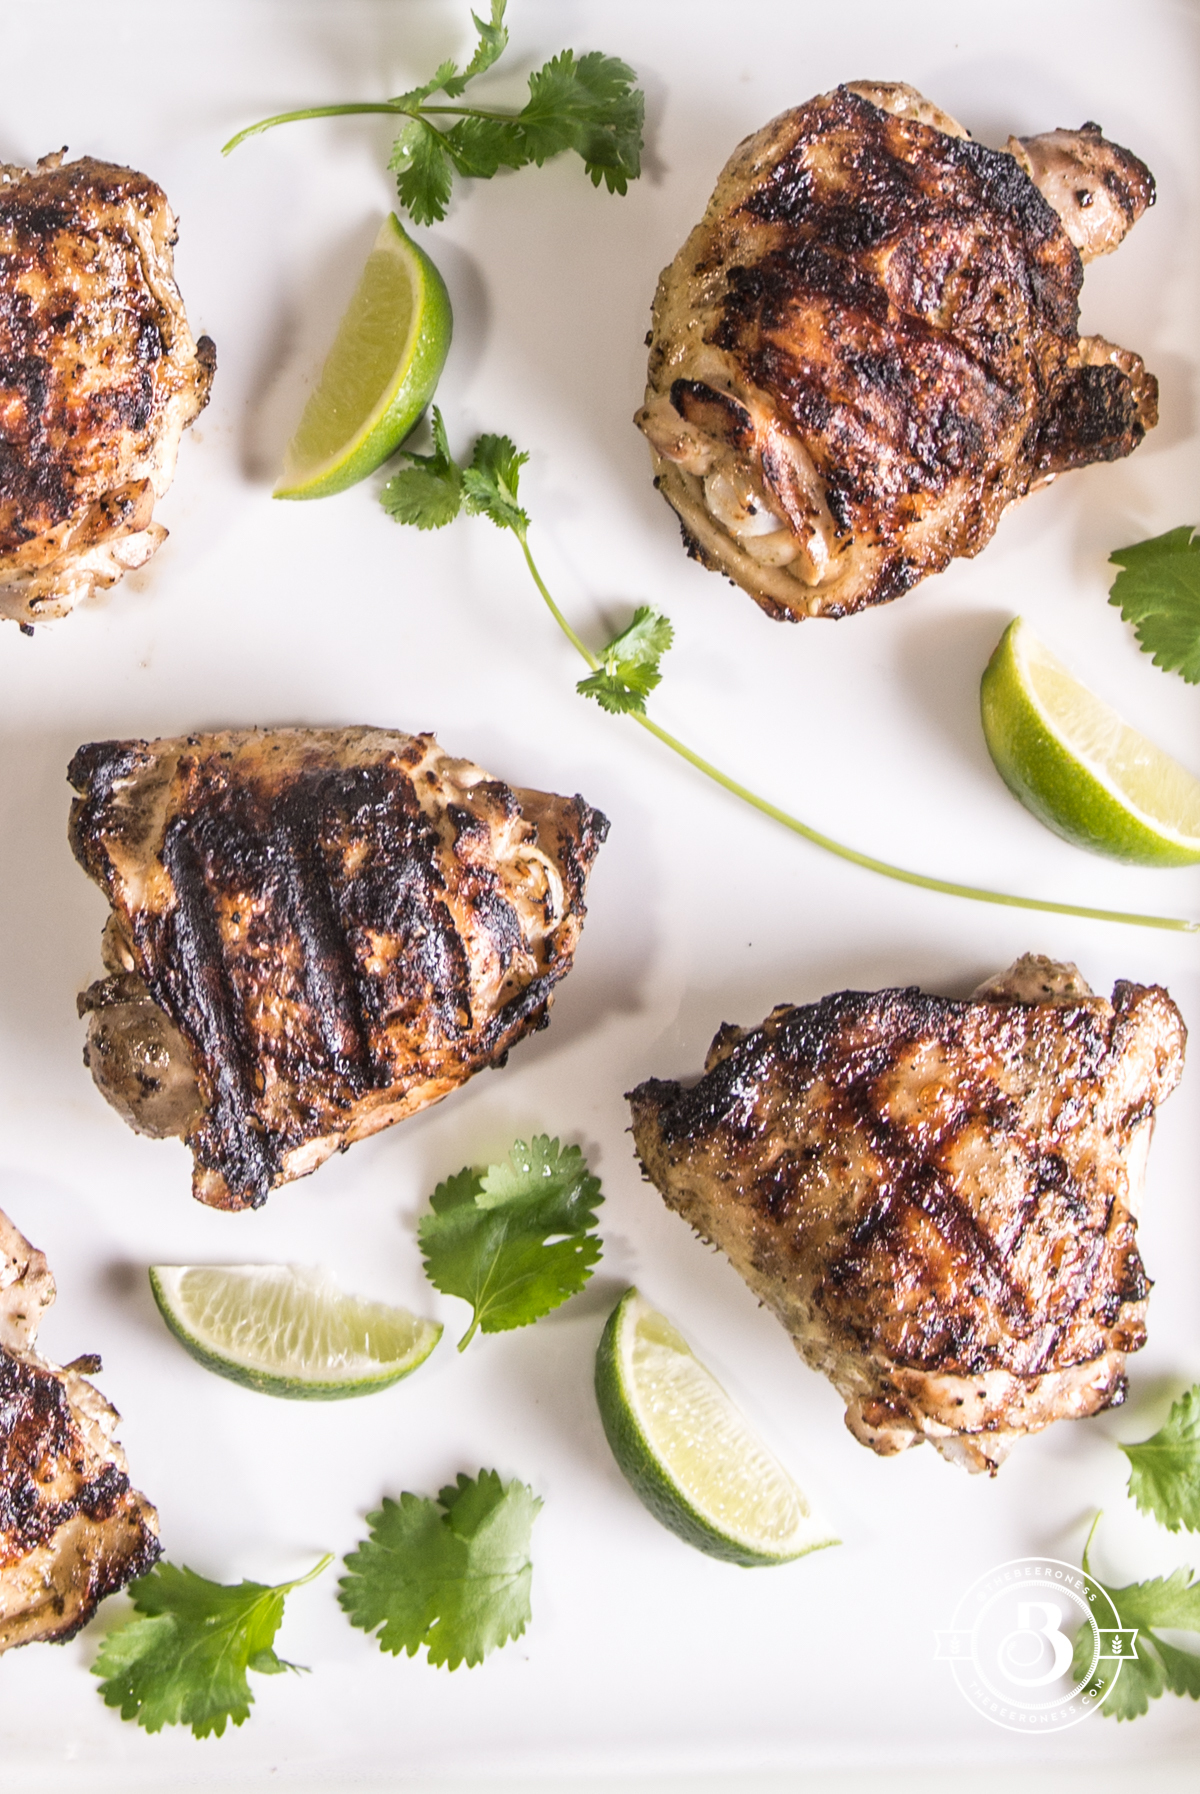
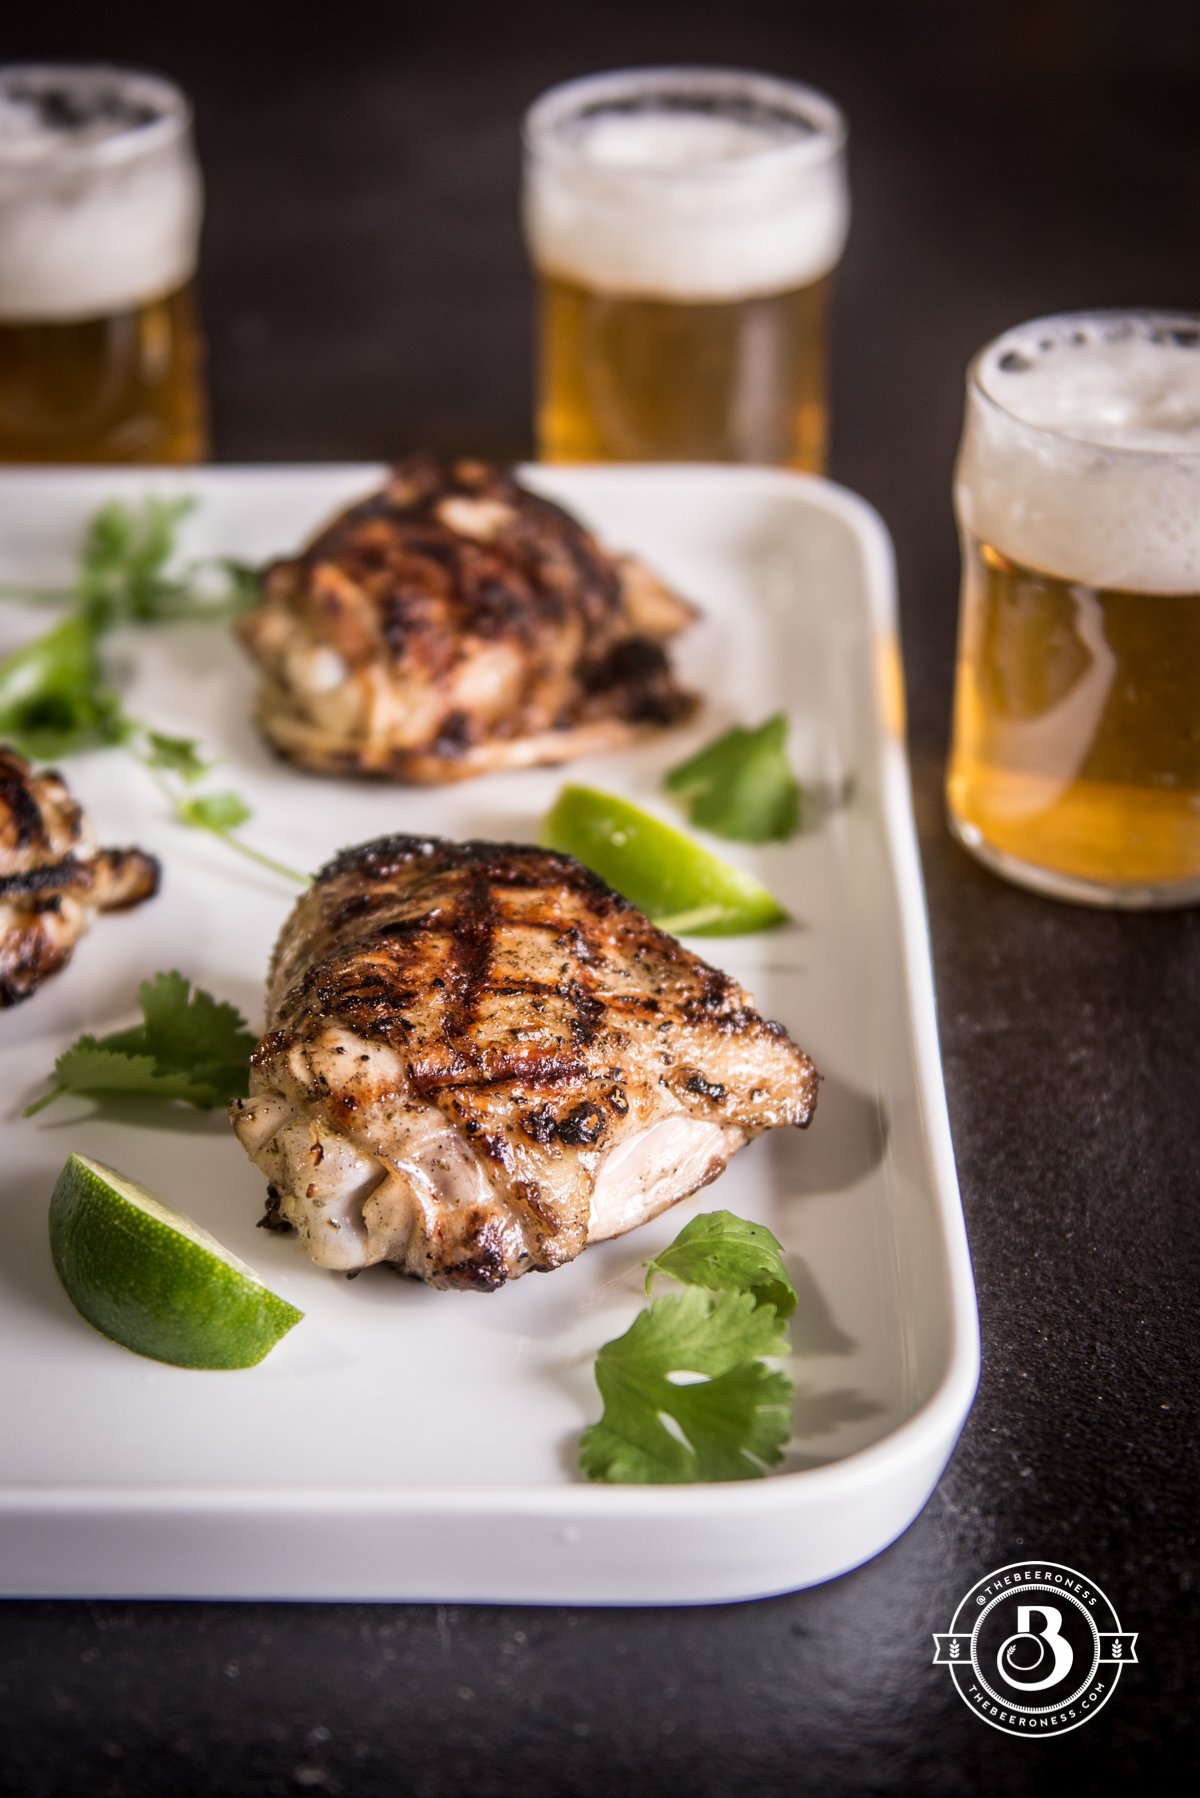
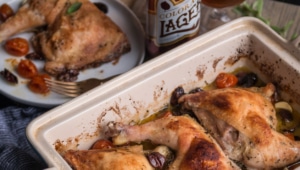
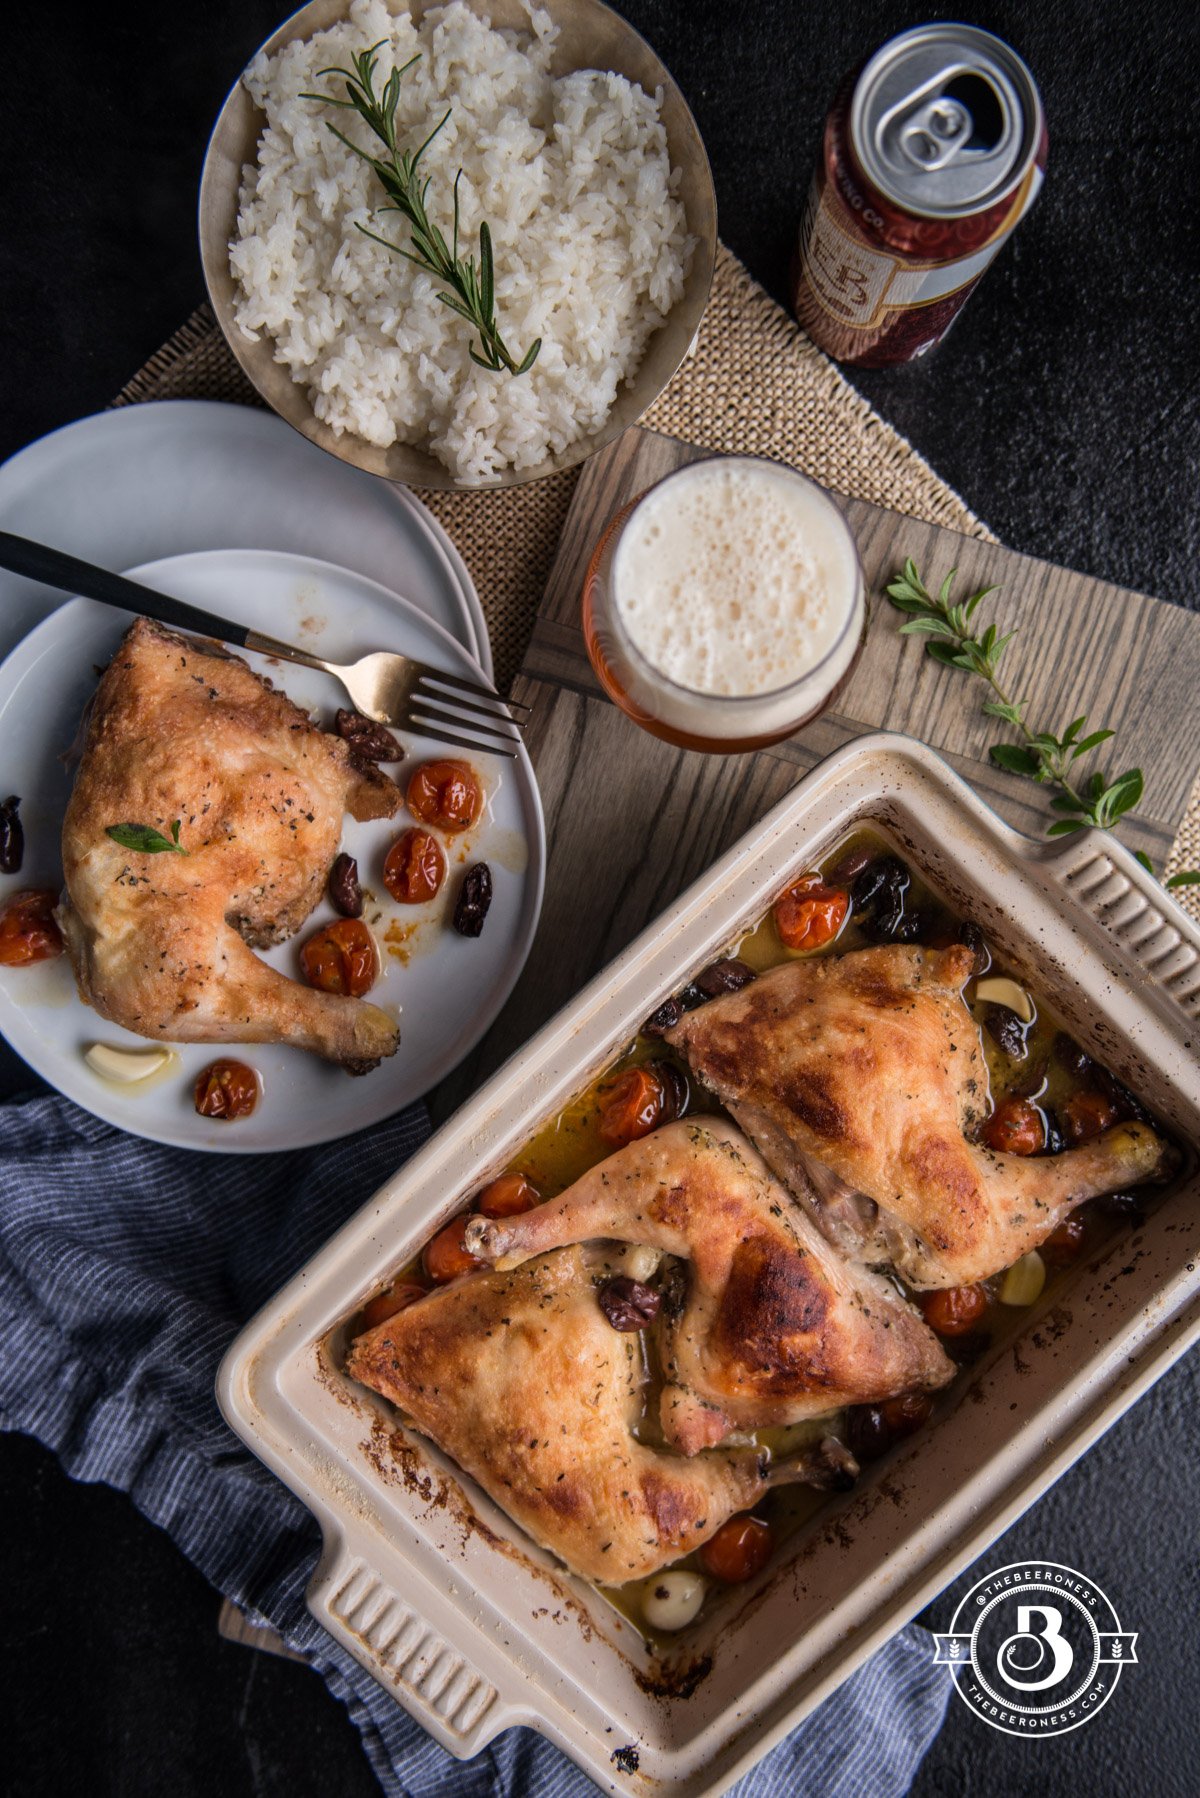
Provençal Beer Chicken, five minutes prep and perfect for weeknights or dinner parties!
This is what happens when I get excited without thinking. I’m just finishing up the back-and-forth-editing phase with my publisher for my next book. The vegetarian book I finished writing this summer (you guys, I love it. I can’t wait to show it to you), so as a celebration I made chicken.
Yes, let that sink in. I made CHICKEN to celebrate my "cooking with beer and in-season produce" vegetarian cookbook. I don’t make sense, you guys know that. Like how I decided to make homemade candy the day after Halloween, or when this happened.
But, the thing is, good food is good food. Sometimes that food has meat in it, sometimes it doesn’t. Roast chicken is one of my favorite ways to feed people, no matter the season. And this beer chicken was perfect: 5 minutes prep, and tastes fancy. I hope you like it. Unless you’re vegetarian, in that case, I apologize. But I do have an entire book headed your way, so I hope you forgive me.
1/3cupbeerpale ale or pale lager, I used Odell Colorado Lager
2cupsgrape tomatoes
¼cupkalamata olivespitted
2teaspoonskosher saltdivided
2sprigs of thyme
1sprig rosemary
1teaspoonfreshly ground black pepper
½cupall-purpose flour
2tablespoonsherbs de Provence
4chicken leg quartersbone-in, skin-on
Rice or pasta for serving.
Instructions
Heat the oven to 400°F.
In a baking dish add the olive oil, garlic, shallots, beer, tomatoes, olives and 1 teaspoon salt, stir to combine. Add the sprigs of thyme and rosemary.
Combine the pepper, flour, herbs de Provence in a shallow bowl.
Sprinkle the chicken on all sides with remaining salt. Dredge the chicken in the flour until well coated on all sides.
Add the chicken on top of the tomatoes in a tight, even layer.
Bake, uncovered, until the chicken is cooked through and skin is golden brown, about 45 minutes, basting with pan juices two or three times during cooking.
Beer Ricotta Raviolo with Egg and Herb Butter Sauce, time to get fancy!
Plus a book giveaway!
It’s somewhere North of 3 am and we’re walking the winding back country roads of Big Bear, California. Thin dresses swishing in the cool August air as we try to walk back into town from the wedding Linda and I are in the mountains for.
Giggly and drunk on wine and still love-high from the touching vows we’d witnesses, we realize that we’re only "sort of" lost as we try to navigate the dusty walk back, void of any sidewalks or street lamps. Our ride had left hours before we did, and since this isn’t the sort of place that Uber inhabits, we decide that walking back down the mountain is our only option.
Grateful that one of the grooms insisted we wear flats—the more appropriate footwear choice for a mountain wedding over the heels we both reluctantly left in the hotel—we realize that running may be necessary when the only vehicle we’ve seen so far suddenly takes notice of us.
As the semi-truck pulls to a stop near us the driver climbs out of his cab to make his way towards us, and we bolt. In unison, we run towards town and around the bend in the road. Like a desert oasis, we see the hotel. Sprinting towards the doors, we finally stop to catch our breath once inside. We look at each other and burst out laughing. Not sure if we were in any real danger, or if the wine had turned a guy just checking on a flat tire into a sure-threat, we don’t care. We’re safe, slightly drunk, and happy.
Since that day Linda has steadily become one of the most important people in my life. Helping me in ways she can’t even understand through two of the most difficult points in my adult life. From frantic texts at midnight to long talks over bottles of wine, she’s the sort you always want to find solace in when the storm hits, or celebrate alongside when the moments are perfect. Although meeting her, years before the Big Bear wedding, I was immediately intimidated.
At a food conference in Los Angeles, she seemed to just appear in front of me. Tall, beautiful, wickedly smart, and incomprehensibly talented, she’s the sort you should be intimidated of. With a rapidly growing following and several TV shows and appearances under her belt, she’s the type that can pull of being pretentious and snobby. She could even get away with it, if she wanted. But the thing about her, possibly the most endearing part, is that there isn’t a trace of that in her, not one bit. She has a heart of gold, a passion for social justice, and she connects with damn near everyone. She won’t just remember you, she’ll remember the story you told her three years ago about your mom being in the hospital and she’ll ask you about it. She is just so likable. She’s also charmingly inappropriate, and wildly unpredictable. Which just makes you like her more.
She’s spent the better part of the past two years pouring herself and her immense knowledge of pasta into her new book, Pasta, Pretty Please, and it’s beautiful. If you don’t follow her on Instagram, you’re missing out, it’s the most impressive feed you’ll see.
I’m giving away a signed copy of the books that won’t just teach you how to make pasta, it will make you fall in love with it. You can enter on Instagram. Don’t have an Instagram? Share this post on Facebook (make sure it’s public so that I can see!) and post a link to your Facebook post in the comments below.
Linda has offered to sign the book for you, or Linda has also offered the option for her to sign your boobs, or both if you’re up for it.
Beer Ricotta Raviolo with Egg and Herb Butter Sauce
Adapted from Pasta, Pretty Please by Linda Miller Nicholson
3cupswhole milkdo not use Ultra-Pasterized, it won’t work
1cupheavy cream
½teaspoonsalt
1/3cupSaison beerPlus 2 tablespoons divided
3tablespoonsApple Cider Vinegaryou can also use lemon juice, or a combination of the two
For the Filling:
6large egg yolks
For the Sauce:
½cupunsalted butter
2clovesgarlicminced
2large leaves sageminced
Leavesfrom 1 sprig rosemarychopped
½cupchicken or vegetable broth
Salt to tastethe amount of salt you need will be dependent on the broth you use
¼cupfresh grated parmesan
Instructions
Make the ricotta:
In a pot over medium high heat (do not use an aluminum pan) add the milk, cream, salt and 1/3 cup beer.
Clip a cooking thermometer onto the side of the pan.
Bring the liquid to 190°F degrees, stirring occasionally to prevent the bottom from scorching. Keep a close eye on it, the liquid reaches and passes 190 very quickly and you don’t want it rising above 200.
Remove from heat, add the 2 tablespoons beer and then the vinegar (or lemon juice) and stir gently once or twice. It should curdle immediately. Allow to sit undisturbed for about 5 minutes.
Line a large strainer with 1 or 2 layers of cheesecloth; place the strainer in the sink over a large bowl.
Pour the ricotta into the strainer and allow to drain for 15 to 30 minutes and up to an hour (the longer it drains, the firmer the consistency)
Place in an air-tight container and store in the fridge, can be made up to 3 days in advance.
Make the green dough (skip if you aren't making the decorations):
In a large saucepan over high heat, bring the salt, baking soda and 8 cups water to a boil. Add the parsley and boil it for 15 seconds, remove it and place in a strainer, run under cold water to blanche. Drain and press out the water.
Add the parsley to a blender along with the eggs, blend first on low speed, then increase the speed and green liquid until smooth.
Strain the puree with a fine mesh strainer, reserving the green liquid and discarding the pulp.
In the bowl of a stand mixer fitted with a paddle attachment, combine the flour and puree. Mix on low speed until a ball of dough forms. Raise the speed to medium and continue to knead for 3 minutes (or by hand for 6-8 minutes) until the dough is smooth and elastic. Cover the ball of dough with plastic wrap and allow to rest at room temperature for 30 minutes (you can also refrigerate the well-wrapped dough for up to three days).
Make the red-orange dough:
In the bowl of a stand mixer fitted with a paddle attachment, combine the flour, eggs and tomato paste. Mix on low speed until a ball of dough forms. Raise the speed to medium and continue to knead for 3 minutes (or by hand for 6-8 minutes) until the dough is smooth and elastic. Cover the ball of dough with plastic wrap and allow to rest at room temperature for 30 minutes (you can also refrigerate the well-wrapped dough for up to three days).
*(skip to step 17 if you aren’t making a decoration) Cut the green dough into four equal sized pieces. Roll one piece out several times to make it thin enough to pass through your dough roller (wrap up the remaining pieces so they don’t dry out).
Pass through your dough roller on the widest setting, then again. Close the dough roller one more stop to make it thinner (one away from the widest setting), pass the dough through twice. Fold into thirds, like a letter going into an envelope. Pass through your dough roller again with the folded ends on the sides (this will make the sides of the dough sheet straight rather than jagged).
Continue to pass through the dough roller stopping down to a thinner setting every two passes until you reach halfway between the thinnest and thickest setting.
Using a cookie cutter, cut out 6 of your desired decoration shapes, set aside while you work on the rest of the Raviolo.
Cut the red-orange dough into four equal sized pieces. Roll one piece out several times to make it thin enough to pass through your dough roller (wrap up the remaining pieces so they don’t dry out).
Pass through your dough roller on the widest setting, then again. Close the dough roller one more stop to make it thinner (one away from the widest setting), pass the dough through twice. Fold into thirds, like a letter going into an envelope. Pass through your dough roller again with the folded ends on the sides (this will make the sides of the dough sheet straight rather than jagged).
Continue to pass through the dough roller stopping down to a thinner setting every two passes until you reach two stops away from the thinnest setting.
Repeat for one more piece of red-orange dough.
Make the Raviolo:
Lay the pasta sheets on a flat surface lightly dusted with flour.
If using a decoration, brush the top of one sheet of pasta with water. Brush the bottom side of the green pasta decoration with water. Place the decorations evenly spaced every 6-8 inches on the sheet of dough. Gently roll with a rolling pin to press together and adhere.
Add the ricotta to a piping bag or a Ziplock bag with the corner cut off.
Make circles of ricotta (a ricotta “nest”) on the blank pasta sheet evenly spaced every 6-8 inches. Nests should be about 3 inches across with a well big enough to just nestle an egg yolk into.
Place one unbroken yolk into each nest. Brush the pasta with water around each nest.
Carefully move the sheet of pasta with the green decorations on top of the sheet with the ricotta nests. Line the sheet up so that the green decorations are directly above the egg yolks.
Press firmly to adhere the top sheet of pasta to the bottom, taking care to remove all the air and seal the dough together.
Cut each Raviolo between each nest making 6 individual Raviolo. Allow to dry for about 15 minutes, flip over and allow the bottom to dry for about another 10 minutes.
Prepare a large pot of salted boiling water.
In a large saucepan melt the butter over medium heat. Stir in the garlic, sage and rosemary, cook for about 5 minutes.
Stir in the broth, cooking until warmed, salt to taste. Allow the sauce to simmer gently but not boil.
One at a time gently add the Raviolo to the boiling water, boil for 2 minutes. Using a large slotted spoon or a Spider, gently remove and allow all the water to drain off. Add to the sauce, cooking for an additional 3 minutes in the sauce while gently spooning the hot butter on top of the Raviolo.
Add to a plate with a spoonful of sauce, top with a sprinkle of parmesan cheese, serve immediately.
Notes
The green pasta decoration is optional. I used a hop flower cookie cutter, but any cookie cutter will do. Feel free to skip this step, it's mostly asthetic and skipping it will not diminish the overall flavor of the dish.
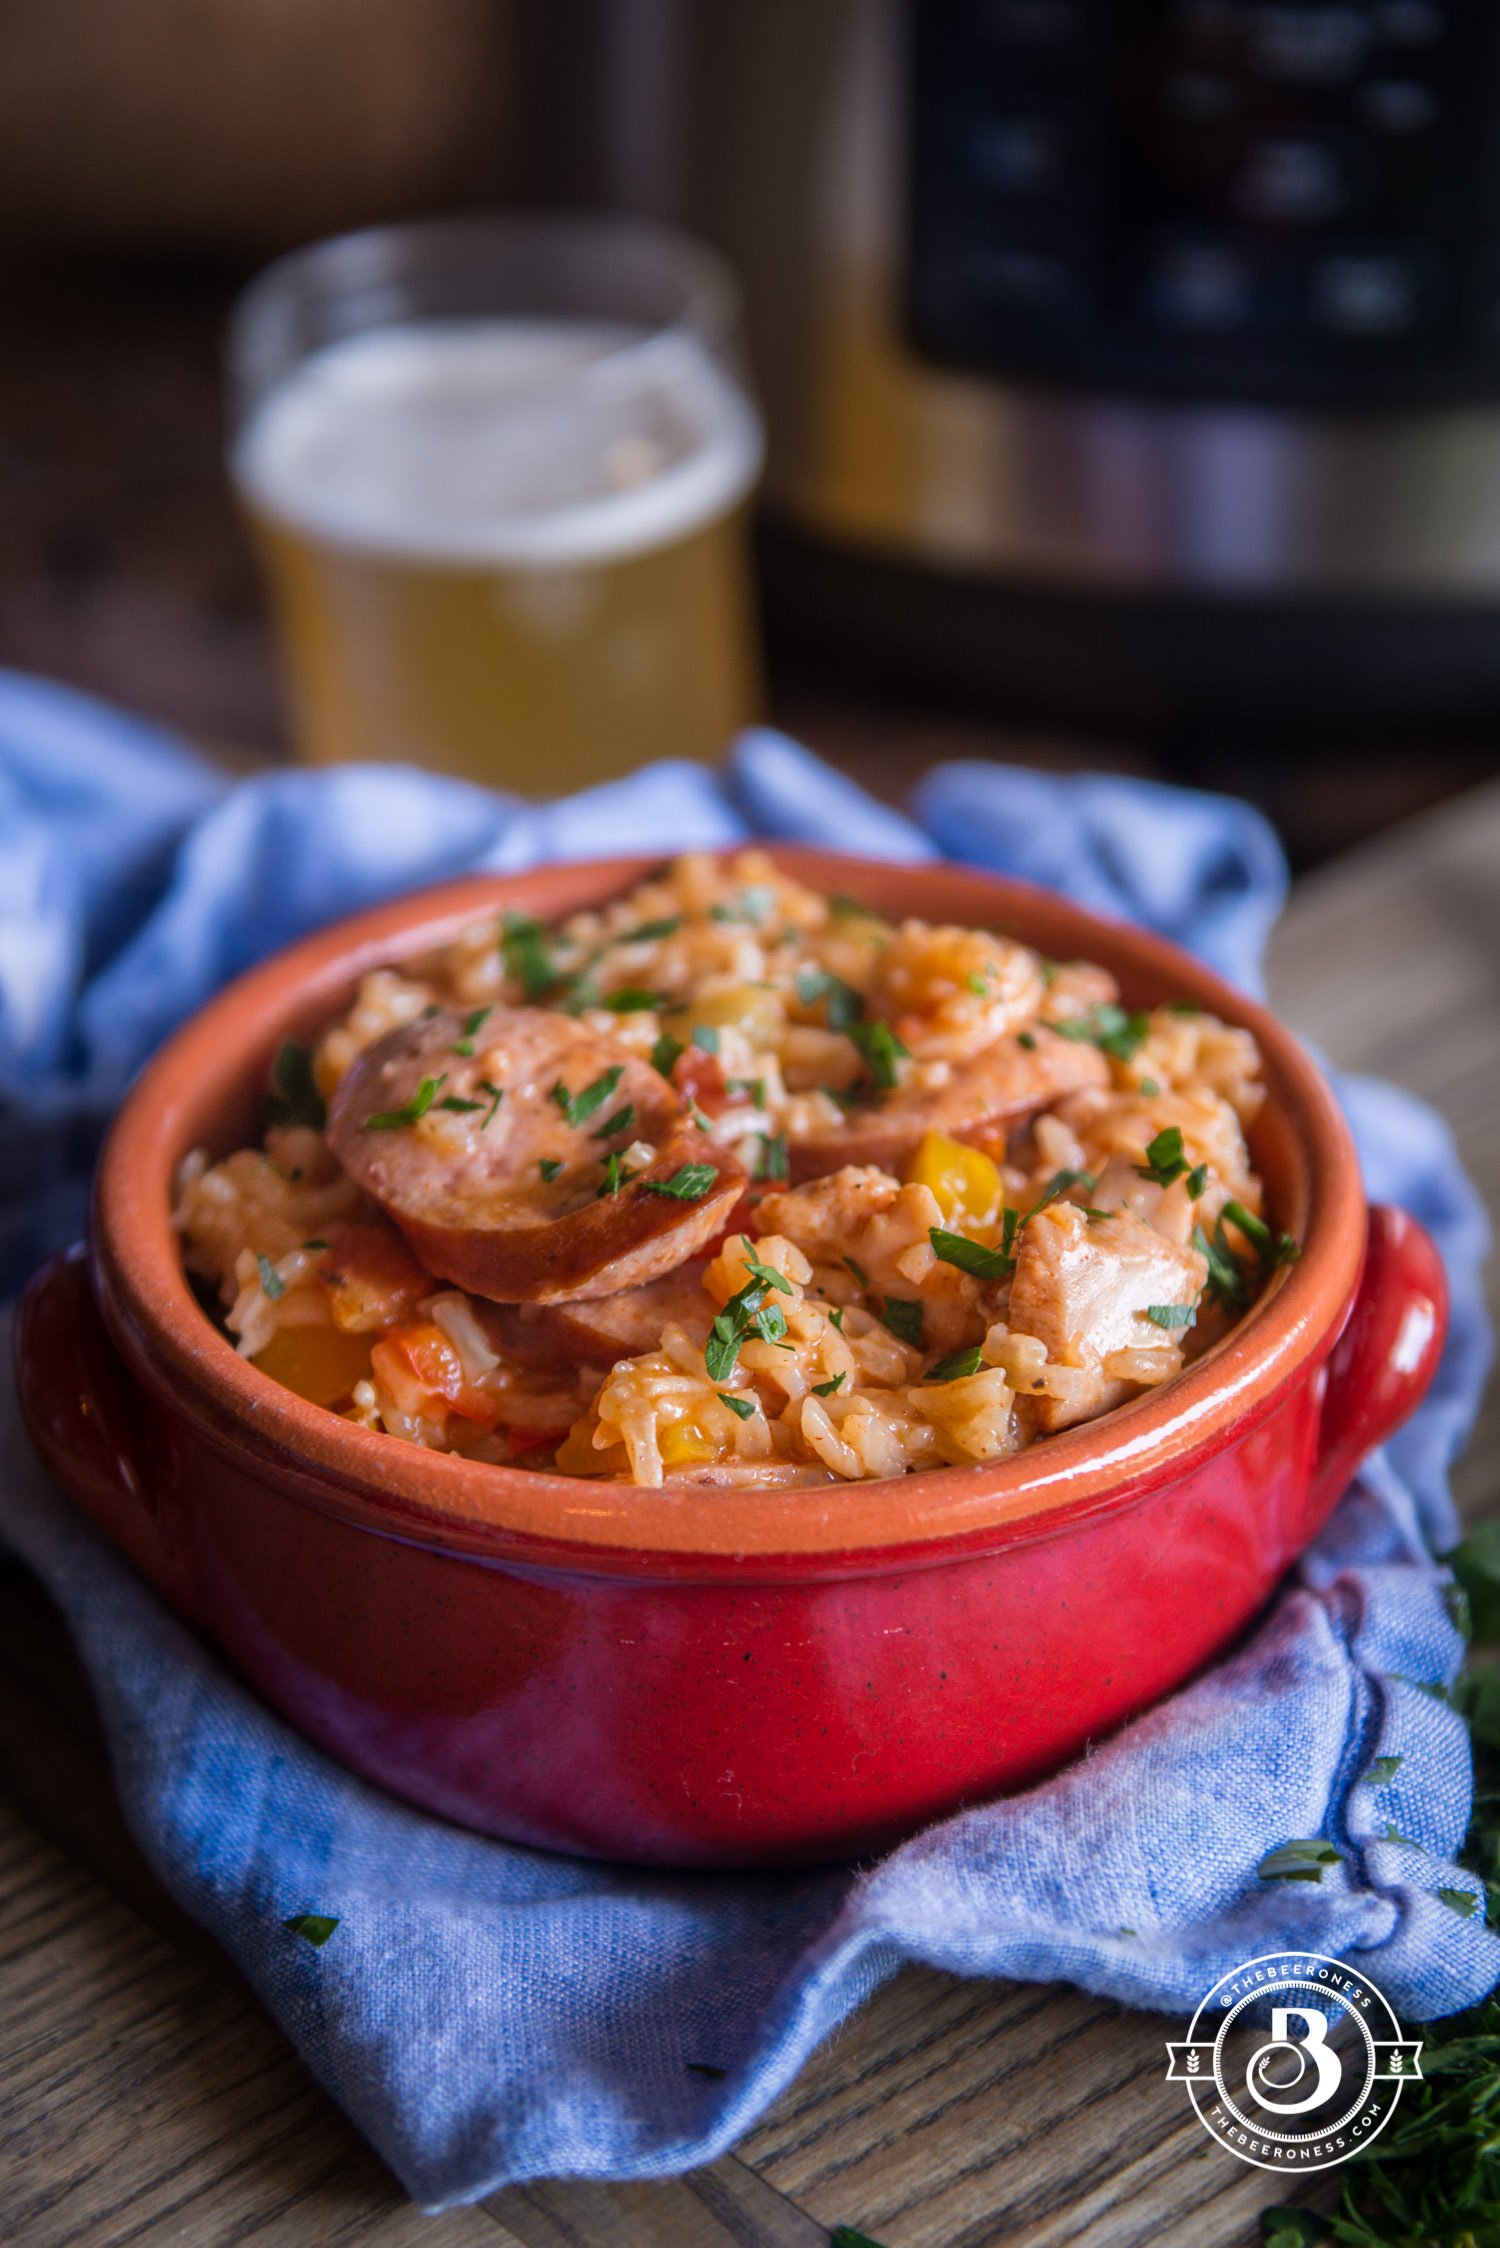
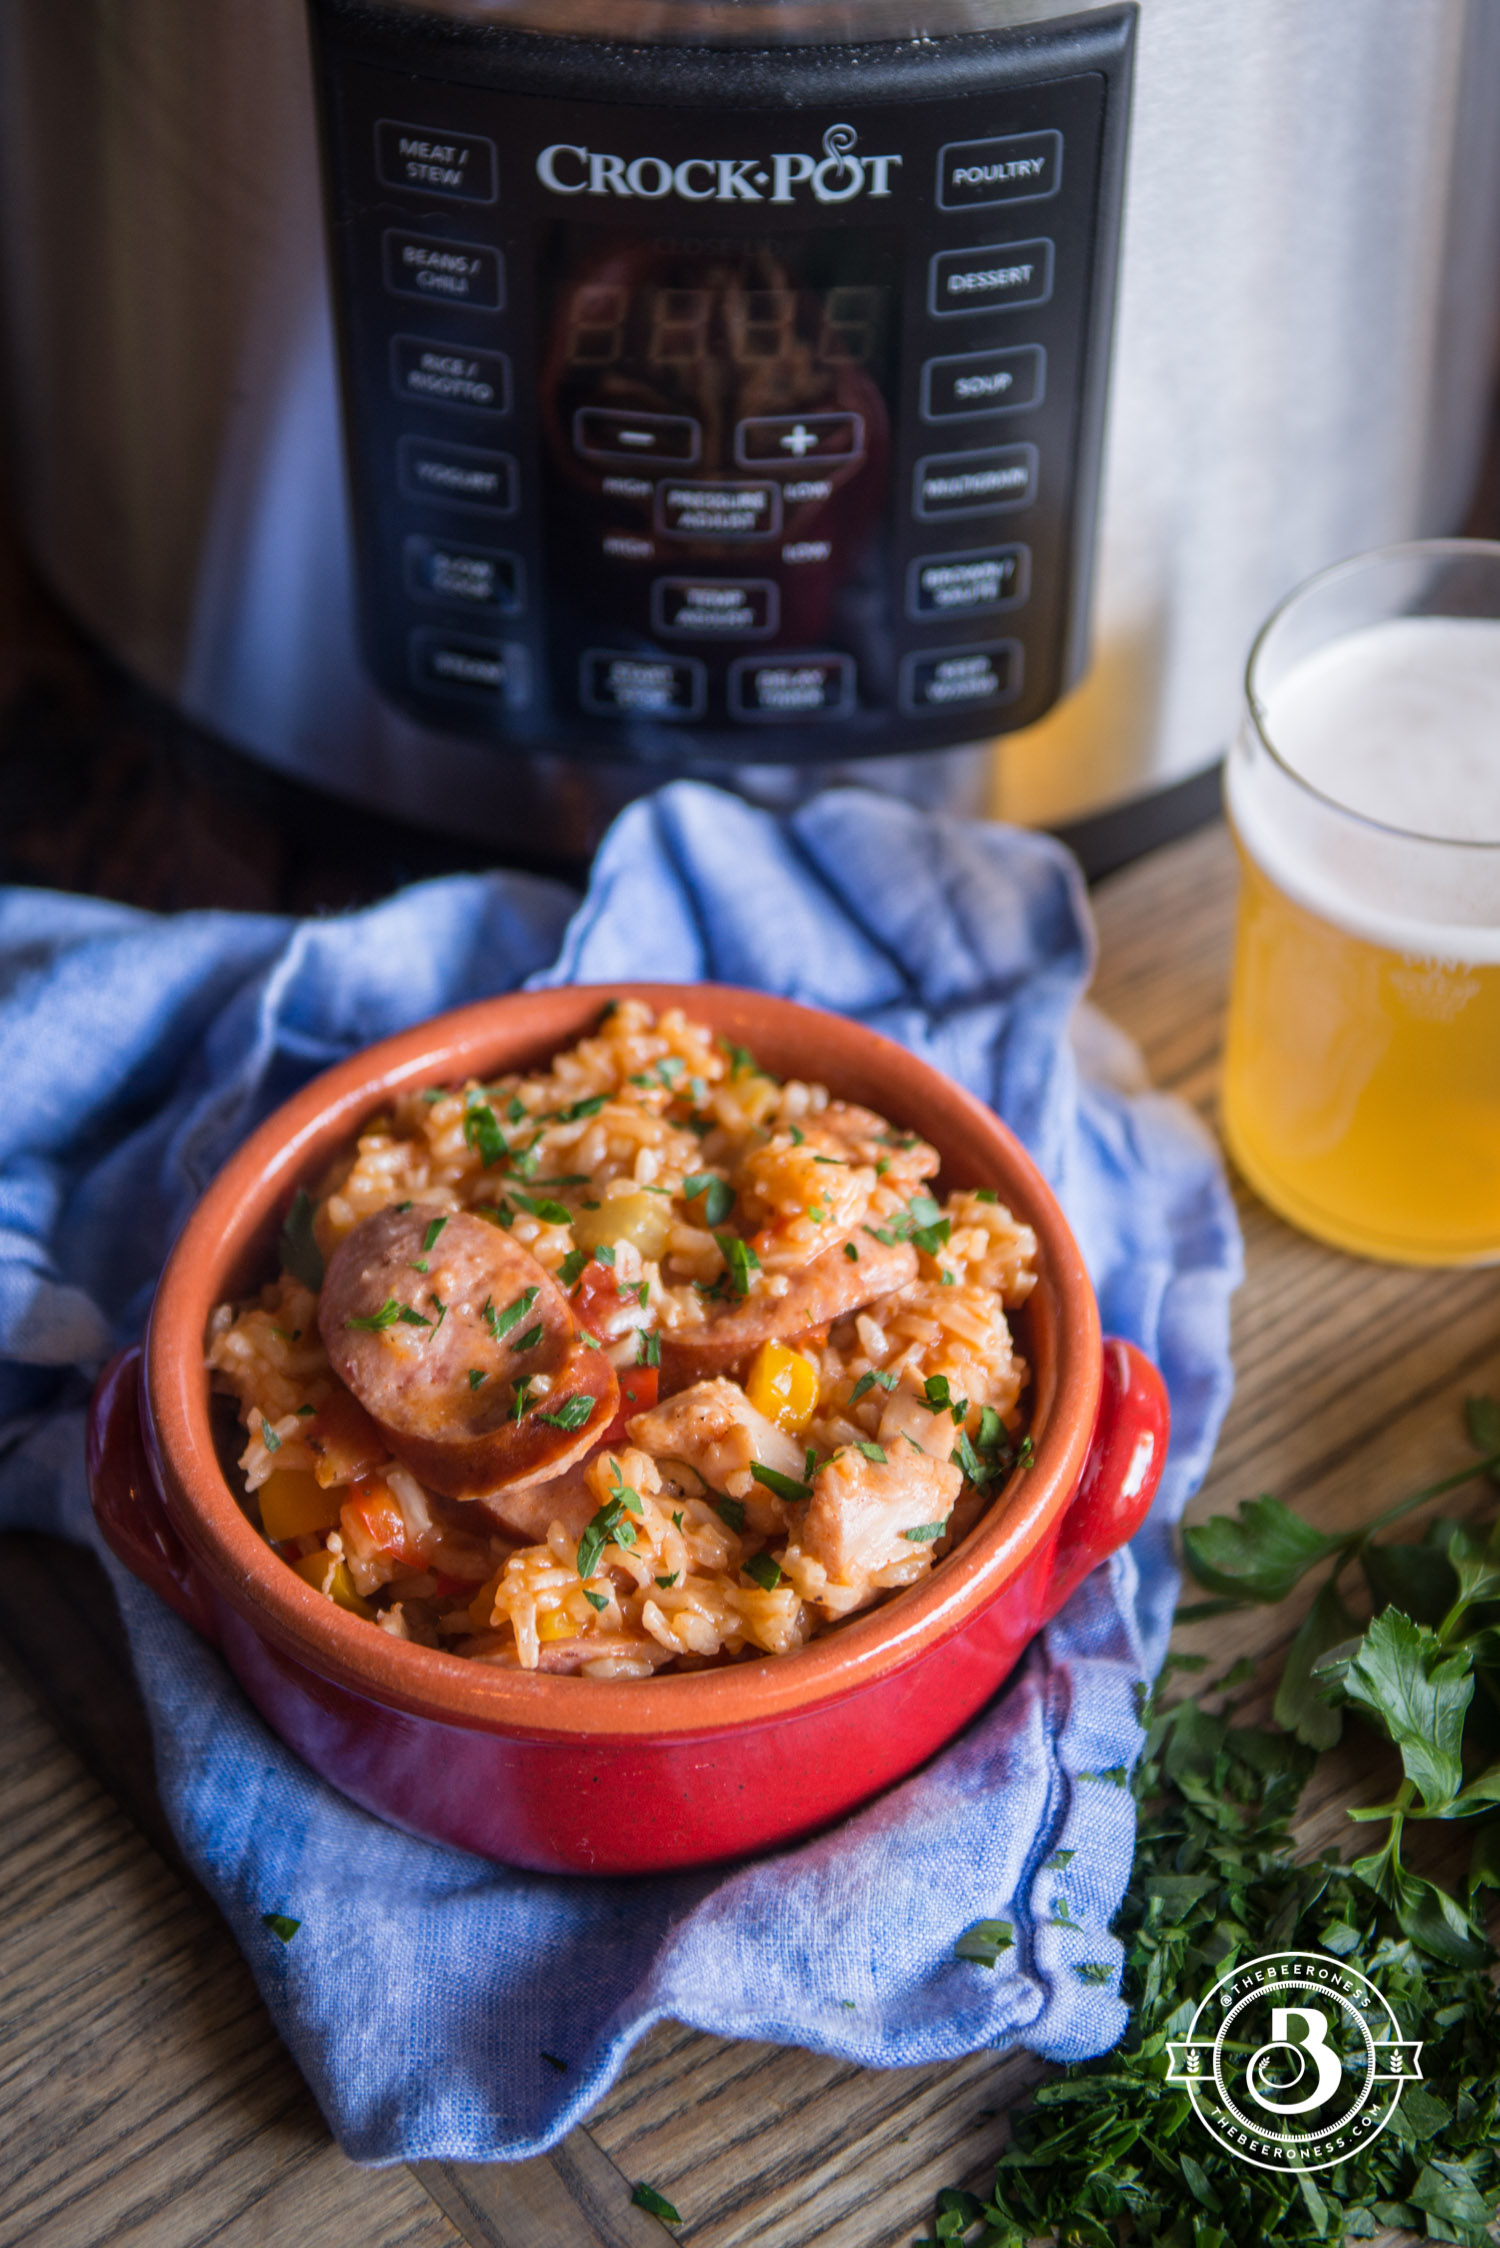
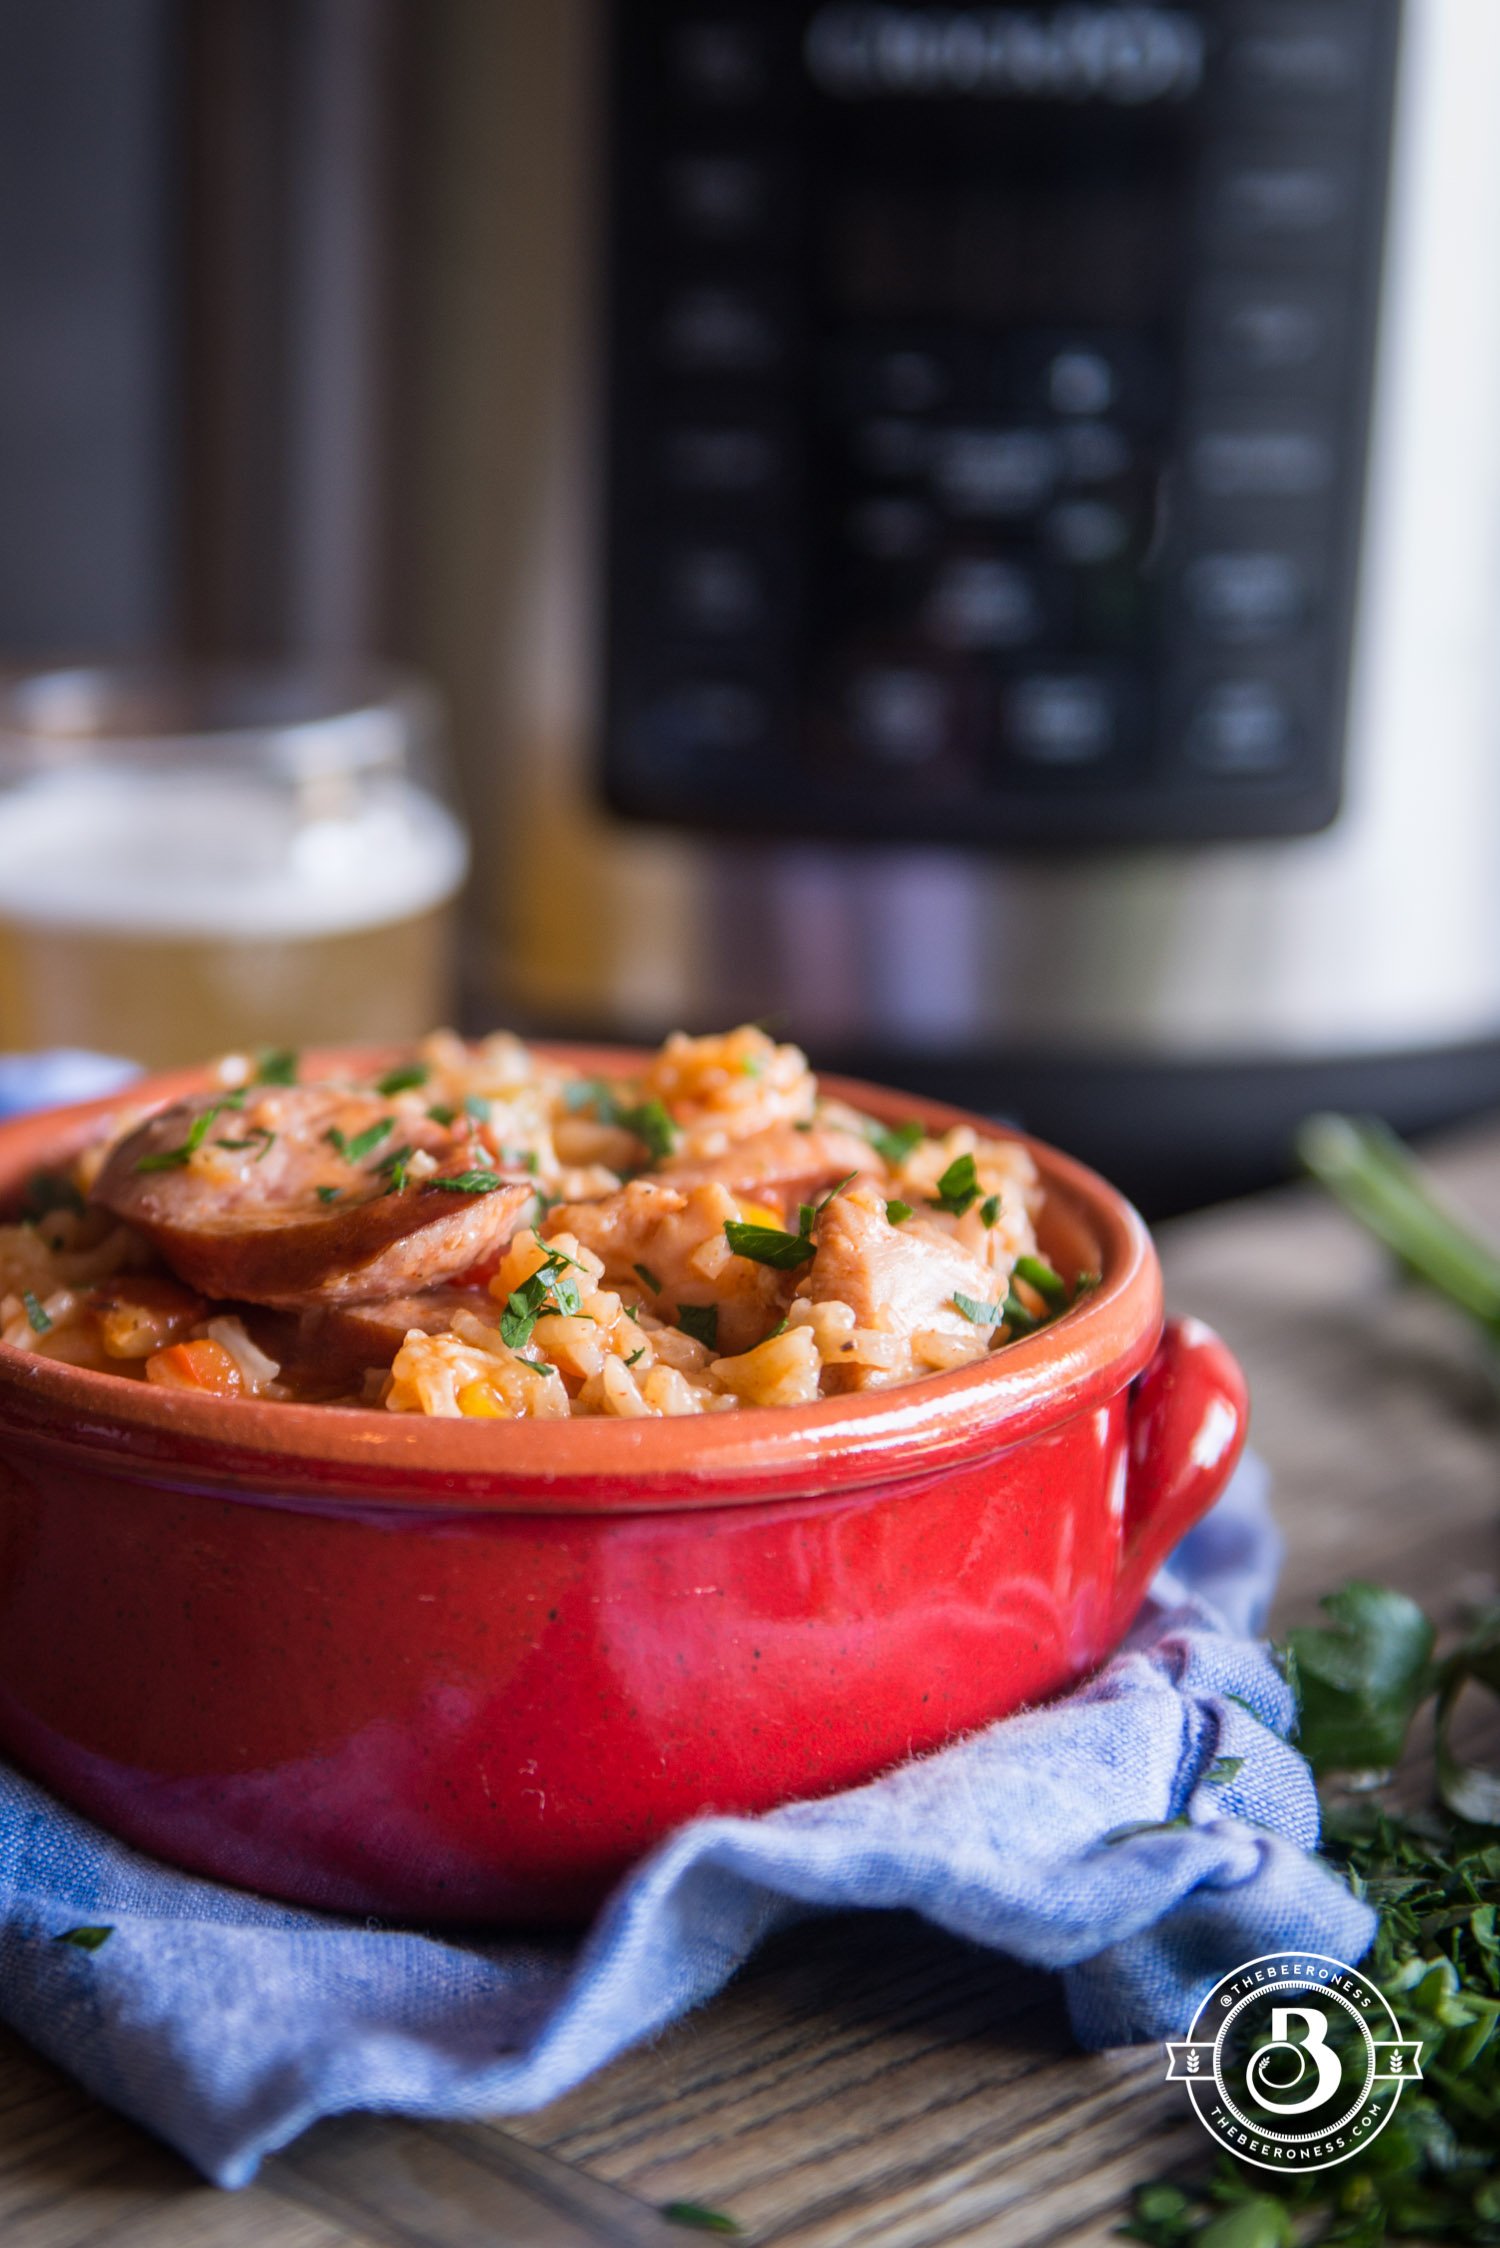
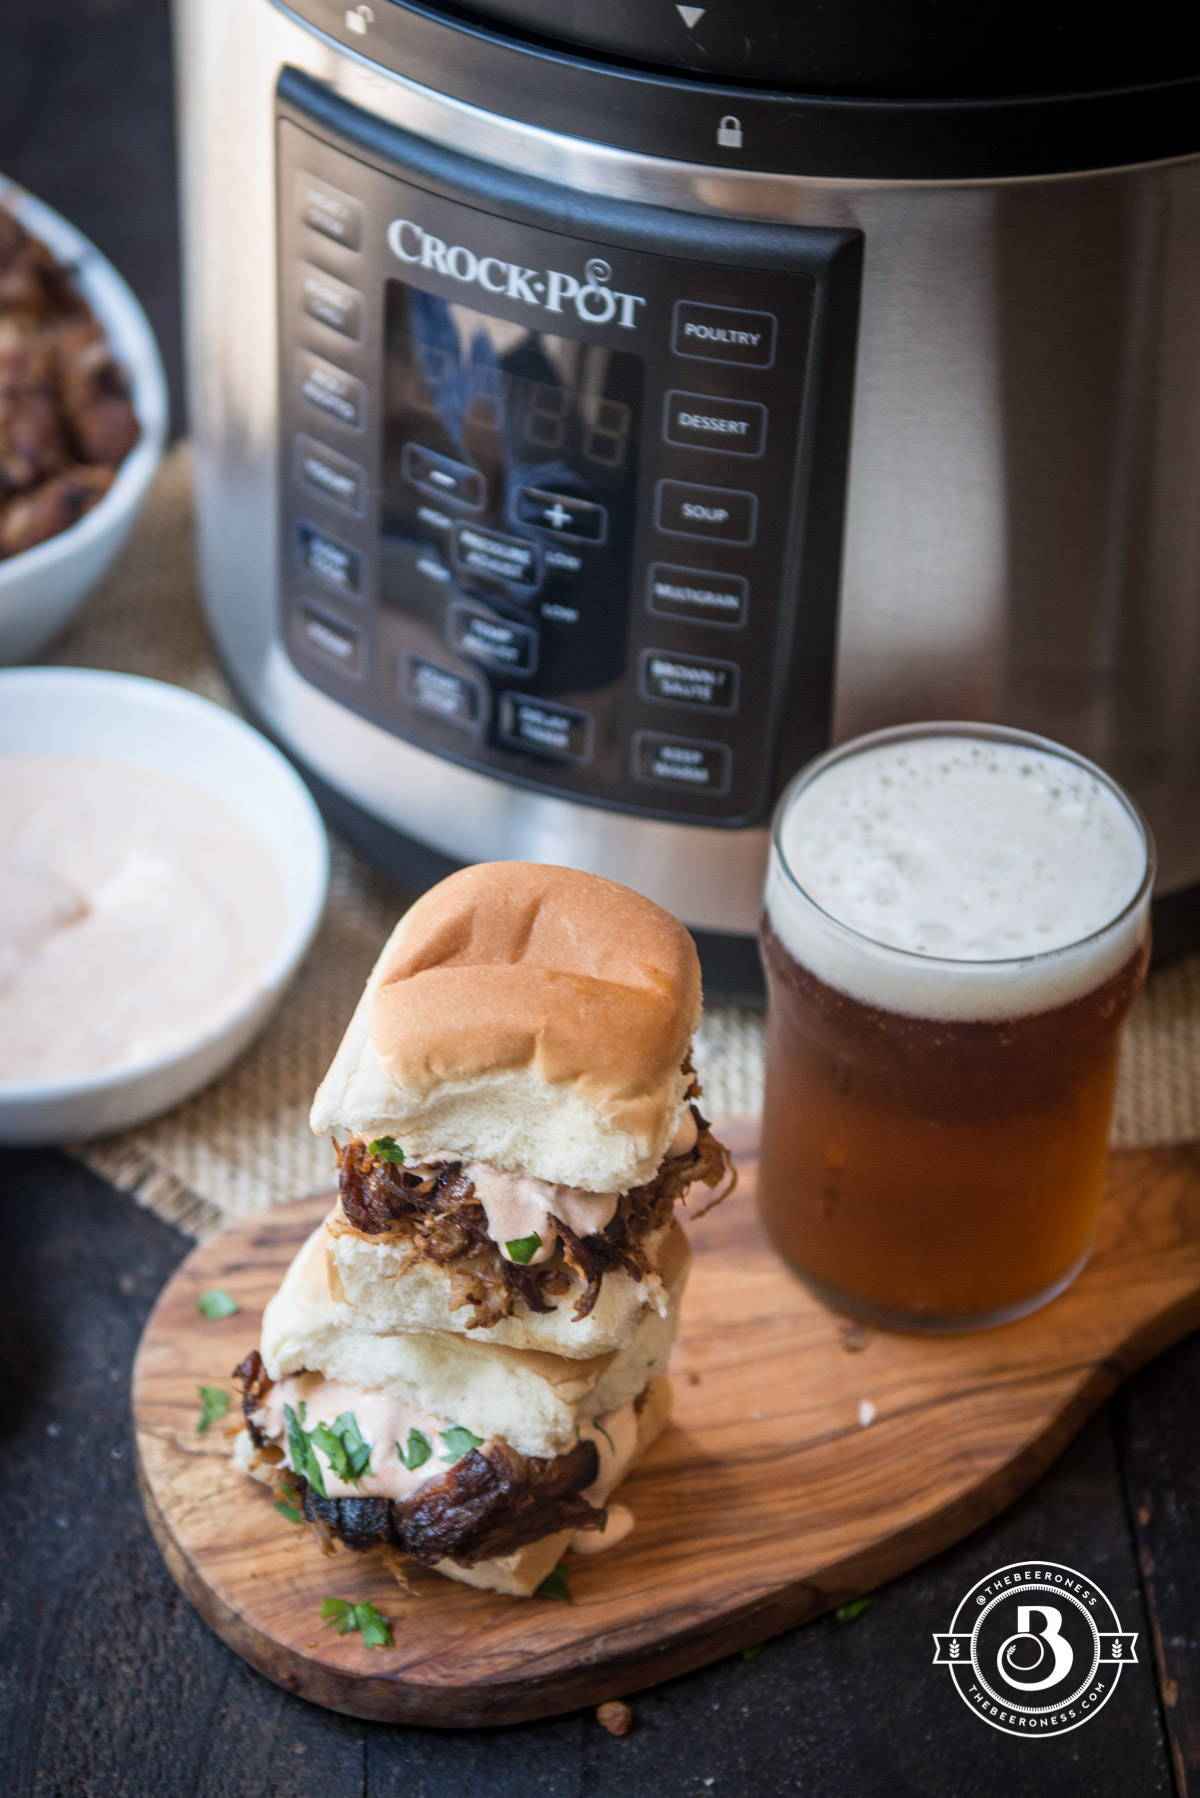
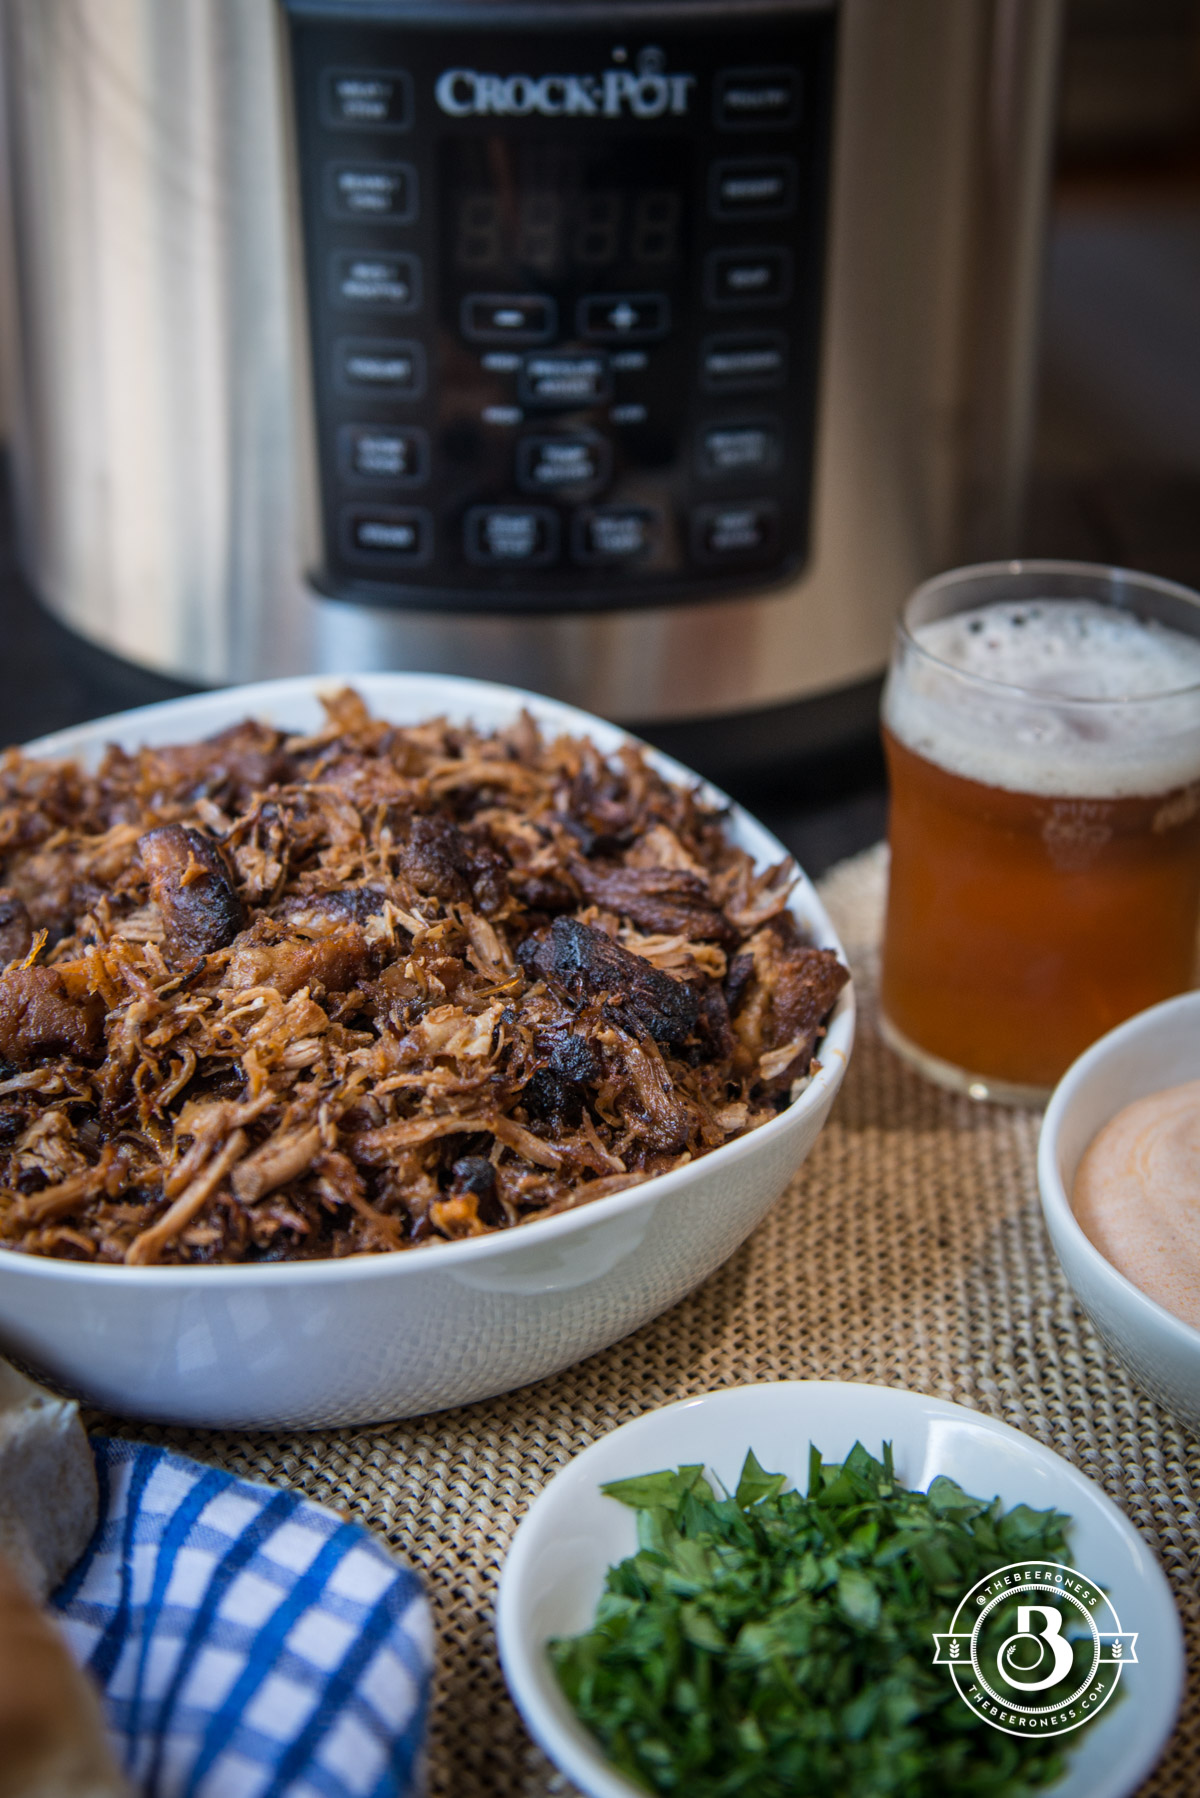
This post was sponsored by the Crock-Pot brand. Partnerships with The Beeroness and outside companies only occur when the company’s products are ones I use and enjoy myself. All ideas and opinions are my own.
The reason I made this two days in a row is the same reason I love this little machine so much. I had every intention of this being a slow-cooker recipe, and that’s what I did. I slow cooked a jambalaya with all the meat, spices and rice that I wanted to cram into one bowl.
I liked it, I did. It was a super easy and satisfying way to eat a big ‘ol bowl of comfort food. But I couldn’t stop wondering how it would taste pressure cooked, and since the Crock-Pot Express Crock Multi-Cooker can do both, that’s just what I did. It was perfect, even better than the slow cooked version. Since the rice setting was built into the pressure cook mode (one of the hardest things to slow cook and get right is rice), it was simple.
The rice was perfectly cooked, the chicken was fall-apart-tender and the flavor tasted like it had slow cooked all day. THIS is how I’ll make jambalaya going forward, it was much better than I even hoped. I hope you like it as much as I do, this may be a staple in my house from now on.
The new Crock-Pot Express Crock Multi-Cookeris a game changer. It has eight different functions that encompass all the functions you would achieve from using multiple different kitchen appliances from slow cooking to pressure cooking and sautéing to searing. The Crock-Pot Express Crock Multi-Cooker is also available in NEW 4-Quart and 8-Quart Models.
12ouncesbeerpale ale, pilsner, pale lager, or wheat beer
114.5-ounce can diced tomatoes
1tablespoonsCajun seasoning blend
¼ to ½teaspooncayenne peppermore for spicier
2teaspoonspaprika
1teaspoongarlic powder
½teaspoonsalta full teaspoon if your Cajun spice mix is low or sodium free
1teaspoonblack pepper
1 ½cupsuncooked long grain white rice
¼cupchopped parsley for garnish
Instructions
Set the Express Crock to sauté on high. Add the oil, allowing to get hot before adding the bell peppers, onions, and celery. Cook until the vegetables have softened.
Stir in the sausage and chicken, cooking until the chicken has turned white on the outside. Stir in the remaining ingredients (reserving the parsley for garnish).
Add the lid, turning to the locked position. Make sure the steam release value is set to sealed.
Turn the rice/risotto setting to high for 8 minutes. The Express Crock will take about 10 minutes to heat up and build pressure, during this time the display will say “HEAt” (yes, with a lowercase “t”). Once the 8 minutes have finished, turn the steam release valve to open (careful, the steam is hot!). Allow the steam to release before opening the Express Crock.
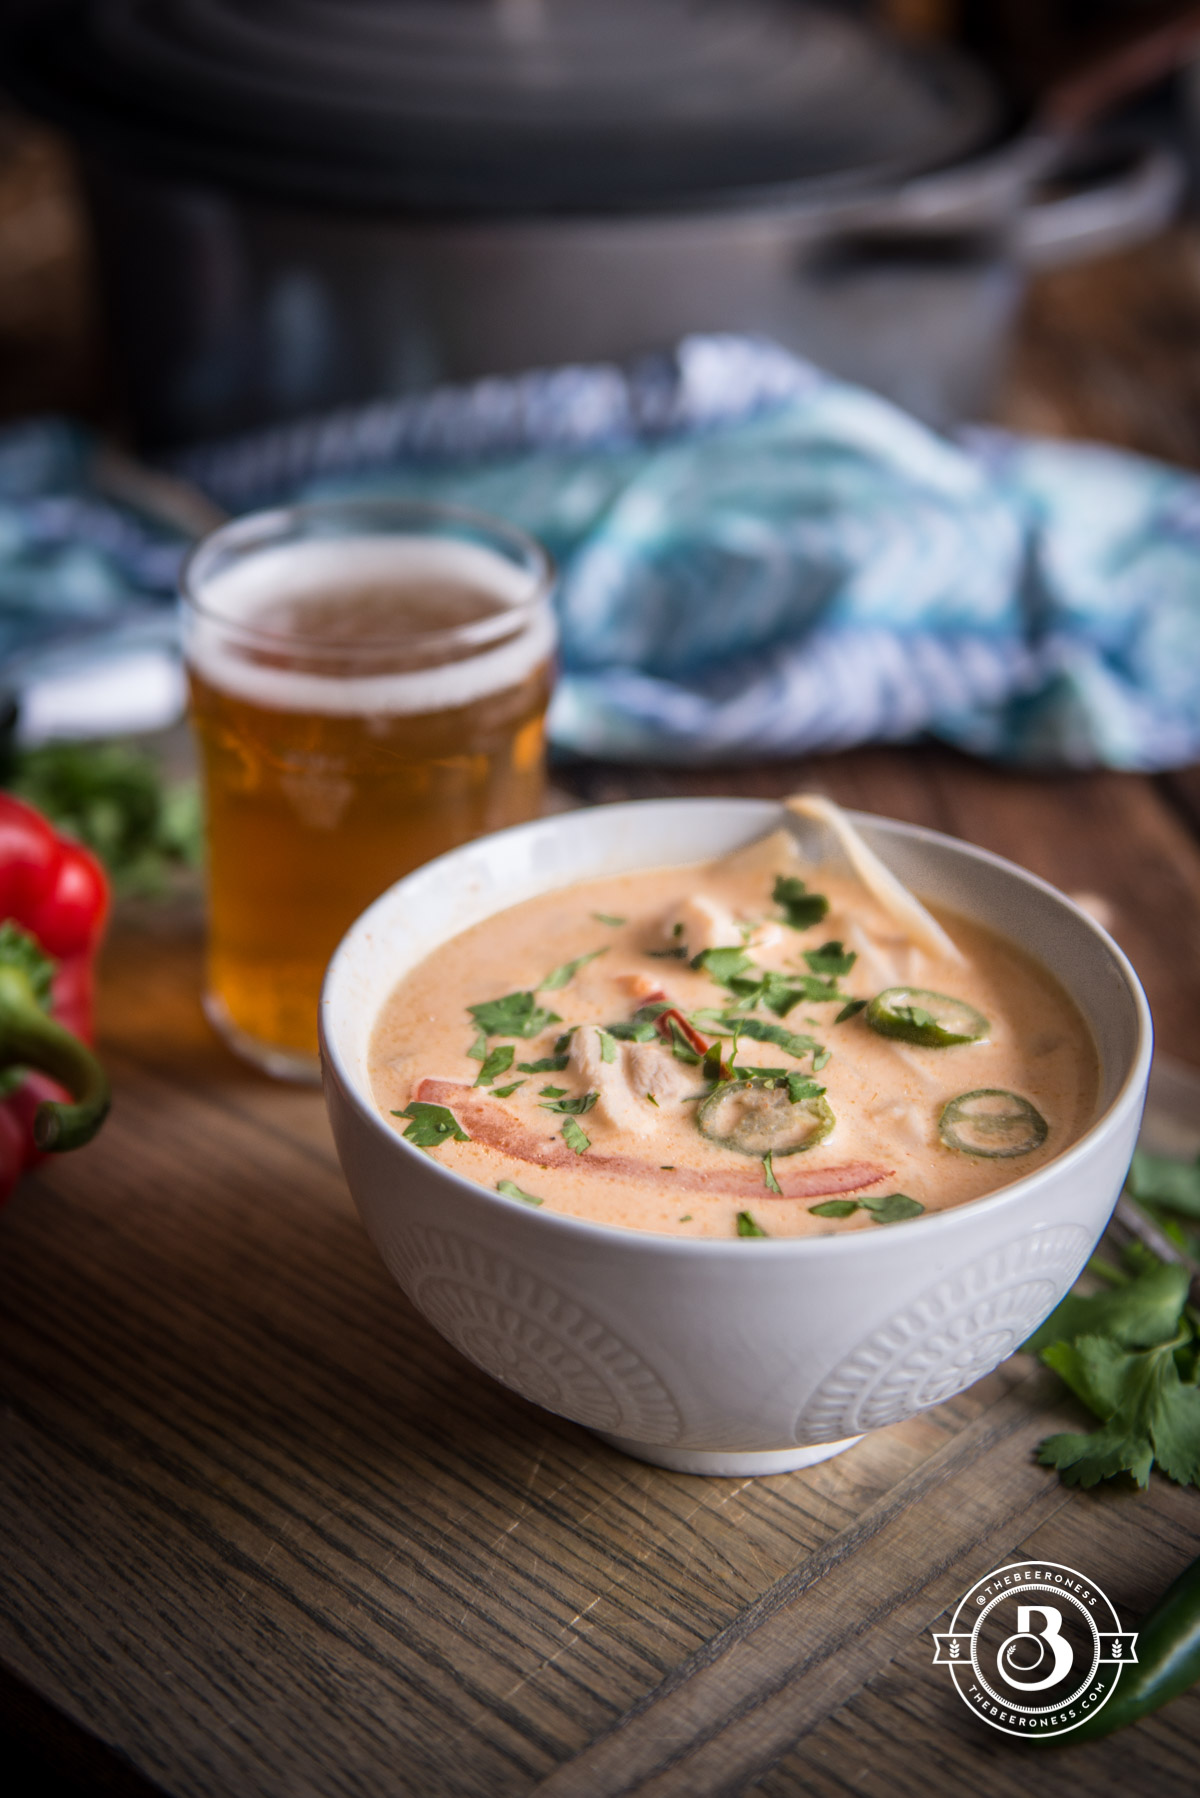
Pale Ale Thai Chicken Noodle Soup, 20-minutes to a deliciously satisfying soup!
We need to brace ourselves. The fall is spilling into winter and you can feel the frost and fire in everyone, online and in person. It makes me retreat, slowly back out the door and avoid other people in order to still like humans in general.
I imagine that we all, just for a moment, agreed on things. A literal moment, 90 seconds or so, all focus on what we can all get behind, even if it’s small. Small things that help us all feel like we get each other: how wrapping our hands around a warm drink on a cold day softens every stress, how squirrels are cute but also little assholes, and how we all dislike Gwyneth Paltrow (but we do, right?).
Maybe it won’t help, but these are the soup-making-days, the days I try to treat collective soul wounds with food. Sure, I know it doesn’t really help. I know I can’t make soup for all of you invisible internet people across the world. But I also know that you probably feel the same, in one way or another. At least this is what I try to believe in order to stay sane in the rapidly dissolving humanity of the world we live in.
Heat the olive oil in large pot or Dutch oven, add the onions, bell pepper and chili. Cook until the vegetables have started to soften, about 5 minutes. Stir in the beer.
Add the coconut milk, broth, chicken, fish sauce, salt, garlic powder and curry paste.
Simmer until chicken has cooked through, about 6 minutes.
Stir in the basil and rice noodles, simmer until noodles are cooked, about 5 minutes.
Adjust seasonings to taste (the amount of salt you need is directly dependent on the broth you use).
This post was sponsored by Crock-Pot. Partnerships with The Beeroness and outside companies are rare and only occur when the company’s products are ones I use and enjoy myself. All ideas and opinions are my own.
I’m still sort of in shock. If you’re a long time carnitas lover, you’ll know what I’m talking about. The best part of this delicious slow-cooked meat dish is the lovely caramelization you get on some of the end bits. It’s really not the same without that.
What shocks me is that I was able to get the perfect seared caramelization in a Crock-Pot! If you’d have told me that was possible, I might have fought you, bet you several pitchers of good beer that it wasn’t possible. And now here I am. I’d owe you quite a few beers, and I’d have gladly paid up, these carnitas were the best I’ve made and that sear is perfect! (Yes, it’s SUPER nerdy that I’m THIS excited about it. But I can’t even try to care, I’m so excited!)
The new Crock-Pot Express Crock Multi-Cooker is a game changer. It has eight different functions that encompass all the functions you would achieve from using multiple different kitchen appliances from slow cooking to pressure cooking and sautéing to searing. The Crock-Pot Express Crock Multi-Cooker is also available in NEW 4-Quart and 8-Quart Models.
I was a bit skeptical that the brown/sauté setting would work as well as a stovetop pot. It’s a good thing I didn’t have a bet going, it was perfect. Also, SO much easier. I didn’t have to use anything but the Multi-Cooker. I’m usually someone who digs the traditional Dutch ovens for such endeavors, but these carnitas came out so well, I’ll never go back.
So, if you want to win yourself a couple beers, just bet someone that you can’t make a Crock-Pot sear. Or pressure cook. You’ll never have to buy beer again.
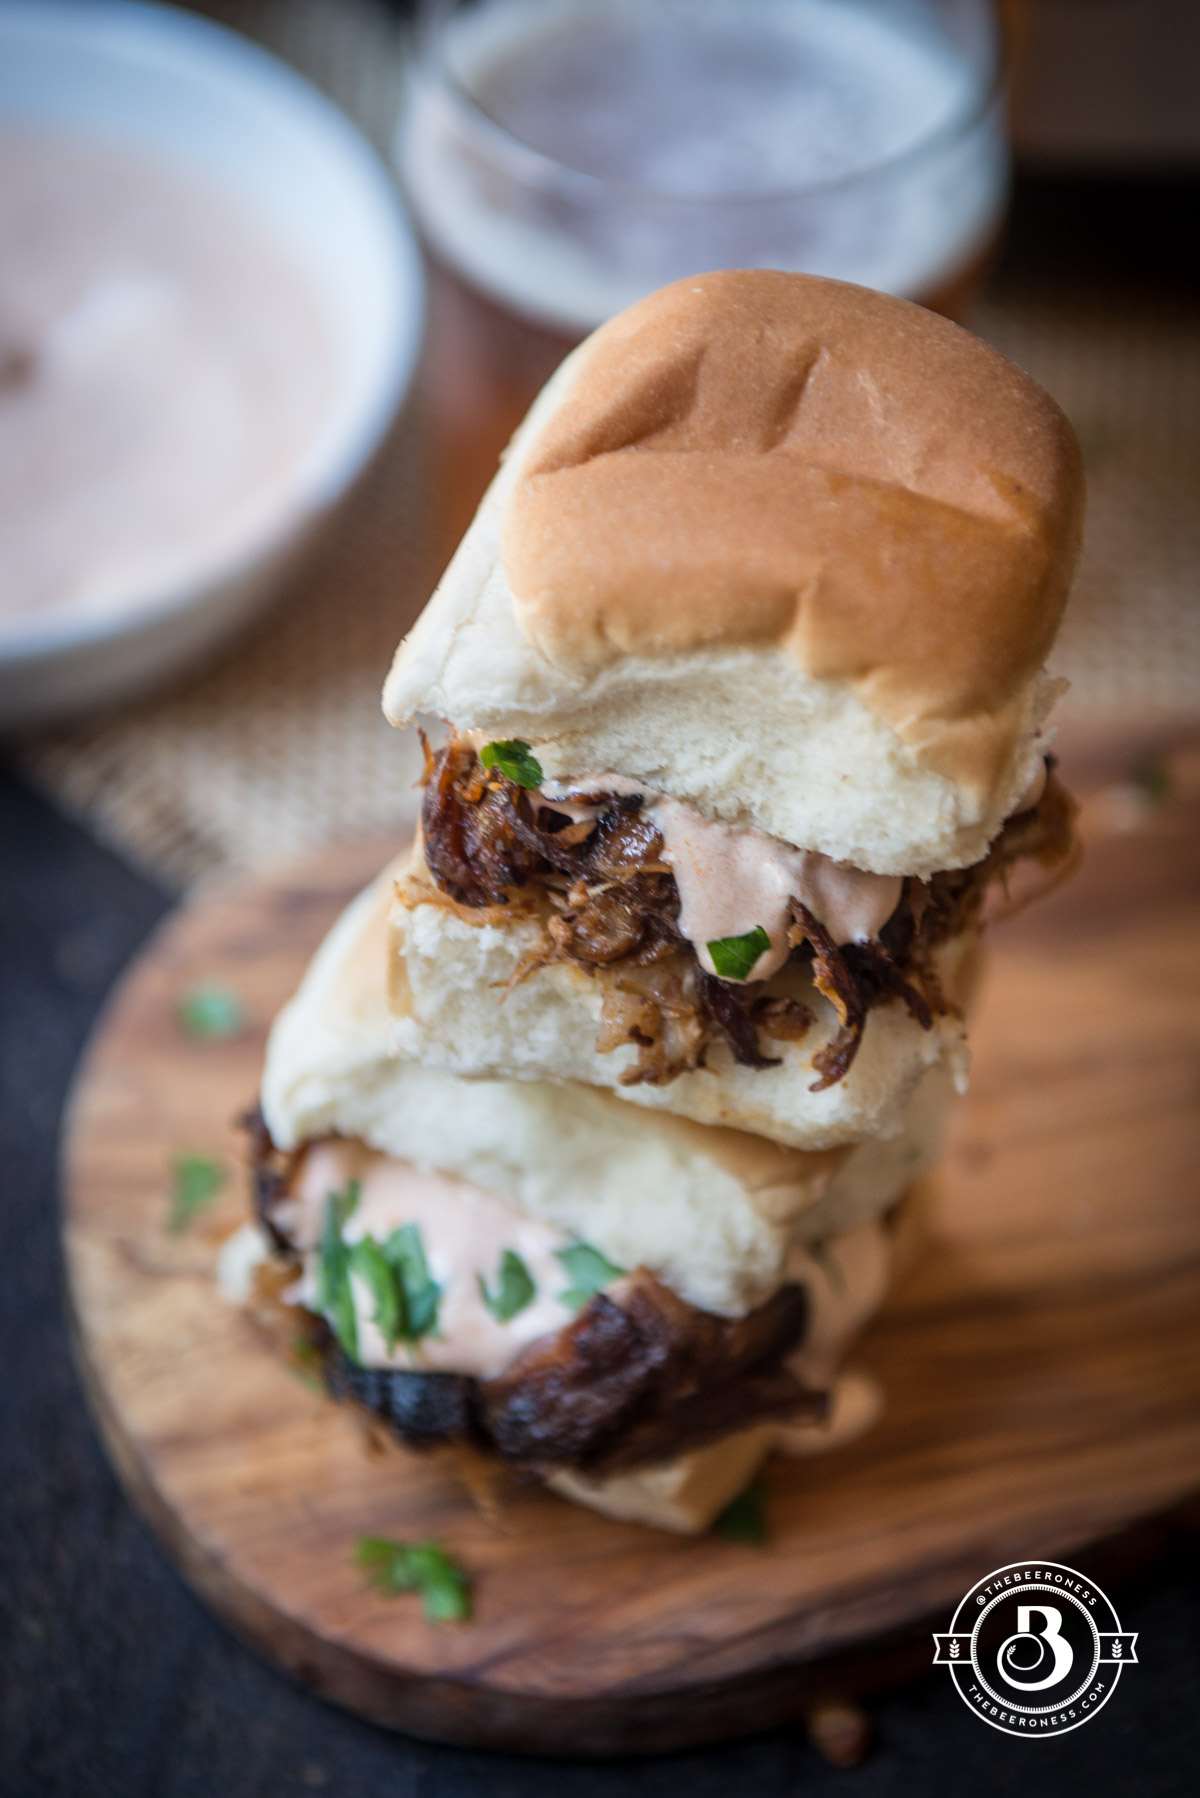
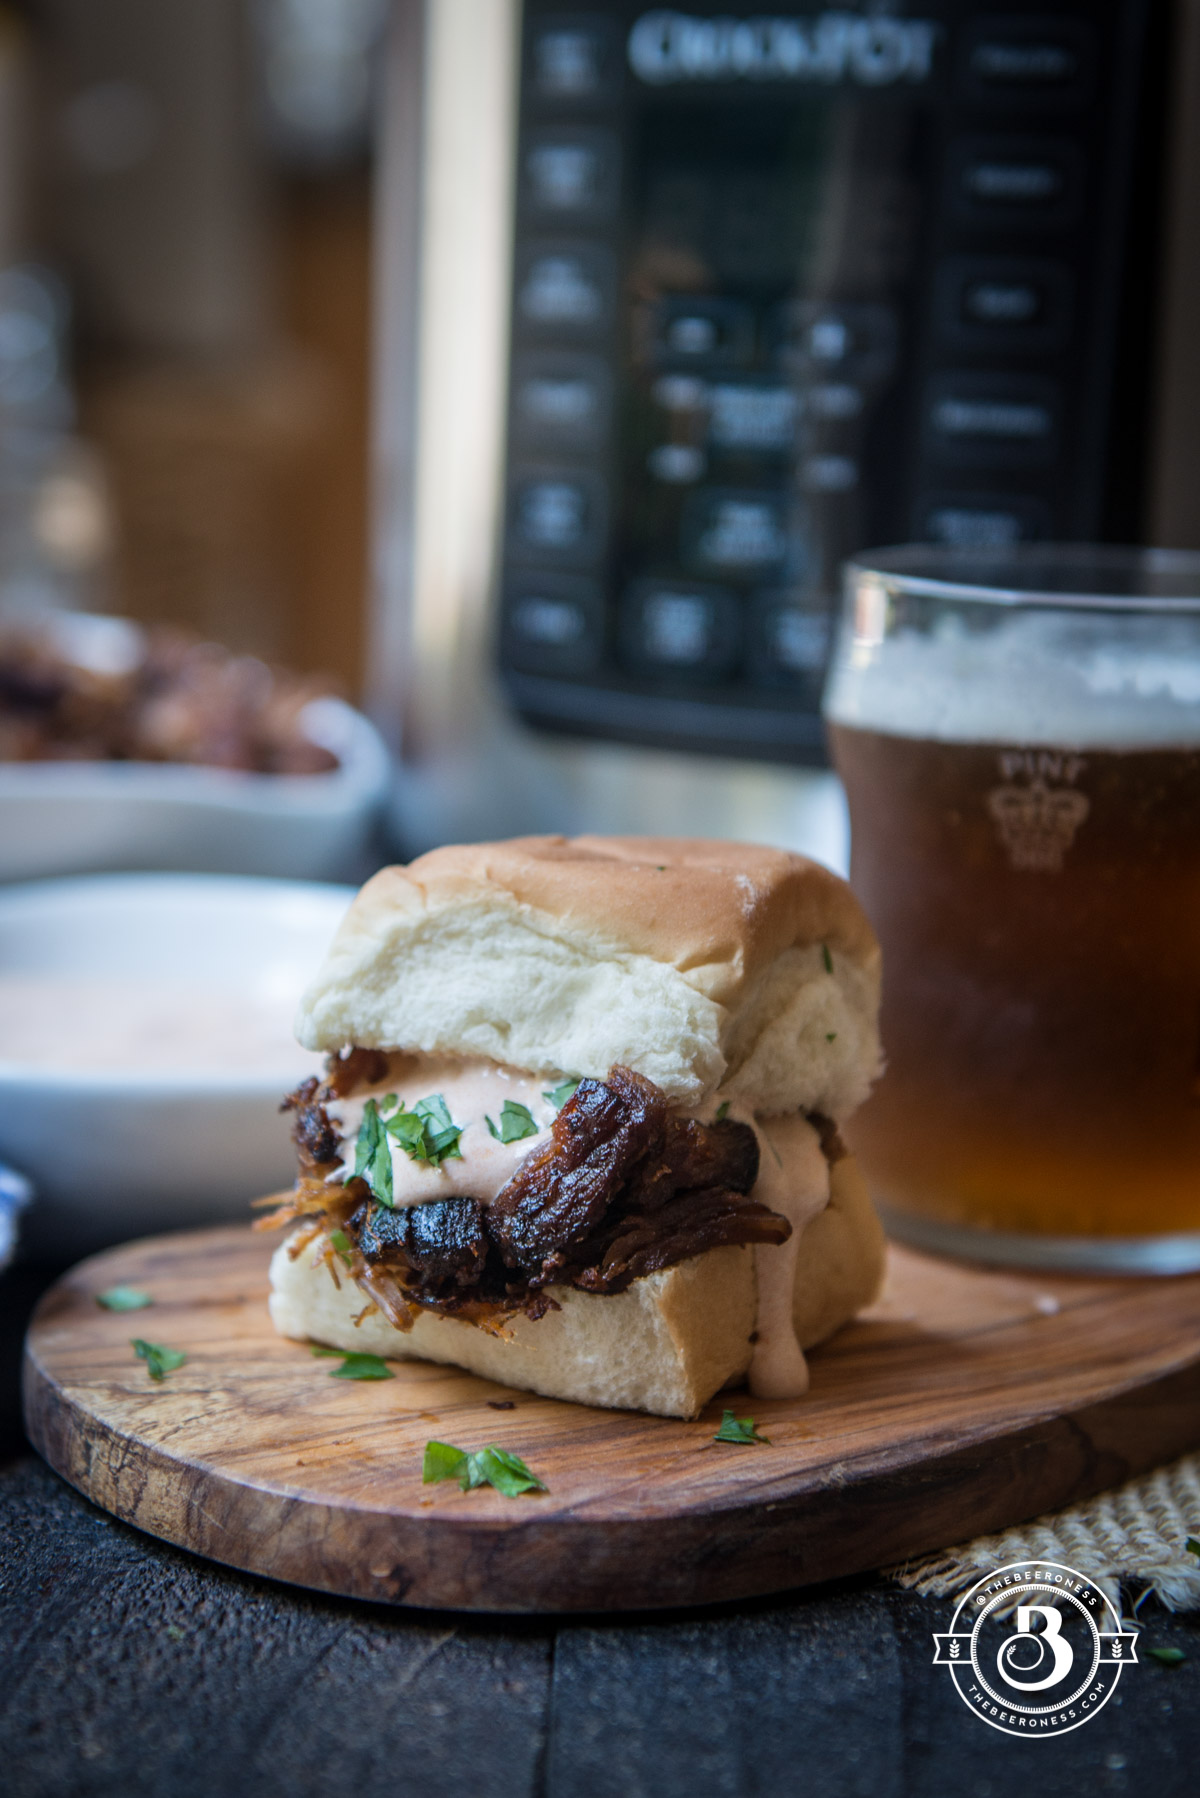
Crock-PotExpress Crock Carnitas Sliders with Chipotle Sour Cream
Sprinkle the pork on all sides with 1 tablespoon salt.
In a small bowl stir together the beer, tomato paste, lime juice, cumin, garlic powder, onion powder, chili powder, cayenne, and smoked paprika.
Add the pork and the sauce to a Crock-Pot Express Crock Multi-Cooker, add the lid (make sure the lid to the Multi-Cooker is locked but the steam value is open to “release” mode). Cook on high for 6 hours, or low for 8 hours.
Remove the inner bowl of the Crock-Pot, pouring off the liquid (leave a small amount, about 2 tablespoons, the amount doesn’t need to be exact), place the bowl back in the Crockpot.
Turn the multi-cooker to the “brown/sauté” setting on high. Shred the pork, in the cooker with two forks while the pot heats up in sauté mode. Press meat firmly down with a wooden spoon into a firm even layer.
Cook for 5-8 minutes, stir and press again into a firm even layer.
Once the remaining liquid is gone and there are pieces of meat that have been nicely caramelized, remove from the pot and add to a serving bowl, toss with the remaining ½ teaspoon salt.
Stir together the sour cream and chipotle peppers.
Add the carnitas to the slider buns, top with sour cream and sprinkle with cilantro.
Notes
*If you plan to make the meat in advance, save about ½ cup of the cooking liquid and add the storage container. It will help to keep the meat moist once you reheat.